Posts Tagged ‘ssh command’

Defining multiple short Server Hostname aliases via SSH config files and defining multiple ssh options for it, Use passwordless authentication via public keys

Thursday, September 16th, 2021

using-ssh-host-acronym-aliases-ssh-client-explained-openssh-logo

In case you have to access multiple servers from your terminal client such as gnome-terminal, kterminal (if on Linux) or something such as mobaxterm + cygwin (if on Windows) with an opens ssh client (ssh command). There is a nifty trick to save time and keyboard typing through creating shortcuts aliases by adding few definitions inside your $HOME/.ssh/config ( ~/.ssh/config ) for your local non root user or even make the configuration system wide (for all existing local /etc/passwd users) via /etc/ssh/ssh_config.
By adding a pseudonym alias for each server it makes sysadmin life much easier as you don't have to type in each time the FQDN (Fully Qualified Domain Name) hostname of remote accessed Linux / Unix / BSD / Mac OS or even Windows sshd ready hosts accessible via remote TCP/IP port 22.


1. Adding local user remote server pointer aliases via ~/.ssh/config


The file ~/.ssh/config is read by the ssh client part of the openssh-client (Linux OS package) on each invokement of the client, and besides defining a pseudonym for the hosts you like to save you time when accessing remote host and hence increase your productivity. Moreover you can also define various other nice options through it to define specifics of remote ssh session for each desired host such as remote host default SSH port (for example if your OpenSSHD is configured to run on non-standard SSH port as lets say 2022 instead of default port TCP 22 for some reason, e.g. security through obscurity etc.).


The general syntax of .ssh/config file si simplistic, it goes like this:
 

Host MACHNE_HOSTNAME

SSH_OPTION1 value1
SSH_OPTION1 value1 value2
SSH_OPTION2 value1 value2


Host MACHNE_HOSTNAME

SSH_OPTION value
SSH_OPTION1 value1 value2

  • Another understood syntax if you prefer to not have empty whitespaces is to use ( = )
    between the parameter name and values.

Host MACHINE_HOSTNAME
SSH_config=value
SSH_config1=value1 value2

  • All empty lines and lines starting with the hash shebang sign ( # ) would be ignored.
  • All values are case-sensitive, but parameter names are not.

If you have never so far used the $HOME/.ssh/config you would have to create the file and set the proper permissions to it like so:

mkdir -p $HOME/.ssh
chmod 0700 $HOME/.ssh


Below are examples taken from my .ssh/config configuration for all subdomains for my pcfreak.org domain


# Ask for password for every subdomain under pc-freak.net for security
Host *.pcfreak.org
user hipopo
passwordauthentication yes
StrictHostKeyChecking no

# ssh public Key authentication automatic login
Host www1.pc-freak.net
user hipopo
Port 22
passwordauthentication no
StrictHostKeyChecking no

UserKnownHostsFile /dev/null

Host haproxy2
    Hostname 213.91.190.233
    User root
    Port 2218
    PubkeyAuthentication yes
    IdentityFile ~/.ssh/haproxy2.pub    
    StrictHostKeyChecking no
    LogLevel INFO     

Host pcfrxenweb
    Hostname 83.228.93.76
    User root
    Port 2218

    PubkeyAuthentication yes
    IdentityFile ~/.ssh/pcfrxenweb.key    
    StrictHostKeyChecking no

Host pcfreak-sf
    Hostname 91.92.15.51
    User root
    Port 2209
    PreferredAuthentications password
    StrictHostKeyChecking no

    Compression yes


As you can see from above configuration the Hostname could be referring either to IP address or to Hostname.

Now to connect to defined IP 91.92.15.51 you can simply refer to its alias

$ ssh pcfreak-sf -v

and you end up into the machine ssh on port 2209 and you will be prompted for a password.

$ ssh pcfrxenweb -v


would lead to IP 83.228.93.76 SSH on Port 2218 and will use the defined public key for a passwordless login and will save you the password typing each time.

Above ssh command is a short alias you can further use instead of every time typing:

$ ssh -i ~/.ssh/pcfrxenweb.key -p 2218 root@83.228.93.76

There is another nifty trick worthy to mention, if you have a defined hostname such as the above config haproxy2 to use a certain variables, but you would like to override some option for example you don't want to connet by default with User root, but some other local account, lets say ssh as devuser@haproxy2 you can type:

$ ssh -o "User=dev" devuser

StrictHostKeyChecking no

– variable will instruct the ssh to not check if the finger print of remote host has changed. Usually this finger print check sum changes in case if for example for some reason the opensshd gets updated or the default /etc/ssh/ssh_host_dsa_key /etc/ssh/sshd_host_dsa_* files have changed due to some reason.
Of course you should use this option only if you tend to access your remote host via a secured VPN or local network, otherwise the Host Key change could be an indicator someone is trying to intercept your ssh session.


Compression yes


– variable  enables compression of connection saves few bits was useful in the old modem telephone lines but still could save you few bits
It is also possible to define a full range of IP addresses to be accessed with one single public rsa / dsa key

Below .ssh/config
 

Host 192.168.5.?
     Hostname 192.168.2.18
     User admin
     IdentityFile ~/.ssh/id_ed25519.pub


Would instruct each host attemted to be reached in the IP range of 192.168.2.1-254 to be automatically reachable by default with ssh client with admin user and the respective ed25519.pub key.
 

$ ssh 192.168.1.[1-254] -v


2. Adding ssh client options system wide for all existing local or remote LDAP login users


The way to add any Host block is absolutely the same as with a default user except you need to add the configuration to /etc/ssh/ssh_config. Here is a confiugaration from mine Latest Debian Linux

$ cat /etc/ssh/ssh_config

# This is the ssh client system-wide configuration file.  See
# ssh_config(5) for more information.  This file provides defaults for
# users, and the values can be changed in per-user configuration files
# or on the command line.

# Configuration data is parsed as follows:
#  1. command line options
#  2. user-specific file
#  3. system-wide file
# Any configuration value is only changed the first time it is set.
# Thus, host-specific definitions should be at the beginning of the
# configuration file, and defaults at the end.

# Site-wide defaults for some commonly used options.  For a comprehensive
# list of available options, their meanings and defaults, please see the
# ssh_config(5) man page.

Host *
#   ForwardAgent no
#   ForwardX11 no
#   ForwardX11Trusted yes
#   PasswordAuthentication yes
#   HostbasedAuthentication no
#   GSSAPIAuthentication no
#   GSSAPIDelegateCredentials no
#   GSSAPIKeyExchange no
#   GSSAPITrustDNS no
#   BatchMode no
#   CheckHostIP yes
#   AddressFamily any
#   ConnectTimeout 0
#   StrictHostKeyChecking ask
#   IdentityFile ~/.ssh/id_rsa
#   IdentityFile ~/.ssh/id_dsa
#   IdentityFile ~/.ssh/id_ecdsa
#   IdentityFile ~/.ssh/id_ed25519
#   Port 22
#   Protocol 2
#   Ciphers aes128-ctr,aes192-ctr,aes256-ctr,aes128-cbc,3des-cbc
#   MACs hmac-md5,hmac-sha1,umac-64@openssh.com
#   EscapeChar ~
#   Tunnel no
#   TunnelDevice any:any
#   PermitLocalCommand no
#   VisualHostKey no
#   ProxyCommand ssh -q -W %h:%p gateway.example.com
#   RekeyLimit 1G 1h
    SendEnv LANG LC_*
    HashKnownHosts yes
    GSSAPIAuthentication yes

As you can see pretty much can be enabled by default such as the forwarding of the Authentication agent option ( -A ) option, necessery for some Company server environments to be anbled. So if you have to connect to remote host with enabled Agent Forwarding instead of typing

ssh -A user@remotehostname


To enable Agent Forwarding instead of

ssh -X user@remotehostname


Simply uncomment and set to yes
 

ForwardX11 yes
ForwardX11Trusted yes


Just simply uncomment above's config ForwardAgent no

As you can see ssh could do pretty much, you can configure enable SSH Tunneling or run via a Proxy with the ProxyCommand (If it is the first time you hear about ProxyCommand I warmly recommend you check my previous article – How to pass SSH traffic through a secured Corporate Proxy Server with corkscrew).

Sometimes for a defines hostname, due to changes on remote server ssh configuration, SSH encryption type or a host key removal you might end up with issues connecting, therefore to override all the previously defined options inside .ssh/config by ignoring the configuration with -F /dev/null

$ ssh -F /dev/null user@freak -v


What we learned ?

To sum it up In this article, we have learned how to easify the stressed sysadmin life, by adding Aliases with certain port numbering and configurations for different remote SSH administrated Linux / Unix, hosts via local ~/.ssh/config or global wide /etc/ssh/ssh_config configuration options, as well as how already applied configuration from ~/.ssh/config affecting each user ssh command execution, could be overriden.
Creating Dynamic SSH Tunnel on Windows with Plink – Scriptable SSH Tunnels on Windows

Friday, July 4th, 2014

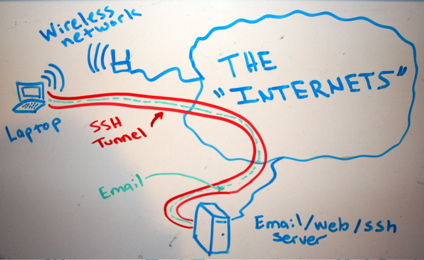
creating-ssh-tunnel-on-windows-with-plink-ssh-tunnel-diagram-tunnel-email-traffic

In my earlier articles I've explained about Creating SSH Tunnels on Linux and BSD and how to create SSH Tunnels with Putty Terminal client on Windows.

Creating SSH Tunnels is a precious knowledge every advanced computer user, a system administrator or security expert should be well aware of.

Probably still there are plenty of people for which the SSH Tunnelling is something never heard of or even if heard it is a mythical term covered by ancient shadows 🙂

So What is an SSH Tunnel? – SSH Tunnels shortly explained.

A SSH tunnel consists of an encrypted tunnel created through a SSH protocol
connection
.

An SSH tunnel can be used to transfer unencrypted traffic over a
network through an encrypted channel
between two hosts (host A and Host B) usually using remote and local port.

Requirements for SSH tunnel

Where Host B has to be running a version of OpenSSH server on some reachable port from Host B, (lets say 22).
Host B OpenSSH server has to be with (enabled X11Forwarding X11Forwarding yes in /etc/ssh/sshd_config) and Host A needs to have some SSH client supporting port forwarding (ssh command on Linux – part of (openssh-client package) and on Windows – Putty / Plink or any other of the many available ssh tunneling clients).

Probably most common SSH Tunnel use is to bypass firewalls that prohibits or filter certain internet services.
In other words SSH Tunnels can be used to get around firewall filtering. If you never heard of Bypassing firewalls with port forwarding I recommend to check this article

We can use a ssh tunnel to securely transfer files between a FTP server and a client even though the FTP
protocol itself is not encrypted
, Tnnel traffic to an SQL server, Tunnel traffic from your Desktop PC to a Proxy
SSH tunnels can be used to tunnel outbound E-mail traffic back to your work PC to avoid having to change SMTP servers etc.

A very common SSH Tunnel use is by office workers who don't want their Custom Web browsing habbits and Web history be tracked,

For people who has to travel a lot tunneling SSH traffic from notebook to your home based SMTP is mandatory, otherwise your e-mail passwords, might end up captured by someone who manages the Free WI-FI used by you somewhere on the road or cafeteria. Another good case use of SSH Tunnel is to tunnel VNC traffic.

SSH Tunneling was historically very famous in days where IRC (Internet Relay Chat) and used to be common way (for people who want to prevent their real IP address from publicly visible) on the Internet.
SSH Tunneling is great way to maintain high communication security, however because it requires some basic technical knowledge most people neglect it or never heard of it, so I hope this article will give at least basic ideas to people new to tunneling.

How to create SSH Tunnels on Microsoft Windows

SSH Tunneling has been originally invented on UNIX / Linux platform, luckily nowdays it is easily possible to create SSH tunnels on almost any moden OS (including Mac OS X and M$ Windows).

Using Plink it is possible to create easily (batch) scriptable SSH tunnels on Windows

Generally here is example of basic plink use syntax:
 

plink.exe {remote-host} -P 22 -C -D 10080 -l username -pw password
 

To make a Tunnel with Plink to remote SSH Server (remote-ssh-server.com) listening for connections on port 22 on localhost 10022

"C:Program Files (x86)PuTTYplink.exe" -ssh remote-username@tunnel-to-ssh-server-host.com -pw PASSWORD123 -C -T -D 127.0.0.1:10022 -N

-D – option instructs Plink to make "Dynamic SOCKS-based port forwarding"
Dynamic Socks-based port forwarding will make your ssh client a simple socks server which listen to port 10022 for incoming connections.
-Ttells plink not to open interactive shell on remote server (disable pty allocation)
-Cenables traffic compression

Using the -D option you can prepare tunnel to traffic all your outgoing server traffic via the SSH tunneling host.

E. g. -D allows you to use the remote ssh server as a proxy server with no need for remote server to run anything except SSH service and have Internet connection.

-N – stands for "don't start shell/command SSH-2 only"

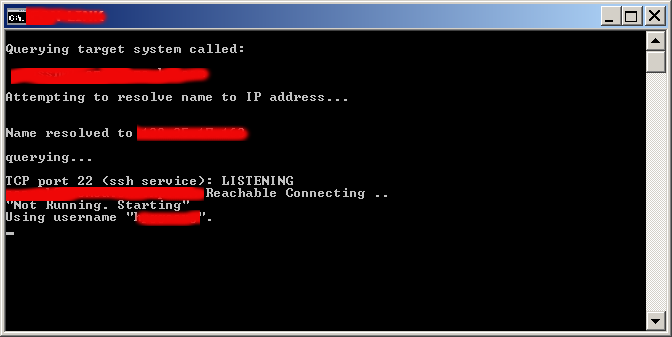
On success of SSH Tunnel establishing you will get a pop-up window similar to below screenshot (note that some of the messages in cmd line are from a batch script – if no batch script is used you wil only get a window with "Using Username":

plink_establishing_ssh_tunnel-on-microsoft-windows-screenshot

Note: That if you're about to be using Plink command frequently add it to your Windows SYSTEM PATH (check my previous article – how to add Putty to System PATH) to enable it invokable without writting the full command path location.

Once this Window is open if you still have doubt, where the tunnel is established, the quickest way to test whether tunnel is working is to open telnet to localhost port 10022.

In Windows command prompt type:
 

C:> telnet localhost 10022


You will get a remote server SSH version printed, like on below shot:

windows-testing-whether-ssh-tunnel-is-working-with-telnet-screenshot-black-screen

Now lets say now you would like to access the internet via just created SSH tunnel.
You can do it by simply setting Socks Proxy in your Firefox / Opera (or whatever browser you use).

Whether you want to run the SSH Tunnel permanent and periodically check whether tunnel is allve and respawn it in case plink quit, you can use a very simple batch script like one below:
 

@ECHO OFF
tasklist /FI "IMAGENAME eq plink.exe" 2>NUL | find /I /N "plink.exe">NUL

if "%ERRORLEVEL%"=="0"  ( echo Programm is running exiting
exit
)
echo "Not Running"
start /b "C:Program Files (x86)PuTTYplink.exe" -ssh remote-username@tunnel-to-ssh-server-host.com -pw Password123 -T -C -D 127.0.0.1:10022 -N"


If you're a Linux guy and you don't want to mess around with Plink but still want to create your SSH tunnels following SSH client UNIX command line syntax, setup the Cygwin port of OpenSSH for Windows.

Or if you're unsure whether remote server is always reachable (you're moving with your notebook from (Country) network to network), you can use also portqry – windows port scanner to check whether remote ssh server port is opened:
 

@ECHO OFF
tasklist /FI "IMAGENAME eq plink.exe" 2>NUL | find /I /N "plink.exe">NUL
if "%ERRORLEVEL%"=="0"  ( echo Programm is running exiting
pause
exit
)
portqry -n tunnel-to-ssh-server-host.com -p tcp -e 22
if %ERRORLEVEL%==0 echo tunnel-to-ssh-server-host.com Reachable Connecting ..
if NOT %ERRORLEVEL%==0 (echo tunnel-to-ssh-server-host.com.com Unreachable
exit)
echo "Not Running. Starting"
"C:Program Files (x86)PuTTYplink.exe" -ssh remote-username@tunnel-to-ssh-server-host.com -pw Password123 -T -C -D 127.0.0.1:10080 –N


Here is another sample use of Plink to create tunnel via SSH host tunnel-to-ssh-server-host.com  to listen for connections on localhost port 1234 and forward all incoming traffic to squid proxy server on 192.168.1.5 on port 3128.
 

C:Usersgeorgi>plink.exe -v -x -a -T -C -noagent -ssh -L 127.0.0.1:1234:192.168.1.5:3128 remote-username@tunnel-to-ssh-server-host.com

Setting then 127.0.0.1:1234 in  Firefox Proxy browser settings will make all traffic from your browser to flow securily to your own proxy server (letting you hide your "custom traffic" from company Web sniffers (Proxying) and Web filtering.
A remark to make here is 192.168.1.5 is (a internal server with Squid Proxy, configured to pass traffic to the internet ).

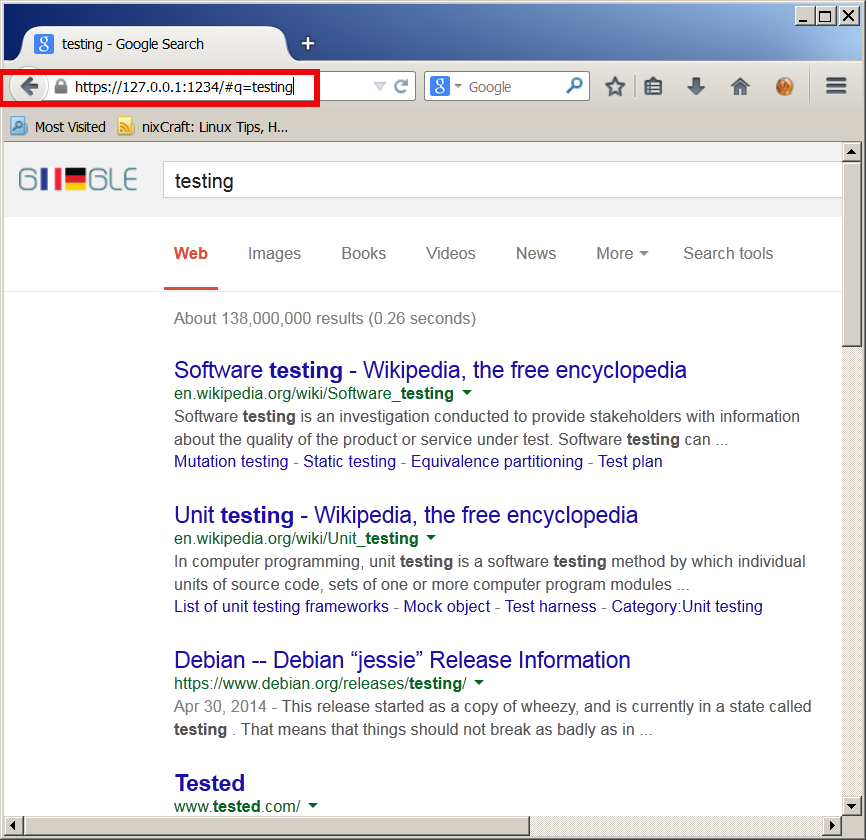
Here is a way to make tunnel between your remote SSH server and local Desktop PC to make Google queries without being logged by your ISP or company where you're working:

plink.exe "-v -x -a -T -C -noagent -ssh -L 127.
0.0.1:1234:95.158.130.242:443 -pw SecretPassword123 -l hipo www.pc-freak.net"

95.158.130.242 – is one of the IPs www.google.com resolves to
www.pc-freak.net – is name of my home router.

To make tunneled queries to Google then open in browser https://127.0.0.1:1234

using_localhost_ssh_tunnel_to_anonymously-search-in-google-plink-tunnel-for-security


If you're a lazy windows user and don't want to bother to make your tunnels from command line and you want need nice gui way to manage multiple tunnels – check out putty-tunnel-manager.

I myself am not a SSH Tunnel expert and thus Iwould be happy to learn further from people for some interesting cases and custom ways to do  SSH Tunnels. If you know of better advantageous ways to tunnel traffic, please share.

Happy tunneling ! 🙂

How to configure ssh to automatically connect to non standard ssh port numbers (!port 22)

Tuesday, August 2nd, 2011

SSH Artistic Logo, don't give away your password

Today I’ve learned from a admin colleague, a handy tip.
I’m administrating some Linux servers which are configured on purpose not to run on the default ssh port number (22) and therefore each time I connect to a host I have to invoke the ssh command with -p PORT_NUMBER option.

This is not such a problem, however when one has to administrate a dozen of servers each of which is configured to listen for ssh connections on various port numbers, every now and then I had to check in my notes which was the correct ssh port number I’m supposed to connect to.

To get around this silly annoyance the ssh client has a feature, whether a number of ssh server hosts can be preconfigured from the ~/.ssh/config in order to later automatically recognize the port number to which the corresponding host will be connecting (whenever) using the ssh user@somehost without any -p argument specified.

In order to make the “auto detection” of the ssh port number, the ~/.ssh/config file should look something similar to:

hipo@noah:~$ cat ~/.ssh/config
Host home.*.www.pc-freak.net
User root
Port 2020
Host www.remotesystemadministration.com
User root
Port 1212
Host sub.www.pc-freak.net
User root
Port 2222
Host www.example-server-host.com
User root
Port 1234

The *.www.pc-freak.net specifies that all ssh-able subdomains belonging to my domain www.pc-freak.net should be by default sshed to port 2020

Now I can simply use:

hipo@noah:~$ ssh root@myhosts.com

And I can connect without bothering to remember port numbers or dig into an old notes.
Hope this ssh tip is helpful.