Posts Tagged ‘selinux’

Configure aide file integrity check server monitoring in Zabbix to track for file changes on servers

Tuesday, March 28th, 2023

zabbix-aide-log-monitoring-logo

Earlier I've written a small article on how to setup AIDE monitoring for Server File integrity check on Linux, which put the basics on how this handy software to improve your server overall Security software can be installed and setup without much hassle.

Once AIDE is setup and a preset custom configuration is prepared for AIDE it is pretty useful to configure AIDE to monitor its critical file changes for better server security by monitoring the AIDE log output for new record occurs with Zabbix. Usually if no files monitored by AIDE are modified on the machine, the log size will not grow, but if some file is modified once Advanced Linux Intrusion Detecting (aide) binary runs via the scheduled Cron job, the /var/log/app_aide.log file will grow zabbix-agentd will continuously check the file for size increases and will react.

Before setting up the Zabbix required Template, you will have to set few small scripts that will be reading a preconfigured list of binaries or application files etc. that aide will monitor lets say via /etc/aide-custom.conf
 

1. Configure aide to monitor files for changes


Before running aide, it is a good idea to prepare a file with custom defined directories and files that you plan to monitor for integrity checking e.g. future changes with aide, for example to capture bad intruders who breaks into server which runs aide and modifies critical files such as /etc/passwd /etc/shadow /etc/group or / /usr/local/etc/* or /var/* / /usr/* critical files that shouldn't be allowed to change without the admin to soon find out.

# cat /etc/aide-custom.conf

# Example configuration file for AIDE.
@@define DBDIR /var/lib/aide
@@define LOGDIR /var/log/aide
# The location of the database to be read.
database=file:@@{DBDIR}/app_custom.db.gz
database_out=file:@@{DBDIR}/app_aide.db.new.gz
gzip_dbout=yes
verbose=5

report_url=file:@@{LOGDIR}/app_custom.log
#report_url=syslog:LOG_LOCAL2
#report_url=stderr
#NOT IMPLEMENTED report_url=mailto:root@foo.com
#NOT IMPLEMENTED report_url=syslog:LOG_AUTH

# These are the default rules.
#
#p:      permissions
#i:      inode:
#n:      number of links
#u:      user
#g:      group
#s:      size
#b:      block count
#m:      mtime
#a:      atime
#c:      ctime
#S:      check for growing size
#acl:           Access Control Lists
#selinux        SELinux security context
#xattrs:        Extended file attributes
#md5:    md5 checksum
#sha1:   sha1 checksum
#sha256:        sha256 checksum
#sha512:        sha512 checksum
#rmd160: rmd160 checksum
#tiger:  tiger checksum

#haval:  haval checksum (MHASH only)
#gost:   gost checksum (MHASH only)
#crc32:  crc32 checksum (MHASH only)
#whirlpool:     whirlpool checksum (MHASH only)

FIPSR = p+i+n+u+g+s+m+c+acl+selinux+xattrs+sha256

#R:             p+i+n+u+g+s+m+c+acl+selinux+xattrs+md5
#L:             p+i+n+u+g+acl+selinux+xattrs
#E:             Empty group
#>:             Growing logfile p+u+g+i+n+S+acl+selinux+xattrs

# You can create custom rules like this.
# With MHASH…
# ALLXTRAHASHES = sha1+rmd160+sha256+sha512+whirlpool+tiger+haval+gost+crc32
ALLXTRAHASHES = sha1+rmd160+sha256+sha512+tiger
# Everything but access time (Ie. all changes)
EVERYTHING = R+ALLXTRAHASHES

# Sane, with multiple hashes
# NORMAL = R+rmd160+sha256+whirlpool
NORMAL = FIPSR+sha512

# For directories, don't bother doing hashes
DIR = p+i+n+u+g+acl+selinux+xattrs

# Access control only
PERMS = p+i+u+g+acl+selinux

# Logfile are special, in that they often change
LOG = >

# Just do sha256 and sha512 hashes
LSPP = FIPSR+sha512

# Some files get updated automatically, so the inode/ctime/mtime change
# but we want to know when the data inside them changes
DATAONLY =  p+n+u+g+s+acl+selinux+xattrs+sha256

##############TOUPDATE
#To delegate to app team create a file like /app/aide.conf
#and uncomment the following line
#@@include /app/aide.conf
#Then remove all the following lines
/etc/zabbix/scripts/check.sh FIPSR
/etc/zabbix/zabbix_agentd.conf FIPSR
/etc/sudoers FIPSR
/etc/hosts FIPSR
/etc/keepalived/keepalived.conf FIPSR
# monitor haproxy.cfg
/etc/haproxy/haproxy.cfg FIPSR
# monitor keepalived
/home/keepalived/.ssh/id_rsa FIPSR
/home/keepalived/.ssh/id_rsa.pub FIPSR
/home/keepalived/.ssh/authorized_keys FIPSR

/usr/local/bin/script_to_run.sh FIPSR
/usr/local/bin/another_script_to_monitor_for_changes FIPSR

#  cat /usr/local/bin/aide-config-check.sh
#!/bin/bash
/sbin/aide -c /etc/aide-custom.conf -D

# cat /usr/local/bin/aide-init.sh
#!/bin/bash
/sbin/aide -c /etc/custom-aide.conf -B database_out=file:/var/lib/aide/custom-aide.db.gz -i


# cat /usr/local/bin/aide-check.sh

#!/bin/bash
/sbin/aide -c /etc/custom-aide.conf -Breport_url=stdout -B database=file:/var/lib/aide/custom-aide.db.gz -C|/bin/tee -a /var/log/aide/custom-aide-check.log|/bin/logger -t custom-aide-check-report
/usr/local/bin/aide-init.sh


# cat /usr/local/bin/aide_app_cron_daily.txt

#!/bin/bash
#If first time, we need to init the DB
if [ ! -f /var/lib/aide/app_aide.db.gz ]
   then
    logger -p local2.info -t app-aide-check-report  "Generating NEW AIDE DATABASE for APPLICATION"
    nice -n 18 /sbin/aide –init -c /etc/aide_custom.conf
    mv /var/lib/aide/app_aide.db.new.gz /var/lib/aide/app_aide.db.gz
fi

nice -n 18 /sbin/aide –update -c /etc/aide_app.conf
#since the option for syslog seems not fully implemented we need to push logs via logger
/bin/logger -f /var/log/aide/app_aide.log -p local2.info -t app-aide-check-report
#Acknoledge the new database as the primary (every results are sended to syslog anyway)
mv /var/lib/aide/app_aide.db.new.gz /var/lib/aide/app_aide.db.gz

What above cron job does is pretty simple, as you can read it yourself. If the configuration predefined aide database store file /var/lib/aide/app_aide.db.gz, does not
exists aide will create its fresh empty database and generate a report for all predefined files with respective checksums to be stored as a comparison baseline for file changes. 

Next there is a line to write aide file changes via rsyslog through the logger and local2.info handler


2. Setup Zabbix Template with Items, Triggers and set Action

2.1 Create new Template and name it YourAppName APP-LB File integrity Check
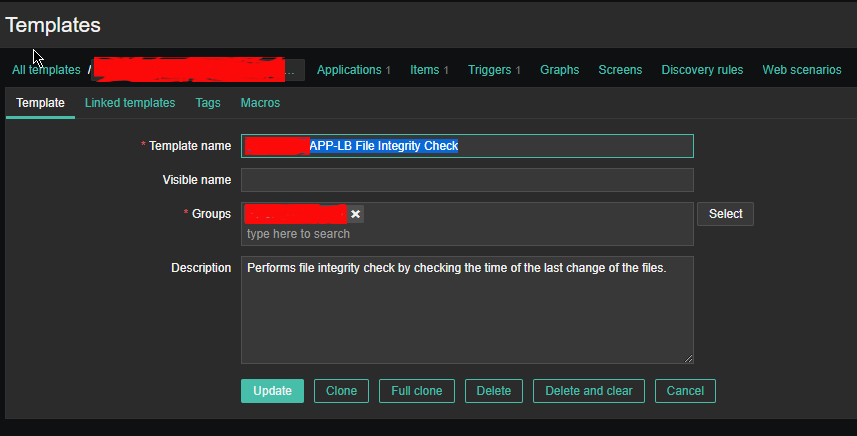
aide-itengrity-check-zabbix_ Configuration of templates

Then setup the required Items, that will be using zabbix's Skip embedded function to scan file in a predefined period of file, this is done by the zabbix-agent that is
supposed to run on the server.

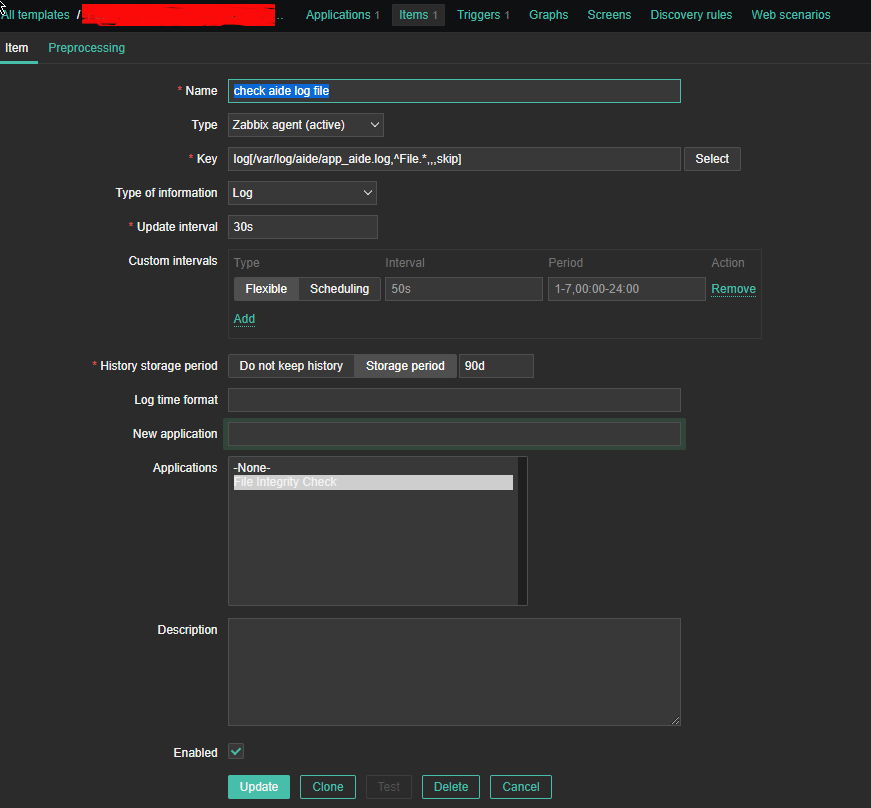
2.2 Configure Item like

aide-zabbix-triggers-screenshot
 

*Name: check aide log file

Type: zabbix (active)

log[/var/log/aide/app_aide.log,^File.*,,,skip]

Type of information: Log

Update Interval: 30s

Applications: File Integrity Check

Configure Trigger like

Enabled: Tick On
images/aide-zabbix-screenshots/check-aide-log-item


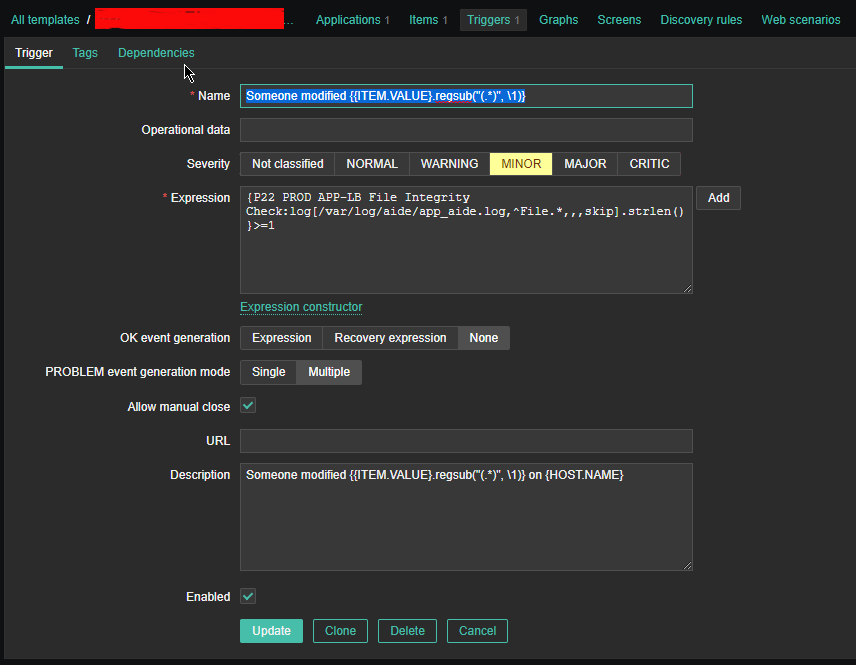
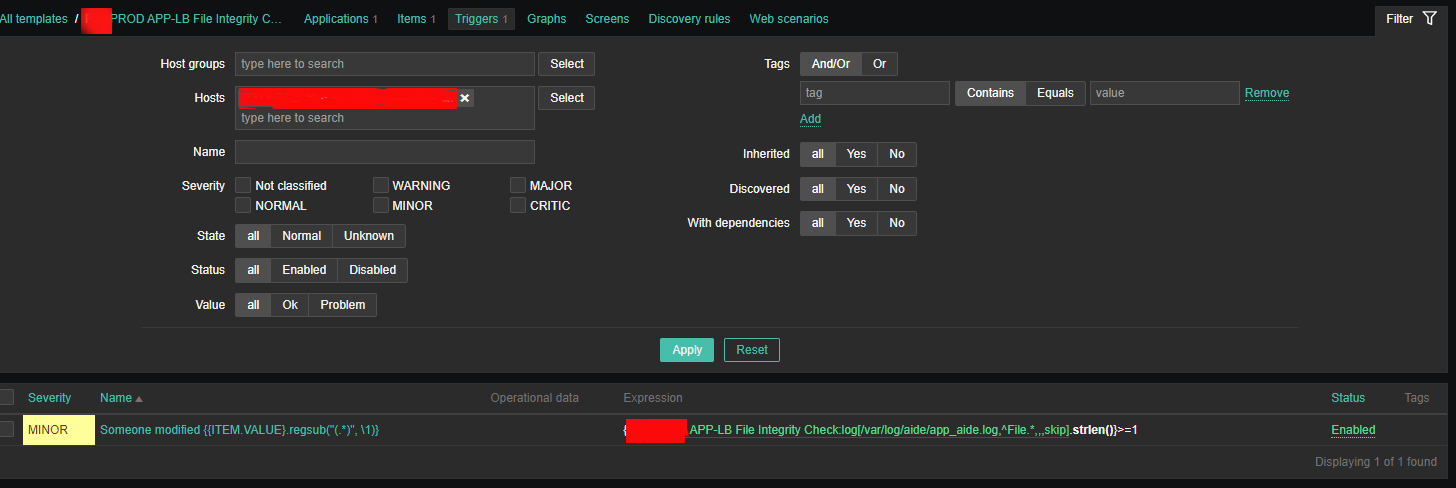
2.3 Create Triggers with the respective regular expressions, that would check the aide generated log file for file modifications


aide-zabbix-screenshot-minor-config

Configure Trigger like
 

Enabled: Tick On


*Name: Someone modified {{ITEM.VALUE}.regsub("(.*)", \1)}

*Expression: {PROD APP-LB File Integrity Check:log[/var/log/aide/app_aide.log,^File.*,,,skip].strlen()}>=1

Allow manual close: yes tick

*Description: Someone modified {{ITEM.VALUE}.regsub("(.*)", \1)} on {HOST.NAME}


2.4 Configure Action
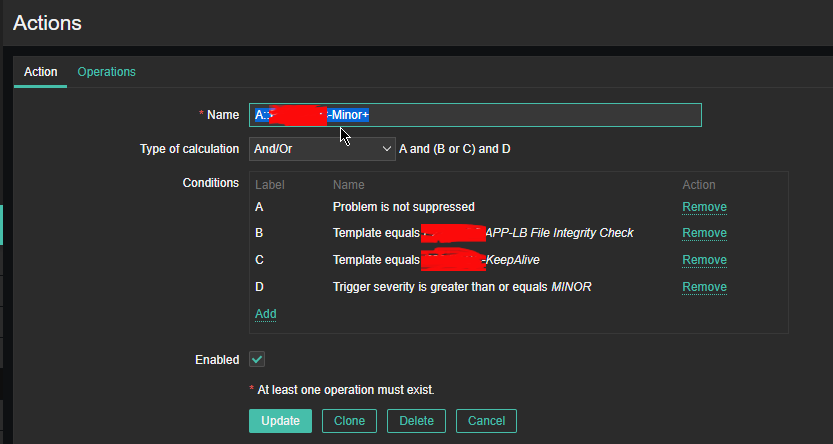
 

aide-zabbix-file-monitoring-action-screensho

Now assuming the Zabbix server has  a properly set media for communication and you set Alerting rules zabbix-server can be easily set tosend mails to a Support email to get Notifications Alerts, everytime a monitored file by aide gets changed.

That's all folks ! Enjoy being notified on every file change on your servers  !
 

Enable zabbix agent to work with SeLinux enabled on CentOS 7 Linux

Wednesday, October 19th, 2022

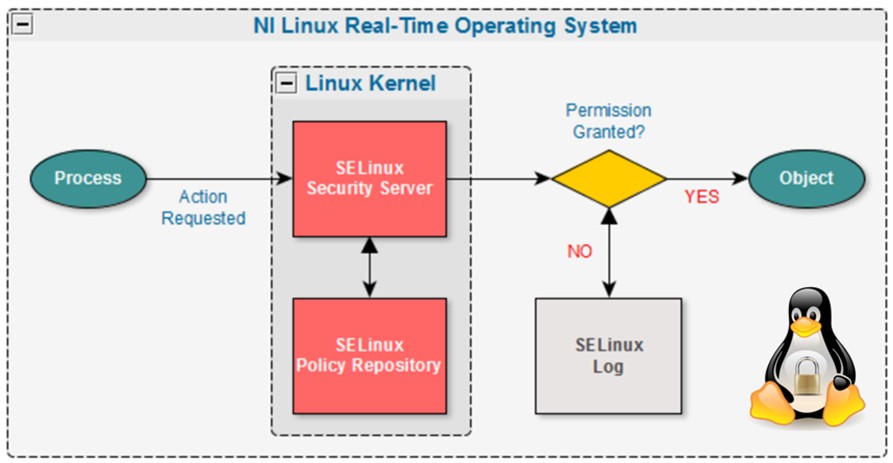
If you have the task to install and use zabbix-agent or zabbix-proxy to report to zabbix-server on CentOS 7 with enabled SeLinux services for security reasons and you have no mean to disable the selinux which is a common step to take under this circumstances, you will have to add the zabbix services to be exluded as permissive in selinux. In below article I'll show you how this is done in few easy steps.

zabbix-agent-service-selinux-linux-real-time-operating-sytems


1. Check the system sestatus

[root@linux zabbix]# sestatus
SELinux status:                 enabled
SELinuxfs mount:                /sys/fs/selinux
SELinux root directory:         /etc/selinux
Loaded policy name:             targeted
Current mode:                   enforcing
Mode from config file:          enforcing

Policy MLS status:              enabled
Policy deny_unknown status:     allowed
Max kernel policy version:      28


2. Enable zabbix to be permissive in selinux

To be able to set zabbix to be in permissive mode as well as for further troubleshooting if you have to enable other  linux services inside selinux you have to install below RPM packs.

[root@linux zabbix]# yum install setroubleshoot.x86_64 setools.x86_64 setools-console.x86_64 policycoreutils-python.x86_64

Set the zabbix permissive exclude rule in SeLINUX

[root@linux zabbix]# semanage permissive –add zabbix_t

Re-run the zabbix proxy (if you have a local zabbix-proxy running and the zabbix-agent)

[root@linux zabbix]# systemctl start zabbix-proxy.service

[root@linux zabbix]# systemctl start zabbix-agent.service

[root@linux zabbix]# systemctl status zabbix-agent
● zabbix-agent.service – Zabbix Agent
   Loaded: loaded (/usr/lib/systemd/system/zabbix-agent.service; enabled; vendor preset: disabled)
   Active: active (running) since Tue 2022-10-18 09:30:16 CEST; 1 day 7h ago
 Main PID: 962952 (zabbix_agentd)
    Tasks: 6 (limit: 100884)
   Memory: 5.1M
   CGroup: /system.slice/zabbix-agent.service
           ├─962952 /usr/sbin/zabbix_agentd -c /etc/zabbix/zabbix_agentd.conf
           ├─962955 /usr/sbin/zabbix_agentd: collector [idle 1 sec]
           ├─962956 /usr/sbin/zabbix_agentd: listener #1 [waiting for connection]
           ├─962957 /usr/sbin/zabbix_agentd: listener #2 [waiting for connection]
           ├─962958 /usr/sbin/zabbix_agentd: listener #3 [waiting for connection]
           └─962959 /usr/sbin/zabbix_agentd: active checks #1 [idle 1 sec]

Oct 18 09:30:16 linux systemd[1]: Starting Zabbix Agent…
Oct 18 09:30:16 linux systemd[1]: Started Zabbix Agent.

3. Check inside audit logs all is OK

To make sure zabbix is really enabled to be omitted by selinux rules check audit.log

[root@linux zabbix]# grep zabbix_proxy /var/log/audit/audit.log

That's all folks, Enjoy ! 🙂

Fix Zabbix selinux caused permission issues on CentOS 7 Linux / cannot set resource limit: [13] Permission denied error solution

Tuesday, July 6th, 2021

zabbix-selinux-logo-fix-zabbix-permission-issues-when-running-on-ceontos-linux-change-selinux-to-permissive-howto.

If you have to install Zabbix client that has to communicate towards Zabbix server via a Zabbix Proxy you might be unpleasently surprised that it cannot cannot be start if the selinux mode is set to Enforcing.
Error message like on below screenshot will be displayed when starting proxy client with systemctl.

zabbix-proxy-cannot-be-started-due-to-selinux-permissions

In the zabbix logs you will see error  messages such as:
 

"cannot set resource limit: [13] Permission denied, CentOS 7"


29085:20160730:062959.263 Starting Zabbix Agent [Test host]. Zabbix 3.0.4 (revision 61185).
29085:20160730:062959.263 **** Enabled features ****
29085:20160730:062959.263 IPv6 support: YES
29085:20160730:062959.263 TLS support: YES
29085:20160730:062959.263 **************************
29085:20160730:062959.263 using configuration file: /etc/zabbix/zabbix_agentd.conf
29085:20160730:062959.263 cannot set resource limit: [13] Permission denied
29085:20160730:062959.263 cannot disable core dump, exiting…


Next step to do is to check whether zabbix is listed in selinux's enabled modules to do so run:
 

[root@centos ~ ]# semodules -l

…..
vhostmd    1.1.0
virt    1.5.0
vlock    1.2.0
vmtools    1.0.0
vmware    2.7.0
vnstatd    1.1.0
vpn    1.16.0
w3c    1.1.0
watchdog    1.8.0
wdmd    1.1.0
webadm    1.2.0
webalizer    1.13.0
wine    1.11.0
wireshark    2.4.0
xen    1.13.0
xguest    1.2.0
xserver    3.9.4
zabbix    1.6.0
zarafa    1.2.0
zebra    1.13.0
zoneminder    1.0.0
zosremote    1.2.0


[root@centos ~ ]# sestatus
# sestatusSELinux status:                 enabled
SELinuxfs mount:                /sys/fs/selinux
SELinux root directory:         /etc/selinux
Loaded policy name:             targeted
Current mode:                   enforcing
Mode from config file:          enforcing
Policy MLS status:              enabled
Policy deny_unknown status:     allowed
Max kernel policy version:      28

To get exact zabbix IDs that needs to be added as permissive for Selinux you can use ps -eZ like so:

[root@centos ~ ]# ps -eZ |grep -i zabbix
system_u:system_r:zabbix_agent_t:s0 1149 ?     00:00:00 zabbix_agentd
system_u:system_r:zabbix_agent_t:s0 1150 ?     00:04:28 zabbix_agentd
system_u:system_r:zabbix_agent_t:s0 1151 ?     00:00:00 zabbix_agentd
system_u:system_r:zabbix_agent_t:s0 1152 ?     00:00:00 zabbix_agentd
system_u:system_r:zabbix_agent_t:s0 1153 ?     00:00:00 zabbix_agentd
system_u:system_r:zabbix_agent_t:s0 1154 ?     02:21:46 zabbix_agentd

As you can see zabbix is enabled and hence selinux enforcing mode is preventing zabbix client / server to operate and communicate normally, hence to make it work we need to change zabbix agent and zabbix proxy to permissive mode.

Setting selinux for zabbix agent and zabbix proxy to permissive mode

If you don't have them installed you might neet the setroubleshoot setools, setools-console and policycoreutils-python rpms packs (if you have them installed skip this step).

[root@centos ~ ]# yum install setroubleshoot.x86_64 setools.x86_64 setools-console.x86_64 policycoreutils-python.x86_64

Then to add zabbix service to become permissive either run

[root@centos ~ ]# semanage permissive –add zabbix_t

[root@centos ~ ]# semanage permissive -a zabbix_agent_t


In some cases you might also need in case if just adding the permissive for zabbix_agent_t try also :

setsebool -P zabbix_can_network=1

Next try to start zabbox-proxy and zabbix-agent systemd services 

[root@centos ~ ]# systemctl start zabbix-proxy.service

[root@centos ~ ]# systemctl start zabbix-agent.service

Hopefully all should report fine with the service checking the status should show you something like:

[root@centos ~ ]# systemctl status zabbix-agent
● zabbix-agent.service – Zabbix Agent
   Loaded: loaded (/usr/lib/systemd/system/zabbix-agent.service; enabled; vendor preset: disabled)
   Active: active (running) since Thu 2021-06-24 07:47:42 CEST; 1 weeks 5 days ago
 Main PID: 1149 (zabbix_agentd)
   CGroup: /system.slice/zabbix-agent.service
           ├─1149 /usr/sbin/zabbix_agentd -c /etc/zabbix/zabbix_agentd.conf
           ├─1150 /usr/sbin/zabbix_agentd: collector [idle 1 sec]
           ├─1151 /usr/sbin/zabbix_agentd: listener #1 [waiting for connection]
           ├─1152 /usr/sbin/zabbix_agentd: listener #2 [waiting for connection]
           ├─1153 /usr/sbin/zabbix_agentd: listener #3 [waiting for connection]
           └─1154 /usr/sbin/zabbix_agentd: active checks #1 [idle 1 sec]

Check the Logs finally to make sure all is fine with zabbix being allowed by selinux.

[root@centos ~ ]# grep zabbix_proxy /var/log/audit/audit.log

[root@centos ~ ]# tail -n 100 /var/log/zabbix/zabbix_agentd.log


If no errors are in and you receive and you can visualize the usual zabbix collected CPU / Memory / Disk etc. values you're good, Enjoy ! 🙂

Debug and fix Virtuozzo / KVM broken Hypervisor error: ‘PrlSDKError(‘SDK error: 0x80000249: Unable to connect to Virtuozzo. You may experience a connection problem or the server may be down.’ on CentOS Linux howto

Thursday, January 28th, 2021

fix-sdkerror-virtuozzo-kvm-how-to-debug-problems-with-hypervisor-host-linux

I've recently yum upgraded a CentOS Linux server runinng Virtuozzo kernel and Virtuozzo virtualization Virtual Machines to the latest available CentOS Linux release 7.9.2009 (Core) just to find out after the upgrade there was issues with both virtuozzo (VZ) way to list installed VZ enabled VMs reporting Unable to connect to Virtuozzo error like below:
 

[root@CENTOS etc]# prlctl list -a
Unable to connect to Virtuozzo. You may experience a connection problem or the server may be down. Contact your Virtuozzo administrator for assistance.


Even the native QEMU KVM VMs installed on the Hypervisor system failed to work to list and bring up the VMs producing another unexplainable error with virsh unable to connect to the hypervisor socket

[root@CENTOS etc]# virsh list –all
error: failed to connect to the hypervisor
error: Failed to connect socket to '/var/run/libvirt/libvirt-sock': No such file or directory


In dmesg cmd kernel log messages the error found looked as so:

[root@CENTOS etc]# dmesg|grep -i sdk


[    5.314601] PrlSDKError('SDK error: 0x80000249: Unable to connect to Virtuozzo. You may experience a connection problem or the server may be down. Contact your Virtuozzo administrator for assistance.',)

To fix it I had to experiment a bit based on some suggestions from Google results as usual and what turned to be the cause is a now obsolete setting for disk probing that is breaking libvirtd

Disable allow_disk_format_probing in /etc/libvirt/qemu.conf

The fix to PrlSDKError('SDK error: 0x80000249: Unable to connect to Virtuozzo comes to commenting a parameter inside 

/etc/libvirt/qemu.conf

which for historical reasons seems to be turned on by default it is like this

allow_disk_format_probing = 1


Resolution is to either change the value to 0 or completely comment the line:

[root@CENTOS etc]# grep allow_disk_format_probing /etc/libvirt/qemu.conf
# If allow_disk_format_probing is enabled, libvirt will probe disk
#allow_disk_format_probing = 1


Debug problems with Virtuozzo services and validate virtualization setup

What really helped to debug the issue was to check the extended status info of libvirtd.service vzevent vz.service libvirtguestd.service prl-disp systemd services

[root@CENTOS etc]# systemctl -l status libvirtd.service vzevent vz.service libvirtguestd.service prl-disp

Here I had to analyze the errors and googled a little bit about it


Once this is changed I had to of course restart libvirtd.service and rest of virtuozzo / kvm services

[root@CENTOS etc]# systemctl restart libvirtd.service ibvirtd.service vzevent vz.service libvirtguest.service prl-disp


Another useful tool part of a standard VZ install that I've used to make sure each of the Host OS Hypervisor components is running smoothly is virt-host-validate (tool is part of libvirt-client rpm package)

[root@CENTOS etc]# virt-host-validate
  QEMU: Checking for hardware virtualization                                 : PASS
  QEMU: Checking if device /dev/kvm exists                                   : PASS
  QEMU: Checking if device /dev/kvm is accessible                            : PASS
  QEMU: Checking if device /dev/vhost-net exists                             : PASS
  QEMU: Checking if device /dev/net/tun exists                               : PASS
  QEMU: Checking for cgroup 'memory' controller support                      : PASS
  QEMU: Checking for cgroup 'memory' controller mount-point                  : PASS
  QEMU: Checking for cgroup 'cpu' controller support                         : PASS
  QEMU: Checking for cgroup 'cpu' controller mount-point                     : PASS
  QEMU: Checking for cgroup 'cpuacct' controller support                     : PASS
  QEMU: Checking for cgroup 'cpuacct' controller mount-point                 : PASS
  QEMU: Checking for cgroup 'cpuset' controller support                      : PASS
  QEMU: Checking for cgroup 'cpuset' controller mount-point                  : PASS
  QEMU: Checking for cgroup 'devices' controller support                     : PASS
  QEMU: Checking for cgroup 'devices' controller mount-point                 : PASS
  QEMU: Checking for cgroup 'blkio' controller support                       : PASS
  QEMU: Checking for cgroup 'blkio' controller mount-point                   : PASS
  QEMU: Checking for device assignment IOMMU support                         : PASS
  QEMU: Checking if IOMMU is enabled by kernel                               : WARN (IOMMU appears to be disabled in kernel. Add intel_iommu=on to kernel cmdline arguments)
   LXC: Checking for Linux >= 2.6.26                                         : PASS
   LXC: Checking for namespace ipc                                           : PASS
   LXC: Checking for namespace mnt                                           : PASS
   LXC: Checking for namespace pid                                           : PASS
   LXC: Checking for namespace uts                                           : PASS
   LXC: Checking for namespace net                                           : PASS
   LXC: Checking for namespace user                                          : PASS
   LXC: Checking for cgroup 'memory' controller support                      : PASS
   LXC: Checking for cgroup 'memory' controller mount-point                  : PASS
   LXC: Checking for cgroup 'cpu' controller support                         : PASS
   LXC: Checking for cgroup 'cpu' controller mount-point                     : PASS
   LXC: Checking for cgroup 'cpuacct' controller support                     : PASS
   LXC: Checking for cgroup 'cpuacct' controller mount-point                 : PASS
   LXC: Checking for cgroup 'cpuset' controller support                      : PASS
   LXC: Checking for cgroup 'cpuset' controller mount-point                  : PASS
   LXC: Checking for cgroup 'devices' controller support                     : PASS
   LXC: Checking for cgroup 'devices' controller mount-point                 : PASS
   LXC: Checking for cgroup 'blkio' controller support                       : PASS
   LXC: Checking for cgroup 'blkio' controller mount-point                   : PASS
   LXC: Checking if device /sys/fs/fuse/connections exists                   : PASS


One thing to note here that virt-host-validate helped me to realize the  fuse (File system in userspace) module kernel support enabled on the HV was missing so I've enabled temporary for this boot with modprobe and permanently via a configuration like so:

# to load it one time
[root@CENTOS etc]#  modprobe fuse
# to load fuse permnanently on next boot

[root@CENTOS etc]#  echo fuse >> /etc/modules-load.d/fuse.conf

Disable selinux on CentOS HV

Another thing was selinux was enabled on the HV. Selinux is really annoying thing and to be honest I never used it on any server and though its idea is quite good the consequences it creates for daily sysadmin work are terrible so I usually disable it. It could be that a Hypervisor Host OS might work just normal with the selinux enabled but just in case I decided to remove it. This is how

[root@CENTOS etc]#  sestatus
SELinux status:                 enabled
SELinuxfs mount:                /sys/fs/selinux
SELinux root directory:         /etc/selinux
Loaded policy name:             targeted
Current mode:                   enforcing
Mode from config file:          enforcing
Policy MLS status:              enabled
Policy deny_unknown status:     allowed
Max kernel policy version:      31

To temporarily change the SELinux mode from targeted to permissive with the following command:

[root@CENTOS etc]#  setenforce 0

Edit /etc/selinux/config file and set the SELINUX mod to disabled

[root@CENTOS etc]# vim /etc/selinux/config
# This file controls the state of SELinux on the system.
# SELINUX= can take one of these three values:
#       enforcing – SELinux security policy is enforced.
#       permissive – SELinux prints warnings instead of enforcing.
#       disabled – No SELinux policy is loaded.
SELINUX=disabled
# SELINUXTYPE= can take one of these two values:
#       targeted – Targeted processes are protected,
#       mls – Multi Level Security protection.
SELINUXTYPE=targeted

Finally rebooted graceously the machine just in case with the good recommended way to reboot servers with shutdown command instead of /sbin/reboot

[root@CENTOS etc]# shutdown -r now

The advantage of shutdown is that it tries to shutdown each service by sending stop requests but usually this takes some time and even a shutdown request could take longer to proccess as each service such as a WebServer application is being waited to close all its network connections etc. |
However if you want to have a quick reboot and you don't care about any established network connections to third party IPs you can go for the brutal old fashioned /sbin/reboot 🙂