Posts Tagged ‘lib’

yum search file in all installable RPM, find out which rpm package provides binary file or missing library dependency on CentOS / RHEL / Fedora

Friday, August 23rd, 2024

images/centos-rhel-yum-clean-var-cache-yum

Sometimes if you have a missing library or a file you know should be available via an rpm but you're not sure which RPM you have to install you have to look up for library or binary file amongs all available installable r[ms on Redhat Linux / CentOS / Fedora or other RPM based distro.

It is really annoying especially, if you try to install an rpm binary and the package does not install due to missing dependency library. Having a missing dependency package could happen, if you use some custom internal prepared repository that is mirroring from original rpm repositories and the RPM Repositories are situated behind a DMZ firewall network (such scenarios are common for corporations and IT companies).
 
Finding out which file is provided by which package on Debian / Ubuntu and other deb based linux distributions is easy and done via the

# apt-file search filename

Thus if you're a system administrator coming from a Debian GNU / Linux sysadmin realm into the wonderful world of redhats, you will want to have an alternative to apt-file tool. You will be happy to find out that that this tedious task is easily done in RPM based Linux and is integrated straight into yum package manager too.

The command to search which rpm package provides a file is:

# yum whatprovides 'nc'

[root@rhel-linux ~]# yum whatprovides nc
Loaded plugins: fastestmirror, versionlock
Loading mirror speeds from cached hostfile
2:nmap-ncat-6.40-19.el7.x86_64 : Nmap's Netcat replacement
Repo        : base
Matched from:
Provides    : nc


2:nmap-ncat-6.40-19.el7.x86_64 : Nmap's Netcat replacement
Repo        : @base
Matched from:
Provides    : nc


yum whatprovides search_file_name can be also invoked with its shortcut yum provides 'search_file_name'

[root@rhel-server ~]# yum provides '/bin/ls'
Loaded plugins: fastestmirror, versionlock
Loading mirror speeds from cached hostfile
coreutils-8.22-24.el7.x86_64 : A set of basic GNU tools commonly used in shell scripts
Repo        : base
Matched from:
Filename    : /bin/ls

coreutils-8.22-24.el7_9.2.x86_64 : A set of basic GNU tools commonly used in shell scripts
Repo        : updates
Matched from:
Filename    : /bin/ls

 Here is another example:

[root@rhel-server ~]# yum -q provides '*lesspipe.sh*'
less-458-9.el7.x86_64 : A text file browser similar to more, but better
Repo        : base
Matched from:
Filename    : /usr/bin/lesspipe.sh

source-highlight-3.1.6-6.el7.i686 : Produces a document with syntax highlighting
Repo        : base
Matched from:
Filename    : /usr/bin/src-hilite-lesspipe.sh

source-highlight-3.1.6-6.el7.x86_64 : Produces a document with syntax highlighting
Repo        : base
Matched from:
Filename    : /usr/bin/src-hilite-lesspipe.sh

spirv-tools-2019.1-4.el7.x86_64 : API and commands for processing SPIR-V modules
Repo        : epel
Matched from:
Filename    : /usr/bin/spirv-lesspipe.sh

You can search for any file and if the RPm repository is defined under /etc/yum/repos.d/* and enabled, yum whatprovides command should be able to find it and tell you which RPM package you have to install to have the file installed Redhat way.

  • You can list all enabled RPM repositories with cmd:
     

[root@rhel-server ~]# yum repolist enabled
Loaded plugins: fastestmirror, versionlock
Loading mirror speeds from cached hostfile
repo id                                                   repo name                                                                      status
3party                                                    Third party packages – x86_64                                                   2,631
base/7/x86_64                                             CentOS-7 – Base                                                                10,072
cr/7/x86_64                                               CentOS-7 – CR                                                                       0
epel/7/x86_64                                             EPEL packages for RedCent 7 – x86_64                                           13,791
extras/7/x86_64                                           CentOS-7 – Extras                                                                 526
updates/7/x86_64                                          CentOS-7 – Updates                                                              5,802
zabbix-6.0                                                Zabbix 6.0 repo                                                                   429
repolist: 33,251
 

  • To list disable RPM repositories:
     

# yum repolist disabled


To list all present available repositories that could be enabled and are set via the /etc/yum.repos.d/* configs

# yum repolist all

Haproxy Enable / Disable Application backend server configured to roundrobin in emergency case via haproxy socket command

Thursday, May 2nd, 2024

haproxy-stats-socket

Haproxy LB backend BACKEND_ROUNDROBIN are configured to roundrobin with check health check port  (check port 33333).
For example letsa say haproxy server is running with a haproxy_roundrobin.cfg like this one.

Under some circumstances however if check port TCP 33333 is UP, but behind 1 or more of Application that is providing the resources to customers misbehaves ,
(app-server1, app-server2, app-server3, app-server4) members , Load Balancer cannot know this, because traffic routing decision is made based on Echo port.

One example scenario when this can happen is if Application server has issue with connectivity towards Database hosts:
(db-host1, db-host2, db-host3, db-host4)

If this happens 25% of traffic might still get balanced to broken Application server. If such scenario happens during OnCall and this is identified as problem,
work around would be to temporary disable the misbehaving App servers member from the 4 configured roundrobin pairs in haproxyproduction.cfg :

For example if app-server3 App node is identified as failing and 25% via LB is lost, to resolve it until broken Application server node is fixed, you will have to temporary exclude it from the ring of roundrobin backend hosts.

1.  Check the status of haproxy backends

echo "show stat" | socat stdio /var/lib/haproxy/stats

As you can see the backend is disabled.

Another way to do it which will make your sessions to the server not directly cut but kept for some time is to put the server you want to exclude from haproxy roundrobin to "maintenace mode".

echo "set server bk_BACKEND_ROUNDROBIN/app-server3 state maint" | socat unix-connect:/var/lib/haproxy/stats stdio

Actually, there is even better and more advanced way to disable backend from a configured rounrobin pair of hosts, with putting the available connections in a long waiting queue in the proxy, and if the App host is inavailable for not too short, haproxy will just ask the remote client to keep the connection for longer and continue the session interaction to remote side and wait for the App server connectivity to go out of maintenance, this is done via "drain" option.

echo "set server bk_BACKEND_ROUNDROBIN/app-server3 state drain" | socat unix-connect:/var/lib/haproxy/stats stdio


  • This sets the backend in DRAIN mode. No new connections are accepted and existing connections are drained.

To get a better idea on what is drain state, here is excerpt from haproxy official documentation:

Force a server's administrative state to a new state. This can be useful to
disable load balancing and/or any traffic to a server. Setting the state to
"ready" puts the server in normal mode, and the command is the equivalent of
the "enable server" command. Setting the state to "maint" disables any traffic
to the server as well as any health checks. This is the equivalent of the
"disable server" command. Setting the mode to "drain" only removes the server
from load balancing but still allows it to be checked and to accept new
persistent connections. Changes are propagated to tracking servers if any.


2. Disable backend app-server3 from rounrobin 


echo "disable server BACKEND_ROUNDROBIN/app-server3" | socat unix-connect:/var/lib/haproxy/stats stdio

# pxname,svname,qcur,qmax,scur,smax,slim,stot,bin,bout,dreq,dresp,ereq,econ,eresp,wretr,wredis,status,weight,act,bck,chkfail,chkdown,lastchg,downtime,qlimit,pid,iid,sid,throttle,lbtot,tracked,type,rate,rate_lim,rate_max,check_status,check_code,check_duration,hrsp_1xx,hrsp_2xx,hrsp_3xx,hrsp_4xx,hrsp_5xx,hrsp_other,hanafail,req_rate,req_rate_max,req_tot,cli_abrt,srv_abrt,comp_in,comp_out,comp_byp,comp_rsp,lastsess,last_chk,last_agt,qtime,ctime,rtime,ttime,
stats,FRONTEND,,,0,0,3000,0,0,0,0,0,0,,,,,OPEN,,,,,,,,,1,2,0,,,,0,0,0,0,,,,0,0,0,0,0,0,,0,0,0,,,0,0,0,0,,,,,,,,
stats,BACKEND,0,0,0,0,300,0,0,0,0,0,,0,0,0,0,UP,0,0,0,,0,282917,0,,1,2,0,,0,,1,0,,0,,,,0,0,0,0,0,0,,,,,0,0,0,0,0,0,-1,,,0,0,0,0,
Frontend_Name,FRONTEND,,,0,0,3000,0,0,0,0,0,0,,,,,OPEN,,,,,,,,,1,3,0,,,,0,0,0,0,,,,,,,,,,,0,0,0,,,0,0,0,0,,,,,,,,
Backend_Name,app-server4,0,0,0,0,,0,0,0,,0,,0,0,0,0,UP,1,1,0,1,0,282917,0,,1,4,1,,0,,2,0,,0,L4OK,,12,,,,,,,0,,,,0,0,,,,,-1,,,0,0,0,0,
Backend_Name,app-server3,0,0,0,0,,0,0,0,,0,,0,0,0,0,MAINT,1,0,1,1,2,2,23,,1,4,2,,0,,2,0,,0,L4OK,,11,,,,,,,0,,,,0,0,,,,,-1,,,0,0,0,0,
Backend_Name,BACKEND,0,0,0,0,300,0,0,0,0,0,,0,0,0,0,UP,1,1,0,,0,282917,0,,1,4,0,,0,,1,0,,0,,,,,,,,,,,,,,0,0,0,0,0,0,-1,,,0,0,0,0,

Once it is confirmed from Application supprt colleagues, that machine is out of maintenance node and working properly again to reenable it:

3. Enable backend app-server3

echo "enable server bk_BACKEND_ROUNDROBIN/app-server3" | socat unix-connect:/var/lib/haproxy/stats stdio

4. Check backend situation again

echo "show stat" | socat stdio /var/lib/haproxy/stats
# pxname,svname,qcur,qmax,scur,smax,slim,stot,bin,bout,dreq,dresp,ereq,econ,eresp,wretr,wredis,status,weight,act,bck,chkfail,chkdown,lastchg,downtime,qlimit,pid,iid,sid,throttle,lbtot,tracked,type,rate,rate_lim,rate_max,check_status,check_code,check_duration,hrsp_1xx,hrsp_2xx,hrsp_3xx,hrsp_4xx,hrsp_5xx,hrsp_other,hanafail,req_rate,req_rate_max,req_tot,cli_abrt,srv_abrt,comp_in,comp_out,comp_byp,comp_rsp,lastsess,last_chk,last_agt,qtime,ctime,rtime,ttime,
stats,FRONTEND,,,0,0,3000,0,0,0,0,0,0,,,,,OPEN,,,,,,,,,1,2,0,,,,0,0,0,0,,,,0,0,0,0,0,0,,0,0,0,,,0,0,0,0,,,,,,,,
stats,BACKEND,0,0,0,0,300,0,0,0,0,0,,0,0,0,0,UP,0,0,0,,0,282955,0,,1,2,0,,0,,1,0,,0,,,,0,0,0,0,0,0,,,,,0,0,0,0,0,0,-1,,,0,0,0,0,
Frontend_Name,FRONTEND,,,0,0,3000,0,0,0,0,0,0,,,,,OPEN,,,,,,,,,1,3,0,,,,0,0,0,0,,,,,,,,,,,0,0,0,,,0,0,0,0,,,,,,,,
Backend_Name,app-server4,0,0,0,0,,0,0,0,,0,,0,0,0,0,UP,1,1,0,1,0,282955,0,,1,4,1,,0,,2,0,,0,L4OK,,12,,,,,,,0,,,,0,0,,,,,-1,,,0,0,0,0,
Backend_Name,app-server3,0,0,0,0,,0,0,0,,0,,0,0,0,0,UP,1,0,1,1,2,3,58,,1,4,2,,0,,2,0,,0,L4OK,,11,,,,,,,0,,,,0,0,,,,,-1,,,0,0,0,0,
Backend_Name,BACKEND,0,0,0,0,300,0,0,0,0,0,,0,0,0,0,UP,1,1,1,,0,282955,0,,1,4,0,,0,,1,0,,0,,,,,,,,,,,,,,0,0,0,0,0,0,-1,,,0,0,0,0,


You should see the backend enabled again.

NOTE:
If you happen to get some "permission denied" errors when you try to send haproxy commands via the configured haproxy status this might be related to the fact you have enabled the socket in read only mode, if that is so it means the haproxy cannot be written to and therefore you can only read info from it with status commands, but not send any write operations to haproxy via unix socket.

One example haproxy configuration that enables haproxy socket in read only looks like this in haproxy.cfg:
 

 stats socket /var/lib/haproxy/stats


To make the haproxy socket read / write mode, for root superuser and some other users belonging to admin group 'adm', you should set the haproxy.cfg to something like:

stats socket /var/lib/haproxy/stats-qa mode 0660 group adm level admin

or if no special users with a set admin group needed to have access to socket, use instead config like:

stats socket /var/lib/haproxy/stats-qa.sock mode 0600 level admin

Fix ruby: /usr/lib/libcrypt.so.1: version `XCRYPT_2.0′ not found in apt upgrade on Debian Linux 10

Saturday, August 5th, 2023

I've an old legacy Thinkpad Laptop that is for simplicty running Window Maker Wmaker which was laying on my home desk for almost an year and I remembered since i'm for few days in my parents home in Dobrich that it will be a good idea to update its software to the latest Debian packages to patch security issues with it. Thus if you're like me and  you tried to update your Debian 10 Linux to the latest Stable release debian packages  and you end up into a critical error that is preventing apt to to resolve conflicts (fix it with) cmds like:

# apt-get update –fix-missing

# apt –fix-broken install

As usual I looked into Google to see about solution and found few articles, claiming to have scripts that fix it but at the end nothing worked.
And the shitty error occured during the standard:

# apt-get update && apt-get upgrade

ruby: /usr/lib/libcrypt.so.1: version `XCRYPT_2.0' not found

Hence the cause and work around seemed to be very unexpected.
For some reason debian makes a link

root@noah:/lib# ls -al /lib/libcrypt.so.1
lrwxrwxrwx 1 root root 19 Aug  3 16:53 /lib/libcrypt.so.1 ->
libcrypt.so.1.bak

root@noah:/lib# ls -al /lib/libcrypt.so.1.bak
lrwxrwxrwx 1 root root 16 Jun 15  2017 /lib/libcrypt.so.1.bak -> libcrypt-2.24.so

Thus to resolve it and force the .deb upgrade package to continue it is up to simply deleting the strange simlink and re-run the

# apt-get update && apt-get upgrade

Setting up libc6:i386 (2.31-13+deb11u6) …
/usr/bin/perl: /lib/libcrypt.so.1: version `XCRYPT_2.0' not found (required by /usr/bin/perl)
dpkg: error processing package libc6:i386 (–configure):
 installed libc6:i386 package post-installation script subprocess returned error exit status 1
Errors were encountered while processing:
 libc6:i386

Few more times. If you get some critical apt failures still, each time make sure to rerun the command after doing a simple removal of the strange simbolic link with cmd:

# rm -f /lib/libcrypt.so.1

That's all folks after a short while your Debian will be updated to latest Enoy folks ! 🙂

Install Zabbix Proxy configure and connect to Zabbix server on CentOS Linux

Thursday, May 4th, 2023

Install Zabbix Proxy configure and connect to Zabbix server on CentOS Linux

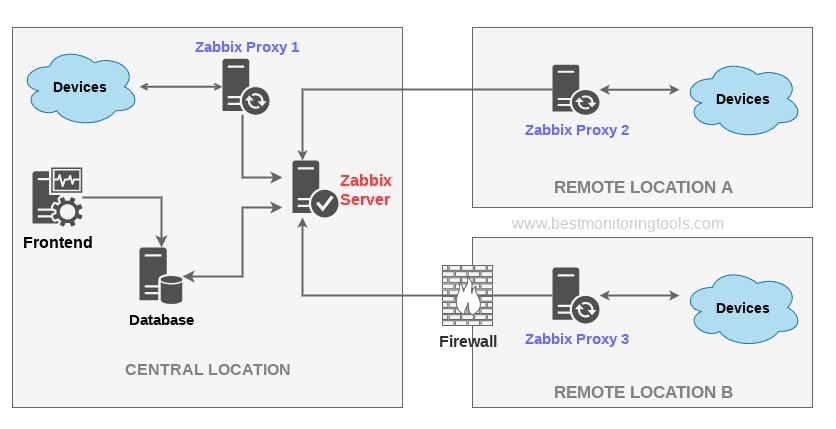
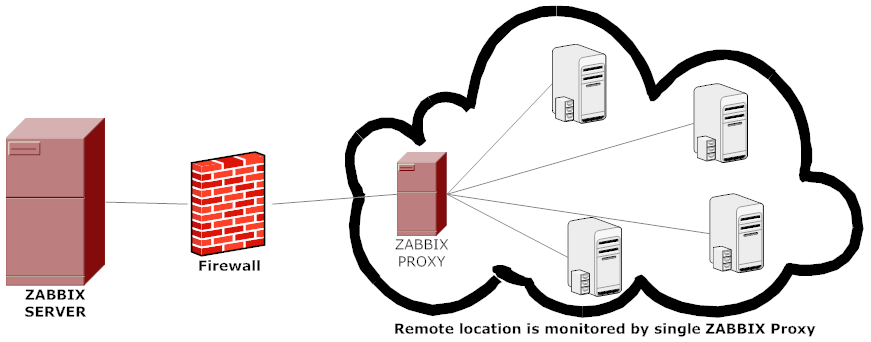
1. Why use Zabbix-Proxy hidden advantages of using Zabbix-Proxy ?
 

Proxy can be used for many purposes and can provide many hidden benefits, just to name few of them:

  • Offload Zabbix Server when monitoring thousands of devices
  • Monitor remote locations
  • Monitor locations having unreliable communications
  • Simplify maintenance of distributed monitoring
  • Improved Security (Zabbix server can be restricted to be connectable only by the set of connected Zabbix Proxy / Proxies


advantages-of-using-zabbix-proxy-instead-of-direct-connect-monitored-hosts-to-zabbix-server-diagram


A Zabbix proxy is the ideal solution if you have numerous hosts with multiple slow items that are affecting the performance of the server simply because processes are spending most of the time simply waiting for a response. A proxy can collect information from all hosts using its internal processes and then send raw historical data to the server. The time needed to connect and receive the host response will be on the proxy site, and the server performance will not be affected at all. A proxy just sends raw values to the server, and the server itself does not have to connect to the host to get the data.
 

2. Install zabbix-proxy-sqlite3 rpm package from Zabbix Official Repositories download page

Zabbix repository provides choice of 3 packages named as follows:

zabbix-proxy-mysql
zabbix-proxy-pgsql
zabbix-proxy-sqlite3

where the last value of the name (after zabbix-proxy) represents database type of the package — MySQL, PostgreSQL and SQLite respectively.

To not bother installing MySQL / PostgreSQL separate database servers, a lightweight choice is to use the sqlite3 db version. 
As I prefer zabbix-proxy data to be stored inside a flat database, thus I choose to use zabbix-proxy-sqlite3.

[root@sysadminshelp:/root ]# yum info zabbix-proxy-sqlite3-5.0.31-1.el7.x86_64
Заредени плъгини: fastestmirror
Loading mirror speeds from cached hostfile
 * base: mirrors.netix.net
 * epel: fedora.ipacct.com
 * extras: mirrors.netix.net
 * remi: remi.mirror.karneval.cz
 * remi-php74: remi.mirror.karneval.cz
 * remi-safe: remi.mirror.karneval.cz
 * updates: mirrors.netix.net
Инсталирани пакети
Име         : zabbix-proxy-sqlite3
Архитект.   : x86_64
Версия      : 5.0.31
Издание     : 1.el7
Обем        : 4.4 M
Хранилище   : installed
Обобщение   : Zabbix proxy for SQLite3 database
URL         : http://www.zabbix.com/
Лиценз      : GPLv2+
Описание    : Zabbix proxy with SQLite3 database support.

My experience to try to install thethe default CentOS RPM package for zabbix-proxy-sqlite3 provided by default
RPM package that came with CentOS did not work as expected and trying to install / configure and use it via

[root@sysadminshelp:/root ]# yum install zabbix-proxy-sqlite3.x86_64 -y

[root@sysadminshelp:/root ]# vi /etc/zabbix/zabbix_proxy.conf


Led me to a nasty errors seen in /var/log/zabbixsrv/zabbix_proxy.log like:

May 1st 2023, 08:42:45.020 zabbix_server cannot set list of PSK ciphersuites: file ssl_lib.c line 1314: error:1410D0B9:SSL routines:SSL_CTX_set_cipher_list:no cipher match
May 1st 2023, 08:42:45.018 zabbix_server cannot set list of PSK ciphersuites: file ssl_lib.c line 1314: error:1410D0B9:SSL routines:SSL_CTX_set_cipher_list:no cipher match
May 1st 2023, 08:42:45.013 zabbix_server cannot set list of PSK ciphersuites: file ssl_lib.c line 1314: error:1410D0B9:SSL routines:SSL_CTX_set_cipher_list:no cipher match
May 1st 2023, 08:42:45.011 zabbix_server cannot set list of PSK ciphersuites: file ssl_lib.c line 1314: error:1410D0B9:SSL routines:SSL_CTX_set_cipher_list:no cipher match


After some googling and reading some threads came upon this one https://support.zabbix.com/browse/ZBXNEXT-3604, there is exmplaed errors preventing the configured zabbix-proxy
to start are caused by the zabbix-proxy-sqlite3 package provided by Redhat (due to openssl incompitability bug or something ).

As one of people in the discussion pointed out the quickest workaround suggested is simply to use the official Zabbix Repository packages for zabbix-proxy-sqlite3, in order to not waste anymore time on this
trivial stuff to install it, simply run:

[root@sysadminshelp:/root ]# rpm -Uvh \
https://repo.zabbix.com/zabbix/5.0/rhel/7/x86_64/zabbix-proxy-sqlite3-5.0.31-1.el7.x86_64.rpm

Alternative way if you seem to not have the machine connected to the internet is simply download the package with wget / lynx / curl / w3m from another machine 
that can reach the Internet upload the package via the local LAN or VPN and install it:

# wget https://repo.zabbix.com/zabbix/5.0/rhel/7/x86_64/zabbix-proxy-sqlite3-5.0.31-1.el7.x86_64.rpm

[root@sysadminshelp:/root ]# rpm -ivh zabbix-proxy-sqlite3-5.0.31-1.el7.x86_64.rpm

NOTE ! Before you install proxy, keep in mind that your proxy version must match the Zabbix server version !

3. Generate a PSK random secret key and set proper permissions for zabbix-proxy directories


[root@sysadminshelp:/root ]# cd /etc/zabbix/
    
[root@sysadminshelp:/root ]# openssl rand -hex 32 >> /etc/zabbix/zabbix_proxy.psk     
[root@sysadminshelp:/root ]# chown root:zabbix zabbix_proxy.psk [root@sysadminshelp:/root ]# vi /etc/zabbix/zabbix_proxy.conf [root@sysadminshelp:/root ]# mkdir -p /var/lib/zabbix-proxy/sqlite3db
[root@sysadminshelp:/root ]# chown -R zabbix:zabbix /var/lib/zabbix-proxy
[root@sysadminshelp:/var/lib/zabbixsrv/sqlite3db]# sqlite3 zabbix_proxy
SQLite version 3.7.17 2013-05-20 00:56:22
Enter ".help" for instructions
Enter SQL statements terminated with a ";"
sqlite> .databases
seq  name             file
—  —————  ———————————————————-
0    main             /var/lib/zabbixsrv/sqlite3db/zabbix_proxy
sqlite>
[root@sysadminshelp:/root ]# vi /etc/zabbix_proxy.conf
#DBName=zabbix_proxy
DBName=/var/lib/zabbixsrv/sqlite3db/zabbix_proxy

4. Configure zabbix proxy to be able to connect to Zabbix Server

[root@sysadminshelp:/root ]#  vi /etc/zabbix/zabbix_proxy.conf     ############ GENERAL PARAMETERS #################
    ProxyMode=0
    Server=192.168.1.28
    ServerPort=10051
    Hostname=zabbix-proxy
    ListenPort=10051
    SourceIP=10.168.1.55
    LogFile=/var/log/zabbix/zabbix_proxy.log
    LogFileSize=1
    DebugLevel=2
    PidFile=/var/run/zabbix/zabbix_proxy.pid
    DBName=/var/lib/zabbix-proxy/sqlite3db/zabbix_proxy.db
    DBUser=zabbix
    
    ######### PROXY SPECIFIC PARAMETERS #############
    ProxyOfflineBuffer=24
    HeartbeatFrequency=60
    ConfigFrequency=120
    
    ############ ADVANCED PARAMETERS ################
    StartPollersUnreachable=3
    StartHTTPPollers=3
    JavaGateway=127.0.0.1
    JavaGatewayPort=10052
    StartJavaPollers=5
    SNMPTrapperFile=/var/log/snmptrap/snmptrap.log
    StartSNMPTrapper=1
    CacheSize=32M
    Timeout=4
    ExternalScripts=/usr/lib/zabbix/externalscripts
    LogSlowQueries=3000
    
    ####### TLS-RELATED PARAMETERS #######
    TLSConnect=psk
    TLSAccept=psk
    TLSPSKIdentity=PSK zabbix-proxy-fqdn-hostname
    TLSPSKFile=/etc/zabbix/zabbix_proxy.psk

5. Check and make sure the installed zabbix proxy as well as the zabbix_proxy server zabbix_agentd client and zabbix_server are at the same major version release

a) Check zabbix proxy version

[root@sysadminshelp:/etc/zabbix]# zabbix_proxy -V
zabbix_proxy (Zabbix) 5.0.31
Revision f64a07aefca 30 January 2023, compilation time: Jan 30 2023 09:55:10

Copyright (C) 2023 Zabbix SIA
License GPLv2+: GNU GPL version 2 or later <https://www.gnu.org/licenses/>.
This is free software: you are free to change and redistribute it according to
the license. There is NO WARRANTY, to the extent permitted by law.

This product includes software developed by the OpenSSL Project
for use in the OpenSSL Toolkit (http://www.openssl.org/).

Compiled with OpenSSL 1.0.1e-fips 11 Feb 2013
Running with OpenSSL 1.0.1e-fips 11 Feb 2013

[root@sysadminshelp:/etc/zabbix]#

b) check zabbix_agentd version

[root@sysadminshelp:/etc/zabbix]# zabbix_agentd -V
zabbix_agentd (daemon) (Zabbix) 5.0.30
Revision 2c96c38fb4b 28 November 2022, compilation time: Nov 28 2022 11:27:43

Copyright (C) 2022 Zabbix SIA
License GPLv2+: GNU GPL version 2 or later <https://www.gnu.org/licenses/>.
This is free software: you are free to change and redistribute it according to
the license. There is NO WARRANTY, to the extent permitted by law.

This product includes software developed by the OpenSSL Project
for use in the OpenSSL Toolkit (http://www.openssl.org/).

Compiled with OpenSSL 1.0.1e-fips 11 Feb 2013
Running with OpenSSL 1.0.1e-fips 11 Feb 2013

c) Check zabbix server version

[root@zabbix:~]# zabbix_server -V
zabbix_server (Zabbix) 5.0.30
Revision 2c96c38fb4b 28 November 2022, compilation time: Nov 28 2022 09:19:03

Copyright (C) 2022 Zabbix SIA
License GPLv2+: GNU GPL version 2 or later <https://www.gnu.org/licenses/>.
This is free software: you are free to change and redistribute it according to
the license. There is NO WARRANTY, to the extent permitted by law.

This product includes software developed by the OpenSSL Project
for use in the OpenSSL Toolkit (http://www.openssl.org/).

Compiled with OpenSSL 1.1.1d  10 Sep 2019
Running with OpenSSL 1.1.1n  15 Mar 2022

6. Starting the zabbix-proxy for a first time

Before beginning with installation make sure selinux is disabled, as it might cause some issues with Zabbix

[root@sysadminshelp:/etc/zabbix]# sestatus
SELinux status:                 disabled

If you need to have the selinux enabled you will have to allow the zabbix-proxy into selinux as well:

cd /tmp
# grep zabbix_proxy /var/log/audit/audit.log | grep denied | audit2allow -m zabbix_proxy > zabbix_proxy.te
grep zabbix_proxy /var/log/audit/audit.log | grep denied | audit2allow -M zabbix_proxy
semodule -i zabbix_proxy.pp


[root@sysadminshelp:/etc/zabbix]# systemctl start zabbix-proxy

Also lets enable zabbix-proxy to automatically start it on next server reboot / boot.

root@sysadminshelp:/etc/zabbix]# systemctl enable zabbix-proxy

Normally running zabbix-proxy should provide a status messages like:

[root@sysadminshelp:/etc/zabbix]# systemctl status zabbix-proxy
● zabbix-proxy.service – Zabbix Proxy
   Loaded: loaded (/usr/lib/systemd/system/zabbix-proxy.service; disabled; vendor preset: disabled)
   Active: active (running) since чт 2023-05-04 14:58:36 CEST; 2h 59min ago
  Process: 8500 ExecStop=/bin/kill -SIGTERM $MAINPID (code=exited, status=0/SUCCESS)
  Process: 8504 ExecStart=/usr/sbin/zabbix_proxy -c $CONFFILE (code=exited, status=0/SUCCESS)
 Main PID: 8506 (zabbix_proxy)
   CGroup: /system.slice/zabbix-proxy.service
           ├─8506 /usr/sbin/zabbix_proxy -c /etc/zabbix/zabbix_proxy.conf
           ├─8507 /usr/sbin/zabbix_proxy: configuration syncer [synced config 40521 bytes in 0.0…
           ├─8508 /usr/sbin/zabbix_proxy: trapper #1 [processed data in 0.000808 sec, waiting fo…
           ├─8509 /usr/sbin/zabbix_proxy: trapper #2 [processed data in 0.005028 sec, waiting fo…
           ├─8510 /usr/sbin/zabbix_proxy: trapper #3 [processed data in 0.001240 sec, waiting fo…
           ├─8511 /usr/sbin/zabbix_proxy: trapper #4 [processed data in 0.004378 sec, waiting fo…
           ├─8512 /usr/sbin/zabbix_proxy: trapper #5 [processed data in 0.004991 sec, waiting fo…
           ├─8513 /usr/sbin/zabbix_proxy: preprocessing manager #1 [queued 0, processed 3 values…
           ├─8514 /usr/sbin/zabbix_proxy: preprocessing worker #1 started
           ├─8515 /usr/sbin/zabbix_proxy: preprocessing worker #2 started
           ├─8516 /usr/sbin/zabbix_proxy: preprocessing worker #3 started
           ├─8517 /usr/sbin/zabbix_proxy: heartbeat sender [sending heartbeat message success in…
           ├─8518 /usr/sbin/zabbix_proxy: data sender [sent 0 values in 0.005241 sec, idle 1 sec…
           ├─8519 /usr/sbin/zabbix_proxy: housekeeper [deleted 4501 records in 0.011462 sec, idl…
           ├─8520 /usr/sbin/zabbix_proxy: http poller #1 [got 0 values in 0.000248 sec, idle 5 s…
           ├─8521 /usr/sbin/zabbix_proxy: http poller #2 [got 0 values in 0.000239 sec, idle 5 s…
           ├─8522 /usr/sbin/zabbix_proxy: http poller #3 [got 0 values in 0.000328 sec, idle 5 s…
           ├─8523 /usr/sbin/zabbix_proxy: discoverer #1 [processed 0 rules in 0.000261 sec, idle…
           ├─8524 /usr/sbin/zabbix_proxy: history syncer #1 [processed 0 values in 0.000009 sec,…
           ├─8525 /usr/sbin/zabbix_proxy: history syncer #2 [processed 0 values in 0.000007 sec,…
           ├─8526 /usr/sbin/zabbix_proxy: history syncer #3 [processed 0 values in 0.000014 sec,…
           ├─8527 /usr/sbin/zabbix_proxy: history syncer #4 [processed 0 values in 0.000021 sec,…
           ├─8528 /usr/sbin/zabbix_proxy: java poller #1 [got 0 values in 0.000017 sec, idle 5 s…
           ├─8529 /usr/sbin/zabbix_proxy: java poller #2 [got 0 values in 0.000019 sec, idle 5 s…
           ├─8530 /usr/sbin/zabbix_proxy: java poller #3 [got 0 values in 0.000019 sec, idle 5 s…
           ├─8531 /usr/sbin/zabbix_proxy: java poller #4 [got 0 values in 0.000018 sec, idle 5 s…
           ├─8532 /usr/sbin/zabbix_proxy: java poller #5 [got 0 values in 0.000013 sec, idle 5 s…
           ├─8533 /usr/sbin/zabbix_proxy: snmp trapper [processed data in 0.000026 sec, idle 1 s…
           ├─8534 /usr/sbin/zabbix_proxy: self-monitoring [processed data in 0.000034 sec, idle …
           ├─8535 /usr/sbin/zabbix_proxy: task manager [processed 0 task(s) in 0.000169 sec, idl…
           ├─8536 /usr/sbin/zabbix_proxy: poller #1 [got 0 values in 0.000012 sec, idle 5 sec]
           ├─8537 /usr/sbin/zabbix_proxy: poller #2 [got 0 values in 0.000021 sec, idle 5 sec]
           ├─8538 /usr/sbin/zabbix_proxy: poller #3 [got 0 values in 0.000039 sec, idle 5 sec]
           ├─8539 /usr/sbin/zabbix_proxy: poller #4 [got 0 values in 0.000024 sec, idle 5 sec]
           ├─8540 /usr/sbin/zabbix_proxy: poller #5 [got 0 values in 0.000019 sec, idle 5 sec]
           ├─8541 /usr/sbin/zabbix_proxy: unreachable poller #1 [got 0 values in 0.000011 sec, i…
           ├─8542 /usr/sbin/zabbix_proxy: unreachable poller #2 [got 0 values in 0.000018 sec, i…
           ├─8543 /usr/sbin/zabbix_proxy: unreachable poller #3 [got 0 values in 0.000041 sec, i…
           └─8544 /usr/sbin/zabbix_proxy: icmp pinger #1 [got 0 values in 0.000022 sec, idle 5 s…

май 04 14:58:36 sysadminshelp systemd[1]: Stopped Zabbix Proxy.
май 04 14:58:36 sysadminshelp systemd[1]: Starting Zabbix Proxy…
май 04 14:58:36 sysadminshelp systemd[1]: Started Zabbix Proxy.

zabbix-server-zabbix-proxy-and-zabbix-clients-overview-diagram

7. Configure zabbix-agentd to use your just new brand new zabbix-proxy

Here is my sample configuration file:

[root@sysadminshelp:/etc/zabbix]# grep -v \# /etc/zabbix/zabbix_agentd.conf | sed '/^$/d'
PidFile=/var/run/zabbix/zabbix_agentd.pid
LogFile=/var/log/zabbix/zabbix_agentd.log
LogFileSize=0
Server=zabbix-proxy
ServerActive=zabbix-proxy:10051
ListenIP
Hostname=sysadminshelp
BufferSend=30
BufferSize=100
Include=/etc/zabbix/zabbix_agentd.d/*.conf


Note that the ServerActive given "zabbix-proxy" should be resolvable from the host, or even better you might want to put the IP of the Proxy if
you don't have at least a pseudo Hostname already configured inside /etc/hosts or actual DNS 'A' Active record configured inside a properly resolving
DNS server configured on the host via /etc/resolv.conf.


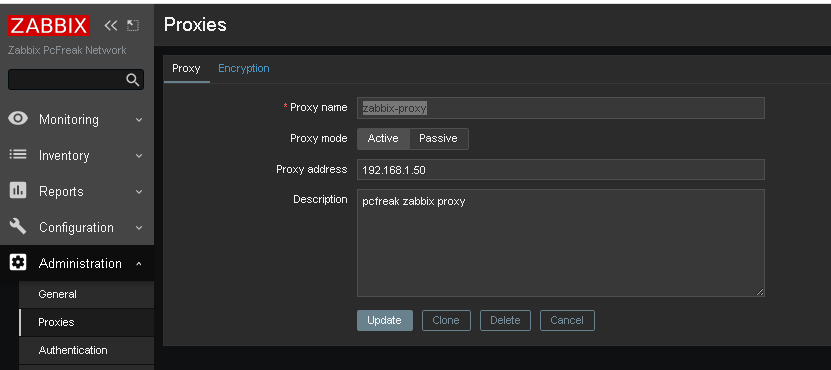
8. Create and Configure new proxy into the Zabbix-server host
 

Go to the zabbix server web interface URL into menus:

zabbix-administration-proxy-config
 

Administration -> Proxies (Proxy) 


Click on ;

Create Proxy button (uppper right corner)

*Proxy name: usually-your-host-pingable-fqdn
Proxy mode: Active
Proxy address: 192.168.1.50
Description: pcfreak zabbix proxy


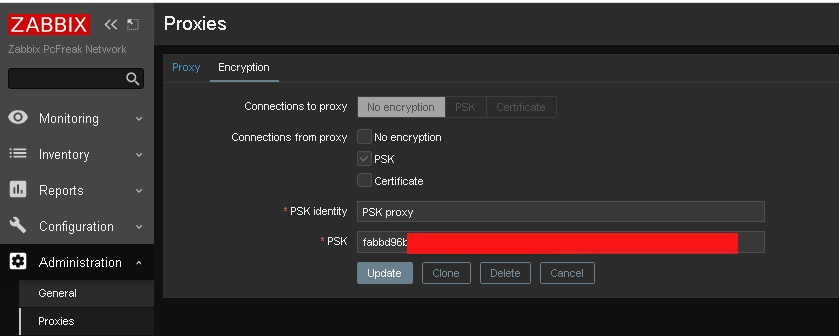
Administration -> Proxies -> Encryption


From "Connection to proxy"

Untick "No encryption"

and

Tick "PSK"


zabbix-administration-proxy-config-encryption

*PSK Identity: PSK proxy
*PSK: Put the key here (copy from /etc/zabbix/zabbix_proxy.psk generated steps earlier with openssl)

[root@sysadminshelp:/etc/zabbix]# cat zabbix_proxy.psk
faddbd96be00ac42c892fda5201634df25d51f3ndbbbf6cee9d354b2817092a28

Press the "Update" Button

zabbix-administration-proxy-config-encryption1

and go again to Proxies and check the zabbix-proxy is connected to the server and hosts configured to use the zabbix proxy reporting frequently.

To make sure that the configured new hosts to use the Zabbix Proxy instead of direct connection to Zabbix Server, go to Latest Data and check whether the configured Hostnames to connect to the Zabbix-Proxy continues to sent Data still.

9. Debugging problems with zabix-proxy and zabbix-agentd connectivity to proxy

In case of troubles check out what is going on inside the Zabbix Proxy / Agent and Server log files
 

[root@sysadminshelp:/etc/zabbix]# tail -n 50 /var/log/zabbix/zabbix_proxy.log

 6832:20230504:134032.281 Starting Zabbix Proxy (active) [zabbix-proxy]. Zabbix 5.0.31 (revision f
64a07aefca).
  6832:20230504:134032.281 **** Enabled features ****
  6832:20230504:134032.281 SNMP monitoring:       YES
  6832:20230504:134032.281 IPMI monitoring:       YES
  6832:20230504:134032.281 Web monitoring:        YES
  6832:20230504:134032.281 VMware monitoring:     YES
  6832:20230504:134032.281 ODBC:                  YES
  6832:20230504:134032.281 SSH support:           YES
  6832:20230504:134032.281 IPv6 support:          YES
  6832:20230504:134032.281 TLS support:           YES
  6832:20230504:134032.281 **************************
  6832:20230504:134032.281 using configuration file: /etc/zabbix/zabbix_proxy.conf
  6832:20230504:134032.291 current database version (mandatory/optional): 05000000/05000005
  6832:20230504:134032.291 required mandatory version: 05000000
  6832:20230504:134032.292 proxy #0 started [main process]
  6833:20230504:134032.292 proxy #1 started [configuration syncer #1]
  6833:20230504:134032.329 received configuration data from server at "192.168.1.28", datalen 40521
  6834:20230504:134032.392 proxy #2 started [trapper #1]
  6835:20230504:134032.401 proxy #3 started [trapper #2]
  6836:20230504:134032.402 proxy #4 started [trapper #3]
  6838:20230504:134032.405 proxy #6 started [trapper #5]
  6837:20230504:134032.409 proxy #5 started [trapper #4]
  6843:20230504:134032.409 proxy #11 started [heartbeat sender #1]
  6845:20230504:134032.412 proxy #13 started [housekeeper #1]
  6847:20230504:134032.412 proxy #15 started [discoverer #1]
  8526:20230504:145836.512 proxy #20 started [history syncer #3]
  8517:20230504:145836.512 proxy #11 started [heartbeat sender #1]
  8530:20230504:145836.515 proxy #24 started [java poller #3]
  8531:20230504:145836.517 proxy #25 started [java poller #4]
  8532:20230504:145836.520 proxy #26 started [java poller #5]
  8536:20230504:145836.522 proxy #30 started [poller #1]
  8527:20230504:145836.525 proxy #21 started [history syncer #4]
  8535:20230504:145836.525 proxy #29 started [task manager #1]
  8533:20230504:145836.528 proxy #27 started [snmp trapper #1]
  8539:20230504:145836.528 proxy #33 started [poller #4]
  8538:20230504:145836.529 proxy #32 started [poller #3]
  8534:20230504:145836.532 proxy #28 started [self-monitoring #1]
  8544:20230504:145836.532 proxy #38 started [icmp pinger #1]
  8543:20230504:145836.532 proxy #37 started [unreachable poller #3]
  8542:20230504:145836.535 proxy #36 started [unreachable poller #2]
  8541:20230504:145836.537 proxy #35 started [unreachable poller #1]
  8540:20230504:145836.540 proxy #34 started [poller #5]
  8507:20230504:150036.453 received configuration data from server at "192.168.1.28", datalen 40521
  8507:20230504:150236.503 received configuration data from server at "192.168.1.28", datalen 40521
  8507:20230504:150436.556 received configuration data from server at "192.168.1.28", datalen 40521
  8507:20230504:150636.608 received configuration data from server at "192.168.1.28", datalen 40521
  8507:20230504:150836.662 received configuration data from server at "192.168.1.28", datalen 40521


[root@sysadminshelp:/etc/zabbix]# tail -n 10  /var/log/zabbix-agent/zabbix_agentd.log
3096166:20230504:182840.461 agent #1 started [collector]
3096167:20230504:182840.462 agent #2 started [listener #1]
3096168:20230504:182840.463 agent #3 started [listener #2]
3096169:20230504:182840.464 agent #4 started [listener #3]
3096170:20230504:182840.464 agent #5 started [active checks #1]

If necessery to Debug further and track some strange errors, you might want to increase the DebugLevel to lets say DebugLevel=5

5 – extended debugging (produces even more information)

If checking both zabbix_agentd.log and zabbix_proxy.log cannot give you enough of a hint on what might be the issues you face with your userparameter scripts or missing Monitored data etc. and hopefully you have access to the zabbix-server machine, check out the zabbix server log as well

[root@zabbix:~]# tail -n 100 /var/log/zabbix/zabbix_server.log

3145027:20230504:182641.556 sending configuration data to proxy "zabbix-proxy" at "192.168.1.50", datalen 40521, bytes 6120 with compression ratio 6.6
3145029:20230504:182716.529 cannot send list of active checks to "192.168.1.30": host [pcfrxenweb] not found
3145028:20230504:182731.959 cannot send list of active checks to "192.168.1.30": host [pcfrxenweb] not found
3145029:20230504:182756.634 cannot send list of active checks to "192.168.1.30": host [pcfrxenweb] not found

Wrapping it up

In this article, we have learned how to install and configure a zabbix-proxy server and prepare a PSK encryption secret key for it.
We learned also  how to connect this server to the central zabbix monitoring host machine in Active mode, so both Zabbix proxy and server can communicate in a secure crypted form,
as well as how to set zabbix_agentd clients to connect to the zabbix proxy
which will from itself send its data to the Central Zabbix server host as well as how to Debug and hopefully solve issues with communication between Zabbix client -> Zabbix Proxy -> Zabbix server.

I know this article, does not say anything revolutionary and there is plenty of posts online talking about how to run yourself a zabbix proxy and make in your home or corporate network,
but I thought to write it down as by writting it and reading a bit more on the topic of Zabbix Server / Proxy / Agent, that give myself a better overview on how this technologies work and such an article will give myself an easier step by step guide to follow,
in future when I have to configure Zabbix Environments for personal hobby or professionally for customers.
Hope you enjoyed. Cheers ! 🙂

Configure aide file integrity check server monitoring in Zabbix to track for file changes on servers

Tuesday, March 28th, 2023

zabbix-aide-log-monitoring-logo

Earlier I've written a small article on how to setup AIDE monitoring for Server File integrity check on Linux, which put the basics on how this handy software to improve your server overall Security software can be installed and setup without much hassle.

Once AIDE is setup and a preset custom configuration is prepared for AIDE it is pretty useful to configure AIDE to monitor its critical file changes for better server security by monitoring the AIDE log output for new record occurs with Zabbix. Usually if no files monitored by AIDE are modified on the machine, the log size will not grow, but if some file is modified once Advanced Linux Intrusion Detecting (aide) binary runs via the scheduled Cron job, the /var/log/app_aide.log file will grow zabbix-agentd will continuously check the file for size increases and will react.

Before setting up the Zabbix required Template, you will have to set few small scripts that will be reading a preconfigured list of binaries or application files etc. that aide will monitor lets say via /etc/aide-custom.conf
 

1. Configure aide to monitor files for changes


Before running aide, it is a good idea to prepare a file with custom defined directories and files that you plan to monitor for integrity checking e.g. future changes with aide, for example to capture bad intruders who breaks into server which runs aide and modifies critical files such as /etc/passwd /etc/shadow /etc/group or / /usr/local/etc/* or /var/* / /usr/* critical files that shouldn't be allowed to change without the admin to soon find out.

# cat /etc/aide-custom.conf

# Example configuration file for AIDE.
@@define DBDIR /var/lib/aide
@@define LOGDIR /var/log/aide
# The location of the database to be read.
database=file:@@{DBDIR}/app_custom.db.gz
database_out=file:@@{DBDIR}/app_aide.db.new.gz
gzip_dbout=yes
verbose=5

report_url=file:@@{LOGDIR}/app_custom.log
#report_url=syslog:LOG_LOCAL2
#report_url=stderr
#NOT IMPLEMENTED report_url=mailto:root@foo.com
#NOT IMPLEMENTED report_url=syslog:LOG_AUTH

# These are the default rules.
#
#p:      permissions
#i:      inode:
#n:      number of links
#u:      user
#g:      group
#s:      size
#b:      block count
#m:      mtime
#a:      atime
#c:      ctime
#S:      check for growing size
#acl:           Access Control Lists
#selinux        SELinux security context
#xattrs:        Extended file attributes
#md5:    md5 checksum
#sha1:   sha1 checksum
#sha256:        sha256 checksum
#sha512:        sha512 checksum
#rmd160: rmd160 checksum
#tiger:  tiger checksum

#haval:  haval checksum (MHASH only)
#gost:   gost checksum (MHASH only)
#crc32:  crc32 checksum (MHASH only)
#whirlpool:     whirlpool checksum (MHASH only)

FIPSR = p+i+n+u+g+s+m+c+acl+selinux+xattrs+sha256

#R:             p+i+n+u+g+s+m+c+acl+selinux+xattrs+md5
#L:             p+i+n+u+g+acl+selinux+xattrs
#E:             Empty group
#>:             Growing logfile p+u+g+i+n+S+acl+selinux+xattrs

# You can create custom rules like this.
# With MHASH…
# ALLXTRAHASHES = sha1+rmd160+sha256+sha512+whirlpool+tiger+haval+gost+crc32
ALLXTRAHASHES = sha1+rmd160+sha256+sha512+tiger
# Everything but access time (Ie. all changes)
EVERYTHING = R+ALLXTRAHASHES

# Sane, with multiple hashes
# NORMAL = R+rmd160+sha256+whirlpool
NORMAL = FIPSR+sha512

# For directories, don't bother doing hashes
DIR = p+i+n+u+g+acl+selinux+xattrs

# Access control only
PERMS = p+i+u+g+acl+selinux

# Logfile are special, in that they often change
LOG = >

# Just do sha256 and sha512 hashes
LSPP = FIPSR+sha512

# Some files get updated automatically, so the inode/ctime/mtime change
# but we want to know when the data inside them changes
DATAONLY =  p+n+u+g+s+acl+selinux+xattrs+sha256

##############TOUPDATE
#To delegate to app team create a file like /app/aide.conf
#and uncomment the following line
#@@include /app/aide.conf
#Then remove all the following lines
/etc/zabbix/scripts/check.sh FIPSR
/etc/zabbix/zabbix_agentd.conf FIPSR
/etc/sudoers FIPSR
/etc/hosts FIPSR
/etc/keepalived/keepalived.conf FIPSR
# monitor haproxy.cfg
/etc/haproxy/haproxy.cfg FIPSR
# monitor keepalived
/home/keepalived/.ssh/id_rsa FIPSR
/home/keepalived/.ssh/id_rsa.pub FIPSR
/home/keepalived/.ssh/authorized_keys FIPSR

/usr/local/bin/script_to_run.sh FIPSR
/usr/local/bin/another_script_to_monitor_for_changes FIPSR

#  cat /usr/local/bin/aide-config-check.sh
#!/bin/bash
/sbin/aide -c /etc/aide-custom.conf -D

# cat /usr/local/bin/aide-init.sh
#!/bin/bash
/sbin/aide -c /etc/custom-aide.conf -B database_out=file:/var/lib/aide/custom-aide.db.gz -i


# cat /usr/local/bin/aide-check.sh

#!/bin/bash
/sbin/aide -c /etc/custom-aide.conf -Breport_url=stdout -B database=file:/var/lib/aide/custom-aide.db.gz -C|/bin/tee -a /var/log/aide/custom-aide-check.log|/bin/logger -t custom-aide-check-report
/usr/local/bin/aide-init.sh


# cat /usr/local/bin/aide_app_cron_daily.txt

#!/bin/bash
#If first time, we need to init the DB
if [ ! -f /var/lib/aide/app_aide.db.gz ]
   then
    logger -p local2.info -t app-aide-check-report  "Generating NEW AIDE DATABASE for APPLICATION"
    nice -n 18 /sbin/aide –init -c /etc/aide_custom.conf
    mv /var/lib/aide/app_aide.db.new.gz /var/lib/aide/app_aide.db.gz
fi

nice -n 18 /sbin/aide –update -c /etc/aide_app.conf
#since the option for syslog seems not fully implemented we need to push logs via logger
/bin/logger -f /var/log/aide/app_aide.log -p local2.info -t app-aide-check-report
#Acknoledge the new database as the primary (every results are sended to syslog anyway)
mv /var/lib/aide/app_aide.db.new.gz /var/lib/aide/app_aide.db.gz

What above cron job does is pretty simple, as you can read it yourself. If the configuration predefined aide database store file /var/lib/aide/app_aide.db.gz, does not
exists aide will create its fresh empty database and generate a report for all predefined files with respective checksums to be stored as a comparison baseline for file changes. 

Next there is a line to write aide file changes via rsyslog through the logger and local2.info handler


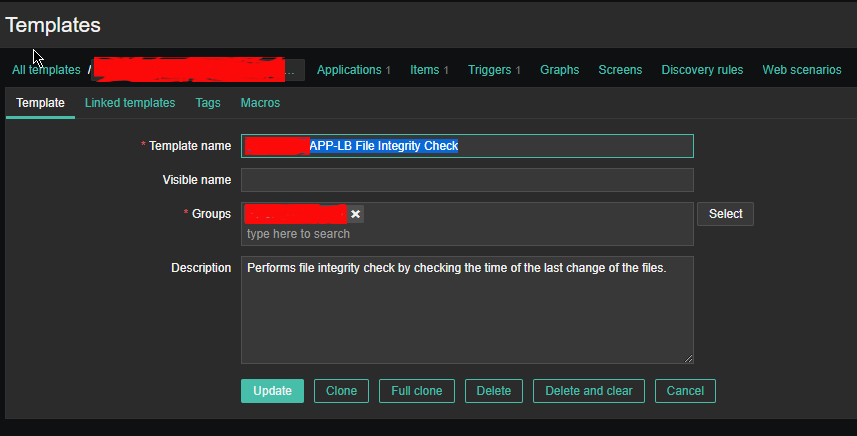
2. Setup Zabbix Template with Items, Triggers and set Action

2.1 Create new Template and name it YourAppName APP-LB File integrity Check

aide-itengrity-check-zabbix_ Configuration of templates

Then setup the required Items, that will be using zabbix's Skip embedded function to scan file in a predefined period of file, this is done by the zabbix-agent that is
supposed to run on the server.

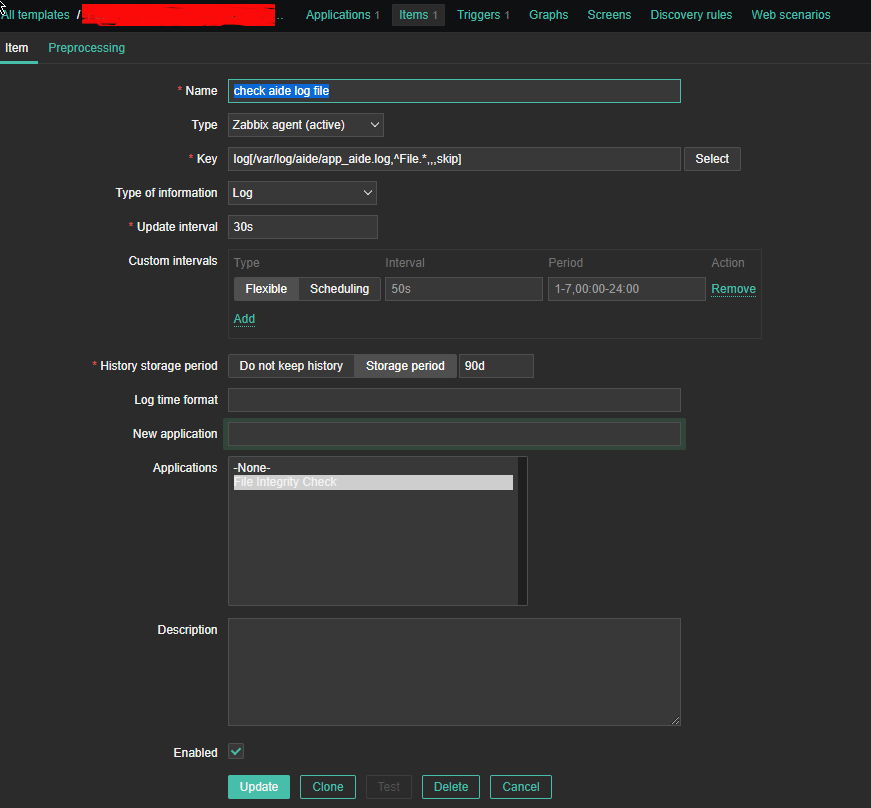
2.2 Configure Item like

aide-zabbix-triggers-screenshot
 

*Name: check aide log file

Type: zabbix (active)

log[/var/log/aide/app_aide.log,^File.*,,,skip]

Type of information: Log

Update Interval: 30s

Applications: File Integrity Check

Configure Trigger like

Enabled: Tick On

images/aide-zabbix-screenshots/check-aide-log-item


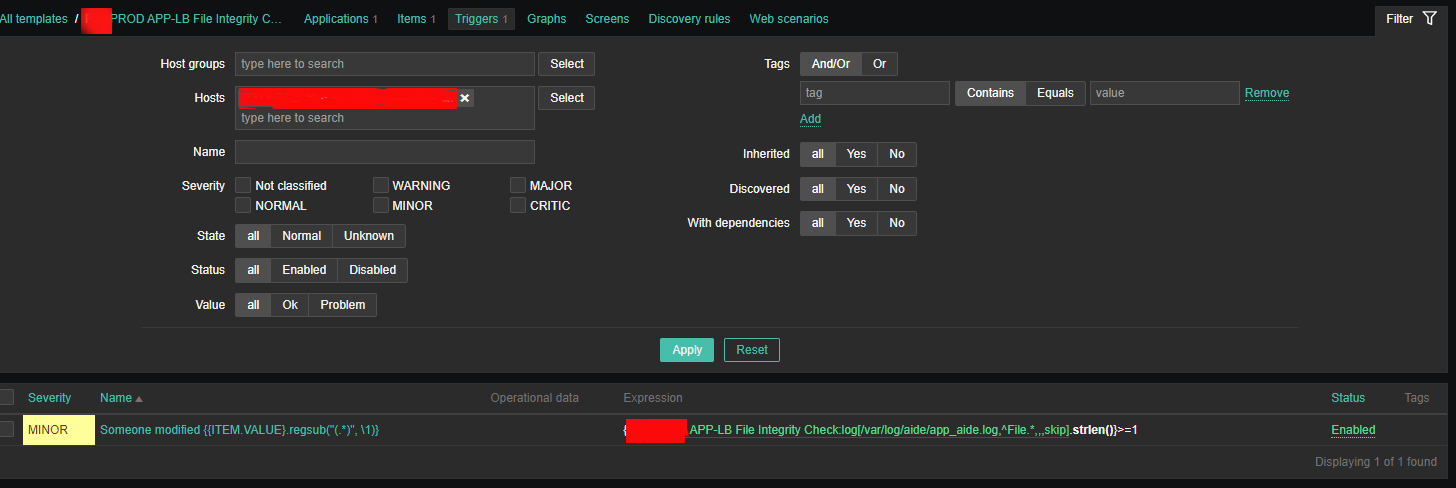
2.3 Create Triggers with the respective regular expressions, that would check the aide generated log file for file modifications


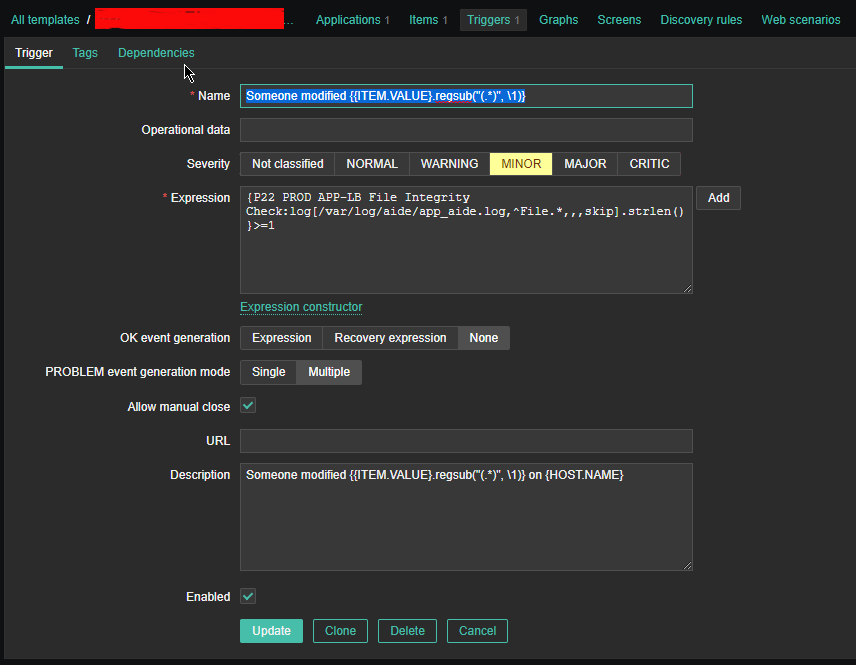
aide-zabbix-screenshot-minor-config

Configure Trigger like
 

Enabled: Tick On


*Name: Someone modified {{ITEM.VALUE}.regsub("(.*)", \1)}

*Expression: {PROD APP-LB File Integrity Check:log[/var/log/aide/app_aide.log,^File.*,,,skip].strlen()}>=1

Allow manual close: yes tick

*Description: Someone modified {{ITEM.VALUE}.regsub("(.*)", \1)} on {HOST.NAME}


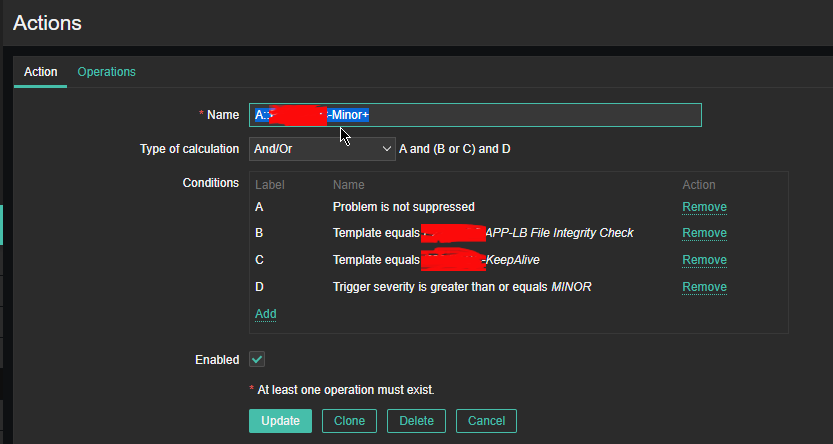
2.4 Configure Action


aide-zabbix-file-monitoring-action-screensho

Now assuming the Zabbix server has  a properly set media for communication and you set Alerting rules zabbix-server can be easily set tosend mails to a Support email to get Notifications Alerts, everytime a monitored file by aide gets changed.

That's all folks ! Enjoy being notified on every file change on your servers  !
 

How to install and configure AIDE ( Advanced Intrusion Detection Environment ) on Debian GNU / Linux 11 to monitor files for changes

Thursday, March 9th, 2023

aide-logo-linux

How to install and configure AIDE ( Advanced Intrusion Detection Environment ) on Debian GNU / Linux 11 to monitor files for changes

Having a intrusion detection system is essential to keeping a server security to good level and being compliant with PCI (Payment Card Industry) DSS Standards. It is a great thing for the sake to protect oneself from hackers assaults. 

There is plenty of Intrusion Detection systems available all around since many years, in the past one of main ones for Linux as older system administrators should remember was Tripwire – integrity tool for monitoring and alerting on specific file change(s) on a range of systems

Tripwire is still used today but many today prefer to use AIDE that is a free software replacement for Tripwire under GPL (General Public License), that is starting to become like a "standard"  for many Unix-like systems as an inexpensive baseline control and rootkit detection system.

In this article I'll explain shortly how to Install / Configure and Use AIDE to monitor, changes with files on the system.

But before proceeding it is worthy to mention on some of the alternatives companies and businesses choose to as an IDS (Intrusion Detection Systems), that is useful to give a brief idea of the sysadmins that has to deal with Security, on what is some of the main Intrusion Detection Systems adopted on UNIX OSes today:
 

  • Samhain

    An integrity checker and host intrusion detection system that can be used on single hosts as well as large, UNIX-based networks. It supports central monitoring as well as powerful (and new) stealth features to run undetected in memory, using steganography. Samhain is an open-source multiplatform application for POSIX systems (Unix, Linux, Cygwin/Windows).

  • OSSEC 
    OSSEC uses a centralized, cross-platform architecture allowing multiple systems to be monitored and managed.
     
  • Snort
    IDS which has the capabilities to prevent attacks. By taking a particular action based on traffic patterns, it can become an intrusion prevention system (IPS). – written in Pure C.
     
  • Zeek (Bro)
    Zeek helps to perform security monitoring by looking into the network's activity. It can find suspicious data streams. Based on the data, it alert, react, and integrate with other tools – written in C++.
  • Maltrail (Maltrail monitors for traffic on the network that might indicate system compromise or other bad behavior. It is great for intrusion detection and monitoring. – written in Python).

1. Install aide deb package

# apt -y install aide

root@haproxy2:~# aide -v
Aide 0.17.3

Compiled with the following options:

WITH_MMAP
WITH_PCRE
WITH_POSIX_ACL
WITH_SELINUX
WITH_XATTR
WITH_CAPABILITIES
WITH_E2FSATTRS
WITH_ZLIB
WITH_MHASH
WITH_AUDIT

Default config values:
config file: <none>
database_in: <none>
database_out: <none>

Available hashsum groups:
md5: yes
sha1: yes
sha256: yes
sha512: yes
rmd160: yes
tiger: yes
crc32: yes
crc32b: yes
haval: yes
whirlpool: yes
gost: yes
stribog256: no
stribog512: no

Default compound groups:
R: l+p+u+g+s+c+m+i+n+md5+acl+selinux+xattrs+ftype+e2fsattrs+caps
L: l+p+u+g+i+n+acl+selinux+xattrs+ftype+e2fsattrs+caps
>: l+p+u+g+i+n+acl+S+selinux+xattrs+ftype+e2fsattrs+caps
H: md5+sha1+rmd160+tiger+crc32+haval+gost+crc32b+sha256+sha512+whirlpool
X: acl+selinux+xattrs+e2fsattrs+caps

2. Prepare AIDE configuration and geenrate (initialize) database

Either you can use the default AIDE configuration which already has a preset rules for various files and directories to be monitored,
or you might add up additional ones.
 

  • For details on configuration of aide.conf accepted options "man aide.conf"

The rules and other configurations resides lays under  /etc/aide/ directory
 

The AIDE database is located under /var/lib/aide

root@server:~# ls -al /var/lib/aide/
общо 33008
drwxr-xr-x  2 root root     4096  9 мар 12:38 ./
drwxr-xr-x 27 root root     4096  9 мар 12:01 ../
-rw——-  1 root root 16895467  9 мар 16:03 aide.db
-rw——-  1 root root 16895467  9 мар 18:49 aide.db.new


Also, details about major setting rules config regarding how AIDE will run via cronjob as with most debian services are into /etc/default/aide

Default aide.conf config is in /etc/aide/aide.conf if you need custom stuff to do with it simply edit it.

Here is an Example:
Lets say you want to omit some directory to not be monitored by aide, which would otherwise do, i.e.
omit /var/log/* from monitoring

# At the end of file /etc/aide/aide.conf

add:

!/var/log
!/home/
!/var/lib
!/proc

  • Initialize the aide database first time

Run aideinit command, aideinit will create a new baseline database –  /var/lib/aide/aide.db.new (a baseline)
Note that, /var/lib/aide/aide.db is the old database that aide uses to check against for any changes of files / directories on the configured monitored filesystem objects.

root@server:~# aideinit
Running aide –init…

debug1: client_input_channel_req: channel 0 rtype keepalive@openssh.com reply 1
Start timestamp: 2023-03-09 12:06:16 +0200 (AIDE 0.17.3)
AIDE initialized database at /var/lib/aide/aide.db.new

Number of entries:      66971

—————————————————
The attributes of the (uncompressed) database(s):
—————————————————

/var/lib/aide/aide.db.new
 SHA256    : nVrYljiBFM/KaKCTjbaJtR2w6N8vc8qN
             DPObbo2UMVo=
 SHA512    : S1ZNB0DCqb4UTmuqaalTgiQ3UAltTOzO
             YNfEQJldp32q5ahplBo4/65uwgtGusMy
             rJC8nvxvYmh+mq+16kfrKA==
 RMD160    : xaUnfW1+/DJV/6FEm/nn1k1UKOU=
 TIGER     : nGYEbX281tsQ6T21VPx1Hr/FwBdwF4cK
 CRC32     : fzf7cg==
 HAVAL     : yYQw/87KUmRiRLSu5JcEIvBUVfsW/G9H
             tVvs6WqL/0I=
 WHIRLPOOL : 6b5y42axPjpUxWFipUs1PtbgP2q0KJWK
             FwFvAGxHXjZeCBPEYZCNkj8mt8MkXBTJ
             g83ZELK9GQBPLea7UF3tng==
 GOST      : sHAzx7hkr5H3q8TCSGCKjndEiZgcvCEL
             E45qcRb25tM=


End timestamp: 2023-03-09 12:38:30 +0200 (run time: 32m 14s)


Be patient now, go grab a coffee / tea or snack as the command might take up to few minutes for the aide to walk through the whole monitored filesystems and built its database.

root@server:~# echo cp /var/lib/aide/aide.db{.new,}
cp /var/lib/aide/aide.db.new /var/lib/aide/aide.db


root@server:~# cp /var/lib/aide/aide.db{.new,}

root@server:~# aide –check –config /etc/aide/aide.conf

Start timestamp: 2023-03-09 13:01:32 +0200 (AIDE 0.17.3)
AIDE found differences between database and filesystem!!

Summary:
  Total number of entries:      66972
  Added entries:                1
  Removed entries:              0
  Changed entries:              7

—————————————————
Added entries:
—————————————————

f+++++++++++++++++: /var/lib/aide/aide.db

—————————————————
Changed entries:
—————————————————

d =…. mc.. .. . : /etc/aide
d =…. mc.. .. . : /root
f <…. mci.H.. . : /root/.viminfo
f =…. mc..H.. . : /var/lib/fail2ban/fail2ban.sqlite3
d =…. mc.. .. . : /var/lib/vnstat
f =…. mc..H.. . : /var/lib/vnstat/vnstat.db
f >b… mc..H.. . : /var/log/sysstat/sa09

—————————————————
Detailed information about changes:
—————————————————

Directory: /etc/aide
 Mtime     : 2023-03-09 12:04:03 +0200        | 2023-03-09 12:51:11 +0200
 Ctime     : 2023-03-09 12:04:03 +0200        | 2023-03-09 12:51:11 +0200

Directory: /root
 Mtime     : 2023-03-09 12:06:13 +0200        | 2023-03-09 12:51:11 +0200
 Ctime     : 2023-03-09 12:06:13 +0200        | 2023-03-09 12:51:11 +0200

File: /root/.viminfo
 Size      : 18688                            | 17764
 Mtime     : 2023-03-09 12:06:13 +0200        | 2023-03-09 12:51:11 +0200
 Ctime     : 2023-03-09 12:06:13 +0200        | 2023-03-09 12:51:11 +0200
 Inode     : 133828                           | 133827
 SHA256    : aV54gi33aA/z/FuBj2ZioU2cTa9H16TT | dnFdLVQ/kx3UlTah09IgEMrJ/aYgczHe
             TzkLSxBDSB4=                     | DdxDAmPOSAM=

3. Test aide detects file changes

Create a new file and append some text and rerun the aide check


root@server:~# touch /root/test.txt
root@server:~# echo aaa > /root/test.txt
root@server:~# aide –check –config /etc/aide/aide.conf


Start timestamp: 2023-03-09 13:07:21 +0200 (AIDE 0.17.3)
AIDE found differences between database and filesystem!!

Summary:
  Total number of entries:      66973
  Added entries:                2
  Removed entries:              0
  Changed entries:              7

—————————————————
Added entries:
—————————————————

f+++++++++++++++++: /root/test.txt
f+++++++++++++++++: /var/lib/aide/aide.db

—————————————————
Changed entries:
—————————————————

d =…. mc.. .. . : /etc/aide
d =…. mc.. .. . : /root
f <…. mci.H.. . : /root/.viminfo
f =…. mc..H.. . : /var/lib/fail2ban/fail2ban.sqlite3
d =…. mc.. .. . : /var/lib/vnstat
f =…. mc..H.. . : /var/lib/vnstat/vnstat.db
f >b… mc..H.. . : /var/log/sysstat/sa09

….


The same command can be shortened for the lazy typist:

root@server:~# aide -c /etc/aide/aide.conf -C

The command will basically try to check the deviation between the AIDE database and the filesystem.

4. Limiting AIDES Integrity Checks to Specific Files / Directories

In order to limit the integrity checks to a specific entries for example /etc, pass the –limit REGEX option to AIDE check command where REGEX is the entry to check.

For example, check and update the database entries matching /etc, you would run aide command as shown below;
 

root@server:~# aide -c /etc/aide/aide.conf –limit /etc –check


AIDE found differences between database and filesystem!!
Limit: /etc

Summary:
  Total number of entries:      66791
  Added entries:                0
  Removed entries:              0
  Changed entries:              2

—————————————————
Changed entries:
—————————————————

d =…. mc.. .. . : /etc/aide
d =…. mc.. .. . : /etc/default

—————————————————
Detailed information about changes:
—————————————————

Directory: /etc/aide
 Mtime     : 2023-03-09 15:59:53 +0200        | 2023-03-09 16:43:03 +0200
 Ctime     : 2023-03-09 15:59:53 +0200        | 2023-03-09 16:43:03 +0200

Directory: /etc/default
 Mtime     : 2023-03-09 12:06:13 +0200        | 2023-03-09 18:42:12 +0200
 Ctime     : 2023-03-09 12:06:13 +0200        | 2023-03-09 18:42:12 +0200


—————————————————
The attributes of the (uncompressed) database(s):
—————————————————

/var/lib/aide/aide.db
 SHA256    : sjCxyIkr0nC/gTkNmn7DNqAQWttreDF6
             vSUV4jBoFY4=
 SHA512    : vNMpb54qxrbOk6S1Z+m9r0UwGvRarkWY
             0m50TfMvGElfZWR1I3SSaeTdORAZ4rQe
             17Oapo5+Sc0E2E+STO93tA==
 RMD160    : anhm5E6UlKmPYYJ4WYnWXk/LT3A=
 TIGER     : 5e1wycoF35/ABrRf7FNypZ45169VTuV4
 CRC32     : EAJlFg==
 HAVAL     : R5imONWRYgNGEfhBTc096K+ABnMFkMmh
             Hsqe9xt20NU=
 WHIRLPOOL : c6zySLliXNgnOA2DkHUdLTCG2d/T18gE
             4rdAuKaC+s7gqAGyA4p2bnDHhdd0v06I
             xEGY7YXCOXiwx8BM8xHAvQ==
 GOST      : F5zO2Ovtvf+f7Lw0Ef++ign1znZAQMHM
             AApQOiB9CqA=


End timestamp: 2023-03-09 20:02:18 +0200 (run time: 1m 32s)

5. Add the modified /root/test.txt to AIDE list of known modified files database
 

root@server:~# aide –update –config /etc/aide/aide.
  ERROR: cannot open config file '/etc/aide/aide.': No such file or directory


root@server:~# ​ aide –update –config /etc/aide/aide.conf
 

Start timestamp: 2023-03-09 18:45:17 +0200 (AIDE 0.17.3)
AIDE found differences between database and filesystem!!
New AIDE database written to /var/lib/aide/aide.db.new

Summary:
  Total number of entries:      66791
  Added entries:                0
  Removed entries:              0
  Changed entries:              8

—————————————————
Changed entries:
—————————————————

d =…. mc.. .. . : /etc/aide
d =…. mc.. .. . : /etc/default
d =…. mc.. .. . : /root
f >…. mci.H.. . : /root/.viminfo
f >…. mci.H.. . : /root/test.txt
f =…. mc..H.. . : /var/lib/fail2ban/fail2ban.sqlite3
d =…. mc.. .. . : /var/lib/vnstat
f =…. mc..H.. . : /var/lib/vnstat/vnstat.db

—————————————————
Detailed information about changes:
—————————————————

Directory: /etc/aide
 Mtime     : 2023-03-09 15:59:53 +0200        | 2023-03-09 16:43:03 +0200
 Ctime     : 2023-03-09 15:59:53 +0200        | 2023-03-09 16:43:03 +0200

Directory: /etc/default
 Mtime     : 2023-03-09 12:06:13 +0200        | 2023-03-09 18:42:12 +0200
 Ctime     : 2023-03-09 12:06:13 +0200        | 2023-03-09 18:42:12 +0200

Directory: /root
 Mtime     : 2023-03-09 15:59:53 +0200        | 2023-03-09 18:44:34 +0200
 Ctime     : 2023-03-09 15:59:53 +0200        | 2023-03-09 18:44:34 +0200

File: /root/.viminfo
 Size      : 16706                            | 16933
 Mtime     : 2023-03-09 15:59:53 +0200        | 2023-03-09 18:44:34 +0200
 Ctime     : 2023-03-09 15:59:53 +0200        | 2023-03-09 18:44:34 +0200
 Inode     : 136749                           | 133828
 SHA256    : KMHGoMVJo10BtafVrWIOLt3Ht9gK8bc+ | rrp8S3VftzZzvjBP1JC+PBpODv9wPKGw
             9uHh/z7iJWA=                     | TA+hyhTiY+U=
 SHA512    : ieDHy7ObSTfYm5d8DtYcHKxHya13CS65 | PDAJjyZ39uU3kKFo2lHBduTqxMDq4i01
             ObMYIRAre6IgvLslEs0ZodQFyrczMyRt | 1Kvm/h6xzFhHtFgjidtcemG8wDcjtfNF
             +d6SrW0gn3skKn2B7G09eQ==         | Z7LO230fgGeO7UepqtxZjQ==
 RMD160    : nUgg/G4zsVGKzVmmrqltuYUDvtg=     | jj61KAFONK92mj+u66RDJmxFhmI=
 TIGER     : 3vPSOrla5k+k2br1E2ES4eNiSZ2novFX | mn4kNCzd8SQr2ID2VSe4f4l0ta7pO/xo
 CRC32     : NDnMgw==                         | AyzVUQ==
 HAVAL     : Q9/KozxRiPbLEkaIfnBUZdEWftaF52Mw | 6jADKV6jg7ZVr/A/oMhR4NXc8TO1AOGW
             7tiR7DXhl0o=                     | NrYe+j6UcO0=
 WHIRLPOOL : vB/ZMCul4hN0aYd39gBu+HmZT/peRUI8 | mg6c1lYYVNZcy4mVzGojwraim8e3X2/R
             KDkaslNb8+YleoFWx0mbhAbkGurc0+jh | urVvEmbsgTuUCJOuf9+OrEACiF0fbe/x
             YPBviZIKcxUbTc2nGthTWw==         | t+BXnSQWk08OL9EI6gMGqA==
 GOST      : owVGTgU9BH3b0If569wQygw3FAbZIZde | ffx29GV2jaCB7XzuNjdiRzziIiZYnbi3
             eAfQfzlRPGY=                     | Ar7jyNMUutk=

File: /root/test.txt
 Size      : 4                                | 8
 Mtime     : 2023-03-09 13:07:12 +0200        | 2023-03-09 18:44:34 +0200
 Ctime     : 2023-03-09 13:07:12 +0200        | 2023-03-09 18:44:34 +0200
 Inode     : 133828                           | 136751
 SHA256    : F+aC8GC1+OR+oExcSFWQiwpa1hICImD+ | jUIZMGfiMdAlWFHu8mmmlml4qAGNQNL5
             UOEeywzAq3Y=                     | 6NhzJ1sYFZE=
 SHA512    : d+UmFKFBzvGadt5hk+nIRbjP//7PSXNl | ixn20lcEMDEtsJo3hO90Ea/wHWLCHcrz
             Pl16XRIUUPq2FCiQ4PeUcVciukJX7ijL | seBWunbBysY0z3BWcfgnN2vH05WfRfvA
             D045ZvGOEcnmL6a6vwp0jw==         | QiNtQS1tStuEdB3Voq54zQ==
 RMD160    : I6waxKN3rMx4WTz4VCUQXoNoxUg=     | urTh1j1t3UHchnJGnBG4lUZnjI4=
 TIGER     : cwUYgfKHcJnWXcA0pr/OKuxuoxh+b9lA | prstKqCfMXL39aVGFPA0kX4Q9x7a+hUn
 CRC32     : UD78Dw==                         | zoYiEA==
 HAVAL     : bdbKR9LvPgsYClViKiHx48fFixfIL/jA | ZdpdeMhw4MvKBgWsM4EeyUgerO86Rt82
             F3tjdc2Gm8Y=                     | W94fJFRWbrM=
 WHIRLPOOL : OLP0Y4oKcqW2yEvme8z419N1KE4TB9GJ | Xk8Ujo3IU2SzSqbJFegq7p1ockmrnxJF
             biHn/9XgrBz4fQiDJ8eHpx+0exA9hXmY | R3Rfstd1jWSwLFNTEwfbRRw+TARtRK50
             EbbakMJJdzLt1ipKWiV9gg==         | iWJeHLsD5dZ+CzV0tf4sUg==
 GOST      : ystISzoeH/ZznYrrXmxe4rwmybWMpGuE | GhMWNxg7Is0svJ+5LP+DVWbgt+CDQO+3
             0PzRnVEqnR8=                     | 08dwBuVAwB8=

File: /var/lib/fail2ban/fail2ban.sqlite3
 Mtime     : 2023-03-09 15:55:01 +0200        | 2023-03-09 18:45:01 +0200
 Ctime     : 2023-03-09 15:55:01 +0200        | 2023-03-09 18:45:01 +0200
 SHA256    : lLilXNleqSgHIP1y4o7c+oG5XyUPGzgi | NCJJ2H6xgCw/NYys1LMA7hOWwoOoxI8Y
             RHYH+zvlAL4=                     | 4SJygfqEioE=
 SHA512    : iQj2pNT4NES4fBcujzdlEEGZhDnkhKgc | ClQZ5HMOSayUNb//++eZc813fiMJcXnj
             QDlGFSAn6vi+RXesFCjCABT7/00eEm5/ | vTGs/2tANojoe6cqpsT/LaJ3QZXpmrfh
             ILcaqlQtBSLJgHjMQehzdg==         | syVak1I4n9yg8cDKEkZUvw==
 RMD160    : Xg4YU8YI935L+DLvkRsDanS4DGo=     | SYrQ27n+/1fvIZ7v+Sar/wQHulI=
 TIGER     : 2WhhPq9kuyeNJkOicDTDeOeJB8HR8zZe | o1LDZtRclri2KfZBe5J3D4YhM05UaP4E
 CRC32     : NQmi4A==                         | tzIsqg==
 HAVAL     : t1ET+84+8WgfwqlLy4R1Qk9qGZQRUbJI | MwVnjtM3dad/RuN2BfgsySX2DpfYq4qi
             z2J0ROGduXc=                     | H1pq6RYsA6o=
 WHIRLPOOL : xKSn71gFIVhk5rWJIBaYQASl0V+pGn+3 | m5LEXfhBbhWFg/d8CFJhklOurmRSkDSG
             N85R0tiCKsTZ2+LRkxDrzcVQdss2k8+z | LC/vICnbEWzLwrCuMwBi1/e5wDNIY8gK
             oqExhoXtPsMaREjpCugd3Q==         | mvGn40x+G4cCYNZ6lGT9Zg==
 GOST      : WptpUlfooIlUjzDHU8XGuOU2waRud5SR | i6K4COXU0nyZ1mL3ZBuGUPz/ZXTj8KKQ
             E/tnoBqk+q0=                     | L6VNyS8/X2Y=

Directory: /var/lib/vnstat
 Mtime     : 2023-03-09 16:00:00 +0200        | 2023-03-09 18:45:01 +0200
 Ctime     : 2023-03-09 16:00:00 +0200        | 2023-03-09 18:45:01 +0200

File: /var/lib/vnstat/vnstat.db
 Mtime     : 2023-03-09 16:00:00 +0200        | 2023-03-09 18:45:00 +0200
 Ctime     : 2023-03-09 16:00:00 +0200        | 2023-03-09 18:45:00 +0200
 SHA256    : X/lnJuuSo4jX4HRzxMBodnKHAjQFvugi | oqtY3HTNds/qDNFCRAEsfN5SuO0U5LRg
             2sh2c0u69x8=                     | otc5z1y+eGY=
 SHA512    : U/g8O6G8cuhsqCUCbrElxgiy+naJKPkI | y+sw4LX8mlDWkRJMX38TsYSo1DQzxPOS
             hG7vdH9rBINjakL87UWajT0s6WSy0pvt | 068otnzw2FSSlM5X5j5EtyJiY6Hd5P+A
             ALaTcDFKHBAmmFrl8df2nQ==         | jFiWStMbx+dQidXYZ4XFAw==
 RMD160    : F6YEjIIQu2J3ru7IaTvSemA9e34=     | bmVSaRKN2qU7qpEWkzfXFoH4ZK4=
 TIGER     : UEwLoeR6Qlf2oOI58pUCEDaWk0pHDkcY | 0Qb4nUqe3cKh/g5CQUnOXGfjZwJHjeWa
 CRC32     : Bv3/6A==                         | jvW6mg==
 HAVAL     : VD7tjHb8o8KTUo5xUH7eJEmTWgB9zjft | rumfiWJvy/sTK/09uj7XlmV3f7vj6KBM
             kOkzKxFWqqU=                     | qeOuKvu0Zjc=
 WHIRLPOOL : wR0qt8u4N8aQn8VQ+bmfrxB7CyCWVwHi | FVWDRE3uY6qHxLlJQLU9i9QggLW+neMj
             ADHpMTUxBEKOpOBlHTWXIk13qYZiD+o/ | Wt+Dj9Rz92BG9EomgLUgUkxfiVFO8cMq
             XtzTB4rMbxS4Z5PAdC/07A==         | WaR/KKq3Z7R8f/50tc9GMQ==
 GOST      : l3ibqMkHMSPpQ+9ok51/xBthET9+JQMd | qn0GyyCg67KRGP13At52tnviZfZDgyAm
             OZtiFGYXmgU=                     | c82NXSzeyV0=


—————————————————
The attributes of the (uncompressed) database(s):
—————————————————

/var/lib/aide/aide.db
 SHA256    : sjCxyIkr0nC/gTkNmn7DNqAQWttreDF6
             vSUV4jBoFY4=
 SHA512    : vNMpb54qxrbOk6S1Z+m9r0UwGvRarkWY
             0m50TfMvGElfZWR1I3SSaeTdORAZ4rQe
             17Oapo5+Sc0E2E+STO93tA==
 RMD160    : anhm5E6UlKmPYYJ4WYnWXk/LT3A=
 TIGER     : 5e1wycoF35/ABrRf7FNypZ45169VTuV4
 CRC32     : EAJlFg==
 HAVAL     : R5imONWRYgNGEfhBTc096K+ABnMFkMmh
             Hsqe9xt20NU=
 WHIRLPOOL : c6zySLliXNgnOA2DkHUdLTCG2d/T18gE
             4rdAuKaC+s7gqAGyA4p2bnDHhdd0v06I
             xEGY7YXCOXiwx8BM8xHAvQ==
 GOST      : F5zO2Ovtvf+f7Lw0Ef++ign1znZAQMHM
             AApQOiB9CqA=

/var/lib/aide/aide.db.new
 SHA256    : QRwubXnz8md/08n28Ek6DOsSQKGkLvuc
             gSZRsw6gRw8=
 SHA512    : 238RmI1PHhd9pXhzcHqM4+VjNzR0es+3
             6eiGNrXHAdDTz7GlAQQ4WfKeQJH9LdyT
             1r5ho/oXRgzfa2BfhKvTHg==
 RMD160    : GJWuX/nIPY05gz62YXxk4tWiH5I=
 TIGER     : l0aOjXlM4/HjyN9bhgBOvvCYeqoQyjpw
 CRC32     : KFz6GA==
 HAVAL     : a//4jwVxF22URf2BRNA612WOOvOrScy7
             OmI44KrNbBM=
 WHIRLPOOL : MBf+NeXElUvscJ2khIuAp+NDu1dm4h1f
             5tBQ0XrQ6dQPNA2HZfOShCBOPzEl/zrl
             +Px3QFV4FqD0jggr5sHK2g==
 GOST      : EQnPh6jQLVUqaAK9B4/U4V89tanTI55N
             K7XqZR9eMG4=


End timestamp: 2023-03-09 18:49:51 +0200 (run time: 4m 34s)
 

6. Substitute old aide database with the new that includes the modified files

As you see AIDE detected the changes in /root/test.txt

To apply the changes be known by AIDE for next time (e.g. this file was authorized and supposed to be written there) simply move the new generated database
to current aide database.

# copy generated DB to master DB
root@dlp:~# cp -p /var/lib/aide/aide.db.new /var/lib/aide/aide.db

7. Check once again to make sure recently modified files are no longer seen as changed by AIDE

Recheck again the database to make sure the files you wanted to omit are no longer mentioned as changed

root@server:~# aide –check –config /etc/aide/aide.conf
Start timestamp: 2023-03-09 16:23:05 +0200 (AIDE 0.17.3)
AIDE found differences between database and filesystem!!

Summary:
  Total number of entries:      66791
  Added entries:                0
  Removed entries:              0
  Changed entries:              3

—————————————————
Changed entries:
—————————————————

f =…. mc..H.. . : /var/lib/fail2ban/fail2ban.sqlite3
d =…. mc.. .. . : /var/lib/vnstat
f =…. mc..H.. . : /var/lib/vnstat/vnstat.db

—————————————————
Detailed information about changes:
—————————————————

File: /var/lib/fail2ban/fail2ban.sqlite3
 Mtime     : 2023-03-09 15:55:01 +0200        | 2023-03-09 16:25:02 +0200
 Ctime     : 2023-03-09 15:55:01 +0200        | 2023-03-09 16:25:02 +0200
 SHA256    : lLilXNleqSgHIP1y4o7c+oG5XyUPGzgi | MnWXC2rBMf7DNJ91kXtHXpM2c2xxF60X
             RHYH+zvlAL4=                     | DfLUQLHiSiY=
 SHA512    : iQj2pNT4NES4fBcujzdlEEGZhDnkhKgc | gxHVBxhGTKi0TjRE8/sn6/gtWsRw7Mfy
             QDlGFSAn6vi+RXesFCjCABT7/00eEm5/ | /wCfPlDK0dkRZEbr8IE2BNUhBgwwocCq
             ILcaqlQtBSLJgHjMQehzdg==         | zuazTy4N4x6X8bwOzRmY0w==
 RMD160    : Xg4YU8YI935L+DLvkRsDanS4DGo=     | +ksl9kjDoSU9aL4tR7FFFOK3mqw=
 TIGER     : 2WhhPq9kuyeNJkOicDTDeOeJB8HR8zZe | 9cvXZNbU+cp5dA5PLiX6sGncXd1Ff5QO
 CRC32     : NQmi4A==                         | y6Oixg==
 HAVAL     : t1ET+84+8WgfwqlLy4R1Qk9qGZQRUbJI | aPnCrHfmZAUm7QjROGEl6rd3776wO+Ep
             z2J0ROGduXc=                     | s/TQn7tH1tY=
 WHIRLPOOL : xKSn71gFIVhk5rWJIBaYQASl0V+pGn+3 | 9Hu6NBhz+puja7uandb21Nt6cEW6zEpm
             N85R0tiCKsTZ2+LRkxDrzcVQdss2k8+z | bTsq4xYA09ekhDHMQJHj2WpKpzZbA+t0
             oqExhoXtPsMaREjpCugd3Q==         | cttMDX8J8M/UadqfL8KZkQ==
 GOST      : WptpUlfooIlUjzDHU8XGuOU2waRud5SR | WUQfAMtye4wADUepBvblvgO+vBodS0Ej
             E/tnoBqk+q0=                     | cIbXy4vpPYc=

Directory: /var/lib/vnstat
 Mtime     : 2023-03-09 16:00:00 +0200        | 2023-03-09 16:25:01 +0200
 Ctime     : 2023-03-09 16:00:00 +0200        | 2023-03-09 16:25:01 +0200

File: /var/lib/vnstat/vnstat.db
 Mtime     : 2023-03-09 16:00:00 +0200        | 2023-03-09 16:25:01 +0200
 Ctime     : 2023-03-09 16:00:00 +0200        | 2023-03-09 16:25:01 +0200
 SHA256    : X/lnJuuSo4jX4HRzxMBodnKHAjQFvugi | N1lzhV3+tkDBud3AVlmIpDkU1c3Rqhnt
             2sh2c0u69x8=                     | YqE8naDicoM=
 SHA512    : U/g8O6G8cuhsqCUCbrElxgiy+naJKPkI | +8B9HvHhOp1C/XdlOORjyd3J2RtTbRBF
             hG7vdH9rBINjakL87UWajT0s6WSy0pvt | b0Moo2Gj+cIxaMCu5wOkgreMp6FloqJR
             ALaTcDFKHBAmmFrl8df2nQ==         | UH4cNES/bAWtonmbj4W7Vw==
 RMD160    : F6YEjIIQu2J3ru7IaTvSemA9e34=     | 8M6TIOHt0NWgR5Mo47DxU28cp+4=
 TIGER     : UEwLoeR6Qlf2oOI58pUCEDaWk0pHDkcY | Du9Ue0JA2URO2tiij31B/+663OaWKefR
 CRC32     : Bv3/6A==                         | v0Ai4w==
 HAVAL     : VD7tjHb8o8KTUo5xUH7eJEmTWgB9zjft | XA+vRnMNdVGFrO+IZtEA0icunWqBGaCf
             kOkzKxFWqqU=                     | leR27LN4ejc=
 WHIRLPOOL : wR0qt8u4N8aQn8VQ+bmfrxB7CyCWVwHi | HG31dNEEcak2zZGR24W7FDJx8mh24MaJ
             ADHpMTUxBEKOpOBlHTWXIk13qYZiD+o/ | BQNhqkuS6R/bmlhx+P+eQ/JimwPAPOaM
             XtzTB4rMbxS4Z5PAdC/07A==         | xWG7cMETIXdT9sUOUal8Sw==
 GOST      : l3ibqMkHMSPpQ+9ok51/xBthET9+JQMd | y6Ek/TyAMGV5egkfCu92Y4qqk1Xge8c0
             OZtiFGYXmgU=                     | 3ONXRveOlr0=


—————————————————
The attributes of the (uncompressed) database(s):
—————————————————

/var/lib/aide/aide.db
 SHA256    : sjCxyIkr0nC/gTkNmn7DNqAQWttreDF6
             vSUV4jBoFY4=
 SHA512    : vNMpb54qxrbOk6S1Z+m9r0UwGvRarkWY
             0m50TfMvGElfZWR1I3SSaeTdORAZ4rQe
             17Oapo5+Sc0E2E+STO93tA==
 RMD160    : anhm5E6UlKmPYYJ4WYnWXk/LT3A=
 TIGER     : 5e1wycoF35/ABrRf7FNypZ45169VTuV4
 CRC32     : EAJlFg==
 HAVAL     : R5imONWRYgNGEfhBTc096K+ABnMFkMmh
             Hsqe9xt20NU=
 WHIRLPOOL : c6zySLliXNgnOA2DkHUdLTCG2d/T18gE
             4rdAuKaC+s7gqAGyA4p2bnDHhdd0v06I
             xEGY7YXCOXiwx8BM8xHAvQ==
 GOST      : F5zO2Ovtvf+f7Lw0Ef++ign1znZAQMHM
             AApQOiB9CqA=


End timestamp: 2023-03-09 16:27:33 +0200 (run time: 4m 28s)

As you can see there are no new added entries for /root/test.txt and some other changed records for vnstat service as well as fail2ban ones, so the Intrusion detection system works just as we expected it.

8. Configure Email AIDE changed files alerting Email recipient address

From here on aide package has set its own cron job which is automatically doing the check operation every day and any new file modifications will be captured and alerts sent to local root@localhost mailbox account, so you can check it out later with mail command.

If you want to sent the Email alert for any files modifications occured to another email, assuming that you have a locally running SMTP server with a mail relay to send to external mails, you can do it via /etc/default/aide via:

MAILTO=root


For example change it to a FQDN email address

MAILTO=external_mail@your-mail.com

9.Force AIDE to run AIDE at specitic more frequent time intervals

You can as well install a cron job to execute AIDE at specific time intervals, as of your choice

Lets say you want to run a custom prepared set of files to monitor in /etc/aide/aide_custom_config.conf configure a new cronjob like below:

root@server:~# crontab -u root -e
*/5 * * * * aide -c /etc/aide/aide_custom_config.conf -u && cp /var/lib/custom-aide/aide.db{.new,}


This will execute AIDE system check every 5 minutse and email the report to ealier configured email username@whatever-your-smtp.com via /etc/default/aide

10. Check the output of AIDE for changes – useful for getting a files changes from aide from scripts

Check the command exit status.

root@server:~# echo $?

According to AIDE man pages, the AIDE’s exit status is normally 0 if no errors occurred. Except when the –check, –compare or –update command was requested, in which case the exit status is defined as:

   1 * (new files detected?)     +

   2 * (removed files detected?) +

   4 * (changed files detected?)


   Since  those three cases can occur together, the respective error codes are added. For example, if there are new files and removed files detected, the exit status will be 1 + 2 = 3.

   Additionally, the following exit codes are defined for generic error conditions in aide help manual:

   14 Error writing error

   15 Invalid argument error

   16 Unimplemented function error

   17 Invalid configureline error

   18 IO error

   19 Version mismatch error

PLEASE CONSIDER

  • That AIDE checks might be resource intensive
    and could cause a peak in CPU use and have a negative effect on lets very loaded application server machines,
    thus causing a performance issuea during integrity checks !
     
  • If you are scanning file system wide and you do it frequent, be sure to provide “enough” resources or schedule the scan at a times that the Linux host will be less used !
     
  • Whenever you made any AIDE configuration changes, remember to initialize the database to create a baseline !
How to mask rpcbind on CentOS to prevent rpcbind service from auto start new local server port listener triggered by Security audit port scanner software

Wednesday, December 1st, 2021

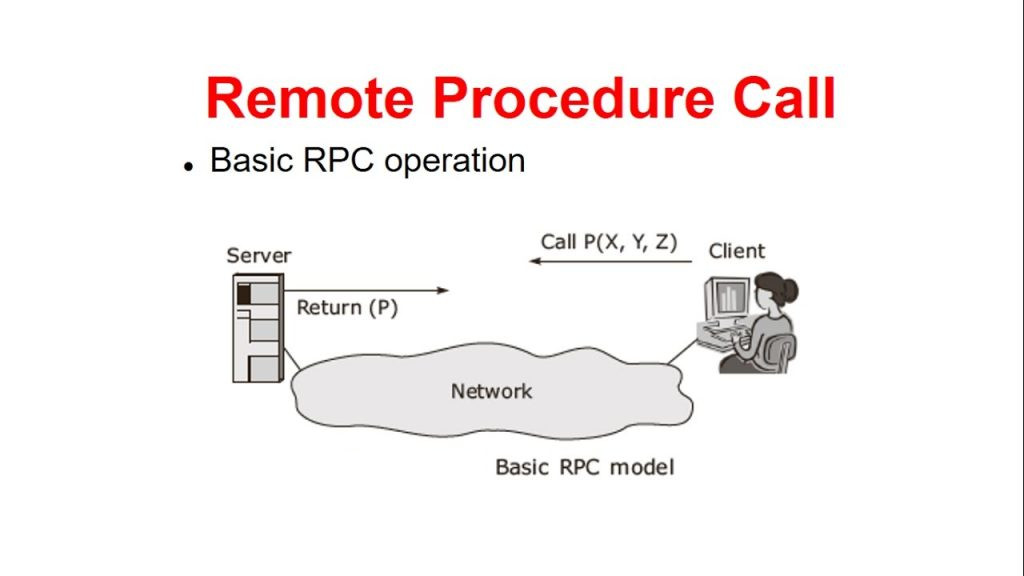
how to mute rpcbind on CentOS to prevent rpcbind service from auto start new local server port rpc-remote-procedure-call-picture


Introduction to  THE PROBLEM :
rpcbind TCP/UDP port 111 automatically starting itself out of nothing on CentOS 7 Linux

For server environments that are being monitored regularly for CVI security breaches based on opened TCP / UDP ports with like Qualys (a proprietary business software that helps automate the full spectrum of auditing, compliance and protection of your IT systems and web applications.), perhaps the closest ex-open source equivallent was Nessus Security Scanner or the more modern security audit Linux tools – Intruder (An Effortless Vulnerability Scanner), OpenVAS (Open Vulnerability Assessment Scanner) or even a simple nmap command port scan on TCP IP / UDP protocol for SunRPC default predefined machine port 111.


[root@centos~]# cat /etc/redhat-release
CentOS Linux release 7.9.2009 (Core)


[root@centos~]# grep -i rpcbind /etc/services
sunrpc          111/tcp         portmapper rpcbind      # RPC 4.0 portmapper TCP
sunrpc          111/udp         portmapper rpcbind      # RPC 4.0 portmapper UDP


Note! For those who don't know it or newer to Linux 
/etc/services file
used to be a file with predefiend well known services and their ports in Linux as well as other UNIXes for years now.

So once this scan is triggered you might end up in a very strange situation that the amount of processes on the CentOS Linux server misterously change with +1 as even though disabled systemctl rpcbind.service process will appear running again.
 

[root@centos~]# ps -ef|grep -i rpcbind
rpc        100     1  0 Nov11 ?        00:00:02 /sbin/rpcbind -w
root     29099 22060  0 13:07 pts/0    00:00:00 grep –color=auto -i rpcbind
[root@centos ~]#

By the wayit took us a while to me and my colleagues to identify what was the mysterious reason for triggering rpcbind process on a  gets triggered and rpcbind process appears in process list even though the machine is in a very secured DMZ Lan and there is no cron jobs or any software that does any kind of scheduling that might lead rpcbind to start up like it does.

[root@centos ~]# systemctl list-unit-files|grep -i rpcbind
rpcbind.service                               disabled
rpcbind.socket                                disabled
rpcbind.target                                static


There is absoultely no logic in that a service whose stopped on TCP / UDP 111 on a machine that is lacking no firewall rules such as iptables CHAINs or whatever.

[root@centos~]# systemctl status rpcbind
● rpcbind.service – RPC bind service
   Loaded: loaded (/usr/lib/systemd/system/rpcbind.service; disabled; vendor preset: enabled)
   Active: inactive (dead)


A you can see the service after all seems to have been disabled originally but after some time this output auto-magically was turning to rpcbind.socket enabled:

root@centos ~]# systemctl list-unit-files|grep -i rpcbind
rpcbind.service                               disabled
rpcbind.socket                                enabled
rpcbind.target                                static

Hence to prevent the rpcbind.socket to automatically respawn itself and lead to resurrection of the dead and disabled /sbin/rpcbind


1. Disable listener in  /usr/lib/systemd/system/rpcbind.socket file


And comment all Listen* rows there

[root@centos ~]# vi /usr/lib/systemd/system/rpcbind.socket

[Unit]

Description=RPCbind Server Activation Socket


[Socket]

ListenStream=/var/run/rpcbind.sock


# RPC netconfig can't handle ipv6/ipv4 dual sockets

BindIPv6Only=ipv6-only

#ListenStream=0.0.0.0:111

#ListenDatagram=0.0.0.0:111

#ListenStream=[::]:111

#ListenDatagram=[::]:111


[Install]

WantedBy=sockets.target

2. Mask rpcbind.socket and, sure /etc/systemd/system/rpcbind.socket links to /dev/null

Mute completely rpcbind.socket (this is systemd option "feature" to link service to /dev/null)

[root@centos ~]# systemctl mask rpcbind.socket


Hence, the link from /etc/systemd/system/rpcbind.socket must be linked to /dev/null

[root@centos ~]# ls -l /etc/systemd/system/rpcbind.socket
lrwxrwxrwx 1 root root 9 Jan 27  2020 /etc/systemd/system/rpcbind.socket -> /dev/null


Voila ! That should be it rpcbind should not hang around anymore among other processes.

Install and configure rkhunter for improved security on a PCI DSS Linux / BSD servers with no access to Internet

Wednesday, November 10th, 2021

install-and-configure-rkhunter-with-tightened-security-variables-rkhunter-logo

rkhunter or Rootkit Hunter scans systems for known and unknown rootkits. The tool is not new and most system administrators that has to mantain some good security servers perhaps already use it in their daily sysadmin tasks.

It does this by comparing SHA-1 Hashes of important files with known good ones in online databases, searching for default directories (of rootkits), wrong permissions, hidden files, suspicious strings in kernel modules, commmon backdoors, sniffers and exploits as well as other special tests mostly for Linux and FreeBSD though a ports for other UNIX operating systems like Solaris etc. are perhaps available. rkhunter is notable due to its inclusion in popular mainstream FOSS operating systems (CentOS, Fedora,Debian, Ubuntu etc.).

Even though rkhunter is not rapidly improved over the last 3 years (its last Official version release was on 20th of Febuary 2018), it is a good tool that helps to strengthen even further security and it is often a requirement for Unix servers systems that should follow the PCI DSS Standards (Payment Card Industry Data Security Standards).

Configuring rkhunter is a pretty straight forward if you don't have too much requirements but I decided to write this article for the reason there are fwe interesting options that you might want to adopt in configuration to whitelist any files that are reported as Warnings, as well as how to set a configuration that sets a stricter security checks than the installation defaults. 

1. Install rkhunter .deb / .rpm package depending on the Linux distro or BSD

  • If you have to place it on a Redhat based distro CentOS / Redhat / Fedora

[root@Centos ~]# yum install -y rkhunter


  • On Debian distros the package name is equevallent to install there exec usual:

root@debian:~# apt install –yes rkhunter

  • On FreeBSD / NetBSD or other BSD forks you can install it from the BSD "World" ports system or install it from a precompiled binary.

freebsd# pkg install rkhunter

One important note to make here is to have a fully functional Alarming from rkhunter, you will have to have a fully functional configured postfix / exim / qmail whatever mail server to relay via official SMTP so you the Warning Alarm emails be able to reach your preferred Alarm email address. If you haven't installed postfix for example and configure it you might do.

– On Deb based distros 

[root@Centos ~]#yum install postfix


– On RPM based distros

root@debian:~# apt-get install –yes postfix


and as minimum, further on configure some functional Email Relay server within /etc/postfix/main.cf
 

# vi /etc/postfix/main.cf
relayhost = [relay.smtp-server.com]

2. Prepare rkhunter.conf initial configuration


Depending on what kind of files are present on the filesystem it could be for some reasons some standard package binaries has to be excluded for verification, because they possess unusual permissions because of manual sys admin monification this is done with the rkhunter variable PKGMGR_NO_VRFY.

If remote logging is configured on the system via something like rsyslog you will want to specificly tell it to rkhunter so this check as a possible security issue is skipped via ALLOW_SYSLOG_REMOTE_LOGGING=1. 

In case if remote root login via SSH protocol is disabled via /etc/ssh/sshd_config
PermitRootLogin no variable, the variable to include is ALLOW_SSH_ROOT_USER=no

It is useful to also increase the hashing check algorithm for security default one SHA256 you might want to change to SHA512, this is done via rkhunter.conf var HASH_CMD=SHA512

Triggering new email Warnings has to be configured so you receive, new mails at a preconfigured mailbox of your choice via variable
MAIL-ON-WARNING=SetMailAddress


# vi /etc/rkhunter.conf

PKGMGR_NO_VRFY=/usr/bin/su

PKGMGR_NO_VRFY=/usr/bin/passwd

ALLOW_SYSLOG_REMOTE_LOGGING=1

# Needed for corosync/pacemaker since update 19.11.2020

ALLOWDEVFILE=/dev/shm/qb-*/qb-*

# enabled ssh root access skip

ALLOW_SSH_ROOT_USER=no

HASH_CMD=SHA512

# Email address to sent alert in case of Warnings

MAIL-ON-WARNING=Your-Customer@Your-Email-Server-Destination-Address.com

MAIL-ON-WARNING=Your-Second-Peronsl-Email-Address@SMTP-Server.com

DISABLE_TESTS=os_specific


Optionally if you're using something specific such as corosync / pacemaker High Availability cluster or some specific software that is creating /dev/ files identified as potential Risks you might want to add more rkhunter.conf options like:
 

# Allow PCS/Pacemaker/Corosync
ALLOWDEVFILE=/dev/shm/qb-attrd-*
ALLOWDEVFILE=/dev/shm/qb-cfg-*
ALLOWDEVFILE=/dev/shm/qb-cib_rw-*
ALLOWDEVFILE=/dev/shm/qb-cib_shm-*
ALLOWDEVFILE=/dev/shm/qb-corosync-*
ALLOWDEVFILE=/dev/shm/qb-cpg-*
ALLOWDEVFILE=/dev/shm/qb-lrmd-*
ALLOWDEVFILE=/dev/shm/qb-pengine-*
ALLOWDEVFILE=/dev/shm/qb-quorum-*
ALLOWDEVFILE=/dev/shm/qb-stonith-*
ALLOWDEVFILE=/dev/shm/pulse-shm-*
ALLOWDEVFILE=/dev/md/md-device-map
# Needed for corosync/pacemaker since update 19.11.2020
ALLOWDEVFILE=/dev/shm/qb-*/qb-*

# tomboy creates this one
ALLOWDEVFILE="/dev/shm/mono.*"
# created by libv4l
ALLOWDEVFILE="/dev/shm/libv4l-*"
# created by spice video
ALLOWDEVFILE="/dev/shm/spice.*"
# created by mdadm
ALLOWDEVFILE="/dev/md/autorebuild.pid"
# 389 Directory Server
ALLOWDEVFILE=/dev/shm/sem.slapd-*.stats
# squid proxy
ALLOWDEVFILE=/dev/shm/squid-cf*
# squid ssl cache
ALLOWDEVFILE=/dev/shm/squid-ssl_session_cache.shm
# Allow podman
ALLOWDEVFILE=/dev/shm/libpod*lock*


3. Set the proper mirror database URL location to internal network repository


Usually  file /var/lib/rkhunter/db/mirrors.dat does contain Internet server address where latest version of mirrors.dat could be fetched, below is how it looks by default on Debian 10 Linux.

root@debian:/var/lib/rkhunter/db# cat mirrors.dat 
Version:2007060601
mirror=http://rkhunter.sourceforge.net

As you can guess a machine that doesn't have access to the Internet neither directly, neither via some kind of secure proxy because it is in a Paranoic Demilitarized Zone (DMZ) Network with many firewalls. What you can do then is setup another Mirror server (Apache / Nginx) within the local PCI secured LAN that gets regularly the database from official database on http://rkhunter.sourceforge.net/ (by installing and running rkhunter –update command on the Mirror WebServer and copying data under some directory structure on the remote local LAN accessible server, to keep the DB uptodate you might want to setup a cron to periodically copy latest available rkhunter database towards the http://mirror-url/path-folder/)

# vi /var/lib/rkhunter/db/mirrors.dat

local=http://rkhunter-url-mirror-server-url.com/rkhunter/1.4/


A mirror copy of entire db files from Debian 10.8 ( Buster ) ready for download are here.

Update entire file property db and check for rkhunter db updates


# rkhunter –update && rkhunter –propupdate

[ Rootkit Hunter version 1.4.6 ]

Checking rkhunter data files…
  Checking file mirrors.dat                                  [ Skipped ]
  Checking file programs_bad.dat                             [ No update ]
  Checking file backdoorports.dat                            [ No update ]
  Checking file suspscan.dat                                 [ No update ]
  Checking file i18n/cn                                      [ No update ]
  Checking file i18n/de                                      [ No update ]
  Checking file i18n/en                                      [ No update ]
  Checking file i18n/tr                                      [ No update ]
  Checking file i18n/tr.utf8                                 [ No update ]
  Checking file i18n/zh                                      [ No update ]
  Checking file i18n/zh.utf8                                 [ No update ]
  Checking file i18n/ja                                      [ No update ]


rkhunter-update-propupdate-screenshot-centos-linux


4. Initiate a first time check and see whether something is not triggering Warnings

# rkhunter –check

rkhunter-checking-for-rootkits-linux-screenshot

As you might have to run the rkhunter multiple times, there is annoying Press Enter prompt, between checks. The idea of it is that you're able to inspect what went on but since usually, inspecting /var/log/rkhunter/rkhunter.log is much more easier, I prefer to skip this with –skip-keypress option.

# rkhunter –check  –skip-keypress


5. Whitelist additional files and dev triggering false warnings alerts


You have to keep in mind many files which are considered to not be officially PCI compatible and potentially dangerous such as lynx browser curl, telnet etc. might trigger Warning, after checking them thoroughfully with some AntiVirus software such as Clamav and checking the MD5 checksum compared to a clean installed .deb / .rpm package on another RootKit, Virus, Spyware etc. Clean system (be it virtual machine or a Testing / Staging) machine you might want to simply whitelist the files which are incorrectly detected as dangerous for the system security.

Again this can be achieved with

PKGMGR_NO_VRFY=

Some Cluster softwares that are preparing their own /dev/ temporary files such as Pacemaker / Corosync might also trigger alarms, so you might want to suppress this as well with ALLOWDEVFILE

ALLOWDEVFILE=/dev/shm/qb-*/qb-*


If Warnings are found check what is the issue and if necessery white list files due to incorrect permissions in /etc/rkhunter.conf .

rkhunter-warnings-found-screenshot

Re-run the check until all appears clean as in below screenshot.

rkhunter-clean-report-linux-screenshot

Fixing Checking for a system logging configuration file [ Warning ]

If you happen to get some message like, message appears when rkhunter -C is done on legacy CentOS release 6.10 (Final) servers:

[13:45:29] Checking for a system logging configuration file [ Warning ]
[13:45:29] Warning: The 'systemd-journald' daemon is running, but no configuration file can be found.
[13:45:29] Checking if syslog remote logging is allowed [ Allowed ]

To fix it, you will have to disable SYSLOG_CONFIG_FILE at all.
 

SYSLOG_CONFIG_FILE=NONE

How to Recover deleted /var/lib/dpkg directory on Debian / Ubuntu Linux server

Wednesday, October 6th, 2021

how-to-recover-accidently-deleted-var-lib-dpkg-directory-on-debian-gnu-linux

Sometimes you might do something stupid, in the hurry like running the wrong rm  command and ending up deleting /var/lib/dpkg on your Debian / Ubuntu system.

by either wrongly issuing the rm to a directory or mistyping rm -r /var/lib/dpkg.
I know this is pretty dumb but sometimes we're all dumb, if you do so and you try to do the regular

root@debian:/ # apt update && apt upgrade

or try to install some random package onwards you will end up with error message:

E: Could not open lock file /var/lib/dpkg/lock – open (2: No such file or directory)

Ending up with this error, does totally blocks your further system administration activities with both apt / aptitude / apt-get as well as with dpkg package management tool.


1. The /var/backups recovery directory

Thankfully, by Gods mercy some of Debian Linux system architects has foreseen such issues might occur and have integrated into it the automatic periodic creation of some important files into directory /var/backups/

Hence the next step is to check what kind of backups are available, there:

root@debian:/ # ls -al /var/backups/
total 19892
drwxr-xr-x  7 root root      4096 Sep 24 06:25 ./
drwxr-xr-x 22 root root      4096 Dec 21  2020 ../
-rw-r–r–  1 root root    245760 Aug 20 06:25 alternatives.tar.0
-rw-r–r–  1 root root     15910 Aug 14 06:25 alternatives.tar.1.gz
-rw-r–r–  1 root root     15914 May 29 06:25 alternatives.tar.2.gz
-rw-r–r–  1 root root     15783 Jan 29  2021 alternatives.tar.3.gz
-rw-r–r–  1 root root     15825 Nov 20  2020 alternatives.tar.4.gz
-rw-r–r–  1 root root     15778 Jul 16  2020 alternatives.tar.5.gz
-rw-r–r–  1 root root     15799 Jul  4  2020 alternatives.tar.6.gz
-rw-r–r–  1 root root     80417 Aug 19 14:48 apt.extended_states.0
-rw-r–r–  1 root root      8693 Apr 27 22:40 apt.extended_states.1.gz
-rw-r–r–  1 root root      8658 Apr 17 19:45 apt.extended_states.2.gz
-rw-r–r–  1 root root      8601 Apr 15 00:52 apt.extended_states.3.gz
-rw-r–r–  1 root root      8599 Apr  9 00:26 apt.extended_states.4.gz
-rw-r–r–  1 root root      8542 Mar 18  2021 apt.extended_states.5.gz
-rw-r–r–  1 root root      8549 Mar 18  2021 apt.extended_states.6.gz
-rw-r–r–  1 root root   9030483 Jul  4  2020 aptitude.pkgstates.0
-rw-r–r–  1 root root    628958 May  7  2019 aptitude.pkgstates.1.gz
-rw-r–r–  1 root root    534758 Oct 21  2017 aptitude.pkgstates.2.gz
-rw-r–r–  1 root root    503877 Oct 19  2017 aptitude.pkgstates.3.gz
-rw-r–r–  1 root root    423277 Oct 15  2017 aptitude.pkgstates.4.gz
-rw-r–r–  1 root root    420899 Oct 14  2017 aptitude.pkgstates.5.gz
-rw-r–r–  1 root root    229508 May  5  2015 aptitude.pkgstates.6.gz
-rw-r–r–  1 root root        11 Oct 14  2017 dpkg.arch.0
-rw-r–r–  1 root root        43 Oct 14  2017 dpkg.arch.1.gz
-rw-r–r–  1 root root        43 Oct 14  2017 dpkg.arch.2.gz
-rw-r–r–  1 root root        43 Oct 14  2017 dpkg.arch.3.gz
-rw-r–r–  1 root root        43 Oct 14  2017 dpkg.arch.4.gz
-rw-r–r–  1 root root        43 Oct 14  2017 dpkg.arch.5.gz
-rw-r–r–  1 root root        43 Oct 14  2017 dpkg.arch.6.gz
-rw-r–r–  1 root root      1319 Apr 27 22:28 dpkg.diversions.0
-rw-r–r–  1 root root       387 Apr 27 22:28 dpkg.diversions.1.gz
-rw-r–r–  1 root root       387 Apr 27 22:28 dpkg.diversions.2.gz
-rw-r–r–  1 root root       387 Apr 27 22:28 dpkg.diversions.3.gz
-rw-r–r–  1 root root       387 Apr 27 22:28 dpkg.diversions.4.gz
-rw-r–r–  1 root root       387 Apr 27 22:28 dpkg.diversions.5.gz
-rw-r–r–  1 root root       387 Apr 27 22:28 dpkg.diversions.6.gz
-rw-r–r–  1 root root       375 Aug 23  2018 dpkg.statoverride.0
-rw-r–r–  1 root root       247 Aug 23  2018 dpkg.statoverride.1.gz
-rw-r–r–  1 root root       247 Aug 23  2018 dpkg.statoverride.2.gz
-rw-r–r–  1 root root       247 Aug 23  2018 dpkg.statoverride.3.gz
-rw-r–r–  1 root root       247 Aug 23  2018 dpkg.statoverride.4.gz
-rw-r–r–  1 root root       247 Aug 23  2018 dpkg.statoverride.5.gz
-rw-r–r–  1 root root       247 Aug 23  2018 dpkg.statoverride.6.gz
-rw-r–r–  1 root root   3363749 Sep 23 14:32 dpkg.status.0
-rw-r–r–  1 root root    763524 Aug 19 14:48 dpkg.status.1.gz
-rw-r–r–  1 root root    760198 Aug 17 19:41 dpkg.status.2.gz
-rw-r–r–  1 root root    760176 Aug 13 12:48 dpkg.status.3.gz
-rw-r–r–  1 root root    760105 Jul 16 15:25 dpkg.status.4.gz
-rw-r–r–  1 root root    759807 Jun 28 15:18 dpkg.status.5.gz
-rw-r–r–  1 root root    759554 May 28 16:22 dpkg.status.6.gz

drwx——  2 root root      4096 Oct 15  2017 ejabberd-2017-10-15T00:22:30.p1e5J8/
drwx——  2 root root      4096 Oct 15  2017 ejabberd-2017-10-15T00:24:02.dAUgDs/
drwx——  2 root root      4096 Oct 15  2017 ejabberd-2017-10-15T12:29:51.FX27WJ/
drwx——  2 root root      4096 Oct 15  2017 ejabberd-2017-10-15T21:18:26.bPQWlW/
drwx——  2 root root      4096 Jul 16  2019 ejabberd-2019-07-16T00:49:52.Gy3sus/
-rw——-  1 root root      2512 Oct 20  2020 group.bak
-rw——-  1 root shadow    1415 Oct 20  2020 gshadow.bak
-rw——-  1 root root      7395 May 11 22:56 passwd.bak
-rw——-  1 root shadow    7476 May 11 22:56 shadow.bak

Considering the situation the important files for us that could, help us restore our previous list of packages, we had installed on the Debian are files under /var/backups/dpkg.status*

Luckily debian based systems keeps backups of its important files that can be used later on for system recovery activities.
Below is a common structure of /var/lib/dpkg on a deb based system.

hipo@debian:/home/hipo$ ls -l /var/lib/dpkg/
total 11504
drwxr-xr-x 2 root root    4096 Aug 19 14:33 alternatives/
-rw-r–r– 1 root root      11 Oct 14  2017 arch
-rw-r–r– 1 root root 2199402 Oct 19  2017 available
-rw-r–r– 1 root root 2197483 Oct 19  2017 available-old
-rw-r–r– 1 root root       8 Sep  6  2012 cmethopt
-rw-r–r– 1 root root    1319 Apr 27 22:28 diversions
-rw-r–r– 1 root root    1266 Nov 18  2020 diversions-old
drwxr-xr-x 2 root root  606208 Sep 23 14:32 info/
-rw-r—– 1 root root       0 Sep 23 14:32 lock
-rw-r—– 1 root root       0 Mar 18  2021 lock-frontend
drwxr-xr-x 2 root root    4096 Sep 17  2012 parts/
-rw-r–r– 1 root root     375 Aug 23  2018 statoverride
-rw-r–r– 1 root root     337 Aug 13  2018 statoverride-old
-rw-r–r– 1 root root 3363749 Sep 23 14:32 status
-rw-r–r– 1 root root 3363788 Sep 23 14:32 status-old
drwxr-xr-x 2 root root    4096 Aug 19 14:48 triggers/
drwxr-xr-x 2 root root    4096 Sep 23 14:32 updates/


2. Recreate basic /var/lib/dpkg directory and files structures

As you can see, there are 5 directories and the status file and some other files. 
Hence the first step is to restore the lost directory structure.

hipo@debian: ~$ sudo mkdir -p /var/lib/dpkg/{alternatives,info,parts,triggers,updates}


3. Recover /var/lib/dpkg/status file

Further on recover the dpkg status file from backup

hipo@debian: ~$  sudo cp /var/backups/dpkg.status.0 /var/lib/dpkg/status


4. Check dpkg package installation works again and reinstall base-files

Next check if dpkg – debian package manager is now working, by simply trying to download dpkg*.deb reinstalling it.

root@debian:/root # apt-get download dpkg
# sudo dpkg -i dpkg*.deb

If you get no errors next step is to reinstall base-files which is important package on which dpkg depends.

root@debian:/root # apt-get download base-files

root@debian:/root # sudo dpkg -i base-files*.deb


5. Update deb system package list and db consistency

Onwards try to update system package list and check dpkg / apt database consistency.

root@debian:/root # dpkg –audit

root@debian:/root # sudo apt-get update

root@debian:/root # sudo apt-get check


The result should be more of the files in /var/lib/dpkg should appear, thus list the directory again and compare to the earlier given list of it, they should be similar.

root@debian:/root # ls -l /var/lib/dpkg

6. Reinstall completely from source code dpkg, if nothing else works
 

If some files are missing they should get created with a normal daily sysadmin package management tasks so no worries.

In case if after attempting to upgrade the system or install a package with apt, you get some nasty error like:
 

'/usr/local/var/lib/dpkg/status' for reading: No such file or directory


Then the next and final thing to try as a recovery is to download compile from a new and reinstall dpkg from source code!


root@debian:/ # wget https://launchpad.net/ubuntu/+archive/primary/+files/dpkg_1.16.1.2ubuntu7.2.tar.bz2
root@debian:/ # tar -xvf dpkg_1.16*

root@debian:/ # cd dpkg-1.16*

root@debian:/ # ./configure

root@debian:/ # make

root@debian:/ # make install


Hopefully you'll have gcc and development tools provided by build-essential .deb package otherwise you have to download and compile this ones as well 🙂
If this doesn't bring you back the installed packages you had priorly (hopefully not), then waste no more time and do a backup of the main things on the server, and reinstall it completely.

The moral out of this incident is always to implement always to your system a good back up system and regularly create backups of /var/lib/dpkg , /etc/ , /usr/local* and other important files on a remote backup server, to be able to easily recover if you do by mistake something whacky.
 

Hope that helped anyone. Cheers 🙂

Fix Out of inodes on Postfix Linux Mail Cluster. How to clean up filesystem running out of Inodes, Filesystem inodes on partition is 100% full

Wednesday, August 25th, 2021

Inode_Entry_inode-table-content

Recently we have faced a strange issue with with one of our Clustered Postfix Mail servers (the cluster is with 2 nodes that each has configured Postfix daemon mail servers (running on an OpenVZ virtualized environment).
A heartbeat that checks liveability of clusters and switches nodes in case of one of the two gets broken due to some reason), pretty much a standard SMTP cluster.

So far so good but since the cluster is a kind of abondoned and is pretty much legacy nowadays and used just for some Monitoring emails from different scripts and systems on servers, it was not really checked thoroughfully for years and logically out of sudden the alarming email content sent via the cluster stopped working.

The normal sysadmin job here  was to analyze what is going on with the cluster and fix it ASAP. After some very basic analyzing we catched the problem is caused by a  "inodes full" (100% of available inodes were occupied) problem, e.g. file system run out of inodes on both machines perhaps due to a pengine heartbeat process  bug  leading to producing a high number of .bz2 pengine recovery archive files stored in /var/lib/pengine>

Below are the few steps taken to analyze and fix the problem.
 

1. Finding out about the the system run out of inodes problem


After logging on to system and not finding something immediately is wrong with inodes, all I can see from crm_mon is cluster was broken.
A plenty of emails were left inside the postfix mail queue visible with a standard command

[root@smtp1: ~ ]# postqueue -p

It took me a while to find ot the problem is with inodes because a simple df -h  was showing systems have enough space but still cluster quorum was not complete.
A bit of further investigation led me to a  simple df -i reporting the number of inodes on the local filesystems on both our SMTP1 and SMTP2 got all occupied.

[root@smtp1: ~ ]# df -i
Filesystem            Inodes   IUsed   IFree IUse% Mounted on
/dev/simfs            500000   500000  0   100% /
none                   65536      61   65475    1% /dev

As you can see the number of inodes on the Virual Machine are unfortunately depleted

Next step was to check directories occupying most inodes, as this is the place from where files could be temporary moved to a remote server filesystem or moved to another partition with space on a server locally attached drives.
Below command gives an ordered list with directories locally under the mail root filesystem / and its respective occupied number files / inodes,
the more files under a directory the more inodes are being occupied by the files on the filesystem.


run-out-if-inodes-what-is-inode-find-out-which-filesystem-or-directory-eating-up-all-your-system-inodes-linux_inode_diagram.gif
1.1 Getting which directory consumes most of the inodes on the systems


[root@smtp1: ~ ]# { find / -xdev -printf '%h\n' | sort | uniq -c | sort -k 1 -n; } 2>/dev/null
….
…..

…….
    586 /usr/lib64/python2.4
    664 /usr/lib64
    671 /usr/share/man/man8
    860 /usr/bin
   1006 /usr/share/man/man1
   1124 /usr/share/man/man3p
   1246 /var/lib/Pegasus/prev_repository_2009-03-10-1236698426.308128000.rpmsave/root#cimv2/classes
   1246 /var/lib/Pegasus/prev_repository_2009-05-18-1242636104.524113000.rpmsave/root#cimv2/classes
   1246 /var/lib/Pegasus/prev_repository_2009-11-06-1257494054.380244000.rpmsave/root#cimv2/classes
   1246 /var/lib/Pegasus/prev_repository_2010-08-04-1280907760.750543000.rpmsave/root#cimv2/classes
   1381 /var/lib/Pegasus/prev_repository_2010-11-15-1289811714.398469000.rpmsave/root#cimv2/classes
   1381 /var/lib/Pegasus/prev_repository_2012-03-19-1332151633.572875000.rpmsave/root#cimv2/classes
   1398 /var/lib/Pegasus/repository/root#cimv2/classes
   1696 /usr/share/man/man3
   400816 /var/lib/pengine

Note, the above command orders the files from bottom to top order and obviosuly the bottleneck directory that is over-eating Filesystem inodes with an exceeding amount of files is
/var/lib/pengine
 

2. Backup old multitude of files just in case of something goes wrong with the cluster after some files are wiped out


The next logical step of course is to check what is going on inside /var/lib/pengine just to find a very ,very large amount of pe-input-*NUMBER*.bz2 files were suddenly produced.


[root@smtp1: ~ ]# ls -1 pe-input*.bz2 | wc -l
 400816


The files are produced by the pengine process which is one of the processes that is controlling the heartbeat cluster state, presumably it is done by running process:

[root@smtp1: ~ ]# ps -ef|grep -i pengine
24        5649  5521  0 Aug10 ?        00:00:26 /usr/lib64/heartbeat/pengine


Hence in order to fix the issue, to prevent some inconsistencies in the cluster due to the file deletion,  copied the whole directory to another mounted parition (you can mount it remotely with sshfs for example) or use a local one if you have one:

[root@smtp1: ~ ]# cp -rpf /var/lib/pengine /mnt/attached_storage


and proceeded to clean up some old multitde of files that are older than 2 years of times (720 days):


3. Clean  up /var/lib/pengine files that are older than two years with short loop and find command


First I made a list with all the files to be removed in external text file and quickly reviewed it by lessing it like so

[root@smtp1: ~ ]#  cd /var/lib/pengine
[root@smtp1: ~ ]# find . -type f -mtime +720|grep -v pe-error.last | grep -v pe-input.last |grep -v pe-warn.last -fprint /home/myuser/pengine_older_than_720days.txt
[root@smtp1: ~ ]# less /home/myuser/pengine_older_than_720days.txt


Once reviewing commands I've used below command to delete the files you can run below command do delete all older than 2 years that are different from pe-error.last / pe-input.last / pre-warn.last which might be needed for proper cluster operation.

[root@smtp1: ~ ]#  for i in $(find . -type f -mtime +720 -exec echo '{}' \;|grep -v pe-error.last | grep -v pe-input.last |grep -v pe-warn.last); do echo $i; done


Another approach to the situation is to simply review all the files inside /var/lib/pengine and delete files based on year of creation, for example to delete all files in /var/lib/pengine from 2010, you can run something like:
 

[root@smtp1: ~ ]# for i in $(ls -al|grep -i ' 2010 ' | awk '{ print $9 }' |grep -v 'pe-warn.last'); do rm -f $i; done


4. Monitor real time inodes freeing

While doing the clerance of old unnecessery pengine heartbeat archives you can open another ssh console to the server and view how the inodes gets freed up with a command like:


# check if inodes is not being rapidly decreased

[root@csmtp1: ~ ]# watch 'df -i'


5. Restart basic Linux services producing pid files and logs etc. to make then workable (some services might not be notified the inodes on the Hard drive are freed up)

Because the hard drive on the system was full some services started to misbehaving and /var/log logging was impacted so I had to also restart them in our case this is the heartbeat itself
that  checks clusters nodes availability as well as the logging daemon service rsyslog


# restart rsyslog and heartbeat services
[root@csmtp1: ~ ]# /etc/init.d/heartbeat restart
[root@csmtp1: ~ ]# /etc/init.d/rsyslog restart

The systems had been a data integrity legacy service samhain so I had to restart this service as well to reforce the /var/log/samhain log file to again continusly start writting data to HDD.

# Restart samhain service init script 
[root@csmtp1: ~ ]# /etc/init.d/samhain restart


6. Check up enough inodes are freed up with df

[root@smtp1 log]# df -i
Filesystem Inodes IUsed IFree IUse% Mounted on
/dev/simfs 500000 410531 19469 91% /
none 65536 61 65475 1% /dev


I had to repeat the same process on the second Postfix cluster node smtp2, and after all the steps like below check the status of smtp2 node and the postfix queue, following same procedure made the second smtp2 cluster member as expected 🙂


7. Check the cluster node quorum is complete, e.g. postfix cluster is operating normally


# Test if email cluster is ok with pacemaker resource cluster manager – lt-crm_mon
 

[root@csmtp1: ~ ]# crm_mon -1
============
Last updated: Tue Aug 10 18:10:48 2021
Stack: Heartbeat
Current DC: smtp2.fqdn.com (bfb3d029-89a8-41f6-a9f0-52d377cacd83) – partition with quorum
Version: 1.0.12-unknown
2 Nodes configured, unknown expected votes
4 Resources configured.
============

Online: [ smtp2.fqdn.com smtp1.fqdn.com ]

failover-ip (ocf::heartbeat:IPaddr2): Started csmtp1.ikossvan.de
Clone Set: postfix_clone
Started: [ smtp2.fqdn.com smtp1fqdn.com ]
Clone Set: pingd_clone
Started: [ smtp2.fqdn.com smtp1.fqdn.com ]
Clone Set: mailto_clone
Started: [ smtp2.fqdn.com smtp1.fqdn.com ]


8.  Force resend a few hundred thousands of emails left in the email queue


After some inodes gets freed up due to the file deletion, i've reforced a couple of times the queued mail servers to be immediately resent to remote mail destinations with cmd:


# force emails in queue to be resend with postfix

[root@smtp1: ~ ]# sendmail -q


– It was useful to watch in real time how the queued emails are quickly decreased (queued mails are successfully sent to destination addresses) with:


# Monitor  the decereasing size of the email queue
[root@smtp1: ~ ]# watch 'postqueue -p|grep -i '@'|wc -l'