![]()
Earlier I've written a small article on how to setup AIDE monitoring for Server File integrity check on Linux, which put the basics on how this handy software to improve your server overall Security software can be installed and setup without much hassle.
Once AIDE is setup and a preset custom configuration is prepared for AIDE it is pretty useful to configure AIDE to monitor its critical file changes for better server security by monitoring the AIDE log output for new record occurs with Zabbix. Usually if no files monitored by AIDE are modified on the machine, the log size will not grow, but if some file is modified once Advanced Linux Intrusion Detecting (aide) binary runs via the scheduled Cron job, the /var/log/app_aide.log file will grow zabbix-agentd will continuously check the file for size increases and will react.
Before setting up the Zabbix required Template, you will have to set few small scripts that will be reading a preconfigured list of binaries or application files etc. that aide will monitor lets say via /etc/aide-custom.conf
1. Configure aide to monitor files for changes
Before running aide, it is a good idea to prepare a file with custom defined directories and files that you plan to monitor for integrity checking e.g. future changes with aide, for example to capture bad intruders who breaks into server which runs aide and modifies critical files such as /etc/passwd /etc/shadow /etc/group or / /usr/local/etc/* or /var/* / /usr/* critical files that shouldn't be allowed to change without the admin to soon find out.
# cat /etc/aide-custom.conf
# Example configuration file for AIDE.
@@define DBDIR /var/lib/aide
@@define LOGDIR /var/log/aide
# The location of the database to be read.
database=file:@@{DBDIR}/app_custom.db.gz
database_out=file:@@{DBDIR}/app_aide.db.new.gz
gzip_dbout=yes
verbose=5report_url=file:@@{LOGDIR}/app_custom.log
#report_url=syslog:LOG_LOCAL2
#report_url=stderr
#NOT IMPLEMENTED report_url=mailto:root@foo.com
#NOT IMPLEMENTED report_url=syslog:LOG_AUTH# These are the default rules.
#
#p: permissions
#i: inode:
#n: number of links
#u: user
#g: group
#s: size
#b: block count
#m: mtime
#a: atime
#c: ctime
#S: check for growing size
#acl: Access Control Lists
#selinux SELinux security context
#xattrs: Extended file attributes
#md5: md5 checksum
#sha1: sha1 checksum
#sha256: sha256 checksum
#sha512: sha512 checksum
#rmd160: rmd160 checksum
#tiger: tiger checksum#haval: haval checksum (MHASH only)
#gost: gost checksum (MHASH only)
#crc32: crc32 checksum (MHASH only)
#whirlpool: whirlpool checksum (MHASH only)FIPSR = p+i+n+u+g+s+m+c+acl+selinux+xattrs+sha256
#R: p+i+n+u+g+s+m+c+acl+selinux+xattrs+md5
#L: p+i+n+u+g+acl+selinux+xattrs
#E: Empty group
#>: Growing logfile p+u+g+i+n+S+acl+selinux+xattrs# You can create custom rules like this.
# With MHASH…
# ALLXTRAHASHES = sha1+rmd160+sha256+sha512+whirlpool+tiger+haval+gost+crc32
ALLXTRAHASHES = sha1+rmd160+sha256+sha512+tiger
# Everything but access time (Ie. all changes)
EVERYTHING = R+ALLXTRAHASHES# Sane, with multiple hashes
# NORMAL = R+rmd160+sha256+whirlpool
NORMAL = FIPSR+sha512# For directories, don't bother doing hashes
DIR = p+i+n+u+g+acl+selinux+xattrs# Access control only
PERMS = p+i+u+g+acl+selinux# Logfile are special, in that they often change
LOG = ># Just do sha256 and sha512 hashes
LSPP = FIPSR+sha512# Some files get updated automatically, so the inode/ctime/mtime change
# but we want to know when the data inside them changes
DATAONLY = p+n+u+g+s+acl+selinux+xattrs+sha256##############TOUPDATE
#To delegate to app team create a file like /app/aide.conf
#and uncomment the following line
#@@include /app/aide.conf
#Then remove all the following lines
/etc/zabbix/scripts/check.sh FIPSR
/etc/zabbix/zabbix_agentd.conf FIPSR
/etc/sudoers FIPSR
/etc/hosts FIPSR
/etc/keepalived/keepalived.conf FIPSR
# monitor haproxy.cfg
/etc/haproxy/haproxy.cfg FIPSR
# monitor keepalived
/home/keepalived/.ssh/id_rsa FIPSR
/home/keepalived/.ssh/id_rsa.pub FIPSR
/home/keepalived/.ssh/authorized_keys FIPSR
/usr/local/bin/script_to_run.sh FIPSR
/usr/local/bin/another_script_to_monitor_for_changes FIPSR
# cat /usr/local/bin/aide-config-check.sh
#!/bin/bash
/sbin/aide -c /etc/aide-custom.conf -D
# cat /usr/local/bin/aide-init.sh
#!/bin/bash
/sbin/aide -c /etc/custom-aide.conf -B database_out=file:/var/lib/aide/custom-aide.db.gz -i
# cat /usr/local/bin/aide-check.sh
#!/bin/bash
/sbin/aide -c /etc/custom-aide.conf -Breport_url=stdout -B database=file:/var/lib/aide/custom-aide.db.gz -C|/bin/tee -a /var/log/aide/custom-aide-check.log|/bin/logger -t custom-aide-check-report
/usr/local/bin/aide-init.sh
# cat /usr/local/bin/aide_app_cron_daily.txt
#!/bin/bash
#If first time, we need to init the DB
if [ ! -f /var/lib/aide/app_aide.db.gz ]
then
logger -p local2.info -t app-aide-check-report "Generating NEW AIDE DATABASE for APPLICATION"
nice -n 18 /sbin/aide –init -c /etc/aide_custom.conf
mv /var/lib/aide/app_aide.db.new.gz /var/lib/aide/app_aide.db.gz
finice -n 18 /sbin/aide –update -c /etc/aide_app.conf
#since the option for syslog seems not fully implemented we need to push logs via logger
/bin/logger -f /var/log/aide/app_aide.log -p local2.info -t app-aide-check-report
#Acknoledge the new database as the primary (every results are sended to syslog anyway)
mv /var/lib/aide/app_aide.db.new.gz /var/lib/aide/app_aide.db.gz
What above cron job does is pretty simple, as you can read it yourself. If the configuration predefined aide database store file /var/lib/aide/app_aide.db.gz, does not
exists aide will create its fresh empty database and generate a report for all predefined files with respective checksums to be stored as a comparison baseline for file changes.
Next there is a line to write aide file changes via rsyslog through the logger and local2.info handler
2. Setup Zabbix Template with Items, Triggers and set Action
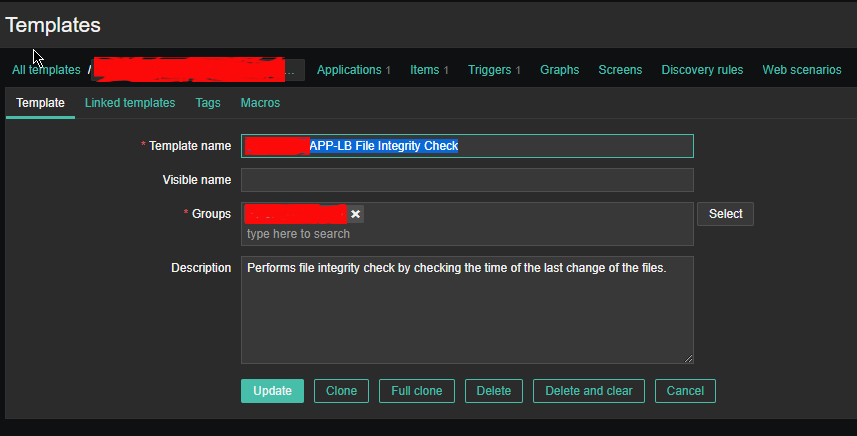
2.1 Create new Template and name it YourAppName APP-LB File integrity Check
Then setup the required Items, that will be using zabbix's Skip embedded function to scan file in a predefined period of file, this is done by the zabbix-agent that is
supposed to run on the server.
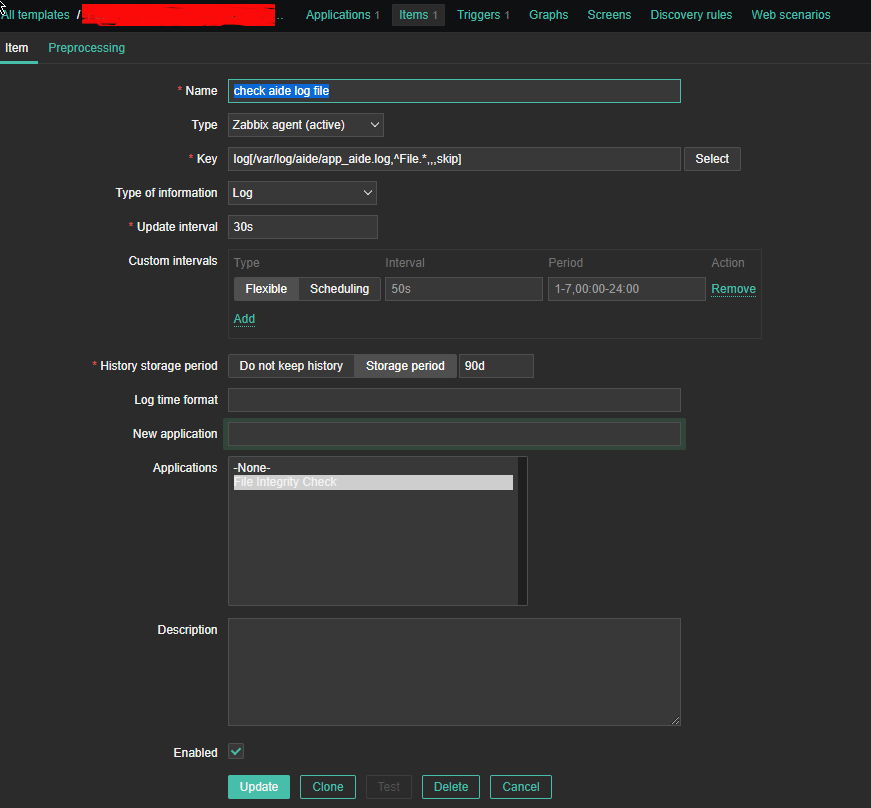
2.2 Configure Item like
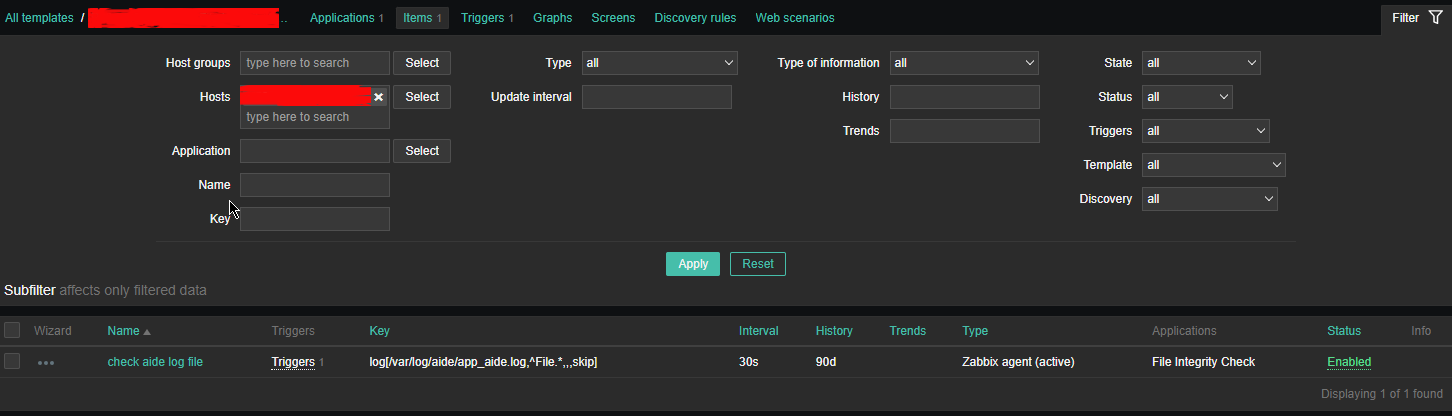
*Name: check aide log file
Type: zabbix (active)
log[/var/log/aide/app_aide.log,^File.*,,,skip]
Type of information: Log
Update Interval: 30s
Applications: File Integrity Check
Configure Trigger like
Enabled: Tick On
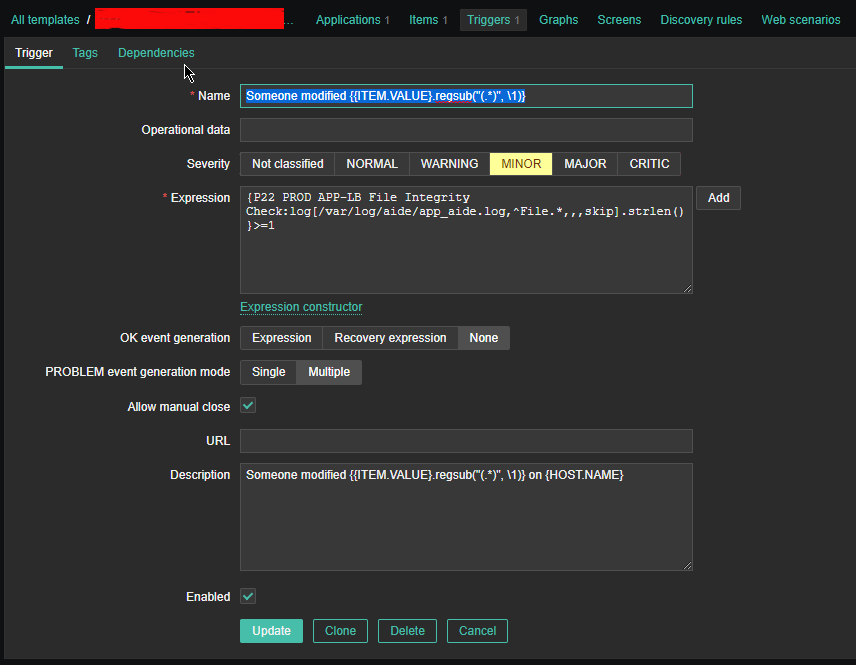
2.3 Create Triggers with the respective regular expressions, that would check the aide generated log file for file modifications
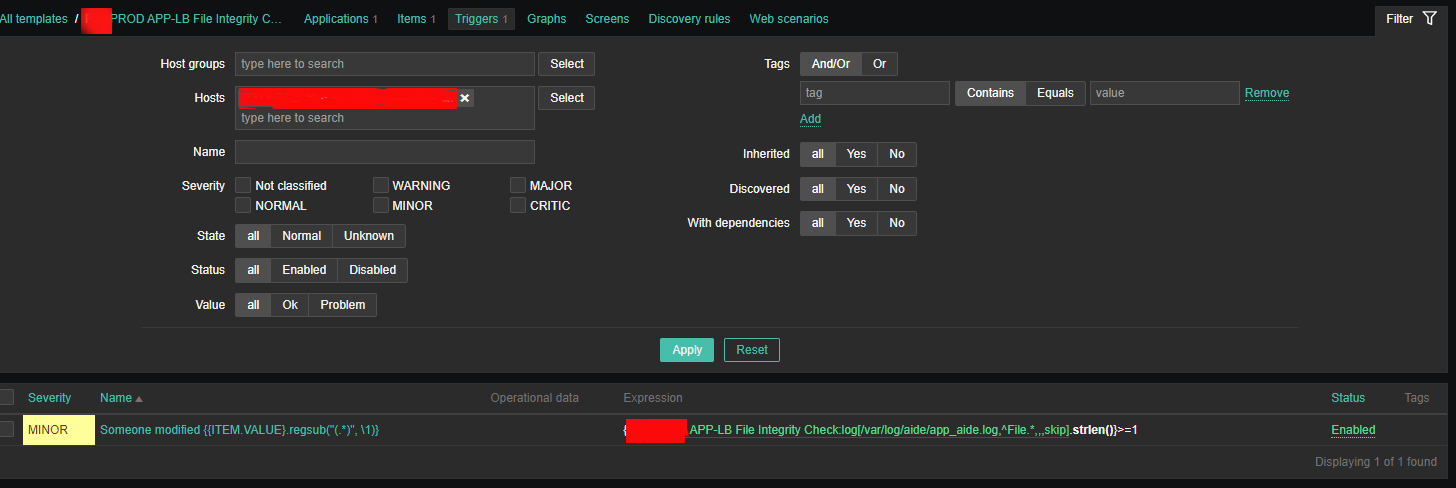
Configure Trigger like
Enabled: Tick On
*Name: Someone modified {{ITEM.VALUE}.regsub("(.*)", \1)}*Expression: {PROD APP-LB File Integrity Check:log[/var/log/aide/app_aide.log,^File.*,,,skip].strlen()}>=1
Allow manual close: yes tick
*Description: Someone modified {{ITEM.VALUE}.regsub("(.*)", \1)} on {HOST.NAME}
2.4 Configure Action
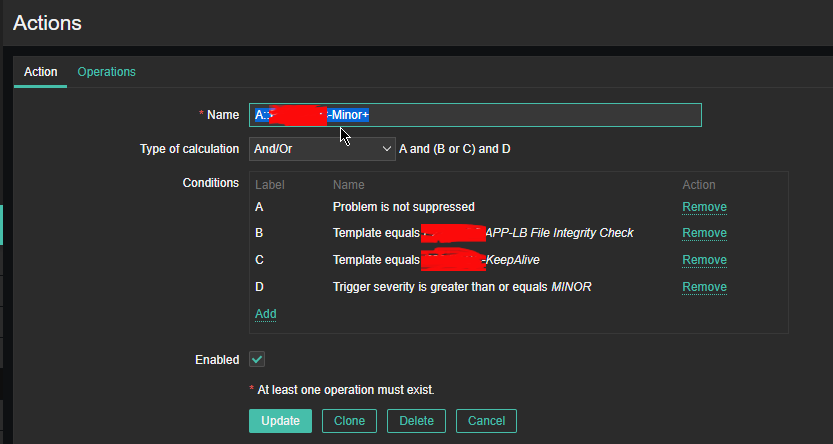
Now assuming the Zabbix server has a properly set media for communication and you set Alerting rules zabbix-server can be easily set tosend mails to a Support email to get Notifications Alerts, everytime a monitored file by aide gets changed.
That's all folks ! Enjoy being notified on every file change on your servers !