Posts Tagged ‘logs’

How to log multiple haproxy / apache / mysql instance via haproxy log-tagging / Segregating log management for multiple HAProxy instances using rsyslog

Tuesday, May 23rd, 2023

rsyslog-logo-picture-use-programname-and-haproxy-log-tag-directives-together-to-log-as-many-process-streams-as-you-like


Introduction

This article provides a guide on refining haproxy  logging mechanism by leveraging the `programname` property in rsyslog, coupled with the `log-tag` directive in haproxy.
This approach will create a granular logging setup, separating logs according to their originating services and specific custom tags, enhancing overall log readability.

Though the article is written concretely for logging multiple log streams from haproxy this can be successfully applied
for any other Linux service to log as many concrete log-tagged data streams as you prefer.

Scope

The guide focuses on tailoring the logging mechanisms for two haproxy  instances named `haproxy` and `haproxyssl`, utilizing the `programname` property in rsyslog and the `log-tag` directive in haproxy for precise log management.

The haproxy and haproxyssl instances are two separate systemd config file prepared instances.
haproxy instance is simple haproxy proxying tcp traffic in non-encrypted form, whether haproxyssl is a special instance
prepared to tunnel the incoming http traffic in ssl form. Both instances of haproxy runs as a separate processes on the server.

Here is the systemd configuration of haproxy systemd service file:

# cat /usr/lib/systemd/system/haproxy.service
[Unit]
Description=HAProxy Load Balancer
After=network-online.target
Wants=network-online.target

[Service]
Environment="CONFIG=/etc/haproxy/haproxy.cfg" "PIDFILE=/run/haproxy.pid"
EnvironmentFile=/etc/sysconfig/haproxy
ExecStartPre=/usr/sbin/haproxy -f $CONFIG -c -q $OPTIONS
ExecStart=/usr/sbin/haproxy -Ws -f $CONFIG -p $PIDFILE $OPTIONS
ExecReload=/usr/sbin/haproxy -f $CONFIG -c -q $OPTIONS
ExecReload=/bin/kill -USR2 $MAINPID
SuccessExitStatus=143
KillMode=mixed
Type=notify

[Install]
WantedBy=multi-user.target


As well as the systemd service configuration for haproxyssl:
 

# cat /usr/lib/systemd/system/haproxyssl.service
[Unit]
Description=HAProxy Load Balancer
After=network-online.target
Wants=network-online.target

[Service]
Environment="CONFIG=/etc/haproxy/haproxy_ssl_prod.cfg" "PIDFILE=/run/haproxy_ssl_prod.pid"
EnvironmentFile=/etc/sysconfig/haproxy
ExecStartPre=/usr/sbin/haproxyssl -f $CONFIG -c -q $OPTIONS
ExecStart=/usr/sbin/haproxyssl -Ws -f $CONFIG -p $PIDFILE $OPTIONS
ExecReload=/usr/sbin/haproxyssl -f $CONFIG -c -q $OPTIONS
ExecReload=/bin/kill -USR2 $MAINPID
SuccessExitStatus=143
KillMode=mixed
Type=notify

[Install]
WantedBy=multi-user.target


Step 1: Configuring HAProxy instances with `log-tag`
 

To distinguish between logs from two HAProxy instances, `log-tag` directive is used to add tags to logs. This tag is used to filter these logs in rsyslog.
Modify the HAProxy configuration file in `/etc/haproxy/haproxy.*.cfg`

HAProxy Instance 1 (haproxy)
 

#———————————————————————
# Global settings
#———————————————————————
global
      log          127.0.0.1 local6 debug
      log-tag      haproxy

HAProxy Instance 2 (haproxyssl)


#———————————————————————
# Global settings
#———————————————————————
global
    log          127.0.0.1 local5 debug
    log-tag      haproxyssl


Step 2: Implementing rsyslog configuration for haproxy logs
 

Next, create a new rsyslog configuration file, stored in /etc/rsyslog.d/. Ensure the new configuration file ends in `.conf`

HAProxy Instance 1 (haproxy)

Now add rsyslog rules to filters logs based on the `programname` and the custom log tag:
 

# vi /etc/rsyslog.d/55_haproxy.conf
if $programname == 'haproxy' then /var/log/haproxy.log
&stop

HAProxy Instance 2 (haproxyssl)
# vi /etc/rsyslog.d/51_haproxy_ssl.conf
if $programname == 'haproxy_ssl' then /var/log/haproxy_ssl.log
&stop


These rules filter logs that originate from haproxy  and contain the respective string haproxy   or haproxy_ssl , directing them to their respective log files. The `& stop` directive ensures that rsyslog stops processing the log once a match is found, preventing dublication.

Finally, restart both the haproxy and rsyslog services for the changes to take effect:

# systemctl restart haproxy
# systemctl restart haproxyssl
# systemctl restart rsyslog


Reading References

haproxy:   log-tag directive

rsyslog:    rsyslogd documentation

This is a guest article originally written by: Dimitar Paskalev, guest blogging with good interesting articles is always mostly welcome 

Configure aide file integrity check server monitoring in Zabbix to track for file changes on servers

Tuesday, March 28th, 2023

zabbix-aide-log-monitoring-logo

Earlier I've written a small article on how to setup AIDE monitoring for Server File integrity check on Linux, which put the basics on how this handy software to improve your server overall Security software can be installed and setup without much hassle.

Once AIDE is setup and a preset custom configuration is prepared for AIDE it is pretty useful to configure AIDE to monitor its critical file changes for better server security by monitoring the AIDE log output for new record occurs with Zabbix. Usually if no files monitored by AIDE are modified on the machine, the log size will not grow, but if some file is modified once Advanced Linux Intrusion Detecting (aide) binary runs via the scheduled Cron job, the /var/log/app_aide.log file will grow zabbix-agentd will continuously check the file for size increases and will react.

Before setting up the Zabbix required Template, you will have to set few small scripts that will be reading a preconfigured list of binaries or application files etc. that aide will monitor lets say via /etc/aide-custom.conf
 

1. Configure aide to monitor files for changes


Before running aide, it is a good idea to prepare a file with custom defined directories and files that you plan to monitor for integrity checking e.g. future changes with aide, for example to capture bad intruders who breaks into server which runs aide and modifies critical files such as /etc/passwd /etc/shadow /etc/group or / /usr/local/etc/* or /var/* / /usr/* critical files that shouldn't be allowed to change without the admin to soon find out.

# cat /etc/aide-custom.conf

# Example configuration file for AIDE.
@@define DBDIR /var/lib/aide
@@define LOGDIR /var/log/aide
# The location of the database to be read.
database=file:@@{DBDIR}/app_custom.db.gz
database_out=file:@@{DBDIR}/app_aide.db.new.gz
gzip_dbout=yes
verbose=5

report_url=file:@@{LOGDIR}/app_custom.log
#report_url=syslog:LOG_LOCAL2
#report_url=stderr
#NOT IMPLEMENTED report_url=mailto:root@foo.com
#NOT IMPLEMENTED report_url=syslog:LOG_AUTH

# These are the default rules.
#
#p:      permissions
#i:      inode:
#n:      number of links
#u:      user
#g:      group
#s:      size
#b:      block count
#m:      mtime
#a:      atime
#c:      ctime
#S:      check for growing size
#acl:           Access Control Lists
#selinux        SELinux security context
#xattrs:        Extended file attributes
#md5:    md5 checksum
#sha1:   sha1 checksum
#sha256:        sha256 checksum
#sha512:        sha512 checksum
#rmd160: rmd160 checksum
#tiger:  tiger checksum

#haval:  haval checksum (MHASH only)
#gost:   gost checksum (MHASH only)
#crc32:  crc32 checksum (MHASH only)
#whirlpool:     whirlpool checksum (MHASH only)

FIPSR = p+i+n+u+g+s+m+c+acl+selinux+xattrs+sha256

#R:             p+i+n+u+g+s+m+c+acl+selinux+xattrs+md5
#L:             p+i+n+u+g+acl+selinux+xattrs
#E:             Empty group
#>:             Growing logfile p+u+g+i+n+S+acl+selinux+xattrs

# You can create custom rules like this.
# With MHASH…
# ALLXTRAHASHES = sha1+rmd160+sha256+sha512+whirlpool+tiger+haval+gost+crc32
ALLXTRAHASHES = sha1+rmd160+sha256+sha512+tiger
# Everything but access time (Ie. all changes)
EVERYTHING = R+ALLXTRAHASHES

# Sane, with multiple hashes
# NORMAL = R+rmd160+sha256+whirlpool
NORMAL = FIPSR+sha512

# For directories, don't bother doing hashes
DIR = p+i+n+u+g+acl+selinux+xattrs

# Access control only
PERMS = p+i+u+g+acl+selinux

# Logfile are special, in that they often change
LOG = >

# Just do sha256 and sha512 hashes
LSPP = FIPSR+sha512

# Some files get updated automatically, so the inode/ctime/mtime change
# but we want to know when the data inside them changes
DATAONLY =  p+n+u+g+s+acl+selinux+xattrs+sha256

##############TOUPDATE
#To delegate to app team create a file like /app/aide.conf
#and uncomment the following line
#@@include /app/aide.conf
#Then remove all the following lines
/etc/zabbix/scripts/check.sh FIPSR
/etc/zabbix/zabbix_agentd.conf FIPSR
/etc/sudoers FIPSR
/etc/hosts FIPSR
/etc/keepalived/keepalived.conf FIPSR
# monitor haproxy.cfg
/etc/haproxy/haproxy.cfg FIPSR
# monitor keepalived
/home/keepalived/.ssh/id_rsa FIPSR
/home/keepalived/.ssh/id_rsa.pub FIPSR
/home/keepalived/.ssh/authorized_keys FIPSR

/usr/local/bin/script_to_run.sh FIPSR
/usr/local/bin/another_script_to_monitor_for_changes FIPSR

#  cat /usr/local/bin/aide-config-check.sh
#!/bin/bash
/sbin/aide -c /etc/aide-custom.conf -D

# cat /usr/local/bin/aide-init.sh
#!/bin/bash
/sbin/aide -c /etc/custom-aide.conf -B database_out=file:/var/lib/aide/custom-aide.db.gz -i


# cat /usr/local/bin/aide-check.sh

#!/bin/bash
/sbin/aide -c /etc/custom-aide.conf -Breport_url=stdout -B database=file:/var/lib/aide/custom-aide.db.gz -C|/bin/tee -a /var/log/aide/custom-aide-check.log|/bin/logger -t custom-aide-check-report
/usr/local/bin/aide-init.sh


# cat /usr/local/bin/aide_app_cron_daily.txt

#!/bin/bash
#If first time, we need to init the DB
if [ ! -f /var/lib/aide/app_aide.db.gz ]
   then
    logger -p local2.info -t app-aide-check-report  "Generating NEW AIDE DATABASE for APPLICATION"
    nice -n 18 /sbin/aide –init -c /etc/aide_custom.conf
    mv /var/lib/aide/app_aide.db.new.gz /var/lib/aide/app_aide.db.gz
fi

nice -n 18 /sbin/aide –update -c /etc/aide_app.conf
#since the option for syslog seems not fully implemented we need to push logs via logger
/bin/logger -f /var/log/aide/app_aide.log -p local2.info -t app-aide-check-report
#Acknoledge the new database as the primary (every results are sended to syslog anyway)
mv /var/lib/aide/app_aide.db.new.gz /var/lib/aide/app_aide.db.gz

What above cron job does is pretty simple, as you can read it yourself. If the configuration predefined aide database store file /var/lib/aide/app_aide.db.gz, does not
exists aide will create its fresh empty database and generate a report for all predefined files with respective checksums to be stored as a comparison baseline for file changes. 

Next there is a line to write aide file changes via rsyslog through the logger and local2.info handler


2. Setup Zabbix Template with Items, Triggers and set Action

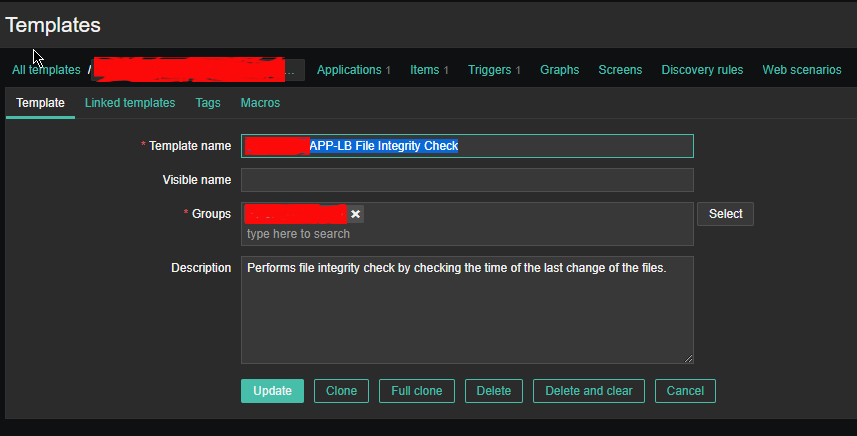
2.1 Create new Template and name it YourAppName APP-LB File integrity Check

aide-itengrity-check-zabbix_ Configuration of templates

Then setup the required Items, that will be using zabbix's Skip embedded function to scan file in a predefined period of file, this is done by the zabbix-agent that is
supposed to run on the server.

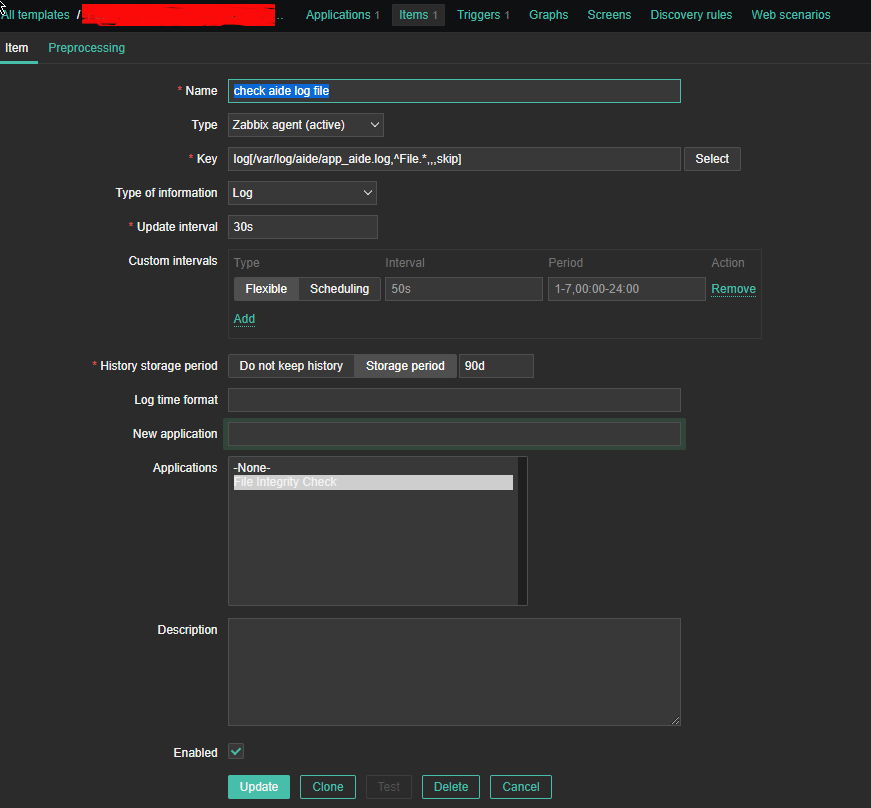
2.2 Configure Item like

aide-zabbix-triggers-screenshot
 

*Name: check aide log file

Type: zabbix (active)

log[/var/log/aide/app_aide.log,^File.*,,,skip]

Type of information: Log

Update Interval: 30s

Applications: File Integrity Check

Configure Trigger like

Enabled: Tick On

images/aide-zabbix-screenshots/check-aide-log-item


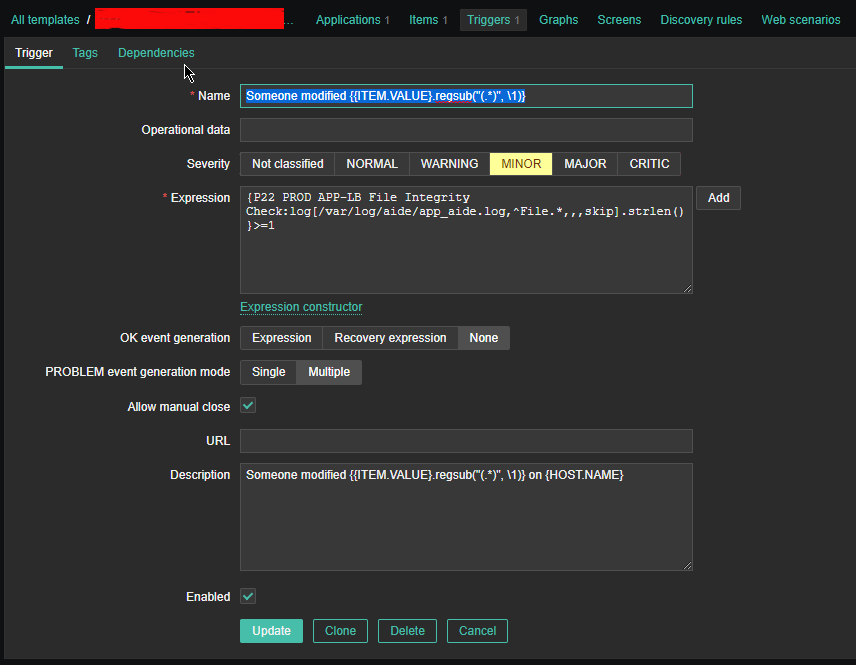
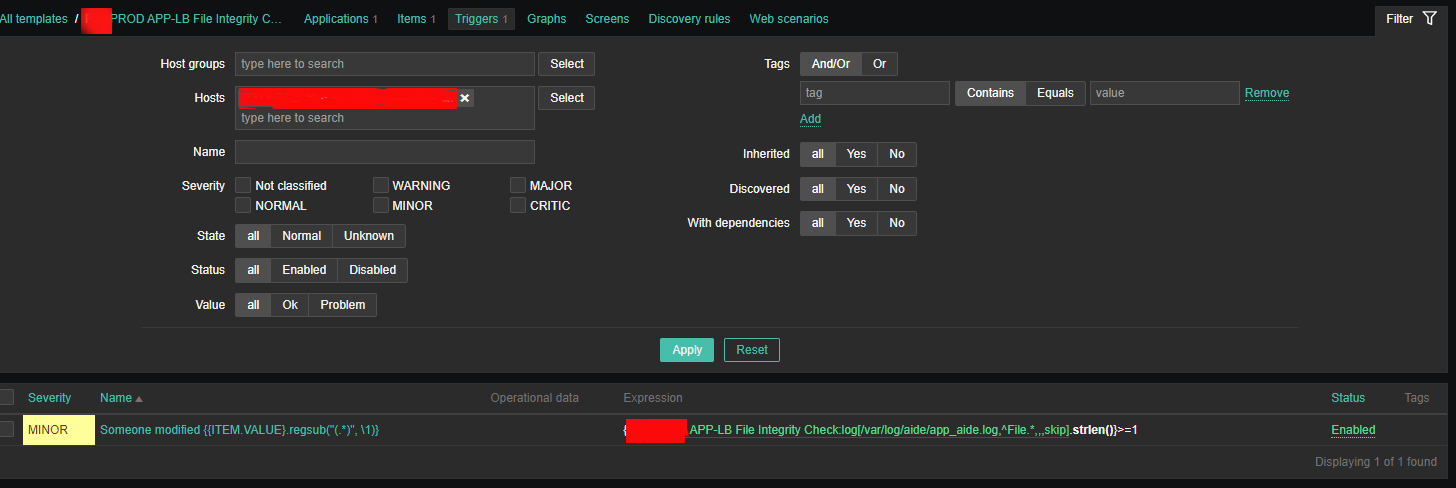
2.3 Create Triggers with the respective regular expressions, that would check the aide generated log file for file modifications


aide-zabbix-screenshot-minor-config

Configure Trigger like
 

Enabled: Tick On


*Name: Someone modified {{ITEM.VALUE}.regsub("(.*)", \1)}

*Expression: {PROD APP-LB File Integrity Check:log[/var/log/aide/app_aide.log,^File.*,,,skip].strlen()}>=1

Allow manual close: yes tick

*Description: Someone modified {{ITEM.VALUE}.regsub("(.*)", \1)} on {HOST.NAME}


2.4 Configure Action


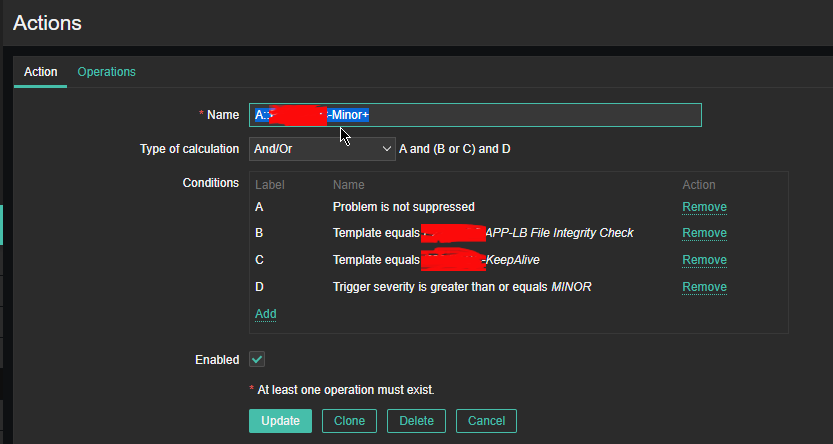
aide-zabbix-file-monitoring-action-screensho

Now assuming the Zabbix server has  a properly set media for communication and you set Alerting rules zabbix-server can be easily set tosend mails to a Support email to get Notifications Alerts, everytime a monitored file by aide gets changed.

That's all folks ! Enjoy being notified on every file change on your servers  !
 

Zabbix: Monitor Linux rsyslog configured central log server is rechable with check_log_server_status.sh userparameter script

Wednesday, June 8th, 2022

zabbix-monitor-central-log-server-is-reachable-from-host-with-a-userparamater-script-zabbix-logo

On modern Linux OS servers on Redhat / CentOS / Fedora and Debian based distros log server service is usually running on the system  such as rsyslog (rsyslogd) to make sure the logging from services is properly logged in separate logs under /var/log.

A very common practice on critical server machines in terms of data security, where logs produced by rsyslog daermon needs to be copied over network via TCP or UDP protocol immediately is to copy over the /var/log produced logs to another configured central logging server. Then later every piece of bit generated by rsyslogd could be  overseen by a third party auditor person and useful for any investigation in case of logs integrity is required or at worse case if there is a suspicion that system in question is hacked by a malicious hax0r and logs have been "cleaned" up from any traces leading to the intruder (things usually done locally by hackers) or by any automated script exploit tools since yesr.

This doubled logging of system events to external log server  ipmentioned is very common practice by companies to protect their log data and quite useful for logs to be recovered easily later on from the central logging server machine that could be also setup for example to use rsyslogd to receive logs from other Linux machines in circumstances where some log disappears just like that (things i've seen happen) for any strange reason or gets destroyed by the admins mistake locally on machine / or by any other mean such as filesystem gets damaged. a very common practice by companies to protect their log data.  

Monitor remote logging server is reachable with userparameter script

Assuming that you already have setup a logging from the server hostname A towards the Central logging server log storepool and everything works as expected the next logical step is to have at least some basic way to monitor remote logging server configured is still reachable all the time and respectively rsyslog /var/log/*.* logs gets properly produced on remote side for example with something like a simple TCP remote server port check and reported in case of troubles in zabbix.

To solve that simple task for company where I'm employed, I've developed below check_log_server_status.sh:
 

#!/bin/bash
# @@ for TCP @ for UDP
# check_log_server_status.sh Script to check if configured TCP / UDP logging server in /etc/rsyslog.conf is rechable
# report to zabbix
DELIMITER='@@';
GREP_PORT='5145';
CONNECT_TIMEOUT=5;

PORT=$(grep -Ei "*.* $DELIMITER.*:$GREP_PORT" /etc/rsyslog.conf|awk -F : '{ print $2 }'|sort -rn |uniq);

#for i in $(grep -Ei "*.* $DELIMITER.*:$GREP_PORT" /etc/rsyslog.conf |grep -v '\#'|awk -F"$DELIMITER" '{ print $2 }' | awk -F ':' '{ print $1 }'|sort -rn); do
HOST=$(grep -Ei "*.* $DELIMITER.*:$GREP_PORT" /etc/rsyslog.conf |grep -v '\#'|awk -F"$DELIMITER" '{ print $2 }' | awk -F ':' '{ print $1 }'|sort -rn)

# echo $PORT

if [[ ! -z $PORT ]] && [[ ! -z $HOST ]]; then
SSH_RETURN=$(/bin/ssh $HOST -p $PORT -o ConnectTimeout=$CONNECT_TIMEOUT 2>&1);
else
echo "PROBLEM Port $GREP_PORT not defined in /etc/rsyslog.conf";
fi

##echo SSH_RETURN $SSH_RETURN;
#exit 1;
if [[ $(echo $SSH_RETURN |grep -i ‘Connection timed out during banner exchange’ | wc -l) -eq ‘1’ ]]; then
echo "rsyslogd $HOST:$PORT OK";
fi

if [[ $(echo $SSH_RETURN |grep -i ‘Connection refused’ | wc -l) -eq ‘1’ ]]; then
echo "rsyslogd $HOST:$PORT PROBLEM";
fi

#sleep 2;
#done


You can download a copy of the script check_log_server_status.sh here

Depending on the port the remote rsyslogd central logging server is using configure it in the script with respective port through the DELIMITER='@@', GREP_PORT='5145', CONNECT_TIMEOUT=5 values.

The delimiter is setup as usually in /etc/rsyslog.conf this the remote logging server for TCP IP is configured with @@ prefix to indicated TCP mode should be used.

Below is example from /etc/rsyslog.conf of how the rsyslogd server is configured:

[root@Server-hostA /root]# grep -i @@ /etc/rsyslogd.conf
# central remote Log server IP / port
*.* @@10.10.10.1:5145

To use the script on a machine, where you have a properly configured zabbix-agentd service host connected and reporting data to a zabbix-server monitoring server.

1. Set up the script under /usr/local/bin/check_log_server_status.sh

[root@Server-hostA /root ]# vim /usr/local/bin/check_log_server_status.sh

[root@Server-hostA /root ]# chmod +x /usr/local/bin/check_log_server_status.sh

2. Prepare userparameter_check_log_server.conf with log_server.check Item key

[root@Server-hostA zabbix_agentd.d]# cat userparameter_check_log_server.conf 
UserParameter=log_server.check, /usr/local/bin/check_log_server_status.sh

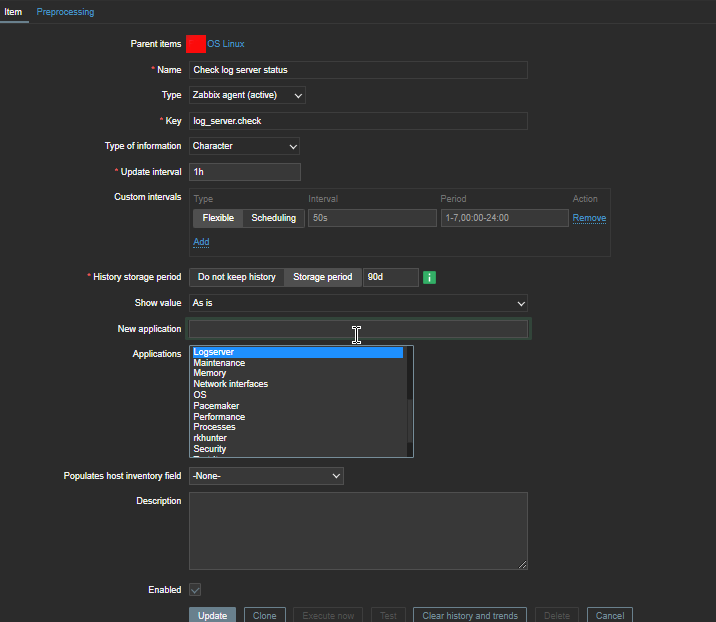
3. Set in Zabbix some Item such as on below screenshot


check-log-server-status-screenshot-linux-item-zabbix.png4. Create a Zabbix trigger 

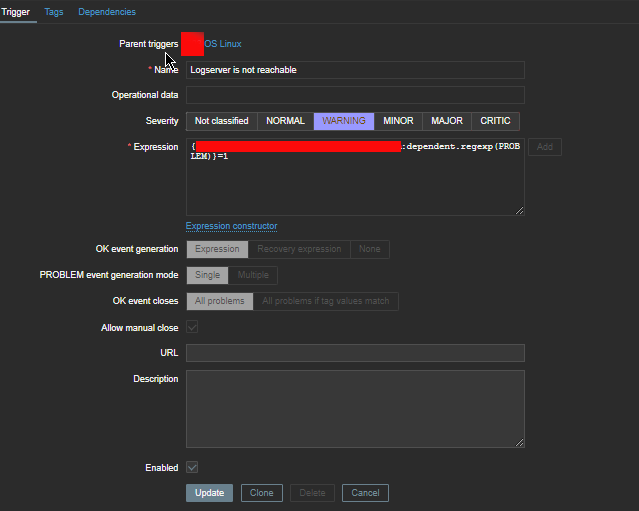
check-log-server-status-trigger-logserver-is-unreachable-zabbix


The redded hided field in Expression field should be substituted with your actual hostname on which the monitor script will run.

How to RPM update Hypervisors and Virtual Machines running Haproxy High Availability cluster on KVM, Virtuozzo without a downtime on RHEL / CentOS Linux

Friday, May 20th, 2022

virtuozzo-kvm-virtual-machines-and-hypervisor-update-manual-haproxy-logo


Here is the scenario, lets say you have on your daily task list two Hypervisor (HV) hosts running CentOS or RHEL Linux with KVM or Virutozzo technology and inside the HV hosts you have configured at least 2 pairs of virtual machines one residing on HV Host 1 and one residing on HV Host 2 and you need to constantly keep the hosts to the latest distribution major release security patchset.

The Virtual Machines has been running another set of Redhat Linux or CentOS configured to work in a High Availability Cluster running Haproxy / Apache / Postfix or any other kind of HA solution on top of corosync / keepalived or whatever application cluster scripts Free or Open Source technology that supports a switch between clustered Application nodes.

The logical question comes how to keep up the CentOS / RHEL Machines uptodate without interfering with the operations of the Applications running on the cluster?

Assuming that the 2 or more machines are configured to run in Active / Passive App member mode, e.g. one machine is Active at any time and the other is always Passive, a switch is possible between the Active and Passive node.

HAProxy--Load-Balancer-cluster-2-nodes-your-Servers

In this article I'll give a simple step by step tested example on how you I succeeded to update (for security reasons) up to the latest available Distribution major release patchset on one by one first the Clustered App on Virtual Machines 1 and VM2 on Linux Hypervisor Host 1. Then the App cluster VM 1 / VM 2 on Hypervisor Host 2.
And finally update the Hypervisor1 (after moving the Active resources from it to Hypervisor2) and updating the Hypervisor2 after moving the App running resources back on HV1.
I know the procedure is a bit monotonic but it tries to go through everything step by step to try to mitigate any possible problems. In case of failure of some rpm dependencies during yum / dnf tool updates you can always revert to backups so in anyways don't forget to have a fully functional backup of each of the HV hosts and the VMs somewhere on a separate machine before proceeding further, any possible failures due to following my aritcle literally is your responsibility 🙂


0. Check situation before the update on HVs / get VM IDs etc.

Check the virsion of each of the machines to be updated both Hypervisor and Hosted VMs, on each machine run:
 

# cat /etc/redhat-release
CentOS Linux release 7.9.2009 (Core)


The machine setup I'll be dealing with is as follows:
 

hypervisor-host1 -> hypervisor-host1.fqdn.com 
•    virt-mach-centos1
•    virt-machine-zabbix-proxy-centos (zabbix proxy)

hypervisor-host2 -> hypervisor-host2.fqdn.com
•    virt-mach-centos2
•    virt-machine-zabbix2-proxy-centos (zabbix proxy)

To check what is yours check out with virsh cmd –if on KVM or with prlctl if using Virutozzo, you should get something like:

[root@hypervisor-host2 ~]# virsh list
 Id Name State
—————————————————-
 1 vm-host1 running
 2 virt-mach-centos2 running

 # virsh list –all

[root@hypervisor-host1 ~]# virsh list
 Id Name State
—————————————————-
 1 vm-host2 running
 3 virt-mach-centos1 running

[root@hypervisor-host1 ~]# prlctl list
UUID                                    STATUS       IP_ADDR         T  NAME
{dc37c201-08c9-589d-aa20-9386d63ce3f3}  running      –               VM virt-mach-centos1
{76e8a5f8-caa8-5442-830e-aa4bfe8d42d9}  running      –               VM vm-host2
[root@hypervisor-host1 ~]#

If you have stopped VMs with Virtuozzo to list the stopped ones as well.
 

# prlctl list -a

[root@hypervisor-host2 74a7bbe8-9245-5385-ac0d-d10299100789]# vzlist -a
                                CTID      NPROC STATUS    IP_ADDR         HOSTNAME
[root@hypervisor-host2 74a7bbe8-9245-5385-ac0d-d10299100789]# prlctl list
UUID                                    STATUS       IP_ADDR         T  NAME
{92075803-a4ce-5ec0-a3d8-9ee83d85fc76}  running      –               VM virt-mach-centos2
{74a7bbe8-9245-5385-ac0d-d10299100789}  running      –               VM vm-host1

# prlctl list -a


If due to Virtuozzo version above command does not return you can manually check in the VM located folder, VM ID etc.
 

[root@hypervisor-host2 vmprivate]# ls
74a7bbe8-9245-4385-ac0d-d10299100789  92075803-a4ce-4ec0-a3d8-9ee83d85fc76
[root@hypervisor-host2 vmprivate]# pwd
/vz/vmprivate
[root@hypervisor-host2 vmprivate]#


[root@hypervisor-host1 ~]# ls -al /vz/vmprivate/
total 20
drwxr-x—. 5 root root 4096 Feb 14  2019 .
drwxr-xr-x. 7 root root 4096 Feb 13  2019 ..
drwxr-x–x. 4 root root 4096 Feb 18  2019 1c863dfc-1deb-493c-820f-3005a0457627
drwxr-x–x. 4 root root 4096 Feb 14  2019 76e8a5f8-caa8-4442-830e-aa4bfe8d42d9
drwxr-x–x. 4 root root 4096 Feb 14  2019 dc37c201-08c9-489d-aa20-9386d63ce3f3
[root@hypervisor-host1 ~]#


Before doing anything with the VMs, also don't forget to check the Hypervisor hosts has enough space, otherwise you'll get in big troubles !
 

[root@hypervisor-host2 vmprivate]# df -h
Filesystem                       Size  Used Avail Use% Mounted on
/dev/mapper/centos_hypervisor-host2-root   20G  1.8G   17G  10% /
devtmpfs                          20G     0   20G   0% /dev
tmpfs                             20G     0   20G   0% /dev/shm
tmpfs                             20G  2.0G   18G  11% /run
tmpfs                             20G     0   20G   0% /sys/fs/cgroup
/dev/sda1                        992M  159M  766M  18% /boot
/dev/mapper/centos_hypervisor-host2-home  9.8G   37M  9.2G   1% /home
/dev/mapper/centos_hypervisor-host2-var   9.8G  355M  8.9G   4% /var
/dev/mapper/centos_hypervisor-host2-vz    755G   25G  692G   4% /vz


[root@hypervisor-host1 ~]# df -h
Filesystem               Size  Used Avail Use% Mounted on
/dev/mapper/centos-root   50G  1.8G   45G   4% /
devtmpfs                  20G     0   20G   0% /dev
tmpfs                     20G     0   20G   0% /dev/shm
tmpfs                     20G  2.1G   18G  11% /run
tmpfs                     20G     0   20G   0% /sys/fs/cgroup
/dev/sda2                992M  153M  772M  17% /boot
/dev/mapper/centos-home  9.8G   37M  9.2G   1% /home
/dev/mapper/centos-var   9.8G  406M  8.9G   5% /var
/dev/mapper/centos-vz    689G   12G  643G   2% /vz

Another thing to do before proceeding with update is to check and tune if needed the amount of CentOS repositories used, before doing anything with yum.
 

[root@hypervisor-host2 yum.repos.d]# ls -al
total 68
drwxr-xr-x.   2 root root  4096 Oct  6 13:13 .
drwxr-xr-x. 110 root root 12288 Oct  7 11:13 ..
-rw-r–r–.   1 root root  4382 Mar 14  2019 CentOS7.repo
-rw-r–r–.   1 root root  1664 Sep  5  2019 CentOS-Base.repo
-rw-r–r–.   1 root root  1309 Sep  5  2019 CentOS-CR.repo
-rw-r–r–.   1 root root   649 Sep  5  2019 CentOS-Debuginfo.repo
-rw-r–r–.   1 root root   314 Sep  5  2019 CentOS-fasttrack.repo
-rw-r–r–.   1 root root   630 Sep  5  2019 CentOS-Media.repo
-rw-r–r–.   1 root root  1331 Sep  5  2019 CentOS-Sources.repo
-rw-r–r–.   1 root root  6639 Sep  5  2019 CentOS-Vault.repo
-rw-r–r–.   1 root root  1303 Mar 14  2019 factory.repo
-rw-r–r–.   1 root root   666 Sep  8 10:13 openvz.repo
[root@hypervisor-host2 yum.repos.d]#


[root@hypervisor-host1 yum.repos.d]# ls -al
total 68
drwxr-xr-x.   2 root root  4096 Oct  6 13:13 .
drwxr-xr-x. 112 root root 12288 Oct  7 11:09 ..
-rw-r–r–.   1 root root  1664 Sep  5  2019 CentOS-Base.repo
-rw-r–r–.   1 root root  1309 Sep  5  2019 CentOS-CR.repo
-rw-r–r–.   1 root root   649 Sep  5  2019 CentOS-Debuginfo.repo
-rw-r–r–.   1 root root   314 Sep  5  2019 CentOS-fasttrack.repo
-rw-r–r–.   1 root root   630 Sep  5  2019 CentOS-Media.repo
-rw-r–r–.   1 root root  1331 Sep  5  2019 CentOS-Sources.repo
-rw-r–r–.   1 root root  6639 Sep  5  2019 CentOS-Vault.repo
-rw-r–r–.   1 root root  1303 Mar 14  2019 factory.repo
-rw-r–r–.   1 root root   300 Mar 14  2019 obsoleted_tmpls.repo
-rw-r–r–.   1 root root   666 Sep  8 10:13 openvz.repo


1. Dump VM definition XMs (to have it in case if it gets wiped during update)

There is always a possibility that something will fail during the update and you might be unable to restore back to the old version of the Virtual Machine due to some config misconfigurations or whatever thus a very good idea, before proceeding to modify the working VMs is to use KVM's virsh and dump the exact set of XML configuration that makes the VM roll properly.

To do so:
Check a little bit up in the article how we have listed the IDs that are part of the directory containing the VM.
 

[root@hypervisor-host1 ]# virsh dumpxml (Id of VM virt-mach-centos1 ) > /root/virt-mach-centos1_config_bak.xml
[root@hypervisor-host2 ]# virsh dumpxml (Id of VM virt-mach-centos2) > /root/virt-mach-centos2_config_bak.xml


2. Set on standby virt-mach-centos1 (virt-mach-centos1)

As I'm upgrading two machines that are configured to run an haproxy corosync cluster, before proceeding to update the active host, we have to switch off
the proxied traffic from node1 to node2, – e.g. standby the active node, so the cluster can move up the traffic to other available node.
 

[root@virt-mach-centos1 ~]# pcs cluster standby virt-mach-centos1


3. Stop VM virt-mach-centos1 & backup on Hypervisor host (hypervisor-host1) for VM1

Another prevention step to make sure you don't get into damaged VM or broken haproxy cluster after the upgrade is to of course backup 


[root@hypervisor-host1 ]# prlctl backup virt-mach-centos1

or
 

[root@hypervisor-host1 ]# prlctl stop virt-mach-centos1
[root@hypervisor-host1 ]# cp -rpf /vz/vmprivate/dc37c201-08c9-489d-aa20-9386d63ce3f3 /vz/vmprivate/dc37c201-08c9-489d-aa20-9386d63ce3f3-bak
[root@hypervisor-host1 ]# tar -czvf virt-mach-centos1_vm_virt-mach-centos1.tar.gz /vz/vmprivate/dc37c201-08c9-489d-aa20-9386d63ce3f3

[root@hypervisor-host1 ]# prlctl start virt-mach-centos1


4. Remove package version locks on all hosts

If you're using package locking to prevent some other colleague to not accidently upgrade the machine (if multiple sysadmins are managing the host), you might use the RPM package locking meachanism, if that is used check RPM packs that are locked and release the locking.

+ List actual list of locked packages

[root@hypervisor-host1 ]# yum versionlock list  

…..
0:libtalloc-2.1.16-1.el7.*
0:libedit-3.0-12.20121213cvs.el7.*
0:p11-kit-trust-0.23.5-3.el7.*
1:quota-nls-4.01-19.el7.*
0:perl-Exporter-5.68-3.el7.*
0:sudo-1.8.23-9.el7.*
0:libxslt-1.1.28-5.el7.*
versionlock list done
                          

+ Clear the locking            

# yum versionlock clear                               


+ List actual list / == clear all entries
 

[root@virt-mach-centos2 ]# yum versionlock list; yum versionlock clear
[root@virt-mach-centos1 ]# yum versionlock list; yum versionlock clear
[root@hypervisor-host1 ~]# yum versionlock list; yum versionlock clear
[root@hypervisor-host2 ~]# yum versionlock list; yum versionlock clear


5. Do yum update virt-mach-centos1


For some clarity if something goes wrong, it is really a good idea to make a dump of the basic packages installed before the RPM package update is initiated,
The exact versoin of RHEL or CentOS as well as the list of locked packages, if locking is used.

Enter virt-mach-centos1 (ssh virt-mach-centos1) and run following cmds:
 

# cat /etc/redhat-release  > /root/logs/redhat-release-$(hostname)-$(date '+%Y-%m-%d_%H-%M-%S').out
# cat /etc/grub.d/30_os-prober > /root/logs/grub2-efi-$(hostname)-$(date '+%Y-%m-%d_%H-%M-%S').out


+ Only if needed!!
 

# yum versionlock clear
# yum versionlock list


Clear any previous RPM packages – careful with that as you might want to keep the old RPMs, if unsure comment out below line
 

# yum clean all |tee /root/logs/yumcleanall-$(hostname)-$(date '+%Y-%m-%d_%H-%M-%S').out


Proceed with the update and monitor closely the output of commands and log out everything inside files using a small script that you should place under /root/status the script is given at the end of the aritcle.:
 

yum check-update |tee /root/logs/yumcheckupdate-$(hostname)-$(date '+%Y-%m-%d_%H-%M-%S').out
yum check-update | wc -l
yum update |tee /root/logs/yumupdate-$(hostname)-$(date '+%Y-%m-%d_%H-%M-%S').out
sh /root/status |tee /root/logs/status-before-$(hostname)-$(date '+%Y-%m-%d_%H-%M-%S').out


6. Check if everything is running fine after upgrade

Reboot VM
 

# shutdown -r now


7. Stop VM virt-mach-centos2 & backup  on Hypervisor host (hypervisor-host2)

Same backup step as prior 

# prlctl backup virt-mach-centos2


or
 

# prlctl stop virt-mach-centos2
# cp -rpf /vz/vmprivate/92075803-a4ce-4ec0-a3d8-9ee83d85fc76 /vz/vmprivate/92075803-a4ce-4ec0-a3d8-9ee83d85fc76-bak
## tar -czvf virt-mach-centos2_vm_virt-mach-centos2.tar.gz /vz/vmprivate/92075803-a4ce-4ec0-a3d8-9ee83d85fc76

# prctl start virt-mach-centos2


8. Do yum update on virt-mach-centos2

Log system state, before the update
 

# cat /etc/redhat-release  > /root/logs/redhat-release-vorher-$(hostname)-$(date '+%Y-%m-%d_%H-%M-%S').out
# cat /etc/grub.d/30_os-prober > /root/logs/grub2-efi-vorher-$(hostname)-$(date '+%Y-%m-%d_%H-%M-%S').out
# yum versionlock clear == if needed!!
# yum versionlock list


Clean old install update / packages if required
 

# yum clean all |tee /root/logs/yumcleanall-$(hostname)-$(date '+%Y-%m-%d_%H-%M-%S').out


Initiate the update

# yum check-update |tee /root/logs/yumcheckupdate-$(hostname)-$(date '+%Y-%m-%d_%H-%M-%S').out 2>&1
# yum check-update | wc -l 
# yum update |tee /root/logs/yumupdate-$(hostname)-$(date '+%Y-%m-%d_%H-%M-%S').out 2>&1
# sh /root/status |tee /root/logs/status-before-$(hostname)-$(date '+%Y-%m-%d_%H-%M-%S').out


9. Check if everything is running fine after upgrade
 

Reboot VM
 

# shutdown -r now


10. Stop VM vm-host2 & backup
 

# prlctl backup vm-host2


or

# prlctl stop vm-host2

Or copy the actual directory containig the Virtozzo VM (use the correct ID)
 

# cp -rpf /vz/vmprivate/76e8a5f8-caa8-5442-830e-aa4bfe8d42d9 /vz/vmprivate/76e8a5f8-caa8-5442-830e-aa4bfe8d42d9-bak
## tar -czvf vm-host2.tar.gz /vz/vmprivate/76e8a5f8-caa8-4442-830e-aa5bfe8d42d9

# prctl start vm-host2


11. Do yum update vm-host2
 

# cat /etc/redhat-release  > /root/logs/redhat-release-vorher-$(hostname)-$(date '+%Y-%m-%d_%H-%M-%S').out
# cat /etc/grub.d/30_os-prober > /root/logs/grub2-efi-vorher-$(hostname)-$(date '+%Y-%m-%d_%H-%M-%S').out


Clear only if needed

# yum versionlock clear
# yum versionlock list
# yum clean all |tee /root/logs/yumcleanall-$(hostname)-$(date '+%Y-%m-%d_%H-%M-%S').out


Do the rpm upgrade

# yum check-update |tee /root/logs/yumcheckupdate-$(hostname)-$(date '+%Y-%m-%d_%H-%M-%S').out
# yum check-update | wc -l
# yum update |tee /root/logs/yumupdate-$(hostname)-$(date '+%Y-%m-%d_%H-%M-%S').out
# sh /root/status |tee /root/logs/status-before-$(hostname)-$(date '+%Y-%m-%d_%H-%M-%S').out


12. Check if everything is running fine after upgrade
 

Reboot VM
 

# shutdown -r now


13. Do yum update hypervisor-host2


# cat /etc/redhat-release  > /root/logs/redhat-release-vorher-$(hostname)-$(date '+%Y-%m-%d_%H-%M-%S').out
# cat /etc/grub.d/30_os-prober > /root/logs/grub2-efi-vorher-$(hostname)-$(date '+%Y-%m-%d_%H-%M-%S').out

Clear lock   if needed

# yum versionlock clear
# yum versionlock list
# yum clean all |tee /root/logs/yumcleanall-$(hostname)-$(date '+%Y-%m-%d_%H-%M-%S').out


Update rpms
 

# yum check-update |tee /root/logs/yumcheckupdate-$(hostname)-$(date '+%Y-%m-%d_%H-%M-%S').out 2>&1
# yum check-update | wc -l
# yum update |tee /root/logs/yumupdate-$(hostname)-$(date '+%Y-%m-%d_%H-%M-%S').out 2>&1
# sh /root/status |tee /root/logs/status-before-$(hostname)-$(date '+%Y-%m-%d_%H-%M-%S').out


14. Stop VM vm-host1 & backup


Some as ealier
 

# prlctl backup vm-host1

or
 

# prlctl stop vm-host1

# cp -rpf /vz/vmprivate/74a7bbe8-9245-4385-ac0d-d10299100789 /vz/vmprivate/74a7bbe8-9245-4385-ac0d-d10299100789-bak
# tar -czvf vm-host1.tar.gz /vz/vmprivate/74a7bbe8-9245-4385-ac0d-d10299100789

# prctl start vm-host1


15. Do yum update vm-host2
 

# cat /etc/redhat-release  > /root/logs/redhat-release-vorher-$(hostname)-$(date '+%Y-%m-%d_%H-%M-%S').out
# cat /etc/grub.d/30_os-prober > /root/logs/grub2-efi-vorher-$(hostname)-$(date '+%Y-%m-%d_%H-%M-%S').out
# yum versionlock clear == if needed!!
# yum versionlock list
# yum clean all |tee /root/logs/yumcleanall-$(hostname)-$(date '+%Y-%m-%d_%H-%M-%S').out
# yum check-update |tee /root/logs/yumcheckupdate-$(hostname)-$(date '+%Y-%m-%d_%H-%M-%S').out
# yum check-update | wc -l
# yum update |tee /root/logs/yumupdate-$(hostname)-$(date '+%Y-%m-%d_%H-%M-%S').out
# sh /root/status |tee /root/logs/status-before-$(hostname)-$(date '+%Y-%m-%d_%H-%M-%S').out


16. Check if everything is running fine after upgrade

+ Reboot VM

# shutdown -r now


17. Do yum update hypervisor-host1

Same procedure for HV host 1 

# cat /etc/redhat-release  > /root/logs/redhat-release-vorher-$(hostname)-$(date '+%Y-%m-%d_%H-%M-%S').out
# cat /etc/grub.d/30_os-prober > /root/logs/grub2-efi-vorher-$(hostname)-$(date '+%Y-%m-%d_%H-%M-%S').out

Clear lock
 

# yum versionlock clear
# yum versionlock list
# yum clean all |tee /root/logs/yumcleanall-$(hostname)-$(date '+%Y-%m-%d_%H-%M-%S').out

# yum check-update |tee /root/logs/yumcheckupdate-$(hostname)-$(date '+%Y-%m-%d_%H-%M-%S').out
# yum check-update | wc -l
# yum update |tee /root/logs/yumupdate-$(hostname)-$(date '+%Y-%m-%d_%H-%M-%S').out
# sh /root/status |tee /root/logs/status-before-$(hostname)-$(date '+%Y-%m-%d_%H-%M-%S').out


18. Check if everything is running fine after upgrade

Reboot VM
 

# shutdown -r now


Check hypervisor-host1 all VMs run as expected 


19. Check if everything is running fine after upgrade

Reboot VM
 

# shutdown -r now


Check hypervisor-host2 all VMs run as expected afterwards


20. Check once more VMs and haproxy or any other contained services in VMs run as expected

Login to hosts and check processes and logs for errors etc.
 

21. Haproxy Unstandby virt-mach-centos1

Assuming that the virt-mach-centos1 and virt-mach-centos2 are running a Haproxy / corosync cluster you can try to standby node1 and check the result
hopefully all should be fine and traffic should come to host node2.

[root@virt-mach-centos1 ~]# pcs cluster unstandby virt-mach-centos1


Monitor logs and make sure HAproxy works fine on virt-mach-centos1


22. If necessery to redefine VMs (in case they disappear from virsh) or virtuosso is not working

[root@virt-mach-centos1 ]# virsh define /root/virt-mach-centos1_config_bak.xml
[root@virt-mach-centos1 ]# virsh define /root/virt-mach-centos2_config_bak.xml


23. Set versionlock to RPMs to prevent accident updates and check OS version release

[root@virt-mach-centos2 ]# yum versionlock \*
[root@virt-mach-centos1 ]# yum versionlock \*
[root@hypervisor-host1 ~]# yum versionlock \*
[root@hypervisor-host2 ~]# yum versionlock \*

[root@hypervisor-host2 ~]# cat /etc/redhat-release 
CentOS Linux release 7.8.2003 (Core)

Other useful hints

[root@hypervisor-host1 ~]# virsh console dc37c201-08c9-489d-aa20-9386d63ce3f3
Connected to domain virt-mach-centos1
..

! Compare packages count before the upgrade on each of the supposable identical VMs and HVs – if there is difference in package count review what kind of packages are different and try to make the machines to look as identical as possible  !

Packages to update on hypervisor-host1 Count: XXX
Packages to update on hypervisor-host2 Count: XXX
Packages to update virt-mach-centos1 Count: – 254
Packages to update virt-mach-centos2 Count: – 249

The /root/status script

+++

#!/bin/sh
echo  '=======================================================   '
echo  '= Systemctl list-unit-files –type=service | grep enabled '
echo  '=======================================================   '
systemctl list-unit-files –type=service | grep enabled

echo  '=======================================================   '
echo  '= systemctl | grep ".service" | grep "running"            '
echo  '=======================================================   '
systemctl | grep ".service" | grep "running"

echo  '=======================================================   '
echo  '= chkconfig –list                                        '
echo  '=======================================================   '
chkconfig –list

echo  '=======================================================   '
echo  '= netstat -tulpn                                          '
echo  '=======================================================   '
netstat -tulpn

echo  '=======================================================   '
echo  '= netstat -r                                              '
echo  '=======================================================   '
netstat -r


+++

That's all folks, once going through the article, after some 2 hours of efforts or so you should have an up2date machines.
Any problems faced or feedback is mostly welcome as this might help others who have the same setup.

Thanks for reading me 🙂

Linux script to periodically log enabled systemctl services, configured network IPs and routings, server established connections and iptables firewall rules

Tuesday, January 25th, 2022

bash-script-command-line-script-logo

For those who are running some kind of server be it virtual or physical, where multiple people or many systemins have access, sometimes it could be quite a mess as someone due to miscommunication or whatever could change something on the configured Network Ethernet interfaces, or configured routing tables, or simply issue an update which might change the set of automatically set to run systemctl services due to update. Such changes on a Linux server Operating system often can remain unnoticed and could cause quite a harm. Even when the change is noticed the logical question occurs what was the previous network route on the server or what kind of network was configured on Ethernet interface ethX etc. 
Problems like the described where, pretty common in many public Private Clouds or VMWare / XEN based Hypervisors that host multiple  Virtual machines, for that reason I've developed a small script which is pretty dumb on the first glimpse but mostly useful as it keeps historical records of such important information.
 

#!/bin/sh
# script to show configured services on system, configured IPs, netstat state and network routes
# Script to be used during CentOS and Redhat Enterprise Linux RPM package updates with yum

output_file=network_ip_routes_services_status;
ddate=$(date '+%Y-%m-%d_%H-%M-%S');
iptables=$(which iptables);
if [ ! -d /root/logs/ ]; then
mkdir /root/logs/;
fi

echo "STARTED: $(date '+%Y-%m-%d_%H-%M-%S'):" | tee -a /root/logs/$output_file-$(hostname)-$ddate.log
echo -e "# systemctl list-unit-files\n" | tee -a /root/logs/$output_file-$(hostname)-$ddate.log
systemctl list-unit-files –type=service | grep enabled | tee -a /root/logs/$output_file-$(hostname)-$ddate.log
echo -e '# systemctl | grep ".service" | grep "running"\n' | tee -a /root/logs/$output_file-$(hostname)-$ddate.log
systemctl | grep ".service" | grep "running" | tee -a /root/logs/$output_file-$(hostname)-$ddate.log
echo -e "# netstat -tulpn\n" | tee -a /root/logs/$output_file-$(hostname)-$ddate.log
netstat -tulpn | tee -a /root/logs/$output_file-$(hostname)-$ddate.log
echo -e "# netstat -r\n" | tee -a /root/logs/$output_file-$(hostname)-$ddate.log
netstat -r | tee -a /root/logs/$output_file-$(hostname)-$ddate.log
echo -e "# ip a s\n" | tee -a /root/logs/$output_file-$(hostname)-$ddate.log
ip a s | tee -a /root/logs/$output_file-$(hostname)-$ddate.log
echo -e "# /sbin/route -n\n" | tee -a /root/logs/$output_file-$(hostname)-$ddate.log
/sbin/route -n | tee -a /root/logs/$output_file-$(hostname)-$ddate.log
echo -e "# $iptables -L -n\n" | tee -a /root/logs/$output_file-$(hostname)-$ddate.log
echo -e "# $iptables -t nat -L" | tee -a /root/logs/$output_file-$(hostname)-$ddate.log
$iptables -L -n | tee -a /root/logs/$output_file-$(hostname)-$ddate.log
$iptables -t nat -L | tee -a /root/logs/$output_file-$(hostname)-$ddate.log
echo "ENDED $(date '+%Y-%m-%d_%H-%M-%S'):" | tee -a /root/logs/$output_file-$(hostname)-$ddate.log


Script produces its logs inside  /root/logs/network_ip_routes_services_status*hostname*currentdate*.log, put the script inside /root/ or wherever you like.

To keep an eye how network routing or ip configuration or firewall changed or there was a peak with the established connections towards daemons running on host (lets say requiring a machine upgrade), I've set the script to run as usually via cron job at the end of the predefined cron job tasks, like so:

# crontab -u root -e
# periodic dump and log network routing tables, netstat and systemctl list-unit-files
*/1 01 01,25 * * /root/show_running_services_netstat_ips_route1.sh 2>&1 >/dev/null

You can download a copy of show_running_services_netstat_ips_route1.sh script here.
The script is written without much of efficiency on mind, as you can see the with the multiple tee -a and for critical hosts it might be a good idea to rewrite it to use '>>' OPERAND instead, anyhows as most machines today are pretty powerful it doesn't really matter much.

Of course today such a script is quite archaic, as most big corporations are using much more complex monitoring software such as Zabbix, Prometheus or if some kind of Elastic Search is used Kibana etc. but for a basic needs and even for a double checking and comparing with other more advanced monitoring tools  (in case if monitoring tools  database gets damaged or temporary down until backupped), still I think such an oldschool simple monitoring script can be of use.

A good addition to that if you use a central logging server is to set another cron to periodically synchronize produced /root/logs/* to somewhere, here is how to do it with simple rsync (considering your host is configured to login with a user without password with ssh key authentication).

# HOSTNAME=$(hostname); rsync -axHv –ignore-existing -e 'ssh -p 22' /bashscripts/  -q -i –out-format="%t %f %b" –log-file=/var/log/rsync_sync_jobs.log –info=progress2 root@BACKUP_SERVER_HOST:/$(HOSTNAME)-logs/

Once something strange occurs with the machine, like the machine needs to be rebuild

I would be glad to hear if some of my readers uses some useful script which I can adopt myself. Cheers  🙂

Linux: How to set KVM Virtual Machine to autostart on system boot

Thursday, July 15th, 2021

linux-kvm-set-vm-to-automatically-boot-on-linux-system-boot

Recently I've written a short article on how to make auto boot OpenVZ container Virtual Machine if system gets rebooted as I had the task to do so in daily job as sysadmin.
Few days ago after some power outage in one of Frankfurt based Data Centers, some Rack tech equipment has been temporary powered of and once the electricity was up again, some Linux servers  running Kernel Based Virtualization ( KVM ) some of the virtual machines did not managed to automatically start up and we had to manually start them one by one.
To manually start each of the machines that did not start up had to do the trivial:

[root@hypervisor ~]# virsh list
 Id    Name                           State
—————————————————-
 3     VM500                   running

[root@hypervisor ~]# virsh dominfo VM500
Id:             3
Name:           VM500
UUID:           82075903-a4ce-5ec0-a3d8-9ee83d85fc75
OS Type:        hvm
State:          running
CPU(s):         2
CPU time:       247407.9s
Max memory:     2097152 KiB
Used memory:    2097152 KiB
Persistent:     yes
Autostart:      disable
Managed save:   no
Security model: selinux
Security DOI:   0
Security label: system_u:system_r:svirt_t:s0:c447,c723 (permissive)

[root@hypervisor ~]# virsh start VM_domain_Name

Of course logcally to prevent future issues in case if Linux server gets suddenly rebooted due to whatever reason, we had to configure the machines in questions to automatically boot on OS system boot.

In some rare cases if above start command does not help you might want to check what is the status of libvirtd and investigate the logs in /var/log/libvirt/ i.e. /var/log/libvirt/libvirt.log

An alternative but more complicated way to set virtual machine to automatically start on boot is by using default location for automatic VM start just like OpenXEn has its /etc/xen/auto/ dirtory from where each soft symlinked VM configuration from /etc/xen/VM_name.cfg is started in KVM Hypervisor hosts to auto boot a certain vm you have to link /etc/libvirt/qemu/VM-to-autoboot-name.xml to /etc/libvirt/qemu/autostart/VM-to-autoboot-name.xml

[root@hypervisor ~]# systemctl status libvirtd
● libvirtd.service – Virtualization daemon
   Loaded: loaded (/usr/lib/systemd/system/libvirtd.service; enabled; vendor preset: enabled)
   Active: active (running) since Tue 2021-06-29 10:21:30 CEST; 2 weeks 2 days ago
     Docs: man:libvirtd(8)
           https://libvirt.org
 Main PID: 1809 (libvirtd)
    Tasks: 22 (limit: 32768)
   CGroup: /system.slice/libvirtd.service
           ├─1809 /usr/sbin/libvirtd
           ├─2335 /usr/sbin/dnsmasq –conf-file=/var/lib/libvirt/dnsmasq/default.conf –leasefile-ro –dhcp-script=/us…
           ├─2336 /usr/sbin/dnsmasq –conf-file=/var/lib/libvirt/dnsmasq/default.conf –leasefile-ro –dhcp-script=/us…
           ├─2386 /usr/sbin/dnsmasq –conf-file=/var/lib/libvirt/dnsmasq/Host-Only.conf –leasefile-ro –dhcp-script=/…
           └─2387 /usr/sbin/dnsmasq –conf-file=/var/lib/libvirt/dnsmasq/Host-Only.conf –leasefile-ro –dhcp-script=/…

If for some reason libvirtd is not running or disabled state you will have to enable it with:

[root@hypervisor ~]# systemctl enable libvirtd

If the virtualization is running on some RPM based distribtuion OpenSuse whatever and libvirtd is controlled via chkconfig (redhat runlevel alternative system), you will have to :

[root@hypervisor ~]# chkconfig libvirtd on

Disabling KVM Virtual Machine from auto start on server boot

[root@hypervisor ~]# virsh autostart Debian10 –disable
Domain Debian10 unmarked as autostarted

Find largest files on AIX system root / show biggest files and directories in AIX folder howto

Friday, November 6th, 2020

ibm-aix-logo-find-largest-files-and-directories-on-system-to-free-space-if-disk-is-full

On an AIX server if you get a root directory ( / ) to be completely full problem and the AIX running services are unable to write their pid files and logs for example in /tmp /admin /home /var/tmp /var/log/ and rest of directory structure or the system is almost full with mounted filesystems which shows it is 90% or 95%+ full on main partition,  the system is either already stuck or it is on the way to stop functiononing normally. Hence the only way to recover IBM AIX machine to a normal behavior is to clean up some files (if you can't extend the partition) or add more physical Hard drive, just as we usually do on Linux.

So How can we clean up largest files on AIX?


Lets say we want to find all files on AIX larger than 1 MB.

aix-system:/ $ find / -xdev -size 2048 -ls | sort -r +6
12579 1400 -rw-r—–  1 root      security   1433534 Jun 26  2019 /etc/security/tsd/tsd.dat
 9325 20361 -rw-r—–  1 root      system    20848752 Nov  6 16:02 /etc/security/failedlogin
21862 7105 -rwxr-xr-x  1 root      system     7274915 Aug 24  2017 /sbin/zabbix_agentd
   72 7005 -rw-rw—-  1 root      system     7172962 Nov  6 16:19 /audit/stream.out
24726 2810 -rw——-  1 root      system     2876944 Feb 29  2012 /etc/syslog-ng/core
29314 2391 -r-xr-xr-x  1 root      system     2447454 Jun 25  2019 /lpp/bos/bos.rte.filesystem/7.1.5.32.save/update.16
21844 2391 -r-xr-xr-x  1 root      system     2447414 Jun 25  2019 /sbin/helpers/jfs2/logredo64
21843 2219 -r-xr-xr-x  1 root      system     2271971 Jun 25  2019 /sbin/helpers/jfs2/logredo
29313 2218 -r-xr-xr-x  1 root      system     2270835 Jun 25  2019 /lpp/bos/bos.rte.filesystem/7.1.5.32.save/update.15
22279 1800 -rw-r–r–  1 root      system     1843200 Nov  4 08:03 /root/smit.log
12577 1399 -rw-r–r–  1 root      system     1431685 Jun 26  2019 /etc/security/tsd/.tsd.bk
21837 1325 -r-xr-xr-x  1 root      system     1356340 Jun 25  2019 /sbin/helpers/jfs2/fsck64
29307 1325 -r-xr-xr-x  1 root      system     1356196 Jun 25  2019 /lpp/bos/bos.rte.filesystem/7.1.5.32.save/update.9
   12 1262 -rw——-  1 root      system     1291365 Aug  8  2011 /core


Above finds all files greater than 1 MB and sort them in reverse
order with the largest files first.

To search all files larger than 64 Megabytes under root ( / )

aix-system:/ $ find / -xdev -size +131072 -ls | sort -r +6
65139 97019 -rw-r–r–  1 root      system    99347181 Mar 31  2017 /admin/archive.zip


Display 10 largest directories on system

aix-system:/ $ du -a /dir | sort -n -r | head -10


Show biggest files and directories in a directory


aix-system:/ $ du -sk * | sort -n
4       Mail
4       liste
4       my_user
4       syslog-ng.conf
140     smit.script
180     smit.transaction
1804    smit.log

Below du display the size of all files and directories in the current directory with the biggest being at the bottom.


List all largest files in dir decrasingly. If a directory is matches show all sub-dirs largest files.

aix-system:/ $ ls -A . | while read name; do du -sk $name; done | sort -nr

Below ls + while loop command sorts disk usage for all files in the current directory by size, in decreasing order. If the file we suspect happens to be a directory, we can then change into that directory, and re-run the preceding command to determine what is taking up space within that directory.

Continue these steps until you find the desired file or files, at which point you can take appropriate actions.

If the bottom-most item is a directory, then cd into that directory and run the du command again. Keep drilling down until you find the biggest files on your system and get rid of them to save some space.

Set all logs to log to to physical console /dev/tty12 (tty12) on Linux

Wednesday, August 12th, 2020

tty linux-logo how to log everything to last console terminal tty12

Those who administer servers from the days of birth of Linux and who used actively GNU / Linux over the years or any other UNIX knows how practical could be to configure logging of all running services / kernel messages / errors and warnings on a physical console.

Traditionally from the days I was learning Linux basics I was shown how to do this on an old Debian Sarge 3.0 Linux without systemd and on all Linux distributions Redhat 9.0 / Calderas and Mandrakes I've used either as a home systems or for servers. I've always configured output of all messages to go to the last easy to access console /dev/tty12 (for those who never use it console switching under Linux plain text console mode is done with key combination of CTRL + ALT + F1 .. F12.

In recent times however with the introduction of systemd pretty much things changed as messages to console are not handled by /etc/inittab which was used to add and refresh physical consoles tty1, tty2 … tty7 (the default added one on Linux were usually 7), but I had to manually include more respawn lines for each console in /etc/inittab.
Nowadays as of year 2020 Linux distros /etc/inittab is no longer there being obsoleted and console print out of INPUT / OUTPUT messages are handled by systemd.
 

1. Enable Physical TTYs from TTY8 till TTY12 etc.


The number of default consoles existing in most Linux distributions I've seen is still from tty1 to tty7. Hence to add more tty consoles and be ready to be able to switch out  not only towards tty7 but towards tty12 once you're connected to the server via a remote ILO (Integrated Lights Out) / IdRAC (Dell Remote Access Controller) / IPMI / IMM (Imtegrated Management Module), you have to do it by telling systemd issuing below systemctl commands:


 # systemctl enable getty@tty8.service Created symlink /etc/systemd/system/getty.target.wants/getty@tty8.service -> /lib/systemd/system/getty@.service.

systemctl enable getty@tty9.service

Created symlink /etc/systemd/system/getty.target.wants/getty@tty9.service -> /lib/systemd/system/getty@.service.

systemctl enable getty@tty10.service

Created symlink /etc/systemd/system/getty.target.wants/getty@tty10.service -> /lib/systemd/system/getty@.service.

systemctl enable getty@tty11.service

Created symlink /etc/systemd/system/getty.target.wants/getty@tty11.service -> /lib/systemd/system/getty@.service.

systemctl enable getty@tty12.service

Created symlink /etc/systemd/system/getty.target.wants/getty@tty12.service -> /lib/systemd/system/getty@.service.


Once the TTYS tty7 to tty12 are enabled you will be able to switch to this consoles either if you have a physical LCD / CRT monitor or KVM switch connected to the machine mounted on the Rack shelf once you're in the Data Center or will be able to see it once connected remotely via the Management IP Interface (ILO) remote console.
 

2. Taking screenshot of the physical console TTY with fbcat


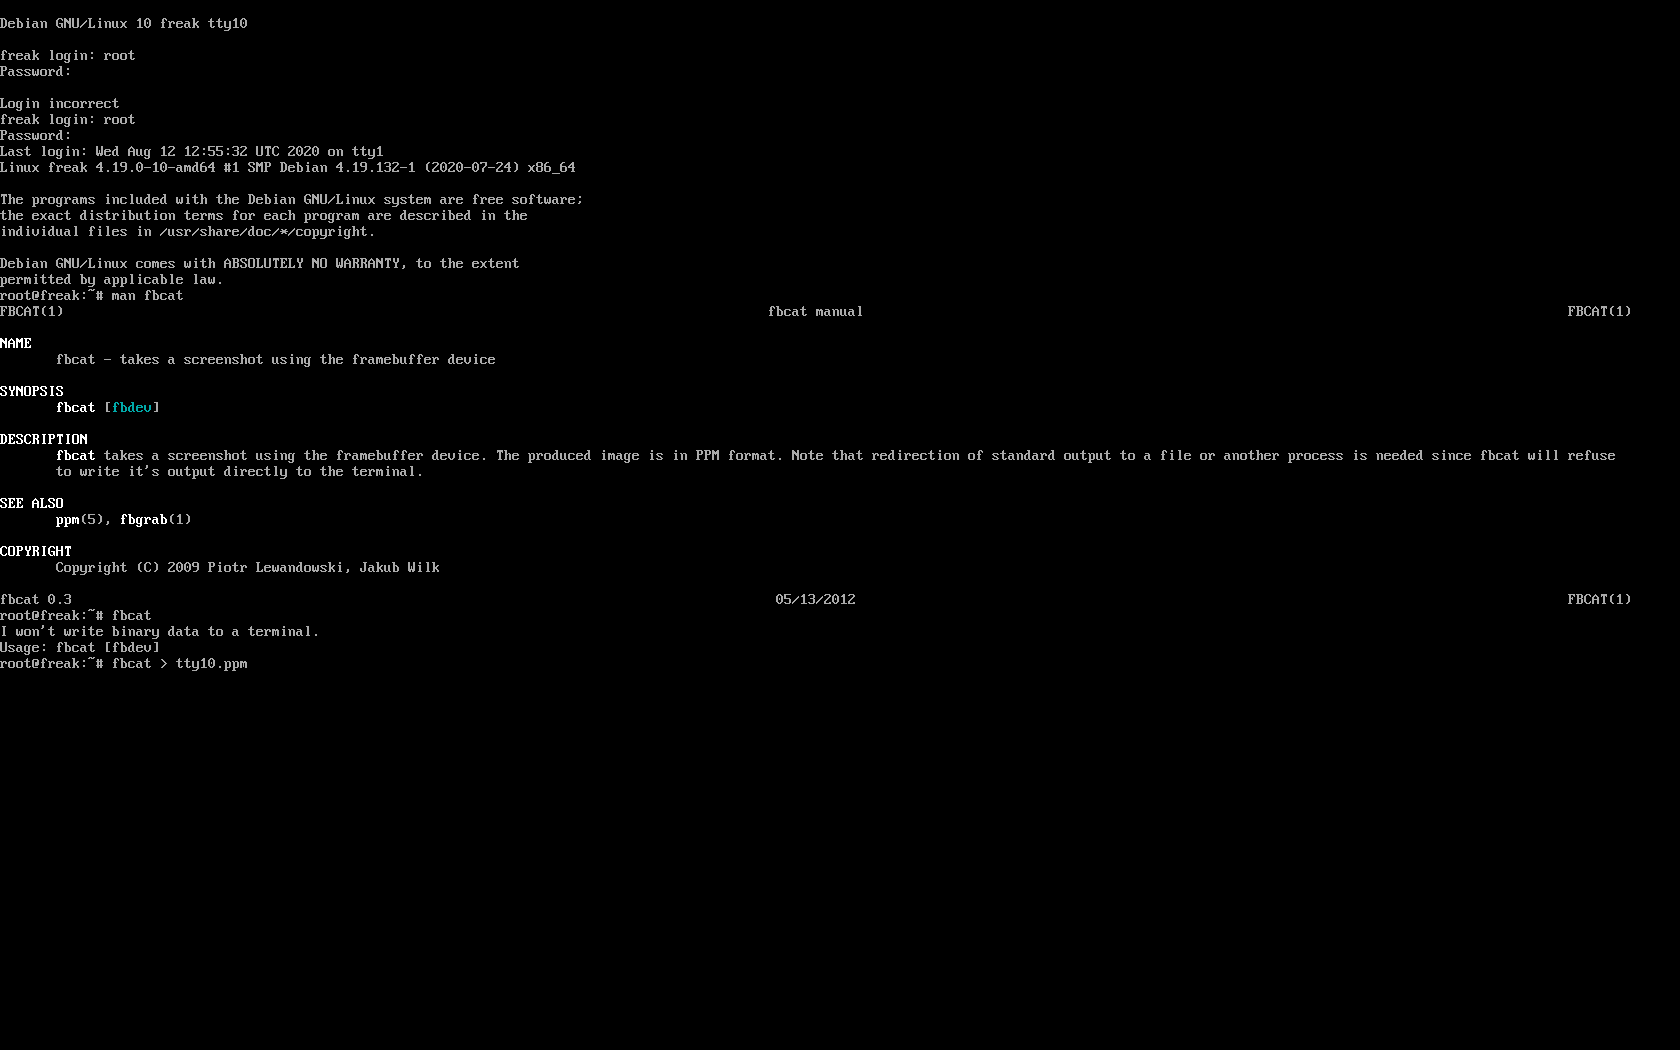
For example below is a screenshot of the 10th enabled tty10:

tty10-linux-screenshot-fbcat-how-to-screenshot-console

As you can in the screenshot I've used the nice tool fbcat that can be used to make a screenshot of remote console. This is very useful especially if remote access via a SSH client such as PuTTY / MobaXterm is not there but you have only a physical attached monitor access on a DCs that are under a heavy firewall that is preventing anyone to get to the system remotely. For example screenshotting the physical console in case if there is a major hardware failure occurs and you need to dump a hardware error message to a flash drive that will be used to later be handled to technicians to analyize it and exchange the broken server hardware part.

Screenshots of the CLI with fbcat is possible across most Linux distributions where as usual.

In Debian you have to first instal the tool via :
 

# apt install –yes fbcat


and on RedHats / CentOS / Fedoras

# yum install -y fbcat


Taking screenshot once tool is on the server of whatever you have printed on console is as easy as

# fbcat > tty_name.ppm


Note that you might want to convert the .ppm created picture to png with any converter such as imagemagick's convert command or if you have a GUI perhaps with GNU Image Manipulation Tool (GIMP).

3. Enabling every rsyslog handled message to log to Physical TTY12


To make everything such as errors, notices, debug, warning messages  become instantly logging towards above added new /dev/tty12.

Open /etc/rsyslog.conf and to the end of the file append below line :
 

daemon,mail.*;\
   news.=crit;news.=err;news.=notice;\
   *.=debug;*.=info;\
   *.=notice;*.=warn   /dev/tty12


To make rsyslog load its new config restart it:


# systemctl status rsyslog


rsyslog.service – System Logging Service
   Loaded: loaded (/lib/systemd/system/rsyslog.service; enabled; vendor preset: enabled)
   Active: active (running) since Mon 2020-08-10 04:09:36 EEST; 2 days ago
     Docs: man:rsyslogd(8)
           https://www.rsyslog.com/doc/
 Main PID: 671 (rsyslogd)
    Tasks: 4 (limit: 4915)
   Memory: 12.5M
   CGroup: /system.slice/rsyslog.service
           └─671 /usr/sbin/rsyslogd -n -iNONE


авг 12 00:00:05 pcfreak rsyslogd[671]:  [origin software="rsyslogd" swVersion="8.1901.0" x-pid="671" x-info="https://www.rsyslo
Warning: Journal has been rotated since unit was started. Log output is incomplete or unavailable.


systemctl restart rsyslog


That's all folks navigate by pressing simultaneously CTRL + ALT + F12 to get to TTY12 or use ALT + LEFT / ALT + RIGHT ARROW (console switch commands) till you get to the console where everything should be now logged.

Enjoy and if you like this article share to tell your sysadmin friends about this nice hack  ! 🙂


Procedure Instructions to safe upgrade CentOS / RHEL Linux 7 Core to latest release

Thursday, February 13th, 2020

safe-upgrade-CentOS-and_Redhat_Enterprise_Linux_RHEL-7-to-latest-stable-release

Generally upgrading both RHEL and CentOS can be done straight with yum tool just we're pretty aware and mostly anyone could do the update, but it is good idea to do some
steps in advance to make backup of any old basic files that might help us to debug what is wrong in case if the Operating System fails to boot after the routine Machine OS restart
after the upgrade that is usually a good idea to make sure that machine is still bootable after the upgrade.

This procedure can be shortened or maybe extended depending on the needs of the custom case but the general framework should be useful anyways to someone that's why
I decided to post this.

Before you go lets prepare a small status script which we'll use to report status of  sysctl installed and enabled services as well as the netstat connections state and
configured IP addresses and routing on the system.

The script show_running_services_netstat_ips_route.sh to be used during our different upgrade stages:
 

# script status ###
echo "STARTED: $(date '+%Y-%m-%d_%H-%M-%S'):" | tee /root/logs/yumcheckupdate-$(hostname)-$(date '+%Y-%m-%d_%H-%M-%S').out
systemctl list-unit-files –type=service | grep enabled
systemctl | grep ".service" | grep "running"
netstat -tulpn
netstat -r
ip a s
/sbin/route -n
echo "ENDED $(date '+%Y-%m-%d_%H-%M-%S'):" | tee /root/logs/yumcheckupdate-$(hostname)-$(date '+%Y-%m-%d_%H-%M-%S').out
####


– Save the script in any file like /root/status.sh

– Make the /root/logs directoriy.
 

[root@redhat: ~ ]# mkdir /root/logs
[root@redhat: ~ ]# vim /root/status.sh
[root@redhat: ~ ]# chmod +x /root/status.sh


1. Get a dump of CentOS installed version release and grub-mkconfig generated os_probe


[root@redhat: ~ ]# cat /etc/redhat-release  > /root/logs/redhat-release-vorher-$(hostname)-$(date '+%Y-%m-%d_%H-%M-%S').out
[root@redhat: ~ ]# cat /etc/grub.d/30_os-prober > /root/logs/grub2-efi-vorher-$(hostname)-$(date '+%Y-%m-%d_%H-%M-%S').out


2. Clear old versionlock marked RPM packages (if there are such)


On servers maintained by multitude of system administrators just like the case is inside a Global Corporations and generally in the corporate world , where people do access the systems via LDAP and more than a single person
has superuser privileges. It is a good prevention measure to use yum package management  functionality to RPM based Linux distributions called  versionlock.
versionlock for those who hear it for a first time is locking the versions of the installed RPM packages so if someone by mistake or on purpose decides to do something like :

[root@redhat: ~ ]# yum install packageversion

Having the versionlock set will prevent the updated package to be installed with a different branch package version.

Also it will prevent a playful unknowing person who just wants to upgrade the system without any deep knowledge to be able to
run

[root@redhat: ~ ]# yum upgrade

update and leave the system in unbootable state, that will be only revealed during the next system reboot.

If you haven't used versionlock before and you want to use it you can do it with:

[root@redhat: ~ ]# yum install yum-plugin-versionlock

To add all the packages for compiling C code and all the interdependend packages, you can do something like:


[root@redhat: ~ ]# yum versionlock gcc-*

If you want to clear up the versionlock, once it is in use run:

[root@redhat: ~ ]#  yum versionlock clear
[root@redhat: ~ ]#  yum versionlock list


3.  Check RPC enabled / disabled


This step is not necessery but it is a good idea to check whether it running on the system, because sometimes after upgrade rpcbind gets automatically started after package upgrade and reboot. 
If we find it running we'll need to stop and mask the service.


# check if rpc enabled
[root@redhat: ~ ]# systemctl list-unit-files|grep -i rpc
var-lib-nfs-rpc_pipefs.mount                                      static
auth-rpcgss-module.service                                        static
rpc-gssd.service                                                  static
rpc-rquotad.service                                               disabled
rpc-statd-notify.service                                          static
rpc-statd.service                                                 static
rpcbind.service                                                   disabled
rpcgssd.service                                                   static
rpcidmapd.service                                                 static
rpcbind.socket                                                    disabled
rpc_pipefs.target                                                 static
rpcbind.target                                                    static

[root@redhat: ~ ]# systemctl status rpcbind.service
● rpcbind.service – RPC bind service
   Loaded: loaded (/usr/lib/systemd/system/rpcbind.service; disabled; vendor preset: enabled)
   Active: inactive (dead)


[root@redhat: ~ ]# systemctl status rpcbind.socket
● rpcbind.socket – RPCbind Server Activation Socket
   Loaded: loaded (/usr/lib/systemd/system/rpcbind.socket; disabled; vendor preset: enabled)
   Active: inactive (dead)
   Listen: /var/run/rpcbind.sock (Stream)
           0.0.0.0:111 (Stream)
           0.0.0.0:111 (Datagram)
           [::]:111 (Stream)
           [::]:111 (Datagram)


4. Check any previously existing downloaded / installed RPMs (check yum cache)


yum install package-name / yum upgrade keeps downloaded packages via its operations inside its cache directory structures in /var/cache/yum/*.
Hence it is good idea to check what were the previously installed packages and their count.


[root@redhat: ~ ]# cd /var/cache/yum/x86_64/;
[root@redhat: ~ ]# find . -iname '*.rpm'|wc -l


5. List RPM repositories set on the server


 [root@redhat: ~ ]# yum repolist
Loaded plugins: fastestmirror, versionlock
Repodata is over 2 weeks old. Install yum-cron? Or run: yum makecache fast
Determining fastest mirrors
repo id                                                                                 repo name                                                                                                            status
!atos-ac/7/x86_64                                                                       Atos Repository                                                                                                       3,128
!base/7/x86_64                                                                          CentOS-7 – Base                                                                                                      10,019
!cr/7/x86_64                                                                            CentOS-7 – CR                                                                                                         2,686
!epel/x86_64                                                                            Extra Packages for Enterprise Linux 7 – x86_64                                                                          165
!extras/7/x86_64                                                                        CentOS-7 – Extras                                                                                                       435
!updates/7/x86_64                                                                       CentOS-7 – Updates                                                                                                    2,500


This step is mandatory to make sure you're upgrading to latest packages from the right repositories for more concretics check what is inside in confs /etc/yum.repos.d/ ,  /etc/yum.conf 
 

6. Clean up any old rpm yum cache packages


This step is again mandatory but a good to follow just to have some more clearness on what packages is our upgrade downloading (not to mix up the old upgrades / installs with our newest one).
For documentation purposes all deleted packages list if such is to be kept under /root/logs/yumclean-install*.out file

[root@redhat: ~ ]# yum clean all |tee /root/logs/yumcleanall-$(hostname)-$(date '+%Y-%m-%d_%H-%M-%S').out


7. List the upgradeable packages's latest repository provided versions


[root@redhat: ~ ]# yum check-update |tee /root/logs/yumcheckupdate-$(hostname)-$(date '+%Y-%m-%d_%H-%M-%S').out


Then to be aware how many packages we'll be updating:


[root@redhat: ~ ]#  yum check-update | wc -l


8. Apply the actual uplisted RPM packages to be upgraded


[root@redhat: ~ ]# yum update |tee /root/logs/yumupdate-$(hostname)-$(date '+%Y-%m-%d_%H-%M-%S').out


Again output is logged to /root/logs/yumcheckupate-*.out 


9. Monitor downloaded packages count real time


To make sure yum upgrade is not in some hanging state and just get some general idea in which state of the upgrade is it e.g. Download / Pre-Update / Install  / Upgrade/ Post-Update etc.
in mean time when yum upgrade is running to monitor,  how many packages has the yum upgrade downloaded from remote RPM set repositories:


[root@redhat: ~ ]#  watch "ls -al /var/cache/yum/x86_64/7Server/…OS-repository…/packages/|wc -l"


10. Run status script to get the status again


[root@redhat: ~ ]# sh /root/status.sh |tee /root/logs/status-before-$(hostname)-$(date '+%Y-%m-%d_%H-%M-%S').out


11. Add back versionlock for all RPM packs


Set all RPM packages installed on the RHEL / CentOS versionlock for all packages.


#==if needed
# yum versionlock \*


12. Get whether old software configuration is not messed up during the Package upgrade (Lookup the logs for .rpmsave and .rpmnew)


During the upgrade old RPM configuration is probably changed and yum did automatically save .rpmsave / .rpmnew saves of it thus it is a good idea to grep the prepared logs for any matches of this 2 strings :
 

[root@redhat: ~ ]#   grep -i ".rpm" /root/logs/yumupdate-server-host-2020-01-20_14-30-41.out
[root@redhat: ~ ]#  grep -i ".rpmsave" /root/logs/yumupdate-server-host-2020-01-20_14-30-41.out
[root@redhat: ~ ]#  grep -i ".rpmnew" /root/logs/yumupdate-server-host-2020-01-20_14-30-41.out


If above commands returns output usually it is fine if there is is .rpmnew output but, if you get grep output of .rpmsave it is a good idea to review the files compare with the original files that were .rpmsaved with the 
substituted config file and atune the differences with the changes manually made for some program functionality.

What are the .rpmsave / .rpmnew files ?
This files are coded files that got triggered by the RPM install / upgrade due to prewritten procedures on time of RPM build.


If a file was installed as part of a rpm, it is a config file (i.e. marked with the %config tag), you've edited the file afterwards and you now update the rpm then the new config file (from the newer rpm) will replace your old config file (i.e. become the active file).
The latter will be renamed with the .rpmsave suffix.

If a file was installed as part of a rpm, it is a noreplace-config file (i.e. marked with the %config(noreplace) tag), you've edited the file afterwards and you now update the rpm then your old config file will stay in place (i.e. stay active) and the new config file (from the newer rpm) will be copied to disk with the .rpmnew suffix.
See e.g. this table for all the details. 

In both cases you or some program has edited the config file(s) and that's why you see the .rpmsave / .rpmnew files after the upgrade because rpm will upgrade config files silently and without backup files if the local file is untouched.

After a system upgrade it is a good idea to scan your filesystem for these files and make sure that correct config files are active and maybe merge the new contents from the .rpmnew files into the production files. You can remove the .rpmsave and .rpmnew files when you're done.


If you need to get a list of all .rpmnew .rpmsave files on the server do:

[root@redhat: ~ ]#  find / -print | egrep "rpmnew$|rpmsave$


13. Reboot the system 

To check whether on next hang up or power outage the system will boot normally after the upgrade, reboot to test it.


you can :


[root@redhat: ~ ]#  reboot


either

[root@redhat: ~ ]#  shutdown -r now


or if on newer Linux with systemd in ues below systemctl reboot.target.

[root@redhat: ~ ]#  systemctl start reboot.target


14. Get again the system status with our status script after reboot

[root@redhat: ~ ]#  sh /root/status.sh |tee /root/logs/status-after-$(hostname)-$(date '+%Y-%m-%d_%H-%M-%S').out


15. Clean up any versionlocks if earlier set


[root@redhat: ~ ]# yum versionlock clear
[root@redhat: ~ ]# yum versionlock list


16. Check services and logs for problems


After the reboot Check closely all running services on system make sure every process / listening ports and services on the system are running fine, just like before the upgrade.
If the sytem had firewall,  check whether firewall rules are not broken, e.g. some NAT is not missing or anything earlier configured to automatically start via /etc/rc.local or some other
custom scripts were run and have done what was expected. 
Go through all the logs in /var/log that are most essential /var/log/boot.log , /var/log/messages … yum.log etc. that could reveal any issues after the boot. In case if running some application server or mail server check /var/log/mail.log or whenever it is configured to log.
If the system runs apache closely check the logs /var/log/httpd/error.log or php_errors.log for any strange errors that occured due to some issues caused by the newer installed packages.
Usually most of the cases all this should be flawless but a multiple check over your work is a stake for good results.
 

How to disable tidy HTML corrector and validator to output error and warning messages

Sunday, March 18th, 2012

I've noticed in /var/log/apache2/error.log on one of the Debian servers I manage a lot of warnings and errors produced by tidy HTML syntax checker and reformatter program.

There were actually quite plenty frequently appearing messages in the the log like:

...
To learn more about HTML Tidy see http://tidy.sourceforge.net
Please fill bug reports and queries using the "tracker" on the Tidy web site.
Additionally, questions can be sent to html-tidy@w3.org
HTML and CSS specifications are available from http://www.w3.org/
Lobby your company to join W3C, see http://www.w3.org/Consortium
line 1 column 1 - Warning: missing <!DOCTYPE> declaration
line 1 column 1 - Warning: plain text isn't allowed in <head> elements
line 1 column 1 - Info: <head> previously mentioned
line 1 column 1 - Warning: inserting implicit <body>
line 1 column 1 - Warning: inserting missing 'title' element
Info: Document content looks like HTML 3.2
4 warnings, 0 errors were found!
...

I did a quick investigation on where from this messages are logged in error.log, and discovered few .php scripts in one of the websites containing the tidy string.
I used Linux find + grep cmds find in all php files the "tidy "string, like so:

server:~# find . -iname '*.php'-exec grep -rli 'tidy' '{}' ;
find . -iname '*.php' -exec grep -rli 'tidy' '{}' ; ./new_design/modules/index.mod.php
./modules/index.mod.php
./modules/index_1.mod.php
./modules/index1.mod.php

Opening the files, with vim to check about how tidy is invoked, revealed tidy calls like:

exec('/usr/bin/tidy -e -ashtml -utf8 '.$tmp_name,$rett);

As you see the PHP programmers who wrote this website, made a bigtidy mess. Instead of using php5's tidy module, they hard coded tidy external command to be invoked via php's exec(); external tidy command invocation.
This is extremely bad practice, since it spawns the command via a pseudo limited apache shell.
I've notified about the issue, but I don't know when, the external tidy calls will be rewritten.

Until the external tidy invocations are rewritten to use the php tidy module, I decided to at least remove the tidy warnings and errors output.

To remove the warning and error messages I've changed:

exec('/usr/bin/tidy -e -ashtml -utf8 '.$tmp_name,$rett);

exec('/usr/bin/tidy --show-warnings no --show-errors no -q -e -ashtml -utf8 '.$tmp_name,$rett);

The extra switches meaning is like so:

q – instructs tidy to produce quiet output
-e – show only errors and warnings
–show warnings no && –show errors no, completely disable warnings and error output

Onwards tidy no longer logs junk messages in error.log Not logging all this useless warnings and errors has positive effect on overall server performance especially, when the scripts, running /usr/bin/tidy are called as frequently as 1000 times per sec. or more