Posts Tagged ‘bash’

Deploying a Server and Managing a 10-Node Linux Infrastructure with Ansible

Friday, May 30th, 2025

File:Ansible Logo.png - Wikimedia Commons

As organizations grow, manually configuring and maintaining servers quickly becomes inefficient, error-prone, and unscalable. Ansible, a powerful open-source automation tool, allows sysadmins and DevOps engineers to automate server provisioning, configuration management, and application deployment across multiple nodes—making it ideal for managing a fleet of Linux servers.

In this article, you’ll learn how to deploy a server using Ansible and manage an infrastructure of 10 Linux servers with ease.


What Is Ansible?

Ansible is a suite of software tools that enables infrastructure as code. It is open-source and the suite includes software provisioning, configuration management, and application deployment functionality.Ansible is an agentless IT automation tool. It uses SSH to connect to remote machines and YAML-based playbooks to define automation tasks. With Ansible, you can:

  • Install and configure software packages
  • Enforce configuration consistency
  • Perform updates across nodes
  • Deploy applications
  • Orchestrate complex workflows
     

Pre-requisites

To follow this guide, you need:

  • A control node (the machine from which you run Ansible)
  • 10 Linux servers (can be VMs or physical machines)
  • SSH access from the control node to all servers
  • Python installed on the target machines (most Linux distros have this by default)
     

1. Install Ansible on the Control Node 

On Ubuntu / Debian Linux

# apt update sudo apt install ansible -y

Or for CentOS/RHEL

# yum install epel-release -y
# yum install ansible -y

Verify installation:

# ansible –version

2. Configure Your Inventory File

Ansible uses an inventory file to define which servers to manage. By default, this is located at /etc/ansible/hosts , but you can also create a custom one.

Create an inventory file hosts.ini

[webservers]
server1 ansible_host=192.168.1.101
server2 ansible_host=192.168.1.102
server3 ansible_host=192.168.1.103
[dbservers]
server4 ansible_host=192.168.1.104
[all:vars]
ansible_user=ansible_user
ansible_ssh_private_key_file=~/.ssh/id_rsa

You can also use hostnames if DNS is configured.

3. Test Connectivity

# ansible -i hosts.ini all -m ping

If everything is set up correctly, you should see pong responses from all servers.

4. Write Your First Playbook (Provisioning Example)

Create a file called server_setup.yml:


– name: Provision and configure Linux servers
  hosts: all
  become: yes
  tasks:

    – name: Update apt cache (Debian/Ubuntu)
      apt:
        update_cache: yes
      when: ansible_os_family == "Debian"

    – name: Install common packages
      package:
        name:
          – curl
          – git
          – htop
        state: present

    – name: Ensure Nginx is installed on webservers
      apt:
        name: nginx
        state: present
      when: "'webservers' in group_names"

    – name: Start and enable Nginx
      service:
        name: nginx
        state: started
        enabled: yes
      when: "'webservers' in group_names"
 

5. Run the Playbook

ansible-playbook -i hosts.ini server_setup.yml

Ansible will SSH into each server, execute the tasks, and return status messages.

6. Scaling to 10+ Servers

Managing a growing infrastructure is simple with Ansible:

  • Add new servers to hosts.ini
  • Reuse existing playbooks for setup
  • Use roles to modularize configuration (e.g., webserver, database, monitoring)
  • Schedule playbooks using cron or CI/CD pipelines (e.g., GitHub Actions, Jenkins)

7. Sample Ansible Project Structure

Organizing your Ansible project effectively is crucial for scalability and maintainability. Here's a sample recommended directory layout:

ansible-infra/
├── hosts.ini
├── server_setup.yml
├── roles/
│   ├── common/
│   │   ├── tasks/
│   │   │   └── main.yml
│   │   └── files/
│   └── webserver/
│       ├── tasks/
│       │   └── main.yml
│       └── templates/
└── group_vars/
    └── all.yml
 

Key Components:
 

  • ansible.cfg: Configuration file defining paths and settings.
  • inventories/: Directory containing environment-specific inventory files.
  • playbooks/: Directory for playbooks that define automation tasks.
  • roles/: Directory for reusable roles, each with its own tasks and variables.
  • requirements.yml: File listing external roles or collections.
     

For a detailed explanation of this structure, refer to the Ansible Documentation.

Visual Workflow (text) Diagram

To illustrate the workflow, here's a diagram depicting how Ansible interacts with your infrastructure:

+——————+        +——————+        +——————+
|   Control Node   |        |    Ansible      |        |   Managed Nodes  |
|  (Your Machine)  |        |  (Ansible Core) |        |  (10 Linux Servers)|
+——————+        +——————+        +——————+
        |                               |                                 |
        | SSH                      | Execute Playbooks  | Apply Configurations
        |                               |                                 |
        +————————->+————————->+

Workflow Steps:

  1. Control Node: You initiate commands from your local machine.

  2. Ansible Core: Ansible connects via SSH to each managed node.

  3. Managed Nodes: Ansible applies configurations as defined in your playbooks and roles.

This workflow ensures consistent and automated management of your infrastructure.

Best Practices

  • Use roles: Organize playbooks into reusable roles
     (ansible-galaxy init myrole)
  • Maintain version control: Keep playbooks and inventory in Git
  • Encrypt secrets: Use ansible-vault for secure credentials
  • Test in staging: Always validate changes before pushing to production

Conclusion

Ansible is a game-changer for managing Linux infrastructure. With a few simple playbooks, you can provision, configure, and maintain your servers consistently and securely.
For a 10-node infrastructure, it offers the perfect balance of simplicity and power—letting you scale efficiently without the overhead of agent-based solutions.

How to Install Jitsi Meet on Debian Linux to have your own free software video conferencing secure server

Thursday, April 24th, 2025


jitsi-meet-create-new-room-for-video-meetings-linux


Jitsi Meet is a free, open-source video conferencing platform that allows you to host secure and scalable video calls both using a Mobile Phone / Tablet / PC or any other electronic device for which jitsi client has available port. Jitsi meet is the best free alternative one can get to Rakuten Viber / Facebook (Meta) / Zoom / Apples' Facetime etc.
What makes Jitsi really worthy is it can make your Video streaming communication give you flexibility to keep your communication a little bit private and harder to be captured than if you use the general Video streaming platforms. 
Jitsi is also a very simple to use and can be used either with a Desktop Client on Windows / Linux and Mac OS or Smart Phone running Android (Samsung / Huawei etc.) or iOS (iPhones) you can configure to use the Jitsi server or directly via a SSL encryption secured web URL address. The only thing i really don't like about Jitsi is it uses Java and its way of work is cryptic just like it is pretty hard to debug or understand exactly how the software works, as when errors came the usual crazzy Java exceptions are filling the jitsi logs.

In below short guide, I'll try provides a simple step-by-step instructions for installing Jitsi Meet on a Debian-based systems, hoping that anyone can benefit from Jitsi by building his own server.


jitsi-meet-conference-free-open-source-video-streaming-viber-and-facebook-alternative


What you should have before you start buillding your new Jitsi meet server

Before you begin, ensure that your system meets the following requirements:

  • A fresh installation of Debian 10 (Buster) or newer.

  • A non-root user with sudo privileges.

  • A fully updated system.

  • A domain name pointing to your server's IP address.

  • OpenJDK 11 installed.​

To get a better understanding on how Jitsi meet works it is worthy to take a quick look on Jitsi Architectural diagram:

Jitsi-meet-video-conferencing-software-linux-windows-mac-Architectural-diagram
 

1. Update Your System

Start by updating your system's package list and upgrading existing packages:​

# apt update sudo apt upgrade -y

2. Install Required Dependencies

Install the necessary packages for adding repositories and managing keys:​

# apt install apt-transport-https curl gnupg2 -y

3 Add Jitsi Repository

Add the Jitsi repository key to your system:

# curl https://download.jitsi.org/jitsi-key.gpg.key | sudo gpg --dearmor -o /usr/share/keyrings/jitsi-keyring.gpg

Then, add the Jitsi repository:​

# echo "deb [signed-by=/usr/share/keyrings/jitsi-keyring.gpg] https://download.jitsi.org stable/" | sudo tee /etc/apt/sources.list.d/jitsi-stable.list > /dev/null

Update your package list to include the Jitsi repository into apt database:​

 # apt update

4. Install Jitsi Meet

Install the Jitsi Meet package:​  

# apt install jitsi-meet -y

During installation, you'll be prompted to:​

  • Enter the hostname: Provide your domain name (e.g., meet.example.com ).

  • Choose SSL certificate: Select "Generate a new self-signed certificate" or "Obtain a Let's Encrypt certificate" if you have a valid domain.​JitsiScaleway

If you opt for Let's Encrypt, ensure that ports 80 and 443 are open on your firewall.​

5. Configure Firewall openings

If you have already a configured firewall to filter out traffic, open the necessary ports to allow traffic to your Jitsi Meet server from your router or entry firewall device as well as on the Linux itself: ​

Allow access to SSH server

# ufw allow 22/tcp


Allow access to HTTP unecrypted to Jitsi meet server

# ufw allow 80/tcp
# ufw allow 443/tcp


Allow access necessery for proper operation of Jitsi VideoBridge (port range 10000 to 20000)
 

# ufw allow 10000:20000/udp
# ufw enable


Verify the firewall status is Okay​ 

# ufw status

6. Access Jitsi Meet in a browser

Open a web browser and navigate to your server's domain or IP address:​

https://meet.your-custom-domain-or-IP.com

Hopefully all is okay and You should see the Jitsi Meet interface, where you can start or join a meeting.​

7. Secure Conference Creation (Optional extra)

By default, anyone can create a conference. To restrict this:​

  1. Install and configure Prosody for authentication.
    For those who don't know Prosody is a modern XMPP communication server

  2. Set up secure domains and configure authentication settings.​

For detailed instructions, refer to the Jitsi DevOps Guide. ​
 

Conclusion

Now You should have successfully installed Jitsi Meet on your Debian server.
Installing to Ubuntu and Redhat OSes such as Fedora or Redhat based distros should be not much difrerent from on this guide, except you have to use
the correct RPM repositories.

Now you can further now host secure video conferences using your own infrastructure and have an increased privacy and perhaps be more calm that the CIA or Mussat, MI6 / FSB might be not spying your Video conference talks (except if they don't already do it on an OS level which most likely the case but this doesn't matter. :).

For advanced configurations and features, consult the Jitsi Handbook and the Jitsi DevOps Guide.​Jitsi

That's all folks Enjoy !

How to Install and Set Up an NFS Server network Shares on on Linux to easify data transfer across multiple hosts

Monday, April 7th, 2025

How to Configure NFS Server in Redhat,CentOS,RHEL,Debian,Ubuntu and Oracle Linux

Network File System (NFS) is a protocol that allows one system to share directories and files with others over a network. It's commonly used in Linux environments for file sharing between systems. In this guide, we'll walk you through the steps to install and set up an NFS server on a Linux system.

Prerequisites

Before you start, make sure you have:

  • A Linux system distros (e.g., Ubuntu, CentOS, Debian, etc.)
  • Root or sudo privileges on the system.
  • A network connection between the server (NFS server) and clients (machines that will access the shared directories).
     

1. Install NFS Server Package


On Ubuntu / Debian based Linux systems:

a. First, update the package list 

# apt update

b. Install the NFS server package
 

# apt install nfs-kernel-server

On CentOS/REL-based systems:

 2. Install the NFS server package
 

      # yum install nfs-utils 

Once the package is installed, ensure that the necessary services are enabled.

 3. Create Shared Directory for file sharing

Decide which directory you want to share over NFS. If the directory doesn't exist, you can create one. For example:

# mkdir -p /nfs_srv_dir/nfs_share

Make sure the directory has the appropriate permissions so that the nfs clients can access it.

# chown nobody:nogroup /nfs_srv_dir/nfs_share 
# chmod 755 /nfs_srv_dir/nfs_share

4. Configure NFS Exports ( /etc/exports file)

The NFS exports file (/etc/exports) is perhaps most important file you will have to create and deal with regularly to define the expored shares, this file contains the configuration settings for directories you want to share with other systems.

       a. Open the /etc/exports file for editing:

vi /etc/exports

Add an entry for the directory you want to share. For example, if you're sharing /nfs_srv_dir/nfs_share and allowing access to all systems on the network (192.168.1.0/24), add the following line:
 

/nfs_srv_dir/nfs_share 192.168.1.0/24(rw,sync,no_subtree_check)


Here’s what each option means:

  • rw: Read and write access.
  • sync: Ensures that changes are written to disk before responding to the client.


Here is few lines of  example of my working /etc/exports on my home running NFS server

/var/www 192.168.0.209/32(rw,no_root_squash,async,subtree_check)
/home/jordan 192.168.0.209/32(rw,no_root_squash,async,subtree_check)
/mnt/sda1/icons-frescoes/ 192.168.0.209/32(rw,no_root_squash,async,subtree_check)
/home/mobfiles 192.168.0.209/32(rw,no_root_squash,async,subtree_check)
/mnt/sda1/icons-frescoes/ 192.168.0.200/32(rw,no_root_squash,async,subtree_check)
/home/hipo/public_html 192.168.0.209/32(rw,no_root_squash,async,subtree_check)
/home/alex/public_html 192.168.0.209/32(rw,no_root_squash,async,subtree_check)
/home/necroleak/public_html 192.168.0.209/32(rw,no_root_squash,async,subtree_check)
/bashscripts 192.168.0.209/32(rw,no_root_squash,async,subtree_check)
/backups/Family-Videos 192.168.0.200/32(ro,no_root_squash,async,subtree_check)


5. Export the NFS Shares with exportfs command

Once the export file is configured, you need to inform the NFS server to start sharing the directory:
 

# exportfs -a


The -a flag will make it export all the sharings.

6. Start and Enable NFS Services

You need to start and enable the NFS server so it will run on system boot.

On Ubuntu / Debian Linux run the following commands:
 

# systemctl start nfs-kernel-server 
# systemctl enable nfs-kernel-server


On CentOS / RHEL Linux:
 

# systemctl start nfs-server
# systemctl enable nfs-server


7. Allow NFS Traffic Through the Firewall

If your server has a firewall configured / enabled, you will need to allow NFS-related ports through the firewall.
These ports include 2049 TCP protocol Ports (NFS) and 111 (RPCbind) UDP and TCP protocol , and some additional ports.

On Ubuntu/Debian (assuming you are using ufw [UNCOMPLICATED FIREWALL]):

# ufw allow from 192.168.1.0/24 to any port nfs sudo ufw reload

On CentOS / RHEL Linux:

# firewall-cmd –permanent –add-service=nfs sudo firewall-cmd –permanent –add-service=mountd sudo firewall-cmd –permanent –add-service=rpc-bind sudo firewall-cmd –reload

8. Verify NFS Server is Running

To ensure the NFS server is running properly, use the following command:
 

# systemctl status nfs-kernel-server

or

# systemctl status nfs-server

You should see output indicating that the service is active and running.


9. Test the NFS Share (Client-Side)

To test the NFS share, you will need to mount it on a client machine. Here's how to mount it:

On the client machine, install the NFS client utilities:

Ubuntu / Debian Linux

# apt install nfs-common

For CentOS / RHEL Linux

# yum install nfs-utils


Create a mount point (Nomatter the distro),:
 

# mkdir -p /mnt/nfs_share


Mount the NFS share:

# mount -t nfs <nfs_server_ip>:/nfs_srv_dir/nfs_share /mnt/nfs_share

Replace <nfs_server_ip> with the IP address of the NFS server or DNS host alias if you have one defined in /etc/hosts file.

Verify that the share is mounted:

​# df -h

You should see the NFS share listed under the mounted file systems.

10. Configure Auto-Mount at Boot (Optional)

To have the NFS share automatically mounted at boot, you can add an entry to the /etc/fstab file on the client machine.

Open /etc/fstab for editing:

# vi /etc/fstab

Add the following line: 

<server-ip>:/nfs_srv_dir/nfs_share /mnt/nfs_share nfs defaults 0 0

Save and close the file.

The NFS share will now be automatically mounted whenever the system reboots.

Debug NFS configuration issues (basics)


You can continue to modify the /etc/exports file to share more directories or set specific access restrictions depending on your needs.

If you encounter any issues, checking the server logs or using
 

# exportfs -v
/var/www          192.168.0.209/32(async,wdelay,hide,sec=sys,rw,secure,no_root_squash,no_all_squash)
/home/var_data      192.168.0.205/32(async,wdelay,hide,sec=sys,rw,secure,no_root_squash,no_all_squash)
/mnt/sda1/
        192.168.0.209/32(async,wdelay,hide,sec=sys,rw,secure,no_root_squash,no_all_squash)
/mnt/sda2/info
        192.168.0.200/32(async,wdelay,hide,sec=sys,rw,secure,no_root_squash,no_all_squash)
/home/mobfiles    192.168.0.209/32(async,wdelay,hide,sec=sys,rw,secure,no_root_squash,no_all_squash)
/home/var_data/public_html
        192.168.0.209/32(async,wdelay,hide,sec=sys,rw,secure,no_root_squash,no_all_squash)
/var/public
        192.168.0.209/32(async,wdelay,hide,sec=sys,rw,secure,no_root_squash,no_all_squash)
/neon/data
        192.168.0.209/32(async,wdelay,hide,sec=sys,rw,secure,no_root_squash,no_all_squash)
/scripts      192.168.0.209/32(async,wdelay,hide,sec=sys,rw,secure,no_root_squash,no_all_squash)
/backups/data-limited
        192.168.0.200/32(async,wdelay,hide,sec=sys,ro,secure,no_root_squash,no_all_squash)
/disk/filetransfer
        192.168.0.200/23(async,wdelay,hide,sec=sys,ro,secure,no_root_squash,no_all_squash)
/public_shared/data
        192.168.0.200/23(async,wdelay,hide,sec=sys,ro,secure,no_root_squash,no_all_squash)


 Of course there is much more to be said on that you can for example, check /var/log/messages /var/log/syslog and other logs that can give you hints about issues, as well as manually try to mount / unmount a NFS stuck share to know more on what is going on, but for a starter that should be enough.

command can help severely in troubleshooting the NFS configuration.

Sum it up what learned ?

We learned how to  set up basic NFS server and mounted its shared directory on a client machine.
This is a great solution for centralized file sharing and collaboration on Linux systems (even though many companies are trying to not use it due to its lack of connection encryption for historical reasons NFS has been widely used over the years and has helped dramatically for the Internet as we know it to become the World Wide Web of today. Thus for a well secured network and perhaps not a critical files infrastructure, still NFS is a key player in file sharing among heterogenous networks for multitudes of Gigabytes or Terra Pentabytes of data you would like to share amoung your Personal Computers / Servers / Phones / Tablets and generally all kind of digital computer equipment devices.

How to Deploy a Docker Container with Apache on Debian Linux and assign container static IP address

Friday, February 14th, 2025

deploy-docker-container-with-static-ip-on-debian-linux-howto-logo

Deploying a Docker container with Apache on Debian Linux is an efficient way to manage web servers in isolated environments. Docker provides a convenient way to package and run applications, and when combined with Apache, it can be used for hosting websites or web applications. In this guide, we’ll walk through the necessary steps to set up and run an Apache web server inside a Docker container on a Debian Linux machine.

Prerequisites

Before starting, ensure that you have the following prerequisites in place:

  • A Debian-based Linux system (e.g., Debian 10, Debian 11).
  • Docker installed on your system. If you don’t have Docker installed, follow the installation steps below.
  • Basic knowledge of Linux commands and Docker concepts.

Step 1: Install Docker on Debian

First, you need to install Docker if it is not already installed on your Debian machine. Here’s how to install Docker on Debian:

  1. Update the package database:
     

    # apt update

  2. Install the required dependencies:

    apt install apt-transport-https ca-certificates curl gnupg lsb-release

  3. Add Docker’s official GPG key:

    # curl -fsSL https://download.docker.com/linux/debian/gpg | sudo gpg --dearmor -o /usr/share/keyrings/docker-archive-keyring.gpg

  4. Set up the stable Docker repository:
     

    # echo "deb [arch=amd64 signed-by=/usr/share/keyrings/docker-archive-keyring.gpg] \
    https://download.docker.com/linux/debian $(lsb_release -cs) stable" \
    | tee /etc/apt/sources.list.d/docker.list > /dev/null 


  5. Install Docker Engine:
     

    # apt update sudo apt install docker-ce docker-ce-cli containerd.io


  6. Start Docker and enable it to run on boot:
     

    systemctl start docker
    # systemctl enable docker

  7. Verify Docker installation:
     

    # docker --version

    This should display the installed Docker version, confirming that Docker is installed successfully.
     

Step 2: Pull Apache Docker Image or whatever docker image you want to have installed

Now that Docker is set up, you need to pull the official Apache image from Docker Hub. The Apache image is maintained by the Docker team and comes pre-configured for running Apache in a container.
 

  1. Pull the Apache HTTP Server image:

    # docker pull httpd

    This will download the official Apache HTTP server image ( httpd ) from Docker Hub.

Step 3: Run Apache Container

Once the Apache image is pulled, you can start a Docker container running Apache.

  1. Run the Docker container:

    # docker run -d --name apache-container -p 80:80 httpd

    Here’s what the options mean:

    • -d : Runs the container in detached mode (in the background).
    • --name apache-container : Names the container apache-container .
    • -p 80:80 : Maps port 80 on the host to port 80 in the container (so you can access the Apache web server through port 80).
    • httpd : The name of the image you want to run (the Apache HTTP server).
  2. Verify the container is running:

    # docker ps

    This will show a list of running containers. You should see the apache-container running.

  3. Test the Apache server:

    Open a web browser and go to http://<your-server-ip> . You should see the default Apache welcome page, indicating that Apache is running successfully in the Docker container.

Step 4: Customize Apache Configuration (Optional)

You may want to customize the Apache configuration or serve your own website inside the container. Here’s how to do it:


. Run the Apache Docker Container with a Specific IP Address

To bind the container to a specific IP address, use the --add-host or --publish flag while running the container.

  • If you want to bind Apache to a specific IP address on the host (for example, 192.168.1.100 ), use the --publish option:

# docker run -d --name apache-container -p 192.168.1.100:80:80 apache-container


This command tells Docker to bind port 80 in the container to port 80 on the host's IP address 192.168.1.100 . Replace 192.168.1.100 with the desired IP address of your system.

  1. Create a directory for your custom website:

    # mkdir -p /home/user/my-website

  2. Add an index.html file or whatever PHP / Perl whatever files will be served:

    Create a simple HTML file in the directory:
     

    # echo '<html><body><h1>Hello, Apache on Docker!</h1></body></html>' > /home/user/my-website/index.html

  3. Stop the running Apache container:

    # docker stop apache-container

  4. Remove the stopped container:

    # docker rm apache-container

  5. Run a new container with your custom website:

    Now, you can mount your custom directory into the container as a volume:

    # docker run -d --name apache-container -p 80:80 -v /home/user/my-website:/usr/local/apache2/htdocs/ httpd

    The -v option mounts the local directory /home/user/my-website to the Apache server’s default document root directory ( /usr/local/apache2/htdocs/ ).

  6. Verify the custom website:

    Reload the web page in your browser. Now, you should see the "Hello, Apache on Docker!" message, confirming that your custom website is being served from the Docker container.

Step 5: Manage Docker Containers

You can manage the running Apache container with the following commands:

  • Stop the container:

    # docker stop apache-container

  • Start the container:

    # docker start apache-container

  • Remove the container (if needed):

    # docker rm apache-container

  • View logs for troubleshooting:

    # docker logs apache-container

Step 6: Automating Docker Container Deployment (Optional step)

If you want the Apache container to restart automatically after a system reboot, you can add the --restart flag to the docker run command.

For example, to make the container restart automatically unless it is manually stopped, use:
 

# docker run -d --name apache-container -p 80:80 --restart unless-stopped \
-v /home/user/my-website:/usr/local/apache2/htdocs/ httpd 

Conclusion

By following these steps, you can easily deploy Apache inside a Docker container on a Debian Linux machine. Docker allows you to run your Apache web server or whatever docker app you need to have in a lightweight and isolated environment, which is useful development, testing, and production environments. You can further customize this setup by adding additional configurations, integrating with databases, or automating deployments with Docker Compose or Kubernetes.

Enjoy your new Dockerized Apache setup!

DNS Monitoring: Check and Alert if DNS nameserver resolver of Linux machine is not properly resolving shell script. Monitor if /etc/resolv.conf DNS runs Okay

Thursday, March 14th, 2024

linux-monitor-check-dns-is-resolving-fine

If you happen to have issues occasionally with DNS resolvers and you want to keep up an eye on it and alert if DNS is not properly resolving Domains, because sometimes you seem to have issues due to network disconnects, disturbances (modifications), whatever and you want to have another mean to see whether a DNS was reachable or unreachable for a time, here is a little bash shell script that does the "trick".

Script work mechacnism is pretty straight forward as you can see we check what are the configured nameservers if they properly resolve and if they're properly resolving we write to log everything is okay, otherwise we write to the log DNS is not properly resolvable and send an ALERT email to preconfigured Email address.

Below is the check_dns_resolver.sh script:


#!/bin/bash
# Simple script to Monitor DNS set resolvers hosts for availability and trigger alarm  via preset email if any of the nameservers on the host cannot resolve
# Use a configured RESOLVE_HOST to try to resolve it via available configured nameservers in /etc/resolv.conf
# if machines are not reachable send notification email to a preconfigured email
# script returns OK 1 if working correctly or 0 if there is issue with resolving $RESOLVE_HOST on $SELF_HOSTNAME and mail on $ALERT_EMAIL
# output of script is to be kept inside DNS_status.log

ALERT_EMAIL='your.email.address@email-fqdn.com';
log=/var/log/dns_status.log;
TIMEOUT=3; DNS=($(grep -R nameserver /etc/resolv.conf | cut -d ' ' -f2));  

SELF_HOSTNAME=$(hostname –fqdn);
RESOLVE_HOST=$(hostname –fqdn);

for i in ${DNS[@]}; do dns_status=$(timeout $TIMEOUT nslookup $RESOLVE_HOST  $i); 

if [[ “$?” == ‘0’ ]]; then echo "$(date "+%y.%m.%d %T") $RESOLVE_HOST $i on host $SELF_HOST OK 1" | tee -a $log; 
else 
echo "$(date "+%y.%m.%d %T")$RESOLVE_HOST $i on host $SELF_HOST NOT_OK 0" | tee -a $log; 

echo "$(date "+%y.%m.%d %T") $RESOLVE_HOST $i DNS on host $SELF_HOST resolve ERROR" | mail -s "$RESOLVE_HOST /etc/resolv.conf $i DNS on host $SELF_HOST resolve ERROR";

fi

 done

Download check_dns_resolver.sh here set the script to run via a cron job every lets say 5 minutes, for example you can set a cronjob like this:
 

# crontab -u root -e
*/5 * * * *  check_dns_resolver.sh 2>&1 >/dev/null


Then Voila, check the log /var/log/dns_status.log if you happen to run inside a service downtime and check its output with the rest of infrastructure componets, network switch equipment, other connected services etc, that should keep you in-line to proof during eventual RCA (Root Cause Analysis) if complete high availability system gets down to proof your managed Linux servers was not the reason for the occuring service unavailability.

A simplified variant of the check_dns_resolver.sh can be easily integrated to do Monitoring with Zabbix userparameter script and DNS Check Template containing few Triggers, Items and Action if I have time some time in the future perhaps, I'll blog a short article on how to configure such DNS zabbix monitoring, the script zabbix variant of the DNS monitor script is like this:

[root@linux-server bin]# cat check_dns_resolver.sh 
#!/bin/bash
TIMEOUT=3; DNS=($(grep -R nameserver /etc/resolv.conf | cut -d ' ' -f2));  for i in ${DNS[@]}; do dns_status=$(timeout $TIMEOUT nslookup $(hostname –fqdn) $i); if [[ “$?” == ‘0’ ]]; then echo "$i OK 1"; else echo "$i NOT OK 0"; fi; done

[root@linux-server bin]#


Hope this article, will help someone to improve his Unix server Infrastucture monitoring.

Enjoy and Cheers !

Configure aide file integrity check server monitoring in Zabbix to track for file changes on servers

Tuesday, March 28th, 2023

zabbix-aide-log-monitoring-logo

Earlier I've written a small article on how to setup AIDE monitoring for Server File integrity check on Linux, which put the basics on how this handy software to improve your server overall Security software can be installed and setup without much hassle.

Once AIDE is setup and a preset custom configuration is prepared for AIDE it is pretty useful to configure AIDE to monitor its critical file changes for better server security by monitoring the AIDE log output for new record occurs with Zabbix. Usually if no files monitored by AIDE are modified on the machine, the log size will not grow, but if some file is modified once Advanced Linux Intrusion Detecting (aide) binary runs via the scheduled Cron job, the /var/log/app_aide.log file will grow zabbix-agentd will continuously check the file for size increases and will react.

Before setting up the Zabbix required Template, you will have to set few small scripts that will be reading a preconfigured list of binaries or application files etc. that aide will monitor lets say via /etc/aide-custom.conf
 

1. Configure aide to monitor files for changes


Before running aide, it is a good idea to prepare a file with custom defined directories and files that you plan to monitor for integrity checking e.g. future changes with aide, for example to capture bad intruders who breaks into server which runs aide and modifies critical files such as /etc/passwd /etc/shadow /etc/group or / /usr/local/etc/* or /var/* / /usr/* critical files that shouldn't be allowed to change without the admin to soon find out.

# cat /etc/aide-custom.conf

# Example configuration file for AIDE.
@@define DBDIR /var/lib/aide
@@define LOGDIR /var/log/aide
# The location of the database to be read.
database=file:@@{DBDIR}/app_custom.db.gz
database_out=file:@@{DBDIR}/app_aide.db.new.gz
gzip_dbout=yes
verbose=5

report_url=file:@@{LOGDIR}/app_custom.log
#report_url=syslog:LOG_LOCAL2
#report_url=stderr
#NOT IMPLEMENTED report_url=mailto:root@foo.com
#NOT IMPLEMENTED report_url=syslog:LOG_AUTH

# These are the default rules.
#
#p:      permissions
#i:      inode:
#n:      number of links
#u:      user
#g:      group
#s:      size
#b:      block count
#m:      mtime
#a:      atime
#c:      ctime
#S:      check for growing size
#acl:           Access Control Lists
#selinux        SELinux security context
#xattrs:        Extended file attributes
#md5:    md5 checksum
#sha1:   sha1 checksum
#sha256:        sha256 checksum
#sha512:        sha512 checksum
#rmd160: rmd160 checksum
#tiger:  tiger checksum

#haval:  haval checksum (MHASH only)
#gost:   gost checksum (MHASH only)
#crc32:  crc32 checksum (MHASH only)
#whirlpool:     whirlpool checksum (MHASH only)

FIPSR = p+i+n+u+g+s+m+c+acl+selinux+xattrs+sha256

#R:             p+i+n+u+g+s+m+c+acl+selinux+xattrs+md5
#L:             p+i+n+u+g+acl+selinux+xattrs
#E:             Empty group
#>:             Growing logfile p+u+g+i+n+S+acl+selinux+xattrs

# You can create custom rules like this.
# With MHASH…
# ALLXTRAHASHES = sha1+rmd160+sha256+sha512+whirlpool+tiger+haval+gost+crc32
ALLXTRAHASHES = sha1+rmd160+sha256+sha512+tiger
# Everything but access time (Ie. all changes)
EVERYTHING = R+ALLXTRAHASHES

# Sane, with multiple hashes
# NORMAL = R+rmd160+sha256+whirlpool
NORMAL = FIPSR+sha512

# For directories, don't bother doing hashes
DIR = p+i+n+u+g+acl+selinux+xattrs

# Access control only
PERMS = p+i+u+g+acl+selinux

# Logfile are special, in that they often change
LOG = >

# Just do sha256 and sha512 hashes
LSPP = FIPSR+sha512

# Some files get updated automatically, so the inode/ctime/mtime change
# but we want to know when the data inside them changes
DATAONLY =  p+n+u+g+s+acl+selinux+xattrs+sha256

##############TOUPDATE
#To delegate to app team create a file like /app/aide.conf
#and uncomment the following line
#@@include /app/aide.conf
#Then remove all the following lines
/etc/zabbix/scripts/check.sh FIPSR
/etc/zabbix/zabbix_agentd.conf FIPSR
/etc/sudoers FIPSR
/etc/hosts FIPSR
/etc/keepalived/keepalived.conf FIPSR
# monitor haproxy.cfg
/etc/haproxy/haproxy.cfg FIPSR
# monitor keepalived
/home/keepalived/.ssh/id_rsa FIPSR
/home/keepalived/.ssh/id_rsa.pub FIPSR
/home/keepalived/.ssh/authorized_keys FIPSR

/usr/local/bin/script_to_run.sh FIPSR
/usr/local/bin/another_script_to_monitor_for_changes FIPSR

#  cat /usr/local/bin/aide-config-check.sh
#!/bin/bash
/sbin/aide -c /etc/aide-custom.conf -D

# cat /usr/local/bin/aide-init.sh
#!/bin/bash
/sbin/aide -c /etc/custom-aide.conf -B database_out=file:/var/lib/aide/custom-aide.db.gz -i


# cat /usr/local/bin/aide-check.sh

#!/bin/bash
/sbin/aide -c /etc/custom-aide.conf -Breport_url=stdout -B database=file:/var/lib/aide/custom-aide.db.gz -C|/bin/tee -a /var/log/aide/custom-aide-check.log|/bin/logger -t custom-aide-check-report
/usr/local/bin/aide-init.sh


# cat /usr/local/bin/aide_app_cron_daily.txt

#!/bin/bash
#If first time, we need to init the DB
if [ ! -f /var/lib/aide/app_aide.db.gz ]
   then
    logger -p local2.info -t app-aide-check-report  "Generating NEW AIDE DATABASE for APPLICATION"
    nice -n 18 /sbin/aide –init -c /etc/aide_custom.conf
    mv /var/lib/aide/app_aide.db.new.gz /var/lib/aide/app_aide.db.gz
fi

nice -n 18 /sbin/aide –update -c /etc/aide_app.conf
#since the option for syslog seems not fully implemented we need to push logs via logger
/bin/logger -f /var/log/aide/app_aide.log -p local2.info -t app-aide-check-report
#Acknoledge the new database as the primary (every results are sended to syslog anyway)
mv /var/lib/aide/app_aide.db.new.gz /var/lib/aide/app_aide.db.gz

What above cron job does is pretty simple, as you can read it yourself. If the configuration predefined aide database store file /var/lib/aide/app_aide.db.gz, does not
exists aide will create its fresh empty database and generate a report for all predefined files with respective checksums to be stored as a comparison baseline for file changes. 

Next there is a line to write aide file changes via rsyslog through the logger and local2.info handler


2. Setup Zabbix Template with Items, Triggers and set Action

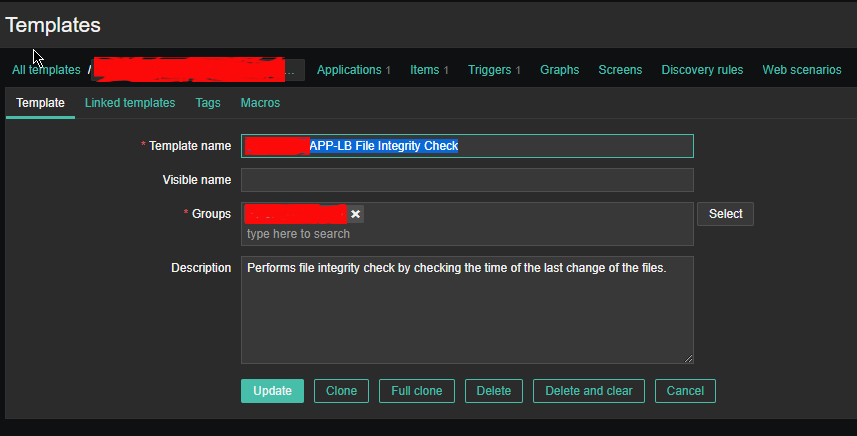
2.1 Create new Template and name it YourAppName APP-LB File integrity Check

aide-itengrity-check-zabbix_ Configuration of templates

Then setup the required Items, that will be using zabbix's Skip embedded function to scan file in a predefined period of file, this is done by the zabbix-agent that is
supposed to run on the server.

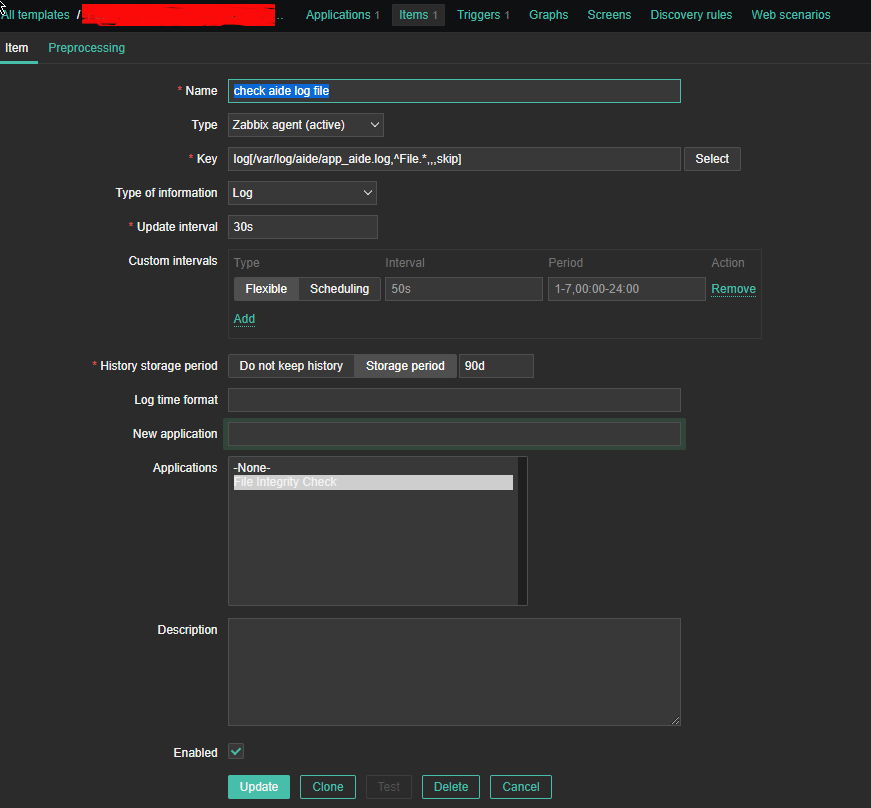
2.2 Configure Item like

aide-zabbix-triggers-screenshot
 

*Name: check aide log file

Type: zabbix (active)

log[/var/log/aide/app_aide.log,^File.*,,,skip]

Type of information: Log

Update Interval: 30s

Applications: File Integrity Check

Configure Trigger like

Enabled: Tick On

images/aide-zabbix-screenshots/check-aide-log-item


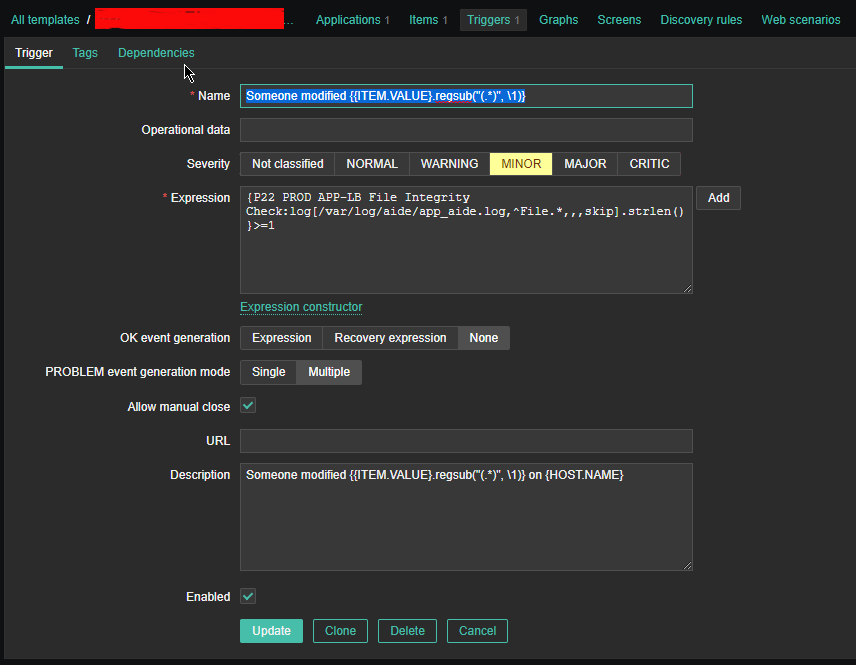
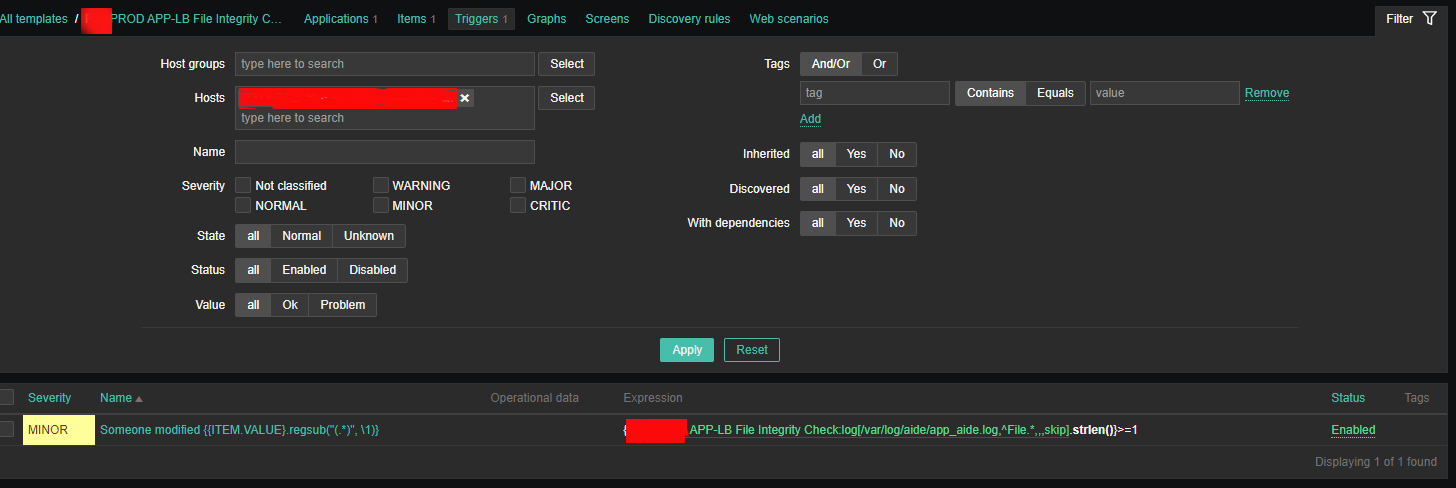
2.3 Create Triggers with the respective regular expressions, that would check the aide generated log file for file modifications


aide-zabbix-screenshot-minor-config

Configure Trigger like
 

Enabled: Tick On


*Name: Someone modified {{ITEM.VALUE}.regsub("(.*)", \1)}

*Expression: {PROD APP-LB File Integrity Check:log[/var/log/aide/app_aide.log,^File.*,,,skip].strlen()}>=1

Allow manual close: yes tick

*Description: Someone modified {{ITEM.VALUE}.regsub("(.*)", \1)} on {HOST.NAME}


2.4 Configure Action


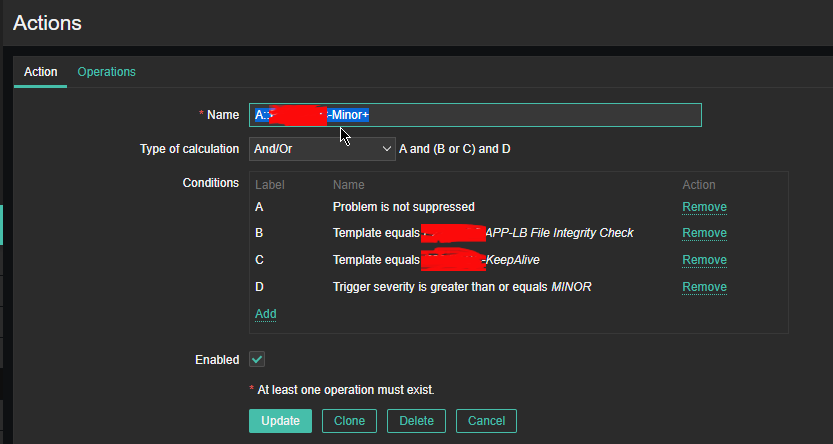
aide-zabbix-file-monitoring-action-screensho

Now assuming the Zabbix server has  a properly set media for communication and you set Alerting rules zabbix-server can be easily set tosend mails to a Support email to get Notifications Alerts, everytime a monitored file by aide gets changed.

That's all folks ! Enjoy being notified on every file change on your servers  !
 

Send TCP / UDP strings and commands to Local and Remote Applications without netcat with Bash

Friday, July 24th, 2020

bash-open-network-tcp-udp-connections-from-shell-gnu-bash-shell-shell-logo

Did you ever needed to send TCP / UDP packets manually to send commands to local or remote applications, having a fully functional BASH Shell but not having the luxury to have NC (Netcat Swiss Army Knife of Networking) tool?
This happens if you have some Linux based embeded device as Arduino or a Linux server with a high security PCI requirement which can't affort to have Netcat in place or another portable hardware with a Linux kernel, that needs to communicate in UDP for any reason but you don't want to waste additional 28KB or physically you have access to a Linux device that doesn't have netcat but you want to be able to send UDP externally …

SInce some time in newer GNU Bash's releases support for TCP / UDP data sending is described in Bash's Manual and should be working it is not as good as you might expect but for a small things it could save you the day.

The syntax to use it is:
 

 /dev/protocol/IP/PORT


To open new socket connection to a UDP / TCP protocol with bash you have to simply open a new Shell handler (lets say 3) to:


/dev/tcp/your-url.com/80


or

/dev/udp/83.228.93.76/53


1. Get GOOGLE HTML Source with simple BASH / Getting URL Index with bash sockets


If you happen to have access to a machine where no network downloader tool or a text browser such as curl, wget, lynx, links is available but you want to dump the content of a index.html or any other URL with simply bash you can do it like so:
 

exec 3<>/dev/tcp/www.google.com/80
echo -e "GET / HTTP/1.1\r\n\r\n" >&3 

cat <&3

If you need to open a connection to a Internet Domain with bash and store the output into a separate .html file:

exec 3<>/dev/tcp/www.google.com/80
echo -e "GET / HTTP/1.1\r\n\r\n" >&3 

cat <&3 | tee -a output.html


Note that this will work only if you're logged into into an interactive shell.
If you want instead do it from a shell script (and omit usage) of wget etc. use something like bash_sockets_google_connect.sh basic script :

#!/bin/bash
exec 3<>/dev/tcp/www.google.com/80
printf "GET /\r\n\r\n" >&3
while IFS= read -r -u3 -t2 line || [[ -n “$line” ]]; do echo "$line"; done
exec 3>&-
exec 3<&-


2. Sending UDP protocol data via bash socket


To send test  variables or commands data to localhost (127.0.0.1) UDP listening service:
 

echo 'TEST COMMAND' > /dev/udp/127.0.0.1/538


echo "Any UDP data" > /dev/udp/127.0.0.1/3000


If you happent to have netcat or running on a bash shell that doesn't properly support TCP / UDP sending you can always do it netcat way:

echo "Command" | nc -u -w0 127.0.0.1 3000


Of course this little hack is useful just for simple things and eventually for more comlex stuff and scripting you would like to use a fully functional HTML reader ( W3C compliant Web Browser )
still  for a quick dirty stuff Bash socketing from the console rocks pretty much ! 🙂


How to disown a process once it is running on Linux – old but useful trick

Thursday, December 20th, 2018

how-to-disown-a-shell-running-process-on-linux-trick

There is one very old but  gold useful UNIX / Linux trick, I remembered which will be interesting to share it's called  it is called disowning.


Lets say you run execution of a job an rsync job or a simple copy job of a very large file, but in the middle of the copy you remembered you need to do something else and thus want to switch back to shell (without opening a new ssh if on remote server) or a new console if on a local machine.
Then how can you background the copy process and move the process to the rest of long running process system list e.g. "disown" it from yourself so the process continues its job in the background just like of the rest of the backgrounded running processes on the system.

Here is the basic syntax of the disown command:
 

help disown
disown: disown [-h] [-ar] [jobspec …]
    By default, removes each JOBSPEC argument from the table of active jobs.
    If the -h option is given, the job is not removed from the table, but is
    marked so that SIGHUP is not sent to the job if the shell receives a
    SIGHUP.  The -a option, when JOBSPEC is not supplied, means to remove all
    jobs from the job table; the -r option means to remove only running jobs.


Here is a live example of what I meant by above lines and actual situation where disown comes super useful.

The 'disown' command/builtin (this is in bash), which will disassociate the process from the shell and not send the HUP signal to the process on exit.

root@linux:~# cp -rpf SomeReallyLargeFile1 SomeReallylargeFile2

[1]+  Stopped                 cp -i -r SomeReallyLargeFile SomeReallylargeFile2
root@linux:~#  bg %1
[1]+ cp -i -r SomeReallyLargeFile SomeReallylargeFile2 &
root@linux:~#  jobs
[1]+  Running                 cp -i -r testLargeFile largeFile2 &
root@linux:~# disown -h %1
root@linux:~# ps -ef |grep largeFile2
root      5790  5577  1 10:04 pts/3    00:00:00 cp -i -rpf SomeReallyLargeFile SomeReallylargeFile2
root      5824  5577  0 10:05 pts/3    00:00:00 grep largeFile2
root@linux:~#


Of course you can always use something like GNU screen (VT100/ ANSI Terminal screen manager) or tmux (terminal multiplexer) to detach the process but you will have to have run the screen  / tmux session in advance which you might haven't  yet as well as it is  required one of the 2 to be present on a servers and on many servers in complex client environments this might be missing and hard to install (such as server is behind a firewall DMZ-ed (Demilitirezed Zoned) network and no way to install extra packages), the disown command makes sense.

Another useful old tip, that new Linux users might not konw is the nohup command (which runs a command immune to hangups with output to a non-tty), nohup's main use is if you want to run process in background with (ampersand) from bash / zsh / tcsh etc. and keep the backgrounded process running even once you've exited the active shell, to do so run the proc background as follows:
 

$ nohup command-to-exec &


Hope this helps someone, Enjoy!


Automatic network restart and reboot Linux server script if ping timeout to gateway is not responding as a way to reduce connectivity downtimes

Monday, December 10th, 2018

automatic-server-network-restart-and-reboot-script-if-connection-to-server-gateway-inavailable-tux-penguing-ascii-art-bin-bash

Inability of server to come back online server automaticallyafter electricity / network outage

These days my home server  is experiencing a lot of issues due to Electricity Power Outages, a construction dig operations to fix / change waterpipe tubes near my home are in action and perhaps the power cables got ruptered by the digger machine.
The effect of all this was that my server networking accessability was affected and as I didn't have network I couldn't access it remotely anymore at a certain point the electricity was restored (and the UPS charge could keep the server up), however the server accessibility did not due restore until I asked a relative to restart it or under a more complicated cases where Tech aquanted guy has to help – Alexander (Alex) a close friend from school years check his old site here – alex.www.pc-freak.net helps a lot.to restart the machine physically either run a quick restoration commands on root TTY terminal or generally do check whether default router is reachable.

This kind of Pc-Freak.net downtime issues over the last month become too frequent (the machine was down about 5 times for 2 to 5 hours and this was too much (and weirdly enough it was not accessible from the internet even after electricity network was restored and the only solution to that was a physical server restart (from the Power Button).

To decrease the number of cases in which known relatives or friends has to  physically go to the server and restart it, each time after network or electricity outage I wrote a small script to check accessibility towards Default defined Network Gateway for my server with few ICMP packages sent with good old PING command
and trigger a network restart and system reboot
(in case if the network restart does fail) in a row.

1. Create reboot-if-nwork-is-downsh script under /usr/sbin or other dir

Here is the script itself:


#!/bin/sh
# Script checks with ping 5 ICMP pings 10 times to DEF GW and if so
# triggers networking restart /etc/inid.d/networking restart
# Then does another 5 x 10 PINGS and if ping command returns errors,
# Reboots machine
# This script is useful if you run home router with Linux and you have
# electricity outages and machine doesn't go up if not rebooted in that case

GATEWAY_HOST='192.168.0.1';

run_ping () {
for i in $(seq 1 10); do
    ping -c 5 $GATEWAY_HOST
done

}

reboot_f () {
if [ $? -eq 0 ]; then
        echo "$(date "+%Y-%m-%d %H:%M:%S") Ping to $GATEWAY_HOST OK" >> /var/log/reboot.log
    else
    /etc/init.d/networking restart
        echo "$(date "+%Y-%m-%d %H:%M:%S") Restarted Network Interfaces:" >> /tmp/rebooted.txt
    for i in $(seq 1 10); do ping -c 5 $GATEWAY_HOST; done
    if [ $? -eq 0 ] && [ $(cat /tmp/rebooted.txt) -lt ‘5’ ]; then
         echo "$(date "+%Y-%m-%d %H:%M:%S") Ping to $GATEWAY_HOST FAILED !!! REBOOTING." >> /var/log/reboot.log
        /sbin/reboot

    # increment 5 times until stop
    [[ -f /tmp/rebooted.txt ]] || echo 0 > /tmp/rebooted.txt
    n=$(< /tmp/rebooted.txt)
        echo $(( n + 1 )) > /tmp/rebooted.txt
    fi
    # if 5 times rebooted sleep 30 mins and reset counter
    if [ $(cat /tmprebooted.txt) -eq ‘5’ ]; then
    sleep 1800
        cat /dev/null > /tmp/rebooted.txt
    fi
fi

}
run_ping;
reboot_f;

You can download a copy of reboot-if-nwork-is-down.sh script here.

As you see in script successful runs  as well as its failures are logged on server in /var/log/reboot.log with respective timestamp.
Also a counter to 5 is kept in /tmp/rebooted.txt, incremented on each and every script run (rebooting) if, the 5 times increment is matched

a sleep is executed for 30 minutes and the counter is being restarted.
The counter check to 5 guarantees the server will not get restarted if access to Gateway is not continuing for a long time to prevent the system is not being restarted like crazy all time.
 

2. Create a cron job to run reboot-if-nwork-is-down.sh every 15 minutes or so 

I've set the script to re-run in a scheduled (root user) cron job every 15 minutes with following  job:

To add the script to the existing cron rules without rewriting my old cron jobs and without tempering to use cronta -u root -e (e.g. do the cron job add in a non-interactive mode with a single bash script one liner had to run following command:


{ crontab -l; echo "*/15 * * * * /usr/sbin/reboot-if-nwork-is-down.sh 2>&1 >/dev/null; } | crontab –


I know restarting a server to restore accessibility is a stupid practice but for home-use or small client servers with unguaranteed networks with a cheap Uninterruptable Power Supply (UPS) devices it is useful.

Summary

Time will show how efficient such a  "self-healing script practice is.
Even though I'm pretty sure that even in a Corporate businesses and large Public / Private Hybrid Clouds where access to remote mounted NFS / XFS / ZFS filesystems are failing a modifications of the script could save you a lot of nerves and troubles and unhappy customers / managers screaming at you on the phone 🙂


I'll be interested to hear from others who have a better  ideas to restore ( resurrect ) access to inessible Linux server after an outage.?