Posts Tagged ‘default configuration’

Fix FTP active connection issues “Cannot create a data connection: No route to host” on ProFTPD Linux dedicated server

Tuesday, October 1st, 2019

proftpd-linux-logo

Earlier I've blogged about an encounter problem that prevented Active mode FTP connections on CentOS
As I'm working for a client building a brand new dedicated server purchased from Contabo Dedi Host provider on a freshly installed Debian 10 GNU / Linux, I've had to configure a new FTP server, since some time I prefer to use Proftpd instead of VSFTPD because in my opinion it is more lightweight and hence better choice for a small UNIX server setups. During this once again I've encounted the same ACTIVE FTP not working from FTP server to FTP client host machine. But before shortly explaining, the fix I find worthy to explain briefly what is ACTIVE / PASSIVE FTP connection.


1. What is ACTIVE / PASSIVE FTP connection?
 

Whether in active mode, the client specifies which client-side port the data channel has been opened and the server starts the connection. Or in other words the default FTP client communication for historical reasons is in ACTIVE MODE. E.g.
Client once connected to Server tells the server to open extra port or ports locally via which the overall FTP data transfer will be occuring. In the early days of networking when FTP protocol was developed security was not of such a big concern and usually Networks did not have firewalls at all and the FTP DATA transfer host machine was running just a single FTP-server and nothing more in this, early days when FTP was not even used over the Internet and FTP DATA transfers happened on local networks, this was not a problem at all.

In passive mode, the server decides which server-side port the client should connect to. Then the client starts the connection to the specified port.

But with the ever increasing complexity of Internet / Networks and the ever tightening firewalls due to viruses and worms that are trying to own and exploit networks creating unnecessery bulk loads this has changed …

active-passive-ftp-explained-diagram
 

2. Installing and configure ProFTPD server Public ServerName

I've installed the server with the common cmd:


apt –yes install proftpd


And the only configuration changed in default configuration file /etc/proftpd/proftpd.conf  was
ServerName          "Debian"

I do this in new FTP setups for the logical reason to prevent the multiple FTP Vulnerability Scan script kiddie Crawlers to know the exact OS version of the server, so this was changed to:


ServerName "MyServerHostname"


Though this is the bad security through obscurity practice doing so is a good practice.
 

3. Create iptable firewall rules to allow ACTIVE FTP mode


But anyways, next step was to configure the firewall to be allowed to communicate on TCP PORT 21 and 20 to incoming source ports range 1024:65535 (to enable ACTIVE FTP) on firewal level with iptables on INPUT and OUTPUT chain rules, like this:


iptables -A INPUT -p tcp –sport 1024:65535 -d 0/0 –dport 21 -m state –state NEW,ESTABLISHED -j ACCEPT
iptables -A INPUT -p tcp -s 0/0 –sport 1024:65535 -d 0/0 –dport 20 -m state –state NEW,ESTABLISHED -j ACCEPT
iptables -A OUTPUT -p tcp -s 0/0 –sport 21 -d 0/0 –dport 1024:65535 -m state –state ESTABLISHED -j ACCEPT
iptables -A OUTPUT -p tcp -s 0/0 –sport 20 -d 0/0 –dport 1024:65535 -m state –state ESTABLISHED,RELATED -j ACCEPT


Talking about Active and Passive FTP connections perhaps for novice Linux users it might be worthy to say few words on Active and Passive FTP connections

Once firewall has enabled FTP Active / Passive connections is on and FTP server is listening, to test all is properly configured check iptable rules and FTP listener:
 

/sbin/iptables -L INPUT |grep ftp
ACCEPT     tcp  —  anywhere             anywhere             tcp spts:1024:65535 dpt:ftp state NEW,ESTABLISHED
ACCEPT     tcp  —  anywhere             anywhere             tcp spts:1024:65535 dpt:ftp-data state NEW,ESTABLISHED
ACCEPT     tcp  —  anywhere             anywhere             tcp dpt:ftp
ACCEPT     tcp  —  anywhere             anywhere             tcp dpt:ftp-data

netstat -l | grep "ftp"
tcp6       0      0 [::]:ftp                [::]:*                  LISTEN    


4. Loading nf_nat_ftp module and net.netfilter.nf_conntrack_helper (for backward compitability)


Next step of course was to add the necessery modules nf_nat_ftp nf_conntrack_sane that makes FTP to properly forward ports with respective Firewall states on any of above source ports which are usually allowed by firewalls, note that the range of ports given 1024:65535 might be too much liberal for paranoid sysadmins and in many cases if ports are not filtered, if you are a security freak you can use some smaller range such as 60000-65535.


Here is time to say for sysadmins who haven't recently had a task to configure a new (unecrypted) File Transfer Server as today Secure FTP is almost alltime used for file transfers for the sake of security might be puzzled to find out the old Linux kernel ip_conntrack_ftp which was the standard module used to make FTP Active connections work is substituted nowadays with  nf_nat_ftp and nf_conntrack_sane.

To make the 2 modules permanently loaded on next boot on Debian Linux they have to be added to /etc/modules

Here is how sample /etc/modules that loads the modules on next system boot looks like

cat /etc/modules
# /etc/modules: kernel modules to load at boot time.
#
# This file contains the names of kernel modules that should be loaded
# at boot time, one per line. Lines beginning with "#" are ignored.
softdog
nf_nat_ftp
nf_conntrack_sane


Next to say is that in newer Linux kernels 3.x / 4.x / 5.x the nf_nat_ftp and nf_conntrack-sane behaviour changed so  simply loading the modules would not work and if you do the stupidity to test it with some FTP client (I used gFTP / ncftp from my Linux desktop ) you are about to get FTP No route to host errors like:


Cannot create a data connection: No route to host
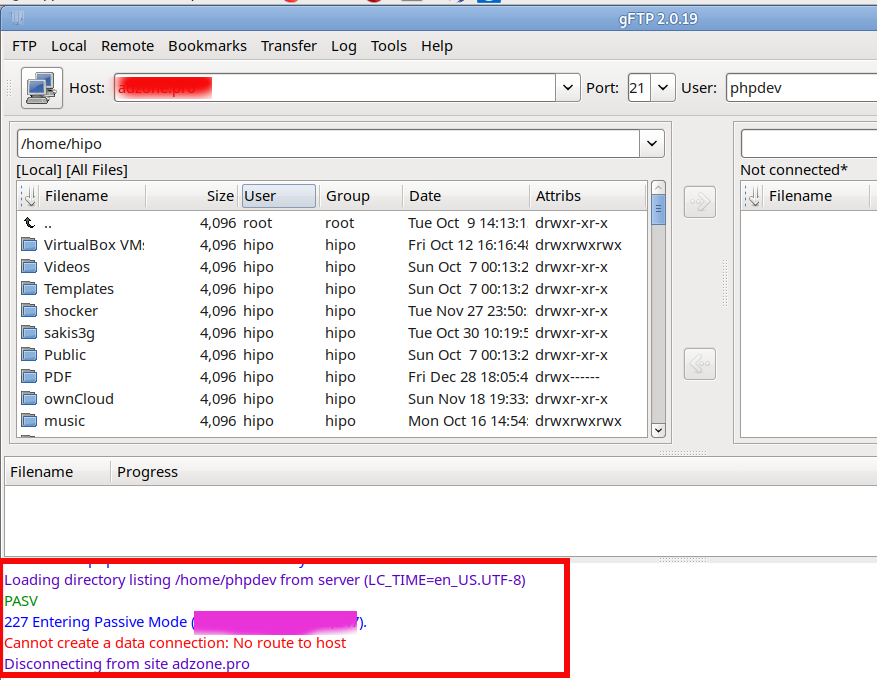
 

cannot-create-a-data-connection-no-route-to-host-linux-error-howto-fix


Sometimes, instead of No route to host error the error FTP client might return is:


227 entering passive mode FTP connect connection timed out error


To make the nf_nat_ftp module on newer Linux kernels hence you have to enable backwards compatibility Kernel variable


/proc/sys/net/netfilter/nf_conntrack_helper


echo 1 > /proc/sys/net/netfilter/nf_conntrack_helper


To make it permanent if you have enabled /etc/rc.local legacy one single file boot place as I do on servers – for how to enable rc.local on newer Linuxes check here

or alternatively add it to load via sysctl

sysctl -w net.netfilter.nf_conntrack_helper=1

And to make change permanent (e.g. be loaded on next boot)

echo 'net.netfilter.nf_conntrack_helper=1' >> /etc/sysctl.conf


5. Enable PassivePorts in ProFTPD or PassivePortRange in PureFTPD


Last but not least open /etc/proftpd/proftpd.conf find PassivePorts config value (commented by default) and besides it add the following line:


PassivePorts 60000 65534


Just for information if instead of ProFTPd you experience the error on PureFTPD the configuration value to set in /etc/pure-ftpd.conf is:
 

PassivePortRange 30000 35000


That's all folks, give the ncftp / lftp / filezilla or whatever FTP client you prefer and test it the FTP client should be able to talk as expected to remote server in ACTIVE FTP mode (and the auto passive mode) will be not triggered anymore, nor you will get a strange errors and failure to connect in FTP clients as gftp.

Cheers 🙂

How to install nginx webserver from source on Debian Linux / Install Latest Nginx on Debian

Wednesday, March 23rd, 2011

Nginx install server logo
If you're running a large website consisting of a mixture of php scripts, images and html. You probably have noticed that using just one Apache server to serve all the content is not that efficient

Each Apache child (I assume you're using Apache mpm prefork consumes approximately (20MB), this means that each client connection would consume 20 mb of your server memory.
This as you can imagine is truly a suicide in terms of memory. Each request for a picture, css or simple html file would ask Apache to fork another process and will consume (20mb of extra memory form your server mem capacity)!.

Taking in consideration all this notes and the need for some efficiency here, the administrator should normally think about dividing the processing of the so called static content from the dynamic content served on the server.

Apache is really a nice webserver software but with all the loaded modules to serve dynamic content, for instance php, cgi, python etc., it's becoming not the best solution for handling a (css, javascript, html, flv, avi, mov etc. files).

Even a plain Apache server installation without (libphp, mod_rewrite mod deflate etc.) is still not dealing efficiently enough with the aforementioned static files content

Here comes the question if Apache is not that quick and efficient in serving static files, what then? The answer is caching webserver! By caching the regular static content files, your website visitors will benefit by experiencing shorter webserver responce files in downloading static contents and therefore will generally hasten your website and improve the end user's experience.

There are plenty of caching servers out there, some are a proprietary software and some are free software.

However the three most popular servers out there for static file content serving are:

  • Squid,
  • Varnish
  • Nginx

In this article as you should have already found out by the article title I'll discuss Nginx

You might ask why exactly Nginx and not some of the other twos, well simply cause Squid is too complicated to configure and on the other hand does provide lower performance than Nginx. On the other hand Varnish is also a good solution for static file webserver, but I believe it is not tested enough. However I should mention that my experience with testing varnish on my own home router is quite good by so far.

If you're further interested into varhisn cache I would suggest you checkout www.varhisn-cache.org .

Now as I have said a few words about squid and varhisn let's proceed to the essence of the article and say few words about nginx

Here is a quote describing nginx in a short and good manner directly extracted from nginx.com

nginx [engine x] is a HTTP and reverse proxy server, as well as a mail proxy server written by Igor Sysoev. It has been running for more than five years on many heavily loaded Russian sites including Rambler (RamblerMedia.com). According to Netcraft nginx served or proxied 4.70% busiest sites in April 2010. Here are some of success stories: FastMail.FM, WordPress.com.

By default nginx is available ready to be installed in Debian via apt-get, however sadly enough the version available for install is pretty much outdated as of time of writting the nginx debian version in lenny's deb package repositories is 0.6.32-3+lenny3

This version was release about 2 years ago and is currently completely outdated, therefore I found it is not a good idea to use this old and probably slower release of nginx and I jumped further to install my nginx from source:
Nginx source installation actually is very simple on Linux platforms.

1. As a first step in order to be able to succeed with the install from source make sure your system you have installed the packages:

debian:~# apt-get install libpcre3 libpcre3-dev libpcrecpp0 libssl-dev zlib1g-dev build-essential

2. Secondly download latest nginx source code tarball

Check out on http://nginx.com/download the latest stable release of nginx and further issue the commands below:

debian:~# cd /usr/local/src
debian:/usr/local/src# wget http://nginx.org/download/nginx-0.9.6.tar.gz

3.Unarchive nginx source code

debian:/usr/local/src#tar -zxvvf nginx-0.9.6.tar.gz
...

The nginx server requirements for me wasn't any special so I proceeded and used the nginx ./configure script which is found in nginx-0.9.6

4. Compline nginx server

debian:/usr/local/src# cd nginx-0.9.6
debian:/usr/local/src/nginx-0.9.6# ./configure && make && make install
+ Linux 2.6.26-2-amd64 x86_64
checking for C compiler ... found
+ using GNU C compiler
+ gcc version: 4.3.2 (Debian 4.3.2-1.1)
checking for gcc -pipe switch ... found
...
...

The last lines printed by the nginx configure script are actually the major interesting ones for administration purposes the default complation options in my case were:

Configuration summary
+ using system PCRE library
+ OpenSSL library is not used
+ md5: using system crypto library
+ sha1 library is not used
+ using system zlib library

nginx path prefix: "/usr/local/nginx"
nginx binary file: "/usr/local/nginx/sbin/nginx"
nginx configuration prefix: "/usr/local/nginx/conf"
nginx configuration file: "/usr/local/nginx/conf/nginx.conf"
nginx pid file: "/usr/local/nginx/logs/nginx.pid"
nginx error log file: "/usr/local/nginx/logs/error.log"
nginx http access log file: "/usr/local/nginx/logs/access.log"
nginx http client request body temporary files: "client_body_temp"
nginx http proxy temporary files: "proxy_temp"
nginx http fastcgi temporary files: "fastcgi_temp"
nginx http uwsgi temporary files: "uwsgi_temp"
nginx http scgi temporary files: "scgi_temp"

If you want to setup nginx server to support ssl (https) and for instance install nginx to a different server path you can use some ./configure configuration options, for instance:

./configure –sbin-path=/usr/local/sbin –with-http_ssl_module

Now before you can start the nginx server, you should also set up the nginx init script;

5. Download and set a ready to use script with cmd:

debian:~# cd /etc/init.d
debian:/etc/init.d# wget https://www.pc-freak.net/files/nginx-init-script
debian:/etc/init.d# mv nginx-init-script nginx
debian:/etc/init.d# chmod +x nginx

6. Configure Nginx

Nginx is a really easy and simple server, just like the Russians, Simple but good!
By the way it's interesting to mention nginx has been coded by a Russian, so it's robust and hard as a rock as all the other Russian creations 🙂
Nginx configuration files in a default install as the one in my case are to be found in /usr/local/nginx/conf

In the nginx/conf directory you're about to find the following list of files which concern nginx server configurations:

deiban:/usr/local/nginx:~# ls -1
fastcgi.conf
fastcgi.conf.default
fastcgi_params
fastcgi_params.default
koi-utf
koi-win
mime.types
mime.types.default
nginx.conf
nginx.conf.default
scgi_params
scgi_params.default
uwsgi_params
uwsgi_params.default
win-utf

The .default files are just a copy of the ones without the .default extension and contain the default respective file directives.

In my case I'm not using fastcgi to serve perl or php scripts via nginx so I don't need to configure the fastcgi.conf and fastcgi_params files, the scgi_params and uwsgi_params conf files are actually files which contain nginx configuration directives concerning the use of nginx to process SSI (Server Side Include) scripts and therefore I skip configuring the SSI conf files.
koi-utf and koi-win are two files which usually you don't need to configure and aims the nginx server to support the UTF-8 character encoding and the mime.types conf is a file which has a number of mime types the nginx server will know how to handle.

Therefore after all being said the only file which needs to configured is nginx.conf

7. Edit /usr/local/nginx/conf/nginx.conf

debian:/usr/local/nginx:# vim /usr/local/nginx/conf/nginx.conf

Therein you will find the following default configuration:

#gzip on;

server {
listen 80;
server_name localhost;

#charset koi8-r;

#access_log logs/host.access.log main;

location / {
root html;
index index.html index.htm;
}
#error_page 404 /404.html;

# redirect server error pages to the static page /50x.html
#
error_page 500 502 503 504 /50x.html;
location = /50x.html {
root html;
}

In the default configuration above you need to modify only the above block of code as follows:

server {
listen 80;
server_name yoursitedomain.com;

#charset koi8-r;

#access_log logs/access.log main;

location / {
root /var/www/yoursitedomain.com/html;
index index.html index.htm;
}

Change the yoursitedomain.com and /var/www/yoursitedomain.com/html with your directory and website destinations.

8. Start nginx server with nginx init script

debian:/usr/local/nginx:# /etc/init.d/nginx start
Starting nginx:

This should bring up the nginx server, if something is miss configured you will notice also some error messages, as you can see in my case in above init script output, thanksfully there are no error messages.
Note that you can also start nginx directly via invoking /usr/local/nginx/sbin/nginx binary

To check if the nginx server has properly started from the command line type:

debian:/usr/local/nginx:~# ps ax|grep -i nginx|grep -v grep
9424 ? Ss 0:00 nginx: master process /usr/local/nginx/sbin/nginx
9425 ? S 0:00 nginx: worker process

Another way to check if the web browser is ready to serve your website file conten,t you can directly access your website by pointing your browser to with http://yoursitedomain.com/, you should get your either your custom index.html file or the default nginx greeting Welcome to nginx

9. Add nginx server to start up during system boot up

debian:/usr/local/nginx:# /usr/sbin/update-rc.d -f nginx defaults

That's all now you have up and running nginx and your static file serving will require you much less system resources, than with Apache.
Hope this article was helpful to somebody, feedback on it is very welcome!

Show / Restore missing Gimp 2.8 Toolbox Menu on Debian Wheezy 7.0 Linux

Tuesday, May 28th, 2013

After installing latest Debian Wheezy Linux on my Lenovo Thinkpad Notebook. One of first packages after very basic GNOME install was of course GIMP.

I edit images with GIMP mostly on daily basis, so life without GIMP is impossible…
Debian 7 comes with shiny new version of GIMP – GIMP 2.8. So far so good, but the problem is when started it for a first time, the default configuration is made in a way that it miss essential Gimp Panel Window (The Toolbox Window). Missing Brushes and selectors, move, scissors etc. is something really terrible.

My first guess was I can display it somehow from GIMP's View menu but after few minutes of try/errs I figured out this is not possible.

One menu I managed to displayed Toolbox in some mostly unusubale form, since they were not fitting well my 1024×768 resolution screen is via menus:

Windows -> Toolbox

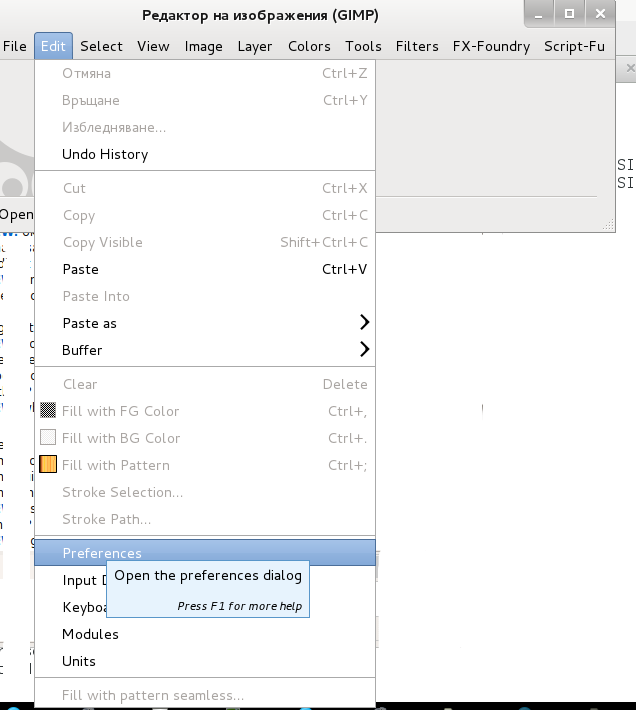
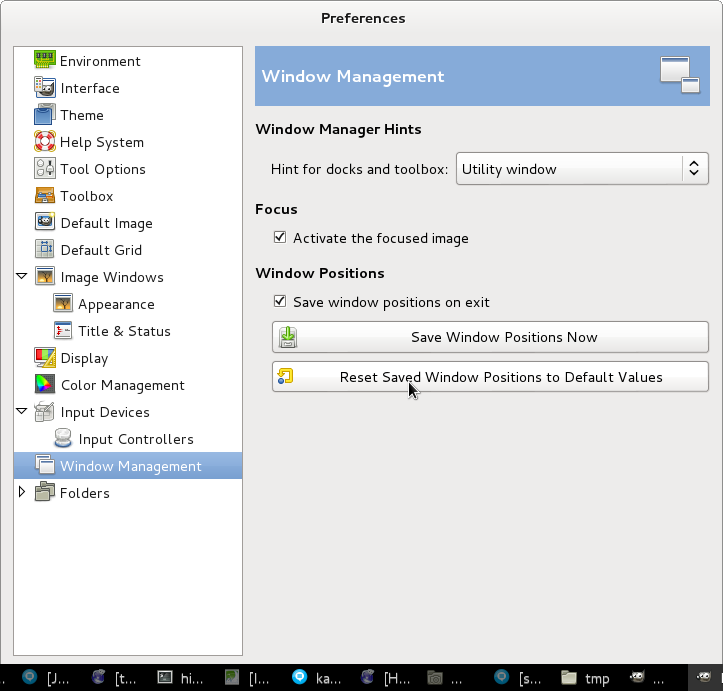
Since this wasn't what I was looking for I spend some 10 minutes until I finally found "the fix". from menus:

Preferences -> Window Management -> Reset Saved Window Positions to Default Values

gimp 2.8 preferences menu screenshot debian gnu linux 7 wheeze screenshot

gimp 2.8 preferences menu restore saved window position to default values screenshot / display missing GIMP menus