Posts Tagged ‘notebook’

Make Laptop Sleep on LID (Monitor) close in Linux Debian and Ubuntu systemd Linux

Monday, June 22nd, 2020

make-laptop-auto-sleep-on-lid-close-in-Linux-Ubuntu-Debian-Linux


I need to make my laptop automatically sleep on LID Screen close but it doesn't why?

If have used your laptop for long years with Windows or any Windows user is used to the default beavrior of Windows to automatically sleep the computer on PC close. This default behavior of automatically sleep on LID Close has been Windows standard for many years
and the reason behind that usually laptop is used for mobility and working on a discharging battery so a LID screen close puts the laptop in (SLEEP) BATTERY SUSPEND MODE aiming to make the charged battery last longer. However often for Desktop use in the Office LID close 
trigger of laptop sleep mode is annoying and undesired I've blogged earlier on that issue and how to make laptop not to sleep on LID close on M$ Windows 10 here.

This bahavior was copied and was working in many of the Linux distributions for years however in Debian GNU / Linux and Ubuntu 16.X this feature is often not properly working due to a systemd bug. Of course closing the notebook LID screen without putting
the PC in sleep mode is not a bug but a very useful feature for those who use their laptop as a Desktop machine that is non-stop running, however for most ppl default behavior to auto-suspend the computer on Laptop Monitor close is desired.

Here is how to  force the close of the laptop lid to go to suspend/sleep mode and when open the lid, it wake it up.


1. First requirement is to make sure the laptop has installed the package pm-utils, if it is not there install it with:


# apt-get install –yes pm-utils


2. Next we need to edit logind.conf and append 3 variables


# vim /etc/systemd/logind.conf


Normally the file should have a bit of commented informative lines as well as a commented variables that could be enabled like so:


[Login]
#NAutoVTs=6
#ReserveVT=6
#KillUserProcesses=no
#KillOnlyUsers=
#KillExcludeUsers=root
#InhibitDelayMaxSec=5
#HandlePowerKey=poweroff
#HandleSuspendKey=suspend
#HandleHibernateKey=hibernate
#HandleLidSwitch=suspend
#HandleLidSwitchExternalPower=suspend
#HandleLidSwitchDocked=ignore
#PowerKeyIgnoreInhibited=no
#SuspendKeyIgnoreInhibited=no
#HibernateKeyIgnoreInhibited=no
#LidSwitchIgnoreInhibited=yes
#HoldoffTimeoutSec=30s
#IdleAction=ignore
#IdleActionSec=30min
#RuntimeDirectorySize=10%
#RemoveIPC=yes
#InhibitorsMax=8192
#SessionsMax=8192


These entries are usually the files that are used by default as a systemd settings.
Before starting make a copy just you happen to mess systemd.conf, e.g.:


cp -rpf /etc/systemd/logind.conf /etc/systemd/logind.conf_bak


To make the PC LID close active append in the end of file below 3 lines:


HandleSuspendKey=suspend
HandleLidSwitch=suspend
HandleLidSwitchDocked=suspend
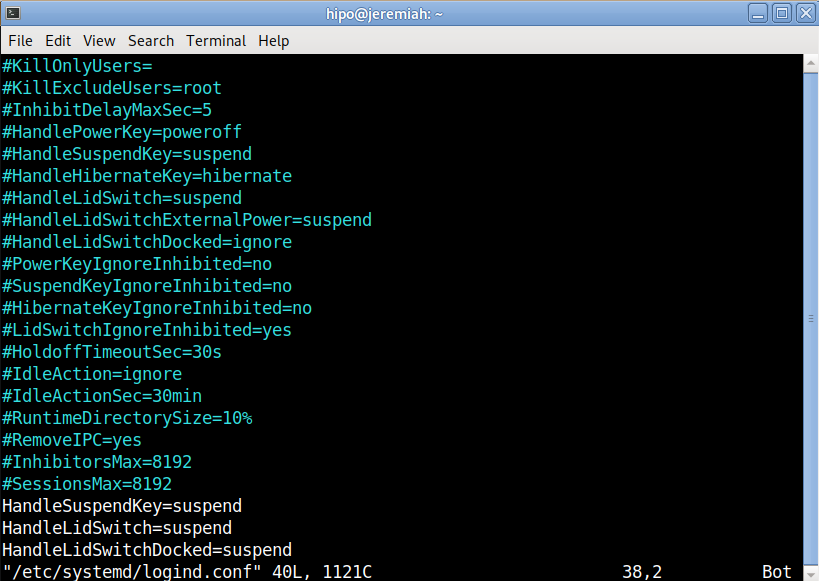
 

systemd-logind-conf-enable-suspend-sleep-on-laptop-lid-screen-close-linux

Save the file and to make systemd daemon reload restart the PC, even though theoretically systemd can be reloaded to digest its new /etc/systemd/logind.conf with:


# systemctl daemon-reexec


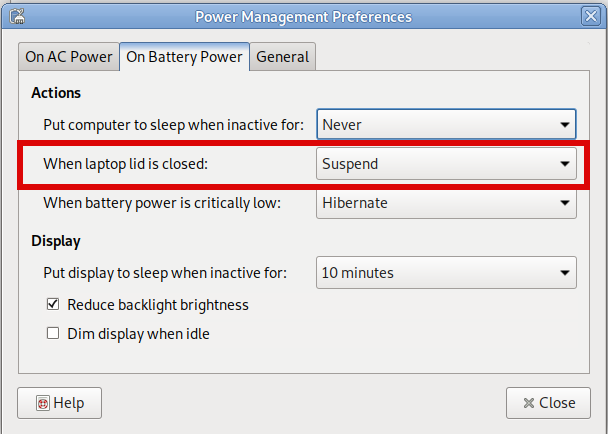
3. Assure yourself the Power Management LID setting of the Desktop Graphical User Interface are set to SUSPEND on close


I use MATE Desktop environment as it is simplistic and quite stable fork of GNOME 2.0, anyway depending on the GUI used on the Linux powered laptop e.g. GNOME / KDE Plasma / XFce etc. make sure the respective
 

Control Panel -> Power Management


settings are set to Force the Laptop Screen LID SUSPEND on Close.

Below is how this is done on MATE:
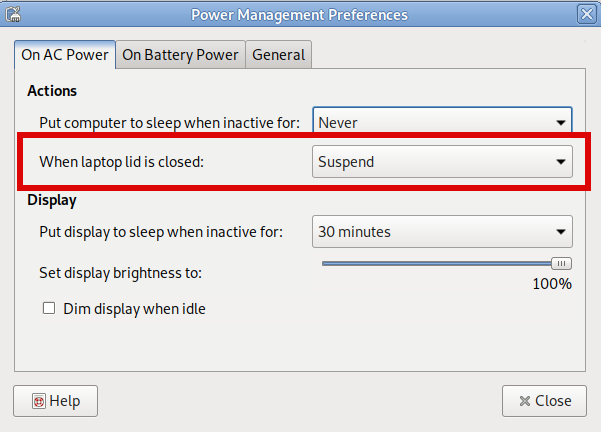
power-management-preferences-when-lid-is-closed-MATE-on-AC-power

power-management-preferences-when-lid-closed-on-battery-suspend

That's all folks, now close your Laptop and enjoy it going to sleep, open it up and get it awaked 🙂 Cheers ! 


Use mac PC built-in camera to make / take pictures on Mac OS X macbookair notebook with Photo Booth

Friday, February 26th, 2016

take-picture-or-video-with-built-in-camera-on-MacOSX-PhotoboothLOGO

It seems we lost our Good high quality Digital Camera somewhere and I was in need urgently to make a good quality photo (my ZTE Phone) has a very bad camera, so I got the idea to use Macbookair's camera as it has better
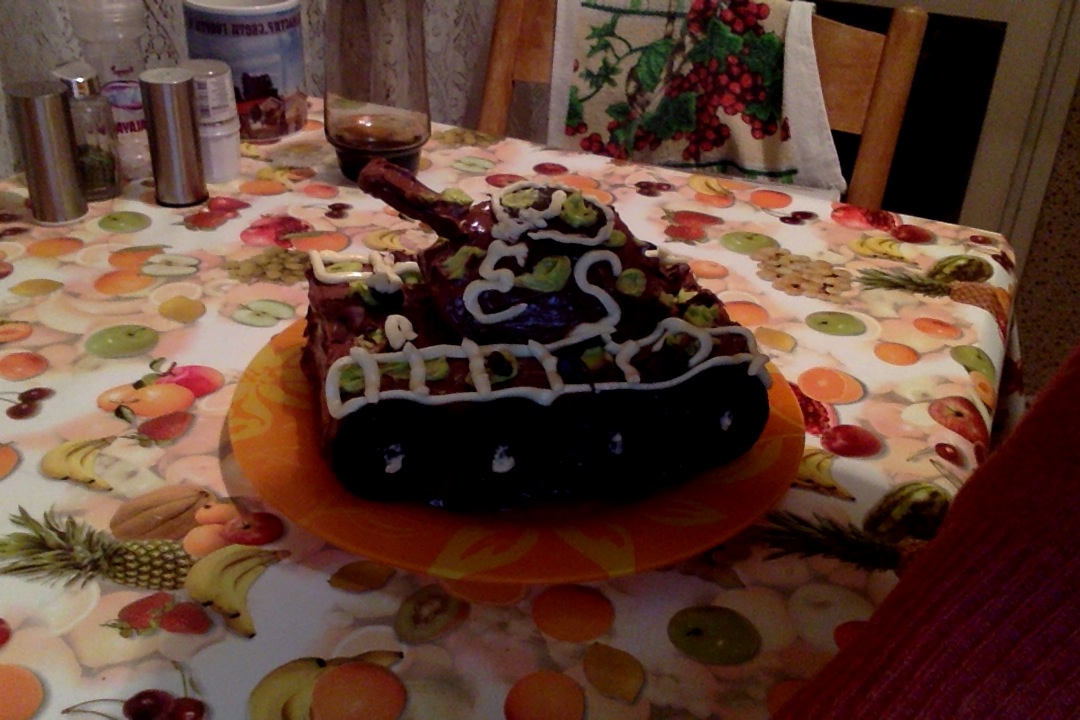
resolution to picture my present a  Tank Tort 🙂 hand made by my wife as a present for the Day of the Defender of the Fatherland which is a major feast in Russia, Belarus and many of the ex-Soviet Union members communist countries.

Actually using build in camare in MacBookAir is a handy thing for people mising at the moment a good high quality digital camera as it is thin and light and build in MacBook cam can be used to make Videos and Pictures exactly the same way
as an ordinary Tablet Computer is used so commonly nowadays by many:

In other words I needed for the Mac OS X equivalent to Cheese's (Photo and Video) capturer program for Linux.

Luckily for people interested in using their Mac OS notebook as a amateur camera this is easy by using default shipped Mac Application called:

Photo Booth app

To Launch Photo Booth app it just look it up in Finder and double click it:

PhotoBooth-how-to-take-photos-on-macosx

Clicking the large red button underneath the preview area will take a picture after an optional countdown.

Tort Tank of Svetka

Besides being able to capture Video and Pictures from Mac's camera it could add also some nice effects to taken pictures and videos (supports a basic video editing) features and effects.

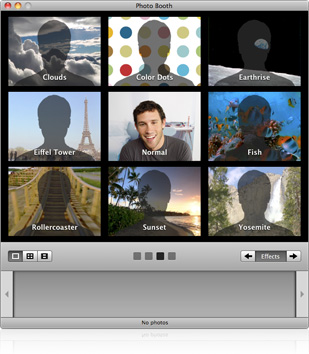
The effects you can choose are are: Sepia, Black and White, Glow, Comic Book, Normal, Colored Pencil, Thermal Camera, X-Ray, and Pop Art. There are also effects that change the person in the picture using these effects: Bulge, Dent, Twirl, Squeeze, Mirror, Light Tunnel, Fish Eye, and Stretch. Actually  photographic filters of Photo Booth are very similar to Adobe Photoshop.

make-picture-on-mac-photobooth-effects-screenshot
By default Photo Booth will create picture, howver

Photo Booth saves your photos as JPEG files in a folder named Photo Booth, located in your home folder.

Choose File > Reveal in Finder

to see your picture files.

A much better way to be able to easily see and access all taken Pictures and Videos with Photo Booth is to


open Terminal


and type:

——-


$ cd Pictures
$ ln -s Photo\ Booth\ Library/Pictures/ PhotoBoothPics


This will make Link to pictures be easily accessible from your Finder -> Pictures folder
 
Applying custom photo backgrounds

A very useful feature of Photo Booth is that the user can apply backdrops to provide an effect similar to a green screen. When a backdrop is selected, a message appears telling the user to step away from the camera. Once the background is analyzed, the user steps back in front of the camera and is shown in front of the chosen backdrop.

For people who prefer to take photos using a console program on Mac OS I guess you should take a look at ffpeg
Here is one more snapshot of the Tort Tank snapshot made with the Macbookair of Svetlana 🙂

Tort Tank


P.S. If you like the Tort Tank and you happen to live in Sofia Bulgaria, you can order it  by dropping me a comment with request 🙂

Enjoy ! 🙂

Reset Windows (NT, 2000, XP, Vista and Windows 7) password / Reset Windows Forgotten Password / Reset Windows Administrator password

Friday, March 12th, 2010

Recently I was in the Pomorie’s Monastery – St. George .
One layman left his notebook (maybe as a donation) to the monks. However the notebook was protected by both: fingerprint check, as well as administrator password and therefore the notebook was completely unusable and was thrown away with many other unused belongings.
When the abbot of the monastery found out I’m adept with computers, he asked if I can fix up the notebook and somehow remove the password, or reinstall the machine to make it usable.
So here I decided to blog what I undertook to reset the windows password with the hope somebody else could benefit from that as well.

1. Go to Offline NT Password & Registry Editor, Bootdisk / CD website

2. Download the bootable CD image zip archive of Offline NT Password & Registry Editor and burn the iso to a CD using K3b (on Linux), Nero or CDBurnerXP on (Windows).

3. Follow the step by step walkthrough manual (here) to either change Some Windows user password or completely reset administrator or any other user password.

Following the walkthrough literally prooved to be quite succesful for me and I was able to properly reset the administrator password!
So Hooray it works again! The monks can now benefit of the cute Toshiba satellite machine.

How to Enable Open files with Microsoft Office Word 2003 in GNOME nautilus on Linux

Saturday, November 24th, 2012

how to addmicrosoft office to linux gui ms word logo with linux tux mascot in GNOME desktop nautiilus

Do you work with Linux and need communicate via e-mail with people sending you Microsoft Doc files created with Microsoft Office Word?

Do you end up with crappy (not identicaly looking) .doc files, after editing with Open Office and mailing back to Windows users, using Microsoft Office (Word)?

I experienced this many time and though it is not completely Open Office fault it is hard to explain or convince others to simply switch to Libre Office and distribute text in .ODT. Also pitily,  most computer users are much below the avarege level and too used to MS Office, so it is hardly possible  to change their bad habits (I try that with my co-students in Anrhem Business School) and I tell you from experience it is not possible …

I use GNU / Linux  as main Desktop operating system for  10 years now and for my work and studying, it is common the colleagues send me files in MS Word .DOC format. Usually I use OpenOffice to read and edit them and send back. However, not all formatted .doc files looks later nice in MS Word 2003 / 2007. Thus I have also a Native Microsoft Office 2003 installed on my Debian Linux running through – WINE Windows emulator.

Often, when I want to be sure a received MS .DOC file should be displaying exactly the same on MS Windows OS – to (avoid collegues criticism). I open the document using wine emulated Microsoft Office 2003.

Most of the MS .doc files are received over e-mail (I use as pop3 client Icedove- Mozilla Thunderbird), so I save them further on my hard disk and need to read / modifythem.
It is rather inconvenient and time inefficient to start Microsoft Office from gnome-terminal and type in below long command in order to edit .docs:

wine ~/.wine/drive_c/"Program Files"/"Microsoft Office"/OFFICE11/WINWORD.EXE

Thus I wanted a more convenient, easy way to be able to directly open .doc files with emulated Microsoft Word from GUI on my Debian Linux notebook.
This is possible using a nautilus plugin tool called nautilus-scripts-manager. Earlier I blogged about how to make extracting PDF to images possible with nautilus-scripts-manager, in the exactly same manner of logic is possible to add as many processing scripts to be available for invokement via the Scriptsnautilus scripts Properties menu.

Here is how to add MS Word to nautilus GNOME menus:

1. Install nautilus-scripts-manager (if not already installed)

debian:~# apt-get install --yes nautilus-scripts-manager

2. Create ~/.gnome2/nautilus-scripts/ directory

(~/ is shortcut for /home/yourusername/) – To add it globally for all users, one has to create the same .gnome2/nautilus-scripts/ directory with respective scripts for all existing users on host.

mkdir ~/.gnome2/nautilus-scripts/

3. Create ~/.gnome2/nautilus-scripts/word.sh MS Word launcher script

  Edit ~/.gnome2/nautilus-scripts/word.sh and add  like following 2 liners script: (note the paths to WINWORD.EXE might vary depending on exact Microsoft Office installed version:

#!/bin/sh
wine ~/.wine/drive_c/"Program Files"/"Microsoft Office"/OFFICE11/WINWORD.EXE "$1"

You can also download nautilus word.sh script here

Further on once placed, make word.sh script executable:

noah:~$ chmod +x ~/.gnome2/nautilus-scripts/word.sh

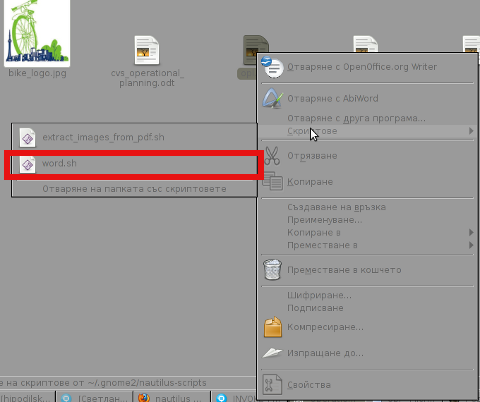
Onwards it is possible to open .doc files from Nautilus Scripts Manager menu press on the .doc file with last mouse button and choose Scripts :

open doc files with Microsoft Word 2003 nautilus script manager on GNU Linux and FreeBSD My GNOME env is configured in Bulgarian language so on below script you see the bulgarian translated word for Scripts (Скриптове).

screenshot of random open doc file with microsoft word 2003 nautilus script manager on my Debian GNU / Linux

Right now I don't have at hand FreeBSD, and I'm not sure if nautilus-scripts-manager is available with FreeBSD gnome so, if someone has tested this and can confirm this works on FreeBSD drop a comment please.

Well that's all enjoy easily opening your .doc files with Microsoft Office on Linux.

Disable bluetooth on Linux IBM / Lenovo Thinkpad laptops

Thursday, February 14th, 2013

bluetooth gnu linux disable bluetooth linux how to tux logo bluetooth thinkpad

I have a Debian GNU / Linux squeeze with bluetooth and bluetooth is started automatically on system boot. This is pretty annoying, cause I use bluetooth quite rarely.
 disable / enable bluetooth via terminal is controlled via Linux sysfs virtual filesystem. The command to disable bluetooth one time is:

debian:~# echo 0 > /sys/devices/platform/thinkpad_acpi/bluetooth_enable

It is efficient in terms of energy saving especially if you use often your notebook on battery to turn off bluetooth permanently and only enable it when needed with:

debian:~# echo 1 > /sys/devices/platform/thinkpad_acpi/bluetooth_enable

To permanently disable bluetooth on Linux boot use:

# service bluetooth stop

In /etc/rc.local before exit 0 line place:

echo 0 > /sys/devices/platform/thinkpad_acpi/bluetooth_enable

An alternative method to permanently disable bluetooth (on other non-Thinkpad – any brand laptops) is via rfkill (bluetooth device control interface), on Ubuntu rfkill is installed by default but Debian users has to explicitly install it via apt:

debian:~# apt-get install –yes rfkill

Once rfkill is installed on host put a line before exit 0 in /etc/local:

rfkill block bluetooth
 

How to fix problem with Skype No Video on MacBook Air with Mac OS X 10.8.6 / Mac OS X Repair OS file permissions with Disk Utility

Monday, December 9th, 2013

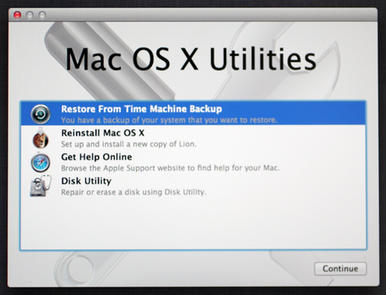
mac os x utilities disk utility reset Mac OSX file permissions to default
My girlfriend Svetlana has MacBook Air and just recently her skype Video calls stopped working once again after Mac OS X offered her to apply some update. Her notebook as of time of writting this post is running Mac OS X version 10.8.6. About 1 month and a halfago she was facing same Skype No VIdeo on Mac BookAri issues for how I fixed her No Video Skype issues back then check here. Initially I thought again the problem will be identical and to test if Web Camera hardware is detected on a hardware level by OS, I tried to check if it is displaying videoi FaceTime application. Last time there was no Video in Skype on her Mac Book Air  I remember clearly camera was detected on OS level and displaying well in Facetime, however this time even in facetime I couldn't see a capture of myself … As obviously problem was not in Skype Mac OS previous time fix of substituting AppleCamera.plugin with older version would not fix it. After some evaluation on problem and reading large number of posts on Apple support forums, I've came to the conclusion that it is possible the whole issues are faced by improper permissions applied by latest applied Mac OS update. In such cases people were recommending to Repair Mac OS Standard OS Files Permissions using an OS embedded tool called Disk Utility.
Disk Utility is an application that's built into OS X that can perform lots of useful and even scary actions.Sysadmins and advanced users seem to find frequent need of this handy tool but those newer to the Mac OS it is better to only use it after reading the docs and well realizing what exactly doing.

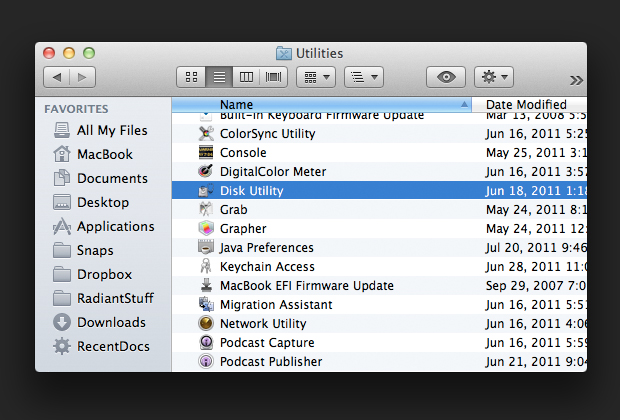
To Find / Open Disk Utility on Mac OS;

Launch Applications folder -> Utilities (folder), click the name of your startup disk, and select Repair Disk Permissions.

mac-oSX-applications-utilitilities-diskutility


Mac OS X 10.8.6 Disk Utility Repair Disk Permissions screenshot
As I can understand from other ports reverting Mac OS File permissions to their default can solve a number of strange issues with Mac OS.
After repairing Mac OS X basis OS file permissions and testing in FaceTime and Skype, Camera god detected and Video was working fine 🙂
Hope this little article helps someone to fix same issues, if so please drop a thank you comment 😉

How to fix Skype no (built in) web camera on MacBook Air with (Mac OS X 10.8.5) resolve Skype issue of Aug 2013

Sunday, September 29th, 2013

Resolve fix issue with no camera in MacBookAir

My dear fiance girlfriend Svetlana, has a MacBookAir from 2013 since a month time. We speak quite regularly in Skype since right now she is in Belarus and I'm in Bulgaria. So it was a big surprise for me today her brand new shiny MacBookAir camera stopped working. She is completely new to Mac OS X so she didn't have idea if something automatically updated on the notebook, probably some update poped up and she proceeded to update. Well no matter how the issue happened … I instructed her how to install TeamViewer (for Mac OS X – just download the .DMG double click it and install) and logged in to the PC to check what's happening. In FaceTime video was showing fine so obviously on OS level webcamera was detected. I saw some threads suggesting sometimes built in webcam is not working due to some other application which uses the camera (Safari instrance using flash to open webcam, FacePalm or whatever) …
I checked the version release of Mac OS X and it showed Mac OS X 10.8.5. I checked whether some updates are available but there were none. After browsing a bit figured out the web camera not detected Skype error is experienced by hundreds of MacBook air users online. Thanksfully there is a quick and simple fix by just substituting a file called AppleCamera.plugin.

Below are instructions on how to fix I followed from Skype's Community Website: 
———————

This is a very simple fix that works! There are lots of ways to do it, but to put it very simply ,

Download  the AppleCamera.plugin provided.
 

Click on go in the finder menu, select go to golder and paste in  /Library/CoreMediaIO/Plug-Ins/DAL/ ,


move that item, AppleCamera.plugin, to the trash


Go to your downloads folder and copy the new  AppleCamera.plugin, then paste it in the folder where the old one was. 


It works

After following literally instructions Skype camera worked out like a charm 😉

Workaround “Running chkdsk in Read-Only mode” on Windows XP

Tuesday, July 16th, 2013

running chkdsk in read only mode microsoft windows XP chkdsk schedule check drive C on next restart

I had to fix old Notebook Dell Insspiron 1501 (890 mb ram and 1.60 Ghz CPU) notebook with Windows XP SP2. The notebook looks okay but as it is an old piece of hardware I decided to check hard drives for bad sectors with Windows (Check Disk) –  chkdsk. 

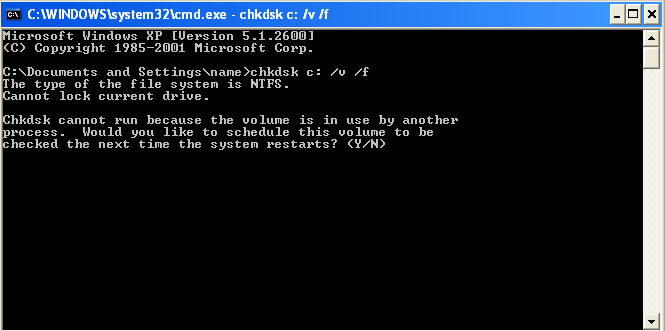
Running chkdsk via -> cmd.exe does not work because file system is in use and once you run chkdsk it does spit warning and error:


"Running CHKDSK in Read-Only mode
".

Errors found. CHKDSK cannot continue in read-only mode

Because it checks hdd in read-only its check is not completely reliable and in case some bad block is matched it is not possible for chkdsk to write on HDD and try fix or move it to some free space blocks.


To work around this its necessary to run chkdsk with options:

chkdsk C: /v /f

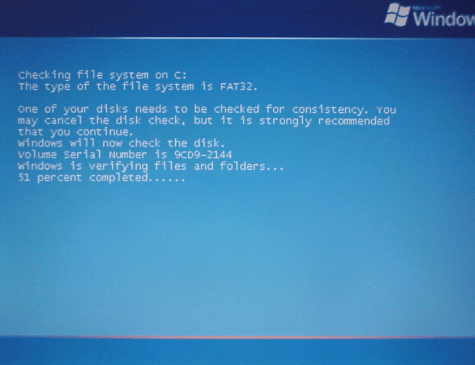
This command brings out prompt like in below screenshot offering to run CHKDSK on C drive on next system boot before starting Windows services which does lock files on file system – making it unavailable for CHKDSK to read blocks on it.

Checking file system on C drive before boot windows XP screenshot

The notebook had 3  Drives C:\, D:\ and E:\ so I run above command also on D:\ and E:\ to make sure there are no physical damages on D and E partitions, i.e.:

chkdsk D: /v /f
....

chkdsk E: /v /f
...
.....

Show / Restore missing Gimp 2.8 Toolbox Menu on Debian Wheezy 7.0 Linux

Tuesday, May 28th, 2013

After installing latest Debian Wheezy Linux on my Lenovo Thinkpad Notebook. One of first packages after very basic GNOME install was of course GIMP.

I edit images with GIMP mostly on daily basis, so life without GIMP is impossible…
Debian 7 comes with shiny new version of GIMP – GIMP 2.8. So far so good, but the problem is when started it for a first time, the default configuration is made in a way that it miss essential Gimp Panel Window (The Toolbox Window). Missing Brushes and selectors, move, scissors etc. is something really terrible.

My first guess was I can display it somehow from GIMP's View menu but after few minutes of try/errs I figured out this is not possible.

One menu I managed to displayed Toolbox in some mostly unusubale form, since they were not fitting well my 1024×768 resolution screen is via menus:

Windows -> Toolbox

Since this wasn't what I was looking for I spend some 10 minutes until I finally found "the fix". from menus:

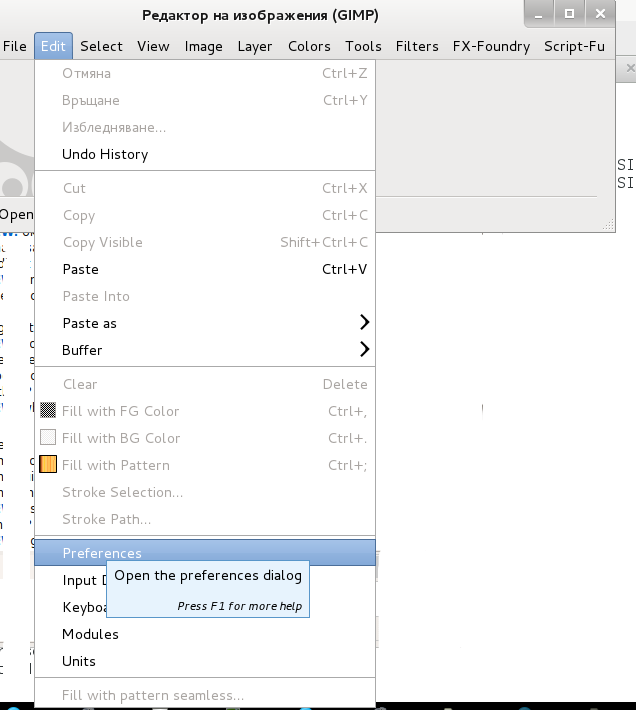
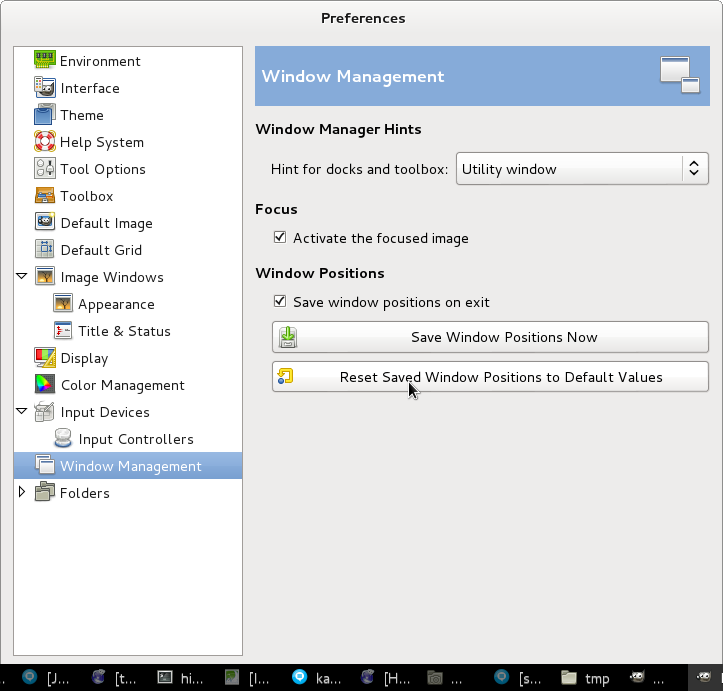
Preferences -> Window Management -> Reset Saved Window Positions to Default Values

gimp 2.8 preferences menu screenshot debian gnu linux 7 wheeze screenshot

gimp 2.8 preferences menu restore saved window position to default values screenshot / display missing GIMP menus

Install Acer Aspire notebook 5100-5023 Windows XP 32-bit Drivers – Fixing problems with Wireless, Video and TouchScreen

Tuesday, October 30th, 2012

Acer Aspire 5100 - 5023 Windows XP drivers download, acer aspire laptop picture


I had to fix one old notebook computer Acer Aspire model 5100 – 5023.
The PC was preloaded with Windows 32 bit XP by someone but the drivers were not installed. I tried installing the drivers downloading them from Acer.com's website drivers download section from here . However the PC in question as it was writen on the vendor sticker was not 5100 but some kind of 5100 modification laptop. Some of the few differences between Acer Aspire 5100 and Acer Aspire 5023 are 5100 is bundled with Camera and a TV Tuner, whether 5100-5023 is without WebCam and TV Tuner.

The most important drivers I've downloaded rom Acer.com's for me was the Wireless Adapter drivers, because without internet on it takes time downloading drivers from my notebook and moving them via an USB stick … I've downloaded drivers for Wireless as provided by website (Wireless_Atheros_5.3.0.67) but installing them though I didn't get any error and the drivers brought up the Wireless Adapter, somehow I couldn't connect to any wireless network protected with WPA2-PSK key (passphrase) encryption. The Windows XP installed by somebody before I received the laptop for repair was Service Pack 2 (SP2) and latest stable Win XP is with SP3 as well as a bunch pack of updates after SP3 so updating Win XP SP2 to Win XP SP3 would have probably take more time than a clean re-install. Besides that the Computer did not have any information to backup as it was bundled with a fresh Win XP SP2 so formatting was not a problem either.

Thus Ire-installed over OS, formatting with Quick Format and a clean latest Windows English XP SP3 .

After re-installing it took me a while of pondering until I figure out what drivers I need to install, I knew for sure there might a problem with Wireless Adapter as on the previous WIN XP installed it did not work. So before proceeding to download all for Acer Aspire 5100 from acer.com's website, I first used Everest 2.20 Home edition to check the exact PC hardware Vendors and consequentially look for the correct WI-FI driver. Everest identified the Wireless Adapter as

  • Atheros_AR5005G_Wireless_Network_Adapter_NE785H

so I looked on the Net for the driver. Actually there are some other brand notebooks which also come bundled with NE785H (i.e. Asus, HP). First I couldn't find correct driver for Acer and give a try installing a NE785H driver for Asus notebook this did not make the WI-FI work correctly, so after a further investigation I found Wireless NE785H 32 bit Windows XP driver for Acer laptops a mirror of is here

After installing this driver, I've downloaded all the rest of drivers from acer.com's website, for convenience of people who look for same Acer Aspire 5100 – 5023 drivers please check my drivers mirror here

For convenience, I've made also a Acer-Aspire-5100-5023-XP_Drivers.tar.gz archive of all drivers for Aspire 5100 – 5023  notebook here (Archive size is 256MB).

Two important notes to make here is I had a severe problem with the notebook touchscreen and for a long time I thought TouchScreen device is not working because of improperly intstalled driver (in Drivers provided by Acer.com there are two drivers provided for two different TouchPad devices – (Synaptics and Elantech). I tried installing them one by one and both together but in any case the TouchScreen did not react but keep hanging – fixing it was as simple as pressing simultaneously FN + F7!

Also another obstacle, I've faced was with the Video Card the notebook is with Integrated ATI Radeon Xpress 1100 as visible in Everest, drivers. In list of drivers on acer.com's website there was not a VGA driver for XP? This was puzzling so I googled and found few ATI Radeon Xpress 1100 drivers for other notebook vendors just like with Wireless. Downloading and testing other vendors drivers seem to install well but inside Control Panel -> System (Device Properties) -> Peripherals  Video Card was with yellow questionmark (not properly working) …

It took me a while to figure it out but later it appeared for Windows XP VGA drivers for Aspire 5100 – 5023 (ATI Radeon Xpress 1100) are there under the not so intuitive name Chipset_ATI_8.251.060427_XPx86.zip. Updating the improper driver inside System -> Peripherals -> Video Adapter with the one from the zip made the Video card finally work 🙂
With rest of PC hardware drivers, there was not issues, I just had to install as usual all rest from vendor ZIPs:

Audio_5_10_0_5273.zip
BTW_5_1_2535_0_utility_1500.zip
CPU Driver Ver.1.3.1.0.zip – For improved CPU work
FIR_SMC_5.1.3600.7_XPx86.zip – Infrared support and card reader
MODEM_Foxconn_7.62.0.0_XPx86.zip – for Integrated Foxconn Modem Wireless LAN_Broadcom_4.100.15.5_XPx86_A.zip – Driver for 5100's lancard
Bluetooth_Broadcom_5.1.2535.0_XPx86.zip – Driver for bluetooth device

Lastly as an article close up if you're living on the territory of The Netherlands (Arnhem , Nijmegen or the near cities) looking for a very Cheap repair (50 to 70 EUR) of your Windows OS PC or notebook contact me 🙂