Posts Tagged ‘common’

Must have software on freshly installed windows – Essential Software after fresh Windows install

Friday, March 18th, 2016

Install-update-multiple-programs-applications-at-once-using-ninite

If you're into IT industry even if you don't like installing frequently Windows or you're completely Linux / BSD user, you will certainly have a lot of friends which will want help from you to re-install or fix their Windows 7 / 8 / 10 OS. At least this is the case with me every year, I'm kinda of obliged to install fresh windowses on new bought friends or relatives notebooks / desktop PCs.

Of course according to for whom the new Windows OS installed the preferrences of necessery software varies, however more or less there is sort of standard list of Windows Software which is used daily by most of Avarage Computer user, such as:
 

Not to forget a good candidate from the list to install on new fresh windows Installation candidates are:

  • Winrar
  • PeaZIP
  • WinZip
  • GreenShot (to be able to easily screenshot stuff and save pictures locally and to the cloud)
  • AnyDesk (non free but very functional alternative to TeamViewer) to be able to remotely access remote PC
  • TightVNC
  • ITunes / Spotify (for people who have also iPhone smart phone)
  • DropBox or pCloud (to have some extra cloud free space)
  • FBReader (for those reading a lot of books in different formats)
  • Rufus – Rufus is an efficient and lightweight tool to create bootable USB drives. It helps you to create BIOS or UEFI bootable devices. It helps you to create Windows TO Go drives. It provides support for various disk, format, and partition.
  • Recuva is a data recovery software for Windows 10 (non free)
  • EaseUS (for specific backup / restore data purposes but unfortunately (non free)
  • For designers
  • Adobe Photoshop
  • Adobe Illustrator
  • f.lux –  to control brightness of screen and potentially Save your eyes
  • ImDisk virtual Disk Driver
  • KeePass / PasswordSafe – to Securely store your passwords
  • Putty / MobaXterm / SecureCRT / mPutty (for system administrators and programmers that has to deal with Linux / UNIX)

I tend to install on New Windows installs and thus I have more or less systematized the process.

I try to usually stick to free software where possible for each of the above categories as a Free Software enthusiast and luckily nowadays there is a lot of non-priprietary or at least free as in beer software available out there.

For Windows sysadmins or College and other public institutions networks including multiple of Windows Computers which are not inside a domain and also for people in computer repair shops where daily dozens of windows pre-installs or a set of software Automatic updates are  necessery make sure to take a look at Ninite

ninite-automate-windows-program-deploy-and-update-on-new-windows-os-openoffice-screenshot

As official website introduces Ninite:

Ninite – Install and Update All Your Programs at Once

Of course as Ninite is used by organizations as NASA, Harvard Medical School etc. it is likely the tool might reports your installed list of Windows software and various other Win PC statistical data to Ninite developers and most likely NSA, but this probably doesn't much matter as this is probably by the moment you choose to have installed a Windows OS on your PC.

ninite-choises-to-build-an-install-package-with-useful-essential-windows-software-screenshot
 

For Windows System Administrators managing small and middle sized network PCs that are not inside a Domain Controller, Ninite could definitely save hours and at cases even days of boring install and maintainance work. HP Enterprise or HP Inc. Employees or ex-employees would definitely love Ninite, because what Ninite does is pretty much like the well known HP Internal Tool PC COE.

Ninite could also prepare an installer containing multiple applications based on the choice on Ninite's website, so that's also a great thing especially if you need to deploy a different type of Users PCs (Scientific / Gamers / Working etc.)

Perhaps there are also other useful things to install on a new fresh Windows installations, if you're using something I'm missing let me know in comments.

How to turn On or Off Screen Reader ORCA on Linux Desktop enabled by mistype or a kid smash on the keyboard

Wednesday, November 22nd, 2023

orca-screen-reader-communication-services-logo

For those who type quite fast and use Microsoft Windows, its quite common to start the annoying NARRATOR (Windows Speaking Program) by accidently due to mistyping pressing together Windows key + Control + Enter.
This enables Narrator to read stuff on the screen here and there and to turn it off you just have to either Lock the Windows Computer and press again Windows key + Control + Enter to TURN OFF NARRATOR.

Linux does not have a Narrator but have also embedded Eye impairment Assistive Technology called ORCA.

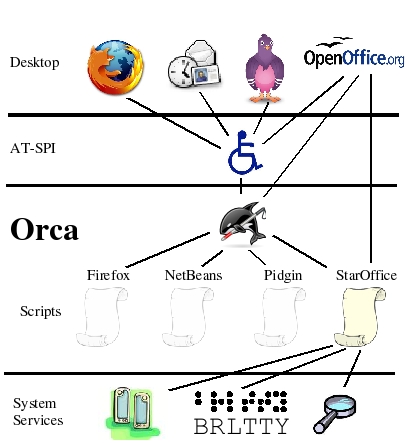
Orca works with applications and toolkits that support the Assistive Technology Service Provider Interface (AT-SPI), which is the primary assistive technology infrastructure for Linux and Solaris. Applications and toolkits supporting the AT-SPI include the GNOME Gtk+ toolkit, the Java platform's Swing toolkit, LibreOffice, Gecko, and WebKitGtk. AT-SPI support for the KDE Qt toolkit is being pursued.

ORCA is nowadays installed and integrated into many if not most Linux distributions out there. Enabling ORCA is not such a common thing on Linux,so today I got quite puzzled once I came back to the computer, leaving the 3.7 months kid near the Keyboard and finding out that I've enabled aloud screen reader that is reading what is every Window / Menu / Program or object I select with the mouse on my Linux MATE Desktop home GUI environment running on top of Debian Linux.

After a quick look up in Google on what exactly is the Linux program that is reading my screen I came across ORCA, which seem to be visible also as running in my process list:

hipo@jeremiah:~/Downloads$ ps -ef|grep -i orca
hipo     1068376    7960 17 18:48 tty2     00:00:01 orca

After a quick check online I found out that,

To start (Turn On ) Orca Screen Reader using the keyboard:

Windows logo button (Super Key) key + Alt + S 

Of course, it is possible to shut off the annoying reader by simply killing it with:

kill -9 orca


Ubuntu users, could start Orca using a mouse and keyboard:

Open the Activities overview and start typing Accessibility.

Click Accessibility to open the panel.

Select thez to open it.

Switch the Screen Reader switch to on.

Problem solved now Screen Reader on Linux is disabled, maybe it is time to disable Orca key press ability to prevent the kid from enabling it again since I don't need it actively thanksfully. with

xmodmap -e 'keycode <value>='

or simply removing the orca package with apt:

# apt remove orca

Dendritism in early ascetism, Saint John of Rila – a Great ascetic saint who practiced Tree living form of monasticism

Friday, October 21st, 2022

saint-John-of-Rila-with-Rila-monastery

“Dendrites hanging on a tree of life blooming in virtues, like a good fruits of the Spirit”

The monasticism is born in the late antiquity in the desert to Egypt, Syria, Palestine and Asia Minor, in a peculiar dialogue with the development of urban Christianity.
As we know, Christianity is a city religion, the structure of it is following example of administrative organization common for the age in the Roman Empire.

With the end of the anti-Christian persecution, church the christian communities in the city of the empire to strengthen, grow, and move on to onether new way of development – with all pluses and minuses for a new state. Freedom to confess (worship) gradually retreating locally to patronage of the empire, which with its whole repressive power stands on the side of the new religion, who has conquered for its four centuries  of existence with it’s evangelic radicalism, won the hearts of many thousands of Roman citizens. This puts the Christian communities in front of the unknown for them challenge, being a Christian now provides additional citizen advantages for better arrangement of lifely affairs. The wine of the apostoles preach to  unreservedly following of Christ is now inter-mixe with the common for a man conformity.

This comes to be a problem for many Christians and most importantly for those who do not want (or cannot) live with their Christian identity in conditions of the Imperial Church.
Hence, the end of the persecutions coincides with the stormy flourishing of monasticism and ascetism, in all regions of the empire from the end of the east to the external borders of the western parts. In the church life is born a single center, which is trying to remind the believers that the Kingdom of God is not from this world, but instead every christian is called to secretly raise his own seed of faith in his field (the good and clean heart) – in secret and independently from the worldly rulers.


Among the diversified forms of cenobitic monasticism and asceticism, present during the early Byzantine period, a typical one known for its radicalism of faith and asceticism of Syrian Christians. It is in the midst Syria where the phenomenon of monastic stylites “pillars” e (στυλίτες) they have a specific hermit type of life, in whose the monk lives on the top of open or closed “tower” or high stone, without coming to earth, in constant prayer, regardless of climatic conditions. Stylitism has received a wide spread between the Orthodox and Monophysitites to theEast, but not among the Nestorians (early christian heretics). Among the well known Stylites are Saint Simeon Stalpnik (Stylites) (lived in 5th century), Daniil the Stylites (5th century), Simeon The-Newest (Novi) and Alipiy the Stylites (6th century).

Having formalized the whole course in monasticism, so-called open monasticism. monasticism is openly (του ανοικτού μέσου), to whose branch a part are the Stylites and the Dendrites  δενδρίτες  (the monks who lives on a tree or inside a tree), monks who live without a shelter. „βοσκοί”. Other extreme forms of ascetism are the “recluse” (οι έγκλειστοι, κλωβίτες), they are part of the  the so-called. "closed type" monasticism (του κλειστού μέσου), the most notable saints representatives from this type are the elders Barsanuphious and elder Ioan (Elder).

Among the most unusual and rarely practiced forms of asceticism was dendriticism. These ascetics remain in the Romance languages ​​with their Greek name – dendrites – inhabiting trees. They lived inside, in the hollow, or in the branches of the tree, standing or sitting. Their feat is compared to that of the columnists, who also live in a small space on tree posts or pillars. The small space they occupied for varying periods of time—usually from one to several years—developed in them the virtue of manly patience. Dendrites "serve God in the trees", these wonderful creations of God, among whom a chosen one become the Holy Christ cross tree that served for the salvation and sanctification of man. With their "blessed solitude" they become the new "witnesses of conscience" after the end of the "witnesses of blood" who deserved and won eternal life in the persecutions of the Roman Empire.

Saint_David_Solunski-Dendronite
 

St. David of Thessalonica But as we said, the creation of a common monastic culture in the spacious borders of the Christian Empire brought this exotic way of life to the West as well. Pillars appear even next to the walls of the capital city – in the person of St. Daniel the Pillar, and Rev. David of Thessalonica (6th century) is among the most famous hermits-dendrites not only in the Balkans, but also in the entire Christian world. And although he spent three years on the almond tree in prayer and fasting, after which he continued his feat on a pillar, in Orthodox iconography he remains immortalized precisely on a tree. And the second hermit who went through this ascetic test was St. John of Rila, the founder of monasticism in the Bulgarian lands.

saint-John-of-Rila-heals-the-demonic-posessed-icon

But as mentioned, the creation of a common monastic culture within the spacious borders of the Christian Empire brought this exotic way of life to the West.

Pillars saints appear even next to the walls of the capital city – in the person of St. Daniel the Pillar, and Rev. David of Thessalonica (6th century) is among the most famous hermits-dendrites not only in the Balkans, but also in the entire Christian world. And although he spent three years on the almond tree in prayer and fasting, after which he continued his feat on a pillar, in Orthodox iconography he remains immortalized depicted precisely on a tree. And the second hermit who went through this ascetic test was St. John of Rila, the founder of monasticism in the Bulgarian lands.

The way of thinking of people in ancient times was very different from the modern way.
All ascetic Byzantine literature testifies to the desire to see in every detail of everyday life a lesson, a symbol, a sign of divine providence in the life of every person.
In this sense, the feat of the ascetics-dendrites is rich in Christian symbols and metaphors. The hymnography of the Church in their glorification highlights two main elements – of the tree of life, to which they become partakers with their feat, and of the freedom of complete surrender in God's hands, inherent in the "birds of the sky", who do not care for their sustenance, but rely on God's mercy.

This is what the first symbol looks like – on the tree not as an ordinary residence, but as an image of the Cross of Christ.

"The dendrites hanging on the tree of life flourish in virtues as good fruits of the Spirit", and in the service of St. David of Thessalonica – the most famous monk in the Balkans who experienced this way of asceticism, we also read:

"Like a light bird he climbed on the tree and made a hut, freezing in winter and burning in summer. Thus he obtained the golden wings of dispassion and perfection, which lifted them to the heavens."

The-Mother-of-God-Theotokos-the-Tree-of-saints

The tree is undoubtedly one of the most common symbols in Christian literature, dating back to the early church. Tertullian compared Christians to evergreen trees.
Origen compares Christ to the tree of life. For Didymus the Blind (4th century), the tree is the vine Christ, whose branches are the righteous men who bear true fruit. This imagery enters the language of church writers through the Gospel texts. The tree is a symbol that Christ himself used many times in his parables – I am the Vine of life… The fig tree that does not bear fruit withers and becomes useless. According to church teaching, "everything that died through the tree of the knowledge of good and evil will live again through the tree of the Cross and the water of baptism that springs from the Tree of the Cross of Christ." Pseudo-Ambrosius.

Clement of Alexandria says that the tree of the living Christ grows in the paradise of the Church, in the waters of renewal and gives as its fruit the teaching and the evangelical way of life.

All these symbols and metaphors of the tree as a symbol of the fall, death and salvation of man pass through the Gospel and patristic texts in the life of the ascetics and more specifically of those of them who choose the solitude of the tree as a place of their witness and feat.

During the period before the Christianization of the Bulgarian people, the Orthodox Church accumulated serious ascetic experience, represented in the monastic movement in its various forms. Different ascetics preferred different forms of asceticism, and each of them developed new virtues and spiritual gifts in the ascetics.

This priceless centuries-old experience grafted into the young Bulgarian Church and its first hermit, St. John of Rila.

The Church of Christ in Bulgaria found in him an ascetic who, within the framework of his life, managed to go through all the forms of asceticism that Christian monasticism had known up to that point – he created a new monastery, where he studied, then became a hermit, lived in a cave, in the open rock, in the hollow of a tree, and finally receives the charisma of spiritual fatherhood and gathers disciple monastic brotherhood.

Already at the very beginning of the Long Life of St. John of Rila, we see the comparison of St. John with the popular Christian symbol of the fruit-bearing tree: "and it bore fruit, indeed a hundredfold, as a tree planted by springs of water."

As in the lives of the other dendrite monks, St. John did not immediately proceed to this difficult feat – he began his monastic journey "in a monastery for the sake of learning" and only then withdrew to the wilderness of the mountain, where he lived in a hut of branches.

Saint John then spent 12 years in a narrow and dark cave! (the cave is nowadays located about 50 minutes walk from the Rila monastery in the mountain of Rila)

 The biographer of Saint John St. Euthymius informs us that only after that he moved "at a considerable distance" from the cave and settled in the hollow of a huge oak, like the oak of Abraham. It is obvious the desire of Patriarch Euthymius to make a connection between this unusual feat for this region of the Christian world and the hospitality of Abraham, who met the Holy Trinity under the Oak.

In the hollow of the tree St. John ate chickpeas. This is, by the way, the first mention of growing chickpeas on the Bulgarian lands – the chickpea is an unpretentious, but still heat-loving plant, which is grown mainly in the southern Bulgarian lands and Dobrudja today.
In the life, the sprouting of chickpeas around the oak of St. John of Rila is compared to the miracle of manna from heaven. The behavior of the shepherds who secretly collect pods of chickpeas from the saint and their unusual joy shows (they loot it) that this food was indeed atypical of the region where St. John traveled and it successfully growing on this mountain coldly place is one of the innumerable miracles of the saints which started even in his lifetime.

After that, exactly what is the logic of the ascetics-dendrites in the other popular stories about them – the sick begin to flock around the saint, his living invariably mention "possessed by demons" who come to heal to him.

The life of prayerful patience and extreme asceticism of these strange hermits living in trees reminded them of Christ's words that "this kind does not come out except by prayer and fasting."
Life conveys to us the prayer of the saint, with which he frees the possessed – from the text we see that it does not have an exorcistic character as in most of the other saint livings, that is, St. John does not directly forbid the demons, but calls on God's omnipotence and thus reveals his deep, extreme humility, with which he receives daring before God.
It is noteworthy to mention that Reverend David of Thessalonica also received the charisma to cast out demons after spending three years in the branches of an almond tree.

saint-David-the-Tree-liver-hermit-saint-icon

The duration of life on the tree for different ascetics is different – for Saint David it is three years, in the life of Saint John of Rila the time is not specified (most likely because the saint asked God to hide this part of his life again for humility).

Three is a symbolic number, corresponding to the request of the prophet David to receive from God goodness, knowledge and prudence. According to Susan Ashbrook Harvey, tree life "seems to have had the character of a temporary discipline in the ascetic practice, in which different places and modes of asceticism were changed." Unlike dendrites, those who live on a pillar spend many more years there, this way of asceticism also becomes a social service.

While life in a tree is usually a transition to some other asceticism, which means that as living conditions it was much more difficult. This is how Reverend David's life is described by his biographer: Further on, the author describes the sufferings of David in the (ἔν) tree – he was tormented by cold, by heat, by winds, but his angel-like face did not change, but looked like blooming rose. Some of his disciples went to the tree and begged him to come down and help them—lest the spiritual wolf prey on the flock while the shepherd was gone. David, however, was steadfast in his decision to remain on the tree. "I will not come down from the tree for three years, then our Lord Jesus Christ will show me that he has accepted my prayer."

Three years later, an angel appeared to him and told him that God had heard his prayer and ordered him to come down from the tree and build himself a cell, because another mission (οἰκονομία) awaited him.
It is interesting that at this point David turns to the official church authority for a kind of sanction of the vision ‒ he sends his disciples to tell what happened to the bishop of Thessalonica, Dorotheus and ask him whether this vision is really from God.

Researchers of monastic culture in the Byzantine era note the greater remoteness, isolation of the ascetics-dendrites from those who live on pillars. Entire temporary settlements of pilgrims, sick people, people from different tribes and countries arise around the latter, which often make noise and disturb the ascetic life of the saint. The most famous example is Rev. Simeon The Stylite ( Stulpnik ) the founder of hermit Stylitism. Around his pillar there was always a crowd that was not always meek, obedient and pious. There are often half-wild Arabs among her, sometimes 200, 300, 1000 people to come.
They often made a noise and continued their tribal quarrels at the foot of the pillar.

However, the dendrites immediately leave the place of their feat if people begin to gather around them – be they pilgrims or disciples. We see this in the life of Revend John as well:
"And the valiant Ivan, as soon as he learned what was happening, got up and went away from there, because he was afraid, and even more, he hated human glory."

We see this clearly expressed in the lives of two brothers in Syria – Rev. Maro (Saint Maron passed on to Christ 410 AD) and Rev. Abraham.
The first was a dendrite, and the second a stylite.
John of Ephesus in the Lives of the Eastern Saints tells of the Reverend Maro(n) Dendrite that he lived in a hollow tree near his brother Abraham, a stylite in his monastery.
Unlike the monks, St. Maro did not communicate with visitors, the door of his tree was closed, and he lived in silence until someone sought healing.
When his brother died, Maro left his imprisonment in the tree and moved to his brother's place and then began to communicate more with people.
But while living in the tree, Maro received no visitors.

saint_Maron-the-Syriac-hermit
Like Reverend Maron in Syria, Saint John of Rila leaves the tree of his asceticism as soon as people begin to gather around him, and switches to another form of asceticism – very close to stair climbing, namely on a high and difficult-to-access rock (today known as the Rock of Saint John a common place for pilgrimage).

But even here, tempted and physically injured by the demons, the ascetic does not remain hidden from the people. It was during this period that he attracted the attention of St. King Peter, who tried to establish contact with him. Of course, the high rock on which St. John of Rila lived for seven and a half years provided much harsher living conditions than the steeple, which is usually near a populated place. But as a philosophy of the ascetic feat, in both cases it is about something in common – maximally narrowing the free space for movement and directing all energy upwards, in the power of prayer and constant unity with God.

The common moments in the lives of the two most famous Dendrite monks in the Balkans – Revend David of Thessaloniki and St. John of Rila, who labored three centuries are similar.

Both begin their monastic journey with "discipleship in a monastery" before heading for the desert, that is, moving away from human society.
For both of them, the life in the oak, respectively in the almond branches is a period of extreme asceticism, which greatly impresses the surrounding population, who begin to flock to them. Their unusual feat inspires in people a desire to live near them and even to imitate them – in their lives we see a number of people who seek their help – starting with students (one of Reverend David's students also became a "dendrite" as his mentor and settled in the hollow of a large tree). There glory quickly reaches the local bishop and all the clergy, as well as the rulers of the city – as mentioned in the life of the Thessalonian ascetic, and to Saint King (Tsar) Peter and the Bulgarian boyars as mentioned in the biographical life of Saint John of Rila .

The biographers of both monks include the stories of the healing of demoniacs precisely while they were living in their unprotected "homes" from the natural elements – i.e. the trees. Finally, for all their desire to remain hidden in the wilderness of their solitude, they attract not only the sick, the afflicted, and the disciples, but the attention of the powerful of the day.
But while St. David came from the East, from Mesopotamia, St. John was local and did not have a great Eastern ascetic teacher as he was local citizen born in Bulgaria, in our lands.
His way of asceticism is undoubtedly influenced by the general ascetic patterns of the age, but it is also unique – it is a testimony to the general internal logic of Christian asceticism, regardless of which parts of the Christian world it is practiced.

Paradoxically, the brightest monastic examples in the Balkans became precisely these two monks, struggling in these harsh, atypical for the western parts of the empire, conditions – dendriticism, stylitism, living in a narrow cave and a high cliff.

Until the 9th century, that is, throughout the early Byzantine period, in today's Greek lands, the cult, the respect for Rev. David of Thessalonica (born c. 450 – 540) was comparable only to that of Saint Great-Martyr (Demetrius) Dimitar of Thessalonica and St. Achilles, bishop of Larissa.

Great Respect and recognition as a saint for him was already alive in the first half of the 9th  century at the same time when saint John’s greatnes shined upon the world, as we can see from the life of St. Gregory the Decapolitan, who sent one of his monks to worship at the saint's grave in a monastery founded by him near Thessaloniki. St. David the Dendrite monastery was an attractive pilgrimage center in the Balkan lands of the empire until the 11th century, when the relics of the saint were brought by the Crusaders to Italy.

Without the spiritual presence of its founder, its monastery declined and disappeared, and its relics returned to Thessaloniki only in the 20th century and were laid in the church of "St. Theodora".

The abode of the Rila desert dweller has a different destiny – it remains as a living spiritual center throughout the centuries, in the heart of the Rila desert, and its founder, already a resident of the Heavenly Jerusalem, invariably remains a faithful and reliable breviary for his kindred in the flesh the Bulgarians.

Report presented at the international conference dedicated to the 500th anniversary of the transfer of the relics of St. John of Rila from Tarnovo to the monastery he founded, organized in 2019 at the Rila Monastery. It was published in the eponymous collection of conference reports under the title: "Dendrite Monks in the Balkans".

Article originally posted in Bulgarian by Zlatina Ivanova on 19.10.2022 – Translated with minor modifications by me (Georgi D. Georgiev a.k.a. hip0)


Living of unknown saint Saint Sophronius of Sofia, known also as Saint Soprhonius of the Bulgaria / Sofronij of the Balkans

Saturday, May 28th, 2022

Sveti-Sofronij-Bylgarski-SofijskiSaint-Sophronius-of-Sofia-Bulgaria-of-the-Balkans
 

Biography of Staint Sofronij / Sophronius of Bulgaria Sofia, Known also as Saint Soprhonius of the Balkans

The parish priest of the village of Penkyovtsi (Sofia, Bulgaria region) Stefan (Te fled to Sofia with his wife due to Turkish violence, from hence he later fled to Wallachia region to the great Wallachian voivode (Duke) Radul. His wife died there and he became a monk named Sophronius (not to be mistaken with the very famous Bulgarian saint Saint Sofronius of Vratza / Sofronij Vrachanski).

After the death of Duke Radul, he returned from the Danube river to his homeland and settled in a monastery near city of Ruse (probably he lived in the cave monastery of Saint Joachim I Patriarch of Tarnovo and the Venerable Demetrius Besarabovsky, that even today is the biggest monastery nearby the city of Ruse).

There he struggled with common sanctification practices as fasting, prayer, work and alms for the poor. The devil did not tolerate his monastic great achievements and set a monastic servant against him, who struck him on the head with an ax and killed him.

Three years later, Sophronius appeared to the people living in the monastery, who obeyed his suggestion (obviously they got inspired to  dug up his grave which is a common ancient Christian practice for notable christians who might have been saints) and look up if his relics are incorruptable and found his relics incorruptible and fragrant (emitting a heavenly odor), as they have been inspired by God's Spirit to do.
People with great joy placed the holy relics in a coffin for common (universal) worship of all the Christians.

We do not know the exact dates he was  born or has been killed, because of the devilish envy, as at that time Bulgaria has been under the Ottoman turks and the founding of his holy relics has happened years after his martyrdom. But most probably the Venerable Sofronij  lived in the second half of the fifteenth century and the beginning of the sixteenth century, by the second decade of which he must have suffered. This information about him is told to us by the Bulgarian writer and priest Father (the bulgarian word for which is Pop – stems from the greek word Papas (Father) Peyu. The same Pop Peyu has been also the author of the life of Saint George of Sofia the New not to be mistaken with Saint George the Newest from Sofia  who maryrdom suffered in year 1515 because of his unwillingless to accept the false Islamic faith.

© Lives of the Saints. Synodal Publishing House, Sofia, 1991, edited by Parthenius, Bishop of Lefkada and Archimandrite Dr. Athanasius (Bonchev) with minor inclusions of the article author Georgi Georgiev

Let by his holy prayers the Bulgarian homeland and especially the suffering in Ukraine and all people everywhere, finds more Peace, Love, Hope, Faith and Goodness 

Webserver farm behind Load Balancer Proxy or how to preserve incoming internet IP to local net IP Apache webservers by adding additional haproxy header with remoteip

Monday, April 18th, 2022

logo-haproxy-apache-remoteip-configure-and-check-to-have-logged-real-ip-address-inside-apache-forwarded-from-load-balancer

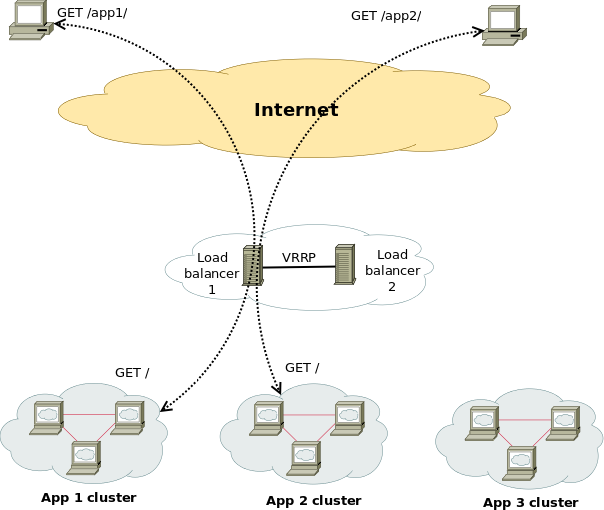
Having a Proxy server for Load Balancing is a common solutions to assure High Availability of Web Application service behind a proxy.
You can have for example 1 Apache HTTPD webservers serving traffic Actively on one Location (i.e. one city or Country) and 3 configured in the F5 LB or haproxy to silently keep up and wait for incoming connections as an (Active Failure) Backup solution

Lets say the Webservers usually are set to have local class C IPs as 192.168.0.XXX or 10.10.10.XXX and living in isolated DMZed well firewalled LAN network and Haproxy is configured to receive traffic via a Internet IP 109.104.212.13 address and send the traffic in mode tcp via a NATTed connection (e.g. due to the network address translation the source IP of the incoming connections from Intenet clients appears as the NATTed IP 192.168.1.50.

The result is that all incoming connections from haproxy -> webservers will be logged in Webservers /var/log/apache2/access.log wrongly as incoming from source IP: 192.168.1.50, meaning all the information on the source Internet Real IP gets lost.

load-balancer-high-availailibility-haproxy-apache
 

How to pass Real (Internet) Source IPs from Haproxy "mode tcp" to Local LAN Webservers  ?
 

Usually the normal way to work around this with Apache Reverse Proxies configured is to use HTTP_X_FORWARDED_FOR variable in haproxy when using HTTP traffic application that is proxied (.e.g haproxy.cfg has mode http configured), you have to add to listen listener_name directive or frontend Frontend_of_proxy

option forwardfor
option http-server-close

However unfortunately, IP Header preservation with X_FORWADED_FOR  HTTP-Header is not possible when haproxy is configured to forward traffic using mode tcp.

Thus when you're forced to use mode tcp to completely pass any traffic incoming to Haproxy from itself to End side, the solution is to
 

  • Use mod_remoteip infamous module that is part of standard Apache installs both on apache2 installed from (.deb) package  or httpd rpm (on redhats / centos).


1. Configure Haproxies to send received connects as send-proxy traffic


The idea is very simple all the received requests from outside clients to Haproxy are to be send via the haproxy to the webserver in a PROXY protocol string, this is done via send-proxy

             send-proxy  – send a PROXY protocol string

Rawly my current /etc/haproxy/haproxy.cfg looks like this:
 

global
        log /dev/log    local0
        log /dev/log    local1 notice
        chroot /var/lib/haproxy
        user haproxy
        group haproxy
        daemon
        maxconn 99999
        nbproc          1
        nbthread 2
        cpu-map         1 0
        cpu-map         2 1


defaults
        log     global
       mode    tcp


        timeout connect 5000
        timeout connect 30s
        timeout server 10s

    timeout queue 5s
    timeout tunnel 2m
    timeout client-fin 1s
    timeout server-fin 1s

                option forwardfor

    retries                 15


frontend http-in
                mode tcp

                option tcplog
        log global

                option logasap
                option forwardfor
                bind 109.104.212.130:80
    fullconn 20000
default_backend http-websrv
backend http-websrv
        balance source
                maxconn 3000

stick match src
    stick-table type ip size 200k expire 30m
        stick on src


        server ha1server-1 192.168.0.205:80 check send-proxy weight 254 backup
        server ha1server-2 192.168.1.15:80 check send-proxy weight 255
        server ha1server-3 192.168.2.30:80 check send-proxy weight 252 backup
        server ha1server-4 192.168.1.198:80 check send-proxy weight 253 backup
                server ha1server-5 192.168.0.1:80 maxconn 3000 check send-proxy weight 251 backup


frontend https-in
                mode tcp

                option tcplog
                log global

                option logasap
                option forwardfor
        maxconn 99999
           bind 109.104.212.130:443
        default_backend https-websrv
                backend https-websrv
        balance source
                maxconn 3000
        stick on src
    stick-table type ip size 200k expire 30m


                server ha1server-1 192.168.0.205:443 maxconn 8000 check send-proxy weight 254 backup
                server ha1server-2 192.168.1.15:443 maxconn 10000 check send-proxy weight 255
        server ha1server-3 192.168.2.30:443 maxconn 8000 check send-proxy weight 252 backup
        server ha1server-4 192.168.1.198:443 maxconn 10000 check send-proxy weight 253 backup
                server ha1server-5 192.168.0.1:443 maxconn 3000 check send-proxy weight 251 backup

listen stats
    mode http
    option httplog
    option http-server-close
    maxconn 10
    stats enable
    stats show-legends
    stats refresh 5s
    stats realm Haproxy\ Statistics
    stats admin if TRUE


After preparing your haproxy.cfg and reloading haproxy in /var/log/haproxy.log you should have the Real Source IPs logged in:
 

root@webserver:~# tail -n 10 /var/log/haproxy.log
Apr 15 22:47:34 pcfr_hware_local_ip haproxy[2914]: 159.223.65.16:58735 [15/Apr/2022:22:47:34.586] https-in https-websrv/ha1server-2 1/0/+0 +0 — 7/7/7/7/0 0/0
Apr 15 22:47:34 pcfr_hware_local_ip haproxy[2914]: 20.113.133.8:56405 [15/Apr/2022:22:47:34.744] https-in https-websrv/ha1server-2 1/0/+0 +0 — 7/7/7/7/0 0/0
Apr 15 22:47:35 pcfr_hware_local_ip haproxy[2914]: 54.36.148.248:15653 [15/Apr/2022:22:47:35.057] https-in https-websrv/ha1server-2 1/0/+0 +0 — 7/7/7/7/0 0/0
Apr 15 22:47:35 pcfr_hware_local_ip haproxy[2914]: 185.191.171.35:26564 [15/Apr/2022:22:47:35.071] https-in https-websrv/ha1server-2 1/0/+0 +0 — 8/8/8/8/0 0/0
Apr 15 22:47:35 pcfr_hware_local_ip haproxy[2914]: 213.183.53.58:42984 [15/Apr/2022:22:47:35.669] https-in https-websrv/ha1server-2 1/0/+0 +0 — 6/6/6/6/0 0/0
Apr 15 22:47:35 pcfr_hware_local_ip haproxy[2914]: 159.223.65.16:54006 [15/Apr/2022:22:47:35.703] https-in https-websrv/ha1server-2 1/0/+0 +0 — 7/7/7/7/0 0/0
Apr 15 22:47:36 pcfr_hware_local_ip haproxy[2914]: 192.241.113.203:30877 [15/Apr/2022:22:47:36.651] https-in https-websrv/ha1server-2 1/0/+0 +0 — 4/4/4/4/0 0/0
Apr 15 22:47:36 pcfr_hware_local_ip haproxy[2914]: 185.191.171.9:6776 [15/Apr/2022:22:47:36.683] https-in https-websrv/ha1server-2 1/0/+0 +0 — 5/5/5/5/0 0/0
Apr 15 22:47:36 pcfr_hware_local_ip haproxy[2914]: 159.223.65.16:64310 [15/Apr/2022:22:47:36.797] https-in https-websrv/ha1server-2 1/0/+0 +0 — 6/6/6/6/0 0/0
Apr 15 22:47:36 pcfr_hware_local_ip haproxy[2914]: 185.191.171.3:23364 [15/Apr/2022:22:47:36.834] https-in https-websrv/ha1server-2 1/1/+1 +0 — 7/7/7/7/0 0/0


2. Enable remoteip proxy protocol on Webservers

Login to each Apache HTTPD and to enable remoteip module run:
 

# a2enmod remoteip


On Debians, the command should produce a right symlink to mods-enabled/ directory
 

# ls -al /etc/apache2/mods-enabled/*remote*
lrwxrwxrwx 1 root root 31 Mar 30  2021 /etc/apache2/mods-enabled/remoteip.load -> ../mods-available/remoteip.load


3. Modify remoteip.conf file and allow IPs of haproxies or F5s


Configure RemoteIPTrustedProxy for every Source IP of haproxy to allow it to send X-Forwarded-For header to Apache,

Here are few examples, from my apache working config on Debian 11.2 (Bullseye):
 

webserver:~# cat remoteip.conf
RemoteIPHeader X-Forwarded-For
RemoteIPTrustedProxy 192.168.0.1
RemoteIPTrustedProxy 192.168.0.205
RemoteIPTrustedProxy 192.168.1.15
RemoteIPTrustedProxy 192.168.0.198
RemoteIPTrustedProxy 192.168.2.33
RemoteIPTrustedProxy 192.168.2.30
RemoteIPTrustedProxy 192.168.0.215
#RemoteIPTrustedProxy 51.89.232.41

On RedHat / Fedora other RPM based Linux distrubutions, you can do the same by including inside httpd.conf or virtualhost configuration something like:
 

<IfModule remoteip_module>
      RemoteIPHeader X-Forwarded-For
      RemoteIPInternalProxy 192.168.0.0/16
      RemoteIPTrustedProxy 192.168.0.215/32
</IfModule>


4. Enable RemoteIP Proxy Protocol in apache2.conf / httpd.conf or Virtualhost custom config
 

Modify both haproxy / haproxies config as well as enable the RemoteIP module on Apache webservers (VirtualHosts if such used) and either in <VirtualHost> block or in main http config include:

RemoteIPProxyProtocol On


5. Change default configured Apache LogFormat

In Domain Vhost or apache2.conf / httpd.conf

Default logging Format will be something like:
 

LogFormat "%h %l %u %t \"%r\" %>s %O \"%{Referer}i\" \"%{User-Agent}i\"" combined


or
 

LogFormat "%v:%p %h %l %u %t \"%r\" %>s %O \"%{Referer}i\" \"%{User-Agent}i\"" combined


Once you find it in /etc/apache2/apache2.conf / httpd.conf or Vhost, you have to comment out this by adding shebang infont of sentence make it look as follows:
 

LogFormat "%v:%p %a %l %u %t \"%r\" %>s %O \"%{Referer}i\" \"%{User-Agent}i\"" vhost_combined
LogFormat "%a %l %u %t \"%r\" %>s %O \"%{Referer}i\" \"%{User-Agent}i\"" combined
LogFormat "%a %l %u %t \"%r\" %>s %O" common
LogFormat "%{Referer}i -> %U" referer
LogFormat "%{User-agent}i" agent


The Changed LogFormat instructs Apache to log the client IP as recorded by mod_remoteip (%a) rather than hostname (%h). For a full explanation of all the options check the official HTTP Server documentation page apache_mod_config on Custom Log Formats.

and reload each Apache server.

on Debian:

# apache2ctl -k reload

On CentOS

# systemctl restart httpd


6. Check proxy protocol is properly enabled on Apaches


remoteip module will enable Apache to expect a proxy connect header passed to it otherwise it will respond with Bad Request, because it will detect a plain HTML request instead of Proxy Protocol CONNECT, here is the usual telnet test to fetch the index.htm page.

root@webserver:~# telnet localhost 80
Trying 127.0.0.1…
Connected to localhost.
Escape character is '^]'.
GET / HTTP/1.1

HTTP/1.1 400 Bad Request
Date: Fri, 15 Apr 2022 19:04:51 GMT
Server: Apache/2.4.51 (Debian)
Content-Length: 312
Connection: close
Content-Type: text/html; charset=iso-8859-1

<!DOCTYPE HTML PUBLIC "-//IETF//DTD HTML 2.0//EN">
<html><head>
<title>400 Bad Request</title>
</head><body>
<h1>Bad Request</h1>
<p>Your browser sent a request that this server could not understand.<br />
</p>
<hr>
<address>Apache/2.4.51 (Debian) Server at grafana.pc-freak.net Port 80</address>
</body></html>
Connection closed by foreign host.


root@webserver:~# telnet localhost 80
Trying 127.0.0.1…
Connected to localhost.
Escape character is '^]'.
HEAD / HTTP/1.1

HTTP/1.1 400 Bad Request
Date: Fri, 15 Apr 2022 19:05:07 GMT
Server: Apache/2.4.51 (Debian)
Connection: close
Content-Type: text/html; charset=iso-8859-1

Connection closed by foreign host.


To test it with telnet you can follow the Proxy CONNECT syntax and simulate you're connecting from a proxy server, like that:
 

root@webserver:~# telnet localhost 80
Trying 127.0.0.1…
Connected to localhost.
Escape character is '^]'.
CONNECT localhost:80 HTTP/1.0

HTTP/1.1 301 Moved Permanently
Date: Fri, 15 Apr 2022 19:13:38 GMT
Server: Apache/2.4.51 (Debian)
Location: https://zabbix.pc-freak.net
Cache-Control: max-age=900
Expires: Fri, 15 Apr 2022 19:28:38 GMT
Content-Length: 310
Connection: close
Content-Type: text/html; charset=iso-8859-1

<!DOCTYPE HTML PUBLIC "-//IETF//DTD HTML 2.0//EN">
<html><head>
<title>301 Moved Permanently</title>
</head><body>
<h1>Moved Permanently</h1>
<p>The document has moved <a href="https://zabbix.pc-freak.net">here</a>.</p>
<hr>
<address>Apache/2.4.51 (Debian) Server at localhost Port 80</address>
</body></html>
Connection closed by foreign host.

You can test with curl simulating the proxy protocol CONNECT with:

root@webserver:~# curl –insecure –haproxy-protocol https://192.168.2.30

<!DOCTYPE HTML PUBLIC "-//W3C//DTD HTML 4.01 Transitional//EN"
"http://w3.org/TR/html4/loose.dtd">
<html>
<head>
<meta name="generator" content="pc-freak.net tidy">
<script src="https://ssl.google-analytics.com/urchin.js" type="text/javascript">
</script>
<script type="text/javascript">
_uacct = "UA-2102595-3";
urchinTracker();
</script>
<script type="text/javascript">
var gaJsHost = (("https:" == document.location.protocol) ? "https://ssl." : "http://");
document.write(unescape("%3Cscript src='" + gaJsHost + "google-analytics.com/ga.js' type='text/javascript'%3E%3C/script%3E"));
</script>
<script type="text/javascript">
try {
var pageTracker = _gat._getTracker("UA-2102595-6");
pageTracker._trackPageview();
} catch(err) {}
</script>


      –haproxy-protocol
              (HTTP) Send a HAProxy PROXY protocol v1 header at the beginning of the connection. This is used by some load balancers and reverse proxies
              to indicate the client's true IP address and port.

              This option is primarily useful when sending test requests to a service that expects this header.

              Added in 7.60.0.


7. Check apache log if remote Real Internet Source IPs are properly logged
 

root@webserver:~# tail -n 10 /var/log/apache2/access.log

213.183.53.58 – – [15/Apr/2022:22:18:59 +0300] "GET /proxy/browse.php?u=https%3A%2F%2Fsteamcommunity.com%2Fmarket%2Fitemordershistogram%3Fcountry HTTP/1.1" 200 12701 "https://www.pc-freak.net" "Mozilla/5.0 (Windows NT 10.0; Win64; x64; rv:98.0) Gecko/20100101 Firefox/98.0"
88.198.48.184 – – [15/Apr/2022:22:18:58 +0300] "GET /blog/iq-world-rank-country-smartest-nations/?cid=1330192 HTTP/1.1" 200 29574 "-" "Mozilla/5.0 (compatible; DataForSeoBot/1.0; +https://dataforseo.com/dataforseo-bot)"
213.183.53.58 – – [15/Apr/2022:22:19:00 +0300] "GET /proxy/browse.php?u=https%3A%2F%2Fsteamcommunity.com%2Fmarket%2Fitemordershistogram%3Fcountry
HTTP/1.1" 200 9080 "https://www.pc-freak.net" "Mozilla/5.0 (Windows NT 10.0; Win64; x64; rv:98.0) Gecko/20100101 Firefox/98.0"
159.223.65.16 – – [15/Apr/2022:22:19:01 +0300] "POST //blog//xmlrpc.php HTTP/1.1" 200 5477 "-" "Mozilla/5.0 (Windows NT 10.0; Win64; x64) AppleWebKit/537.36 (KHTML, like Gecko) Chrome/89.0.4389.114 Safari/537.36"
159.223.65.16 – – [15/Apr/2022:22:19:02 +0300] "POST //blog//xmlrpc.php HTTP/1.1" 200 5477 "-" "Mozilla/5.0 (Windows NT 10.0; Win64; x64) AppleWebKit/537.36 (KHTML, like Gecko) Chrome/89.0.4389.114 Safari/537.36"
213.91.190.233 – – [15/Apr/2022:22:19:02 +0300] "POST /blog/wp-admin/admin-ajax.php HTTP/1.1" 200 1243 "https://www.pc-freak.net/blog/wp-admin/post.php?post=16754&action=edit" "Mozilla/5.0 (Windows NT 6.1; Win64; x64; rv:89.0) Gecko/20100101 Firefox/89.0"
46.10.215.119 – – [15/Apr/2022:22:19:02 +0300] "GET /images/saint-Paul-and-Peter-holy-icon.jpg HTTP/1.1" 200 134501 "https://www.google.com/" "Mozilla/5.0 (Windows NT 10.0; Win64; x64) AppleWebKit/537.36 (KHTML, like Gecko) Chrome/100.0.4896.75 Safari/537.36 Edg/100.0.1185.39"
185.191.171.42 – – [15/Apr/2022:22:19:03 +0300] "GET /index.html.latest/tutorials/tutorials/penguins/vestnik/penguins/faith/vestnik/ HTTP/1.1" 200 11684 "-" "Mozilla/5.0 (compatible; SemrushBot/7~bl; +http://www.semrush.com/bot.html)"

116.179.37.243 – – [15/Apr/2022:22:19:50 +0300] "GET /blog/wp-content/cookieconsent.min.js HTTP/1.1" 200 7625 "https://www.pc-freak.net/blog/how-to-disable-nginx-static-requests-access-log-logging/" "Mozilla/5.0 (compatible; Baiduspider-render/2.0; +http://www.baidu.com/search/spider.html)"
116.179.37.237 – – [15/Apr/2022:22:19:50 +0300] "GET /blog/wp-content/plugins/google-analytics-dashboard-for-wp/assets/js/frontend-gtag.min.js?ver=7.5.0 HTTP/1.1" 200 8898 "https://www.pc-freak.net/blog/how-to-disable-nginx-static-requests-access-log-logging/" "Mozilla/5.0 (compatible; Baiduspider-render/2.0; +http://www.baidu.com/search/spider.html)"


You see from above output remote Source IPs in green are properly logged, so haproxy Cluster is correctly forwarding connections passing on in the Haproxy generated Initial header the Real IP of its remote connect IPs.


Sum it up, What was done?


HTTP_X_FORWARD_FOR is impossible to set, when haproxy is used on mode tcp and all traffic is sent as received from TCP IPv4 / IPv6 Network stack, e.g. modifying any HTTP sent traffic inside the headers is not possible as this might break up the data.

Thus Haproxy was configured to send all its received data by sending initial proxy header with the X_FORWARDED usual Source IP data, then remoteip Apache module was used to make Apache receive and understand haproxy sent Header which contains the original Source IP via the send-proxy functionality and example was given on how to test the remoteip on Webserver is working correctly.

Finally you've seen how to check configured haproxy and webserver are able to send and receive the End Client data with the originator real source IP correctly and those Internet IP is properly logged inside both haproxy and apaches.

Create Linux High Availability Load Balancer Cluster with Keepalived and Haproxy on Linux

Tuesday, March 15th, 2022

keepalived-logo-linux

Configuring a Linux HA (High Availibiltiy) for an Application with Haproxy is already used across many Websites on the Internet and serious corporations that has a crucial infrastructure has long time
adopted and used keepalived to provide High Availability Application level Clustering.
Usually companies choose to use HA Clusters with Haproxy with Pacemaker and Corosync cluster tools.
However one common used alternative solution if you don't have the oportunity to bring up a High availability cluster with Pacemaker / Corosync / pcs (Pacemaker Configuration System) due to fact machines you need to configure the cluster on are not Physical but VMWare Virtual Machines which couldn't not have configured a separate Admin Lans and Heartbeat Lan as we usually do on a Pacemaker Cluster due to the fact the 5 Ethernet LAN Card Interfaces of the VMWare Hypervisor hosts are configured as a BOND (e.g. all the incoming traffic to the VMWare vSphere  HV is received on one Virtual Bond interface).

I assume you have 2 separate vSphere Hypervisor Physical Machines in separate Racks and separate switches hosting the two VMs.
For the article, I'll call the two brand new brought Virtual Machines with some installation automation software such as Terraform or Ansible – vm-server1 and vm-server2 which would have configured some recent version of Linux.

In that scenario to have a High Avaiability for the VMs on Application level and assure at least one of the two is available at a time if one gets broken due toe malfunction of the HV, a Network connectivity issue, or because the VM OS has crashed.
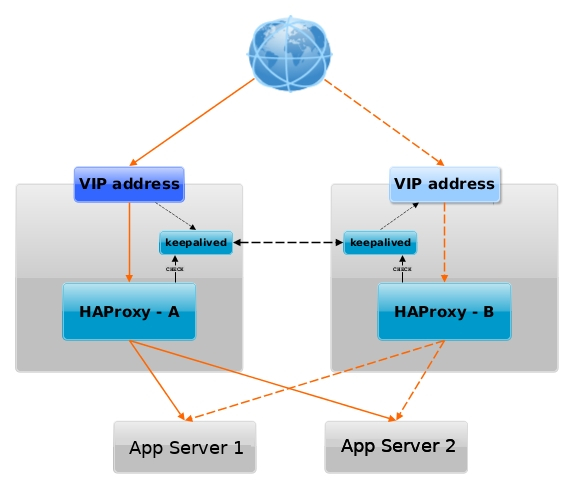
Then one relatively easily solution is to use keepalived and configurea single High Availability Virtual IP (VIP) Address, i.e. 10.10.10.1, which would float among two VMs using keepalived so at a time at least one of the two VMs would be reachable on the Network.

haproxy_keepalived-vip-ip-diagram-linux

Having a VIP IP is quite a common solution in corporate world, as it makes it pretty easy to add F5 Load Balancer in front of the keepalived cluster setup to have a 3 Level of security isolation, which usually consists of:

1. Physical (access to the hardware or Virtualization hosts)
2. System Access (The mechanism to access the system login credetials users / passes, proxies, entry servers leading to DMZ-ed network)
3. Application Level (access to different programs behind L2 and data based on the specific identity of the individual user,
special Secondary UserID,  Factor authentication, biometrics etc.)


1. Install keepalived and haproxy on machines

Depending on the type of Linux OS:

On both machines
 

[root@server1:~]# yum install -y keepalived haproxy

If you have to install keepalived / haproxy on Debian / Ubuntu and other Deb based Linux distros

[root@server1:~]# apt install keepalived haproxy –yes

2. Configure haproxy (haproxy.cfg) on both server1 and server2


Create some /etc/haproxy/haproxy.cfg configuration


[root@server1:~]vim /etc/haproxy/haproxy.cfg

#———————————————————————
# Global settings
#———————————————————————
global
    log          127.0.0.1 local6 debug
    chroot       /var/lib/haproxy
    pidfile      /run/haproxy.pid
    stats socket /var/lib/haproxy/haproxy.sock mode 0600 level admin 
    maxconn      4000
    user         haproxy
    group        haproxy
    daemon
    #debug
    #quiet

#———————————————————————
# common defaults that all the 'listen' and 'backend' sections will
# use if not designated in their block
#———————————————————————
defaults
    mode        tcp
    log         global
#    option      dontlognull
#    option      httpclose
#    option      httplog
#    option      forwardfor
    option      redispatch
    option      log-health-checks
    timeout connect 10000 # default 10 second time out if a backend is not found
    timeout client 300000
    timeout server 300000
    maxconn     60000
    retries     3

#———————————————————————
# round robin balancing between the various backends
#———————————————————————

listen FRONTEND_APPNAME1
        bind 10.10.10.1:15000
        mode tcp
        option tcplog
#        #log global
        log-format [%t]\ %ci:%cp\ %bi:%bp\ %b/%s:%sp\ %Tw/%Tc/%Tt\ %B\ %ts\ %ac/%fc/%bc/%sc/%rc\ %sq/%bq
        balance roundrobin
        timeout client 350000
        timeout server 350000
        timeout connect 35000
        server app-server1 10.10.10.55:30000 weight 1 check port 68888
        server app-server2 10.10.10.55:30000 weight 2 check port 68888

listen FRONTEND_APPNAME2
        bind 10.10.10.1:15000
        mode tcp
        option tcplog
        #log global
        log-format [%t]\ %ci:%cp\ %bi:%bp\ %b/%s:%sp\ %Tw/%Tc/%Tt\ %B\ %ts\ %ac/%fc/%bc/%sc/%rc\ %sq/%bq
        balance roundrobin
        timeout client 350000
        timeout server 350000
        timeout connect 35000
        server app-server1 10.10.10.55:30000 weight 5
        server app-server2 10.10.10.55:30000 weight 5 


You can get a copy of above haproxy.cfg configuration here.
Once configured roll it on.

[root@server1:~]#  systemctl start haproxy
 
[root@server1:~]# ps -ef|grep -i hapro
root      285047       1  0 Mar07 ?        00:00:00 /usr/sbin/haproxy -Ws -f /etc/haproxy/haproxy.cfg -p /run/haproxy.pid
haproxy   285050  285047  0 Mar07 ?        00:00:26 /usr/sbin/haproxy -Ws -f /etc/haproxy/haproxy.cfg -p /run/haproxy.pid

Bring up the haproxy also on server2 machine, by placing same configuration and starting up the proxy.
 

[root@server1:~]vim /etc/haproxy/haproxy.cfg


3. Configure keepalived on both servers

We'll be configuring 2 nodes with keepalived even though if necessery this can be easily extended and you can add more nodes.
First we make a copy of the original or existing server configuration keepalived.conf (just in case we need it later on or if you already had something other configured manually by someone – that could be so on inherited servers by other sysadmin)
 

[root@server1:~]# mv /etc/keepalived/keepalived.conf /etc/keepalived/keepalived.conf.orig
[root@server2:~]# mv /etc/keepalived/keepalived.conf /etc/keepalived/keepalived.conf.orig

a. Configure keepalived to serve as a MASTER Node


[root@server1:~]# vim /etc/keepalived/keepalived.conf

Master Node
global_defs {
  router_id server1-fqdn # The hostname of this host.
  
  enable_script_security
  # Synchro of the state of the connections between the LBs on the eth0 interface
   lvs_sync_daemon eth0
 
notification_email {
        linuxadmin@notify-domain.com     # Email address for notifications 
    }
 notification_email_from keepalived@server1-fqdn        # The from address for the notifications
    smtp_server 127.0.0.1                       # SMTP server address
    smtp_connect_timeout 15
}

vrrp_script haproxy {
  script "killall -0 haproxy"
  interval 2
  weight 2
  user root
}

vrrp_instance LB_VIP_QA {
  virtual_router_id 50
  advert_int 1
  priority 51

  state MASTER
  interface eth0
  smtp_alert          # Enable Notifications Via Email
  
  authentication {
              auth_type PASS
              auth_pass testp141

    }
### Commented because running on VM on VMWare
##    unicast_src_ip 10.44.192.134 # Private IP address of master
##    unicast_peer {
##        10.44.192.135           # Private IP address of the backup haproxy
##   }

#        }
# master node with higher priority preferred node for Virtual IP if both keepalived up
###  priority 51
###  state MASTER
###  interface eth0
  virtual_ipaddress {
     10.10.10.1 dev eth0 # The virtual IP address that will be shared between MASTER and BACKUP
  }
  track_script {
      haproxy
  }
}


 To dowload a copy of the Master keepalived.conf configuration click here

Below are few interesting configuration variables, worthy to mention few words on, most of them are obvious by their names but for more clarity I'll also give a list here with short description of each:


  • vrrp_instance – defines an individual instance of the VRRP protocol running on an interface.
  • state – defines the initial state that the instance should start in (i.e. MASTER / SLAVE )state –
  • interface – defines the interface that VRRP runs on.
  • virtual_router_id – should be unique value per Keepalived Node (otherwise slave master won't function properly)
  • priority – the advertised priority, the higher the priority the more important the respective configured keepalived node is.
  • advert_int – specifies the frequency that advertisements are sent at (1 second, in this case).
  • authentication – specifies the information necessary for servers participating in VRRP to authenticate with each other. In this case, a simple password is defined.
    only the first eight (8) characters will be used as described in  to note is Important thing
    man keepalived.conf – keepalived.conf variables documentation !!! Nota Bene !!! – Password set on each node should match for nodes to be able to authenticate !
  • virtual_ipaddress – defines the IP addresses (there can be multiple) that VRRP is responsible for.
  • notification_email – the notification email to which Alerts will be send in case if keepalived on 1 node is stopped (e.g. the MASTER node switches from host 1 to 2)
  • notification_email_from – email address sender from where email will originte
    ! NB ! In order for notification_email to be working you need to have configured MTA or Mail Relay (set to local MTA) to another SMTP – e.g. have configured something like Postfix, Qmail or Postfix

b. Configure keepalived to serve as a SLAVE Node

[root@server1:~]vim /etc/keepalived/keepalived.conf
 

#Slave keepalived
global_defs {
  router_id server2-fqdn # The hostname of this host!

  enable_script_security
  # Synchro of the state of the connections between the LBs on the eth0 interface
  lvs_sync_daemon eth0
 
notification_email {
        linuxadmin@notify-host.com     # Email address for notifications
    }
 notification_email_from keepalived@server2-fqdn        # The from address for the notifications
    smtp_server 127.0.0.1                       # SMTP server address
    smtp_connect_timeout 15
}

vrrp_script haproxy {
  script "killall -0 haproxy"
  interval 2
  weight 2
  user root
}

vrrp_instance LB_VIP_QA {
  virtual_router_id 50
  advert_int 1
  priority 50

  state BACKUP
  interface eth0
  smtp_alert          # Enable Notifications Via Email

authentication {
              auth_type PASS
              auth_pass testp141
}
### Commented because running on VM on VMWare    
##    unicast_src_ip 10.10.192.135 # Private IP address of master
##    unicast_peer {
##        10.10.192.134         # Private IP address of the backup haproxy
##   }

###  priority 50
###  state BACKUP
###  interface eth0
  virtual_ipaddress {
     10.10.10.1 dev eth0 # The virtual IP address that will be shared betwee MASTER and BACKUP.
  }
  track_script {
    haproxy
  }
}


Download the keepalived.conf slave config here


c. Set required sysctl parameters for haproxy to work as expected
 

[root@server1:~]vim /etc/sysctl.conf
#Haproxy config
# haproxy
net.core.somaxconn=65535
net.ipv4.ip_local_port_range = 1024 65000
net.ipv4.ip_nonlocal_bind = 1
net.ipv4.tcp_tw_reuse = 1
net.ipv4.tcp_max_syn_backlog = 10240
net.ipv4.tcp_max_tw_buckets = 400000
net.ipv4.tcp_max_orphans = 60000
net.ipv4.tcp_synack_retries = 3

4. Test Keepalived keepalived.conf configuration syntax is OK


[root@server1:~]keepalived –config-test
(/etc/keepalived/keepalived.conf: Line 7) Unknown keyword 'lvs_sync_daemon_interface'
(/etc/keepalived/keepalived.conf: Line 21) Unable to set default user for vrrp script haproxy – removing
(/etc/keepalived/keepalived.conf: Line 31) (LB_VIP_QA) Specifying lvs_sync_daemon_interface against a vrrp is deprecated.
(/etc/keepalived/keepalived.conf: Line 31)              Please use global lvs_sync_daemon
(/etc/keepalived/keepalived.conf: Line 35) Truncating auth_pass to 8 characters
(/etc/keepalived/keepalived.conf: Line 50) (LB_VIP_QA) track script haproxy not found, ignoring…

I've experienced this error because first time I've configured keepalived, I did not mention the user with which the vrrp script haproxy should run,
in prior versions of keepalived, leaving the field empty did automatically assumed you have the user with which the vrrp script runs to be set to root
as of RHELs keepalived-2.1.5-6.el8.x86_64, i've been using however this is no longer so and thus in prior configuration as you can see I've
set the user in respective section to root.
The error Unknown keyword 'lvs_sync_daemon_interface'
is also easily fixable by just substituting the lvs_sync_daemon_interface and lvs_sync_daemon and reloading
keepalived etc.

Once keepalived is started and you can see the process on both machines running in process list.

[root@server1:~]ps -ef |grep -i keepalived
root     1190884       1  0 18:50 ?        00:00:00 /usr/sbin/keepalived -D
root     1190885 1190884  0 18:50 ?        00:00:00 /usr/sbin/keepalived -D

Next step is to check the keepalived statuses as well as /var/log/keepalived.log

If everything is configured as expected on both keepalived on first node you should see one is master and one is slave either in the status or the log

[root@server1:~]#systemctl restart keepalived


[root@server1:~]systemctl status keepalived|grep -i state
Mar 14 18:59:02 server1-fqdn Keepalived_vrrp[1192003]: (LB_VIP_QA) Entering MASTER STATE

[root@server1:~]systemctl status keepalived

● keepalived.service – LVS and VRRP High Availability Monitor
   Loaded: loaded (/usr/lib/systemd/system/keepalived.service; enabled; vendor preset: disabled)
   Active: inactive (dead) since Mon 2022-03-14 18:15:51 CET; 32min ago
  Process: 1187587 ExecStart=/usr/sbin/keepalived $KEEPALIVED_OPTIONS (code=exited, status=0/SUCCESS)
 Main PID: 1187589 (code=exited, status=0/SUCCESS)

Mar 14 18:15:04 server1lb-fqdn Keepalived_vrrp[1187590]: Sending gratuitous ARP on eth0 for 10.44.192.142
Mar 14 18:15:50 server1lb-fqdn systemd[1]: Stopping LVS and VRRP High Availability Monitor…
Mar 14 18:15:50 server1lb-fqdn Keepalived[1187589]: Stopping
Mar 14 18:15:50 server1lb-fqdn Keepalived_vrrp[1187590]: (LB_VIP_QA) sent 0 priority
Mar 14 18:15:50 server1lb-fqdn Keepalived_vrrp[1187590]: (LB_VIP_QA) removing VIPs.
Mar 14 18:15:51 server1lb-fqdn Keepalived_vrrp[1187590]: Stopped – used 0.002007 user time, 0.016303 system time
Mar 14 18:15:51 server1lb-fqdn Keepalived[1187589]: CPU usage (self/children) user: 0.000000/0.038715 system: 0.001061/0.166434
Mar 14 18:15:51 server1lb-fqdn Keepalived[1187589]: Stopped Keepalived v2.1.5 (07/13,2020)
Mar 14 18:15:51 server1lb-fqdn systemd[1]: keepalived.service: Succeeded.
Mar 14 18:15:51 server1lb-fqdn systemd[1]: Stopped LVS and VRRP High Availability Monitor

[root@server2:~]systemctl status keepalived|grep -i state
Mar 14 18:59:02 server2-fqdn Keepalived_vrrp[297368]: (LB_VIP_QA) Entering BACKUP STATE

[root@server1:~]# grep -i state /var/log/keepalived.log
Mar 14 18:59:02 server1lb-fqdn Keepalived_vrrp[297368]: (LB_VIP_QA) Entering MASTER STATE
 

a. Fix Keepalived SECURITY VIOLATION – scripts are being executed but script_security not enabled.
 

When configurating keepalived for a first time we have faced the following strange error inside keepalived status inside keepalived.log 
 

Feb 23 14:28:41 server1 Keepalived_vrrp[945478]: SECURITY VIOLATION – scripts are being executed but script_security not enabled.


To fix keepalived SECURITY VIOLATION error:

Add to /etc/keepalived/keepalived.conf on the keepalived node hosts
inside 

global_defs {}

After chunk
 

enable_script_security

include

# Synchro of the state of the connections between the LBs on the eth0 interface
  lvs_sync_daemon_interface eth0


5. Prepare rsyslog configuration and Inlcude additional keepalived options
to force keepalived log into /var/log/keepalived.log

To force keepalived log into /var/log/keepalived.log on RHEL 8 / CentOS and other Redhat Package Manager (RPM) Linux distributions

[root@server1:~]# vim /etc/rsyslog.d/48_keepalived.conf

#2022/02/02: HAProxy logs to local6, save the messages
local7.*                                                /var/log/keepalived.log
if ($programname == 'Keepalived') then -/var/log/keepalived.log
if ($programname == 'Keepalived_vrrp') then -/var/log/keepalived.log
& stop

[root@server:~]# touch /var/log/keepalived.log

Reload rsyslog to load new config
 

[root@server:~]# systemctl restart rsyslog
[root@server:~]# systemctl status rsyslog


rsyslog.service – System Logging Service
   Loaded: loaded (/usr/lib/systemd/system/rsyslog.service; enabled; vendor preset: enabled)
  Drop-In: /etc/systemd/system/rsyslog.service.d
           └─rsyslog-service.conf
   Active: active (running) since Mon 2022-03-07 13:34:38 CET; 1 weeks 0 days ago
     Docs: man:rsyslogd(8)

           https://www.rsyslog.com/doc/
 Main PID: 269574 (rsyslogd)
    Tasks: 6 (limit: 100914)
   Memory: 5.1M
   CGroup: /system.slice/rsyslog.service
           └─269574 /usr/sbin/rsyslogd -n

Mar 15 08:15:16 server1lb-fqdn rsyslogd[269574]: — MARK —
Mar 15 08:35:16 server1lb-fqdn rsyslogd[269574]: — MARK —
Mar 15 08:55:16 server1lb-fqdn rsyslogd[269574]: — MARK —


If once keepalived is loaded but you still have no log written inside /var/log/keepalived.log

[root@server1:~]# vim /etc/sysconfig/keepalived
 KEEPALIVED_OPTIONS="-D -S 7"

[root@server2:~]# vim /etc/sysconfig/keepalived
 KEEPALIVED_OPTIONS="-D -S 7"

[root@server1:~]# systemctl restart keepalived.service
[root@server1:~]#  systemctl status keepalived

● keepalived.service – LVS and VRRP High Availability Monitor
   Loaded: loaded (/usr/lib/systemd/system/keepalived.service; enabled; vendor preset: disabled)
   Active: active (running) since Thu 2022-02-24 12:12:20 CET; 2 weeks 4 days ago
 Main PID: 1030501 (keepalived)
    Tasks: 2 (limit: 100914)
   Memory: 1.8M
   CGroup: /system.slice/keepalived.service
           ├─1030501 /usr/sbin/keepalived -D
           └─1030502 /usr/sbin/keepalived -D

Warning: Journal has been rotated since unit was started. Log output is incomplete or unavailable.

[root@server2:~]# systemctl restart keepalived.service
[root@server2:~]# systemctl status keepalived

6. Monitoring VRRP traffic of the two keepaliveds with tcpdump
 

Once both keepalived are up and running a good thing is to check the VRRP protocol traffic keeps fluently on both machines.
Keepalived VRRP keeps communicating over the TCP / IP Port 112 thus you can simply snoop TCP tracffic on its protocol.
 

[root@server1:~]# tcpdump proto 112

tcpdump: verbose output suppressed, use -v or -vv for full protocol decode
listening on eth0, link-type EN10MB (Ethernet), capture size 262144 bytes
11:08:07.356187 IP server1lb-fqdn > vrrp.mcast.net: VRRPv2, Advertisement, vrid 50, prio 53, authtype simple, intvl 1s, length 20
11:08:08.356297 IP server1lb-fqdn > vrrp.mcast.net: VRRPv2, Advertisement, vrid 50, prio 53, authtype simple, intvl 1s, length 20
11:08:09.356408 IP server1lb-fqdn > vrrp.mcast.net: VRRPv2, Advertisement, vrid 50, prio 53, authtype simple, intvl 1s, length 20
11:08:10.356511 IP server1lb-fqdn > vrrp.mcast.net: VRRPv2, Advertisement, vrid 50, prio 53, authtype simple, intvl 1s, length 20
11:08:11.356655 IP server1lb-fqdn > vrrp.mcast.net: VRRPv2, Advertisement, vrid 50, prio 53, authtype simple, intvl 1s, length 20

[root@server2:~]# tcpdump proto 112

tcpdump: verbose output suppressed, use -v or -vv for full protocol decode
​listening on eth0, link-type EN10MB (Ethernet), capture size 262144 bytes
11:08:07.356187 IP server1lb-fqdn > vrrp.mcast.net: VRRPv2, Advertisement, vrid 50, prio 53, authtype simple, intvl 1s, length 20
11:08:08.356297 IP server1lb-fqdn > vrrp.mcast.net: VRRPv2, Advertisement, vrid 50, prio 53, authtype simple, intvl 1s, length 20
11:08:09.356408 IP server1lb-fqdn > vrrp.mcast.net: VRRPv2, Advertisement, vrid 50, prio 53, authtype simple, intvl 1s, length 20
11:08:10.356511 IP server1lb-fqdn > vrrp.mcast.net: VRRPv2, Advertisement, vrid 50, prio 53, authtype simple, intvl 1s, length 20
11:08:11.356655 IP server1lb-fqdn > vrrp.mcast.net: VRRPv2, Advertisement, vrid 50, prio 53, authtype simple, intvl 1s, length 20

As you can see the VRRP traffic on the network is originating only from server1lb-fqdn, this is so because host server1lb-fqdn is the keepalived configured master node.

It is possible to spoof the password configured to authenticate between two nodes, thus if you're bringing up keepalived service cluster make sure your security is tight at best the machines should be in a special local LAN DMZ, do not configure DMZ on the internet !!! 🙂 Or if you eventually decide to configure keepalived in between remote hosts, make sure you somehow use encrypted VPN or SSH tunnels to tunnel the VRRP traffic.

[root@server1:~]tcpdump proto 112 -vv
tcpdump: listening on eth0, link-type EN10MB (Ethernet), capture size 262144 bytes
11:36:25.530772 IP (tos 0xc0, ttl 255, id 59838, offset 0, flags [none], proto VRRP (112), length 40)
    server1lb-fqdn > vrrp.mcast.net: vrrp server1lb-fqdn > vrrp.mcast.net: VRRPv2, Advertisement, vrid 50, prio 53, authtype simple, intvl 1s, length 20, addrs: VIPIP_QA auth "testp431"
11:36:26.530874 IP (tos 0xc0, ttl 255, id 59839, offset 0, flags [none], proto VRRP (112), length 40)
    server1lb-fqdn > vrrp.mcast.net: vrrp server1lb-fqdn > vrrp.mcast.net: VRRPv2, Advertisement, vrid 50, prio 53, authtype simple, intvl 1s, length 20, addrs: VIPIP_QA auth "testp431"

Lets also check what floating IP is configured on the machines:

[root@server1:~]# ip -brief address show
lo               UNKNOWN        127.0.0.1/8 
eth0             UP             10.10.10.5/26 10.10.10.1/32 

The 10.10.10.5 IP is the main IP set on LAN interface eth0, 10.10.10.1 is the floating IP which as you can see is currently set by keepalived to listen on first node.

[root@server2:~]# ip -brief address show |grep -i 10.10.10.1

An empty output is returned as floating IP is currently configured on server1

To double assure ourselves the IP is assigned on correct machine, lets ping it and check the IP assigned MAC  currently belongs to which machine.
 

[root@server2:~]# ping 10.10.10.1
PING 10.10.10.1 (10.10.10.1) 56(84) bytes of data.
64 bytes from 10.10.10.1: icmp_seq=1 ttl=64 time=0.526 ms
^C
— 10.10.10.1 ping statistics —
1 packets transmitted, 1 received, 0% packet loss, time 0ms
rtt min/avg/max/mdev = 0.526/0.526/0.526/0.000 ms

[root@server2:~]# arp -an |grep -i 10.44.192.142
? (10.10.10.1) at 00:48:54:91:83:7d [ether] on eth0
[root@server2:~]# ip a s|grep -i 00:48:54:91:83:7d
[root@server2:~]# 

As you can see from below output MAC is not found in configured IPs on server2.
 

[root@server1-fqdn:~]# /sbin/ip a s|grep -i 00:48:54:91:83:7d -B1 -A1
 eth0: <BROADCAST,MULTICAST,UP,LOWER_UP> mtu 1500 qdisc mq state UP group default qlen 1000
    link/ether 00:48:54:91:83:7d brd ff:ff:ff:ff:ff:ff
inet 10.10.10.1/26 brd 10.10.1.191 scope global noprefixroute eth0

Pretty much expected MAC is on keepalived node server1.


7. Testing keepalived on server1 and server2 maachines VIP floating IP really works
 

To test the overall configuration just created, you should stop keeaplived on the Master node and in meantime keep an eye on Slave node (server2), whether it can figure out the Master node is gone and switch its
state BACKUP to save MASTER. By changing the secondary (Slave) keepalived to master the floating IP: 10.10.10.1 will be brought up by the scripts on server2.

Lets assume that something went wrong with server1 VM host, for example the machine crashed due to service overload, DDoS or simply a kernel bug or whatever reason.
To simulate that we simply have to stop keepalived, then the broadcasted information on VRRP TCP/IP proto port 112 will be no longer available and keepalived on node server2, once
unable to communicate to server1 should chnage itself to state MASTER.

[root@server1:~]# systemctl stop keepalived
[root@server1:~]# systemctl status keepalived

● keepalived.service – LVS and VRRP High Availability Monitor
   Loaded: loaded (/usr/lib/systemd/system/keepalived.service; enabled; vendor preset: disabled)
   Active: inactive (dead) since Tue 2022-03-15 12:11:33 CET; 3s ago
  Process: 1192001 ExecStart=/usr/sbin/keepalived $KEEPALIVED_OPTIONS (code=exited, status=0/SUCCESS)
 Main PID: 1192002 (code=exited, status=0/SUCCESS)

Mar 14 18:59:07 server1lb-fqdn Keepalived_vrrp[1192003]: Sending gratuitous ARP on eth0 for 10.10.10.1
Mar 15 12:11:32 server1lb-fqdn systemd[1]: Stopping LVS and VRRP High Availability Monitor…
Mar 15 12:11:32 server1lb-fqdn Keepalived[1192002]: Stopping
Mar 15 12:11:32 server1lb-fqdn Keepalived_vrrp[1192003]: (LB_VIP_QA) sent 0 priority
Mar 15 12:11:32 server1lb-fqdn Keepalived_vrrp[1192003]: (LB_VIP_QA) removing VIPs.
Mar 15 12:11:33 server1lb-fqdn Keepalived_vrrp[1192003]: Stopped – used 2.145252 user time, 15.513454 system time
Mar 15 12:11:33 server1lb-fqdn Keepalived[1192002]: CPU usage (self/children) user: 0.000000/44.555362 system: 0.001151/170.118126
Mar 15 12:11:33 server1lb-fqdn Keepalived[1192002]: Stopped Keepalived v2.1.5 (07/13,2020)
Mar 15 12:11:33 server1lb-fqdn systemd[1]: keepalived.service: Succeeded.
Mar 15 12:11:33 server1lb-fqdn systemd[1]: Stopped LVS and VRRP High Availability Monitor.


On keepalived off, you will get also a notification Email on the Receipt Email configured from keepalived.conf from the working keepalived node with a simple message like:

=> VRRP Instance is no longer owning VRRP VIPs <=

Once keepalived is back up you will get another notification like:

=> VRRP Instance is now owning VRRP VIPs <=

[root@server2:~]# systemctl status keepalived
● keepalived.service – LVS and VRRP High Availability Monitor
   Loaded: loaded (/usr/lib/systemd/system/keepalived.service; enabled; vendor preset: disabled)
   Active: active (running) since Mon 2022-03-14 18:13:52 CET; 17h ago
  Process: 297366 ExecStart=/usr/sbin/keepalived $KEEPALIVED_OPTIONS (code=exited, status=0/SUCCESS)
 Main PID: 297367 (keepalived)
    Tasks: 2 (limit: 100914)
   Memory: 2.1M
   CGroup: /system.slice/keepalived.service
           ├─297367 /usr/sbin/keepalived -D -S 7
           └─297368 /usr/sbin/keepalived -D -S 7

Mar 15 12:11:33 server2lb-fqdn Keepalived_vrrp[297368]: Sending gratuitous ARP on eth0 for 10.10.10.1
Mar 15 12:11:33 server2lb-fqdn Keepalived_vrrp[297368]: Remote SMTP server [127.0.0.1]:25 connected.
Mar 15 12:11:33 server2lb-fqdn Keepalived_vrrp[297368]: SMTP alert successfully sent.
Mar 15 12:11:38 server2lb-fqdn Keepalived_vrrp[297368]: (LB_VIP_QA) Sending/queueing gratuitous ARPs on eth0 for 10.10.10.1
Mar 15 12:11:38 server2lb-fqdn Keepalived_vrrp[297368]: Sending gratuitous ARP on eth0 for 10.10.10.1

[root@server2:~]#  ip addr show|grep -i 10.10.10.1
    inet 10.10.10.1/32 scope global eth0
    

As you see the VIP is now set on server2, just like expected – that's OK, everything works as expected. If the IP did not move double check the keepalived.conf on both nodes for errors or misconfigurations.

To recover the initial order of things so server1 is MASTER and server2 SLAVE host, we just have to switch on the keepalived on server1 machine.

[root@server1:~]# systemctl start keepalived

The automatic change of server1 to MASTER node and respective move of the VIP IP is done because of the higher priority (of importance we previously configured on server1 in keepalived.conf).
 

What we learned?
 

So what we learned in  this article?
We have seen how to easily install and configure a High Availability Load balancer with Keepalived with single floating VIP IP address with 1 MASTER and 1 SLAVE host and a Haproxy example config with few frontends / App backends. We have seen how the config can be tested for potential errors and how we can monitor whether the VRRP2 network traffic flows between nodes and how to potentially debug it further if necessery.
Further on rawly explained some of the keepalived configurations but as keepalived can do pretty much more,for anyone seriously willing to deal with keepalived on a daily basis or just fine tune some already existing ones, you better read closely its manual page "man keepalived.conf" as well as the official Redhat Linux documentation page on setting up a Linux cluster with Keepalived (Be prepare for a small nightmare as the documentation of it seems to be a bit chaotic, and even I would say partly missing or opening questions on what does the developers did meant – not strange considering the havoc that is pretty much as everywhere these days.)

Finally once keepalived hosts are prepared, it was shown how to test the keepalived application cluster and Floating IP does move between nodes in case if one of the 2 keepalived nodes is inaccessible.

The same logic can be repeated multiple times and if necessery you can set multiple VIPs to expand the HA reachable IPs solution.

high-availability-with-two-vips-example-diagram

The presented idea is with haproxy forward Proxy server to proxy requests towards Application backend (servince machines), however if you need to set another set of server on the flow to  process HTML / XHTML / PHP / Perl / Python  programming code, with some common Webserver setup ( Nginx / Apache / Tomcat / JBOSS) and enable SSL Secure certificate with lets say Letsencrypt, this can be relatively easily done. If you want to implement letsencrypt and a webserver check this redundant SSL Load Balancing with haproxy & keepalived article.

That's all folks, hope you enjoyed.
If you need to configure keepalived Cluster or a consultancy write your query here 🙂

How to set up dsmc client Tivoli ( TSM ) release version and process check monitoring with Zabbix

Thursday, December 17th, 2020

zabbix-monitor-dsmc-client-monitor-ibm-tsm-with-zabbix-howto

As a part of Monitoring IBM Spectrum (the new name of IBM TSM) if you don't have the money to buy something like HP Open View monitoring or other kind of paid monitoring system but you use Zabbix open source solution to monitor your Linux server infrastructure and you use Zabbix as a main Services and Servers monitoring platform you will want to monitor at least whether the running Tivoli dsmc backup clients run fine on each of the server (e.g. the dsmc client) runs normally as a backup solution with its common /usr/bin/dsmc process service that connects towards remote IBM TSM server where the actual Data storage is kept.

It might be a kind of weird monitoring to setup to have the tsm version frequently reported to a Zabbix server on a first glimpse, but in reality this is quite useful especially if you want to have a better overview of your multiple servers environment IBM (Spectrum Protect) Storage manager backup solution actual release.
 
So the goal is to have reported dsmc interactive storage manager version as reported from
 

[root@server ~]# dsmc

IBM Spectrum Protect
Command Line Backup-Archive Client Interface
  Client Version 8, Release 1, Level 11.0
  Client date/time: 12/17/2020 15:59:32
(c) Copyright by IBM Corporation and other(s) 1990, 2020. All Rights Reserved.

Node Name: Sub-Hostname.FQDN.COM
Session established with server TSM_SERVER: AIX
  Server Version 8, Release 1, Level 10.000
  Server date/time: 12/17/2020 15:59:34  Last access: 12/17/2020 13:28:01


into zabbix and set reports in case if your sysadmins have changed version of a IBM TSM to a newer version. Thus for non sysadmins and less technical persons as Service Delivery Managers (SDMs) it is much easier to track changes of multiple servers Tivoli version to a newer one.

Enough talk let me next show you how to setup the required with a small UserParameter one liner bash shell script.
 

1. Create TSM Userparameter script


With Userparameter key and content as below:

[root@server ~]# vim /etc/zabbix/zabbix_agentd.d/userparameter_TSM.conf


UserParameter=dsmc.version,cat /var/tsm/sched.log | grep Clie | tail -n 1 | awk '{print $7 " " $8 " " $9 " " $10 " " $11 " " $12 " " $13}'


The script output of TivSM version will be reported as so:

[root@server ~]# cat /var/tsm/sched.log | grep Clie | tail -n 1 | awk '{print $7 " " $8 " " $9 " " $10 " " $11 " " $12 " " $13}'
Client Version 8, Release 1, Level 11.0


If you want to get only a major version report from dsmc:

UserParameter=dsmc.version,cat /var/tsm/sched.log | grep Clie | tail -n 1 | awk '{print $7 " " $8 " " $9}'


The output as a major version you will get is

[root@server ~]# cat /var/tsm/sched.log | grep Clie | tail -n 1 | awk '{print $7 " " $8 " " $9}'
Client Version 8,


2. Restart the zabbix agent to load userparam script

To load above configured Userparameter script we need to restart zabbix-agent client

[root@server ~]# systemctl restart zabbix-agent

[root@server ~]#  systemctl status zabbix-agent
● zabbix-agent.service – Zabbix Agent
   Loaded: loaded (/usr/lib/systemd/system/zabbix-agent.service; enabled; vendor preset: disabled)
   Active: active (running) since Wed 2020-07-22 16:17:17 CEST; 4 months 26 days ago
 Main PID: 7817 (zabbix_agentd)
   CGroup: /system.slice/zabbix-agent.service
           ├─7817 /usr/sbin/zabbix_agentd -c /etc/zabbix/zabbix_agentd.conf
           ├─7818 /usr/sbin/zabbix_agentd: collector [idle 1 sec]
           ├─7819 /usr/sbin/zabbix_agentd: listener #1 [waiting for connection]
           ├─7820 /usr/sbin/zabbix_agentd: listener #2 [waiting for connection]
           ├─7821 /usr/sbin/zabbix_agentd: listener #3 [waiting for connection]
           └─7822 /usr/sbin/zabbix_agentd: active checks #1 [idle 1 sec]


3. Create template for TSM Service check and TSM Version


You will need to create 1 Trigger and 2 Items for the Service check and for TSM version reporting

tsm-service-version-screenshot-zabbix
As you see necessery names / keys to create are:

Name / Key: TSM – Service State proc.num{dsmcad}

Name / key: TSM version dmsc.version


3.1 Create the trigger


Now lets create the trigger that will report the Service State

tsm-service-state-zabbix-screenshot


Linux TSM:proc.num[dsmcad].last()}=0


3.2 Create the Items


zabbix-dsmc-proc-num-item-setting-screenshot-linux


Name: dsmcad
Key: proc.num{dsmcad}


tsm-version-item-zabbix-screenshot
 

Update interval: 1d
History Storage period: 90d
Applications: TSM


3.3 Create Zabbix Action

As usual if you want to receive some Email Alerting or lets say send SMS in case of Trigger is matched create the necessery Action with
instructions on how to solve the problem if there is a Standard Operation Procedure ( SOP ) as often called in the corporate world for that.

That's all folks ! 🙂


Adding custom user based host IP aliases load custom prepared /etc/hosts from non root user on Linux – Script to allow define IPs that doesn’t have DNS records to user preferred hostname

Wednesday, April 14th, 2021

adding-custom-user-based-host-aliases-etc-hosts-logo-linux

Say you have access to a remote Linux / UNIX / BSD server, i.e. a jump host and you have to remotely access via ssh a bunch of other servers
who have existing IP addresses but the DNS resolver recognized hostnames from /etc/resolv.conf are long and hard to remember by the jump host in /etc/resolv.conf and you do not have a way to include a new alias to /etc/hosts because you don't have superuser admin previleges on the hop station.
To make your life easier you would hence want to add a simplistic host alias to be able to easily do telnet, ssh, curl to some aliased name like s1, s2, s3 … etc.


The question comes then, how can you define the IPs to be resolvable by easily rememberable by using a custom User specific /etc/hosts like definition file? 

Expanding /etc/hosts predefined host resolvable records is pretty simple as most as most UNIX / Linux has the HOSTALIASES environment variable
Hostaliases uses the common technique for translating host names into IP addresses using either getaddrinfo(3) or the obsolete gethostbyname(3). As mentioned in hostname(7), you can set the HOSTALIASES environment variable to point to an alias file, and you've got per-user aliases

create ~/.hosts file

linux:~# vim ~/.hosts

with some content like:
 

g google.com
localhostg 127.0.0.1
s1 server-with-long-host1.fqdn-whatever.com 
s2 server5-with-long-host1.fqdn-whatever.com
s3 server18-with-long-host5.fqdn-whatever.com

linux:~# export HOSTALIASES=$PWD/.hosts

The caveat of hostaliases you should know is this will only works for resolvable IP hostnames.
So if you want to be able to access unresolvable hostnames.
You can use a normal alias for the hostname you want in ~/.bashrc with records like:

alias server-hostname="ssh username@10.10.10.18 -v -o stricthostkeychecking=no -o passwordauthentication=yes -o UserKnownHostsFile=/dev/null"
alias server-hostname1="ssh username@10.10.10.19 -v -o stricthostkeychecking=no -o passwordauthentication=yes -o UserKnownHostsFile=/dev/null"
alias server-hostname2="ssh username@10.10.10.20 -v -o stricthostkeychecking=no -o passwordauthentication=yes -o UserKnownHostsFile=/dev/null"

then to access server-hostname1 simply type it in terminal.

The more elegant solution is to use a bash script like below:

# include below code to your ~/.bashrc
function resolve {
        hostfile=~/.hosts
        if [[ -f “$hostfile” ]]; then
                for arg in $(seq 1 $#); do
                        if [[ “${!arg:0:1}” != “-” ]]; then
                                ip=$(sed -n -e "/^\s*\(\#.*\|\)$/d" -e "/\<${!arg}\>/{s;^\s*\(\S*\)\s*.*$;\1;p;q}" "$hostfile")
                                if [[ -n “$ip” ]]; then
                                        command "${FUNCNAME[1]}" "${@:1:$(($arg-1))}" "$ip" "${@:$(($arg+1)):$#}"
                                        return
                                fi
                        fi
                done
        fi
        command "${FUNCNAME[1]}" "$@"
}

function ping {
        resolve "$@"
}

function traceroute {
        resolve "$@"
}

function ssh {
        resolve "$@"
}

function telnet {
        resolve "$@"
}

function curl {
        resolve "$@"
}

function wget {
        resolve "$@"
}


Now after reloading bash login session $HOME/.bashrc with:

linux:~# source ~/.bashrc

ssh / curl / wget / telnet / traceroute and ping will be possible to the defined ~/.hosts IP addresses just like if it have been defined global wide on System in /etc/hosts.

Enjoy
 

Hack: Using ssh / curl or wget to test TCP port connection state to remote SSH, DNS, SMTP, MySQL or any other listening service in PCI environment servers

Wednesday, December 30th, 2020

using-curl-ssh-wget-to-test-tcp-port-opened-or-closed-for-web-mysql-smtp-or-any-other-linstener-in-pci-linux-logo

If you work on PCI high security environment servers in isolated local networks where each package installed on the Linux / Unix system is of importance it is pretty common that some basic stuff are not there in most cases it is considered a security hole to even have a simple telnet installed on the system. I do have experience with such environments myself and thus it is pretty daunting stuff so in best case you can use something like a simple ssh client if you're lucky and the CentOS / Redhat / Suse Linux whatever distro has openssh-client package installed.
If you're lucky to have the ssh onboard you can use telnet in same manner as netcat or the swiss army knife (nmap) network mapper tool to test whether remote service TCP / port is opened or not. As often this is useful, if you don't have access to the CISCO / Juniper or other (networ) / firewall equipment which is setting the boundaries and security port restrictions between networks and servers.

Below is example on how to use ssh client to test port connectivity to lets say the Internet, i.e.  Google / Yahoo search engines.
 

[root@pciserver: /home ]# ssh -oConnectTimeout=3 -v google.com -p 23
OpenSSH_7.9p1 Debian-10+deb10u2, OpenSSL 1.1.1g  21 Apr 2020
debug1: Connecting to google.com [172.217.169.206] port 23.
debug1: connect to address 172.217.169.206 port 23: Connection timed out
debug1: Connecting to google.com [2a00:1450:4017:80b::200e] port 23.
debug1: connect to address 2a00:1450:4017:80b::200e port 23: Cannot assign requested address
ssh: connect to host google.com port 23: Cannot assign requested address
root@pcfreak:/var/www/images# ssh -oConnectTimeout=3 -v google.com -p 80
OpenSSH_7.9p1 Debian-10+deb10u2, OpenSSL 1.1.1g  21 Apr 2020
debug1: Connecting to google.com [172.217.169.206] port 80.
debug1: connect to address 172.217.169.206 port 80: Connection timed out
debug1: Connecting to google.com [2a00:1450:4017:807::200e] port 80.
debug1: connect to address 2a00:1450:4017:807::200e port 80: Cannot assign requested address
ssh: connect to host google.com port 80: Cannot assign requested address
root@pcfreak:/var/www/images# ssh google.com -p 80
ssh_exchange_identification: Connection closed by remote host
root@pcfreak:/var/www/images# ssh google.com -p 80 -v -oConnectTimeout=3
OpenSSH_7.9p1 Debian-10+deb10u2, OpenSSL 1.1.1g  21 Apr 2020
debug1: Connecting to google.com [172.217.169.206] port 80.
debug1: connect to address 172.217.169.206 port 80: Connection timed out
debug1: Connecting to google.com [2a00:1450:4017:80b::200e] port 80.
debug1: connect to address 2a00:1450:4017:80b::200e port 80: Cannot assign requested address
ssh: connect to host google.com port 80: Cannot assign requested address
root@pcfreak:/var/www/images# ssh google.com -p 80 -v -oConnectTimeout=5
OpenSSH_7.9p1 Debian-10+deb10u2, OpenSSL 1.1.1g  21 Apr 2020
debug1: Connecting to google.com [142.250.184.142] port 80.
debug1: connect to address 142.250.184.142 port 80: Connection timed out
debug1: Connecting to google.com [2a00:1450:4017:80c::200e] port 80.
debug1: connect to address 2a00:1450:4017:80c::200e port 80: Cannot assign requested address
ssh: connect to host google.com port 80: Cannot assign requested address
root@pcfreak:/var/www/images# ssh google.com -p 80 -v
OpenSSH_7.9p1 Debian-10+deb10u2, OpenSSL 1.1.1g  21 Apr 2020
debug1: Connecting to google.com [172.217.169.206] port 80.
debug1: Connection established.
debug1: identity file /root/.ssh/id_rsa type 0
debug1: identity file /root/.ssh/id_rsa-cert type -1
debug1: identity file /root/.ssh/id_dsa type -1
debug1: identity file /root/.ssh/id_dsa-cert type -1
debug1: identity file /root/.ssh/id_ecdsa type -1
debug1: identity file /root/.ssh/id_ecdsa-cert type -1
debug1: identity file /root/.ssh/id_ed25519 type -1
debug1: identity file /root/.ssh/id_ed25519-cert type -1
debug1: identity file /root/.ssh/id_xmss type -1
debug1: identity file /root/.ssh/id_xmss-cert type -1
debug1: Local version string SSH-2.0-OpenSSH_7.9p1 Debian-10+deb10u2
debug1: ssh_exchange_identification: HTTP/1.0 400 Bad Request


debug1: ssh_exchange_identification: Content-Type: text/html; charset=UTF-8


debug1: ssh_exchange_identification: Referrer-Policy: no-referrer


debug1: ssh_exchange_identification: Content-Length: 1555


debug1: ssh_exchange_identification: Date: Wed, 30 Dec 2020 14:13:25 GMT


debug1: ssh_exchange_identification:


debug1: ssh_exchange_identification: <!DOCTYPE html>

debug1: ssh_exchange_identification: <html lang=en>

debug1: ssh_exchange_identification:   <meta charset=utf-8>

debug1: ssh_exchange_identification:   <meta name=viewport content="initial-scale=1, minimum-scale=1, width=device-width">

debug1: ssh_exchange_identification:   <title>Error 400 (Bad Request)!!1</title>

debug1: ssh_exchange_identification:   <style>

debug1: ssh_exchange_identification:     *{margin:0;padding:0}html,code{font:15px/22px arial,sans-serif}html{background:#fff;color:#222;padding:15px}body{margin:7% auto 0;max-width:390px;min-height:180px;padding:30px 0 15px}* > body{background:url(//www.google.com/images/errors/robot.png) 10
debug1: ssh_exchange_identification: 0% 5px no-repeat;padding-right:205px}p{margin:11px 0 22px;overflow:hidden}ins{color:#777;text-decoration:none}a img{border:0}@media screen and (max-width:772px){body{background:none;margin-top:0;max-width:none;padding-right:0}}#logo{background:url(//www.g
debug1: ssh_exchange_identification: oogle.com/images/branding/googlelogo/1x/googlelogo_color_150x54dp.png) no-repeat;margin-left:-5px}@media only screen and (min-resolution:192dpi){#logo{background:url(//www.google.com/images/branding/googlelogo/2x/googlelogo_color_150x54dp.png) no-repeat 0
debug1: ssh_exchange_identification: % 0%/100% 100%;-moz-border-image:url(//www.google.com/images/branding/googlelogo/2x/googlelogo_color_150x54dp.png) 0}}@media only screen and (-webkit-min-device-pixel-ratio:2){#logo{background:url(//www.google.com/images/branding/googlelogo/2x/googlelogo_
debug1: ssh_exchange_identification: color_150x54dp.png) no-repeat;-webkit-background-size:100% 100%}}#logo{display:inline-block;height:54px;width:150px}

debug1: ssh_exchange_identification:   </style>

debug1: ssh_exchange_identification:   <a href=//www.google.com/><span id=logo aria-label=Google></span></a>

debug1: ssh_exchange_identification:   <p><b>400.</b> <ins>That\342\200\231s an error.</ins>

debug1: ssh_exchange_identification:   <p>Your client has issued a malformed or illegal request.  <ins>That\342\200\231s all we know.</ins>

ssh_exchange_identification: Connection closed by remote host


Here is another example on how to test remote host whether a certain service such as DNS (bind) or telnetd is enabled and listening on remote local network  IP with ssh

[root@pciserver: /home ]# ssh 192.168.1.200 -p 53 -v -oConnectTimeout=5
OpenSSH_7.9p1 Debian-10+deb10u2, OpenSSL 1.1.1g  21 Apr 2020
debug1: Connecting to 192.168.1.200 [192.168.1.200] port 53.
debug1: connect to address 192.168.1.200 port 53: Connection timed out
ssh: connect to host 192.168.1.200 port 53: Connection timed out

[root@server: /home ]# ssh 192.168.1.200 -p 23 -v -oConnectTimeout=5
OpenSSH_7.9p1 Debian-10+deb10u2, OpenSSL 1.1.1g  21 Apr 2020
debug1: Connecting to 192.168.1.200 [192.168.1.200] port 23.
debug1: connect to address 192.168.1.200 port 23: Connection timed out
ssh: connect to host 192.168.1.200 port 23: Connection timed out


But what if Linux server you have tow work on is so paranoid that you even the ssh client is absent? Well you can use anything else that is capable of doing a connectivity to remote port such as wget or curl. Some web servers or application servers usually have wget or curl as it is integral part for some local shell scripts doing various operation needed for proper services functioning or simply to test locally a local or remote listener services, if that's the case we can use curl to connect and get output of a remote service simulating a normal telnet connection like this:

host:~# curl -vv 'telnet://remote-server-host5:22'
* About to connect() to remote-server-host5 port 22 (#0)
*   Trying 10.52.67.21… connected
* Connected to aflpvz625 (10.52.67.21) port 22 (#0)
SSH-2.0-OpenSSH_5.3

Now lets test whether we can connect remotely to a local net remote IP's Qmail mail server with curls telnet simulation mode:

host:~#  curl -vv 'telnet://192.168.0.200:25'
* Expire in 0 ms for 6 (transfer 0x56066e5ab900)
*   Trying 192.168.0.200…
* TCP_NODELAY set
* Expire in 200 ms for 4 (transfer 0x56066e5ab900)
* Connected to 192.168.0.200 (192.168.0.200) port 25 (#0)
220 This is Mail Pc-Freak.NET ESMTP

Fine it works, lets now test whether a remote server who has MySQL listener service on standard MySQL port TCP 3306 is reachable with curl

host:~#  curl -vv 'telnet://192.168.0.200:3306'
* Expire in 0 ms for 6 (transfer 0x5601fafae900)
*   Trying 192.168.0.200…
* TCP_NODELAY set
* Expire in 200 ms for 4 (transfer 0x5601fafae900)
* Connected to 192.168.0.200 (192.168.0.200) port 3306 (#0)
Warning: Binary output can mess up your terminal. Use "–output -" to tell
Warning: curl to output it to your terminal anyway, or consider "–output
Warning: <FILE>" to save to a file.
* Failed writing body (0 != 107)
* Closing connection 0
root@pcfreak:/var/www/images#  curl -vv 'telnet://192.168.0.200:3306'
* Expire in 0 ms for 6 (transfer 0x5598ad008900)
*   Trying 192.168.0.200…
* TCP_NODELAY set
* Expire in 200 ms for 4 (transfer 0x5598ad008900)
* Connected to 192.168.0.200 (192.168.0.200) port 3306 (#0)
Warning: Binary output can mess up your terminal. Use "–output -" to tell
Warning: curl to output it to your terminal anyway, or consider "–output
Warning: <FILE>" to save to a file.
* Failed writing body (0 != 107)
* Closing connection 0

As you can see the remote connection is returning binary data which is unknown to a standard telnet terminal thus to get the output received we need to pass curl suggested arguments.

host:~#  curl -vv 'telnet://192.168.0.200:3306' –output –
* Expire in 0 ms for 6 (transfer 0x55b205c02900)
*   Trying 192.168.0.200…
* TCP_NODELAY set
* Expire in 200 ms for 4 (transfer 0x55b205c02900)
* Connected to 192.168.0.200 (192.168.0.200) port 3306 (#0)
g


The curl trick used to troubleshoot remote port to remote host from a Windows OS host which does not have telnet installed by default but have curl instead.

Also When troubleshooting vSphere Replication, it is often necessary to troubleshoot port connectivity as common Windows utilities are not available.
As Curl is available in the VMware vCenter Server Appliance command line interface.

On servers where curl is not there but you have wget is installed you can use it also to test a remote port


# wget -vv -O /dev/null http://google.com:554 –timeout=5
–2020-12-30 16:54:22–  http://google.com:554/
Resolving google.com (google.com)… 172.217.169.206, 2a00:1450:4017:80b::200e
Connecting to google.com (google.com)|172.217.169.206|:554… failed: Connection timed out.
Connecting to google.com (google.com)|2a00:1450:4017:80b::200e|:554… failed: Cannot assign requested address.
Retrying.

–2020-12-30 16:54:28–  (try: 2)  http://google.com:554/
Connecting to google.com (google.com)|172.217.169.206|:554… ^C

As evident from output the port 554 is filtered in google which is pretty normal.

If curl or wget is not there either as a final alternative you can either install some perl, ruby, python or bash script etc. that can opens a remote socket to the remote IP.

Postfix copy every email to a central mailbox (send a copy of every mail sent via mail server to a given email)

Wednesday, October 28th, 2020

Postfix-logo-always-bcc-email-option-send-all-emails-to-a-single-address-with-postfix.svg

Say you need to do a mail server migration, where you have a local configured Postfix on a number of Linux hosts named:

Linux-host1
Linux-host2
Linux-host3

etc.


all configured to send email via old Email send host (MailServerHostOld.com) in each linux box's postfix configuration's /etc/postfix/main.cf.
Now due to some infrastructure change in the topology of network or anything else, you need to relay Mails sent via another asumably properly configured Linux host relay (MailServerNewHost.com).

Usually such a migrations has always a risk that some of the old sent emails originating from local running scripts on Linux-host1, Linux-Host2 … or some application or anything else set to send via them might not properly deliver emails to some external Internet based Mailboxes via the new relayhost MailServerNewHost.com.

E.g. in /etc/postfix/main.cf Linux-Host* machines, you have below config after the migration:

relayhost = [MailServerNewHost.com]

Lets say that you want to make sure, that you don't end up with lost emails as you can't be sure whether the new email server will deliver correctly to the old repicient emails. What to do then?

To make sure will not end up in undelivered state and get lost forever after a week or so (depending on the mail queue configuration retention period made on Linux sent MTAs and mailrelay MailServerNewHost.com, it is a very good approach to temprorary set all email communication that will be sent via MailServerNewHost.com a BCC emaills (A Blind Carbon Copy) of each sent mail via relay that is set on your local configured Postfix-es on Linux-Host*.

In postfix to achieve that it is very easy all you have to do is set on your MailServerNewHost.com a postfix config variable always_bcc smartly included by postfix Mail Transfer Agent developers for cases exactly like this.

To forward all passed emails via the mail server just place in the end of /etc/postfix/mail.conf after login via ssh on MailServerNewHost.com

always_bcc=All-Emails@your-diresired-redirect-email-address.com


Now all left is to reload the postfix to force the new configuration to get loaded on systemd based hosts as it is usually today do:

# systemctl reload postfix


Finally to make sure all works as expected and mail is sent do from do a testing via local MTAs. 
 

Linux-Host:~# echo -e "Testing body" | mail -s "testing subject" -r "testing@test.com" georgi.stoyanov@remote-user-email-whatever-address.com

Linux-Host:~# echo -e "Testing body" | mail -s "testing subject" -r "testing@test.com" georgi.stoyanov@sample-destination-address.com


As you can see I'm using the -r to simulate a sender address, this is a feature of mailx and is not available on older Linux Os hosts that are bundled with mail only command.
Now go to and open the All-Emails@your-diresired-redirect-email-address.com in Outlook (if it is M$ Office 365 MX Shared mailbox), Thunderbird or whatever email fetching software that supports POP3 or IMAP (in case if you configured the common all email mailbox to be on some other Postfix / Sendmail / Qmail MTA). and check whether you started receiving a lot of emails 🙂

That's all folks enjoy ! 🙂