Posts Tagged ‘need’

How to RIP audio CD and convert to MP3 format on Linux

Thursday, April 11th, 2024

I've been given a very tedious task to Copy music from Audio CD Drive to MP3 / MP4 file format and then copy the content to external Flash drive.
Doing so is pretty trivial, you just need to have a CD / DVD rom on your computer something that becomes rare nowadays and then you need to have installed a bunch of software, if you don't already have it as i've pointed in my previous article Howto craete Music Audio CD from MP3 files, create playable WAV format audio CD Albums from MP3s.

Creating a Audio CD from an MP3 collection is exactly the opposite to what is aim't now (to copy the content of a CD to a computer and prepare it for A Car MP3 player).

1. RIPing audio CDs to WAV and Conver to MP3 from terminal
 

On Linux there is  many ways to do it and many tools that can do it for your both graphical and command line.
But as I prefer command line to do stuff, in this article I'll mention the quickest and most elementary one which is done in 2 steps.

1. Use a tool to dump the CD Audio music to Tracks in WAV format
2. Convert the WAV to MP3 format

We'll need cdparanoia tool installed as well as ffmpeg.

If you don't have them installed do:

# apt-get install –yes cdparanoia dvd+rw-tools cdw cdrdao audiotools cdlabelgen dvd+rw-tools wodim ffmpeg lame normalize-audio libavcodec58

Next create the directory where you want to dump the .wav files.

# mkdir /home/hipo/audiorip/cd1
# cd /home/hipo/audiorip/cd1

Next assumng the Audio CD is plugged in the CD reader, dump its full content into track*.WAV files with cmd:

# paranoia -B

This will produce you the dumped songs into .wav files.

hipo@noah:~/audiorip/cd1$ ls -al *.wav
-rw-r–r– 1 root root  10278284 мар 25 22:49 track01.cdda.wav
-rw-r–r– 1 root root  21666668 мар 25 22:50 track02.cdda.wav
-rw-r–r– 1 root root  88334108 мар 25 22:53 track03.cdda.wav
-rw-r–r– 1 root root  53453948 мар 25 22:55 track04.cdda.wav
-rw-r–r– 1 root root 100846748 мар 25 22:58 track05.cdda.wav
-rw-r–r– 1 root root  41058908 мар 25 22:59 track06.cdda.wav
-rw-r–r– 1 root root 105952940 мар 25 23:02 track07.cdda.wav
-rw-r–r– 1 root root  50074124 мар 25 23:03 track08.cdda.wav
-rw-r–r– 1 root root  92555948 мар 25 23:06 track09.cdda.wav
-rw-r–r– 1 root root  61939964 мар 25 23:07 track10.cdda.wav
-rw-r–r– 1 root root   8521340 мар 25 23:07 track11.cdda.wav

Then you can use a simple for loop with ffmpeg command to conver the .wav files to .mp3s.

hipo@noah:~/audiorip/cd1$  for i in $( ls -1 *); do ffmpeg -i $i $i.wav.mp3; done
 

ffmpeg version 1.2.12 Copyright (c) 2000-2015 the FFmpeg developers
  built on Feb 12 2015 18:03:16 with gcc 4.7 (Debian 4.7.2-5)
  configuration: –prefix=/usr –extra-cflags='-g -O2 -fstack-protector –param=ssp-buffer-size=4 -Wformat -Werror=format-security ' –extra-ldflags='-Wl,-z,relro' –cc='ccache cc' –enable-shared –enable-libmp3lame –enable-gpl –enable-nonfree –enable-libvorbis –enable-pthreads –enable-libfaac –enable-libxvid –enable-postproc –enable-x11grab –enable-libgsm –enable-libtheora –enable-libopencore-amrnb –enable-libopencore-amrwb –enable-libx264 –enable-libspeex –enable-nonfree –disable-stripping –enable-libvpx –enable-libschroedinger –disable-encoder=libschroedinger –enable-version3 –enable-libopenjpeg –enable-librtmp –enable-avfilter –enable-libfreetype –enable-libvo-aacenc –disable-decoder=amrnb –enable-libvo-amrwbenc –enable-libaacplus –libdir=/usr/lib/x86_64-linux-gnu –disable-vda –enable-libbluray –enable-libcdio –enable-gnutls –enable-frei0r –enable-openssl –enable-libass –enable-libopus –enable-fontconfig –enable-libpulse –disable-mips32r2 –disable-mipsdspr1 –dis  libavutil      52. 18.100 / 52. 18.100
  libavcodec     54. 92.100 / 54. 92.100
  libavformat    54. 63.104 / 54. 63.104
  libavdevice    54.  3.103 / 54.  3.103
  libavfilter     3. 42.103 /  3. 42.103
  libswscale      2.  2.100 /  2.  2.100
  libswresample   0. 17.102 /  0. 17.102
  libpostproc    52.  2.100 / 52.  2.100
[wav @ 0x66c900] max_analyze_duration 5000000 reached at 5015510 microseconds
Guessed Channel Layout for  Input Stream #0.0 : stereo
Input #0, wav, from 'track01.cdda.wav':
  Duration: 00:00:23.19, bitrate: 1411 kb/s
    Stream #0:0: Audio: pcm_s16le ([1][0][0][0] / 0x0001), 44100 Hz, stereo, s16, 1411 kb/s
Output #0, mp3, to 'track01.cdda.wav.wav.mp3':
  Metadata:
    TSSE            : Lavf54.63.104
    Stream #0:0: Audio: mp3, 44100 Hz, stereo, s16p
Stream mapping:
  Stream #0:0 -> #0:0 (pcm_s16le -> libmp3lame)
Press [q] to stop, [?] for help
size=     363kB time=00:00:23.19 bitrate= 128.2kbits/s    
video:0kB audio:363kB subtitle:0 global headers:0kB muxing overhead 0.058402%
ffmpeg version 1.2.12 Copyright (c) 2000-2015 the FFmpeg developers
  built on Feb 12 2015 18:03:16 with gcc 4.7 (Debian 4.7.2-5)
  configuration: –prefix=/usr –extra-cflags='-g -O2 -fstack-protector –param=ssp-buffer-size=4 -Wformat -Werror=format-security ' –extra-ldflags='-Wl,-z,relro' –cc='ccache cc' –enable-shared –enable-libmp3lame –enable-gpl –enable-nonfree –enable-libvorbis –enable-pthreads –enable-libfaac –enable-libxvid –enable-postproc –enable-x11grab –enable-libgsm –enable-libtheora –enable-libopencore-amrnb –enable-libopencore-amrwb –enable-libx264 –enable-libspeex –enable-nonfree –disable-stripping –enable-libvpx –enable-libschroedinger –disable-encoder=libschroedinger –enable-version3 –enable-libopenjpeg –enable-librtmp –enable-avfilter –enable-libfreetype –enable-libvo-aacenc –disable-decoder=amrnb –enable-libvo-amrwbenc –enable-libaacplus –libdir=/usr/lib/x86_64-linux-gnu –disable-vda –enable-libbluray –enable-libcdio –enable-gnutls –enable-frei0r –enable-openssl –enable-libass –enable-libopus –enable-fontconfig –enable-libpulse –disable-mips32r2 –disable-mipsdspr1 –dis  libavutil      52. 18.100 / 52. 18.100
  libavcodec     54. 92.100 / 54. 92.100
  libavformat    54. 63.104 / 54. 63.104
  libavdevice    54.  3.103 / 54.  3.103
  libavfilter     3. 42.103 /  3. 42.103
  libswscale      2.  2.100 /  2.  2.100
  libswresample   0. 17.102 /  0. 17.102
  libpostproc    52.  2.100 / 52.  2.100
[mp3 @ 0x66c900] max_analyze_duration 5000000 reached at 5015510 microseconds
Input #0, mp3, from 'track01.cdda.wav.mp3':
  Metadata:
    encoder         : Lavf54.63.104
  Duration: 00:00:23.22, start: 0.000000, bitrate: 128 kb/s
    Stream #0:0: Audio: mp3, 44100 Hz, stereo, s16p, 128 kb/s
File 'track01.cdda.wav.mp3.wav.mp3' already exists. Overwrite ? [y/N] y
Output #0, mp3, to 'track01.cdda.wav.mp3.wav.mp3':
  Metadata:
    TSSE            : Lavf54.63.104
    Stream #0:0: Audio: mp3, 44100 Hz, stereo, s16p
Stream mapping:
  Stream #0:0 -> #0:0 (mp3 -> libmp3lame)
Press [q] to stop, [?] for help
Trying to remove 1152 samples, but the queue is emptys    
size=     363kB time=00:00:23.24 bitrate= 128.1kbits/s    
video:0kB audio:363kB subtitle:0 global headers:0kB muxing overhead 0.058336%
ffmpeg version 1.2.12 Copyright (c) 2000-2015 the FFmpeg developers
  built on Feb 12 2015 18:03:16 with gcc 4.7 (Debian 4.7.2-5)
  configuration: –prefix=/usr –extra-cflags='-g -O2 -fstack-protector –param=ssp-buffer-size=4 -Wformat -Werror=format-security ' –extra-ldflags='-Wl,-z,relro' –cc='ccache cc' –enable-shared –enable-libmp3lame –enable-gpl –enable-nonfree –enable-libvorbis –enable-pthreads –enable-libfaac –enable-libxvid –enable-postproc –enable-x11grab –enable-libgsm –enable-libtheora –enable-libopencore-amrnb –enable-libopencore-amrwb –enable-libx264 –enable-libspeex –enable-nonfree –disable-stripping –enable-libvpx –enable-libschroedinger –disable-encoder=libschroedinger –enable-version3 –enable-libopenjpeg –enable-librtmp –enable-avfilter –enable-libfreetype –enable-libvo-aacenc –disable-decoder=amrnb –enable-libvo-amrwbenc –enable-libaacplus –libdir=/usr/lib/x86_64-linux-gnu –disable-vda –enable-libbluray –enable-libcdio –enable-gnutls –enable-frei0r –enable-openssl –enable-libass –enable-libopus –enable-fontconfig –enable-libpulse –disable-mips32r2 –disable-mipsdspr1 –dis  libavutil      52. 18.100 / 52. 18.100
  libavcodec     54. 92.100 / 54. 92.100
  libavformat    54. 63.104 / 54. 63.104
  libavdevice    54.  3.103 / 54.  3.103
  libavfilter     3. 42.103 /  3. 42.103
  libswscale      2.  2.100 /  2.  2.100
  libswresample   0. 17.102 /  0. 17.102
  libpostproc    52.  2.100 / 52.  2.100
[mp3 @ 0x66c900] max_analyze_duration 5000000 reached at 5015510 microseconds
Input #0, mp3, from 'track01.cdda.wav.mp3.wav.mp3':
  Metadata:
    encoder         : Lavf54.63.104
  Duration: 00:00:23.25, start: 0.000000, bitrate: 128 kb/s
    Stream #0:0: Audio: mp3, 44100 Hz, stereo, s16p, 128 kb/s
Output #0, mp3, to 'track01.cdda.wav.mp3.wav.mp3.wav.mp3':
  Metadata:
    TSSE            : Lavf54.63.104
    Stream #0:0: Audio: mp3, 44100 Hz, stereo, s16p
Stream mapping:
  Stream #0:0 -> #0:0 (mp3 -> libmp3lame)
Press [q] to stop, [?] for help
Trying to remove 1152 samples, but the queue is emptys    
size=     364kB time=00:00:23.27 bitrate= 128.1kbits/s    
video:0kB audio:364kB subtitle:0 global headers:0kB muxing overhead 0.058271%
ffmpeg version 1.2.12 Copyright (c) 2000-2015 the FFmpeg developers
  built on Feb 12 2015 18:03:16 with gcc 4.7 (Debian 4.7.2-5)
  configuration: –prefix=/usr –extra-cflags='-g -O2 -fstack-protector –param=ssp-buffer-size=4 -Wformat -Werror=format-security ' –extra-ldflags='-Wl,-z,relro' –cc='ccache cc' –enable-shared –enable-libmp3lame –enable-gpl –enable-nonfree –enable-libvorbis –enable-pthreads –enable-libfaac –enable-libxvid –enable-postproc –enable-x11grab –enable-libgsm –enable-libtheora –enable-libopencore-amrnb –enable-libopencore-amrwb –enable-libx264 –enable-libspeex –enable-nonfree –disable-stripping –enable-libvpx –enable-libschroedinger –disable-encoder=libschroedinger –enable-version3 –enable-libopenjpeg –enable-librtmp –enable-avfilter –enable-libfreetype –enable-libvo-aacenc –disable-decoder=amrnb –enable-libvo-amrwbenc –enable-libaacplus –libdir=/usr/lib/x86_64-linux-gnu –disable-vda –enable-libbluray –enable-libcdio –enable-gnutls –enable-frei0r –enable-openssl –enable-libass –enable-libopus –enable-fontconfig –enable-libpulse –disable-mips32r2 –disable-mipsdspr1 –dis  libavutil      52. 18.100 / 52. 18.100
  libavcodec     54. 92.100 / 54. 92.100
  libavformat    54. 63.104 / 54. 63.104
  libavdevice    54.  3.103 / 54.  3.103
  libavfilter     3. 42.103 /  3. 42.103
  libswscale      2.  2.100 /  2.  2.100
  libswresample   0. 17.102 /  0. 17.102
  libpostproc    52.  2.100 / 52.  2.100
[wav @ 0x66c900] max_analyze_duration 5000000 reached at 5015510 microseconds
Guessed Channel Layout for  Input Stream #0.0 : stereo
Input #0, wav, from 'track02.cdda.wav':
  Duration: 00:02:21.28, bitrate: 1411 kb/s
    Stream #0:0: Audio: pcm_s16le ([1][0][0][0] / 0x0001), 44100 Hz, stereo, s16, 1411 kb/s
Output #0, mp3, to 'track02.cdda.wav.wav.mp3':
  Metadata:
    TSSE            : Lavf54.63.104
    Stream #0:0: Audio: mp3, 44100 Hz, stereo, s16p
Stream mapping:
  Stream #0:0 -> #0:0 (pcm_s16le -> libmp3lame)
Press [q] to stop, [?] for help


Finally remove the old unneded .wav files and enjoy the mp3s with vlc / mplayer / mpg123 or whatever player you like.

hipo@noah:~/audiorip/cd1$  rm -f *.wav


Now mount the flash drive and copy th files into it.

# mkdir /media/usb-drive
# mount /dev/sdc1 /media/usb-drive/
# mkdir -p /media/usb-drive/cd1
# fdisk -l |grep -i sdc1

/dev/sdc1 on /media/usb-drive type vfat (rw,relatime,fmask=0022,dmask=0022,codepage=437,iocharset=utf8,shortname=mixed,errors=remount-ro

# cp -rpf ~/audiorip/cd1*.mp3 /mnt/usb-drive/cd1
# umount /dev/sdc1


2. RIPping audio CD on Linux with rip-audio-cds-linux.sh  script
 

#!/bin/bash
# A simple shell script to rip audio cd and create mp3 using lame
# and cdparanoia utilities.
# —————————————————————————-
# Written by Vivek Gite <http://www.cyberciti.biz/>
# (c) 2006 nixCraft under GNU GPL v2.0+
# —————————————————————————-
read -p "Starting in 5 seconds ( to abort press CTRL + C ) " -t 5
cdparanoia -B
for i in *.wav
do
    lame –vbr-new -b 360 "$i" "${i%%.cdda.wav}.mp3"
    rm -f "$i"
done


If you need to automate the task of dumping the audio CDs to WAV and convert them to MP3s you can do it via a small shell script like the one provided by cyberciti.biz that uses paranoia and lame commands in a shell script loop. Script rip-audio-cds-linux.sh is here

3. Dump Audio CD to MP3 with Graphical program ( ripperx ) 

By default most modern Linux distributions including the Debian GNU / Linux based ones has the ripperx in the default repositories, as well as the tool is downloadable and compilable from source from sourceforge.net 
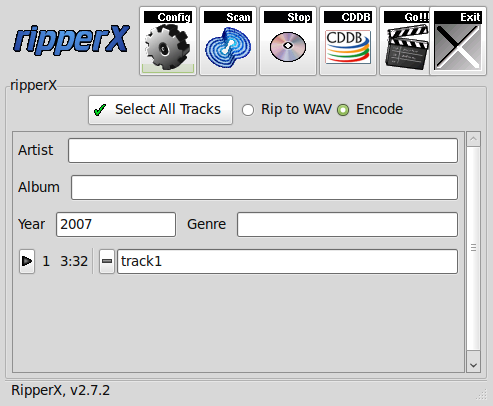
ripping-audio-cds-linux-graphical-program-ripperx-tool

# apt-cache show ripperx|grep -i descript -A3 -B3
Architecture: amd64
Depends: cdparanoia, vorbis-tools (>= 1.0beta3), libatk1.0-0 (>= 1.12.4), libc6 (>= 2.14), libcairo2 (>= 1.2.4), libfontconfig1 (>= 2.12.6), libfreetype6 (>= 2.2.1), libgcc1 (>= 1:3.0), libgdk-pixbuf2.0-0 (>= 2.22.0), libglib2.0-0 (>= 2.16.0), libgtk2.0-0 (>= 2.8.0), libpango-1.0-0 (>= 1.14.0), libpangocairo-1.0-0 (>= 1.14.0), libpangoft2-1.0-0 (>= 1.14.0), libstdc++6 (>= 5.2), libtag1v5 (>= 1.9.1-2.2~)
Suggests: sox, cdtool, mpg321, flac, toolame
Description-en: GTK-based audio CD ripper/encoder
 ripperX is a graphical interface for ripping CD audio tracks (using
 cdparanoia) and then encoding them into the Ogg, FLAC, or MP2/3
 formats using the vorbis tools, FLAC, toolame or other available
 MP3 encoders.
 .
 It includes support for CDDB lookups and ID3v2 tags.
Description-md5: cdeabf4ef72c33d57aecc4b4e2fd5952
Homepage: http://sourceforge.net/projects/ripperx/
Tag: hardware::storage, hardware::storage:cd, interface::graphical,
 interface::x11, role::program, scope::application, uitoolkit::gtk,

# apt install –yes ripperx
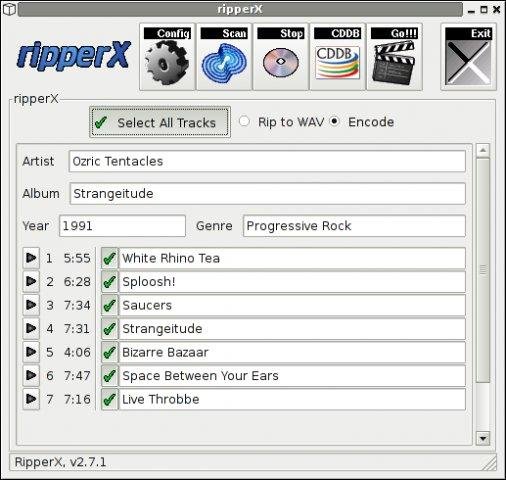

https://www.pc-freak.net/images/ripperx-linux-gui-rip-audio-cds-tool

That's all folks.
Enjoy !
How to do a port redirect to localhost service with socat or ncat commands to open temporary access to service not seen on the network

Friday, February 23rd, 2024

socat-simple-redirect-tcp-port-on-linux-bsd-logo

You know sometimes it is necessery to easily and temporary redirect network TCP ports to be able to be accessible from Internal DMZ-ed Network via some Local Network IP connection or if the computer system is Internet based and has an external "'real" Internet Class A / B address to be reachable directly from the internet via lets say a modern Internet browser such as Mozilla Firefox / Google Chrome Browser etc.

Such things are easy to be done with iptables if you need to do the IP redirect permanent with Firewall rule changes on Linux router with iptables.
One way to create a TCP port redirect using firewall would include few iptable rules  like for example:

1. Redirect port traffic from external TCP port source to internal one

# iptables -t nat -I PREROUTING -p tcp –dport 10000 -j REDIRECT –to-ports 80
# iptables -t nat -I OUTPUT -p tcp -o lo –dport 10000 -j REDIRECT –to-ports 80
# iptables -t nat -A OUTPUT -o lo -d 127.0.0.1 -p tcp –dport 80 -j DNAT  –to-destination 192.168.0.50:10000
# iptables -t nat -I OUTPUT –source 0/0 –destination 0/0 -p tcp –dport 80 -j REDIRECT –to-ports 10000


Then you will have 192.168.00.50:10000 listener (assuming that the IP is already configured on some of the host network interface, plugged in to the network).

 But as messing up with the firewall is not the best thing to do especially, if you need to just temporary redirect external listener port to a service configured on the server to only run on TCP port on loopback address 127.0.0.1, you can do it instead with another script or command for simplicy.

One simple way to do a port redirect on the fly on GNU / Linux or FreeBSD / OpenBSD is with socat command.

Lets say you have a running statistics of a web server Apache / Nginx / Haproxy frontend / backend statistics or whatever kind of web TCP service on port 80 on your server and this interface is on purpose configured to be reachable only on localhost interface port 80, so you can either access it by creating an ssh tunnel towards the service on 127.0.0.1 or by accessing it by redirecting the traffic towards another external TCP port, lets say 10000.

Here is how you can achieve

2. Redirect Local network accessible IP on all configured Server network interfaces port 10000 to 127.0.0.1 TCP 80 with socat

# socat tcp-l:10000,fork,reuseaddr tcp:127.0.0.1:80

If you need to access later the redirected port in a Browser, pick up the machine first configured IP and open it in a browser (assuming there is no firewall filter prohibiting access to redirected port).

root@pcfreak:~# ifconfig eth0
eth0: flags=4163<UP,BROADCAST,RUNNING,MULTICAST>  mtu 1500
        inet 109.104.212.130  netmask 255.255.255.0  broadcast 109.104.212.255
        ether 91:f8:51:03:75:e5  txqueuelen 1000  (Ethernet)
        RX packets 652945510  bytes 598369753019 (557.2 GiB)
        RX errors 0  dropped 10541  overruns 0  frame 0
        TX packets 619726615  bytes 630209829226 (586.9 GiB)
        TX errors 0  dropped 0 overruns 0  carrier 0  collisions 0

Then in a browser open http://102.104.212.130 or https://102.104.212.130 (depending on if remote service has SSL encryption enabled or not) and you're done, the configured listener Server service should pop-up on the screen.

3. Redirect IP Traffic from External IP to Localhost loopback interface with netcat ( ncat ) swiss army knife hackers and sysadmins tool

If you need to redirect lets say TCP / IP port 8000 to Port a server local binded service on TCP 80 with ncat, instead of socat (if lets say socat is not pre-installed on the machine), you can do it by simply running those two commands:

[root@server ~]# mkfifo svr1_to_svr2
[root@server ~]# ncat -vk -l 8000 < svr1_to_svr2 | ncat 127.0.0.1 80 > svr1_to_svr2
Ncat: Version 7.92 ( https://nmap.org/ncat )
Ncat: Listening on 0.0.0.0:10000
Ncat: Connection from 10.10.258.39.
Ncat: Connection from 10.10.258.39:51813.
Ncat: Connection from 10.10.258.39.
Ncat: Connection from 10.10.258.39:23179.


I you don't care to log what is going on the background of connection and you simply want to background the process with a one liner command you can achive that with:


[root@server /tmp]# cd tmp; mkfifo svr1_to_svr2; (ncat -vk -l 8000 < svr1_to_svr2 | ncat 127.0.0.1 80 > svr1_to_svr2 &)
 

Then you can open the Internal Machine Port 80 TCP service on 8000 in a browser as usual.

For those who want a bit of more sophisticated proxy like script I would suggest you take a look at using netcat and a few lines of shell script loop, that can simulate a raw and very primitive proxy with netcat this is exampled in my previous article Create simple proxy server with netcat ( nc ) based utility.

Hope this article is helpful to anyone, there is plenty of other ways to do a port redirect with lets say perl, python and perhaps other micro tools. If you know of one liners or small scripts, that do it please share in comments, so we can learn from each other ! 

Enjoy ! 🙂
 

Megaraid SAS software installation on CentOS Linux

Saturday, October 20th, 2012

With a standard el5 on a new Dell server, it may be necessary to install the Dell Raid driver, otherwise the OMSA always reports an error and hardware monitoring is therefore obsolete:

Previously, the megaraid_sys package was now called mptlinux

For this we need the following packages in advance:

# yum install gcc kernel-devel
Now the driver stuff:

# yum install dkms mptlinux
That should have built the new module, better test it:

# modinfo mptsas

# dkms status
After a kernel update it may be necessary to build the driver for the new version:

# dkms build -m mptlinux -v 4.00.38.02

# dkms install -m mptlinux -v 4.00.38.02

KVM Virtual Machine RHEL 8.3 Linux install on Redhat 8.3 Linux Hypervisor with custom tailored kickstart.cfg

Friday, January 22nd, 2021

kvm_virtualization-logo-redhat-8.3-install-howto-with-kickstart

If you don't have tried it yet Redhat and CentOS and other RPM based Linux operationg systems that use anaconda installer is generating a kickstart file after being installed under /root/{anaconda-ks.cfg,initial-setup- ks.cfg,original-ks.cfg} immediately after the OS installation completes. Using this Kickstart file template you can automate installation of Redhat installation with exactly the same configuration as many times as you like by directly loading your /root/original-ks.cfg file in RHEL installer.

Here is the official description of Kickstart files from Redhat:

"The Red Hat Enterprise Linux installation process automatically writes a Kickstart file that contains the settings for the installed system. This file is always saved as /root/anaconda-ks.cfg. You may use this file to repeat the installation with identical settings, or modify copies to specify settings for other systems."


Kickstart files contain answers to all questions normally asked by the text / graphical installation program, such as what time zone you want the system to use, how the drives should be partitioned, or which packages should be installed. Providing a prepared Kickstart file when the installation begins therefore allows you to perform the installation automatically, without need for any intervention from the user. This is especially useful when deploying Redhat based distro (RHEL / CentOS / Fedora …) on a large number of systems at once and in general pretty useful if you're into the field of so called "DevOps" system administration and you need to provision a certain set of OS to a multitude of physical servers or create or recreate easily virtual machines with a certain set of configuration.
 

1. Create /vmprivate storage directory where Virtual machines will reside

First step on the Hypervisor host which will hold the future created virtual machines is to create location where it will be created:

[root@redhat ~]#  lvcreate –size 140G –name vmprivate vg00
[root@redhat ~]#  mkfs.ext4 -j -b 4096 /dev/mapper/vg00-vmprivate
[root@redhat ~]# mount /dev/mapper/vg00-vmprivate /vmprivate

To view what is the situation with Logical Volumes and  VG group names:

[root@redhat ~]# vgdisplay -v|grep -i vmprivate -A7 -B7
  Segments               1
  Allocation             inherit
  Read ahead sectors     auto
  – currently set to     8192
  Block device           253:0


  — Logical volume —
  LV Path                /dev/vg00/vmprivate
  LV Name                vmprivate
  VG Name                vg00
  LV UUID                VVUgsf-FXq2-TsMJ-QPLw-7lGb-Dq5m-3J9XJJ
  LV Write Access        read/write
  LV Creation host, time main.hostname.com, 2021-01-20 17:26:11 +0100
  LV Status              available
  # open                 1
  LV Size                150.00 GiB


Note that you'll need to have the size physically available on a SAS / SSD Hard Drive physically connected to Hypervisor Host.

To make the changes Virtual Machines storage location directory permanently mounted add to /etc/fstab

/dev/mapper/vg00-vmprivate  /vmprivate              ext4    defaults,nodev,nosuid 1 2

[root@redhat ~]# echo '/dev/mapper/vg00-vmprivate  /vmprivate              ext4    defaults,nodev,nosuid 1 2' >> /etc/fstab


2. Second we need to install the following set of RPM packages on the Hypervisor Hardware host

[root@redhat ~]# yum install qemu-kvm qemu-img libvirt virt-install libvirt-client virt-manager libguestfs-tools virt-install virt-top -y

3. Enable libvirtd on the host

[root@redhat ~]#  lsmod | grep -i kvm
[root@redhat ~]#  systemctl enable libvirtd

4. Configure network bridging br0 interface on Hypervisor


In /etc/sysconfig/network-scripts/ifcfg-eth0 you need to include:

NM_CONTROLED=NO

Next use nmcli redhat configurator to create the bridge (you can use ip command instead) but since the tool is the redhat way to do it lets do it their way ..

[root@redhat ~]# nmcli connection delete eno3
[root@redhat ~]# nmcli connection add type bridge autoconnect yes con-name br0 ifname br0
[root@redhat ~]# nmcli connection modify br0 ipv4.addresses 10.80.51.16/26 ipv4.method manual
[root@redhat ~]# nmcli connection modify br0 ipv4.gateway 10.80.51.1
[root@redhat ~]# nmcli connection modify br0 ipv4.dns 172.20.88.2
[root@redhat ~]# nmcli connection add type bridge-slave autoconnect yes con-name eno3 ifname eno3 master br0
[root@redhat ~]# nmcli connection up br0

5. Prepare a working kickstart.cfg file for VM


Below is a sample kickstart file I've used to build a working fully functional Virtual Machine with Red Hat Enterprise Linux 8.3 (Ootpa) .

#version=RHEL8
#install
# Run the Setup Agent on first boot
firstboot --enable
ignoredisk --only-use=vda
# Use network installation
#url --url=http://hostname.com/rhel/8/BaseOS
##url --url=http://171.23.8.65/rhel/8/os/BaseOS
# Use text mode install
text
#graphical
# System language
#lang en_US.UTF-8
keyboard --vckeymap=us --xlayouts='us'
# Keyboard layouts
##keyboard us
lang en_US.UTF-8
# Root password
rootpw $6$gTiUCif4$YdKxeewgwYCLS4uRc/XOeKSitvDJNHFycxWVHi.RYGkgKctTMCAiY2TErua5Yh7flw2lUijooOClQQhlbstZ81 --iscrypted
# network-stuff
# place ip=your_VM_IP, netmask, gateway, nameserver hostname 
network --bootproto=static --ip=10.80.21.19 --netmask=255.255.255.192 --gateway=10.80.21.1 --nameserver=172.30.85.2 --device=eth0 --noipv6 --hostname=FQDN.VMhost.com --onboot=yes
# if you need just localhost initially configured uncomment and comment above
##network В --device=lo --hostname=localhost.localdomain
# System authorization information
authconfig --enableshadow --passalgo=sha512 --enablefingerprint
# skipx
skipx
# Firewall configuration
firewall --disabled
# System timezone
timezone Europe/Berlin
# Clear the Master Boot Record
##zerombr
# Repositories
## Add RPM repositories from KS file if necessery
#repo --name=appstream --baseurl=http://hostname.com/rhel/8/AppStream
#repo --name=baseos --baseurl=http://hostname.com/rhel/8/BaseOS
#repo --name=inst.stage2 --baseurl=http://hostname.com ff=/dev/vg0/vmprivate
##repo --name=rhsm-baseos В  В --baseurl=http://172.54.8.65/rhel/8/rhsm/x86_64/BaseOS/
##repo --name=rhsm-appstream --baseurl=http://172.54.8.65/rhel/8/rhsm/x86_64/AppStream/
##repo --name=os-baseos В  В  В --baseurl=http://172.54.9.65/rhel/8/os/BaseOS/
##repo --name=os-appstream В  --baseurl=http://172.54.8.65/rhel/8/os/AppStream/
#repo --name=inst.stage2 --baseurl=http://172.54.8.65/rhel/8/BaseOS
# Disk partitioning information set proper disk sizing
##bootloader --location=mbr --boot-drive=vda
bootloader --append=" crashkernel=auto tsc=reliable divider=10 plymouth.enable=0 console=ttyS0 " --location=mbr --boot-drive=vda
# partition plan
zerombr
clearpart --all --drives=vda --initlabel
part /boot --size=1024 --fstype=ext4 --asprimary
part swap --size=1024
part pv.01 --size=30000 --grow --ondisk=vda
##part pv.0 --size=80000 --fstype=lvmpv
#part pv.0 --size=61440 --fstype=lvmpv
volgroup s pv.01
logvol / --vgname=s --size=15360 --name=root --fstype=ext4
logvol /var/cache/ --vgname=s --size=5120 --name=cache --fstype=ext4 --fsoptions="defaults,nodev,nosuid"
logvol /var/log --vgname=s --size=7680 --name=log --fstype=ext4 --fsoptions="defaults,nodev,noexec,nosuid"
logvol /tmp --vgname=s --size=5120 --name=tmp --fstype=ext4 --fsoptions="defaults,nodev,nosuid"
logvol /home --vgname=s --size=5120 --name=home --fstype=ext4 --fsoptions="defaults,nodev,nosuid"
logvol /opt --vgname=s --size=2048 --name=opt --fstype=ext4 --fsoptions="defaults,nodev,nosuid"
logvol /var/log/audit --vgname=s --size=3072 --name=audit --fstype=ext4 --fsoptions="defaults,nodev,nosuid"
logvol /var/spool --vgname=s --size=2048 --name=spool --fstype=ext4 --fsoptions="defaults,nodev,nosuid"
logvol /var --vgname=s --size=7680 --name=var --fstype=ext4 --fsoptions="defaults,nodev,nosuid"
# SELinux configuration
selinux --disabled
# Installation logging level
logging --level=debug
# reboot automatically
reboot
###
%packages
@standard
python3
pam_ssh_agent_auth
-nmap-ncat
#-plymouth
#-bpftool
-cockpit
#-cryptsetup
-usbutils
#-kmod-kvdo
#-ledmon
#-libstoragemgmt
#-lvm2
#-mdadm
-rsync
#-smartmontools
-sos
-subscription-manager-cockpit
# Tune Linux vm.dirty_background_bytes (IMAGE-439)
# The following tuning causes dirty data to begin to be background flushed at
# 100 Mbytes, so that it writes earlier and more often to avoid a large build
# up and improving overall throughput.
echo "vm.dirty_background_bytes=100000000" >> /etc/sysctl.conf
# Disable kdump
systemctl disable kdump.service
%end

Important note to make here is the MD5 set root password string in (rootpw) line this string can be generated with openssl or mkpasswd commands :

Method 1: use openssl cmd to generate (md5, sha256, sha512) encrypted pass string

[root@redhat ~]# openssl passwd -6 -salt xyz test
$6$xyz$rjarwc/BNZWcH6B31aAXWo1942.i7rCX5AT/oxALL5gCznYVGKh6nycQVZiHDVbnbu0BsQyPfBgqYveKcCgOE0

Note: passing -1 will generate an MD5 password, -5 a SHA256 encryption and -6 SHA512 encrypted string (logically recommended for better security)

Method 2: (md5, sha256, sha512)

[root@redhat ~]# mkpasswd –method=SHA-512 –stdin

The option –method accepts md5, sha-256 and sha-512
Theoretically there is also a kickstart file generator web interface on Redhat's site here however I never used it myself but instead use above kickstart.cfg
 

6. Install the new VM with virt-install cmd


Roll the new preconfigured VM based on above ks template file use some kind of one liner command line  like below:
 

[root@redhat ~]# virt-install -n RHEL8_3-VirtualMachine –description "CentOS 8.3 Virtual Machine" –os-type=Linux –os-variant=rhel8.3 –ram=8192 –vcpus=8 –location=/vmprivate/rhel-server-8.3-x86_64-dvd.iso –disk path=/vmprivate/RHEL8_3-VirtualMachine.img,bus=virtio,size=70 –graphics none –initrd-inject=/root/kickstart.cfg –extra-args "console=ttyS0 ks=file:/kickstart.cfg"

7. Use a tiny shell script to automate VM creation


For some clarity and better automation in case you plan to repeat VM creation you can prepare a tiny bash shell script:
 

#!/bin/sh
KS_FILE='kickstart.cfg';
VM_NAME='RHEL8_3-VirtualMachine';
VM_DESCR='CentOS 8.3 Virtual Machine';
RAM='8192';
CPUS='8';
# size is in Gigabytes
VM_IMG_SIZE='140';
ISO_LOCATION='/vmprivate/rhel-server-8.3-x86_64-dvd.iso';
VM_IMG_FILE_LOC='/vmprivate/RHEL8_3-VirtualMachine.img';

virt-install -n "$VMNAME" –description "$VM_DESCR" –os-type=Linux –os-variant=rhel8.3 –ram=8192 –vcpus=8 –location="$ISO_LOCATION" –disk path=$VM_IMG_FILE,bus=virtio,size=$IMG_VM_SIZE –graphics none –initrd-inject=/root/$KS_FILE –extra-args "console=ttyS0 ks=file:/$KS_FILE"


A copy of virt-install.sh script can be downloaded here

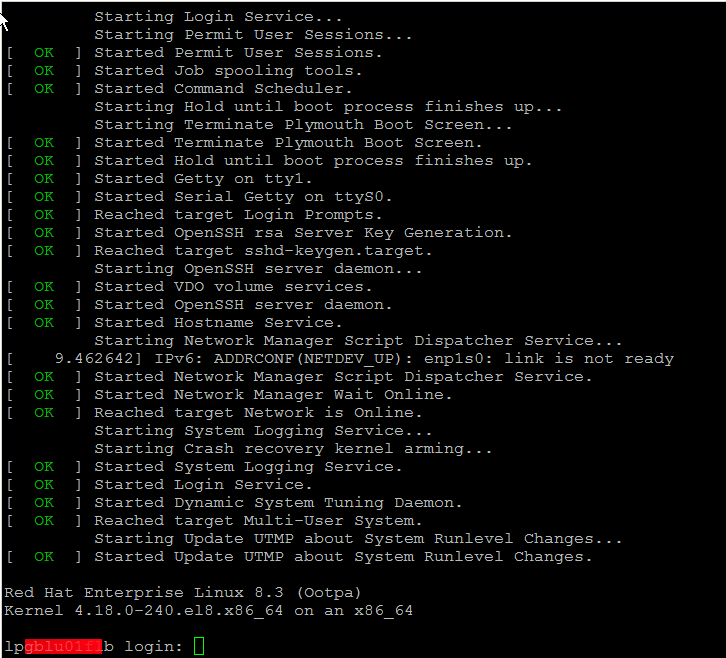
Wait for the installation to finish it should be visualized and if all installation is smooth you should get a login prompt use the password generated with openssl tool and test to login, then disconnect from the machine by pressing CTRL + ] and try to login via TTY with

[root@redhat ~]# virst list –all
 Id   Name        State
—————————
 2    
RHEL8_3-VirtualMachine   running

[root@redhat ~]#  virsh console RHEL8_3-VirtualMachine


redhat8-login-prompt

One last thing I recommend you check the official documentation on Kickstart2 from CentOS official website

In case if you later need to destroy the VM and the respective created Image file you can do it with:
 

[root@redhat ~]#  virsh destroy RHEL8_3-VirtualMachine
[root@redhat ~]#  virsh undefine RHEL8_3-VirtualMachine

Don't forget to celebreate the success and give this nice article a credit by sharing this nice tutorial with a friend or by placing a link to it from your blog 🙂


Enjoy !

OpenVZ enable or disable auto start on Linux Hypervisor host boot for Virtual Machine containers

Wednesday, July 7th, 2021

howto-add-virtual-machine-to-auto-start-with-vz-openvz-linux-containers-4-logo-slogan-vertical-big

To make OpenVZ / Virtuozzo Hypervisor servers and you are not sure whether your configured container virtual machines are configured to automatically boot on Linux Physical OS host boot in case of restart after patch update set or after unexpected shutdown due to Kernel / OS bug a hang or due to some electricity Power outage.

To check what is your current configuration for Virtual Environment on CentOS Linux you need to check inside /etc/sysconfig/vz-scripts/VEID.conf
You need to check the value for inside the file

ONBOOT="" 

To get the exact ID of "VEID.conf of the current openvz guest VM containers exec:

[root@openvz vz-scripts]# vzlist -a
      CTID      NPROC STATUS    IP_ADDR         HOSTNAME
       300         23 running   10.10.10.1     VirtualMachine1
       301         25 running   10.10.10.2     VirtualMachine2

[root@openvz ~]# cd /etc/sysconfig/vz-scripts
[root@gbapp2 vz-scripts]# pwd
/etc/sysconfig/vz-scripts

[root@openvz vz-scripts]# grep -i ONBOOT 300.conf 301.conf
300.conf:ONBOOT="yes"
301.conf:ONBOOT="yes"

If you happen to have configured ONBOOT="no" you will need to the change to respective VEID.conf:

vi /etc/sysconfig/vz-scripts/VEID.conf

search for

ONBOOT=”no”

and change to

ONBOOT=”yes”

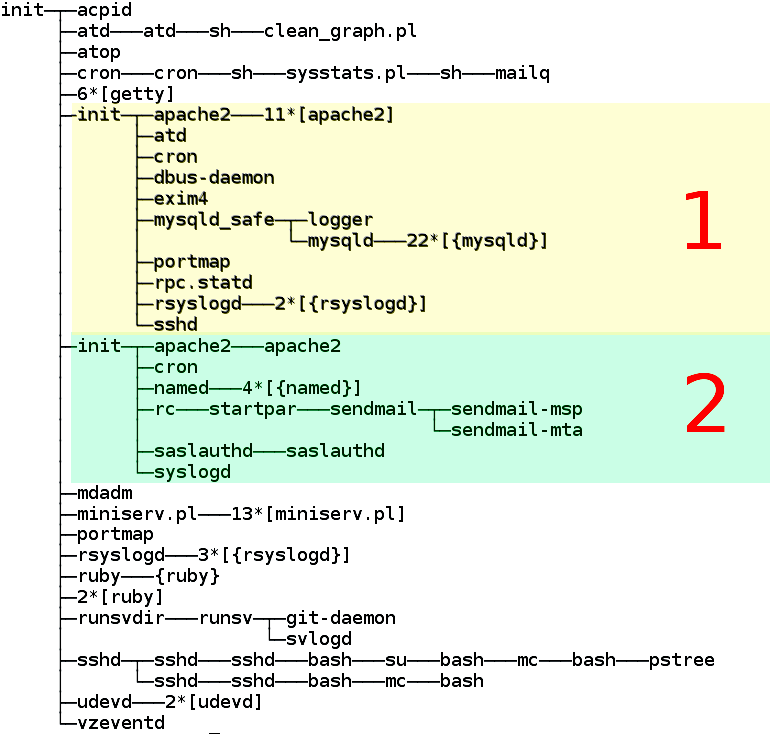
OpenVZ_virtuozzo-standard-process-tree-landscape

OpenVZ server process tree. The colors of the virtual severs are indicated by colors.

OpenVZ Quick cheat sheet commands

This change will auto-start the VPS container next time the host Hypervisor node is rebooted.
If you happen to have daily work with OpenVZ legacy systems like I do you might find also useful the following OpenVZ Cheatsheet pdf document.

A miniature quick cheatsheet for OpenVZ Virtualion, in case if you are like me and you have to use various virtualization technologies and tend to forget is as below:

vzlist                               # List running instances
vzlist -a                            # List all instances


vzctl stop <instance>
vzctl start <instance>
vzctl status <instance>

vzctl exec <instance> <command>      # Run a command

vzctl enter <instance>               # Get console

vzyum <instance> install <package>   # Install a package


# Change properties
vzctl set <instance> –hostname <hostname> –save
vzctl set <instance> –ipadd <IP> –save
vzctl set <instance> –userpasswd root:<password> –save

If need to get more insight on how OpenVZ Virtualization does work on a low level and stretch out its possibilities, an old but useful document you might want to check is OpenVZ-Users-Guide PDF.


If you need it to hava e copy of it openvz_cheat_sheet.txt.

Configure rsyslog buffering on Linux to avoid message lost to Central Logging server

Wednesday, January 13th, 2021

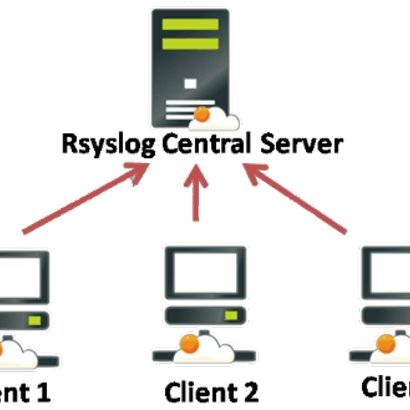
rsyslog-Centralized-Logging-System-using-Rsyslog_logo

1. Rsyslog Buffering

One of the best practice about logs management is to send syslog to a central server. However, a logging system should be capable of avoiding message loss in situations where the server is not reachable. To do so, unsent data needs to be buffered at the client when central server is not available. You might have recently noticed that many servers forwarding logs messages to a central server do not have buffering functionalities activated. Thus I strongly advise you to have look to this documentation to know how to check your configuration: http://www.rsyslog.com/doc/rsyslog_reliable_forwarding.html

Rsyslog buffering with TCP/UDP configured

In rsyslog, every action runs on its own queue and each queue can be set to buffer data if the action is not ready. Of course, you must be able to detect that "the action is not ready", which means the remote server is offline. This can be detected with plain TCP syslog and RELP, but not with UDP. So you need to use either of the two. In this howto, we use plain TCP syslog.

– Version requirement

Please note that we are using rsyslog-specific features. The are required on the client, but not on the server. So the client system must run rsyslog (at least version 3.12.0), while on the server another syslogd may be running, as long as it supports plain tcp syslog.

How To Setup rsyslog buffering on Linux

First, you need to create a working directory for rsyslog. This is where it stores its queue files (should need arise). You may use any location on your local system. Next, you need to do is instruct rsyslog to use a disk queue and then configure your action. There is nothing else to do. With the following simple config file, you forward anything you receive to a remote server and have buffering applied automatically when it goes down. This must be done on the client machine.

# Example:
# $ModLoad imuxsock             # local message reception
# $WorkDirectory /rsyslog/work  # default location for work (spool) files
# $ActionQueueType LinkedList   # use asynchronous processing
# $ActionQueueFileName srvrfwd  # set file name, also enables disk mode
# $ActionResumeRetryCount -1    # infinite retries on insert failure
# $ActionQueueSaveOnShutdown on # save in-memory data if rsyslog shuts down
# *.*       @@server:port

Start Stop Restart Microsoft IIS Webserver from command line and GUI

Thursday, April 17th, 2014

start-stop-restart-microsoft-iis-howto-iis-server-logo
For a decomissioning project just recently I had the task to stop Microsoft IIS  on Windows Server system.
If you have been into security for a while you know well how many vulnerabilities Microsoft (Internet Information Server) Webserver used to be. Nowadays things with IIS are better but anyways it is better not to use it if possible …

Nomatter what the rason if you need to make IIS stop serving web pages here is how to do it via command line:

At Windows Command Prompt, type:

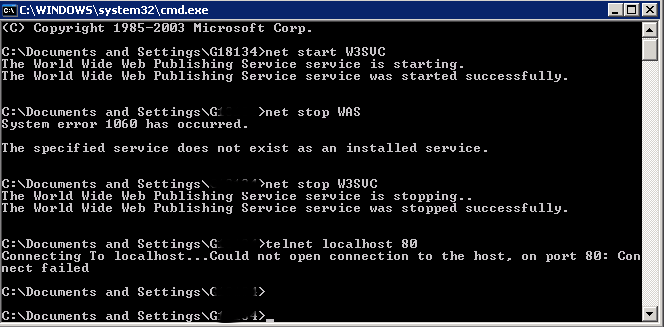
net stop WAS

If the command returns error message to stop it type:

net stop W3SVC

stop-microsoft-IIS-webservice
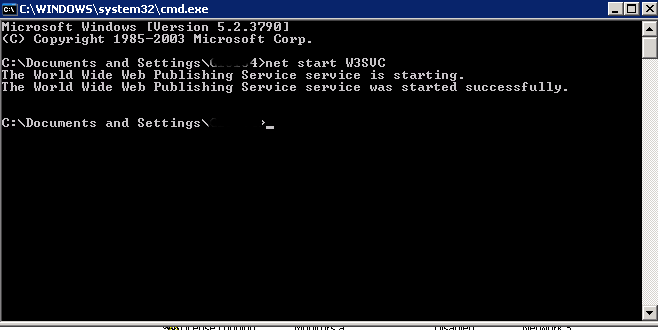
Just in case you have to start it again run:

net start W3SVC

start-restart-IIS-webserver-screenshot

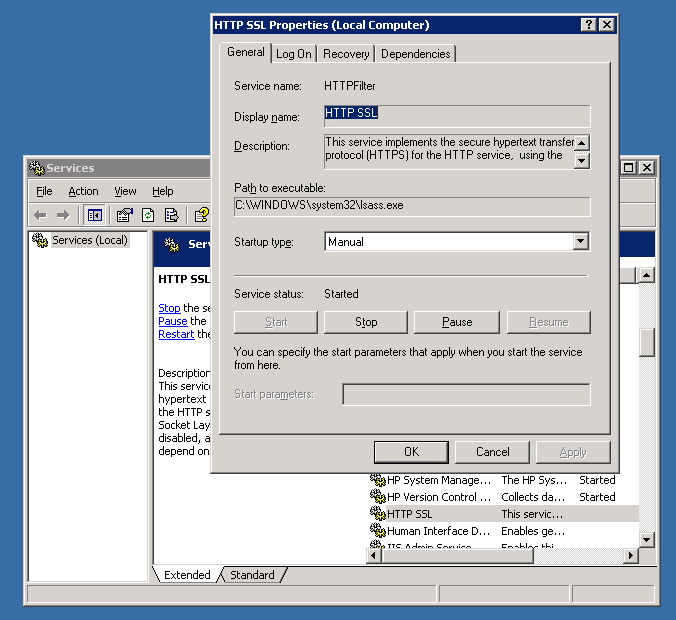
For those who prefer to do it from GUI interface, launch services.msc command from Windows Run:

> services.msc

services-msc-stop-microsoft-iis-webserver

In list of services lookup for
IIS Admin Service and HTTP SSL
a) (Click over it with right mouse button -> Properties)
b) Set Startup type to Manual
c) Click Stop Button

You're done now IIS is stopped to make sure it is stopped you can run from cmd.exe:

telnet localhost 80

when not working you should get 'Could not open connection to the host. on port 80: Connection failed' like shown up in screenshot.

How to convert .CRT SSL Certificate to .PFX format (with openssl Linux command) and Import newly generated .PFX to Windows IIS Webserver

Tuesday, September 27th, 2016

IIS8_Windows_Webserver_logo_convert_CRT_and_import_PFX-certificate

1. Converting to .CRT to.PFX file format with OpenSSL tool on GNU / Linux to import in Windows (for example, IIS)

Assuming you have generated already a certificate using the openssl Linux command and you have issued the .CRT SSL Certificate issuer file
and you need to have the new .CRT SSL Certificate installed on Windows Server (lets say on Windows 2012) with IIS Webserver version 8.5, you will need a way to convert the .CRT file to .PFX, there is plenty of ways to do that including using online Web Site SSL Certificate converter or use a stand alone program on the Windows server or even use a simple perl / python / ruby script to do the conversion but anyways the best approach will be to convert the new .CRT file to IIS supported binary Certificate format .PFX on the same (Linux certificate issuer host where you have first generated the certificate issuer request .KEY (private key file used with third party certificate issuer such as Godaddy or Hostgator to receive the .CRT / PEM file).

Here is how to generate the .PFX file based on the .CRT file for an Internal SSL Certfiicate:


openssl pkcs12 -export -in server.crt -inkey server.key -out server.pfx

On the password prompt to appear use any password because otherwise the future IIS Webserver certificate import will not work.
 

To do a certificate chain SSL export to be accessed from the  internet.


openssl pkcs12 -export -in server.crt -inkey server.key -out server.pfx -certfile internet v2.crt

2. Import the PFX file in Windows


Run: mmc, add snap, Certificates, Computer account, Local Computer; in the
Console:

Certificates (Local Computer) > Personal > Certificates: Select All Tasks > Import File

Enter previously chosen password.
You should get further the Message "Import was successful."

You can import the PFX file by simply copying it to the server where you want it imported and double click it this will  open Windows Importwizzard.

Then select the IIS:


Site, Properties, Directory Security, Server Certificate, Replace the current certficate, select proper Certificate. Done.

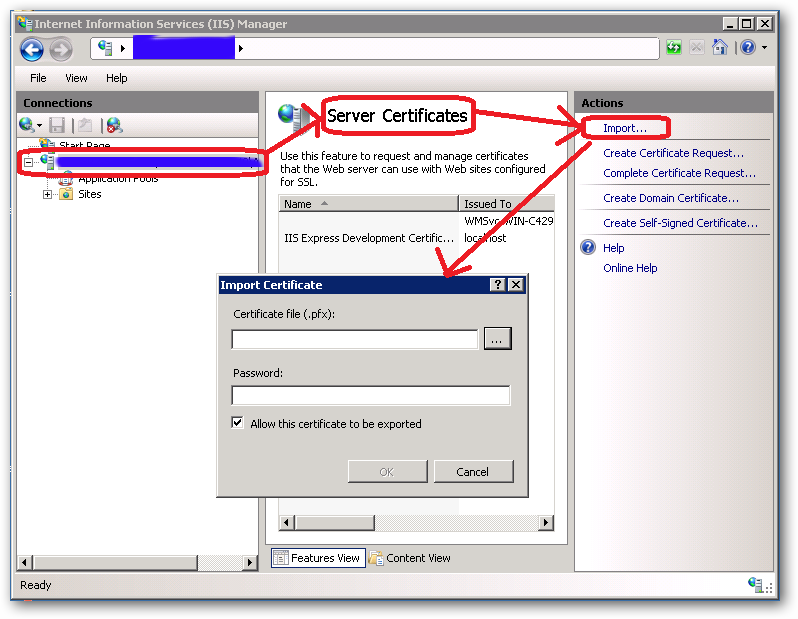
Alternatively to complete the IIS Webserver certificate import within one step when a new certificate is to be imported:

In IIS Manager interface go to :

Site, Properties, Directory Security, Server Certificate, Server Certificate Wizard


Click on

Next

Choose

import a certificate from a .pfx file, select and enter password.

Internet_Information_Server_IIS_Windows-SSL_Certificate-import-PKF-file

3. Import the PFX file into a Java keystore


Another thing you might need if you have the IIS Webserver using a backend Java Virtual Machine on the same or a different Windows server is to import the newly generated .PFX file within the Java VM keystore.

To import with keytool command for Java 1.6 type:


keytool -importkeystore -deststorepass your_pass_here -destkeypass changeit -destkeystore keystore.jks -srckeystore server.pfx -srcstoretype PKCS12 -srcstorepass 1234 -srcalias 1 -destalias xyz


Also the .CRT file could be directly imported into the Java keystore


Import a .crt in a Java keystore


/usr/java/jre/bin/keytool -import -keystore /webdienste/java/jdk/jre/lib/security/cacerts -file certificate.crt -alias Some alias


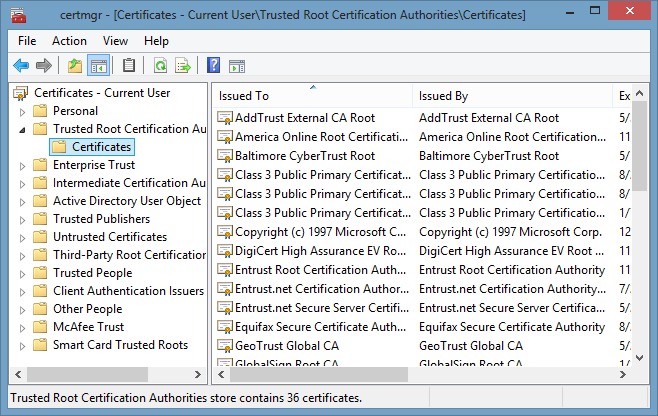
4. Get a list of Windows locally installed certificates

To manager installed certificates on Windows 7 / 8 / 2012 Server OS is to run command via

Start -> Run


certmgr.msc

certmgr_trca_windows_check-windows-installed-ssl-certificates


One other way to see the installed certificates on your Windows server is checking within

Internet Explorer

Go to Tools (Alt+X) → Internet Options → Content → Certificates.


To get a a complete list of installed Certificate Chain on Windows you can use PowerShell


Get-ChildItem -Recurse Cert:


That's all folks ! 🙂


Minsk Monastery trip to saint Elizabeth’s Nun Convent – Spiritual realms of Belarus

Monday, April 7th, 2014

st_Elizabeth_Romanova-monastery-Church
If you happen to be in Belarus's capital Minsk and you're a Christian you would definitely will be interested to see the spiritual side of Belarus. I was in Minsk with my wife for a month and had the chance to go for a pilgrimage in st. Elisaberth's Orthodox Christian Convent.

In Belarus about 80% of population of population are Orthodox Christians with about 7% Catholics, some 4% protestants and 9% atheists. I'm Orthodox Christian myself so mostly I kept interest in exoeriencing Orthodox religion life there. The religious life in Belarus so deeply impressed me so I decided to even document it here.

I was in a couple of Orthodox Churches during the Great Lent first week attending afternoon (Great) Repentence services canon of St. Andrew of Crete. And was amazed how many people are religious in this God fearful country. All Churches where I was during the Great Canon or Holy Liturgy was so full of people that you cannot even enter the Church if you're late for the service. People attending were also very concentrated on the service and most of the people came to services bringing most of which holding a book with the Great Repentance Canon following the service and concentrated in praying and doing ground prostrations. One thing to note is Belarusian Orthodox Church is a sub-division of Russian Orthodox Church (ROC), Belarusian doesn't have their own patriarch but are under the patriarchy of Russian and all Moscow patriarch – Kiril I.

Few weeks ago for Sunday of All Orthodoxy (Triumph of All orthodoxy) for Holy Liturgy service me and Svetlana with a close friend of her Tatyiana went to St. Elisabeth's Monastery. 
Monastery is named in honour of St. Elizabeth Feodorovna Romanova – which is the last Russian Grand Princess of the Romanov family later executed with her husband and kids by Communists Bolsheviks, canonized by ROC in the 1990s.

Saint_Elizabeth_holy_orthodox_icon_monastery_Minskst_Elizabeth_Romanova-monastery-Church

The monastery as almost all Churches in Belarus is so full of people you cannot move (it seems in Russian Orthodox Church – there is an amazing spiritual awakening at the moment). I wanted to confess and even though I was in the Church building before beginning of the holy liturgy and there were two priests to confess the queue of people to confess was so long that confession lasted until the end of the Holy Liturgy. In order to able to confess I've waited on the "confession queue" for about 2 hours and a half. Even though Holy Liturgy completed confession continued and those who confessed after the Church service end was also offered the Holy Sacraments. Another stunning thing for me was the amount of young and obviously intelligent people who was in the Church – just to compare here in Bulgaria, seeing young people in most Churches and monasteries is a rare thing ..

Saint Elisabeth's Monastery is the only monastery situated in (very near 19 km away) from MINSK on Vigotskogo 6 str. We reached the monastery by taking bus from regular Minsktrans (state's bus company) city bus nr. 26, other bus and trolley riding there are – bus 18 and trolley 33, 38, 55.
Monastery was established in 1990 after dissolvement of USSR and is situatuated on a place where previously there was no church or a monastery. The SisterHood in monastery is enormous by size and consists nowadays of 7 Churches!!!

St_Elizabeth_Monastery_Monastery_Minsk-picture

The main Church of the Monastery has saint relics from all around the known Orthodox Walls, to venerate all the saint relics you will need at least 20 minutes!! The Holy Relics of the monastery are so much that they remind me very much of Monasteries I've seen on Holy Mounth Athos. The spiritual father of the monastery is father Andreya Lemoshonka.

father-Andreya-Lemeshonka-spiritual-father-of-st-Elizabeth-monastery-Minsk


From ruromrs the sisterhood in monastery consists of about 120 sisters (and even maybe more), some of them are Nuns and others are the so called "Sisters of Mercy" (something like the "White Sisters" moveing in the Roman Catholic Church) – woman who deliberately decided to help the monastery often walking the streets shops and metro stations collecting charity for poor, sick and people in need. Sisters of mercy are something exception and seeing a lady dressed in white robes on the street or metro with a prayer book at hand is something rare to see in today's crazy materialistic world. Some of this kind sisters of mercy are novice nuns in the monastery and others are just worldly woman with family whom the monastery employes on a small renumeration.

Minsk-sister-of-mercy-sestri-miloserdie-Belarus

The cloister is a unique place next to the majestic Church buildings, the monastery has a coffeteria where you can have a coffee / snacks or even a dinner after service, there is a Church shops full of icon and all kind of orthodox spiritual literature,a Christian games for kids (Orthodox Lotto, kids collapsible Churches from cardboards) as well as a food store with fasting and non-fasting food and even a shop for Christian clothing "Православная Одежда". 

orthodox-clothes-shop

Orthodox Clothes Shop near St. Elizabeth's monastery Minsk

st_Elizabeth-monastery_minsk-medovaja_lavka

A Honey Store – St. Elizabeth Monastery Belarus

st_elizabeth_monastery-food-store

Orthodox Foodstore near St. Elizabeth Monastery Misnk

In one of the Churches there is a 3 floor tiny shop first floor sell icons, books and faith related things, monastic souvenirs and on the second floor there is a herbal pharmacy  with healing herbs for almost all kind of physical and nervological disorders etc. Part of monastic life is the evening and morning service which occur everyday in the monastery. The spiritual father of a monastery Andreya Lemoshonka who is a married priest is also leading frequent lectures on faith and is often helping people coming to him for a spiritual advice, a problem or question related to faith. The Nuns are fasting each Monday, Wednesday and Friday – fasting also in Mondays even though this fasting day was only observed in ancient Church and in many Orthodox monasteries, Monday fastings (In veneration of Angels) is no longer observed – i.e. sisterhood life is very strict. Near the monastery is situated a Mental Hospital and one of the duties of nuns is to often visit the mentally sick there. The sisterhood helps orphanage homes and is bringing for Holy sacraments often a lot of sick children.

st_elizabeth-monastery-minsk1

Part of monastery service is sheltering the homeless, alcoholics and drug addicts offering them encouragement and work in the small monastic farm. The monastery has also workshops where people with disability work in making gloves, icons, decorations, souvenirs embroided by hand. Near the monastery there is a wooden shop where one can order all kind of custom crafted wooden wardrobes, chairs or anything wooden you like for your home.

What I saw there make my heart joyful. It seems Minsk Monastery achieved something which is rarely seen in Orthodox world a symbiosis between Faith, charity and a monetary funding model that works
The monastery very much reminded me to an Orthodox movie Forpost and to the Godly initiate in Bulgaria by father Ioan of Novi Khan who by his efforts, Gods help and the charity of hundreds of bulgarian takes care for about 150 homeless orphans in a monastery.


'Forpost' (Outpost) – What the Church Can Accomplish. 

As a closure word I want say Thanks and Glory be to the Holy Trinity The Father, The Son and the Holy Spirit! for blessing me to the pilgrimage journet to St. Elizabeth's monastery!

Howto create Linux Music Audio CD from MP3 files / Create playable WAV format Audio CD Albums from MP3s

Tuesday, July 16th, 2019

cdburning-audio-music-cd-from-mp3-on-linuxcomapct-disc-tux-linux-logo

Recently my Mother asked me to prepare a Music Audio CD for her from a popular musician accordionist Stefan Georgiev from Dobrudja who has a unique folklore Bulgarian music.

As some of older people who still remember the age of the CD and who had most likely been into the CD burning Copy / Piracy business so popular in the countries of the ex-USSR so popular in the years 1995-2000 audio ,  Old CD Player Devices were not able to play the MP3 file format due to missing codecs (as MP3 was a proprietary compression that can't be installed on every device without paying the patent to the MP3 compression rights holder.

The revolutionary MP3 compression used to be booming standard for transferring Music data due to its high compression which made an ordinary MP3 of 5 minutes of 5MB (10+ times more compression than an ordinary classic WAV Audio the CPU intensiveness of MP3 files that puts on the reading device, requiring the CD Player to have a more powerful CPU.

Hence  due to high licensing cost and requirement for more powerful CPU enabled Audio Player many procuders of Audio Players never introduced MP3 to their devices and MP3 Neve become a standard for the Audio CD that was the standard for music listening inside almost every car out there.

Nowdays it is very rare need to create a Audio CD as audio CDs seems to be almost dead (As I heard from a Richard Stallman lecture In USA nowadays there is only 1 shop in the country where you can still buy CD or DVD drives) and only in third world as Africa Audio CDs perhaps are still in circulation.

Nomatter that as we have an old Stereo CD player on my village and perhaps many others, still have some old retired CD reading devices being able to burn out a CD is a useful thing.

Thus to make mother happy and as a learning excercise, I decided to prepare the CD for her on my Linux notebook.
Here I'll shortly describe the takes I took to make it happen which hopefully will be useful for other people that need to Convert and burn Audio CD from MP3 Album.


1. First I downloaded the Album in Mp3 format from Torrent tracker

My homeland Bulgaria and specific birth place place the city of Dobrich has been famous its folklore:  Galina Durmushlijska and Stefan Georgiev are just 2 of the many names along with Оркестър Кристал (Orchestra Crystal) and the multitude of gifted singers. My mother has a santiment for Stefan Georgiev, as she listened to this gifted accordinist on her Uncle's marriage.

Thus In my case this was (Стефан Георгиев Хора и ръченици от Добруджа) the album full song list here If you're interested to listen the Album and Enjoy unique Folklore from Dobrudja (Dobrich) my home city, Stefan Georgiev's album Hora and Rachenica Dances is available here


Stefan_Georgiev-old-audio-Music-CD-Hora-i-Rychenici-ot-Dobrudja-Horos-and-Ruchenitsas-from-Dobrudja-CD_Cover
I've downloaded them from Bulgarian famous torrent tracker zamunda.net in MP3 format.
Of course you need to have a CD / DVD readed and write device on the PC which nowdays is not present on most modern notebooks and PCs but as a last resort you can buy some cheap External Optical CD / DVD drive for 25 to 30$ from Amazon / Ebay etc.


2. You will need to install a couple of programs on Linux host (if you don't have it already)


To be able to convert from command line from MP3 to WAV you will need as minimum ffmpeg and normalize-audio packages as well as some kind of command line burning tool like cdrskin  wodim which is
the fork of old good known cdrecord, so in case if you you're wondering what happened with it just
use instead wodim.

Below is a good list of tools (assuming you have enough HDD space) to install:


root@jeremiah:/ # apt-get install –yes dvd+rw-tools cdw cdrdao audiotools growisofs cdlabelgen dvd+rw-tools k3b brasero wodim ffmpeg lame normalize-audio libavcodec58


Note that some of above packages I've installed just for other Write / Read operations for DVD drives and you might not need that but it is good to have it as some day in future you will perhaps need to write out a DVD or something.
Also the k3b here is specific to KDE and if you're a GNOME user you could use Native GNOME Desktop app such brasero or if you're in a more minimalistic Linux desktop due to hardware contrains use XFCE's native xfburn program.

If you're a console / terminal geek like me you will definitely enjoy to use cdw
 

root@jeremiah:/ # apt-cache show cdw|grep -i description -A 1
Description-en: Tool for burning CD's – console version
 Ncurses-based frontend for wodim and genisoimage. It can handle audio and

Description-md5: 77dacb1e6c00dada63762b78b9a605d5
Homepage: http://cdw.sourceforge.net/


3. Selecting preferred CD / DVD / BD program to use to write out the CD from Linux console


cdw uses wodim (which is a successor of good old known console cdrecord command most of use used on Linux in the past to burn out new Redhat / Debian / different Linux OS distro versions for upgrade purposes on Desktop and Server machines.

To check whether your CD / DVD drive is detected and ready to burn on your old PC issue:


root@jeremiah:/# wodim -checkdrive
Device was not specified. Trying to find an appropriate drive…
Detected CD-R drive: /dev/cdrw
Using /dev/cdrom of unknown capabilities
Device type    : Removable CD-ROM
Version        : 5
Response Format: 2
Capabilities   :
Vendor_info    : 'HL-DT-ST'
Identification : 'DVDRAM GT50N    '
Revision       : 'LT20'
Device seems to be: Generic mmc2 DVD-R/DVD-RW.
Using generic SCSI-3/mmc   CD-R/CD-RW driver (mmc_cdr).
Driver flags   : MMC-3 SWABAUDIO BURNFREE
Supported modes: TAO PACKET SAO SAO/R96P SAO/R96R RAW/R16 RAW/R96P RAW/R96R

You can also use xorriso (whose added value compared to other console burn cd tools is is not using external program for ISO9660 formatting neither it use an external or an external burn program for CD, DVD or BD (Blue Ray) drive but it has its own libraries incorporated from libburnia-project.org libs.

Below output is from my Thinkpad T420 notebook. If the old computer CD drive is there and still functional in most cases you should not get issues to detect it.

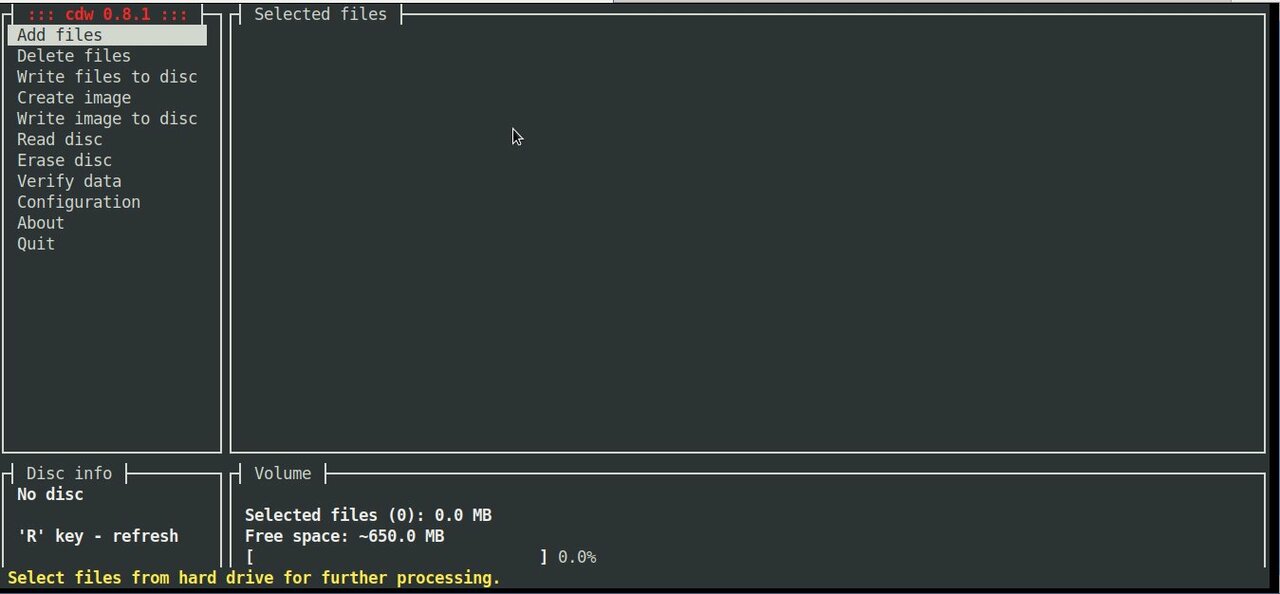
cdw ncurses text based CD burner tool's interface is super intuitive as you can see from below screenshot:

cdw-burn-cds-from-console-terminal-on-GNU-Linux-and-FreeBSD-old-PC-computer

CDW has many advanced abilities such as “blanking” a disk or ripping an audio CD on a selected folder. To overcome the possible problem of CDW not automatically detecting the disk you have inserted you can go to the “Configuration” menu, press F5 to enter the Hardware options and then on the first entry press enter and choose your device (by pressing enter again). Save the setting with F9.
 

4. Convert MP3 / MP4 Files or whatever format to .WAV to be ready to burn to CD


Collect all the files you want to have collected from the CD album in .MP3 a certain directory and use a small one liner loop to convert files to WAV with ffmpeg:
 

cd /disk/Music/Mp3s/Singer-Album-directory-with-MP3/

for i in $( ls *.mp3); do ffmpeg -i $i $i.wav; done


If you don't have ffmpeg installed and have mpg123 you can also do the Mp3 to WAV conversion with mpg123 cmd like so:


for i in $( ls ); do mpg123 -w $i.wav $i.mp3; done


Another alternative for conversion is to use good old lame (used to create Mp3 audio files but abling to also) decode
mp3 to wav.


lame –decode somefile.mp3 somefile.wav


In the past there was a burn command tool that was able to easily convert MP3s to WAV but in up2date Linux modern releases it is no longer available most likely due to licensing issues, for those on older Debian Linux 7 / 8 / 9 / Ubuntu 8 to 12.XX / old Fedoras etc. if you have the command you can install burn and use it (and not bother with shell loops):

apt-get install burn

or

yum install burn


Once you have it to convert


$ burn -A -a *.mp3


5. Fix file naming to remove empty spaces such as " " and substitute to underscores as some Old CD Players are
unable to understand spaces in file naming with another short loop.


for f in *; do mv "$f" `echo $f | tr ' ' '_'`; done


6. Normalize audio produced .WAV files (set the music volume to a certain level)


In case if wondering why normalize audio is needed here is short extract from normalize-audio man page command description to shed some light.

"normalize-audio  is  used  to  adjust  the volume of WAV or MP3 audio files to a standard volume level.  This is useful for things like creating mp3 mixes, where different recording levels on different albums can cause the volume to  vary  greatly from song to song."
 

cd /disk/Music/Mp3s/Singer-Album-directory-with-MP3/

normalize-audio -m *.wav


7. Burn the produced normalized Audio WAV files to the the CD


wodim -v -fix -eject dev='/dev/sr0' -audio -pad *.wav


Alternatively you can conver all your MP3 files to .WAV with anything be it audacity
or another program or even use 
GNOME's CDBurn tool brasero (if gnome user) or KDE's CDBurn which in my opinion is
the best CD / DVD burning application for Linux K3B.

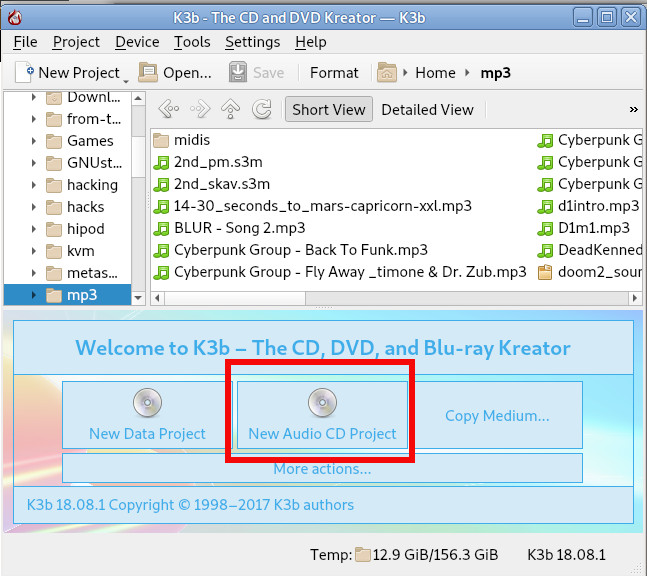
Burning Audio CD with K3b is up to few clicks and super easy and even k3b is going to handle the MP3 to WAV file Conversion itself. To burn audio with K3B just run it and click over 'New Audio CD Project'.

k3b-on-debian-gnu-linux-burn-audio-cd-screenshot

For those who want to learn a bit more on CD / DVD / Blue-Ray burning on GNU / Linux good readings are:
Linux CD Burning Mini Howto, is Linux's CD Writing Howto on ibiblio (though a bit obsolete) or Debian's official documentation on BurnCD.
 

8. What we learned here


Though the accent of this tutorial was how to Create Audio Music CD from MP3 on GNU / Linux, the same commands are available in most FreeBSD / NetBSD / OpenBSD ports tree so you can use the same method to build prepare Audio Music CD on *BSDs.

In this article, we went through few basic ways on how to prepare WAV files from MP3 normalize the new created WAV files on Linux, to prepare files for creation of Audio Music CD for the old mom or grandma's player or even just for fun to rewind some memories. For GUI users this is easily done with  k3b,  brasero or xfburn.

I've pointed you to cdw a super useful text ncurses tool that makes CD Burninng from plain text console (on servers) without a Xorg / WayLand  GUI installed super easy. It was shortly reviewed what has changed over the last few years and why and why cdrecord was substituted for wodim. A few examples were given on how to handle conversion through bash shell loops and you were pointed to some extra reading resources to learn a bit more on the topic.
There are plenty of custom scripts around for doing the same CD Burn / Covnersion tasks, so pointing me to any external / Shell / Perl scripts is mostly welcome.

Hope this learned you something new, Enjoy ! 🙂