![]()
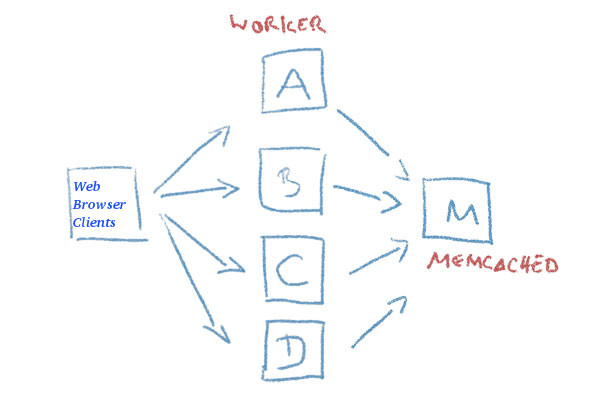
Recently I had to come up with a solution to make A bunch of websites hosted on a machine to be high available. For the task haproxy is one of logical options to use. However as I didn't wanted to set new IP addresses and play around to build a cluster. I decided the much more simplistic approach to use 2 separate Machines each running Up-to-date same version of Apache Webserver as front end and using a shared data running on Master-to-Master MySQL replication database as a backend. For the load balancing itself I've used a simple 2 multiple DNS 'A' Active records, configured via the Bind DNS name server an Round Robin DNS load balancing for each of the domains, to make them point to the the 2 Internet IP addresses (XXX.XXX.XXX.4 and YYY.YYY.YYY.5) each configured on the 2 Linux servers eth0.
So far so good, this setup worked but immediately, I've run another issue as I found out the WordPress and Joomla based websites's PHP sessions are lost, as the connectivity by the remote client browser reaches one time on XXX…4 and one time on YYY…4 configured listerner on TCP port 80 and TCP p. 443. In other words if request comes up to Front end Apache worker webserver 1 with opened channel data is sent back to Client Browser and the next request is sent due to the other IP resolved by the DNS server to come to Apache worker webserver 2 of course webserver 2 has no idea about this previous session data and it gets confused and returns soemething like a 404 or 500 or any other error … not exciting really huh …
I've thought about work around and as I didn't wanted to involve thirty party stuff as Privoxy / Squid / Varnish / Polipo etc. just as that would add extra complexity as if I choose to use haproxy from the beginning, after short investigation came to a reason to use memcached as a central PHP sessions storage.
Why I choose memcached ?
Well it is relatively easy to configure, it doesn't come with mambo-jambo unreadable over-complicated configuration and the time to configure everything is really little as well as the configuration is much straight forward, plus I don't need to occupy more IP addresses and I don't need to do any changes to the already running 2 WebServers on 2 separate Linux hosts configured to be reachable from the Internet.
Of course using memcached is not a rock solid and not the best solution out there, as there is risk that if a memcached dies out for some reason all sessions stored in are lost as they're stored only in volatile memory, as well as there is a drawback that if a communication was done via one of the 2 webservers and one of them goes down sessions that were known by one of Apache's workers disappears.
So let me proceed and explain you the steps to take to configure memcached as a central session storage system.
1. Install memcached and php-memcached packages
To enable support for memcached besides installing memcached daemon, you need to have the php-memcached which will provide the memcached.so used by Apache loaded php script interpretter module.
On a Debian / Ubuntu and other deb based GNU / Linux it should be:
webserver1:~# apt-get install memcached php-memcached
TO use php-memcached I assume Apache and its support for PHP is already installed with lets say:
webserver1:~# apt-get install php libapache2-mod-php php-mcrypt
On CentOS / RHEL / Fedora Linux it is a little bit more complicated as you'll need to install php-pear and compile the module with pecl
[root@centos ~]# yum install php-pear
…
[root@centos ~]# yum install php-pecl-memcache
…
Compile memcache
[root@centos ~]# pecl install memcache
…
2. Test if memcached is properly loaded in PHP
Once installed lets check if memcached service is running and memcached support is loaded as module into PHP core.
webserver1:~# ps -efa | egrep memcached
nobody 14443 1 0 Oct23 ? 00:04:34 /usr/bin/memcached -v -m 64 -p 11211 -u nobody -l 127.0.0.1 -l 192.168.0.1
root@webserver1:/# php -m | egrep memcache
memcached
To get a bit more verbose information on memcache version and few of memcached variable settings:
root@webserver1:/# php -i |grep -i memcache
/etc/php/7.4/cli/conf.d/25-memcached.ini
memcached
memcached support => enabled
libmemcached version => 1.0.18
memcached.compression_factor => 1.3 => 1.3
memcached.compression_threshold => 2000 => 2000
memcached.compression_type => fastlz => fastlz
memcached.default_binary_protocol => Off => Off
memcached.default_connect_timeout => 0 => 0
memcached.default_consistent_hash => Off => Off
memcached.serializer => php => php
memcached.sess_binary_protocol => On => On
memcached.sess_connect_timeout => 0 => 0
memcached.sess_consistent_hash => On => On
memcached.sess_consistent_hash_type => ketama => ketama
memcached.sess_lock_expire => 0 => 0
memcached.sess_lock_max_wait => not set => not set
memcached.sess_lock_retries => 5 => 5
memcached.sess_lock_wait => not set => not set
memcached.sess_lock_wait_max => 150 => 150
memcached.sess_lock_wait_min => 150 => 150
memcached.sess_locking => On => On
memcached.sess_number_of_replicas => 0 => 0
memcached.sess_persistent => Off => Off
memcached.sess_prefix => memc.sess.key. => memc.sess.key.
memcached.sess_randomize_replica_read => Off => Off
memcached.sess_remove_failed_servers => Off => Off
memcached.sess_sasl_password => no value => no value
memcached.sess_sasl_username => no value => no value
memcached.sess_server_failure_limit => 0 => 0
memcached.store_retry_count => 2 => 2
Registered save handlers => files user memcached
Make sure /etc/default/memcached (on Debian is enabled) on CentOS / RHELs this should be /etc/sysconfig/memcached
webserver1:~# cat default/memcached
# Set this to no to disable memcached.
ENABLE_MEMCACHED=yes
As assured on server1 memcached + php is ready to be used, next login to Linux server 2 and repeat the same steps install memcached and the module and check it is showing as loaded.
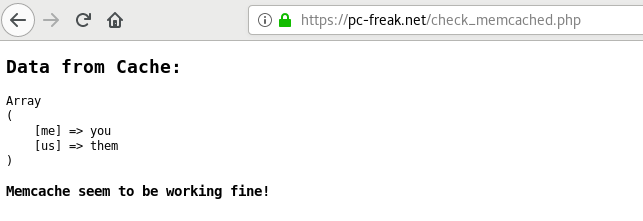
Next place under some of your webservers hosted websites under check_memcached.php below PHP code
<?php
if (class_exists('Memcache')) {
$server = 'localhost';
if (!empty($_REQUEST[‘server’])) {
$server = $_REQUEST[‘server’];
}
$memcache = new Memcache;
$isMemcacheAvailable = @$memcache->connect($server);if ($isMemcacheAvailable) {
$aData = $memcache->get('data');
echo '<pre>';
if ($aData) {
echo '<h2>Data from Cache:</h2>';
print_r($aData);
} else {
$aData = array(
'me' => 'you',
'us' => 'them',
);
echo '<h2>Fresh Data:</h2>';
print_r($aData);
$memcache->set('data', $aData, 0, 300);
}
$aData = $memcache->get('data');
if ($aData) {
echo '<h3>Memcache seem to be working fine!</h3>';
} else {
echo '<h3>Memcache DOES NOT seem to be working!</h3>';
}
echo '</pre>';
}
}if (!$isMemcacheAvailable) {
echo 'Memcache not available';
}?>
Launch in a browser https://your-dns-round-robined-domain.com/check_memcached.php, the browser output should be as on below screenshot:
3. Configure memcached daemons on both nodes
All we need to set up is the listen IPv4 addresses
On Host Webserver1
You should have in /etc/memcached.conf
-l 127.0.0.1
-l 192.168.0.1
webserver1:~# grep -Ei '\-l' /etc/memcached.conf
-l 127.0.0.1
-l 192.168.0.1
On Host Webserver2
-l 127.0.0.1
-l 192.168.0.200
webserver2:~# grep -Ei '\-l' /etc/memcached.conf
-l 127.0.0.1
-l 192.168.0.200
4. Configure memcached in php.ini
Edit config /etc/php.ini (on CentOS / RHEL) or on Debians / Ubuntus etc. modify /etc/php/*/apache2/php.ini (where depending on the PHP version you're using your php location could be different lets say /etc/php/5.6/apache2/php.ini):
If you wonder where is the php.ini config in your case you can usually get it from the php cli:
webserver1:~# php -i | grep "php.ini"
Configuration File (php.ini) Path => /etc/php/7.4/cli
Loaded Configuration File => /etc/php/7.4/cli/php.ini
! Note: That on on PHP-FPM installations (where FastCGI Process Manager) is handling PHP requests,path would be rather something like:
/etc/php5/fpm/php.ini
in php.ini you need to change as minimum below 2 variables
session.save_handler =
session.save_path =
By default session.save_path would be set to lets say session.save_path = "
/var/lib/php7/sessions"
To make php use a 2 central configured memcached servers on webserver1 and webserver2 or even more memcached configured machines set it to look as so:
session.save_path="192.168.0.200:11211, 192.168.0.1:11211"
Also modify set
session.save_handler = memcache
Overall changed php.ini configuration on Linux machine 1 ( webserver1 ) and Linux machine 2 ( webserver2 ) should be:
session.save_handler = memcache
session.save_path="192.168.0.200:11211, 192.168.0.1:11211"
Below is approximately how it should look on both :
webserver1: ~# grep -Ei 'session.save_handler|session.save_path' /etc/php.ini
;; session.save_handler = files
session.save_handler = memcache
; session.save_path = "N;/path"
; session.save_path = "N;MODE;/path"
;session.save_path = "/var/lib/php7/sessions"
session.save_path="192.168.0.200:11211, 192.168.0.1:11211"
; (see session.save_path above), then garbage collection does *not*
webserver2: ~# grep -Ei 'session.save_handler|session.save_path' /etc/php.ini
;; session.save_handler = files
session.save_handler = memcache
; session.save_path = "N;/path"
; session.save_path = "N;MODE;/path"
;session.save_path = "/var/lib/php7/sessions"
session.save_path="192.168.0.200:11211, 192.168.0.1:11211"
; (see session.save_path above), then garbage collection does *not*
As you can see I have configured memcached on webserver1 to listen on internal local LAN IP 192.168.0.200 and on Local LAN eth iface 192.168.0.1 on TCP port 11211 (this is the default memcached connections listen port), for security or obscurity reasons you might choose another empty one. Make sure to also set the proper firewalling to that port, the best is to enable connections only between 192.168.0.200 and 192.168.0.1 on each of machine 1 and machine 2.
5. Enable Memcached for session redundancy
Next step is to configure memcached to allow failover (e.g. use both memcached on 2 linux hosts) and configure session redundancy.
Configure /etc/php/7.3/mods-available/memcache.ini or /etc/php5/mods-available/memcache.ini or respectively to the right location depending on the PHP installed and used webservers version.
webserver1 :~# vim /etc/php/7.3/mods-available/memcache.ini
; configuration for php memcached module
; priority=20
; settings to write sessions to both servers and have fail over
memcache.hash_strategy=consistent
memcache.allow_failover=1
memcache.session_redundancy=3
extension=memcached.so
webserver2 :~# vim /etc/php/7.3/mods-available/memcache.ini
; configuration for php memcached module
; priority=20
; settings to write sessions to both servers and have fail over
memcache.hash_strategy=consistent
memcache.allow_failover=1
memcache.session_redundancy=3
extension=memcached.so
memcache.session_redundancy directive must be equal to the number of memcached servers + 1 for the session information to be replicated to all the servers. This is due to a bug in PHP.
I have only 2 memcached configured that's why I set it to 3.
6. Restart Apache Webservers
Restart on both machines webserver1 and webserver2 Apache to make php load memcached.so
webserver1:~# systemctl restart httpd
…
webserver2:~# systemctl restart httpd
7. Restart memcached on machine 1 and 2
webserver1 :~# systemctl restart memcached
webserver2 :~# systemctl restart memcached
8. Test php sessions are working as expected with a php script
Copy to both website locations to accessible URL a file test_sessions.php:
<?php
session_start();if(isset($_SESSION[‘georgi’]))
{
echo "Sessions is ".$_SESSION[‘georgi’]."!\n";
}
else
{
echo "Session ID: ".session_id()."\n";
echo "Session Name: ".session_name()."\n";
echo "Setting 'georgi' to 'cool'\n";
$_SESSION[‘georgi’]='cool';
}
?>
Now run the test to see PHP sessions are kept persistently:
hipo@jeremiah:~/Desktop $ curl -vL -s https://www.pc-freak.net/session.php 2>&1 | grep 'Set-Cookie:'
< Set-Cookie: PHPSESSID=micir464cplbdfpo36n3qi9hd3; expires=Tue, 10-Nov-2020 12:14:32 GMT; Max-Age=86400; path=/
hipo@jeremiah:~/Desktop $ curl -L –cookie "PHPSESSID=micir464cplbdfpo36n3qi9hd3" http://83.228.93.76/session.php http://213.91.190.233/session.php
Session is cool!
Session is cool!
Copy to the locations that is resolving to both DNS servers some sample php script such as sessions_test.php with below content:
<?php
header('Content-Type: text/plain');
session_start();
if(!isset($_SESSION[‘visit’]))
{
echo "This is the first time you're visiting this server\n";
$_SESSION[‘visit’] = 0;
}
else
echo "Your number of visits: ".$_SESSION[‘visit’] . "\n";$_SESSION[‘visit’]++;
echo "Server IP: ".$_SERVER[‘SERVER_ADDR’] . "\n";
echo "Client IP: ".$_SERVER[‘REMOTE_ADDR’] . "\n";
print_r($_COOKIE);
?>
Test in a Web Opera / Firefox / Chrome browser.
You should get an output in the browser similar to:
Your number of visits: 15
Server IP: 83.228.93.76
Client IP: 91.92.15.51
Array
(
[_ga] => GA1.2.651288003.1538922937
[__utma] => 238407297.651288003.1538922937.1601730730.1601759984.45
[__utmz] => 238407297.1571087583.28.4.utmcsr=google|utmccn=(organic)|utmcmd=organic|utmctr=(not provided)
[shellInABox] => 467306938:1110101010
[fpestid] => EzkIzv_9OWmR9PxhUM8HEKoV3fbOri1iAiHesU7T4Pso4Mbi7Gtt9L1vlChtkli5GVDKtg
[__gads] => ID=8a1e445d88889784-22302f2c01b9005b:T=1603219663:RT=1603219663:S=ALNI_MZ6L4IIaIBcwaeCk_KNwmL3df3Z2g
[PHPSESSID] => mgpk1ivhvfc2d0daq08e0p0ec5
)
If you want to test php sessions are working with text browser or from another external script for automation use something as below PHP code:
<?php
// save as "session_test.php" inside your webspace
ini_set('display_errors', 'On');
error_reporting(6143);session_start();
$sessionSavePath = ini_get('session.save_path');
echo '<br><div style="background:#def;padding:6px">'
, 'If a session could be started successfully <b>you should'
, ' not see any Warning(s)</b>, otherwise check the path/folder'
, ' mentioned in the warning(s) for proper access rights.<hr>';
echo "WebServer IP:" . $_SERVER[‘SERVER_ADDR’] . "\n<br />";
if (empty($sessionSavePath)) {
echo 'A "<b>session.save_path</b>" is currently',
' <b>not</b> set.<br>Normally "<b>';
if (isset($_ENV[‘TMP’])) {
echo $_ENV[‘TMP’], ‘” ($_ENV[“TMP”]) ';
} else {
echo '/tmp</b>" or "<b>C:\tmp</b>" (or whatever',
' the OS default "TMP" folder is set to)';
}
echo ' is used in this case.';
} else {
echo 'The current "session.save_path" is "<b>',
$sessionSavePath, '</b>".';
}echo '<br>Session file name: "<b>sess_', session_id()
, '</b>".</div><br>';
?>
You can download the test_php_sessions.php script here.
To test with lynx:
hipo@jeremiah:~/Desktop $ lynx -source 'https://www.pc-freak.net/test_php_sessions.php'
<br><div style="background:#def;padding:6px">If a session could be started successfully <b>you should not see any Warning(s)</b>, otherwise check the path/folder mentioned in the warning(s) for proper access rights.<hr>WebServer IP:83.228.93.76
<br />The current "session.save_path" is "<b>tcp://192.168.0.200:11211, tcp://192.168.0.1:11211</b>".<br>Session file name: "<b>sess_5h18f809b88isf8vileudgrl40</b>".</div><br>