Posts Tagged ‘apache2’

Webserver farm behind Load Balancer Proxy or how to preserve incoming internet IP to local net IP Apache webservers by adding additional haproxy header with remoteip

Monday, April 18th, 2022

logo-haproxy-apache-remoteip-configure-and-check-to-have-logged-real-ip-address-inside-apache-forwarded-from-load-balancer

Having a Proxy server for Load Balancing is a common solutions to assure High Availability of Web Application service behind a proxy.
You can have for example 1 Apache HTTPD webservers serving traffic Actively on one Location (i.e. one city or Country) and 3 configured in the F5 LB or haproxy to silently keep up and wait for incoming connections as an (Active Failure) Backup solution

Lets say the Webservers usually are set to have local class C IPs as 192.168.0.XXX or 10.10.10.XXX and living in isolated DMZed well firewalled LAN network and Haproxy is configured to receive traffic via a Internet IP 109.104.212.13 address and send the traffic in mode tcp via a NATTed connection (e.g. due to the network address translation the source IP of the incoming connections from Intenet clients appears as the NATTed IP 192.168.1.50.

The result is that all incoming connections from haproxy -> webservers will be logged in Webservers /var/log/apache2/access.log wrongly as incoming from source IP: 192.168.1.50, meaning all the information on the source Internet Real IP gets lost.
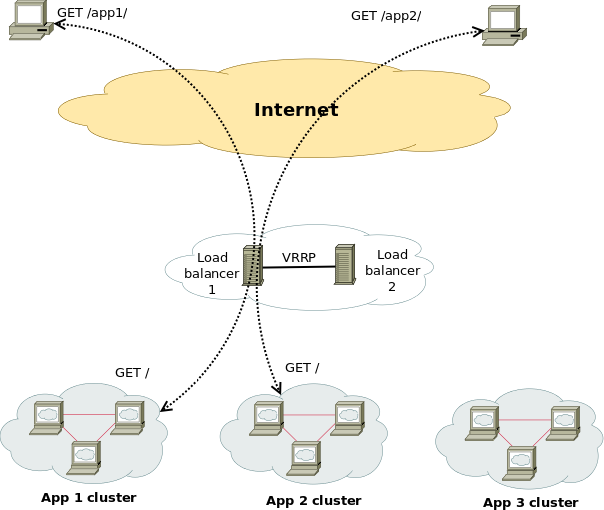
load-balancer-high-availailibility-haproxy-apache
 

How to pass Real (Internet) Source IPs from Haproxy "mode tcp" to Local LAN Webservers  ?
 

Usually the normal way to work around this with Apache Reverse Proxies configured is to use HTTP_X_FORWARDED_FOR variable in haproxy when using HTTP traffic application that is proxied (.e.g haproxy.cfg has mode http configured), you have to add to listen listener_name directive or frontend Frontend_of_proxy

option forwardfor
option http-server-close

However unfortunately, IP Header preservation with X_FORWADED_FOR  HTTP-Header is not possible when haproxy is configured to forward traffic using mode tcp.

Thus when you're forced to use mode tcp to completely pass any traffic incoming to Haproxy from itself to End side, the solution is to
 

  • Use mod_remoteip infamous module that is part of standard Apache installs both on apache2 installed from (.deb) package  or httpd rpm (on redhats / centos).


1. Configure Haproxies to send received connects as send-proxy traffic


The idea is very simple all the received requests from outside clients to Haproxy are to be send via the haproxy to the webserver in a PROXY protocol string, this is done via send-proxy

             send-proxy  – send a PROXY protocol string

Rawly my current /etc/haproxy/haproxy.cfg looks like this:
 

global
        log /dev/log    local0
        log /dev/log    local1 notice
        chroot /var/lib/haproxy
        user haproxy
        group haproxy
        daemon
        maxconn 99999
        nbproc          1
        nbthread 2
        cpu-map         1 0
        cpu-map         2 1


defaults
        log     global
       mode    tcp


        timeout connect 5000
        timeout connect 30s
        timeout server 10s

    timeout queue 5s
    timeout tunnel 2m
    timeout client-fin 1s
    timeout server-fin 1s

                option forwardfor

    retries                 15


frontend http-in
                mode tcp

                option tcplog
        log global

                option logasap
                option forwardfor
                bind 109.104.212.130:80
    fullconn 20000
default_backend http-websrv
backend http-websrv
        balance source
                maxconn 3000

stick match src
    stick-table type ip size 200k expire 30m
        stick on src


        server ha1server-1 192.168.0.205:80 check send-proxy weight 254 backup
        server ha1server-2 192.168.1.15:80 check send-proxy weight 255
        server ha1server-3 192.168.2.30:80 check send-proxy weight 252 backup
        server ha1server-4 192.168.1.198:80 check send-proxy weight 253 backup
                server ha1server-5 192.168.0.1:80 maxconn 3000 check send-proxy weight 251 backup


frontend https-in
                mode tcp

                option tcplog
                log global

                option logasap
                option forwardfor
        maxconn 99999
           bind 109.104.212.130:443
        default_backend https-websrv
                backend https-websrv
        balance source
                maxconn 3000
        stick on src
    stick-table type ip size 200k expire 30m


                server ha1server-1 192.168.0.205:443 maxconn 8000 check send-proxy weight 254 backup
                server ha1server-2 192.168.1.15:443 maxconn 10000 check send-proxy weight 255
        server ha1server-3 192.168.2.30:443 maxconn 8000 check send-proxy weight 252 backup
        server ha1server-4 192.168.1.198:443 maxconn 10000 check send-proxy weight 253 backup
                server ha1server-5 192.168.0.1:443 maxconn 3000 check send-proxy weight 251 backup

listen stats
    mode http
    option httplog
    option http-server-close
    maxconn 10
    stats enable
    stats show-legends
    stats refresh 5s
    stats realm Haproxy\ Statistics
    stats admin if TRUE


After preparing your haproxy.cfg and reloading haproxy in /var/log/haproxy.log you should have the Real Source IPs logged in:
 

root@webserver:~# tail -n 10 /var/log/haproxy.log
Apr 15 22:47:34 pcfr_hware_local_ip haproxy[2914]: 159.223.65.16:58735 [15/Apr/2022:22:47:34.586] https-in https-websrv/ha1server-2 1/0/+0 +0 — 7/7/7/7/0 0/0
Apr 15 22:47:34 pcfr_hware_local_ip haproxy[2914]: 20.113.133.8:56405 [15/Apr/2022:22:47:34.744] https-in https-websrv/ha1server-2 1/0/+0 +0 — 7/7/7/7/0 0/0
Apr 15 22:47:35 pcfr_hware_local_ip haproxy[2914]: 54.36.148.248:15653 [15/Apr/2022:22:47:35.057] https-in https-websrv/ha1server-2 1/0/+0 +0 — 7/7/7/7/0 0/0
Apr 15 22:47:35 pcfr_hware_local_ip haproxy[2914]: 185.191.171.35:26564 [15/Apr/2022:22:47:35.071] https-in https-websrv/ha1server-2 1/0/+0 +0 — 8/8/8/8/0 0/0
Apr 15 22:47:35 pcfr_hware_local_ip haproxy[2914]: 213.183.53.58:42984 [15/Apr/2022:22:47:35.669] https-in https-websrv/ha1server-2 1/0/+0 +0 — 6/6/6/6/0 0/0
Apr 15 22:47:35 pcfr_hware_local_ip haproxy[2914]: 159.223.65.16:54006 [15/Apr/2022:22:47:35.703] https-in https-websrv/ha1server-2 1/0/+0 +0 — 7/7/7/7/0 0/0
Apr 15 22:47:36 pcfr_hware_local_ip haproxy[2914]: 192.241.113.203:30877 [15/Apr/2022:22:47:36.651] https-in https-websrv/ha1server-2 1/0/+0 +0 — 4/4/4/4/0 0/0
Apr 15 22:47:36 pcfr_hware_local_ip haproxy[2914]: 185.191.171.9:6776 [15/Apr/2022:22:47:36.683] https-in https-websrv/ha1server-2 1/0/+0 +0 — 5/5/5/5/0 0/0
Apr 15 22:47:36 pcfr_hware_local_ip haproxy[2914]: 159.223.65.16:64310 [15/Apr/2022:22:47:36.797] https-in https-websrv/ha1server-2 1/0/+0 +0 — 6/6/6/6/0 0/0
Apr 15 22:47:36 pcfr_hware_local_ip haproxy[2914]: 185.191.171.3:23364 [15/Apr/2022:22:47:36.834] https-in https-websrv/ha1server-2 1/1/+1 +0 — 7/7/7/7/0 0/0


2. Enable remoteip proxy protocol on Webservers

Login to each Apache HTTPD and to enable remoteip module run:
 

# a2enmod remoteip


On Debians, the command should produce a right symlink to mods-enabled/ directory
 

# ls -al /etc/apache2/mods-enabled/*remote*
lrwxrwxrwx 1 root root 31 Mar 30  2021 /etc/apache2/mods-enabled/remoteip.load -> ../mods-available/remoteip.load


3. Modify remoteip.conf file and allow IPs of haproxies or F5s


Configure RemoteIPTrustedProxy for every Source IP of haproxy to allow it to send X-Forwarded-For header to Apache,

Here are few examples, from my apache working config on Debian 11.2 (Bullseye):
 

webserver:~# cat remoteip.conf
RemoteIPHeader X-Forwarded-For
RemoteIPTrustedProxy 192.168.0.1
RemoteIPTrustedProxy 192.168.0.205
RemoteIPTrustedProxy 192.168.1.15
RemoteIPTrustedProxy 192.168.0.198
RemoteIPTrustedProxy 192.168.2.33
RemoteIPTrustedProxy 192.168.2.30
RemoteIPTrustedProxy 192.168.0.215
#RemoteIPTrustedProxy 51.89.232.41

On RedHat / Fedora other RPM based Linux distrubutions, you can do the same by including inside httpd.conf or virtualhost configuration something like:
 

<IfModule remoteip_module>
      RemoteIPHeader X-Forwarded-For
      RemoteIPInternalProxy 192.168.0.0/16
      RemoteIPTrustedProxy 192.168.0.215/32
</IfModule>


4. Enable RemoteIP Proxy Protocol in apache2.conf / httpd.conf or Virtualhost custom config
 

Modify both haproxy / haproxies config as well as enable the RemoteIP module on Apache webservers (VirtualHosts if such used) and either in <VirtualHost> block or in main http config include:

RemoteIPProxyProtocol On


5. Change default configured Apache LogFormat

In Domain Vhost or apache2.conf / httpd.conf

Default logging Format will be something like:
 

LogFormat "%h %l %u %t \"%r\" %>s %O \"%{Referer}i\" \"%{User-Agent}i\"" combined


or
 

LogFormat "%v:%p %h %l %u %t \"%r\" %>s %O \"%{Referer}i\" \"%{User-Agent}i\"" combined


Once you find it in /etc/apache2/apache2.conf / httpd.conf or Vhost, you have to comment out this by adding shebang infont of sentence make it look as follows:
 

LogFormat "%v:%p %a %l %u %t \"%r\" %>s %O \"%{Referer}i\" \"%{User-Agent}i\"" vhost_combined
LogFormat "%a %l %u %t \"%r\" %>s %O \"%{Referer}i\" \"%{User-Agent}i\"" combined
LogFormat "%a %l %u %t \"%r\" %>s %O" common
LogFormat "%{Referer}i -> %U" referer
LogFormat "%{User-agent}i" agent


The Changed LogFormat instructs Apache to log the client IP as recorded by mod_remoteip (%a) rather than hostname (%h). For a full explanation of all the options check the official HTTP Server documentation page apache_mod_config on Custom Log Formats.

and reload each Apache server.

on Debian:

# apache2ctl -k reload

On CentOS

# systemctl restart httpd


6. Check proxy protocol is properly enabled on Apaches


remoteip module will enable Apache to expect a proxy connect header passed to it otherwise it will respond with Bad Request, because it will detect a plain HTML request instead of Proxy Protocol CONNECT, here is the usual telnet test to fetch the index.htm page.

root@webserver:~# telnet localhost 80
Trying 127.0.0.1…
Connected to localhost.
Escape character is '^]'.
GET / HTTP/1.1

HTTP/1.1 400 Bad Request
Date: Fri, 15 Apr 2022 19:04:51 GMT
Server: Apache/2.4.51 (Debian)
Content-Length: 312
Connection: close
Content-Type: text/html; charset=iso-8859-1

<!DOCTYPE HTML PUBLIC "-//IETF//DTD HTML 2.0//EN">
<html><head>
<title>400 Bad Request</title>
</head><body>
<h1>Bad Request</h1>
<p>Your browser sent a request that this server could not understand.<br />
</p>
<hr>
<address>Apache/2.4.51 (Debian) Server at grafana.pc-freak.net Port 80</address>
</body></html>
Connection closed by foreign host.


root@webserver:~# telnet localhost 80
Trying 127.0.0.1…
Connected to localhost.
Escape character is '^]'.
HEAD / HTTP/1.1

HTTP/1.1 400 Bad Request
Date: Fri, 15 Apr 2022 19:05:07 GMT
Server: Apache/2.4.51 (Debian)
Connection: close
Content-Type: text/html; charset=iso-8859-1

Connection closed by foreign host.


To test it with telnet you can follow the Proxy CONNECT syntax and simulate you're connecting from a proxy server, like that:
 

root@webserver:~# telnet localhost 80
Trying 127.0.0.1…
Connected to localhost.
Escape character is '^]'.
CONNECT localhost:80 HTTP/1.0

HTTP/1.1 301 Moved Permanently
Date: Fri, 15 Apr 2022 19:13:38 GMT
Server: Apache/2.4.51 (Debian)
Location: https://zabbix.pc-freak.net
Cache-Control: max-age=900
Expires: Fri, 15 Apr 2022 19:28:38 GMT
Content-Length: 310
Connection: close
Content-Type: text/html; charset=iso-8859-1

<!DOCTYPE HTML PUBLIC "-//IETF//DTD HTML 2.0//EN">
<html><head>
<title>301 Moved Permanently</title>
</head><body>
<h1>Moved Permanently</h1>
<p>The document has moved <a href="https://zabbix.pc-freak.net">here</a>.</p>
<hr>
<address>Apache/2.4.51 (Debian) Server at localhost Port 80</address>
</body></html>
Connection closed by foreign host.

You can test with curl simulating the proxy protocol CONNECT with:

root@webserver:~# curl –insecure –haproxy-protocol https://192.168.2.30

<!DOCTYPE HTML PUBLIC "-//W3C//DTD HTML 4.01 Transitional//EN"
"http://w3.org/TR/html4/loose.dtd">
<html>
<head>
<meta name="generator" content="pc-freak.net tidy">
<script src="https://ssl.google-analytics.com/urchin.js" type="text/javascript">
</script>
<script type="text/javascript">
_uacct = "UA-2102595-3";
urchinTracker();
</script>
<script type="text/javascript">
var gaJsHost = (("https:" == document.location.protocol) ? "https://ssl." : "http://");
document.write(unescape("%3Cscript src='" + gaJsHost + "google-analytics.com/ga.js' type='text/javascript'%3E%3C/script%3E"));
</script>
<script type="text/javascript">
try {
var pageTracker = _gat._getTracker("UA-2102595-6");
pageTracker._trackPageview();
} catch(err) {}
</script>


      –haproxy-protocol
              (HTTP) Send a HAProxy PROXY protocol v1 header at the beginning of the connection. This is used by some load balancers and reverse proxies
              to indicate the client's true IP address and port.

              This option is primarily useful when sending test requests to a service that expects this header.

              Added in 7.60.0.


7. Check apache log if remote Real Internet Source IPs are properly logged
 

root@webserver:~# tail -n 10 /var/log/apache2/access.log

213.183.53.58 – – [15/Apr/2022:22:18:59 +0300] "GET /proxy/browse.php?u=https%3A%2F%2Fsteamcommunity.com%2Fmarket%2Fitemordershistogram%3Fcountry HTTP/1.1" 200 12701 "https://www.pc-freak.net" "Mozilla/5.0 (Windows NT 10.0; Win64; x64; rv:98.0) Gecko/20100101 Firefox/98.0"
88.198.48.184 – – [15/Apr/2022:22:18:58 +0300] "GET /blog/iq-world-rank-country-smartest-nations/?cid=1330192 HTTP/1.1" 200 29574 "-" "Mozilla/5.0 (compatible; DataForSeoBot/1.0; +https://dataforseo.com/dataforseo-bot)"
213.183.53.58 – – [15/Apr/2022:22:19:00 +0300] "GET /proxy/browse.php?u=https%3A%2F%2Fsteamcommunity.com%2Fmarket%2Fitemordershistogram%3Fcountry
HTTP/1.1" 200 9080 "https://www.pc-freak.net" "Mozilla/5.0 (Windows NT 10.0; Win64; x64; rv:98.0) Gecko/20100101 Firefox/98.0"
159.223.65.16 – – [15/Apr/2022:22:19:01 +0300] "POST //blog//xmlrpc.php HTTP/1.1" 200 5477 "-" "Mozilla/5.0 (Windows NT 10.0; Win64; x64) AppleWebKit/537.36 (KHTML, like Gecko) Chrome/89.0.4389.114 Safari/537.36"
159.223.65.16 – – [15/Apr/2022:22:19:02 +0300] "POST //blog//xmlrpc.php HTTP/1.1" 200 5477 "-" "Mozilla/5.0 (Windows NT 10.0; Win64; x64) AppleWebKit/537.36 (KHTML, like Gecko) Chrome/89.0.4389.114 Safari/537.36"
213.91.190.233 – – [15/Apr/2022:22:19:02 +0300] "POST /blog/wp-admin/admin-ajax.php HTTP/1.1" 200 1243 "https://www.pc-freak.net/blog/wp-admin/post.php?post=16754&action=edit" "Mozilla/5.0 (Windows NT 6.1; Win64; x64; rv:89.0) Gecko/20100101 Firefox/89.0"
46.10.215.119 – – [15/Apr/2022:22:19:02 +0300] "GET /images/saint-Paul-and-Peter-holy-icon.jpg HTTP/1.1" 200 134501 "https://www.google.com/" "Mozilla/5.0 (Windows NT 10.0; Win64; x64) AppleWebKit/537.36 (KHTML, like Gecko) Chrome/100.0.4896.75 Safari/537.36 Edg/100.0.1185.39"
185.191.171.42 – – [15/Apr/2022:22:19:03 +0300] "GET /index.html.latest/tutorials/tutorials/penguins/vestnik/penguins/faith/vestnik/ HTTP/1.1" 200 11684 "-" "Mozilla/5.0 (compatible; SemrushBot/7~bl; +http://www.semrush.com/bot.html)"

116.179.37.243 – – [15/Apr/2022:22:19:50 +0300] "GET /blog/wp-content/cookieconsent.min.js HTTP/1.1" 200 7625 "https://www.pc-freak.net/blog/how-to-disable-nginx-static-requests-access-log-logging/" "Mozilla/5.0 (compatible; Baiduspider-render/2.0; +http://www.baidu.com/search/spider.html)"
116.179.37.237 – – [15/Apr/2022:22:19:50 +0300] "GET /blog/wp-content/plugins/google-analytics-dashboard-for-wp/assets/js/frontend-gtag.min.js?ver=7.5.0 HTTP/1.1" 200 8898 "https://www.pc-freak.net/blog/how-to-disable-nginx-static-requests-access-log-logging/" "Mozilla/5.0 (compatible; Baiduspider-render/2.0; +http://www.baidu.com/search/spider.html)"


You see from above output remote Source IPs in green are properly logged, so haproxy Cluster is correctly forwarding connections passing on in the Haproxy generated Initial header the Real IP of its remote connect IPs.


Sum it up, What was done?


HTTP_X_FORWARD_FOR is impossible to set, when haproxy is used on mode tcp and all traffic is sent as received from TCP IPv4 / IPv6 Network stack, e.g. modifying any HTTP sent traffic inside the headers is not possible as this might break up the data.

Thus Haproxy was configured to send all its received data by sending initial proxy header with the X_FORWARDED usual Source IP data, then remoteip Apache module was used to make Apache receive and understand haproxy sent Header which contains the original Source IP via the send-proxy functionality and example was given on how to test the remoteip on Webserver is working correctly.

Finally you've seen how to check configured haproxy and webserver are able to send and receive the End Client data with the originator real source IP correctly and those Internet IP is properly logged inside both haproxy and apaches.
Disable VNC on KVM Virtual Machine without VM restart / How to Change VNC listen address

Monday, February 28th, 2022

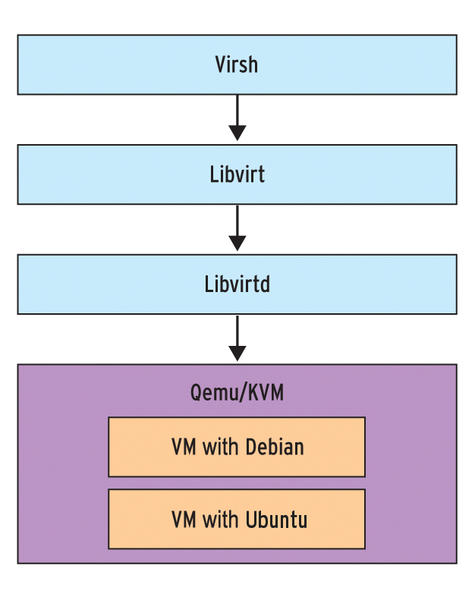
disable-vnc-port-listener-on-a-KVM-ran-virtual-machine-virsh-libvirt-libvirt-architecture-design

Say you have recently run a new KVM Virtual machine, have connected via VNC on lets say the default tcp port 5900 
installed a brand new Linux OS using a VNC client to connect, such as:
TightVNC / RealVNC if connecting from Windows Client machine or Vncviewer / Remmina if connecting from Linux / BSD  and now 
you want to turn off the VNC VM listener server either for security reasons to make sure some script kiddie random scanner did not manage to connect and take control over your VM or just because, you will be only further using the new configured VM only via SSH console sessions as they call it in modern times to make a buziness buzz out of it a headless UNIX server (server machines connected a network without a Physical monitor attached to it).


The question comes then how can be the KVM VNC listener on TCP port 5900 be completely disabled?

One way of course is to filter out with a firewall 5900 completely either on a Switch Level (lets say on a Cisco equipment catalist in front of the machine) or the worst solution to  locally filter directly on the server with firewalld or iptables chain rules.
 

1. Disable KVM VNC Port listener via VIRSH VM XML edit

The better way of course  is to completely disable the VNC using KVM, that is possible through the virsh command interface.
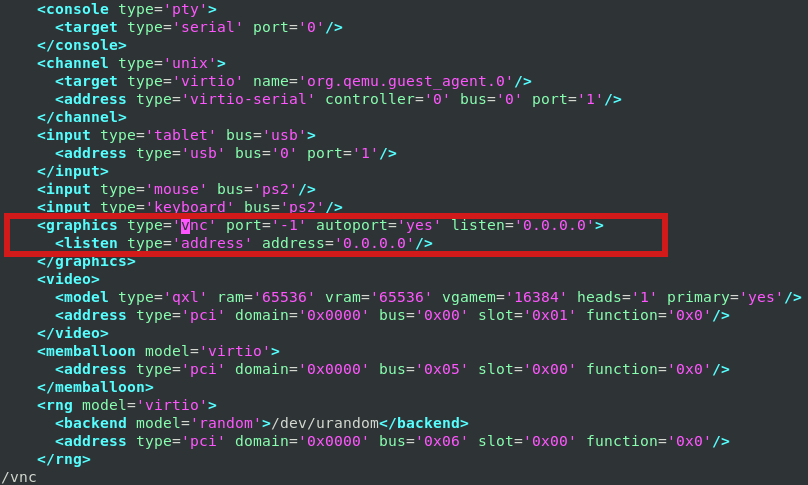
By editing the XML Virtual Machine configuration and finding the line about vnc confiuguration with:

root@server:/kvm/disk# virsh edit pcfreakweb
Domain pcfreakweb XML configuration not changed.

like:

<graphics type='vnc' port='5900' autoport='yes' listen='0.0.0.0'>
      <listen type='address' address='0.0.0.0'/>


and set value to undefined:

port='-1'


virsh-KVM-disable-VNC-port-listener-virsh-xml-edit-screenshot

Modifying the XML however will require you to reboot the Virtual Machine for which XML was editted. This might be not possible
if you have a running production server already configured with Apache / Proxy / PostgreSQL / Mail or any other Internet public service.

2. Disable VNC KVM TCP port 5900 to a dynamic running VM without a machine reboot


Thus if you want to remove the KVM VNC Port Listener on 5900 without a VM shutdown / reboot you can do it via KVM's virsh client interface.

root@server:/kvm/disk# virsh
Welcome to virsh, the virtualization interactive terminal.

Type:  'help' for help with commands
       'quit' to quit

virsh # qemu-monitor-command pcfreakweb –hmp change  vnc none


The virsh management user interface client, can do pretty much more of real time VM changes, it is really useful to use it if you have KVM Hypervisor hosts with 10+ Virtual machines and it if you have to deal with KVM machines on daily, do specific changes to the VMs on how VM networks are configured, information on HV hardware, configure / reconfigure storage volumes to VMs etc, take some time to play with it 🙂

Apache disable requests to not log to access.log Logfile through SetEnvIf and dontlog httpd variables

Monday, October 11th, 2021

apache-disable-certain-strings-from-logging-to-access-log-logo

Logging to Apache access.log is mostly useful as this is a great way to keep log on who visited your website and generate periodic statistics with tools such as Webalizer or Astats to keep track on your visitors and generate various statistics as well as see the number of new visitors as well most visited web pages (the pages which mostly are attracting your web visitors), once the log analysis tool generates its statistics, it can help you understand better which Web spiders visit your website the most (as spiders has a predefined) IP addresses, which can give you insight on various web spider site indexation statistics on Google, Yahoo, Bing etc. . Sometimes however either due to bugs in web spiders algorithms or inconsistencies in your website structure, some of the web pages gets double visited records inside the logs, this could happen for example if your website uses to include iframes.

Having web pages accessed once but logged to be accessed twice hence is erroneous and unwanted, and though that usually have to be fixed by the website programmers, if such approach is not easily doable in the moment and the website is running on critical production system, the double logging of request can be omitted thanks to a small Apache log hack with SetEnvIf Apache config directive. Even if there is no double logging inside Apache log happening it could be that some cron job or automated monitoring scripts or tool such as monit is making periodic requests to Apache and this is garbling your Log Statistics results.

In this short article hence I'll explain how to do remove certain strings to not get logged inside /var/log/httpd/access.log.

1. Check SetEnvIf is Loaded on the Webserver
 

On CentOS / RHEL Linux:

# /sbin/apachectl -M |grep -i setenvif
AH00558: httpd: Could not reliably determine the server's fully qualified domain name, using localhost.localdomain. Set the 'ServerName' directive globally to suppress this message
 setenvif_module (shared)


On Debian / Ubuntu Linux:

/usr/sbin/apache2ctl -M |grep -i setenvif
AH00548: NameVirtualHost has no effect and will be removed in the next release /etc/apache2/sites-enabled/000-default.conf:1
 setenvif_module (shared)


2. Using SetEnvIf to omit certain string to get logged inside apache access.log


SetEnvIf could be used either in some certain domain VirtualHost configuration (if website is configured so), or it can be set as a global Apache rule from the /etc/httpd/conf/httpd.conf 

To use SetEnvIf  you have to place it inside a <Directory …></Directory> configuration block, if it has to be enabled only for a Certain Apache configured directory, otherwise you have to place it in the global apache config section.

To be able to use SetEnvIf, only in a certain directories and subdirectories via .htaccess, you will have defined in <Directory>

AllowOverride FileInfo


The general syntax to omit a certain Apache repeating string from keep logging with SetEnvIf is as follows:
 

SetEnvIf Request_URI "^/WebSiteStructureDirectory/ACCESS_LOG_STRING_TO_REMOVE$" dontlog


General syntax for SetEnvIf is as follows:

SetEnvIf attribute regex env-variable

SetEnvIf attribute regex [!]env-variable[=value] [[!]env-variable[=value]] …

Below is the overall possible attributes to pass as described in mod_setenvif official documentation.
 

  • Host
  • User-Agent
  • Referer
  • Accept-Language
  • Remote_Host: the hostname (if available) of the client making the request.
  • Remote_Addr: the IP address of the client making the request.
  • Server_Addr: the IP address of the server on which the request was received (only with versions later than 2.0.43).
  • Request_Method: the name of the method being used (GET, POST, etc.).
  • Request_Protocol: the name and version of the protocol with which the request was made (e.g., "HTTP/0.9", "HTTP/1.1", etc.).
  • Request_URI: the resource requested on the HTTP request line – generally the portion of the URL following the scheme and host portion without the query string.

Next locate inside the configuration the line:

CustomLog /var/log/apache2/access.log combined


To enable filtering of included strings, you'll have to append env=!dontlog to the end of line.


CustomLog /var/log/apache2/access.log combined env=!dontlog


You might be using something as cronolog for log rotation to prevent your WebServer logs to become too big in size and hard to manage, you can append env=!dontlog to it in same way.

If you haven't used cronolog is it is perhaps best to show you the package description.

server:~# apt-cache show cronolog|grep -i description -A10 -B5
Version: 1.6.2+rpk-2
Installed-Size: 63
Maintainer: Debian QA Group <packages@qa.debian.org>
Architecture: amd64
Depends: perl:any, libc6 (>= 2.4)
Description-en: Logfile rotator for web servers
 A simple program that reads log messages from its input and writes
 them to a set of output files, the names of which are constructed
 using template and the current date and time.  The template uses the
 same format specifiers as the Unix date command (which are the same
 as the standard C strftime library function).
 .
 It intended to be used in conjunction with a Web server, such as
 Apache, to split the access log into daily or monthly logs:
 .
   TransferLog "|/usr/bin/cronolog /var/log/apache/%Y/access.%Y.%m.%d.log"
 .
 A cronosplit script is also included, to convert existing
 traditionally-rotated logs into this rotation format.

Description-md5: 4d5734e5e38bc768dcbffccd2547922f
Homepage: http://www.cronolog.org/
Tag: admin::logging, devel::lang:perl, devel::library, implemented-in::c,
 implemented-in::perl, interface::commandline, role::devel-lib,
 role::program, scope::utility, suite::apache, use::organizing,
 works-with::logfile
Section: web
Priority: optional
Filename: pool/main/c/cronolog/cronolog_1.6.2+rpk-2_amd64.deb
Size: 27912
MD5sum: 215a86766cc8d4434cd52432fd4f8fe7

If you're using cronolog to daily rotate the access.log and you need to filter out the strings out of the logs, you might use something like in httpd.conf:


CustomLog "|/usr/bin/cronolog –symlink=/var/log/httpd/access.log /var/log/httpd/access.log_%Y_%m_%d" combined env=!dontlog


3. Disable Apache logging access.log from certain USERAGENT browser
 

You can do much more with SetEnvIf for example you might want to omit logging requests from a UserAgent (browser) to end up in /dev/null (nowhere), e.g. prevent any Website requests originating from Internet Explorer (MSIE) to not be logged.

SetEnvIf User_Agent "(MSIE)" dontlog

CustomLog /var/log/apache2/access.log combined env=!dontlog


4. Disable Apache logging from requests coming from certain FQDN (Fully Qualified Domain Name) localhost 127.0.0.1 or concrete IP / IPv6 address

SetEnvIf Remote_Host "dns.server.com$" dontlog

CustomLog /var/log/apache2/access.log combined env=!dontlog


Of course for this to work, your website should have a functioning DNS servers and Apache should be configured to be able to resolve remote IPs to back resolve to their respective DNS defined Hostnames.

SetEnvIf recognized also perl PCRE Regular Expressions, if you want to filter out of Apache access log requests incoming from multiple subdomains starting with a certain domain hostname.


SetEnvIf Remote_Host "^example" dontlog

– To not log anything coming from localhost.localdomain address ( 127.0.0.1 ) as well as from some concrete IP address :

SetEnvIf Remote_Addr "127\.0\.0\.1" dontlog

SetEnvIf Remote_Addr "192\.168\.1\.180" dontlog

– To disable IPv6 requests that be coming at the log even though you don't happen to use IPv6 at all

SetEnvIf Request_Addr "::1" dontlog

CustomLog /var/log/apache2/access.log combined env=!dontlog


– Note here it is obligatory to escape the dots '.'


5. Disable robots.txt Web Crawlers requests from being logged in access.log

SetEnvIf Request_URI "^/robots\.txt$" dontlog

CustomLog /var/log/apache2/access.log combined env=!dontlog

Using SetEnvIfNoCase to read incoming useragent / Host / file requests case insensitve

The SetEnvIfNoCase is to be used if you want to threat incoming originators strings as case insensitive, this is useful to omit extraordinary regular expression SetEnvIf rules for lower upper case symbols.

SetEnvIFNoCase User-Agent "Slurp/cat" dontlog
SetEnvIFNoCase User-Agent "Ask Jeeves/Teoma" dontlog
SetEnvIFNoCase User-Agent "Googlebot" dontlog
SetEnvIFNoCase User-Agent "bingbot" dontlog
SetEnvIFNoCase Remote_Host "fastsearch.net$" dontlog

Omit from access.log logging some standard web files .css , .js .ico, .gif , .png and Referrals from own domain

Sometimes your own site scripts do refer to stuff on your own domain that just generates junks in the access.log to keep it off.

SetEnvIfNoCase Request_URI "\.(gif)|(jpg)|(png)|(css)|(js)|(ico)|(eot)$" dontlog


SetEnvIfNoCase Referer "www\.myowndomain\.com" dontlog

CustomLog /var/log/apache2/access.log combined env=!dontlog


6. Disable Apache requests in access.log and error.log completely


Sometimes at rare cases the produced Apache logs and error log is really big and you already have the requests logged in another F5 Load Balancer or Haproxy in front of Apache WebServer or alternatively the logging is not interesting at all as the Web Application served written in ( Perl / Python / Ruby ) does handle the logging itself. 
I've earlier described how this is done in a good amount of details in previous article Disable Apache access.log and error.log logging on Debian Linux and FreeBSD

To disable it you will have to comment out CustomLog or set it to together with ErrorLog to /dev/null in apache2.conf / httpd.conf (depending on the distro)
 

CustomLog /dev/null
ErrorLog /dev/null


7. Restart Apache WebServer to load settings
 

An important to mention is in case you have Webserver with multiple complex configurations and there is a specific log patterns to omit from logs it might be a very good idea to:

a. Create /etc/httpd/conf/dontlog.conf / etc/apache2/dontlog.conf
add inside all your custom dontlog configurations
b. Include dontlog.conf from /etc/httpd/conf/httpd.conf / /etc/apache2/apache2.conf

Finally to make the changes take affect, of course you will need to restart Apache webserver depending on the distro and if it is with systemd or System V:

For systemd RPM based distro:

systemctl restart httpd

or for Deb based Debian etc.

systemctl apache2 restart

On old System V scripts systems:

On RedHat / CentOS etc. restart Apache with:
 

/etc/init.d/httpd restart


On Deb based SystemV:
 

/etc/init.d/apache2 restart


What we learned ?
 

We have learned about SetEnvIf how it can be used to prevent certain requests strings getting logged into access.log through dontlog, how to completely stop certain browser based on a useragent from logging to the access.log as well as how to omit from logging certain requests incoming from certain IP addresses / IPv6 or FQDNs and how to stop robots.txt from being logged to httpd log.


Finally we have learned how to completely disable Apache logging if logging is handled by other external application.
 

Linux: Howto Disable logging for all VirtualHosts on Apache and NGINX Webservers one liner

Wednesday, July 1st, 2020

disable-apache-nginx-logging-for-all-virtualhosts
Did you happen to administer Apache Webservers or NGINX webservers whose logs start to grow so rapidly that are flooding the disk too quickly?
Well this happens sometimes and it also happens that sometimes you just want to stop logging especially, to offload disk writting.

There is an easy way to disable logging for requests and errors (access_log and error_log usually residing under /var/log/httpd or /var/log/nginx ) for  all configured Virtual Domains with a short one liner, here is how.

Before you start  Create backup of /etc/apache2/sites-enabled / or /etc/nginx to be able to revert back to original config.

# cp -rpf /etc/apache2/sites-enabled/ ~/

# cp -rpf /etc/nginx/ ~/


1. Disable Logging for All  Virtual Domains configured for Apache Webserver

First lets print what the command will do to make sure we don't mess something

# find /home/hipo/sites-enabled/* -exec echo sed -i 's/#*[Cc]ustom[Ll]og/#CustomLog/g' {} \;


You will get some output like

find /home/hipo//sites-enabled/* -exec echo sed -i 's/#*[Cc]ustom[Ll]og/#CustomLog/g' {} \;

find /etc/apache2/sites-enabled/* -exec sed -i 's/#*[Cc]ustom[Ll]og/#CustomLog/g' {} \;
find /etc/apache2/sites-enabled/* -exec sed -i 's/#*[Ee]rror[Ll]og/#ErrorLog/g' {} \;

2. Disable Logging for All configured Virtual Domains for NGINX Webserver
 

find /etc/nginx/sites-enabled/* -exec sed -i 's/#*access_log/#access_log/g' {} \;
find /etc/nginx/sites-enabled/* -exec sed -i 's/#*error_log/#error_log/g' {} \;

f course above substituations that will comment out with '#' occurances from file configs of only default set access_log and error_log / access.log, error.log 
for machines where there is no certain convention on file naming and there are multiple domains in custom produced named log files this won't work.

This one liner was inspired from a friend's daily Martin Petrov. Martin blogged initially about this nice tip for those reading Cyrillic check out mpetrov.net, so. Thanks Marto ! 🙂

Create and Configure SSL bundle file for GoGetSSL issued certificate in Apache Webserver on Linux

Saturday, November 3rd, 2018

gogetssl-install-certificate-on-linux-howto-sslcertificatechainfile-obsolete

I had a small task to configure a new WildCard SSL for domains on a Debian GNU / Linux Jessie running Apache 2.4.25.

The official documentation on how to install the SSL certificate on Linux given by GoGetSSL (which is by COMODO was obsolete as of time of writting this article and suggested as install instructions:
 

SSLEngine on
SSLCertificateKeyFile /etc/ssl/ssl.key/server.key
SSLCertificateFile /etc/ssl/ssl.crt/yourDomainName.crt
SSLCertificateChainFile /etc/ssl/ssl.crt/yourDomainName.ca-bundle


Adding such configuration to domain Vhost and testing with apache2ctl spits an error like:


root@webserver:~# apache2ctl configtest
AH02559: The SSLCertificateChainFile directive (/etc/apache2/sites-enabled/the-domain-name-ssl.conf:17) is deprecated, SSLCertificateFile should be used instead
Syntax OK


To make issued GoGetSSL work with Debian Linux, hence, here is the few things done:

The files issued by Gogetssl.COM were the following:


AddTrust_External_CA_Root.crt
COMODO_RSA_Certification_Authority.crt
the-domain-name.crt


The webserver had already SSL support via mod_ssl Apache module, e.g.:


root@webserver:~# ls -al /etc/apache2/mods-available/*ssl*
-rw-r–r– 1 root root 3112 окт 21  2017 /etc/apache2/mods-available/ssl.conf
-rw-r–r– 1 root root   97 сеп 19  2017 /etc/apache2/mods-available/ssl.load
root@webserver:~# ls -al /etc/apache2/mods-enabled/*ssl*
lrwxrwxrwx 1 root root 26 окт 19  2017 /etc/apache2/mods-enabled/ssl.conf -> ../mods-available/ssl.conf
lrwxrwxrwx 1 root root 26 окт 19  2017 /etc/apache2/mods-enabled/ssl.load -> ../mods-available/ssl.load


For those who doesn't have mod_ssl enabled, to enable it quickly run:


# a2enmod ssl


The VirtualHost used for the domains had Apache config as below:


NameVirtualHost *:443

<VirtualHost *:443>
    ServerAdmin support@the-domain-name.com
    ServerName the-domain-name.com
    ServerAlias *.the-domain-name.com the-domain-name.com

    DocumentRoot /home/the-domain-namecom/www
    SSLEngine On
#    <Directory />
#        Options FollowSymLinks
#        AllowOverride None
#    </Directory>
    <Directory /home/the-domain-namecom/www>
        Options Indexes FollowSymLinks MultiViews
        AllowOverride None
        Include /home/the-domain-namecom/www/htaccess_new.txt
        Order allow,deny
        allow from all
    </Directory>

    ScriptAlias /cgi-bin/ /usr/lib/cgi-bin/
    <Directory "/usr/lib/cgi-bin">
        AllowOverride None
        Options +ExecCGI -MultiViews +SymLinksIfOwnerMatch
        Order allow,deny
        Allow from all
    </Directory>

    ErrorLog ${APACHE_LOG_DIR}/error.log

    # Possible values include: debug, info, notice, warn, error, crit,
    # alert, emerg.
    LogLevel warn

    CustomLog ${APACHE_LOG_DIR}/access.log combined

#    Alias /doc/ "/usr/share/doc/"
#   <Directory "/usr/share/doc/">
#       Options Indexes MultiViews FollowSymLinks
#       AllowOverride None
#       Order deny,allow
#       Deny from all
#       Allow from 127.0.0.0/255.0.0.0 ::1/128
#   </Directory>
SSLCertificateKeyFile /etc/apache2/ssl/the-domain-name.com.key
SSLCertificateFile /etc/apache2/ssl/chain.crt


</VirtualHost>

The config directives enabling and making the SSL actually work are:
 

SSLEngine On
SSLCertificateKeyFile /etc/apache2/ssl/the-domain-name.com.key
SSLCertificateFile /etc/apache2/ssl/chain.crt


The chain.crt file is actually a bundle file containing a bundle of the gogetssl CA_ROOT and RSA_Certification_Authority 3 files, to prepare that file, I've used bundle.sh small script found on serverfault.com here I've made a mirror of bundle.sh on www.pc-freak.net here   the script content is as follows:

To prepare the chain.crt  bundle, I ran:


sh create-ssl-bundle.sh _iq-test_cc.crt chain.crt
sh create-ssl-bundle.sh _iq-test_cc.crt >chain.crt
sh create-ssl-bundle.sh COMODO_RSA_Certification_Authority.crt >> chain.crt
sh create-ssl-bundle.sh bundle.sh AddTrust_External_CA_Root.crt >> chain.crt


Then I copied the file to /etc/apache2/ssl together with the-domain-name.com.key file earlier generated using openssl command earlier explained in my article how to install RapidSSL certificate on Linux

/etc/apache2/ssl was not previously existing (on Debian Linux), so to create it:


root@webserver:~# mkdir /etc/apache2/ssl
root@webserver:~# ls -al /etc/apache2/ssl/chain.crt
-rw-r–r– 1 root root 20641 Nov  2 12:27 /etc/apache2/ssl/chain.crt
root@webserver:~# ls -al /etc/apache2/ssl/the-domain-name.com.key
-rw-r–r– 1 root root 6352 Nov  2 20:35 /etc/apache2/ssl/the-domain-name.com.key


As I needed to add the SSL HTTPS configuration for multiple domains, further on I've wrote and used a tiny shell script add_new_vhost.sh which accepts as argument the domain name I want to add. The script works with a sample Skele (Template) file, which is included in the script itself and can be easily modified for the desired vhost config.
To add my multiple domains, I've used the script as follows:
 

sh add_new_vhost.sh add-new-site-domain.com
sh add_new_vhost.sh add-new-site-domain1.com


etc.

Here is the complete script as well:


#!/bin/sh
# Shell script to add easily new domains for virtual hosting on Debian machines
# arg1 should be a domain name
# This script takes the domain name which you type as arg1 uses it and creates
# Docroot / cgi-bin directory for the domain, create seperate site's apache log directory
# then takes a skele.com file and substitutes a skele.com with your domain name and directories
# This script's aim is to easily enable sysadmin to add new domains in Debian
sites_base_dir=/var/www/jail/home/www-data/sites/;
# the directory where the skele.com file is
skele_dir=/etc/apache2/sites-available;
# base directory where site log dir to be created
cr_sep_log_file_d=/var/log/apache2/sites;
# owner of the directories
username='www-data';
# read arg0 and arg1
arg0=$0;
arg1=$1;
if [[ -z $arg1 ]]; then
echo "Missing domain name";
exit 1;
fi


# skele template
echo "#
#  Example.com (/etc/apache2/sites-available/www.skele.com)
#
<VirtualHost *>
        ServerAdmin admin@design.bg
        ServerName  skele.com
        ServerAlias www.skele.com


        # Indexes + Directory Root.
        DirectoryIndex index.php index.htm index.html index.pl index.cgi index.phtml index.jsp index.py index.asp

        DocumentRoot /var/www/jail/home/www-data/sites/skelecom/www/docs
        ScriptAlias /cgi-bin "/var/www/jail/home/www-data/sites/skelecom/cgi-bin"
        
        # Logfiles
        ErrorLog  /var/log/apache2/sites/skelecom/error.log
        CustomLog /var/log/apache2/sites/skelecom/access.log combined
#       CustomLog /dev/null combined
      <Directory /var/www/jail/home/www-data/sites/skelecom/www/docs/>
                Options FollowSymLinks MultiViews -Includes
                AllowOverride None
                Order allow,deny
                allow from all
                # This directive allows us to have apache2's default start page
                # in /apache2-default/, but still have / go to the right place
#               RedirectMatch ^/$ /apache2-default/
        </Directory>

        <Directory /var/www/jail/home/www-data/sites/skelecom/www/docs/>
                Options FollowSymLinks ExecCGI -Includes
                AllowOverride None
                Order allow,deny
                allow from all
        </Directory>

</VirtualHost>
" > $skele_dir/skele.com;

domain_dir=$(echo $arg1 | sed -e 's/\.//g');
new_site_dir=$sites_base_dir/$domain_dir/www/docs;
echo "Creating $new_site_dir";
mkdir -p $new_site_dir;
mkdir -p $sites_base_dir/cgi-bin;
echo "Creating sites's Docroot and CGI directory";
chown -R $username:$username $new_site_dir;
chown -R $username:$username $sites_base_dir/cgi-bin;
echo "Creating site's Log files Directory";
mkdir -p $cr_sep_log_file_d/$domain_dir;
echo "Creating sites's VirtualHost file and adding it for startup";
sed -e "s#skele.com#$arg1#g" -e "s#skelecom#$domain_dir#g" $skele_dir/skele.com >> $skele_dir/$arg1;
ln -sf $skele_dir/$arg1 /etc/apache2/sites-enabled/;
echo "All Completed please restart apache /etc/init.d/apache restart to Load the new virtual domain";

# Date Fri Jan 11 16:27:38 EET 2008


Using the script saves a lot of time to manually, copy vhost file and then edit it to change ServerName directive, for vhosts whose configuration is identical and only the ServerName listener has to change, it is perfect to create all necessery domains, I've created a simple text file with each of the domains and run it in a loop:
 

while :; do sh add_new_vhost.sh $i; done < domain_list.txt


Installing the phpbb forum on Debian (Squeeze/Sid) Linux

Saturday, September 11th, 2010

howto-easily-install-phpbb-on-debian-gnu-linux

I've just installed the phpbb forum on a Debian Linux because we needed a goodquick to install communication media in order to improve our internal communication in a student project in Strategic HR we're developing right now in Arnhem Business School.

Here are the exact steps I followed to have a properly it properly instlled:

1. Install the phpbb3 debian package
This was pretty straight forward:

debian:~# apt-get install phpbb3

At this point of installation I've faced a dpkg-reconfigure phpbb deb package configuration issue:
I was prompted to pass in the credentials for my MySQL password right after I've selected the MySQL as my preferred database back engine.
I've feeded my MySQL root password as well as my preferred forum database name, however the database installation failed because, somehow the configuration procedure tried to connect to my MySQL database with the htcheck user.
I guess this has to be a bug in the package itself or something from my previous installation misconfigured the way the debian database backend configuration was operating.
My assumption is that my previously installed htcheck package or something beforehand I've done right after the htcheck and htcheck-php packages installation.

after the package configuration failed still the package had a status of properly installed when I reviewed it with dpkg
I've thought about trying to manually reconfigure it using the dpkg-reconfigure debian command and I gave it a try like that:

debian:~# dpkg-reconfigure phpbb3

This time along with the other fields I've to fill in the ncurses interface I was prompted for a username before the password prompted appeared.
Logically I tried to fill in the root as it's my global privileges MySQL allowed user.
However that didn't helped at all and again the configuration tried to send the credentials with user htcheck to my MySQL database server.
To deal with the situation I had to approach it in the good old manual way.

2. Manually prepare / create the required phpbb forum database

To completet that connected to the MySQL server with the mysql client and created the proper database like so:

debian:~# mysql -u root -p
mysql>
CREATE database phpbb3forum;

3. Use phpmyadmin or the mysql client command line to create a new user for the phpbb forum

Here since adding up the user using the phpmyadmin was a way easier to do I decided to go that route, anyways using the mysql cli is also an option.

From phpmyadmin It's pretty easy to add a new user and grant privileges to a certain database, to do so navigate to the following database:

Privileges -> -> Add a new user ->

Now type your User name: , Host , Password , Re-type password , also for a Host: you have to choose Local from the drop down menu.

Leave the Database for user field empty as we have already previously created our desired database in step 2 of this article

Now press the "Go" button and the user will get created.

Further after choose the Privileges menu right on the bottom of the page once again, select through the checkbox the username you have just created let's say the previously created user is phpbb3

Go to Action (There is a picture with a man and a pencil on the right side of this button

Scroll down to the page part saying Database-specific privileges and in the field Add privileges on the following database: fill in your previosly created database name in our case it's phpbb3forum

and then press the "Go" button once again.
A page will appear where you will have to select the exact privileges you would like to grant on the specific selected database.
For some simplicity just check all the checkbox to grant as many privilegs to your database as you could.
Then again you will have to press the "Go" button and there you go you should have already configured an username and database ready to go with your new phpbb forum.

4. Create a virtualhost if you would like to have the forum as a subdomain or into a separate domain

If you decide to have the forum on a separate sub-domain or domain as I did you will have to add some kind of Virtualhost into either your Apache configuration /etc/apache2/apache2.conf or into where officially the virutualhosts are laid in Debian Linux in /etc/apache2/sites-available
I've personally created a new file like for instance /etc/apache2/sites-available/mysubdomain.mydomain.com

Here is an example content of the new Virtualhost:

<VirtualHost *>
ServerAdmin admin-email@domain.com
ServerName mysubdomain.domain.com

# Indexes + Directory Root.
DirectoryIndex index.php index.php5 index.htm index.html index.pl index.cgi index.phtml index.jsp index.py index.asp

DocumentRoot /usr/share/phpbb3/www/

# Logfiles
ErrorLog /var/log/apache2/yourdomain/error.log
CustomLog /var/log/apache2/yourdomain/access.log combined
# CustomLog /dev/null combined
<Directory /usr/share/phpbb3/www/>
Options FollowSymLinks MultiViews -Includes ExecCGI
AllowOverride All
Order allow,deny
allow from all </Directory>
</VirtualHost>

In above Virtualhost just change the values for ServerAdmin , ServerName , DocumentRoot , ErrorLog , CustomLog and Directory declaration to adjust it to your situation.

5. Restart the Apache webserver for the new Virtualhost to take affect

debian:~# /etc/init.d/apache2 restart

Now accessing your http://mysubdomain.domain.com should display the installed phpbb3 forum
The default username and password for your forum you can use straight are:

username: admin
password: admin

So far so good you by now have the PHPBB3 forum properly installed and running, however if you try to Register a new user in the forum you will notice that it's impossible because of a terrible ugly message reading:

Sorry but this board is currently unavailable.

I've spend few minutes online to scrape through the forums before I can understand what I have to stop that annoying message from appearing and allow new users to register in the phpbb forum

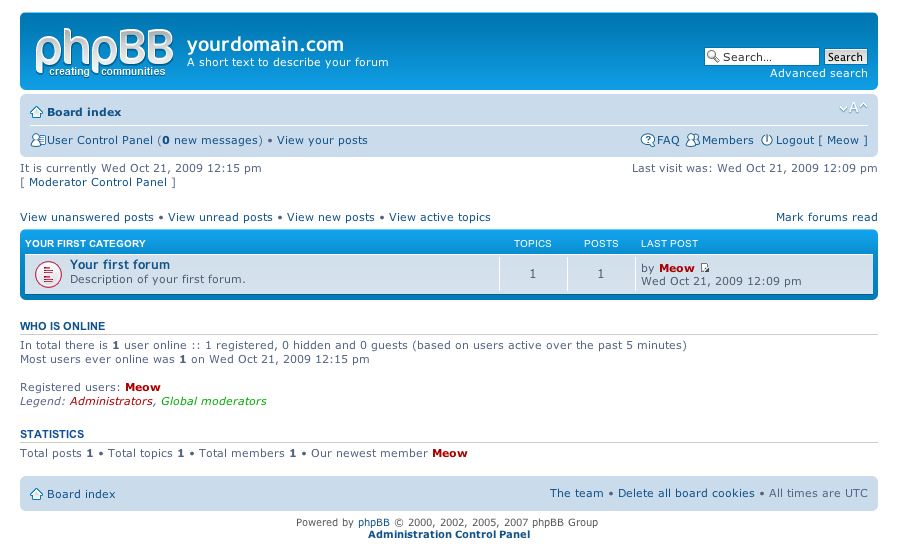
The solution came natural and was a setting that had to be changed with the forum admin account, thus login as admin and look at the bottom of the page, below the text reading Powered by phpBB © 2000, 2002, 2005, 2007 phpBB Group you will notice a link with Administration Control Panel
just press there a whole bunch of menus will appear on the screen allowing you to do numerous things, however what you will have to do is go to
Board Settings -> Disable Board

and change the radio button there to say No

That's all now your forum will be ready to go and your users can freely register and if the server where the forum is installed has an already running mail server, they will receive an emails with a registration data concerning their new registrations in your new phpbb forum.
Cheers and Enjoy your new shiny phpbb Forum 🙂

Finding top access IPs in Webserver or how to delay connects from Bots (Web Spiders) to your site to prevent connect Denial of Service

Friday, September 15th, 2017

analyze-log-files-most-visited-ips-and-find-and-stopwebsite-hammering-bot-spiders-neo-tux

If you're a sysadmin who has to deal with cracker attemps for DoS (Denial of Service) on single or multiple servers (clustered CDN or standalone) Apache Webservers, nomatter whether working for some web hosting company or just running your private run home brew web server its very useful thing to inspect Web Server log file (in Apache HTTPD case that's access.log).

Sometimes Web Server overloads and the follow up Danial of Service (DoS) affect is not caused by evil crackers (mistkenly often called hackers but by some data indexing Crawler Search Engine bots who are badly configured to aggressively crawl websites and hence causing high webserver loads flooding your servers with bad 404 or 400, 500 or other requests, just to give you an example of such obstructive bots.

1. Dealing with bad Search Indexer Bots (Spiders) with robots.txt

Just as I mentioned hackers word above I feel obliged to expose the badful lies the press and media spreading for years misconcepting in people's mind the word cracker (computer intruder) with a hacker, if you're one of those who mistakenly call security intruders hackers I recommend you read Dr. Richard Stallman's article On Hacking to get the proper understanding that hacker is an cheerful attitude of mind and spirit and a hacker could be anyone who has this kind of curious and playful mind out there. Very often hackers are computer professional, though many times they're skillful programmers, a hacker is tending to do things in a very undstandard and weird ways to make fun out of life but definitelely follow the rule of do no harm to the neighbor.

Well after the short lirical distraction above, let me continue;

Here is a short list of Search Index Crawler bots with very aggressive behaviour towards websites:


# mass download bots / mirroring utilities
1. webzip
2. webmirror
3. webcopy
4. netants
5. getright
6. wget
7. webcapture
8. libwww-perl
9. megaindex.ru
10. megaindex.com
11. Teleport / TeleportPro
12. Zeus
….

Note that some of the listed crawler bots are actually a mirroring clients tools (wget) etc., they're also included in the list of server hammering bots because often  websites are attempted to be mirrored by people who want to mirror content for the sake of good but perhaps these days more often mirror (duplicate) your content for the sake of stealing, this is called in Web language Content Stealing in SEO language.


I've found a very comprehensive list of Bad Bots to block on Mike's tech blog his website provided example of bad robots.txt file is mirrored as plain text file here

Below is the list of Bad Crawler Spiders taken from his site:


# robots.txt to prohibit bad internet search engine spiders to crawl your website
# Begin block Bad-Robots from robots.txt
User-agent: asterias
Disallow:/
User-agent: BackDoorBot/1.0
Disallow:/
User-agent: Black Hole
Disallow:/
User-agent: BlowFish/1.0
Disallow:/
User-agent: BotALot
Disallow:/
User-agent: BuiltBotTough
Disallow:/
User-agent: Bullseye/1.0
Disallow:/
User-agent: BunnySlippers
Disallow:/
User-agent: Cegbfeieh
Disallow:/
User-agent: CheeseBot
Disallow:/
User-agent: CherryPicker
Disallow:/
User-agent: CherryPickerElite/1.0
Disallow:/
User-agent: CherryPickerSE/1.0
Disallow:/
User-agent: CopyRightCheck
Disallow:/
User-agent: cosmos
Disallow:/
User-agent: Crescent
Disallow:/
User-agent: Crescent Internet ToolPak HTTP OLE Control v.1.0
Disallow:/
User-agent: DittoSpyder
Disallow:/
User-agent: EmailCollector
Disallow:/
User-agent: EmailSiphon
Disallow:/
User-agent: EmailWolf
Disallow:/
User-agent: EroCrawler
Disallow:/
User-agent: ExtractorPro
Disallow:/
User-agent: Foobot
Disallow:/
User-agent: Harvest/1.5
Disallow:/
User-agent: hloader
Disallow:/
User-agent: httplib
Disallow:/
User-agent: humanlinks
Disallow:/
User-agent: InfoNaviRobot
Disallow:/
User-agent: JennyBot
Disallow:/
User-agent: Kenjin Spider
Disallow:/
User-agent: Keyword Density/0.9
Disallow:/
User-agent: LexiBot
Disallow:/
User-agent: libWeb/clsHTTP
Disallow:/
User-agent: LinkextractorPro
Disallow:/
User-agent: LinkScan/8.1a Unix
Disallow:/
User-agent: LinkWalker
Disallow:/
User-agent: LNSpiderguy
Disallow:/
User-agent: lwp-trivial
Disallow:/
User-agent: lwp-trivial/1.34
Disallow:/
User-agent: Mata Hari
Disallow:/
User-agent: Microsoft URL Control – 5.01.4511
Disallow:/
User-agent: Microsoft URL Control – 6.00.8169
Disallow:/
User-agent: MIIxpc
Disallow:/
User-agent: MIIxpc/4.2
Disallow:/
User-agent: Mister PiX
Disallow:/
User-agent: moget
Disallow:/
User-agent: moget/2.1
Disallow:/
User-agent: mozilla/4
Disallow:/
User-agent: Mozilla/4.0 (compatible; BullsEye; Windows 95)
Disallow:/
User-agent: Mozilla/4.0 (compatible; MSIE 4.0; Windows 95)
Disallow:/
User-agent: Mozilla/4.0 (compatible; MSIE 4.0; Windows 98)
Disallow:/
User-agent: Mozilla/4.0 (compatible; MSIE 4.0; Windows NT)
Disallow:/
User-agent: Mozilla/4.0 (compatible; MSIE 4.0; Windows XP)
Disallow:/
User-agent: Mozilla/4.0 (compatible; MSIE 4.0; Windows 2000)
Disallow:/
User-agent: Mozilla/4.0 (compatible; MSIE 4.0; Windows ME)
Disallow:/
User-agent: mozilla/5
Disallow:/
User-agent: NetAnts
Disallow:/
User-agent: NICErsPRO
Disallow:/
User-agent: Offline Explorer
Disallow:/
User-agent: Openfind
Disallow:/
User-agent: Openfind data gathere
Disallow:/
User-agent: ProPowerBot/2.14
Disallow:/
User-agent: ProWebWalker
Disallow:/
User-agent: QueryN Metasearch
Disallow:/
User-agent: RepoMonkey
Disallow:/
User-agent: RepoMonkey Bait & Tackle/v1.01
Disallow:/
User-agent: RMA
Disallow:/
User-agent: SiteSnagger
Disallow:/
User-agent: SpankBot
Disallow:/
User-agent: spanner
Disallow:/
User-agent: suzuran
Disallow:/
User-agent: Szukacz/1.4
Disallow:/
User-agent: Teleport
Disallow:/
User-agent: TeleportPro
Disallow:/
User-agent: Telesoft
Disallow:/
User-agent: The Intraformant
Disallow:/
User-agent: TheNomad
Disallow:/
User-agent: TightTwatBot
Disallow:/
User-agent: Titan
Disallow:/
User-agent: toCrawl/UrlDispatcher
Disallow:/
User-agent: True_Robot
Disallow:/
User-agent: True_Robot/1.0
Disallow:/
User-agent: turingos
Disallow:/
User-agent: URLy Warning
Disallow:/
User-agent: VCI
Disallow:/
User-agent: VCI WebViewer VCI WebViewer Win32
Disallow:/
User-agent: Web Image Collector
Disallow:/
User-agent: WebAuto
Disallow:/
User-agent: WebBandit
Disallow:/
User-agent: WebBandit/3.50
Disallow:/
User-agent: WebCopier
Disallow:/
User-agent: WebEnhancer
Disallow:/
User-agent: WebmasterWorldForumBot
Disallow:/
User-agent: WebSauger
Disallow:/
User-agent: Website Quester
Disallow:/
User-agent: Webster Pro
Disallow:/
User-agent: WebStripper
Disallow:/
User-agent: WebZip
Disallow:/
User-agent: WebZip/4.0
Disallow:/
User-agent: Wget
Disallow:/
User-agent: Wget/1.5.3
Disallow:/
User-agent: Wget/1.6
Disallow:/
User-agent: WWW-Collector-E
Disallow:/
User-agent: Xenu’s
Disallow:/
User-agent: Xenu’s Link Sleuth 1.1c
Disallow:/
User-agent: Zeus
Disallow:/
User-agent: Zeus 32297 Webster Pro V2.9 Win32
Disallow:/
Crawl-delay: 20
# Begin Exclusion From Directories from robots.txt
Disallow: /cgi-bin/

Veryimportant variable among the ones passed by above robots.txt is
 

Crawl-Delay: 20


You might want to tune that variable a Crawl-Delay of 20 instructs all IP connects from any Web Spiders that are respecting robots.txt variables to delay crawling with 20 seconds between each and every connect client request, that is really useful for the Webserver as less connects means less CPU and Memory usage and less degraded performance put by aggressive bots crawling your site like crazy, requesting resources 10 times per second or so …

As you can conclude by the naming of some of the bots having them disabled would prevent your domain/s clients from Email harvesting Spiders and other not desired activities.


2. Listing IP addresses Hits / How many connects per IPs used to determine problematic server overloading a huge number of IPs connects

After saying few words about SE bots and I think it it is fair to also  mention here a number of commands, that helps the sysadmin to inspect Apache's access.log files.
Inspecting the log files regularly is really useful as the number of malicious Spider Bots and the Cracker users tends to be
raising with time, so having a good way to track the IPs that are stoning at your webserver and later prohibiting them softly to crawl either via robots.txt (not all of the Bots would respect that) or .htaccess file or as a last resort directly form firewall is really useful to know.
 

– Below command Generate a list of IPs showing how many times of the IPs connected the webserver (bear in mind that commands are designed log fields order as given by most GNU / Linux distribution + Apache default logging configuration;


webhosting-server:~# cd /var/log/apache2 webhosting-server:/var/log/apache2# cat access.log| awk '{print $1}' | sort | uniq -c |sort -n


Below command provides statistics info based on whole access.log file records, sometimes you will need to have analyzed just a chunk of the webserver log, lets say last 12000 IP connects, here is how:
 

webhosting-server:~# cd /var/log/apache2 webhosting-server:/var/log/apache2# tail -n 12000 access.log| awk '{print $1}' | sort | uniq -c |sort -n


You can combine above basic bash shell parser commands with the watch command to have a top like refresh statistics every few updated refreshing IP statistics of most active customers on your websites.

Here is an example:


webhosting-server:~# watch "cat access.log| awk '{print $1}' | sort | uniq -c |sort -n";


Once you have the top connect IPs if you have a some IP connecting with lets say 8000-10000 thousand times in a really short interval of time 20-30 minues or so. Hence it is a good idea to investigate further where is this IP originating from and if it is some malicious Denial of Service, filter it out either in Firewall (with iptables rules) or ask your ISP or webhosting to do you a favour and drop all the incoming traffic from that IP.

Here is how to investigate a bit more about a server stoner IP;
Lets assume that you found IP: 176.9.50.244 to be having too many connects to your webserver:
 

webhosting-server:~# grep -i 176.9.50.244 /var/log/apache2/access.log|tail -n 1
176.9.50.244 – – [12/Sep/2017:07:42:13 +0300] "GET / HTTP/1.1" 403 371 "-" "Mozilla/5.0 (compatible; MegaIndex.ru/2.0; +http://megaindex.com/crawler)"


webhosting-server:~# host 176.9.50.244
244.50.9.176.in-addr.arpa domain name pointer static.244.50.9.176.clients.your-server.de.


webhosting-server:~# whois 176.9.50.244|less


The outout you will get would be something like:

% This is the RIPE Database query service.
% The objects are in RPSL format.
%
% The RIPE Database is subject to Terms and Conditions.
% See http://www.ripe.net/db/support/db-terms-conditions.pdf

% Note: this output has been filtered.
%       To receive output for a database update, use the "-B" flag.

% Information related to '176.9.50.224 – 176.9.50.255'

% Abuse contact for '176.9.50.224 – 176.9.50.255' is 'abuse@hetzner.de'

inetnum:        176.9.50.224 – 176.9.50.255
netname:        HETZNER-RZ15
descr:          Hetzner Online GmbH
descr:          Datacenter 15
country:        DE
admin-c:        HOAC1-RIPE
tech-c:         HOAC1-RIPE
status:         ASSIGNED PA
mnt-by:         HOS-GUN
mnt-lower:      HOS-GUN
mnt-routes:     HOS-GUN
created:        2012-03-12T09:45:54Z
last-modified:  2015-08-10T09:29:53Z
source:         RIPE

role:           Hetzner Online GmbH – Contact Role
address:        Hetzner Online GmbH
address:        Industriestrasse 25
address:        D-91710 Gunzenhausen
address:        Germany
phone:          +49 9831 505-0
fax-no:         +49 9831 505-3
abuse-mailbox:  abuse@hetzner.de
remarks:        *************************************************
remarks:        * For spam/abuse/security issues please contact *
remarks:        * abuse@hetzner.de, not this address. *
remarks:        * The contents of your abuse email will be *
remarks:        * forwarded directly on to our client for *
….


3. Generate list of directories and files that are most called by clients
 

webhosting-server:~# cd /var/log/apache2; webhosting-server:/var/log/apache2# awk '{print $7}' access.log|cut -d? -f1|sort|uniq -c|sort -nk1|tail -n10

( take in consideration that this info is provided only on current records from /var/log/apache2/ and is short term for long term statistics you have to merge all existing gzipped /var/log/apache2/access.log.*.gz )

To merge all the old gzipped files into one single file and later use above shown command to analyize run:


cd /var/log/apache2/
cp -rpf *access.log*.gz apache-gzipped/
cd apache-gzipped
for i in $(ls -1 *access*.log.*.gz); do gzip -d $i; done
rm -f *.log.gz;
for i in $(ls -1 *|grep -v access_log_complete); do cat $i >> access_log_complete; done


Though the accent of above article is Apache Webserver log analyzing, the given command examples can easily be recrafted to work properly on other Web Servers LigHTTPD, Nginx etc.

Above commands are about to put a higher load to your server during execution, so on busy servers it is a better idea, to first go and synchronize the access.log files to another less loaded servers in most small and midsized companies this is being done by a periodic synchronization of the logs to the log server used usually only to store log various files and later used to do various analysis our run analyse software such as Awstats, Webalizer, Piwik, Go Access etc.

Worthy to mention one great text console must have Apache tool that should be mentioned to analyze in real time for the lazy ones to type so much is Apache-top but those script will be not installed on most webhosting servers and VPS-es, so if you don't happen to own a self-hosted dedicated server / have webhosting company etc. – (have root admin access on server), but have an ordinary server account you can use above commands to get an overall picture of abusive webserver IPs.

logstalgia-visual-loganalyzer-in-reali-time-windows-linux-mac
 

If you have a Linux with a desktop GUI environment and have somehow mounted remotely the weblog server partition another really awesome way to visualize in real time the connect requests to  web server Apache / Nginx etc. is with Logstalgia

Well that's all folks, I hope that article learned you something new. Enjoy

Thanks for article neo-tux picture to segarkshtri.com.np)

Auto insert password for a Trusted SSL Certificate / Automatically enter password for an SSL Certificate during Apache startup on Debian Lenny

Friday, March 26th, 2010

Protect-Your-Private-SSL_keys-Apache-howto
I've recently installed a Trusted certificate that I've previously protected with a pass-phrase to an Apache server running on top of Debian in order to have a better security.
Now everytime I restart Apache it's pretty annyoing and non-practical at the same time, to enter the Passphrase assigned to the SSL certificate.
It's also dangerous because if Apache crashes and tries to resurrect itself restartig it might not start-up again.
Another unpleasant possible scenario is if for example some of the php code developers tries to change something minor in some Virtualhost and afterwards restarts Apache for the new configurations to take place, again Apache won't bring up and a chaos would emerge.
So I decided to configurate my Apache that it auto fills in the passphrase each time it's being started or restarted.To do that I consulted some online resources and I end up redirected by a blog post to the mod_ssl ssl_reference web page

There is plenty of stuff on that document however in my case all I needed was one directive in /etc/apache2/mods-avalable/mods-available/ssl.conf :

SSLPassPhraseDialog exec:/etc/apache2/mods-available/passphrase

The above code must replace:

SSLPassPhraseDialog builtin

Now last step is to prepare the /etc/apache2/mods-available/passphrase .
Make sure the file has the following content:

#!/bin/sh
echo "yoursecretpassword"

Change above yoursecretpassword with your configured passphrase.
Also please make sure /etc/apache2/mods-availabe/passphrase has proper set permissions. In my case I've set the following permissions for the file:

debian:~# chown www-data:www-data /etc/apache2/mods-available/passphrase
debian:~# chmod 700 /etc/apache2/mods-available/passphrase

That should be it, Restart Apache and make sure Apache is properly loaded without anySSL passphrase prompts.
However you should have in mind that auto enabling passphrase loading on starting in Apache is much more insecure than typing in the password every time you restart Apache. Storing the passphrase in a file is quite insecure compared to if you type it every time Apache starts.
For instance if a hacker breaks into your server he might be able to steal your SSL certificate as well as the passphrase file.
And surely this is something you don't want. Anyways flexibility has a price and if you decide to go the way described, please note the risk first.


If you haven't already added a password to your private key during certficate generation time,

Of course you can add/remove a passphrase at a later time.

    add one (assuming it was an rsa key, else use dsa)

    openssl rsa -des3 -in your.key -out your.encrypted.key
    mv your.encrypted.key your.key

    the -des3 tells openssl to encrypt the key with DES3.

    remove it

    openssl rsa -in your.key -out your.open.key

    you will be asked for your passphrase one last time
    by omitting the -des3 you tell openssl to not encrypt the output.

    mv your.open.key your.key


How to force logrorate process logs / Make logrotate changes take effect immediately

Sunday, April 10th, 2016

how-to-force-logrorate-to-process-logs-make-logrorate-changes-take-effect-immediately-log-rotate-300x299

Dealing with logrorate as admins we need to change or add new log-rorate configurations (on most Linux distributions configs are living uder
/etc/logrotate.d/
 

logrotate uses crontab to work. It's scheduled work, not as daemon, so usually no need to reload its configuration.
When the crontab executes logrotate, it will use your new config file automatically.

Most of the logrotate setups I've seen on various distros runs out of the /etc/cron.daily

$ ls -l /etc/cron.daily/logrotate 
-rwxr-xr-x 1 root root 180 May 18  2014 /etc/cron.daily/logrotate

Here is content of cron job scheduled script:

$ cat /etc/cron.daily/logrorate

#!/bin/sh /usr/sbin/logrotate /etc/logrotate.conf EXITVALUE=$? if [ $EXITVALUE != 0 ]; then /usr/bin/logger -t logrotate "ALERT exited abnormally with [$EXITVALUE]" fi exit 0

Configurations change to lograte configs takes effect on next crontab run,
but what If you need to test your config you can also execute logrotate
on your own with below ommand:


logrotate -vf /etc/logrotate.conf 

If you encounter some issues with just modified or newly added logrorate script to check out the status of last logrorate executing bunch of log-rotate scripts run on Debian  / Ubuntu etc. deb based Linux:

cat /var/lib/logrotate/status

Or on RHEL, Fedora, CentOS Linux


cat /var/lib/logrotate.status

logrotate state -- version 2


"/var/log/syslog" 2016-4-9
"/var/log/dpkg.log" 2016-4-1
"/var/log/unattended-upgrades/unattended-upgrades.log" 2012-9-20
"/var/log/unattended-upgrades/unattended-upgrades-shutdown.log" 2013-5-17
"/var/log/apache2/mailadmin.www.pc-freak.net-access.log" 2012-9-19
"/var/log/snort/portscan.log" 2012-9-12
"/var/log/apt/term.log" 2016-4-1
"/var/log/squid/access.log" 2015-3-21
"/var/log/mysql/mysql-slow.log" 2016-4-9
"/var/log/debug" 2016-4-3
"/var/log/mysql.log" 2016-4-9
"/var/log/squid/store.log" 2015-3-21
"/var/log/apache2/mailadmin.www.pc-freak.net-error.log" 2012-9-19
"/var/log/daemon.log" 2016-4-3
"/var/log/munin/munin-update.log" 2016-4-9
"/var/log/unattended-upgrades/unattended-upgrades*.log" 2013-5-16
"/var/log/razor-agent.log" 2015-2-19
"/var/log/btmp" 2016-4-1
"/var/log/squid/*.log" 2014-11-24
"/var/log/munin/munin-graph.log" 2016-4-9
"/var/log/mysql/mysql.log" 2012-9-12
"/var/log/munin/munin-html.log" 2016-4-9
"/var/log/clamav/freshclam.log" 2016-4-3
"/var/log/munin/munin-node.log" 2016-1-23
"/var/log/mail.info" 2016-4-3
"/var/log/apache2/other_vhosts_access.log" 2016-4-3
"/var/log/exim4/rejectlog" 2012-9-12
"/var/log/squid/cache.log" 2015-3-21
"/var/log/messages" 2016-4-3
"/var/log/stunnel4/stunnel.log" 2012-9-19
"/var/log/apache2/php_error.log" 2012-10-21
"/var/log/ConsoleKit/history" 2016-4-1
"/var/log/rsnapshot.log" 2013-4-15
"/var/log/iptraf/*.log" 2012-9-12
"/var/log/snort/alert" 2012-10-17
"/var/log/privoxy/logfile" 2016-4-3
"/var/log/auth.log" 2016-4-3
"/var/log/postgresql/postgresql-8.4-main.log" 2012-10-21
"/var/log/apt/history.log" 2016-4-1
"/var/log/pm-powersave.log" 2012-11-1
"/var/log/proftpd/proftpd.log" 2016-4-3
"/var/log/proftpd/xferlog" 2016-4-1
"/var/log/zabbix-agent/zabbix_agentd.log" 2016-3-25
"/var/log/alternatives.log" 2016-4-7
"/var/log/mail.log" 2016-4-3
"/var/log/kern.log" 2016-4-3
"/var/log/privoxy/errorfile" 2013-5-28
"/var/log/aptitude" 2015-5-6
"/var/log/apache2/access.log" 2016-4-3
"/var/log/wtmp" 2016-4-1
"/var/log/pm-suspend.log" 2012-9-20
"/var/log/snort/portscan2.log" 2012-9-12
"/var/log/mail.warn" 2016-4-3
"/var/log/bacula/log" 2013-5-1
"/var/log/lpr.log" 2012-12-12
"/var/log/mail.err" 2016-4-3
"/var/log/tor/log" 2016-4-9
"/var/log/fail2ban.log" 2016-4-3
"/var/log/exim4/paniclog" 2012-9-12
"/var/log/tinyproxy/tinyproxy.log" 2015-3-25
"/var/log/munin/munin-limits.log" 2016-4-9
"/var/log/proftpd/controls.log" 2012-9-19
"/var/log/proftpd/xferreport" 2012-9-19
"/var/spool/qscan/qmail-queue.log" 2013-5-15
"/var/log/user.log" 2016-4-3
"/var/log/apache2/error.log" 2016-4-3
"/var/log/exim4/mainlog" 2012-10-16
"/var/log/privoxy/jarfile" 2013-5-28
"/var/log/cron.log" 2016-4-3
"/var/log/clamav/clamav.log" 2016-4-3


The timestamp date next to each of the rotated service log is when the respective log was last rorated

It is also a handy thing to rorate only a certain service log, lets say clamav-server, mysql-server, apache2 and nginx


logrorate /etc/logrorate.d/clamav-server
logrorate /etc/logrorate.d/mysql-server
logrotate /etc/logrotate.d/nginx

How to Remove / Add SuSE Linux start service command

Thursday, July 2nd, 2015

opensuse-remove-add-new-service-geeko-suse-linux-mini-logo
If you happen to administer SUSE LINUX Enterprise Server 9 (x86_64) and you need to add or remove already existing /etc/init.d script or custom created Apache / Tomcat .. etc. service and you're already familiar with Fedora's / RHEL chkconfig, then the good news chkconfig is also available on SuSE and you can use in same way chkconfig to start / stop / enable / disable boot time services.

To list all available boot time init.d services use:
 

suse-linux:/etc # chkconfig –list


SuSEfirewall2_final       0:off  1:off  2:off  3:off  4:off  5:off  6:off
SuSEfirewall2_init        0:off  1:off  2:off  3:off  4:off  5:off  6:off
SuSEfirewall2_setup       0:off  1:off  2:off  3:off  4:off  5:off  6:off
Tivoli_lcfd1.bkp          0:off  1:off  2:off  3:off  4:off  5:off  6:off
activate_web_all          0:off  1:off  2:off  3:on   4:off  5:on   6:off
alsasound                 0:off  1:off  2:on   3:on   4:off  5:on   6:off
apache2                   0:off  1:off  2:off  3:off  4:off  5:off  6:off
apache2-eis               0:off  1:off  2:off  3:on   4:off  5:off  6:off
atd                       0:off  1:off  2:off  3:off  4:off  5:off  6:off
audit                     0:off  1:off  2:off  3:off  4:off  5:off  6:off
autofs                    0:off  1:off  2:off  3:off  4:off  5:off  6:off
autoyast                  0:off  1:off  2:off  3:off  4:off  5:off  6:off
boot.clock                0:off  1:off  2:off  3:off  4:off  5:off  6:off
boot.crypto               0:off  1:off  2:off  3:off  4:off  5:off  6:off
boot.device-mapper        0:off  1:off  2:off  3:off  4:off  5:off  6:off
boot.evms                 0:off  1:off  2:off  3:off  4:off  5:off  6:off
boot.idedma               0:off  1:off  2:off  3:off  4:off  5:off  6:off
boot.ipconfig             0:off  1:off  2:off  3:off  4:off  5:off  6:off
boot.isapnp               0:off  1:off  2:off  3:off  4:off  5:off  6:off
boot.klog                 0:off  1:off  2:off  3:off  4:off  5:off  6:off
boot.ldconfig             0:off  1:off  2:off  3:off  4:off  5:off  6:off
boot.loadmodules          0:off  1:off  2:off  3:off  4:off  5:off  6:off
boot.localfs              0:off  1:off  2:off  3:off  4:off  5:off  6:off
boot.localnet             0:off  1:off  2:off  3:off  4:off  5:off  6:off
boot.lvm                  0:off  1:off  2:off  3:off  4:off  5:off  6:off
boot.md                   0:off  1:off  2:off  3:off  4:off  5:off  6:off
boot.multipath            0:off  1:off  2:off  3:off  4:off  5:off  6:off
boot.proc                 0:off  1:off  2:off  3:off  4:off  5:off  6:off
boot.restore_permissions  0:off  1:off  2:off  3:off  4:off  5:off  6:off
boot.rootfsck             0:off  1:off  2:off  3:off  4:off  5:off  6:off
boot.sched                0:off  1:off  2:off  3:off  4:off  5:off  6:off
boot.scpm                 0:off  1:off  2:off  3:off  4:off  5:off  6:off
boot.scsidev              0:off  1:off  2:off  3:off  4:off  5:off  6:off
boot.shm                  0:off  1:off  2:off  3:off  4:off  5:off  6:off
boot.swap                 0:off  1:off  2:off  3:off  4:off  5:off  6:off
boot.sysctl               0:off  1:off  2:off  3:off  4:off  5:off  6:off
boot.udev                 0:off  1:off  2:off  3:off  4:off  5:off  6:off
coldplug                  0:off  1:on   2:on   3:on   4:off  5:on   6:off


To then stop the service:
 

suse-linux:/etc # chkconfig gtiweb off


If you prefer to do it the SuSE way and learn a bit more on SuSE boot time process check out:


suse-linux:/etc # man insserv


Removing already existing SuSE start-up script from init.d start up with insserv is done with:

suse-linux:/etc # cd /etc/init.d/
suse-linux:etc/init.d # insserv -r gtiweb
insserv: script ipmi.hp: service ipmidrv already provided!
insserv: script boot.multipath.2008-10-29: service boot.multipath already provided!


To install a new custom written and placed into /etc/inti.d/ on SuSE's server boot time with insserv:


suse-linux:/etc/init.d/ # insserv your_custom_script_name