Posts Tagged ‘Below’

How to update expiring OpenSSL certificates without downtime on haproxy Pacemaker / Corosync PCS Cluster

Tuesday, July 19th, 2022

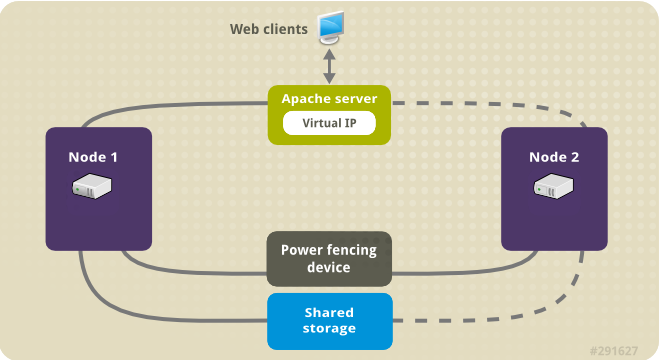
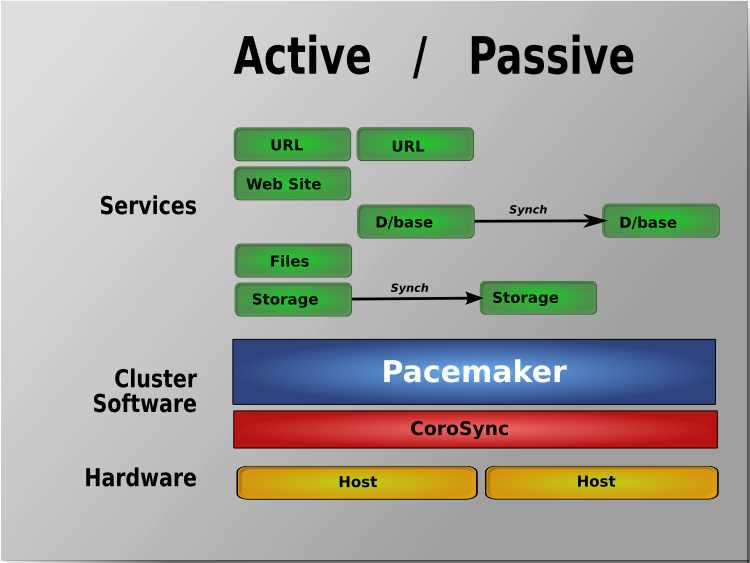
pcm-active-passive-scheme-corosync-pacemaker-openssl-renew-fix-certificate

Lets say you have a running PCS Haproxy cluster with 2 nodes and you have already a configuration in haproxy with a running VIP IP and this proxies
are tunneling traffic to a webserver such as Apache or directly to an Application and you end up in the situation where the configured certificates,
are about to expire soon. As you can guess having the cluster online makes replacing the old expiring SSL certificate with a new one relatively easy
task. But still there are a couple of steps to follow which seems easy but systemizing them and typing them down takes some time and effort.
In short you need to check the current certificates installed on the haproxy inside the Haproxy configuration files,
in my case the haproxy cluster was running 2 haproxy configs haproxyprod.cfg and haproxyqa.cfg and the certificates configured are places inside this
configuration.

Hence to do the certificate update, I had to follow few steps:

A. Find the old certificate key or generate a new one that will be used later together with the CSR (Certificate Request File) to generate the new Secure Socket Layer
certificate pair.
B. Either use the old .CSR (this is usually placed inside the old .CRT certificate file) or generate a new one
C. Copy those .CSR file to the Copy / Paste buffer and place it in the Website field on the step to fill in a CSR for the new certificate on the Domain registrer
such as NameCheap / GoDaddy / BlueHost / Entrust etc.
D. Registrar should then be able to generate files like the the new ServerCertificate.crt, Public Key Root Certificate Authority etc.
E. You should copy and store these files in some database for future perhaps inside some database such as .xdb
for example you can se the X – Certificate and Key management xca (google for xca download).
F. Copy this certificate and place it on the top of the old .crt file that is configured on the haproxies for each domain for which you have configured it on node2
G. standby node1 so the cluster sends the haproxy traffic to node2 (where you should already have the new configured certificate)
H. Prepare the .crt file used by haproxy by including the new ServerCertificate.crt content on top of the file on node1 as well
I. unstandby node1
J. Check in browser by accessing the URL the certificate is the new one based on the new expiry date that should be extended in future
K. Check the status of haproxy
L. If necessery check /var/log/haproxy.log on both clusters to check all works as expected

haserver_cluster_sample

Below are the overall commands to use to complete below jobs

Old extracted keys and crt files are located under /home/username/new-certs

1. Check certificate expiry start / end dates


[root@haproxy-serv01 certs]# openssl s_client -connect 10.40.18.88:443 2>/dev/null| openssl x509 -noout -enddate
notAfter=Aug 12 12:00:00 2022 GMT

2. Find Certificate location taken from /etc/haproxy/haproxyprod.cfg / /etc/haproxy/haproxyqa.cfg

# from Prod .cfg
   bind 10.40.18.88:443 ssl crt /etc/haproxy/certs/www.your-domain.com.crt ca-file /etc/haproxy/certs/ccnr-ca-prod.crt 
 

# from QA .cfg

    bind 10.50.18.87:443 ssl crt /etc/haproxy/certs/test.your-domain.com.crt ca-file /etc/haproxy/certs

3. Check  CRT cert expiry


# for haproxy-serv02 qa :443 listeners

[root@haproxy-serv01 certs]# openssl s_client -connect 10.50.18.87:443 2>/dev/null| openssl x509 -noout -enddate 
notAfter=Dec  9 13:24:00 2029 GMT


[root@haproxy-serv01 certs]# openssl x509 -enddate -noout -in /etc/haproxy/certs/www.your-domain.com.crt
notAfter=Aug 12 12:00:00 2022 GMT

[root@haproxy-serv01 certs]# openssl x509 -noout -dates -in /etc/haproxy/certs/www.your-domain.com.crt 
notBefore=May 13 00:00:00 2020 GMT
notAfter=Aug 12 12:00:00 2022 GMT


[root@haproxy-serv01 certs]# openssl x509 -noout -dates -in /etc/haproxy/certs/other-domain.your-domain.com.crt 
notBefore=Dec  6 13:52:00 2019 GMT
notAfter=Dec  9 13:52:00 2022 GMT

4. Check public website cert expiry in a Chrome / Firefox or Opera browser

In a Chrome browser go to updated URLs:

https://www.your-domain/login

https://test.your-domain/login

https://other-domain.your-domain/login

and check the certs

5. Login to one of haproxy nodes haproxy-serv02 or haproxy-serv01

Check what crm_mon (the cluster resource manager) reports of the consistancy of cluster and the belonging members
you should get some output similar to below:

[root@haproxy-serv01 certs]# crm_mon
Stack: corosync
Current DC: haproxy-serv01 (version 1.1.23-1.el7_9.1-9acf116022) – partition with quorum
Last updated: Fri Jul 15 16:39:17 2022
Last change: Thu Jul 14 17:36:17 2022 by root via cibadmin on haproxy-serv01

2 nodes configured
6 resource instances configured

Online: [ haproxy-serv01 haproxy-serv02 ]

Active resources:

 ccnrprodlbvip  (ocf::heartbeat:IPaddr2):       Started haproxy-serv01
 ccnrqalbvip    (ocf::heartbeat:IPaddr2):       Started haproxy-serv01
 Clone Set: haproxyqa-clone [haproxyqa]
     Started: [ haproxy-serv01 haproxy-serv02 ]
 Clone Set: haproxyprod-clone [haproxyprod]
     Started: [ haproxy-serv01 haproxy-serv02 ]


6. Create backup of existing certificates before proceeding to regenerate expiring
On both haproxy-serv01 / haproxy-serv02 run:


# cp -vrpf /etc/haproxy/certs/ /home/username/etc-haproxy-certs_bak_$(date +%d_%y_%m)/


7. Find the .key file etract it from latest version of file CCNR-Certificates-DB.xdb

Extract passes from XCA cert manager (if you're already using XCA if not take the certificate from keypass or wherever you have stored it.

+ For XCA cert manager ccnrlb pass
Find the location of the certificate inside the .xdb place etc.

+++++ www.your-domain.com.key file +++++

—–BEGIN PUBLIC KEY—–

—–END PUBLIC KEY—–


# Extracted from old file /etc/haproxy/certs/www.your-domain.com.crt
 

—–BEGIN RSA PRIVATE KEY—–

—–END RSA PRIVATE KEY—–


+++++

8. Renew Generate CSR out of RSA PRIV KEY and .CRT

[root@haproxy-serv01 certs]# openssl x509 -noout -fingerprint -sha256 -inform pem -in www.your-domain.com.crt
SHA256 Fingerprint=24:F2:04:F0:3D:00:17:84:BE:EC:BB:54:85:52:B7:AC:63:FD:E4:1E:17:6B:43:DF:19:EA:F4:99:L3:18:A6:CD

# for haproxy-serv01 prod :443 listeners

[root@haproxy-serv02 certs]# openssl x509 -x509toreq -in www.your-domain.com.crt -out www.your-domain.com.csr -signkey www.your-domain.com.key


9. Move (Standby) traffic from haproxy-serv01 to ccnrl0b2 to test cert works fine

[root@haproxy-serv01 certs]# pcs cluster standby haproxy-serv01


10. Proceed the same steps on haproxy-serv01 and if ok unstandby

[root@haproxy-serv01 certs]# pcs cluster unstandby haproxy-serv01


11. Check all is fine with openssl client with new certificate


Check Root-Chain certificates:

# openssl verify -verbose -x509_strict -CAfile /etc/haproxy/certs/ccnr-ca-prod.crt -CApath  /etc/haproxy/certs/other-domain.your-domain.com.crt{.pem?)
/etc/haproxy/certs/other-domain.your-domain.com.crt: OK

# openssl verify -verbose -x509_strict -CAfile /etc/haproxy/certs/thawte-ca.crt -CApath  /etc/haproxy/certs/www.your-domain.com.crt
/etc/haproxy/certs/www.your-domain.com.crt: OK

################# For other-domain.your-domain.com.crt ##############
Do the same

12. Check cert expiry on /etc/haproxy/certs/other-domain.your-domain.com.crt

# for haproxy-serv02 qa :15443 listeners
[root@haproxy-serv01 certs]# openssl s_client -connect 10.40.18.88:15443 2>/dev/null| openssl x509 -noout -enddate
notAfter=Dec  9 13:52:00 2022 GMT

[root@haproxy-serv01 certs]#  openssl x509 -enddate -noout -in /etc/haproxy/certs/other-domain.your-domain.com.crt 
notAfter=Dec  9 13:52:00 2022 GMT


Check also for 
+++++ other-domain.your-domain.com..key file +++++
 

—–BEGIN PUBLIC KEY—–

—–END PUBLIC KEY—–


# Extracted from /etc/haproxy/certs/other-domain.your-domain.com.crt
 

—–BEGIN RSA PRIVATE KEY—–

—–END RSA PRIVATE KEY—–


+++++

13. Standby haproxy-serv01 node 1

[root@haproxy-serv01 certs]# pcs cluster standby haproxy-serv01

14. Renew Generate CSR out of RSA PRIV KEY and .CRT for second domain other-domain.your-domain.com

# for haproxy-serv01 prod :443 renew listeners
[root@haproxy-serv02 certs]# openssl x509 -x509toreq -in other-domain.your-domain.com.crt  -out domain-certificate.com.csr -signkey domain-certificate.com.key


And repeat the same steps e.g. fill the CSR inside the domain registrer and get the certificate and move to the proxy, check the fingerprint if necessery
 

[root@haproxy-serv01 certs]# openssl x509 -noout -fingerprint -sha256 -inform pem -in other-domain.your-domain.com.crt
SHA256 Fingerprint=60:B5:F0:14:38:F0:1C:51:7D:FD:4D:C1:72:EA:ED:E7:74:CA:53:A9:00:C6:F1:EB:B9:5A:A6:86:73:0A:32:8D


15. Check private key's SHA256 checksum

# openssl pkey -in terminals-priv.KEY -pubout -outform pem | sha256sum
# openssl x509 -in other-domain.your-domain.com.crt -pubkey -noout -outform pem | sha256sum

# openssl pkey -in  www.your-domain.com.crt-priv-KEY -pubout -outform pem | sha256sum

# openssl x509 -in  www.your-domain.com.crt -pubkey -noout -outform pem | sha256sum


16. Check haproxy config is okay before reload cert


# haproxy -c -V -f /etc/haproxy/haproxyprod.cfg
Configuration file is valid


# haproxy -c -V -f /etc/haproxy/haproxyqa.cfg
Configuration file is valid

Good so next we can the output of status of certificate

17.Check old certificates are reachable via VIP IP address

Considering that the cluster VIP Address is lets say 10.40.18.88 and running one of the both nodes cluster to check it do something like:
 

# curl -vvI https://10.40.18.88:443|grep -Ei 'start date|expire date'


As output you should get the old certificate


18. Reload Haproxies for Prod and QA on node1 and node2

You can reload the haproxy clusters processes gracefully something similar to kill -HUP but without loosing most of the current established connections with below cmds:

Login on node1 (haproxy-serv01) do:

# /usr/sbin/haproxy -f /etc/haproxy/haproxyprod.cfg -D -p /var/run/haproxyprod.pid  -sf $(cat /var/run/haproxyprod.pid)
# /usr/sbin/haproxy -f /etc/haproxy/haproxyqa.cfg -D -p /var/run/haproxyqa.pid  -sf $(cat /var/run/haproxyqa.pid)

repeat the same commands on haproxy-serv02 host

19.Check new certificates online and the the haproxy logs

# curl -vvI https://10.50.18.88:443|grep -Ei 'start date|expire date'

*       start date: Jul 15 08:19:46 2022 GMT
*       expire date: Jul 15 08:19:46 2025 GMT


You should get the new certificates Issueing start date and expiry date.

On both nodes (if necessery) do:

# tail -f /var/log/haproxy.log

Zabbix: Monitor Linux rsyslog configured central log server is rechable with check_log_server_status.sh userparameter script

Wednesday, June 8th, 2022

zabbix-monitor-central-log-server-is-reachable-from-host-with-a-userparamater-script-zabbix-logo

On modern Linux OS servers on Redhat / CentOS / Fedora and Debian based distros log server service is usually running on the system  such as rsyslog (rsyslogd) to make sure the logging from services is properly logged in separate logs under /var/log.

A very common practice on critical server machines in terms of data security, where logs produced by rsyslog daermon needs to be copied over network via TCP or UDP protocol immediately is to copy over the /var/log produced logs to another configured central logging server. Then later every piece of bit generated by rsyslogd could be  overseen by a third party auditor person and useful for any investigation in case of logs integrity is required or at worse case if there is a suspicion that system in question is hacked by a malicious hax0r and logs have been "cleaned" up from any traces leading to the intruder (things usually done locally by hackers) or by any automated script exploit tools since yesr.

This doubled logging of system events to external log server  ipmentioned is very common practice by companies to protect their log data and quite useful for logs to be recovered easily later on from the central logging server machine that could be also setup for example to use rsyslogd to receive logs from other Linux machines in circumstances where some log disappears just like that (things i've seen happen) for any strange reason or gets destroyed by the admins mistake locally on machine / or by any other mean such as filesystem gets damaged. a very common practice by companies to protect their log data.  

Monitor remote logging server is reachable with userparameter script

Assuming that you already have setup a logging from the server hostname A towards the Central logging server log storepool and everything works as expected the next logical step is to have at least some basic way to monitor remote logging server configured is still reachable all the time and respectively rsyslog /var/log/*.* logs gets properly produced on remote side for example with something like a simple TCP remote server port check and reported in case of troubles in zabbix.

To solve that simple task for company where I'm employed, I've developed below check_log_server_status.sh:
 

#!/bin/bash
# @@ for TCP @ for UDP
# check_log_server_status.sh Script to check if configured TCP / UDP logging server in /etc/rsyslog.conf is rechable
# report to zabbix
DELIMITER='@@';
GREP_PORT='5145';
CONNECT_TIMEOUT=5;

PORT=$(grep -Ei "*.* $DELIMITER.*:$GREP_PORT" /etc/rsyslog.conf|awk -F : '{ print $2 }'|sort -rn |uniq);

#for i in $(grep -Ei "*.* $DELIMITER.*:$GREP_PORT" /etc/rsyslog.conf |grep -v '\#'|awk -F"$DELIMITER" '{ print $2 }' | awk -F ':' '{ print $1 }'|sort -rn); do
HOST=$(grep -Ei "*.* $DELIMITER.*:$GREP_PORT" /etc/rsyslog.conf |grep -v '\#'|awk -F"$DELIMITER" '{ print $2 }' | awk -F ':' '{ print $1 }'|sort -rn)

# echo $PORT

if [[ ! -z $PORT ]] && [[ ! -z $HOST ]]; then
SSH_RETURN=$(/bin/ssh $HOST -p $PORT -o ConnectTimeout=$CONNECT_TIMEOUT 2>&1);
else
echo "PROBLEM Port $GREP_PORT not defined in /etc/rsyslog.conf";
fi

##echo SSH_RETURN $SSH_RETURN;
#exit 1;
if [[ $(echo $SSH_RETURN |grep -i ‘Connection timed out during banner exchange’ | wc -l) -eq ‘1’ ]]; then
echo "rsyslogd $HOST:$PORT OK";
fi

if [[ $(echo $SSH_RETURN |grep -i ‘Connection refused’ | wc -l) -eq ‘1’ ]]; then
echo "rsyslogd $HOST:$PORT PROBLEM";
fi

#sleep 2;
#done


You can download a copy of the script check_log_server_status.sh here

Depending on the port the remote rsyslogd central logging server is using configure it in the script with respective port through the DELIMITER='@@', GREP_PORT='5145', CONNECT_TIMEOUT=5 values.

The delimiter is setup as usually in /etc/rsyslog.conf this the remote logging server for TCP IP is configured with @@ prefix to indicated TCP mode should be used.

Below is example from /etc/rsyslog.conf of how the rsyslogd server is configured:

[root@Server-hostA /root]# grep -i @@ /etc/rsyslogd.conf
# central remote Log server IP / port
*.* @@10.10.10.1:5145

To use the script on a machine, where you have a properly configured zabbix-agentd service host connected and reporting data to a zabbix-server monitoring server.

1. Set up the script under /usr/local/bin/check_log_server_status.sh

[root@Server-hostA /root ]# vim /usr/local/bin/check_log_server_status.sh

[root@Server-hostA /root ]# chmod +x /usr/local/bin/check_log_server_status.sh

2. Prepare userparameter_check_log_server.conf with log_server.check Item key

[root@Server-hostA zabbix_agentd.d]# cat userparameter_check_log_server.conf 
UserParameter=log_server.check, /usr/local/bin/check_log_server_status.sh

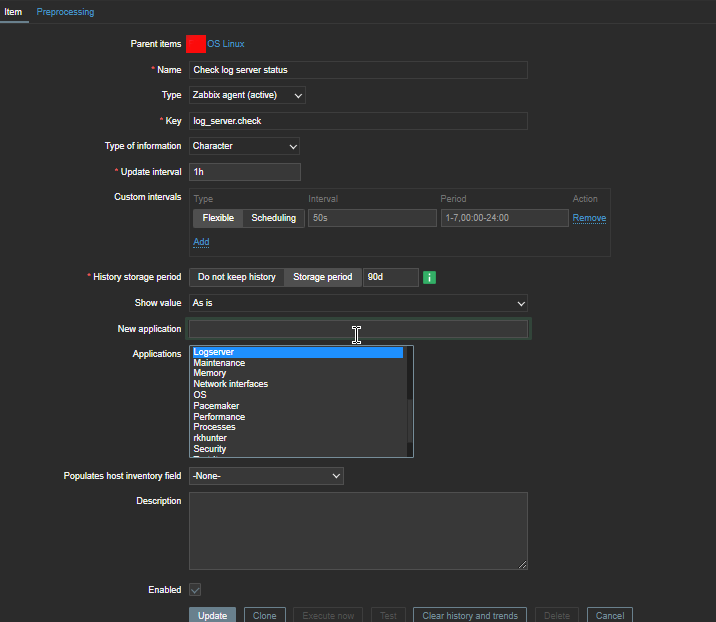
3. Set in Zabbix some Item such as on below screenshot


check-log-server-status-screenshot-linux-item-zabbix.png4. Create a Zabbix trigger 

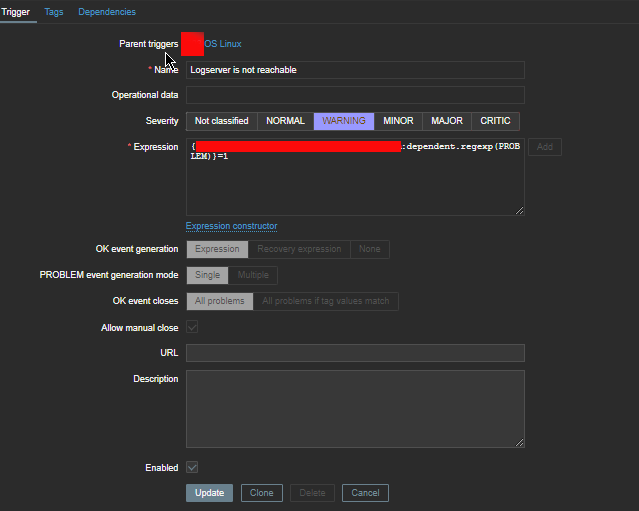
check-log-server-status-trigger-logserver-is-unreachable-zabbix


The redded hided field in Expression field should be substituted with your actual hostname on which the monitor script will run.

Create Linux High Availability Load Balancer Cluster with Keepalived and Haproxy on Linux

Tuesday, March 15th, 2022

keepalived-logo-linux

Configuring a Linux HA (High Availibiltiy) for an Application with Haproxy is already used across many Websites on the Internet and serious corporations that has a crucial infrastructure has long time
adopted and used keepalived to provide High Availability Application level Clustering.
Usually companies choose to use HA Clusters with Haproxy with Pacemaker and Corosync cluster tools.
However one common used alternative solution if you don't have the oportunity to bring up a High availability cluster with Pacemaker / Corosync / pcs (Pacemaker Configuration System) due to fact machines you need to configure the cluster on are not Physical but VMWare Virtual Machines which couldn't not have configured a separate Admin Lans and Heartbeat Lan as we usually do on a Pacemaker Cluster due to the fact the 5 Ethernet LAN Card Interfaces of the VMWare Hypervisor hosts are configured as a BOND (e.g. all the incoming traffic to the VMWare vSphere  HV is received on one Virtual Bond interface).

I assume you have 2 separate vSphere Hypervisor Physical Machines in separate Racks and separate switches hosting the two VMs.
For the article, I'll call the two brand new brought Virtual Machines with some installation automation software such as Terraform or Ansible – vm-server1 and vm-server2 which would have configured some recent version of Linux.

In that scenario to have a High Avaiability for the VMs on Application level and assure at least one of the two is available at a time if one gets broken due toe malfunction of the HV, a Network connectivity issue, or because the VM OS has crashed.
Then one relatively easily solution is to use keepalived and configurea single High Availability Virtual IP (VIP) Address, i.e. 10.10.10.1, which would float among two VMs using keepalived so at a time at least one of the two VMs would be reachable on the Network.
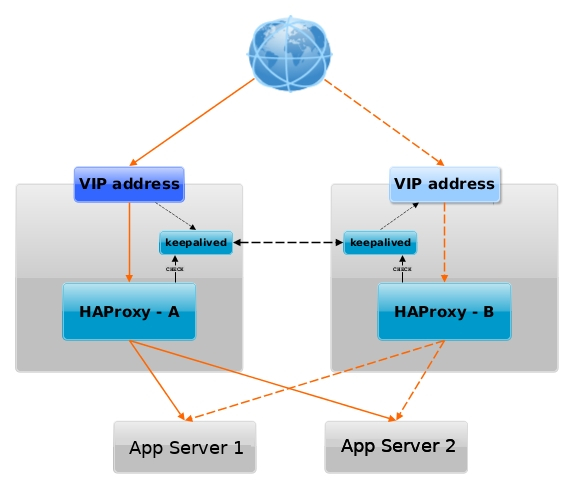
haproxy_keepalived-vip-ip-diagram-linux

Having a VIP IP is quite a common solution in corporate world, as it makes it pretty easy to add F5 Load Balancer in front of the keepalived cluster setup to have a 3 Level of security isolation, which usually consists of:

1. Physical (access to the hardware or Virtualization hosts)
2. System Access (The mechanism to access the system login credetials users / passes, proxies, entry servers leading to DMZ-ed network)
3. Application Level (access to different programs behind L2 and data based on the specific identity of the individual user,
special Secondary UserID,  Factor authentication, biometrics etc.)


1. Install keepalived and haproxy on machines

Depending on the type of Linux OS:

On both machines
 

[root@server1:~]# yum install -y keepalived haproxy

If you have to install keepalived / haproxy on Debian / Ubuntu and other Deb based Linux distros

[root@server1:~]# apt install keepalived haproxy –yes

2. Configure haproxy (haproxy.cfg) on both server1 and server2


Create some /etc/haproxy/haproxy.cfg configuration


[root@server1:~]vim /etc/haproxy/haproxy.cfg

#———————————————————————
# Global settings
#———————————————————————
global
    log          127.0.0.1 local6 debug
    chroot       /var/lib/haproxy
    pidfile      /run/haproxy.pid
    stats socket /var/lib/haproxy/haproxy.sock mode 0600 level admin 
    maxconn      4000
    user         haproxy
    group        haproxy
    daemon
    #debug
    #quiet

#———————————————————————
# common defaults that all the 'listen' and 'backend' sections will
# use if not designated in their block
#———————————————————————
defaults
    mode        tcp
    log         global
#    option      dontlognull
#    option      httpclose
#    option      httplog
#    option      forwardfor
    option      redispatch
    option      log-health-checks
    timeout connect 10000 # default 10 second time out if a backend is not found
    timeout client 300000
    timeout server 300000
    maxconn     60000
    retries     3

#———————————————————————
# round robin balancing between the various backends
#———————————————————————

listen FRONTEND_APPNAME1
        bind 10.10.10.1:15000
        mode tcp
        option tcplog
#        #log global
        log-format [%t]\ %ci:%cp\ %bi:%bp\ %b/%s:%sp\ %Tw/%Tc/%Tt\ %B\ %ts\ %ac/%fc/%bc/%sc/%rc\ %sq/%bq
        balance roundrobin
        timeout client 350000
        timeout server 350000
        timeout connect 35000
        server app-server1 10.10.10.55:30000 weight 1 check port 68888
        server app-server2 10.10.10.55:30000 weight 2 check port 68888

listen FRONTEND_APPNAME2
        bind 10.10.10.1:15000
        mode tcp
        option tcplog
        #log global
        log-format [%t]\ %ci:%cp\ %bi:%bp\ %b/%s:%sp\ %Tw/%Tc/%Tt\ %B\ %ts\ %ac/%fc/%bc/%sc/%rc\ %sq/%bq
        balance roundrobin
        timeout client 350000
        timeout server 350000
        timeout connect 35000
        server app-server1 10.10.10.55:30000 weight 5
        server app-server2 10.10.10.55:30000 weight 5 


You can get a copy of above haproxy.cfg configuration here.
Once configured roll it on.

[root@server1:~]#  systemctl start haproxy
 
[root@server1:~]# ps -ef|grep -i hapro
root      285047       1  0 Mar07 ?        00:00:00 /usr/sbin/haproxy -Ws -f /etc/haproxy/haproxy.cfg -p /run/haproxy.pid
haproxy   285050  285047  0 Mar07 ?        00:00:26 /usr/sbin/haproxy -Ws -f /etc/haproxy/haproxy.cfg -p /run/haproxy.pid

Bring up the haproxy also on server2 machine, by placing same configuration and starting up the proxy.
 

[root@server1:~]vim /etc/haproxy/haproxy.cfg


3. Configure keepalived on both servers

We'll be configuring 2 nodes with keepalived even though if necessery this can be easily extended and you can add more nodes.
First we make a copy of the original or existing server configuration keepalived.conf (just in case we need it later on or if you already had something other configured manually by someone – that could be so on inherited servers by other sysadmin)
 

[root@server1:~]# mv /etc/keepalived/keepalived.conf /etc/keepalived/keepalived.conf.orig
[root@server2:~]# mv /etc/keepalived/keepalived.conf /etc/keepalived/keepalived.conf.orig

a. Configure keepalived to serve as a MASTER Node


[root@server1:~]# vim /etc/keepalived/keepalived.conf

Master Node
global_defs {
  router_id server1-fqdn # The hostname of this host.
  
  enable_script_security
  # Synchro of the state of the connections between the LBs on the eth0 interface
   lvs_sync_daemon eth0
 
notification_email {
        linuxadmin@notify-domain.com     # Email address for notifications 
    }
 notification_email_from keepalived@server1-fqdn        # The from address for the notifications
    smtp_server 127.0.0.1                       # SMTP server address
    smtp_connect_timeout 15
}

vrrp_script haproxy {
  script "killall -0 haproxy"
  interval 2
  weight 2
  user root
}

vrrp_instance LB_VIP_QA {
  virtual_router_id 50
  advert_int 1
  priority 51

  state MASTER
  interface eth0
  smtp_alert          # Enable Notifications Via Email
  
  authentication {
              auth_type PASS
              auth_pass testp141

    }
### Commented because running on VM on VMWare
##    unicast_src_ip 10.44.192.134 # Private IP address of master
##    unicast_peer {
##        10.44.192.135           # Private IP address of the backup haproxy
##   }

#        }
# master node with higher priority preferred node for Virtual IP if both keepalived up
###  priority 51
###  state MASTER
###  interface eth0
  virtual_ipaddress {
     10.10.10.1 dev eth0 # The virtual IP address that will be shared between MASTER and BACKUP
  }
  track_script {
      haproxy
  }
}


 To dowload a copy of the Master keepalived.conf configuration click here

Below are few interesting configuration variables, worthy to mention few words on, most of them are obvious by their names but for more clarity I'll also give a list here with short description of each:


  • vrrp_instance – defines an individual instance of the VRRP protocol running on an interface.
  • state – defines the initial state that the instance should start in (i.e. MASTER / SLAVE )state –
  • interface – defines the interface that VRRP runs on.
  • virtual_router_id – should be unique value per Keepalived Node (otherwise slave master won't function properly)
  • priority – the advertised priority, the higher the priority the more important the respective configured keepalived node is.
  • advert_int – specifies the frequency that advertisements are sent at (1 second, in this case).
  • authentication – specifies the information necessary for servers participating in VRRP to authenticate with each other. In this case, a simple password is defined.
    only the first eight (8) characters will be used as described in  to note is Important thing
    man keepalived.conf – keepalived.conf variables documentation !!! Nota Bene !!! – Password set on each node should match for nodes to be able to authenticate !
  • virtual_ipaddress – defines the IP addresses (there can be multiple) that VRRP is responsible for.
  • notification_email – the notification email to which Alerts will be send in case if keepalived on 1 node is stopped (e.g. the MASTER node switches from host 1 to 2)
  • notification_email_from – email address sender from where email will originte
    ! NB ! In order for notification_email to be working you need to have configured MTA or Mail Relay (set to local MTA) to another SMTP – e.g. have configured something like Postfix, Qmail or Postfix

b. Configure keepalived to serve as a SLAVE Node

[root@server1:~]vim /etc/keepalived/keepalived.conf
 

#Slave keepalived
global_defs {
  router_id server2-fqdn # The hostname of this host!

  enable_script_security
  # Synchro of the state of the connections between the LBs on the eth0 interface
  lvs_sync_daemon eth0
 
notification_email {
        linuxadmin@notify-host.com     # Email address for notifications
    }
 notification_email_from keepalived@server2-fqdn        # The from address for the notifications
    smtp_server 127.0.0.1                       # SMTP server address
    smtp_connect_timeout 15
}

vrrp_script haproxy {
  script "killall -0 haproxy"
  interval 2
  weight 2
  user root
}

vrrp_instance LB_VIP_QA {
  virtual_router_id 50
  advert_int 1
  priority 50

  state BACKUP
  interface eth0
  smtp_alert          # Enable Notifications Via Email

authentication {
              auth_type PASS
              auth_pass testp141
}
### Commented because running on VM on VMWare    
##    unicast_src_ip 10.10.192.135 # Private IP address of master
##    unicast_peer {
##        10.10.192.134         # Private IP address of the backup haproxy
##   }

###  priority 50
###  state BACKUP
###  interface eth0
  virtual_ipaddress {
     10.10.10.1 dev eth0 # The virtual IP address that will be shared betwee MASTER and BACKUP.
  }
  track_script {
    haproxy
  }
}


Download the keepalived.conf slave config here


c. Set required sysctl parameters for haproxy to work as expected
 

[root@server1:~]vim /etc/sysctl.conf
#Haproxy config
# haproxy
net.core.somaxconn=65535
net.ipv4.ip_local_port_range = 1024 65000
net.ipv4.ip_nonlocal_bind = 1
net.ipv4.tcp_tw_reuse = 1
net.ipv4.tcp_max_syn_backlog = 10240
net.ipv4.tcp_max_tw_buckets = 400000
net.ipv4.tcp_max_orphans = 60000
net.ipv4.tcp_synack_retries = 3

4. Test Keepalived keepalived.conf configuration syntax is OK


[root@server1:~]keepalived –config-test
(/etc/keepalived/keepalived.conf: Line 7) Unknown keyword 'lvs_sync_daemon_interface'
(/etc/keepalived/keepalived.conf: Line 21) Unable to set default user for vrrp script haproxy – removing
(/etc/keepalived/keepalived.conf: Line 31) (LB_VIP_QA) Specifying lvs_sync_daemon_interface against a vrrp is deprecated.
(/etc/keepalived/keepalived.conf: Line 31)              Please use global lvs_sync_daemon
(/etc/keepalived/keepalived.conf: Line 35) Truncating auth_pass to 8 characters
(/etc/keepalived/keepalived.conf: Line 50) (LB_VIP_QA) track script haproxy not found, ignoring…

I've experienced this error because first time I've configured keepalived, I did not mention the user with which the vrrp script haproxy should run,
in prior versions of keepalived, leaving the field empty did automatically assumed you have the user with which the vrrp script runs to be set to root
as of RHELs keepalived-2.1.5-6.el8.x86_64, i've been using however this is no longer so and thus in prior configuration as you can see I've
set the user in respective section to root.
The error Unknown keyword 'lvs_sync_daemon_interface'
is also easily fixable by just substituting the lvs_sync_daemon_interface and lvs_sync_daemon and reloading
keepalived etc.

Once keepalived is started and you can see the process on both machines running in process list.

[root@server1:~]ps -ef |grep -i keepalived
root     1190884       1  0 18:50 ?        00:00:00 /usr/sbin/keepalived -D
root     1190885 1190884  0 18:50 ?        00:00:00 /usr/sbin/keepalived -D

Next step is to check the keepalived statuses as well as /var/log/keepalived.log

If everything is configured as expected on both keepalived on first node you should see one is master and one is slave either in the status or the log

[root@server1:~]#systemctl restart keepalived


[root@server1:~]systemctl status keepalived|grep -i state
Mar 14 18:59:02 server1-fqdn Keepalived_vrrp[1192003]: (LB_VIP_QA) Entering MASTER STATE

[root@server1:~]systemctl status keepalived

● keepalived.service – LVS and VRRP High Availability Monitor
   Loaded: loaded (/usr/lib/systemd/system/keepalived.service; enabled; vendor preset: disabled)
   Active: inactive (dead) since Mon 2022-03-14 18:15:51 CET; 32min ago
  Process: 1187587 ExecStart=/usr/sbin/keepalived $KEEPALIVED_OPTIONS (code=exited, status=0/SUCCESS)
 Main PID: 1187589 (code=exited, status=0/SUCCESS)

Mar 14 18:15:04 server1lb-fqdn Keepalived_vrrp[1187590]: Sending gratuitous ARP on eth0 for 10.44.192.142
Mar 14 18:15:50 server1lb-fqdn systemd[1]: Stopping LVS and VRRP High Availability Monitor…
Mar 14 18:15:50 server1lb-fqdn Keepalived[1187589]: Stopping
Mar 14 18:15:50 server1lb-fqdn Keepalived_vrrp[1187590]: (LB_VIP_QA) sent 0 priority
Mar 14 18:15:50 server1lb-fqdn Keepalived_vrrp[1187590]: (LB_VIP_QA) removing VIPs.
Mar 14 18:15:51 server1lb-fqdn Keepalived_vrrp[1187590]: Stopped – used 0.002007 user time, 0.016303 system time
Mar 14 18:15:51 server1lb-fqdn Keepalived[1187589]: CPU usage (self/children) user: 0.000000/0.038715 system: 0.001061/0.166434
Mar 14 18:15:51 server1lb-fqdn Keepalived[1187589]: Stopped Keepalived v2.1.5 (07/13,2020)
Mar 14 18:15:51 server1lb-fqdn systemd[1]: keepalived.service: Succeeded.
Mar 14 18:15:51 server1lb-fqdn systemd[1]: Stopped LVS and VRRP High Availability Monitor

[root@server2:~]systemctl status keepalived|grep -i state
Mar 14 18:59:02 server2-fqdn Keepalived_vrrp[297368]: (LB_VIP_QA) Entering BACKUP STATE

[root@server1:~]# grep -i state /var/log/keepalived.log
Mar 14 18:59:02 server1lb-fqdn Keepalived_vrrp[297368]: (LB_VIP_QA) Entering MASTER STATE
 

a. Fix Keepalived SECURITY VIOLATION – scripts are being executed but script_security not enabled.
 

When configurating keepalived for a first time we have faced the following strange error inside keepalived status inside keepalived.log 
 

Feb 23 14:28:41 server1 Keepalived_vrrp[945478]: SECURITY VIOLATION – scripts are being executed but script_security not enabled.


To fix keepalived SECURITY VIOLATION error:

Add to /etc/keepalived/keepalived.conf on the keepalived node hosts
inside 

global_defs {}

After chunk
 

enable_script_security

include

# Synchro of the state of the connections between the LBs on the eth0 interface
  lvs_sync_daemon_interface eth0


5. Prepare rsyslog configuration and Inlcude additional keepalived options
to force keepalived log into /var/log/keepalived.log

To force keepalived log into /var/log/keepalived.log on RHEL 8 / CentOS and other Redhat Package Manager (RPM) Linux distributions

[root@server1:~]# vim /etc/rsyslog.d/48_keepalived.conf

#2022/02/02: HAProxy logs to local6, save the messages
local7.*                                                /var/log/keepalived.log
if ($programname == 'Keepalived') then -/var/log/keepalived.log
if ($programname == 'Keepalived_vrrp') then -/var/log/keepalived.log
& stop

[root@server:~]# touch /var/log/keepalived.log

Reload rsyslog to load new config
 

[root@server:~]# systemctl restart rsyslog
[root@server:~]# systemctl status rsyslog


rsyslog.service – System Logging Service
   Loaded: loaded (/usr/lib/systemd/system/rsyslog.service; enabled; vendor preset: enabled)
  Drop-In: /etc/systemd/system/rsyslog.service.d
           └─rsyslog-service.conf
   Active: active (running) since Mon 2022-03-07 13:34:38 CET; 1 weeks 0 days ago
     Docs: man:rsyslogd(8)

           https://www.rsyslog.com/doc/
 Main PID: 269574 (rsyslogd)
    Tasks: 6 (limit: 100914)
   Memory: 5.1M
   CGroup: /system.slice/rsyslog.service
           └─269574 /usr/sbin/rsyslogd -n

Mar 15 08:15:16 server1lb-fqdn rsyslogd[269574]: — MARK —
Mar 15 08:35:16 server1lb-fqdn rsyslogd[269574]: — MARK —
Mar 15 08:55:16 server1lb-fqdn rsyslogd[269574]: — MARK —


If once keepalived is loaded but you still have no log written inside /var/log/keepalived.log

[root@server1:~]# vim /etc/sysconfig/keepalived
 KEEPALIVED_OPTIONS="-D -S 7"

[root@server2:~]# vim /etc/sysconfig/keepalived
 KEEPALIVED_OPTIONS="-D -S 7"

[root@server1:~]# systemctl restart keepalived.service
[root@server1:~]#  systemctl status keepalived

● keepalived.service – LVS and VRRP High Availability Monitor
   Loaded: loaded (/usr/lib/systemd/system/keepalived.service; enabled; vendor preset: disabled)
   Active: active (running) since Thu 2022-02-24 12:12:20 CET; 2 weeks 4 days ago
 Main PID: 1030501 (keepalived)
    Tasks: 2 (limit: 100914)
   Memory: 1.8M
   CGroup: /system.slice/keepalived.service
           ├─1030501 /usr/sbin/keepalived -D
           └─1030502 /usr/sbin/keepalived -D

Warning: Journal has been rotated since unit was started. Log output is incomplete or unavailable.

[root@server2:~]# systemctl restart keepalived.service
[root@server2:~]# systemctl status keepalived

6. Monitoring VRRP traffic of the two keepaliveds with tcpdump
 

Once both keepalived are up and running a good thing is to check the VRRP protocol traffic keeps fluently on both machines.
Keepalived VRRP keeps communicating over the TCP / IP Port 112 thus you can simply snoop TCP tracffic on its protocol.
 

[root@server1:~]# tcpdump proto 112

tcpdump: verbose output suppressed, use -v or -vv for full protocol decode
listening on eth0, link-type EN10MB (Ethernet), capture size 262144 bytes
11:08:07.356187 IP server1lb-fqdn > vrrp.mcast.net: VRRPv2, Advertisement, vrid 50, prio 53, authtype simple, intvl 1s, length 20
11:08:08.356297 IP server1lb-fqdn > vrrp.mcast.net: VRRPv2, Advertisement, vrid 50, prio 53, authtype simple, intvl 1s, length 20
11:08:09.356408 IP server1lb-fqdn > vrrp.mcast.net: VRRPv2, Advertisement, vrid 50, prio 53, authtype simple, intvl 1s, length 20
11:08:10.356511 IP server1lb-fqdn > vrrp.mcast.net: VRRPv2, Advertisement, vrid 50, prio 53, authtype simple, intvl 1s, length 20
11:08:11.356655 IP server1lb-fqdn > vrrp.mcast.net: VRRPv2, Advertisement, vrid 50, prio 53, authtype simple, intvl 1s, length 20

[root@server2:~]# tcpdump proto 112

tcpdump: verbose output suppressed, use -v or -vv for full protocol decode
​listening on eth0, link-type EN10MB (Ethernet), capture size 262144 bytes
11:08:07.356187 IP server1lb-fqdn > vrrp.mcast.net: VRRPv2, Advertisement, vrid 50, prio 53, authtype simple, intvl 1s, length 20
11:08:08.356297 IP server1lb-fqdn > vrrp.mcast.net: VRRPv2, Advertisement, vrid 50, prio 53, authtype simple, intvl 1s, length 20
11:08:09.356408 IP server1lb-fqdn > vrrp.mcast.net: VRRPv2, Advertisement, vrid 50, prio 53, authtype simple, intvl 1s, length 20
11:08:10.356511 IP server1lb-fqdn > vrrp.mcast.net: VRRPv2, Advertisement, vrid 50, prio 53, authtype simple, intvl 1s, length 20
11:08:11.356655 IP server1lb-fqdn > vrrp.mcast.net: VRRPv2, Advertisement, vrid 50, prio 53, authtype simple, intvl 1s, length 20

As you can see the VRRP traffic on the network is originating only from server1lb-fqdn, this is so because host server1lb-fqdn is the keepalived configured master node.

It is possible to spoof the password configured to authenticate between two nodes, thus if you're bringing up keepalived service cluster make sure your security is tight at best the machines should be in a special local LAN DMZ, do not configure DMZ on the internet !!! 🙂 Or if you eventually decide to configure keepalived in between remote hosts, make sure you somehow use encrypted VPN or SSH tunnels to tunnel the VRRP traffic.

[root@server1:~]tcpdump proto 112 -vv
tcpdump: listening on eth0, link-type EN10MB (Ethernet), capture size 262144 bytes
11:36:25.530772 IP (tos 0xc0, ttl 255, id 59838, offset 0, flags [none], proto VRRP (112), length 40)
    server1lb-fqdn > vrrp.mcast.net: vrrp server1lb-fqdn > vrrp.mcast.net: VRRPv2, Advertisement, vrid 50, prio 53, authtype simple, intvl 1s, length 20, addrs: VIPIP_QA auth "testp431"
11:36:26.530874 IP (tos 0xc0, ttl 255, id 59839, offset 0, flags [none], proto VRRP (112), length 40)
    server1lb-fqdn > vrrp.mcast.net: vrrp server1lb-fqdn > vrrp.mcast.net: VRRPv2, Advertisement, vrid 50, prio 53, authtype simple, intvl 1s, length 20, addrs: VIPIP_QA auth "testp431"

Lets also check what floating IP is configured on the machines:

[root@server1:~]# ip -brief address show
lo               UNKNOWN        127.0.0.1/8 
eth0             UP             10.10.10.5/26 10.10.10.1/32 

The 10.10.10.5 IP is the main IP set on LAN interface eth0, 10.10.10.1 is the floating IP which as you can see is currently set by keepalived to listen on first node.

[root@server2:~]# ip -brief address show |grep -i 10.10.10.1

An empty output is returned as floating IP is currently configured on server1

To double assure ourselves the IP is assigned on correct machine, lets ping it and check the IP assigned MAC  currently belongs to which machine.
 

[root@server2:~]# ping 10.10.10.1
PING 10.10.10.1 (10.10.10.1) 56(84) bytes of data.
64 bytes from 10.10.10.1: icmp_seq=1 ttl=64 time=0.526 ms
^C
— 10.10.10.1 ping statistics —
1 packets transmitted, 1 received, 0% packet loss, time 0ms
rtt min/avg/max/mdev = 0.526/0.526/0.526/0.000 ms

[root@server2:~]# arp -an |grep -i 10.44.192.142
? (10.10.10.1) at 00:48:54:91:83:7d [ether] on eth0
[root@server2:~]# ip a s|grep -i 00:48:54:91:83:7d
[root@server2:~]# 

As you can see from below output MAC is not found in configured IPs on server2.
 

[root@server1-fqdn:~]# /sbin/ip a s|grep -i 00:48:54:91:83:7d -B1 -A1
 eth0: <BROADCAST,MULTICAST,UP,LOWER_UP> mtu 1500 qdisc mq state UP group default qlen 1000
    link/ether 00:48:54:91:83:7d brd ff:ff:ff:ff:ff:ff
inet 10.10.10.1/26 brd 10.10.1.191 scope global noprefixroute eth0

Pretty much expected MAC is on keepalived node server1.


7. Testing keepalived on server1 and server2 maachines VIP floating IP really works
 

To test the overall configuration just created, you should stop keeaplived on the Master node and in meantime keep an eye on Slave node (server2), whether it can figure out the Master node is gone and switch its
state BACKUP to save MASTER. By changing the secondary (Slave) keepalived to master the floating IP: 10.10.10.1 will be brought up by the scripts on server2.

Lets assume that something went wrong with server1 VM host, for example the machine crashed due to service overload, DDoS or simply a kernel bug or whatever reason.
To simulate that we simply have to stop keepalived, then the broadcasted information on VRRP TCP/IP proto port 112 will be no longer available and keepalived on node server2, once
unable to communicate to server1 should chnage itself to state MASTER.

[root@server1:~]# systemctl stop keepalived
[root@server1:~]# systemctl status keepalived

● keepalived.service – LVS and VRRP High Availability Monitor
   Loaded: loaded (/usr/lib/systemd/system/keepalived.service; enabled; vendor preset: disabled)
   Active: inactive (dead) since Tue 2022-03-15 12:11:33 CET; 3s ago
  Process: 1192001 ExecStart=/usr/sbin/keepalived $KEEPALIVED_OPTIONS (code=exited, status=0/SUCCESS)
 Main PID: 1192002 (code=exited, status=0/SUCCESS)

Mar 14 18:59:07 server1lb-fqdn Keepalived_vrrp[1192003]: Sending gratuitous ARP on eth0 for 10.10.10.1
Mar 15 12:11:32 server1lb-fqdn systemd[1]: Stopping LVS and VRRP High Availability Monitor…
Mar 15 12:11:32 server1lb-fqdn Keepalived[1192002]: Stopping
Mar 15 12:11:32 server1lb-fqdn Keepalived_vrrp[1192003]: (LB_VIP_QA) sent 0 priority
Mar 15 12:11:32 server1lb-fqdn Keepalived_vrrp[1192003]: (LB_VIP_QA) removing VIPs.
Mar 15 12:11:33 server1lb-fqdn Keepalived_vrrp[1192003]: Stopped – used 2.145252 user time, 15.513454 system time
Mar 15 12:11:33 server1lb-fqdn Keepalived[1192002]: CPU usage (self/children) user: 0.000000/44.555362 system: 0.001151/170.118126
Mar 15 12:11:33 server1lb-fqdn Keepalived[1192002]: Stopped Keepalived v2.1.5 (07/13,2020)
Mar 15 12:11:33 server1lb-fqdn systemd[1]: keepalived.service: Succeeded.
Mar 15 12:11:33 server1lb-fqdn systemd[1]: Stopped LVS and VRRP High Availability Monitor.


On keepalived off, you will get also a notification Email on the Receipt Email configured from keepalived.conf from the working keepalived node with a simple message like:

=> VRRP Instance is no longer owning VRRP VIPs <=

Once keepalived is back up you will get another notification like:

=> VRRP Instance is now owning VRRP VIPs <=

[root@server2:~]# systemctl status keepalived
● keepalived.service – LVS and VRRP High Availability Monitor
   Loaded: loaded (/usr/lib/systemd/system/keepalived.service; enabled; vendor preset: disabled)
   Active: active (running) since Mon 2022-03-14 18:13:52 CET; 17h ago
  Process: 297366 ExecStart=/usr/sbin/keepalived $KEEPALIVED_OPTIONS (code=exited, status=0/SUCCESS)
 Main PID: 297367 (keepalived)
    Tasks: 2 (limit: 100914)
   Memory: 2.1M
   CGroup: /system.slice/keepalived.service
           ├─297367 /usr/sbin/keepalived -D -S 7
           └─297368 /usr/sbin/keepalived -D -S 7

Mar 15 12:11:33 server2lb-fqdn Keepalived_vrrp[297368]: Sending gratuitous ARP on eth0 for 10.10.10.1
Mar 15 12:11:33 server2lb-fqdn Keepalived_vrrp[297368]: Remote SMTP server [127.0.0.1]:25 connected.
Mar 15 12:11:33 server2lb-fqdn Keepalived_vrrp[297368]: SMTP alert successfully sent.
Mar 15 12:11:38 server2lb-fqdn Keepalived_vrrp[297368]: (LB_VIP_QA) Sending/queueing gratuitous ARPs on eth0 for 10.10.10.1
Mar 15 12:11:38 server2lb-fqdn Keepalived_vrrp[297368]: Sending gratuitous ARP on eth0 for 10.10.10.1

[root@server2:~]#  ip addr show|grep -i 10.10.10.1
    inet 10.10.10.1/32 scope global eth0
    

As you see the VIP is now set on server2, just like expected – that's OK, everything works as expected. If the IP did not move double check the keepalived.conf on both nodes for errors or misconfigurations.

To recover the initial order of things so server1 is MASTER and server2 SLAVE host, we just have to switch on the keepalived on server1 machine.

[root@server1:~]# systemctl start keepalived

The automatic change of server1 to MASTER node and respective move of the VIP IP is done because of the higher priority (of importance we previously configured on server1 in keepalived.conf).
 

What we learned?
 

So what we learned in  this article?
We have seen how to easily install and configure a High Availability Load balancer with Keepalived with single floating VIP IP address with 1 MASTER and 1 SLAVE host and a Haproxy example config with few frontends / App backends. We have seen how the config can be tested for potential errors and how we can monitor whether the VRRP2 network traffic flows between nodes and how to potentially debug it further if necessery.
Further on rawly explained some of the keepalived configurations but as keepalived can do pretty much more,for anyone seriously willing to deal with keepalived on a daily basis or just fine tune some already existing ones, you better read closely its manual page "man keepalived.conf" as well as the official Redhat Linux documentation page on setting up a Linux cluster with Keepalived (Be prepare for a small nightmare as the documentation of it seems to be a bit chaotic, and even I would say partly missing or opening questions on what does the developers did meant – not strange considering the havoc that is pretty much as everywhere these days.)

Finally once keepalived hosts are prepared, it was shown how to test the keepalived application cluster and Floating IP does move between nodes in case if one of the 2 keepalived nodes is inaccessible.

The same logic can be repeated multiple times and if necessery you can set multiple VIPs to expand the HA reachable IPs solution.
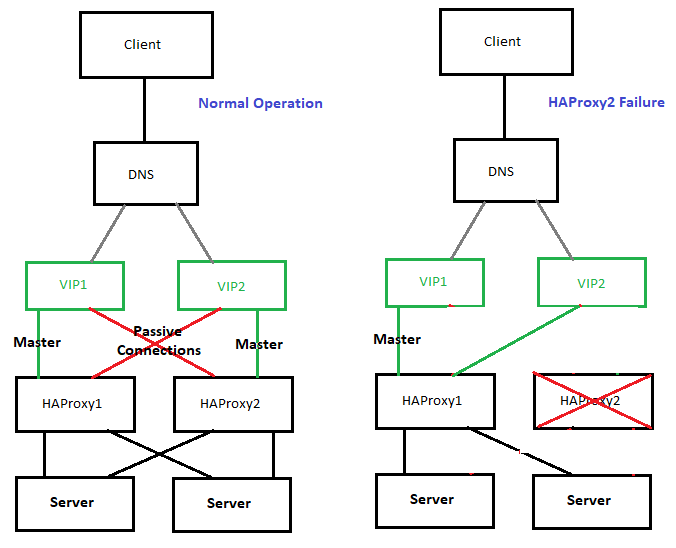
high-availability-with-two-vips-example-diagram

The presented idea is with haproxy forward Proxy server to proxy requests towards Application backend (servince machines), however if you need to set another set of server on the flow to  process HTML / XHTML / PHP / Perl / Python  programming code, with some common Webserver setup ( Nginx / Apache / Tomcat / JBOSS) and enable SSL Secure certificate with lets say Letsencrypt, this can be relatively easily done. If you want to implement letsencrypt and a webserver check this redundant SSL Load Balancing with haproxy & keepalived article.

That's all folks, hope you enjoyed.
If you need to configure keepalived Cluster or a consultancy write your query here 🙂
KVM Virtual Machine RHEL 8.3 Linux install on Redhat 8.3 Linux Hypervisor with custom tailored kickstart.cfg

Friday, January 22nd, 2021

kvm_virtualization-logo-redhat-8.3-install-howto-with-kickstart

If you don't have tried it yet Redhat and CentOS and other RPM based Linux operationg systems that use anaconda installer is generating a kickstart file after being installed under /root/{anaconda-ks.cfg,initial-setup- ks.cfg,original-ks.cfg} immediately after the OS installation completes. Using this Kickstart file template you can automate installation of Redhat installation with exactly the same configuration as many times as you like by directly loading your /root/original-ks.cfg file in RHEL installer.

Here is the official description of Kickstart files from Redhat:

"The Red Hat Enterprise Linux installation process automatically writes a Kickstart file that contains the settings for the installed system. This file is always saved as /root/anaconda-ks.cfg. You may use this file to repeat the installation with identical settings, or modify copies to specify settings for other systems."


Kickstart files contain answers to all questions normally asked by the text / graphical installation program, such as what time zone you want the system to use, how the drives should be partitioned, or which packages should be installed. Providing a prepared Kickstart file when the installation begins therefore allows you to perform the installation automatically, without need for any intervention from the user. This is especially useful when deploying Redhat based distro (RHEL / CentOS / Fedora …) on a large number of systems at once and in general pretty useful if you're into the field of so called "DevOps" system administration and you need to provision a certain set of OS to a multitude of physical servers or create or recreate easily virtual machines with a certain set of configuration.
 

1. Create /vmprivate storage directory where Virtual machines will reside

First step on the Hypervisor host which will hold the future created virtual machines is to create location where it will be created:

[root@redhat ~]#  lvcreate –size 140G –name vmprivate vg00
[root@redhat ~]#  mkfs.ext4 -j -b 4096 /dev/mapper/vg00-vmprivate
[root@redhat ~]# mount /dev/mapper/vg00-vmprivate /vmprivate

To view what is the situation with Logical Volumes and  VG group names:

[root@redhat ~]# vgdisplay -v|grep -i vmprivate -A7 -B7
  Segments               1
  Allocation             inherit
  Read ahead sectors     auto
  – currently set to     8192
  Block device           253:0


  — Logical volume —
  LV Path                /dev/vg00/vmprivate
  LV Name                vmprivate
  VG Name                vg00
  LV UUID                VVUgsf-FXq2-TsMJ-QPLw-7lGb-Dq5m-3J9XJJ
  LV Write Access        read/write
  LV Creation host, time main.hostname.com, 2021-01-20 17:26:11 +0100
  LV Status              available
  # open                 1
  LV Size                150.00 GiB


Note that you'll need to have the size physically available on a SAS / SSD Hard Drive physically connected to Hypervisor Host.

To make the changes Virtual Machines storage location directory permanently mounted add to /etc/fstab

/dev/mapper/vg00-vmprivate  /vmprivate              ext4    defaults,nodev,nosuid 1 2

[root@redhat ~]# echo '/dev/mapper/vg00-vmprivate  /vmprivate              ext4    defaults,nodev,nosuid 1 2' >> /etc/fstab


2. Second we need to install the following set of RPM packages on the Hypervisor Hardware host

[root@redhat ~]# yum install qemu-kvm qemu-img libvirt virt-install libvirt-client virt-manager libguestfs-tools virt-install virt-top -y

3. Enable libvirtd on the host

[root@redhat ~]#  lsmod | grep -i kvm
[root@redhat ~]#  systemctl enable libvirtd

4. Configure network bridging br0 interface on Hypervisor


In /etc/sysconfig/network-scripts/ifcfg-eth0 you need to include:

NM_CONTROLED=NO

Next use nmcli redhat configurator to create the bridge (you can use ip command instead) but since the tool is the redhat way to do it lets do it their way ..

[root@redhat ~]# nmcli connection delete eno3
[root@redhat ~]# nmcli connection add type bridge autoconnect yes con-name br0 ifname br0
[root@redhat ~]# nmcli connection modify br0 ipv4.addresses 10.80.51.16/26 ipv4.method manual
[root@redhat ~]# nmcli connection modify br0 ipv4.gateway 10.80.51.1
[root@redhat ~]# nmcli connection modify br0 ipv4.dns 172.20.88.2
[root@redhat ~]# nmcli connection add type bridge-slave autoconnect yes con-name eno3 ifname eno3 master br0
[root@redhat ~]# nmcli connection up br0

5. Prepare a working kickstart.cfg file for VM


Below is a sample kickstart file I've used to build a working fully functional Virtual Machine with Red Hat Enterprise Linux 8.3 (Ootpa) .

#version=RHEL8
#install
# Run the Setup Agent on first boot
firstboot --enable
ignoredisk --only-use=vda
# Use network installation
#url --url=http://hostname.com/rhel/8/BaseOS
##url --url=http://171.23.8.65/rhel/8/os/BaseOS
# Use text mode install
text
#graphical
# System language
#lang en_US.UTF-8
keyboard --vckeymap=us --xlayouts='us'
# Keyboard layouts
##keyboard us
lang en_US.UTF-8
# Root password
rootpw $6$gTiUCif4$YdKxeewgwYCLS4uRc/XOeKSitvDJNHFycxWVHi.RYGkgKctTMCAiY2TErua5Yh7flw2lUijooOClQQhlbstZ81 --iscrypted
# network-stuff
# place ip=your_VM_IP, netmask, gateway, nameserver hostname 
network --bootproto=static --ip=10.80.21.19 --netmask=255.255.255.192 --gateway=10.80.21.1 --nameserver=172.30.85.2 --device=eth0 --noipv6 --hostname=FQDN.VMhost.com --onboot=yes
# if you need just localhost initially configured uncomment and comment above
##network В --device=lo --hostname=localhost.localdomain
# System authorization information
authconfig --enableshadow --passalgo=sha512 --enablefingerprint
# skipx
skipx
# Firewall configuration
firewall --disabled
# System timezone
timezone Europe/Berlin
# Clear the Master Boot Record
##zerombr
# Repositories
## Add RPM repositories from KS file if necessery
#repo --name=appstream --baseurl=http://hostname.com/rhel/8/AppStream
#repo --name=baseos --baseurl=http://hostname.com/rhel/8/BaseOS
#repo --name=inst.stage2 --baseurl=http://hostname.com ff=/dev/vg0/vmprivate
##repo --name=rhsm-baseos В  В --baseurl=http://172.54.8.65/rhel/8/rhsm/x86_64/BaseOS/
##repo --name=rhsm-appstream --baseurl=http://172.54.8.65/rhel/8/rhsm/x86_64/AppStream/
##repo --name=os-baseos В  В  В --baseurl=http://172.54.9.65/rhel/8/os/BaseOS/
##repo --name=os-appstream В  --baseurl=http://172.54.8.65/rhel/8/os/AppStream/
#repo --name=inst.stage2 --baseurl=http://172.54.8.65/rhel/8/BaseOS
# Disk partitioning information set proper disk sizing
##bootloader --location=mbr --boot-drive=vda
bootloader --append=" crashkernel=auto tsc=reliable divider=10 plymouth.enable=0 console=ttyS0 " --location=mbr --boot-drive=vda
# partition plan
zerombr
clearpart --all --drives=vda --initlabel
part /boot --size=1024 --fstype=ext4 --asprimary
part swap --size=1024
part pv.01 --size=30000 --grow --ondisk=vda
##part pv.0 --size=80000 --fstype=lvmpv
#part pv.0 --size=61440 --fstype=lvmpv
volgroup s pv.01
logvol / --vgname=s --size=15360 --name=root --fstype=ext4
logvol /var/cache/ --vgname=s --size=5120 --name=cache --fstype=ext4 --fsoptions="defaults,nodev,nosuid"
logvol /var/log --vgname=s --size=7680 --name=log --fstype=ext4 --fsoptions="defaults,nodev,noexec,nosuid"
logvol /tmp --vgname=s --size=5120 --name=tmp --fstype=ext4 --fsoptions="defaults,nodev,nosuid"
logvol /home --vgname=s --size=5120 --name=home --fstype=ext4 --fsoptions="defaults,nodev,nosuid"
logvol /opt --vgname=s --size=2048 --name=opt --fstype=ext4 --fsoptions="defaults,nodev,nosuid"
logvol /var/log/audit --vgname=s --size=3072 --name=audit --fstype=ext4 --fsoptions="defaults,nodev,nosuid"
logvol /var/spool --vgname=s --size=2048 --name=spool --fstype=ext4 --fsoptions="defaults,nodev,nosuid"
logvol /var --vgname=s --size=7680 --name=var --fstype=ext4 --fsoptions="defaults,nodev,nosuid"
# SELinux configuration
selinux --disabled
# Installation logging level
logging --level=debug
# reboot automatically
reboot
###
%packages
@standard
python3
pam_ssh_agent_auth
-nmap-ncat
#-plymouth
#-bpftool
-cockpit
#-cryptsetup
-usbutils
#-kmod-kvdo
#-ledmon
#-libstoragemgmt
#-lvm2
#-mdadm
-rsync
#-smartmontools
-sos
-subscription-manager-cockpit
# Tune Linux vm.dirty_background_bytes (IMAGE-439)
# The following tuning causes dirty data to begin to be background flushed at
# 100 Mbytes, so that it writes earlier and more often to avoid a large build
# up and improving overall throughput.
echo "vm.dirty_background_bytes=100000000" >> /etc/sysctl.conf
# Disable kdump
systemctl disable kdump.service
%end

Important note to make here is the MD5 set root password string in (rootpw) line this string can be generated with openssl or mkpasswd commands :

Method 1: use openssl cmd to generate (md5, sha256, sha512) encrypted pass string

[root@redhat ~]# openssl passwd -6 -salt xyz test
$6$xyz$rjarwc/BNZWcH6B31aAXWo1942.i7rCX5AT/oxALL5gCznYVGKh6nycQVZiHDVbnbu0BsQyPfBgqYveKcCgOE0

Note: passing -1 will generate an MD5 password, -5 a SHA256 encryption and -6 SHA512 encrypted string (logically recommended for better security)

Method 2: (md5, sha256, sha512)

[root@redhat ~]# mkpasswd –method=SHA-512 –stdin

The option –method accepts md5, sha-256 and sha-512
Theoretically there is also a kickstart file generator web interface on Redhat's site here however I never used it myself but instead use above kickstart.cfg
 

6. Install the new VM with virt-install cmd


Roll the new preconfigured VM based on above ks template file use some kind of one liner command line  like below:
 

[root@redhat ~]# virt-install -n RHEL8_3-VirtualMachine –description "CentOS 8.3 Virtual Machine" –os-type=Linux –os-variant=rhel8.3 –ram=8192 –vcpus=8 –location=/vmprivate/rhel-server-8.3-x86_64-dvd.iso –disk path=/vmprivate/RHEL8_3-VirtualMachine.img,bus=virtio,size=70 –graphics none –initrd-inject=/root/kickstart.cfg –extra-args "console=ttyS0 ks=file:/kickstart.cfg"

7. Use a tiny shell script to automate VM creation


For some clarity and better automation in case you plan to repeat VM creation you can prepare a tiny bash shell script:
 

#!/bin/sh
KS_FILE='kickstart.cfg';
VM_NAME='RHEL8_3-VirtualMachine';
VM_DESCR='CentOS 8.3 Virtual Machine';
RAM='8192';
CPUS='8';
# size is in Gigabytes
VM_IMG_SIZE='140';
ISO_LOCATION='/vmprivate/rhel-server-8.3-x86_64-dvd.iso';
VM_IMG_FILE_LOC='/vmprivate/RHEL8_3-VirtualMachine.img';

virt-install -n "$VMNAME" –description "$VM_DESCR" –os-type=Linux –os-variant=rhel8.3 –ram=8192 –vcpus=8 –location="$ISO_LOCATION" –disk path=$VM_IMG_FILE,bus=virtio,size=$IMG_VM_SIZE –graphics none –initrd-inject=/root/$KS_FILE –extra-args "console=ttyS0 ks=file:/$KS_FILE"


A copy of virt-install.sh script can be downloaded here

Wait for the installation to finish it should be visualized and if all installation is smooth you should get a login prompt use the password generated with openssl tool and test to login, then disconnect from the machine by pressing CTRL + ] and try to login via TTY with

[root@redhat ~]# virst list –all
 Id   Name        State
—————————
 2    
RHEL8_3-VirtualMachine   running

[root@redhat ~]#  virsh console RHEL8_3-VirtualMachine


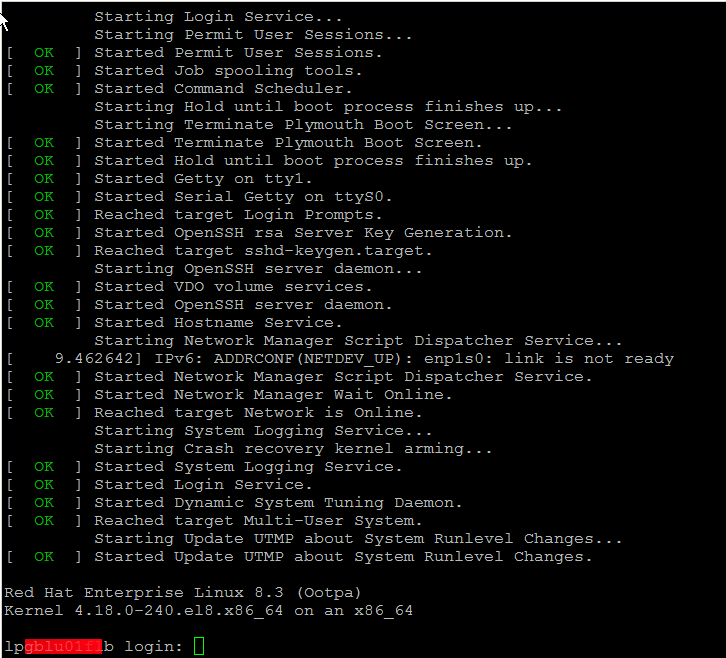
redhat8-login-prompt

One last thing I recommend you check the official documentation on Kickstart2 from CentOS official website

In case if you later need to destroy the VM and the respective created Image file you can do it with:
 

[root@redhat ~]#  virsh destroy RHEL8_3-VirtualMachine
[root@redhat ~]#  virsh undefine RHEL8_3-VirtualMachine

Don't forget to celebreate the success and give this nice article a credit by sharing this nice tutorial with a friend or by placing a link to it from your blog 🙂


Enjoy !

Apache disable requests to not log to access.log Logfile through SetEnvIf and dontlog httpd variables

Monday, October 11th, 2021

apache-disable-certain-strings-from-logging-to-access-log-logo

Logging to Apache access.log is mostly useful as this is a great way to keep log on who visited your website and generate periodic statistics with tools such as Webalizer or Astats to keep track on your visitors and generate various statistics as well as see the number of new visitors as well most visited web pages (the pages which mostly are attracting your web visitors), once the log analysis tool generates its statistics, it can help you understand better which Web spiders visit your website the most (as spiders has a predefined) IP addresses, which can give you insight on various web spider site indexation statistics on Google, Yahoo, Bing etc. . Sometimes however either due to bugs in web spiders algorithms or inconsistencies in your website structure, some of the web pages gets double visited records inside the logs, this could happen for example if your website uses to include iframes.

Having web pages accessed once but logged to be accessed twice hence is erroneous and unwanted, and though that usually have to be fixed by the website programmers, if such approach is not easily doable in the moment and the website is running on critical production system, the double logging of request can be omitted thanks to a small Apache log hack with SetEnvIf Apache config directive. Even if there is no double logging inside Apache log happening it could be that some cron job or automated monitoring scripts or tool such as monit is making periodic requests to Apache and this is garbling your Log Statistics results.

In this short article hence I'll explain how to do remove certain strings to not get logged inside /var/log/httpd/access.log.

1. Check SetEnvIf is Loaded on the Webserver
 

On CentOS / RHEL Linux:

# /sbin/apachectl -M |grep -i setenvif
AH00558: httpd: Could not reliably determine the server's fully qualified domain name, using localhost.localdomain. Set the 'ServerName' directive globally to suppress this message
 setenvif_module (shared)


On Debian / Ubuntu Linux:

/usr/sbin/apache2ctl -M |grep -i setenvif
AH00548: NameVirtualHost has no effect and will be removed in the next release /etc/apache2/sites-enabled/000-default.conf:1
 setenvif_module (shared)


2. Using SetEnvIf to omit certain string to get logged inside apache access.log


SetEnvIf could be used either in some certain domain VirtualHost configuration (if website is configured so), or it can be set as a global Apache rule from the /etc/httpd/conf/httpd.conf 

To use SetEnvIf  you have to place it inside a <Directory …></Directory> configuration block, if it has to be enabled only for a Certain Apache configured directory, otherwise you have to place it in the global apache config section.

To be able to use SetEnvIf, only in a certain directories and subdirectories via .htaccess, you will have defined in <Directory>

AllowOverride FileInfo


The general syntax to omit a certain Apache repeating string from keep logging with SetEnvIf is as follows:
 

SetEnvIf Request_URI "^/WebSiteStructureDirectory/ACCESS_LOG_STRING_TO_REMOVE$" dontlog


General syntax for SetEnvIf is as follows:

SetEnvIf attribute regex env-variable

SetEnvIf attribute regex [!]env-variable[=value] [[!]env-variable[=value]] …

Below is the overall possible attributes to pass as described in mod_setenvif official documentation.
 

  • Host
  • User-Agent
  • Referer
  • Accept-Language
  • Remote_Host: the hostname (if available) of the client making the request.
  • Remote_Addr: the IP address of the client making the request.
  • Server_Addr: the IP address of the server on which the request was received (only with versions later than 2.0.43).
  • Request_Method: the name of the method being used (GET, POST, etc.).
  • Request_Protocol: the name and version of the protocol with which the request was made (e.g., "HTTP/0.9", "HTTP/1.1", etc.).
  • Request_URI: the resource requested on the HTTP request line – generally the portion of the URL following the scheme and host portion without the query string.

Next locate inside the configuration the line:

CustomLog /var/log/apache2/access.log combined


To enable filtering of included strings, you'll have to append env=!dontlog to the end of line.


CustomLog /var/log/apache2/access.log combined env=!dontlog


You might be using something as cronolog for log rotation to prevent your WebServer logs to become too big in size and hard to manage, you can append env=!dontlog to it in same way.

If you haven't used cronolog is it is perhaps best to show you the package description.

server:~# apt-cache show cronolog|grep -i description -A10 -B5
Version: 1.6.2+rpk-2
Installed-Size: 63
Maintainer: Debian QA Group <packages@qa.debian.org>
Architecture: amd64
Depends: perl:any, libc6 (>= 2.4)
Description-en: Logfile rotator for web servers
 A simple program that reads log messages from its input and writes
 them to a set of output files, the names of which are constructed
 using template and the current date and time.  The template uses the
 same format specifiers as the Unix date command (which are the same
 as the standard C strftime library function).
 .
 It intended to be used in conjunction with a Web server, such as
 Apache, to split the access log into daily or monthly logs:
 .
   TransferLog "|/usr/bin/cronolog /var/log/apache/%Y/access.%Y.%m.%d.log"
 .
 A cronosplit script is also included, to convert existing
 traditionally-rotated logs into this rotation format.

Description-md5: 4d5734e5e38bc768dcbffccd2547922f
Homepage: http://www.cronolog.org/
Tag: admin::logging, devel::lang:perl, devel::library, implemented-in::c,
 implemented-in::perl, interface::commandline, role::devel-lib,
 role::program, scope::utility, suite::apache, use::organizing,
 works-with::logfile
Section: web
Priority: optional
Filename: pool/main/c/cronolog/cronolog_1.6.2+rpk-2_amd64.deb
Size: 27912
MD5sum: 215a86766cc8d4434cd52432fd4f8fe7

If you're using cronolog to daily rotate the access.log and you need to filter out the strings out of the logs, you might use something like in httpd.conf:


CustomLog "|/usr/bin/cronolog –symlink=/var/log/httpd/access.log /var/log/httpd/access.log_%Y_%m_%d" combined env=!dontlog


3. Disable Apache logging access.log from certain USERAGENT browser
 

You can do much more with SetEnvIf for example you might want to omit logging requests from a UserAgent (browser) to end up in /dev/null (nowhere), e.g. prevent any Website requests originating from Internet Explorer (MSIE) to not be logged.

SetEnvIf User_Agent "(MSIE)" dontlog

CustomLog /var/log/apache2/access.log combined env=!dontlog


4. Disable Apache logging from requests coming from certain FQDN (Fully Qualified Domain Name) localhost 127.0.0.1 or concrete IP / IPv6 address

SetEnvIf Remote_Host "dns.server.com$" dontlog

CustomLog /var/log/apache2/access.log combined env=!dontlog


Of course for this to work, your website should have a functioning DNS servers and Apache should be configured to be able to resolve remote IPs to back resolve to their respective DNS defined Hostnames.

SetEnvIf recognized also perl PCRE Regular Expressions, if you want to filter out of Apache access log requests incoming from multiple subdomains starting with a certain domain hostname.


SetEnvIf Remote_Host "^example" dontlog

– To not log anything coming from localhost.localdomain address ( 127.0.0.1 ) as well as from some concrete IP address :

SetEnvIf Remote_Addr "127\.0\.0\.1" dontlog

SetEnvIf Remote_Addr "192\.168\.1\.180" dontlog

– To disable IPv6 requests that be coming at the log even though you don't happen to use IPv6 at all

SetEnvIf Request_Addr "::1" dontlog

CustomLog /var/log/apache2/access.log combined env=!dontlog


– Note here it is obligatory to escape the dots '.'


5. Disable robots.txt Web Crawlers requests from being logged in access.log

SetEnvIf Request_URI "^/robots\.txt$" dontlog

CustomLog /var/log/apache2/access.log combined env=!dontlog

Using SetEnvIfNoCase to read incoming useragent / Host / file requests case insensitve

The SetEnvIfNoCase is to be used if you want to threat incoming originators strings as case insensitive, this is useful to omit extraordinary regular expression SetEnvIf rules for lower upper case symbols.

SetEnvIFNoCase User-Agent "Slurp/cat" dontlog
SetEnvIFNoCase User-Agent "Ask Jeeves/Teoma" dontlog
SetEnvIFNoCase User-Agent "Googlebot" dontlog
SetEnvIFNoCase User-Agent "bingbot" dontlog
SetEnvIFNoCase Remote_Host "fastsearch.net$" dontlog

Omit from access.log logging some standard web files .css , .js .ico, .gif , .png and Referrals from own domain

Sometimes your own site scripts do refer to stuff on your own domain that just generates junks in the access.log to keep it off.

SetEnvIfNoCase Request_URI "\.(gif)|(jpg)|(png)|(css)|(js)|(ico)|(eot)$" dontlog


SetEnvIfNoCase Referer "www\.myowndomain\.com" dontlog

CustomLog /var/log/apache2/access.log combined env=!dontlog


6. Disable Apache requests in access.log and error.log completely


Sometimes at rare cases the produced Apache logs and error log is really big and you already have the requests logged in another F5 Load Balancer or Haproxy in front of Apache WebServer or alternatively the logging is not interesting at all as the Web Application served written in ( Perl / Python / Ruby ) does handle the logging itself. 
I've earlier described how this is done in a good amount of details in previous article Disable Apache access.log and error.log logging on Debian Linux and FreeBSD

To disable it you will have to comment out CustomLog or set it to together with ErrorLog to /dev/null in apache2.conf / httpd.conf (depending on the distro)
 

CustomLog /dev/null
ErrorLog /dev/null


7. Restart Apache WebServer to load settings
 

An important to mention is in case you have Webserver with multiple complex configurations and there is a specific log patterns to omit from logs it might be a very good idea to:

a. Create /etc/httpd/conf/dontlog.conf / etc/apache2/dontlog.conf
add inside all your custom dontlog configurations
b. Include dontlog.conf from /etc/httpd/conf/httpd.conf / /etc/apache2/apache2.conf

Finally to make the changes take affect, of course you will need to restart Apache webserver depending on the distro and if it is with systemd or System V:

For systemd RPM based distro:

systemctl restart httpd

or for Deb based Debian etc.

systemctl apache2 restart

On old System V scripts systems:

On RedHat / CentOS etc. restart Apache with:
 

/etc/init.d/httpd restart


On Deb based SystemV:
 

/etc/init.d/apache2 restart


What we learned ?
 

We have learned about SetEnvIf how it can be used to prevent certain requests strings getting logged into access.log through dontlog, how to completely stop certain browser based on a useragent from logging to the access.log as well as how to omit from logging certain requests incoming from certain IP addresses / IPv6 or FQDNs and how to stop robots.txt from being logged to httpd log.


Finally we have learned how to completely disable Apache logging if logging is handled by other external application.
 

How to redirect TCP port traffic from Internet Public IP host to remote local LAN server, Redirect traffic for Apache Webserver, MySQL, or other TCP service to remote host

Thursday, September 23rd, 2021


Linux-redirect-forward-tcp-ip-port-traffic-from-internet-to-remote-internet-LAN-IP-server-rinetd-iptables-redir


1. Use the good old times rinetd – internet “redirection server” service


Perhaps, many people who are younger wouldn't remember rinetd's use was pretty common on old Linuxes in the age where iptables was not on the scene and its predecessor ipchains was so common.
In the raise of mass internet rinetd started loosing its popularity because the service was exposed to the outer world and due to security holes and many exploits circulating the script kiddie communities
many servers get hacked "pwned" in the jargon of the script kiddies.

rinetd is still available even in modern Linuxes and over the last years I did not heard any severe security concerns regarding it, but the old paranoia perhaps and the set to oblivion makes it still unpopular soluttion for port redirect today in year 2021.
However for a local secured DMZ lans I can tell you that its use is mostly useful and I chooes to use it myself, everynow and then due to its simplicity to configure and use.
rinetd is pretty standard among unixes and is also available in old Sun OS / Solaris and BSD-es and pretty much everything on the Unix scene.

Below is excerpt from 'man rinetd':


DESCRIPTION
     rinetd redirects TCP connections from one IP address and port to another. rinetd is a single-process server which handles any number of connections to the address/port pairs
     specified in the file /etc/rinetd.conf.  Since rinetd runs as a single process using nonblocking I/O, it is able to redirect a large number of connections without a severe im‐
     pact on the machine. This makes it practical to run TCP services on machines inside an IP masquerading firewall. rinetd does not redirect FTP, because FTP requires more than
     one socket.
     rinetd is typically launched at boot time, using the following syntax:      /usr/sbin/rinetd      The configuration file is found in the file /etc/rinetd.conf, unless another file is specified using the -c command line option.

To use rinetd on any LInux distro you have to install and enable it with apt or yum as usual. For example on my Debian GNU / Linux home machine to use it I had to install .deb package, enable and start it it via systemd :


server:~# apt install –yes rinetd

server:~#  systemctl enable rinetd


server:~#  systemctl start rinetd


server:~#  systemctl status rinetd
● rinetd.service
   Loaded: loaded (/etc/init.d/rinetd; generated)
   Active: active (running) since Tue 2021-09-21 10:48:20 EEST; 2 days ago
     Docs: man:systemd-sysv-generator(8)
    Tasks: 1 (limit: 4915)
   Memory: 892.0K
   CGroup: /system.slice/rinetd.service
           └─1364 /usr/sbin/rinetd


rinetd is doing the traffic redirect via a separate process daemon, in order for it to function once you have service up check daemon is up as well.

root@server:/home/hipo# ps -ef|grep -i rinet
root       359     1  0 16:10 ?        00:00:00 /usr/sbin/rinetd
root       824 26430  0 16:10 pts/0    00:00:00 grep -i rinet

+ Configuring a new port redirect with rinetd


Is pretty straight forward everything is handled via one single configuration – /etc/rinetd.conf

The format (syntax) of a forwarding rule is as follows:

     [bindaddress] [bindport] [connectaddress] [connectport]


Besides that rinetd , could be used as a primitive firewall substitute to iptables, general syntax of allow deny an IP address is done with (allow, deny) keywords:
 

allow 192.168.2.*
deny 192.168.2.1?


To enable logging to external file ,you'll have to include in the configuration:

# logging information
logfile /var/log/rinetd.log

Here is an example rinetd.conf configuration, redirecting tcp mysql 3306, nginx on port 80 and a second web service frontend for ILO to server reachable via port 8888 and a redirect from External IP to local IP SMTP server.


#
# this is the configuration file for rinetd, the internet redirection server
#
# you may specify global allow and deny rules here
# only ip addresses are matched, hostnames cannot be specified here
# the wildcards you may use are * and ?
#
# allow 192.168.2.*
# deny 192.168.2.1?


#
# forwarding rules come here
#
# you may specify allow and deny rules after a specific forwarding rule
# to apply to only that forwarding rule
#
# bindadress    bindport  connectaddress  connectport


# logging information
logfile /var/log/rinetd.log
83.228.93.76        80            192.168.0.20       80
192.168.0.2        3306            192.168.0.19        3306
83.228.93.76        443            192.168.0.20       443
# enable for access to ILO
83.228.93.76        8888            192.168.1.25 443

127.0.0.1    25    192.168.0.19    25


83.228.93.76 is my external ( Public )  IP internet address where 192.168.0.20, 192.168.0.19, 192.168.0.20 (are the DMZ-ed Lan internal IPs) with various services.

To identify the services for which rinetd is properly configured to redirect / forward traffic you can see it with netstat or the newer ss command
 

root@server:/home/hipo# netstat -tap|grep -i rinet
tcp        0      0 www.pc-freak.net:8888   0.0.0.0:*               LISTEN      13511/rinetd      
tcp        0      0 www.pc-freak.n:http-alt 0.0.0.0:*               LISTEN      21176/rinetd        
tcp        0      0 www.pc-freak.net:443   0.0.0.0:*               LISTEN      21176/rinetd      


+ Using rinetd to redirect External interface IP to loopback's port (127.0.0.1)


If you have the need to redirect an External connectable living service be it apache mysql / privoxy / squid or whatever rinetd is perhaps the tool of choice (especially since there is no way to do it with iptables.

If you want to redirect all traffic which is accessed via Linux's loopback interface (localhost) to be reaching a remote host 11.5.8.1 on TCP port 1083 and 1888, use below config

# bindadress    bindport  connectaddress  connectport
11.5.8.1        1083            127.0.0.1       1083
11.5.8.1        1888            127.0.0.1       1888


For a quick and dirty solution to redirect traffic rinetd is very useful, however you'll have to keep in mind that if you want to redirect traffic for tens of thousands of connections constantly originating from the internet you might end up with some disconnects as well as notice a increased use of rinetd CPU use with the incrased number of forwarded connections.


2. Redirect TCP / IP port using DNAT iptables firewall rules


Lets say you have some proxy, webservice or whatever service running on port 5900 to be redirected with iptables.
The easeiest legacy way is to simply add the redirection rules to /etc/rc.local​. In newer Linuxes rc.local so if you decide to use,
you'll have to enable rc.local , I've written earlier a short article on how to enable rc.local on newer Debian, Fedora, CentOS


# redirect 5900 TCP service 
sysctl -w net.ipv4.conf.all.route_localnet=1
iptables -t nat -I PREROUTING -p tcp –dport 5900 -j REDIRECT –to-ports 5900
iptables -t nat -I OUTPUT -p tcp -o lo –dport 5900 -j REDIRECT –to-ports 5900
iptables -t nat -A OUTPUT -o lo -d 127.0.0.1 -p tcp –dport 5900 -j DNAT  –to-destination 192.168.1.8:5900
iptables -t nat -I OUTPUT –source 0/0 –destination 0/0 -p tcp –dport 5900 -j REDIRECT –to-ports 5900


Here is another two example which redirects port 2208 (which has configured a bind listener for SSH on Internal host 192.168.0.209:2208) from External Internet IP address (XXX.YYY.ZZZ.XYZ) 
 

# Port redirect for SSH to VM on openxen internal Local lan server 192.168.0.209 
-A PREROUTING  -p tcp –dport 2208 -j DNAT –to-destination 192.168.0.209:2208
-A POSTROUTING -p tcp –dst 192.168.0.209 –dport 2208 -j SNAT –to-source 83.228.93.76


3. Redirect TCP traffic connections with redir tool


If you look for an easy straight forward way to redirect TCP traffic, installing and using redir (ready compiled program) might be a good idea.


root@server:~# apt-cache show redir|grep -i desc -A5 -B5
Version: 3.2-1
Installed-Size: 60
Maintainer: Lucas Kanashiro <kanashiro@debian.org>
Architecture: amd64
Depends: libc6 (>= 2.15)
Description-en: Redirect TCP connections
 It can run under inetd or stand alone (in which case it handles multiple
 connections).  It is 8 bit clean, not limited to line mode, is small and
 light. Supports transparency, FTP redirects, http proxying, NAT and bandwidth
 limiting.
 .
 redir is all you need to redirect traffic across firewalls that authenticate
 based on an IP address etc. No need for the firewall toolkit. The
 functionality of inetd/tcpd and "redir" will allow you to do everything you
 need without screwy telnet/ftp etc gateways. (I assume you are running IP
 Masquerading of course.)

Description-md5: 2089a3403d126a5a0bcf29b22b68406d
Homepage: https://github.com/troglobit/redir
Tag: interface::daemon, network::server, network::service, role::program,
 use::proxying
Section: net
Priority: optional


server:~# apt-get install –yes redir

Here is a short description taken from its man page 'man redir'


DESCRIPTION
     redir redirects TCP connections coming in on a local port, [SRC]:PORT, to a specified address/port combination, [DST]:PORT.  Both the SRC and DST arguments can be left out,
     redir will then use 0.0.0.0.

     redir can be run either from inetd or as a standalone daemon.  In –inetd mode the listening SRC:PORT combo is handled by another process, usually inetd, and a connected
     socket is handed over to redir via stdin.  Hence only [DST]:PORT is required in –inetd mode.  In standalone mode redir can run either in the foreground, -n, or in the back‐
     ground, detached like a proper UNIX daemon.  This is the default.  When running in the foreground log messages are also printed to stderr, unless the -s flag is given.

     Depending on how redir was compiled, not all options may be available.


+ Use redir to redirect TCP traffic one time


Lets say you have a MySQL running on remote machine on some internal or external IP address, lets say 192.168.0.200 and you want to redirect all traffic from remote host to the machine (192.168.0.50), where you run your Apache Webserver, which you want to configure to use
as MySQL localhost TCP port 3306.

Assuming there are no irewall restrictions between Host A (192.168.0.50) and Host B (192.168.0.200) is already permitting connectivity on TCP/IP port 3306 between the two machines.

To open redirection from localhost on 192.168.0.50 -> 192.168.0.200:


server:~# redir –laddr=127.0.0.1 –lport=3306 –caddr=192.168.0.200 –cport=3306


If you need other third party hosts to be additionally reaching 192.168.0.200 via 192.168.0.50 TCP 3306.

root@server:~# redir –laddr=192.168.0.50 –lport=3306 –caddr=192.168.0.200 –cport=3306


Of course once you close, the /dev/tty or /dev/vty console the connection redirect will be cancelled.


+ Making TCP port forwarding from Host A to Host B permanent


One solution to make the redir setup rules permanent is to use –rinetd option or simply background the process, nevertheless I prefer to use instead GNU Screen.
If you don't know screen is a vVrtual Console Emulation manager with VT100/ANSI terminal emulation to so, if you don't have screen present on the host install it with whatever Linux OS package manager is present and run:


root@server:~#screen -dm bash -c 'redir –laddr=127.0.0.1 –lport=3306 –caddr=192.168.0.200 –cport=3306'


That would run it into screen session and detach so you can later connect, if you want you can make redir to also log connections via syslog with ( -s) option.

I found also useful to be able to track real time what's going on currently with the opened redirect socket by changing redir log level.

Accepted log level is:


  -l, –loglevel=LEVEL
             Set log level: none, err, notice, info, debug.  Default is notice.


root@server:/ # screen -dm bash -c 'redir –laddr=127.0.0.1 –lport=3308 –caddr=192.168.0.200 –cport=3306 -l debug'


To test connectivity works as expected use telnet:
 

root@server:/ # telnet localhost 3308
Trying 127.0.0.1…
Connected to localhost.
Escape character is '^]'.
g
5.5.5-10.3.29-MariaDB-0+deb10u1-log�+c2nWG>B���o+#ly=bT^]79mysql_native_password

6#HY000Proxy header is not accepted from 192.168.0.19 Connection closed by foreign host.

once you attach to screen session with


root@server:/home #  screen -r


You will get connectivity attempt from localhost logged : .
 

redir[10640]: listening on 127.0.0.1:3306
redir[10640]: target is 192.168.0.200:3306
redir[10640]: Waiting for client to connect on server socket …
redir[10640]: target is 192.168.0.200:3306
redir[10640]: Waiting for client to connect on server socket …
redir[10793]: peer IP is 127.0.0.1
redir[10793]: peer socket is 25592
redir[10793]: target IP address is 192.168.0.200
redir[10793]: target port is 3306
redir[10793]: Connecting 127.0.0.1:25592 to 127.0.0.1:3306
redir[10793]: Entering copyloop() – timeout is 0
redir[10793]: Disconnect after 1 sec, 165 bytes in, 4 bytes out

The downsides of using redir is redirection is handled by the separate process which is all time hanging in the process list, as well as the connection redirection speed of incoming connections might be about at least 30% slower to if you simply use a software (firewall ) redirect such as iptables. If you use something like kernel IP set ( ipsets ). If you hear of ipset for a first time and you wander whta it is below is short package description.


root@server:/root# apt-cache show ipset|grep -i description -A13 -B5
Maintainer: Debian Netfilter Packaging Team <pkg-netfilter-team@lists.alioth.debian.org>
Architecture: amd64
Provides: ipset-6.38
Depends: iptables, libc6 (>= 2.4), libipset11 (>= 6.38-1~)
Breaks: xtables-addons-common (<< 1.41~)
Description-en: administration tool for kernel IP sets
 IP sets are a framework inside the Linux 2.4.x and 2.6.x kernel which can be
 administered by the ipset(8) utility. Depending on the type, currently an
 IP set may store IP addresses, (TCP/UDP) port numbers or IP addresses with
 MAC addresses in a  way which ensures lightning speed when matching an
 entry against a set.
 .
 If you want to
 .
  * store multiple IP addresses or port numbers and match against the
    entire collection using a single iptables rule.
  * dynamically update iptables rules against IP addresses or ports without
    performance penalty.
  * express complex IP address and ports based rulesets with a single
    iptables rule and benefit from the speed of IP sets.

 .
 then IP sets may be the proper tool for you.
Description-md5: d87e199641d9d6fbb0e52a65cf412bde
Homepage: http://ipset.netfilter.org/
Tag: implemented-in::c, role::program
Section: net
Priority: optional
Filename: pool/main/i/ipset/ipset_6.38-1.2_amd64.deb
Size: 50684
MD5sum: 095760c5db23552a9ae180bd58bc8efb
SHA256: 2e2d1c3d494fe32755324bf040ffcb614cf180327736c22168b4ddf51d462522

Change Windows 10 default lock screen image via win registry LockScreenImage key change

Tuesday, September 21st, 2021

fix-lock-screen-missing-change-option-on-windows-10-windows-registry-icon

If you do work for a corporation on a Windows machine that is part of Windows Active Directory domain or a Microsoft 365 environment and your Domain admimistrator after some of the scheduled updates. Has enforced a Windows lock screen image change.
You  might be surprised to have some annoying corporation logo picture shown as a default Lock Screen image on your computer on next reoboot. Perhaps for some people it doesn't matter but for as a person who seriously like customizations, and a valuer of
freedom having an enforced picture logo each time I press CTRL + L (To lock my computer) is really annoying.

The logical question hence was how to reverse my desired image as  a default lock screen to enkoy. Some would enjoy some relaxing picture of a Woods, Cave or whatever Natural place landscape. I personally prefer simplicity so I simply use a simple purely black
background.

To do it you'll have anyways to have some kind of superuser access to the computer. At the company I'm epmloyeed, it is possible to temporary request Administrator access this is done via a software installed on the machine. So once I request it I become
Administratof of machine for 20 minutes. In that time I do used a 'Run as Administartor' command prompt cmd.exe and inside Windows registry do the following Registry change.

The first logical thing to do is to try to manually set the picture via:
 

Settings ->  Lock Screen

But unfortunately as you can see in below screenshot, there was no way to change the LockScreen background image.

Windows-settings-lockscreen-screenshot

In Windows Registry Editor

I had to go to registry path


[HKEY_LOCAL_MACHINE\SOFTWARE\Policies\Microsoft\Windows\.]

And from there in create a new "String Value" key
 

"LockScreenImage"


so full registry key path should be equal to:


[HKEY_LOCAL_MACHINE\SOFTWARE\Policies\Microsoft\Windows\Personalization\LockScreenImage]"

The value to set is:

C:\Users\a768839\Desktop\var-stuff\background\Desired-background-picture.jpg

windows-registry-change-lock-screen-background-picture-from-registry-screenshot

If you want to set a black background picture for LockScreen like me you can download my black background picture from here.

That's all press CTRL + L  key combination and the black screen background lock screen picture will appear !

Hopefully the Domain admin, would not soon enforce some policty to update the registry keys or return your old registry database from backup if something crashs out with something strange to break just set configuration.

To test whether the setting will stay permanent after the next scheduled Windows PC update of policies enforced by the Active Directory (AD) sysadmin, run manually from CMD.EXE

C:\> gpupdate /force


The command will download latest policies from Windows Domain, try to lock the screen once again with Control + L, if the background picture is still there most likely the Picture change would stay for a long.
If you get again the corporation preset domain background instead,  you're out of luck and will have to follow the same steps every, now and then after a domani policy update.

Enjoy your new smooth LockScreen Image 🙂


Defining multiple short Server Hostname aliases via SSH config files and defining multiple ssh options for it, Use passwordless authentication via public keys

Thursday, September 16th, 2021

using-ssh-host-acronym-aliases-ssh-client-explained-openssh-logo

In case you have to access multiple servers from your terminal client such as gnome-terminal, kterminal (if on Linux) or something such as mobaxterm + cygwin (if on Windows) with an opens ssh client (ssh command). There is a nifty trick to save time and keyboard typing through creating shortcuts aliases by adding few definitions inside your $HOME/.ssh/config ( ~/.ssh/config ) for your local non root user or even make the configuration system wide (for all existing local /etc/passwd users) via /etc/ssh/ssh_config.
By adding a pseudonym alias for each server it makes sysadmin life much easier as you don't have to type in each time the FQDN (Fully Qualified Domain Name) hostname of remote accessed Linux / Unix / BSD / Mac OS or even Windows sshd ready hosts accessible via remote TCP/IP port 22.


1. Adding local user remote server pointer aliases via ~/.ssh/config


The file ~/.ssh/config is read by the ssh client part of the openssh-client (Linux OS package) on each invokement of the client, and besides defining a pseudonym for the hosts you like to save you time when accessing remote host and hence increase your productivity. Moreover you can also define various other nice options through it to define specifics of remote ssh session for each desired host such as remote host default SSH port (for example if your OpenSSHD is configured to run on non-standard SSH port as lets say 2022 instead of default port TCP 22 for some reason, e.g. security through obscurity etc.).


The general syntax of .ssh/config file si simplistic, it goes like this:
 

Host MACHNE_HOSTNAME

SSH_OPTION1 value1
SSH_OPTION1 value1 value2
SSH_OPTION2 value1 value2


Host MACHNE_HOSTNAME

SSH_OPTION value
SSH_OPTION1 value1 value2

  • Another understood syntax if you prefer to not have empty whitespaces is to use ( = )
    between the parameter name and values.

Host MACHINE_HOSTNAME
SSH_config=value
SSH_config1=value1 value2

  • All empty lines and lines starting with the hash shebang sign ( # ) would be ignored.
  • All values are case-sensitive, but parameter names are not.

If you have never so far used the $HOME/.ssh/config you would have to create the file and set the proper permissions to it like so:

mkdir -p $HOME/.ssh
chmod 0700 $HOME/.ssh


Below are examples taken from my .ssh/config configuration for all subdomains for my pcfreak.org domain


# Ask for password for every subdomain under pc-freak.net for security
Host *.pcfreak.org
user hipopo
passwordauthentication yes
StrictHostKeyChecking no

# ssh public Key authentication automatic login
Host www1.pc-freak.net
user hipopo
Port 22
passwordauthentication no
StrictHostKeyChecking no

UserKnownHostsFile /dev/null

Host haproxy2
    Hostname 213.91.190.233
    User root
    Port 2218
    PubkeyAuthentication yes
    IdentityFile ~/.ssh/haproxy2.pub    
    StrictHostKeyChecking no
    LogLevel INFO     

Host pcfrxenweb
    Hostname 83.228.93.76
    User root
    Port 2218

    PubkeyAuthentication yes
    IdentityFile ~/.ssh/pcfrxenweb.key    
    StrictHostKeyChecking no

Host pcfreak-sf
    Hostname 91.92.15.51
    User root
    Port 2209
    PreferredAuthentications password
    StrictHostKeyChecking no

    Compression yes


As you can see from above configuration the Hostname could be referring either to IP address or to Hostname.

Now to connect to defined IP 91.92.15.51 you can simply refer to its alias

$ ssh pcfreak-sf -v

and you end up into the machine ssh on port 2209 and you will be prompted for a password.

$ ssh pcfrxenweb -v


would lead to IP 83.228.93.76 SSH on Port 2218 and will use the defined public key for a passwordless login and will save you the password typing each time.

Above ssh command is a short alias you can further use instead of every time typing:

$ ssh -i ~/.ssh/pcfrxenweb.key -p 2218 root@83.228.93.76

There is another nifty trick worthy to mention, if you have a defined hostname such as the above config haproxy2 to use a certain variables, but you would like to override some option for example you don't want to connet by default with User root, but some other local account, lets say ssh as devuser@haproxy2 you can type:

$ ssh -o "User=dev" devuser

StrictHostKeyChecking no

– variable will instruct the ssh to not check if the finger print of remote host has changed. Usually this finger print check sum changes in case if for example for some reason the opensshd gets updated or the default /etc/ssh/ssh_host_dsa_key /etc/ssh/sshd_host_dsa_* files have changed due to some reason.
Of course you should use this option only if you tend to access your remote host via a secured VPN or local network, otherwise the Host Key change could be an indicator someone is trying to intercept your ssh session.


Compression yes


– variable  enables compression of connection saves few bits was useful in the old modem telephone lines but still could save you few bits
It is also possible to define a full range of IP addresses to be accessed with one single public rsa / dsa key

Below .ssh/config
 

Host 192.168.5.?
     Hostname 192.168.2.18
     User admin
     IdentityFile ~/.ssh/id_ed25519.pub


Would instruct each host attemted to be reached in the IP range of 192.168.2.1-254 to be automatically reachable by default with ssh client with admin user and the respective ed25519.pub key.
 

$ ssh 192.168.1.[1-254] -v


2. Adding ssh client options system wide for all existing local or remote LDAP login users


The way to add any Host block is absolutely the same as with a default user except you need to add the configuration to /etc/ssh/ssh_config. Here is a confiugaration from mine Latest Debian Linux

$ cat /etc/ssh/ssh_config

# This is the ssh client system-wide configuration file.  See
# ssh_config(5) for more information.  This file provides defaults for
# users, and the values can be changed in per-user configuration files
# or on the command line.

# Configuration data is parsed as follows:
#  1. command line options
#  2. user-specific file
#  3. system-wide file
# Any configuration value is only changed the first time it is set.
# Thus, host-specific definitions should be at the beginning of the
# configuration file, and defaults at the end.

# Site-wide defaults for some commonly used options.  For a comprehensive
# list of available options, their meanings and defaults, please see the
# ssh_config(5) man page.

Host *
#   ForwardAgent no
#   ForwardX11 no
#   ForwardX11Trusted yes
#   PasswordAuthentication yes
#   HostbasedAuthentication no
#   GSSAPIAuthentication no
#   GSSAPIDelegateCredentials no
#   GSSAPIKeyExchange no
#   GSSAPITrustDNS no
#   BatchMode no
#   CheckHostIP yes
#   AddressFamily any
#   ConnectTimeout 0
#   StrictHostKeyChecking ask
#   IdentityFile ~/.ssh/id_rsa
#   IdentityFile ~/.ssh/id_dsa
#   IdentityFile ~/.ssh/id_ecdsa
#   IdentityFile ~/.ssh/id_ed25519
#   Port 22
#   Protocol 2
#   Ciphers aes128-ctr,aes192-ctr,aes256-ctr,aes128-cbc,3des-cbc
#   MACs hmac-md5,hmac-sha1,umac-64@openssh.com
#   EscapeChar ~
#   Tunnel no
#   TunnelDevice any:any
#   PermitLocalCommand no
#   VisualHostKey no
#   ProxyCommand ssh -q -W %h:%p gateway.example.com
#   RekeyLimit 1G 1h
    SendEnv LANG LC_*
    HashKnownHosts yes
    GSSAPIAuthentication yes

As you can see pretty much can be enabled by default such as the forwarding of the Authentication agent option ( -A ) option, necessery for some Company server environments to be anbled. So if you have to connect to remote host with enabled Agent Forwarding instead of typing

ssh -A user@remotehostname


To enable Agent Forwarding instead of

ssh -X user@remotehostname


Simply uncomment and set to yes
 

ForwardX11 yes
ForwardX11Trusted yes


Just simply uncomment above's config ForwardAgent no

As you can see ssh could do pretty much, you can configure enable SSH Tunneling or run via a Proxy with the ProxyCommand (If it is the first time you hear about ProxyCommand I warmly recommend you check my previous article – How to pass SSH traffic through a secured Corporate Proxy Server with corkscrew).

Sometimes for a defines hostname, due to changes on remote server ssh configuration, SSH encryption type or a host key removal you might end up with issues connecting, therefore to override all the previously defined options inside .ssh/config by ignoring the configuration with -F /dev/null

$ ssh -F /dev/null user@freak -v


What we learned ?

To sum it up In this article, we have learned how to easify the stressed sysadmin life, by adding Aliases with certain port numbering and configurations for different remote SSH administrated Linux / Unix, hosts via local ~/.ssh/config or global wide /etc/ssh/ssh_config configuration options, as well as how already applied configuration from ~/.ssh/config affecting each user ssh command execution, could be overriden.

Fix Out of inodes on Postfix Linux Mail Cluster. How to clean up filesystem running out of Inodes, Filesystem inodes on partition is 100% full

Wednesday, August 25th, 2021

Inode_Entry_inode-table-content

Recently we have faced a strange issue with with one of our Clustered Postfix Mail servers (the cluster is with 2 nodes that each has configured Postfix daemon mail servers (running on an OpenVZ virtualized environment).
A heartbeat that checks liveability of clusters and switches nodes in case of one of the two gets broken due to some reason), pretty much a standard SMTP cluster.

So far so good but since the cluster is a kind of abondoned and is pretty much legacy nowadays and used just for some Monitoring emails from different scripts and systems on servers, it was not really checked thoroughfully for years and logically out of sudden the alarming email content sent via the cluster stopped working.

The normal sysadmin job here  was to analyze what is going on with the cluster and fix it ASAP. After some very basic analyzing we catched the problem is caused by a  "inodes full" (100% of available inodes were occupied) problem, e.g. file system run out of inodes on both machines perhaps due to a pengine heartbeat process  bug  leading to producing a high number of .bz2 pengine recovery archive files stored in /var/lib/pengine>

Below are the few steps taken to analyze and fix the problem.
 

1. Finding out about the the system run out of inodes problem


After logging on to system and not finding something immediately is wrong with inodes, all I can see from crm_mon is cluster was broken.
A plenty of emails were left inside the postfix mail queue visible with a standard command

[root@smtp1: ~ ]# postqueue -p

It took me a while to find ot the problem is with inodes because a simple df -h  was showing systems have enough space but still cluster quorum was not complete.
A bit of further investigation led me to a  simple df -i reporting the number of inodes on the local filesystems on both our SMTP1 and SMTP2 got all occupied.

[root@smtp1: ~ ]# df -i
Filesystem            Inodes   IUsed   IFree IUse% Mounted on
/dev/simfs            500000   500000  0   100% /
none                   65536      61   65475    1% /dev

As you can see the number of inodes on the Virual Machine are unfortunately depleted

Next step was to check directories occupying most inodes, as this is the place from where files could be temporary moved to a remote server filesystem or moved to another partition with space on a server locally attached drives.
Below command gives an ordered list with directories locally under the mail root filesystem / and its respective occupied number files / inodes,
the more files under a directory the more inodes are being occupied by the files on the filesystem.


run-out-if-inodes-what-is-inode-find-out-which-filesystem-or-directory-eating-up-all-your-system-inodes-linux_inode_diagram.gif
1.1 Getting which directory consumes most of the inodes on the systems


[root@smtp1: ~ ]# { find / -xdev -printf '%h\n' | sort | uniq -c | sort -k 1 -n; } 2>/dev/null
….
…..

…….
    586 /usr/lib64/python2.4
    664 /usr/lib64
    671 /usr/share/man/man8
    860 /usr/bin
   1006 /usr/share/man/man1
   1124 /usr/share/man/man3p
   1246 /var/lib/Pegasus/prev_repository_2009-03-10-1236698426.308128000.rpmsave/root#cimv2/classes
   1246 /var/lib/Pegasus/prev_repository_2009-05-18-1242636104.524113000.rpmsave/root#cimv2/classes
   1246 /var/lib/Pegasus/prev_repository_2009-11-06-1257494054.380244000.rpmsave/root#cimv2/classes
   1246 /var/lib/Pegasus/prev_repository_2010-08-04-1280907760.750543000.rpmsave/root#cimv2/classes
   1381 /var/lib/Pegasus/prev_repository_2010-11-15-1289811714.398469000.rpmsave/root#cimv2/classes
   1381 /var/lib/Pegasus/prev_repository_2012-03-19-1332151633.572875000.rpmsave/root#cimv2/classes
   1398 /var/lib/Pegasus/repository/root#cimv2/classes
   1696 /usr/share/man/man3
   400816 /var/lib/pengine

Note, the above command orders the files from bottom to top order and obviosuly the bottleneck directory that is over-eating Filesystem inodes with an exceeding amount of files is
/var/lib/pengine
 

2. Backup old multitude of files just in case of something goes wrong with the cluster after some files are wiped out


The next logical step of course is to check what is going on inside /var/lib/pengine just to find a very ,very large amount of pe-input-*NUMBER*.bz2 files were suddenly produced.


[root@smtp1: ~ ]# ls -1 pe-input*.bz2 | wc -l
 400816


The files are produced by the pengine process which is one of the processes that is controlling the heartbeat cluster state, presumably it is done by running process:

[root@smtp1: ~ ]# ps -ef|grep -i pengine
24        5649  5521  0 Aug10 ?        00:00:26 /usr/lib64/heartbeat/pengine


Hence in order to fix the issue, to prevent some inconsistencies in the cluster due to the file deletion,  copied the whole directory to another mounted parition (you can mount it remotely with sshfs for example) or use a local one if you have one:

[root@smtp1: ~ ]# cp -rpf /var/lib/pengine /mnt/attached_storage


and proceeded to clean up some old multitde of files that are older than 2 years of times (720 days):


3. Clean  up /var/lib/pengine files that are older than two years with short loop and find command


First I made a list with all the files to be removed in external text file and quickly reviewed it by lessing it like so

[root@smtp1: ~ ]#  cd /var/lib/pengine
[root@smtp1: ~ ]# find . -type f -mtime +720|grep -v pe-error.last | grep -v pe-input.last |grep -v pe-warn.last -fprint /home/myuser/pengine_older_than_720days.txt
[root@smtp1: ~ ]# less /home/myuser/pengine_older_than_720days.txt


Once reviewing commands I've used below command to delete the files you can run below command do delete all older than 2 years that are different from pe-error.last / pe-input.last / pre-warn.last which might be needed for proper cluster operation.

[root@smtp1: ~ ]#  for i in $(find . -type f -mtime +720 -exec echo '{}' \;|grep -v pe-error.last | grep -v pe-input.last |grep -v pe-warn.last); do echo $i; done


Another approach to the situation is to simply review all the files inside /var/lib/pengine and delete files based on year of creation, for example to delete all files in /var/lib/pengine from 2010, you can run something like:
 

[root@smtp1: ~ ]# for i in $(ls -al|grep -i ' 2010 ' | awk '{ print $9 }' |grep -v 'pe-warn.last'); do rm -f $i; done


4. Monitor real time inodes freeing

While doing the clerance of old unnecessery pengine heartbeat archives you can open another ssh console to the server and view how the inodes gets freed up with a command like:


# check if inodes is not being rapidly decreased

[root@csmtp1: ~ ]# watch 'df -i'


5. Restart basic Linux services producing pid files and logs etc. to make then workable (some services might not be notified the inodes on the Hard drive are freed up)

Because the hard drive on the system was full some services started to misbehaving and /var/log logging was impacted so I had to also restart them in our case this is the heartbeat itself
that  checks clusters nodes availability as well as the logging daemon service rsyslog


# restart rsyslog and heartbeat services
[root@csmtp1: ~ ]# /etc/init.d/heartbeat restart
[root@csmtp1: ~ ]# /etc/init.d/rsyslog restart

The systems had been a data integrity legacy service samhain so I had to restart this service as well to reforce the /var/log/samhain log file to again continusly start writting data to HDD.

# Restart samhain service init script 
[root@csmtp1: ~ ]# /etc/init.d/samhain restart


6. Check up enough inodes are freed up with df

[root@smtp1 log]# df -i
Filesystem Inodes IUsed IFree IUse% Mounted on
/dev/simfs 500000 410531 19469 91% /
none 65536 61 65475 1% /dev


I had to repeat the same process on the second Postfix cluster node smtp2, and after all the steps like below check the status of smtp2 node and the postfix queue, following same procedure made the second smtp2 cluster member as expected 🙂


7. Check the cluster node quorum is complete, e.g. postfix cluster is operating normally


# Test if email cluster is ok with pacemaker resource cluster manager – lt-crm_mon
 

[root@csmtp1: ~ ]# crm_mon -1
============
Last updated: Tue Aug 10 18:10:48 2021
Stack: Heartbeat
Current DC: smtp2.fqdn.com (bfb3d029-89a8-41f6-a9f0-52d377cacd83) – partition with quorum
Version: 1.0.12-unknown
2 Nodes configured, unknown expected votes
4 Resources configured.
============

Online: [ smtp2.fqdn.com smtp1.fqdn.com ]

failover-ip (ocf::heartbeat:IPaddr2): Started csmtp1.ikossvan.de
Clone Set: postfix_clone
Started: [ smtp2.fqdn.com smtp1fqdn.com ]
Clone Set: pingd_clone
Started: [ smtp2.fqdn.com smtp1.fqdn.com ]
Clone Set: mailto_clone
Started: [ smtp2.fqdn.com smtp1.fqdn.com ]


8.  Force resend a few hundred thousands of emails left in the email queue


After some inodes gets freed up due to the file deletion, i've reforced a couple of times the queued mail servers to be immediately resent to remote mail destinations with cmd:


# force emails in queue to be resend with postfix

[root@smtp1: ~ ]# sendmail -q


– It was useful to watch in real time how the queued emails are quickly decreased (queued mails are successfully sent to destination addresses) with:


# Monitor  the decereasing size of the email queue
[root@smtp1: ~ ]# watch 'postqueue -p|grep -i '@'|wc -l'

ASCII Art studio – A powerful ASCII art editor for Windows / Playscii a cool looking text editor for Linux

Monday, June 28th, 2021

This post is just informative for Text Geeks who are in love with ASCII Art, it is a bit of rant as I will say nothing new, but I thought it might be of interest to some console maniac out there 🙂

ascii art studio aas program windows xp professional drawing program screenshot

While checking stuff on Internet I've stumbled on interesting ASCII arts freak software – >ASCII Art Studio. ASCII Art Studio is unfortunately needs licensing is not Free Software. But anyways, for anyone willing to draw pro ASCII art pictures it is a must see. Check it out;

Isn't it like a Plain Text pro Photoshop ? 🙂 Its a pity we don't have a Linux / BSD Release of this wonderful piece of software. I've tried with WINE (Windows Emulator) on Linux to make the Ascii Art Studio work but that was a fail. It seems only way to make it work is have Windows as a worst case install a Virtual Machine with VirtualBox / Vmware and run it inside if you don't have a Windows PC at hand.

Of course there are stuff on Linux to ascii art edit you can use if you want to have a native software to edit ASCIIs such as Playscii. Unfortunately Playscii is not an easy one to install and the software doesn't have a prepared rpm or deb binary you can easily roll on the OS and you have to manually build all required python modules and have a working version of python3 to be able to make it work.

I did not have much time to test to install it and since I faced issues with plascii install I just abandoned it. If some geek has some more time anyways I guess it is worse to give it a try below is 2 screenshots from PLAYSCII official download page. 

playscii_shot1-official.

As you see authors of the open source playscii whose source is available via github choose to have an amazing looking ascii art text menus, though for daily ASCII art editing it is perhaps much more complicated to use than the simlistic ASCII Art Studio

playscii_shot2-official

There is other stuff for Linux to do ASCII Art files text edit like:
JaVE (this one I don't personally like because it is Java Based),  Ascii Art Maker or Pablow Draw Linux (unfortunately this 2 ones are proprietary).