Posts Tagged ‘checking’

Zabbix script to track arp address cache loss (arp incomplete) from Linux server to gateway IP

Tuesday, January 30th, 2024

Zabbix_arp-network-incomplete-check-logo.svg

Some of the Linux servers recently, I'm responsible had a very annoying issue recently. The problem is ARP address to default configured server gateway is being lost, every now and then and it takes up time, fot the remote CISCO router to realize the problem and resolve it. We have debugged with the Network expert colleague, while he was checking the Cisco router and we were checking the arp table on the Linux server with arp command. And we came to conclusion this behavior is due to some network mess because of too many NAT address configurations on the network or due to a Cisco bug. The colleagues asked Cisco but cisco does not have any solution to the issue and the only close work around for the gateway loosing the mac is to set a network rule on the Cisco router to flush its arp record for the server it was loosing the MAC address for.
This does not really solve completely the problem but at least, once we run into the issue, it gets resolved as quick as 5 minutes time. }

As we run a cluster environment it is useful to Monitor and know immediately once we hit into the MAC gateway disappear issue and if the issue persists, exclude the Linux node from the Cluster so we don't loose connection traffic.
For the purpose of Monitoring MAC state from the Linux haproxy machine towards the Network router GW, I have developed a small userparameter script, that is periodically checking the state of the MAC address of the IP address of remote gateway host and log to a external file for any problems with incomplete MAC address of the Remote configured default router.

In case if you happen to need the same MAC address state monitoring for your servers, I though that might be of a help to anyone out there.
To monitor MAC address incomplete state with Zabbix, do the following:
 

1. Create  userparamater_arp_gw_check.conf Zabbix script
 

# cat userparameter_arp_gw_check.conf 
UserParameter=arp.check,/usr/local/bin/check_gw_arp.sh


2. Create the following shell script /usr/local/bin/check_gw_arp.sh


#!/bin/bash
# simple script to run on cron peridically or via zabbix userparameter
# to track arp loss issues to gateway IP
#gw_ip='192.168.0.55';
gw_ip=$(ip route show|grep -i default|awk '{ print $3 }');
log_f='/var/log/arp_incomplete.log';
grep_word='incomplete';
inactive_status=$(arp -n "$gw_ip" |grep -i $grep_word);
# if GW incomplete record empty all is ok
if [[ $inactive_status == ” ]]; then 
echo $gw_ip OK 1; 
else 
# log inactive MAC to gw_ip
echo "$(date '+%Y-%m-%d %H:%M:%S')" "ARP_ERROR $inactive_status 0" | tee -a $log_f 2>&1 >/dev/null;
# printout to zabbix
echo "1 ARP FAILED: $inactive_status"; 
fi

You can download the check_gw_arp.sh here.

The script is supposed to automatically grep for the Default Gateway router IP, however before setting it up. Run it and make sure this corresponds correctly to the default Gateway IP MAC you would like to monitor.
 

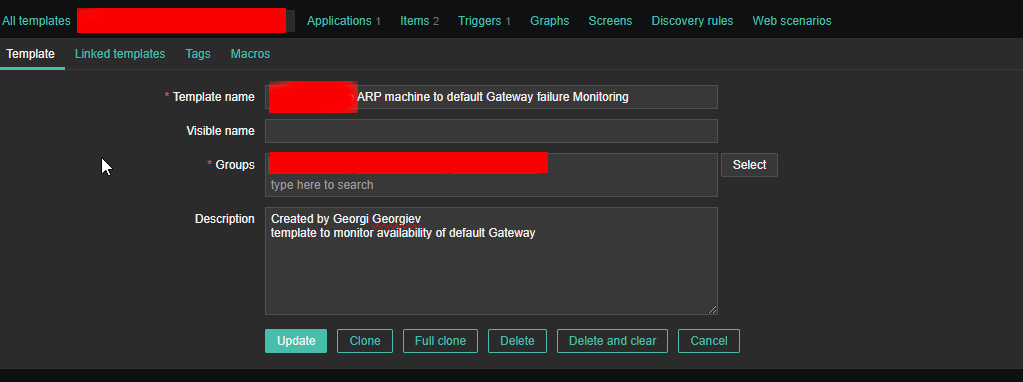
3. Create New Zabbix Template for ARP incomplete monitoring
 

arp-machine-to-default-gateway-failure-monitoring-template-screenshot

Create Application 

*Name
Default Gateway ARP state

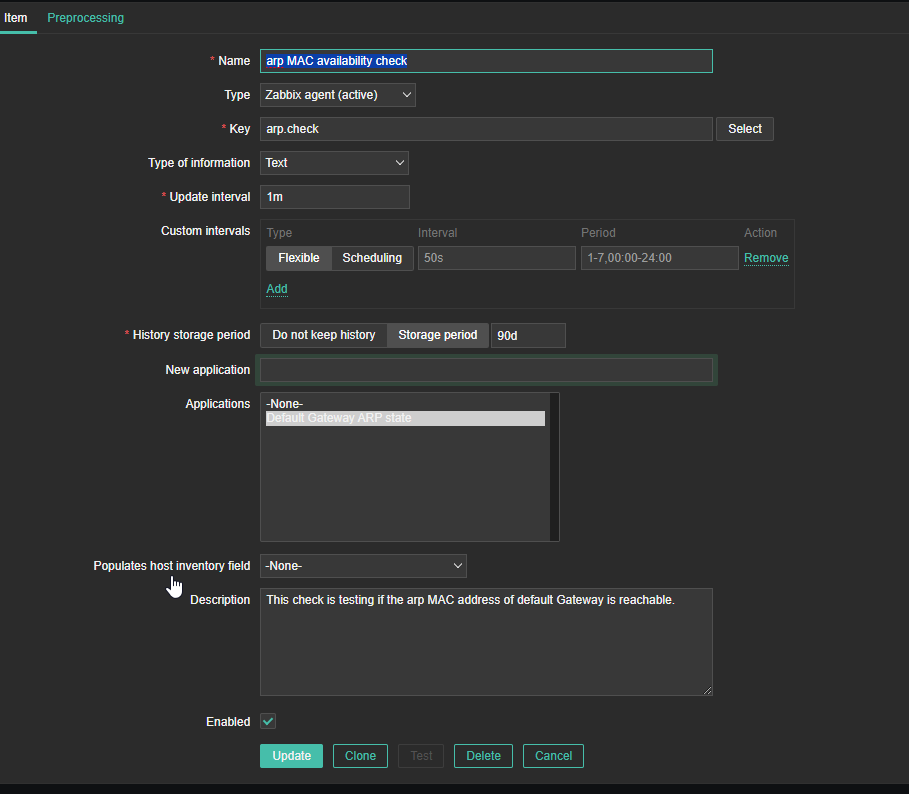
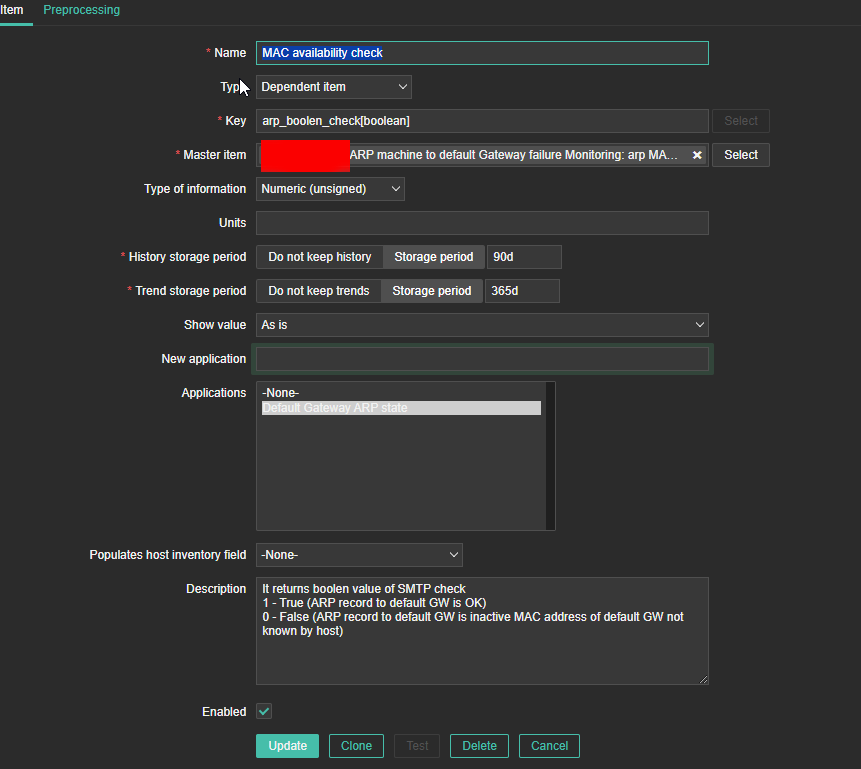
4. Create Item and Dependent Item 
 

Create Zabbix Item and Dependent Item like this

arp-machine-to-default-gateway-failure-monitoring-item-screenshot


arp-machine-to-default-gateway-failure-monitoring-item1-screenshot

arp-machine-to-default-gateway-failure-monitoring-item2-screenshot


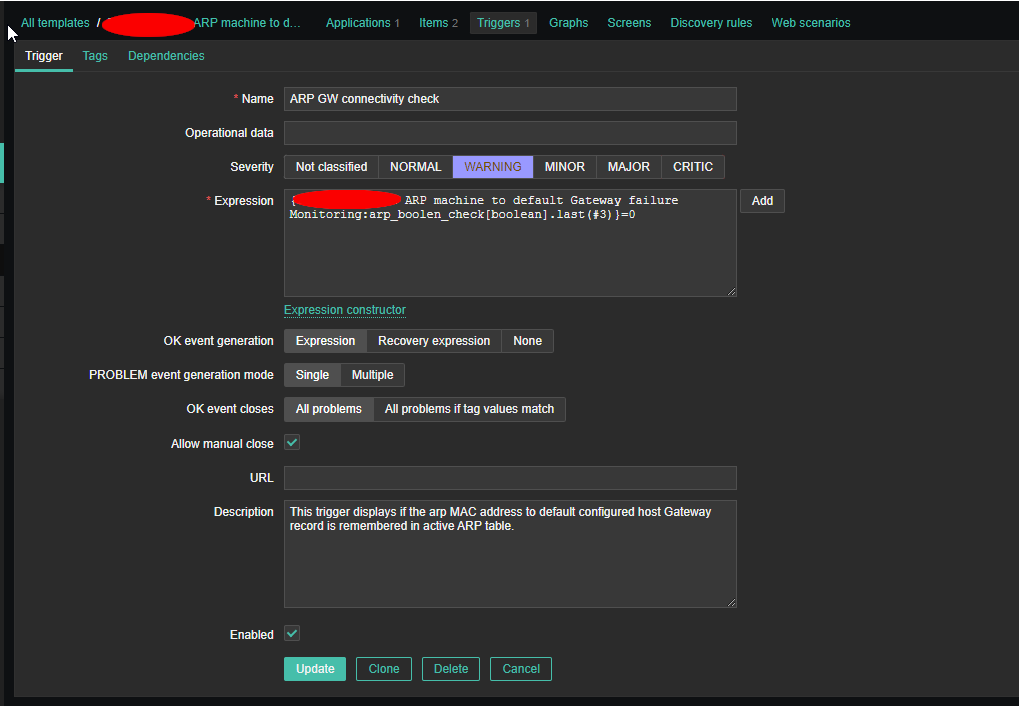
5. Create Trigger to trigger WARNING or whatever you like
 

arp-machine-to-default-gateway-failure-monitoring-trigger-screenshot


arp-machine-to-default-gateway-failure-monitoring-trigger1-screenshot

arp-machine-to-default-gateway-failure-monitoring-trigger2-screenshot


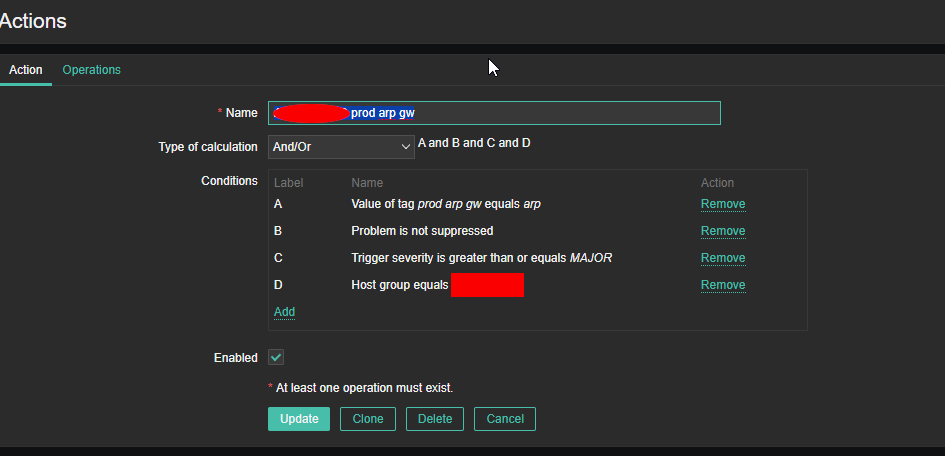
6. Create Zabbix Action to notify via Email etc.
 

arp-machine-to-default-gateway-failure-monitoring-action1-screenshot


arp-machine-to-default-gateway-failure-monitoring-action2-screenshot

That's all. Once you set up this few little things, you can enjoy having monitoring Alerts for your ARP state incomplete on your Linux / Unix servers.
Enjoy !

Install and configure rkhunter for improved security on a PCI DSS Linux / BSD servers with no access to Internet

Wednesday, November 10th, 2021

install-and-configure-rkhunter-with-tightened-security-variables-rkhunter-logo

rkhunter or Rootkit Hunter scans systems for known and unknown rootkits. The tool is not new and most system administrators that has to mantain some good security servers perhaps already use it in their daily sysadmin tasks.

It does this by comparing SHA-1 Hashes of important files with known good ones in online databases, searching for default directories (of rootkits), wrong permissions, hidden files, suspicious strings in kernel modules, commmon backdoors, sniffers and exploits as well as other special tests mostly for Linux and FreeBSD though a ports for other UNIX operating systems like Solaris etc. are perhaps available. rkhunter is notable due to its inclusion in popular mainstream FOSS operating systems (CentOS, Fedora,Debian, Ubuntu etc.).

Even though rkhunter is not rapidly improved over the last 3 years (its last Official version release was on 20th of Febuary 2018), it is a good tool that helps to strengthen even further security and it is often a requirement for Unix servers systems that should follow the PCI DSS Standards (Payment Card Industry Data Security Standards).

Configuring rkhunter is a pretty straight forward if you don't have too much requirements but I decided to write this article for the reason there are fwe interesting options that you might want to adopt in configuration to whitelist any files that are reported as Warnings, as well as how to set a configuration that sets a stricter security checks than the installation defaults. 

1. Install rkhunter .deb / .rpm package depending on the Linux distro or BSD

  • If you have to place it on a Redhat based distro CentOS / Redhat / Fedora

[root@Centos ~]# yum install -y rkhunter


  • On Debian distros the package name is equevallent to install there exec usual:

root@debian:~# apt install –yes rkhunter

  • On FreeBSD / NetBSD or other BSD forks you can install it from the BSD "World" ports system or install it from a precompiled binary.

freebsd# pkg install rkhunter

One important note to make here is to have a fully functional Alarming from rkhunter, you will have to have a fully functional configured postfix / exim / qmail whatever mail server to relay via official SMTP so you the Warning Alarm emails be able to reach your preferred Alarm email address. If you haven't installed postfix for example and configure it you might do.

– On Deb based distros 

[root@Centos ~]#yum install postfix


– On RPM based distros

root@debian:~# apt-get install –yes postfix


and as minimum, further on configure some functional Email Relay server within /etc/postfix/main.cf
 

# vi /etc/postfix/main.cf
relayhost = [relay.smtp-server.com]

2. Prepare rkhunter.conf initial configuration


Depending on what kind of files are present on the filesystem it could be for some reasons some standard package binaries has to be excluded for verification, because they possess unusual permissions because of manual sys admin monification this is done with the rkhunter variable PKGMGR_NO_VRFY.

If remote logging is configured on the system via something like rsyslog you will want to specificly tell it to rkhunter so this check as a possible security issue is skipped via ALLOW_SYSLOG_REMOTE_LOGGING=1. 

In case if remote root login via SSH protocol is disabled via /etc/ssh/sshd_config
PermitRootLogin no variable, the variable to include is ALLOW_SSH_ROOT_USER=no

It is useful to also increase the hashing check algorithm for security default one SHA256 you might want to change to SHA512, this is done via rkhunter.conf var HASH_CMD=SHA512

Triggering new email Warnings has to be configured so you receive, new mails at a preconfigured mailbox of your choice via variable
MAIL-ON-WARNING=SetMailAddress


# vi /etc/rkhunter.conf

PKGMGR_NO_VRFY=/usr/bin/su

PKGMGR_NO_VRFY=/usr/bin/passwd

ALLOW_SYSLOG_REMOTE_LOGGING=1

# Needed for corosync/pacemaker since update 19.11.2020

ALLOWDEVFILE=/dev/shm/qb-*/qb-*

# enabled ssh root access skip

ALLOW_SSH_ROOT_USER=no

HASH_CMD=SHA512

# Email address to sent alert in case of Warnings

MAIL-ON-WARNING=Your-Customer@Your-Email-Server-Destination-Address.com

MAIL-ON-WARNING=Your-Second-Peronsl-Email-Address@SMTP-Server.com

DISABLE_TESTS=os_specific


Optionally if you're using something specific such as corosync / pacemaker High Availability cluster or some specific software that is creating /dev/ files identified as potential Risks you might want to add more rkhunter.conf options like:
 

# Allow PCS/Pacemaker/Corosync
ALLOWDEVFILE=/dev/shm/qb-attrd-*
ALLOWDEVFILE=/dev/shm/qb-cfg-*
ALLOWDEVFILE=/dev/shm/qb-cib_rw-*
ALLOWDEVFILE=/dev/shm/qb-cib_shm-*
ALLOWDEVFILE=/dev/shm/qb-corosync-*
ALLOWDEVFILE=/dev/shm/qb-cpg-*
ALLOWDEVFILE=/dev/shm/qb-lrmd-*
ALLOWDEVFILE=/dev/shm/qb-pengine-*
ALLOWDEVFILE=/dev/shm/qb-quorum-*
ALLOWDEVFILE=/dev/shm/qb-stonith-*
ALLOWDEVFILE=/dev/shm/pulse-shm-*
ALLOWDEVFILE=/dev/md/md-device-map
# Needed for corosync/pacemaker since update 19.11.2020
ALLOWDEVFILE=/dev/shm/qb-*/qb-*

# tomboy creates this one
ALLOWDEVFILE="/dev/shm/mono.*"
# created by libv4l
ALLOWDEVFILE="/dev/shm/libv4l-*"
# created by spice video
ALLOWDEVFILE="/dev/shm/spice.*"
# created by mdadm
ALLOWDEVFILE="/dev/md/autorebuild.pid"
# 389 Directory Server
ALLOWDEVFILE=/dev/shm/sem.slapd-*.stats
# squid proxy
ALLOWDEVFILE=/dev/shm/squid-cf*
# squid ssl cache
ALLOWDEVFILE=/dev/shm/squid-ssl_session_cache.shm
# Allow podman
ALLOWDEVFILE=/dev/shm/libpod*lock*


3. Set the proper mirror database URL location to internal network repository


Usually  file /var/lib/rkhunter/db/mirrors.dat does contain Internet server address where latest version of mirrors.dat could be fetched, below is how it looks by default on Debian 10 Linux.

root@debian:/var/lib/rkhunter/db# cat mirrors.dat 
Version:2007060601
mirror=http://rkhunter.sourceforge.net

As you can guess a machine that doesn't have access to the Internet neither directly, neither via some kind of secure proxy because it is in a Paranoic Demilitarized Zone (DMZ) Network with many firewalls. What you can do then is setup another Mirror server (Apache / Nginx) within the local PCI secured LAN that gets regularly the database from official database on http://rkhunter.sourceforge.net/ (by installing and running rkhunter –update command on the Mirror WebServer and copying data under some directory structure on the remote local LAN accessible server, to keep the DB uptodate you might want to setup a cron to periodically copy latest available rkhunter database towards the http://mirror-url/path-folder/)

# vi /var/lib/rkhunter/db/mirrors.dat

local=http://rkhunter-url-mirror-server-url.com/rkhunter/1.4/


A mirror copy of entire db files from Debian 10.8 ( Buster ) ready for download are here.

Update entire file property db and check for rkhunter db updates


# rkhunter –update && rkhunter –propupdate

[ Rootkit Hunter version 1.4.6 ]

Checking rkhunter data files…
  Checking file mirrors.dat                                  [ Skipped ]
  Checking file programs_bad.dat                             [ No update ]
  Checking file backdoorports.dat                            [ No update ]
  Checking file suspscan.dat                                 [ No update ]
  Checking file i18n/cn                                      [ No update ]
  Checking file i18n/de                                      [ No update ]
  Checking file i18n/en                                      [ No update ]
  Checking file i18n/tr                                      [ No update ]
  Checking file i18n/tr.utf8                                 [ No update ]
  Checking file i18n/zh                                      [ No update ]
  Checking file i18n/zh.utf8                                 [ No update ]
  Checking file i18n/ja                                      [ No update ]


rkhunter-update-propupdate-screenshot-centos-linux


4. Initiate a first time check and see whether something is not triggering Warnings

# rkhunter –check

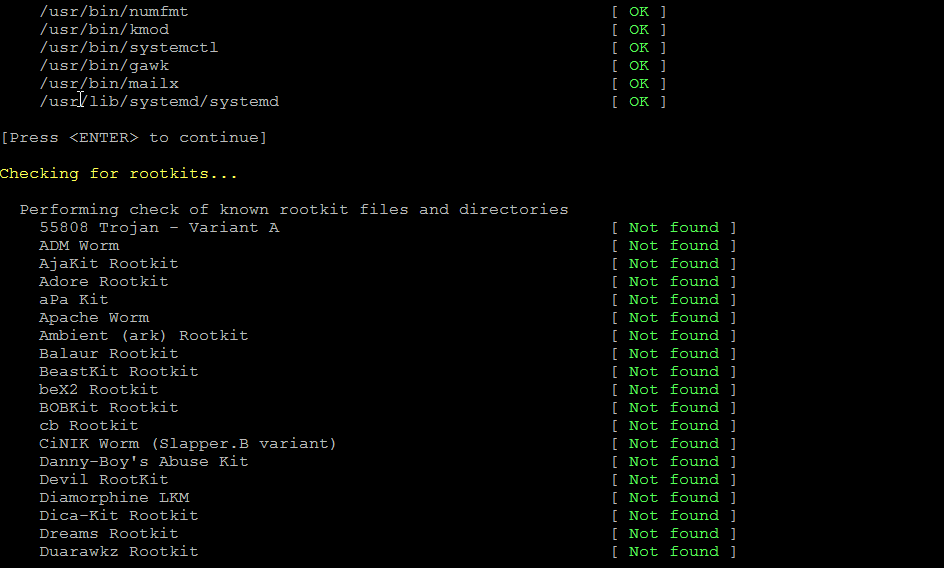
rkhunter-checking-for-rootkits-linux-screenshot

As you might have to run the rkhunter multiple times, there is annoying Press Enter prompt, between checks. The idea of it is that you're able to inspect what went on but since usually, inspecting /var/log/rkhunter/rkhunter.log is much more easier, I prefer to skip this with –skip-keypress option.

# rkhunter –check  –skip-keypress


5. Whitelist additional files and dev triggering false warnings alerts


You have to keep in mind many files which are considered to not be officially PCI compatible and potentially dangerous such as lynx browser curl, telnet etc. might trigger Warning, after checking them thoroughfully with some AntiVirus software such as Clamav and checking the MD5 checksum compared to a clean installed .deb / .rpm package on another RootKit, Virus, Spyware etc. Clean system (be it virtual machine or a Testing / Staging) machine you might want to simply whitelist the files which are incorrectly detected as dangerous for the system security.

Again this can be achieved with

PKGMGR_NO_VRFY=

Some Cluster softwares that are preparing their own /dev/ temporary files such as Pacemaker / Corosync might also trigger alarms, so you might want to suppress this as well with ALLOWDEVFILE

ALLOWDEVFILE=/dev/shm/qb-*/qb-*


If Warnings are found check what is the issue and if necessery white list files due to incorrect permissions in /etc/rkhunter.conf .

rkhunter-warnings-found-screenshot

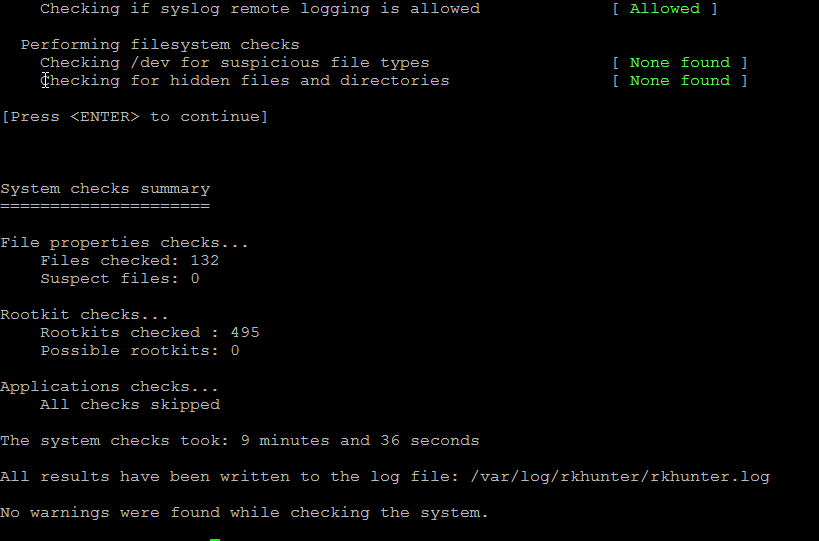
Re-run the check until all appears clean as in below screenshot.

rkhunter-clean-report-linux-screenshot

Fixing Checking for a system logging configuration file [ Warning ]

If you happen to get some message like, message appears when rkhunter -C is done on legacy CentOS release 6.10 (Final) servers:

[13:45:29] Checking for a system logging configuration file [ Warning ]
[13:45:29] Warning: The 'systemd-journald' daemon is running, but no configuration file can be found.
[13:45:29] Checking if syslog remote logging is allowed [ Allowed ]

To fix it, you will have to disable SYSLOG_CONFIG_FILE at all.
 

SYSLOG_CONFIG_FILE=NONE

ASCII Art studio – A powerful ASCII art editor for Windows / Playscii a cool looking text editor for Linux

Monday, June 28th, 2021

This post is just informative for Text Geeks who are in love with ASCII Art, it is a bit of rant as I will say nothing new, but I thought it might be of interest to some console maniac out there 🙂

ascii art studio aas program windows xp professional drawing program screenshot

While checking stuff on Internet I've stumbled on interesting ASCII arts freak software – >ASCII Art Studio. ASCII Art Studio is unfortunately needs licensing is not Free Software. But anyways, for anyone willing to draw pro ASCII art pictures it is a must see. Check it out;

Isn't it like a Plain Text pro Photoshop ? 🙂 Its a pity we don't have a Linux / BSD Release of this wonderful piece of software. I've tried with WINE (Windows Emulator) on Linux to make the Ascii Art Studio work but that was a fail. It seems only way to make it work is have Windows as a worst case install a Virtual Machine with VirtualBox / Vmware and run it inside if you don't have a Windows PC at hand.

Of course there are stuff on Linux to ascii art edit you can use if you want to have a native software to edit ASCIIs such as Playscii. Unfortunately Playscii is not an easy one to install and the software doesn't have a prepared rpm or deb binary you can easily roll on the OS and you have to manually build all required python modules and have a working version of python3 to be able to make it work.

I did not have much time to test to install it and since I faced issues with plascii install I just abandoned it. If some geek has some more time anyways I guess it is worse to give it a try below is 2 screenshots from PLAYSCII official download page. 

playscii_shot1-official.

As you see authors of the open source playscii whose source is available via github choose to have an amazing looking ascii art text menus, though for daily ASCII art editing it is perhaps much more complicated to use than the simlistic ASCII Art Studio

playscii_shot2-official

There is other stuff for Linux to do ASCII Art files text edit like:
JaVE (this one I don't personally like because it is Java Based),  Ascii Art Maker or Pablow Draw Linux (unfortunately this 2 ones are proprietary).

How to fix rkhunter checking dev for suspisiocus files, solve rkhunter checking if SSH root access is allowed warning

Friday, November 20th, 2020

rkhunter-logo

On a server if you have a rkhunter running and you suddenly you get some weird Warnings for suspicious files under dev, like show in in the screenshot and you're puzzled how comes this happened as so far it was not reported before the regular package patching update conducted …

root@haproxy-server ~]# rkhunter –check

rkhunter-warn-screenshot

To investigate further I've checked rkhunter produced log /var/log/rkhunter.log for a verobose message and found more specifics there on what is the exact files which rkhunter finds suspicious.
To further investigate what exactly are this suspicious files for or where, they're used for something on the system or in reality it is a hacker who hacked our supposibly PCI compliant system,
I've used the good old fuser command which is capable to show which system process is actively using a file. To have fuser report for each file from /var/log/rkhunter.log with below shell loop:

[root@haproxy-server ~]#  for i in $(tail -n 50 /var/log/rkhunter/rkhunter.log|grep -i /dev/shm|awk '{ print $2 }'|sed -e 's#:##g'); do fuser -v $i; done
                     BEN.        PID ZUGR.  BEFEHL
/dev/shm/qb-1783-1851-27-f1sTlC/qb-request-cpg-header:
                     root       1783 ….m corosync
                     hacluster   1851 ….m attrd
                     BEN.        PID ZUGR.  BEFEHL
/dev/shm/qb-1783-1844-26-Znk1UM/qb-event-quorum-data:
                     root       1783 ….m corosync
                     root       1844 ….m pacemakerd
                     BEN.        PID ZUGR.  BEFEHL
/dev/shm/qb-1783-1844-26-Znk1UM/qb-event-quorum-header:
                     root       1783 ….m corosync
                     root       1844 ….m pacemakerd
                     BEN.        PID ZUGR.  BEFEHL
/dev/shm/qb-1783-1844-26-Znk1UM/qb-response-quorum-data:
                     root       1783 ….m corosync
                     root       1844 ….m pacemakerd
                     BEN.        PID ZUGR.  BEFEHL
/dev/shm/qb-1783-1844-26-Znk1UM/qb-response-quorum-header:
                     root       1783 ….m corosync
                     root       1844 ….m pacemakerd
                     BEN.        PID ZUGR.  BEFEHL
/dev/shm/qb-1783-1844-26-Znk1UM/qb-request-quorum-data:
                     root       1783 ….m corosync
                     root       1844 ….m pacemakerd
                     BEN.        PID ZUGR.  BEFEHL
/dev/shm/qb-1783-1844-26-Znk1UM/qb-request-quorum-header:
                     root       1783 ….m corosync
                     root       1844 ….m pacemakerd
                     BEN.        PID ZUGR.  BEFEHL
/dev/shm/qb-1783-1844-25-oCdaKX/qb-event-cpg-data:
                     root       1783 ….m corosync
                     root       1844 ….m pacemakerd
                     BEN.        PID ZUGR.  BEFEHL
/dev/shm/qb-1783-1844-25-oCdaKX/qb-event-cpg-header:
                     root       1783 ….m corosync
                     root       1844 ….m pacemakerd
                     BEN.        PID ZUGR.  BEFEHL
/dev/shm/qb-1783-1844-25-oCdaKX/qb-response-cpg-data:
                     root       1783 ….m corosync
                     root       1844 ….m pacemakerd
                     BEN.        PID ZUGR.  BEFEHL
/dev/shm/qb-1783-1844-25-oCdaKX/qb-response-cpg-header:
                     root       1783 ….m corosync
                     root       1844 ….m pacemakerd
                     BEN.        PID ZUGR.  BEFEHL
/dev/shm/qb-1783-1844-25-oCdaKX/qb-request-cpg-data:
                     root       1783 ….m corosync
                     root       1844 ….m pacemakerd
                     BEN.        PID ZUGR.  BEFEHL
/dev/shm/qb-1783-1844-25-oCdaKX/qb-request-cpg-header:
                     root       1783 ….m corosync
                     root       1844 ….m pacemakerd
                     BEN.        PID ZUGR.  BEFEHL
/dev/shm/qb-1783-1844-24-GKyj3l/qb-event-cfg-data:
                     root       1783 ….m corosync
                     root       1844 ….m pacemakerd
                     BEN.        PID ZUGR.  BEFEHL
/dev/shm/qb-1783-1844-24-GKyj3l/qb-event-cfg-header:
                     root       1783 ….m corosync
                     root       1844 ….m pacemakerd
                     BEN.        PID ZUGR.  BEFEHL
/dev/shm/qb-1783-1844-24-GKyj3l/qb-response-cfg-data:
                     root       1783 ….m corosync
                     root       1844 ….m pacemakerd
                     BEN.        PID ZUGR.  BEFEHL
/dev/shm/qb-1783-1844-24-GKyj3l/qb-response-cfg-header:
                     root       1783 ….m corosync
                     root       1844 ….m pacemakerd
                     BEN.        PID ZUGR.  BEFEHL
/dev/shm/qb-1783-1844-24-GKyj3l/qb-request-cfg-data:
                     root       1783 ….m corosync
                     root       1844 ….m pacemakerd
                     BEN.        PID ZUGR.  BEFEHL
/dev/shm/qb-1783-1844-24-GKyj3l/qb-request-cfg-header:
                     root       1783 ….m corosync
                     root       1844 ….m pacemakerd


As you see from the output all the /dev/shm/qb/ files in question are currently opened by the corosync / pacemaker and necessery for proper work of the haproxy cluster processes running on the machines.
 

How to solve the /dev/ suspcisios files rkhunter warning?

To solve we need to tell rkhunter not check against this files this is done via  /etc/rkhunter.conf first I thought this is done by EXISTWHITELIST= but then it seems there is  a special option for rkhunter whitelisting /dev type of files only ALLOWDEVFILE.

Hence to resolve the warning for the upcoming planned early PCI audit and save us troubles we had to add on running OS which is CentOS Linux release 7.8.2003 (Core) in /etc/rkhunter.conf

ALLOWDEVFILE=/dev/shm/qb-*/qb-*

Re-run

# rkhunter –check

and Voila, the warning should be no more.

rkhunter-check-output

Another thing is on another machine the warnings produced by rkhunter were a bit different as rkhunter has mistakenly detected the root login is enabled where in reality PermitRootLogin was set to no in /etc/ssh/sshd_config

rkhunter-warning

As the problem was experienced on some machines and on others it was not.
I've done the standard boringconfig comparison we sysadmins do to tell
why stuff differs.
The result was on first machine where we had everything working as expected and
PermitRootLogin no was recognized the correct configuration was:

— SNAP —
#ALLOW_SSH_ROOT_USER=no
ALLOW_SSH_ROOT_USER=unset
— END —

On the second server where the problem was experienced the values was:

— SNAP —
#ALLOW_SSH_ROOT_USER=unset
ALLOW_SSH_ROOT_USER=no
— END —

Note that, the warning produced regarding the rsyslog remote logging is allowed is perfectly fine as, we had enabled remote logging to a central log server on the machines, this is done with:

This is done with config options under /etc/rsyslog.conf

# Configure Remote rsyslog logging server
*.* @remote-logging-server.com:514

IBM TSM dsmc console client use for listing configured backups, checking set scheduled backups and backup and restore operations howto

Friday, March 6th, 2020

tsm-ibm-logo_tivoli-dsmc-console-client-listing-backups-create-backups-and-restore-on-linux-unix-windows

Creating a simple home based backup solution with some shell scripting and rsync is a common use. However as a sysadmin in a middle sized or large corporations most companies use some professional backup service such as IBM Tivoli Storage Manager TSM – recently IBM changed the name of the product to IBM Spectrum.

IBM TSM  is a data protection platform that gives enterprises a single point of control and administration for backup and recovery that is used for Privare Clouds backup and other high end solutions where data criticality is top.
Usually in large companies TSM backup handling is managed by a separate team or teams as managing a large TSM infrastructure is quite a complex task, however my experience as a sysadmin show me that even if you don't have too much of indepth into tsm it is very useful to know how to manage at least basic Incremental backup operations such as view what is set to be backupped, set-up a new directory structure for backup, check the backup schedule configured, check what files are included and which excluded from the backup store etc. 

TSM has multi OS support ans you can use it on most streamline Operating systems Windows / Mac OS X and Linux in this specific article I'll be talking concretely about backing up data with tsm on Linux, tivoli can be theoretically brought up even on FreeBSD machines via the Linuxemu BSD module and the 64-Bit Tivoli Storage Manager RPMs.
Therefore in this small article I'll try to give few useful operations for the novice admin that stumbles on tsm backupped server that needs some small maintenance.
 

1. Starting up the dsmc command line client


Nomatter the operating system on which you run it to run the client run:

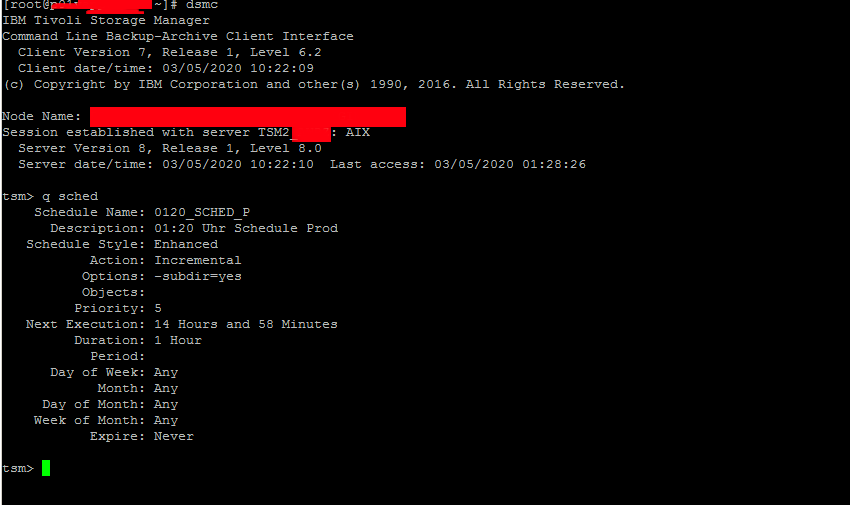
# dsmc


tsm-check-backup-schedule-set-time

Note that usually dsmc should run as superuser so if you try to run it via a normal non-root user you will get an error message like:


[ user@linux ~]$ dsmc
ANS1398E Initialization functions cannot open one of the Tivoli Storage Manager logs or a related file: /var/tsm/dsmerror.log. errno = 13, Permission denied


Tivoli SM has an extensive help so to get the use basics, type help
 

tsm> help
1.0 New for IBM Tivoli Storage Manager Version 6.4
2.0 Using commands
  2.1 Start and end a client command session
    2.1.1 Process commands in batch mode
    2.1.2 Process commands in interactive mode
  2.2 Enter client command names, options, and parameters
    2.2.1 Command name
    2.2.2 Options
    2.2.3 Parameters
    2.2.4 File specification syntax
  2.3 Wildcard characters
  2.4 Client commands reference
  2.5 Archive
  2.6 Archive FastBack

Enter 'q' to exit help, 't' to display the table of contents,
press enter or 'd' to scroll down, 'u' to scroll up or
enter a help topic section number, message number, option name,
command name, or command and subcommand:    


2. Listing files listed for backups


A note to make here is as in most corporate products tsm supports command aliases so any command supported described in the help like query, could be
abbreviated with its first letters only, e.g. query filespace tsm cmd can be abbreviated as

tsm> q fi

Commands can be run non-interactive mode also so if you want the output of q fi you can straight use:

tsm> dsmc q fi


tsm-check-included-excluded-files-q-file-if-backupped-list-backup-set-directories

This shows the directories and files that are set for backup creation with Tivoli.


3. Getting included and excluded backup set files


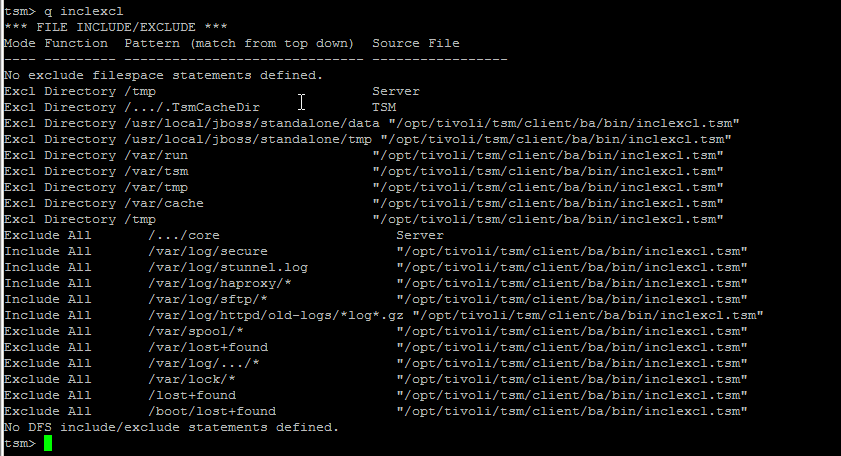
It is useful to know what are the exact excluded files from tsm set backup this is done with query inclexcl

tsm-check-excluded-included-files


4. Querying for backup schedule time

Tivoli as every other backup solution is creating its set to backup files in a certain time slot periods. 
To find out what is the time slot for backup creation use;

tsm> q sched
Schedule Name: WEEKLY_ITSERV
      Description: ITSERV weekly incremental backup
   Schedule Style: Classic
           Action: Incremental
          Options: 
          Objects: 
         Priority: 5
   Next Execution: 180 Hours and 35 Minutes
         Duration: 15 Minutes
           Period: 1 Week  
      Day of Week: Wednesday
            Month:
     Day of Month:
    Week of Month:
           Expire: Never  


tsm-query-partitions-backupeed-or-not


5. Check which files have been backed up

If you want to make sure backups are really created it is a good to check, which files from the selected backup files have already
a working backup copy.

This is done with query backup like so:

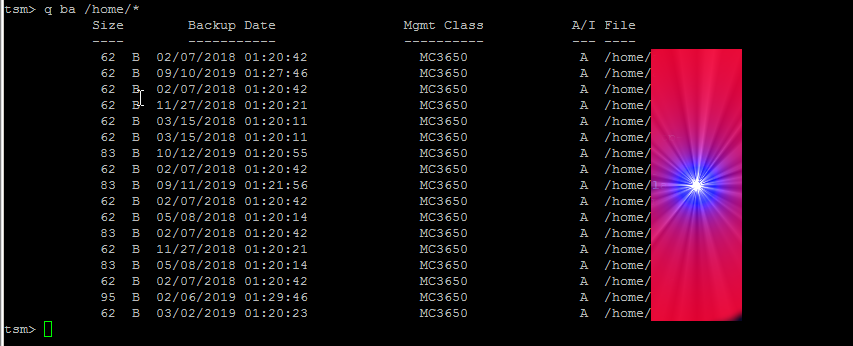
tsm> q ba /home/*


tsm-dsmc-query-user-home-for-backups

If you want to query all the current files and directories backed up under a directory and all its subdirectories you need to add the -subdir=yes option as below:


tsm> q ba /home/hipo/projects/* -subdir=yes
   
Size      Backup Date        Mgmt Class A/I File
   —-      ———–        ———- — —-
    512  12-09-2011 19:57:09    STANDARD    A  /home/hipo/projects/hfs0106
  1,024  08-12-2011 02:46:53    STANDARD    A  /home/hipo/projects/hsm41perf
    512  12-09-2011 19:57:09    STANDARD    A  /home/hipo/projects/hsm41test
    512  24-04-2012 00:22:56    STANDARD    A  /home/hipo/projects/hsm42upg
  1,024  12-09-2011 19:57:09    STANDARD    A  /home/hipo/projects/hfs0106/test
  1,024  12-09-2011 19:57:09    STANDARD    A  /home/hipo/projects/hfs0106/test/test2
 12,048  04-12-2011 02:01:29    STANDARD    A  /home/hipo/projects/hsm41perf/tables
 50,326  30-04-2012 01:35:26    STANDARD    A  /home/hipo/projects/hsm42upg/PMR70023
 50,326  27-04-2012 00:28:15    STANDARD    A  /home/hipo/projects/hsm42upg/PMR70099
 11,013  24-04-2012 00:22:56    STANDARD    A  /home/hipo/projects/hsm42upg/md5check  


  • To make tsm, backup some directories on Linux / AIX other unices:


tsm> incr /  /usr  /usr/local  /home /lib


  • For tsm to backup some standard netware drives, use:


tsm> incr NDS:  USR:  SYS:  APPS:  


  • To backup C:\ D:\ E:\ F:\ if TSM is running on Windows


tsm> incr C:  D:  E: F:  -incrbydate 


  • To back up entire disk volumes irrespective of whether files have changed since the last backup, use the selective command with a wildcard and -subdir=yes as below:


tsm> sel /*  /usr/*   /home/*  -su=yes   ** Unix/Linux


7. Backup selected files from a backup location


It is intuitive to think you can just add some wildcard characters to select what you want
to backup from a selected location but this is not so, if you try something like below
you will get an err.


tsm> incr /home/hipo/projects/*/* -su=yes      
ANS1071E Invalid domain name entered: '/home/hipo/projects/*/*'


The proper way to select a certain folder / file for backup is with:


tsm> sel /home/hipo/projects/*/* -su=yes


8. Restoring tsm data from backup


To restore the config httpd.conf to custom directory use:


tsm> rest /etc/httpd/conf/httpd.conf  /home/hipo/restore/


N!B! that in order for above to work you need to have the '/' trailing slash at the end.

If you want to restore a file under a different name:


tsm> rest /etc/ntpd.conf  /home/hipo/restore/


9. Restoring a whole backupped partition


tsm> rest /home/*  /tmp/restore/ -su=yes


This is using the Tivoli 'Restoring multiple files and directories', and the files to restore '*'
are kept till the one that was recovered (saying this in case if you accidently cancel the restore)


10. Restoring files with back date 


By default the restore function will restore the latest available backupped file, if you need
to recover a specific file, you need the '-inactive' '-pick' options.
The 'pick' interface is interactive so once listed you can select the exact file from the date
you want to restore.

General restore command syntax is:
 

tsm> restore [source-file] [destination-file]


tsm> rest /home/hipo/projects/*  /tmp/restore/ -su=yes  -inactive -pick

TSM Scrollable PICK Window – Restore

     #    Backup Date/Time        File Size A/I  File
   ————————————————————————————————–
   170. | 12-09-2011 19:57:09        650  B  A   /home/hipo/projects/hsm41test/inclexcl.test
   171. | 12-09-2011 19:57:09       2.74 KB  A   /home/hipo/projects/hsm41test/inittab.ORIG
   172. | 12-09-2011 19:57:09       2.74 KB  A   /home/hipo/projects/hsm41test/inittab.TEST
   173. | 12-09-2011 19:57:09       1.13 KB  A   /home/hipo/projects/hsm41test/md5.out
   174. | 30-04-2012 01:35:26        512  B  A   /home/hipo/projects/hsm42125upg/PMR70023
   175. | 26-04-2012 01:02:08        512  B  I   /home/hipo/projects/hsm42125upg/PMR70023
   176. | 27-04-2012 00:28:15        512  B  A   /home/hipo/projects/hsm42125upg/PMR70099
   177. | 24-04-2012 19:17:34        512  B  I   /home/hipo/projects/hsm42125upg/PMR70099
   178. | 24-04-2012 00:22:56       1.35 KB  A   /home/hipo/projects/hsm42125upg/dsm.opt
   179. | 24-04-2012 00:22:56       4.17 KB  A   /home/hipo/projects/hsm42125upg/dsm.sys
   180. | 24-04-2012 00:22:56       1.13 KB  A   /home/hipo/projects/hsm42125upg/dsmmigfstab
   181. | 24-04-2012 00:22:56       7.30 KB  A   /home/hipo/projects/hsm42125upg/filesystems
   182. | 24-04-2012 00:22:56       1.25 KB  A   /home/hipo/projects/hsm42125upg/inclexcl
   183. | 24-04-2012 00:22:56        198  B  A   /home/hipo/projects/hsm42125upg/inclexcl.dce
   184. | 24-04-2012 00:22:56        291  B  A   /home/hipo/projects/hsm42125upg/inclexcl.ox_sys
   185. | 24-04-2012 00:22:56        650  B  A   /home/hipo/projects/hsm42125upg/inclexcl.test
   186. | 24-04-2012 00:22:56        670  B  A   /home/hipo/projects/hsm42125upg/inetd.conf
   187. | 24-04-2012 00:22:56       2.71 KB  A   /home/hipo/projects/hsm42125upg/inittab
   188. | 24-04-2012 00:22:56       1.00 KB  A   /home/hipo/projects/hsm42125upg/md5check
   189. | 24-04-2012 00:22:56      79.23 KB  A   /home/hipo/projects/hsm42125upg/mkreport.020423.out
   190. | 24-04-2012 00:22:56       4.27 KB  A   /home/hipo/projects/hsm42125upg/ssamap.020423.out
   191. | 26-04-2012 01:02:08      12.78 MB  A   /home/hipo/projects/hsm42125upg/PMR70023/70023.tar
   192. | 25-04-2012 16:33:36      12.78 MB  I   /home/hipo/projects/hsm42125upg/PMR70023/70023.tar
        0———10——–20——–30——–40——–50——–60——–70——–80——–90–
<U>=Up  <D>=Down  <T>=Top  <B>=Bottom  <R#>=Right  <L#>=Left
<G#>=Goto Line #  <#>=Toggle Entry  <+>=Select All  <->=Deselect All
<#:#+>=Select A Range <#:#->=Deselect A Range  <O>=Ok  <C>=Cancel
pick> 


To navigate in pick interface you can select individual files to restore via the number seen leftside.
To scroll up / down use 'U' and 'D' as described in the legenda.


11. Restoring your data to another machine


In certain circumstances, it may be necessary to restore some, or all, of your data onto a machine other than the original from which it was backed up.

In ideal case the machine platform should be identical to that of the original machine. Where this is not possible or practical please note that restores are only possible for partition types that the operating system supports. Thus a restore of an NTFS partition to a Windows 9x machine with just FAT support may succeed but the file permissions will be lost.
TSM does not work fine with cross-platform backup / restore, so better do not try cross-platform restores.
 Trying to restore files onto a Windows machine that have previously been backed up with a non-Windows one. TSM created backups on Windows sent by other OS platforms can cause  backups to become inaccessible from the host system.

To restore your data to another machine you will need the TSM software installed on the target machine. Entries in Tivoli configuration files dsm.sys and/or dsm.opt need to be edited if the node that you are restoring from does not reside on the same server. Please see our help page section on TSM configuration files for their locations for your operating system. 

To access files from another machine you should then start the TSM client as below:


# dsmc -virtualnodename=RESTORE.MACHINE      


You will then be prompted for the TSM password for this machine.


You will probably want to restore to a different destination to the original files to prevent overwriting files on the local machine, as below:


  • Restore of D:\ Drive to D:\Restore ** Windows 


tsm> rest D:\*   D:\RESTORE\    -su=yes 


  • Restore user /home/* to /scratch on ** Mac, Unix/Linux


tsm> rest /home/* /scratch/     -su=yes  


  • Restoring Tivoli data on old netware


tsm> rest SOURCE-SERVER\USR:*  USR:restore/   -su=yes  ** Netware


12. Adding more directories for incremental backup / Check whether TSM backup was done correctly?

The easiest way is to check the produced dschmed.log if everything is okay there should be records in the log that Tivoli backup was scheduled in a some hours time
succesfully.
A normally produced backup scheduled in log should look something like:


14-03-2020 23:03:04 — SCHEDULEREC STATUS BEGIN
14-03-2020 23:03:04 Total number of objects inspected:   91,497
14-03-2020 23:03:04 Total number of objects backed up:      113
14-03-2020 23:03:04 Total number of objects updated:          0
14-03-2020 23:03:04 Total number of objects rebound:          0
14-03-2020 23:03:04 Total number of objects deleted:          0
14-03-2020 23:03:04 Total number of objects expired:         53
14-03-2020 23:03:04 Total number of objects failed:           6
14-03-2020 23:03:04 Total number of bytes transferred:    19.38 MB
14-03-2020 23:03:04 Data transfer time:                    1.54 sec
14-03-2020 23:03:04 Network data transfer rate:        12,821.52 KB/sec
14-03-2020 23:03:04 Aggregate data transfer rate:        114.39 KB/sec
14-03-2020 23:03:04 Objects compressed by:                    0%
14-03-2020 23:03:04 Elapsed processing time:           00:02:53
14-03-2020 23:03:04 — SCHEDULEREC STATUS END
14-03-2020 23:03:04 — SCHEDULEREC OBJECT END WEEKLY_23_00 14-12-2010 23:00:00
14-03-2020 23:03:04 Scheduled event 'WEEKLY_23_00' completed successfully.
14-03-2020 23:03:04 Sending results for scheduled event 'WEEKLY_23_00'.
14-03-2020 23:03:04 Results sent to server for scheduled event 'WEEKLY_23_00'.


in case of errors you should check dsmerror.log
 

Conclusion


In this article I've briefly evaluated some basics of IBM Commercial Tivoli Storage Manager (TSM) to be able to  list backups, check backup schedules and how to the files set to be
excluded from a backup location and most importantly how to check that data backed up data is in a good shape and accessible.
It was explained how backups can be restored on a local and remote machine as well as how to  append new files to be set for backup on next incremental scheduled backup.
It was shown how the pick interactive cli interface could be used to restore files at a certain data back in time as well as how full partitions can be restored and how some
certain file could be retrieved from the TSM data copy.

Scanning ports with netcat “nc” command on Linux and UNIX / Checking for firewall filtering between source and destination with nc

Friday, September 6th, 2019

scanning-ports-with-netcat-nc-command-on-Linux-and-UNIX-checking-for-firewall-filtering-between-source-destination-host-with-netcat

Netcat ( nc ) is one of that tools, that is well known in the hacker (script kiddie) communities, but little underestimated in the sysadmin world, due to the fact nmap (network mapper) – the network exploratoin and security auditing tool has become like the standard penetration testing TCP / UDP port tool
 

nc is feature-rich network debugging and investigation tool with tons of built-in capabilities for reading from and writing to network connections using TCP or UDP.

Its Plethora of features includes port listening, port scanning & Transferring files due to which it is often used by Hackers and PenTesters as Backdoor. Netcat was written by a guy we know as the Hobbit <hobbit@avian.org>.

For a start-up and middle sized companies if nmap is missing on server usually it is okay to install it without risking to open a huge security hole, however in Corporate world, due to security policies often nmap is not found on the servers but netcat (nc) is present on the servers so you have to learn, if you haven't so to use netcat for the usual IP range port scans, if you're so used to nmap.

There are different implementations of Netcat, whether historically netcat was UNIX (BSD) program with a latest release of March 1996. The Linux version of NC is GNU Netcat (official source here) and is POSIX compatible. The other netcat in Free Software OS-es is OpenBSD's netcat whose ported version is also used in FreeBSD. Mac OS X also comes with default prebundled netcat on its Mac OS X from OS X version (10.13) onwards, on older OS X-es it is installable via MacPorts package repo, even FreeDOS has a port of it called NTOOL.

The (Swiss Army Knife of Embedded Linux) busybox includes a default leightweight version of netcat and Solaris has the OpenBSD netcat version bundled.

A cryptography enabled version fork exists that supports that supports integrated transport encryption capabilities called Cryptcat.

The Nmap suite also has included rewritten version of GNU Netcat named Ncat, featuring new possibilities such as "Connection Brokering", TCP/UDP Redirection, SOCKS4 client and server support, ability to "Chain" Ncat processes, HTTP CONNECT proxying (and proxy chaining), SSL connect/listen support and IP address/connection filtering. Just like Nmap, Ncat is cross-platform.

In this small article I'll very briefly explain on basic netcat – known as the TCP Army knife tool port scanning for an IP range of UDP / TCP ports.


1. Scanning for TCP opened / filtered ports remote Linux / Windows server


Everyone knows scanning of a port is possible with a simple telnet request towards the host, e.g.:

telnet SMTP.EMAIL-HOST.COM 25


The most basic netcat use that does the same is achiavable with:


$ nc SMTP.EMAIL-HOST.COM 25
220 jeremiah ESMTP Exim 4.92 Thu, 05 Sep 2019 20:39:41 +0300


Beside scanning the remote port, using netcat interactively as pointing in above example, if connecting to HTTP Web services, you can request remote side to return a webpage by sending a false referer, source host and headers, this is also easy doable with curl / wget and lynx but doing it with netcat just like with telnet could be fun, here is for example how to request an INDEX page with spoofed HTTP headers.
 

nc Web-Host.COM 25
GET / HTTP/1.1
Host: spoofedhost.com
Referrer: mypage.com
User-Agent: my-spoofed-browser


2. Performing a standard HTTP request with netcat


To do so just pype the content with a standard bash integrated printf function with the included end of line (the unix one is \n but to be OS independent it is better to use r\n  – the end of line complition character for Windows.


printf "GET /index.html HTTP/1.0\r\nHost: www.pc-freak.net\r\n\r\n" | nc www.pc-freak.net 80


3. Scanning a range of opened / filtered UDP ports


To scan for lets say opened remote system services on the very common important ports opened from UDP port 25 till, 1195 – more specifically for:

  • UDP Bind Port 53
  • Time protocol Port (37)
  • TFTP (69)
  • Kerberos (88)
  • NTP 123
  • Netbios (137,138,139)
  • SNMP (161)
  • LDAP 389
  • Microsoft-DS (Samba 445)
  • Route BGP (52)
  • LDAPS (639)
  • openvpn (1194)


nc -vzu 192.168.0.1 25 1195


UDP tests will show opened, if no some kind of firewall blocking, the -z flag is given to scan only for remote listening daemons without sending any data to them.


4. Port Scanning TCP listening ports with Netcat


As prior said using netcat to scan for remote opened HTTP Web Server on port 80 an FTP on Port 23 or a Socks Proxy or MySQL Database on 3306 / PostgreSQL DB on TCP 5432 is very rare case scenario.

Below is example to scan a Local network situated IP for TCP open ports from port 1 till 7000.


# nc -v -n -z -w 5 192.168.1.2 1-7000

           nc: connect to host.example.com 80 (tcp) failed: Connection refused
           nc: connect to host.example.com 20 (tcp) failed: Connection refused
           Connection to host.example.com port [tcp/ssh] succeeded!
           nc: connect to host.example.com 23 (tcp) failed: Connection refused


Be informed that scanning with netcat is much more slower, than nmap, so specifying smaller range of ports is always a good idea to reduce annoying waiting …


The -w flag is used to set a timeout to remote connection, usually on a local network situated machines the timeout could be low -w 1 but for machines across different Data Centers (let say one in Berlin and one in Seattle), use as a minimum -w 5.

If you expect remote service to be responsive (as it should always be), it is a nice idea to use netcat with a low timeout (-w) value of 1 below is example:
 

netcat -v -z -n -w 1 scanned-hosts 1-1023


5. Port scanning range of IP addresses with netcat


If you have used Nmap you know scanning for a network range is as simple as running something like nmap -sP -P0 192.168.0.* (to scan from IP range 1-255 map -sP -P0 192.168.0.1-150 (to scan from local IPs ending in 1-150) or giving the network mask of the scanned network, e.g. nmap -sF 192.168.0.1/24 – for more examples please check my previous article Checking port security on Linux with nmap (examples).

But what if nmap is not there and want to check a bunch 10 Splunk servers (software for searching, monitoring, and analyzing machine-generated big data, via a Web-style interface.), with netcat to find, whether the default Splunk connection port 9997 is opened or not:


for i in `seq 1 10`; do nc -z -w 5 -vv splunk0$i.server-domain.com 9997; done


6. Checking whether UDP port traffic is allowed to destination server


Assuring you have access on Source traffic (service) Host A  and Host B (remote destination server where a daemon will be set-upped to listen on UDP port and no firewall in the middle Network router or no traffic control and filtering software HUB is preventing the sent UDP proto traffic, lets say an ntpd will be running on its standard 123 port there is done so:

– On host B (the remote machine which will be running ntpd and should be listening on port 123), run netcat to listen for connections


# nc -l -u -p 123
Listening on [0.0.0.0] (family 2, port 123)


Make sure there is no ntpd service actively running on the server, if so stop it with /etc/init.d/ntpd stop
and run above command. The command should run as superuser as UDP port 123 is from the so called low ports from 1-1024 and binding services on such requires root privileges.

– On Host A (UDP traffic send host


nc -uv remote-server-host 123


netcat-linux-udp-connection-succeeded

If the remote port is not reachable due to some kind of network filtering, you will get "connection refused".
An important note to make is on some newer Linux distributions netcat might be silently trying to connect by default using IPV6, bringing false positives of filtered ports due to that. Thus it is generally a good idea, to make sure you're connecting to IPV6


$ nc -uv -4 remote-server-host 123


Another note to make here is netcat's UDP connection takes 2-3 seconds, so make sure you wait at least 4-8 seconds for a very distant located hosts that are accessed over a multitude of routers.
 

7. Checking whether TCP port traffic allowed to DST remote server


To listen for TCP connections on a specified location (external Internet IP or hostname), it is analogous to listening for UDP connections.

Here is for example how to bind and listen for TCP connections on all available Interface IPs (localhost, eth0, eth1, eth2 etc.)
 

nc -lv 0.0.0.0 12345


Then on client host test the connection with


nc -vv 192.168.0.103 12345
Connection to 192.168.0.103 12345 port [tcp/*] succeeded!


8. Proxying traffic with netcat


Another famous hackers use of Netcat is its proxying possibility, to proxy anything towards a third party application with UNIX so any content returned be printed out on the listening nc spawned daemon like process.
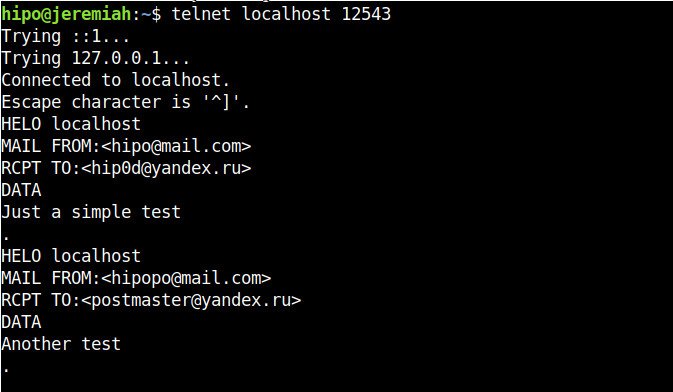
For example one application is traffic SMTP (Mail traffic) with netcat, below is example of how to proxy traffic from Host B -> Host C (in that case the yandex current mail server mx.yandex.ru)

linux-srv:~# nc -l 12543 | nc mx.yandex.ru 25


Now go to Host A or any host that has TCP/IP protocol access to port 12543 on proxy-host Host B (linux-srv) and connect to it on 12543 with another netcat or telnet.

to make netcat keep connecting to yandex.ru MX (Mail Exchange) server you can run it in a small never ending bash shell while loop, like so:


linux-srv:~# while :; do nc -l 12543 | nc mx.yandex.ru 25; done


 Below are screenshots of a connection handshake between Host B (linux-srv) proxy host and Host A (the end client connecting) and Host C (mx.yandex.ru).

host-B-running-as-a-proxy-daemon-towards-Host-C-yandex-mail-exchange-server


Host B netcat as a (Proxy)

Host-A-Linux-client-connection-handshake-to-proxy-server-with-netcat
that is possible in combination of UNIX and named pipes (for more on Named pipes check my previous article simple linux logging with named pipes), here is how to run a single netcat version to proxy any traffic in a similar way as the good old tinyproxy.

On Proxy host create the pipe and pass the incoming traffic towards google.com and write back any output received back in the named pipe.
 

# mkfifo backpipe
# nc -l 8080 0<backpipe | nc www.google.com 80 1>backpipe

Other useful netcat proxy set-up is to simulate a network connectivity failures.

For instance, if server:port on TCP 1080 is the normal host application would connect to, you can to set up a forward proxy from port 2080 with

    nc -L server:1080 2080

then set-up and run the application to connect to localhost:2080 (nc proxy port)

    /path/to/application_bin –server=localhost –port=2080

Now application is connected to localhost:2080, which is forwarded to server:1080 through netcat. To simulate a network connectivity failure, just kill the netcat proxy and check the logs of application_bin.

Using netcat as a bind shell (make any local program / process listen and deliver via nc)


netcat can be used to make any local program that can receive input and send output to a server, this use is perhaps little known by the junior sysadmin, but a favourite use of l337 h4x0rs who use it to spawn shells on remote servers or to make connect back shell. The option to do so is -e

-e – option spawns the executable with its input and output redirected via network socket.

One of the most famous use of binding a local OS program to listen and receive / send content is by
making netcat as a bind server for local /bin/bash shell.

Here is how

nc -l -p 4321 -e /bin/sh


If necessery specify the bind hostname after -l. Then from any client connect to 4321 (and if it is opened) you will gain a shell with the user with which above netcat command was run. Note that many modern distribution versions such as Debian / Fedora / SuSE Linux's netcat binary is compiled without the -e option (this works only when compiled with -DGAPING_SECURITY_HOLE), removal in this distros is because option is potentially opening a security hole on the system.

If you're interested further on few of the methods how modern hackers bind new backdoor shell or connect back shell, check out Spawning real tty shells article.


For more complex things you might want to check also socat (SOcket CAT) – multipurpose relay for bidirectional data transfer under Linux.
socat is a great Linux Linux / UNIX TCP port forwarder tool similar holding the same spirit and functionality of netcat plus many, many more.
 

On some of the many other UNIX operating systems that are lacking netcat or nc / netcat commands can't be invoked a similar utilitiesthat should be checked for and used instead are:

ncat, pnetcat, socat, sock, socket, sbd

To use nmap's ncat to spawn a shell for example that allows up to 3 connections and listens for connects only from 192.168.0.0/24 network on port 8081:

ncat –exec "/bin/bash" –max-conns 3 –allow 192.168.0.0/24 -l 8081 –keep-open


9. Copying files over network with netcat


Another good hack often used by hackers to copy files between 2 servers Server1 and Server2 who doesn't have any kind of FTP / SCP / SFTP / SSH / SVN / GIT or any kind of Web copy support service – i.e. servers only used as a Database systems that are behind a paranoid sysadmin firewall is copying files between two servers with netcat.

On Server2 (the Machine on which you want to store the file)
 

nc -lp 2323 > files-archive-to-copy.tar.gz


On server1 (the Machine from where file is copied) run:
 

nc -w 5 server2.example.com 2323 < files-archive-to-copy.tar.gz


Note that the downside of such transfers with netcat is data transferred is unencrypted so any one with even a simple network sniffer or packet analyzier such as iptraf or tcpdump could capture the file, so make sure the file doesn't contain sensitive data such as passwords.

Copying partition images like that is perhaps best way to get disk images from a big server onto a NAS (when you can't plug the NAS into the server).
 

10. Copying piped archived directory files with netcat


On computer A:

export ARIBTRARY_PORT=3232
nc -l $ARBITRARY_PORT | tar vzxf –

On Computer B:

tar vzcf – files_or_directories | nc computer_a $ARBITRARY_PORT


11. Creating a one page webserver with netcat and ncat


As netcat could listen to port and print content of a file, it can be set-up with a bit of bash shell scripting to serve
as a one page webserver, or even combined with some perl scripting and bash to create a multi-serve page webserver if needed.

To make netact serve a page to any connected client run in a screen / tmux session following code:


while true; do nc -l -p 80 -q 1 < somepage.html; done


Another interesting fun example if you have installed ncat (is a small web server that connects current time on server on connect).
 

ncat -lkp 8080 –sh-exec 'echo -ne "HTTP/1.0 200 OK\r\n\r\nThe date is "; date;'


12. Cloning Hard disk partitions with netcat


rsync is a common tool used to clone hard disk partitions over network. However if rsync is not installed on a server and netcat is there you can use it instead, lets say we want to clone /dev/sdb
from Server1 to Server2 assuming (Server1 has a configured working Local or Internet connection).


On Server2 run:
 

nc -l -p 4321 | dd of=/dev/sdb


Following on Server2 to start the Partition / HDD cloning process run


dd if=/dev/sdb | nc 192.168.0.88 4321


Where 192.168.0.88 is the IP address listen configured on Server2 (in case you don't know it, check the listening IP to access with /sbin/ifconfig).

Next you have to wait for some short or long time depending on the partiiton or Hard drive, number of files / directories and allocated disk / partition size.

To clone /dev/sda (a main partiiton) from Server1 to Server2 first requirement is that it is not mounted, thus to have it unmounted on a system assuming you have physical access to the host, you can boot some LiveCD Linux distribution such as Knoppix Live CD on Server1, manually set-up networking with ifconfig or grab an IP via DHCP from the central DHCP server and repeat above example.


Happy netcating 🙂

How to configure mutual Apache WebServer SSL authentication – Two Way SSL mutual authentication for better security and stronger encryption

Tuesday, September 12th, 2017

how-to-configure-one-way-and-two-way-handshake-authentication-apache-one-and-two-way-ssl-handshake-authentication-explained-diagram

In this post I'm about to explain how to configure Apache Web server for Two Way SSL Authentication alone and how to configure Two Way SSL Authentication for a Certain Domain URL Locations and the mixture of both One Way standar SSL authentication and Two Way Handshake Authentication .
 

Generally before starting I have to say most Web sites does not require a Mutual SSL  Authentication (the so called Two-Way SSL).

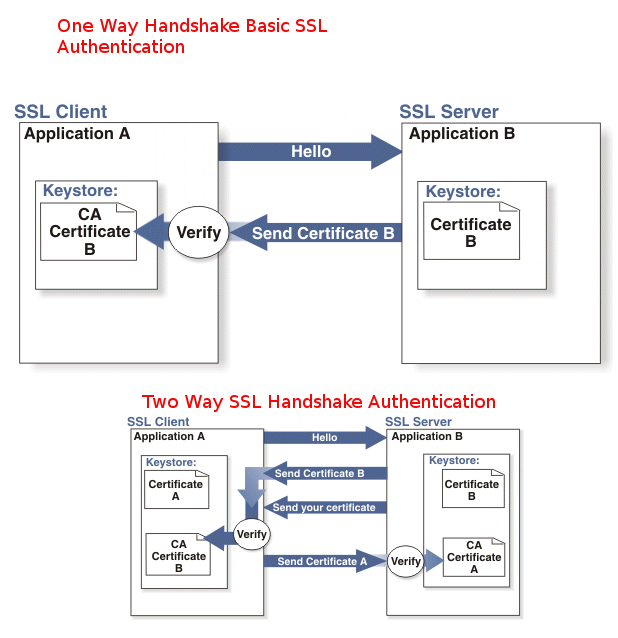
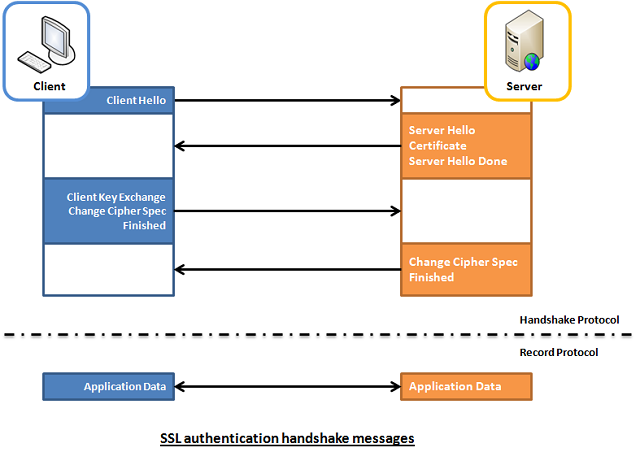
In most configurations Apache Web server is configured for One Way Basic authentication where The Web server authenticates to the Client usuall that's Browser program such as Mozilla  Firefox / Chrome / IE / Epiphany whatever presenting certificate signed by Trustable Certificate Authority such as VeriSign.

1WaySSL-clien-to-server-illustrated
 

The authority then autneticates to the browser that the Installed certificate on the Apache Web Server is trustable and the website is not a fraudulant, that is especially important for websites where sensitive data is being transferred, lets say Banks (Doing Money Transfers online), Hospitals (Transfelling your Medical results data) or purchasing something from Amazon.com, Ebay.Com, PayPal etc.

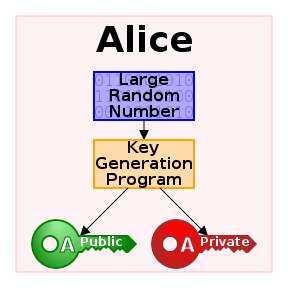
Once client validates the certificate the communication line gets encrypted based on Public Key, below diagram illustrates this.

Public Ke Cryptography diagram how it works

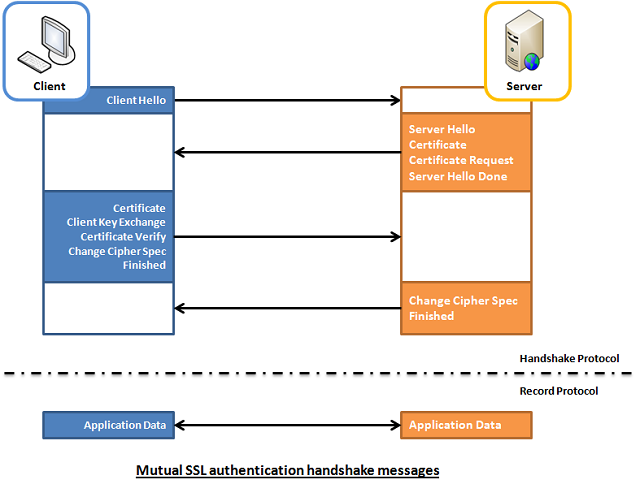
However in some casis where an additional Security Hardening is required, the Web Server might be configured to require additional certificate so the authentication between Client -> Server doesn't work by certificating with just a Server provided certificate but to work Two Ways, e.g. the Client might be setup to also have a Trusted Authority Certificate and to present it to server and send back this certificate to the Server as well for a mutual authentication and only once the certificate handshake between;

client -> server and server -> client

2WaySSL-client-to-server-and-server-to-client-mutual-authentication-illustration

is confirmed as successful the two could establish a trustable encypted SSL channel over which they can talk securely this is called
Two way SSL Authentication.


1. Configure Two Way SSL Authentication on Apache HTTPD
 

To be able to configure Two Way SSL Authentication handshake on Apache HTTPD just like with One way standard one, the mod_ssl Apache module have to enabled.

Enabling two-way SSL is usually not done on normal clients but is done with another server acting as client that is using some kind of REST API to connect to the server


The Apache directive used for Mutual Authentication is SSLVerifyClient directive (this is provided by mod_ssl)

the options that SSLVerifyClient receives are:

none: instructs no client Certificate is required
optional: the client is allowed to present a valid certificate but optionally
require: the client is always required to present a valid Certificate for mutual Authenticaton
optional_no_ca: the client is asked to present a valid Certificate however it has to be successfully verified.

In most of Apache configuratoins the 2 ones that are used are either none or require
because optional is reported to not behave properly with some of the web browsers and
optional_no_ca is not restrictive and is usually used just for establishing basic SSL test pages.

At some cases when configuring Apache HTTPD it is required to have a mixture of both One Way and Two Way Authentication, if that is your case the SSLVerifyClient none is to be used inside the virtual host configuration and then include SSLVerifyClient require to each directory (URL) location that requires a client certificate with mutual auth.

Below is an example VirtualHost configuration as a sample:


The SSLVerifyClient directive from mod_ssl dictates whether a client certificate is required for a given location:
 

<VirtualHost *:443>

SSLVerifyClient none
<Location /whatever_extra_secured_location/dir>
            …
            SSLVerifyClient require
</Location>
</VirtualHost>


Because earlier in configuration the SSLVerifyClient none is provided, the client will not be doing a Two Way Mutual Authentication for the whole domain but just the selected Location the client certificate will be not requested by the server for a 2 way mutual auth, but only when the client requests the Location setupped resouce a renegotiation will be done and client will be asked to provide certificate for the two way handshake authentication.

Keep in mind that on a busy servers with multitudes of connections this renegotiation might put an extra load on the server and this even can turn into server scaling issue on a high latency networks, because of the multiple client connects. Every new SSL renegotiation is about to assign new session ID and that could have a negative impact on overall performance and could eat you a lot of server memory.
To avoid this often it i suseful to use SSLRenegBufferSize directive which by default is set in Apache 2.2.X to 128 Kilobytes and for multiple connects it might be wise to raise this.

A mutual authentication that is done on a Public Server that is connected to the Internet without any DMZ might be quite dangerous thing as due to to the multiple renegotiations the server might end up easily a victim of Denial of Service (DOS) attack, by multiple connects to the server trying to consume all its memory …
Of course the security is not dependent on how you have done the initial solution design but also on how the Client software that is doing the mutual authentication is written to make the connections to the Web Server.


2. Configure a Mixture of One Way Standard (Basic) SSL Authentication together with Two Way Client Server Handshake SSL Authentication


Below example configuring is instructing Apache Webserver to listen for a mixture of One Way standard Client to browser authentication and once the client browser establishes the session it asks for renegotiation for every location under Main Root / to be be authenticated with a Mutual Two Way Handshake Authentication, then the received connection is proxied by the Reverse Proxy to the end host which is another proxy server listening on the same host on (127.0.0.1 or localhost) on port 8080.


<VirtualHost *:8001>
  ServerAdmin name@your-server.com
  SSLEngine on
  SSLCertificateFile /etc/ssl/server-cert.pem
  SSLCertificateKeyFile /etc/ssl/private/server-key.pem

  SSLVerifyClient require
  SSLVerifyDepth 10
  SSLCACertificateFile /home/etc/ssl/cacert.pem
  <location />
    Order allow,deny
    allow from all
    SSLRequire (%{SSL_CLIENT_S_DN_CN} eq "clientcn")
 </location>
  ProxyPass / http://127.0.0.1:8080/
  ProxyPassReverse / http://127.0.0.1:8080/
</VirtualHost>


3. So what other useful options do we have?


Keep Connections Alive

This is a good option but it may consume significant amount of memory. If Apache is using the prefork MPM (as many Webservers still do instead of Apache Threading), keeping all connections alive means multiple live processes. For example, if Apache has to support 1000 concurrent connections, each process consuming 2.7MB, an additional 2700MB should be considered. This may be of lesser significance when using other MPMs. This option will mitigate the problem but will still require SSL renegotiation when the SSL sessions will time out.

Another better approach in terms of security to the mixture of requirement for both One Side Basic SSL Authentication to a Webserver and Mutual Handshake SSL Auth is just to set different Virtualhosts one or more configuration to serve the One Way SSL authentication and others that are configured just to do the Mutual Two Way Handshake SSL to specified Locations.

4. So what if you need to set-up multiple Virtualhosts with SSL authentication on the Same IP address Apache (SNI) ?


For those who did not hear still since some time Apache Web Server has been rewritten to support SNI (Server Name Indication), SNI is really great feature as it can give to the webserver the ability to serve multiple one and two way handshake authentications on the same IP address. For those older people you might remember earlier before SNI was introduced, in order to support a VirtualHost with SSL encryption authentication the administrator had to configure a separate IP address for each SSL certificate on each different domian name.  

SNI feature can also be used here with both One Way standard Apache SSL auth or Two Way one the only downside of course is SNI could be a performance bottleneck if improperly scaled. Besides that some older browsers are not supporting SNI at all, so possibly for public services SNI is less recommended but it is better to keep-up to the good old way to have a separate IP address for each :443 set upped VirtualHost.
One more note to make here is SNI works by checking the Host Header send by the Client (browser) request
SSL with Virtual Hosts Using SNI.

SNI (Server Name Indication) is a cool feature. Basically it allows multiple virtual hosts with different configurations to listen to the same port. Each virtual host should specify a unique server name identification using the SeverName directive. When accepting connections, Apache will select a virtual host based on the host header that is part of the request (must be set on both HTTP and SSL levels). You can also set one of the virtual hosts as a default to serve clients that don’t support SNI. You should bear in mind that SNI has different support levels in Java. Java 1.7 was the first version to support SNI and therefore it should be a minimum requirement for Java clients.

5. Overall list of useful Options for Mutual Two Way And Basic SSL authentication
 

Once again the few SSL options for Apache Mutual Handhake Authentication

SSLVerifyClient -> to enable the two-way SSL authentication

SSLVerifyDepth -> to specify the depth of the check if the certificate has an approved CA

SSLCACertificateFile -> the public key that will be used to decrypt the data recieved

SSLRequire -> Allows only requests that satisfy the expression


Below is another real time example for a VirtualHost Apache configuration configured for a Two Way Handshake Mutual Authentication


For the standard One way Authentication you need the following Apache directives


SSLEngine on -> to enable the single way SSL authentication

SSLCertificateFile -> to specify the public certificate that the WebServer will show to the users

SSLCertificateKeyFIle -> to specify the private key that will be used to encrypt the data sent


6. Configuring Mutual Handshake SSL Authentication on Apache 2.4.x

Below guide is focusing on Apache HTTPD 2.2.x nomatter that it can easily be adopted to work on Apache HTTPD 2.4.x branch, if you're planning to do a 2 way handshake auth on 2.4.x I recommend you check SSL / TLS Apache 2.4.x Strong Encryption howto official Apache documentation page.

In meantime here is one working configuration for SSL Mutual Auth handshake for Apache 2.4.x:


<Directory /some-directory/location/html>
    RedirectMatch permanent ^/$ /auth/login.php
    Options -Indexes +FollowSymLinks

    # Anything which matches a Require rule will let us in

    # Make server ask for client certificate, but not insist on it
    SSLVerifyClient optional
    SSLVerifyDepth  2
    SSLOptions      +FakeBasicAuth +StrictRequire

    # Client with appropriate client certificate is OK
    <RequireAll>
        Require ssl-verify-client
        Require expr %{SSL_CLIENT_I_DN_O} eq "Company_O"
    </RequireAll>

    # Set up basic (username/password) authentication
    AuthType Basic
    AuthName "Password credentials"
    AuthBasicProvider file
    AuthUserFile /etc/apache2/htaccess/my.passwd

    # User which is acceptable to basic authentication is OK
    Require valid-user

    # Access from these addresses is OK
    Require ip 10.20.0.0/255.255.0.0
    Require ip 10.144.100
</Directory>

Finally to make the new configurations working depending you need to restart Apache Webserver depending on your GNU / Linux / BSD or Windows distro use the respective script to do it.

Enjoy!

Briefly unavailable for scheduled maintenance. Fix WordPress after interrupted upgrade

Thursday, March 2nd, 2017

briefly-unavaiable-for-a-scheduled-maintenance-wordpress-website-fix-howto_1

I've recenty tried Update my WordPress blog sites and being unattentive I've selected all the plugins possitble for Upgrade by checking the "Select All" check box on the Update dialogs and almost automatically int he hurry pressing Update button however out of a sudden I've realized I could screw up my websites brutally as some of the plugins to upgraded might be lacking 100% compitability with their prior versions.

I've made a messes out of my blog many times during upgrades because of choosing to upgrade the wrong not 100% compatible plugins and I know well how painful and hard to track it could be a misbehaving incompatible plugin or how ot could cause a severe sluggishness to blog which automatically reflects on how well the website search engine ranked in Google / Yahoo / Bing indexed etc.

Thus as an almost unconcsious reaction to prevent myself the future troubles I've tried to cancel the update request in Firefox browser and trying to reload the Update page with a hope that I might be quick enough for the Apache / WP / MySQLbackend Update Update queries request to be delaying for processing but I was too slow and bang! I ended up with the following unpleasent message in my browser:

briefly-unavaiable-for-a-scheduled-maintenance-wordpress-website-fix-howto
Briefly unavailable for scheduled maintenance.
 

As you could guess that message caused me quite a lot of worries at hand especially since I've already break up my sites many times by doing quick unmindful reactions and the fact that there is Google Adsense ads appearing which does give me some Return on Investment cents every now and then …

It took me few minutes of research online to find what really happened and how to fix / resolve the WebSites normal operations.


So what causes the Briefly unavailable for scheduled maintenance. appears ?

When WordPress does some of its integrated maintenance jobs a plugin enable / disable or any task that has to modify crucial configurations inside the database WordPress does disable access to all end clients to itself in order to protect its sensitive data to appear to browser requestors as showing some unexpected information to end client browser could be later used by crackers / hackers or a possibly open a security hole for an attacker.

The message is wordpress generated notice and it is pretty normal for the end user to see it during the WP site installation update depending on how many plugins are installed and loaded to the site and how long it will take for the backend Linux / Windows server to fetch the archived .zips of plugins and substitute with the new ones and update the files extracting them to wp-content/plugins and updating the respective required SQL database / tables it could be showing for end users from few secs to few minutes.

However under some circumstances on Browser request timeout to remote wordpress site due to a network connectivity issue or just a bad configuration of Apache for requests timeout (or a slow remote server Apache responce time due to server Hardware / Mem overload) or a stupid browser "Stop" / cancel request like in my case you end up with the Briefly unavailable for scheduled maintenance and you can can longer access the your https://siteurl.com/wp-admin Admin Panel.

The message is triggered by a WP craeted file .maintenance inside /var/www/blog-site/ e.g. WordPress PHP scripts does check for /var/www/blog-site/.maintenance
existence and if it is matched the WP scripts does generate the Briefly unavailble … message.


How to resolve the "Briefly unavailable for scheduled maintenance. Check back in a minute" WordPress error ?

As you might guess removing the maintenance "coming soon" like message in most of the cases comes to just deleting the .maintenance file, to do so:

1. Login to remote server via FTP or SFTP
2. Locate your WP website root folder that should be something like /var/www/blog-site/.maintenance and issue:
issue something like:
 

$ rm -rf /var/www/bog-site/.maintenance


Assuming that some plugin Update .zip extraction or SQL update query did not ended being half installed / executed that should solve the error.
To check whether all is back to normal just refresh your browser pointing to the "broken" site. If it appears well you can thank God for that 🙂
If not check the apache error logs and php error logs and see which of the php scripts is failing and then try to manually fetch and unzip the WP .zip package to wp-content/plugins folder and give it another try and if God bless so it will work as before 🙂
How to prevent your WP based business in future from such nasty errors using A Staging site (test) version of your blog ?

Just run a duplicate of your website under a separate folder on your hosting and do enable the same plugins as on the primary website and copy over the MySQL / PostgreSQL Database from your Live site to the Staging, then once it is enabled before doing any crucial WordPress version updates or Plugins Update always do try the Upgrade first on your Test Staging site. If it does execute fine there in most of the cases the result should be the same on the Production host and that could solve you effors and nerves of debugging a hard to get failure errors or faulty plugins without affecting what your End users see.

If you're not hosting the WordPress install under your own hosting like me you can always use some of the public available hostings like  BlueHost or WPEngine