Posts Tagged ‘program’

Howto create Linux Music Audio CD from MP3 files / Create playable WAV format Audio CD Albums from MP3s

Tuesday, July 16th, 2019

cdburning-audio-music-cd-from-mp3-on-linuxcomapct-disc-tux-linux-logo

Recently my Mother asked me to prepare a Music Audio CD for her from a popular musician accordionist Stefan Georgiev from Dobrudja who has a unique folklore Bulgarian music.

As some of older people who still remember the age of the CD and who had most likely been into the CD burning Copy / Piracy business so popular in the countries of the ex-USSR so popular in the years 1995-2000 audio ,  Old CD Player Devices were not able to play the MP3 file format due to missing codecs (as MP3 was a proprietary compression that can't be installed on every device without paying the patent to the MP3 compression rights holder.

The revolutionary MP3 compression used to be booming standard for transferring Music data due to its high compression which made an ordinary MP3 of 5 minutes of 5MB (10+ times more compression than an ordinary classic WAV Audio the CPU intensiveness of MP3 files that puts on the reading device, requiring the CD Player to have a more powerful CPU.

Hence  due to high licensing cost and requirement for more powerful CPU enabled Audio Player many procuders of Audio Players never introduced MP3 to their devices and MP3 Neve become a standard for the Audio CD that was the standard for music listening inside almost every car out there.

Nowdays it is very rare need to create a Audio CD as audio CDs seems to be almost dead (As I heard from a Richard Stallman lecture In USA nowadays there is only 1 shop in the country where you can still buy CD or DVD drives) and only in third world as Africa Audio CDs perhaps are still in circulation.

Nomatter that as we have an old Stereo CD player on my village and perhaps many others, still have some old retired CD reading devices being able to burn out a CD is a useful thing.

Thus to make mother happy and as a learning excercise, I decided to prepare the CD for her on my Linux notebook.
Here I'll shortly describe the takes I took to make it happen which hopefully will be useful for other people that need to Convert and burn Audio CD from MP3 Album.


1. First I downloaded the Album in Mp3 format from Torrent tracker

My homeland Bulgaria and specific birth place place the city of Dobrich has been famous its folklore:  Galina Durmushlijska and Stefan Georgiev are just 2 of the many names along with Оркестър Кристал (Orchestra Crystal) and the multitude of gifted singers. My mother has a santiment for Stefan Georgiev, as she listened to this gifted accordinist on her Uncle's marriage.

Thus In my case this was (Стефан Георгиев Хора и ръченици от Добруджа) the album full song list here If you're interested to listen the Album and Enjoy unique Folklore from Dobrudja (Dobrich) my home city, Stefan Georgiev's album Hora and Rachenica Dances is available here


Stefan_Georgiev-old-audio-Music-CD-Hora-i-Rychenici-ot-Dobrudja-Horos-and-Ruchenitsas-from-Dobrudja-CD_Cover
I've downloaded them from Bulgarian famous torrent tracker zamunda.net in MP3 format.
Of course you need to have a CD / DVD readed and write device on the PC which nowdays is not present on most modern notebooks and PCs but as a last resort you can buy some cheap External Optical CD / DVD drive for 25 to 30$ from Amazon / Ebay etc.


2. You will need to install a couple of programs on Linux host (if you don't have it already)


To be able to convert from command line from MP3 to WAV you will need as minimum ffmpeg and normalize-audio packages as well as some kind of command line burning tool like cdrskin  wodim which is
the fork of old good known cdrecord, so in case if you you're wondering what happened with it just
use instead wodim.

Below is a good list of tools (assuming you have enough HDD space) to install:


root@jeremiah:/ # apt-get install –yes dvd+rw-tools cdw cdrdao audiotools growisofs cdlabelgen dvd+rw-tools k3b brasero wodim ffmpeg lame normalize-audio libavcodec58


Note that some of above packages I've installed just for other Write / Read operations for DVD drives and you might not need that but it is good to have it as some day in future you will perhaps need to write out a DVD or something.
Also the k3b here is specific to KDE and if you're a GNOME user you could use Native GNOME Desktop app such brasero or if you're in a more minimalistic Linux desktop due to hardware contrains use XFCE's native xfburn program.

If you're a console / terminal geek like me you will definitely enjoy to use cdw
 

root@jeremiah:/ # apt-cache show cdw|grep -i description -A 1
Description-en: Tool for burning CD's – console version
 Ncurses-based frontend for wodim and genisoimage. It can handle audio and

Description-md5: 77dacb1e6c00dada63762b78b9a605d5
Homepage: http://cdw.sourceforge.net/


3. Selecting preferred CD / DVD / BD program to use to write out the CD from Linux console


cdw uses wodim (which is a successor of good old known console cdrecord command most of use used on Linux in the past to burn out new Redhat / Debian / different Linux OS distro versions for upgrade purposes on Desktop and Server machines.

To check whether your CD / DVD drive is detected and ready to burn on your old PC issue:


root@jeremiah:/# wodim -checkdrive
Device was not specified. Trying to find an appropriate drive…
Detected CD-R drive: /dev/cdrw
Using /dev/cdrom of unknown capabilities
Device type    : Removable CD-ROM
Version        : 5
Response Format: 2
Capabilities   :
Vendor_info    : 'HL-DT-ST'
Identification : 'DVDRAM GT50N    '
Revision       : 'LT20'
Device seems to be: Generic mmc2 DVD-R/DVD-RW.
Using generic SCSI-3/mmc   CD-R/CD-RW driver (mmc_cdr).
Driver flags   : MMC-3 SWABAUDIO BURNFREE
Supported modes: TAO PACKET SAO SAO/R96P SAO/R96R RAW/R16 RAW/R96P RAW/R96R

You can also use xorriso (whose added value compared to other console burn cd tools is is not using external program for ISO9660 formatting neither it use an external or an external burn program for CD, DVD or BD (Blue Ray) drive but it has its own libraries incorporated from libburnia-project.org libs.

Below output is from my Thinkpad T420 notebook. If the old computer CD drive is there and still functional in most cases you should not get issues to detect it.

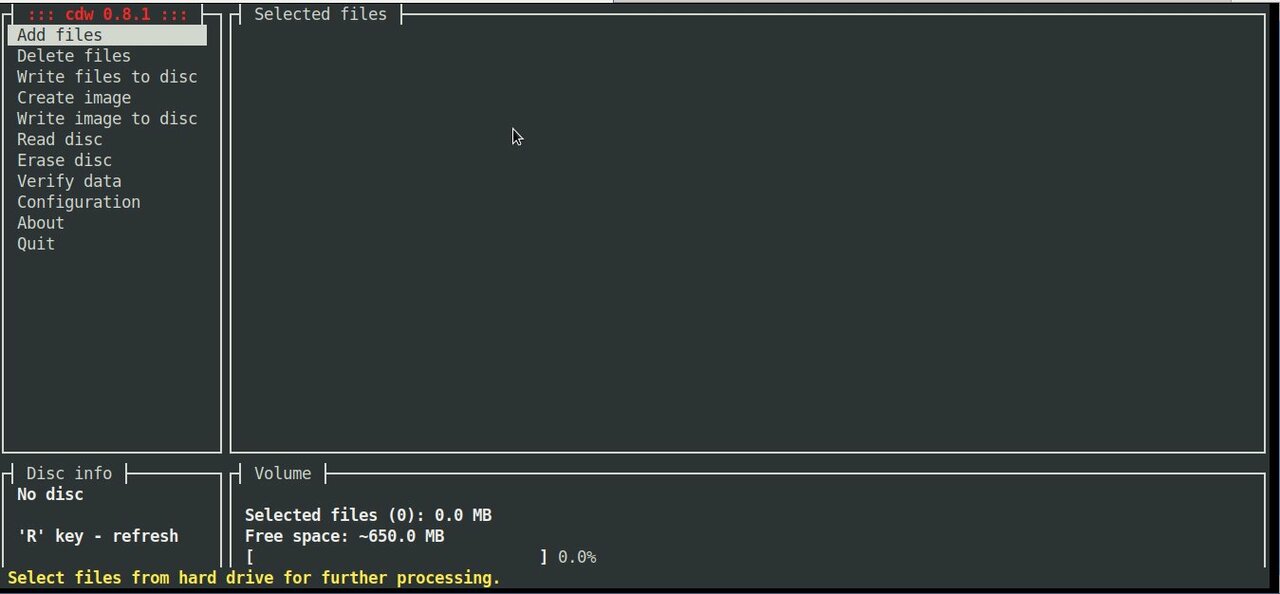
cdw ncurses text based CD burner tool's interface is super intuitive as you can see from below screenshot:
cdw-burn-cds-from-console-terminal-on-GNU-Linux-and-FreeBSD-old-PC-computer

CDW has many advanced abilities such as “blanking” a disk or ripping an audio CD on a selected folder. To overcome the possible problem of CDW not automatically detecting the disk you have inserted you can go to the “Configuration” menu, press F5 to enter the Hardware options and then on the first entry press enter and choose your device (by pressing enter again). Save the setting with F9.
 

4. Convert MP3 / MP4 Files or whatever format to .WAV to be ready to burn to CD


Collect all the files you want to have collected from the CD album in .MP3 a certain directory and use a small one liner loop to convert files to WAV with ffmpeg:
 

cd /disk/Music/Mp3s/Singer-Album-directory-with-MP3/

for i in $( ls *.mp3); do ffmpeg -i $i $i.wav; done


If you don't have ffmpeg installed and have mpg123 you can also do the Mp3 to WAV conversion with mpg123 cmd like so:


for i in $( ls ); do mpg123 -w $i.wav $i.mp3; done


Another alternative for conversion is to use good old lame (used to create Mp3 audio files but abling to also) decode
mp3 to wav.


lame –decode somefile.mp3 somefile.wav


In the past there was a burn command tool that was able to easily convert MP3s to WAV but in up2date Linux modern releases it is no longer available most likely due to licensing issues, for those on older Debian Linux 7 / 8 / 9 / Ubuntu 8 to 12.XX / old Fedoras etc. if you have the command you can install burn and use it (and not bother with shell loops):

apt-get install burn

or

yum install burn


Once you have it to convert


$ burn -A -a *.mp3


5. Fix file naming to remove empty spaces such as " " and substitute to underscores as some Old CD Players are
unable to understand spaces in file naming with another short loop.


for f in *; do mv "$f" `echo $f | tr ' ' '_'`; done


6. Normalize audio produced .WAV files (set the music volume to a certain level)


In case if wondering why normalize audio is needed here is short extract from normalize-audio man page command description to shed some light.

"normalize-audio  is  used  to  adjust  the volume of WAV or MP3 audio files to a standard volume level.  This is useful for things like creating mp3 mixes, where different recording levels on different albums can cause the volume to  vary  greatly from song to song."
 

cd /disk/Music/Mp3s/Singer-Album-directory-with-MP3/

normalize-audio -m *.wav


7. Burn the produced normalized Audio WAV files to the the CD


wodim -v -fix -eject dev='/dev/sr0' -audio -pad *.wav


Alternatively you can conver all your MP3 files to .WAV with anything be it audacity
or another program or even use 
GNOME's CDBurn tool brasero (if gnome user) or KDE's CDBurn which in my opinion is
the best CD / DVD burning application for Linux K3B.

Burning Audio CD with K3b is up to few clicks and super easy and even k3b is going to handle the MP3 to WAV file Conversion itself. To burn audio with K3B just run it and click over 'New Audio CD Project'.
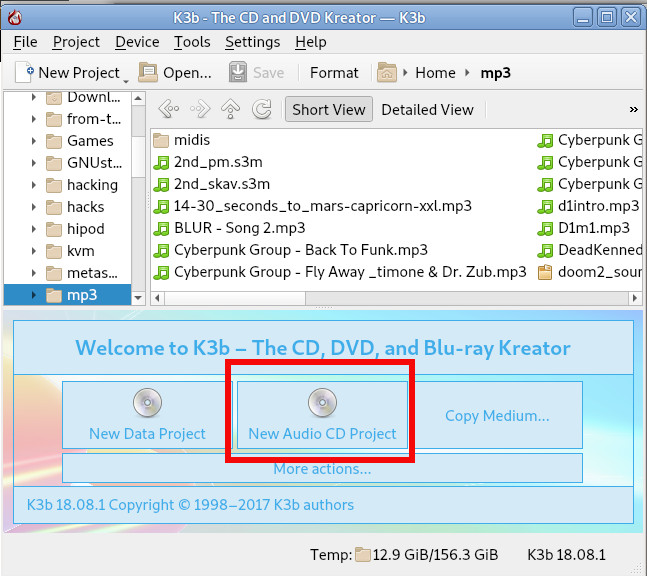
k3b-on-debian-gnu-linux-burn-audio-cd-screenshot

For those who want to learn a bit more on CD / DVD / Blue-Ray burning on GNU / Linux good readings are:
Linux CD Burning Mini Howto, is Linux's CD Writing Howto on ibiblio (though a bit obsolete) or Debian's official documentation on BurnCD.
 

8. What we learned here


Though the accent of this tutorial was how to Create Audio Music CD from MP3 on GNU / Linux, the same commands are available in most FreeBSD / NetBSD / OpenBSD ports tree so you can use the same method to build prepare Audio Music CD on *BSDs.

In this article, we went through few basic ways on how to prepare WAV files from MP3 normalize the new created WAV files on Linux, to prepare files for creation of Audio Music CD for the old mom or grandma's player or even just for fun to rewind some memories. For GUI users this is easily done with  k3b,  brasero or xfburn.

I've pointed you to cdw a super useful text ncurses tool that makes CD Burninng from plain text console (on servers) without a Xorg / WayLand  GUI installed super easy. It was shortly reviewed what has changed over the last few years and why and why cdrecord was substituted for wodim. A few examples were given on how to handle conversion through bash shell loops and you were pointed to some extra reading resources to learn a bit more on the topic.
There are plenty of custom scripts around for doing the same CD Burn / Covnersion tasks, so pointing me to any external / Shell / Perl scripts is mostly welcome.

Hope this learned you something new, Enjoy ! 🙂
Windows unable to delete file, file locked unlocking with Unlocker tiny tool

Wednesday, April 13th, 2016

Windows-Unlocker-program-show-what-program-or-software-is-locking-your-file-why-file-cant-be-deleted-file-locked

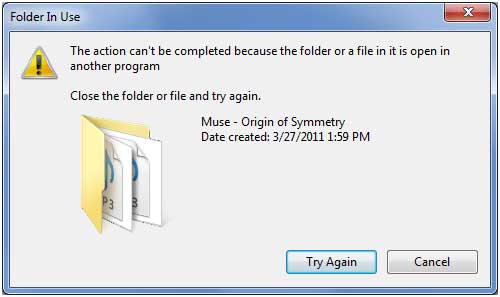
If you want to delete some file on a Windows server or Desktop but you get the a dialog with an error saying:

"This action can't be completed because the folder or a file in it is open in another program"

windows-unable-to-delete-file-file-locked-get-what-is-locking-it-and-unlock-the-file-with-Unlocker-tiny-desktop-graphic-tool-0

Then you need to find out which Program is preventing the file from deletion / locking the file, I've earlier blogged on how to check which process locks file with tasklist or wmic Windows commands

However some users might prefer to not bother with command line check what is locking a file and then killing the Process manually with taskmanager (taskmgr.exe) but do both file unlocking from one single gui interface, that's especially for lazy novice users, gamers and most of Desktop Windows users.

If you're one of those lazy users you will appriace

Unlocker – a useful utility for unlocking files, it will help you figure out which file is using a file what program is using the file you're prevented to delete.
Unlocker is the tool for you if you get any of below error messages, when you try to delete a file:


  • Cannot delete folder: It is being used by another person or program
  • Cannot delete file: Access is denied
  • There has been a sharing violation.
  • The source or destination file may be in use.
  • The file is in use by another program or user.
  • Make sure the disk is not full or write-protected and that the file is not currently in use.
     

windows-unable-to-delete-file-file-locked-get-what-is-locking-it-and-unlock-the-file-with-Unlocker-tiny-desktop-graphic-tool-1

If you stumble unto an locked file once you download and install Unlocker tool and launch the tool ( in case it disappers in future a mirror of Unlocker tool here ).
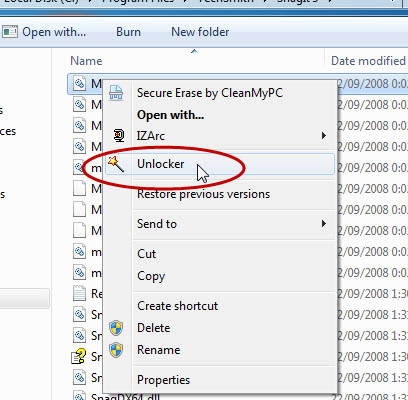
Once installed if you click properties over the file which is refused to be deleted you will get a new menu such as in below screenshot:

NB! Beware while installing Unlocker you might be offered to install a bunch of malware (make sure you deselect it). Also Unlocker's site is made in a way so the Download button could easily be confused with some Google Adsense

unlocker-windows-menu-added-to-properties-options-screenshot

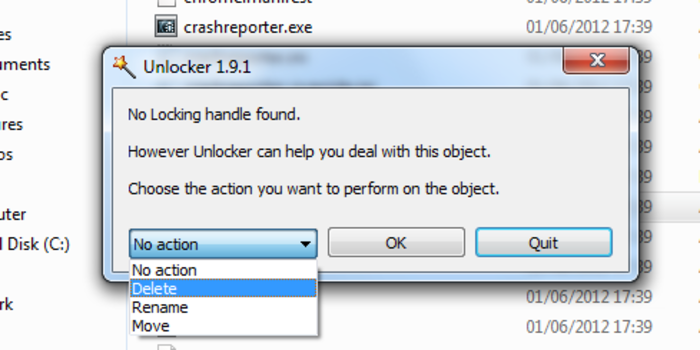
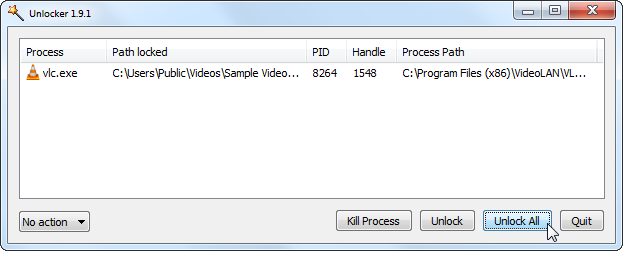
Click on the file that is being locked and choose the Unlocker button, for example if you have a bunch of Videos installed and the video is being locked by VLC clicking on the file you will be shown VLC like in below screenshot


Unlocker-screenshot-locked-file-because-movie-opened-in-VLC

As you see you're shown the Process PID that is being used by the file the full path to the locking program and you have the option to quickly kill the process or unlock the file. Note that at some cases unlocking a file used by some critical program lets say Microsoft Word / Excel or OneNote could cause you a data loss, so before unlocking a file make sure you know what you're doing.

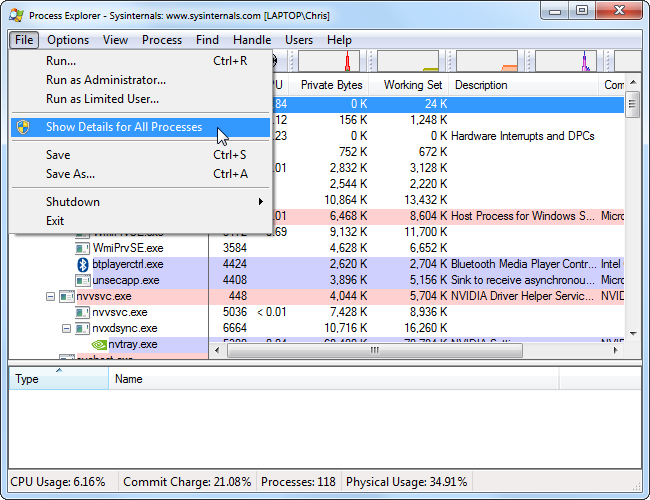
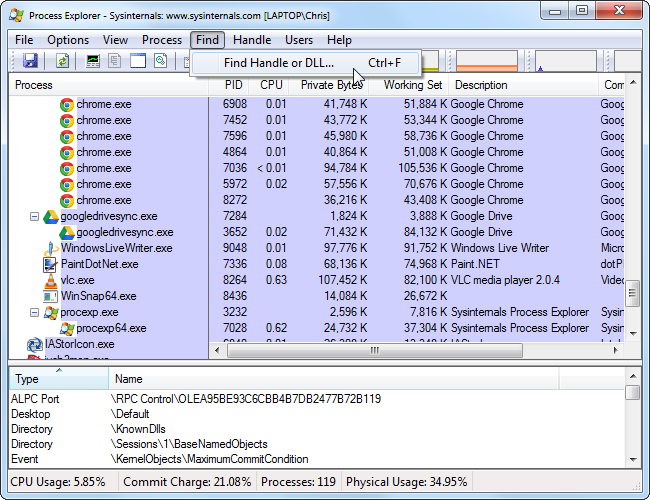
For more advanced users that still prefer GUI to find out what is Locking a file you can also check out Microsoft Process Explorer (advabced task manager) like tool.
If you haven't tried Process Explorer be sure to take a look at it as its a great tool for Win SysAdmins:

Process Explorer is very handy if you want to explore which .DLL (Windows Libraries) are used by a Process / Program

Windows-process-explorer-an-advanced-task-manager-for-windows-and-handy-tool-to-see-what-external-libraries-and-files-a-program-is-using.png

Windows-process-explorer-an-advanced-task-manager-for-windows-and-handy-tool-to-see-what-external-libraries-and-files-a-program-is-using-1


Use mac PC built-in camera to make / take pictures on Mac OS X macbookair notebook with Photo Booth

Friday, February 26th, 2016

take-picture-or-video-with-built-in-camera-on-MacOSX-PhotoboothLOGO

It seems we lost our Good high quality Digital Camera somewhere and I was in need urgently to make a good quality photo (my ZTE Phone) has a very bad camera, so I got the idea to use Macbookair's camera as it has better
resolution to picture my present a  Tank Tort 🙂 hand made by my wife as a present for the Day of the Defender of the Fatherland which is a major feast in Russia, Belarus and many of the ex-Soviet Union members communist countries.

Actually using build in camare in MacBookAir is a handy thing for people mising at the moment a good high quality digital camera as it is thin and light and build in MacBook cam can be used to make Videos and Pictures exactly the same way
as an ordinary Tablet Computer is used so commonly nowadays by many:

In other words I needed for the Mac OS X equivalent to Cheese's (Photo and Video) capturer program for Linux.

Luckily for people interested in using their Mac OS notebook as a amateur camera this is easy by using default shipped Mac Application called:

Photo Booth app

To Launch Photo Booth app it just look it up in Finder and double click it:

PhotoBooth-how-to-take-photos-on-macosx

Clicking the large red button underneath the preview area will take a picture after an optional countdown.

Tort Tank of Svetka

Besides being able to capture Video and Pictures from Mac's camera it could add also some nice effects to taken pictures and videos (supports a basic video editing) features and effects.

The effects you can choose are are: Sepia, Black and White, Glow, Comic Book, Normal, Colored Pencil, Thermal Camera, X-Ray, and Pop Art. There are also effects that change the person in the picture using these effects: Bulge, Dent, Twirl, Squeeze, Mirror, Light Tunnel, Fish Eye, and Stretch. Actually  photographic filters of Photo Booth are very similar to Adobe Photoshop.

make-picture-on-mac-photobooth-effects-screenshot
By default Photo Booth will create picture, howver

Photo Booth saves your photos as JPEG files in a folder named Photo Booth, located in your home folder.

Choose File > Reveal in Finder

to see your picture files.

A much better way to be able to easily see and access all taken Pictures and Videos with Photo Booth is to


open Terminal


and type:

——-


$ cd Pictures
$ ln -s Photo\ Booth\ Library/Pictures/ PhotoBoothPics


This will make Link to pictures be easily accessible from your Finder -> Pictures folder
 
Applying custom photo backgrounds

A very useful feature of Photo Booth is that the user can apply backdrops to provide an effect similar to a green screen. When a backdrop is selected, a message appears telling the user to step away from the camera. Once the background is analyzed, the user steps back in front of the camera and is shown in front of the chosen backdrop.

For people who prefer to take photos using a console program on Mac OS I guess you should take a look at ffpeg
Here is one more snapshot of the Tort Tank snapshot made with the Macbookair of Svetlana 🙂

Tort Tank


P.S. If you like the Tort Tank and you happen to live in Sofia Bulgaria, you can order it  by dropping me a comment with request 🙂

Enjoy ! 🙂

How to install Winrar on Mac OS X on Console and Graphical Interface – IZIP and Keka Free archivers short review

Friday, February 19th, 2016

howto-install-winrar-free-gui-program-for-mac-osx-notebook-pc

If you're looking for just Mac OS X, console version of rar and unrar then standard WinRar website binaries for Mac should be perfect for you.
If you're an advanced Mac OS X user with UNIX background and you've already installed Mac Ports or Brew – The Missing package manager for Mac OS X
To install WinRar on Mac (with brew) with:
 

macosx# brew install unrar


If you're using MacPorts instead:
 

macosx:/home$ sudo port install unrar


However console version isn't the best choice for my wife which is not a console ninja, so I had to look and install some oher Graphic Interface program 🙂
As I don't like using AppleStore (I can't even properly register for an Apple Store ID,as I'm required to fill in my credit card … )
Hence I looked online on some WinRar dearchiver GUIs and  found IZip which is natively a ZIP archiver but also supports .RAR Archives.
Though IZIp website give the impression IZip is a great tiny prog, once installing the .DMG downloaded from the website and installing into Applications it turned out IZip is currently crashing on the Mac Book Air with Mac OS X 10.8.5Mountain Lion

If you want a simplistic interface program you would probably want to check out UnrarX though I personally didin't liked that one because it is not properly handing UTF-8 and CP-1251 filenames written in Russian, Bulgarian Cyrillic and probably also Chineese, Viatnamese and other exotic language encodings.
After few more minutes of searching I finally got KEKA – The Free  Mac OSX file archiver.

keka_winrar-archive-unarchive-free-program-for-macosx-icon

Though the program Logo is a little scary, Keka turned to be very nice tiny, easy  to install WinRAR GUI interfaced program for Mac OS X and the installation comes to standard download and run of .DMG file and moving it to the Finder Applications.

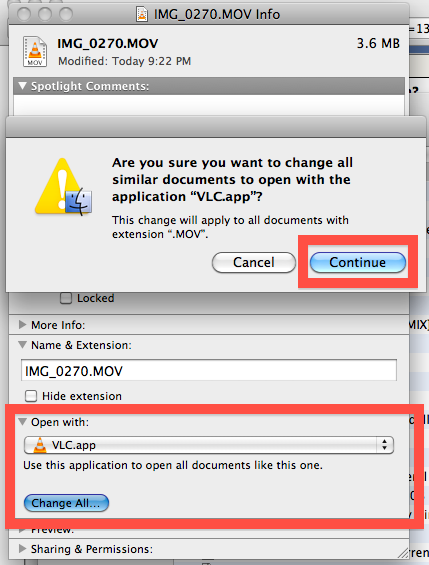
Once installed, if you turn to have a .rar file association issues (by default in my case) files were opened with VLC. To change the file type association of a certain file on the Mac I've had to press Command (button) + I over the .rar extensioned file, e.g:

  • Command + I
  • Click to expand the “Open with” section within that files info screen
  • From the pull down menu, select the application you want to open this specific file with
  • Close the Get Info window
     

change-mac-file-association-to-rar-kaka-free-winrar-winzip-archive-dearchive-macosx

Turn your Windows PC / notebook to Wireless Router with My Wifi Router 3.0 and TP-Link TL-WN722N

Wednesday, January 7th, 2015

my-wifi-router-3.0-turn-regular-windows-notebook-to-wifi-router

I've been to home of my wife's parents and for this Christmas, they have received second hand Acer Aspire notebook as a Christmas gift. So far they were using internet using their Windows XP PC which is getting internet here in Belarus via UTP network cable using ByFly ZTE ADSL router modem. As ADSL modem lacked wifh WI-FI Antenna (support) and there was already the Acer notebook which had to access the internet preferrably via Wireless connection, the option was to get a WI-FI router and connect it to the ADSL modem but as this would cost (20 EUR at minimum) and there was alreay Wireless (Receiver) adapter TP-LINK TL-WN722N unused, I decided to try make the TP-LINK Receiver and Windows XP PC to act as a small Home Made Wireless  (software) router.

Until I succeeded I've tried multiple softwares which all failed to turn the Windows PC to Wi-Fi Hotspot.
Here is list of few of the softwares I tried that didn't worked for some reason:

1. Wifi HotSpot Creator

WiFi-HotSpot-Creator-screenshot

Turn your PC into a Wi-Fi Router for Free!

Instantly share your internet connection with your friends and peers over Wi-Fi. Turns your PC into a Wi-Fi Router! And its Free! Wifi HotSpot Creator is said to be able to convert any Mac OS X and Windows PC to hotspot here is Wifi HotSpot Creator download website
Wifi HotSpot Creator is said to work with Windows Vista / XP / 7 / 8, however as I said it doesn't work for me on Windows XP.
 

2. Virtual Wifi router

Here is

With Virtual WiFi Router you can create a WiFi hotspot for WiFi Reverse Tethering on Windows 7 and for wifi supported mobiles and other wifi enabled computer to create a network and to share internet. Virtual Wifi Router in a minute converts your PC into a WiFi hot spot for free.

To make the program working it depends on .NET 4.5. Though the program looked like a superb it unfortunately was crashing on Windows XP. Below are few screenshots from program working on Windows 7.

virtual-wifi-router-screenshot

virtual-wifi-router-connected-device-screenshot-windows
3. My Wifi Router 3.0

Finally I've come across My Wifi Router 3.0 which is just another program that makes necessery Windows configuration to TP-Link TL-WN722N Wireless receiver Adapter to turn it into a homemade Wi-Fi router.
my-wifi-router-on-windows-xp-desktop-pc-noteboko-creenshot

By default Amiss_papp Wifi is configured, this can be changed, however in my case when I tried changing it there were some issues, so finally I've had to re-install My Wifi Router to make it working again.
Once configured My Wifi Router there is the green button (Activate / Deactivate Free Wifi) as seen from screenshot.

As you can see My Wifi Router also allows to Share Videos over WiFi. Once I've tested the program and confirmed it as working, I had to configure it to automatically start on Windows PC boot.

This is done from Settings (located on backward triangle button, next to minimize function).
I had to set check in to  Auto Start and Software Conflict Detection.

make-windows-pc-with-wireless-wifi-router-my-wifi-router-settings-screenshot

Once connected to the TP-Link TL-WN722N (USB) Wi-Fi (High Gain) Receiver adapter in Windows Tray a new indicator will popup that a device has been connected. I've tested My Wifi Router and it seem to be working fine with 3 remote connected Wi-Fi devices (1 Notebook and 2 Nokia Lumia mobile phones). The speed of internet was fast and if I didn't know the connection is done in a software way via such an improvised Windows XP Wi-Fi network router I would think it is just a regular Wi-Fi network router.

One more thing I had to do to make the internet working I had to share the the LAN Network (ethernet card) Interface's internet from
 

Control Panel -> Networking -> Local Area Connection (Properties) -> Advanced

https://www.pc-freak.net/images/windows-xp-internet-connection-sharing-how-to-networking-screenshot-make-network-address-translation-windows-xp.jpg

A downside of My Wifi Router is I couldn't find a way to save password while connection to the newly created WiFi router with it, so each time I had to login I had to manually type in the password (default my wifi router password is 123567890). Re-typing password on each login is annoying but if you have to do it once per day in the morning when you turn on your notebook it is not such a big deal.

Once connected to My Wifi Router in Connection Management in Friends (tab) you will see a list with connected devices.

my-wifi-router-on-windows-xp-with-htc-and-ipad-iphone-connected
As visible from above screenshot default IPs which will be assigned to new connected clients to My Wifi Router will be in local network IP range 192.168.23.2 – 192.168.23.254.

Now all left is to Enjoy  your new Software Wi-Fi router 🙂

Restart hung Mac OS application – How to kill programs in Mac OS – alternative of Windows CTRL + ALT + DEL

Friday, May 23rd, 2014

mac-kill-hung-application-killing-freezed-application-on-mac-osx
If you happen to have the rare case of having a hung MAC OS X application and you're coming from a Linux / Windows background you will be certainly wonderhing how to kill Mac OS X hung application.
In Mac OS the 3 golden buttons to kill crashed application are:


COMMAND + OPTION + ESCAPE

Command + Option + Escape

while pressed simultaneously is the Mac Computer equivalent of Windows CTRL + ALT + DEL

mac-os-force-kill-hung-application-force-program-exit-mac-OSX

Holding together COMMAND  + OPTION + ESCAPE on MAC OS brings up the Force Quit Window showing and letting you choose between the list of open applications. To close freezed MAC application, choose it and Press the Force Quit Button this will kill immediately that application.  

To directly end application without invoking the choose Force Quit Window menu, to force a hanging app quit right click on its icon in Dock (CTRL + Click) and choose "Force Quit” from context menu.

A little bit more on why applications hung in MAC OS. Each application in MAC OS has its event queue. Event queue is created on initial application launch, event queue is buffer that accepts input from system (could be user input from kbd or mouse, messages passed from other programs etc.). Program is hanging when system detects queued events are not being used.

macOSX-EventQueue-reason-for-application-hung-in-macs
Other reasons for Mac OS hanging program is whether you're attaching detaching new hardware peripherals (i.e. problems caused by improper mount / unmounts), same hang issues are often observed on BSD and Linux. Sometimes just re-connecting (mouse, external hdd etc.) resolves it.
Program hungs due to buggy software are much rarer in Macs just like in IPhones and Ipads due to fact mac applications are very well tested until published in appstore.

Issues with program hungs in Mac sometimes happen after "sleep mode" during "system wake" function – closing, opening macbook. If a crashed program is of critical importance and you don't want to "Force Quit" with COMMAND + OPTION + ESC. Try send PC to sleep mode for a minute or 2 by pressing together OPTION + COMMAND + EJECT.

An alternative approach to solve hanging app issue is to Force-quit Finder and Dock to try that, launch Terminal

And type there:

# killall Dock

Other useful to know Mac OS keyboard combination is COMMAND + OPTION + POWERHold together Command and Option and after a while press Power – This is a shortcut to instruct your Mac PC to reboot.

luckyBackup Linux GUI back-up and synchronization tool

Wednesday, May 14th, 2014

luckybackup_best-linux-graphical-tool-for-backup_linux_gui-defacto-standard-tool
If you're a using GNU / Linux  for Desktop and you're already tired of creating backups by your own hacks using terminal and you want to make your life a little bit more easier and easily automate your important files back up through GUI program take a look at luckyBackup.

Luckibackup is a GUI frontend to the infamous rsync command line backup  tool. Luckibackup is available as a package in almost all modern Linux distributions its very easy to setup and can save you a lot of time especially if you have to manage a number of your Workplace Desktop Office Linux based computers.
Luckibackup is an absolute must have program for Linux Desktop start-up users. If you're migrating from Microsoft Windows realm and you're used to BackupPC, Luckibackup is probably the defacto Linux BackupPC substitute.

The sad news for Linux GNOME Desktop users is luckibackup is written in QT and it using it will load up a bit your notebook.
It is not installed by default so once a new Linux Desktop is installed you will have to install it manually on Debian and Ubuntu based Linux-es to install Luckibackup apt-get it.

debian:~# apt-get install --yes luckibackup
...

On Fedora and CentOS Linux install LuckiBackup via yum rpm package manager

[root@centos :~]# yum -y install luckibackup
.

Luckibackup is also ported for OpenSuSE Slackware, Gentoo, Mandriva and ArchLinux. In 2009 Luckibackup won the prize of Sourceforge Community Choice Awards for "best new project".

luckyBackup copies over only the changes you've made to the source directory and nothing more.
You will be surprised when your huge source is backed up in seconds (after the first backup).

Whatever changes you make to the source including adding, moving, deleting, modifying files / directories etc, will have the same effect to the destination.
Owner, group, time stamps, links and permissions of files are preserved (unless stated otherwise).

Luckibackup creates different multiple backup "snapshots".Each snapshot is an image of the source data that refers to a specific date-time.
Easy rollback to any of the snapshots is possible. Besides that luckibackup support Sync (just like rsync) od any directories keeping the files that were most recently modified on both of them.

Useful if you modify files on more than one PCs (using a flash-drive and don't want to bother remembering what did you use last. Luckibackup is capable of excluding certain files or directories from backupsExclude any file, folder or pattern from backup transfer.

After each operation a logfile is created in your home folder. You can have a look at it any time you want.

luckyBackup can run in command line if you wish not to use the gui, but you have to first create the profile that is going to be executed.
Type "luckybackup –help" at a terminal to see usage and supported options.
There is also TrayNotification – Visual feedback at the tray area informs you about what is going on.


how to archive with Windows default zip (compress) algorithm

Tuesday, April 1st, 2014

windows-sent-to-compressed-file
I'm working on a decomissioning project (for those who hear decomissioning for a first time – in corporate world this means removal of service/s or assigned resources of a server or a physical server hardware that is not to be used in future or is obsolete). The decomissioning includes removal of Apache Tomcat (Software Configuration Item CI – in HP terms) from Microsoft Windows 2007 – Service Pack 2.
Part of decomissioning is of course to create backup of Tomcat Application server and for that I needed to create compressed archive of Tomcat instances. Usually I do archives on Windows using Winrar or Winzip but this time as the server productive server has the minimum installed there was no any external vendor produced archiving software available.

My memories from past were that there is a native compressing program embedded into Windows as I've unzipped compressed archives on Win hosts with no need for external WinZip. However until so far I never did .ZIP archive with no available external uncompress software.

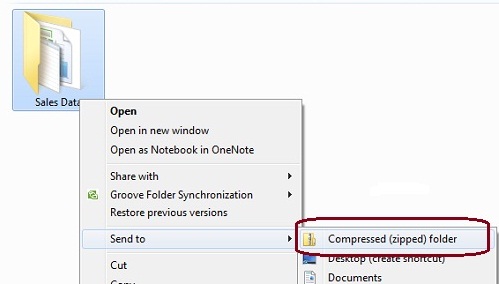
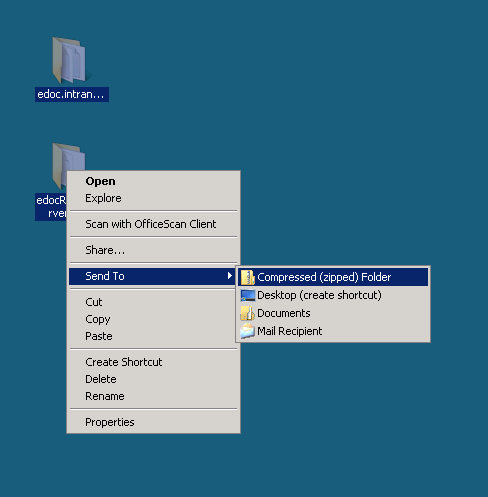
Using Winzip or Winrar so far to make archive from a number of files I used to select files to enter Archive press right mouse button and select Create Archive (Add To Archive) so I expected this will work whenever no Winrar, however there was no obvious button like this, so I googled a bit to find out how is that possible ending up on Article from Microsoft titled "Compress and uncompress files (zip files)", there is a dumb proof video teaching Compressing files with Microsoft default ZIP program is done by the the weird "Send To" menu 🙂 

Selecting files to enter Archive;
> (Click Right Mouse Button) -> (Send To Compressed Zipped Folder)

compress_zipped_folder_with_windows_default_archive_algorithm how to archive with windows default compress archive

Honestly If I didn't checked the net probably I will never think of looking it there.

Total Commander or Free Commander a must have Windows file Explorer alternatives

Monday, December 2nd, 2013

Total Commander must have windows file explorer alternative logo

Whether coming from Linux background and you're forced to work with MS Windows or even if you're born as a Windows user  and you hold a strong dislike for Windows File Explorer. You will certainly appreacite some Windows Explorer alternative like Total Commander.
 

1. Total Commander –  Windows Advanced File Manager

Total Commander was widely spread and still is mostly used by advanced Windows users since the distant 1996 when it came to exist.
Total Commander is highly spread among programmers and computer professionals. It is well known in Russia and the ex-Soviet Union block countries Total Commander is strongly preferred over Windows Explorer by anyone who ever had to work in Old command line MS-DOS, Unix consoles / Midnight Commander etc. Total Commander has just one downside it is not free as in freedom but shareware, so you either have to find a crack for it or everytime you run it press a number before you can proceed with it, this however is not such a big issue as usually you work with computer whole day and even if you should press a number once to continue run as Shareware, you have to do it just once or twice a day.

Total Commander windows internet explorer hackers alternative not registered screenshot

So why use Total Commander or Free Commander preferred choice over Windows Explorer and why it is better for one to use it:

1. Security

Big part of viruses have hidden attribute. Of course we can’t see it’s presence in Windows Explorer, this is so common with USB Drive Viruses. While MS Explorer has limited capability in showing system file, Total Commander is different, once it is specified to show hidden files, all kind of hidden files are to be shown.

2. Support for multiple upload protocols like FTP and SFTP

Through Total Commander plugins you can enjoy simplified way to do every operation from one interface. Once plugin for SFTP / Webdav … plugins you will not have to install separate clients like WinSCP / CarotWebDav etc.

3. Play multimedia mp3 / Zip / Unzip, watch pictures

You can play your mp3s with no need for WinAmp, Unzip or IrfanView. As this is done internally in Total Commander through plugins. So using Total Commander saves you from multiple applications also gives you unified interface something which saves time and annoyance of separate applications pop-up windows.

Total commander directory Cdrive listing the hacker choice for file explorer

4. Better file copying internal program

Total Commander's copier is much better than Windows Explorer default one. Lets say you have a power outage during copying a large file. What Windows Explorer will offer is overwrite the file loosing you time, whether Total Commander will continue copying from file byte size it stopped due to outage. Another advantage is it will be able to copy damaged files much better than Windows default copier program. TT's internal copy is not so quick as TerraCopy but faster than Windows Explorer default one..

5. More powerful search than Explorer's

TT has capabilities to search inside archives, set search encoding type. Search only by directories or files, set a range of dates from which files has to be found, search only hidden directories, search by directory file attribute, file size, look for duplicate files etc. etc.

total commander more powerful windows search window screenshot

Here is a complete list of Basic features embedded in Total Commander latest version which of time of writting is 8.01;
 

  • Two file windows side by side
  • Multiple language and Unicode support
  • Enhanced search function
  • Compare files (now with editor) / synchronize directories
  • Quick View panel with bitmap display
  • ZIP, ARJ, LZH, RAR, UC2, TAR, GZ, CAB, ACE archive handling + plugins
  • Built-in FTP client with FXP (server to server) and HTTP proxy support
  • Parallel port link, multi-rename tool
  • Tabbed interface, regular expressions, history+favorites buttons
  • Thumbnails view, custom columns, enhanced search
  • Compare editor, cursor in lister, separate trees, logging, enhanced overwrite dialog etc.
  • Unicode names almost everywhere, long names (>259 characters), password manager for ftp and plugins, synchronize empty dirs, 64 bit context menu, quick file filter (Ctrl+S)
  • USB port connection via special, many improvements to ftp, synchronizing and other functions

Total Commander has a portable version for those who travel a lot and like to use it on multiple computers from a USB Stick.

2. Free Commander – A Total Commander Free for personal use Alternative

Freecommander FC / Free Commander hackers free windows explorer alternative

Free Commander is not open source but it is free to use for non-commercial use and not Shareware, so it is perfect alternative for those who like Total Commander but dislike fact you have to press a number on each TT start up and you have to see in Total Commander Title (NOT REGISTERED)

List of basic supported functions by Free Commander are;


  •     Dual-panel technology – horizontal and vertical
  •     Tabbed interface
  •     Optional tree view for each panel
  •     Built in file viewer to view files in hex, binary, text or image format
  •     File viewer inside archives too
  •     Built in archive handling: ZIP (read, write), CAB (read, write), RAR (read)
  •     Nested archive handling
  •     Built in FTP client
  •     Easy access to system folders, control panel, desktop and start menu
  •     Copy, move, delete, rename files and folders
  •     Multi rename tool
  •     Wipe files
  •     Create and verify MD5 checksums
  •     File splitting
  •     File properties and context menu
  •     Calculation of folder size
  •     Folder comparison / synchronization
  •     Modification of file date and attributes
  •     Folder / program favorites
  •     File searching (inside archive too)
  •     File filters for display
  •     User defined columns for detailed view
  •     DOS command line
  •     Multiple language  support

Just like Total Command, Free Commander has a portable version for those who want run it on Windows machines with no admin permissions to install.