Posts Tagged ‘key value’

Enable PSK encryption on Zabbix Agent (client) sent encrypted monitored datas to Zabbix server

Friday, April 7th, 2023

zabbix-client-server-encryption-public-key-exchange

Those concerned of security and in use of their Zabbix monitored data who communicate Zabbix collected agent
data over internet or via some kind of untrusted network might definitely not enjoy the fact that zabbix-agent sents
its collected data to server in a plain text. Clear text data is allowing any network sniffer to possibly collect your
monitored server and hardware devices data and exposes all data sent over the network to same problems like in the past
the old uencrypted SMTP protocol.

To mitigate those great security hole for the paranoid sys admin it is rather easy to enable PSK (Pre Shared Key) based encryption.
To generate Pre Shared key you have to had to important values present

1. PSK Identity
2. PSK Secret

PSK secret should be minimum of 128 bit (16-byte PSK, entered as 32 hexadecimal digits), and supports up to
2048 bit (256-byte PSK, entered as 512 hexadecimal digits)

Usually something like 256 bit PSK secret on the machine should be strong enough and simply generated by running

# openssl rand -hex 32

1. Agent to zabbix server or proxy connection config

In /etc/zabbix/zabbix_agentd.conf for a Server Active (e.g. server to actively request the client to sent its collected data)
On machine running zabbix-agent should have a configuration similar to:

# cat /etc/zabbix/zabbix_agentd.conf

PidFile=/var/run/zabbix/zabbix_agentd.pid
LogFile=/var/log/zabbix/zabbix_agentd.log
LogFileSize=0

# IP of the machine
SourceIP=10.10.10.30
# turn it on if you need to execute to remote machine commands
EnableRemoteCommands=0

# IP of the server
servers=10.30.50.80
ListenPort=10080

# IP of the machine
ListenIP=10.30.30.31

# IP of the server
ServerActive=10.30.50.80

HostMetadataItem=system.uname
BufferSize=5400
MaxLinesPerSecond=5
Timeout=10
AllowRoot=0
StartAgents=5
LogRemoteCommands=0


# Machine hostname
Hostname=fqdn-of-zabbix-data-collect-server.com
Include=/etc/zabbix/zabbix_agentd.d/*.conf

# Encryption
TLSConnect=psk
TLSAccept=psk
TLSPSKIdentity=PSK to Zabbix Server5
TLSPSKFile=/etc/zabbix/zabbix_agentd.psk


! Important security note

!!! The TLSPSKIdentity value you decide will not be encrypted on transport, so don't use anything sensitive.

Once you include the TSL config

2 Generate / Create Zabbix Agent Key

Generate the key with pseudo-random bites inside /etc/zabbix/zabbix_agentd_key.psk

# cd /etc/zabbix
# openssl rand -hex 32 > zabbix_agentd_key.psk
# chown zabbix:zabbix zabbix_agentd_key.psk
# chmod 600 zabbix_agentd_key.psk

3. Configure PSK encryption in Zabbix Server Web User interface

Go to Zabbix Server User interface in browser and configure the PSK encryption options for the host.

Select the:

'Connections to host' = PSK

'Connections from host' = PSK

'PSK Identity' = [public-value-configured-in-Zabbix-agent-config]

'PSK' = [paste the long hex string generated from the OpenSSL command above]


In some seconds up to a minute or two the Zabbix Server and Agent will successfully communicate using PSK encryption.
Making the monitored data unreadable in plain text for malignant sniffers hanging in the middle equipment between the zabbix-agent and zabbix-server hosts.

4. PSK encryption behind a Proxy

Many companies, nowadays use zabbix proxy for improvement of network infrastrucutre. For example it is used to offload the zabbix-server when multiple zabbix-agents have to report various datas or to monitor servers and devices that are phyisically in separate networks or data centers (are passing through paranoic built firewalls) or monitor locations are having unreliable communications between each other.
 

To enable PSK for communications between your Zabbix Server and Zabbix Proxy.

1. Create a new secret, and add the PSK Identity and Secret to

Administration ⇾ Proxies ⇾ [Your proxy] ⇾ Encryption

2. Adjust the settings inside the zabbix proxies configuration file at /etc/zabbix/zabbix_proxy.conf


If setting up PSK encryption for agents behind a Zabbix proxy, ensure your have

Zabbix Server ⇽⇾ Proxy PSK enabled
first in Zabbix Server UI.

This is because, when you start the Proxy, or do some testing to send some key value to Zabbix server via the proxy with commands :

# zabbix_get -s 127.0.0.1 -k system.hostname
# zabbix_server -R config_cache_reload


config_cache_reload, the Proxy will download all its host settings from the server, and this also includes the servers copy of the secret.

The proxy needs to know the secret since it is now managing the communications on behalf of the server.

3. To add PSK encryption for any Agents behind a proxy, then you continue to set up the Agents as normal by creating a new secret, editing

Configuration ⇾ Hosts ⇾ [Your Host] ⇾ Encryption page

and also editing /etc/zabbix/zabbix_agentd.conf.

Remember that, since your Agents Host configuration in the Zabbix UI will be set as Monitored by Proxy, the PSK settings will be applicable for communications happening between the Zabbix Proxy and the Agent that it is monitoring, not between the Zabbix Server and the Agent behind the proxy.

You can also add PSK Encryption between your Zabbix Proxy and its own local Agent if you want.
You would set its PSK settings in the Proxy Agents host configuration at

Configuration ⇾ Hosts ⇾ [Your proxy] ⇾ Encryption

and modify the settings in the agents on configuration file at /etc/zabbix/zabbix_agentd.conf.
Keep in mind, this is only applicable to communications between the Zabbix Proxy, and its own Agent process.

When setting up PSK encryption for the Zabbix Server, Proxy and Agents, you may see an error in the Proxy logs,

cannot send proxy data to server at "zabbix.your-domain.tld": connection of type "TLS with PSK" is not allowed for proxy "your-proxy".

If you hit this, check that your

Zabbix Server ⇽⇾ Proxy PSK settings

are correct first.

Don't get confused between the Proxies own optional agent process, and its main Proxy process which is required.

How to configure Nautilus (Linux application like Windows Explorer) to work with standard Windows button + E On Linux GNOME en Mate

Monday, October 9th, 2017

how-to-configure-nautilus-linux-applicatoin-to-act-like-windows-explorer-make-windows-button-work-in-GNOME-and-Mate
As an ex-Windows user I'm still addicted to Windows User brainwashing as an ex-victim of Windows 95 / 98 and XP:), so I tend to love very much and its still hard for me to forget some major Key Binding (Windows Key Combinations).

On every new Desktop Linux I install, I have the habit to configure few great key combination shortcuts that makes my digital life much easier.
I use usually as a graphical environment GNOME and recently switched to MATE (GNOME 2 fork, cause GNOME 3 is totally messed up and unworthy to me), that's why this article is targetting this two Linux GUI envs, I'll be glad to hear in article comments for any other useful key bindings and how to configure similar key bindings for other Major Linux graphical environments (Cinnamon, KDE Plasma, XFCE, LXDE).


1. Configuring Lock Screen (Win button + L), Open Explorer(Win button + E), View Desktop (Win + D) in MATE graphic env


———  WINDOWS BUTTON, OFTEN USED KEY SHORTCUTS ———

Windows + E – Open new Windows File Explorer 

Windows + L – Lock Computer

Windows + M – To minimize All Windows

Windows + D – Show Desktop (similar to Windows +M though it doesn't switch to Desktop)

Win – + / – To Maginfy Text and Windows

Shift + Win + Left/Right Arrow – (In Windows if you have multiple monitors connected to the same computer lets say Right Monitor and Left, that combination switches between left monitor and right monitor)


——————————————————————–


The list goes on but I'm not used to all of them, I'll stop here and continue on with how to remake some of my favourite Windows keybindings in Gnu / Linux

Either run it from Menus:
 

System -> Settings -> Hardware -> Keyboard Shortcuts


Or run command


$ mate-keybinding-properties


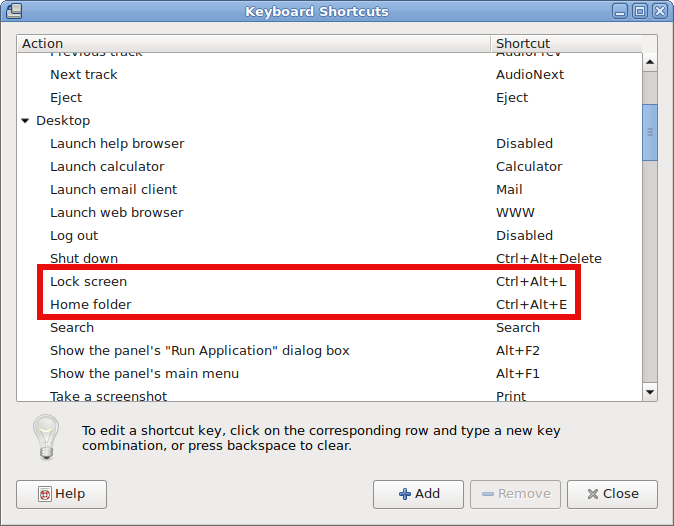
howto-gnome-mate-remap-shortcut-keybinding-keys-mate-keybinding-properties


After rebinding the Windows: 
– Lock Screen and Open New Nautilus Explorer Window (Home folder) variable to be invoked with Windows button, the result
is as that:

howto-gnome-mate-remap-shortcut-keybinding-keys-mate-keybinding-properties


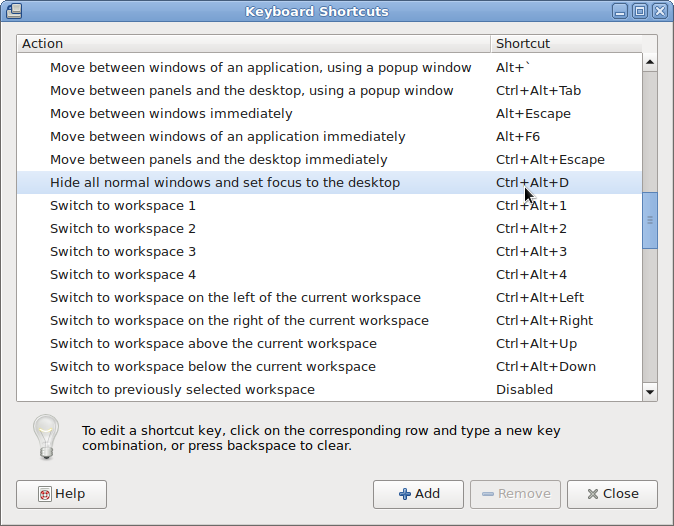
Scroll down Mate Keyboard shortcuts and you'll find

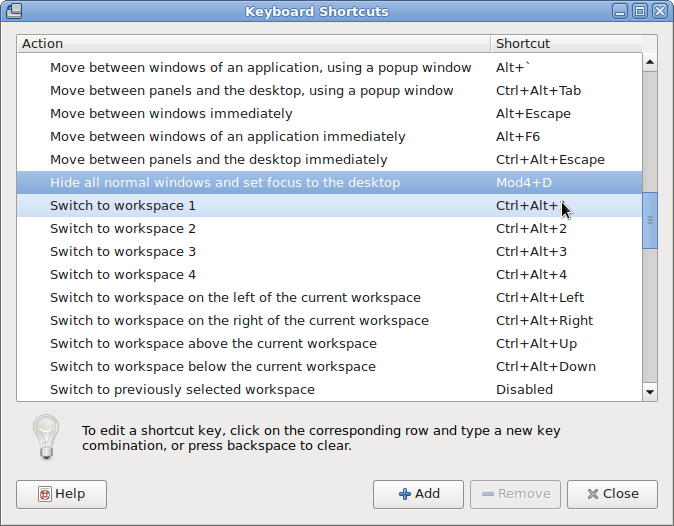
also how to configure Windows Button and D Key Combination, following 2 more screenshots showing how to do it note that MOD Key appears once you press Windows Keyboard Key + something (e.g. MATE recognizes MOD Key as Win Key):

Before the change to bind Win Key + D to work:

mate-how-to-make-desktop-view-open-with-standard-windows-button_and_d-combination-linux-debian

When configured Win Button + D looks like so:

mate-how-to-make-desktop-view-open-with-standard-windows-button_and_d-combination-linux-debian-1

2. Configuring Lock Screen (Win button + L), Open Explorer(Win button + E), View Desktop (Win + D) in GNOME

Usually in GNOME until > version 3.X.X (in older GNOME graphic environment access to KeyBinding Properties was done via:


System -> Preferences -> Keybord Shortcuts -> Add ->


In fallback gnome with Metacity (if installed along with GNOME Desktop 3.2.X environment to access Key Bindings):

d

System->Apps->Metacity->global_keybindings  


Also it is possible to remap keys via dconf-editor, I've written a small article earlier explaining how to remap Screenshotting buttons with dconf-editor but the example could be easily adapted, so you can edit almost everything.

Besides that you can use a command to run the keyboard configuration (in older GNOMEs) via:


linux:~$ gnome-keybinding-properties


Just for information for those who might know, many Key Binding interesting options are available via gnome-tweak-tool, so if you don't have it yet install it and give it a try:


linux:~# apt-get install –yes gnome-tweak-tool


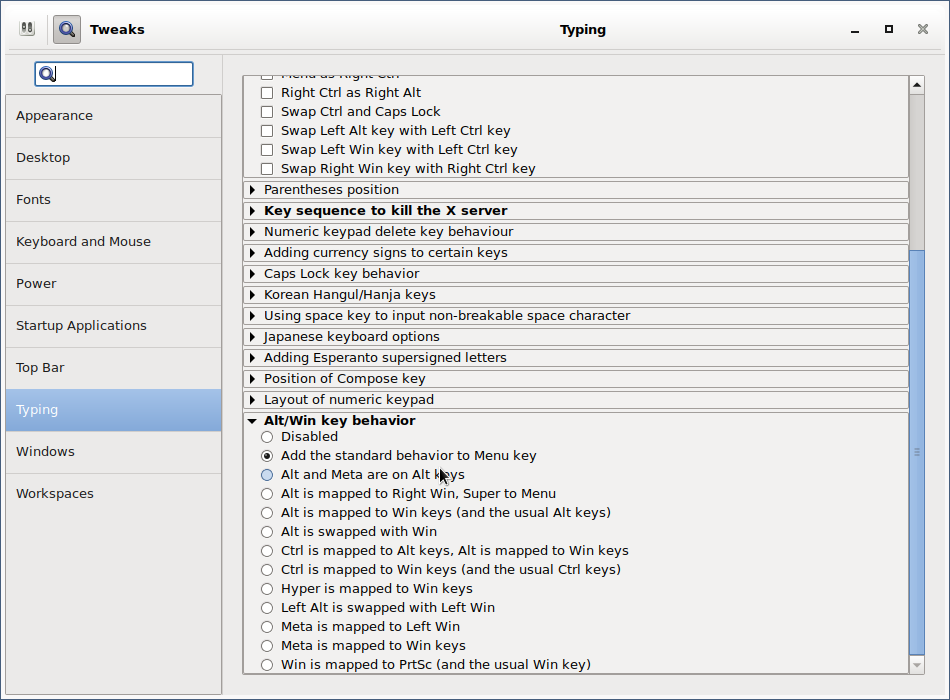
As you can see, there are plenty of options to make Win (key) to act like Alt (key):

linux:~# gnome-tweak-tool
 

gnome-tweak-tool-make-win-key-to-behave-like-alt-key-howto 


After configuring the changes enjoy your WINDOWS Button + L, WINDOWS + E and WINDOWS + D WORKING AGAIN HOORAY !!! 🙂 


3. Most used shortcuts in Gnome and Nautilus 
 

Below are most used shortcuts thanks to LinuxQuestions Forum for providing them

Howdy! I thought that it would be useful to post a practical selection of shortcut keys for GNOME (the Desktop Environment) and Nautilus (the File Manager) and some information about customizing shortcut keys in Ubuntu. I wrote it especially for Ubuntu beginners, but I hope it will prove useful for all. 


2.1 GNOME/Nautilus shortcut keys – Very useful for the keyboard maniax like me :):
 

Ctrl-H: show hidden files

Ctrl-N: new window

Ctrl-Shift-N: create new folder

Alt-Home : jump to home folder

Alt-Enter : file / folder properties

F9 : toggle side-pane

Alt-F1 : launch applications menu

Alt-F2 : launch "run application" dialogue

Ctrl-Alt – Right/Left arrow : move to the next virtual desktop

Ctrl-Alt-Shift – Right/Left arrow : take current window to the next virtual desktop

Ctrl-Alt-D: minimize all windows, and gives focus to the desktop. 

Alt-Tab: switch between windows. When you use these shortcut keys, a list of windows that you can select is displayed. Release the keys to select a window. 

Ctrl-Alt-Tab: switch the focus between the panels and the desktop. When you use these shortcut keys, a list of items that you can select is displayed. Release the keys to select an item. 

Ctrl-Alt-L: lock the screen (tested only in Ubuntu) 

Ctrl-L: shortcut for opening locations-by default the path is the home folder*
/ : same as Ctrl-L but has the root (/) as default path* (shortcut found on here)
* both shortcuts can be used while you are on the desktop (no window active)

Ctrl-T : move to trash (in Nautilus)
Quite dangerous key combination because many of us are used to press these keys in order to open a new tab. Because we all delete items using the Delete key, I recommend to deactivate this shortcut key. To do that, go to System » Preferences » Appearance » Interface. Select Editable menu shortcut keys and close the dialog box. Click on the Edit menu in the File Browser. Click the Empty Trash item (it has Ctrl-T as the keyboard shortcut) Press the Delete key to get rid of the shortcut.
You can find all GNOME shortcut keys here


2.2 How to create a custom hotkey to launch whatever application you want in GNOME
 

As an example, we will set a lock-screen shortcut.


Open "gconf-editor" as the user as you're logged in in GNOME (typing gconf-editor in the terminal or "Run Application").
 

Go to apps > metacity > keybinding_commands


Here we have a list of twelve slots for commands.


Double click on e.g. "run_command_1" 

In Key Value Type in the name of the application or command you want to launch (e.g. gnome-screensaver-command –lock).


Go to apps -> Metacity -> global_keybindings 

Double click on e.g. "run_command_1" 
Change the key value to whatever key combination you like (e.g. <Ctrl><Alt>L).Press "Ok".


2.3.How to create/change GNOME shortcuts


Click on System -> Preferences -> Keyboard Shortcuts


Click the action in the list and press Enter. 
Press the new key or key combination you want to assign to the action. (To clear a shortcut, press the Backspace key)


Hope it helps, Enjoy Life .;)

How to improve your web browser security – Better securing your personal identity privacy on the Net

Monday, August 2nd, 2010

improve-browser-security-howto-improve-firefox-chrome-security
Nowadays internet privacy has become a taboo. Many people do understand how vital is it to protect your privacy online.
Unfortunately not much has done much in order to improve their state of security whilst on the net.
In this article you’re about to find out how trusted and secure is the browsing in the Internet and next to it you will find some possibleways and thoughts how you can improve your personal privacy and the amount of information your browser reveals about your (habits, interestest, and, lifestyle) while surfing online.
There are a lot of private information that can leak through a simple web serarch, let’s say you decide to search for some kind of sickness and it’s treatment.. just few minutes later the paid advertisement popping up will be showing up targetting ads related to your previous sickness google search.
This is tiny bit of information your browser reveals, however there is much much more. So let me give you a few more examples:
Let’s say you visit a website with an Adobe Flash browser player enabled. It’s very likely that the website will have flash advertisement this popular this day. If that is the scenario it’s very likely that the flash application is built to use тхе so called flash cookies supported.
You might have never heard about flash cookies but anyways this one of cookies are one of the most malicious cookies ever invented.
One of the main reason they’re so dubious is the fact THEY NEVER EXPIRE!
Though as with normal cookies flash cookies are used for storing user details, let’s say your profile details or settings concerning your youtube video player etc. and this sound nice, market guys use the same features to track what you do online.
Using flash cookies for instance everybody who cratefted a specific adobe flash page is able to list your flash cookies stored browser history!
To partly setup the behaviour of your Flash player and change the defailt flash player settings for good use the flashplayer settings manager

It’s really odd that the only way to configure flash is to configure it via adobe’s webpage this is much sneaky since, God only knows what kind of information as well probably your whole flash browser history and flash cookies is being sent Adobe for later analysis.
Moreover the flash player is a propriatary software and this makes it even more likely to have included some extra spying software and stuff alike ..

To see all the stored information by flash about a websites you have visited check out:

flashplayer settings manager

Honestly I was quite shocked when I saw many websites I have visited for the rest 1.5+ year listed.

From hence since we know how “evil” flash storage manager cookies are, one sure step to increase your browser privacy is to periodically get rid of Flash Storage (Flash Cookies).
To achieve periodical flash cookies wipe out on Linux, below I provide you with a tiny .tcsh script which is tested and is working on Debian and Ubuntu. Get rid of Local Flash Storage shell script for Linux
(Stores data of the websites you have visited using your browser flash player)

To check your general Browser security The Electronic Frontier Foundation has developed a special website to test your browser anonymity visit penoptickclick.eff.org and click the > TEST ME button

In my case all my installed browser plugins were listed as well many information related to what kind of browser I use the version on the architecture I’m running on etc. etc.
Thereafter navigate to about:config and set the variable dom.storage.enabled to false . This will completely disable the DOM cookies which by the way never expire!
DOM cookies aren’t so widely used yet but still it’s possible that some websites online has stareted using them, since they’re completely junky and bad designed for instance DOM a cookie can contant up to (100KB) of information. then it’s best that you disable them completely.
Another recommendable thing to disable on your Iceweasel / Firefox that will tighten up your security is the keyword.enabled variable click twice on it and assure yourself it reads false
Disabling it will prevent the google word suggest to appear each time you type something in Google search box, albeit not every character you type will be sent to Google.

Also a really nice worthy reading is the article explaining dom cookies
Take some time and read it to get a better idea on DOM cookies what they are and why you don’t want them.
Likewise take a look at Flash Cookie Forensics for a bit more insight on the flash cookies

After reading the article about flash cookies, I came to the conclusion that maybe it’s best that they’re completely enabled. Anyways if they’re disabled then many websites won’t work properly which is something we don’t want.
It’s rather strange that the only available way to control your flash and disable the flash cookies is via Flashplayer Web Based Setting Manager
Since it’s “Web Based Manager” and it is hosted on Adobe’s web site this probably means that everything you do through it gets logged by Adobe, not so nice (neither secure) heh ..

It’s recommended also to install and configure the following list of extra Firefox plugins to ensure a bit more Anonimity while surfing on the Internet.

  • Adblock Plus
  • AntiSocial
  • BeeFree
  • Beef Taco
  • BetterPrivacy
  • DownloadHelper
  • Download Statusbar
  • Live HTTP Headers
  • No FB Tracking
  • NoScript
  • RefControl

Now configure AdBlock plus to work with EasyPrivacy+EasyList (by default it works only with EasyList).
To subscribe for ABP EasyPrivacy click here

BeeFree Mozilla Addon .
Is under the GNU GPL license and it helps you defend a bit more your privacy. It’s advantage use is to prevent search engines from knowing which links from their search results is most probably for you to check. Looks like a promising and great stuff
It is said in the add-on website that as a side effect of using the plugin it will probably increase your browser speed.
This post has highly adopted information from the Bulgarian Article by Anton Zinoviev, 2010 About your web browser and the inviolability of your personal life
Big thanks to Anton Zinoviev for the time and effort taken to research on the topic of browser security and write this wonderful thoroughful article.
To configure the BeeFree Firefox security tightening browser addon you will have to type in your browser URL address bar once again
about:config
Now you will have to look up for the following browser config keys:

extensions.beefree.websites.default.header.accept-charset.action
a
Set it’s value to be 2 e.g. extensions.beefree.websites.default.header.accept-charset.action = 2
Now look for the key value extensions.beefree.websites.default.header.accept-charset.value.text and set it’s value to:
*/*
Changing the extensions.beefree.websites.default.header.accept-charset.action = */* will make BeeFree compatible to some securing anti spam programs.
Last thing to do to complete the BeeFree configuration create the key value extensions.beefree.website.generic.header.useragent.action
To create this one press on a random key the last mouse button and select New -> Integer
The value for the newly created extensions.beefree.website.generic.header.useragent.action should be set to 4
Creating this key will instruct beefree to protect your browser from revealing it’s browser version variable.
Interesting to say each restart of the browser will make BeeFree to select a random Firefox Linux or Windows version, dependant of the OS type you use.

The AntiSocial addon will prevent your browser from revealing information to Facebook about your personal interests. It blocks the facebook elements which are being embedded to your browser by some websites.

No FB Tracking stops facebook of keeping an eye on you through the buttons “I like”. Using this buttons facebook can track you even if you’re not logged in or registered in the social network.

Installing all this plugins would take you time but considering the privacy is invaluable time shouldn’t be a concern of you.
Also some of the plugins like NoScript make take some time until you’re used to it but it’s worth to learn using it.
BetterPrivacy is able and will delete all flash cookies when your browser exits, this will prevent that some sites pry on you through the shitty flash cookies technology, this type of cookies NEVER EXPIRE! Hard to swallow but a fact …

In Linux this plugin is reported to work correctly however, in Windows there are dubious reports about it.
This is just a brief overview about how to improve your browsing privacy and therefore general personal data security, there is plenty much already red and said on topic, however I hope this could be some kind of basis for my dear reader for a later research on the topic.

Fixing Active Desktop Recovery Windows XP problem

Thursday, April 11th, 2013

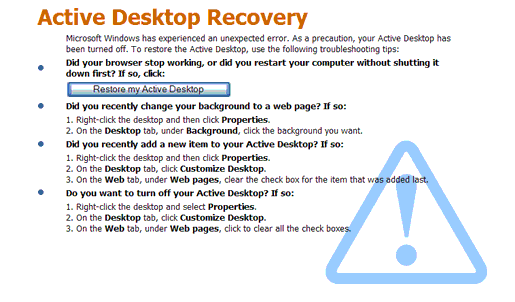
Windows XP active desktop recovery screenshot picture

I had to repair Windows XP PC which got the annoying Active Desktop Recovery screen. I remember seeing this screen back in the days when I was still using Microsoft Windows 98. It was quite shocking for me to find out this stupid pointless Windows bug appears on NT based Windows as well…

As you can see on the screenshot there is a button Restore My Active Desktop but pressing this button doesn't change anything

People around the net recommend two ways to fix that one is through:

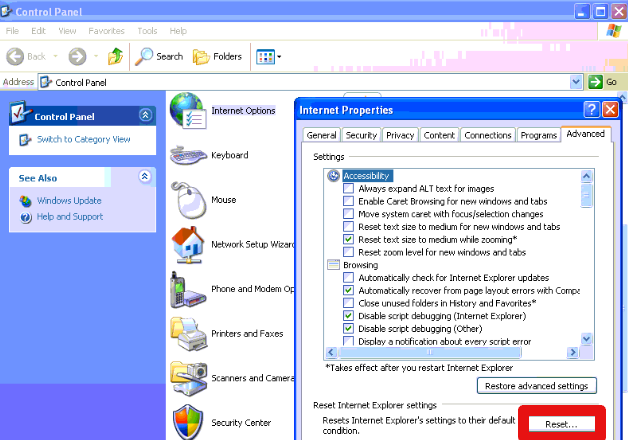
Control Panel -> Internet Options -> Advanced (Reset)

Windows XP Control Panel Internet Options Advanced Reset tab screenshot

After this I tried the usual Computer Restart but unfortunately this not solved the problem.

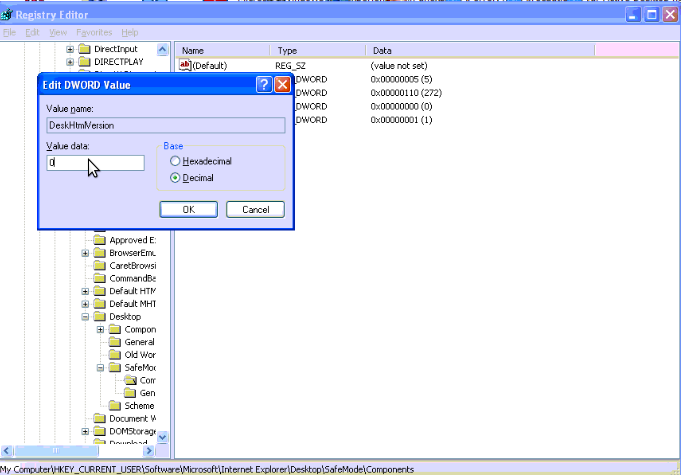
Second suggested method was through a change in Windows registry from

C:\> regedit

HKEY_CURRENT_USER\\Software\Microsoft\\Internet Explorer\\Desktop\\SafeMode\\Components

Change the key value – DeskHtmlVersion REG_DWORD 0x00000110(272) to decimal zero.

Windows XP fix Active Desktop Recovery - change the key value - DeskHtmlVersion REG_DWORD 0x00000110(272) to decimal zero