Posts Tagged ‘Click’

How to view WIFI Passwords for Profile from command line with netsh on Windows 10

Wednesday, May 29th, 2024

how-to-find-out-your-wifi-password-on-windows-10

The common way, if you have connected to a Wireless Network Access Point and saved the password in Windows is to view the password via Windows GUI interface, via menus following few easy steps:

1. Settings -> Network and Internet -> Network and Sharing Center

network-and-sharing-center
2. Click on (Wifi Network name) for which you need password and 
3. In View your active networks section

select-wifi
4. When the Wi-Fi network status window opens, click Wireless Properties

wireless-properties
5. Move to the Security Tab and check the checkbox, next to "Show Characters" to view the network password.

show-wifi-password-windows-10
 

Nevertheless as a system administrator you might have wondered, how you can easily review in plain text Saved Wireless Networks Wi-FI passwords, without using the Graphical Interface via a direct command line cmd.exe?
Such thing is helpful on maintaining multiple Windows 10 hosts, especially if you have a telnet or SSH remote administration enabled or you have a domain of PCs.
To do so open cmd.exe command prompt and run:

C:\Users> netsh

netsh>wlan show profile

Profiles on interface Wi-Fi:

Group policy profiles (read only)
———————————

User profiles
————-
All User Profile : WIFI_Pofile-name
All User Profile: Hotel stage 2
All User Profile: Home Wifi
All User Profile: HP_Custom

Now lets review the clear text password of the profile from netsh console:

netsh>wlan show profile "WIFI_Pofile-name" key=clear

Profile WIFI_Pofile-name on interface Wi-Fi:
===================================================

Applied: All User Profile

Profile information
——————-
Version : 1
Type : Wireless LAN
Name : WIFI_Pofile-name
Control options :
Connection mode : Connect automatically
Network broadcast : Connect only if this network is broadcasting
AutoSwitch : Do not switch to other networks
MAC Randomization : Disabled

Connectivity settings
———————
Number of SSIDs : 1
SSID name : "WIFI_Pofile-name"
Network type : Infrastructure
Radio type : [ Any Radio Type ]
Vendor extension : Not present

Security settings
—————–
Authentication : WPA2-Personal
Cipher : CCMP
Authentication : WPA2-Personal
Cipher : GCMP
Security key : Present
Key Content : Very-secret-password-for-WIFI-plain-text

TADADAM !

We see the password key text Saved WIFI Passwords plain text !

Note that sometimes, if you have a Hidden Wifi Network the command to use to reveal the plain text password with netsh would be:

C:\Users> netsh wlan show profile "name=SSID hidden WiFi Net" key=clear


This trick is very much used today by "hackers" e.g. script kiddies, who break up into others windows.
It is also useful if you want to have a quick way to review plain text passwords for WIFI accounts with organization, lets say if you're a security expert and doing some kind of periodic Security audits within a corporation on multiple Domain attached computers.

Thanks to Martin Petrov (Amridikon) for his trick as I've learned first time from his blog https://mpetrov.net, which is full of many computer geek goodies stuff.

Of course this approach can be easily scripted with a short PowerShell script:
 

netsh wlan show profile |
    Select-String '(?<=All User Profile\s+:\s).+' |
    ForEach-Object {
        $wlan = $_.Matches.Value
        $passw = netsh wlan show profile $wlan key=clear |
            Select-String '(?<=Key Content\s+:\s).+'

        [pscustomobject]@{
            Name     = $wlan
            Password = $passw.Matches.Value
        }
    }


If you need the script View-all-wifi-passwords-plaintext-windows10.ps1 to reuse it download it from here.
 

Windows-WiFi-PasswordRevealer-ScreenShot
There is also some freeware tools online which can help you reveal passwords, saving you any typing, that might be useful if you want to delegate the task to a non-sysadmin user, you can simply point him and ask him to install a GUI Win tool like Wifi Password revealer (that makes showing plain text passwords piece of cake) and let user reveal his passwords for himself, if needs the password to share it to a colleague 🙂
That's all folks, Happy hacking !

Install Zabbix Proxy configure and connect to Zabbix server on CentOS Linux

Thursday, May 4th, 2023

Install Zabbix Proxy configure and connect to Zabbix server on CentOS Linux

1. Why use Zabbix-Proxy hidden advantages of using Zabbix-Proxy ?
 

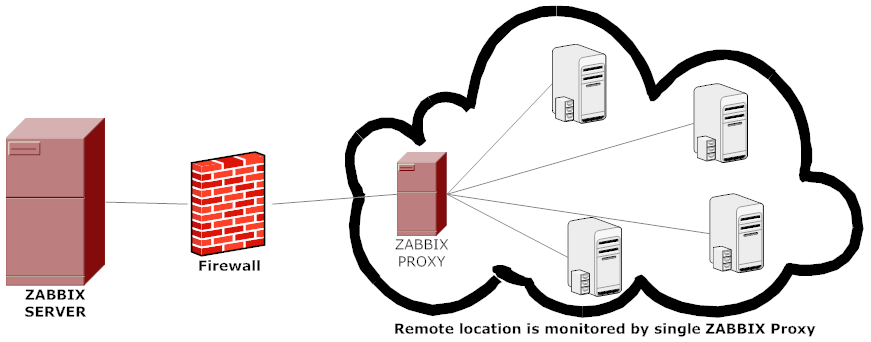
Proxy can be used for many purposes and can provide many hidden benefits, just to name few of them:

  • Offload Zabbix Server when monitoring thousands of devices
  • Monitor remote locations
  • Monitor locations having unreliable communications
  • Simplify maintenance of distributed monitoring
  • Improved Security (Zabbix server can be restricted to be connectable only by the set of connected Zabbix Proxy / Proxies

advantages-of-using-zabbix-proxy-instead-of-direct-connect-monitored-hosts-to-zabbix-server-diagram


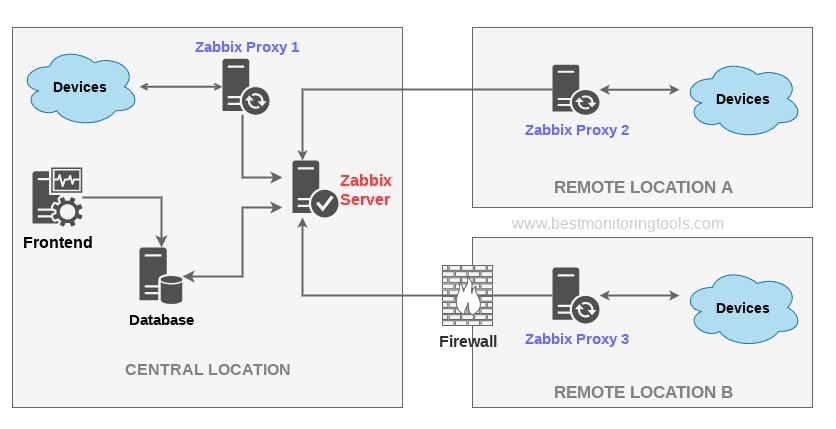
A Zabbix proxy is the ideal solution if you have numerous hosts with multiple slow items that are affecting the performance of the server simply because processes are spending most of the time simply waiting for a response. A proxy can collect information from all hosts using its internal processes and then send raw historical data to the server. The time needed to connect and receive the host response will be on the proxy site, and the server performance will not be affected at all. A proxy just sends raw values to the server, and the server itself does not have to connect to the host to get the data.
 

2. Install zabbix-proxy-sqlite3 rpm package from Zabbix Official Repositories download page

Zabbix repository provides choice of 3 packages named as follows:

zabbix-proxy-mysql
zabbix-proxy-pgsql
zabbix-proxy-sqlite3

where the last value of the name (after zabbix-proxy) represents database type of the package — MySQL, PostgreSQL and SQLite respectively.

To not bother installing MySQL / PostgreSQL separate database servers, a lightweight choice is to use the sqlite3 db version. 
As I prefer zabbix-proxy data to be stored inside a flat database, thus I choose to use zabbix-proxy-sqlite3.

[root@sysadminshelp:/root ]# yum info zabbix-proxy-sqlite3-5.0.31-1.el7.x86_64
Заредени плъгини: fastestmirror
Loading mirror speeds from cached hostfile
 * base: mirrors.netix.net
 * epel: fedora.ipacct.com
 * extras: mirrors.netix.net
 * remi: remi.mirror.karneval.cz
 * remi-php74: remi.mirror.karneval.cz
 * remi-safe: remi.mirror.karneval.cz
 * updates: mirrors.netix.net
Инсталирани пакети
Име         : zabbix-proxy-sqlite3
Архитект.   : x86_64
Версия      : 5.0.31
Издание     : 1.el7
Обем        : 4.4 M
Хранилище   : installed
Обобщение   : Zabbix proxy for SQLite3 database
URL         : http://www.zabbix.com/
Лиценз      : GPLv2+
Описание    : Zabbix proxy with SQLite3 database support.

My experience to try to install thethe default CentOS RPM package for zabbix-proxy-sqlite3 provided by default
RPM package that came with CentOS did not work as expected and trying to install / configure and use it via

[root@sysadminshelp:/root ]# yum install zabbix-proxy-sqlite3.x86_64 -y

[root@sysadminshelp:/root ]# vi /etc/zabbix/zabbix_proxy.conf


Led me to a nasty errors seen in /var/log/zabbixsrv/zabbix_proxy.log like:

May 1st 2023, 08:42:45.020 zabbix_server cannot set list of PSK ciphersuites: file ssl_lib.c line 1314: error:1410D0B9:SSL routines:SSL_CTX_set_cipher_list:no cipher match
May 1st 2023, 08:42:45.018 zabbix_server cannot set list of PSK ciphersuites: file ssl_lib.c line 1314: error:1410D0B9:SSL routines:SSL_CTX_set_cipher_list:no cipher match
May 1st 2023, 08:42:45.013 zabbix_server cannot set list of PSK ciphersuites: file ssl_lib.c line 1314: error:1410D0B9:SSL routines:SSL_CTX_set_cipher_list:no cipher match
May 1st 2023, 08:42:45.011 zabbix_server cannot set list of PSK ciphersuites: file ssl_lib.c line 1314: error:1410D0B9:SSL routines:SSL_CTX_set_cipher_list:no cipher match


After some googling and reading some threads came upon this one https://support.zabbix.com/browse/ZBXNEXT-3604, there is exmplaed errors preventing the configured zabbix-proxy
to start are caused by the zabbix-proxy-sqlite3 package provided by Redhat (due to openssl incompitability bug or something ).

As one of people in the discussion pointed out the quickest workaround suggested is simply to use the official Zabbix Repository packages for zabbix-proxy-sqlite3, in order to not waste anymore time on this
trivial stuff to install it, simply run:

[root@sysadminshelp:/root ]# rpm -Uvh \
https://repo.zabbix.com/zabbix/5.0/rhel/7/x86_64/zabbix-proxy-sqlite3-5.0.31-1.el7.x86_64.rpm

Alternative way if you seem to not have the machine connected to the internet is simply download the package with wget / lynx / curl / w3m from another machine 
that can reach the Internet upload the package via the local LAN or VPN and install it:

# wget https://repo.zabbix.com/zabbix/5.0/rhel/7/x86_64/zabbix-proxy-sqlite3-5.0.31-1.el7.x86_64.rpm

[root@sysadminshelp:/root ]# rpm -ivh zabbix-proxy-sqlite3-5.0.31-1.el7.x86_64.rpm

NOTE ! Before you install proxy, keep in mind that your proxy version must match the Zabbix server version !

3. Generate a PSK random secret key and set proper permissions for zabbix-proxy directories


[root@sysadminshelp:/root ]# cd /etc/zabbix/
    
[root@sysadminshelp:/root ]# openssl rand -hex 32 >> /etc/zabbix/zabbix_proxy.psk     
[root@sysadminshelp:/root ]# chown root:zabbix zabbix_proxy.psk [root@sysadminshelp:/root ]# vi /etc/zabbix/zabbix_proxy.conf [root@sysadminshelp:/root ]# mkdir -p /var/lib/zabbix-proxy/sqlite3db
[root@sysadminshelp:/root ]# chown -R zabbix:zabbix /var/lib/zabbix-proxy
[root@sysadminshelp:/var/lib/zabbixsrv/sqlite3db]# sqlite3 zabbix_proxy
SQLite version 3.7.17 2013-05-20 00:56:22
Enter ".help" for instructions
Enter SQL statements terminated with a ";"
sqlite> .databases
seq  name             file
—  —————  ———————————————————-
0    main             /var/lib/zabbixsrv/sqlite3db/zabbix_proxy
sqlite>
[root@sysadminshelp:/root ]# vi /etc/zabbix_proxy.conf
#DBName=zabbix_proxy
DBName=/var/lib/zabbixsrv/sqlite3db/zabbix_proxy

4. Configure zabbix proxy to be able to connect to Zabbix Server

[root@sysadminshelp:/root ]#  vi /etc/zabbix/zabbix_proxy.conf     ############ GENERAL PARAMETERS #################
    ProxyMode=0
    Server=192.168.1.28
    ServerPort=10051
    Hostname=zabbix-proxy
    ListenPort=10051
    SourceIP=10.168.1.55
    LogFile=/var/log/zabbix/zabbix_proxy.log
    LogFileSize=1
    DebugLevel=2
    PidFile=/var/run/zabbix/zabbix_proxy.pid
    DBName=/var/lib/zabbix-proxy/sqlite3db/zabbix_proxy.db
    DBUser=zabbix
    
    ######### PROXY SPECIFIC PARAMETERS #############
    ProxyOfflineBuffer=24
    HeartbeatFrequency=60
    ConfigFrequency=120
    
    ############ ADVANCED PARAMETERS ################
    StartPollersUnreachable=3
    StartHTTPPollers=3
    JavaGateway=127.0.0.1
    JavaGatewayPort=10052
    StartJavaPollers=5
    SNMPTrapperFile=/var/log/snmptrap/snmptrap.log
    StartSNMPTrapper=1
    CacheSize=32M
    Timeout=4
    ExternalScripts=/usr/lib/zabbix/externalscripts
    LogSlowQueries=3000
    
    ####### TLS-RELATED PARAMETERS #######
    TLSConnect=psk
    TLSAccept=psk
    TLSPSKIdentity=PSK zabbix-proxy-fqdn-hostname
    TLSPSKFile=/etc/zabbix/zabbix_proxy.psk

5. Check and make sure the installed zabbix proxy as well as the zabbix_proxy server zabbix_agentd client and zabbix_server are at the same major version release

a) Check zabbix proxy version

[root@sysadminshelp:/etc/zabbix]# zabbix_proxy -V
zabbix_proxy (Zabbix) 5.0.31
Revision f64a07aefca 30 January 2023, compilation time: Jan 30 2023 09:55:10

Copyright (C) 2023 Zabbix SIA
License GPLv2+: GNU GPL version 2 or later <https://www.gnu.org/licenses/>.
This is free software: you are free to change and redistribute it according to
the license. There is NO WARRANTY, to the extent permitted by law.

This product includes software developed by the OpenSSL Project
for use in the OpenSSL Toolkit (http://www.openssl.org/).

Compiled with OpenSSL 1.0.1e-fips 11 Feb 2013
Running with OpenSSL 1.0.1e-fips 11 Feb 2013

[root@sysadminshelp:/etc/zabbix]#

b) check zabbix_agentd version

[root@sysadminshelp:/etc/zabbix]# zabbix_agentd -V
zabbix_agentd (daemon) (Zabbix) 5.0.30
Revision 2c96c38fb4b 28 November 2022, compilation time: Nov 28 2022 11:27:43

Copyright (C) 2022 Zabbix SIA
License GPLv2+: GNU GPL version 2 or later <https://www.gnu.org/licenses/>.
This is free software: you are free to change and redistribute it according to
the license. There is NO WARRANTY, to the extent permitted by law.

This product includes software developed by the OpenSSL Project
for use in the OpenSSL Toolkit (http://www.openssl.org/).

Compiled with OpenSSL 1.0.1e-fips 11 Feb 2013
Running with OpenSSL 1.0.1e-fips 11 Feb 2013

c) Check zabbix server version

[root@zabbix:~]# zabbix_server -V
zabbix_server (Zabbix) 5.0.30
Revision 2c96c38fb4b 28 November 2022, compilation time: Nov 28 2022 09:19:03

Copyright (C) 2022 Zabbix SIA
License GPLv2+: GNU GPL version 2 or later <https://www.gnu.org/licenses/>.
This is free software: you are free to change and redistribute it according to
the license. There is NO WARRANTY, to the extent permitted by law.

This product includes software developed by the OpenSSL Project
for use in the OpenSSL Toolkit (http://www.openssl.org/).

Compiled with OpenSSL 1.1.1d  10 Sep 2019
Running with OpenSSL 1.1.1n  15 Mar 2022

6. Starting the zabbix-proxy for a first time

Before beginning with installation make sure selinux is disabled, as it might cause some issues with Zabbix

[root@sysadminshelp:/etc/zabbix]# sestatus
SELinux status:                 disabled

If you need to have the selinux enabled you will have to allow the zabbix-proxy into selinux as well:

cd /tmp
# grep zabbix_proxy /var/log/audit/audit.log | grep denied | audit2allow -m zabbix_proxy > zabbix_proxy.te
grep zabbix_proxy /var/log/audit/audit.log | grep denied | audit2allow -M zabbix_proxy
semodule -i zabbix_proxy.pp


[root@sysadminshelp:/etc/zabbix]# systemctl start zabbix-proxy

Also lets enable zabbix-proxy to automatically start it on next server reboot / boot.

root@sysadminshelp:/etc/zabbix]# systemctl enable zabbix-proxy

Normally running zabbix-proxy should provide a status messages like:

[root@sysadminshelp:/etc/zabbix]# systemctl status zabbix-proxy
● zabbix-proxy.service – Zabbix Proxy
   Loaded: loaded (/usr/lib/systemd/system/zabbix-proxy.service; disabled; vendor preset: disabled)
   Active: active (running) since чт 2023-05-04 14:58:36 CEST; 2h 59min ago
  Process: 8500 ExecStop=/bin/kill -SIGTERM $MAINPID (code=exited, status=0/SUCCESS)
  Process: 8504 ExecStart=/usr/sbin/zabbix_proxy -c $CONFFILE (code=exited, status=0/SUCCESS)
 Main PID: 8506 (zabbix_proxy)
   CGroup: /system.slice/zabbix-proxy.service
           ├─8506 /usr/sbin/zabbix_proxy -c /etc/zabbix/zabbix_proxy.conf
           ├─8507 /usr/sbin/zabbix_proxy: configuration syncer [synced config 40521 bytes in 0.0…
           ├─8508 /usr/sbin/zabbix_proxy: trapper #1 [processed data in 0.000808 sec, waiting fo…
           ├─8509 /usr/sbin/zabbix_proxy: trapper #2 [processed data in 0.005028 sec, waiting fo…
           ├─8510 /usr/sbin/zabbix_proxy: trapper #3 [processed data in 0.001240 sec, waiting fo…
           ├─8511 /usr/sbin/zabbix_proxy: trapper #4 [processed data in 0.004378 sec, waiting fo…
           ├─8512 /usr/sbin/zabbix_proxy: trapper #5 [processed data in 0.004991 sec, waiting fo…
           ├─8513 /usr/sbin/zabbix_proxy: preprocessing manager #1 [queued 0, processed 3 values…
           ├─8514 /usr/sbin/zabbix_proxy: preprocessing worker #1 started
           ├─8515 /usr/sbin/zabbix_proxy: preprocessing worker #2 started
           ├─8516 /usr/sbin/zabbix_proxy: preprocessing worker #3 started
           ├─8517 /usr/sbin/zabbix_proxy: heartbeat sender [sending heartbeat message success in…
           ├─8518 /usr/sbin/zabbix_proxy: data sender [sent 0 values in 0.005241 sec, idle 1 sec…
           ├─8519 /usr/sbin/zabbix_proxy: housekeeper [deleted 4501 records in 0.011462 sec, idl…
           ├─8520 /usr/sbin/zabbix_proxy: http poller #1 [got 0 values in 0.000248 sec, idle 5 s…
           ├─8521 /usr/sbin/zabbix_proxy: http poller #2 [got 0 values in 0.000239 sec, idle 5 s…
           ├─8522 /usr/sbin/zabbix_proxy: http poller #3 [got 0 values in 0.000328 sec, idle 5 s…
           ├─8523 /usr/sbin/zabbix_proxy: discoverer #1 [processed 0 rules in 0.000261 sec, idle…
           ├─8524 /usr/sbin/zabbix_proxy: history syncer #1 [processed 0 values in 0.000009 sec,…
           ├─8525 /usr/sbin/zabbix_proxy: history syncer #2 [processed 0 values in 0.000007 sec,…
           ├─8526 /usr/sbin/zabbix_proxy: history syncer #3 [processed 0 values in 0.000014 sec,…
           ├─8527 /usr/sbin/zabbix_proxy: history syncer #4 [processed 0 values in 0.000021 sec,…
           ├─8528 /usr/sbin/zabbix_proxy: java poller #1 [got 0 values in 0.000017 sec, idle 5 s…
           ├─8529 /usr/sbin/zabbix_proxy: java poller #2 [got 0 values in 0.000019 sec, idle 5 s…
           ├─8530 /usr/sbin/zabbix_proxy: java poller #3 [got 0 values in 0.000019 sec, idle 5 s…
           ├─8531 /usr/sbin/zabbix_proxy: java poller #4 [got 0 values in 0.000018 sec, idle 5 s…
           ├─8532 /usr/sbin/zabbix_proxy: java poller #5 [got 0 values in 0.000013 sec, idle 5 s…
           ├─8533 /usr/sbin/zabbix_proxy: snmp trapper [processed data in 0.000026 sec, idle 1 s…
           ├─8534 /usr/sbin/zabbix_proxy: self-monitoring [processed data in 0.000034 sec, idle …
           ├─8535 /usr/sbin/zabbix_proxy: task manager [processed 0 task(s) in 0.000169 sec, idl…
           ├─8536 /usr/sbin/zabbix_proxy: poller #1 [got 0 values in 0.000012 sec, idle 5 sec]
           ├─8537 /usr/sbin/zabbix_proxy: poller #2 [got 0 values in 0.000021 sec, idle 5 sec]
           ├─8538 /usr/sbin/zabbix_proxy: poller #3 [got 0 values in 0.000039 sec, idle 5 sec]
           ├─8539 /usr/sbin/zabbix_proxy: poller #4 [got 0 values in 0.000024 sec, idle 5 sec]
           ├─8540 /usr/sbin/zabbix_proxy: poller #5 [got 0 values in 0.000019 sec, idle 5 sec]
           ├─8541 /usr/sbin/zabbix_proxy: unreachable poller #1 [got 0 values in 0.000011 sec, i…
           ├─8542 /usr/sbin/zabbix_proxy: unreachable poller #2 [got 0 values in 0.000018 sec, i…
           ├─8543 /usr/sbin/zabbix_proxy: unreachable poller #3 [got 0 values in 0.000041 sec, i…
           └─8544 /usr/sbin/zabbix_proxy: icmp pinger #1 [got 0 values in 0.000022 sec, idle 5 s…

май 04 14:58:36 sysadminshelp systemd[1]: Stopped Zabbix Proxy.
май 04 14:58:36 sysadminshelp systemd[1]: Starting Zabbix Proxy…
май 04 14:58:36 sysadminshelp systemd[1]: Started Zabbix Proxy.
zabbix-server-zabbix-proxy-and-zabbix-clients-overview-diagram

7. Configure zabbix-agentd to use your just new brand new zabbix-proxy

Here is my sample configuration file:

[root@sysadminshelp:/etc/zabbix]# grep -v \# /etc/zabbix/zabbix_agentd.conf | sed '/^$/d'
PidFile=/var/run/zabbix/zabbix_agentd.pid
LogFile=/var/log/zabbix/zabbix_agentd.log
LogFileSize=0
Server=zabbix-proxy
ServerActive=zabbix-proxy:10051
ListenIP
Hostname=sysadminshelp
BufferSend=30
BufferSize=100
Include=/etc/zabbix/zabbix_agentd.d/*.conf


Note that the ServerActive given "zabbix-proxy" should be resolvable from the host, or even better you might want to put the IP of the Proxy if
you don't have at least a pseudo Hostname already configured inside /etc/hosts or actual DNS 'A' Active record configured inside a properly resolving
DNS server configured on the host via /etc/resolv.conf.


8. Create and Configure new proxy into the Zabbix-server host
 

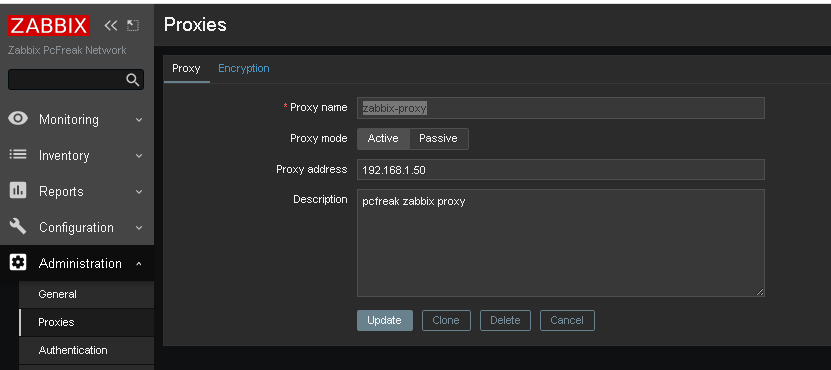
Go to the zabbix server web interface URL into menus:
zabbix-administration-proxy-config
 

Administration -> Proxies (Proxy) 


Click on ;

Create Proxy button (uppper right corner)

*Proxy name: usually-your-host-pingable-fqdn
Proxy mode: Active
Proxy address: 192.168.1.50
Description: pcfreak zabbix proxy


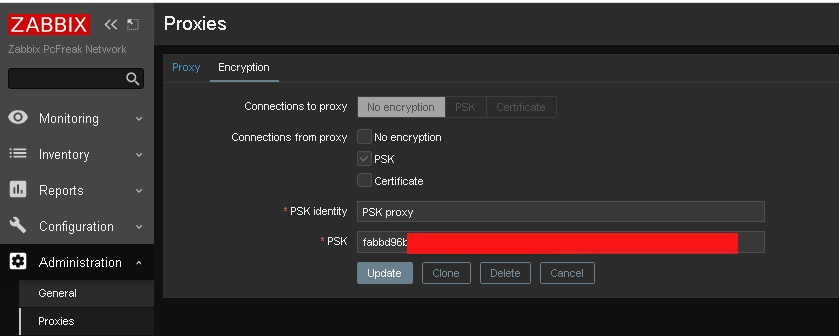
Administration -> Proxies -> Encryption


From "Connection to proxy"

Untick "No encryption"

and

Tick "PSK"

zabbix-administration-proxy-config-encryption

*PSK Identity: PSK proxy
*PSK: Put the key here (copy from /etc/zabbix/zabbix_proxy.psk generated steps earlier with openssl)

[root@sysadminshelp:/etc/zabbix]# cat zabbix_proxy.psk
faddbd96be00ac42c892fda5201634df25d51f3ndbbbf6cee9d354b2817092a28

Press the "Update" Button

zabbix-administration-proxy-config-encryption1

and go again to Proxies and check the zabbix-proxy is connected to the server and hosts configured to use the zabbix proxy reporting frequently.

To make sure that the configured new hosts to use the Zabbix Proxy instead of direct connection to Zabbix Server, go to Latest Data and check whether the configured Hostnames to connect to the Zabbix-Proxy continues to sent Data still.

9. Debugging problems with zabix-proxy and zabbix-agentd connectivity to proxy

In case of troubles check out what is going on inside the Zabbix Proxy / Agent and Server log files
 

[root@sysadminshelp:/etc/zabbix]# tail -n 50 /var/log/zabbix/zabbix_proxy.log

 6832:20230504:134032.281 Starting Zabbix Proxy (active) [zabbix-proxy]. Zabbix 5.0.31 (revision f
64a07aefca).
  6832:20230504:134032.281 **** Enabled features ****
  6832:20230504:134032.281 SNMP monitoring:       YES
  6832:20230504:134032.281 IPMI monitoring:       YES
  6832:20230504:134032.281 Web monitoring:        YES
  6832:20230504:134032.281 VMware monitoring:     YES
  6832:20230504:134032.281 ODBC:                  YES
  6832:20230504:134032.281 SSH support:           YES
  6832:20230504:134032.281 IPv6 support:          YES
  6832:20230504:134032.281 TLS support:           YES
  6832:20230504:134032.281 **************************
  6832:20230504:134032.281 using configuration file: /etc/zabbix/zabbix_proxy.conf
  6832:20230504:134032.291 current database version (mandatory/optional): 05000000/05000005
  6832:20230504:134032.291 required mandatory version: 05000000
  6832:20230504:134032.292 proxy #0 started [main process]
  6833:20230504:134032.292 proxy #1 started [configuration syncer #1]
  6833:20230504:134032.329 received configuration data from server at "192.168.1.28", datalen 40521
  6834:20230504:134032.392 proxy #2 started [trapper #1]
  6835:20230504:134032.401 proxy #3 started [trapper #2]
  6836:20230504:134032.402 proxy #4 started [trapper #3]
  6838:20230504:134032.405 proxy #6 started [trapper #5]
  6837:20230504:134032.409 proxy #5 started [trapper #4]
  6843:20230504:134032.409 proxy #11 started [heartbeat sender #1]
  6845:20230504:134032.412 proxy #13 started [housekeeper #1]
  6847:20230504:134032.412 proxy #15 started [discoverer #1]
  8526:20230504:145836.512 proxy #20 started [history syncer #3]
  8517:20230504:145836.512 proxy #11 started [heartbeat sender #1]
  8530:20230504:145836.515 proxy #24 started [java poller #3]
  8531:20230504:145836.517 proxy #25 started [java poller #4]
  8532:20230504:145836.520 proxy #26 started [java poller #5]
  8536:20230504:145836.522 proxy #30 started [poller #1]
  8527:20230504:145836.525 proxy #21 started [history syncer #4]
  8535:20230504:145836.525 proxy #29 started [task manager #1]
  8533:20230504:145836.528 proxy #27 started [snmp trapper #1]
  8539:20230504:145836.528 proxy #33 started [poller #4]
  8538:20230504:145836.529 proxy #32 started [poller #3]
  8534:20230504:145836.532 proxy #28 started [self-monitoring #1]
  8544:20230504:145836.532 proxy #38 started [icmp pinger #1]
  8543:20230504:145836.532 proxy #37 started [unreachable poller #3]
  8542:20230504:145836.535 proxy #36 started [unreachable poller #2]
  8541:20230504:145836.537 proxy #35 started [unreachable poller #1]
  8540:20230504:145836.540 proxy #34 started [poller #5]
  8507:20230504:150036.453 received configuration data from server at "192.168.1.28", datalen 40521
  8507:20230504:150236.503 received configuration data from server at "192.168.1.28", datalen 40521
  8507:20230504:150436.556 received configuration data from server at "192.168.1.28", datalen 40521
  8507:20230504:150636.608 received configuration data from server at "192.168.1.28", datalen 40521
  8507:20230504:150836.662 received configuration data from server at "192.168.1.28", datalen 40521


[root@sysadminshelp:/etc/zabbix]# tail -n 10  /var/log/zabbix-agent/zabbix_agentd.log
3096166:20230504:182840.461 agent #1 started [collector]
3096167:20230504:182840.462 agent #2 started [listener #1]
3096168:20230504:182840.463 agent #3 started [listener #2]
3096169:20230504:182840.464 agent #4 started [listener #3]
3096170:20230504:182840.464 agent #5 started [active checks #1]

If necessery to Debug further and track some strange errors, you might want to increase the DebugLevel to lets say DebugLevel=5

5 – extended debugging (produces even more information)

If checking both zabbix_agentd.log and zabbix_proxy.log cannot give you enough of a hint on what might be the issues you face with your userparameter scripts or missing Monitored data etc. and hopefully you have access to the zabbix-server machine, check out the zabbix server log as well

[root@zabbix:~]# tail -n 100 /var/log/zabbix/zabbix_server.log

3145027:20230504:182641.556 sending configuration data to proxy "zabbix-proxy" at "192.168.1.50", datalen 40521, bytes 6120 with compression ratio 6.6
3145029:20230504:182716.529 cannot send list of active checks to "192.168.1.30": host [pcfrxenweb] not found
3145028:20230504:182731.959 cannot send list of active checks to "192.168.1.30": host [pcfrxenweb] not found
3145029:20230504:182756.634 cannot send list of active checks to "192.168.1.30": host [pcfrxenweb] not found

Wrapping it up

In this article, we have learned how to install and configure a zabbix-proxy server and prepare a PSK encryption secret key for it.
We learned also  how to connect this server to the central zabbix monitoring host machine in Active mode, so both Zabbix proxy and server can communicate in a secure crypted form,
as well as how to set zabbix_agentd clients to connect to the zabbix proxy
which will from itself send its data to the Central Zabbix server host as well as how to Debug and hopefully solve issues with communication between Zabbix client -> Zabbix Proxy -> Zabbix server.

I know this article, does not say anything revolutionary and there is plenty of posts online talking about how to run yourself a zabbix proxy and make in your home or corporate network,
but I thought to write it down as by writting it and reading a bit more on the topic of Zabbix Server / Proxy / Agent, that give myself a better overview on how this technologies work and such an article will give myself an easier step by step guide to follow,
in future when I have to configure Zabbix Environments for personal hobby or professionally for customers.
Hope you enjoyed. Cheers ! 🙂

Improve MobaXterm Best Windows terminal client with some additional settings tune ups / Install extra Linux Cygwin tools on MobaXterm and various post install configuration goodies

Friday, January 20th, 2023

mobaxterm-logo_400x400-terminal-client-tune-up-howto-for-a-new-install

Earlier I've written a an article MobaXTerm: A good gnome-terminal like tabbed SSH client for Windows / Windows Putty Tabs Alternative in which I've introduced the best in my opinion SSH / Telnet / VNC / RDP / Xserver in one Terminal client emulator for Windows operating systems.

The client has been around for quite some time and it has been improving rapidly over the last 10 years, where it now more looks like a separate Operating System than a single terminal client. It's size is quite compact as well and my opinion and every self respectiving developer, system administrator, IT geek or a hacker would definitely
use the mobaxterm at home or at work place on a daily. I guess some of my readers, who have already migrated SuperPutty / SecureCRT or Putty / XMing or whatever kind of exotic Remote SSH Console terminal is used could validate this 🙂

Therefore as I've set up Mobaxterm on a multiple computers all around, I've found it useful to write a small article with some post-install hints (tune ups) one can do immediately once he has installed the Desktop or Portable Apps version of mobaxterm on desktop PC / notebook.
 

1. Set up your bashrc server / command aliases

Lets say you need to setup some rules for connectivity via a socks proxy to dig holes over a harsh company firewalls or add
custom options to every ssh client attempt to remote server, or simply alias some of your servers with custom connectivity options
and so on simply open vi / vim text editor from mobaxterm local terminal and place inside your rules, for example that could be anything like:


alias ssh='ssh -o stricthostkeychecking=no -o passwordauthentication=yes -o PreferredAuthentications=password  -v'
alias sftp='sftp -o stricthostkeychecking=no -o passwordauthentication=yes -o PreferredAuthentications=password'

alias work-server='ssh UserName@work-server -v -o passwordauthentication=yes -o PreferredAuthentications=password'

alias proxy='ssh -D 3128 UserName@proxyIP-host1 -o ConnectTimeout=80'
alias proxy1='ssh -D 3128 UserName@proxy-host2 -p 443 -o ConnectTimeout=60'
alias proxy3='ssh -D 3128 Username@proxy-host3 -p 443 -o ConnectTimeout=60'

Simply open the terminal and setup whatever you require
export ftp_proxy="http://proxy-host:8080"
export https_proxy="https://proxy-host:8080"
export http_proxy="http://proxy-host:8080"
export HTTP_PROXY="http://proxy-host:8080"
export HTTPS_PROXY="http://proxy-host:8080"


2. Set mobaxterm presistent directory / persistent root directory and default text editor

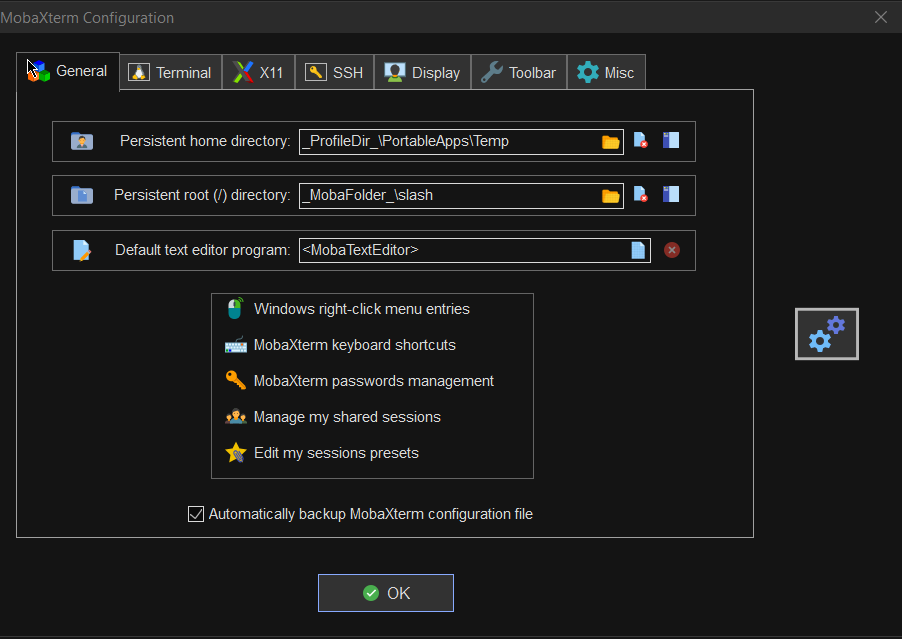
Make sure you have properly defined at least Persistent directory / Persistent directory if you want to keep the files under your /home/mobaxterm and root directory be able to save your data from local mobaxterm terminal work you have done.

To do so o to Configuration -> General

MobaXterm-persistent-home-directory
 

3. Change default settings for Opening / Closing Terminal tabs just like in gnome-terminal

MobaXterm is really awesome as the developer, followed pretty much the logic of some common GNU / Linux Terminal clients like Gnome-Terminal and KDE's default Konsole terminal.

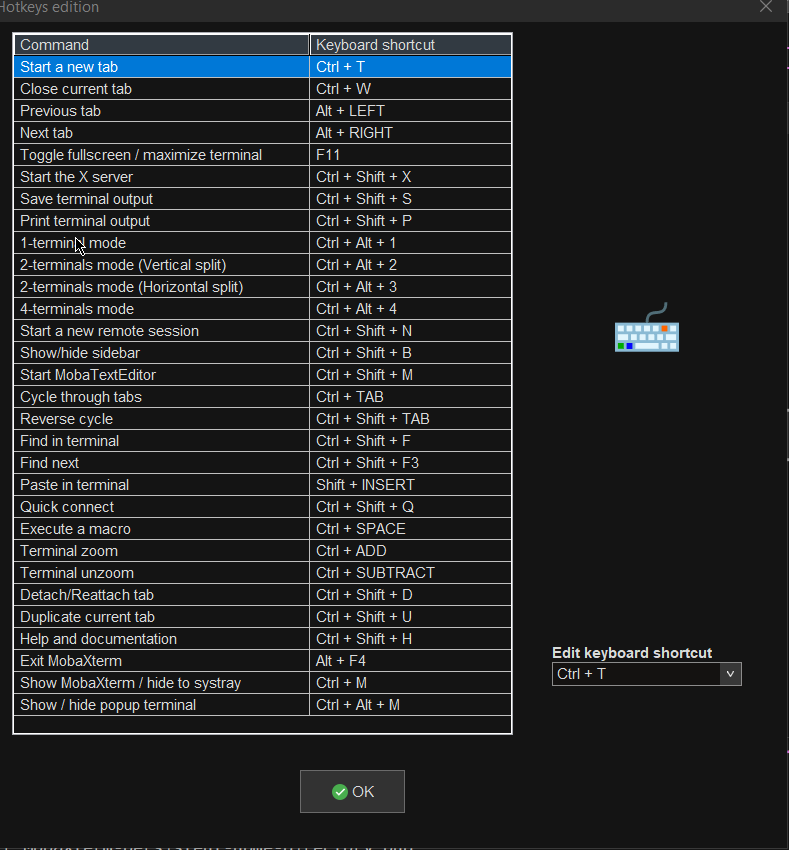
One of the first things to do once Mobaxterm is installed on the PC is to set up nice key binds as default onces might be heard to learn at the beginning or you might have already the habit to use the certain set of key combinations on your Linux desktop:

Common once are:

1. Open tab / Close tab common once I bind to are (CTRL + T / CTRL + W)
2. Previous tab move / Next tab move keys common one I use are (ALT + LEFT / ALT + RIGHT)
3. Find in terminal (CTRL + F)

rebind-mobaxterm-standard-keys
 

4. Make MobaXterm to automatically open a terminal to not Start local terminal every time

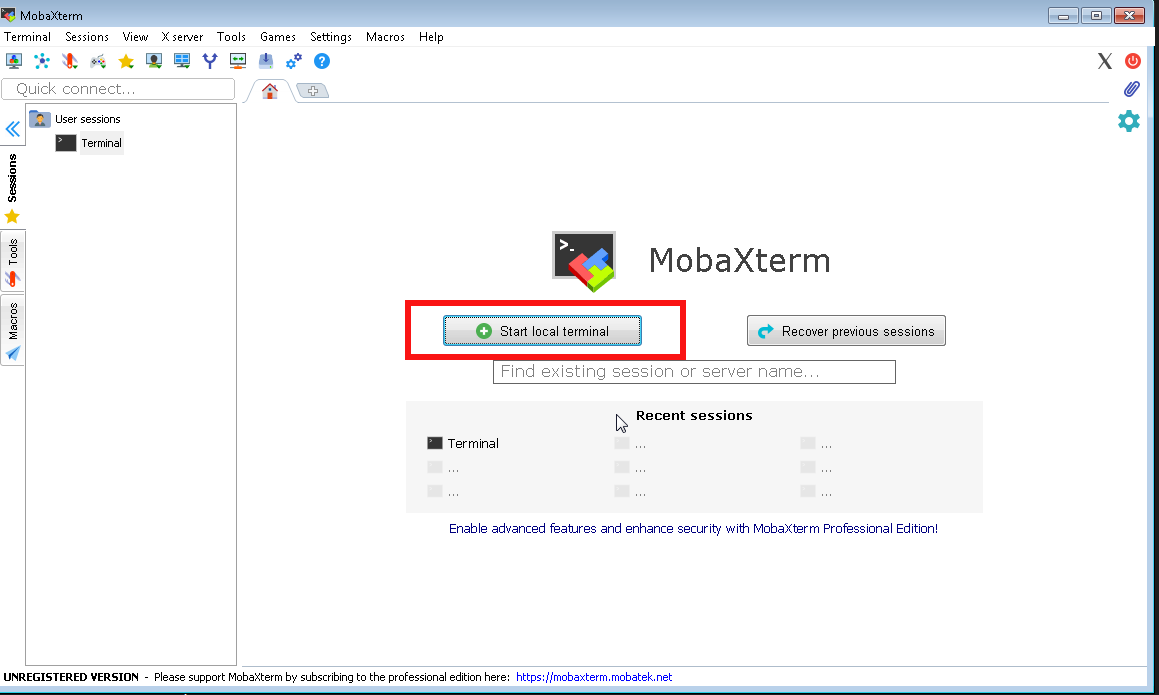
By default mobaxterm it is really annoying cause every time you run it after system reboot you have to select
Start local terminal
Once you run the terminal you get this prompt and you have to press on Start local terminal

mobaxterm-start-local-terminal


How to make Mobaxterm automatically open local Terminal Tab on every boot?
 

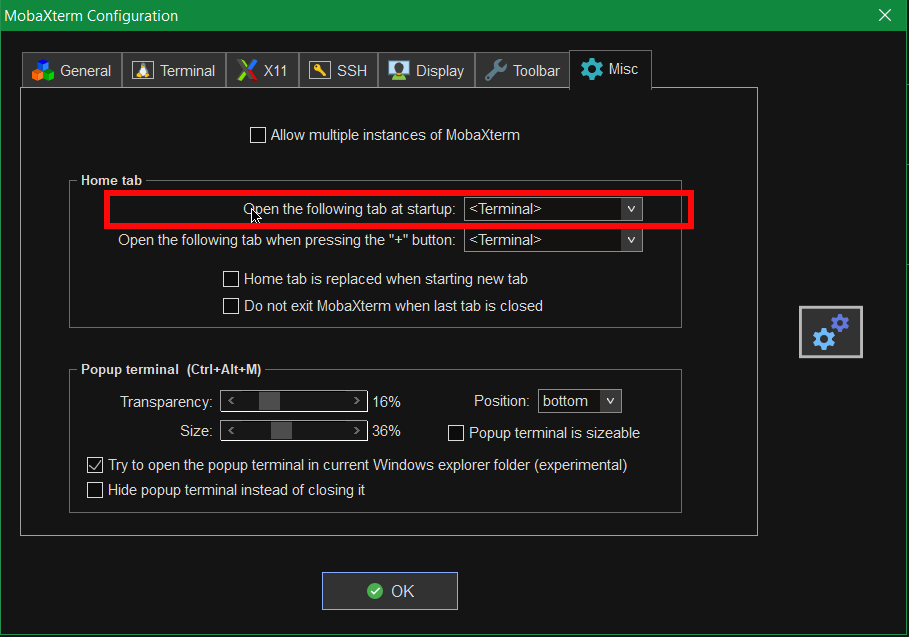
To fix this so every time a local terminal is spawn on MobaXterm you have get to:
 

Settings -> Configuration -> Misc


Open the Following tab at startup by default it will be

<Home (Pinned)>

Change it to:

<Terminal>

mobaxterm-open-the-followintab-tab-in-startup

That's it on next login your Local Terminal with /bin/bash.exe will auto load !
 

[hipo.WINDOWS-PC] ➤ env|grep -i SHELL
SHELL=/bin/bash.exe
PATH=/bin:/drives/c/Users/hipo/DOCUME~1
/MobaXterm/slash/bin:/drives/c/Windows:/drives/c/Windows/system32:/drives/c/Windows/system32:/drives/c/Windows:/drives/c/Windows/System32/Wbem:
/drives/c/Windows/System32/WindowsPowerShell/v1.0:/drives/c/Windows/sysnative
PSModulePath=C:\Windows\system32\WindowsPowerShell\v1.0\Modules\
CMDPATH=C:\Windows\system32;C:\Windows;C:\Windows\System32\Wbem;
C:\Windows\System32\WindowsPowerShell\v1.0\;C:\Windows\sysnative\;
C:\Users\hipo\DOCUME~1\MobaXterm\slash\bin
WINPATH=C:\Windows\system32;C:\Windows;C:\Windows\System32\Wbem;C:\Windows\System32\WindowsPowerShell\v1.0\;C:\Windows\sysnative\


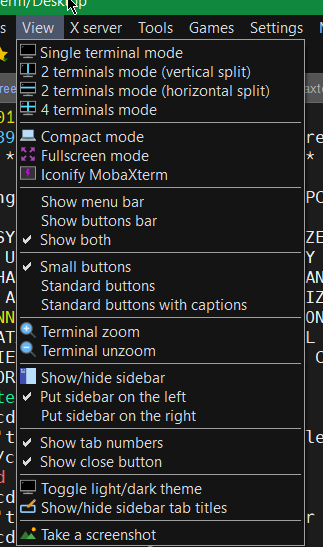
5. Make menu buttons to appear smaller


Go to menu and select
View -> (Small Buttons)

mobaxterm-select-small-buttons-screenshot

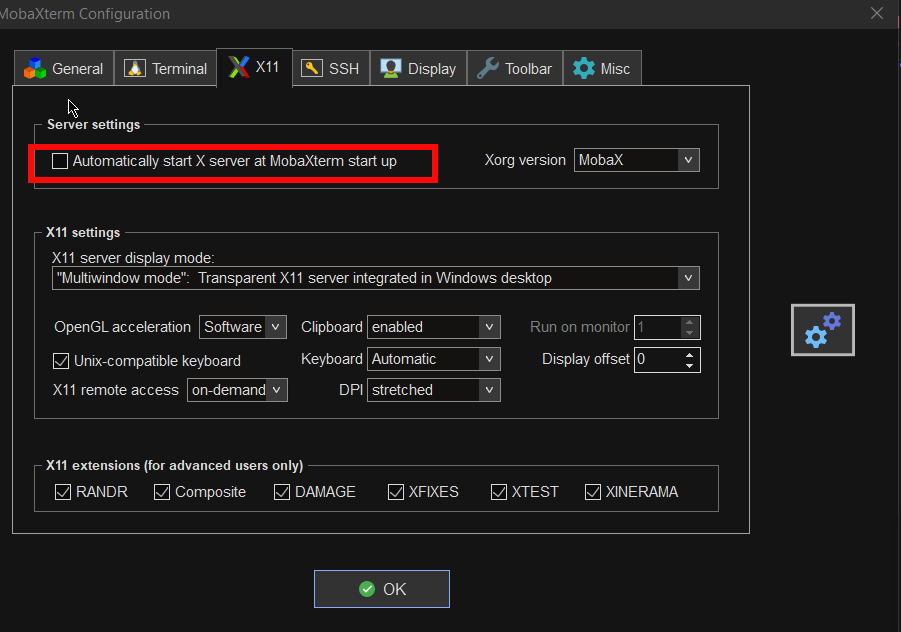
6. Disable auto start of XServer to prevent a port listener on the machine on TCP port

By default mobaxterm opens XServer listener, so you can immediately connect from a remote SSH servers missing Xserver and install software requiring an XServer, for example software such as Oracle Database or some MiddleWare WebLogig or IBM's Web Sphere. This is useful but if you want to have a good security only allow this server on a purpose. Otherwise the XServer will run in parallel with rest of your Moba and just load up your PC and eat up some RAM memory. To disable it go to:

mobaxterm-x11-automatically-start-X-server-disable-stop-at-startup

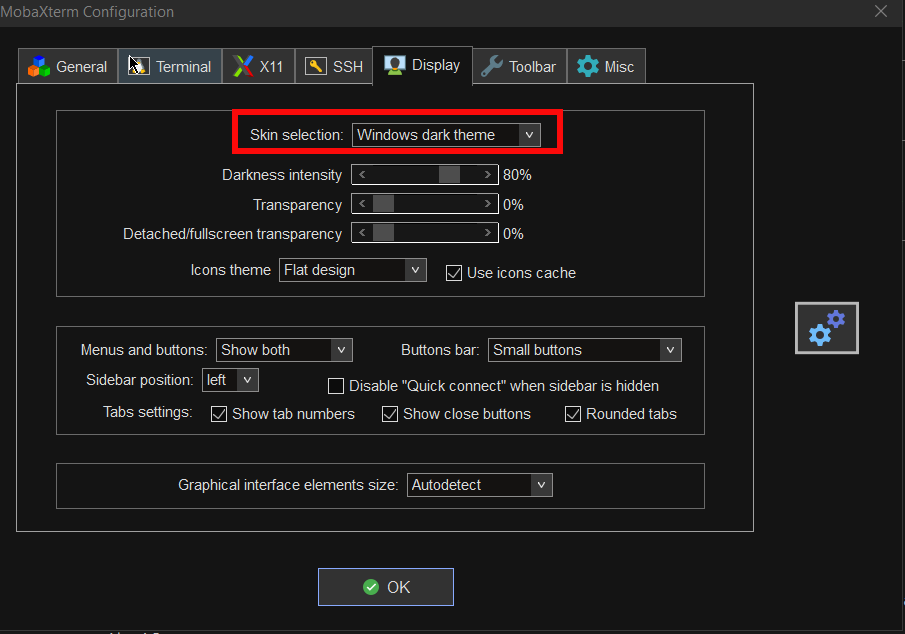
7. Change the mobaxterm Default theme to Dark

This is optional I like to set the Theme to Dark, also as a Theme for Windows as well as for MobaxTerm, the aim of that is simply to not put extra stress on my eye sight. Being on the PC around 8 to 10 hours and spending some 6 to 8 hours on console work is enough. If you want to do as well.

mobaxterm-change-default-theme-to-dark-theme

8. Install additional set of common Linux tools to mobaxterm to use on Windows
 

Tools such as:

1. Midnight Commander (mc)
2. Wget
3. Curl
4. Vim
5. Screen
6. Rsync
7. Perl
8. W3m
9. dosunix
10. unix2dos
11. gnupg
12. diffutils
13. mysql
14. mpg123
15. whois


If you want to have a set of packages pre-installed that are including above as well as the rest of mine, here is a dump of my installed mobapt manager packages:

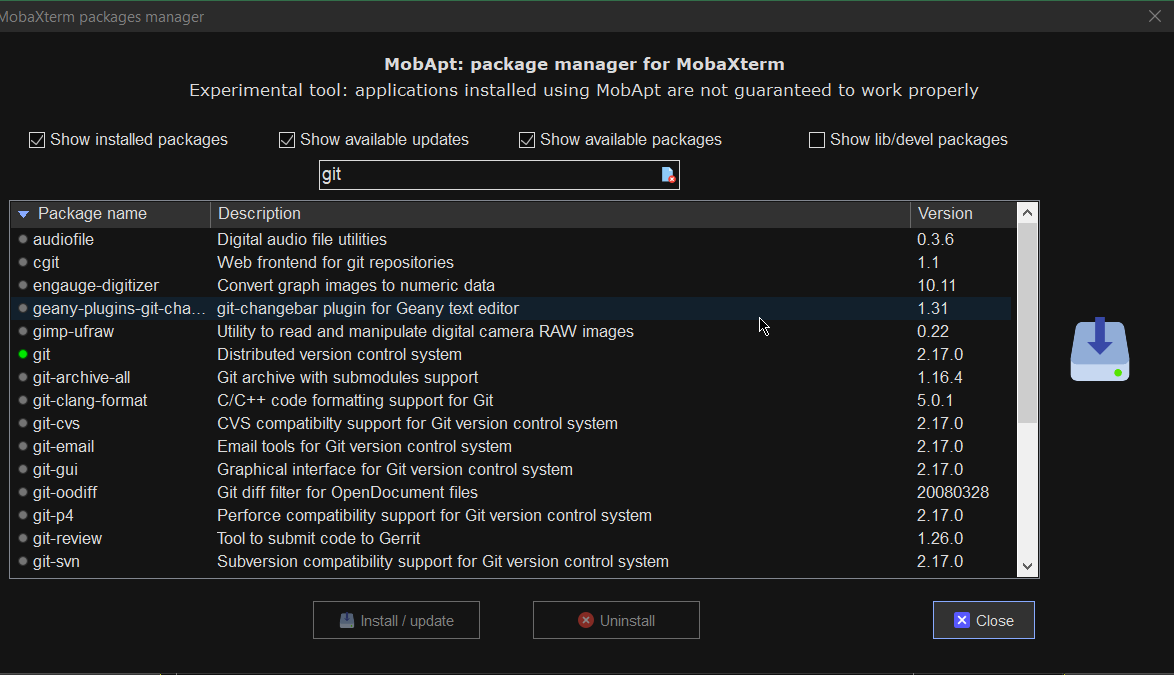
For more simply use the experimental Mobaxterm  Graphical Package installer
 

[hipo.WINDOWS-PC] ➤  for i in $(cat Downloads/installed-packages-mobaxterm.txt ); do apt-cyg install $i; done
 

Found package GeoIP-database

Installing GeoIP-database
Downloading GeoIP-database-20180505-1.tar.xz…
Unpacking GeoIP-database-20180505-1.tar.xz…


Running postinstall scripts
Package GeoIP-database installed.

Rebasing new libraries

Found package adwaita-icon-theme

Installing adwaita-icon-theme
Downloading adwaita-icon-theme-3.26.1-1.tar.xz…


You will be prompted for a single Yes for the respository

MobApt Packages Manager

mobapt-pkg-manager-install-git-from-gui-mobaxterm-package-installer

Though it is said it is experimental, I have to say the MobApt Apt Manager works quite good, I never had any issues with it so far.

9. Mobaxterm.ini the settings storage file that can help you move your configurations

If you have to prepeare new MobaXterm on multiple PCs frequently perhaps it is best to just copy the Mobaxterm.ini file. 
Here is an example of my mobaxterm.ini for download.
 

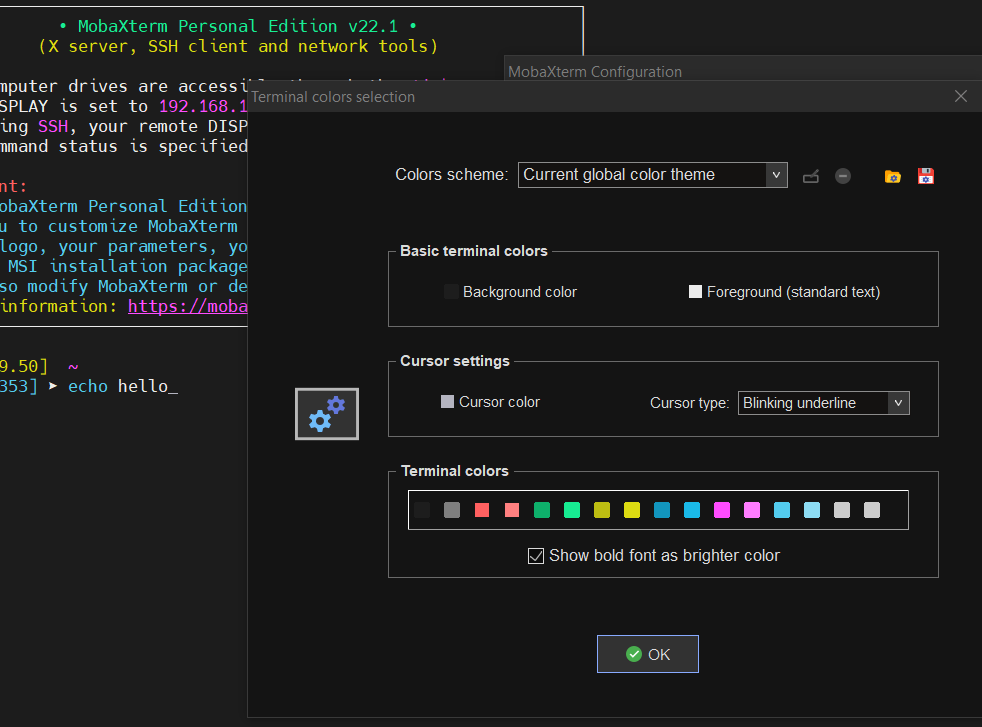
10. Change terminal colors and curor type and enable blinking (customizations)


Settings -> Configuration -> Terminal -> (Default Terminal Color Settings)


mobaxterm-change-terminal-colors-and-blinking-cursor-setting-screenshot

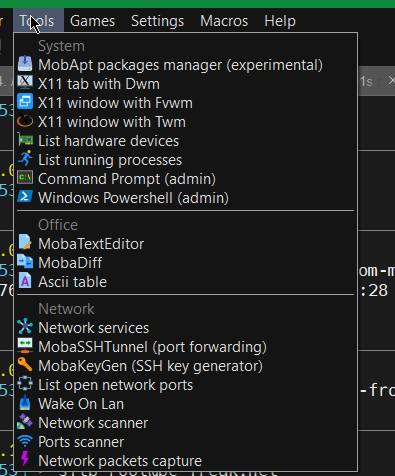
11. Use very useful moba Tools
 

mobaxterm-terminal-great-useful-tools-screenshot
For sysadmins Moba has plenty of other jems such as:

  • Network Port scanner such as Nmap with GUI

  • list open network ports (GUI interface to netmap)

  • SSH tunnel tool

  • Moba Diff

  • Wake on Lan

  • Network Packet capturer (such as tcpdump)

  • List running processes (such as taskmgr in simple form)

  • List machine hardware devices (such as Windows Device manager)

 
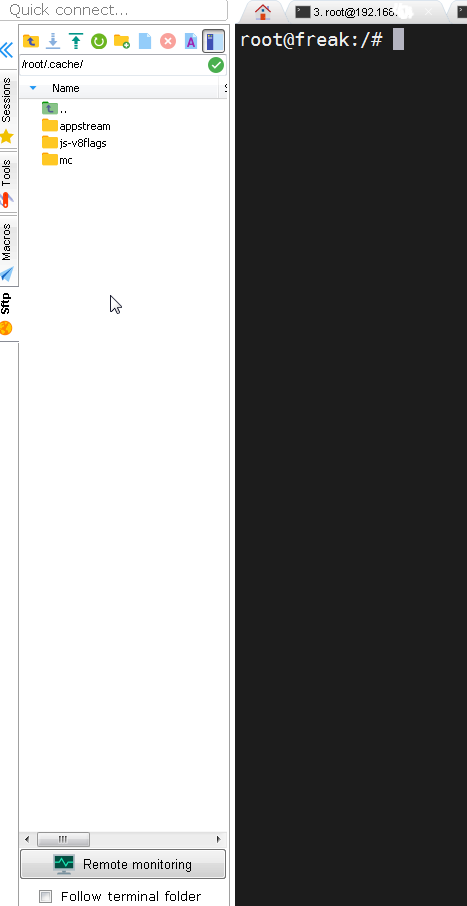
12. Remote monitoring of opened ssh session


To enable remote monitoring for a Saved session simply use the "Remote monitoring" button on the down left corner of the terminal.

mobaxterm-remote-monitoring-of-remote-ssh-server-screenshot-button

Or to enable it for a new host, open:

1. "Saved sessions"
2. Click over "User sessions"
3. New Session -> (SSH)
4. Basic SSH Settings (Remote host) -> OK
5. Click over the new created session
6. Click on Remote monitoring for the opened session

remote-monitoring-from-mobaxterm-screenshot

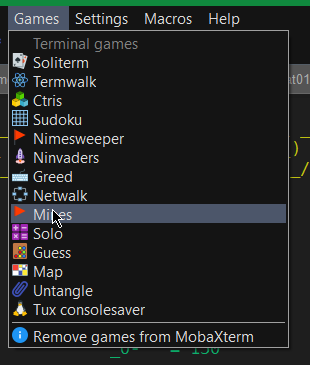
13. Play some mobaxterm console games

As you might have pissed off of configuring go on and enjoy some of the great console games, some of which are also present on a normal Linux new distribution installation. 🙂

mobaxterm-list-of-games-screenshot

List of Moba Games

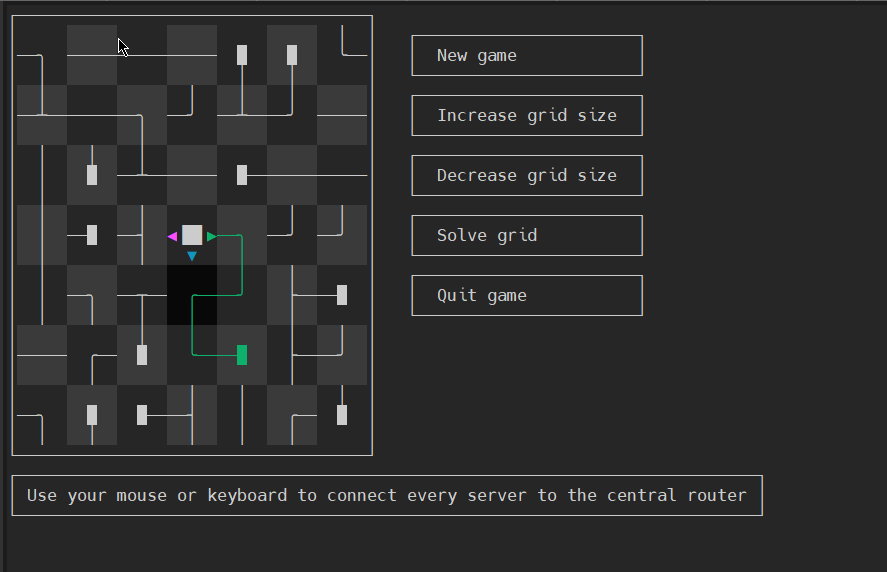
teamwalk-mobaxterm-console-connect-network-routers-game
TeamWalk (Use your mouse or keyboard to connect every server to the central router)

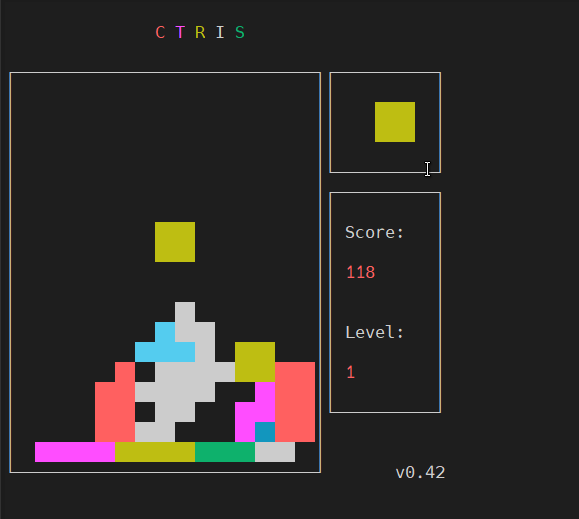
ctris-console-text-game-mobaxterm

Ctris Console tetris from Mobaxterm

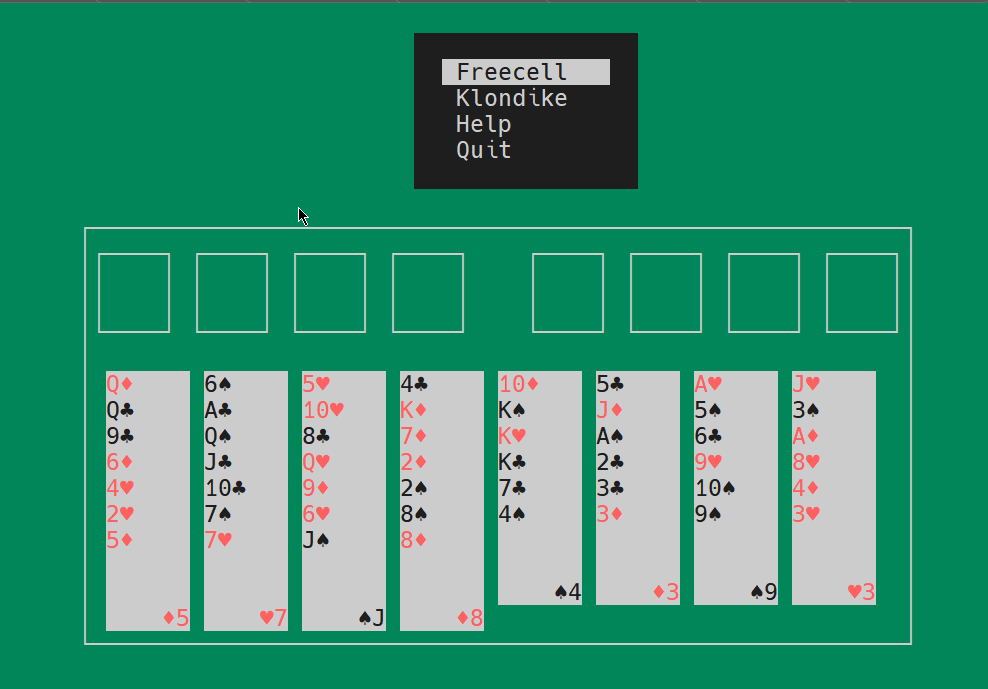
solitaire-text-console-game-played-on-mobaxterm-screenshot

Text console Solitaire from Moba
 

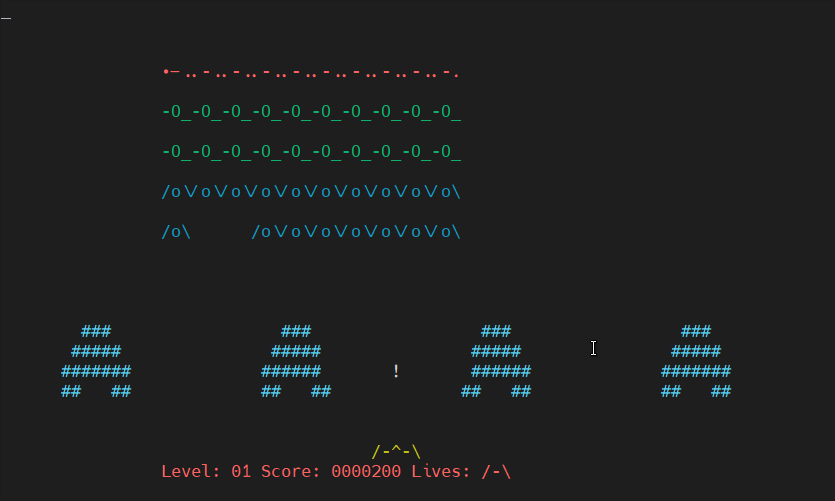
Ninvaders-console-game-mobaxterm

Here is NinVaders (Text Version of Space Invaders Arcade Classic)
 

Enjoy ! 🙂
Export / Import PuTTY Tunnels SSH Sessions from one to another Windows machine howto

Thursday, January 31st, 2019

Putty-copy-ssh-tunnels-howto-from-one-to-another-windows-machine-3

As I've started on job position – Linux Architect in last November 2018 in Itelligence AG as a contractor (External Service) – a great German company who hires the best IT specialists out there and offers a flexible time schedules for emploees doing various very cool IT advanced operations and Strategic advancement of SAP's Cloud used Technology and Services improvements for SAP SE – SAP S4HANA and HEC (HANA Enterprise Cloud) and been given for work hardware a shiny Lenovo Thinkpad 500 Laptop with Windows 10 OS (SAP pre-installed), I needed to make some SSH Tunnels to machines to (Hop Station / Jump hosts) for that purpose, after some experimenting with MobaXterm Free (Personal Edition 11.0) and the presumable limitations of tunnels of the free client as well as my laziness to add the multiple ssh tunnels to different ssh / rdp / vnc etc. servers, finally I decided to just copy all the tunnels from a colleague who runs Putty and again use the good old Putty – old school Winblows SSH Terminal Client but just for creating the SSH tunnels and for rest use MobaXterm, just like in old times while still employe in Hewlett Packard. For that reason to copy the Tunnels from my dear German Colleague Henry Beck (A good herated collegue who works in field of Storage dealing with NetApps / filer Clusters QNap etc.).

Till that moment I had no idea how copying a saved SSH Tunnels definition is possible, I did a quick research just to find out this is done not with Putty Interface itself but, insetead through dumping Windows Putty Stored Registry records into a File, then transfer to the PC where Tunnels needs to be imported and then again (either double click the registry file) to load it, into registry or use Windows registry editor command line interface reg, here is how:
 

1. Export


Run cmd.exe (note below command) 

requires elevated Run as Administrator prompt:

Only sessions:

regedit /e "%USERPROFILE%\Desktop\putty-sessions.reg" HKEY_CURRENT_USER\Software\SimonTatham\PuTTY\Sessions

All settings:

regedit /e "%USERPROFILE%\Desktop\putty.reg" HKEY_CURRENT_USER\Software\SimonTatham

Powershell:

If you have powershell installed on machine, to dump

Only sessions:


reg export HKCU\Software\SimonTatham\PuTTY\Sessions ([Environment]::GetFolderPath("Desktop") + "\putty-sessions.reg")

All settings:

reg export HKCU\Software\SimonTatham ([Environment]::GetFolderPath("Desktop") + "\putty.reg")


2. Import

Double-click on the 

*.reg

 file and accept the import.


Alternative ways:


cmd.exe

require elevated command prompt:

regedit /i putty-sessions.reg regedit /i putty.reg

PowerShell:

reg import putty-sessions.reg reg import putty.reg


Below are some things to consider:

Note !do not replace 

SimonTatham

 with your username.


Note !: It will create a 

reg

 file on the Desktop of the current user (for a different location modify path)


Note !: It will not export your related (old system stored) SSH keys.

What to expect next?

Putty-Tunnels-SSH-Sessions-screenshot-Windows

The result is in Putty you will have the Tunnel sessions loadable when you launch (Portable or installed) Putty version.
Press Load button over the required saved Tunnels list and there you go under


Connection SSH -> Tunnels 


you will see all the copied tunnels.

Enjoy!

Putty load as default session another session – Save other Putty session configuration to default howto

Thursday, November 29th, 2018

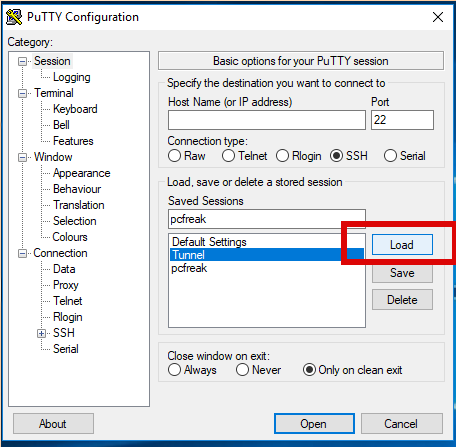
putty-load-button-screenshot

Recently I had to use PuTTY which I haven't used for years to open a number of SSH Pernanent Tunnels necessery for my daily work as a SAP Consultant.

I've saved them under a certain new profile and saved the set SSH Tunnel configuration not in the default Session but in separate named one, therefore had to press Load button every time after clicking over my Putty shortcut icon. 

That was annoying and took few seconds out of my life every next morning for about a week, so finally I found osme time to google it and it seemed it is pretty easy to have any Putty sessoin loaded you like.

Here is how:

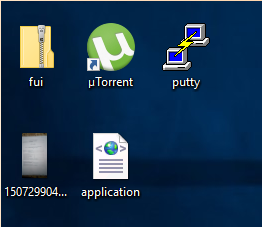
1. Create a new Putty Shortcut

putty-screenshot1

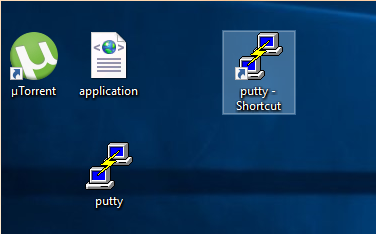
putty-shortcut-screenshot-windows

Click over Putty icon while holding CTRL + SHIFT (Control SHIFT keys simultaneously ) and move the mouse somewhere on the desktop to create the shortcut.
 

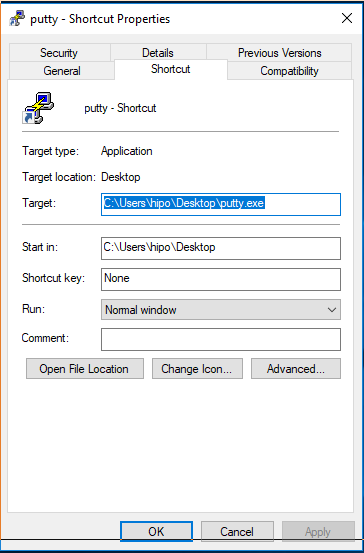
2. Right click on Putty Shortcut

putty-target-screenshot-windows1

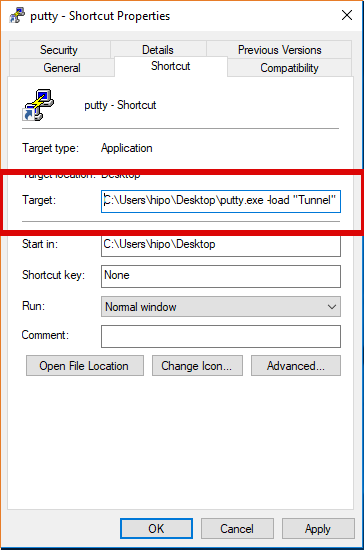
putty-target-screenshot-windows2


"C:\Program Files\PuTTY\putty.exe" -load "your_saved_session" "username@your_server_address" -pw "your_password"


fill out "target" field of shortcut using above code (alter to your own properties).
click Apply button.

If you need to pass a user and password from Shortcut itself (which is a bad practice for security but sometimes useful, for not so important Tunnels – for example a tunnel to an Open Proxy), do it by typing in the target field like so:
 

"C:\Program Files\PuTTY\putty.exe" -load "your_saved_session" "username@your_server_address" -pw "your_password"


And Hooray !!! After that when you click on PuTTy shortcut it loads your session automatically using given username and password.

How to configure Nautilus (Linux application like Windows Explorer) to work with standard Windows button + E On Linux GNOME en Mate

Monday, October 9th, 2017

how-to-configure-nautilus-linux-applicatoin-to-act-like-windows-explorer-make-windows-button-work-in-GNOME-and-Mate
As an ex-Windows user I'm still addicted to Windows User brainwashing as an ex-victim of Windows 95 / 98 and XP:), so I tend to love very much and its still hard for me to forget some major Key Binding (Windows Key Combinations).

On every new Desktop Linux I install, I have the habit to configure few great key combination shortcuts that makes my digital life much easier.
I use usually as a graphical environment GNOME and recently switched to MATE (GNOME 2 fork, cause GNOME 3 is totally messed up and unworthy to me), that's why this article is targetting this two Linux GUI envs, I'll be glad to hear in article comments for any other useful key bindings and how to configure similar key bindings for other Major Linux graphical environments (Cinnamon, KDE Plasma, XFCE, LXDE).


1. Configuring Lock Screen (Win button + L), Open Explorer(Win button + E), View Desktop (Win + D) in MATE graphic env


———  WINDOWS BUTTON, OFTEN USED KEY SHORTCUTS ———

Windows + E – Open new Windows File Explorer 

Windows + L – Lock Computer

Windows + M – To minimize All Windows

Windows + D – Show Desktop (similar to Windows +M though it doesn't switch to Desktop)

Win – + / – To Maginfy Text and Windows

Shift + Win + Left/Right Arrow – (In Windows if you have multiple monitors connected to the same computer lets say Right Monitor and Left, that combination switches between left monitor and right monitor)


——————————————————————–


The list goes on but I'm not used to all of them, I'll stop here and continue on with how to remake some of my favourite Windows keybindings in Gnu / Linux

Either run it from Menus:
 

System -> Settings -> Hardware -> Keyboard Shortcuts


Or run command


$ mate-keybinding-properties


howto-gnome-mate-remap-shortcut-keybinding-keys-mate-keybinding-properties


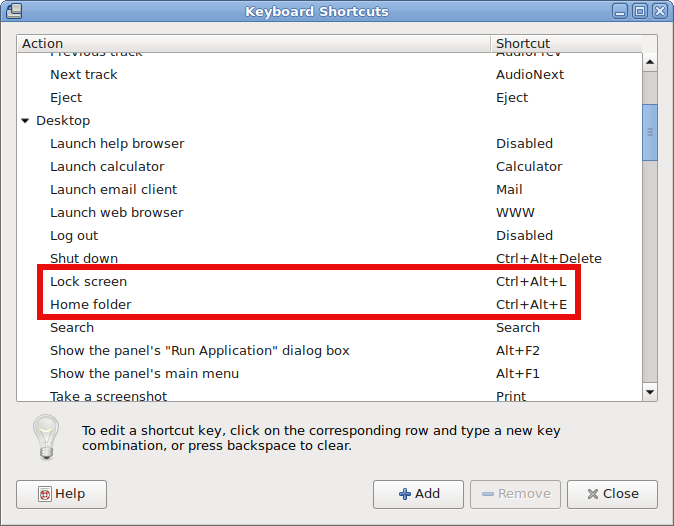
After rebinding the Windows: 
– Lock Screen and Open New Nautilus Explorer Window (Home folder) variable to be invoked with Windows button, the result
is as that:

howto-gnome-mate-remap-shortcut-keybinding-keys-mate-keybinding-properties


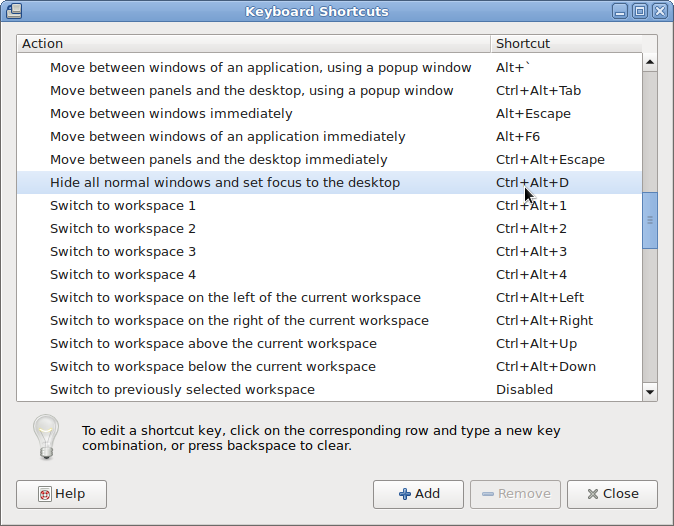
Scroll down Mate Keyboard shortcuts and you'll find

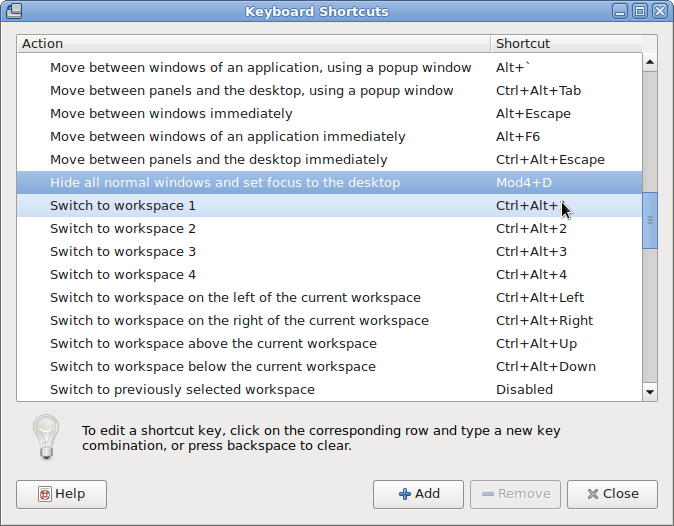
also how to configure Windows Button and D Key Combination, following 2 more screenshots showing how to do it note that MOD Key appears once you press Windows Keyboard Key + something (e.g. MATE recognizes MOD Key as Win Key):

Before the change to bind Win Key + D to work:

mate-how-to-make-desktop-view-open-with-standard-windows-button_and_d-combination-linux-debian

When configured Win Button + D looks like so:

mate-how-to-make-desktop-view-open-with-standard-windows-button_and_d-combination-linux-debian-1

2. Configuring Lock Screen (Win button + L), Open Explorer(Win button + E), View Desktop (Win + D) in GNOME

Usually in GNOME until > version 3.X.X (in older GNOME graphic environment access to KeyBinding Properties was done via:


System -> Preferences -> Keybord Shortcuts -> Add ->


In fallback gnome with Metacity (if installed along with GNOME Desktop 3.2.X environment to access Key Bindings):

d

System->Apps->Metacity->global_keybindings  


Also it is possible to remap keys via dconf-editor, I've written a small article earlier explaining how to remap Screenshotting buttons with dconf-editor but the example could be easily adapted, so you can edit almost everything.

Besides that you can use a command to run the keyboard configuration (in older GNOMEs) via:


linux:~$ gnome-keybinding-properties


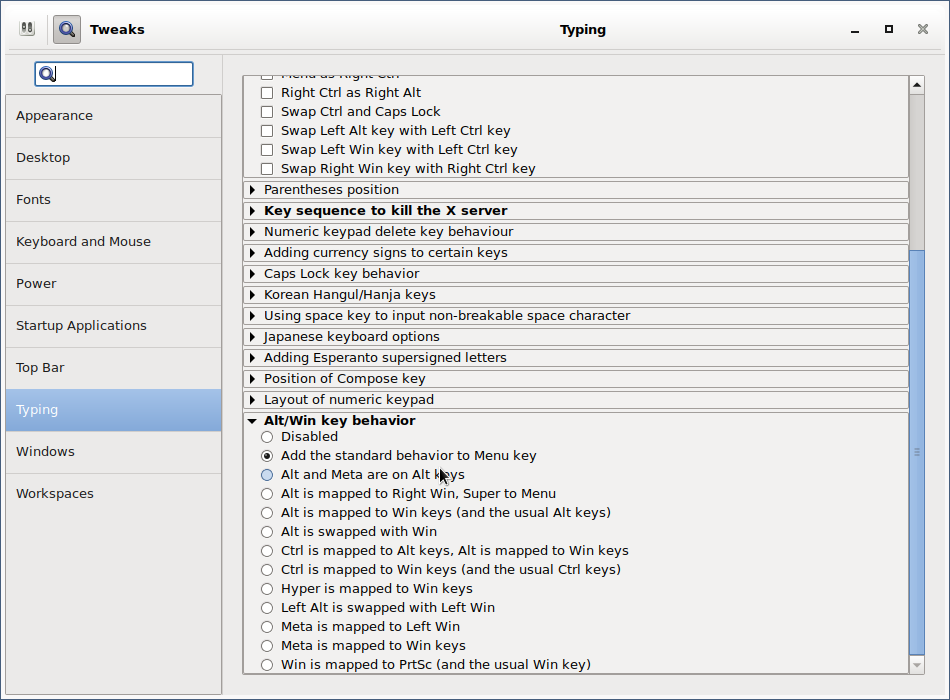
Just for information for those who might know, many Key Binding interesting options are available via gnome-tweak-tool, so if you don't have it yet install it and give it a try:


linux:~# apt-get install –yes gnome-tweak-tool


As you can see, there are plenty of options to make Win (key) to act like Alt (key):

linux:~# gnome-tweak-tool
 

gnome-tweak-tool-make-win-key-to-behave-like-alt-key-howto 


After configuring the changes enjoy your WINDOWS Button + L, WINDOWS + E and WINDOWS + D WORKING AGAIN HOORAY !!! 🙂 


3. Most used shortcuts in Gnome and Nautilus 
 

Below are most used shortcuts thanks to LinuxQuestions Forum for providing them

Howdy! I thought that it would be useful to post a practical selection of shortcut keys for GNOME (the Desktop Environment) and Nautilus (the File Manager) and some information about customizing shortcut keys in Ubuntu. I wrote it especially for Ubuntu beginners, but I hope it will prove useful for all. 


2.1 GNOME/Nautilus shortcut keys – Very useful for the keyboard maniax like me :):
 

Ctrl-H: show hidden files

Ctrl-N: new window

Ctrl-Shift-N: create new folder

Alt-Home : jump to home folder

Alt-Enter : file / folder properties

F9 : toggle side-pane

Alt-F1 : launch applications menu

Alt-F2 : launch "run application" dialogue

Ctrl-Alt – Right/Left arrow : move to the next virtual desktop

Ctrl-Alt-Shift – Right/Left arrow : take current window to the next virtual desktop

Ctrl-Alt-D: minimize all windows, and gives focus to the desktop. 

Alt-Tab: switch between windows. When you use these shortcut keys, a list of windows that you can select is displayed. Release the keys to select a window. 

Ctrl-Alt-Tab: switch the focus between the panels and the desktop. When you use these shortcut keys, a list of items that you can select is displayed. Release the keys to select an item. 

Ctrl-Alt-L: lock the screen (tested only in Ubuntu) 

Ctrl-L: shortcut for opening locations-by default the path is the home folder*
/ : same as Ctrl-L but has the root (/) as default path* (shortcut found on here)
* both shortcuts can be used while you are on the desktop (no window active)

Ctrl-T : move to trash (in Nautilus)
Quite dangerous key combination because many of us are used to press these keys in order to open a new tab. Because we all delete items using the Delete key, I recommend to deactivate this shortcut key. To do that, go to System » Preferences » Appearance » Interface. Select Editable menu shortcut keys and close the dialog box. Click on the Edit menu in the File Browser. Click the Empty Trash item (it has Ctrl-T as the keyboard shortcut) Press the Delete key to get rid of the shortcut.
You can find all GNOME shortcut keys here


2.2 How to create a custom hotkey to launch whatever application you want in GNOME
 

As an example, we will set a lock-screen shortcut.


Open "gconf-editor" as the user as you're logged in in GNOME (typing gconf-editor in the terminal or "Run Application").
 

Go to apps > metacity > keybinding_commands


Here we have a list of twelve slots for commands.


Double click on e.g. "run_command_1" 

In Key Value Type in the name of the application or command you want to launch (e.g. gnome-screensaver-command –lock).


Go to apps -> Metacity -> global_keybindings 

Double click on e.g. "run_command_1" 
Change the key value to whatever key combination you like (e.g. <Ctrl><Alt>L).Press "Ok".


2.3.How to create/change GNOME shortcuts


Click on System -> Preferences -> Keyboard Shortcuts


Click the action in the list and press Enter. 
Press the new key or key combination you want to assign to the action. (To clear a shortcut, press the Backspace key)


Hope it helps, Enjoy Life .;)

Windows: Create quick screenshot and import it to Outlook Email – A great Outlook tip everybody should know

Saturday, October 3rd, 2015

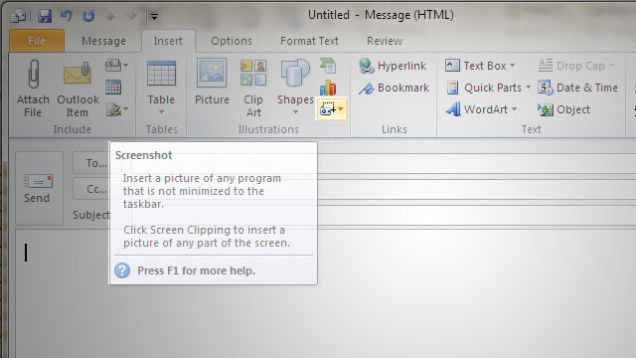
https://www.pc-freak.net/images/make-quick-screenshot-from-your-windows-screen-with-microsoft-outlook-2010-embedded-feature

If you're into a huge company like IBM (no it doesn't stand for I Blame You butInternational Business Machines ) or Hewlett Packard – where using Microsoft Windows mailing is almost mandatory and you have to write tons of mails daily, you will certainly need to do plenty of screenshots.
Screenshotting in MS Windows is a very trivial thing, you press Prt + Scr (Print Screen Button), open Microsoft Paint and paste (CTRL+V) the file into it then Save the file as a lets say JPEG extension. However if you have to do that regularly, each time to create a screenshot you will have to loose a minute or two. Also it is quite annoying to open Paint and
Outlook version 2010 has a very useful feature Take screenshot from any existing opened Window on Windows host.
To make screenshot directly from Outlook mail client. Click the Write new mail Button

New E-mail -> Insert (tab) -> (click Screenshot)
Depending on your ribbon menu setup, this might be a tiny icon—specifically, a little camera icon with a dotted rectangle.
You will be offered to choose along all opened Windows, for the Window from which you would like to have screenshot, choose one and enjoy
If you don't see a window you want to insert, make sure the program isn't minimized to the taskbar.
Alternatively, if you want just a portion of the screen, click on the Screen Clipping button at the bottom of the Screenshot dropdown. This will bring up a crosshair cursor for you to drag around the area of the screen you want to select.
Your selection should then be inserted into your emailscreenshot ready to share with your mates.

Skype remove word completion / Howto Disable spellcheck autocorrect on Mac OS X, Android Phones Tablets and IPhone iOS

Tuesday, March 14th, 2017

How-to-disable-auto-correct-on-MacOS-X-android-and-iphone

I've recently upgraded my wife's Mac Book Air Mac OS X release from Mountain Lion to latest available OS X release Yosemite and after upgrade the old version of Skype used for about 3 years without any problems (except camera issues due to mac OS X bug the old post is here) stopped working (did crashed) on Skype launch so I took few minutes to upgrade Skype as well from Skype.com Skype for Mac official download page after the quick and unproblematic Skype re-install, Skype client was back to normal with a shiny new outlook and on a first glimpse all worked like a charm but …

On the next day when I took use of temporary the upgraded Mac Book Air with the fresh new OS X Yosemite and Skype's latest app to to do a quick login with my Skype credentials noticed a very annoying autocorrect (auto spelling)  Skype behavior on any new input text message.

I have to admit the idea of autocorrect feature on a system wide scale is great however quick keyboard typers like me who are used to type more than a letter per second use to type so quickly that occasinally you do errors which you're quick to fix but anyhow errors are automatically corrected in a way that you have to retype the whole word quite often which makes your typing a hellish experience. Then the same auto-correct feature becomes a terrible experience and on any device I notice this behavior I tend to remove it immediately.

I remember  the same dictionary auto-spell check / corect behavior was present on my Android run ZTE blade 3 mobile after first Mobile boot and also present on my current iPhone 5 iOS and thus the first thing I did once I start using it is to remove autocorrect (auto spelling) feature and relax the irritation of it.

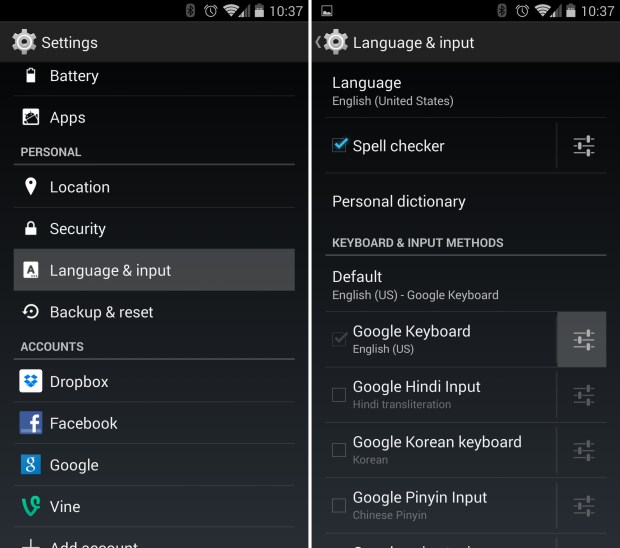
Just in case if you need to disable Spellcheck auto-correct on Android Phone or Tablet do it from

Settings -> Language & input

android-phone-tablet-disable-autocorrect-spell-check

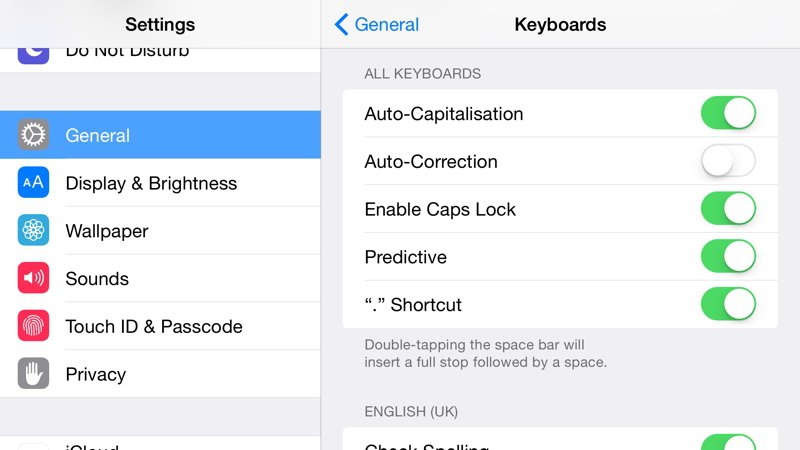
If you happen to be using also IPhone 5 as me or  Iphone 6 / 7 to disable AutoCorrect feature on SMSes / Skype / Viber and other applications do it from Phone's:

Settings -> General

disable_Turn_off_AutoCorrect_in_IPhone_iOS

Shortly I've noticed that the auto-correct feature does not only mess up your typing in Skype but also in Mail and TweetDeck and generally any open application where you can type on Yosemite.


I've took the time to investigate quickly what was causing the new feature that bugged me so much online and came to this nice little article How to turnoff autocorrect on Mac OS X 10.11 El Captain

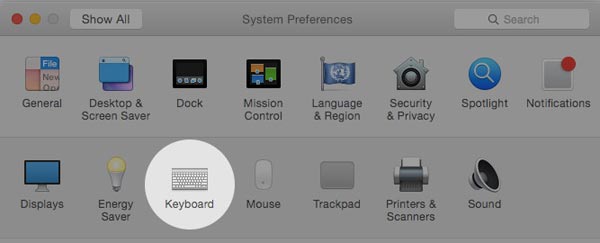
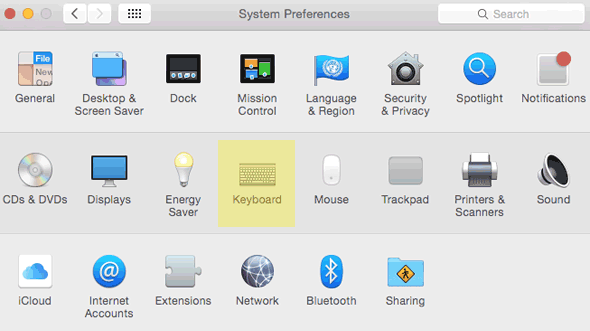
As the article revealed to Turn off the autocorrect Mac OS X feature you I have to go:

Finder -> System Preferences


stop-skype-autocorrect-annoying-macosx-yosemite-system-preferences-menu-screenshot

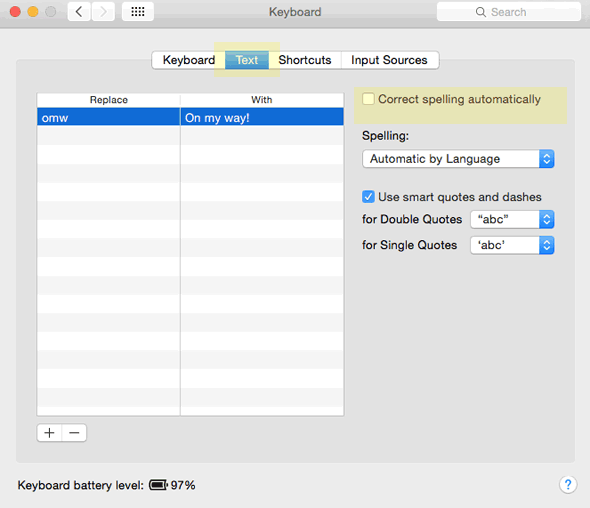
Click on Keyboard -> Text
and turn  Autocorrect off by unchecking Correct spelling automatically

stop-skype-autocorrect-annoying-macosx-yosemite-system-preferences-keyboard-menu-screenshot

By doing this autocorrect spelling is disabled for all applications, however for some people it might be handy to leave the correct feature for Mail app or Microsoft Office (Microsoft Word / Excel) etc. and only turn off (disable) the autorrect feature per application side.

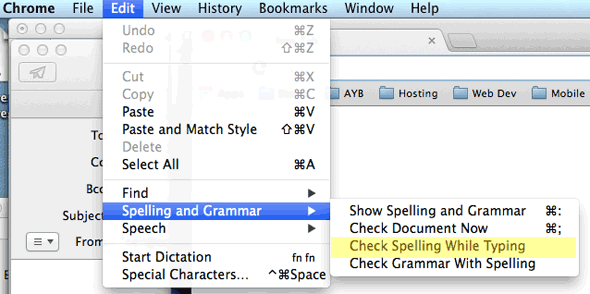
You can  do this in the separate Applications (of choise where you need auto spelling) from  Edit Menu under Spelling and Grammer and enable / disableCheck Spelling While Typing

stop-skype-autocorrect-annoying-macosx-yosemite-spelling-and-grammar-menu-screenshot


Tadam Enjoy ! 🙂
 

How to Remove Firefox TABS all time Moving Backward / Forward (Waiting) Wheel cursor – Browser and OS Wheel Ring cursor might affect hypnotically

Monday, September 7th, 2015

remove-firefox-tabs-all-time-annoying-moving-back-forward-waiting-wheel-cursor-browser-and-ring-cursor-might-affect-you-hypnotically

I've been annoying for quite a long time by the the Clockwise moving backward and Forward Wheel (Ring) on Top of browser Tabs everytime I navigate to a new Internet domain or request a resource on the Net.

I'm aware that seeing the wheel all the time move back and forward is a very bad manipulation technique that is often used in advertisements in old movies and some advertisements in the start of the video . I'm talking about the infamous backward counting technique in a Circle (it was moer commonly used in the dawn of Television) aiming to induce watchers mind into hypnotic state …

back-counting-10-9-8-7-manipulation-technique-to-make-your-mind-susceptible

Those who have a degree in psychology or have been into marketing or human resources fields or any field involved where you have to influence the masses are already aware of the backward counting methology which has been practiced heavily by hypnosis practisioners such as Sigmund Freud, to induce any kind of hypnotic state the hypnotist always asks the object of hypnotism to watch closely into a moving back and forwards clock, often accompanied by counting backwards …

Well my Theory here is that the same techniques is well aware of those who planned Windows OS in which if you remember the Sand Clock has been substituted in Windows 7 / 8 and Windows 10 with the rotating back and foward Wheel for the reason that this aims to influence people mind to go into Alpha state from Beta state and thus make them feel more relaxed while doing stuff on the PC.

One thing to mention here is Back and Forward wheel is not only into OS level it has been heavily adopted by leading Software as a Service (SAS) UIs such as Google's and probably more importantly Youtube (have you noticed the Cycling Wheel when waiting for a Youtube movie to Load), the Wheel is also heavily incoruprated in most if not all biggest Websites on the Net. Even If you have noticed these days Google's Cycling (Waiting) Wheel is not only Cycling but has the colorful programming incorporated.

google-wheel-color-programming-example

Well probably many people who use computers daily did not really realize that the Computer OS and Programs GUI Interface they're using is influencing their mind and some famous psychological methods such as color programming and hypnotic tricks could be used more or less.

In that regard as a Firefox user I decided to change tne Back and Forward Wheel with another one which will not trigger my subconsciousness / mind all the time while browing on the Net into Alpha State. As I'm not a Firefox expert and my quick research on search Engines on how to achieve changing or removing the Browser Tabs all time turning wheel did not led me to nothing positive, I've consulted the experts in irc.freenode.net #firefox.

As always the guys were helpful and pointed me out to UserStyles.org website's Static-Throbbler CSS. I've mirrored the CSS script under a name remove-firefox-tab-wheel-script.css in case if UserSpace.org disappears in future, below is also a paste of the script:

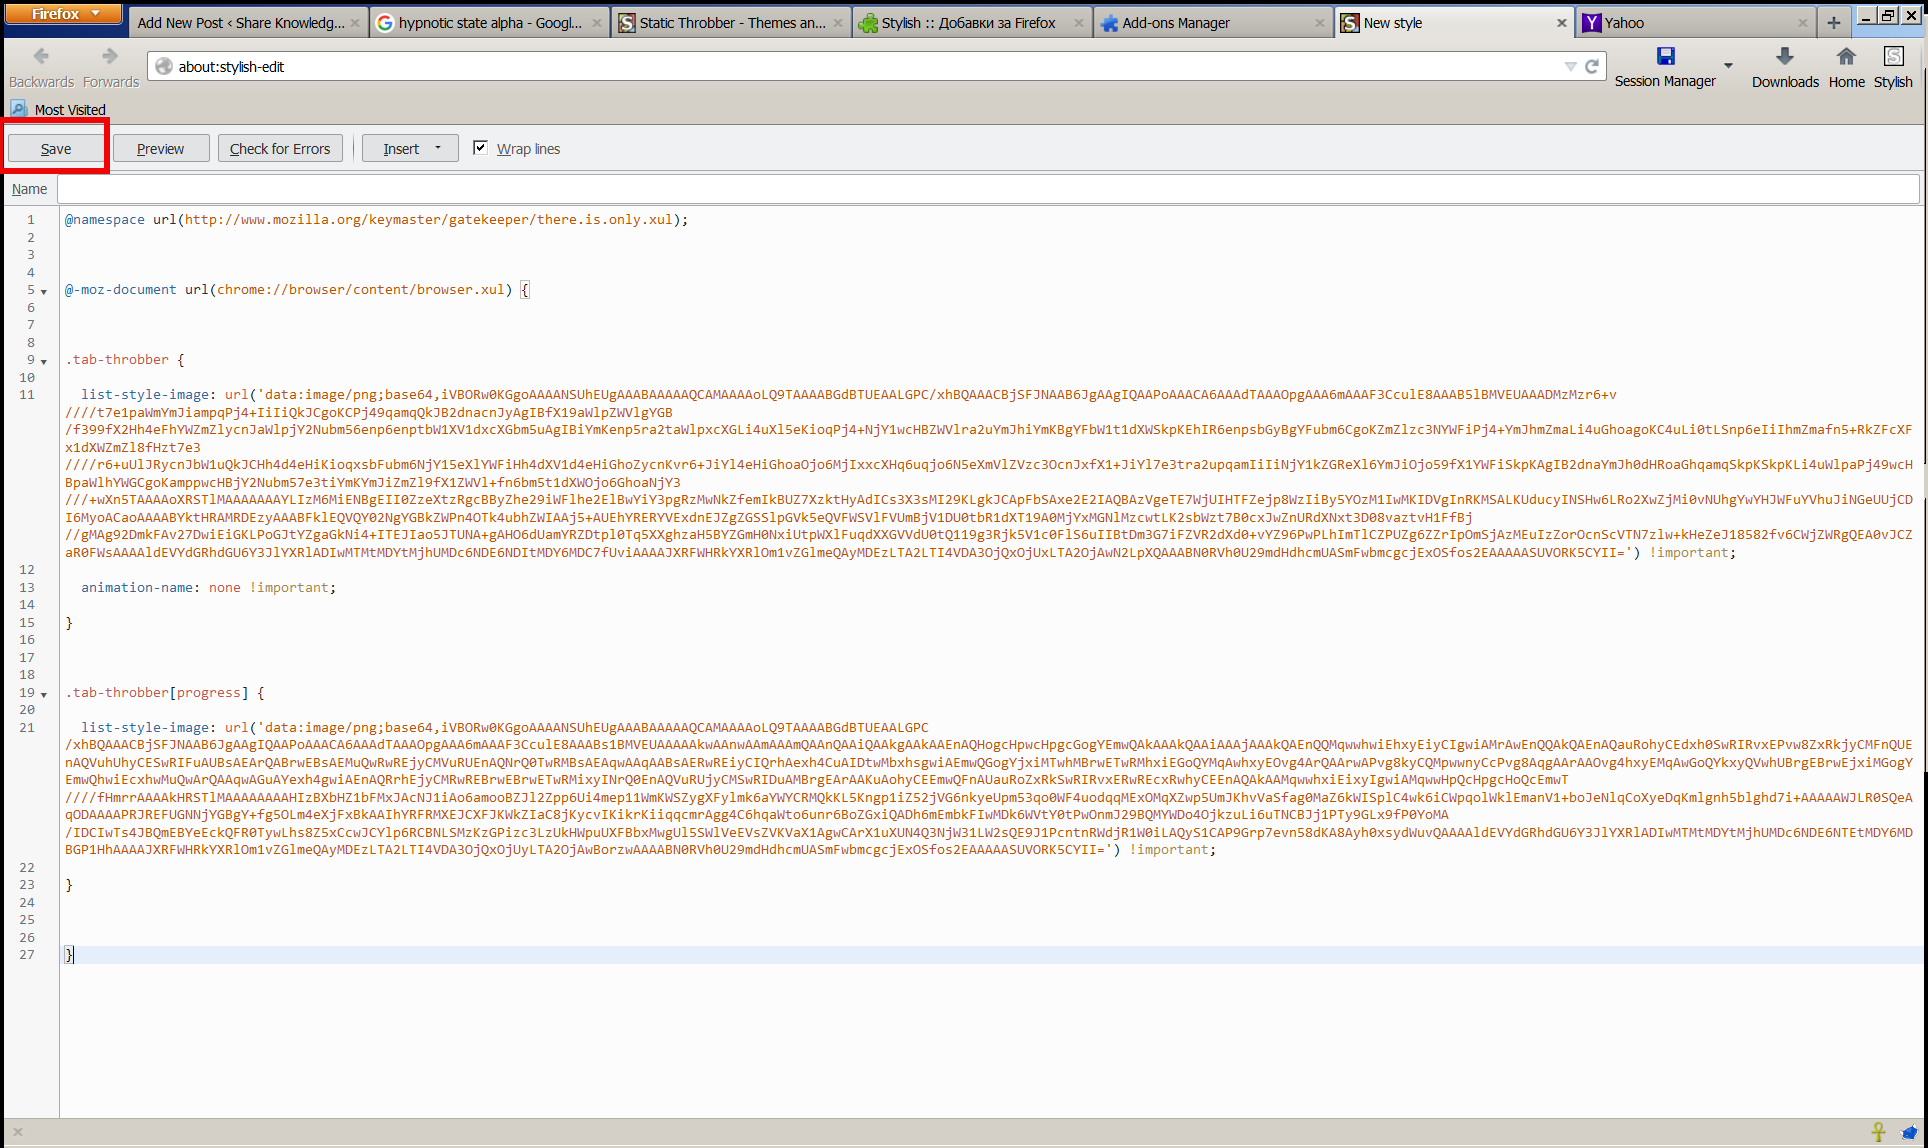
@namespace url(https://www.mozilla.org/keymaster/gatekeeper/there.is.only.xul); @-moz-document url(chrome://browser/content/browser.xul) { .tab-throbber { list-style-image: url('data:image/png;base64,iVBORw0KGgoAAAANSUhEUgAAABAAAAAQCAMAAAAoLQ9TAAAABGdBTUEAALGPC/xhBQAAACBjSFJNAAB6JgAAgIQAAPoAAACA6AAAdTAAAOpgAAA6mAAAF3CculE8AAAB5lBMVEUAAADMzMzr6+v////t7e1paWmYmJiampqPj4+IiIiQkJCgoKCPj49qamqQkJB2dnacnJyAgIBfX19aWlpZWVlgYGB/f399fX2Hh4eFhYWZmZlycnJaWlpjY2Nubm56enp6enptbW1XV1dxcXGbm5uAgIBiYmKenp5ra2taWlpxcXGLi4uXl5eKioqPj4+NjY1wcHBZWVlra2uYmJhiYmKBgYFbW1t1dXWSkpKEhIR6enpsbGyBgYFubm6CgoKZmZlzc3NYWFiPj4+YmJhmZmaLi4uGhoagoKC4uLi0tLSnp6eIiIhmZmafn5+RkZFcXFx1dXWZmZl8fHzt7e3////r6+uUlJRycnJbW1uQkJCHh4d4eHiKioqxsbFubm6NjY15eXlYWFiHh4dXV1d4eHiGhoZycnKvr6+JiYl4eHiGhoaOjo6MjIxxcXHq6uqjo6N5eXmVlZVzc3OcnJxfX1+JiYl7e3tra2upqamIiIiNjY1kZGReXl6YmJiOjo59fX1YWFiSkpKAgIB2dnaYmJh0dHRoaGhqamqSkpKSkpKLi4uWlpaPj49wcHBpaWlhYWGCgoKamppwcHBjY2Nubm57e3tiYmKYmJiZmZl9fX1ZWVl+fn6bm5t1dXWOjo6GhoaNjY3///+wXn5TAAAAoXRSTlMAAAAAAAYLIzM6MiENBgEII0ZzeXtzRgcBByZhe29iWFlhe2ElBwYiY3pgRzMwNkZfemIkBUZ7XzktHyAdICs3X3sMI29KLgkJCApFbSAxe2E2IAQBAzVgeTE7WjUIHTFZejp8WzIiBy5YOzM1IwMKIDVgInRKMSALKUducyINSHw6LRo2XwZjMi0vNUhgYwYHJWFuYVhuJiNGeUUjCDI6MyoACaoAAAABYktHRAMRDEzyAAABFklEQVQY02NgYGBkZWPn4OTk4ubhZWIAAj5+AUEhYRERYVExdnEJZgZGSSlpGVk5eQVFWSVlFVUmBjV1DU0tbR1dXT19A0MjYxMGNlMzcwtLK2sbWzt7B0cxJwZnURdXNxt3D08vaztvH1FfBj//gMAg92DmkFAv27DwiEiGKLPoGJtYZgaGkNi4+ITEJIao5JTUNA+gAHO6dUamYRZDtpl0Tq5XXghzaH5BYZGmH0NxiUtpWXlFuqdXXGVVdU0tQ119g3Rjk5V1c0FlS6uIIBtDm3G7iFZVR2dXd0+vYZ96PwPLhImTlCZPUZg6ZZrIpOmSjAzMEuIzZorOcnScVTN7zlw+kHeZeJ18582fv6CWjZWRgQEA0vJCZaR0FWsAAAAldEVYdGRhdGU6Y3JlYXRlADIwMTMtMDYtMjhUMDc6NDE6NDItMDY6MDC7fUviAAAAJXRFWHRkYXRlOm1vZGlmeQAyMDEzLTA2LTI4VDA3OjQxOjUxLTA2OjAwN2LpXQAAABN0RVh0U29mdHdhcmUASmFwbmcgcjExOSfos2EAAAAASUVORK5CYII=') !important; animation-name: none !important; } .tab-throbber[progress] { list-style-image: url('data:image/png;base64,iVBORw0KGgoAAAANSUhEUgAAABAAAAAQCAMAAAAoLQ9TAAAABGdBTUEAALGPC/xhBQAAACBjSFJNAAB6JgAAgIQAAPoAAACA6AAAdTAAAOpgAAA6mAAAF3CculE8AAABs1BMVEUAAAAAkwAAnwAAmAAAmQAAnQAAiQAAkgAAkAAEnAQHogcHpwcHpgcGogYEmwQAkAAAkQAAiAAAjAAAkQAEnQQMqwwhwiEhxyEiyCIgwiAMrAwEnQQAkQAEnAQauRohyCEdxh0SwRIRvxEPvw8ZxRkjyCMFnQUEnAQVuhUhyCESwRIFuAUBsAEArQABrwEBsAEMuQwRwREjyCMVuRUEnAQNrQ0TwRMBsAEAqwAAqAABsAERwREiyCIQrhAexh4CuAIDtwMbxhsgwiAEmwQGogYjxiMTwhMBrwETwRMhxiEGoQYMqAwhxyEOvg4ArQAArwAPvg8kyCQMpwwnyCcPvg8AqgAArAAOvg4hxyEMqAwGoQYkxyQVwhUBrgEBrwEjxiMGogYEmwQhwiEcxhwMuQwArQAAqwAGuAYexh4gwiAEnAQRrhEjyCMRwREBrwEBrwETwRMixyINrQ0EnAQVuRUjyCMSwRIDuAMBrgEArAAKuAohyCEEmwQFnAUauRoZxRkSwRIRvxERwREcxRwhyCEEnAQAkAAMqwwhxiEixyIgwiAMqwwHpQcHpgcHoQcEmwT////fHmrrAAAAkHRSTlMAAAAAAAAHIzBXbHZ1bFMxJAcNJ1iAo6amooBZJl2Zpp6Ui4mep11WmKWSZygXFylmk6aYWYCRMQkKL5Kngp1iZ52jVG6nkyeUpm53qo0WF4uodqqMExOMqXZwp5UmJKhvVaSfag0MaZ6kWISplC4wk6iCWpqolWklEmanV1+boJeNlqCoXyeDqKmlgnh5blghd7i+AAAAAWJLR0SQeAqODAAAAPRJREFUGNNjYGBgY+fg5OLm4eXjFxBkAAIhYRFRMXEJCXFJKWkZIaC8jKycvIKikrKiiqqcmrAgg4C6hqaWto6unr6BoZGxiQADh6mEmbkFIwMDk6WVtY0tPwOnmJ29BQMYWDo4OjkzuLi6uTNCBJj1PTy9GLx9fP0YoMA/IDCIwTs4JBQmEBYeEckQFR0TywLhs8Z5xCcwJCYlp6RCBNLSMzKzGPizc3LzUkHWpuUXFBbxMwgUl5SWlVeEVsZVKVaX1AgwCArX1uXUN4Q3NjW31LW2sQE9J1PcntnRWdjR1W0iLAQyS1CAP9Grp7evn58dKA8Ayh0xsydWuvQAAAAldEVYdGRhdGU6Y3JlYXRlADIwMTMtMDYtMjhUMDc6NDE6NTEtMDY6MDBGP1HhAAAAJXRFWHRkYXRlOm1vZGlmeQAyMDEzLTA2LTI4VDA3OjQxOjUyLTA2OjAwBorzwAAAABN0RVh0U29mdHdhcmUASmFwbmcgcjExOSfos2EAAAAASUVORK5CYII=') !important; } }

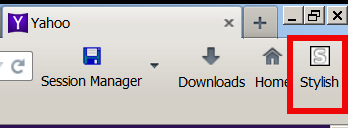
To use the script you will first need to install the Stylish FF plugin, then:

Stylish-FireFox-plugin-screenshot-Windows-7-OS
 

1. Enable Stylish plugin and Restart firefox when prompted
2. Click on Write New Style
3. Paste above CSS script and click on Save button


stylish-static-throbbler-css-script-change-back-forward-rotating-tab-wheel-on-Firefox-howto

Now instead of the moving wheel you will get just a circle appearing as a static image while the page is loading.

If you want to absolutely remove any circles or images and show nothing when loading, e.g. not have any mean to monitor whether page is loaded or not, but also make it easier for the eye I even finally decided to completely remove the all time moving Wheel from Firefox Tabs even the static picture out using below CSS script with Stylish:
 

@namespace url(https://www.mozilla.org/keymaster/gatekeeper/there.is.only.xul); @-moz-document url(chrome://browser/content/browser.xul) { .tab-throbber { list-style-image: none !important; animation-name: none !important; } .tab-throbber[progress] { list-style-image: none !important; } }

After all even after removing the FF Tabs wheel, there is the Status being printed down the webpage, showing text based the connection status. I find this kind of page loading status much less agressive and preferrable, than the current verions Firefox 4 onwards ..

One other thing I do to prevent the annoying Windows OS default Theme wheel is to change it to the old fashioned sand clock as well as bring back the theme of Windows 7 / 8 to Classic Theme of Win 2000, as I believe this reduced the level of zoombification the PC imposes on self 🙂
Enjoy!