Posts Tagged ‘terminal’

Disable VNC on KVM Virtual Machine without VM restart / How to Change VNC listen address

Monday, February 28th, 2022

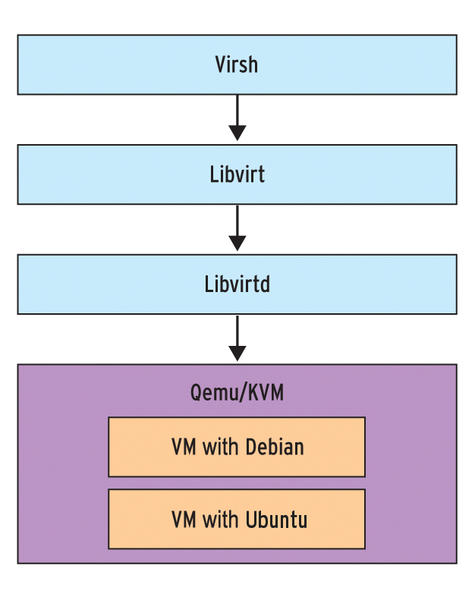
disable-vnc-port-listener-on-a-KVM-ran-virtual-machine-virsh-libvirt-libvirt-architecture-design

Say you have recently run a new KVM Virtual machine, have connected via VNC on lets say the default tcp port 5900 
installed a brand new Linux OS using a VNC client to connect, such as:
TightVNC / RealVNC if connecting from Windows Client machine or Vncviewer / Remmina if connecting from Linux / BSD  and now 
you want to turn off the VNC VM listener server either for security reasons to make sure some script kiddie random scanner did not manage to connect and take control over your VM or just because, you will be only further using the new configured VM only via SSH console sessions as they call it in modern times to make a buziness buzz out of it a headless UNIX server (server machines connected a network without a Physical monitor attached to it).


The question comes then how can be the KVM VNC listener on TCP port 5900 be completely disabled?

One way of course is to filter out with a firewall 5900 completely either on a Switch Level (lets say on a Cisco equipment catalist in front of the machine) or the worst solution to  locally filter directly on the server with firewalld or iptables chain rules.
 

1. Disable KVM VNC Port listener via VIRSH VM XML edit

The better way of course  is to completely disable the VNC using KVM, that is possible through the virsh command interface.
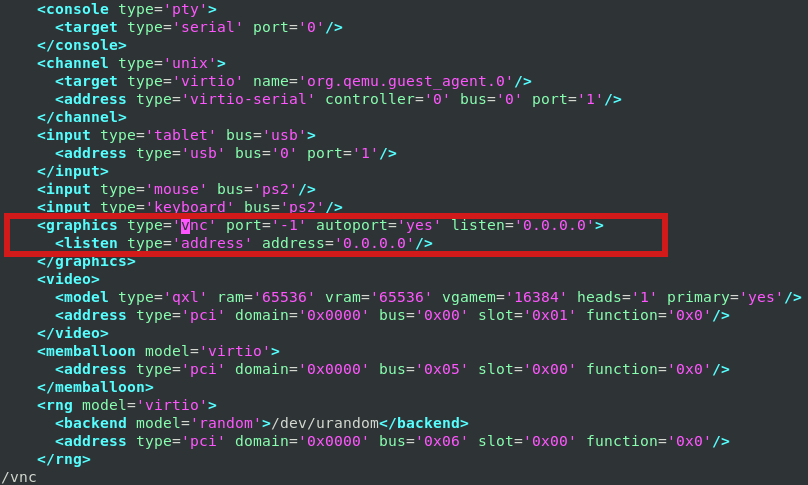
By editing the XML Virtual Machine configuration and finding the line about vnc confiuguration with:

root@server:/kvm/disk# virsh edit pcfreakweb
Domain pcfreakweb XML configuration not changed.

like:

<graphics type='vnc' port='5900' autoport='yes' listen='0.0.0.0'>
      <listen type='address' address='0.0.0.0'/>


and set value to undefined:

port='-1'


virsh-KVM-disable-VNC-port-listener-virsh-xml-edit-screenshot

Modifying the XML however will require you to reboot the Virtual Machine for which XML was editted. This might be not possible
if you have a running production server already configured with Apache / Proxy / PostgreSQL / Mail or any other Internet public service.

2. Disable VNC KVM TCP port 5900 to a dynamic running VM without a machine reboot


Thus if you want to remove the KVM VNC Port Listener on 5900 without a VM shutdown / reboot you can do it via KVM's virsh client interface.

root@server:/kvm/disk# virsh
Welcome to virsh, the virtualization interactive terminal.

Type:  'help' for help with commands
       'quit' to quit

virsh # qemu-monitor-command pcfreakweb –hmp change  vnc none


The virsh management user interface client, can do pretty much more of real time VM changes, it is really useful to use it if you have KVM Hypervisor hosts with 10+ Virtual machines and it if you have to deal with KVM machines on daily, do specific changes to the VMs on how VM networks are configured, information on HV hardware, configure / reconfigure storage volumes to VMs etc, take some time to play with it 🙂

Getting Console and Graphical hardware system information on Linux with cpuinfo, neofetch, CPU-X (CPU-Z Unix alternative), I-nex and inxi

Tuesday, September 17th, 2019

getting-console-information-and-graphical-hardware-system-information-Linux-cpuinfo-neofetch-cpu-x-i-nex-1

Earlier I've wrote extensive article on how to get hardware information on Linux using tools such as dmidecode, hardinfo, lshw, hwinfo, x86info and biosdecode but there are few other hardware reporting tools for Linux worthy to mention that has been there for historical reasons such as cpuinfo as we as some new shiny ones such as neofetch (a terminal / console hardware report tool as well the CPU-X and I-Nex  which is Linux equivalent to the all known almost standard for Windows hardware detection CPU-Z worthy to say few words about.
 

1. cpuinfo


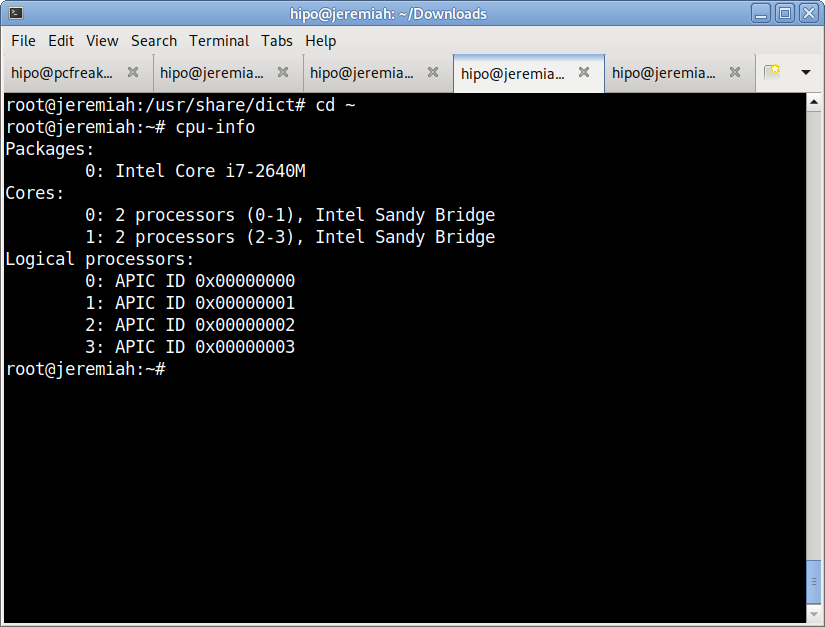
Perhaps the most basic tool to give you a brief information about your Processor type (model) number of Cores and Logical Processors is cpuinfo

I remember cpuinfo has been there since the very beginning on almost all Linux distributions's repository, nowadays its popularity of the days when the kings on the Linux OS server scenes were Slackware, Caldera OpenLinux and Redhat 6.0 Linux and Debian 3.0  declined but still for scripting purposes it is handy small proggie.

To install and run it in Debian  / Ubuntu / Mint Linux etc.:


aptitude install -y cpuinfo

/usr/bin/cpu-info


Linux-get-processor-system-info-in-console-cpu-info


2. neofetch


The next one worthy to install and check is neofetch (a cross-platform and easy-to-use system information
 command line script that collects your Linux system information and display it on the terminal next to an image, it could be your distributions logo or any ascii art of your choice.)

The cool thing about neofetch is besides being able to identify the System server / desktop hardware parameters, it gives some basic info about number of packages installed on the system, memory free and in use, used kernel and exact type of System (be it Dell PowerEdge Model XX, IBM eSeries Model / HP Proliant Model etc.

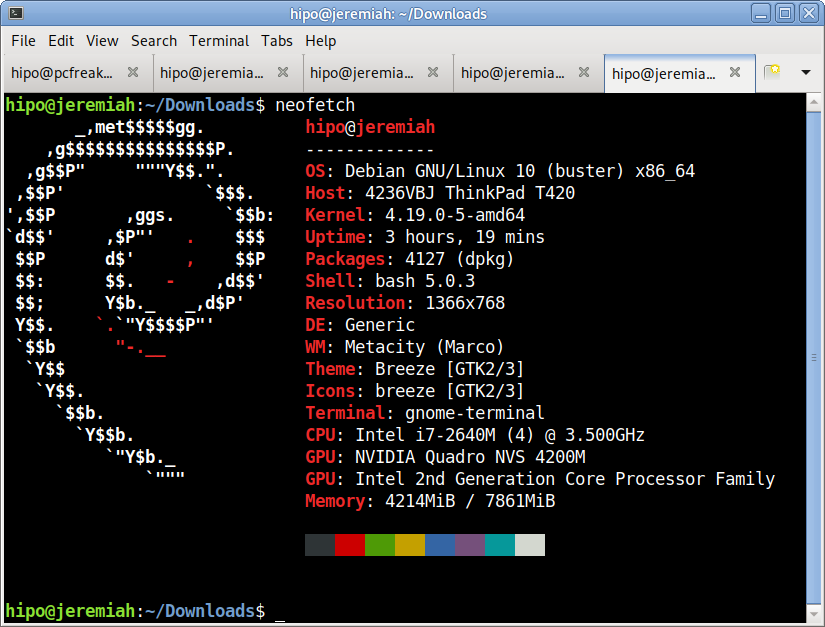
neofetch-OS-hardware-information-Linux-ascii-system-info-desktop-notebook

neofetch info generated on my home used Lenovo Thikpad T420

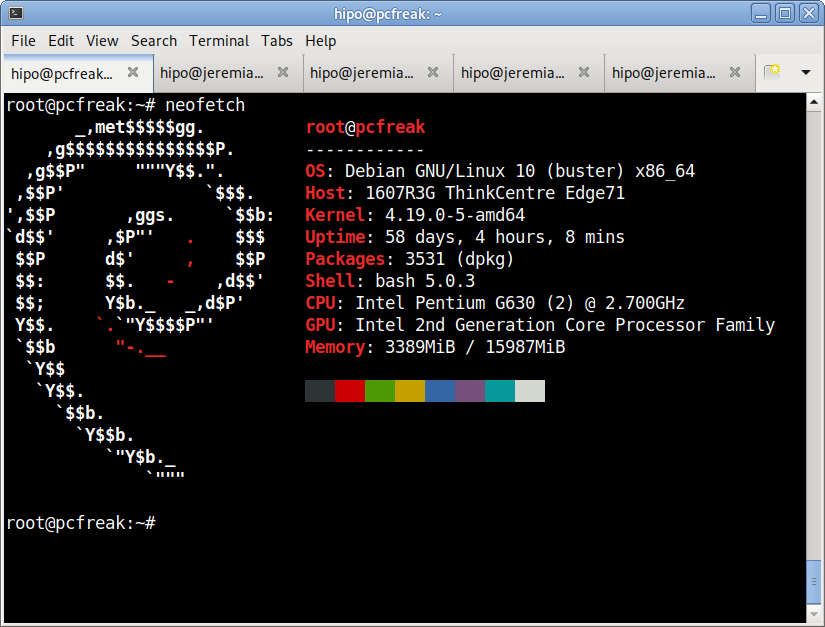
neofetch-OS-hardware-information-Linux-ascii-system-info-pcfreak-home-server
neofetch info from www.pc-freak.net running current machine

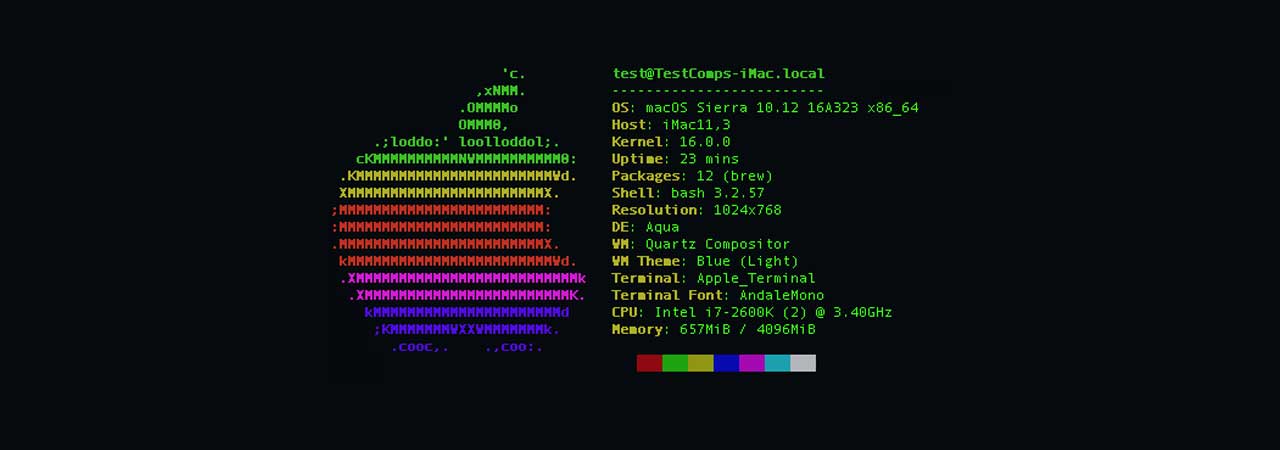
neofetch even supports Mac OS X and Windows OS ! 🙂

To install neofetch on Mac OS X:
 

/usr/bin/ruby -e "$(curl -fsSL https://raw.githubusercontent.com/Homebrew/install/master/install)"


or via Mac ported packages using brew

brew install neofetch


neofetch-screenshot-from-Mac-OS-X

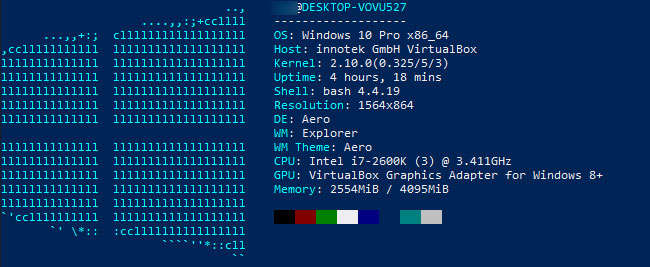
neofetch is even installable on Windows OS that has the scoop command line installer tool installer manager with below PowerShell code in cmd.exe (Command line):

powershell Set-ExecutionPolicy RemoteSigned -scope CurrentUser
iex (new-object net.webclient).downloadstring('https://get.scoop.sh')
scoop install git
scoop install neofetch

neofetch-microsoft-windows-hardware-command-line-report-tool-screenshot


By the way Scoop was quite a finding for me and it is pretty handy to install plenty of useful command line Linux / UNIX tools, such as curl, wget, git etc. in the same easy straight forward way as a standard yum or apt-get on Windows (without explicitly installing things as GnuWin and CygWin).
 

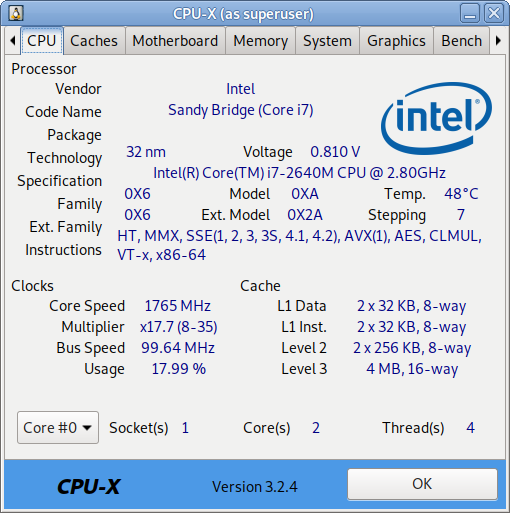
3. CPU-X graphical user interface hardware report Linux GUI alternative to Windows CPU-Z


The packages for CPU-X are a bit outdated and even though there are rpm packages for Fedora, OpenSuSE and .deb package for Debian for Debian, Ubuntu and ArchLinux (pacman), there is no up to date version for Debian 10 and the package builds distributed for different Linux distros are a bit outdated.

Thus to install CPU-X on any Linux distribution it is perhaps best to use the portable version (static binary) of CPU-X.
It is currently available on https://github.com/X0rg/CPU-X/releases

To install latest portable version of CPU-X

wget https://github.com/X0rg/CPU-X/releases/download/v3.2.4/CPU-X_v3.2.4_portable.tar.gz

mkdir CPU-X
cd CPU-X

tar -zxvvf CPU-X_v3.2.4_portable.tar.gz
-rwxr-xr-x yohan/users 4563032 2019-01-13 22:15 CPU-X_v3.2.4_portable.bsd64
-rwxr-xr-x yohan/users 5484968 2019-01-13 22:15 CPU-X_v3.2.4_portable.linux64


cp -rpf CPU-X_v3.2.4_portable.linux64 /usr/local/bin/
ln -sf /usr/local/bin/CPU-X_v3.2.4_portable.linux64 /usr/local/bin/cpu-x


Next run as superuser (root)
 

hipo@jeremiah:~$ su -c 'cpu-x'


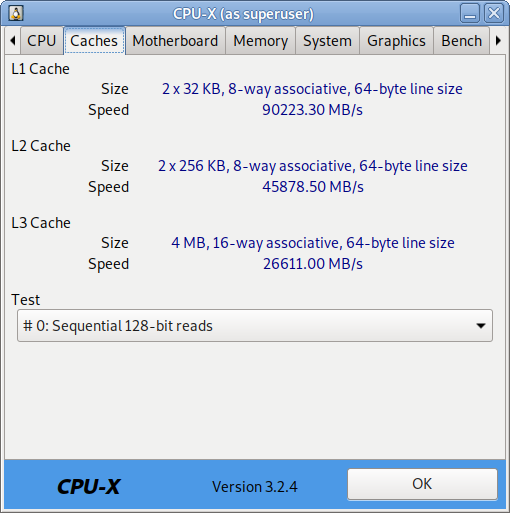
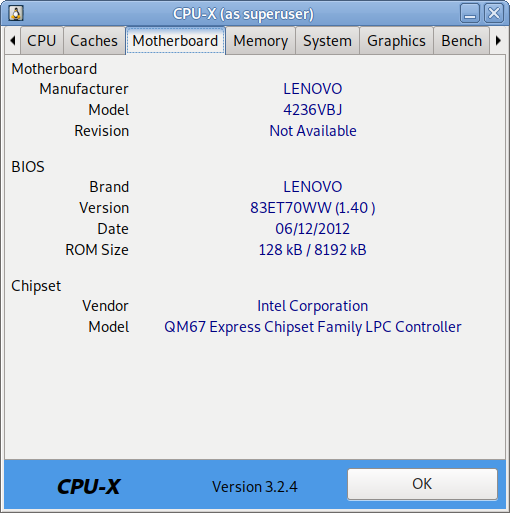
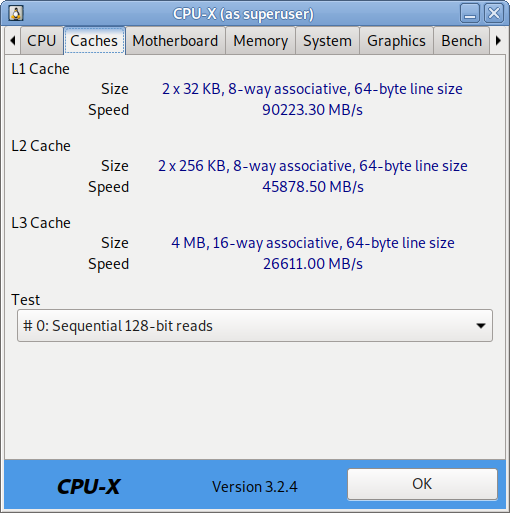
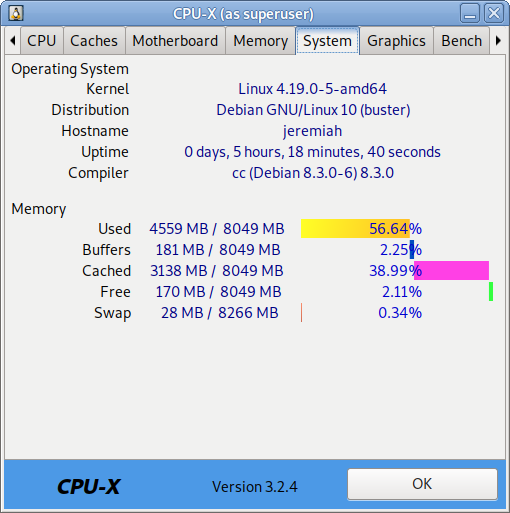
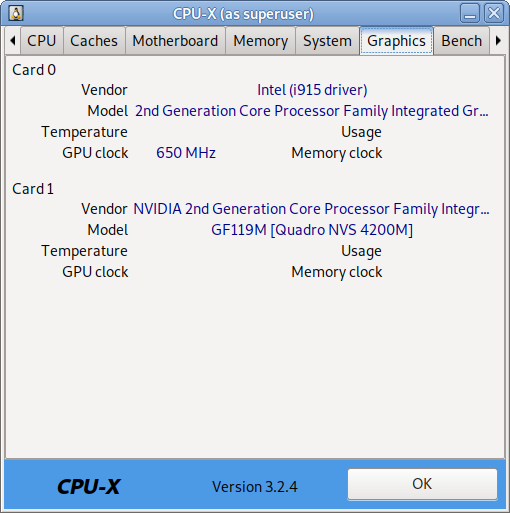
As seen from below screenshots cpu-x reports a lot of concrete specific hardware data on:

  • Processor
  • Motherboard
  • Memory
  • System
  • Graphic card
  • Performance

cpu-x-cpu-cpu-z-alternative-linux-screenshot-CPU-info

cpu-x-cpu-cpu-z-alternative-linux-screenshot-caches-info

cpu-x-cpu-cpu-z-alternative-linux-screenshot-Motherboard-info

cpu-x-cpu-cpu-z-alternative-linux-screenshot-memory-info

cpu-x-cpu-cpu-z-alternative-linux-screenshot-system-info

cpu-x-cpu-cpu-z-alternative-linux-screenshot-graphics-info

CPU-X can be installed also on FreeBSD very easily by just installing from BSD port tree sysutils/cpu-x/
It is also said to work on other *BSDs, NetBSD, OpenBSD Unixes but I guess this will require a manual compilation based on FreeBSD's port Makefile.

4. I-Nex another GUI alternative to CPU-Z for UNIX / Linux

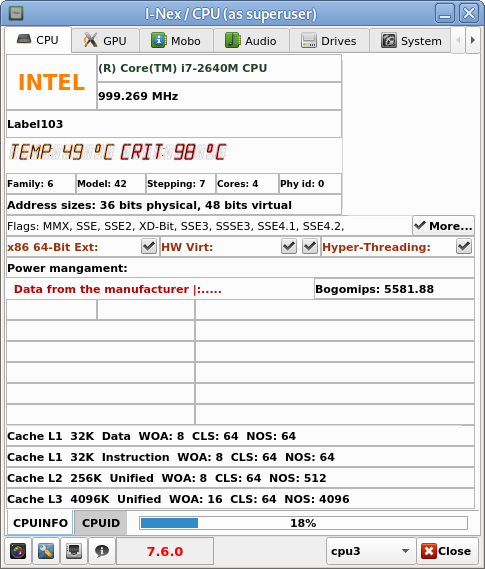
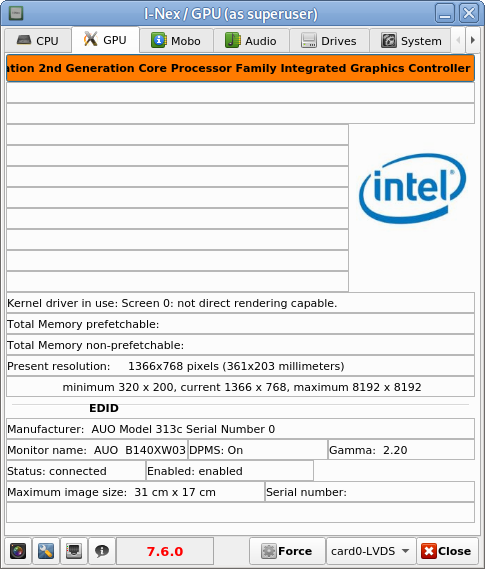
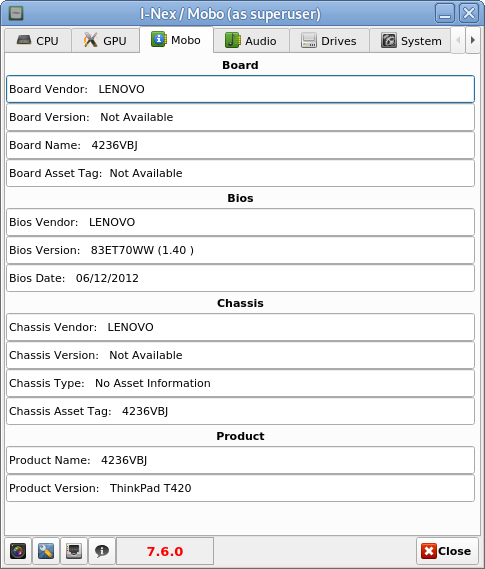
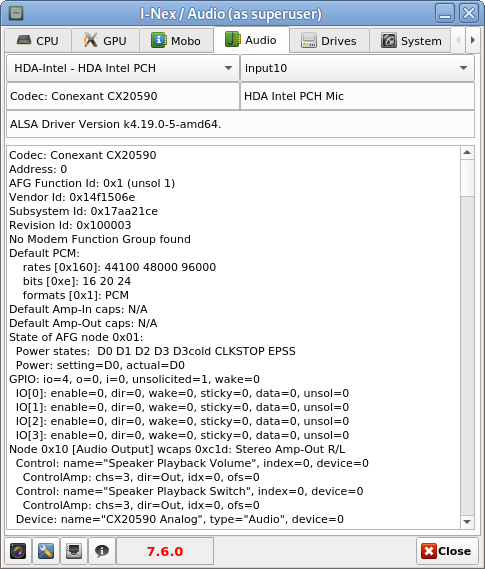
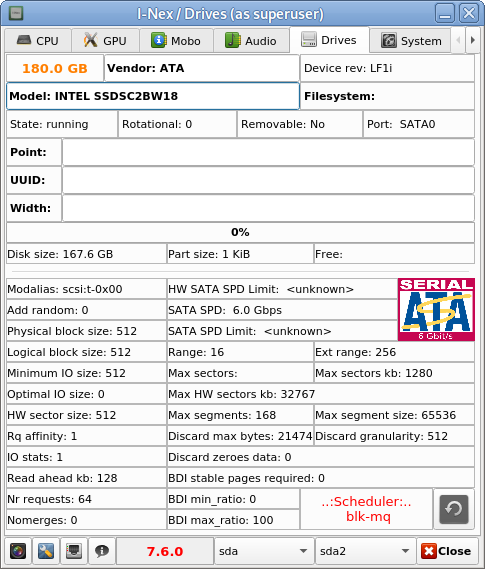
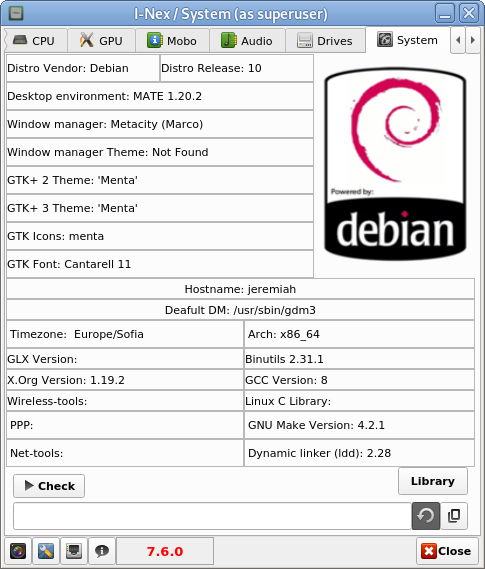
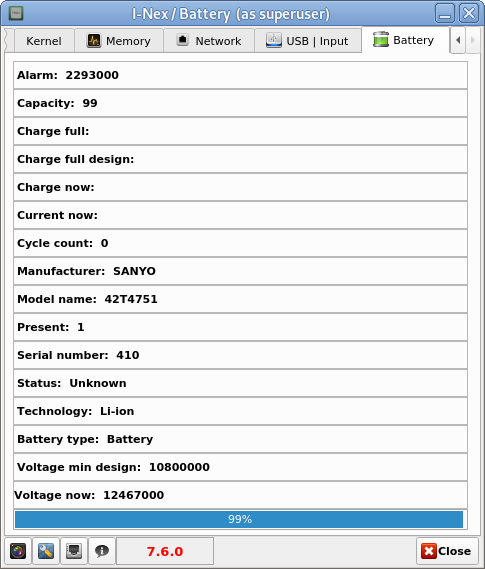
I-Nex is even more useful for general hardware reporting as it reports many hardware specifications not reported by CPU-X such as Battery type and Model Name  (if the hardware report is on a laptop), info on USB devices slots or plugged USB devices brand and specifications, the available Network devices on the system (MAC Addresses) of each of it, Installed and used drivers on Hard Disk (ATA / SATA / SCSI / SSD), HW Sector size, Logical Block size, HDD Sectors count and other specific Hard Drive data as well as information on available Audio (Sound Blaster) devices (HDA-Intel), used Codecs, loaded kernel ALSA driver, Video card used and most importantly indicators on Processor reported CPU (temperature).


To install I-nex

Go to https://launchpad.net/i-nex or any of the mirror links where it resides and install the respective package, in my case, I was doing the installation on Debian Linux, so fetched current latest amd64 package which as of moment of writting this article is i-nex_7.6.0-0-bzr977-20161012-ubuntu16.10.1_amd64.deb , next installed it with dpkg
 

dpkg -i i-nex_7.6.0-0-bzr977-20161012-ubuntu16.10.1_amd64.deb


As the package was depending on some other .deb packages, which failed to install to install the missing ones I had to further run
 

apt –fix-broken install

i-nex-cpu-info-linux-hardware-info-program


hre

I-Nex thermal indicators about CPU temperature on a Linux Desktop notebook

i-nex-gpu-info-linux-hardware-info-program

i-nex-mobo-info-linux-hardware-info-program

i-nex-audio-info-linux-hardware-info-program

i-nex-drivers-info-linux-hardware-info-program

i-nex-system-info-linux-hardware-info-program

i-nex-battery-info-linux-hardware-info-program


There are other Hardware identification report tools such as CUDA-Z that are useful to check if you have Nvidia Video Card hardware Installed on the PC to check the status of CUDA enabled GPUs, useful if working with nVidia Geforce, Quadro, Tesla cards and ION chipsets.

If you use it however be aware that CUDA-Z is not compatible with 3rd-party linux drivers for NVidia so make sure you have the current official Nvidia version.


5. Inxi full featured system information script


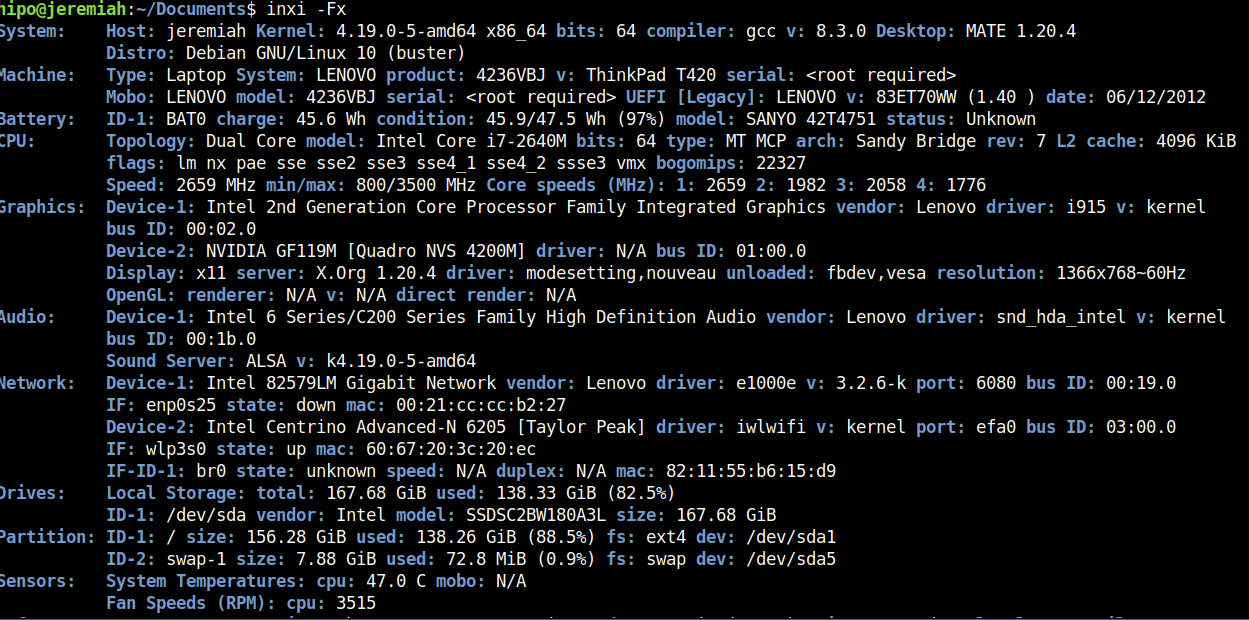
Inxi is a 10000 lines mega bash script that fetches hardware details from multiple different sources in /proc /sys and from commands on the system, and generates a beautiful looking console report that non technical users can read easily.

inxi-10-k-mega-bash-shell-script-reporting-on-installed-system-computer-hardware


inxi -Fx


inxi-report-on-installed-hardware-on-my-lenovo-thinkpad-home-laptop

Each of the pointed above tools has different method of collection of Hardware information from various resources e.g. – kernel loaded modules, dmesg, files like /proc/meminfo /proc/version /proc/scsi/scsi /proc/partitions.
Hence some of the tools are likely to report more info than otheres, so in case if some information you need regarding the system plugged in hardware is missing you can perhaps obtain it from another program. Most Linux distribution desktop provided GNOME package are including Hardinfo gui tool, but in many cases above mentioned tools are likely to add even more on info on what is inside your PC Box.
If you're aware of others tools that are useful not mentioned here please share it.

Check weather forecast from console (terminal) on GNU / Linux and FreeBSD howto

Friday, August 23rd, 2019

how to get weather forecast prognosis from command line text terminal / console on Linux and FreeBSD

Doing everything in Linux console / terminal is a question perhaps every Linux / BSD hacker wants to do as Graphical user interface and using web search or using Graphical Environment plugins is an unneded complexity + googling or duckduckgoing for weather to check your next vacation destination city has been more and more of a terrible experience (for me) as I'm not a big fan of using the OS in a GUI.
In that manner of thoughts, as a Linux console geek and hard core ASCII art fan. I was recently happy to find that  possible to check weather forecast in tty console or Linux terminal in a beautiful ascii art way easily through a Web wttr.in service – a web application weather forecast service that supports displaying the current and few days in future, weather forecast either in browser as a plain text or from the command line by simply accessing it with your favourite web access / transfer tool such as;
wget / curl or any of your favourite text browser elinks / lynx / w3m or if on *BSDs use fetch command.


Install Curl data transfer tool if it is not already


Wget is installed by default across most Linux distributions and fetch is present by default on BSDs, displaying it in text browser would perhaps be never used but if you decide to give it a try maybe try with elinks (to get colorful output), w3m and lynx will display a black and white results.

In case if you miss curl, install it:

On Debian distro


aptitude install -y curl


or Fedora

yum install -y curl


Of course to use wttr.in as it is Internet based Weather Forecast service the minimum you need to have is to have Internet connection to your Linux / BSD desktop computer.

Text based Weather Forecast Web App currently supports:

display the current weather as well as a 3-day weather forecast, split into morning, noon, evening and night

  • Temperature is displayed for morning, noon, evening and night (includes temperature range, wind speed and direction, viewing distance, precipitation amount and probability)
  • Provide results for Weather based on City / town / village location
  • Supports display of Moon Phases Forecast in calendar days
  • Supports multilingual names (Bulgarian Phonetic cyrillic / Russian and other exotic UTF-8 encodings such as Chineese and Japanese),  50+ languages are currently supported
  • Has ability for prognosis for hostname (domain) location based on an its IP GeoIP location on the Globe
  • Geographical locations / landmarks such as Lakes / Mountains etc. can be easily queried
  • Query results metrics could be configured, e.g. USCS units or EU and rest of world accepted ones (SI) metric
  • Displayed result could be either in ANSI (if from terminal / console / HTML if queried from browser or in PNG – if needed)


Where wttr.in could be useful ?

The best applications use, I can think of are for server (shell) / perl scripting automation purposes, it could be useful especially in TOO HOT, TOO, COLD, TOO WET location in Small and Middle sized Data Centers Green Energy (Sun Panel) Parks / Wind Energy situated Linux monitoring hosts to track possible problems of overheats or overcolding of servers due to abnormal excessive temperatures such as the ones we experienced this summer here All across in Europe or in too Cold DC locations such as heat locations Deserts in African Countries, Saudi Arabia or Chukotka or Siberia in Russia.
Other application is as a backup option to other normal Weather report services by PHP or Python scripts that fetch data, from multiple places.
Of course since this is a third party controlled service, the downtime is due to excessive connection requests, the service could get flooded and stopped working, but I guess for any Commercial use, wttr.in creator Igor Chubin would be happy to sell a specific crafted service for any end user candidates.


Here is few examples of the beautiful returned ASCII art formatted output of wttr.in.
 

1. Getting a three days Weather Forecast prognosis for city / town location

To get what is current weather in my current city of Living, Sofia Bulgaria just pass the city to the URL address

curl http://wttr.in/Sofia
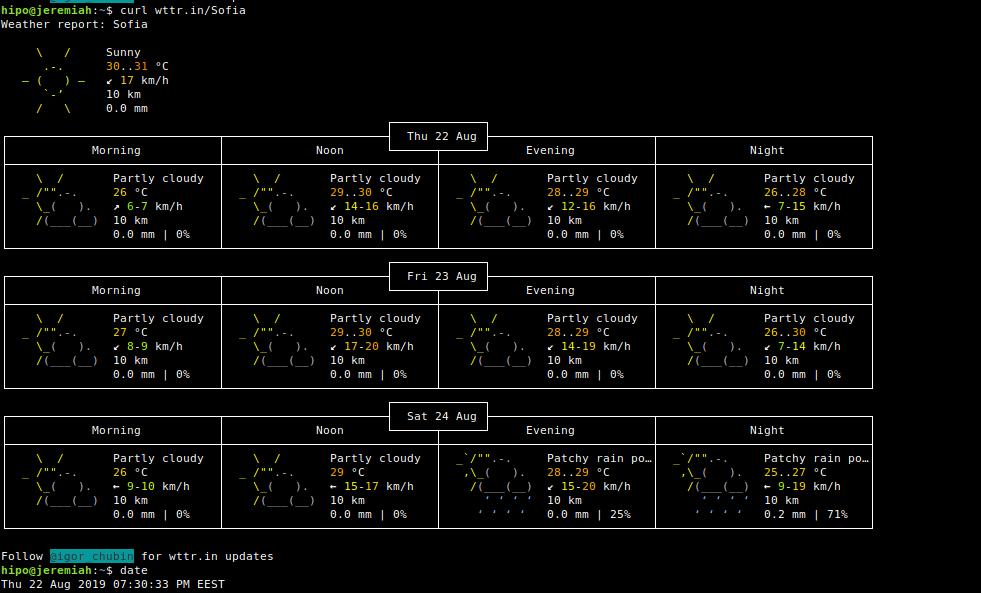
text-console-wttr.in-Weather-forecast-Sofia-for-Linux


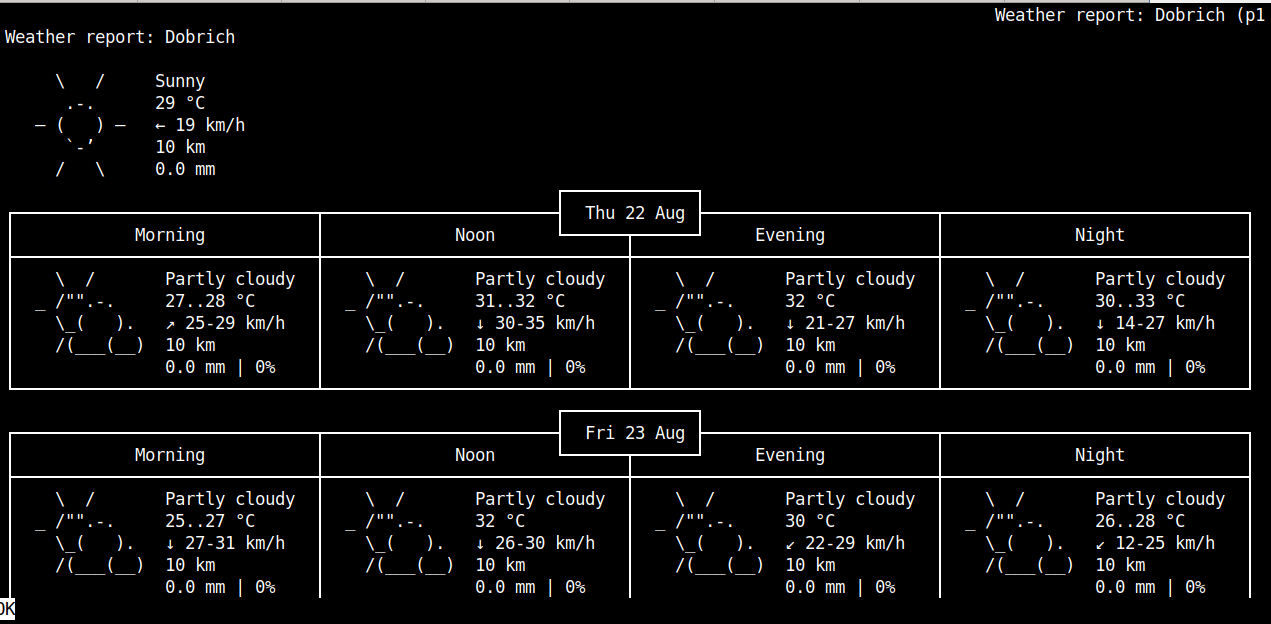
links http://wttr.in/Dobrich


curl-Linux-show--Dobrich-Weather-forecast-in-lynx-text-browser


Default links (Linux) www text browser produces ugly black and white

2. Displaying Weather forecast with wget


wget -O- -q http://wttr.in
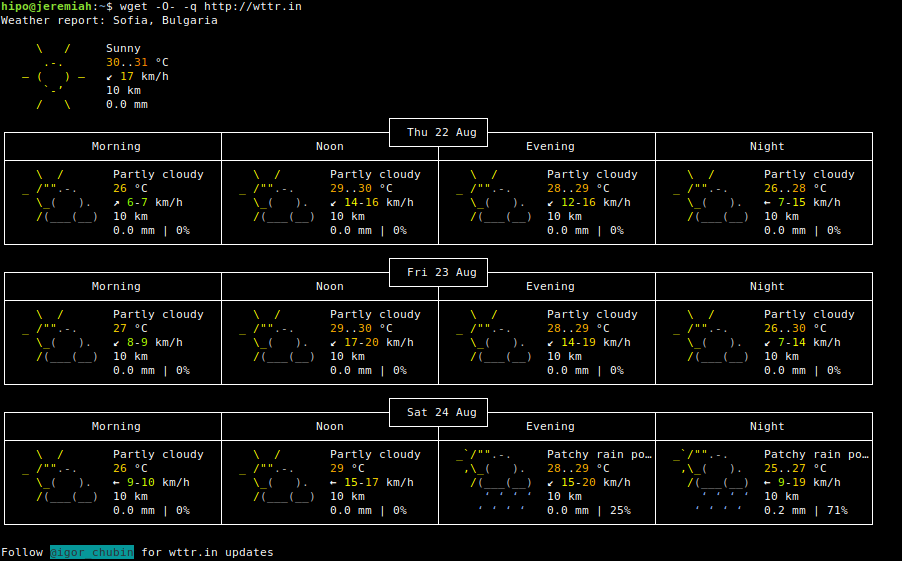

getting-weather-forecast-on-linux-terminal-console-with-wget-command

If you're lazy you can even omit the http:// as wget will look for HyperText Transmission Protocol by itself


wget -O- -q wttr.in


3. Getting Forecast results for a Tourist Destination


Lets get the weather forecast for the popular tourist Bulgarian destination of the Seven Rila Lakes (near Rila Monastery), situated in the Rila Mountain BG.


curl http://wttr.in/Seven+Rila+Lakes
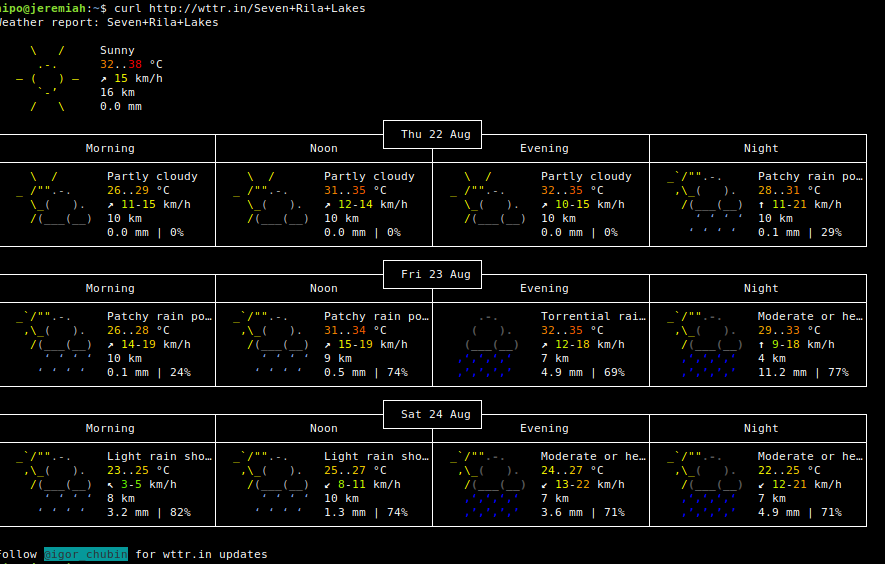
 

Console-terminal-Weather-forecast-Linux-Seven-Rila-Lakes


4. Display Forecast for a specific server IP


Displaying information on specific server IP address current situated in GeoIP database, of course could be not really true, as the IP could be just a Load Balancer a router that does NAT to some internal DMZ-ed location server, but anyways it is a cool feature.

Lets get information on what is the weather on Google Global's Public DNS server IP 8.8.8.8 so commonly used to guarantee a Windows and Linux Desktop client machines Internet connectivity.
 

curl wttr.in/@8.8.8.8
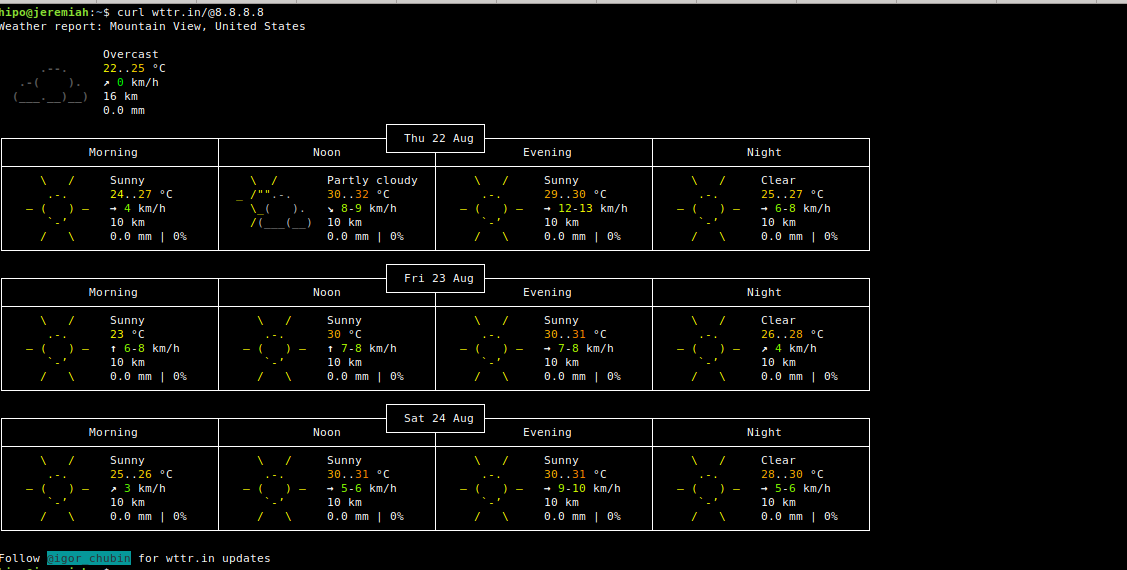
 

wttr.in-Linux-text--forecast-service-curl-screenshot Google Public DNS location weather forecast

5. Download PNG image picture from wttr.in service


Lets say you want to get a 3 days standard Weather forecast for the popular Black Sea Resort town in Bulgaria Pomorie (a beautiful sea city which has even a functioning 5 Monks Monastery Pomorie Monastery situated near sea coast)


curl http://wttr.in/Pomorie.png


–2019-08-22 20:15:51–  http://wttr.in/Pomorie.png
Resolving wttr.in (wttr.in)… 5.9.243.187
Connecting to wttr.in (wttr.in)|5.9.243.187|:80… connected.
HTTP request sent, awaiting response… 200 OK
Length: 42617 (42K) [image/png]
Saving to: ‘Pomorie.png’

Pomorie.png                                     100%[=======================================================================================================>]  41.62K  –.-KB/s    in 0.07s   

2019-08-22 20:15:52 (586 KB/s) – ‘Pomorie.png’ saved [42617/42617]


Note: The generated .png is again the ASCII art produced by a direct text fetch bug in pic format


6. Displaying Current Moon Phase


If you want to enjoy a text based Moon phase picture through wttr.in 🙂

wget -O- -q wttr.in/Moon
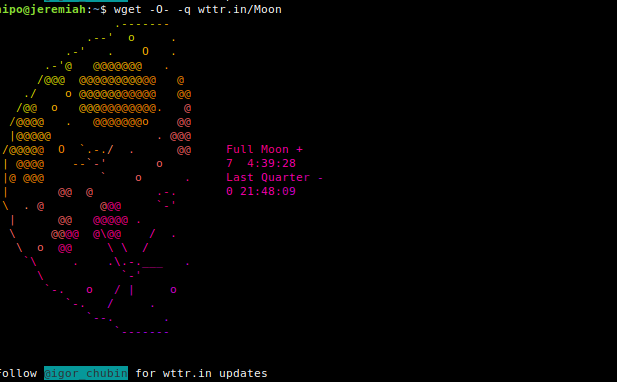

Display-current-Phase-of-Moon-in-terminal-console-Linux-wttr.in-service

You can also get a Moon Phase prognosis for a current future date or get a previous date phase


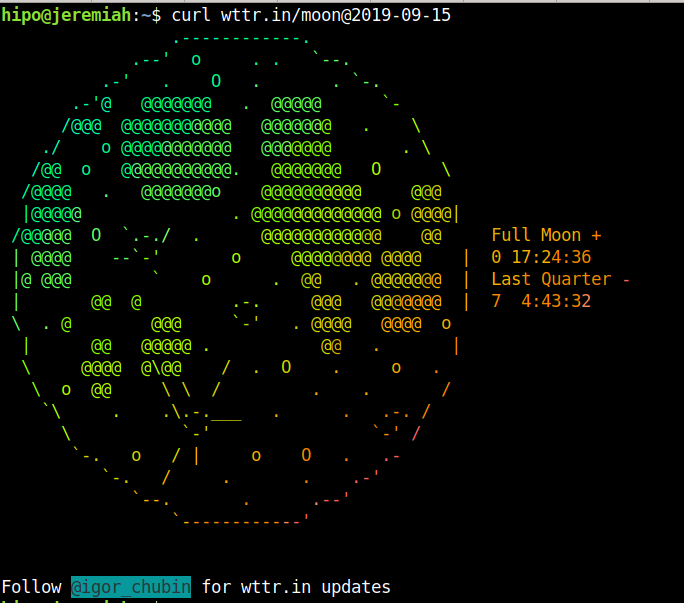
curl wttr.in/moon@2019-09-15

Full-Moon-Weather-forecast-text-console-reporting-via-wttr.in-on-Gnu_Linux


Full Moon Madness !! – Vampires are out beaware and Enjoy the ultra kewl ASCII Colorful Art 🙂
 

7. Getting help for wttr.in terminal Waether Forecast results


$ curl wttr.in/:help
Usage:


    $ curl wttr.in          # current location
    $ curl wttr.in/muc      # weather in the Munich airport

Supported location types:

    /paris                  # city name
    /~Eiffel+tower          # any location
    /Москва                 # Unicode name of any location in any language
    /muc                    # airport code (3 letters)
    /@stackoverflow.com     # domain name
    /94107                  # area codes
    /-78.46,106.79          # GPS coordinates

Special locations:

    /moon                   # Moon phase (add ,+US or ,+France for these cities)
    /moon@2016-10-25        # Moon phase for the date (@2016-10-25)

Units:

    m                       # metric (SI) (used by default everywhere except US)
    u                       # USCS (used by default in US)
    M                       # show wind speed in m/s

View options:

    0                       # only current weather
    1                       # current weather + 1 day
    2                       # current weather + 2 days
    A                       # ignore User-Agent and force ANSI output format (terminal)
    F                       # do not show the "Follow" line
    n                       # narrow version (only day and night)
    q                       # quiet version (no "Weather report" text)
    Q                       # superquiet version (no "Weather report", no city name)
    T                       # switch terminal sequences off (no colors)

PNG options:

    /paris.png              # generate a PNG file
    p                       # add frame around the output
    t                       # transparency 150
    transparency=…        # transparency from 0 to 255 (255 = not transparent)

Options can be combined:

    /Paris?0pq
    /Paris?0pq&lang=fr
    /Paris_0pq.png          # in PNG the file mode are specified after _
    /Rome_0pq_lang=it.png   # long options are separated with underscore

Localization:

    $ curl fr.wttr.in/Paris
    $ curl wttr.in/paris?lang=fr
    $ curl -H "Accept-Language: fr" wttr.in/paris

Supported languages:

    af da de el et fr fa hu id it nb nl pl pt-br ro ru tr uk vi (supported)
    az be bg bs ca cy cs eo es fi ga hi hr hy is ja jv ka kk ko ky lt lv mk ml nl fy nn pt pt-br sk sl sr sr-lat sv sw th te uz zh zu he (in progress)

Special URLs:

    /:help                  # show this page
    /:bash.function         # show recommended bash function wttr()
    /:translation           # show the information about the translators


8. Comparing two cities weather from command line


One useful use of wttr.in if you plan to travel from Location city A to Location city B is to compare the temperatures with a simple bash one liner script:


diff -Naur <(curl -s http://wttr.in/Sofia ) <(curl -s http://wttr.in/Beograd )


9. Using ansiweather command to get Weather Temperature / Wind / Humidity in one line beuatiful text


If you go and install answeather Linux package


apt-get install –yes ansiweather


You will get a shell script wrapper with ANSI colors and Unicode symbols support. Weather data comes from OpenWeatherMap, this is useful if wttr.in is not working due to some URL malfunction (due to service is DoS-ed) etc.


ansiweather -l Atina


ansiweather-Atina-weather-forecast-result-linux-text-console

Lets use ansiweather to print the weather prognosis for upcoming 5 days for near port of Burgas, BG
 

ansiweather -F -l Burgas

ansiweather-print-weather-forecast-prognosis-for-5-days-in-Linux-text-terminal


10. Get all Weather current forecast for each Capital in the world


You can download and use this simple plain text file list of All Country Capitals in the World (country-capitals-all-world.txt) with ansiweather and a bash loop to get displayed each and every current day Weather Forecast in the World, here is how:


while read line; do ansiweather -l $line; sleep 3; done < country-capitals-all-world.txt
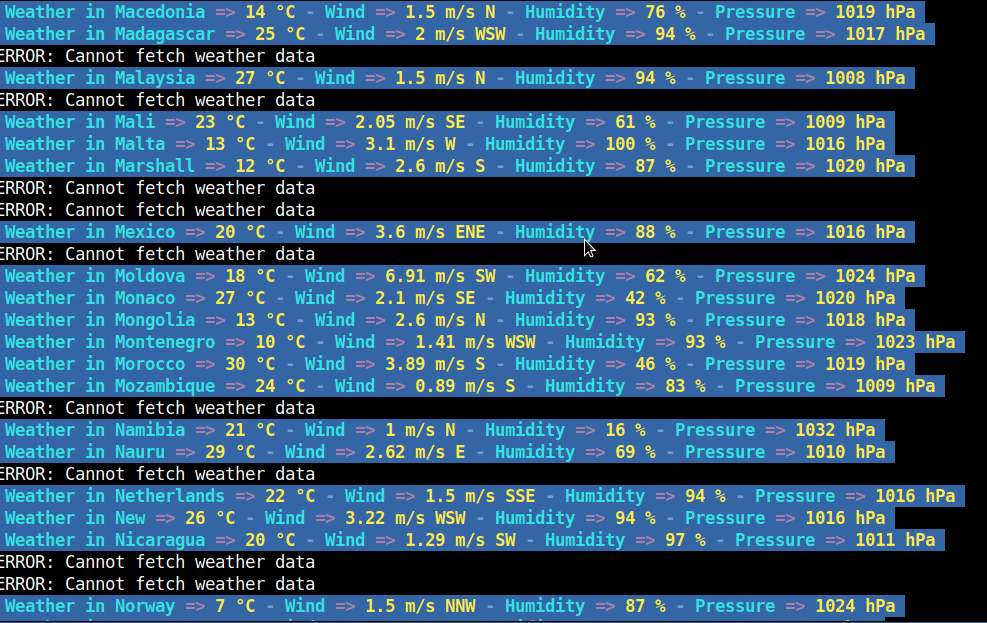

ansiweather-all-countires-capitals-result

As you can see some of the very exotic third world capitals does not return data so 'ERROR: Cannot fetch weather data' is returned.


You can also substitute ansiweather with curl wttr.in/$line to do get the beautiful ASCII art 3 days weather forecast via wttr.in


while read line; do curl http://wttr.in/$line; sleep 3; done < country-capitals-all-world.txt


I'll be happy to know other nice ASCII Art supporting Web service to enjoy from text terminal on Linux (nomatter useful or) just funny joyful prank maniacal pranks such as Watching text ASCII version remake of Star Wars Classic Movie by simply telnetting to towel.blinkenlights.nl (if you haven't so just telnet and enjoy the streamed ASCIIs ! 🙂


telnet towel.blinkenlights.nl
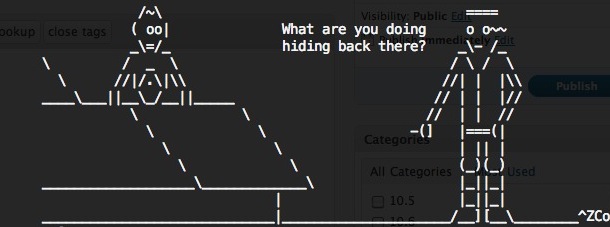
 

watch-star-wars-ascii-art-version-remake-online-with-telnet-on-linux-console-terminal


Talking about fun and ASCII, its worthy to mention hollywood Linux package

hipo@jeremiah:~/Desktop$ apt-cache show hollywood|grep -i desc -A 3
Description-en: fill your console with Hollywood melodrama technobabble
 This utility will split your console into a multiple panes of genuine
 technobabble, perfectly suitable for any Hollywood geek melodrama.
 It is particularly suitable on any number of computer consoles in the


Description-md5: 768f44c76220ea2b35f855ea34c8bc35
Homepage: http://launchpad.net/hollywood
Section: games
Priority: optional


Once installed on Debian with:

aptitude install -y hollywood

You can get in a rapid manner plenty of tmux (screen like – virtual console emulator) split screen statistics about your notebook / workstation / server CPU usage, mlocate.db status, info about plugged in machine voltage, Speedometer (statistics about Network bandwidth usage), System load avarage (CPU Count, Memory Utilization) and some other random info coming out of dmesg kernel log and more. The information displayed in splitted windows changes rapidly and (assuming you run it at home Desktop with a soundblaster) and not remotely, a james bond Agent 007 soundtrack is played on the back, that brings up one's adrenaline and makes it look even cooler.
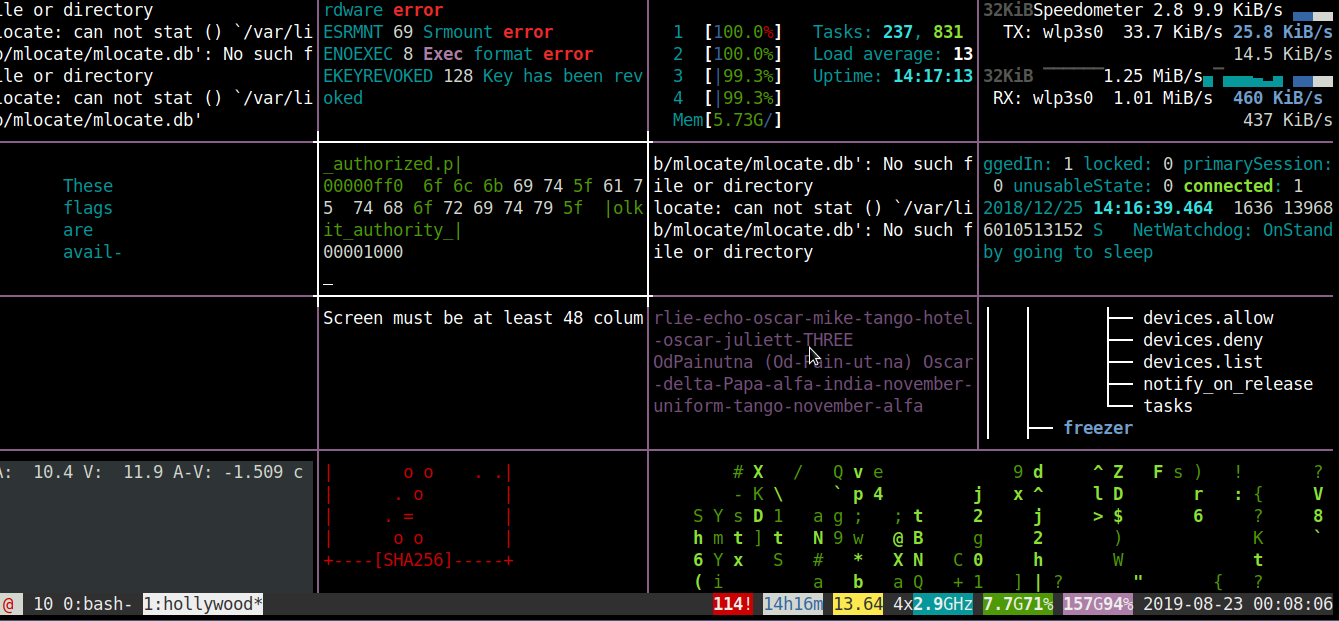
hollywood-melodrama-technobubble-split-console-multiple-panes-for-genuine-technobubble

To give you an idea what to expect, here is shot of /usr/games/hollywood (the program start binary location) on Debian GNU / Linux running, Enjoy! 🙂
 

How to configure Nautilus (Linux application like Windows Explorer) to work with standard Windows button + E On Linux GNOME en Mate

Monday, October 9th, 2017

how-to-configure-nautilus-linux-applicatoin-to-act-like-windows-explorer-make-windows-button-work-in-GNOME-and-Mate
As an ex-Windows user I'm still addicted to Windows User brainwashing as an ex-victim of Windows 95 / 98 and XP:), so I tend to love very much and its still hard for me to forget some major Key Binding (Windows Key Combinations).

On every new Desktop Linux I install, I have the habit to configure few great key combination shortcuts that makes my digital life much easier.
I use usually as a graphical environment GNOME and recently switched to MATE (GNOME 2 fork, cause GNOME 3 is totally messed up and unworthy to me), that's why this article is targetting this two Linux GUI envs, I'll be glad to hear in article comments for any other useful key bindings and how to configure similar key bindings for other Major Linux graphical environments (Cinnamon, KDE Plasma, XFCE, LXDE).


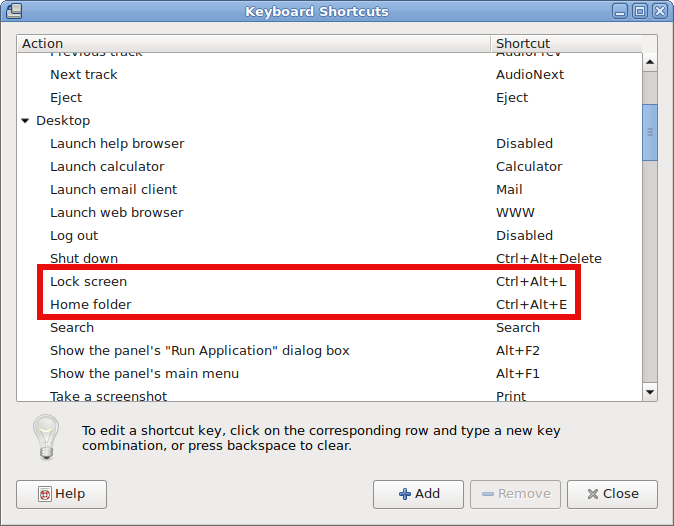
1. Configuring Lock Screen (Win button + L), Open Explorer(Win button + E), View Desktop (Win + D) in MATE graphic env


———  WINDOWS BUTTON, OFTEN USED KEY SHORTCUTS ———

Windows + E – Open new Windows File Explorer 

Windows + L – Lock Computer

Windows + M – To minimize All Windows

Windows + D – Show Desktop (similar to Windows +M though it doesn't switch to Desktop)

Win – + / – To Maginfy Text and Windows

Shift + Win + Left/Right Arrow – (In Windows if you have multiple monitors connected to the same computer lets say Right Monitor and Left, that combination switches between left monitor and right monitor)


——————————————————————–


The list goes on but I'm not used to all of them, I'll stop here and continue on with how to remake some of my favourite Windows keybindings in Gnu / Linux

Either run it from Menus:
 

System -> Settings -> Hardware -> Keyboard Shortcuts


Or run command


$ mate-keybinding-properties


howto-gnome-mate-remap-shortcut-keybinding-keys-mate-keybinding-properties


After rebinding the Windows: 
– Lock Screen and Open New Nautilus Explorer Window (Home folder) variable to be invoked with Windows button, the result
is as that:

howto-gnome-mate-remap-shortcut-keybinding-keys-mate-keybinding-properties


Scroll down Mate Keyboard shortcuts and you'll find

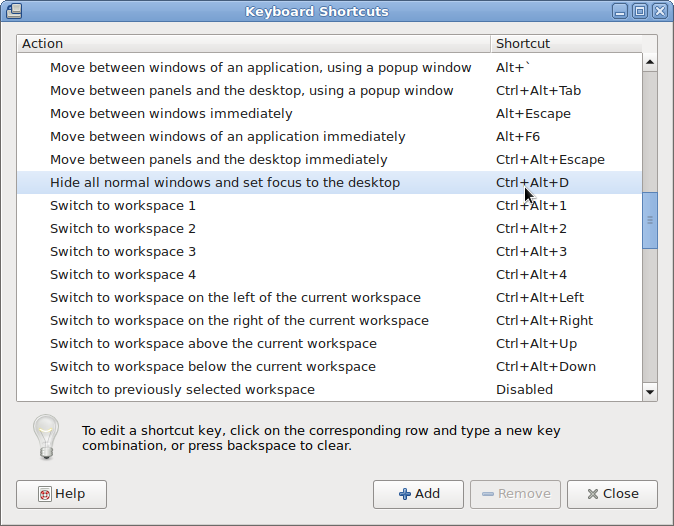
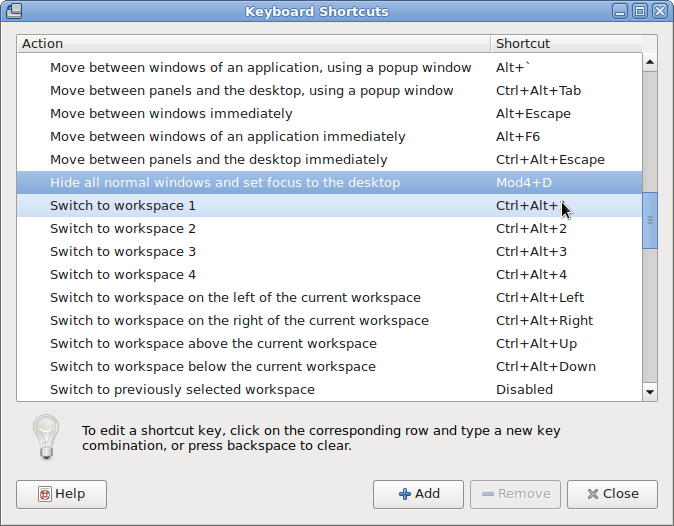
also how to configure Windows Button and D Key Combination, following 2 more screenshots showing how to do it note that MOD Key appears once you press Windows Keyboard Key + something (e.g. MATE recognizes MOD Key as Win Key):

Before the change to bind Win Key + D to work:

mate-how-to-make-desktop-view-open-with-standard-windows-button_and_d-combination-linux-debian

When configured Win Button + D looks like so:

mate-how-to-make-desktop-view-open-with-standard-windows-button_and_d-combination-linux-debian-1

2. Configuring Lock Screen (Win button + L), Open Explorer(Win button + E), View Desktop (Win + D) in GNOME

Usually in GNOME until > version 3.X.X (in older GNOME graphic environment access to KeyBinding Properties was done via:


System -> Preferences -> Keybord Shortcuts -> Add ->


In fallback gnome with Metacity (if installed along with GNOME Desktop 3.2.X environment to access Key Bindings):

d

System->Apps->Metacity->global_keybindings  


Also it is possible to remap keys via dconf-editor, I've written a small article earlier explaining how to remap Screenshotting buttons with dconf-editor but the example could be easily adapted, so you can edit almost everything.

Besides that you can use a command to run the keyboard configuration (in older GNOMEs) via:


linux:~$ gnome-keybinding-properties


Just for information for those who might know, many Key Binding interesting options are available via gnome-tweak-tool, so if you don't have it yet install it and give it a try:


linux:~# apt-get install –yes gnome-tweak-tool


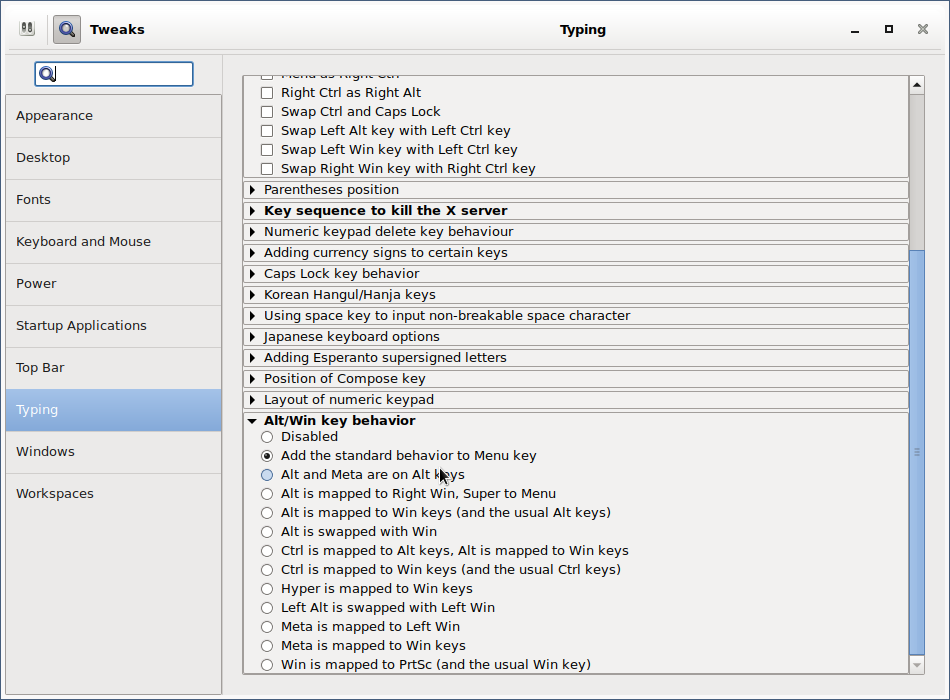
As you can see, there are plenty of options to make Win (key) to act like Alt (key):

linux:~# gnome-tweak-tool
 

gnome-tweak-tool-make-win-key-to-behave-like-alt-key-howto 


After configuring the changes enjoy your WINDOWS Button + L, WINDOWS + E and WINDOWS + D WORKING AGAIN HOORAY !!! 🙂 


3. Most used shortcuts in Gnome and Nautilus 
 

Below are most used shortcuts thanks to LinuxQuestions Forum for providing them

Howdy! I thought that it would be useful to post a practical selection of shortcut keys for GNOME (the Desktop Environment) and Nautilus (the File Manager) and some information about customizing shortcut keys in Ubuntu. I wrote it especially for Ubuntu beginners, but I hope it will prove useful for all. 


2.1 GNOME/Nautilus shortcut keys – Very useful for the keyboard maniax like me :):
 

Ctrl-H: show hidden files

Ctrl-N: new window

Ctrl-Shift-N: create new folder

Alt-Home : jump to home folder

Alt-Enter : file / folder properties

F9 : toggle side-pane

Alt-F1 : launch applications menu

Alt-F2 : launch "run application" dialogue

Ctrl-Alt – Right/Left arrow : move to the next virtual desktop

Ctrl-Alt-Shift – Right/Left arrow : take current window to the next virtual desktop

Ctrl-Alt-D: minimize all windows, and gives focus to the desktop. 

Alt-Tab: switch between windows. When you use these shortcut keys, a list of windows that you can select is displayed. Release the keys to select a window. 

Ctrl-Alt-Tab: switch the focus between the panels and the desktop. When you use these shortcut keys, a list of items that you can select is displayed. Release the keys to select an item. 

Ctrl-Alt-L: lock the screen (tested only in Ubuntu) 

Ctrl-L: shortcut for opening locations-by default the path is the home folder*
/ : same as Ctrl-L but has the root (/) as default path* (shortcut found on here)
* both shortcuts can be used while you are on the desktop (no window active)

Ctrl-T : move to trash (in Nautilus)
Quite dangerous key combination because many of us are used to press these keys in order to open a new tab. Because we all delete items using the Delete key, I recommend to deactivate this shortcut key. To do that, go to System » Preferences » Appearance » Interface. Select Editable menu shortcut keys and close the dialog box. Click on the Edit menu in the File Browser. Click the Empty Trash item (it has Ctrl-T as the keyboard shortcut) Press the Delete key to get rid of the shortcut.
You can find all GNOME shortcut keys here


2.2 How to create a custom hotkey to launch whatever application you want in GNOME
 

As an example, we will set a lock-screen shortcut.


Open "gconf-editor" as the user as you're logged in in GNOME (typing gconf-editor in the terminal or "Run Application").
 

Go to apps > metacity > keybinding_commands


Here we have a list of twelve slots for commands.


Double click on e.g. "run_command_1" 

In Key Value Type in the name of the application or command you want to launch (e.g. gnome-screensaver-command –lock).


Go to apps -> Metacity -> global_keybindings 

Double click on e.g. "run_command_1" 
Change the key value to whatever key combination you like (e.g. <Ctrl><Alt>L).Press "Ok".


2.3.How to create/change GNOME shortcuts


Click on System -> Preferences -> Keyboard Shortcuts


Click the action in the list and press Enter. 
Press the new key or key combination you want to assign to the action. (To clear a shortcut, press the Backspace key)


Hope it helps, Enjoy Life .;)

Find all running hosts, used IPs and ports on your local wireless / ethernet network or how to do a basic network security audit with nmap

Monday, September 4th, 2017

Find all running hosts / used IPs on your local wireless or ethernet network

nmap-scn-local-network-find-all-running-hosts-used-IPs-on-your-wireless-ethernet-network

If you're using a Free Software OS such as GNU / Linux or some other proprietary OS such as Mac OS X or Windows and you need a quick way to check all running IPs hosts / nodes locally on your current connected Ethernet or Wireless network, here is how to do it with nmap (Network exploration and security tool port scanner).

So why would you do scan that? 

Well just for fun, out of curiousity or just because you want to inspect your local network whether someone unexpected cracker did not break and is not using your Wi-Fi or Ethernet local network and badly snoring your network listening for passwords.

Before you start you should have installed NMAP network scanner on your GNU / Linux, to do so on 

Redhat Based Linux (Fedora / CentOS / Redhat Enterprise RHEL):


yum -y install nmap


On Deb based GNU / Linux-es such as Ubuntu / Mint / Debian etc.


apt-get install –yes nmap


To install nmap on FreeBSD / NetBSD / OpenBSD OS issue from console or terminal:


cd /usr/ports/security/nmap
make install clean 


or if you prefer to install it from latest binary instead of compiling


pkg_add -vr nmap


On a proprietary Mac OS X (I don't recommend you to use this obnoxious OS which is designed as a proprpietary software to steal your freedom and control you, but anyways for Mac OS victims), you can do it to with Macs equivalent tool of apt-get / yum called homebrew:

Open Mac OS X terminal and to install homebrew run:


ruby -e "$(curl -fsSL https://raw.githubusercontent.com/Homebrew/install/master/install)"
brew install nmap
brew search nmap
brew info nmap


If you want to do it system wide become root (super user) from Mac terminal with


su root


and run above commands as administrator user.

Windows users might take a look at Nmap for Windows or use the M$ Windows native portqry command line port scanner

Test whether nmap is properly installed and ready to use with command:


nmap –help
Nmap 6.00 ( http://nmap.org )
Usage: nmap [Scan Type(s)] [Options] {target specification}
TARGET SPECIFICATION:
  Can pass hostnames, IP addresses, networks, etc.
  Ex: scanme.nmap.org, microsoft.com/24, 192.168.0.1; 10.0.0-255.1-254
  -iL <inputfilename>: Input from list of hosts/networks
  -iR <num hosts>: Choose random targets
  –exclude <host1[,host2][,host3],…>: Exclude hosts/networks
  –excludefile <exclude_file>: Exclude list from file
HOST DISCOVERY:
  -sL: List Scan – simply list targets to scan
  -sn: Ping Scan – disable port scan
  -Pn: Treat all hosts as online — skip host discovery
  -PS/PA/PU/PY[portlist]: TCP SYN/ACK, UDP or SCTP discovery to given ports
  -PE/PP/PM: ICMP echo, timestamp, and netmask request discovery probes
  -PO[protocol list]: IP Protocol Ping
  -n/-R: Never do DNS resolution/Always resolve [default: sometimes]
  –dns-servers <serv1[,serv2],…>: Specify custom DNS servers
  –system-dns: Use OS's DNS resolver
  –traceroute: Trace hop path to each host
SCAN TECHNIQUES:
  -sS/sT/sA/sW/sM: TCP SYN/Connect()/ACK/Window/Maimon scans
  -sU: UDP Scan
  -sN/sF/sX: TCP Null, FIN, and Xmas scans
  –scanflags <flags>: Customize TCP scan flags
  -sI <zombie host[:probeport]>: Idle scan
  -sY/sZ: SCTP INIT/COOKIE-ECHO scans
  -sO: IP protocol scan
  -b <FTP relay host>: FTP bounce scan
PORT SPECIFICATION AND SCAN ORDER:
  -p <port ranges>: Only scan specified ports
    Ex: -p22; -p1-65535; -p U:53,111,137,T:21-25,80,139,8080,S:9
  -F: Fast mode – Scan fewer ports than the default scan
  -r: Scan ports consecutively – don't randomize
  –top-ports <number>: Scan <number> most common ports
  –port-ratio <ratio>: Scan ports more common than <ratio>
SERVICE/VERSION DETECTION:
  -sV: Probe open ports to determine service/version info
  –version-intensity <level>: Set from 0 (light) to 9 (try all probes)
  –version-light: Limit to most likely probes (intensity 2)
  –version-all: Try every single probe (intensity 9)
  –version-trace: Show detailed version scan activity (for debugging)
SCRIPT SCAN:
  -sC: equivalent to –script=default
  –script=<Lua scripts>: <Lua scripts> is a comma separated list of 
           directories, script-files or script-categories
  –script-args=<n1=v1,[n2=v2,…]>: provide arguments to scripts
  –script-args-file=filename: provide NSE script args in a file
  –script-trace: Show all data sent and received
  –script-updatedb: Update the script database.
  –script-help=<Lua scripts>: Show help about scripts.
           <Lua scripts> is a comma separted list of script-files or
           script-categories.
OS DETECTION:
  -O: Enable OS detection
  –osscan-limit: Limit OS detection to promising targets
  –osscan-guess: Guess OS more aggressively
TIMING AND PERFORMANCE:
  Options which take <time> are in seconds, or append 'ms' (milliseconds),
  's' (seconds), 'm' (minutes), or 'h' (hours) to the value (e.g. 30m).
  -T<0-5>: Set timing template (higher is faster)
  –min-hostgroup/max-hostgroup <size>: Parallel host scan group sizes
  –min-parallelism/max-parallelism <numprobes>: Probe parallelization
  –min-rtt-timeout/max-rtt-timeout/initial-rtt-timeout <time>: Specifies
      probe round trip time.
  –max-retries <tries>: Caps number of port scan probe retransmissions.
  –host-timeout <time>: Give up on target after this long
  –scan-delay/–max-scan-delay <time>: Adjust delay between probes
  –min-rate <number>: Send packets no slower than <number> per second
  –max-rate <number>: Send packets no faster than <number> per second
FIREWALL/IDS EVASION AND SPOOFING:
  -f; –mtu <val>: fragment packets (optionally w/given MTU)
  -D <decoy1,decoy2[,ME],…>: Cloak a scan with decoys
  -S <IP_Address>: Spoof source address
  -e <iface>: Use specified interface
  -g/–source-port <portnum>: Use given port number
  –data-length <num>: Append random data to sent packets
  –ip-options <options>: Send packets with specified ip options
  –ttl <val>: Set IP time-to-live field
  –spoof-mac <mac address/prefix/vendor name>: Spoof your MAC address
  –badsum: Send packets with a bogus TCP/UDP/SCTP checksum
OUTPUT:
  -oN/-oX/-oS/-oG <file>: Output scan in normal, XML, s|<rIpt kIddi3,
     and Grepable format, respectively, to the given filename.
  -oA <basename>: Output in the three major formats at once
  -v: Increase verbosity level (use -vv or more for greater effect)
  -d: Increase debugging level (use -dd or more for greater effect)
  –reason: Display the reason a port is in a particular state
  –open: Only show open (or possibly open) ports
  –packet-trace: Show all packets sent and received
  –iflist: Print host interfaces and routes (for debugging)
  –log-errors: Log errors/warnings to the normal-format output file
  –append-output: Append to rather than clobber specified output files
  –resume <filename>: Resume an aborted scan
  –stylesheet <path/URL>: XSL stylesheet to transform XML output to HTML
  –webxml: Reference stylesheet from Nmap.Org for more portable XML
  –no-stylesheet: Prevent associating of XSL stylesheet w/XML output
MISC:
  -6: Enable IPv6 scanning
  -A: Enable OS detection, version detection, script scanning, and traceroute
  –datadir <dirname>: Specify custom Nmap data file location
  –send-eth/–send-ip: Send using raw ethernet frames or IP packets
  –privileged: Assume that the user is fully privileged
  –unprivileged: Assume the user lacks raw socket privileges
  -V: Print version number
  -h: Print this help summary page.
EXAMPLES:
  nmap -v -A scanme.nmap.org
  nmap -v -sn 192.168.0.0/16 10.0.0.0/8
  nmap -v -iR 10000 -Pn -p 80
SEE THE MAN PAGE (http://nmap.org/book/man.html) FOR MORE OPTIONS AND EXAMPLES


Most local router local networks are running under an IP range of 192.168.0.1/24 (192.168.0.1.254) or 192.168.1.1/24 or at some weird occasions depending on how the router is configured it might be something like 192.168.10.0/24 to be sure on what kind of network your computer is configured, you can check with ifconfig command, what kind of network IP has the router assigned to your computer, here is output from my Debian GNU / Linux /sbin/ifconfig


 hipo@noah:~$ /sbin/ifconfig 
lo        Link encap:Local Loopback  
          inet addr:127.0.0.1  Mask:255.0.0.0
          inet6 addr: ::1/128 Scope:Host
          UP LOOPBACK RUNNING  MTU:16436  Metric:1
          RX packets:336 errors:0 dropped:0 overruns:0 frame:0
          TX packets:336 errors:0 dropped:0 overruns:0 carrier:0
          collisions:0 txqueuelen:0 
          RX bytes:26656 (26.0 KiB)  TX bytes:26656 (26.0 KiB)


wlan0     Link encap:Ethernet  HWaddr 00:1c:bf:bd:27:59  
          inet addr:192.168.0.103  Bcast:192.168.0.255  Mask:255.255.255.0
          inet6 addr: fe80::21c:bfff:ffbd:2759/64 Scope:Link
          UP BROADCAST RUNNING MULTICAST  MTU:1500  Metric:1
          RX packets:112836 errors:0 dropped:0 overruns:0 frame:0
          TX packets:55363 errors:0 dropped:0 overruns:0 carrier:0
          collisions:0 txqueuelen:1000 
          RX bytes:141318655 (134.7 MiB)  TX bytes:7391330 (7.0 MiB)


As evident from above output my router assigns IPs via DHCP once authenticated into the Wi-Fi router under standard IP range of 192.168.0.0/24

So under this IP range case, to inspect my small local networkconnected computer I had to run from gnome-terminal or under a /dev/ttyX virtual console:


hipo@noah:~$ nmap -sn 192.168.0.0/24

Starting Nmap 6.00 ( http://nmap.org ) at 2017-09-04 12:45 EEST
Nmap scan report for pcfreak (192.168.0.1)
Host is up (0.011s latency).
Nmap scan report for 192.168.0.103
Host is up (0.00011s latency).
Nmap done: 256 IP addresses (2 hosts up) scanned in 2.53 seconds


-sn argument instructs nmap to do the so called ping scan, e.g. not to do a port s
can after host discovery but just print available hosts that are responding

Some bigger corporate networks are configured to run a couple of local networks simultaneously such as 192.168.168.0.0/24, 192.168.1.0/24, 192.168.2.0/24 etc.

So if that's the case you can add more virtual IPs to your ifconfig after becoming root super user with:


hipo@noah:~$ su root 
Password: 
root@noah:/home/hipo# 


And then run:


/sbin/ifconfig wlan0:0 192.168.1.110 netmask 255.255.255.0
/sbin/ifconfig wlan0:1 192.168.2.110 netmask 255.255.255.0


etc.

Note that here I purposefully choose .110 IP because often the 192.168.1.1 is an IP assigned to the router and that might cause some IP conflicts and trigger alarms in the router security which I want to avoid.

To check just added extra Virtual IPs on wlan0 wireless interface (note that depending on your Wi-Fi card and your driver this interface might come under a different name on your computer):


root@noah# /sbin/ifconfig |grep -i wlan0 -A 1
wlan0     Link encap:Ethernet  HWaddr 00:1c:bf:bd:25:59  
          inet addr:192.168.0.103  Bcast:192.168.0.255  Mask:255.255.255.0

wlan0:0   Link encap:Ethernet  HWaddr 00:1c:bf:bd:25:59  
          inet addr:192.168.1.110  Bcast:192.168.1.255  Mask:255.255.255.0

wlan0:1   Link encap:Ethernet  HWaddr 00:1c:bf:bd:27:59  
          inet addr:192.168.2.110  Bcast:192.168.2.255  Mask:255.255.255.0


If you're scanning not on your own network but on a public connected network you might prefer to not use the ping scan as this might identify you in router's firewall as possible intruder and could cause you headaches, besides that some network connected nodes are connected to not respond on a ping scan (some networks purposefully disable pings at all) to avoid possibility of the so called ping flood that might overload a router buffer or bring down hosts on the network beinf flooded.

If you have doubts that a network has ping disabled and it shows no result you can give a try to the so called SYN / FIN Stealth packet scan with added requirement to scan for UDP open ports (-sS) argument


root@noah:/~# nmap -sS -sU -sT 192.168.0.1-255

Starting Nmap 6.00 ( http://nmap.org ) at 2017-09-04 13:31 EEST
Nmap scan report for pcfreak (192.168.0.1)
Host is up (0.012s latency).
Not shown: 998 closed ports
PORT     STATE SERVICE
80/tcp   open  http
1900/tcp open  upnp
MAC Address: 10:FE:ED:43:CF:0E (Unknown)

Nmap scan report for 192.168.0.100
Host is up (0.0036s latency).
Not shown: 998 closed ports
PORT      STATE SERVICE
625/tcp   open  apple-xsrvr-admin
49153/tcp open  unknown
MAC Address: 84:38:35:5F:28:75 (Unknown)

Nmap scan report for 192.168.0.103
Host is up (0.000012s latency).
Not shown: 999 closed ports
PORT   STATE SERVICE
22/tcp open  ssh


You might also like to add some verbosy (that would generate a lot of output so be careful):

In case if above scan fails due to firewalls and you have a ping scan disabled on the network too you might also try out the so called nmap connect TCP connect scan (-sT), that would avoid the SYN scan. The -sT is useful also if you're not possessing root superprivileges on nmap running host.


nmap -sS -sU 192.168.0.1-255


Note that connect scan could take ages as nmap tries to connect every port from default port scanned ranged on remote found hosts that are reporting as up and running.

If the shown results lead you find some unknown computer / tablet / mobile / phone device connected to your network, then connect to your router and thoroughfully inspect the traffic flowing through it, if you find intruder cut him off and change immediately your router passwords and monitor your network periodically to make sure the unwanted guest did not go back in future.

There is much more you can do with nmap so if you have some extra time and interest into penetration testing I recommend you check out Nmap Book (The Official Nmap project guide to Network Discovery and Security Scanning)

Monitoring Disk use, CPU Load, Memory use and Network in one console ncurses interface – Glance

Thursday, August 14th, 2014

monitoring-disk-use-memory-cpu-load-and-network-in-one-common-interfaces-with-glances-Linux-BSD-UNIX
If you're Linux / UNIX / BSD system administrator you already have experience with basic admin's system monitoring:

  •     CPU load
  •     OS Name/Kernel version
  •     System load avarage and Uptime
  •     Disk and Network Input/Output I/O operations by interface
  •     Process statistics / Top loading processes etc.
  •     Memory / SWAP usage and free memory
  •     Mounted partitions


Such info is provided by command line tools such as:

top, df, free, sensors, ifconfig, iotop, hddtemp, mount, nfsstat, nfsiostat, dstat, uptime, nethogs iptraf

etc.

There are plenty of others advanced tools also Web based server monitoring visualization  tools, such as Monit, Icanga, PHPSysInfo, Cacti which provide you statistics on computer hardware and network utilization

So far so good, if you already are used to convenience of web *NIX based monitoring but you don't want to put load on the servers with such and you're lazy to write custom scripts that show most important monitoring information – necessery for daily system administration monitoring and prevention from downtimes and tracking bottlenecks you will be glad to hear about Glances
 

Glances is a free (LGPL) cross-platform curses-based monitoring tool which aims to present a maximum of information in a minimum of space, ideally to fit in a classical 80×24 terminal or higher to have additionnal information. Glances can adapt dynamically the displayed information depending on the terminal size. It can also work in a client/server mode for remote monitoring.


1. Installing Glances curses-based monitoring tool on Debian 7 / Ubuntu 13+ / Mint  Linux

We have to install python-pip (python package installer tool) to later install Glances

apt-get install –yes 'python-dev' 'python-jinja2' 'python-psutil'
                        'python-setuptools' 'hddtemp' 'python-pip' 'lm-sensors'


Before proceeding to install Glances to make Thermal sensors working (if supported by hardware) run:


 sensors-detect

Glances is written in Python and uses psutil library to obtain monitoring statistic values, thus it is necessery to install few more Python libraries:

pip install 'batinfo' 'pysensors'

If you're about to use pip – Python package installer tool, behind a proxy server use instead:
 

pip install –proxy=http://your-proxy-host.com:8080 'batinfo' 'pysensors'

Then install Glances script itself again using pip
 

pip install 'Glances'

Downloading/unpacking Glances
  Downloading Glances-2.0.1.tar.gz (3.3Mb): 3.3Mb downloaded
  Running setup.py egg_info for package Glances
    
Downloading/unpacking psutil>=2.0.0 (from Glances)
  Downloading psutil-2.1.1.tar.gz (216Kb): 216Kb downloaded
  Running setup.py egg_info for package psutil

Successfully installed Glances psutil


Then run glances from terminal
 

glances -t 3

-t 3 option tells glances to refresh collected statistics every 3 seconds

glances-console-monitoring-tool-every-systemad-ministrator-should-know-and-use-show-memory-disk-cpu-mount-point-statistics-in-common-shared-screen-linux-freebsd-unix


2. Installing Glances monitoring console tool on CentOS / RHEL / Fedora / Scientific Linux

Installing glances on CentOS 7 / Fedora and rest of RPM based distributions can be done by adding external RPM repositories, cause glances is not available in default yum repositories.

To enable Extra-packages repositories:
 

rpm -ivh http://dl.fedoraproject.org/pub/epel/6/x86_64/epel-release-6-8.noarch.rpm


Then update yum to include new repository's packages into package list and install python-pip and python-devel rpms
 

yum update
yum install python-pip python-devel


Glances-console-server-stateScreenhot-on-CentOS-Linux-monitoring-in-ncurses-Linux-BSD

There is also FreeBSD port to install Glances on FreeBSD:
 

cd /usr/sysutils/py-glances
make install


Enjoy 🙂 !


luckyBackup Linux GUI back-up and synchronization tool

Wednesday, May 14th, 2014

luckybackup_best-linux-graphical-tool-for-backup_linux_gui-defacto-standard-tool
If you're a using GNU / Linux  for Desktop and you're already tired of creating backups by your own hacks using terminal and you want to make your life a little bit more easier and easily automate your important files back up through GUI program take a look at luckyBackup.

Luckibackup is a GUI frontend to the infamous rsync command line backup  tool. Luckibackup is available as a package in almost all modern Linux distributions its very easy to setup and can save you a lot of time especially if you have to manage a number of your Workplace Desktop Office Linux based computers.
Luckibackup is an absolute must have program for Linux Desktop start-up users. If you're migrating from Microsoft Windows realm and you're used to BackupPC, Luckibackup is probably the defacto Linux BackupPC substitute.

The sad news for Linux GNOME Desktop users is luckibackup is written in QT and it using it will load up a bit your notebook.
It is not installed by default so once a new Linux Desktop is installed you will have to install it manually on Debian and Ubuntu based Linux-es to install Luckibackup apt-get it.

debian:~# apt-get install --yes luckibackup
...

On Fedora and CentOS Linux install LuckiBackup via yum rpm package manager

[root@centos :~]# yum -y install luckibackup
.

Luckibackup is also ported for OpenSuSE Slackware, Gentoo, Mandriva and ArchLinux. In 2009 Luckibackup won the prize of Sourceforge Community Choice Awards for "best new project".

luckyBackup copies over only the changes you've made to the source directory and nothing more.
You will be surprised when your huge source is backed up in seconds (after the first backup).

Whatever changes you make to the source including adding, moving, deleting, modifying files / directories etc, will have the same effect to the destination.
Owner, group, time stamps, links and permissions of files are preserved (unless stated otherwise).

Luckibackup creates different multiple backup "snapshots".Each snapshot is an image of the source data that refers to a specific date-time.
Easy rollback to any of the snapshots is possible. Besides that luckibackup support Sync (just like rsync) od any directories keeping the files that were most recently modified on both of them.

Useful if you modify files on more than one PCs (using a flash-drive and don't want to bother remembering what did you use last. Luckibackup is capable of excluding certain files or directories from backupsExclude any file, folder or pattern from backup transfer.

After each operation a logfile is created in your home folder. You can have a look at it any time you want.

luckyBackup can run in command line if you wish not to use the gui, but you have to first create the profile that is going to be executed.
Type "luckybackup –help" at a terminal to see usage and supported options.
There is also TrayNotification – Visual feedback at the tray area informs you about what is going on.


MobaXTerm: A good gnome-terminal like tabbed SSH client for Windows / Windows Putty Tabs Alternative

Wednesday, November 13th, 2013

Mobaxterm ssh client putty MS Windows alternative with tabs suitable for ex linux users

mobaxterm with tabbed ssh connections screenshot best putty windows ssh client alternative now

Last 10+ years I worked on GNU / Linux as Desktop. Last 7 years most of my SSH connections were managed from GNOME and I'm quite used to gnome-terminal ssh tabbing. In my new Employee Hewlett Packard. I'm forced to work on Microsoft Windows 7 and thus I used for a month or so Putty and Kitty fork from version 0.63 of PuTTY advertising itself as the best telnet / SSH client in the world. Both of the two lack tabbing and have interface which is pretty unfamiliar to me. As I'm so used to using native UNIX terminal. Fortunately a colleague of mine Ivelin was using an SSH client called MobaXTerm which very much did emulation similar to my favourite gnome-terminal. MobaXterm is not free software / open source app but this doesn't matter so much to me as anyways I'm running a non-free Win OS on my desktop. What makes MobaXterm so attractive is its rich functionality (cosmic years infront of Putty).

Here is website description of MobaXterm quoted from its website:

MobaXterm is an enhanced terminal for Windows with an X11 server, a tabbed SSH client and several other network tools for remote computing (VNC, RDP, telnet, rlogin). MobaXterm brings all the essential Unix commands to Windows desktop, in a single portable exe file which works out of the box.

Overall list of features MobaXterm offers are;

  •     multitab terminal with embedded Unix commands (ls, cd, cat, sed, grep, awk, rsync, wget, …)

  •     embedded X11 server for easily exporting your Unix/Linux display

  •     a session manager with several network utilities: SSH, RDP, VNC, Telnet, Rlogin, FTP, SFTP and XDMCP

  •     passwords management for SSH, RDP, VNC, SFTP (on demand password saving)

  •     easy graphical file transfer using drag and drop during SSH sessions

  •     advanced SSH tunnels creation tool (graphical port forwarding builder)

  •     tasks automation using scripts or macros

Mobaxterm is portable just like Putty so its useful to use on HOP stations to servers like used in big companies like HP. Featured embedded Unix commands (e.g., ls, cd, cat, sed, grep, awk, rsync, wget) gives a feeling like you're working on pure Linux console making people addicted to Linux / BSD quite confortable. Some other very useful terminal emulator functions are support for anti-aliasing session manager (save / remember passwords for ssh sessions in Crypted format so much missing in Putty) and it even supports basic macros.
Basic UNIX commands embedded in MobaXterm are taken and ported from Cygwin projectLinux-like environment for Windows making it possible to port software running on POSIX systems (such as Linux, BSD, and Unix systems) to Windows. A very cool think is also MobaXterm gives you a Linux like feel of console navigation in between basic files installed from Cygwin. Some downside I found is program menus which look at first glimpse a bit confusing especially for people used to simplicity of gnome-terminal. Once logged in to remote host via ssh command the program offers you to log you in also via SFTP protocol listing in parallel small window with possibility to navigate / copy / move etc. between server files in SFTP session which at times is pretty useful as it saves you time to use some external SFTP connector tools like  WinSCP.

From Tools configuration menu, there are few precious tools as well;
         – embedded text editor MobaTextEditor
         – MobaFoldersDiff (Able to show diffeernces between directories)
         – AsciiTable (Complete List of Ascii table with respective codes and characters)
         – Embedded simple Calculator
         – List open network ports – GUI Tool to list all open ports on Windows localhost
         – Network packets capture – A Gui tool showing basic info like from UNIX's tcpdump!
         – Ability to start quickly on local machine (TFTP, FTP, SFTP / SSH server, Telnet server, NFS server, VNC Server and even simple implementation of HTTP server)

Mobaxterm list of tools various stuff

         Mobaxterm run various services quickly on Windows servers management screenshot

Below are few screenshots to get you also idea about what kind of configuration MobaXterm supports
  mobaxterm terminal configuration settings screenshot

mobaxterm better putty alternative x11 configuration tab screenshot

mobaxterm windows ssh client for linux users configuration ssh tab screenshot

mobaxterm-putty-alternative-for-windows-configuration-display-screenshot
MobaXTerm Microsoft Windows ssh client configuration misc menu screenshot
To configure and use Telnet, RSH, RDP, VNC, FTP etc. Sessions use the Sessions tab on top menu.

One very handy thing is MobaXterm supports export of remote UNIX display with no requirement to install special Xserver like already a bit obsolete Xming – X server for Windows.
The X Display Manager Control Protocol (XCMCP) is a key feature of the X11 architecture. Together with XDMCP, the X network protocol allows distributed operation of the X server and X display manager. The requesting X server runs on the client (usually as an X terminal), thus providing a login service, that why the X server ported to MobaXterm from Cygwin also supports XDMCP. If, for example, you want to start a VNC session with a remote VNC server, all you have to do is enter the remote VNC server’s IP address in the VNC area; the default VNC port is already registered.

Accessing the remote Windows server via RDP (Remote Desktop Protocol) is also a piece of cake. Once you establish a session to RDP or other Proto it is possible to save this session so later you just choose between session to access. The infamous (X11 Port Forwarding) or creation of SSH encrypted tunnels between hosts to transfer data securily or hide your hostname is also there.

MobaXterm is undoubtedly a very useful and versatile tool. Functionally, the software is well mannered, and Windows users who want to sniff a little Linux/Unix air can get a good idea of how Linux works. A closer look reveals that anything you can do with MobaXterm can be achieved directly with freely available tools (Cygwin) and Unix tools ported from Cygwin. However, although Cygwin provides a non-Posix environment for Windows, it doesn’t offer a decent terminal, which is one thing Moba-Xterm has going for it.

Admittedly, in pure vanilla Cygwin, you can start an X server automatically and then use xterm, but xterm lacks good-quality fonts, whereas MobaXterm conveniently lets you integrate a font server.

Converting .odt (Open Office Document) to (MS Word) .doc in console / terminal on Linux and FreeBSD

Thursday, November 15th, 2012

Convert .odt open office document to Microsoft Office Word .doc format on GNU / Linux and FreeBSD unoconv - the universal console all open office supported file format to any other supported
If you need to convert from command line .ODT to .DOC on Linux or FreeBSD without installing the clumsy OpenOffice (particularly useful on older computers on which OpenOffice works too slow and takes too much of useless disk space), check  unoconv

Besides from supporting convert from .DOC to .PDF and a bunch of other formats convertion, I've just learned it supports also convert .ODT to .DOC. 

unoconv is also very simple to use, below is an example of converting .ODT previously created with LibreOffice to .DOC

hipo@noah:~$ unoconv -f doc Document_To_Convert.odt

hipo@noah:~$ ls -al Document_To_Convert.doc
-rw-r--r-- 1 hipo hipo 9885184 14 ное 21,22 Document_To_Convert.doc

hipo@noah:~$ file Document_To_Convert.doc 
Document_To_Convert.doc: CDF V2 Document, Little Endian, Os: Windows, Version 1.0, Code page: -535, Author: HBB, Last Saved By: HBB, Revision Number: 2, Total Editing Time: 04:00, Create Time/Date: Fri Feb 16 14:25:00 2007, Last Saved Time/Date: Fri Feb 16 14:25:00 2007

Here is also a full list of all formats to which unoconv supports convert

hipo@noah:~$ unoconv –show
The following list of document formats are currently available:

bib – BibTeX [.bib]
doc – Microsoft Word 97/2000/XP [.doc]
doc6 – Microsoft Word 6.0 [.doc]
doc95 – Microsoft Word 95 [.doc]
docbook – DocBook [.xml]
html – HTML Document (OpenOffice.org Writer) [.html]
odt – Open Document Text [.odt]
ott – Open Document Text [.ott]
ooxml – Microsoft Office Open XML [.xml]
pdb – AportisDoc (Palm) [.pdb]
pdf – Portable Document Format [.pdf]
psw – Pocket Word [.psw]
rtf – Rich Text Format [.rtf]
latex – LaTeX 2e [.ltx]
sdw – StarWriter 5.0 [.sdw]
sdw4 – StarWriter 4.0 [.sdw]
sdw3 – StarWriter 3.0 [.sdw]
stw – Open Office.org 1.0 Text Document Template [.stw]
sxw – Open Office.org 1.0 Text Document [.sxw]
text – Text Encoded [.txt]
txt – Plain Text [.txt]
vor – StarWriter 5.0 Template [.vor]
vor4 – StarWriter 4.0 Template [.vor]
vor3 – StarWriter 3.0 Template [.vor]
xhtml – XHTML Document [.html]

The following list of graphics formats are currently available:

bmp – Windows Bitmap [.bmp]
emf – Enhanced Metafile [.emf]
eps – Encapsulated PostScript [.eps]
gif – Graphics Interchange Format [.gif]
html – HTML Document (OpenOffice.org Draw) [.html]
jpg – Joint Photographic Experts Group [.jpg]
met – OS/2 Metafile [.met]
odd – OpenDocument Drawing [.odd]
otg – OpenDocument Drawing Template [.otg]
pbm – Portable Bitmap [.pbm]
pct – Mac Pict [.pct]
pdf – Portable Document Format [.pdf]
pgm – Portable Graymap [.pgm]
png – Portable Network Graphic [.png]
ppm – Portable Pixelmap [.ppm]
ras – Sun Raster Image [.ras]
std – OpenOffice.org 1.0 Drawing Template [.std]
svg – Scalable Vector Graphics [.svg]
svm – StarView Metafile [.svm]
swf – Macromedia Flash (SWF) [.swf]
sxd – OpenOffice.org 1.0 Drawing [.sxd]
sxd3 – StarDraw 3.0 [.sxd]
sxd5 – StarDraw 5.0 [.sxd]
tiff – Tagged Image File Format [.tiff]
vor – StarDraw 5.0 Template [.vor]
vor3 – StarDraw 3.0 Template [.vor]
wmf – Windows Metafile [.wmf]
xhtml – XHTML [.xhtml]
xpm – X PixMap [.xpm]

The following list of presentation formats are currently available:

bmp – Windows Bitmap [.bmp]
emf – Enhanced Metafile [.emf]
eps – Encapsulated PostScript [.eps]
gif – Graphics Interchange Format [.gif]
html – HTML Document (OpenOffice.org Impress) [.html]
jpg – Joint Photographic Experts Group [.jpg]
met – OS/2 Metafile [.met]
odd – OpenDocument Drawing (Impress) [.odd]
odg – OpenOffice.org 1.0 Drawing (OpenOffice.org Impress) [.odg]
odp – OpenDocument Presentation [.odp]
otp – OpenDocument Presentation Template [.otp]
pbm – Portable Bitmap [.pbm]
pct – Mac Pict [.pct]
pdf – Portable Document Format [.pdf]
pgm – Portable Graymap [.pgm]
png – Portable Network Graphic [.png]
pot – Microsoft PowerPoint 97/2000/XP Template [.pot]
ppm – Portable Pixelmap [.ppm]
ppt – Microsoft PowerPoint 97/2000/XP [.ppt]
pwp – PlaceWare [.pwp]
ras – Sun Raster Image [.ras]
sda – StarDraw 5.0 (OpenOffice.org Impress) [.sda]
sdd – StarImpress 5.0 [.sdd]
sdd3 – StarDraw 3.0 (OpenOffice.org Impress) [.sdd]
sdd4 – StarImpress 4.0 [.sdd]
sti – OpenOffice.org 1.0 Presentation Template [.sti]
stp – OpenDocument Presentation Template [.stp]
svg – Scalable Vector Graphics [.svg]
svm – StarView Metafile [.svm]
swf – Macromedia Flash (SWF) [.swf]
sxi – OpenOffice.org 1.0 Presentation [.sxi]
tiff – Tagged Image File Format [.tiff]
vor – StarImpress 5.0 Template [.vor]
vor3 – StarDraw 3.0 Template (OpenOffice.org Impress) [.vor]
vor4 – StarImpress 4.0 Template [.vor]
vor5 – StarDraw 5.0 Template (OpenOffice.org Impress) [.vor]
wmf – Windows Metafile [.wmf]
xhtml – XHTML [.xml]
xpm – X PixMap [.xpm]

The following list of spreadsheet formats are currently available:

csv – Text CSV [.csv]
dbf – dBase [.dbf]
dif – Data Interchange Format [.dif]
html – HTML Document (OpenOffice.org Calc) [.html]
ods – Open Document Spreadsheet [.ods]
ooxml – Microsoft Excel 2003 XML [.xml]
pdf – Portable Document Format [.pdf]
pts – OpenDocument Spreadsheet Template [.pts]
pxl – Pocket Excel [.pxl]
sdc – StarCalc 5.0 [.sdc]
sdc4 – StarCalc 4.0 [.sdc]
sdc3 – StarCalc 3.0 [.sdc]
slk – SYLK [.slk]
stc – OpenOffice.org 1.0 Spreadsheet Template [.stc]
sxc – OpenOffice.org 1.0 Spreadsheet [.sxc]
vor3 – StarCalc 3.0 Template [.vor]
vor4 – StarCalc 4.0 Template [.vor]
vor – StarCalc 5.0 Template [.vor]
xhtml – XHTML [.xhtml]
xls – Microsoft Excel 97/2000/XP [.xls]
xls5 – Microsoft Excel 5.0 [.xls]
xls95 – Microsoft Excel 95 [.xls]
xlt – Microsoft Excel 97/2000/XP Template [.xlt]
xlt5 – Microsoft Excel 5.0 Template [.xlt]
xlt95 – Microsoft Excel 95 Template [.xlt]


unoconv is said to support convertion between any to any document format that is already supported by OpenOffice / LibreOffice. The script is written by Dag Wieers (users of Fedora, RHEL and other RPM based distros should remember him well. DGW repositories always were of great help where some kind of not main stream software has to be installed on RPM based Linux. You might want to check unoconv's official website which gives good overview on it.

Though the tool is written for Linux, there is a BSD users port in freshports.