Posts Tagged ‘Microsoft’
Friday, September 10th, 2021 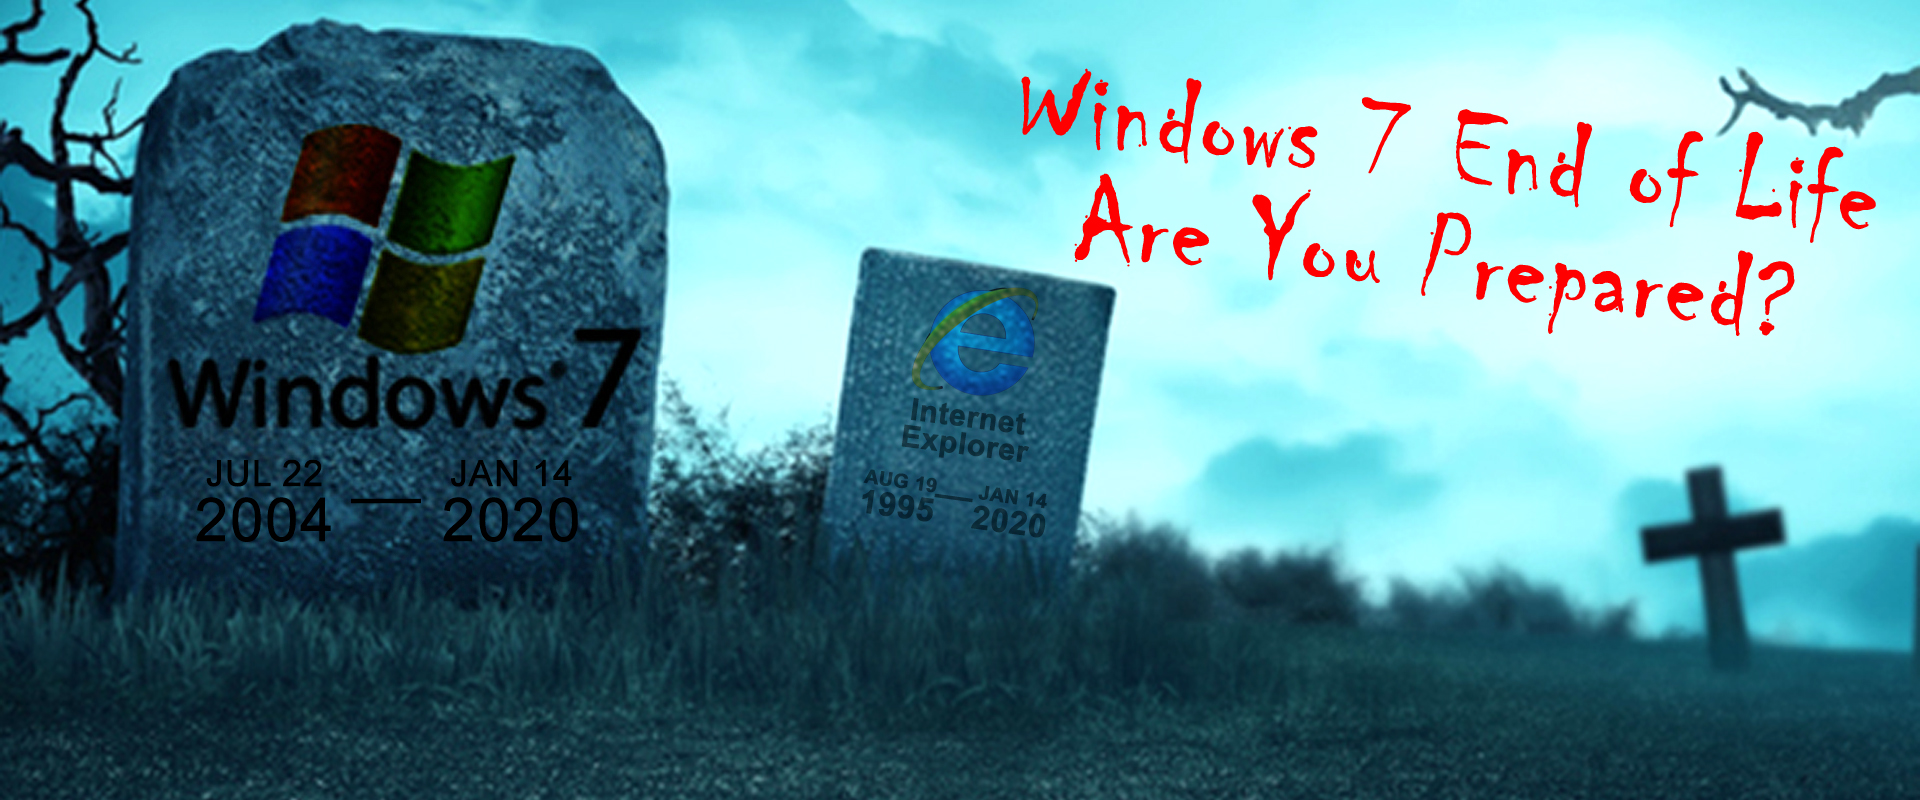
Since January 15th 2020, Windows 7 which reached its End of Life (EOL) and is no longer Supported. Windows 7 Service Pack 1 Starter, Home Basic, Home Premium, and Professional installations will display the message
"Your Windows 7 PC is out of support".
The use of Windows 7, since 2020 is steadily declining but some hard core maniacs, who refuse to be in tune with latest fashion do still roll Windows 7 on dedicated VPS Servers (running on Xen / VMWare etc.).
With the reach of End of Support, people who still run Windows 7 have no longer the usual Operating system provided.
- No security updates
- No software updates
- No tech support
Even though running End of Support system is quite dangerous and you might get hacked easily by autometed bot, still for some custom uses and if the Windows 7 Runs behind a solid firewall it could be considered relatively safe.
Microsoft hence made their Windows (remote controlled system) to have an annoying pop up window with the "YOUR WINDOWS 7 PC IS OUT OF SUPPORT" as shown in below screenshot:
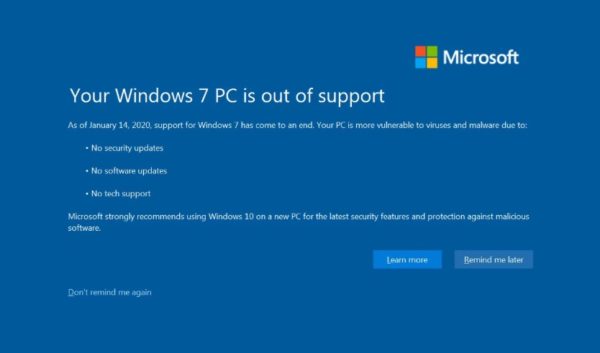
For those who don't plan to migrate from Windows 7 to Windows 10, this message becomes quickly very annoying especially if you happen to access remotely your Windows 7 VPS and use it for simple things as browsing a few news websites or you're a marketer and you use the Windows for accessing Amazon / Ebay from a different country as many Marketers do to access General Webstores emulating access from a remote location.
Disable "Your Windows 7 PC is out of support" popup alert
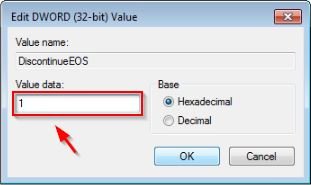
Luckily it is possible to disable this annoying Your Windows 7 pop-up alert by setting a value key in Windows Registry
DiscontinueEOS to 1.
To do so launch from Administrator command line cmd.exe prompt (or start it from Windows start menu):
regedit
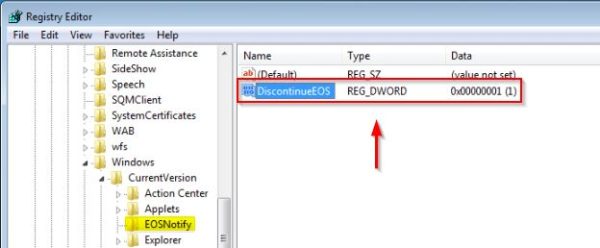
1. Open Windows Registry Editor and navigate to
HKEY_CURRENT_USER\Software\Microsoft\Windows\CurrentVersion\EOSNotify.
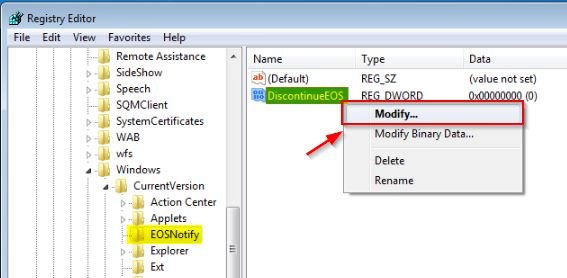
You will need to set the DWORD DiscontinueEOS value to 1 in the Windows Registry
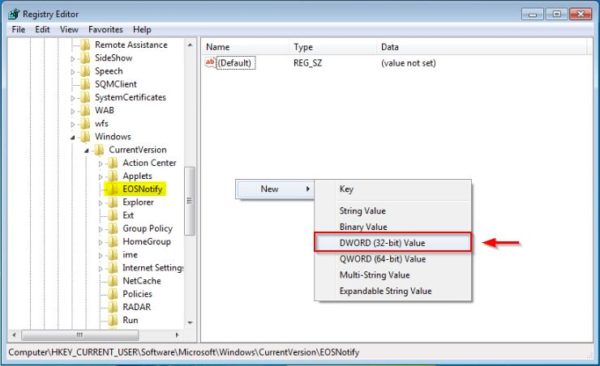
– In case EOSNotify key is not available, right-click the CurrentVersion key and select New > Key and name it EOSNotify.

2. Right click anywhere in the right pane and select New > DWORD (32-bit) Value and name it DiscontinueEOS.
3. Set Value data to 1 and click OK.
4. When the new value has been set, Restart the Windows7 computer / Virtual machine, to make sure registry setting take effect.
To automate the procedure in large environments, you can create a small script using the reg command load the Registry key or use Windows GPO (Group Policy Object) to enforce the setting across all Active Directory PC members.
[HKEY_CURRENT_USER\Software\Microsoft\Windows\CurrentVersion\EOSNotify]
"DiscontinueEOS"=dword:00000001
custom GPO in Active Directory.
To avoid potential issues using a non supported OS, you should start planning to upgrade your Windows 7 clients to Windows 10.
That's it ! Out of support Windows 7 alert should no longer bug you 🙂
Tags: access, com, Luckily, Microsoft, Open Windows Registry Editor, Pc, Remove Windows, reoccuring, right, screenshot, Set Value, setting, use
Posted in Hacks, Windows | No Comments »
Friday, August 19th, 2011 I'm tuning a Windows 2003 for better performance and securing it against DoS of service attacks. After applying all the changes I needed to restart the WebServer for the new configurations to take effect.
As I'm not a GUI kind of guy I found it handy there is a fast command to restart the Microsoft Internet Information Server. The command to restart IIS is:
c:> iisreset
Tags: command, DoS, effect, GUI, guy, IIS, iisreset, information, Internet, internet information server, kind, line, Microsoft, microsoft iis, microsoft internet information server, performance, server, Service, webserver, Windows, windows command
Posted in IIS, System Administration, Windows | 1 Comment »
Wednesday, June 28th, 2017 
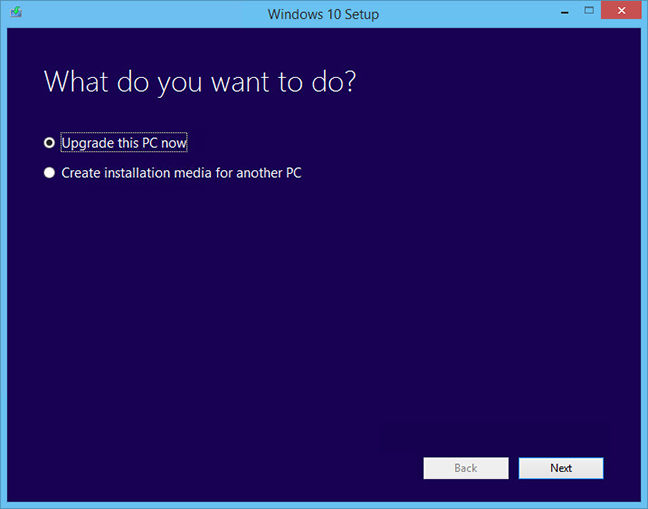
However as I've been upgrading my sister's computer previously running Windows 7 to Windows 10 (the process of upgrading is really simple you just download Windows-Media-Creation-tool from Microsoft website and the rest comes to few clicks (Accept Windows 10 User Agreement, Create current install restore point (backup) etc.) and waiting some 30 minutes or so for the upgrade to complete.
Then it was up to downloading some other updates on a few times and restarting the computer, each time the upgrades were made and all the computer was ready. I've installed Avira (AntiVirus) as I usually do on new PCs and downloaded a bunch of anti-malware (MalwareBytes / Rfkill / Zemanta) to make sure that the old upgraded WIndows was not already infected before the upgrade and I've found a bunch of malware, that got quickly cleared up.
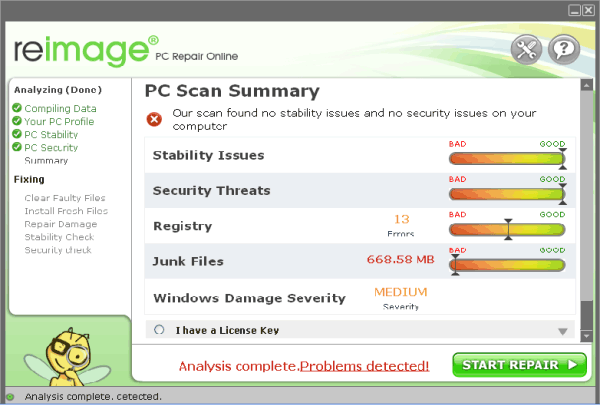
Anyways I've tried also another tool called ReimagePlus – Online Computer Repair in order to check whether there are no some broken WIndows system files after the upgrade
(here I have to say I've done that besides running in an Administrator command prompt (cmd.exe) and running
sfc /scannow
command to check base system files integrity, which luckily showed no problems with the Win base system files.
ReimagePlus however showed some failed services and some failed programs that were previously installed from Windows 7 before the upgrade and even it showed indication for Trojan present on computer but since ReImagePlus is a payed software and I didn't have the money to spend on it, I just proceeded to clean up what was found manually.
After that the computer ran fine, with the only strange thing that some data was from hard drive was red a bit too frequently, after a short call with a close friend (Nomen) – thx man, he suggested that the frequenty hdd usage might be related to Windows Search Indexing service database rebuilt and he adviced me to disable it which I did following this article How to speed up Windows by disabling Search Index Service.
One issue worthy to mention stumbled upon after the upgrade was problems with Windows Explorer which was frequently crashing and "restarting the Desktop", but once, I've enabled all upgrades from Microsoft and Applied them after some update failures and restarts, once all was up2date to all latest from Microsoft, Explorer started working normally.
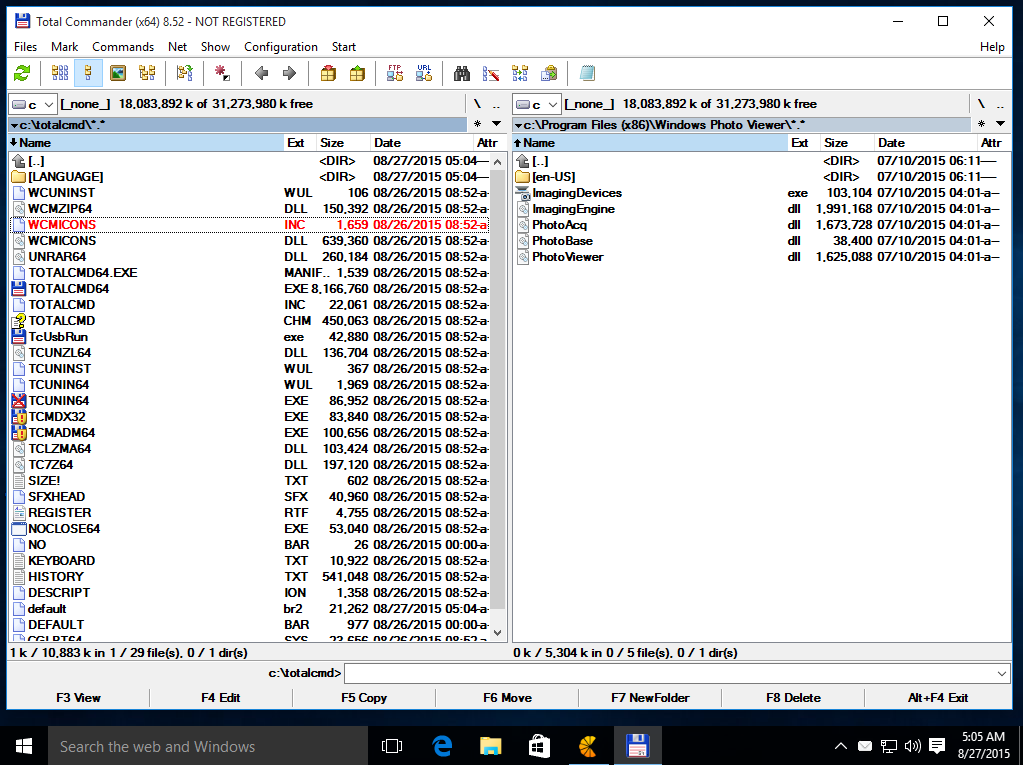
In the mean time while Windows Explorer was crashing in order to browse my file system I used the good old Win Total Command or Norton Commander for Windows – WinNC (with its most cool bizzarre own File Explorer tool).
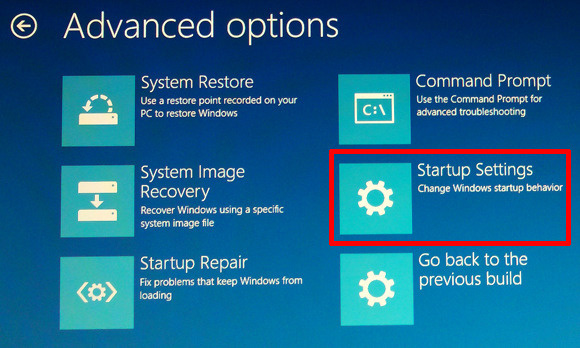
As I wanted to run a MalwareBytes scan and Antivirus under Windows Safe-Mode, I tried entering it by restarting the Computer and pressing F8 a number of times before the Windows boot screen but this didn't work as Safe-Mode boot was changed in Windows 10 to be callable in another way because of some extra Windows Boot speed up optimizations, in short the easiest way I found to enter Windows 10 Safe Mode was to Hit Start Button -> Choose Restart PC and keep pressed SHIFT button simultaneously
that calls a menu that gives you some restore options, along with safe mode options for those who want to read more on How to Enter Safe mode (Command Prompt) on Windows 10 – please read this article.
Once the upgrade was over and all below done unfortunately I've realized her previously installed WIndows 7 is x86 (32 bit) version and the Acer notebook 5736Z where it is being installed is actually X64 (64 bit), hence I've decided to upgrade my dear sis computer to a 64 Bit Windows 10 and researched online whether, there is some tool that is capable to upgrade WIndows 10 from 32 bit to Windows 10 64 bit just to find out the only option is to either use some program to creaty a backup of files on the PC or to manually copy files to external hard drive and reinstall with a Windows 10 64 bit bootable USB Flash or CD / DVD image, so I took my USB flash and used again Windows Media Creation Tool to burn Windows and re-install with the 64 bit iso.
If you're wonder about why I choose to re-install finally Win 10 32 bit with Win 64 bit, because you might think performance difference might be not really so dramatic, then I have to say the Acer notebook is equipped with 4 Gigabytes of RAM Memory and Windows 10 32bit (Pro) could recognize a maximum of 3 Gigabytes (2.9 GB if I have to be precise) and 1 Gigabyte of memory stays totally unusued all the time with Winblows 10 32 bit.

I've tried my best actually to not loose time to fully upgrade Windows 7 (32 bit) -> Windows 10 (64 bit) but to make Windows 7 32 bit Windows to use more than the default Limitation of 3GB of memory by using this thirt party PAE Externsion Kernel Patch
which is patching the Windows Kernel to extend the Windows support for PCs with up to 128 GB of memory however it turned out that this Patch file is not compatible with my Windows Kernel version once I followed readme instructions.
It seems the PAE (Physical Address Extension) is supported by default by Microsoft only on 32 bit Windows Server 10 to read more on the PAE if interested give a look here.
Well that's all folks, the rest I did was to just boot from the USB drive just burned and re-install WIndows and copy my files from User profile / Downloads / Pictures / Music etc. to the same locations on the new installed Windows 10 professional 64 bit and enjoy the better performance.
Tags: memory, Microsoft, post, read, system, upgrade, USB, windows explorer, Windows Kernel, working
Posted in Anti-Malware Tools, Computer Security, Curious Facts, Everyday Life, Windows | 2 Comments »
Tuesday, October 12th, 2010 I'm studying Project Management, right now. In that spirit of thoughts I and a couple of other guys are building a Project Plan.
As it Project Plan it's necessary to put a GANTT Chart in it to show visually the project timeline (the phases), the duration and the inter-relation between the different tasks which leads the project to an actual completion.
After a bit of thorough research online on available software to deal with project management and particularly, ones that are capable to build a GANTT charts on Linux / BSD.
I've come with the following list of software capable to be a substitute for the Microsoft Project software.
Redmine GANTT Chart
1. Gantt Project
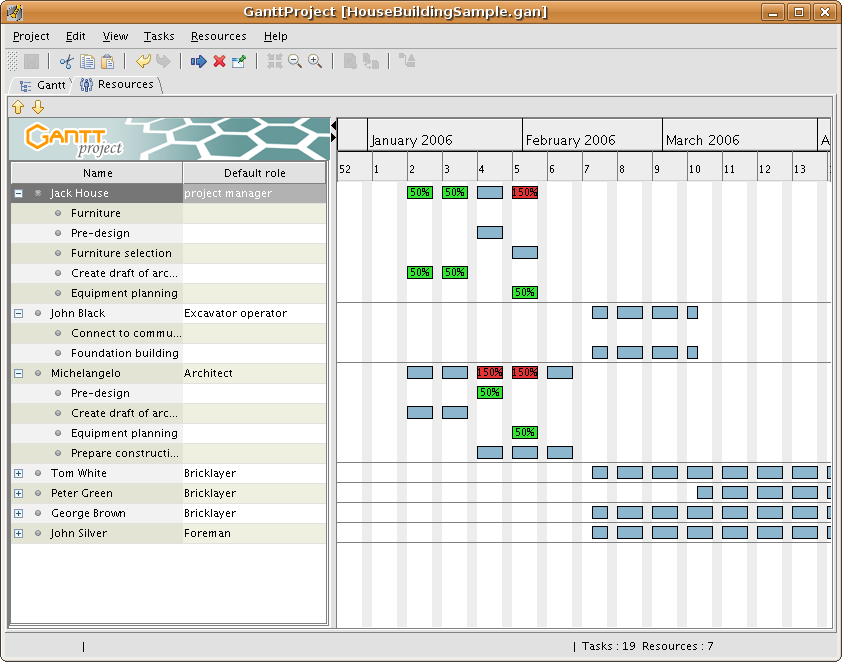 GANTTProject Chart
2. Gnome Planner
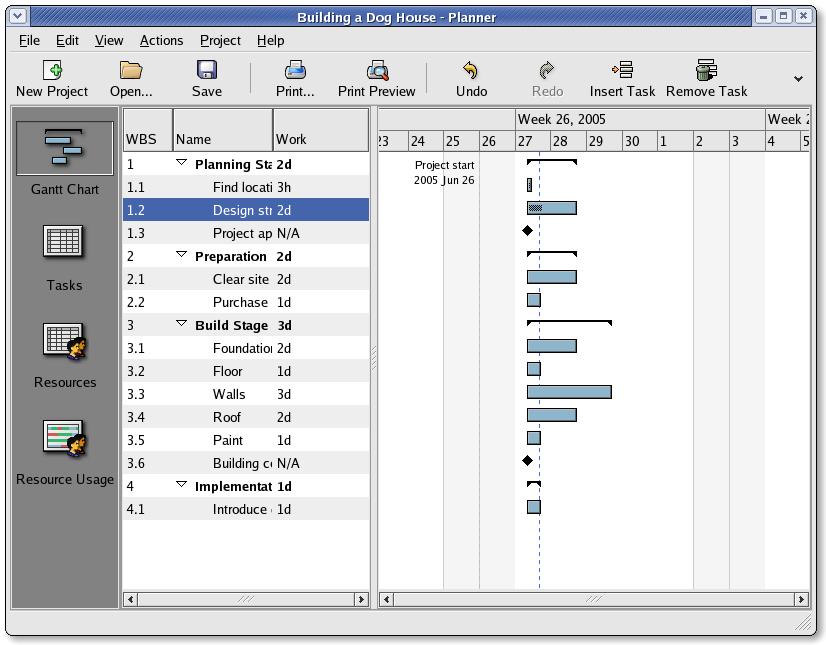 Planner GANTT Chone Chart
3. Task Juggler Project Manager with GANTT Capability for (KDE)
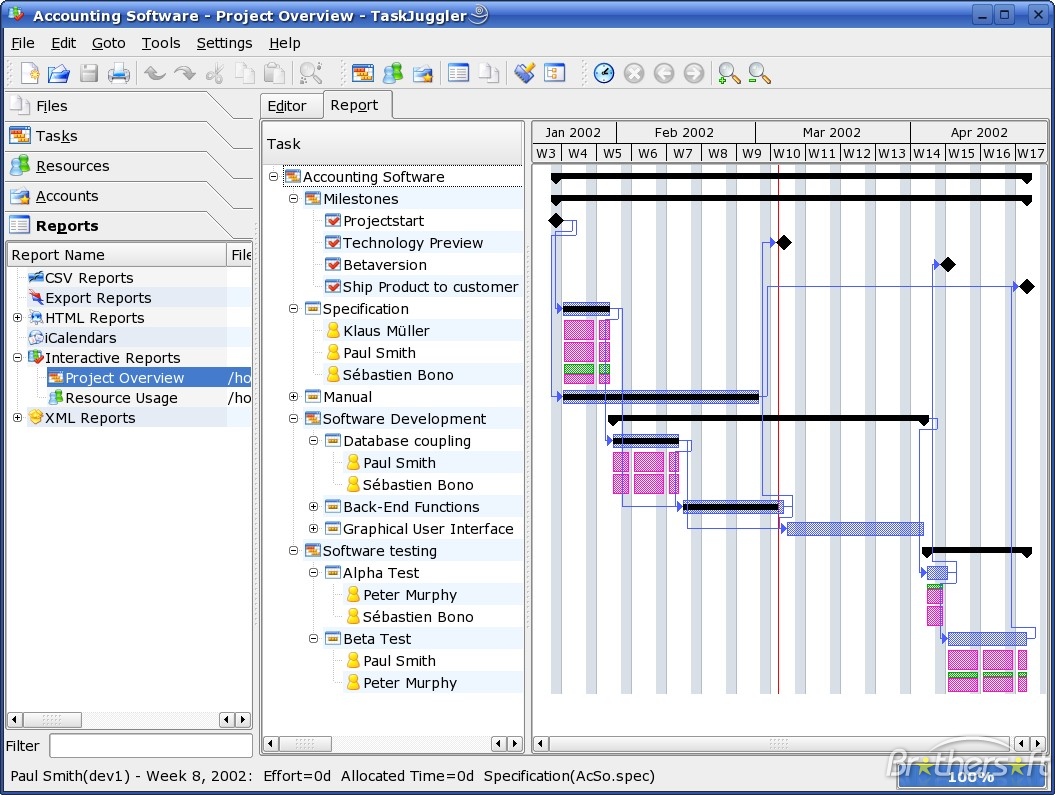 Task Juggler
4. JxProject – This software is not free, though it can be considered almost free
Take a look also at:
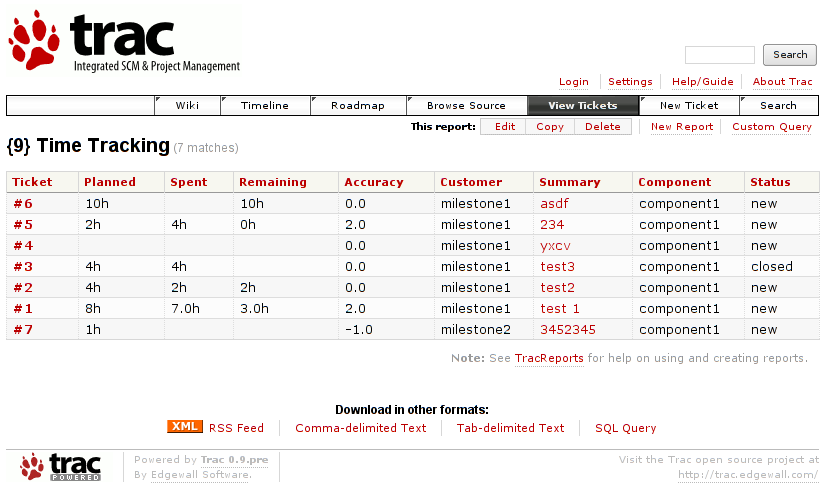
5. Trac , though it doesn't really support GANTT charts it's a lovely software to be used for PM.
Another option you have is to try out:
6. PHProjekt
Update 20.09.2016 – PHPProject Old download link is no longer active
It is this link http://www.phprojekt.com/, but the page doesn’t seem to be active any more. I thought you might want to update.
If you are looking for an alternative please check out http://wiht.link/PHProjekt-PM, it may make a suitable replacement.
Kind Regards,
Tom Wilcox
That piece of softwre really looks promising, especially if we consider that it's web based and how much essential is today to have an anline tools for doing the ordinary desktop jobs.
You can even check an online demo of the PHPProjekt software here
If you're a type of KDE user you definitely has to try out Kplato
As I've tested the software the software is easy to be used, however it still is missing some essential parts that Microsoft Project includes so it's not 100% substitute.
Also it's not able to open Microsoft Project (MPP) files, neither able to save the charts in the .mpp format.
Moving ahead I've came across DotProject 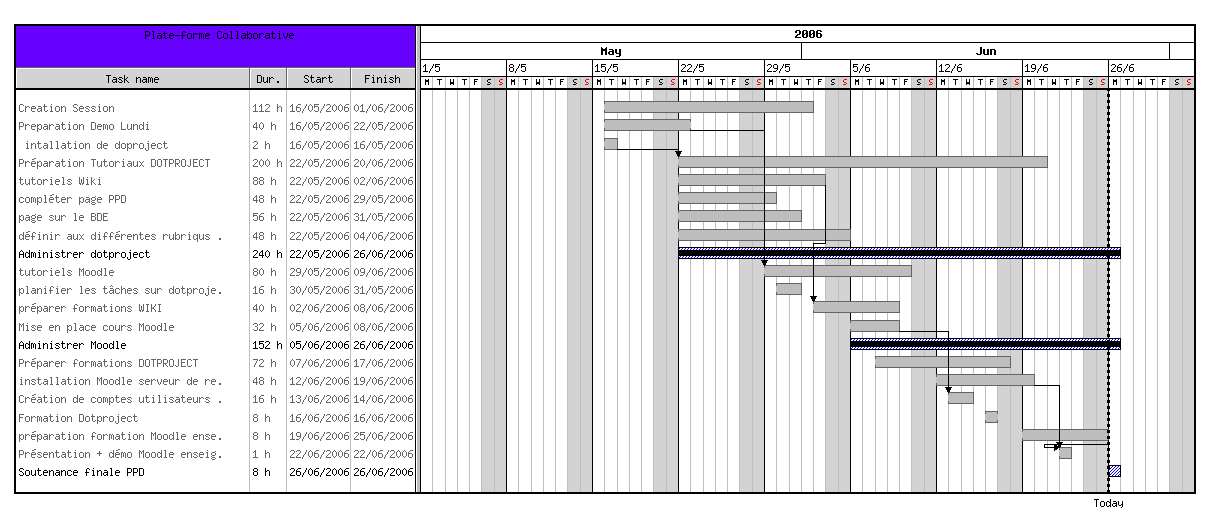
DottProject Gantt Chart
I haven't took the time to test it myself but however, as I go through the software website the project looked quite good.
Lastly you can take a look at: 7. PStricks as a mean of project management, however I think it doesn't support GANTT chart building.
>
Tags: anline, available software, BSD, building, capability, Chart, check, completion, demo, Desktop, doesn, Drawing GANTT Charts and Project Management on Linux, duration, GANTT, gantt chart, gantt charts, Gnome, jobs, Juggler, Linux, linux microsoft, look, Microsoft, Microsoft Project, microsoft project software, mpp, mpp format, online, option, page doesn, PHProjekt, piece, project, project management, project mpp, Project Plan, project timeline, software, software website, Spirit, substitute, support, time, trac, type, unix
Posted in Business Management, Curious Facts, Everyday Life, Linux | 1 Comment »
Friday, April 8th, 2016 
These days it is not common to install Windows XP however for some old unsupproted applications that still work on XP in many countries in Africa, Asia, Europe and even America. Custom patched Windows XP is still heaveily used for some corporate businesses in accounting and on airports and other government institutions even to these day, I'm aware of Windows still heavily used especially in Russia, Belarus,Ukraine, Kazakhstan, Armenia, Bulgaria etc.
Hence still there is plenty of softwares designed to work XP the good old Win XP and thus often XP needs to be emulated on VMs though officially not supported any longer by Microsoft (its Support lifecycle End was for a last time on April 14, 2009).
Now I guess these days I guess nobody doesn't install and use Windows XP on a normal hardware PC Desktop / laptop but XP is continually installed on Virtual machine servers VMWare / VirtualBox.
Hence if you happen to have already migrated or installed some old Windows XP operating systems under VMWare for a corporate clients single core machine (no matter virtual or physical) and the client requires an update of hardware of the Virtual Machine you will be surprised that even though you add a second / third etc. core (new CPUs) the virtual machine hardware and restart the Windows XP installation.
It seems XP is designed to remember the install time CPU model hardware so once the VM and doesn't have a way to update its HAL (Hardware Abstraction Layer) definitions if you install it in Virtualbox thus to make XP recognize the extra added CPU cores it is necessery to do a small hack with a devcon.exe utility downloadable from Microsoft site to do the trick
1. Download the command line devicemanager utility (devcon.exe) from Microsoft Development Network MSDN here.
Note that it will work only if you use the correct version depending whether XP is (x86/x64) bit install so check it out from My Computer -> Properties.
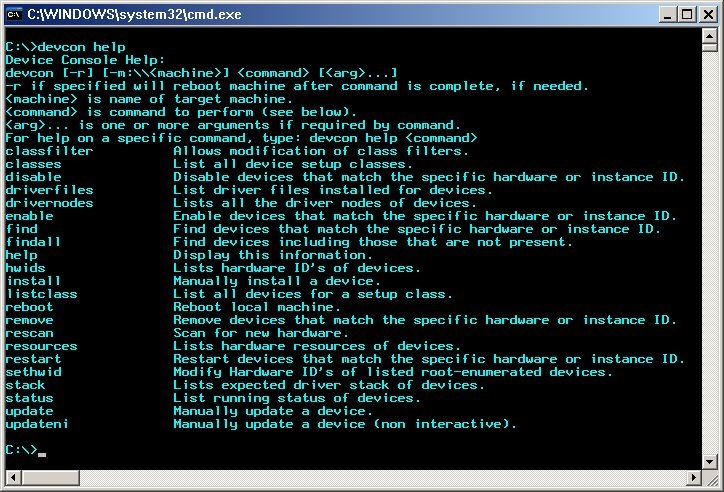
2 Next. Execute the following 2 commands:
devcon sethwid @ROOT\ACPI_HAL\0000 := +acpiapic_mp !acpiapic_up
devcon update c:\windows\inf\hal.inf acpiapic_mp
devcon.exe will let the automatic hardware detection find out the extra CPU (multicores) added.
Wait 'till you get prompted for a reboot.
Be brave Reboot! 🙂
There is pretty much more fun useful things you can do with devcon.exe such as disabling USBs from command line,
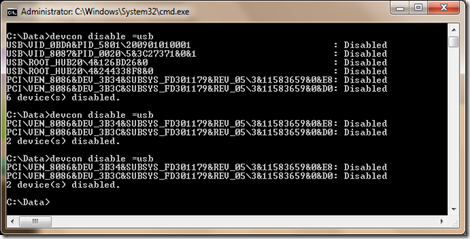
listing your PCI devices and so on:

You should now see all cores, hooray cores will appear in Task Manager / System Information.
Tags: cores, CPU, detect multiple cpus XP, devcon.exe command to detect hardware peripherals, doesn, enable multicore windows xp, exe, line, Microsoft, Task Manager System Information, update, virtual machine, why xp doesnt detect more cpus after install, windows enable disable usb command, work, XP
Posted in Virtual Machines, Windows | No Comments »
Wednesday, February 17th, 2016 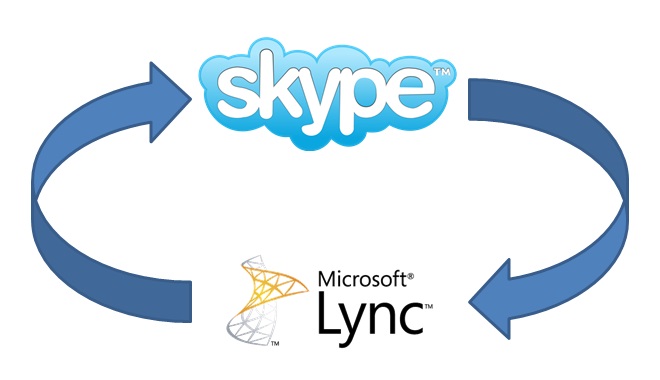
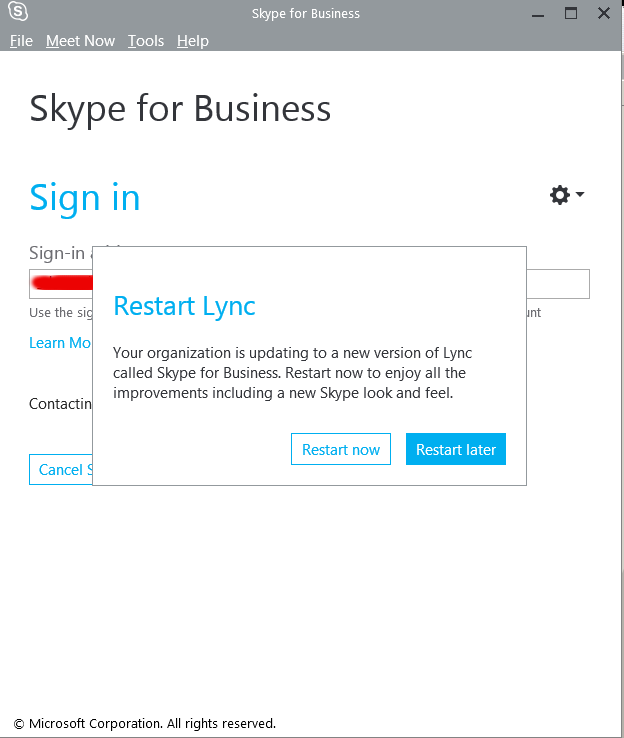
If you are working in a large corporation such as (HP or HPE – Hewlett Packard Enterprise (HPE is the new splitted company brand name for the Software and Servers division of ex-HP) / IBM / Dell or any other company with the size of top fortune companies and you Computer Domain admistrator has forced your work PC to already use Skype for Business instead of the good tested Lync Client along with the goodies and PROS of having the newer Skype for Business (S4B) as usual for old fashened users like me and the avarage employee the New S4B interface will turn into nightmare with all this circled names and more buttons and the annoying Skype Blue Theme.
For anyone who has even basic idea of design and aesthetics, I believe the default Theme of Skype For Business will be evaluated as a serious "interface downgrade" compared to the simple looking Interface and White Skin of Lync Client.
With this said it will be logical for the end user like me to desire to customize a bit default S4B Skin to make it more elegant looking like Lync 2013 client but guess what there is a Surprise if you google around, Skype For Business just like the regular Skype client doesn't have integrated support for Skins / Themes.
To make the horror complete, many big corporations are choosing to migrate their Email infrastructure from the classical and well tested Windows Domain with Exchange Server to Microsoft Office 365 (Cloud services),
which makes the dependency on M$ products even bigger and in the long run control and spying on people's email and information (people's data security even worsers) as you know how hackable Windows prooved to be over the years.
Well for those who remember the good old times of IRC (Internet Relay Chat) and ICQ (I seek you) 🙂 and even Jabber when chatting emerged and boomed into popularity all the chat clients nomatter whether it was a free software under GPL / BSD license or it was a Proprietary licensed software, there was always alternative on the Interface Outlook of the Chat clients and on practically all popular Chat / Audio / Video communication Standards / Protocols, there used to be some option for the users to use either a different client or to customize the outook of the program.
Well now the big surprise with Skype Protocol which was purchased by Microsoft some years ago back is this terrible already M$ program doesn't have any option for changing the Theme and even basic customization besides the ones provided by default by Microsoft. For my surprise such a trivial and everybody used program like Skype with perhaps already 1.5 or 2 Billion or even more users doesn't have even basic support for customization !!!
To make the Skype program use horror story even worser Microsoft does upgrade the Skype client agressively and for the last 3 or 4 years Skype is owned by Microsoft the interface gets changing slightly or even completely with every next release.
Now with latest Skype versions since a 1.5 year or so the agressiveness of the program even increased further as it wants you to automatically upgrade, every time you run Skype.
With this in mind and the fact, I have to spend about 8 to 10 years on the PC with Skype for Business switched on on my notebook with no option to use Lync for communication because of the Domain Exchange forcing the changes to all of the users within our EMEA.
So after some serious digging on the Internet, the only work around to change the Skype For Business Theme available by a couple of sources is to Revert Back the Skype User Interface to Lync 2013 Client by changing a value to the Windows registry and get back the good old elegant Lync interface instead of S4B.
The Windows registry value that needs to be changed is:
[HKEY_CURRENT_USER\Software\Microsoft\Office\Lync]
The default value there is:
Windows Registry Editor Version 5.00
[HKEY_CURRENT_USER\Software\Microsoft\Office\Lync]
"CanSharePptInCollab"=dword:00000001
"CanAppShareInCollab"=dword:00000001
"CanShareOneNoteInCollab"=dword:00000001
"EnableSkypeUI"=hex:01,00,00,00
The value has to be changed to:
Windows Registry Editor Version 5.00
[HKEY_CURRENT_USER\Software\Microsoft\Office\Lync]
"CanSharePptInCollab"=dword:00000001
"CanAppShareInCollab"=dword:00000001
"CanShareOneNoteInCollab"=dword:00000001
"EnableSkypeUI"=hex:00,00,00,00
The value "EnableSkypeUI"=hex:01,00,00,00 – instructs so Skype for Business UI is used:
"EnableSkypeUI"=hex:00,00,00,00 – instructs S4B to revert back to Old Lync interface
For a little bit more on the value check out also articles – Alternate Between The Microsoft Lync and Skype for Business
and Managing the Skype Client UI in Skype for Business.
To modify about registry setting you will either have to manually run regedit from Start -> Run -> cmd.exe or use Windows button + R and type inside run box:
regedit
Or even better just use and Run (Click over twice) on this skype.reg (download) sciprt which will modify registry
Because the Domain administrator has forced a policy to automatically offer Change of Lync Interface to Skype for Business on every notebook boot to disable EnableSkypeUI registry value and make Skype appear in the good old Lync UI, I've created also a tiny Batch script lync_ui.bat with following content:
cd \
cd \Users\georgi\scripts
regedit /s skype.reg
exit
You can download lync_ui.bat from here
Note that both skype.reg and lync_ui.bat should be existing in my case in C:\Users\georgi\scipts , change this path to whatever your username is and create scripts folder in your User Home dir.
If unsure about the home directory name you can check it from command prompt with:
C:\Users\georgi> echo %HOMEPATH%
\Users\georgi
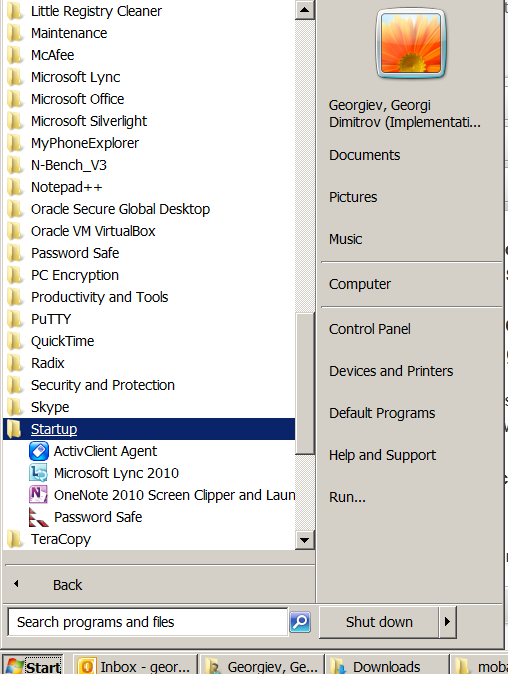
To make the lync_ui.bat (script invoking skype.reg) be executed on every PC boot, you need to add it to:
Start -> All Programs -> StartUp
Well this is it now you will have back the Lync UI, Enjoy! 🙂
Tags: basic, Business, com, interface, make, Microsoft, option, Pc, Run Click, Skype, UI, username, value
Posted in Everyday Life, Outlook, System Administration, Various, Windows | 2 Comments »
Wednesday, October 26th, 2011 
After configuring a new Qmail+POP3+IMAP with vpopmail install based on Thibs QmailRocks I faced some issues with configuring mail accounts in Mozilla Thunderbird. The problem is also present in Microsoft Outlook Express as some colleagues working on Windows reported they can't configure there email accounts in Outlook either.
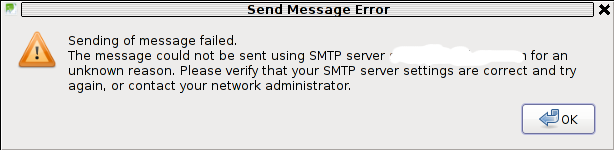
The issue was like this, the mail server is running fine, and I can send without issues directly from the server shell with mail command, however in Thunderbird I could only fetch the messages via POP3 or IMAP, whever I give a try to send one I got the error:
Sending of Message Failed

The message could not be sent using SMTP server for an

unknown reason. Please verify that SMTP server settings are correct and try

again, or contact your network administrator
Here is a screenshot preseting the issue, taken from my Thunderbird:
The reason for this error is an automatic setting that is being configured in Thunderbird in New Account Creation time:
Thunderbird queries the mail server and asks for the type of encryptions available for both POP3 and SMTP MX primary host.
Seeing that it supports STARTTLS data transfer encryption mail protocol for both POP3 / IMAP, Thunderbirds auto configuration does place STARTTLS to be used with SMTP and POP3
The incorrect setting which is being automatically filled in can be checked in following these Thunderbird menus:
Edit -> Account Settings -> Outgoing Server (SMTP)
If the configured mail account MX server is let's say mail.exampledomain.com one needs to Edit the settings for this SMTP auto configured domains and he will see some example settings like the one shown in the below screenshot:
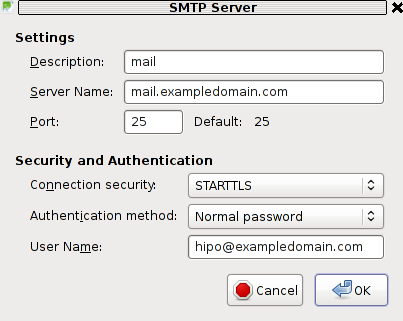
You can see from above's screenshot that the auto configured Connection Security setting is improperly set to: STARTTLS. Usually STARTTLS should be working on SMTP port 25, however it seems the problem consists in the fact that the MAIL FROM and RCPT TO is sent in incorrec time (ain't sure if its before or after the encryption).
Therefore the consequence of this failure to use STARTTLS being detected as the correct encryption type for SMTP lead that the new configured mail server clients were unable tot properly connect and send emails via the SMTP listening server on port 25.
I give a try and changing the Connection Security:STARTTLS to Connection SecuritySSL/TLS immediately resolved the SMTP sending issues. Therefore as I found out the SMTP server is working just fine configured to use my QMAIL on port 465 with Connection Security: SSL/TLS and hence to work around the SMTP sending issues, decided to completely disable the STARTTLS encryption to be reported as a supported encryption by qmail-smtpd
On Thibs QmailRocks and some other Qmail installstions based more or less on qmail.jms1.net service damemontools scripts, this can be done by simply changing a line:
DENY_TLS=0
to
DENY_TLS=1
The qmail start up scripts which these change has to be done if one has configured a mail server based on QmailRocks Thibs updated tutorial are:
1. /service/qmail-smtpd
2. /service/qmail-smtpdssl
A quick way to do the DENY_TLS=0 to DENY_TLS=1 changes via sed is like this:
qmail# sed -e 's#DENY_TLS=0#DENY_TLS=1#g' /service/qmail-smtpd/run >> /tmp/qmail-smtpd-run;qmail# sed -e 's#DENY_TLS=0#DENY_TLS=1#g' /service/qmail-smtpdssl/run >> /tmp/qmail-smtpdssl-run;qmail# mv /tmp/qmail-smtpd-run /service/qmail-smtpd/run

qmail# mv /tmp/qmail-smtpdssl-run /service/qmail-smtpdssl/run
After the correct modifications, of course as usual a qmail restart is required, e.g.:
qmail# qmailctl restart

...
Making this changes, irradicated the sending issues. It's best practice that the account which had issues with sending before is deleted and recreated from scratch.
Hope this helps somebody out there who encounters the same issue. Cheers 😉
Tags: account creation, account settings, administratorHere, anunknown, auto configuration, com, configure, configured, connection security, creation time, email accounts, encryption, Express, host, How to, inco, issue, mail account, mail accounts, mail command, mail protocol, mail server, Microsoft, microsoft outlook express, Mozilla, mozilla thunderbird, mx server, network administrator, Outgoing, outgoing server, outlook, outlook mail, place, pop, Qmail, QmailRocks, reason, screenshot, Sending, server settings, server smtp, Shell, smtp, smtp port 25, starttls, thunderbirds, time, TLS, tmp, type, working
Posted in FreeBSD, Linux, Qmail, System Administration, Various, Web and CMS | 5 Comments »
Tuesday, January 17th, 2012 
My beloved sister was complaining games were failing to properly be played with wine emulator , therefore I decided to be kind and help her by installing a Windows XP to run inside a Virtual Machine.My previous install experiments with running MS Windows XP on Linux was on Debian using QEMU virtualmachine emulator.
However as Qemu is a bit less interactive and slower virtualmachine for running Windows (though I prefer it for being completely free software), this time I decided to install the Windows OS with Virtualbox.
My hope was using VirtualBox would be a way easier but I was wrong… I've faced few troubles and I thought many people who initially try to install Virtualbox VM to run Windows on Ubuntu and other Debian based Linux distros will probably experience the same problems as mine, so here is how this article was born.
Here is what I did to have a VirtualBox OS emulator to run Windows XP SP2 on Ubuntu 11.10 Linux
1. Install Virtualbox required packages with apt
root@ubuntu:~# apt-get install virtualbox virtualbox-dkms virtualbox-guest-dkms
root@ubuntu:~# apt-get install virtualbox-ose-dkms virtualbox-guest-utils virtualbox-guest-x11

...
If you prefer more GUI or lazy to type commands, the Software Package Manager can also be used to straight install the same packages.
virtualbox-dkms virtualbox-guest-dkms packages are the two which are absolutely necessery in order to enable VirtualBox to support installing Microsoft Windows XP. DKMS modules are also necessery to be able to emulate some other proprietary (non-free) operating systems.
The DKMS packages provide a source for building Vbox guest (OS) additional kernel modules. They also require the kernel source to be install otherwise they fail to compile.
Failing to build the DKMS modules will give you error every time you try to create new VirtualMachine container for installing a fresh Windows XP.
The error happens if the two packages do not properly build the vboxdrv extra Vbox kernel module while the Windows XP installer is loaded from a CD or ISO. The error to pop up is:
Kernel driver not installed (rc=-1908)
The VirtualBox Linux kernel driver (vboxdrv) is either not loaded or there is a permission problem with /dev/vboxdrv. Please reinstall the kernel module by executing
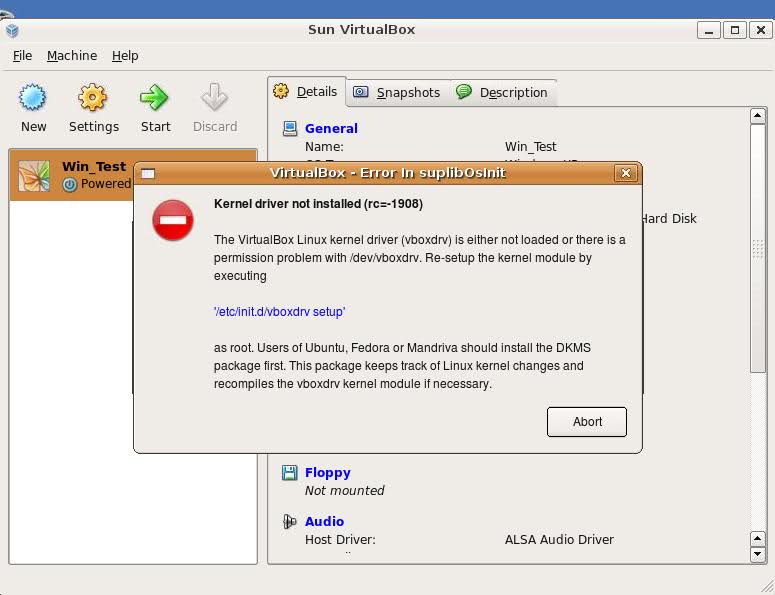
To fix the error:
2. Install latest Kernel source that corresponds to your current kernel version
root@ubuntu:~# apt-get install linux-headers-`uname -r`

...
Next its necessery to rebuild the DKMS modules using dpkg-reconfigure:
3. Rebuild VirtualBox DKMS deb packages
root@ubuntu:~# dpkg-reconfigure virtualbox-dkms

...

root@ubuntu:~# dpkg-reconfigure virtualbox-guest-dkms

...

root@ubuntu:~# dpkg-reconfigure virtualbox-ose-dkms

...
Hopefully the copilation of vboxdrv kernel module should complete succesfully.
To test if all is fine just load the module:
4. Load vboxdrv virtualbox kernel module
root@ubuntu:~# modprobe vboxdrv

root@ubuntu:~#
If you get some error during loading, this means vboxdrv failed to properly compile, try read thoroughfully what the error is and fix it) ;).
As a next step the vboxdrv has to be set to load on every system boot.
5. Set vboxdrv to load on every Ubuntu boot
root@ubuntu:~# echo 'vboxdrv' >> /etc/modules
I am not sure if this step is required, it could be /etc/init.d/virtualbox init script automatically loads the module, anyways putting it to load on boot would do no harm, so better do it.
That's all now, you can launch VirtualBox and use the New button to initiate a new Virtual Machine, I will skip explaining how to do the configurations for a Windows XP as most of the configurations offered by default would simply work without any tampering.
After booting the Windows XP installer I simply followed the usual steps to install Windows and all went smoothly.
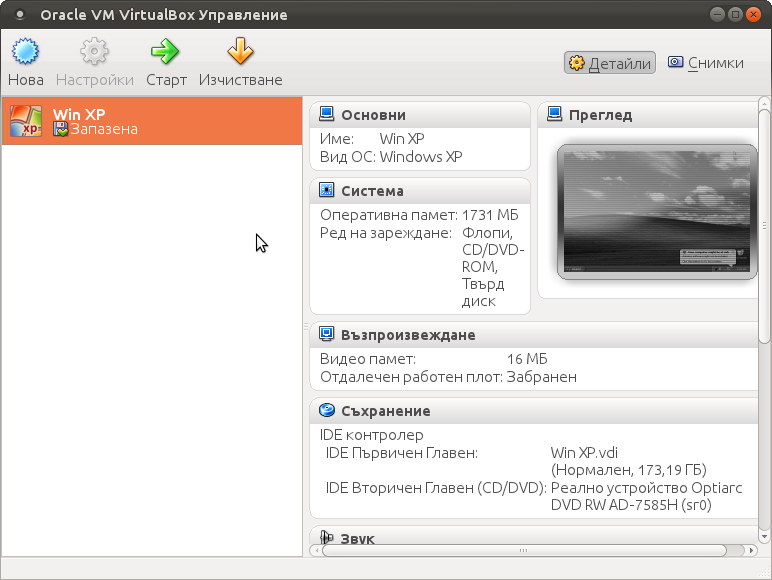
Below you see a screenshot showing the installed Windows XP Virtualbox saved VM session. The screenshot letters are in Bulgarian as my sisters default lanaguage for Ubuntu is bulgarian 😉
I hope this article helps someone out there. Please drop me a comment if you experience any troubles with it. Cya 🙂
Tags: Auto, beloved sister, DKMS, Draft, Failing, free operating systems, guest os, How to, init, init script, Install, ISO, kernel modules, kernel source, Linux, loading, Microsoft, microsoft windows, ms windows, necessery, Permission, qemu, root, screenshot, Set, software, software package, system boot, time, type, Ubuntu, uname, vbox, Virtual, virtual machine, VirtualBox, virtualmachine, vm, Windows, windows os, windows xp, windows xp sp2, wine, x11
Posted in Linux, Linux and FreeBSD Desktop, Linux Audio & Video | 1 Comment »
Tuesday, April 1st, 2014 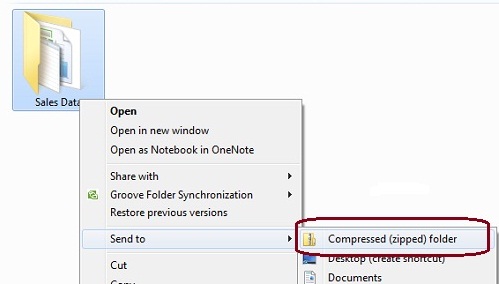
I'm working on a decomissioning project (for those who hear decomissioning for a first time – in corporate world this means removal of service/s or assigned resources of a server or a physical server hardware that is not to be used in future or is obsolete). The decomissioning includes removal of Apache Tomcat (Software Configuration Item CI – in HP terms) from Microsoft Windows 2007 – Service Pack 2.
Part of decomissioning is of course to create backup of Tomcat Application server and for that I needed to create compressed archive of Tomcat instances. Usually I do archives on Windows using Winrar or Winzip but this time as the server productive server has the minimum installed there was no any external vendor produced archiving software available.
My memories from past were that there is a native compressing program embedded into Windows as I've unzipped compressed archives on Win hosts with no need for external WinZip. However until so far I never did .ZIP archive with no available external uncompress software.
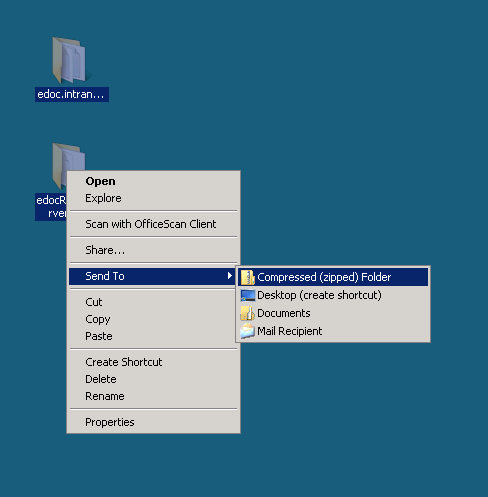
Using Winzip or Winrar so far to make archive from a number of files I used to select files to enter Archive press right mouse button and select Create Archive (Add To Archive) so I expected this will work whenever no Winrar, however there was no obvious button like this, so I googled a bit to find out how is that possible ending up on Article from Microsoft titled "Compress and uncompress files (zip files)", there is a dumb proof video teaching Compressing files with Microsoft default ZIP program is done by the the weird "Send To" menu 🙂
Selecting files to enter Archive;
–> (Click Right Mouse Button) -> (Send To Compressed Zipped Folder)
Honestly If I didn't checked the net probably I will never think of looking it there.
Tags: algorithm, archive, Create Archive, hp, make, memories, Microsoft, microsoft windows, mouse button, need, past, physical server, program, proof, server, server hardware, software, time, Tomcat Application, Win, Windows, WinZip, working, zip
Posted in Everyday Life, System Administration, Various, Windows | 1 Comment »
Tuesday, November 25th, 2014 
If you're a system administrator of Windows Servers or or just a PC support in a small company and you have to fix PCs running Microsoft Windows XP / 7 / 8 daily, sooner or later you will be interested into how to optimize your windows maintainance work to be able to do more adminsitration work for less time.
M$ Windows OS has evolved a lot over the past 10+ years and many of the features available GUI are now either possibile to be done via a standard commands and the GUI interfaces. Various adminsitration and common daily work simplification goodies are now accessible through quick access shortcuts and commands.
Virtually all Windows operating system environment could be now customized by using such shortcuts, this reduces the multitude of annoying double clicks which are truely pissing off sysadmins and tech-supports involved in Windows Ticket solving.
Win Shortcuts and Commands helps to:
- Quickly invoke almost all System Settings available from Windows Control Panel
- Access all admins tools GUIs throguh command
- Speed up Opening Video, Pictures, Documents, Downloads folders start Windows Update, Configure Printers / Fax / Add Sharings
etc..
A lot of the commands were new to me thus I decided to try out all of the commands in command prompt (cmd). Many of the tools down-mentioned were news to me and let me understand better on Windows Internals, so if you time try them out.
| Function | Comand |
| Open Documents Folder | Start menu -> Search (Type documents) |
| Open Videos folder | Start -> Search (Type videos) |
| Open Downloads Folder | Start -> Search (Type downloads) |
| Open Favorites Folder | favorites |
| View Recent messages of your PC | Start menu -> Search (Type recent) |
| Open Recent Folder | N/A |
| Open Pictures Folder | Start menu -> Search (Type pictures) |
| Windows Sideshow | control.exe /name Microsoft.WindowsSideshow |
| Windows CardSpace (Windows ID Manager) | control.exe /name Microsoft.cardspace |
| Windows Anytime Upgrade | Start menu -> Search dialog (Type WindowsUpdate) |
| Taskbar and Start Menu | control.exe /name Microsoft.TaskbarandStartMenu |
| Troubleshooting | control.exe /name Microsoft.Troubleshooting |
| User Accounts (Run user accounts Interface) | control.exe /name Microsoft.UserAccounts |
| Adding a new Device | devicepairingwizard |
| Add Hardware Wizard | hdwwiz |
| Advanced User Accounts Management | netplwiz |
| Advanced User Accounts (Authorization Mgr) | azman.msc |
| Windows Backup and Restore | sdclt |
| Bluetooth File Transfer | fsquirt |
| Calculator | calc |
| Certificates Manager | certmgr.msc |
| Change Computer Performance Settings | systempropertiesperformance (Remove visual effects) |
| Change Data Execution Prevention Settings | systempropertiesdataexecutionprevention |
| Change Data Execution Prevention Settings | printui |
| Character Map | charmap |
| ClearType Tuner | cttune (Make text onscreen more readable) |
| Color Management | colorcpl |
| Command Prompt | cmd |
| Component Services | comexp.msc |
| Component Services | dcomcnfg |
| Computer Management Interface | compmgmt.msc |
| Computer Management Interface | compmgmtlauncher |
| Connect to Network Project via Network | netproj |
| Connect to a Projector | displayswitch (Alias for Fn key + F4) |
| Run Control Panel command | control |
| Create A Shared Folder Wizard | shrpubw |
| Create a System Repair Disc | recdisc |
| Credential Backup and Restore Wizard | credwiz |
| Data Execution Prevention | systempropertiesdataexecutionprevention |
| Date and Time | timedate.cpl |
| Default Location | locationnotifications |
| Device Manager | devmgmt.msc |
| Device Manager | hdwwiz.cpl |
| Device Pairing Wizard | devicepairingwizard |
| Diagnostics Troubleshooting Wizard | msdt |
| Digitizer Calibration Tool | tabcal |
| DirectX Diagnostic Tool | dxdiag |
| Disk Cleanup | cleanmgr |
| Disk Defragmenter | dfrgui |
| Disk Management | diskmgmt.msc |
| Display (Change font size of text onscreen) | dpiscaling |
| Display Color Calibration | dccw |
| Display Switch | displayswitch |
| DPAPI Key Migration Wizard | dpapimig |
| Driver Verifier Manager | verifier |
| Ease of Access Center | utilman |
| EFS Wizard | rekeywiz |
| Event Viewer | eventvwr.msc |
| Fax Cover Page Editor | fxscover |
| File Signature Verification | sigverif |
| Font Viewer | fontview |
| Game Controllers | joy.cpl |
| Windows Getting Started Iface | gettingstarted |
| IExpress Wizard | iexpress |
| Another alias for Getting Started | irprops.cpl |
| Install or Uninstall Display Languages | lusrmgr |
| Internet Explorer | iexplore |
| Run Internet Explorer Internet Options | inetcpl.cpl |
| iSCSI Initiator Configuration Tool | iscsicpl |
| Language Pack Installer | lpksetup |
| Local Group Policy Editor | gpedit.msc |
| Local Security Policy | secpol.msc |
| Local Users and Groups | lusrmgr.msc |
| Location Activity | locationnotifications |
| Magnifier | magnify |
| Malicious Software Removal Tool | mrt (Might be not existent on some Windows versions) |
| Manage Your File Encryption Certificates | rekeywiz |
| Math Input Panel | mip |
| Microsoft Management Console | mmc |
| Microsoft Support Diagnostic Tool | msdt |
| Mouse | main.cpl |
| NAP Client Configuration | napclcfg.msc |
| Narrator | narrator |
| Network Connections | ncpa.cpl |
| New Scan Wizard | wiaacmgr |
| Notepad | notepad |
| ODBC Data Source Administrator | odbcad32 |
| ODBC Driver Configuration | odbcconf |
| On-Screen Keyboard | osk |
| Paint | mspaint |
| Pen and Touch | tabletpc.cpl |
| People Near Me | collab.cpl |
| Performance Monitor | perfmon.msc |
| Performance Options | systempropertiesperformance |
| Phone and Modem | telephon.cpl |
| Phone Dialer | dialer |
| Power Options | powercfg.cpl |
| Presentation Settings | presentationsettings |
| Print Management | printmanagement.msc |
| Printer Migration | printbrmui |
| Printer User Interface | printui |
| Private Character Editor | eudcedit |
| Problem Steps Recorder | psr |
| Programs and Features (Install / Uninstall) | appwiz.cpl |
| Protected Content Migration | dpapimig |
| Region and Language | intl.cpl |
| Registry Editor | regedit |
| Registry Editor 32 | regedt32 |
| Remote Access Phonebook | rasphone |
| Remote Desktop Connection | mstsc |
| Resource Monitor | resmon |
| Resultant Set of Policy | rsop.msc |
| SAM Lock Tool | syskey |
| Screen Resolution | desk.cpl |
| Securing the Windows Account Database | syskey |
| Services | services.msc |
| Set Program Access and Computer Defaults | computerdefaults |
| Share Creation Wizard | shrpubw |
| Shared Folders | fsmgmt.msc |
| Snipping Tool | snippingtool |
| Sound | mmsys.cpl |
| Sound recorder | soundrecorder |
| SQL Server Client Network Utility | cliconfg |
| Sticky Notes | stikynot |
| Stored User Names and Passwords | credwiz |
| Sync Center | mobsync |
| System Configuration | msconfig |
| System Configuration Editor | sysedit |
| System Information | msinfo32 |
| System Properties | sysdm.cpl |
| System Properties (Advanced Tab) | systempropertiesadvanced |
| System Properties (Computer Name Tab) | systempropertiescomputername |
| System Properties (Hardware Tab) | systempropertieshardware |
| System Properties (Remote Tab) | systempropertiesremote |
| System Properties (System Protection Tab) | systempropertiesprotection |
| System Restore | rstrui |
| Task Manager | taskmgr |
| Task Scheduler | taskschd.msc |
| Trusted Platform Module (TPM) Management | tpm.msc |
| User Account Control Settings | useraccountcontrolsettings |
| Utility Manager | utilman |
| Version Reporter Applet | winver |
| Volume Mixer | sndvol |
| Windows Action Center | wscui.cpl |
| Windows Activation Client | slui (Runs on Windows license activation time) |
| Windows Anytime Upgrade Results | windowsanytimeupgraderesults |
| Windows CardSpace | infocardcpl.cpl |
| Windows Disc Image Burning Tool | isoburn (Command line tool to burn images) |
| Windows DVD Maker | dvdmaker (N/A on Windows 7, 8) |
| Windows Easy Transfer | migwiz (N/A on many Windows versions) |
| Run Windows Explorer | explorer |
| Windows Fax and Scan | wfs |
| Windows Features | optionalfeatures |
| Windows Firewall | firewall.cpl |
| Windows Firewall with Advanced Security | wf.msc |
| Windows Journal | journal (N/A on Windows 7) |
| Windows Media Player | wmplayer (N/A on many Windows releases) |
| Windows Memory Diagnostic Scheduler | mdsched (Check your PC memory on next boot) |
| Windows Mobility Center (Stats) | mblctr |
| Windows Picture Acquisition Wizard | wiaacmgr |
| Windows PowerShell | powershell |
| Windows PowerShell ISE | powershell_ise |
| Windows Remote Assistance | msra |
| Windows Repair Disc | recdisc |
| Windows Script Host | wscript |
| Windows Update | wuapp |
| Windows Update Standalone Installer | wusa |
| Show Windows Version | winver |
| WMI Management | wmimgmt.msc |
| WordPad | write |
| XPS Viewer | xpsrchvw |
Most of above commands works fine with Windows XP, Vista and Windows 7 / 8, Windows 2003 / 2012, however some cmds are missing across some win versions.
Here is list of other useful Windows shortcut keys:
General keyboard shortcuts
- Ctrl+C (Copy)
- Ctrl+X (Delete selected item and save a copy to the clipboard)
- Ctrl+V (Paste)
- Ctrl+Z (Undo)
- Delete (Delete)
- Shift+Delete (Delete the selected item permanently without moving the item to the Recycle Bin)
- Ctrl while dragging an item (Copy the selected item)
- Ctrl+Shift while dragging an item (Create a shortcut to the selected item)
- F2 key (Rename the selected item)
- Ctrl+Right Arrow (Move the cursor to the beginning of the next word)
- Ctrl+Left Arrow (Move the cursor to the beginning of the previous word)
- Ctrl+Down Arrow (Move the cursor to the beginning of the next paragraph)
- Ctrl+Up Arrow (Move the cursor to the beginning of the previous paragraph)
- Ctrl+Shift with any arrow key (Highlight a block of text)
- Shift with any arrow key (Select more than one item in a window or on the desktop, or select text in a document)
- Ctrl+A (Select all)
- F3 key (Search for a file or a folder)
- Alt+Enter (View the properties for the selected item)
- Alt+F4 (Close the active item, or exit the active program)
- Alt+Enter (Display the properties of the selected object)
- Alt+Spacebar (Open the shortcut menu for the active window)
- Ctrl+F4 (Close the active document in programs that enable multiple documents to be open at the same time)
- Alt+Tab (Switch between the open items)
- Alt+Esc (Cycle through items in the order in which they were opened)
- F6 key (Cycle through the screen elements in a window or on the desktop)
- F4 key (Display the Address bar list in My Computer or in Windows Explorer)
- Shift+F10 (Display the shortcut menu for the selected item)
- Alt+Spacebar (Display the System menu for the active window)
- Ctrl+Esc (Display the Start menu)
- Alt+Underlined letter in a menu name (Display the corresponding menu)
- Underlined letter in a command name on an open menu (Perform the corresponding command)
- F10 key (Activate the menu bar in the active program)
- Right Arrow (Open the next menu to the right, or open a submenu)
- Left Arrow (Open the next menu to the left, or close a submenu)
- F5 key (Update the active window)
- Backspace (View the folder one level up in My Computer or Windows Explorer)
- Esc (Cancel the current task)
- Shift when you insert a CD into the CD drive (Prevent the CD from automatically playing)
- Ctrl+Shift+Esc (Open Task Manager)
Dialog box keyboard shortcuts
- Ctrl+Tab (Move forward through the tabs)
- Ctrl+Shift+Tab (Move backward through the tabs)
- Tab (Move forward through the options)
- Shift+Tab (Move backward through the options)
- Alt+Underlined letter (Perform the corresponding command, or select the corresponding option)
- Enter (Perform the command for the active option or button)
- Spacebar (Select or clear the check box if the active option is a check box)
- Arrow keys (Select a button if the active option is a group of option buttons)
- F1 key (Display Help)
- F4 key (Display the items in the active list)
- Backspace (Open a folder one level up if a folder is selected in the Save As or Open dialog box)
Microsoft natural keyboard shortcuts
- Windows Logo (Display or hide the Start menu)
- Windows Logo+Break (Display the System Properties dialog box)
- Windows Logo+D (Display the desktop)
- Windows Logo+M (Minimize all the windows)
- Windows Logo+Shift+M (Restore the minimized windows)
- Windows Logo+E (Open My Computer)
- Windows Logo+F (Search for a file or a folder)
- Ctrl+Windows Logo+F (Search for computers)
- Windows Logo+F1 (Display Windows Help)
- Windows Logo+ L (Lock the keyboard)
- Windows Logo+R (Open the Run dialog box)
- Windows Logo+U (Open Utility Manager)
Accessibility keyboard shortcuts
- Right Shift for eight seconds (Switch FilterKeys on or off)
- Left Alt+left Shift+Print Screen (Switch High Contrast on or off)
- Left Alt+left Shift+Num Lock (Switch the MouseKeys on or off)
- Shift five times (Switch the StickyKeys on or off)
- Num Lock for five seconds (Switch the ToggleKeys on or off)
- Windows Logo +U (Open Utility Manager)
Windows Explorer keyboard shortcuts
- End (Display the bottom of the active window)
- Home (Display the top of the active window)
- Num Lock+Asterisk sign (*) (Display all the subfolders that are under the selected folder)
- Num Lock+Plus sign (+) (Display the contents of the selected folder)
- Num Lock+Minus sign (-) (Collapse the selected folder)
- Left Arrow (Collapse the current selection if it is expanded, or select the parent folder)
- Right Arrow (Display the current selection if it is collapsed, or select the first subfolder)
Keyboard Shortcuts for Character Map
After you double-click a character on the grid of characters, you can move through the grid by using the keyboard shortcuts:
- Right Arrow (Move to the right or to the beginning of the next line)
- Left Arrow (Move to the left or to the end of the previous line)
- Up Arrow (Move up one row)
- Down Arrow (Move down one row)
- Page Up (Move up one screen at a time)
- Page Down (Move down one screen at a time)
- Home (Move to the beginning of the line)
- End (Move to the end of the line)
- Ctrl+Home (Move to the first character)
- Ctrl+End (Move to the last character)
- Spacebar (Switch between Enlarged and Normal mode when a character is selected)
Microsoft Management Console (MMC) main window keyboard shortcuts
- Ctrl+O (Open a saved console)
- Ctrl+N (Open a new console)
- Ctrl+S (Save the open console)
- Ctrl+M (Add or remove a console item)
- Ctrl+W (Open a new window)
- F5 key (Update the content of all console windows)
- Alt+Spacebar (Display the MMC window menu)
- Alt+F4 (Close the console)
- Alt+A (Display the Action menu)
- Alt+V (Display the View menu)
- Alt+F (Display the File menu)
- Alt+O (Display the Favorites menu)
Microsoft Management Console (MMC) window keyboard shortcuts
- Ctrl+P (Print the current page or active pane)
- Alt+Minus sign (-) (Display the window menu for the active console window)
- Shift+F10 (Display the Action shortcut menu for the selected item)
- F1 key (Open the Help topic, if any, for the selected item)
- F5 key (Update the content of all console windows)
- Ctrl+F10 (Maximize the active console window)
- Ctrl+F5 (Restore the active console window)
- Alt+Enter (Display the Properties dialog box, if any, for the selected item)
- F2 key (Rename the selected item)
- Ctrl+F4 (Close the active console window. When a console has only one console window, this shortcut closes the console)
Remote desktop connection navigation
- Ctrl+Alt+End (Open the Microsoft Windows NT Security dialog box)
- Alt+Page Up (Switch between programs from left to right)
- Alt+Page Down (Switch between programs from right to left)
- Alt+Insert (Cycle through the programs in most recently used order)
- Alt+Home (Display the Start menu)
- Ctrl+Alt+Break (Switch the client computer between a window and a full-screen display)
- Alt+Delete (Display the Windows menu)
- Ctrl+Alt+Minus sign (-) (Put a snapshot of the complete client window area on the Terminal server clipboard and provide the same functionality as pressing Alt+Print Screen on a local computer)
- Ctrl+Alt+Plus sign (+) (Put a snapshot of the active window in the client on the Terminal server clipboard and provide the same functionality as pressing Print Screen on a local computer.)
Microsoft Internet Explorer navigation
- Ctrl+B (Open the Organize Favorites dialog box)
- Ctrl+E (Open the Search bar)
- Ctrl+F (Start the Find utility)
- Ctrl+H (Open the History bar)
- Ctrl+I (Open the Favorites bar)
- Ctrl+L (Open the Open dialog box)
- CtrlL+N (Start another instance of the browser with the same web address)
- Ctrl+O (Open the Open dialog box, the same as CTRL+L)
- Ctrl+P (Open the Print dialog box)
- Ctrl+R (Update the current webpage)
- Ctrl+W (Close the current window)
Complete list of Windows Keyboard Shorcuts is on Microsoft website
Tags: beginning, cmd, command prompt, complete list, control, Ctrl Left Arrow Move, Ctrl Right Arrow Move, Device, exe, firewall, General, joy, list, Microsoft, msconfig, phone, Programs, Securing, Shift Print Screen Switch High Contrast, Start, system administrator, Touch, Windows
Posted in Everyday Life, System Administration, Various, Windows | 1 Comment »


 etc.) and waiting some 30 minutes or so for the upgrade to complete.<br /> <br /> <img alt="windows-7-to-10-windows-setup-upgrade-this-pc-prompt" src="https://www.pc-freak.net/images/windows-7-to-10-windows-setup-upgrade-this-pc-prompt.png" style="width: 500px; height: 393px;" /></strong><br /> <br /> <strong>Then it was up to downloading some other updates on a few times and restarting the computer, each time the upgrades were made and all the computer was ready. I've installed Avira (AntiVirus) as I usually do on new PCs and downloaded a bunch of anti-malware (<em>MalwareBytes / Rfkill / Zemanta</em>) to make sure that the old upgraded WIndows was not already infected before the upgrade and I've found a bunch of malware, that got quickly cleared up.</strong><br /> <br /> Anyways I've tried also another tool called <a href="http://www.reimageplus.com"><strong>ReimagePlus - Online Computer Repair</strong> </a>in <strong>order to check whether there are no some broken WIndows system files after the upgrade </strong><br /> <br /> <img alt="Reimage_Repair-Windows-fix-windows-failing-services-and-broken-windows-installations-clear-up-malware" src="https://www.pc-freak.net/images/Reimage_Repair-Windows-fix-windows-failing-services-and-broken-windows-installations-clear-up-malware.png" style="width: 600px; height: 406px;" /><br /> (here I have to say I've done that besides <em>running in an Administrator command prompt</em> (<strong>cmd.exe</strong>) and running<br /> </p> <blockquote> <strong>sfc /scannow </strong> </blockquote> <p> <br /> <strong>command to check base system files integrity, which luckily showed no problems with the Win base system files.</strong><br /> <br /> <strong>ReimagePlus </strong>however showed some failed services and some failed programs that were previously installed from Windows 7 before the upgrade and even it showed indication for Trojan present on computer but since ReImagePlus is a payed software and I didn't have the money to spend on it, I just proceeded to clean up what was found manually.<br /> <br /> After that the computer ran fine, with the only strange thing that some data was from hard drive was red a bit too frequently, after a short call with a close friend (<strong>Nomen</strong>) - thx man, he suggested that the frequenty hdd usage might be related to <em><strong>Windows Search Indexing service database rebuilt</strong></em> and he adviced me to disable it which I did following <a href="https://www.howtogeek.com/howto/windows-vista/speed-up-or-disable-windows-search-indexing-in-vista/">this article How to speed up Windows by disabling Search Index Service.</a><br /> <br /> <br /> One issue worthy to mention <strong>stumbled upon after the upgrade was problems with Windows Explorer which was frequently crashing and "restarting the Desktop"</strong>, but once, I've enabled all <strong>upgrades from Microsoft and Applied them after some update failures and restarts</strong>, once all was up2date to all latest from Microsoft, Explorer started working normally. </p> <p> In the mean time while Windows Explorer was crashing in order to browse my file system I used the <a href="https://www.winnc.com/download/">good old Win Total Command or Norton Commander for Windows - WinNC (with its most cool bizzarre own File Explorer tool)</a>.<br /> <br /> <img alt="Windows-Total-commander-tool-running-on-MS-Windows-10" src="https://www.pc-freak.net/images/Windows-Total-commander-tool-running-on-MS-Windows-10.png" style="width: 500px; height: 374px;" /><br /> <br /> As I wanted to run a MalwareBytes scan and Antivirus under Windows Safe-Mode, I tried entering it by restarting the Computer and <strong>pressing F8 a number of times before the Windows boot screen but this didn't work </strong>as Safe-Mode boot was changed in Windows 10 to be callable in another way because of <strong>some extra Windows Boot speed up optimizations</strong>, in short<span style="font-size:16px;"><strong> the easiest way I found to enter Windows 10 Safe Mode was to Hit Start Button -> Choose Restart PC and keep pressed SHIFT button simultaneously</strong></span><br /> that calls a menu that gives you some restore options, along with safe mode options for those who want to read more on <a href="http://www.digitalcitizen.life/4-ways-boot-safe-mode-windows-10">How to Enter Safe mode (Command Prompt) on Windows 10 - please read this article.</a><br /> <br /> <br /> <br /> <img alt="Windows-10-enable-Safe-Mode-options-screen" src="https://www.pc-freak.net/images/Windows-10-enable-Safe-Mode-options-screen.jpg" style="width: 500px; height: 300px;" /> </p> <p> Once the upgrade was over and all below done unfortunately I've realized her previously installed <em>WIndows 7 is x86 (32 bit) version</em> and the <strong>Acer notebook 5736Z where it is being installed is actually X64 (64 bit), hence I've decided to upgrade my dear sis computer to a 64 Bit Windows 10 and researched online whether, there is some tool that is capable to upgrade WIndows 10 from 32 bit to Windows 10 64 bit just to find out the only option is to either use some program to creaty a backup of files on the PC or to manually copy files to external hard drive and reinstall with a Windows 10 64 bit bootable USB Flash or CD / DVD image, so I took my USB flash and used again Windows Media Creation Tool to burn Windows and re-install with the 64 bit iso.<br /> <br /> If you're wonder about why I choose to re-install finally<em> Win 10 32 bit with Win 64 bit</em>, because you might think performance difference might be not really so dramatic, then I have to say the Acer notebook is equipped with 4 Gigabytes of RAM Memory and Windows 10 32bit (Pro) could recognize a maximum of 3 Gigabytes (2.9 GB if I have to be precise) and 1 Gigabyte of memory stayes totally unusued with <em>Winblows 10 32 bit</em>.<br /> <br /> <em>Well that's all folks, the rest I did was to just boot from the USB drive just burned and re-install WIndows and copy my files from User profile / Downloads / Pictures / Music etc. to the same locations on the new installed Windows 10 professional 64 bit and enjoy the better performance.</em></strong> </p>)