Posts Tagged ‘Secure’

Generate and Use WiFi passwords via QR code on Linux

Monday, November 17th, 2025

If you’re running a WiFi network for a guest house / AirBNB, a small hotel or an office / home network and you’re tired of telling / dictating guests your long, complicated Wi-Fi password every time they visit, there’s a simple and secure way to share the WiFi name and password by putting the info in a WiFi authentication QR code. With a simple scan from their phone via a QR reader (which iPhones and all modern smartphones have), they can join your network instantly with zero typing.

In short — Why use a QR Code for Wi-Fi?

  • Convenience for guests: No more reading or spelling out your SSID and password.
  • Better security practice: Keep a strong password while still making access easy.
  • Works on most devices: Android and iOS both support Wi-Fi QR codes.

The Wi-Fi QR Code Standard Format

Smartphones understand Wi-Fi QR codes using this format:

WIFI:S:;T:;P:;;

  • S: your Wi-Fi network name (SSID)
  • T: encryption type (WPA, WEP, or nopass)
  • P: your Wi-Fi password
  • Everything ends with ;;

If your SSID or password contains special characters such as ; or \, they must be escaped using a backslash \.

Example:

SSID = WifiNetworkName
Password = @ss;word45123P4?#$!
Type = WPA

The final string becomes:

WIFI:S:WifiNetworkName;T:WPA;P:@ss\;word45123P4?#$!;;

How to Generate the QR Code Locally on Linux

You can generate the QR code locally using qrencode instead of uploading credentials online.

  1. Install qrencode (Debian/Ubuntu):

    # apt update # apt install qrencode

  2. Generate the QR code:

    # qrencode -o wifi-qr.png 'WIFI:S:WifiNetwork;T:WPA;P:P@ss\;word!;;'

    Example with colors and SVG output:

    # qrencode -t svg –foreground=FFFFFF –background=000000 \ -o qr-code.svg –inline –rle -s 10 \ "WIFI:S:MyWiFI;T:WPA;P:<Secret_Pass>;;"

    Use -s to increase size, e.g. -s 10.

  3. Print or share the generated wifi-qr.png.

Alternative: GUI / Desktop Approach

On GNOME-based systems (Ubuntu, Fedora), install the WiFi QR Code GNOME extension.

  • Open quick settings → Wi-Fi → “Show QR Code”
  • Right-click to copy or save for printing

Advanced: Using wifi-qr Tool

The wifi-qr tool provides CLI and GUI Wi-Fi QR generation.

# terminal interface to generate QR
# wifi-qr -t

wifi-qr screenshot

This command prints your current Wi-Fi SSID, encryption type, and password in clear text.

Security Tips

  • Limit where you display the QR
  • Rotate the password when needed
  • Use a guest network instead of your main one
  • Prefer WPA2/WPA3
  • Store QR images safely

How Guests Use the QR Code

  1. Open the phone camera (iOS/Android)
  2. Point it at the QR
  3. Tap “Join” when the Wi-Fi prompt appears

Final Thoughts

Generating a Wi-Fi QR code blends security with usability. Whether using qrencode, a GUI extension, or a website, guests connect instantly with a quick scan – no typing required.

How to Install and Use Netdata on Debian / Ubuntu Linux for Real-Time Server Monitoring

Wednesday, October 29th, 2025

netdata-server-monitoring-simple-tool-for-linux-bsd-windows

Monitoring system performance is one of the most overlooked aspects of server administration – until something breaks. That is absolutely true for beginners and home brew labs for learnings on how to manage servers and do basic system administration. For novice monitoring servers and infrastructure is not a big deal as usually testing machines are OK to break things. But still if you happen to host yourself some own brew websites a blog or Video streaming servers a torrent server, a tor server, some kind of public proxy or whatever of community advantageous solution for free at home, then monitoring will become important topic at some time when your small thing becomes big.

 While many sysadmins reach for Prometheus or Zabbix, using those comes with much of a complexity and effort to put in installing + setting up the overall server and agent clients as well as configure different monitoring checks.

Anyways sometimes you just need a lightweight, zero-configuration server monitoring tool that gives you instant visibility and you don’t want to learn much to have the basic and a bit of heuristic monitoring in the house.

That’s where Netdata shines.

What is Netdata?

Netdata is an open-source, real-time performance monitoring tool that visualizes CPU, memory, disk, network, and process metrics directly in your browser. It’s written in C and optimized for minimal overhead, making it perfect for both old hardware and modern VPS setups.

Netdata is built to primarly monitor different Linux OS distributions such as CentOS / RHEL / AlmaLinux / Rocky Linux / OpenSuse / Arch Linux / Amazon Linux and Oracle Linux it also has support for Windows OS as well as partially supports Mac OS and FreeBSD / OpenBSD / Dragonfly BSD and some other BSDs but some of its Linux features are not available on those.

1. Install Netdata real time performance monitoring tool


root@pcfreak:~# apt-cache show netdata|grep -i description -A3

Description-en: real-time performance monitoring (metapackage)

 Netdata is distributed, real-time, performance and health monitoring for

 systems and applications. It provides insights of everything happening on the

 systems it runs using interactive web dashboards.

Description-md5: 6843dd310958e94a27dd618821504b8e

Homepage: https://github.com/netdata/netdata

Section: net

Priority: optional

Netdata runs on most Linux distributions. On Debian or Ubuntu, installation is dead simple:

# apt update

# apt install curl -y


To be with the latest version since the default repositories provide usually older release you can use for install directly the kickstart installer from netdata.

# bash <(curl -Ss https://my-netdata.io/kickstart.sh)

This script automatically installs dependencies, sets up the Netdata daemon, and enables it as a systemd service.

Once installed, Netdata starts immediately. You can verify with:

# systemctl status netdata

2. Access the Web Dashboard


Open your browser and navigate to:

http://your-server-ip:19999/

You’ll be greeted by an intuitive dashboard showing real-time graphs of every aspect of your system — CPU load, memory usage, disk I/O, network bandwidth, and more.

If you’re running this on a public server, make sure to secure access with a firewall or reverse proxy, since by default Netdata is open to all IPs.

Example (UFW):

# ufw allow from YOUR.IP.ADDRESS.HERE to any port 19999

# ufw enable

3. Enable Persistent Storage

By default, Netdata stores only live data in memory. To retain historical data:
 

# vim /etc/netdata/netdata.conf

Find the [global] section and modify:

[global]

  history = 86400

  update every = 1

This keeps 24 hours of data at one-second resolution. You can also connect Netdata to a database backend for long-term archiving.

4. Secure with Basic Auth (Optional)

If you want simple password protection:

# apt install apache2-utils

# htpasswd -c /etc/netdata/.htpasswd admin

Then edit /etc/netdata/netdata.conf to include:

[web]

  mode = static-threaded

  default port = 19999

  allow connections from = localhost 192.168.1.*

  basic auth users file = /etc/netdata/.htpasswd

Restart Netdata:

# systemctl restart netdata

Why Netdata is Awesome 

Unlike Prometheus or Grafana, Netdata gives you instant insights without heavy setup. It’s ideal for:

  • Debugging high load or memory leaks in real time
  • Monitoring multiple VPS or embedded devices
  • Visualizing system resource usage with minimal CPU cost

And because it’s written in C, it’s insanely fast — often using less than 1% CPU on idle systems.

Final Thoughts

If you’re running any Linux server – whether for personal projects, web hosting, or experiments – Netdata is one of the easiest ways to visualize what’s happening under the hood.

You can even integrate it into your homelab or connect multiple nodes to the Netdata Cloud for centralized monitoring. And of course the full featured use and all the features of the tool are available just in the cloud version but that is absolutely normal. As the developers of netdata seems to have adopted the usual business model of providing things for free and same time selling another great things to make cash.

Netdata is really cool solution without cloud for people who needs to be able to quickly monitor like 20 or 50 servers without putting too much effort. You can simply install it across the machines and you will get a plenty of monitoring, just open each of the machines inside a separate browser tabs and take a look at what is going on once or 2 times a day. It is very old fashioned way to do monitoring but still can make sense if you don't want to bother too much with developing the monitoring or put any effort in it but still have a kind of obeservability on your mid size computer infrastructure.

So, next time your VPS feels sluggish or your load average spikes, fire up Netdata — your CPU will tell you exactly what’s wrong.

How to set the preferred cipher suite on Apache 2.2.x and Apache 2.4.x Reverse Proxy

Thursday, May 4th, 2017

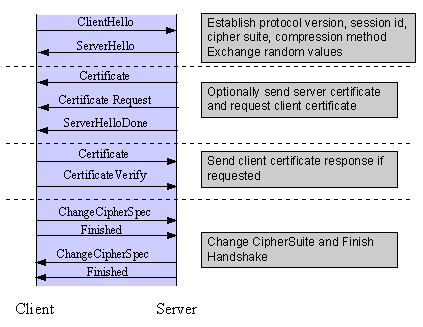
how-to-set-the-preferred-default-delivered-ssl-cipher-suite-apache-2.2-apache-2.4-how-ssl-handshake-works

1. Change default Apache (Reverse Proxy) SSL client cipher suite to end customer for Android Mobile applications to work

If you're a sys admin like me and you need  to support client environments with multiple Reverse Proxy Apache servers include old ones Apache version 2.2.x (with mod_ssl compiled in Apache or enabled as external module)
and for that reason a certain specific Apache Reverse Proxy certificate SSL encoding cipher default served suite change to be TLS_DHE_RSA_WITH_AES_128_CBC_SHA in order for the application to properly communicate with the server backend application then this article might help you.

There is an end user client application which is Live on a production servers some of which running on  backend WebSphere Application Servers (WAS) / SAP /  Tomcat servers and for security and logging purposes the traffic is being forwarded from the Apache Reverse Proxies (whose traffic is incoming from a roundup Load Balancers).

Here is a short background history of why cipher suite change is necessery?

The application worked fine and was used by a desktop PCs, however since recently there is an existent Android and Apple Store (iOS) mobile phone application and the Android Applications are unable to properly handle the default served Apache Reverse Proxy cipher suite and which forced the client to ask for change in the default SSL cipher suite to:

TLS_DHE_RSA_WITH_AES_128_CBC_SHA

By default, the way the client lists the cipher suites within its Client Hello will influence on Apache the selection of the cipher suite used between the client and server.

The current httpd.conf in Apache is configured so the ciphers for RP client cipher suite Hello transferred between Reverse Proxy -> Client are being provided in the following order:


1.    TLS_RSA_WITH_RC4_128_MD5
2.    TLS_RSA_WITH_RC4_128_SHA
3.    TLS_RSA_WITH_RC4_128_CBC_SHA
4.    TLS_DHE_RSA_WITH_AES_128_CBC_SHA


This has to be inverted so:

4. TLS_DHE_RSA_WITH_AES_128_CBC_SHA
becomes on the place of
1. TLS_RSA_WITH_RC4_128_MD5


A very good reading that helped me achieve the task as usual was Apache's official documentation about mod_ssl see here


So to fix the SSL/TLS cipher suite default served order use SSLCipherSuite and SSLHonorCipherOrder directives.


SSLCipherSuite directive is used to specify the cipher suites enabled on the server.
To dictate also  preferred cipher suite order directive and that's why you need SSLHonorCipherOrder directive (note that this is not available for older  Apache 2.x branch), the original bug for this directive can be seen within
 

For Example:


SSLHonorCipherOrder On
SSLCipherSuite RC4-SHA:AES128-SHA:AES256-SHA:DHE-RSA-AES128-SHA:DHE-RSA-AES256-SHA:DES-CBC3-SHA


So here is my fix for changing the Ciphersuite SSL Crypt order (notice the TLS_DHE_RSA_WITH_AES_128_CBC_SHA being given as first argument):


SSLHonorCipherOrder On
SSLCipherSuite TLS_DHE_RSA_WITH_AES_128_CBC_SHA:RC4-SHA:AES128-SHA:AES256-SHA:DHE-RSA-AES128-SHA:DHE-RSA-AES256-SHA:DES-CBC3-SHA

if you want also to enable TLSv1.2 certificate cipher support you can use also:
 

SSLProtocol -all +TLSv1.2

SSLHonorCipherOrder on


# Old Commented configuration from my httpd.conf – no RC4, 3DES allowed
#SSLCipherSuite "EECDH+ECDSA+AESGCM EECDH+aRSA+AESGCM EECDH+ECDSA+SHA384 EECDH+ECDSA+SHA256 EECDH+aRSA+SHA384 EECDH+aRSA+SHA256 EECDH+aRSA+RC4 EECDH EDH+aRSA 3DES-EDE-CBC-SHA RC4 !aNULL !eNULL !LOW !MD5 !EXP !PSK !SRP !DSS !RC4"


Because there was also requirement for a multiple of SSL cipher encryption (to support large range of both mobile and desktop computers and operating systems the final) cipher suite configuration in httpd.conf that worked for the client looked like so:
 

SSLCipherSuite ECDHE-RSA-AES128-GCM-SHA256:ECDHE-ECDSA-AES128-GCM-SHA256:ECDHE-RSA-AES256-GCM-SHA384:ECDHE-ECDSA-AES256-GCM-SHA384:DHE-DSS-AES128-GCM-SHA256:kEDH+AESGCM:ECDHE-RSA-AES128-SHA256:ECDHE-ECDSA-AES128-SHA256:ECDHE-RSA-AES128-SHA:ECDHE-ECDSA-AES128-SHA:ECDHE-RSA-AES256-SHA384:ECDHE-ECDSA-AES256-SHA384:ECDHE-RSA-AES256-SHA:ECDHE-ECDSA-AES256-SHA:DHE-DSS-AES128-SHA256:DHE-DSS-AES256-SHA:AES128-GCM-SHA256:AES256-GCM-SHA384:AES128-SHA:AES256-SHA:AES:CAMELLIA:DES-CBC3-SHA:!aNULL:!eNULL:!EXPORT:!DES:!RC4:!MD5:!PSK:!aECDH:!EDH-DSS-DES-CBC3-SHA:!EDH-RSA-DES-CBC3-SHA:!KRB5-DES-CBC3-SHA:!DHE-RSA-AES128-GCM-SHA256:!DHE-RSA-AES256-GCM-SHA384:!DHE-RSA-AES128-SHA256:!DHE-RSA-AES256-SHA:!DHE-RSA-AES128-SHA:!DHE-RSA-AES256-SHA256:!DHE-RSA-CAMELLIA128-SHA:!DHE-RSA-CAMELLIA256-SHA


Once this was done the customer requested HTTP cookie restriction to be added to the same virtual host.
There initial request was to:

2. Set HTTP cookie secure flag and HttpOnly on every cookie that is not being accessed from Internal website JavaScript code

To make Apache Reverse Proxy to behave that way here is the httpd.conf config added to httpd.conf
 

# vim httpd.conf


   #Header edit Set-Cookie ^(.*)$ $1;HttpOnly;Secure
   Header always edit Set-Cookie ^(.*)$ $1;HttpOnly;Secure

Finally an Apache restart was necessery
Secure your work PC internet traffic using SSH Dynamic Tunnel as Proxy to get around Corporate Spy Proxy and Site Filtering

Friday, March 20th, 2015

use-ssh-dynamic-tunnel-as-socks5-proxy-to-get-around-corporate-website-filtering-restrictions

If you work for some huge corporations such as IBM / Sony / Toshiba / Concentrix / HP etc. and you're using a Windows Work Computer (notebook), pre-installed with a custom Company software which is by default configured to use a Proxy Server for all your Browsing activities and at a certain point you start being filtered some of the websites you love to visit so much because of some Corporate policies (limitations) at some filtered sites you will start getting empty pages or some   nasty filtering messages.

Even if you don't get a filtering message but you know all your Company Internal Network traffic is proxified for the sake of keeping your personal (privacy) high stop browsing using company's default proxy, because all your access requests (passwords) and queries to the internet are probably logged for later (review) in case if you enter the company's paragraph of "non-compliant employee".
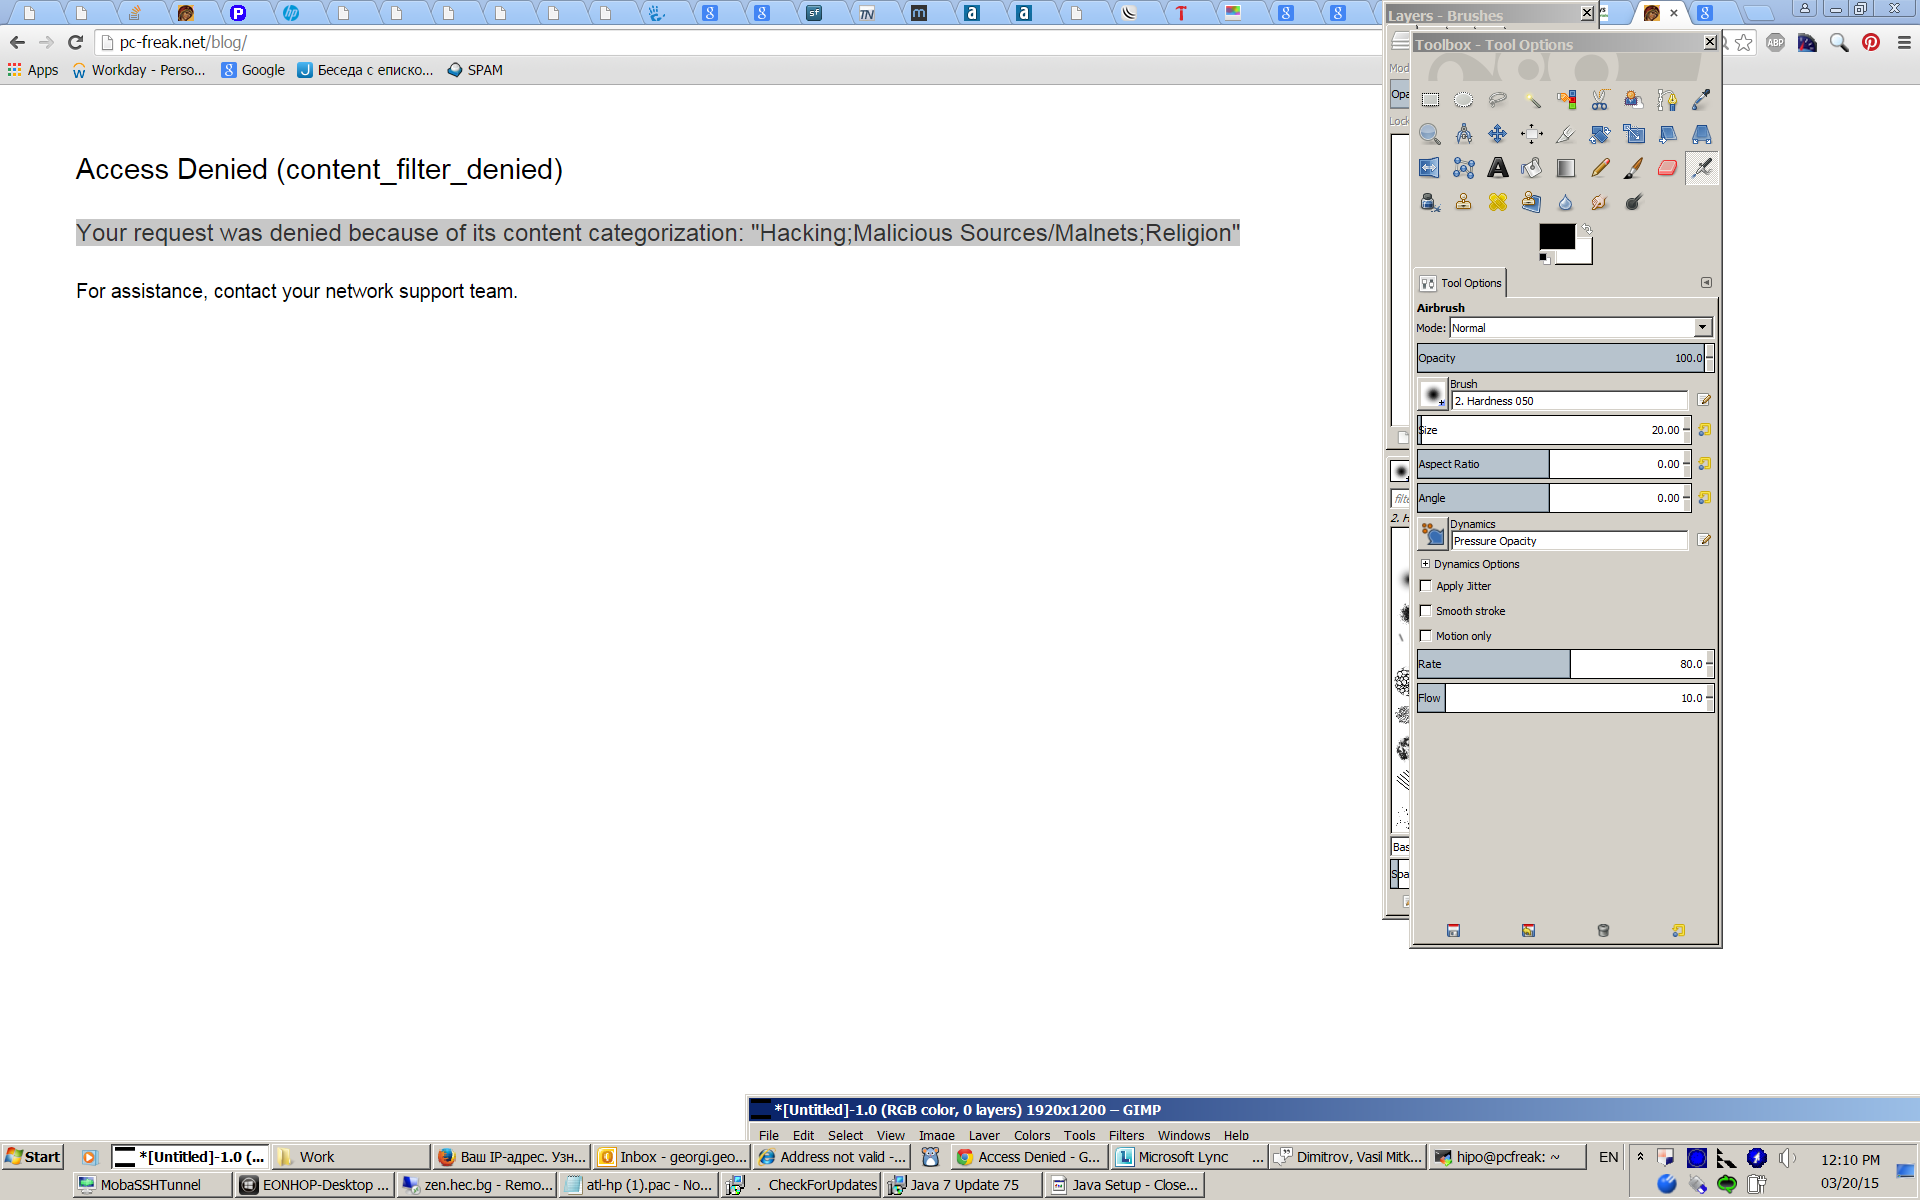
If you fail on time to get around the default set "Corporate Proxy", sooner or later you will start getting filtering messages to some of the regular websites you use daily, as I did today while trying to open my personal blog (to check if there are new user comments):

Your request was denied because of its content categorization: "Hacking;Malicious Sources/Malnets;Religion"
For assistance, contact your network support team.

Screenshot of above message from today here

You see this guys or automated Proxy filter became so prudent that my site was filtered because it contains some Proof of Concept (PoC) security tools and content related to Christian (Faith) Religion. I guess its the time to think seriously is there a censorship in large corporations and how far could censorship go and if such censorship so easily adopted in large companies wouldn't same happen also on a backbone ISP level in short future??
If today my site is being filtered out to be unable to open from a corporation network because it contains "Religious" contain I would not be surprised if tomorrow, I've been prohibited to confess publicly my faith in salvation power of the Cross of our Lord Jesus Christ or even already in a blacklist because I'm trying to be a dedicated Orthodox Christian …
The fact that Religion is already perceived in same light as Hacking and Malicious Source or Malnet bots is also very eloquent and shows how very big part of people nowdays (including the person that added my site to this proxy filtering rules) think of religion and in what bad state our society and understanding of freedom and respect for others went.

Obviously it is time to react to this censorship and stop the evil corporation from spying on your traffic and logging all that matches there "kilometer long" prohibited sites filter lists. There are few ways to do that and the most straight forward is to set-up and use a Own Proxy server such as Privoxy / Polipo or Squid Proxy, however the proxy method requires that your company local network doesn't have too strick (restrictive) firewall rules (e.g. you need some port opened to the Internet such as 8080, 3128, 8118, 1080 standard port for (socks) etc.

As many companies are too restrictive in their outbound firewall rules and you might be in situation like with me where Browsers such as Internet Explorer / Opera / Firefox and Chrome are configured to use by default company proxy host (autocache.proxy-ur-company.hp.com:80) (with a custom Proxy PAC file filtering out a whole ranges of useful domains and IPs) and only allowed firewall access outside of local corporate network in on port 22 (for outside ssh session purposes) only.

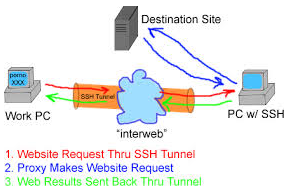
Then your best way to get across such restrictive network configuration is to run your own home Linux / BSD / Windows server with opensshd installed and use OpenSSH protocol Dynamic Tunneling (Proxy socks5 like) capabilities to tunnel all your favourite Web Browser Traffic (lets say Firefox's) through your remote-home-host.com:22.


In short once you have installed plink.exe on your PC run manually from command line (cmd.exe)


plink.exe -ssh UserName@remote-home-host.com -P 22 -pw Secret_Password -D 127.0.0.1:8080 -N


For people who use MobaXTerm it is even easier as there is an integrated SSH tunneling input interface which can be used to create the SSH tunnel.

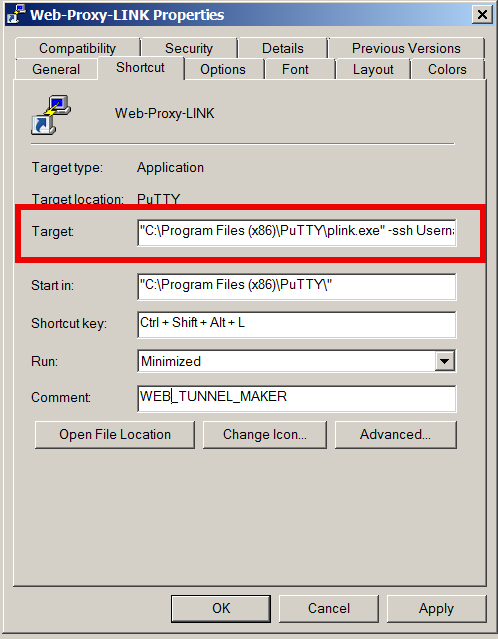
To have a quick way to Enable SSH Dynamic Tunnel button on your Desktop make a SymLink to Plink with Target below command line:

web-tunnel-maker-with-plink-win-ssh-connection-tool-screenshot-on-ms-windows-7

  • If from Linux / *BSD / Mac OS host to create Dynamic SSH Tunnel to your remote home SSH server host run in a Terminal
     

ssh -D 8080 Username@remote-home-host.com


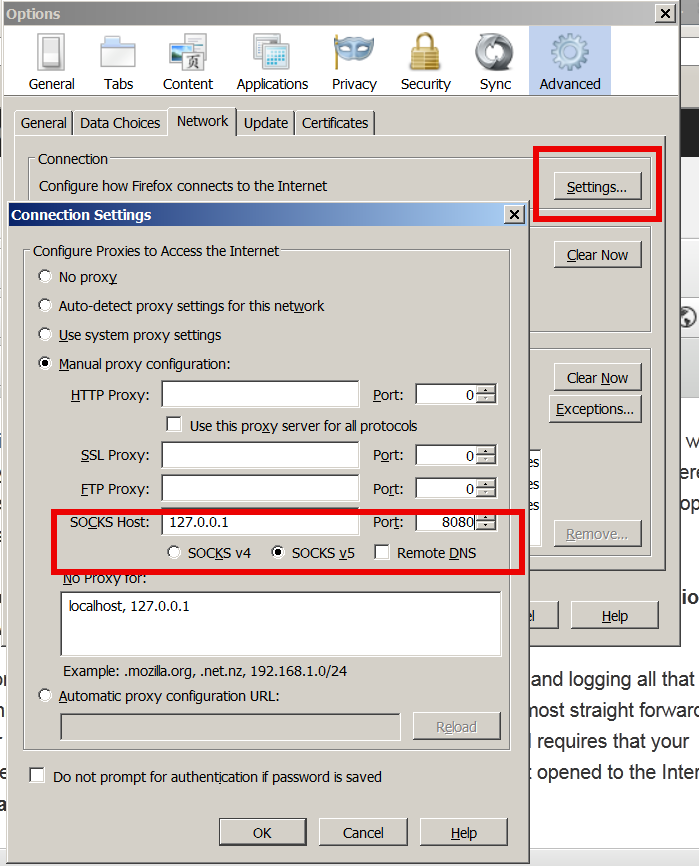
To start tunneling all your Web traffic via just created Dynamic SSH Tunnel to host remote-home-host.com, just set in browser's proxy options to use as proxy socks5 – localhost:8080

Secure-your-work-PC-notebook-internet-traffic-using-SSH-Dynamic-Tunnel-as-Proxy

To test whether your traffic is going to the Internet from remote-home-host.com open in just set proxy browser www.myip.ru .
You should see your home SSH server IP as IP which made the request to www.myip.ru.

Maximal protection against SSH attacks. If your server has to stay with open SSH (Secure Shell) port open to the world

Thursday, April 7th, 2011

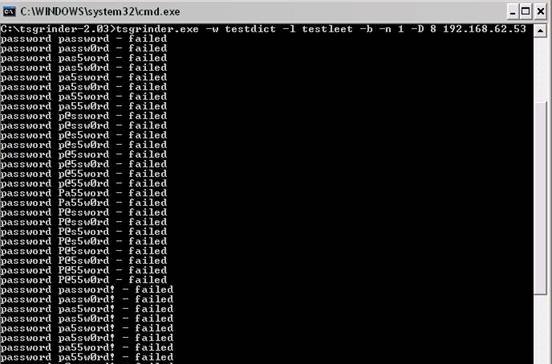
Brute Force Attack SSH screen, Script kiddie attacking
If you’re a a remote Linux many other Unix based OSes, you have defitenily faced the security threat of many failed ssh logins or as it’s better known a brute force attack

During such attacks your /var/log/messages or /var/log/auth gets filled in with various failed password logs like for example:

Feb 3 20:25:50 linux sshd[32098]: Failed password for invalid user oracle from 95.154.249.193 port 51490 ssh2
Feb 3 20:28:30 linux sshd[32135]: Failed password for invalid user oracle1 from 95.154.249.193 port 42778 ssh2
Feb 3 20:28:55 linux sshd[32141]: Failed password for invalid user test1 from 95.154.249.193 port 51072 ssh2
Feb 3 20:30:15 linux sshd[32163]: Failed password for invalid user test from 95.154.249.193 port 47481 ssh2
Feb 3 20:33:20 linux sshd[32211]: Failed password for invalid user testuser from 95.154.249.193 port 51731 ssh2
Feb 3 20:35:32 linux sshd[32249]: Failed password for invalid user user from 95.154.249.193 port 38966 ssh2
Feb 3 20:35:59 linux sshd[32256]: Failed password for invalid user user1 from 95.154.249.193 port 55850 ssh2
Feb 3 20:36:25 linux sshd[32268]: Failed password for invalid user user3 from 95.154.249.193 port 36610 ssh2
Feb 3 20:36:52 linux sshd[32274]: Failed password for invalid user user4 from 95.154.249.193 port 45514 ssh2
Feb 3 20:37:19 linux sshd[32279]: Failed password for invalid user user5 from 95.154.249.193 port 54262 ssh2
Feb 3 20:37:45 linux sshd[32285]: Failed password for invalid user user2 from 95.154.249.193 port 34755 ssh2
Feb 3 20:38:11 linux sshd[32292]: Failed password for invalid user info from 95.154.249.193 port 43146 ssh2
Feb 3 20:40:50 linux sshd[32340]: Failed password for invalid user peter from 95.154.249.193 port 46411 ssh2
Feb 3 20:43:02 linux sshd[32372]: Failed password for invalid user amanda from 95.154.249.193 port 59414 ssh2
Feb 3 20:43:28 linux sshd[32378]: Failed password for invalid user postgres from 95.154.249.193 port 39228 ssh2
Feb 3 20:43:55 linux sshd[32384]: Failed password for invalid user ftpuser from 95.154.249.193 port 47118 ssh2
Feb 3 20:44:22 linux sshd[32391]: Failed password for invalid user fax from 95.154.249.193 port 54939 ssh2
Feb 3 20:44:48 linux sshd[32397]: Failed password for invalid user cyrus from 95.154.249.193 port 34567 ssh2
Feb 3 20:45:14 linux sshd[32405]: Failed password for invalid user toto from 95.154.249.193 port 42350 ssh2
Feb 3 20:45:42 linux sshd[32410]: Failed password for invalid user sophie from 95.154.249.193 port 50063 ssh2
Feb 3 20:46:08 linux sshd[32415]: Failed password for invalid user yves from 95.154.249.193 port 59818 ssh2
Feb 3 20:46:34 linux sshd[32424]: Failed password for invalid user trac from 95.154.249.193 port 39509 ssh2
Feb 3 20:47:00 linux sshd[32432]: Failed password for invalid user webmaster from 95.154.249.193 port 47424 ssh2
Feb 3 20:47:27 linux sshd[32437]: Failed password for invalid user postfix from 95.154.249.193 port 55615 ssh2
Feb 3 20:47:54 linux sshd[32442]: Failed password for www-data from 95.154.249.193 port 35554 ssh2
Feb 3 20:48:19 linux sshd[32448]: Failed password for invalid user temp from 95.154.249.193 port 43896 ssh2
Feb 3 20:48:46 linux sshd[32453]: Failed password for invalid user service from 95.154.249.193 port 52092 ssh2
Feb 3 20:49:13 linux sshd[32458]: Failed password for invalid user tomcat from 95.154.249.193 port 60261 ssh2
Feb 3 20:49:40 linux sshd[32464]: Failed password for invalid user upload from 95.154.249.193 port 40236 ssh2
Feb 3 20:50:06 linux sshd[32469]: Failed password for invalid user debian from 95.154.249.193 port 48295 ssh2
Feb 3 20:50:32 linux sshd[32479]: Failed password for invalid user apache from 95.154.249.193 port 56437 ssh2
Feb 3 20:51:00 linux sshd[32492]: Failed password for invalid user rds from 95.154.249.193 port 45540 ssh2
Feb 3 20:51:26 linux sshd[32501]: Failed password for invalid user exploit from 95.154.249.193 port 53751 ssh2
Feb 3 20:51:51 linux sshd[32506]: Failed password for invalid user exploit from 95.154.249.193 port 33543 ssh2
Feb 3 20:52:18 linux sshd[32512]: Failed password for invalid user postgres from 95.154.249.193 port 41350 ssh2
Feb 3 21:02:04 linux sshd[32652]: Failed password for invalid user shell from 95.154.249.193 port 54454 ssh2
Feb 3 21:02:30 linux sshd[32657]: Failed password for invalid user radio from 95.154.249.193 port 35462 ssh2
Feb 3 21:02:57 linux sshd[32663]: Failed password for invalid user anonymous from 95.154.249.193 port 44290 ssh2
Feb 3 21:03:23 linux sshd[32668]: Failed password for invalid user mark from 95.154.249.193 port 53285 ssh2
Feb 3 21:03:50 linux sshd[32673]: Failed password for invalid user majordomo from 95.154.249.193 port 34082 ssh2
Feb 3 21:04:43 linux sshd[32684]: Failed password for irc from 95.154.249.193 port 50918 ssh2
Feb 3 21:05:36 linux sshd[32695]: Failed password for root from 95.154.249.193 port 38577 ssh2
Feb 3 21:06:30 linux sshd[32705]: Failed password for bin from 95.154.249.193 port 53564 ssh2
Feb 3 21:06:56 linux sshd[32714]: Failed password for invalid user dev from 95.154.249.193 port 34568 ssh2
Feb 3 21:07:23 linux sshd[32720]: Failed password for root from 95.154.249.193 port 43799 ssh2
Feb 3 21:09:10 linux sshd[32755]: Failed password for invalid user bob from 95.154.249.193 port 50026 ssh2
Feb 3 21:09:36 linux sshd[32761]: Failed password for invalid user r00t from 95.154.249.193 port 58129 ssh2
Feb 3 21:11:50 linux sshd[537]: Failed password for root from 95.154.249.193 port 58358 ssh2

This brute force dictionary attacks often succeed where there is a user with a weak a password, or some old forgotten test user account.
Just recently on one of the servers I administrate I have catched a malicious attacker originating from Romania, who was able to break with my system test account with the weak password tset .

Thanksfully the script kiddie was unable to get root access to my system, so what he did is he just started another ssh brute force scanner to crawl the net and look for some other vulnerable hosts.

As you read in my recent example being immune against SSH brute force attacks is a very essential security step, the administrator needs to take on a newly installed server.

The easiest way to get read of the brute force attacks without using some external brute force filtering software like fail2ban can be done by:

1. By using an iptables filtering rule to filter every IP which has failed in logging in more than 5 times

To use this brute force prevention method you need to use the following iptables rules:
linux-host:~# /sbin/iptables -I INPUT -p tcp --dport 22 -i eth0 -m state -state NEW -m recent -set
linux-host:~# /sbin/iptables -I INPUT -p tcp --dport 22 -i eth0 -m state -state NEW
-m recent -update -seconds 60 -hitcount 5 -j DROP

This iptables rules will filter out the SSH port to an every IP address with more than 5 invalid attempts to login to port 22

2. Getting rid of brute force attacks through use of hosts.deny blacklists

sshbl – The SSH blacklist, updated every few minutes, contains IP addresses of hosts which tried to bruteforce into any of currently 19 hosts (all running OpenBSD, FreeBSD or some Linux) using the SSH protocol. The hosts are located in Germany, the United States, United Kingdom, France, England, Ukraine, China, Australia, Czech Republic and setup to report and log those attempts to a central database. Very similar to all the spam blacklists out there.

To use sshbl you will have to set up in your root crontab the following line:

*/60 * * * * /usr/bin/wget -qO /etc/hosts.deny http://www.sshbl.org/lists/hosts.deny

To set it up from console issue:

linux-host:~# echo '*/60 * * * * /usr/bin/wget -qO /etc/hosts.deny http://www.sshbl.org/lists/hosts.deny' | crontab -u root -

These crontab will download and substitute your system default hosts with the one regularly updated on sshbl.org , thus next time a brute force attacker which has been a reported attacker will be filtered out as your Linux or Unix system finds out the IP matches an ip in /etc/hosts.deny

The /etc/hosts.deny filtering rules are written in a way that only publicly known brute forcer IPs will only be filtered for the SSH service, therefore other system services like Apache or a radio, tv streaming server will be still accessible for the brute forcer IP.

It’s a good practice actually to use both of the methods 😉
Thanks to Static (Multics) a close friend of mine for inspiring this article.