![]()
For everyone that has to to manage Linux servers which are holding thousand of users for example UNIX Jump hosts (hop stations) or Free Shells, VPS shared developer hosts etc. setting a good password policies is a basis for proprietary confidential data protection .
Password expiry in jump host machines that are using LDAP authentication to grant access to users, 2 factor authentication or passwordless authentication policies is not a scope of this article, as they are handled by the LDAP authentication service sssd daemon on the login Unix host.
However there are many machines nowadays holding shared local users and setting a good password expiry policy on them is an essential to guarantee less probability of some external unathenticated intruder to be able to break in with some old user account of an employee that is no longer working for the company. Even for home brew Linux machines setting a password policy is a must if you don't want to end up some day with a strange logins from Asia unknown IPs and at a worst case a rooted machine …
1. Change user password / passphrases at least one every 90 days
Perhaps the best practice of local password security, practiced in most IT companies like IBM, Hewlett Packard, SAP, Amazon is to have a password policy expiry of 3 months this is done to fulfill the recommended PCI security standards recomendations.
A more paranoid ones perhaps prefer even shorter password expiry spans like 1 month but I think this is a bit too much and 3 months of local existing user password expiry is in the middle of too permissive and too restrictive pwd approach.
It is a very good security practice to set a password complexity and length
Control over password expiry on Linux is handled from /etc/login.defs, default settings for password policy is to never expire, below is a configuration from my Debian Linux.
PASS_MAX_DAYS 99999
PASS_MIN_DAYS 0
PASS_WARN_AGE 7
Here is /etc/login.defs that is a good security practice to implement on RHEL or CentOS
PASS_MAX_DAYS 90
PASS_MIN_DAYS 0
PASS_MIN_LEN 10
PASS_WARN_AGE 14
One note to make here is PASS_MAX_DAYS is not understood on .deb based Linuxes but will be understand by the OS only on RPM distros RHEL / Fedora etc.
Config options meaning is:
PASS_MIN_LEN – Minimum password length
PASS_MIN_DAYS – The minimum number of days allowed between password changes. Any password changes attempted sooner than this will be rejected. If not specified, -1 will be assumed (which disables the
restriction).
PASS_WARN_AGE – The number of days warning given before a password expires. A zero means warning is given only upon the day of expiration, a negative value means no warning is given. If not specified, no
warning will be provided.
Getting the user set user expiry date is done with the chage cmd
root@linux:~# chage -l hipo
Last password change : окт 17, 2017
Password expires : never
Password inactive : never
Account expires : never
Minimum number of days between password change : 0
Maximum number of days between password change : 99999
Number of days of warning before password expires : 7
root@linux:~#
root@linux:/home/test# chage -l test
Last password change : окт 07, 2017
Password expires : яну 05, 2018
Password inactive : never
Account expires : never
Minimum number of days between password change : 0
Maximum number of days between password change : 90
Number of days of warning before password expires : 7
root@linux#
To set a certain special user, to lets say non-privileged user used by sysadmin to never expire:
root@linux:~# chage -M 99999 username
2. Increase requirements for password quality
This is done through the libpwquality system library that is present on virtually any modern fresh new GNU / Linux distribution install.
The paswrod requirements to authenticate access to system is configured via /etc/security/pwqualtity.conf or for more verbose user specific pwd authentication requirements with rules to be set in /etc/security/pwquality.conf.d/*.conf.
Many things could be configured via this simple name = value config just to mention few
minlen – minimum lenght of changing passowrd
minclass – the minimum amount of characters required for new pass (digit, uppercase, lowercase, others).
maxrepeat – maximum number of same repeatable consecutive characters in new set pass.
dcredit – require at least one digit in the new pass
A good set of configuration options one could benit from is as follows:
minlen = 10
dcredit = -1
lcredit = -1
ucredit = -1
ocredit = -1
minclass = 2
maxrepeat = 4
minclass = 4
maxclassrepeat = 0
For full supported capabitilies of libpwquality check out man pwquality.conf
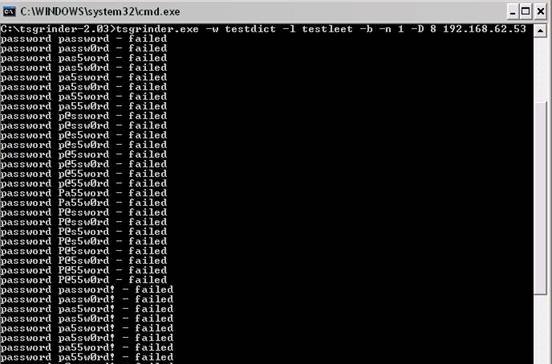
3. Limit repeated access attempts by locking out the user ID if more than 6 unsuccesful login
In Red Hat Enterprise Linux 7 and CentOS the pam_faillock PAM module allows system administrators to lock out user accounts after a specified number of failed attempts. Limiting user login attempts serves mainly as a security measure that aims to prevent possible brute force attacks targeted to obtain a user's account password.
With the pam_faillock module, failed login attempts are stored in a separate file for each user in the /var/run/faillock directory.
Locking account if a number of unsuccessful login attempts are made is a very good security practice as this will block long lasting attempts to brute force local user credentials.
To do so add the following line immediately before the pam_unix.so statement in the AUTH section of /etc/pam.d/system-auth and /etc/pam.d/password-auth:
auth required pam_faillock.so preauth silent deny=6 unlock_time=1800 fail_interval=900
Now try to ssh to the machine. After the number of 6 failed attemp threshold is reached, user account will be locked.
In /var/log/secure the default location where RHEL / CentOS / Fedora and other RPM based distros store their login success and failure messages you should get a message like:
Aug 15 10:40:43 linux sshd[29038]: pam_unix(sshd:auth): authentication failure; logname= uid=0 euid=0 tty=ssh ruser= rhost=10.43.135.1 user=hipo
Aug 15 10:40:43 linux sshd[29038]: pam_faillock(sshd:auth): Consecutive login failures for user deepak account temporarily locked
4. Set blockout user lockout duration to 30 minutes
Once a user is blocked after a number of failure attempts, it is normal to block that user to some reasonable duration like 30 minutes in most cases, however some paranoid administrators
prefer to block the user forever until the user contacts and requests the administrator to unlock him his "by mistake" blocked user by the login policies.
To automatically set a clerance of blocked user, add the following line immediately after the pam_unix.so statement in the AUTH section of /etc/pam.d/system-auth and /etc/pam.d/password-auth:
auth [default=die] pam_faillock.so authfail deny=6 unlock_time=1800 fail_interval=900
And add the following line immediately before the pam_unix.so statement in the ACCOUNT section of /etc/pam.d/system-auth and /etc/pam.d/password-auth:
account required pam_faillock.so
5. Check and reset fail lock number attempts from user
To check failure counts from user
root@linux:~# pam_tally –user hipo
Login Failures Latest failure From
hipo 3 08/28/19 22:00:50 10.55.135.3
To reset the faillog counter
root@linux:~# pam_tally2 –user hipo –reset
To check now the login failure counter
root@linux:~# pam_tally2 –user hipo
User hipo (1000) has 0
P.S. You can use also faillock instead of pam_tally
6. Check user new set passwords against dictionary with pam_pwquality.so
pam_pwquality – is the PAM module to perform password quality checking
To have it installed and possible to use on a Linux system you will need to have some kind of variation of the pam_pwquality package installed, for example on Debian Linux this is provided by libpam-pwquality package.
Default Debian installs does not have it installed so to have it do the usual:
debian:~# apt-get install –yes libpam-pwquality
Most RPM based distributions RHEL / Fedora etc. comes preinstalled with it, so it can be straight used.
To get an idea about what kind of checks it does on new password set, here is an extract from man pam_pwquality
The action of this module is to prompt the user for a password and check its strength against a system dictionary and a set of rules for identifying poor choices.
The first action is to prompt for a single password, check its strength and then, if it is considered strong, prompt for the password a second time (to verify that it was typed correctly on the
first occasion). All being well, the password is passed on to subsequent modules to be installed as the new authentication token.The checks for strength are:
Palindrome
Is the new password a palindrome?Case Change Only
Is the new password the the old one with only a change of case?Similar
Is the new password too much like the old one? This is primarily controlled by one argument, difok which is a number of character changes (inserts, removals, or replacements) between the old
and new password that are enough to accept the new password.Simple
Is the new password too small? This is controlled by 6 arguments minlen, maxclassrepeat, dcredit, ucredit, lcredit, and ocredit. See the section on the arguments for the details of how these
work and there defaults.Rotated
Is the new password a rotated version of the old password?Same consecutive characters
Optional check for same consecutive characters.Too long monotonic character sequence
Optional check for too long monotonic character sequence.Contains user name
Check whether the password contains the user's name in some form.Dictionary check
The Cracklib routine is called to check if the password is part of a dictionary.These checks are configurable either by use of the module arguments or by modifying the /etc/security/pwquality.conf configuration file. The module arguments override the settings in the
configuration file.
The benefit you will get once it is installed is the new Improved password enforcement policies that every sysadmin or security expert needs, below is output of libpam pwquality security strict policies in action.
[root@host ~]# passwd build
Changing password for user build.
New password: @teztpassy1
BAD PASSWORD: The password contains less than 1 uppercase letters
New password: @teztPassy
BAD PASSWORD: The password contains less than 1 digits
New password: teztPassy1
BAD PASSWORD: The password contains less than 1 non-alphanumeric characters
passwd: Have exhausted maximum number of retries for service
Once a strict password is given that is matching the enforced password security policy password will have to be repeated 3 times and not 2 times as the usual passwd user command does.
[root@host ~]# passwd build
Changing password for user build.
New password: @teztPassy1
Retype new password: @teztPassy1
passwd: all authentication tokens updated successfully.
7. Set User Session Timeout in 15 minutes
Another good security practice is to set the SSH logged in users active sessions to disconnect after lets say 20 minutes (1200 seconds).
This is done by using the TMOUT embedded variable in bash shell.
To give it a try how it works on any of your active bash session export TMOUT variable to 300 secs.
export TMOUT=300
Keep the shell opened for 5 minutes without any activity and you'll get automatically disconnected.
TMOUT variable can be set as a default for all users through placing it in /etc/bashrc or /etc/profile.
or only to certain users by appending it to selected users ~/.bashrc or ~/.bash_profile.
However as some of the most advanced users could notice its existence by issuing env command and checking the current environment variables
and decide to get rid of it with unset TMOUT it is good idea to make the variable readonly to do so append in /etc/bashrc
TMOUT=900
readonly TMOUT
export TMOUT
Now the risk that logged in user forgot his console active on a public place and someone got access to his account through that is minimized, however
for some users that might be quite annoying as any forgot console will get dropped off after short time and that could be quite irritating ..
8. Increase size of logged User commands history HISTFILE and HISTFILESIZE variables
There are 2 embedded bash variables that controls the size of logged commands after user logs in to their bash shell this is HISTFILE and HISTFILESIZE
The difference between HISTSIZE and HISTFILESIZE is that HISTSIZE limits the number of commands shown by the command history while HISTFILESIZE limits the number of commands which can be saved in $HISTFILE.
When one exits the bash, if there are more than $HISTSIZE number of commands which have been executed in the single bash session, the contents of $HISTFILE will be replaced by the $HISTSIZE number of commands. If there are less than or equal to $HISTSIZE number of commands in the bash session, these commands will be appended to $HISTFILE as long as $HISTFILESIZE permits.
The number of commands to be remembered in the history can be specified by the environment variable HISTSIZE.
Below is example of some values that will log up to 20000 of commands run by the user, this is much desired as the default logged in commands is only 1000 and if you tend to run many commands daily and this history size is exceeded in a couple of days.
export HISTSIZE=2000
export HISTFILESIZE=20000
To make this permanent for all server existing users add the records to /etc/profile or /etc/bashrc to make custom HISTORYFILESIZE add it to $HOME/.bashrc or ~/.bash_profile.
To apply (test) new exported changes either relogin to the shell or run:
linux~:# source /etc/profile
You can run shopt command to force to append the history commands to $HISTFILE even though there are more than $HISTSIZE number of commands which have been executed in the bash session:
# shopt -s histappend
9. Display TIMESTAMP in command history using HISTTIMEFORMAT
The normal way history command does show the history of previously user run commands is in line ordered form. This is not very useful for auditing purpose.
If for example you need to track a certain user activity as you cannot exactly see when the history logged command was issued.
Here is example what I mean:
linux~:# history|head -n 5
7 tail -f /var/log/apache2/error.log|grep -i seg
8 php -v
9 /usr/bin/php5.6 -v
10 w
11 tail -f /var/log/apache2/php_error.log
To set a basic date-month-year time timestamp formatting you can append
linux:~# export HISTTIMEFORMAT=’%F %T ‘
in /etc/profile /etc/bash.bashrc to apply it for all users or
for local users to ~/.bashrc ~/.bash_profile
The resulted formatting will be:
linux:~# history| tail -n 5
31 2020-05-07 10:06:34 sudo su – root
32 2020-05-07 10:06:34 w
33 2020-05-07 10:06:34 sudo su – root
34 2020-05-07 10:06:36 history
35 2020-05-07 10:06:45 history| tail -n 5
To show printed the exact day of week and written with letters you instead of numeric:
linux:~# export HISTTIMEFORMAT="%a %h %d – %r "
history log output results then will be as so:
linux:~# history |tail -n 2
101 Monday May 07 – 07:39:53 PM top
102 Monday May 22 – 07:39:54 PM historyThat's all folks Enjoy !