Posts Tagged ‘localhost’
Thursday, February 3rd, 2022 
Configuring proper logging for haproxy is always a pain in the ass in Linux, because of rsyslogd various config syntax among versions, because of bugs in OS etc.
Today we have been given 2 Redhat 8.5 Linux servers where we had a task to start configuring haproxies, to have an idea on what is going on of course we had to enable proper haproxy logging in separate log file under separate local, for the test one can use haproxy's
log /dev/log local6
config, this is a general way to configure logging which I've described earlier in the article How to enable haproxy logging to a separate log /var/log/haproxy.log / prevent duplicate messages to appear in /var/log/messages
However this time I wanted to not use /dev/log as this device is also used by systemd / journald and theoretically could be used by other services and there might be multiple services logging to the same places possibly leading to some issue, thus I wanted to send and process the haproxy messages directly from rsyslog on RHEL 8.5.
Create a custom file that is loaded with the rest of configuration from /etc/rsyslog.conf with a line like:
# Include all config files in /etc/rsyslog.d/
include(file="/etc/rsyslog.d/*.conf" mode="optional")
Create 49_haproxy.conf with below content
[root@haproxy: ~]# vim /etc/rsyslog.d/49_haproxy.conf
$ModLoad imudp
$UDPServerAddress 127.0.0.1
$UDPServerRun 514
#2022/02/02: HAProxy logs to local6, save the messages
local6.* /var/log/haproxy.log
if ($programname == 'haproxy') then -/var/log/haproxy.log
& stop
touch /var/log/haproxy.log
chown haproxy:haproxy /var/log/haproxy.log
In /etc/haproxy/haproxy.cfg under global section to print in verbose mode messages (i.e. check, the haproxy is receiving properly sent traffic) do configure something like:
global
log 127.0.0.1 local6 debug
Eventually you might want to remove the debug word out of the config, if you don't want to log too much verbosily once everything is properly tested and configured
[root@haproxy: ~]# curl -v -c -k 10.10.192.135:16010
* Rebuilt URL to: 10.10.192.135:15010/
* Trying 10.10.192.135…
* TCP_NODELAY set
* Connected to 10.10.192.135 (10.10.192.135) port 15010 (#0)
> GET / HTTP/1.1
> Host: 10.10.192.135:15010
> User-Agent: curl/7.61.1
> Accept: */*
>
* Empty reply from server
* Connection #0 to host 10.10.192.135 left intact
curl: (52) Empty reply from server
In /var/log/haproxy.log you should get some messages like:
Feb 3 14:16:44 localhost.localdomain haproxy[25029]: proxy IN_Traffic_Bak has no server available!
Feb 3 14:16:44 localhost.localdomain haproxy[25029]: proxy IN_Traffic_Bak has no server available!
Feb 3 15:59:50 localhost.localdomain haproxy[25029]: [03/Feb/2022:15:59:50.162] 10.44.192.135:1348 -:- IN_Traffic/<NOSRV>:- -1/-1/0 0 SC 1/1/0/0/0 0/0
Feb 3 15:59:50 localhost.localdomain haproxy[25029]: [03/Feb/2022:15:59:50.162] 10.44.192.135:1348 -:- IN_Traffic/<NOSRV>:- -1/-1/0 0 SC 1/1/0/0/0 0/0
Feb 3 15:59:50 localhost.localdomain haproxy[25029]: [03/Feb/2022:15:59:50.162] 10.44.192.135:1348 -:- IN_Traffic/<NOSRV>:- -1/-1/0 0 SC 1/1/0/0/0 0/0
Tags: configured, haproxy, localdomain, localhost, log messages, logging, Redhat Enterprise Linux, rsyslog, server, various
Posted in Haproxy, Linux | No Comments »
Thursday, April 17th, 2014 
For a decomissioning project just recently I had the task to stop Microsoft IIS on Windows Server system.
If you have been into security for a while you know well how many vulnerabilities Microsoft (Internet Information Server) Webserver used to be. Nowadays things with IIS are better but anyways it is better not to use it if possible …
Nomatter what the rason if you need to make IIS stop serving web pages here is how to do it via command line:
At Windows Command Prompt, type:
net stop WAS
If the command returns error message to stop it type:
net stop W3SVC
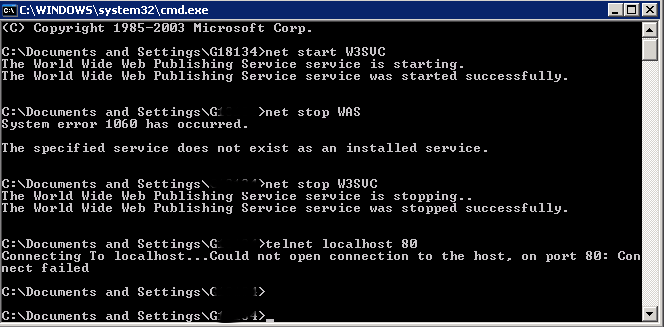
Just in case you have to start it again run:
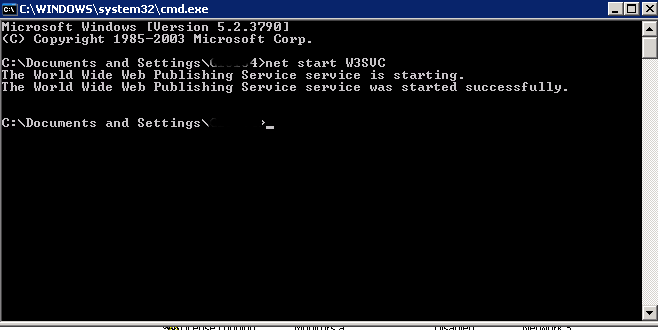
net start W3SVC
For those who prefer to do it from GUI interface, launch services.msc command from Windows Run:
> services.msc
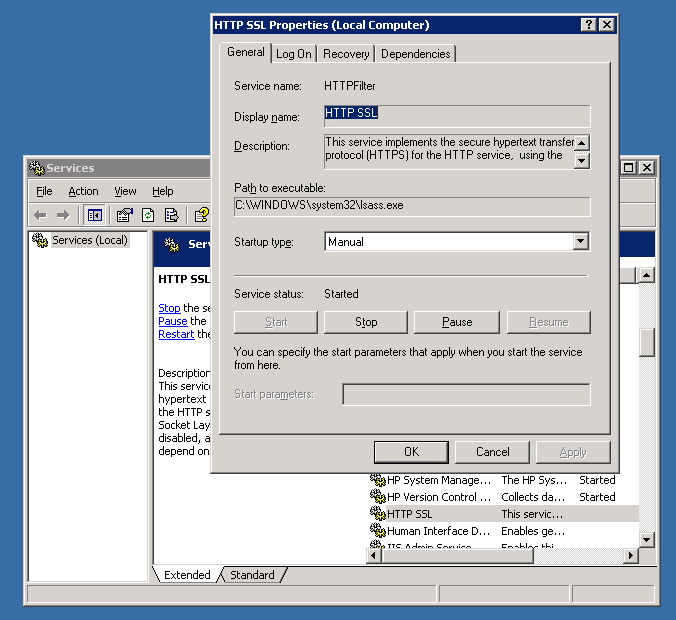
In list of services lookup for
IIS Admin Service and HTTP SSL
a) (Click over it with right mouse button -> Properties)
b) Set Startup type to Manual
c) Click Stop Button
You're done now IIS is stopped to make sure it is stopped you can run from cmd.exe:
telnet localhost 80
when not working you should get 'Could not open connection to the host. on port 80: Connection failed' like shown up in screenshot.
Tags: Click Stop Button, cmd, command, connection, exe, GUI, host, IIS, launch, line, localhost, lookup, make, Microsoft Internet Information Server Webserver, need, net, nomatter, run, task, web, Windows Run
Posted in IIS, System Administration, Web and CMS | No Comments »
Monday, April 27th, 2015 
In a Web application data migration project, I've come across a situation where I have to copy / transfer 500 Gigabytes of data from Linux server 1 (host A) to Linux server 2 (host B). However the two machines doesn't have direct access to each other (via port 22) for security reasons and hence I cannot use sshfs to mount remotely host dir via ssh and copy files like local ones.
As this is a data migration project its however necessery to migrate the data finding a way … Normal way companies do it is to copy the data to External Hard disk storage and send it via some Country Post services or some employee being send in Data center to attach the SAN to new server where data is being migrated However in my case this was not possible so I had to do it different.
I have access to both servers as they're situated in the same Corporate DMZ network and I can thus access both UNIX machines via SSH.
Thanksfully there is a small SSH protocol + TAR archiver and default UNIX pipe's capabilities hack that makes possible to transfer easy multiple (large) files and directories. The only requirement to use this nice trick is to have SSH client installed on the middle host from which you can access via SSH protocol Server1 (from where data is migrated) and Server2 (where data will be migrated).
If the hopping / jump server from which you're allowed to have access to Linux servers Server1 and Server2 is not Linux and you're missing the SSH client and don't have access on Win host to install anything on it just use portable mobaxterm (as it have Cygwin SSH client embedded )
Here is how:
jump-host:~$ ssh server1 "tar czf – /somedir/" | pv | ssh server2 "cd /somedir/; tar xf
As you can see from above command line example an SSH is made to server1 a tar is used to archive the directory / directories containing my hundred of gigabytes and then this is passed to another opened ssh session to server 2 via UNIX Pipe mechanism and then TAR archiver is used second time to unarchive previously passed archived content. pv command which is in the middle is not obligitory though it is a nice way to monitor status about data transfer like below:
500GB 0:00:01 [10,5MB/s] [===================================================>] 27%
P.S. If you don't have PV installed install it either with apt-get on Debian:
debian:~# apt-get install –yes pv
Or on CentOS / Fedora / RHEL etc.
[root@centos ~]# yum -y install pv
Below is a small chunk of PV manual to give you better idea of what it does:
NAME
pv – monitor the progress of data through a pipe
SYNOPSIS
pv [OPTION] [FILE]…
pv [-h|-V]
DESCRIPTION
pv allows a user to see the progress of data through a pipeline, by giving information such as time elapsed, percentage
completed (with progress bar), current throughput rate, total data transferred, and ETA.
To use it, insert it in a pipeline between two processes, with the appropriate options. Its standard input will be passed
through to its standard output and progress will be shown on standard error.
pv will copy each supplied FILE in turn to standard output (- means standard input), or if no FILEs are specified just
standard input is copied. This is the same behaviour as cat(1).
A simple example to watch how quickly a file is transferred using nc(1):
pv file | nc -w 1 somewhere.com 3000
A similar example, transferring a file from another process and passing the expected size to pv:
cat file | pv -s 12345 | nc -w 1 somewhere.com 3000
Note that with too big file transfers using PV will delay data transfer because everything will have to pass through another 2 pipes, however for file transfers up to few gigabytes its really nice to include it.
If you only need to transfer huge .tar.gz archive and you don't bother about traffic security (i.e. don't care whether transferred traffic is going through encrypted SSH tunnel and don't want to put an overhead to both systems for encrypting the data and you have some unfiltered ports between host 1 and host 2 you can run netcat on host 2 to listen for connections and forward .tar.gz content via netcat's port like so:
linux2:~$ nc -l -p 12345 > /path/destinationfile
linux2:~$ cat /path/sourcfile | nc desti.nation.ip.address 12345
Another way to transfer large data without having connection with server1 and server2 but having connection to a third host PC is to use rsync and good old SSH Tunneling, like so:
jump-host:~$ ssh -R 2200:Linux-server1:22 root@Linux-server2 "rsync -e 'ssh -p 2200' –stats –progress -vaz /directory/to/copy root@localhost:/copy/destination/dir"
Tags: command, copy, copy files, data, example, file, file transfers, ftp access, Linux, Linux Unix, localhost, progress, second time, ssh ftp, ssh session, standard, tar
Posted in Everyday Life, Linux, Various, Web and CMS | 2 Comments »
Friday, March 20th, 2015 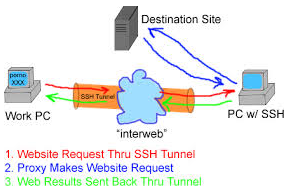
If you work for some huge corporations such as IBM / Sony / Toshiba / Concentrix / HP etc. and you're using a Windows Work Computer (notebook), pre-installed with a custom Company software which is by default configured to use a Proxy Server for all your Browsing activities and at a certain point you start being filtered some of the websites you love to visit so much because of some Corporate policies (limitations) at some filtered sites you will start getting empty pages or some nasty filtering messages.
Even if you don't get a filtering message but you know all your Company Internal Network traffic is proxified for the sake of keeping your personal (privacy) high stop browsing using company's default proxy, because all your access requests (passwords) and queries to the internet are probably logged for later (review) in case if you enter the company's paragraph of "non-compliant employee".
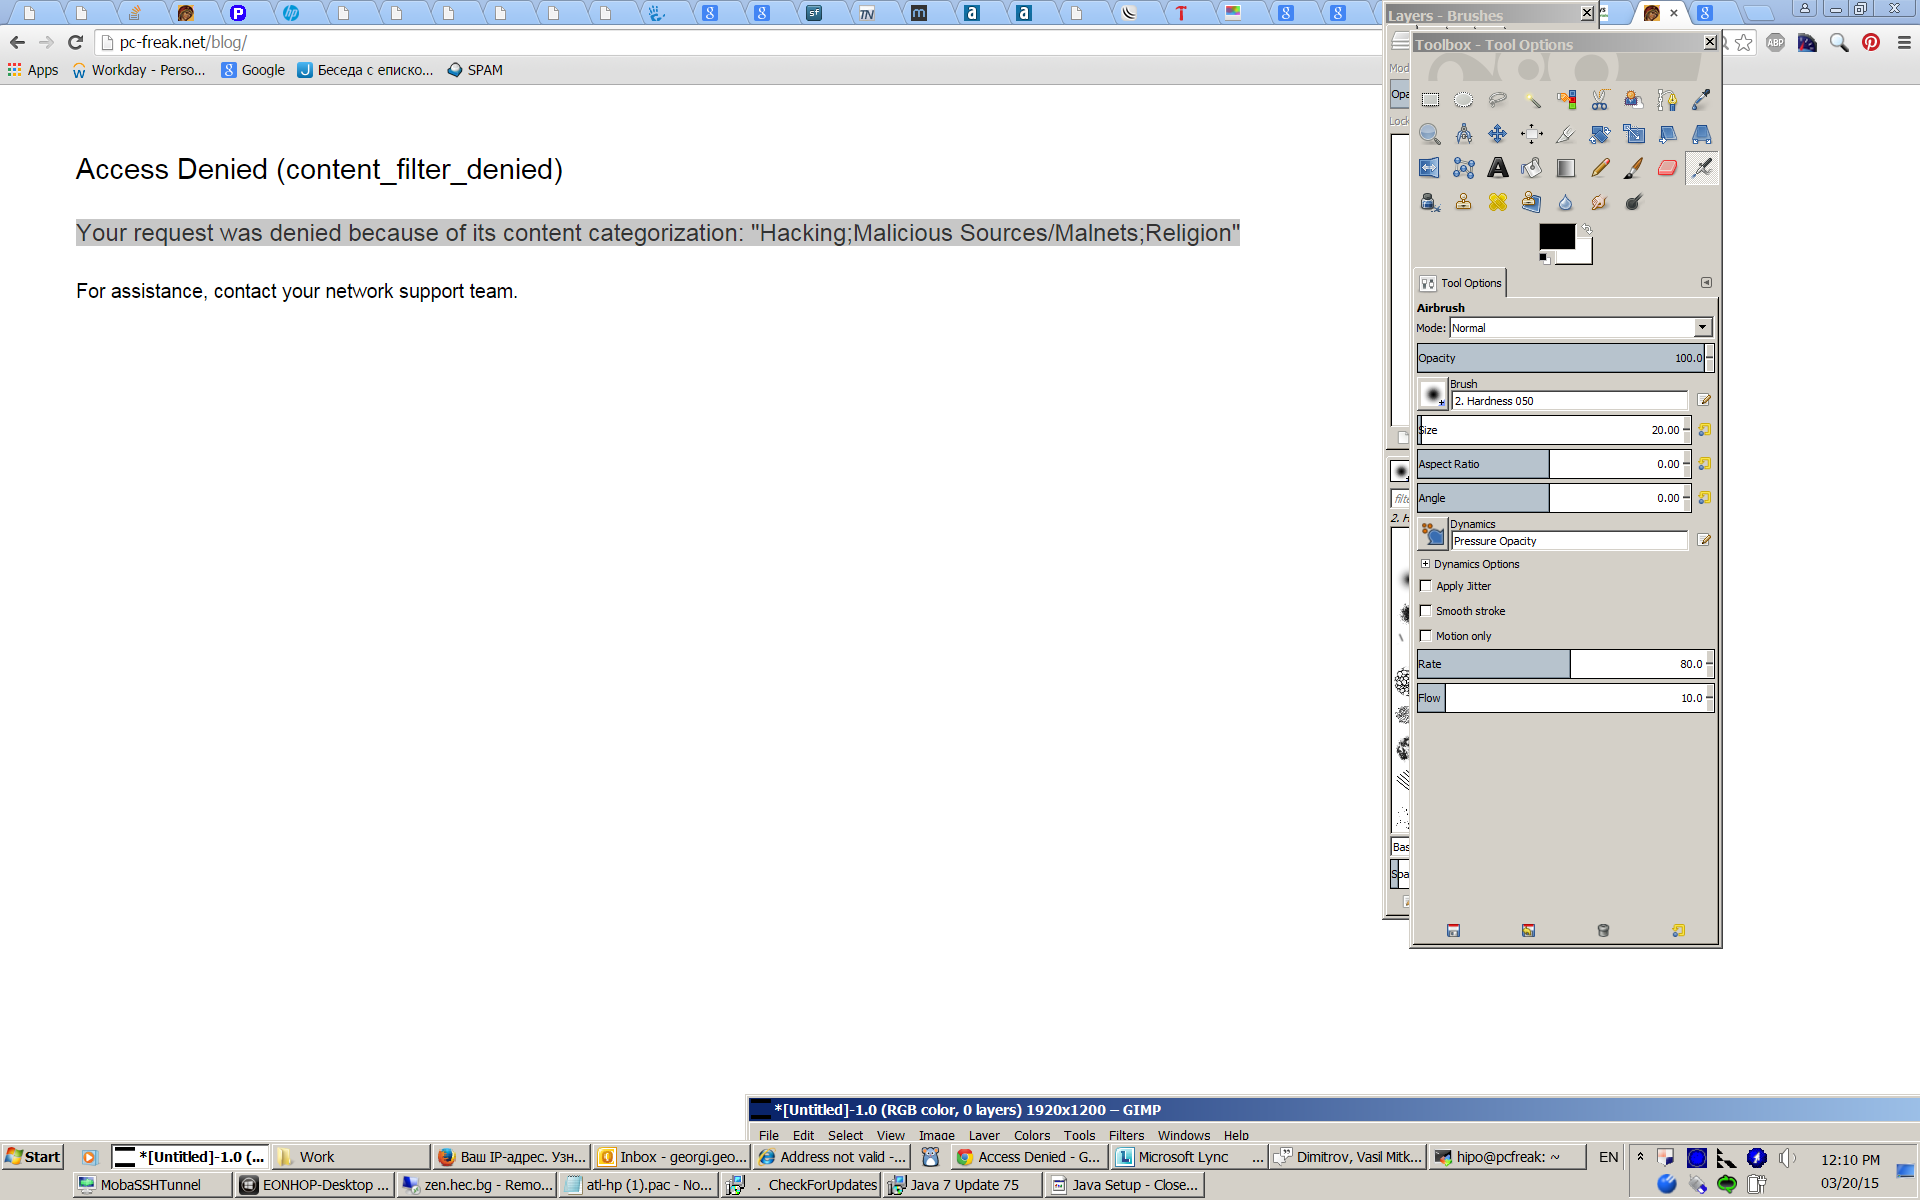
If you fail on time to get around the default set "Corporate Proxy", sooner or later you will start getting filtering messages to some of the regular websites you use daily, as I did today while trying to open my personal blog (to check if there are new user comments):
Your request was denied because of its content categorization: "Hacking;Malicious Sources/Malnets;Religion"
For assistance, contact your network support team.
Screenshot of above message from today here
You see this guys or automated Proxy filter became so prudent that my site was filtered because it contains some Proof of Concept (PoC) security tools and content related to Christian (Faith) Religion. I guess its the time to think seriously is there a censorship in large corporations and how far could censorship go and if such censorship so easily adopted in large companies wouldn't same happen also on a backbone ISP level in short future??
If today my site is being filtered out to be unable to open from a corporation network because it contains "Religious" contain I would not be surprised if tomorrow, I've been prohibited to confess publicly my faith in salvation power of the Cross of our Lord Jesus Christ or even already in a blacklist because I'm trying to be a dedicated Orthodox Christian …
The fact that Religion is already perceived in same light as Hacking and Malicious Source or Malnet bots is also very eloquent and shows how very big part of people nowdays (including the person that added my site to this proxy filtering rules) think of religion and in what bad state our society and understanding of freedom and respect for others went.
Obviously it is time to react to this censorship and stop the evil corporation from spying on your traffic and logging all that matches there "kilometer long" prohibited sites filter lists. There are few ways to do that and the most straight forward is to set-up and use a Own Proxy server such as Privoxy / Polipo or Squid Proxy, however the proxy method requires that your company local network doesn't have too strick (restrictive) firewall rules (e.g. you need some port opened to the Internet such as 8080, 3128, 8118, 1080 standard port for (socks) etc.
As many companies are too restrictive in their outbound firewall rules and you might be in situation like with me where Browsers such as Internet Explorer / Opera / Firefox and Chrome are configured to use by default company proxy host (autocache.proxy-ur-company.hp.com:80) (with a custom Proxy PAC file filtering out a whole ranges of useful domains and IPs) and only allowed firewall access outside of local corporate network in on port 22 (for outside ssh session purposes) only.
Then your best way to get across such restrictive network configuration is to run your own home Linux / BSD / Windows server with opensshd installed and use OpenSSH protocol Dynamic Tunneling (Proxy socks5 like) capabilities to tunnel all your favourite Web Browser Traffic (lets say Firefox's) through your remote-home-host.com:22.
In short once you have installed plink.exe on your PC run manually from command line (cmd.exe)
plink.exe -ssh UserName@remote-home-host.com -P 22 -pw Secret_Password -D 127.0.0.1:8080 -N
For people who use MobaXTerm it is even easier as there is an integrated SSH tunneling input interface which can be used to create the SSH tunnel.
To have a quick way to Enable SSH Dynamic Tunnel button on your Desktop make a SymLink to Plink with Target below command line:

- If from Linux / *BSD / Mac OS host to create Dynamic SSH Tunnel to your remote home SSH server host run in a Terminal
ssh -D 8080 Username@remote-home-host.com
To start tunneling all your Web traffic via just created Dynamic SSH Tunnel to host remote-home-host.com, just set in browser's proxy options to use as proxy socks5 – localhost:8080
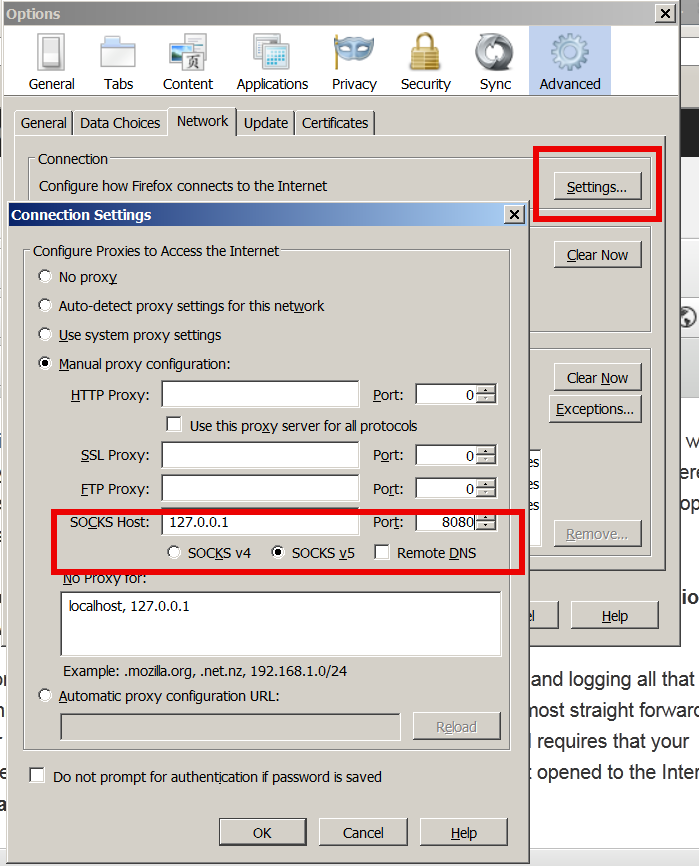
To test whether your traffic is going to the Internet from remote-home-host.com open in just set proxy browser www.myip.ru .
You should see your home SSH server IP as IP which made the request to www.myip.ru.
Tags: Browsers, censorship, Christian Faith Religion, Company Internal Network, Corporate Proxy, default, firewall rules, localhost, Secure, site, ssh session, time, use, Web Browser Traffic
Posted in Computer Security, Curious Facts, Everyday Life, Firefox, Linux, Networking, Various, Web and CMS | 1 Comment »
Friday, September 2nd, 2011 
One of the QMAIL server installs, I have installed very long time ago. I've been notified by clients, that the certificate of the mail server has expired and therefore I had to quickly renew the certificate.
This qmail installation, SSL certificates were located in /var/qmail/control under the names servercert.key and cervercert.pem
Renewing the certificates with a new self signed ones is pretty straight forward, to renew them I had to issue the following commands:
1. Generate servercert encoded key with 1024 bit encoding
debian:~# cd /var/qmail/control

debian:/var/qmail/control# openssl genrsa -des3 -out servercert.key.enc 1024

Generating RSA private key, 1024 bit long modulus

...........++++++

.........++++++

e is 65537 (0x10001)

Enter pass phrase for servercert.key.enc:

Verifying - Enter pass phrase for servercert.key.enc:
In the Enter pass phrase for servercert.key.enc I typed twice my encoded key password, any password is good, here though using a stronger one is better.
2. Generate the servercert.key file
debian:/var/qmail/control# openssl rsa -in servercert.key.enc -out servercert.key

Enter pass phrase for servercert.key.enc:

writing RSA key
3. Generate the certificate request
debian:/var/qmail/control# openssl req -new -key servercert.key -out servercert.csr

debian:/var/qmail/control# openssl rsa -in servercert.key.enc -out servercert.key

Enter pass phrase for servercert.key.enc:writing RSA key

root@soccerfame:/var/qmail/control# openssl req -new -key servercert.key -out servercert.csr

You are about to be asked to enter information that will be incorporated

into your certificate request.

What you are about to enter is what is called a Distinguished Name or a DN.

There are quite a few fields but you can leave some blank

For some fields there will be a default value,

If you enter '.', the field will be left blank.

-----

Country Name (2 letter code) [AU]:UK

State or Province Name (full name) [Some-State]:London

Locality Name (eg, city) []:London

Organization Name (eg, company) [Internet Widgits Pty Ltd]:My Company

Organizational Unit Name (eg, section) []:My Org

Common Name (eg, YOUR name) []:

Email Address []:admin@adminmail.com
Please enter the following 'extra' attributes
to be sent with your certificate request
A challenge password []:
An optional company name []:
In the above prompts its necessery to fill in the company name and location, as each of the prompts clearly states.
4. Sign the just generated certificate request
debian:/var/qmail/control# openssl x509 -req -days 9999 -in servercert.csr -signkey servercert.key -out servercert.crt
Notice the option -days 9999 this option instructs the newly generated self signed certificate to be valid for 9999 days which is quite a long time, the reason why the previous generated self signed certificate expired was that it was built for only 365 days
5. Fix the newly generated servercert.pem permissions
debian:~# cd /var/qmail/control

debian:/var/qmail/control# chmod 640 servercert.pem

debian:/var/qmail/control# chown vpopmail:vchkpw servercert.pem

debian:/var/qmail/control# cp -f servercert.pem clientcert.pem

debian:/var/qmail/control# chown root:qmail clientcert.pem

debian:/var/qmail/control# chmod 640 clientcert.pem
Finally to load the new certificate, restart of qmail is required:
6. Restart qmail server
debian:/var/qmail/control# qmailctl restart

Restarting qmail:

* Stopping qmail-smtpd.

* Sending qmail-send SIGTERM and restarting.

* Restarting qmail-smtpd.
Test the newly installed certificate
To test the newly installed SSL certificate use the following commands:
debian:~# openssl s_client -crlf -connect localhost:465 -quiet

depth=0 /C=UK/ST=London/L=London/O=My Org/OU=My Company/emailAddress=admin@adminmail.com

verify error:num=18:self signed certificate

verify return:1

...

debian:~# openssl s_client -starttls smtp -crlf -connect localhost:25 -quiet

depth=0 /C=UK/ST=London/L=London/O=My Org/OU=My Company/emailAddress=admin@adminmail.com

verify error:num=18:self signed certificate

verify return:1

250 AUTH LOGIN PLAIN CRAM-MD5

...
If an error is returned like 32943:error:140770FC:SSL routines:SSL23_GET_SERVER_HELLO:unknown protocol:s23_clnt.c:607: this means that SSL variable in the qmail-smtpdssl/run script is set to 0.
To solve this error, change SSL=0 to SSL=1 in /var/qmail/supervise/qmail-smtpdssl/run and do qmailctl restart
The error verify return:1 displayed is perfectly fine and it's more of a warning than an error as it just reports the certificate is self signed.
Tags: bit, certificate, certificate request, Certificates, client, com, control, csr, csropenssl, des3, Distinguished, distinguished name, dn, file, genrsa, How to, information, installation, key, key file, keyroot, localhost, long time, mail server, modulus, nam, openssl, option, password, pem, phrase, private key, province name, qmail installation, qmailctl, request, Restart, rocks, root, RSA, self, soccerfame, time, toaster, var
Posted in Linux, Qmail, System Administration, Various | 2 Comments »
Wednesday, April 2nd, 2014 
On a project there are some issues with root admin user unable to access the server from remote host and the most probable reason was there is no access to the server from that host thus it was necessary check mysql root user privilegse and allowed hosts to connect, here SQL query to do it:
mysql> select * from `user` where user like 'root%';
+——————————–+——+——————————————-+————-+————-+————-+————-+————-+———–+————-+—————+————–+———–+————+—————–+————+————+————–+————+———————–+——————+————–+—————–+——————+——————+—————-+———————+——————–+——————+————+————–+———-+————+————-+————–+—————+————-+—————–+———————-+
| Host | User | Password | Select_priv | Insert_priv | Update_priv | Delete_priv | Create_priv | Drop_priv | Reload_priv | Shutdown_priv | Process_priv | File_priv | Grant_priv | References_priv | Index_priv | Alter_priv | Show_db_priv | Super_priv | Create_tmp_table_priv | Lock_tables_priv | Execute_priv | Repl_slave_priv | Repl_client_priv | Create_view_priv | Show_view_priv | Create_routine_priv | Alter_routine_priv | Create_user_priv | Event_priv | Trigger_priv | ssl_type | ssl_cipher | x509_issuer | x509_subject | max_questions | max_updates | max_connections | max_user_connections |
+——————————–+——+——————————————-+————-+————-+————-+————-+————-+———–+————-+—————+————–+———–+————+—————–+————+————+————–+————+———————–+——————+————–+—————–+——————+——————+—————-+———————+——————–+——————+————+————–+———-+————+————-+————–+—————+————-+—————–+———————-+
| localhost | root | *5A07790DCF43AC89820F93CAF7B03DE3F43A10D9 | Y | Y | Y | Y | Y | Y | Y | Y | Y | Y | Y | Y | Y | Y | Y | Y | Y | Y | Y | Y | Y | Y | Y | Y | Y | Y | Y | Y | | | | | 0 | 0 | 0 | 0 |
| server737 | root | *5A07790DCF43AC89820F93CAF7B03DE3F43A10D9 | Y | Y | Y | Y | Y | Y | Y | Y | Y | Y | Y | Y | Y | Y | Y | Y | Y | Y | Y | Y | Y | Y | Y | Y | Y | Y | Y | Y | | | | | 0 | 0 | 0 | 0 |
| 127.0.0.1 | root | *5A07790DCF43AC89820F93CAF7B03DE3F43A10D9 | Y | Y | Y | Y | Y | Y | Y | Y | Y | Y | Y | Y | Y | Y | Y | Y | Y | Y | Y | Y | Y | Y | Y | Y | Y | Y | Y | Y | | | | | 0 | 0 | 0 | 0 |
| server737.server.myhost.net | root | *5A07790DCF43FC89820A93CAF7B03DE3F43A10D9 | Y | Y | Y | Y | Y | Y | Y | Y | Y | Y | Y | Y | Y | Y | Y | Y | Y | Y | Y | Y | Y | Y | Y | Y | Y | Y | Y | Y | | | | | 0 | 0 | 0 | 0 |
| server4586 | root | *5A07790DCF43AC89820F93CAF7B03DE3F43A10D9 | N | N | N | N | N | N | N | N | N | N | N | N | N | N | N | N | N | N | N | N | N | N | N | N | N | N | N | N | | | | | 0 | 0 | 0 | 0 |
| server4586.myhost.net | root | *5A07790DCF43AC89820F93CAF7B03DE3F43A10D9 | N | N | N | N | N | N | N | N | N | N | N | N | N | N | N | N | N | N | N | N | N | N | N | N | N | N | N | N | | | | | 0 | 0 | 0 | 0 |
+——————————–+——+——————————————-+————-+————-+————-+————-+————-+———–+————-+—————+————–+———–+————+—————–+————+————+————–+————+———————–+——————+————–+—————–+——————+——————+—————-+———————+——————–+——————+————+————–+———-+————+————-+————–+—————+————-+—————–+———————-+
6 rows in set (0.00 sec)
mysql> exit
Here is query explained:
select * from `user` where user like 'root%'; query means:
select * – show all
from `user` – from user database
where user like 'root%' – where there is match in user column to any string starting with 'root*',
Tags: admin user, check, cli, exit, host, hosts, How to, localhost, match, net, project, root, root admin, root user, server, string
Posted in MySQL, System Administration | No Comments »
Sunday, May 20th, 2012 
My home run machine MySQL server was suddenly down as I tried to check my blog and other sites today, the error I saw while trying to open, this blog as well as other hosted sites using the MySQL was:
Error establishing a database connection
The topology, where this error occured is simple, I have two hosts:
1. Apache version 2.0.64 compiled support externally PHP scripts interpretation via libphp – the host runs on (FreeBSD)
2. A Debian GNU / Linux squeeze running MySQL server version 5.1.61
The Apache host is assigned a local IP address 192.168.0.1 and the SQL server is running on a host with IP 192.168.0.2
To diagnose the error I've logged in to 192.168.0.2 and weirdly the mysql-server was appearing to run just fine:
debian:~# ps ax |grep -i mysql
31781 pts/0 S 0:00 /bin/sh /usr/bin/mysqld_safe
31940 pts/0 Sl 12:08 /usr/sbin/mysqld –basedir=/usr –datadir=/var/lib/mysql –user=mysql –pid-file=/var/run/mysqld/mysqld.pid –socket=/var/run/mysqld/mysqld.sock –port=3306
31941 pts/0 S 0:00 logger -t mysqld -p daemon.error
32292 pts/0 S+ 0:00 grep -i mysql
Moreover I could connect to the localhost SQL server with mysql -u root -p and it seemed to run fine. The error Error establishing a database connection meant that either something is messed up with the database or 192.168.0.2 Mysql port 3306 is not properly accessible.
My first guess was something is wrong due to some firewall rules, so I tried to connect from 192.168.0.1 to 192.168.0.2 with telnet:
freebsd# telnet 192.168.0.2 3306
Trying 192.168.0.2…
Connected to jericho.
Escape character is '^]'.
Host 'webserver' is blocked because of many connection errors; unblock with 'mysqladmin flush-hosts'
Connection closed by foreign host.
Right after the telnet was initiated as I show in the above output the connection was immediately closed with the error:
Host 'webserver' is blocked because of many connection errors; unblock with 'mysqladmin flush-hosts'Connection closed by foreign host.
In the error 'webserver' is my Apache machine set hostname. The error clearly states the problems with the 'webserver' apache host unable to connect to the SQL database are due to 'many connection errors' and a fix i suggested with mysqladmin flush-hosts
To temporary solve the error and restore my normal connectivity between the Apache and the SQL servers I logged I had to issue on the SQL host:
mysqladmin -u root -p flush-hostsEnter password:
Thogh this temporar fix restored accessibility to the databases and hence the websites errors were resolved, this doesn't guarantee that in the future I wouldn't end up in the same situation and therefore I looked for a permanent fix to the issues once and for all.
The permanent fix consists in changing the default value set for max_connect_error in /etc/mysql/my.cnf, which by default is not too high. Therefore to raise up the variable value, added in my.cnf in conf section [mysqld]:
debian:~# vim /etc/mysql/my.cnf

...

max_connect_errors=4294967295
and afterwards restarted MYSQL:
debian:~# /etc/init.d/mysql restart

Stopping MySQL database server: mysqld.

Starting MySQL database server: mysqld.

Checking for corrupt, not cleanly closed and upgrade needing tables..
To make sure the assigned max_connect_errors=4294967295 is never reached due to Apache to SQL connection errors, I've also added as a cronjob.
debian:~# crontab -u root -e

00 03 * * * mysqladmin flush-hosts
In the cron I have omitted the mysqladmin -u root -p (user/pass) input options because for convenience I have already stored the mysql root password in /root/.my.cnf
Here is how /root/.my.cnf looks like:
debian:~# cat /root/.my.cnf

[client]

user=root

password=a_secret_sql_password
Now hopefully, this would permanently solve SQL's 'failure to accept connections' due to too many connection errors for future.
Tags: apache version, Auto, basedir, bin, cnf, connection, connectionThe, daemon, database connection, debian gnu, default, Draft, due, error error, firewall rules, fix, freebsd, GNU, guess, host, host name, hostname, lib, Linux, local ip address, localhost, machine, mysql server, mysqladmin, mysqld, mysqlMoreover, nbsp, occured, password, port 3306, root, root password, running, server version, sl 12, Socket, something, SQL, sql server, squeeze, support, topology, value, webserver
Posted in MySQL, System Administration, Web and CMS | No Comments »
Monday, June 11th, 2012 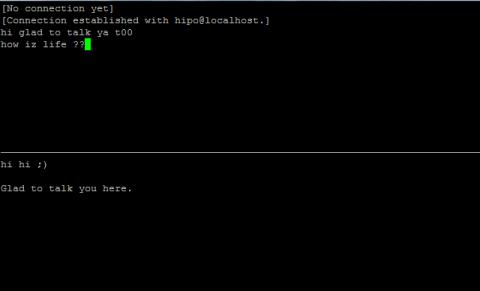
After writting in previous article on how talk be used to handle interactive chat console sessions on FreeBSD, I thought of dropping a few lines on how same is done on Debian, so here is how:
1.; Install talk and talkd
noah:/home/hipo# apt-get --yes install talk talkd

Reading package lists... Done

Building dependency tree

Reading state information... Done

The following NEW packages will be installed:

talk talkd

0 upgraded, 2 newly installed, 0 to remove and 93 not upgraded.

Need to get 19.0 kB/42.3 kB of archives.

After this operation, 201 kB of additional disk space will be used.

Get:1 http://ftp.nl.debian.org/debian/ stable/main talkd amd64 0.17-14 [19.0 kB]

Fetched 19.0 kB in 0s (67.1 kB/s)

Selecting previously deselected package talk.

(Reading database ... 90%

Unpacking talk (from .../talk_0.17-14_amd64.deb) ...

Selecting previously deselected package talkd.

Unpacking talkd (from .../talkd_0.17-14_amd64.deb) ...

Processing triggers for man-db ...

Setting up talk (0.17-14) ...

update-alternatives: using /usr/bin/netkit-ntalk to provide /usr/bin/talk (talk) in auto mode.

Setting up talkd (0.17-14) ...
2.;; Check and make sure talk and ntalkd lines are present in /etc/inetd.conf
noah:/home/hipo# grep -i talk /etc/inetd.conf

#:BSD: Shell, login, exec and talk are BSD protocols.

talk dgram udp wait nobody.tty /usr/sbin/in.talkd in.talkd

ntalk dgram udp wait nobody.tty /usr/sbin/in.ntalkd in.ntalkd
Now you probably wonder why are there two lines in /etc/inetd.conf for ))
in.talkd and in.ntald
in.talkd daemon's aim is to deliver talk sessions between logged in users on one Linux host with few logged in users willing to talk to each other locally;;
Wheter in.ntalkd is designed to serve interactive user talks between the host where in.ntalkd is installed and remote systems ruwhich have the talk client program installed. Of course in order for remote talks to work properly the firewall (if such has to be modified to allow in.ntalkd chats. I've never used in.ntalkd and on most machines having in.ntald hanging around from inetd, could be a potential security hole so, for people not planning to initiate remote TALKs between Unix / Linux / BSD hosts on a network it is a good practice the ntalkd line seen above in inetd.conf to be commented out ::;
noah:/home/hipo# grep -i talk /etc/inetd.conf

#:BSD: Shell, login, exec and talk are BSD protocols.

talk dgram udp wait nobody.tty /usr/sbin/in.talkd in.talkd

#ntalk dgram udp wait nobody.tty /usr/sbin/in.ntalkd in.ntalkd
3.;;; Restart openbsd-inetd init script and talk is ready to use
noah:~# /etc/init.d/openbsd-inetd restart

* Restarting internet superserver inetd
Onwards to use talk between two users the syntax is same like on other BSD, as a matter of fact TALK – console / terminal interactive chat originally was developed for the 4.2BSD UNIX release ;; the Linux code is a port of this BSD talk and not rewrite from scratch.
Using talk between two logged in users on pts/1 (lets say user test) and tty1 (user logged as root) is done with:
noah:~$ tty

noah:~$ talk root@localhost tty1

/dev/pts/1
On tty1 the user has to have enabled Talk sessions request, by default this behaviour in Debian and probably other Debian based Linuxes (Ubuntu) for instance is configured to have talks disabled, i,e ,,,
root@noah:~# mesg

is n
Enabling it on root console is done with:
root@noah:~# mesg y
Once enabled the root will be able to see the TALK service requests on tty1 otherwise, the user gets nothing. With enabled messaging the root user will get on his tty:
Message from TalkDaemon@his_machine...

talk: connection requested by your_name@your_machine.

talk: respond with: talk your_name@your_machine
So on the root console to reply back to talk chat request:
noah:~$ talk hipo@localhost
Tags: aim, Auto, auto mode, building, configured, confnoah, daemon, deb, debian gnu, dependency, dependency tree, dgram, Disk, disk space, DoneBuilding, Draft, exec, Fetched, freebsd, gnu linux, inetd, information, Install, Installing, interactive user, localhost, login, mesg, network, noah, nobody, ntalk, ntalkd, operation, package, protocols, reading database, reading package, request, root, root user, sbin, sessions, Shell, shell login, state information, tree, tty, wait, work, writting
Posted in Curious Facts, Everyday Life, Linux, Various | No Comments »
Thursday, July 7th, 2011 
If you're an administrator of a shared hosting server running mail server on localhost, you've definitely come across to issues with your mail server ip entering into public blacklists like spamhaus's CBL,XBL, PBL etc.
The usual procedure after one's ip gets listed in blacklists is to delist it manually following spamhaus or any other blacklist website's web interface, however often even after delisting yourself from blacklists you get back into them in a couple of hours, since your mail server continues to send a mass amounts of spam.
To track issues like as a system administrator I always use the good old network swiss army of knife tool tcpdump
tcpdump is really precious in tracking all kind of traffic oddities or mail server traffic.
To check if there are oddities with traffic flowing from a mail server on localhost after I login to a mail server with issues I use tcpdump command with following options:
tcpdump -nNxXi eth0 -s 0 proto TCP and port 25
The usual output of it should look something like:
root@hosting:/home/hipo/public_html:# tcpdump -nNxXi eth0 -s 0 proto TCP and port 25

tcpdump: verbose output suppressed, use -v or -vv for full protocol decodelistening on eth0, link-type EN10MB (Ethernet), capture size 65535 bytes

11:37:51.692685 IP xxx.xxx.xxx.xxx.smtp > 212.235.67.205.53745: P 2645817175:2645817203(28) ack 31168958 win 7632

0x0000: 4500 0044 92b4 4000 4006 9ae8 5511 9f4d E..D..@.@...U..M

0x0010: d4eb 43cd 0019 d1f1 9db3 f757 01db 99be ..C........W....

0x0020: 5018 1dd0 0d4e 0000 3235 3020 4f4b 2069 P....N..250.OK.i

0x0030: 643d 3151 656c 3150 2d30 3033 7666 412d d=1Qel1P-003vfA-

0x0040: 4730 0d0a G0..

11:37:52.175038 IP 212.235.67.205.53745 > xxx.xxx.xxx.xxx.smtp: . ack 28 win 65064

0x0000: 4500 0028 1bb4 4000 7706 db04 d4eb 43cd E..(..@.w.....C.

0x0010: 5511 9f4d d1f1 0019 01db 99be 9db3 f773 U..M...........s

0x0020: 5010 fe28 a1c8 0000 0000 0000 0000 P..(..........
In this example the xxx.xxx.xxx.xxx is the IP address of the hosting server (my mail server) and the other IP is the interaction of my mail server's smtp port 25 with tther machine 212.235.67.205.
If after issuing this command there are tons of repeating address IPs the mail server interacts with this is possible sign of spammers who sent traffic via the mail server.
Of course this is not always the case as sometimes, some clients use to send large newsletters or just some planned advertisements, however in most cases as I said it's a spammer.
To futher get the abuser I check Apache logs and the mail server logs. Also in many cases a spammer can be catched via observing the mail server logs (/var/log/maillog, /var/log/qmail/current or wherever the mail server logs it's interactions).
In the above tcpdump output you can even read some of the information flowing in between mail servers in a very raw form for example in above tcpdump output notice the 250.OK . This is obviously an interaction between the two mail servers where the server running on my hosting server with ip (xxx.xxx.xxx.xxx) sends to the remote mail server the command 250 OK
Hope this article is helpful to somebody 😉
Tags: ack, blacklists, cbl, command, course, delisting, eth, hipo, host, hosting server, How to, interaction, Knife, knife tool, localhost, log, login, logs, look, machine, mail server, mail servers, mass, mass amounts, n 250, oddities, PBL, proto, Qel, root, server ip, server traffic, size, smtp, something, spamhaus, spammer, swiss army, system administrator, tcpdump, tool, tther, verbose, vv, web interface, xxx
Posted in Linux, Monitoring, Networking, Qmail, System Administration | 3 Comments »
Wednesday, February 22nd, 2012 
Everyone who used Linux is probably familiar with wget or has used this handy download console tools at least thousand of times. Not so many Desktop GNU / Linux users like Ubuntu and Fedora Linux users had tried using wget to do something more than single files download.
Actually wget is not so popular as it used to be in earlier linux days. I've noticed the tendency for newer Linux users to prefer using curl (I don't know why).
With all said I'm sure there is plenty of Linux users curious on how a website mirror can be made through wget.
This article will briefly suggest few ways to do website mirroring on linux / bsd as wget is both available on those two free operating systems.
1. Most Simple exact mirror copy of website
The most basic use of wget's mirror capabilities is by using wget's -mirror argument:
# wget -m http://website-to-mirror.com/sub-directory/
Creating a mirror like this is not a very good practice, as the links of the mirrored pages will still link to external URLs. In other words link URL will not pointing to your local copy and therefore if you're not connected to the internet and try to browse random links of the webpage you will end up with many links which are not opening because you don't have internet connection.
2. Mirroring with rewritting links to point to localhost and in between download page delay
Making mirror with wget can put an heavy load on the remote server as it fetches the files as quick as the bandwidth allows it. On heavy servers rapid downloads with wget can significantly reduce the download server responce time. Even on a some high-loaded servers it can cause the server to hang completely.
Hence mirroring pages with wget without explicity setting delay in between each page download, could be considered by remote server as a kind of DoS – (denial of service) attack. Even some site administrators have already set firewall rules or web server modules configured like Apache mod_security which filter requests to IPs which are doing too frequent HTTP GET /POST requests to the web server.
To make wget delay with a 10 seconds download between mirrored pages use:
# wget -mk -w 10 -np --random-wait http://website-to-mirror.com/sub-directory/
The -mk stands for -m/-mirror and -k / shortcut argument for –convert-links (make links point locally), –random-wait tells wget to make random waits between o and 10 seconds between each page download request.
3. Mirror / retrieve website sub directory ignoring robots.txt "mirror restrictions"
Some websites has a robots.txt which restricts content download with clients like wget, curl or even prohibits, crawlers to download their website pages completely.
/robots.txt restrictions are not a problem as wget has an option to disable robots.txt checking when downloading.
Getting around the robots.txt restrictions with wget is possible through -e robots=off option.
For instance if you want to make a local mirror copy of the whole sub-directory with all links and do it with a delay of 10 seconds between each consequential page request without reading at all the robots.txt allow/forbid rules:
# wget -mk -w 10 -np -e robots=off --random-wait http://website-to-mirror.com/sub-directory/
4. Mirror website which is prohibiting Download managers like flashget, getright, go!zilla etc.
Sometimes when try to use wget to make a mirror copy of an entire site domain subdirectory or the root site domain, you get an error similar to:
Sorry, but the download manager you are using to view this site is not supported.
We do not support use of such download managers as flashget, go!zilla, or getright
This message is produced by the site dynamic generation language PHP / ASP / JSP etc. used, as the website code is written to check on the browser UserAgent sent.
wget's default sent UserAgent to the remote webserver is:
Wget/1.11.4
As this is not a common desktop browser useragent many webmasters configure their websites to only accept well known established desktop browser useragents sent by client browsers.
Here are few typical user agents which identify a desktop browser:
- Mozilla/5.0 (Windows NT 6.1; rv:6.0) Gecko/20110814 Firefox/6.0
- Mozilla/5.0 (X11; Linux i686; rv:6.0) Gecko/20100101 Firefox/6.0
- Mozilla/6.0 (Macintosh; I; Intel Mac OS X 11_7_9; de-LI; rv:1.9b4) Gecko/2012010317 Firefox/10.0a4
- Mozilla/5.0 (Windows NT 6.1; Win64; x64; rv:2.2a1pre) Gecko/20110324 Firefox/4.2a1pre
etc. etc.
If you're trying to mirror a website which has implied some kind of useragent restriction based on some "valid" useragent, wget has the -U option enabling you to fake the useragent.
If you get the Sorry but the download manager you are using to view this site is not supported , fake / change wget's UserAgent with cmd:
# wget -mk -w 10 -np -e robots=off \

--random-wait

--referer="http://www.google.com" \--user-agent="Mozilla/5.0 (Windows; U; Windows NT 5.1; en-US; rv:1.8.1.6) Gecko/20070725 Firefox/2.0.0.6" \--header="Accept:text/xml,application/xml,application/xhtml+xml,text/html;q=0.9,text/plain;q=0.8,image/png,*/*;q=0.5" \--header="Accept-Language: en-us,en;q=0.5" \--header="Accept-Encoding: gzip,deflate" \--header="Accept-Charset: ISO-8859-1,utf-8;q=0.7,*;q=0.7" \--header="Keep-Alive: 300"
For the sake of some wget anonimity – to make wget permanently hide its user agent and pretend like a Mozilla Firefox running on MS Windows XP use .wgetrc like this in home directory.
5. Make a complete mirror of a website under a domain name
To retrieve complete working copy of a site with wget a good way is like so:
# wget -rkpNl5 -w 10 --random-wait www.website-to-mirror.com
Where the arguments meaning is:
-r – Retrieve recursively
-k – Convert the links in documents to make them suitable for local viewing
-p – Download everything (inline images, sounds and referenced stylesheets etc.)
-N – Turn on time-stamping
-l5 – Specify recursion maximum depth level of 5
6. Make a dynamic pages static site mirror, by converting CGI, ASP, PHP etc. to HTML for offline browsing
It is often websites pages are ending in a .php / .asp / .cgi … extensions. An example of what I mean is for instance the URL http://php.net/manual/en/tutorial.php. You see the url page is tutorial.php once mirrored with wget the local copy will also end up in .php and therefore will not be suitable for local browsing as .php extension is not understood how to interpret by the local browser.
Therefore to copy website with a non-html extension and make it offline browsable in HTML there is the –html-extension option e.g.:
# wget -mk -w 10 -np -e robots=off \

--random-wait \

--convert-links http://www.website-to-mirror.com
A good practice in mirror making is to set a download limit rate. Setting such rate is both good for UP and DOWN side (the local host where downloading and remote server). download-limit is also useful when mirroring websites consisting of many enormous files (documental movies, some music etc.).
To set a download limit to add –limit-rate= option. Passing by to wget –limit-rate=200K would limit download speed to 200KB.
Other useful thing to assure wget has made an accurate mirror is wget logging. To use it pass -o ./my_mirror.log to wget.
Tags: adm, argument, Auto, bandwidth, briefly, browser, BSD, capabilities, cgi, common, connection, copy, denial of service, denial of service attack, Desktop, download, Draft, exact mirror, external urls, fedora linux, flashget, free operating systems, gnu linux, heavy load, home directory, How to, internet connection, Linux, linux users, localhost, make, manager, mirror copy, Mozilla, option, page, php extension, quot, random links, remote server, request, servers, site mirroring, something, tendency, text, text html, time, Ubuntu, URLs, UserAgent, website mirror, wget
Posted in Linux, System Administration, Web and CMS | 2 Comments »


