Archive for the ‘Web and CMS’ Category

Run custom user script after reboot with a cronjob on Linux

Friday, September 21st, 2018

howto-add-custom-script-on-reboot-with-non-administrative-root-user-on-gnu-linux

Perhaps you have a websites on a server on some Linux distro / FreeBSD / AIX / HP-UX / Sun OS that uses Vixie-cron cron jobs to run / respawn dead php / python perl scripts etc.  that do stuff on the server every lets say 30 minutes an hour or even every 12 / 24 hours in the background.
But sometimes due to server or Linux kernel upgrades you need to reboot the server with reboot command or shutdown -r now right in the minutes the scripts were supposed to run and do a database backup / synchronize some data with a remote MySQL with replication configured or do some site maintenance job such as clearing old Messages / Spam / data log file records.

Of course one possible workaround to that is to add the non-root user scripts in question  to /etc/rc.local to run on every server boot, but that fix requires a root access and very often developers did not have that, neither sysadmins are willing to bother  add a user sudo-ed scripts e.g. add  (sudo -u whateveruser "/path/to/script") to /etc/rc.local.

Run custom user  script after reboot the cron way

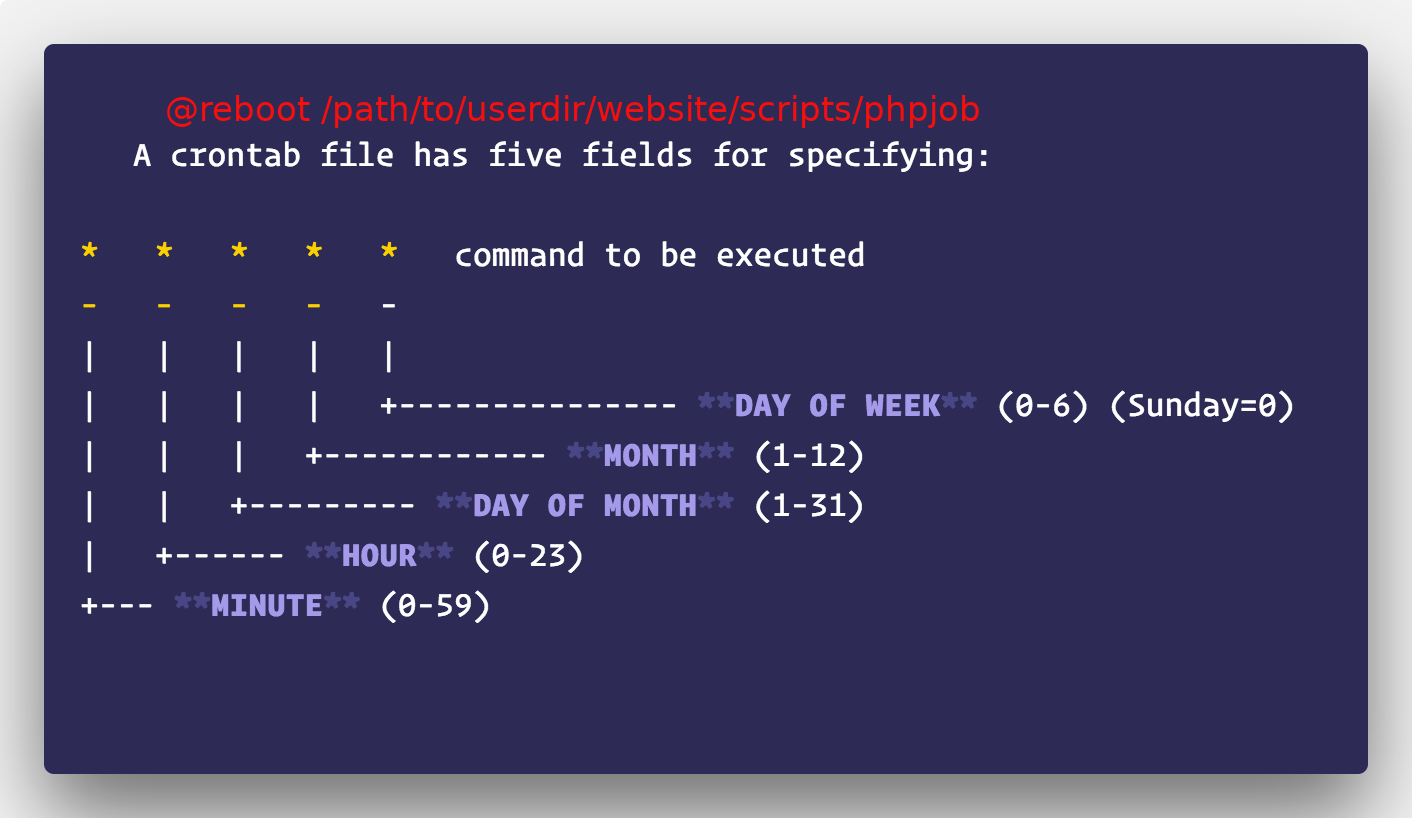
Happily there is ctually a better cron way to do that by telling crond to execute a cronjob during boot and assuming the non-admin user on the Linux has access to shell and access to using cron jobs by using @reboot cron direcive.

Here is few examples on how to run a re-run cron job on start up:
 

linux:~$ crontab -e


Some editor as nano or vim will open listing all your previous set system jobs to add scripts phpjob.php

@reboot  /user/dir/path/to/phpjob
@reboot  /path/to/shell_script
@reboot  /path/to/linux-command

That's pretty shitty situation but thanksfully remote access of website username with SSH will be enough to set the right cron activity (of course this can't be made for servers that are missing crond service running.

The scripts set in cron job that way will respawn right after the OS system had booted and there will be no need for them to wait the next hour to execute configured data synch.
For more on how to run a tiny script respawn every second using a single cron job check out my previous article How to set a crontab to execute commands on a seconds time interval on GNU / Linux and FreeBSD.

Historically it is interestingly to mention that in times before systemd appeared in modern Linux distributions,
a cool thack to run a script that had to be respawned every second after boot for a privileged user was to use /etc/inittab (no longer available in most all non System V Linux distrubutions in 2018), to do so
if you happen to still administer some old Linux servers CentOS 7 etc. you and you need to add a custom script to run and respawn all the time by including a line in /etc/inittab (again assuming a System V Linux is on remote machine):
 

mysvc:235:respawn:/home/me/bin/my_service_starter_script

Putting a service to respawn in that way via inittab uses init (process) and the kernel and keeps re-running it.

Note: 

If a command fails when it starts, and init is configured to restart it, it will use a lot of system resources: init starts it, it fails, init starts it, it fails, init starts it, it fails, and so on, ad infinitum. To prevent this, init will keep track of how often it restarts a command, and if the frequency grows to high, it will delay for five minutes before restarting again.If the kernel 
Using inittab should always be tested on a testbed before adding to remote server, note that if the script is using a lot of memory and keeps crashing it can easily leave out the kernel without memory and the system is about to get errors like:
 

process respawning too fast 


Another useful thing if you have doubts that the script might be crashing is to use something like monit to monitor the script (assuming the script does provide some kind of tcp / udp connection on port) and report you via email / sms about issues with crashing script.
If you hear monit the first time I recommend you read my previous article Monitoring and restart server services (Apache, Mysql, Bind) with Monit to prevent server downtimes.

Mass substitute WordPress site Old domain URL to new URL in MySQL (MariaDB) database after website migration

Thursday, September 13th, 2018

mass-substitute-old-urls-to-new-urls-when-moving-wordpress-website-migrate-wordpress

Mass substitute WordPress site Old domain URL to new URL in MySQL (MariaDB) database after website migration

If you have just migrated a wordpress blog or site to a new server (domain URL) and you have many articles pointing to the old URL. Out of sudden the new domain will end up with many broken links and that would have a severe negative SEO effect on your website leading to a certain downfall of your number of daily unique visits.

Of course manually changing the URL links is achievable by going through all Published Posts when migrating small websites with 10-20 pages,  however it is an impossible tedious task you would definitely want to avoid when you're migrating large WP based websites with few hundred or thousands of posts / pages,
bacause this would be a few weeks of mindless repeatable job to go through each and every post and substite the broken URLs.

Fortunately with a little bit of SQL magic either through MySQL CLI or PHPMyAdmin (if the website is moved to a shared hosting where you have disabled access to MySQL (MariaDB) default connect tcp port 3306.

Depending on the type of WordPress or Website the old broken URLs might be located in various Database tables.
 

– So when Mass URL substitution is might be required ?


1. You migrate a Website http://what-ever-website.com with (PHP / CSS / HTML / Templates) etc. from Hosting Provider Hostgator.com to UK2.com (because the website target client changed lately to United Kingdom customers) to http://what-ever-website.co.uk and the site is moved to a new domain beacause of Business rebranding
 

2. Other reason for changing internal URLs from one URL to another might be if you're migrating your website from HTTP to HTTPS for security.

3. You are restructuring file storage / image directories on the server or due to migration of files to external CDN (Content Delivery Network).
For example (http://your-server.com/images/ , http://your-server.com/files )  URLs pointing to old website location subdirectory has to be changed to the new one (http://your-server.com/img/ , http://your-server.com/data)


– So what is the automated approach to solve the task of Mass URL substitution across WP site ?


  •  Create full backup of all your website database and double-check the backup (try to restore on a test (home) server or other hosting account to make sure the backup is consistent and restore would work normally if necessery
     
  • You can Create Backup either with mysqldump command tool manually … with the right command arguments or use some kind of script such as My tiny mysqlbackupper.sh shell script which I shared under my previous article Make daily MySQL on Linux backup with Shell Script  via PhpMyAdmin.


2. Change old website URL to new one directly from Database using MySQL text client
 

To change incorrect URL with the new correct one the general query to run is:


update TABLE_NAME set FIELD_NAME = replace(FIELD_NAME, ‘find string’, ‘replace string’);


To change old website URL to the new website URL across every table within the wordpress database use below queries:
 

hipo@linux:~$ mysql -u root -p
Enter password:


USE blog;


UPDATE wp_options SET option_value = replace(option_value, 'Existing (old) URL', 'New URL') WHERE option_name = 'home' OR option_name = 'siteurl';

UPDATE wp_posts SET post_content = replace(post_content, 'Existing (old)URL', 'New URL');

UPDATE wp_postmeta SET meta_value = replace(meta_value,'Existing (old) URL','New URL');

UPDATE wp_usermeta SET meta_value = replace(meta_value, 'Existing (old) URL','New URL');

UPDATE wp_links SET link_url = replace(link_url, 'Existing (old) URL','New URL');

UPDATE wp_comments SET comment_content = replace(comment_content , 'Existing (old) URL','New URL');


3. Replace Old website URL to New one after migration using PHPMyAdmin web interface
 

If you don't have access  ssh shell, you can also run the queries via PhpMyAdmin to do so:

1. Open PHPMyadmin URL Panel in browser and login with your user / pass

2. Choose the wordpress database of the wordpress site / blog

3. Select SQL tab and in the panel type on above given SQL queries
 

web-hosting-phpmyadmin-sql-query-tab-screenshot-how-to-run-sql-queries-via-phpmyadmin

If you're lazy to type there is also a web based SQL queries generator tool for moving websites to a new domain


4. Using Search and Replace WordPress plugin to do the old URL to new URL (strings) transition
 

If you have never used SQL queries and you're totally new to it and don't want to risk breaking up something there is also a bunch of wordpress plugins available that do the URL string substitution throughout each wordpress table in a WP database one such WordPress plugin is Search and Replace I have written earlier an article Change string in all WordPress Posts with Search and Replace plugin.


5. Problems with data-serialization
 

If you do a simple search and replace of Old domain urls to New ones, using above given commands and you still end up with some broken links on WP Pages that might be due to data-serialization issues (for the cause of issues check out what is data serialization).
Data serialization in wordpress terms is an array of PHP encrypted data that contains the actual URL, thus a simple search and replace as explained above if URLs use data-serialization would not work. There are available tools online that does URL search and replace operation through  "serialize-data sensitively" if you stuck with data-serializatoin caused issues.

Besides that for there are written scripts that does URL substitution to a WordPress or Joomla websites so an alternative to above WP plugin to replace the URL after migration is to use one of the scripts available a very famous one that will do pain-free all URL / string substitutions inside your WP, Drupal,  Joomla databses is interconnect/it.
 

Few closure words
 

As a system administrator and webmaster I have migrated wordpress installations many times with the need to change the old URLs to a new ones for both customer websites and my own wordpress based. On many ocassions because of lack of attention and hurry, I've messed up things.
The moral I got out of this is when you're doing a WordPress migration just like everything you have to be very attentive and do everything step by step slowly and have a good idea on what you're doing in advance …

Even as a person who had overall idea on how MySQL Server works and have experience in writting SQL queries, I have to confess I've  made mistakes during URL substitution operations when doing it via the MySQL CLI every now and then.

Thus I would recommend you better use some of the many plugins for wordpress and script tools (few of which I mentioned above), especially if you're not having at least few years with some kind of UNIX variation / Linux / MySQL.

Optimize PNG images by compressing on GNU / Linux, FreeBSD server to Improve Website overall Performance

Monday, November 27th, 2017

how-to-optimize-your-png-pictures-to-reduce-size-and-save-speed-bandwidth-optipng-compression-tests-results

If you own a website with some few hundreds of .PNG images like 10 000 / 15 000 png images and the website shows to perform slow in Google PageSpeed Insights and is slow to open when Google Searched or Shared on Facebook / Twitter etc. then one recommended step to boost up the website opening speed is to compress (optimize) the .PNG pictures without loosing the images quality to both save space and account bandwidth you could use optipng even though this is not the only tool available to help you optimize and reduce the size of your images, some few other tools you might like to check out if you have more time are:

 a.)  pngcrush – optimizes PNG (Portable Network Graphics) files.
 b.)  pngnq – tool for optimizing PNG (Portable Network Graphics) images. It is a tool for quantizing PNG images in RGBA format.
 c.)  pngquant – PNG (Portable Network Graphics) image optimising utility. It is a command-line utility for converting 24/32-bit PNG images to paletted (8-bit) PNGs.
 

1. Install and Compress / optimize PNG / GIF / PNM / TIFF file format with optipng
 

OPTIPING tool recompresses the .PNG images to a smaller size without loosing any quality information, besides PNG file format it also supports (BMP, GIF, PNM and TIFF) image format.

If you don't have optipng installed on your server you can;

a.) install it on Redhat RPM based Linux distributions lets say CentOS Linux use:


[root@centos: ~]# yum install epel-release
[root@centos: ~]# yum install optipng

Note that, You will need to  first enable epel repo on centos 7


b.) If instead you're on a Debian GNU / Linux

debian:~# apt-get install optipng


c.) FreeBSD users can install it from FreeBSD ports with:


freebsd# cd /usr/ports/graphics/optipng
freebsd# make install clean

optipng syntax is quite self explanatory
optipng [options] what-ever-file.png


You can get a full list of possible command options with -? command, here is a list:


debian:~# optipng -?
Synopsis:
    optipng [options] files …
Files:
    Image files of type: PNG, BMP, GIF, PNM or TIFF
Basic options:
    -?, -h, -help    show this help
    -o <level>        optimization level (0-7)        [default: 2]
    -v            run in verbose mode / show copyright and version info
General options:
    -backup, -keep    keep a backup of the modified files
    -clobber        overwrite existing files
    -fix        enable error recovery
    -force        enforce writing of a new output file
    -preserve        preserve file attributes if possible
    -quiet, -silent    run in quiet mode
    -simulate        run in simulation mode
    -out <file>        write output file to <file>
    -dir <directory>    write output file(s) to <directory>
    -log <file>        log messages to <file>
    —            stop option switch parsing
Optimization options:
    -f <filters>    PNG delta filters (0-5)            [default: 0,5]
    -i <type>        PNG interlace type (0-1)
    -zc <levels>    zlib compression levels (1-9)        [default: 9]
    -zm <levels>    zlib memory levels (1-9)        [default: 8]
    -zs <strategies>    zlib compression strategies (0-3)    [default: 0-3]
    -zw <size>        zlib window size (256,512,1k,2k,4k,8k,16k,32k)
    -full        produce a full report on IDAT (might reduce speed)
    -nb            no bit depth reduction
    -nc            no color type reduction
    -np            no palette reduction
    -nx            no reductions
    -nz            no IDAT recoding
Editing options:
    -snip        cut one image out of multi-image or animation files
    -strip <objects>    strip metadata objects (e.g. "all")
Optimization levels:
    -o0        <=>    -o1 -nx -nz                (0 or 1 trials)
    -o1        <=>    -zc9 -zm8 -zs0 -f0            (1 trial)
            (or…)    -zc9 -zm8 -zs1 -f5            (1 trial)
    -o2        <=>    -zc9 -zm8 -zs0-3 -f0,5            (8 trials)
    -o3        <=>    -zc9 -zm8-9 -zs0-3 -f0,5        (16 trials)
    -o4        <=>    -zc9 -zm8 -zs0-3 -f0-5            (24 trials)
    -o5        <=>    -zc9 -zm8-9 -zs0-3 -f0-5        (48 trials)
    -o6        <=>    -zc1-9 -zm8 -zs0-3 -f0-5        (120 trials)
    -o7        <=>    -zc1-9 -zm8-9 -zs0-3 -f0-5        (240 trials)
    -o7 -zm1-9    <=>    -zc1-9 -zm1-9 -zs0-3 -f0-5        (1080 trials)
Notes:
    The combination for -o1 is chosen heuristically.
    Exhaustive combinations such as "-o7 -zm1-9" are not generally recommended.
Examples:
    optipng file.png                        (default speed)
    optipng -o5 file.png                    (slow)
    optipng -o7 file.png                    (very slow)

Just running it with, lets say -o7 arguments is enough for optipng to compress your image and reduce some 15 to 30% of picture size

optipng -o7 what-ever-image-you-have.png

optipng-example-on-reducing-image-screenshot-24.9-png-image-compression

2. Compress images without loosing quality recursively inside directory and subdirectories with optiping

a.) To optimize all pictures inside a single directory (without sub-directories) on remote server you can run, below command:
 

cd whatever-dir/
for i in *.png; do optipng -o6 -quiet -keep -preserve -dir optimized -log optipng-compress.log "$i"; done


As you can see a log is being written on what the command has done and the originals of the optimized images is going to be preserved, the optimize level is 6 is the PNG encoding level.


cd /var/www/your-site/images/
find . -type f -iname "*.png" -print0 | xargs -I {} -0 optipng -o6 -keep -preserve -log optipng-compress.log "{}"


This command is pretty handy to run on own dedicated server, if you don't have one just do it on your Linux computer at home or if you don't own a PC with Linux install any Deb / RPM based Linux inside VirtualBox or VMWare Virtual Machine and do it there, then upload to your Hosting Provider / Amazon EC2 etc and Enjoy the increased website performance 🙂


Add gzip compression to optimize web server served files in Apache, Nginx and LiteSpeed

Wednesday, November 15th, 2017

Enable-Gzip-Compression-quick-howto-on-apache-nginx-litespeed

What is GZIP Compression and why you need it?

no-gzip-support-illustration

  • What is gzip? – In Linux / Unix gzip of files is used to compress files so they can take less space when they're transferred from server to server via network in order to speed up file transfer.
  • Usually gzipped files are named as filename.gz
  • Why GZIp compression is important to be enabled on servers, well because that reduces the transferred (served) file by webserver to client browser
  • The effect of this is the faster file transfer of the file and increased overall web user performance


how-gzip-works-with-nginx-illustrated

Most webservers / websites online currently use gzipping of a sort, those who still did not use it has websites which are up to 40% slower than those of competitor websites

How to enable GZIP Compression on Apache Webserver

The easiest way for most people out there who run there websites on a shared hosting is to add the following Apache directives to dynamic loadable .htaccess file:
 

<ifModule mod_gzip.c>
mod_gzip_on Yes
mod_gzip_dechunk Yes
mod_gzip_item_include file .(html?|txt|css|js|php|pl)$
mod_gzip_item_include handler ^cgi-script$
mod_gzip_item_include mime ^text/.*
mod_gzip_item_include mime ^application/x-javascript.*
mod_gzip_item_exclude mime ^image/.*
mod_gzip_item_exclude rspheader ^Content-Encoding:.*gzip.*
</ifModule>


You can put a number of other useful things in .htaccess the file should already be existing in most webhostings with Cpanel or Kloxo kind of administration management interface.

Once the code is included to .htaccess you can reflush site cache.
To test whether the just added HTTP gzip compression works for the Webserver you can use The Online HTTP Compression test

If for some reason after adding this code you don't rip the benefits of gzipped content served by webserver you can try to add altenatively to .htaccess


AddOutputFilterByType DEFLATE text/plain
AddOutputFilterByType DEFLATE text/html
AddOutputFilterByType DEFLATE text/xml
AddOutputFilterByType DEFLATE text/css
AddOutputFilterByType DEFLATE application/xml
AddOutputFilterByType DEFLATE application/xhtml+xml
AddOutputFilterByType DEFLATE application/rss+xml
AddOutputFilterByType DEFLATE application/javascript
AddOutputFilterByType DEFLATE application/x-javascript


Howto Enable GZIP HTTP file compression on NGINX Webserver?

Open NGINX configuration file and add to it the following command parameters:


gzip on;
gzip_comp_level 2;
gzip_http_version 1.0;
gzip_proxied any;
gzip_min_length 1100;
gzip_buffers 16 8k;
gzip_types text/plain text/html text/css application/x-javascript text/xml application/xml application/xml+rss text/javascript;


# Disable for IE < 6 because there are some known problems
gzip_disable "MSIE [1-6].(?!.*SV1)";

# Add a vary header for downstream proxies to avoid sending cached gzipped files to IE6
gzip_vary on;

Enable HTTP file Compression on LiteSpeed webserver

In configuration under TUNING section check whether "enable compression" is enabled, if it is not choose "Edit"
and turn it on.

litespeed-how-to-enable-gzip-compressible_type-illustrated

What is the speed benefits of using HTTP gzip compression?

By using HTTP gzip compression you can save your network and clients abot 50 to 70% (e.g. transferred data) of the original file size.
This would mean less time for loading pages and fetched files and decrease in used bandwidth.

effect-of-gzip-compression-diagram-illustrated

A very handy tool to test whether HTTP Compression is enabled as well as how much is optimized for Speed your Website is Google PageSpeed Insights
as well as GTMetrix.com

Where are Apache log files on my server – Apache log file locations on Debian / Ubuntu / CentOS / Fedora and FreeBSD ?

Tuesday, November 7th, 2017

apache-where-are-httpd-access-log-files

Where are Apache log files on my server?

1. Finding Linux / FreeBSD operating system distribtion and version

Before finding location of Apache log files it is useful to check what is the remote / local Linux operating system version, hence

First thing to do when you login to your remote Linux server is to check what kind of GNU / Linux you're dealing with:

cat /etc/issue
cat /etc/issue.net


In most GNU / Linux distributions should give you enough information about the exact Linux distribution and version remote server is running.

You will get outputs like

# cat /etc/issue
SUSE LINUX Enterprise Server 10.2 Kernel \r (\m), \l

or

# cat /etc/issue
Debian GNU/Linux 8 \n \l

If remote Linux is Fedora look for fedora-release file:

cat /etc/fedora-release Fedora release 7 (Moonshine)

The proposed freedesktop.org standard with the introduction of systemd across all Linux distributions is

/etc/os-release


# cat /etc/os-release
PRETTY_NAME="Debian GNU/Linux 8 (jessie)"
NAME="Debian GNU/Linux"
VERSION_ID="8"
VERSION="8 (jessie)"
ID=debian
HOME_URL="http://www.debian.org/"
SUPPORT_URL="http://www.debian.org/support"
BUG_REPORT_URL="https://bugs.debian.org/"


Once we know what kind of Linux distribution we're dealing with, we can proceed with looking up for standard location of Apache config:

2. Apache config file location for Fedora / CentOS / RHEL and other RPM based distributions

RHEL / Red Hat / CentOS / Fedora Linux Apache access file location
 

/var/log/httpd/access_log


3. Apache config file location for Debian / Ubuntu and other deb based Linux distributions

Debian / Ubuntu Linux Apache access log file location

/var/log/apache2/access.log


4. Apache config file location for FreeBSD

FreeBSD Apache access log file location –

/var/log/httpd-access.log


5. Finding custom Apache access log locations
 

If for some reason the system administrator on the remote server changed default path for each of distributions, you can find custom configured log files through:

a) On Debian / Ubuntu / deb distros:

debian:~# grep CustomLog /etc/apache2/apache2.conf


b) On CentOS / RHEL / Fedora Linux RPM based ones:

[root@centos:  ~]# grep CustomLog /etc/httpd/conf/httpd.conf


c) On FreeBSD OS


freebsd# grep CustomLog /etc/httpd/conf/httpd.conf
 # a CustomLog directive (see below).
    #CustomLog "/var/log/httpd-access.log" common
    CustomLog "/var/log/httpd-access.log" combined

How to Downgrade WordPress install to a prior release to Fix problems with wordpress after upgrade

Friday, October 27th, 2017

howto-downgrade-wordpress-to-a-prior-previous-version-easily-with-wp-downgrade-plugin-step-by-step-guide

Are you a wordpress website or blog owner? Did you recently upgraded to the latest WordPress release as you wanted to always keep ahead with security and latest wordpress functionalities ?

but out of a sudden components of WordPress stopped working after the upgrade …

I'm one of this and recently I've upgraded WordPress to 4.8.2, hopeing that this would make my blog even better with the fresh new wordpress but suddenly my Widgets stopped working, e.g.


Appearance -> Widgets


Show me strange blank page, when I tried to debug that in browser, with browser console in Google Chrome and Firefox ESR / Opera with Inspect elements, I could see some partially generated webpage, so I investigated further to see what in reality is creating my WordPress Widget troubles, I tried adding WordPress Debugging in wp-config.php for those who don't know how to do it to do so, you need to add the following line of code to wp-config.php
 

# vim /var/www/blog/wp-config.php

define( 'WP_DEBUG', true );
define( 'WP_DEBUG_LOG', true );


If everything is fine with your wordpress installation (e.g. directory / file permissions are reporting the fine), The log file should be situated under
 

wp-includes/debug.log


But if you enabled debugging like me and nothing was visible neither in WordPress WP generated page, neither in that log or even worse, the file is not being written, that might be an indicator of either a seriously messed wordpress installation, or bugs occuring due to combination of WordPress release with the PHP installed on the server in my case the WordPress was 4.82 and PHP is standard Debian package PHP 5.6.30


The next place I checked logically is HTTPD (Apache) both access and error logs and there I found the widgets.php once called is returning 500 (Internal Server Errors), so I was forced to do something to make my appearance work again.

I tried my best to make Appearance -> Widgets and Appearance -> Customize WP Dashboard menus to work but without success so I finally got pissed off and decided to downgrade WordPress to the previous version where everything was running fine.

A quick investigation in Google led to find that there is an easy to use WordPress plugin that is capable of upgrading / downgrading wordpress to virtually all official WordPress releases.

Below is shortly what I had to do to Downgrade my WP 4.8.2 to WP 4.7.3


1. Download WP Downgrade Specific Core Version wordpress plugin
 

 The plugin “WP Downgrade” forces the WordPress update routine to perform the installation of a specified WordPress release. The Core Release you specify is then downloaded from wordpress.org and installed as would any regular update. You can permanently stay on a previous version of your choice or update selected.

To download the plugin click here, save it to your computer and then transfer to server or directly use wget or curl commands with the exact plugin location and unzip it standardly

#  cd /var/www/blog/wp-content/plugins
#  wget https://downloads.wordpress.org/plugin/wp-downgrade.zip
#  unzip wp-downgrade.zip

N.B. ! On a shared hosting or CPanel, you might have to upload the plugin with FTP.


2. Enable WP Downgrade Specific Core Version wordpress plugin
 

Plugins -> WP Downgrade Specific Core Version enable


Below is a quote from the plugin website describing more about WP Downgrade plugin:

"WP Downgrade | Specific Core Version has the potential for becoming one of the best-loved plugins among those, who simply cannot update to the latest WP release.

In the past the latest WP release was the only offering for WP’s Automatic Update routine. This left all those behind, who have to wait with Core updates, until their plugins become compatible with newer WP releases. When this finally happens, more often than not there has already been yet another Core update. In the end a dreaded, cumbersome, time-consuming and error-prone Manual Update used to be the only way to go.

With WP Downgrade | Specific Core Version this is now a thing of the past. Anyone who lags behind the latest WP release is now able to use Automatic Updates even to lower WP versions. What WP Downgrade does simply is to make WP believe that the version you want to update to actually is the latest version. Because of this, there is no difference to updating to the latest version."


3. Configure WP Downgrade Specific Core Version plugin


Navigate to:

Settings -> WP-Downgrade

how-to-downgrade-wordpress-easily-to-a-previous-prior-release-wp-downgrade-screenshot


4. Install (Downgrade) WordPress to the previous release


Next you will have to press the re-install button to install the desired WordPress release, if you're unsure which was the exact previous version you used you can check the list of All WordPress official released versions here choose any version that was released few months before the latest that was creating troubles for you and do re-install with it, if you face issues with it, you plenty of other versions that are close to it with which you can try, after all one of them should be working.
 

downgrade-wordpress-howto-wordpress-re-install-button-screenshot
 

Assuming that your directory structure of the current installed WordPress is not having any permission issues, the respective version of wordpress would be downloaded and untarred over the actual latest release you're having, so soon you'll have your WP reverted to the OLD release.

Once downgrading in my case immediately my Appearance -> Widgets started working again. Hooray!

Note: that if you face some permission errors during download or install of the downgradable version of wordpress you will be notified, to fix that just take few minutes with chown command and so something like:


chown -R www-data /var/www/blog/


that should fix permissions for you so then you can happily again, re-run the re-Install button to finalize WP Downgrade.

Now you can enjoy your life as everytihng will be working as expected, no broken more strange plugins behavior (which is another additional effect showing incompitability between WordPress release and a Plugin, no nothing), you can sleep calmly again.

Enjoy! 🙂

The Best Most Effective Search Engine Optimization SEO tips or how to stay ahead of your competitors

Friday, October 27th, 2017


The 16 most effective search engine optimization tips

I've found an infogram that is showing the best practices of Search Engine Optimization as today SEO has been dependent strongly on this factors I suggest you closely check your site, whether all of the 16 pinpointed tips are already implemented in your site if not you better implement them before the robots (Machine Learning), Cloud Computing and the rest of the modern tech savy mambo jambo stuff modern technology takes over SEO ranking in Google. If you run a start up business like me this tips will definitely help you to keep up in the list of Google, Bing and Yahoo ahead of your competitors.

Enjoy Learning and please share anything you find missing on the diagram which you already do to Boost Up your SEO!

How to merge two or more wordpress sites from separete domains into one without impacting SEO

Monday, October 23rd, 2017

merge-multiple-wordpres-websites-howto-merge-two-or-more-websites-together-without-loosing-seo-credability

If you run multiple WordPress websites or blogs, but one of the websites is much more developed at a certain point you might decide that the best of the two worlds would be two merge two WordPress blogs into one.
 

So how can we do merge your multiple wordpress websites into single ?


1. Export content from each of the old websites you will be closing soon

First thing to do is to immediately create SQL data and WordPress sites backup, so if something goes wrong you can easily restore.


Next From wordpress admin area wp-admin

export-content-wordpress-website-screenshot-howto

Visit

Tools -> Export

Make sure, the All Content option is selected like shown in above screenshot and click on

Download Export File button

The downloaded files will have a copy of all yours

– Posts and pages
– Custom Post Types
– All included categories and tags

Once we have transferred the file to the Website with which we're going to merge old WP content, we need to install the Import plugin

install-wordpress-importer-to-merge-multiple-wordpress-sites

To do so navigate to:

Tools -> Import -> (Intall now)

wordpress-merge-two-or-more-websites-run-importer-screenshot.

Tools -> Run Importer

You will be asked for the file you just dumped into the second wordpress install which you'll be merging

export-and-import-wp-file-screenshot

Wordpress will start importing, your Export file and analyze it, then you will be redirected to

Import Settings Page
 

wordpress-import-settings-page-screenshot-howto-merge-sites

Assign Authors (that should be your account or the account with which the primary blog has most posts and with which you'll be merging).

Hopefully all will be fine with import and you will get the success page:

wordpress-success-page-importing-two-websites

One last step is to set properly redirects so that the transition merge from the Old Website to the New one does not impact your website Search Engine Optimization Ratings.

The redirects are made via .htaccess file it will be located in the Document Root (Or main directory) of your wordpress installed websites for example if your website is located under /var/www/wordpress-site your .htaccess file will be located under /var/www/wordpress-site/.htaccess

Open the file (SITUATED ON THE OLD WORDPRESS WEBSITE THAT YOU'LL BE MERGING) with editor directly on the server or if it is a shared hosting, download it and edit it at your side.

To the beginning of it add the following Apache ModRewrite code:
 

#Options +FollowSymLinks
RewriteEngine on
RewriteRule ^(.*)$ http://www.newsite.com/$1 [R=301,L]


Replace inside above example http://www.newsite.com with the name of the primary domain name to which we're merging (e.g. the merging domain and not the one we merge).

If you experience some problems with pictures or you like to Merge Bulk Edit categories  and tags  read import external images to wordpress as well as how to merge bulk edit categories in tags in WordPress


How to install / add new root certificates on Debian, Ubuntu, Mint Linux

Saturday, October 21st, 2017

add-install-new-root-ca-certificates-to-debian-ubuntu-linux-howto

How to add / Installing a root/CA Certificate on Debian, Ubuntu, Mint Linux


 Because of various auditing failures and other security issues, the CAcert root certificate set is slowly disappearing from the Ubuntu and Debian ‘ca-certificates’ package.

That's really tricky because if you're a system administrator or have a bunch of programmers whose needs is to install a new set of root certificates for their freshly develped Application or you have to make a corporate certificates added to debian rootca, then the good news is it is quite easy to install new certificates to deb based distributions.


Given a CA certificate file foo.crt, follow these steps to install it on Debian / Ubuntu:

    Create a directory for extra CA certificates in /usr/share/ca-certificates:


    debian:~# mkdir /usr/share/ca-certificates/extra-certificates


    Copy the CA .crt file to this directory:


    debian:~# cp foo.crt /usr/share/ca-certificates/extra-certificates/foo.crt


    Let Debian / Ubuntu add the .crt file's path relative to /usr/share/ca-certificates to /etc/ca-certificates.conf (the file lists certificates that you wish to use or to ignore to be installed in /etc/ssl/certs)


    debian:~# dpkg-reconfigure ca-certificates


In case you want to include a .pem file to the list of trustable certificates on Debian / Ubuntu, it must first be converted to a .crt file first, you can do that with:


    debian:~# openssl x509 -in foo.pem -inform PEM -out foo.crt


Lets say you want to add some custom Root certificate for exapmle cacert.org


   debian:~# mkdir /usr/local/share/ca-certificates/cacert.org
   debian:~# cd /usr/local/share/ca-certificates/cacert.org
   debian:~# mkdir /usr/local/share/ca-certificates/cacert.org
   debian:~# wget -P /usr/local/share/ca-certificates/cacert.org http://www.cacert.org/certs/root.crt http://www.cacert.org/certs/class3.crt


Then once again update the ca certificates bundle

   debian:~# update-ca-certificates


List of vulnerable wordpress plugins. Hacked, dangerous, vulnerable

Tuesday, October 17th, 2017

list-of-vulnerable-wordpress-pluginshacked-dangerous-vulnerable-wp


Have your wordpress has been hacked recently? Mine has Don't despair, below is a list of famous WordPress Plugins for its hackability.
Hope this helps you prevent your self on time and wipe out all the unnecessery plugins.
Double check the version number of Vulnerable plugins, and remove it only when you're sure its hackable. If you're sure you happen to run on your WordPress Blog or site one of the below plugins immediately deactivate and delete it.


Vulnerability types

A quick reminder of the most common security holes and issues WordPress plugins face. Please note that most problems are a combination of two or more types listed below.

Arbitrary file viewing
Instead of allowing only certain file source to be viewed (for example plugin templates) the lack of checks in the code allows the attacker to view the source of any file, including those with sensitive information such as wp-config.php

Arbitrary file upload
Lack of file type and content filtering allows for upload of arbitrary files that can contain executable code which, once run, can do pretty much anything on a site

Privilege escalation
Once the attacker has an account on the site, even if it’s only of the subscriber type, he can escalate his privileges to a higher level, including administrative ones.

SQL injection
By not escaping and filtering data that goes into SQL queries, malicious code can be injected into queries and data deleted, updated or inserted into the database. This is one of the most common vulnerabilities.

Remote code execution (RCE)
Instead of uploading and running malicious code, the attacker can run it from a remote location. The code can do anything, from hijacking the site to completely deleting it.

Plugin Name Vulnerability Type Min / Max Versions Affected
1 Flash Gallery arbitrary file upload 1.3.0 / 1.5.6
360 Product Rotation arbitrary file upload 1.1.3 / 1.2.0
Tevolution arbitrary file upload 2.0 / 2.2.9
Addblockblocker arbitrary file upload 0.0.1
Ads Widget remote code execution (RCE) 2.0 / n/a
Advanced Access Manager privilege escalation 3.0.4 / 3.2.1
Advanced Ajax Page Loader arbitrary file upload 2.5.7 / 2.7.6
Advanced Video Embed Embed Videos Or Playlists arbitrary file viewing n/a / 1.0
Analytic remote code execution (RCE) 1.8
Analytics Counter PHP object injection 1.0.0 / 3.4.1
Appointments PHP object injection 1.4.4 Beta / 2.2.0
Asgaros Forum settings change 1.0.0 / 1.5.7
Aspose Cloud Ebook Generator arbitrary file viewing 1.0
Aspose Doc Exporter arbitrary file viewing 1.0
Aspose Importer Exporter arbitrary file viewing 1.0
Aspose Pdf Exporter arbitrary file viewing 1.0
Attachment Manager arbitrary file upload 1.0.0 / 2.1.1
Auto Attachments arbitrary file upload 0.2.7 / 0.3
Bbpress Like Button SQL injection 1.0 / 1.5
Bepro Listings arbitrary file upload 2.0.54 / 2.2.0020
Blaze Slide Show For WordPress arbitrary file upload 2.0 / 2.7
Brandfolder local file inclusion (LFI) 2.3 / 3.0
Breadcrumbs Ez remote code execution (RCE) n/a
Candidate Application Form arbitrary file viewing 1.0
Category Grid View Gallery arbitrary file upload 0.1.0 / 0.1.1
Cherry Plugin arbitrary file upload 1.0 / 1.2.6
Chikuncount arbitrary file upload 1.3
Cip4 Folder Download Widget arbitrary file viewing 1.4 / 1.10
Cms Commander Client PHP object injection 2.02 / 2.21
Contus Video Gallery arbitrary file viewing 2.2 / 2.3
Cookie Eu remote code execution (RCE) 1.0
Cp Image Store arbitrary file viewing 1.0.1 / 1.0.5
Cross Rss arbitrary file viewing 0.5
Custom Content Type Manager remote code execution 0.9.8.8
Custom Lightbox possible remote code execution (RCE) 0.24
Cysteme Finder arbitrary file viewing 1.1 / 1.3
Db Backup arbitrary file viewing 1.0 / 4.5
Delete All Comments arbitrary file upload 2.0
Developer Tools arbitrary file upload 1.0.0 / 1.1.4
Disclosure Policy Plugin remote file inclusion (RFI) 1.0
Display Widgets remote code execution 2.6
Dop Slider arbitrary file upload 1.0
Download Zip Attachments arbitrary file viewing 1
Downloads Manager arbitrary file upload 1.0 Beta / 1.0 rc-1
Dp Thumbnail arbitrary file upload 1.0
Dropbox Backup PHP object injection 1.0 / 1.4.7.5
Dukapress arbitrary file viewing 2.3.7 / 2.5.3
Ebook Download arbitrary file viewing 1.1
Ecstatic arbitrary file upload 0.90 (x9) / 0.9933
Ecwid Shopping Cart PHP Object Injection 3.4.4 / 4.4.3
Enable Google Analytics remote code execution (RCE) n/a
Estatik arbitrary file upload 1.0.0 / 2.2.5
Event Commerce Wp Event Calendar persistent cross-site scripting (XSS) 1.0
Filedownload arbitrary file viewing 0.1
Flickr Gallery PHP object injection 1.2 / 1.5.2
Form Lightbox option update 1.1 / 2.1
Formidable information disclosure 1.07.5 / 2.0.07
Fresh Page arbitary file upload .11 / 1.1
Front End Upload arbitrary file upload 0.3.0 / 0.5.3
Front File Manager arbitrary file upload 0.1
Fs Real Estate Plugin SQL injection 1.1 / 2.06.03
G Translate remote code execution (RCE) 1.0 / 1.3
Gallery Objects SQL injection 0.2 / 0.4
Gallery Slider remote code execution (RCE) 2.0 / 2.1
Genesis Simple Defaults arbitrary file upload 1.0.0
Gi Media Library arbitrary file viewing 1.0.300 / 2.2.2
Google Analytics Analyze remote code execution (RCE) 1.0
Google Document Embedder SQL injection 2.5 / 2.5.16
Google Maps By Daniel Martyn remote code exection (RCE) 1.0
Google Mp3 Audio Player arbitrary file viewing 1.0.9 / 1.0.11
Grapefile arbitrary file upload 1.0 / 1.1
Gravityforms reflected cross-site scripting (XSS) 1.7 / 1.9.15.11
Hb Audio Gallery Lite arbitrary file viewing 1.0.0
History Collection arbitrary file viewing 1.1. / 1.1.1
Html5avmanager arbitrary file upload 0.1.0 / 0.2.7
I Dump Iphone To WordPress Photo Uploader arbitrary file upload 1.1.3 / 1.8
Ibs Mappro arbitrary file viewing 0.1 / 0.6
Image Export arbitrary file viewing 1.0.0 / 1.1.0
Image Symlinks arbitrary file upload 0.5 / 0.8.2
Imdb Widget arbitrary file viewing 1.0.1 / 1.0.8
Inboundio Marketing arbitrary file upload 1.0.0 / 2.0
Infusionsoft arbitrary file upload 1.5.3 / 1.5.10
Inpost Gallery local file inclusion (LFI) 2.0.9 / 2.1.2
Invit0r arbitrary file upload 0.2 / 0.22
Is Human remote code execution 1.3.3 / 1.4.2
Iwp Client PHP object injection 0.1.4 / 1.6.0
Jssor Slider arbitrary file upload 1.0 / 1.3
Like Dislike Counter For Posts Pages And Comments SQL injection 1.0 / 1.2.3
Mac Dock Gallery arbitrary file upload 1.0 / 2.7
Magic Fields arbitrary file upload 1.5 / 1.5.5
Mailchimp Integration remote code execution (RCE) 1.0.1 / 1.1
Mailpress local file inclusion (LFI) 5.2 / 5.4.6
Mdc Youtube Downloader arbitrary file viewing 2.1.0
Menu Image malicious JavaScript loading 2.6.5 / 2.6.9
Miwoftp arbitrary file viewing 1.0.0 / 1.0.4
Mm Forms Community arbitrary file upload 1.0 / 2.2.6
Mobile App Builder By Wappress arbitrary file upload n/a / 1.05
Mobile Friendly App Builder By Easytouch arbitrary file upload 3.0
Multi Plugin Installer arbitrary file viewing 1.0.0 / 1.1.0
Mypixs local file inclusion (LFI) 0.3
Nmedia User File Uploader arbitrary file upload 1.8
Option Seo remote code execution (RCE) 1.5
Page Google Maps remote code execution (RCE) 1.4
Party Hall Booking Management System SQL injection 1.0 / 1.1
Paypal Currency Converter Basic For Woocommerce arbitrary file viewing 1.0 / 1.3
Php Analytics arbitrary file upload n/a
Pica Photo Gallery arbitrary file viewing 1.0
Pitchprint arbitrary file upload 7.1 / 7.1.1
Plugin Newsletter arbitrary file viewing 1.3 / 1.5
Post Grid file deletion 2.0.6 / 2.0.12
Posts In Page authenticated local file inclusion (LFI) 1.0.0 / 1.2.4
Really Simple Guest Post local file inclusion (LFI) 1.0.1 / 1.0.6
Recent Backups arbitrary file viewing 0.1 / 0.7
Reflex Gallery arbitrary file upload 1.0 / 3.0
Resume Submissions Job Postings arbitrary file upload 2.0 / 2.5.3
Return To Top remote code execution (RCE) 1.8 / 5.0
Revslider arbitrary file viewing 1.0 / 4.1.4
S3bubble Amazon S3 Html 5 Video With Adverts arbitrary file viewing 0.5 / 0.7
Sam Pro Free local file inclusion (LFI) 1.4.1.23 / 1.9.6.67
Se Html5 Album Audio Player arbitrary file viewing 1.0.8 / 1.1.0
Sell Downloads arbitrary file viewing 1.0.1
Seo Keyword Page remote code execution (RCE) 2.0.5
Seo Spy Google WordPress Plugin arbitrary file upload 2.0 / 2.6
Seo Watcher arbitrary file upload 1.3.2 / 1.3.3
Sexy Contact Form arbitrary file upload 0.9.1 / 0.9.8
Share Buttons Wp remote code execution (RCE) 1.0
Showbiz arbitrary file viewing 1.0 / 1.5.2
Simple Ads Manager information disclosure 2.0.73 / 2.7.101
Simple Download Button Shortcode arbitrary file viewing 1.0
Simple Dropbox Upload Form arbitrary file upload 1.8.6 / 1.8.8
Simple Image Manipulator arbitrary file viewing 1.0
Simplr Registration Form privilege escalation 2.2.0 / 2.4.3
Site Import remote page inclusion 1.0.0 / 1.2.0
Slide Show Pro arbitrary file upload 2.0 / 2.4
Smart Slide Show arbitrary file upload 2.0 / 2.4
Smart Videos remote code execution (RCE) 1.0
Social Networking E Commerce 1 arbitrary file upload 0.0.32
Social Sharing possible arbitrary file upload 1.0
Social Sticky Animated remote code execution (RCE) 1.0
Spamtask arbitrary file upload 1.3 / 1.3.6
Spicy Blogroll local file inclusion (LFI) 0.1 / 1.0.0
Spotlightyour arbitrary file upload 1.0 / 4.5
Stats Counter PHP object injection 1.0 / 1.2.2.5
Stats Wp remote code execution 1.8
Store Locator Le unrestricted email sending 2.6 / 4.2.56
Tera Charts reflected cross-site scripting (XSS) 0.1 / 1.0
The Viddler WordPress Plugin cross-site request forgery (CSRF)/cross-site scripting (XSS) 1.2.3 / 2.0.0
Thecartpress local file inclusion (LFI) 1.1.0 / 1.1.5
Tinymce Thumbnail Gallery arbitrary file viewing v1.0.4 / v1.0.7
Ultimate Product Catalogue arbitrary file upload 1.0 / 3.1.1
User Role Editor privilege escalation 4.19 / 4.24
Web Tripwire arbitrary file upload 0.1.2
Webapp Builder arbitrary file upload 2.0
Website Contact Form With File Upload arbitrary file upload 1.1 / 1.3.4
Weever Apps 20 Mobile Web Apps arbitrary file upload 3.0.25 / 3.1.6
Woocommerce Catalog Enquiry arbitrary file upload 2.3.3 / 3.0.0
Woocommerce Product Addon arbitrary file upload 1.0 / 1.1
Woocommerce Products Filter authenticated persistent cross-site scripting (XSS) 1.1.4 / 1.1.4.2
Woopra arbitrary file upload 1.4.1 / 1.4.3.1
WordPress File Monitor persistent cross-site scripting (XSS) 2.0 / 2.3.3
Wp Appointment Schedule Booking System persistent cross-site scripting (XSS) 1.0
Wp Business Intelligence Lite arbitrary file upload 1.0 / 1.0.7
Wp Crm arbitrary file upload 0.15 / 0.31.0
Wp Custom Page arbitrary file viewing 0.5 / 0.5.0.1
Wp Dreamworkgallery arbitrary file upload 2.0 / 2.3
Wp Easybooking reflected cross-site scripting (XSS) 1.0.0 / 1.0.3
Wp Easycart authenticated arbitrary file upload 1.1.27 / 3.0.8
Wp Ecommerce Shop Styling authenticated arbitrary file viewing 1.0 / 2.5
Wp Editor authenticated arbitrary file upload 1.0.2 / 1.2.5.3
Wp Filemanager arbitrary file viewing 1.2.8 / 1.3.0
Wp Flipslideshow persistent cross-site scripting (XSS) 2.0 / 2.2
Wp Front End Repository arbitrary file upload 1.0.0 / 1.1
Wp Handy Lightbox remote code execution (RCE) 1.4.5
Wp Homepage Slideshow arbitrary file upload 2.0 / 2.3
Wp Image News Slider arbitrary file upload 3.0 / 3.5
Wp Levoslideshow arbitrary file upload 2.0 / 2.3
Wp Miniaudioplayer arbitrary file viewing 0.5 / 1.2.7
Wp Mobile Detector authenticated persistent cross-site scripting (XSS) 3.0 / 3.2
Wp Mon arbitrary file viewing 0.5 / 0.5.1
Wp Online Store arbitrary file viewing 1.2.5 / 1.3.1
Wp Piwik persistent cross-site scripting (XSS) 0.10.0.1 / 1.0.10
Wp Popup remote code execution (RCE) 2.0.0 / 2.1
Wp Post Frontend arbitrary file upload 1.0
Wp Property arbitrary file upload 1.20.0 / 1.35.0
Wp Quick Booking Manager persistent cross-site scripting (XSS) 1.0 / 1.1
Wp Royal Gallery persistent cross-site scripting (XSS) 2.0 / 2.3
Wp Seo Spy Google arbitrary file upload 3.0 / 3.1
Wp Simple Cart arbitrary file upload 0.9.0 / 1.0.15
Wp Slimstat Ex arbitrary file upload 2.1 / 2.1.2
Wp Superb Slideshow arbitrary file upload 2.0 / 2.4
Wp Swimteam arbitrary file viewing 1 / 1.44.1077
Wp Symposium arbitrary file upload 13.04 / 14.11
Wp Vertical Gallery arbitrary file upload 2.0 / 2.3
Wp Yasslideshow arbitrary file upload 3.0 / 3.4
Wp2android Turn Wp Site Into Android App arbitrary file upload 1.1.4
Wpeasystats local file inclusion (LFI) 1.8
Wpmarketplace arbitrary file viewing 2.2.0 / 2.4.0
Wpshop arbitrary file upload 1.3.1.6 / 1.3.9.5
Wpstorecart arbitrary file upload 2.0.0 / 2.5.29
Wptf Image Gallery arbitrary file viewing 1.0.1 / 1.0.3
Wsecure remote code execution (RCE) 2.3
Wysija Newsletters arbitrary file upload 1.1 / 2.6.7
Xdata Toolkit arbitrary file upload 1.6 / 1.9
Zen Mobile App Native arbitrary file upload 3.0
Zingiri Web Shop arbitrary file upload 2.3.6 / 2.4.3
Zip Attachments arbitrary file viewing 1.0 / 1.4


Have your WordPress site been hacked?

Don’t despair; it happens to the best of us. It’s tough to give generic advice without having a look at your site.