Posts Tagged ‘Optimize’

How to start / Stop and Analyze system services and improve Linux system boot time performance

Friday, July 5th, 2019

systemd-components-systemd-utilities-targets-cores-libraries
This post is going to be a very short one and to walk through shortly to System V basic start / stop remove service old way and the new ways introduced over the last 10 years or so with the introduction of systemd on mass base across Linux distributions.
Finally I'll give you few hints on how to check (analyze) the boot time performance on a modern GNU / Linux system that is using systemd enabled services.
 

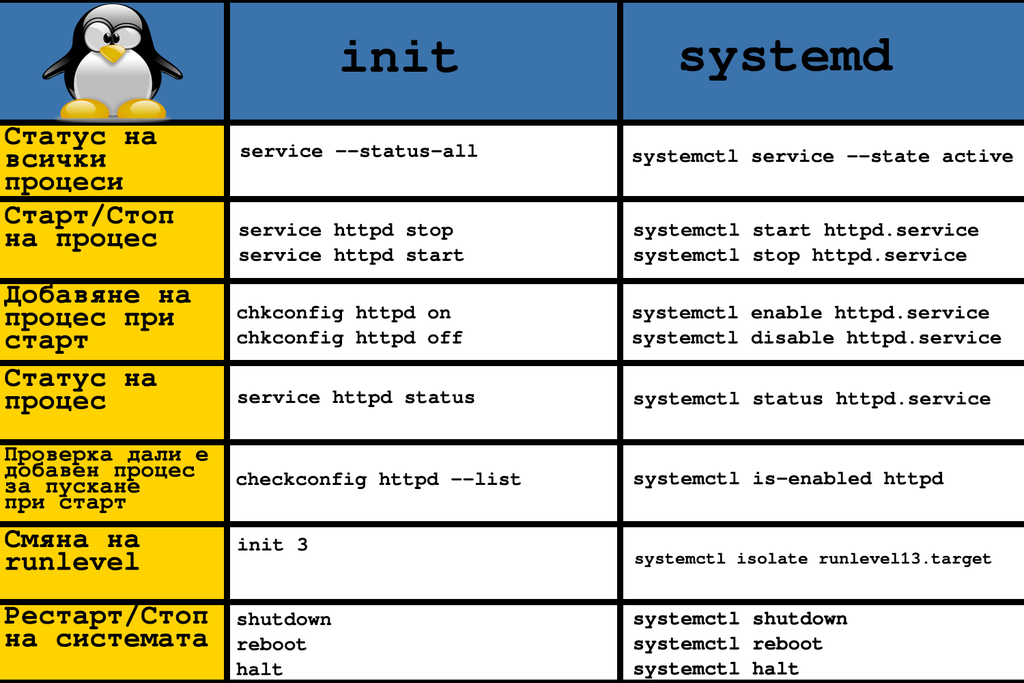
1. System V and the old days few classic used ways to stop / start / restart services (runlevels and common wrapper scripts)


The old fashioned days when Linux was using SystemV / e.g. no SystemD used way was to just go through all the running services with following the run script logic inside the runlevel the system was booting, e.g. to check runlevel and then potimize each and every run script via the respective location of the bash service init scripts:


root@noah:/home/hipo# /sbin/runlevel 
N 5


Or on some RPM based distros like Fedora / RHEL / SUSE Enterprise Linux to use chkconfig command, e.g. list services:

~]# chkconfig –list

etworkManager  0:off   1:off   2:on    3:on    4:on    5:on    6:off
abrtd           0:off   1:off   2:off   3:on    4:off   5:on    6:off
acpid           0:off   1:off   2:on    3:on    4:on    5:on    6:off
anamon          0:off   1:off   2:off   3:off   4:off   5:off   6:off
atd             0:off   1:off   2:off   3:on    4:on    5:on    6:off
auditd          0:off   1:off   2:on    3:on    4:on    5:on    6:off
avahi-daemon    0:off   1:off   2:off   3:on    4:on    5:on    6:off

And to start stop the service into (default runlevel) or respective runlevel:


~]#  chkconfig httpd on

~]# chkconfig –list httpd
httpd            0:off   1:off   2:on    3:on    4:on    5:on    6:off


~]# chkconfig service_name on –level runlevels


Debian / Ubuntu and other .deb based distributions with System V (which executes scripts without single order but one by one) are not having natively chkconfig but instead are famous for update-rc.d init script wrapper, here is few basic use  of it:

update-rc.d <service> defaults
update-rc.d <service> start 20 3 4 5
update-rc.d -f <service>  remove

Here defaults means default set boot runtime for system and numbers are just whether service is started or stopped for respective runlevels. To check what is your default one simply run /sbin/runlevel

Other useful tool to stop / start services and analyze what service is running and which not in real time (but without modifying boot time set for a service) – more universal nowadays is to use the service command.

root@noah:/home/hipo# service –status-all
 [ + ]  acpid
 [ – ]  alsa-utils
 [ – ]  anacron
 [ + ]  apache-htcacheclean
 [ – ]  apache2
 [ + ]  atd
 [ + ]  aumix

root@noah:/home/hipo# service cron restart/usr/sbin/service command is just a simple wrapper bash shell script that takes care about start / stop etc. operations of scripts found under /etc/init.d

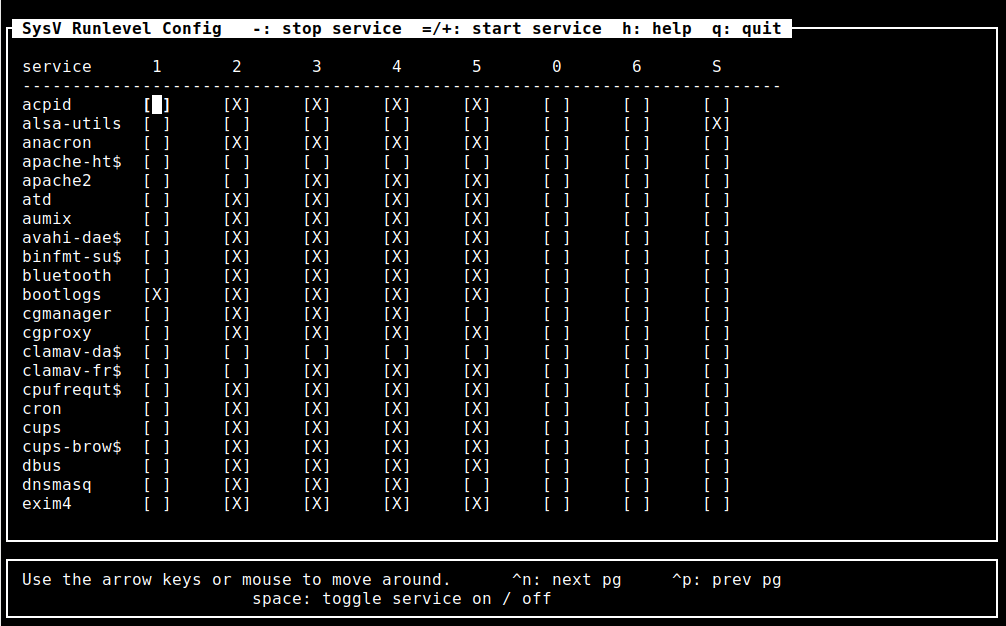
For those who don't want to tamper with too much typing and manual configuration there is an all distribution system V compatible ncurses interface text itnerface sysv-rc-conf which could make your life easier on configuring services on non-systemd (old) Linux-es.

To install on Debian distros:

debian:~# apt-get install sysv-rc-conf

debian:~# sysv-rc-conf


SysV RC Conf desktop on GNU Linux using sysv-rc-conf systemV and systemd
 

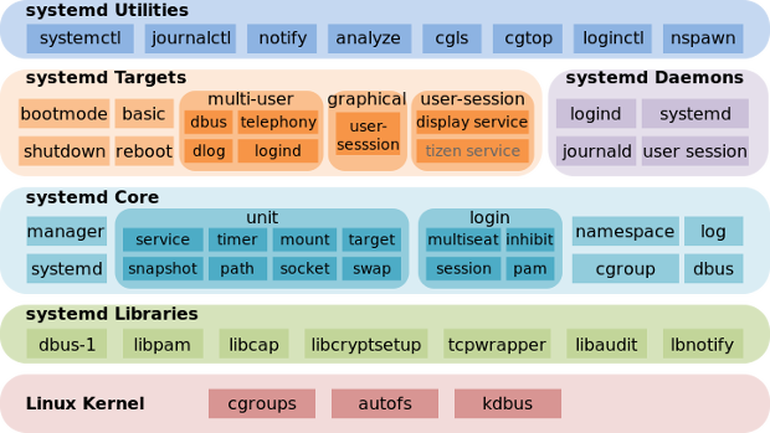
2. SystemD basic use Start / stop check service and a little bit of information
for the novice

As most Linux kernel based distributions except some like Slackware and few others see the full list of Linux distributions without systemd (and aha yes slackw. users loves rc.local so much – we all do 🙂  migrated and are nowadays using actively SystemD, to start / stop analyze running system runnig services / processes

systemctl – Control the systemd system and service manager

To check whether a service is enabled

systemctl is-active application.service

To check whether a unit is in a failed state

systemctl is-failed application.service

To get a status of running application via systemctl messaging

# systemctl status sshd
● ssh.service – OpenBSD Secure Shell server Loaded: loaded (/lib/systemd/system/ssh.service; enabled; vendor preset: enabled) Active: active (running) since Sat 2019-07-06 20:01:02 EEST; 2h 3min ago Main PID: 1335 (sshd) Tasks: 1 (limit: 4915) CGroup: /system.slice/ssh.service └─1335 /usr/sbin/sshd -D юли 06 20:01:00 noah systemd[1]: Starting OpenBSD Secure Shell server… юли 06 20:01:02 noah sshd[1335]: Server listening on 0.0.0.0 port 22. юли 06 20:01:02 noah sshd[1335]: Server listening on :: port 22. юли 06 20:01:02 noah systemd[1]: Started OpenBSD Secure Shell server.

To enable / disable application with systemctl systemctl enable application.service

systemctl disable application.service

To stop / start given application systemcl stop sshd

systemctl stop tor

To reload running application

systemctl reload sshd

Some applications does not have the right functionality in systemd script to reload configuration without fully restarting the app if this is the case use systemctl reload-or-restart application.service

systemctl list-unit-files

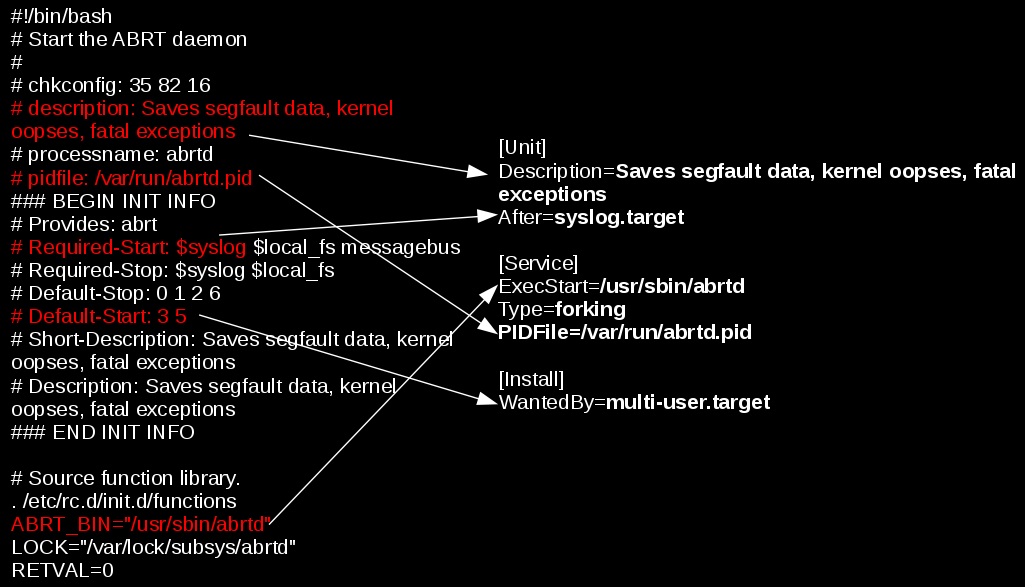
Then to view the content of a single service unit file:

:~# systemctl cat apache2.service
# /lib/systemd/system/apache2.service
[Unit]
Description=The Apache HTTP Server
After=network.target remote-fs.target nss-lookup.target

[Service]
Type=forking
Environment=APACHE_STARTED_BY_SYSTEMD=true
ExecStart=/usr/sbin/apachectl start
ExecStop=/usr/sbin/apachectl stop
ExecReload=/usr/sbin/apachectl graceful
PrivateTmp=true
Restart=on-abort

[Install]
WantedBy=multi-user.target


converting-traditional-init-scripts-to-systemd-graphical-diagram

systemd's advancement over normal SystemV services it is able to track and show dependencies
of a single run service for proper operation on other services

:~# systemctl list-dependencies sshd.service


● ├─system.slice
● └─sysinit.target
●   ├─dev-hugepages.mount
●   ├─dev-mqueue.mount
●   ├─keyboard-setup.service
●   ├─kmod-static-nodes.service
●   ├─proc-sys-fs-binfmt_misc.automount
●   ├─sys-fs-fuse-connections.mount
●   ├─sys-kernel-config.mount
●   ├─sys-kernel-debug.mount
●   ├─systemd-ask-password-console.path
●   ├─systemd-binfmt.service
….

.


You can also mask / unmask service e.g. make it temporary unavailable via systemd with

sudo systemctl mask nginx.service

it will then appear as masked if you do list-unit-files

If you want to change something on a systemd unit file this is done with

systemctl edit –full nginx.service

In case if some modificatgion was done to systemd service files e.g. lets say to
/etc/systemd/system/apache2.service or even you've made a Linux system Upgrade recently
that added extra systemd service config files it will be necessery to reload all files
present in /etc/systemd/system/* with:

systemctl daemon-reload


Systemd has a target states which are pretty similar to the runlevel concept (e.g. runlevel 5 means graphical etc.), for example to check the default target for a system:

One very helpful feature is to restart systemd but it seems this is not well documented as of now and though this might work after some system package upgrade roll-outs it is always better to reboot the system, but you can give it a try if restart can't be done due to application criticallity.

To restart systemd and its spawned subprocesses do:
 

systemctl daemon-reexec


root@noah:/home/hipo# systemctl get-default
graphical.target


 to check all targets possible targets

root@noah:/home/hipo# systemctl list-unit-files –type=target
UNIT FILE                 STATE   
basic.target              static  
bluetooth.target          static  
busnames.target           static  
cryptsetup-pre.target     static  
cryptsetup.target         static  
ctrl-alt-del.target       disabled
default.target            static  
emergency.target          static  
exit.target               disabled
final.target              static  
getty.target              static  
graphical.target          static  

you can put the system in Single user mode if you like without running the good old well known command:

/sbin/init 1 

command with

systemctl rescue

You can even shutdown / poweroff / reboot system via systemctl (though I never did that and I don't recommend) 🙂
To do so use:

systemctl halt
systemctl poweroff
systemctl reboot


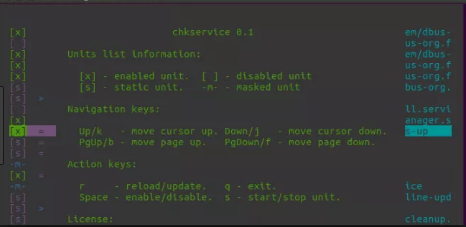
For the lazy ones that don't want to type all the time like crazy to configure and manage simple systemctl set services take a look at chkservice – an ncurses text based menu systemctl management interface

As chkservice is relatively new it is still not present in stable Stretch Debian repositories but it is in current testing Debian unstable Buster / Sid – Testing / Unstable distribution and has installable package for Ubuntu / Arch Linux and Fedora

chkservice-Linux-systemctl-ncurses-text-menu-service-management-interface-start-chkservice
Picture Source Tecmint.com

chkservice linux help screen


3. Analyzing and fix performance boot slowness issues due to a service taking long to boot


The first very useful thing is to know how long exactly all daemons / services got booted
on your GNU / Linux OS.

linux-server:~# systemd-analyze 
Startup finished in 4.135s (kernel) + 3min 47.863s (userspace) = 3min 51.998s

As you can see it reports both the kernel boot time and userspace (surrounding services
that had to boot for the system to be considered fully booted).


Once you have the system properly booted you have a console or / ssh access

root@pcfreak:/home/hipo# systemd-analyze blame
    2min 14.172s tor@default.service
    1min 40.455s docker.service
     1min 3.649s fail2ban.service
         58.806s nmbd.service
         53.992s rc-local.service
         51.458s systemd-tmpfiles-setup.service
         50.495s mariadb.service
         46.348s snort.service
         34.910s ModemManager.service
         33.748s squid.service
         32.226s ejabberd.service
         28.207s certbot.service
         28.104s networking.service
         23.639s munin-node.service
         20.917s smbd.service
         20.261s tinyproxy.service
         19.981s accounts-daemon.service
         18.501s loadcpufreq.service
         16.756s stunnel4.service
         15.575s oidentd.service
         15.376s dev-sda1.device
         15.368s courier-authdaemon.service
         15.301s sysstat.service
         15.154s gpm.service
         13.276s systemd-logind.service
         13.251s rsyslog.service
         13.240s lpd.service
         13.237s pppd-dns.service
         12.904s NetworkManager-wait-online.service
         12.540s lm-sensors.service
         12.525s watchdog.service
         12.515s inetd.service


As you can see you get a list of services time took to boot in secs and you can
further debug each of it to find out why it boots so slow (netwok / DNS / configuration isssue whatever).

On a servers it is useful to look up for some processes slowing it down like gdm.service etc.


Close up words rant on SystemD vs SysemV

init-and-systemd-comparison-commands-linux-booting-1

A lot could be ranted on what is better systemd or systemV. I personally hated systemd since day since I saw it being introduced first in Fedora / CentOS linuxes and a bit later in my beloved desktop used Debian Linux.
I still remember the bugs and headaches with systemd's intruduction as it is with all new the early adoption of technology makes a lot of pain in the ass.
Eventually systemd has become a standard and with my employment as a contractor through Itelligence GmBH for SAP AG I now am forced to work with systemd daily on SLES 12 based Linuces and I was forced to get used to it. 
But still there is my personal preference to SystemV even though the critics of slow boot etc.but for managing a multitude of Linux preinstalled servers like Virtual Machines and trying to standardize a Data Center with Tens of Thousands of Linuxes running on different Hypervisors VMWare / OpenXen + physical hosts etc. systemd brings a bit of more standardization that makes it a winner.

Optimize PNG images by compressing on GNU / Linux, FreeBSD server to Improve Website overall Performance

Monday, November 27th, 2017

how-to-optimize-your-png-pictures-to-reduce-size-and-save-speed-bandwidth-optipng-compression-tests-results

If you own a website with some few hundreds of .PNG images like 10 000 / 15 000 png images and the website shows to perform slow in Google PageSpeed Insights and is slow to open when Google Searched or Shared on Facebook / Twitter etc. then one recommended step to boost up the website opening speed is to compress (optimize) the .PNG pictures without loosing the images quality to both save space and account bandwidth you could use optipng even though this is not the only tool available to help you optimize and reduce the size of your images, some few other tools you might like to check out if you have more time are:

 a.)  pngcrush – optimizes PNG (Portable Network Graphics) files.
 b.)  pngnq – tool for optimizing PNG (Portable Network Graphics) images. It is a tool for quantizing PNG images in RGBA format.
 c.)  pngquant – PNG (Portable Network Graphics) image optimising utility. It is a command-line utility for converting 24/32-bit PNG images to paletted (8-bit) PNGs.
 

1. Install and Compress / optimize PNG / GIF / PNM / TIFF file format with optipng
 

OPTIPING tool recompresses the .PNG images to a smaller size without loosing any quality information, besides PNG file format it also supports (BMP, GIF, PNM and TIFF) image format.

If you don't have optipng installed on your server you can;

a.) install it on Redhat RPM based Linux distributions lets say CentOS Linux use:


[root@centos: ~]# yum install epel-release
[root@centos: ~]# yum install optipng

Note that, You will need to  first enable epel repo on centos 7


b.) If instead you're on a Debian GNU / Linux

debian:~# apt-get install optipng


c.) FreeBSD users can install it from FreeBSD ports with:


freebsd# cd /usr/ports/graphics/optipng
freebsd# make install clean

optipng syntax is quite self explanatory
optipng [options] what-ever-file.png


You can get a full list of possible command options with -? command, here is a list:


debian:~# optipng -?
Synopsis:
    optipng [options] files …
Files:
    Image files of type: PNG, BMP, GIF, PNM or TIFF
Basic options:
    -?, -h, -help    show this help
    -o <level>        optimization level (0-7)        [default: 2]
    -v            run in verbose mode / show copyright and version info
General options:
    -backup, -keep    keep a backup of the modified files
    -clobber        overwrite existing files
    -fix        enable error recovery
    -force        enforce writing of a new output file
    -preserve        preserve file attributes if possible
    -quiet, -silent    run in quiet mode
    -simulate        run in simulation mode
    -out <file>        write output file to <file>
    -dir <directory>    write output file(s) to <directory>
    -log <file>        log messages to <file>
    —            stop option switch parsing
Optimization options:
    -f <filters>    PNG delta filters (0-5)            [default: 0,5]
    -i <type>        PNG interlace type (0-1)
    -zc <levels>    zlib compression levels (1-9)        [default: 9]
    -zm <levels>    zlib memory levels (1-9)        [default: 8]
    -zs <strategies>    zlib compression strategies (0-3)    [default: 0-3]
    -zw <size>        zlib window size (256,512,1k,2k,4k,8k,16k,32k)
    -full        produce a full report on IDAT (might reduce speed)
    -nb            no bit depth reduction
    -nc            no color type reduction
    -np            no palette reduction
    -nx            no reductions
    -nz            no IDAT recoding
Editing options:
    -snip        cut one image out of multi-image or animation files
    -strip <objects>    strip metadata objects (e.g. "all")
Optimization levels:
    -o0        <=>    -o1 -nx -nz                (0 or 1 trials)
    -o1        <=>    -zc9 -zm8 -zs0 -f0            (1 trial)
            (or…)    -zc9 -zm8 -zs1 -f5            (1 trial)
    -o2        <=>    -zc9 -zm8 -zs0-3 -f0,5            (8 trials)
    -o3        <=>    -zc9 -zm8-9 -zs0-3 -f0,5        (16 trials)
    -o4        <=>    -zc9 -zm8 -zs0-3 -f0-5            (24 trials)
    -o5        <=>    -zc9 -zm8-9 -zs0-3 -f0-5        (48 trials)
    -o6        <=>    -zc1-9 -zm8 -zs0-3 -f0-5        (120 trials)
    -o7        <=>    -zc1-9 -zm8-9 -zs0-3 -f0-5        (240 trials)
    -o7 -zm1-9    <=>    -zc1-9 -zm1-9 -zs0-3 -f0-5        (1080 trials)
Notes:
    The combination for -o1 is chosen heuristically.
    Exhaustive combinations such as "-o7 -zm1-9" are not generally recommended.
Examples:
    optipng file.png                        (default speed)
    optipng -o5 file.png                    (slow)
    optipng -o7 file.png                    (very slow)

Just running it with, lets say -o7 arguments is enough for optipng to compress your image and reduce some 15 to 30% of picture size

optipng -o7 what-ever-image-you-have.png

optipng-example-on-reducing-image-screenshot-24.9-png-image-compression

2. Compress images without loosing quality recursively inside directory and subdirectories with optiping

a.) To optimize all pictures inside a single directory (without sub-directories) on remote server you can run, below command:
 

cd whatever-dir/
for i in *.png; do optipng -o6 -quiet -keep -preserve -dir optimized -log optipng-compress.log "$i"; done


As you can see a log is being written on what the command has done and the originals of the optimized images is going to be preserved, the optimize level is 6 is the PNG encoding level.


cd /var/www/your-site/images/
find . -type f -iname "*.png" -print0 | xargs -I {} -0 optipng -o6 -keep -preserve -log optipng-compress.log "{}"


This command is pretty handy to run on own dedicated server, if you don't have one just do it on your Linux computer at home or if you don't own a PC with Linux install any Deb / RPM based Linux inside VirtualBox or VMWare Virtual Machine and do it there, then upload to your Hosting Provider / Amazon EC2 etc and Enjoy the increased website performance 🙂


Add gzip compression to optimize web server served files in Apache, Nginx and LiteSpeed

Wednesday, November 15th, 2017

Enable-Gzip-Compression-quick-howto-on-apache-nginx-litespeed

What is GZIP Compression and why you need it?

no-gzip-support-illustration

  • What is gzip? – In Linux / Unix gzip of files is used to compress files so they can take less space when they're transferred from server to server via network in order to speed up file transfer.
  • Usually gzipped files are named as filename.gz
  • Why GZIp compression is important to be enabled on servers, well because that reduces the transferred (served) file by webserver to client browser
  • The effect of this is the faster file transfer of the file and increased overall web user performance


how-gzip-works-with-nginx-illustrated

Most webservers / websites online currently use gzipping of a sort, those who still did not use it has websites which are up to 40% slower than those of competitor websites

How to enable GZIP Compression on Apache Webserver

The easiest way for most people out there who run there websites on a shared hosting is to add the following Apache directives to dynamic loadable .htaccess file:
 

<ifModule mod_gzip.c>
mod_gzip_on Yes
mod_gzip_dechunk Yes
mod_gzip_item_include file .(html?|txt|css|js|php|pl)$
mod_gzip_item_include handler ^cgi-script$
mod_gzip_item_include mime ^text/.*
mod_gzip_item_include mime ^application/x-javascript.*
mod_gzip_item_exclude mime ^image/.*
mod_gzip_item_exclude rspheader ^Content-Encoding:.*gzip.*
</ifModule>


You can put a number of other useful things in .htaccess the file should already be existing in most webhostings with Cpanel or Kloxo kind of administration management interface.

Once the code is included to .htaccess you can reflush site cache.
To test whether the just added HTTP gzip compression works for the Webserver you can use The Online HTTP Compression test

If for some reason after adding this code you don't rip the benefits of gzipped content served by webserver you can try to add altenatively to .htaccess


AddOutputFilterByType DEFLATE text/plain
AddOutputFilterByType DEFLATE text/html
AddOutputFilterByType DEFLATE text/xml
AddOutputFilterByType DEFLATE text/css
AddOutputFilterByType DEFLATE application/xml
AddOutputFilterByType DEFLATE application/xhtml+xml
AddOutputFilterByType DEFLATE application/rss+xml
AddOutputFilterByType DEFLATE application/javascript
AddOutputFilterByType DEFLATE application/x-javascript


Howto Enable GZIP HTTP file compression on NGINX Webserver?

Open NGINX configuration file and add to it the following command parameters:


gzip on;
gzip_comp_level 2;
gzip_http_version 1.0;
gzip_proxied any;
gzip_min_length 1100;
gzip_buffers 16 8k;
gzip_types text/plain text/html text/css application/x-javascript text/xml application/xml application/xml+rss text/javascript;


# Disable for IE < 6 because there are some known problems
gzip_disable "MSIE [1-6].(?!.*SV1)";

# Add a vary header for downstream proxies to avoid sending cached gzipped files to IE6
gzip_vary on;

Enable HTTP file Compression on LiteSpeed webserver

In configuration under TUNING section check whether "enable compression" is enabled, if it is not choose "Edit"
and turn it on.

litespeed-how-to-enable-gzip-compressible_type-illustrated

What is the speed benefits of using HTTP gzip compression?

By using HTTP gzip compression you can save your network and clients abot 50 to 70% (e.g. transferred data) of the original file size.
This would mean less time for loading pages and fetched files and decrease in used bandwidth.

effect-of-gzip-compression-diagram-illustrated

A very handy tool to test whether HTTP Compression is enabled as well as how much is optimized for Speed your Website is Google PageSpeed Insights
as well as GTMetrix.com

Optimize, check and repair tables in MySQL, howto improve work with tables in MySQL

Monday, April 12th, 2010

There are few quick tips that helps if some unexpected downtime of your SQL server occurs. Even though nowdays this won’t happen too often with servers running with a good ups, sometimes even administrator errors can cause problems with your mysql tables. If your MySQL server refuses to start, it’s quite probable that you’re experiencing a problem with a broken table or tables in MySQL. Therefore you need to go through all your mysql databases and check the consistency of your MyISAM or Innodb tables, ofcourse accordingly to your MySQL database types. To check a certain table for consistency with MySQL after you select the database, you have to execute: mysql$ CHECK TABLE your_table_name; If the above command after presumably executed with all your databases and there consequent tables reports, everytime OK then your MySQL crashes are not caused by table incosistencies. However if instead of OK the CHECK TABLE reports Corruptthen you have a broken table and you have to fix it as soon as possible, in order to be able to bring up to life the MySQL server once again. Here is an example of a broken table after a CHECK REPAIR searchindex; : +------------------+-------+----------+------------------------------------+ | Table | Op | Msg_type | Msg_text | +------------------+-------+----------+------------------------------------+ | test.searchindex | check | error | Key in wrong position at page 4096 | | test.searchindex | check | error | Corrupt | +------------------+-------+----------+------------------------------------+ To fix the CORRUPTED or BROKEN table as also known you have to issue the command: mysql$ REPAIR TABLE yourtable_name; Depending on your table size after a while, if everything is going fine you should see something like: +------------------+--------+----------+----------+ | Table | Op | Msg_type | Msg_text | +------------------+--------+----------+----------+ | test.searchindex | repair | status | OK | +------------------+--------+----------+----------+ 1 row in set (0.08 sec) Be aware that sometimes in order to fix a broken table you have to use the MySQL repair extended function. Expect The EXTENDED REPAIR function option to take a much more time, even sometimes with large databases with million of records it could take hours, especially if the MySQL server is serving other client requests as well. This terrible siutation sometimes occurs because of mysql locks, though I believe locks are probably a topic of another post. Hopefully after issuing that the table in MySQL would properly repair and your MySQL will begin starting up with the rc script once again. Apart from crashes and table repairs there are few nice things concerning MySQL that are doing me good every now and then. I’m talking about the MySQL functions: ANALYZE TABLE and OPTIMIZE TABLE ANALYZE TABLE does synchronization of the information concerning the variables within tables that has a INDEX key settled according to the database to which they belong. In other simply words, executing ANALYZE TABLE to your database tables every now and then and that would probably help in speeding up the code executed in the SQL that has JOINS involved. The second one OPTIMIZE TABLE is natively supported with MyISAM SQL database types, and secondary supported with Innodb, where the Optimize with Innodb is done in a non-traditional way. When invoked to process an Innodb table OPTIMIZE TABLE does use ALTER TABLE to achieve an Innodb table optimization. In practice what the optimize table does is defragmentation of the table unto which it’s executed. A quick example of the optimize table is for instance: OPTIMIZE TABLE your_table_name; In order to find out which tables need to be defragmented or in other words needs optimize table you have to issue the cmd: show table status where Data_free!=0; Note that you have to issue this command on each of your databases; Just because this is so boring you can of course use my script check_optimize_sql.sh which will quickly loop through all the databases and show you which tables need to be optimized. I’ve written also a second shell script that loops through all MySQL databases and lists all databases and sub tables that requires optimize and further on proceeds optimizing to download the script check_and_optimize_sql_tables.sh click here Happy optimizing 🙂

How to digital watermark to a picture – Protect pic with copyright image or text with composite, convert and Phatch on GNU / Linux

Friday, March 23rd, 2012

Watermarking is a technique to identify a physical or non-physical object with its owner (creator). First watermarks in history originates from very ancient times.

There are two basic types of Watermark types:

I. Physical Watermarks (classical)

II. Digital Watermarks

Historically Classical Watermarks, were mostly important. As we tend to use more and more visible and we switch to use of more invisible stuff, nowdays the importance and use of digital watermarks is steadily raising.

You have most likely already seen pictures from websites which contain a copyright holder message stamp or website logo on it.
As you could imagine the picture watermark is placed in order to prevent pictures from being re-used in another internet space ,without the picture copyright holder explicit permission…

Watermarks have entered most if not all areas of our life, but we often don't recognize they're there / rarely think about them.
Few of the many "physical watermarks" we use daily are:
 

  • paper money watermark (to protect against anti money forgery)
  • bank debit / credit cards stamps near the card chip
  • postcards paper stamps

There are too many different kind of "physical watermarks" and since this is not the accent of this article, I will continue straight to explaiin a bit on Digital (picture) watermarks and how to watermark images with ImageMagick image editting command line suit.

Just like with physical watermarks, there are different kinds of digital watermarks. There are:
 

  • Picture (Images) digital watermarks
  • – Steganography

  • Video watermarks
  • Audio stream digital watermarks
  • Visual digital watermarks
  • – Visible area of text or picture over another text picture or video

  • Invisible digital watermarks
  • – digital information (files) metadata with watermark content etc.

The topic of watermarking is quite wide, so I will stop here and focus on the main idea of this article – to show how to place digital watermark on graphic image or collection of pictures.

The most straightway non-interactive way to do picture watermarking is with ImageMagick's composite command line tool. This little handy tool is capable of creating watermarks in single and multiple pictures.

If you prefer to have a simple text as a watermark, then you should use imagick's convert cmd.

1. Putting a watermark of picture in the right bottom corner

$ composite -gravity southeast -dissolve 100 \
watermark_picture.png image-to-watermark.png \
output-watermarked-image.png

Snoopy Writting pc freak watermark picture text watermark on the right bottom corner with composite

2. Placing watermark to picture in the bottom right corner

$ composite -gravity northeast -dissolve 80 \
watermark_picture.png image-to-watermark.png \
output-watermarked-image.png

Snoopy Writting pc freak picture text watermark on the right bottom corner with composite

3. Watermarking picture in the bottom left corner

$ composite -gravity southwest -dissolve 90 \
watermark_picture.png image-to-watermark.png \
output-watermarked-image.png

Snoopy writting watermarking picture on the bottom left corner imagemagick (composite)

4. Watermarking picture in the top left corner

$ composite -gravity northwest -dissolve 100 \
watermark_picture.png image-to-watermark.jpg \
output-watermarked-image.jpg

As you see from above example, composite even accept mixing up input / output between PNG and JPEG pictures 🙂

Output Watermarked Image picture on top left corner with pc-freak logo image Imagick composite

5. Put a watermark in the image center

$ composite -gravity center -dissolve 100 \
watermark_picture.png image-to-watermark.png \
output-watermarked-image.png

position watermark on the picture middle (center) composite output picture

6. Sealing image with custom text / Text Watermarking a picture

a) Writting text watermark to an image centered in "footer"

$ convert image-to-watermark.png -pointsize 20 \
-draw "gravity south fill black text 0,12 \
'hip0s Watermark'" output-watermarked-image.jpg

This will place a watermark in position 0,12, meaning the text will be added in the bottom center of the watermarked image.

Watermarking a picture sealing with custom text image imagick composite pic

-pointsize 20 defines the text font size. hip0s Watermark is the actual text that will be stamped.

b) Writting image watermark with font type customization (Arial Tahoma etc.):

To list all available fonts ready to be used by convert, type:

$ convert -list font
$ convert -list font |grep -i arial
Font: Arial-Black-Regular
family: Arial Black
glyphs: /usr/share/fonts/truetype/msttcorefonts/Arial_Black.ttf
Font: Arial-Bold
family: Arial
glyphs: /usr/share/fonts/truetype/msttcorefonts/Arial_Bold.ttf
Font: Arial-Bold-Italic
family: Arial
glyphs: /usr/share/fonts/truetype/msttcorefonts/arialbi.ttf
Font: Arial-Italic
family: Arial
glyphs: /usr/share/fonts/truetype/msttcorefonts/ariali.ttf
Font: Arial-Regular
family: Arial
glyphs: /usr/share/fonts/truetype/msttcorefonts/Arial.ttf

$ convert -list type
Bilevel
ColorSeparation
ColorSeparationMatte
Grayscale
GrayscaleMatte
Optimize
Palette
PaletteBilevelMatte
PaletteMatte
TrueColorMatte
TrueColor

On my system, I have 392 of fonts installed, to check the number of installed fonts ready for use by convert I used:

$ convert -list font|grep -i 'font:'|wc -l
392

To only check exact fonts names usable in convert:

$ convert -list font|grep -i 'font:'

To use the red marked Arial-Regular for font of the text picture timestamp issue;

$ convert watermark_picture.jpg -font Arial-Regular \
-pointsize 20 -draw "gravity south fill black text 0,12 'hip0s Watermark'" \
output-watermarked-image.jpg

Watermark and with Arial-Regular font image magick convert screenshot dog type writter

c) Using external font with convert to place image text watermark

Lets say you would like to use an external font (arhangai.ttf) not listed in convert -font list usable fonts:

$ convert image-to-watermark.png -pointsize 20 \
-font /usr/share/fonts/truetype/arhangai/arhangai.ttf \
-draw "gravity south fill black text 0,12 \
'hip0s Watermark'" output-watermarked-image_7.png

Talking about fonts, if you would like to add some external, nice free-fonts (ttf) files to your current logged in user, exec:

hipo@noah:~$ cd ~/fonts
hipo@noah:/fonts$ for i in \
$(lynx -dump http://www.webpagepublicity.com/free-fonts.html|grep -i .ttf|grep -i http|awk '{ print $2 }'); \
do wget -r -l2 -nd -Nc $i;
done

This will add 85 new nice looking fonts. Putting fonts in .fonts/ directory, are red while fonts are looked up by applications installed on respective the server or desktop GNU / Linux systems. Any font put there is ready to be used across all ImageMagick command line tools, as well as will be added across the list of possible fonts to use in GIMP and the rest of gui editors installed on the system.

According to the (watermark) texts font size passed to convert on some pictures the text written will exceed the picture dimensions and only partially some of the text intended as watermark will be visible.
If you encounter the exceed picture text problem, take few minutes and play with fonts sizes until you have a good font size to fit the approximate dimensions of the (expected minimum / maximum – horizontal and vertical) stamped picture dimensions.

For the sake of clarity, here is a list with arguments used in above, composite and convert examples.
 

  • composite — The ImageMagick command that combines two images.
  • -dissolve 80 — The number after the option determines the brightness of the watermark.  100 is full strength.
  • -gravity southeast — Determines the placement of watermark.
    Possible options are; north, west, south, east, northwest, northeast, southeast, southwest, center
  • watermark_picture.png — The watermark image is the first argument.
  • image-to-watermark.jpg — The second argument is the original image to be watermarked.
  • output-watermarked-image.jpg — The third argument is the new composite image to be created.
    N. B. !  If you don't specify a new file, be careful, the original file will be overwritten.

As ImageMagick is cross platform graphic editting suit – it runs on both *nix (Linux,BSD) and Windows. I have tested it on Linux, only but on FreeBSD and other BSDs it should work without any problem.
The composite and convert above examples should be easily rewritten to run on achieve watarmarking on MS Windows too.

7. Watermarking multiple pictures in a directory

To watermark multiple pictures within a directory use, a short bash loop in combination with either convert or composite could be used:

$ cd your-directory/
$ for i in *; do
convert $i -pointsize 20 -draw "gravity south fill black text 0,12 'hip0s Watermark'" output-watermarked-image.jpg
done

convert and composite also support wildcards like '*.JPG, *.PNG', but I'm not sure if this syntax can be used for mass picture marking?

8. Adding watermark and doing other various advanced Image Edit, Convert and Compose stuff with Phatch GUI program

Another program that is capable to put watermarks on pictures and besides that doing a number of routine graphic manipulation operations achievable with expert Image manipulation programs like GIMP / Inkscape is PHATCH = PHOTO & BATCH

Phatch is swiss army knife for doing web design or or graphics design on Linux.

Phatch is really great and easy to use program. Tt makes putting basic designer effects on pictures with no requirement for any design skills.
With Phatch you can become a designer for a day literally 😉

If you haven't used it yet, make sure you try it!
Below, are two screenshots of Phatch running on my Debian G* / Linux

Phatch Linux Debian Squeeze Screenshot

Phatch Linux Debian Squeeze Screenshot Watermark effect

Phatch is installable via apt on Debian and Ubuntu Linux. It has also a phatch-cli tools, which are a possible substitute to ImageMagick's composite / convert tools.

On deb based distros install Phatch with:

noah:~# apt-get --yes install phatch phatch-cli

In Phatch it is also possible, to create a combination of filters to be later applied to an image file or a group of image files all in a directory. The program capabilities are really outstanding, it is pure joy to work with it.

Using Phatch GUI interface is hard to comprehend in the beginning, I needed few minutes until I can get the idea how to use it. Anyhow once you know the basics, its very easy to use onwards.

Phatch currently can perform the following actions:
 

  • Auto Contrast – Maximize image contrast
  • Border – Crop or add border to all sides
  • Brightness – Adjust brightness from black to white
  • Canvas – Crop the image or enlarge canvas without resizing the image
  • Colorize – Colorize grayscale image
  • Common – Copies the most common pixel value
  • Contrast – Adjust from grey to black & white
  • Convert Mode – Convert the color mode of an image (grayscale, RGB, RGBA or CMYK)
  • Effect – Blur, Sharpen, Emboss, Smooth, ..
  • Equalize – Equalize the image histogram
  • Fit – Downsize and crop image with fixed ratio
  • Grayscale – Fade all colours to gray
  • Invert – Invert the colors of the image (negative)
  • Maximum – Copies the maximum pixel value
  • Median – Copies the median pixel value
  • Minimum – Copies the minimum pixel value
  • Offset – Offset by distance and wrap around
  • Posterize – Reduce the number of bits of colour channel
  • Rank – Copies the rank'th pixel value
  • Rotate – Rotate with random angle
  • Round – Round or crossed corners with variable radius and corners
  • Saturation – Adjust saturation from grayscale to high
  • Save – Save an image with variable compression in different types
  • Scale – Scale an image with different resample filters.
  • Shadow – Drop a blurred shadow under a photo with variable position, blur and color
  • Solarize – Invert all pixel values above threshold
  • Text – Write text at a given position
  • Transpose – Flip or rotate an image by 90 degrees
  • Watermark – Apply a watermark image with variable placement (offset, scaling, tiling) and opacity

Most of the function / effects Phatch in the up list works fine as I tested them to get to know the program.
The only effect that didn't worked for me is Blender effect.
Trying to apply the Blending effect I got error:

Can not apply action Blender:
'dict' object has no attribute 'rfind'

dict object has not attribiture rfind error screenshot my linux

Its really a pity blender filter don't work. I've seen on Phatch's website some pictures showing the blender effect in action and it looks really awesome.

In attempt to work around the err, I tried downloading Phatch's latest release and running it with python interpreter but it didn't work out …
I tried also to install some packages to the system that somehow seemed to be related to blenderversatile 3D modeller/renderer program but this worked neither.
I suspect Phatch blender effect is not working on Ubuntu too as I've red complains in some Ubuntu forums.
If someone succeeding making blend effect work please let me know how?

Interesting feature of Phatch is the program support for applying its predefined filters using a cli interface.
The syntax for phatch cli, should be something like:

phatch -console action_list.phatch

Where action_list.phatch is a Phatch predefined filter. Anyways I didn't manage to figure out how to use the program CLI. I'll be glad to hear if someone succeeded in using the program console, if so please share with me how?

9. Adding Watermark to pictures with GIMP

To add a watermark text or picture in GIMP, there are plenty of ways but is more time consuming by both Phatch or convert, composite..
There is a script in gimp plugin registry site – watermark.scm which adds watermarking capability to GIMP

On my system this script was installed with the deb package gimp-data-extras. To apply the plugin on a pic, I used GIMP menus:

Filters -> Eg -> Copyright Placer

GIMP Copyright Holder plugin Watermark Screenshot

If someone knows about better or quicker ways to do watermarking, please share 🙂

Possible way to Improve wordpress performance with wp-config.php 4 config variables

Tuesday, March 6th, 2012

Wordpress improve performance wp-config.php logo chromium effect GIMP

Nowdays WordPress is ran by million of blogs and websites all around the net. I myself run wordpress for this blog in general wordpress behaves quite well in terms of performance. However as with time the visitors tend to increase, on frequently updated websites or blogs. As a consequence, the blog / website performance slowly starts to decrease as result of the MySQL server read / write operations creating I/O and CPU load overheads. Buying a new hardware and migrating the wordpress database is a possible solution, however for many small or middle size wordpress blogs en sites like mine this is not easy task. Getting a dedicated server or simply upgrading your home server hardware is expensive and time consuming process… In my efforts to maximize my hardware utilization and increase my blog decaying performance I've stumbled on the article Optimize WordPress performance with wp-config.php

According to the article there are 4 simple wp-config.php config directvies useful in decreasing a lot of queries to the MySQL server issued with each blog visitor.

define('WP_HOME','http://www.yourblog-or-siteurl.com');
define('WP_SITEURL','http://www.yourblog-or-siteurl.com');
define('TEMPLATEPATH', '/var/www/blog/wp-content/themes/default');
define('STYLESHEETPATH', '/var/www/blog/wp-content/themes/default');

1. WP_HOME and WP_SITEURL wp-config.php directvies

The WP_HOME and WP_SITEURL variables are used to hard-code the address of the wordpress blog or site url, so wordpress doesn't have to check everytime in the database on every user request to know it is own URL address.

2. TEMPLATEPATH and TEMPLATEPATH wp variables

This variables will surely improve performance to Wodpress blogs which doesn't implement caching. On wp install with enabled caching plugins like WordPress Super Cache, Hyper Cache or WordPress Db Cache is used, I don't know if this variables will have performance impact …

So far I have tested the vars on a couple of wordpress based installs with caching enabled and even on them it seems the pages load faster than before, but I cannot say this for sure as I did not check the site loading time in advance before hardcoding the vars.

Anyways even if the suggested variables couldn't make positive impact on performance, having the four variables in wp-config.php is a good practice for blogs or websites which are looking for extra clarity.
For multiple wordpress installations living on the same server, having defined the 4 vars in different wordpress seems like a good idea too.