Archive for the ‘Web and CMS’ Category

Improve SSL security: Generate and add Diffie Hellman key to SSL certificate for stronger line encryption

Wednesday, June 10th, 2020

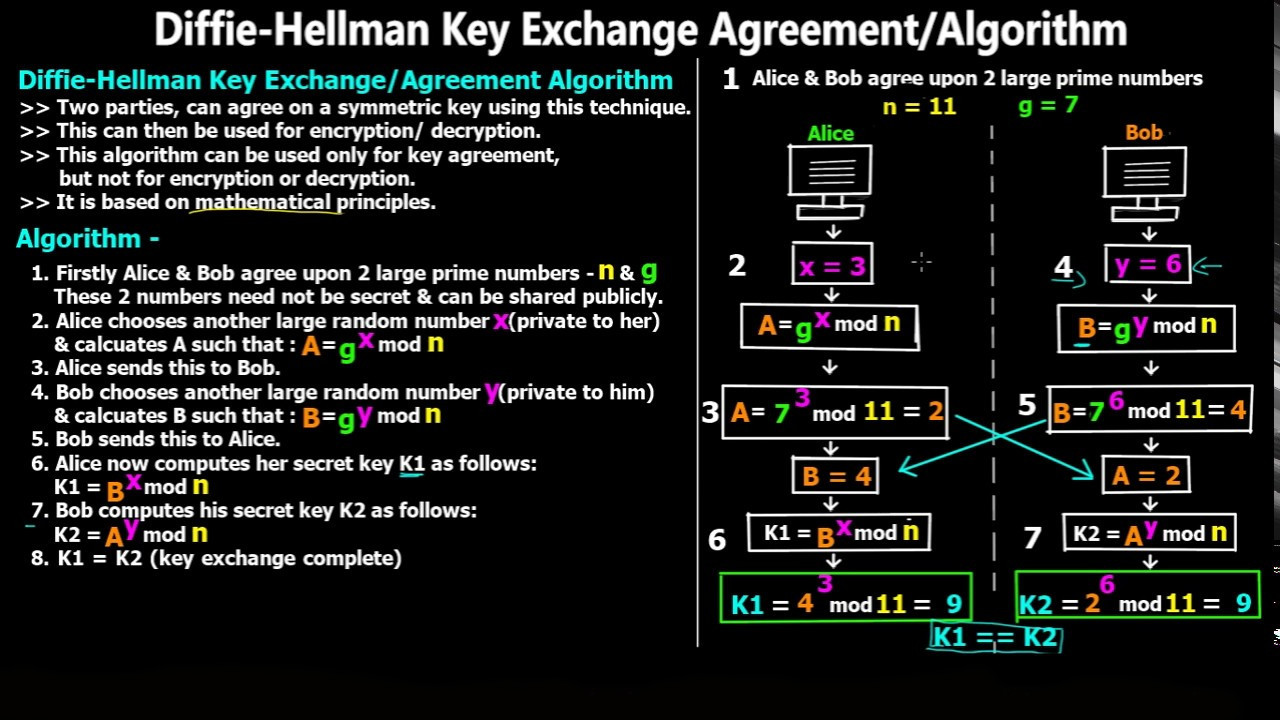
Diffie–Hellman key exchange (DH) is a method of securely exchanging cryptographic keys over a public channel and was one of the first public-key protocols as conceived by Ralph Merkle and named after Whitfield Diffie and Martin Hellman. DH is one of the earliest practical examples of public key exchange implemented within the field of cryptography.

Traditionally, secure encrypted communication between two parties required that they first exchange keys by some secure physical means, such as paper key lists transported by a trusted courier. The Diffie–Hellman key exchange method allows two parties that have no prior knowledge of each other to jointly establish a shared secret key over an insecure channel. This key can then be used to encrypt subsequent communications using a symmetric key cipher.

DH has been widely used on the Internet for improving the authentication encryption among parties. The only note is it useful if both the communication sides A and B are at your control, as what DH does is just strenghten the already established connection between client A and B and not protect from Man in the Middle Attacks. If some malicious user could connect to B pretending it is A the encryption will be established.

diffie-hellman-explained

Alternatively, the Diffie-Hellman key exchange can be combined with an algorithm like the Digital Signature Standard (DSS) to provide authentication, key exchange, confidentiality and check the integrity of the data. In such a situation, RSA is not necessary for securing the connection.

TLS, which is a protocol that is used to secure much of the internet, can use the Diffie-Hellman exchange in three different ways: anonymous, static and ephemeral. In practice, only ephemeral Diffie-Hellman should be implemented, because the other options have security issues.

Anonymous Diffie-Hellman – This version of the Diffie-Hellman key exchange doesn’t use any authentication, leaving it vulnerable to man-in-the-middle attacks. It should not be used or implemented.

Static Diffie-Hellman – Static Diffie-Hellman uses certificates to authenticate the server. It does not authenticate the client by default, nor does it provide forward secrecy.

Ephemeral Diffie-Hellman – This is considered the most secure implementation because it provides perfect forward secrecy. It is generally combined with an algorithm such as DSA or RSA to authenticate one or both of the parties in the connection.

Ephemeral Diffie-Hellman uses different key pairs each time the protocol is run. This gives the connection perfect forward secrecy, because even if a key is compromised in the future, it can’t be used to decrypt all of the past messages.

diffie-hellman-dh-revised

DH encryption key could be generated with the openssl command and could be generated depending on your preference using a 1024 / 2048 or 4096 bit encryption.
Of course it is best to have the strongest encryption possible i.e 4096.

The Logjam attack 

The Diffie-Hellman key exchange was designed on the basis of the discrete logarithm problem being difficult to solve. The most effective publicly known mechanism for finding the solution is the number field sieve algorithm.

The capabilities of this algorithm were taken into account when the Diffie-Hellman key exchange was designed. By 1992, it was known that for a given group, G, three of the four steps involved in the algorithm could potentially be computed beforehand. If this progress was saved, the final step could be calculated in a comparatively short time.

This wasn’t too concerning until it was realized that a significant portion of internet traffic uses the same groups that are 1024 bits or smaller. In 2015, an academic team ran the calculations for the most common 512-bit prime used by the Diffie-Hellman key exchange in TLS.

They were also able to downgrade 80% of TLS servers that supported DHE-EXPORT, so that they would accept a 512-bit export-grade Diffie-Hellman key exchange for the connection. This means that each of these servers is vulnerable to an attack from a well-resourced adversary.

The researchers went on to extrapolate their results, estimating that a nation-state could break a 1024-bit prime. By breaking the single most-commonly used 1024-bit prime, the academic team estimated that an adversary could monitor 18% of the one million most popular HTTPS websites.

They went on to say that a second prime would enable the adversary to decrypt the connections of 66% of VPN servers, and 26% of SSH servers. Later in the report, the academics suggested that the NSA may already have these capabilities.

“A close reading of published NSA leaks shows that the agency’s attacks on VPNs are consistent with having achieved such a break.”

Despite this vulnerability, the Diffie-Hellman key exchange can still be secure if it is implemented correctly. As long as a 2048-bit key is used, the Logjam attack will not work. Updated browsers are also secure from this attack.

Is the Diffie-Hellman key exchange safe?

While the Diffie-Hellman key exchange may seem complex, it is a fundamental part of securely exchanging data online. As long as it is implemented alongside an appropriate authentication method and the numbers have been selected properly, it is not considered vulnerable to attack.

The Diffie-Hellman key exchange was an innovative method for helping two unknown parties communicate safely when it was developed in the 1970s. While we now implement newer versions with larger keys to protect against modern technology the protocol itself looks like it will continue to be secure until the arrival of quantum computing and the advanced attacks that will come with it.

Here is how easy it is to add this extra encryption to make the SSL tunnel between A and B stronger.

On a Linux / Mac / BSD OS machine install and use openssl client like so:
 

# openssl dhparam -out dhparams1.pem 2048
Generating DH parameters, 2048 bit long safe prime, generator 2
This is going to take a long time
……………………………………………………….+………..+………………………………………………………+


…..
…. ………………..++*++*

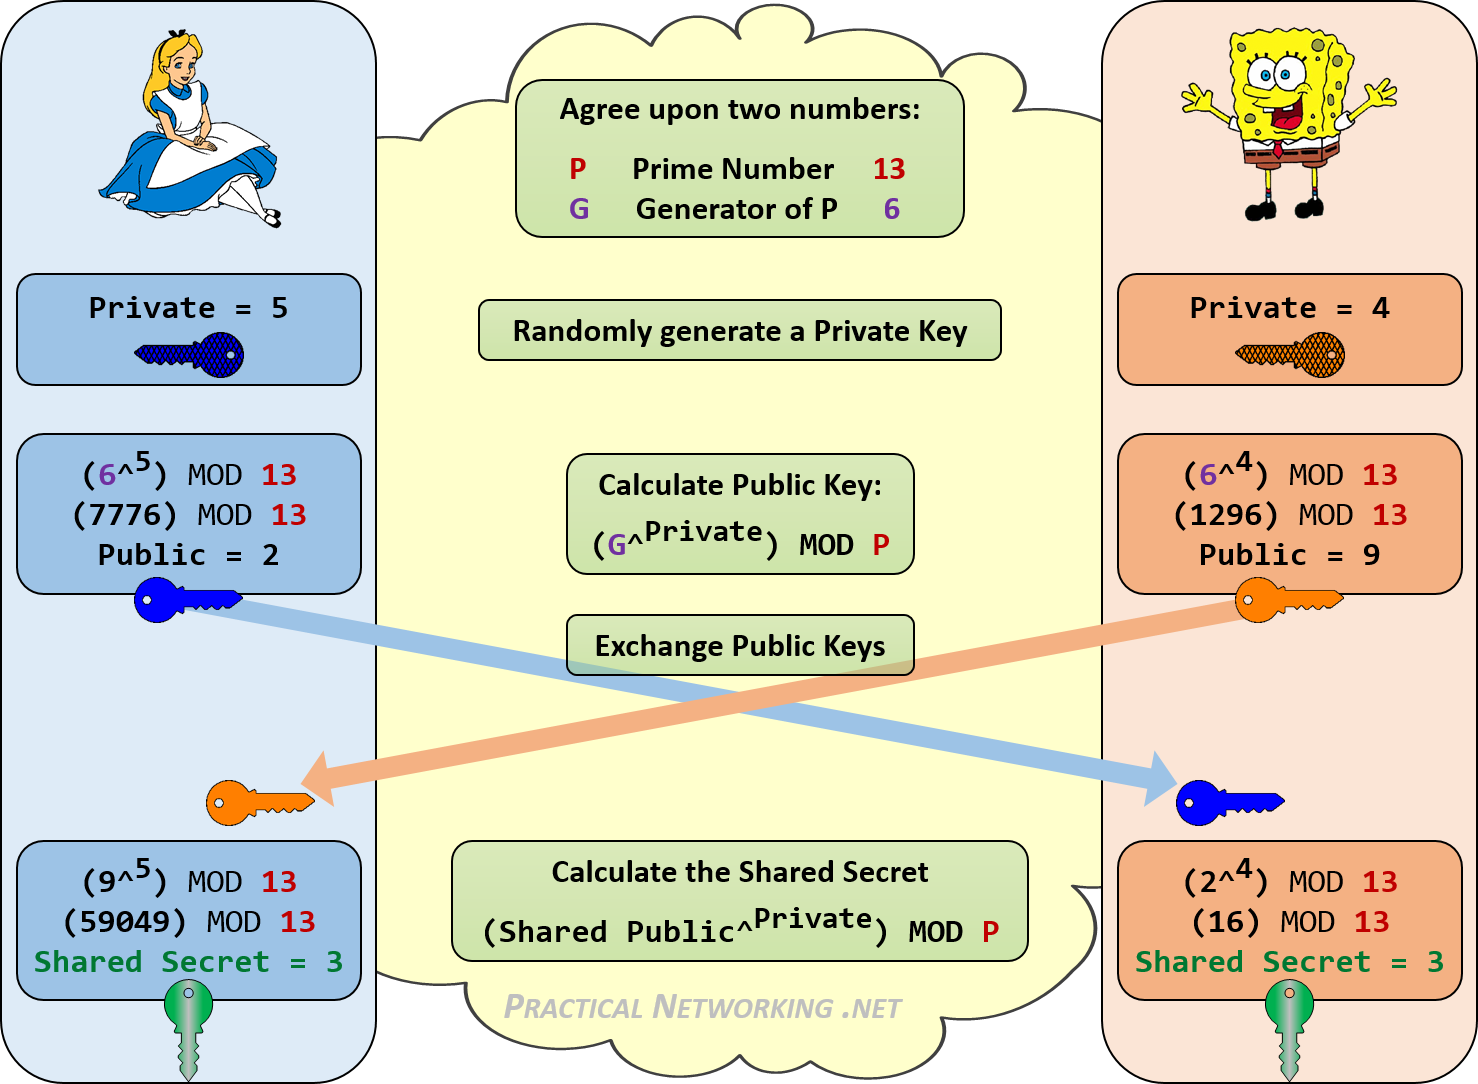
Be aware that the Diffie-Hellman key exchange would be insecure if it used numbers as small as those in our example. We are only using such small numbers to demonstrate the concept in a simpler manner.


# cat dhparams1.pem
—–BEGIN DH PARAMETERS—–
MIIBCAKCAQEAwG85wZPoVAVhwR23H5cF81Ml4BZTWuEplrmzSMOR9UNMnKjURf10
JX9xe/ZaqlwMxFYwZLyqtFQB2zczuvp1j+tKkSi4/TbD6Qm6gtsTeRghqunfypjS
+c4dNOVSbo/KLuIB5jDT31iMUAIDJF8OBUuqazRsg4pmYVHFm1KLHCcgcTk5kXqh
m8vXoCTlaLlmicC9pRTgQLuAQRXAF8LnVLCUvGlsyynTdc0yUFePWkmeYHMYAmWo
aBS6AMFNDvOxCubWv9cULkOouhPzd8k0wWYhUrrxMJXc1bSDFCBA7DiRCLPorefd
kCcNJFrh7rgy1lmu00d3I5S9EPH/EyoGSwIBAg==
—–END DH PARAMETERS—–


Copy the generated DH PARAMETERS headered key string to your combined .PEM certificate pair at the end of the file and save it


# vim /etc/haproxy/cert/ssl-cert.pem
….
—–BEGIN DH PARAMETERS—–
MIIBCAKCAQEAwG85wZPoVAVhwR23H5cF81Ml4BZTWuEplrmzSMOR9UNMnKjURf10
JX9xe/ZaqlwMxFYwZLyqtFQB2zczuvp1j+tKkSi4/TbD6Qm6gtsTeRghqunfypjS
+c4dNOVSbo/KLuIB5jDT31iMUAIDJF8OBUuqazRsg4pmYVHFm1KLHCcgcTk5kXqh
m8vXoCTlaLlmicC9pRTgQLuAQRXAF8LnVLCUvGlsyynTdc0yUFePWkmeYHMYAmWo
aBS6AMFNDvOxCubWv9cULkOouhPzd8k0wWYhUrrxMJXc1bSDFCBA7DiRCLPorefd
kCcNJFrh7rgy1lmu00d3I5S9EPH/EyoGSwIBAg==
—–END DH PARAMETERS—–

…..

Restart the WebServer or Proxy service wher Diffie-Hellman key was installed and Voila you should a bit more secure.


How to enable HaProxy logging to a separate log /var/log/haproxy.log / prevent HAProxy duplicate messages to appear in /var/log/messages

Wednesday, February 19th, 2020

haproxy-logging-basics-how-to-log-to-separate-file-prevent-duplicate-messages-haproxy-haproxy-weblogo-squares
haproxy  logging can be managed in different form the most straight forward way is to directly use /dev/log either you can configure it to use some log management service as syslog or rsyslogd for that.

If you don't use rsyslog yet to install it: 

# apt install -y rsyslog

Then to activate logging via rsyslogd we can should add either to /etc/rsyslogd.conf or create a separte file and include it via /etc/rsyslogd.conf with following content:
 

Enable haproxy logging from rsyslogd


Log haproxy messages to separate log file you can use some of the usual syslog local0 to local7 locally used descriptors inside the conf (be aware that if you try to use some wrong value like local8, local9 as a logging facility you will get with empty haproxy.log, even though the permissions of /var/log/haproxy.log are readable and owned by haproxy user.

When logging to a local Syslog service, writing to a UNIX socket can be faster than targeting the TCP loopback address. Generally, on Linux systems, a UNIX socket listening for Syslog messages is available at /dev/log because this is where the syslog() function of the GNU C library is sending messages by default. To address UNIX socket in haproxy.cfg use:

log /dev/log local2 


If you want to log into separate log each of multiple running haproxy instances with different haproxy*.cfg add to /etc/rsyslog.conf lines like:

local2.* -/var/log/haproxylog2.log
local3.* -/var/log/haproxylog3.log


One important note to make here is since rsyslogd is used for haproxy logging you need to have enabled in rsyslogd imudp and have a UDP port listener on the machine.

E.g. somewhere in rsyslog.conf or via rsyslog include file from /etc/rsyslog.d/*.conf needs to have defined following lines:

$ModLoad imudp
$UDPServerRun 514


I prefer to use external /etc/rsyslog.d/20-haproxy.conf include file that is loaded and enabled rsyslogd via /etc/rsyslog.conf:

# vim /etc/rsyslog.d/20-haproxy.conf

$ModLoad imudp
$UDPServerRun 514​
local2.* -/var/log/haproxy2.log


It is also possible to produce different haproxy log output based on the severiy to differentiate between important and less important messages, to do so you'll need to rsyslog.conf something like:
 

# Creating separate log files based on the severity
local0.* /var/log/haproxy-traffic.log
local0.notice /var/log/haproxy-admin.log


Prevent Haproxy duplicate messages to appear in /var/log/messages

If you use local2 and some default rsyslog configuration then you will end up with the messages coming from haproxy towards local2 facility producing doubled simultaneous records to both your pre-defined /var/log/haproxy.log and /var/log/messages on Proxy servers that receive few thousands of simultanous connections per second.
This is a problem since doubling the log will produce too much data and on systems with smaller /var/ partition you will quickly run out of space + this haproxy requests logging to /var/log/messages makes the file quite unreadable for normal system events which are so important to track clearly what is happening on the server daily.

To prevent the haproxy duplicate messages you need to define somewhere in rsyslogd usually /etc/rsyslog.conf local2.none near line of facilities configured to log to file:

*.info;mail.none;authpriv.none;cron.none;local2.none     /var/log/messages

This configuration should work but is more rarely used as most people prefer to have haproxy log being written not directly to /dev/log which is used by other services such as syslogd / rsyslogd.

To use /dev/log to output logs from haproxy configuration in global section use config like:
 

global
        log /dev/log local2 debug
        chroot /var/lib/haproxy
        stats socket /run/haproxy/admin.sock mode 660 level admin
        stats timeout 30s
        user haproxy
        group haproxy
        daemon

The log global directive basically says, use the log line that was set in the global section for whole config till end of file. Putting a log global directive into the defaults section is equivalent to putting it into all of the subsequent proxy sections.

Using global logging rules is the most common HAProxy setup, but you can put them directly into a frontend section instead. It can be useful to have a different logging configuration as a one-off. For example, you might want to point to a different target Syslog server, use a different logging facility, or capture different severity levels depending on the use case of the backend application. 

Insetad of using /dev/log interface that is on many distributions heavily used by systemd to store / manage and distribute logs,  many haproxy server sysadmins nowdays prefer to use rsyslogd as a default logging facility that will manage haproxy logs.
Admins prefer to use some kind of mediator service to manage log writting such as rsyslogd or syslog, the reason behind might vary but perhaps most important reason is  by using rsyslogd it is possible to write logs simultaneously locally on disk and also forward logs  to a remote Logging server  running rsyslogd service.

Logging is defined in /etc/haproxy/haproxy.cfg or the respective configuration through global section but could be also configured to do a separate logging based on each of the defined Frontend Backends or default section. 
A sample exceprt from this section looks something like:

#———————————————————————
# Global settings
#———————————————————————
global
    log         127.0.0.1 local2

    chroot      /var/lib/haproxy
    pidfile     /var/run/haproxy.pid
    maxconn     4000
    user        haproxy
    group       haproxy
    daemon

    # turn on stats unix socket
    stats socket /var/lib/haproxy/stats

#———————————————————————
defaults
    mode                    tcp
    log                     global
    option                  tcplog
    #option                  dontlognull
    #option http-server-close
    #option forwardfor       except 127.0.0.0/8
    option                  redispatch
    retries                 7
    #timeout http-request    10s
    timeout queue           10m
    timeout connect         30s
    timeout client          20m
    timeout server          10m
    #timeout http-keep-alive 10s
    timeout check           30s
    maxconn                 3000


# HAProxy Monitoring Config
#———————————————————————
listen stats 192.168.0.5:8080                #Haproxy Monitoring run on port 8080
    mode http
    option httplog
    option http-server-close
    stats enable
    stats show-legends
    stats refresh 5s
    stats uri /stats                            #URL for HAProxy monitoring
    stats realm Haproxy\ Statistics
    stats auth hproxyauser:Password___          #User and Password for login to the monitoring dashboard


#———————————————————————
# frontend which proxys to the backends
#———————————————————————
frontend ft_DKV_PROD_WLPFO
    mode tcp
    bind 192.168.233.5:30000-31050
    option tcplog
    log-format %ci:%cp\ [%t]\ %ft\ %b/%s\ %Tw/%Tc/%Tt\ %B\ %ts\ %ac/%fc/%bc/%sc/%rc\ %sq/%bq
    default_backend Default_Bakend_Name


#———————————————————————
# round robin balancing between the various backends
#———————————————————————
backend bk_DKV_PROD_WLPFO
    mode tcp
    # (0) Load Balancing Method.
    balance source
    # (4) Peer Sync: a sticky session is a session maintained by persistence
    stick-table type ip size 1m peers hapeers expire 60m
    stick on src
    # (5) Server List
    # (5.1) Backend
    server Backend_Server1 10.10.10.1 check port 18088
    server Backend_Server2 10.10.10.2 check port 18088 backup


The log directive in above config instructs HAProxy to send logs to the Syslog server listening at 127.0.0.1:514. Messages are sent with facility local2, which is one of the standard, user-defined Syslog facilities. It’s also the facility that our rsyslog configuration is expecting. You can add more than one log statement to send output to multiple Syslog servers.

Once rsyslog and haproxy logging is configured as a minumum you need to restart rsyslog (assuming that haproxy config is already properly loaded):

# systemctl restart rsyslogd.service

To make sure rsyslog reloaded successfully:

systemctl status rsyslogd.service


Restarting HAproxy

If the rsyslogd logging to 127.0.0.1 port 514 was recently added a HAProxy restart should also be run, you can do it with:
 

# /usr/sbin/haproxy -f /etc/haproxy/haproxy.cfg -D -p /var/run/haproxy.pid -sf $(cat /var/run/haproxy.pid)


Or to restart use systemctl script (if haproxy is not used in a cluster with corosync / heartbeat).

# systemctl restart haproxy.service

You can control how much information is logged by adding a Syslog level by

    log         127.0.0.1 local2 info


The accepted values are the standard syslog security level severity:

Value Severity Keyword Deprecated keywords Description Condition
0 Emergency emerg panic System is unusable A panic condition.
1 Alert alert   Action must be taken immediately A condition that should be corrected immediately, such as a corrupted system database.
2 Critical crit   Critical conditions Hard device errors.
3 Error err error Error conditions  
4 Warning warning warn Warning conditions  
5 Notice notice   Normal but significant conditions Conditions that are not error conditions, but that may require special handling.
6 Informational info   Informational messages  
7 Debug debug   Debug-level messages Messages that contain information normally of use only when debugging a program.


Logging only errors / timeouts / retries and errors is done with option:

Note that if the rsyslog is configured to listen on different port for some weird reason you should not forget to set the proper listen port, e.g.:
 

  log         127.0.0.1:514 local2 info

option dontlog-normal

in defaults or frontend section.

You most likely want to enable this only during certain times, such as when performing benchmarking tests.

(or log-format-sd for structured-data syslog) directive in your defaults or frontend
 

Haproxy Logging shortly explained


The type of logging you’ll see is determined by the proxy mode that you set within HAProxy. HAProxy can operate either as a Layer 4 (TCP) proxy or as Layer 7 (HTTP) proxy. TCP mode is the default. In this mode, a full-duplex connection is established between clients and servers, and no layer 7 examination will be performed. When in TCP mode, which is set by adding mode tcp, you should also add option tcplog. With this option, the log format defaults to a structure that provides useful information like Layer 4 connection details, timers, byte count and so on.

Below is example of configured logging with some explanations:

Log-format "%ci:%cp [%t] %ft %b/%s %Tw/%Tc/%Tt %B %ts %ac/%fc/%bc/%sc/%rc %sq/%bq"

haproxy-logged-fields-explained
Example of Log-Format configuration as shown above outputted of haproxy config:

Log-format "%ci:%cp [%tr] %ft %b/%s %TR/%Tw/%Tc/%Tr/%Ta %ST %B %CC %CS %tsc %ac/%fc/%bc/%sc/%rc %sq/%bq %hr %hs %{+Q}r"

haproxy_http_log_format-explained1

To understand meaning of this abbreviations you'll have to closely read  haproxy-log-format.txt. More in depth info is to be found in HTTP Log format documentation


haproxy_logging-explained

Logging HTTP request headers

HTTP request header can be logged via:
 

 http-request capture

frontend website
    bind :80
    http-request capture req.hdr(Host) len 10
    http-request capture req.hdr(User-Agent) len 100
    default_backend webservers


The log will show headers between curly braces and separated by pipe symbols. Here you can see the Host and User-Agent headers for a request:

192.168.150.1:57190 [20/Dec/2018:22:20:00.899] website~ webservers/server1 0/0/1/0/1 200 462 – – —- 1/1/0/0/0 0/0 {mywebsite.com|Mozilla/5.0 (X11; Linux x86_64) AppleWebKit/537.36 (KHTML, like Gecko) Ubuntu Chromium/71.0.3578.80 } "GET / HTTP/1.1"


Haproxy Stats Monitoring Web interface


Haproxy is having a simplistic stats interface which if enabled produces some general useful information like in above screenshot, through which
you can get a very basic in browser statistics and track potential issues with the proxied traffic for all configured backends / frontends incoming outgoing
network packets configured nodes
 experienced downtimes etc.

haproxy-statistics-report-picture

The basic configuration to make the stats interface accessible would be like pointed in above config for example to enable network listener on address
 

https://192.168.0.5:8080/stats


with hproxyuser / password config would be:

# HAProxy Monitoring Config
#———————————————————————
listen stats 192.168.0.5:8080                #Haproxy Monitoring run on port 8080
    mode http
    option httplog
    option http-server-close
    stats enable
    stats show-legends
    stats refresh 5s
    stats uri /stats                            #URL for HAProxy monitoring
    stats realm Haproxy\ Statistics
    stats auth hproxyauser:Password___          #User and Password for login to the monitoring dashboard


Sessions states and disconnect errors on new application setup

Both TCP and HTTP logs include a termination state code that tells you the way in which the TCP or HTTP session ended. It’s a two-character code. The first character reports the first event that caused the session to terminate, while the second reports the TCP or HTTP session state when it was closed.

Here are some essential termination codes to track in for in the log:
 

Here are some termination code examples most commonly to see on TCP connection establishment errors:

Two-character code    Meaning
—    Normal termination on both sides.
cD    The client did not send nor acknowledge any data and eventually timeout client expired.
SC    The server explicitly refused the TCP connection.
PC    The proxy refused to establish a connection to the server because the process’ socket limit was reached while attempting to connect.


To get all non-properly exited codes the easiest way is to just grep for anything that is different from a termination code –, like that:

tail -f /var/log/haproxy.log | grep -v ' — '


This should output in real time every TCP connection that is exiting improperly.

There’s a wide variety of reasons a connection may have been closed. Detailed information about all possible termination codes can be found in the HAProxy documentation.
To get better understanding a very useful reading to haproxy Debug errors with  is in haproxy-logging.txt in that small file are collected all the cryptic error messages codes you might find in your logs when you're first time configuring the Haproxy frontend / backend and the backend application behind.

Another useful analyze tool which can be used to analyze Layer 7 HTTP traffic is halog for more on it just google around.

A quick and easy way to install Social Network on Linux/BSD System with Elgg

Monday, March 14th, 2011

elgg-blue-logo
I'm experimenting this days with Elgg – An Open Source Free Software GPLed Social Network which enables users to quickly create Communities.

Elgg is really easy to install and all it requires is a Linux/BSD or Windows system with PHP, MySQL and Apache installed.

Elgg is provided with dozens of nice plugins which for a short time enables individual to create fully operational Social Network like facebook.

Many people nowdays use facebook without realizing how bad facebook is how it breaks their privacy.
Facebook is actually a spy network, it stores data and pictures, likings and user behaviour of million of users around the world.
This needs to be stopped somehow, maybe if people start using the free software networks like elgg to build a mini-community which has profound interests in a certain spheres of work, life and amusement.
The evil empire of facebook will slowly start to loose it's position and the small projects networks based on Elgg and the other Free Software Social Networks which are currently available will start to rise up.
I'm currently really a novice into Elgg but I'm more convinced that the guys who develop it and contribute to it in terms of handy plugins have done really a great job.

It's ultra easy even for non professional middle level user to setup himself an Elgg install.
The installation procedure is not much harder than a simple wordpress blog or joomla based website install.
The installation of elgg takes no more than 10 to 20 minutes, the plugin installation and setup time further could take few days but in the end you have a full featured Social Network! This is really amazing.
The installation of new plugins in elgg is also fool proof / easy all you have to do to equip a newly installed elgg with plugins is to go to it's root directory and look for the mod directory. The new plugins which needs to be installed, could be directly downloaded and saved via links, elinks, lynx or even wget to the elgg installation directory.

Most of the elgg plugins comes in a form of zip files so after being installed simply executing:

server:/home/elgg/mysocialnetwork/mod# unzip walltowall.zip
....

The above cmd will for example unzip the WallToWall elgg plugin and the plugin will be further ready to be enabled via the administrator user set upped during your elgg installation.

The configurations of elgg are being accomplished via:

Administration -> Tool Administration

I should I'm still experimenting with Elgg social, until this very moment I've installed the following elgg plugins:

aaudio
akismet
artfolio
blog
bookmarks
buddytalk
captcha
categories
chat
crontrigger
custom_index
custom_profile_fields
default_widgets
diagnostics
elgg-ebuddy
embed
embedvideo
emoticons
externalpages
family
fbconnect
file
file_tree
flyers
forum
friend_request
friends
garbagecollector
groups
htmlawed
invitations
invitefriends
izap_videos
kaltura_video
lastfm
likes
logbrowser
logrotate
lucygames
members
messageboard
messages
milockergames_frameme
noscript_message
notifications
pages
polls
profile
reportedcontent
resume
river_comments
riverdashboard
riverfaces
search
siteaccess
tagcloud
theme_simpleneutral
thewire
tidypics
tidypicsExt
tinymce
twitter
twitterservice
user_contact_list
uservalidationbyemail
walltowall
weather
wp1
zaudio

One very handy feature I truly enjoy about Elgg is that it gives every user an own blog which or in other words when somebody registers in Elgg, he automatically gets a personal blog! How cool this is Yeash 😉
The Elgg photo upload plugin is also another interesting story. The photo plugin is a way better from my first impressions than facebook's buggy upload client.
Elgg also uses heavily jquery for it's various operations and the user experience feels very interactive.

Of course as with all free software things are not perfect some of the elgg plugins or (mods) as they are called are not working.
For example I couldn't make by so far the weather plugin which is supposed to report the weather.

Maybe some tweakening of the not working plugins will easily make them working. What is really important is that the Elgg basis system looks and seems to work really good and enpowers the user with a social network alternatives to the ugly facebook.

In order to experiment with Elgg and I've established a small social network targetting at University College and School Students called MockATeacher – mockateacher.com>/i>. The idea behind is to help students in their report writting by providing them with a place where they can meet other students and share files.

Some other aspects I've planned for MockATeacher is to build a small community of people who would like to share about idiot teachers, teacher stupid sayings as well as to mock the idiotic type of education that we and our children are up to in this age.
Just to close up, if you're looking for some time to spend in experimenting in an enjoyable way you definitely need to install elgg and play with it 😉

How to reduce blog and other SPAM on Elgg by adding meta name rel=”nofollow, akismet and robots.txt

Tuesday, March 15th, 2011

elgg-data-logo
As I'm playing with Elgg – free social network these days, I've been stuck with my newly established elgg based social network gets high amounts of spam via the elgg blog on http://mockateacher.com – my MockATeacher – Student Share Files network

I've researched on how I can reduce the amounts of spam the site gets and I've found few ways for that, let me elaborate on that:

First I've been reading for a while about izap,izap-ecommerce, izap-videos, however my experience with my tests with this ones were not good, thus i won't recommend this plugins to any elgg administrator.
Further on I've installed the elgg Akismet plugin which by the way is very easy to install (just place and unzip the plugin in elgg based website's mod/ directory ).

A quick elgg Akismet configuration is also necessary in order to config go to:

Administration -> Tool Administration -> Akismet [Settings]

All necessary to place in the Akismet [Settings] field is just an akismet, key. I personally have placed my old Akismet obtained key for my wordpress blog installation and therefore I skipped the long and time wasting process of issuing a new API key for Akismet.
Nevertheless if you don't have an Akismet API key already you will have to go Akismet.com and sign up for a new user and a key.
After installing the akismet.

Moving on with the available anti-spam plugins for elgg, I've the antispammer-for-elgg plugin. The installation went smoothly, however I needed a special API key for the plugin which I couldn't issue.
There were some instructions on how to obtain the antispammer-for-elgg API Key in order to start using the plugin by registering first to some forum called stopforumspam.com but even though I've registed in the forum and followed the instructions the forum seems not to allow me to login and therefore I couldn't issue myself an API Key 🙁
The problem is not described on Elgg's website and I do suppose many other elgg enthusiasts have been stucked into the same can't issue antispammer-for-elgg API key problem !

Next I've stubmled upon some very nice suggestions on how to decrease the amount of spam by equipping the elgg based website installation with the following robots.txt file:

User-agent: *
Disallow: /pg/admin/
Disallow: /account/forgotten_password.php
Disallow: /_css
Disallow: /_graphics
Disallow: /account
Disallow: /admin
Disallow: /engine
Disallow: /languages
Disallow: /service
Disallow: /settings
Disallow: /simplecache
Disallow: /vendors

The file needs to be placed in the main directory root of the elgg installation and will instruct:

Google, Yahoo, Bing, Ask Jeeves and Yandex crawlers not to crawl and index the above list of directories.

I've also red online some interesting suggestions to use the &ltmeta robots rel="nofollow> in order to instruct GoogleBot and the rest of the search engine crawlers not to follow the spam links which appear on spammer user blogs and video links.

To implement the rel="nofollow meta in my elgg installation I used the elgg plugin called Metatag_Manager
Metatag manager is ultra easy to install and is installed via the regular elgg installation procedure by placing and unarchiving in mod/ dir
The plugin is lacking a good documentation as with many of the Elgg plugins so it took me a while until I realize how can I Set it up
Thanksfully finally I found that the Metatag Manager plugin configuration is located in:

Administration -> Site Administration

On the Site Administration page you will notice the Robots and Author empty fields.

Now to instruct elgg to show <meta content="nofollow" rel="nofollow"> to all your elgg based website pages (including the user blogs simply fill in the Robots field:

Robots

nofollow

Press the save button and you're done the rel="nofollow" will appear on every elgg generated page and hopefully your social network search engines pagerank will hop up.

I have to say that by so far Elgg is missing a serious anti-spam protection support and the developers should work in that direction to make this awesome project a bit more usable.
I've also noticed there is also a commercial (paid) plugin for Elgg called PluginLotto which appears to be a promising one but since it costs money and I can't afford the fee I have no observations on it.
It would be nice if somebody could share if it's an usable one and it worths the money.

Howto add adsense ads to Elgg user blog/s

Saturday, March 19th, 2011

I wanted to add google adsense on my Elgg powered experimental social network mockateacher.com

There are plenty of ways described which enables a user to add a google adsense code to elgg, however none of the ones I've red online worked for me for my elgg site user blog section

One of the promising ways to add the adsense code to all sections of an elgg enpowered website is described to be achieved through Elgg Google Adverts in the spotlight plugin.
I gave this suggested method for adsense inclusion to elgg by installing and setting it up but it worked not.

There was a blog which described a procedure which gaves a possibility the adsense code to be embedded on every user dashboard's right widget right below the elgg's Edit Page

This method seems to work but wasn't exactly enabling me to place google advertisements only on the elgg's blogs and therefore was useless to me.

Thus I played a bit with the files in the mod/blog located under the elgg's install root directory and hooray I found out a way to add my adsense code to my elgg user blog section.

Here is how:

1. Edit the file mod/blog/views/default/blog/object/blog.php

In the file look for the line:

<div class="blog_post">

This is located nearbly line 51 in the file on my elgg version 1.7.7, with latest available blog plugin at this time, on prior version this might be located on different line.

After this line just place your Adsense code obtained from your Adsense Google account and you're done.
The google adsense advertisements will start appearing in the head of your elgg's users blog pages 😉

Create and Configure SSL bundle file for GoGetSSL issued certificate in Apache Webserver on Linux

Saturday, November 3rd, 2018

gogetssl-install-certificate-on-linux-howto-sslcertificatechainfile-obsolete

I had a small task to configure a new WildCard SSL for domains on a Debian GNU / Linux Jessie running Apache 2.4.25.

The official documentation on how to install the SSL certificate on Linux given by GoGetSSL (which is by COMODO was obsolete as of time of writting this article and suggested as install instructions:
 

SSLEngine on
SSLCertificateKeyFile /etc/ssl/ssl.key/server.key
SSLCertificateFile /etc/ssl/ssl.crt/yourDomainName.crt
SSLCertificateChainFile /etc/ssl/ssl.crt/yourDomainName.ca-bundle


Adding such configuration to domain Vhost and testing with apache2ctl spits an error like:


root@webserver:~# apache2ctl configtest
AH02559: The SSLCertificateChainFile directive (/etc/apache2/sites-enabled/the-domain-name-ssl.conf:17) is deprecated, SSLCertificateFile should be used instead
Syntax OK


To make issued GoGetSSL work with Debian Linux, hence, here is the few things done:

The files issued by Gogetssl.COM were the following:


AddTrust_External_CA_Root.crt
COMODO_RSA_Certification_Authority.crt
the-domain-name.crt


The webserver had already SSL support via mod_ssl Apache module, e.g.:


root@webserver:~# ls -al /etc/apache2/mods-available/*ssl*
-rw-r–r– 1 root root 3112 окт 21  2017 /etc/apache2/mods-available/ssl.conf
-rw-r–r– 1 root root   97 сеп 19  2017 /etc/apache2/mods-available/ssl.load
root@webserver:~# ls -al /etc/apache2/mods-enabled/*ssl*
lrwxrwxrwx 1 root root 26 окт 19  2017 /etc/apache2/mods-enabled/ssl.conf -> ../mods-available/ssl.conf
lrwxrwxrwx 1 root root 26 окт 19  2017 /etc/apache2/mods-enabled/ssl.load -> ../mods-available/ssl.load


For those who doesn't have mod_ssl enabled, to enable it quickly run:


# a2enmod ssl


The VirtualHost used for the domains had Apache config as below:


NameVirtualHost *:443

<VirtualHost *:443>
    ServerAdmin support@the-domain-name.com
    ServerName the-domain-name.com
    ServerAlias *.the-domain-name.com the-domain-name.com

    DocumentRoot /home/the-domain-namecom/www
    SSLEngine On
#    <Directory />
#        Options FollowSymLinks
#        AllowOverride None
#    </Directory>
    <Directory /home/the-domain-namecom/www>
        Options Indexes FollowSymLinks MultiViews
        AllowOverride None
        Include /home/the-domain-namecom/www/htaccess_new.txt
        Order allow,deny
        allow from all
    </Directory>

    ScriptAlias /cgi-bin/ /usr/lib/cgi-bin/
    <Directory "/usr/lib/cgi-bin">
        AllowOverride None
        Options +ExecCGI -MultiViews +SymLinksIfOwnerMatch
        Order allow,deny
        Allow from all
    </Directory>

    ErrorLog ${APACHE_LOG_DIR}/error.log

    # Possible values include: debug, info, notice, warn, error, crit,
    # alert, emerg.
    LogLevel warn

    CustomLog ${APACHE_LOG_DIR}/access.log combined

#    Alias /doc/ "/usr/share/doc/"
#   <Directory "/usr/share/doc/">
#       Options Indexes MultiViews FollowSymLinks
#       AllowOverride None
#       Order deny,allow
#       Deny from all
#       Allow from 127.0.0.0/255.0.0.0 ::1/128
#   </Directory>
SSLCertificateKeyFile /etc/apache2/ssl/the-domain-name.com.key
SSLCertificateFile /etc/apache2/ssl/chain.crt


</VirtualHost>

The config directives enabling and making the SSL actually work are:
 

SSLEngine On
SSLCertificateKeyFile /etc/apache2/ssl/the-domain-name.com.key
SSLCertificateFile /etc/apache2/ssl/chain.crt


The chain.crt file is actually a bundle file containing a bundle of the gogetssl CA_ROOT and RSA_Certification_Authority 3 files, to prepare that file, I've used bundle.sh small script found on serverfault.com here I've made a mirror of bundle.sh on www.pc-freak.net here   the script content is as follows:

To prepare the chain.crt  bundle, I ran:


sh create-ssl-bundle.sh _iq-test_cc.crt chain.crt
sh create-ssl-bundle.sh _iq-test_cc.crt >chain.crt
sh create-ssl-bundle.sh COMODO_RSA_Certification_Authority.crt >> chain.crt
sh create-ssl-bundle.sh bundle.sh AddTrust_External_CA_Root.crt >> chain.crt


Then I copied the file to /etc/apache2/ssl together with the-domain-name.com.key file earlier generated using openssl command earlier explained in my article how to install RapidSSL certificate on Linux

/etc/apache2/ssl was not previously existing (on Debian Linux), so to create it:


root@webserver:~# mkdir /etc/apache2/ssl
root@webserver:~# ls -al /etc/apache2/ssl/chain.crt
-rw-r–r– 1 root root 20641 Nov  2 12:27 /etc/apache2/ssl/chain.crt
root@webserver:~# ls -al /etc/apache2/ssl/the-domain-name.com.key
-rw-r–r– 1 root root 6352 Nov  2 20:35 /etc/apache2/ssl/the-domain-name.com.key


As I needed to add the SSL HTTPS configuration for multiple domains, further on I've wrote and used a tiny shell script add_new_vhost.sh which accepts as argument the domain name I want to add. The script works with a sample Skele (Template) file, which is included in the script itself and can be easily modified for the desired vhost config.
To add my multiple domains, I've used the script as follows:
 

sh add_new_vhost.sh add-new-site-domain.com
sh add_new_vhost.sh add-new-site-domain1.com


etc.

Here is the complete script as well:


#!/bin/sh
# Shell script to add easily new domains for virtual hosting on Debian machines
# arg1 should be a domain name
# This script takes the domain name which you type as arg1 uses it and creates
# Docroot / cgi-bin directory for the domain, create seperate site's apache log directory
# then takes a skele.com file and substitutes a skele.com with your domain name and directories
# This script's aim is to easily enable sysadmin to add new domains in Debian
sites_base_dir=/var/www/jail/home/www-data/sites/;
# the directory where the skele.com file is
skele_dir=/etc/apache2/sites-available;
# base directory where site log dir to be created
cr_sep_log_file_d=/var/log/apache2/sites;
# owner of the directories
username='www-data';
# read arg0 and arg1
arg0=$0;
arg1=$1;
if [[ -z $arg1 ]]; then
echo "Missing domain name";
exit 1;
fi


# skele template
echo "#
#  Example.com (/etc/apache2/sites-available/www.skele.com)
#
<VirtualHost *>
        ServerAdmin admin@design.bg
        ServerName  skele.com
        ServerAlias www.skele.com


        # Indexes + Directory Root.
        DirectoryIndex index.php index.htm index.html index.pl index.cgi index.phtml index.jsp index.py index.asp

        DocumentRoot /var/www/jail/home/www-data/sites/skelecom/www/docs
        ScriptAlias /cgi-bin "/var/www/jail/home/www-data/sites/skelecom/cgi-bin"
        
        # Logfiles
        ErrorLog  /var/log/apache2/sites/skelecom/error.log
        CustomLog /var/log/apache2/sites/skelecom/access.log combined
#       CustomLog /dev/null combined
      <Directory /var/www/jail/home/www-data/sites/skelecom/www/docs/>
                Options FollowSymLinks MultiViews -Includes
                AllowOverride None
                Order allow,deny
                allow from all
                # This directive allows us to have apache2's default start page
                # in /apache2-default/, but still have / go to the right place
#               RedirectMatch ^/$ /apache2-default/
        </Directory>

        <Directory /var/www/jail/home/www-data/sites/skelecom/www/docs/>
                Options FollowSymLinks ExecCGI -Includes
                AllowOverride None
                Order allow,deny
                allow from all
        </Directory>

</VirtualHost>
" > $skele_dir/skele.com;

domain_dir=$(echo $arg1 | sed -e 's/\.//g');
new_site_dir=$sites_base_dir/$domain_dir/www/docs;
echo "Creating $new_site_dir";
mkdir -p $new_site_dir;
mkdir -p $sites_base_dir/cgi-bin;
echo "Creating sites's Docroot and CGI directory";
chown -R $username:$username $new_site_dir;
chown -R $username:$username $sites_base_dir/cgi-bin;
echo "Creating site's Log files Directory";
mkdir -p $cr_sep_log_file_d/$domain_dir;
echo "Creating sites's VirtualHost file and adding it for startup";
sed -e "s#skele.com#$arg1#g" -e "s#skelecom#$domain_dir#g" $skele_dir/skele.com >> $skele_dir/$arg1;
ln -sf $skele_dir/$arg1 /etc/apache2/sites-enabled/;
echo "All Completed please restart apache /etc/init.d/apache restart to Load the new virtual domain";

# Date Fri Jan 11 16:27:38 EET 2008


Using the script saves a lot of time to manually, copy vhost file and then edit it to change ServerName directive, for vhosts whose configuration is identical and only the ServerName listener has to change, it is perfect to create all necessery domains, I've created a simple text file with each of the domains and run it in a loop:
 

while :; do sh add_new_vhost.sh $i; done < domain_list.txt


Display Content of SSL certificate .pem file with openssl command

Thursday, October 11th, 2018

display-content-of-pem-der-and-scr-file-how-to-view-pem-file-linux

If you have generated a .pem formatted SSL certificate or you have multiple .pem SSL certificates and you're not sure which .pem file is generated for which domain / subdomain it is useful to Display content of SSL Certificate .PEM file with openssl command.

Viewing certificate's content is also very useful if you have hosted multiple websites hosted on a server and you want to check which of the SSLs assigned in the Virtualhosts has Expired (for example if you have domains that expire in short term period (365 days).


1. How to Display Content of SSL certificate .pem file?


root@pcfreak:~# openssl x509 -in cert.pem -text
Certificate:
    Data:
        Version: 3 (0x2)
        Serial Number:
            04:d1:ad:55:91:f3:f9:ef:3e:53:ea:2c:3a:f4:5f:e6:ce:c1
    Signature Algorithm: sha256WithRSAEncryption
        Issuer: C = US, O = Let's Encrypt, CN = Let's Encrypt Authority X3
        Validity
            Not Before: Oct 10 17:49:34 2018 GMT
            Not After : Jan  8 17:49:34 2019 GMT
        Subject: CN = mail.www.pc-freak.net

        Subject Public Key Info:
            Public Key Algorithm: rsaEncryption
                Public-Key: (2048 bit)
                Modulus:
                    00:bb:b0:c9:1c:83:82:61:47:f9:c2:73:60:c0:48:
                    e6:0c:f2:a1:ff:db:ae:f1:84:17:14:5d:fc:a3:b2:
                    e4:00:3a:d1:85:42:90:da:41:a9:e9:a8:af:20:3d:
                    12:ef:8e:ca:61:a1:71:f2:cc:43:bf:40:0d:fa:08:
                    7d:d9:61:2b:ea:5d:30:e0:52:43:db:18:30:92:0c:
                    2c:ce:87:93:84:ea:91:61:b7:70:db:11:7c:b6:a4:
                    33:de:d8:3f:d6:61:47:42:f2:36:12:7f:3d:e3:f7:
                    5b:11:3e:1c:f0:af:96:cd:61:8a:1a:a0:f0:b5:23:
                    65:73:b6:b4:9c:19:a7:09:dd:43:96:37:ac:48:fc:
                    21:07:02:52:67:26:2c:81:24:f4:d7:10:e6:f4:12:
                    69:53:ef:91:2a:15:6a:21:06:22:ea:fe:31:38:82:
                    b4:5a:b5:9b:67:90:16:b8:31:e8:27:38:f2:41:b9:
                    19:02:8f:c7:6e:e1:2c:84:75:19:6d:bb:30:3b:d2:
                    02:f0:65:f1:76:82:15:9c:ce:31:3a:d4:7c:83:ca:
                    d1:f9:e1:b7:76:f6:78:93:47:d2:00:f9:63:aa:94:
                    41:d4:78:d0:ee:bc:e6:e9:14:14:e4:ae:54:31:88:
                    f8:58:8d:7b:3e:9f:87:5c:f2:04:e5:07:e0:4c:9a:
                    81:eb
                Exponent: 65537 (0x10001)
        X509v3 extensions:
            X509v3 Key Usage: critical
                Digital Signature, Key Encipherment
            X509v3 Extended Key Usage:
                TLS Web Server Authentication, TLS Web Client Authentication
            X509v3 Basic Constraints: critical
                CA:FALSE
            X509v3 Subject Key Identifier:
                DB:AB:81:E3:14:5F:6D:BE:B4:78:7B:5E:7D:FB:66:BF:56:37:C5:1D
            X509v3 Authority Key Identifier:
                keyid:A8:4A:6A:63:04:7D:DD:BA:E6:D1:39:B7:A6:45:65:EF:F3:A8:EC:A1


            Authority Information Access:
                OCSP – URI:http://ocsp.int-x3.letsencrypt.org
                CA Issuers – URI:http://cert.int-x3.letsencrypt.org/

            X509v3 Subject Alternative Name:
                DNS:mail.www.pc-freak.net
            X509v3 Certificate Policies:
                Policy: 2.23.140.1.2.1
                Policy: 1.3.6.1.4.1.44947.1.1.1
                  CPS: http://cps.letsencrypt.org
                  User Notice:
                    Explicit Text: This Certificate may only be relied upon by Relying Parties and only in accordance with the Certificate Policy found at https://letsencrypt.org/repository/

            CT Precertificate SCTs:
                Signed Certificate Timestamp:
                    Version   : v1 (0x0)
                    Log ID    : E2:69:4B:AE:26:E8:E9:40:09:E8:86:1B:B6:3B:83:D4:
                                3E:E7:FE:74:88:FB:A4:8F:28:93:01:9D:DD:F1:DB:FE
                    Timestamp : Oct 10 18:49:34.453 2018 GMT
                    Extensions: none
                    Signature : ecdsa-with-SHA256
                                30:46:02:21:00:D6:DE:47:AD:D2:32:BE:BE:DD:B3:EB:
                                EE:84:9E:02:8A:4F:33:E2:63:21:D5:F7:4D:47:82:92:
                                AB:B9:0A:49:62:02:21:00:E8:7D:17:81:32:E3:4F:CF:
                                2D:79:8C:97:46:E1:EF:5E:99:F4:8A:8B:B5:6D:23:5F:
                                05:84:E2:14:6A:56:8E:A0
                Signed Certificate Timestamp:
                    Version   : v1 (0x0)
                    Log ID    : 29:3C:51:96:54:C8:39:65:BA:AA:50:FC:58:07:D4:B7:
                                6F:BF:58:7A:29:72:DC:A4:C3:0C:F4:E5:45:47:F4:78
                    Timestamp : Oct 10 18:49:34.451 2018 GMT
                    Extensions: none
                    Signature : ecdsa-with-SHA256
                                30:44:02:20:6C:8E:E7:E2:70:AD:33:A6:5C:E0:89:84:
                                FB:0B:F6:E1:5C:05:06:0A:A8:DB:8B:1C:7A:D0:52:99:
                                5F:3F:A2:64:02:20:4B:CD:0B:E7:A0:27:04:31:19:18:
                                58:99:51:73:49:6B:77:25:A7:E7:5B:10:8C:BD:ED:54:
                                03:DD:40:E4:2D:31
    Signature Algorithm: sha256WithRSAEncryption
         9c:86:b3:34:64:af:ac:9d:c4:d3:a7:cc:fc:8a:32:18:75:95:
         95:47:9b:9c:3c:0e:3b:61:f9:88:61:38:1a:a6:92:69:3d:14:
         6a:53:13:14:65:e6:ca:fa:b9:8e:48:c9:d4:73:f6:e4:74:8a:
         1f:2b:f2:14:86:f1:18:55:26:1b:a0:97:89:15:0b:62:c6:2b:
         27:81:6f:60:af:55:68:b3:2c:5b:10:56:a2:7d:28:cb:8e:fc:
         f0:21:65:78:9b:3a:52:d3:9d:27:ff:d7:24:95:de:0f:d8:3d:
         a2:43:6e:fc:a5:2d:f2:ad:37:e9:ea:db:b5:75:b8:7c:ad:23:
         45:1d:bd:fe:4e:36:c7:f4:e2:3d:47:c9:06:fc:cb:75:ba:d4:
         0a:90:17:ea:e1:7f:49:e6:68:27:97:8a:70:c7:50:e9:19:4a:
         8a:21:18:26:79:a3:61:ff:1b:26:9e:fe:85:8f:20:ed:c6:4d:
         c1:0e:04:21:a8:05:d4:29:69:99:53:63:81:c7:d5:58:71:df:
         02:b5:94:c9:36:48:c9:35:80:ab:71:78:d9:12:f6:f5:10:25:
         3d:38:c5:40:75:25:b1:95:18:d8:1c:96:f1:c6:1a:d2:c4:99:
         f5:01:2e:f4:e1:4a:1f:10:42:0e:34:ed:92:8e:53:9f:c2:7b:
         11:51:78:6a
—–BEGIN CERTIFICATE—–
MIIGDTCCBPWgAwIBAgISBNGtVZHz+e8+U+osOvRf5s7BMA0GCSqGSIb3DQEBCwUA
MEoxCzAJBgNVBAYTAlVTMRYwFAYDVQQKEw1MZXQncyBFbmNyeXB0MSMwIQYDVQQD
ExpMZXQncyBFbmNyeXB0IEF1dGhvcml0eSBYMzAeFw0xODEwMTAxNzQ5MzRaFw0x
OTAxMDgxNzQ5MzRaMBwxGjAYBgNVBAMTEW1haWwucGMtZnJlYWsubmV0MIIBIjAN
BgkqhkiG9w0BAQEFAAOCAQ8AMIIBCgKCAQEAu7DJHIOCYUf5wnNgwEjmDPKh/9uu
8YQXFF38o7LkADrRhUKQ2kGp6aivID0S747KYaFx8sxDv0AN+gh92WEr6l0w4FJD
2xgwkgwszoeThOqRYbdw2xF8tqQz3tg/1mFHQvI2En894/dbET4c8K+WzWGKGqDw
tSNlc7a0nBmnCd1DljesSPwhBwJSZyYsgST01xDm9BJpU++RKhVqIQYi6v4xOIK0
WrWbZ5AWuDHoJzjyQbkZAo/HbuEshHUZbbswO9IC8GXxdoIVnM4xOtR8g8rR+eG3
dvZ4k0fSAPljqpRB1HjQ7rzm6RQU5K5UMYj4WI17Pp+HXPIE5QfgTJqB6wIDAQAB
o4IDGTCCAxUwDgYDVR0PAQH/BAQDAgWgMB0GA1UdJQQWMBQGCCsGAQUFBwMBBggr
BgEFBQcDAjAMBgNVHRMBAf8EAjAAMB0GA1UdDgQWBBTbq4HjFF9tvrR4e159+2a/
VjfFHTAfBgNVHSMEGDAWgBSoSmpjBH3duubRObemRWXv86jsoTBvBggrBgEFBQcB
AQRjMGEwLgYIKwYBBQUHMAGGImh0dHA6Ly9vY3NwLmludC14My5sZXRzZW5jcnlw
dC5vcmcwLwYIKwYBBQUHMAKGI2h0dHA6Ly9jZXJ0LmludC14My5sZXRzZW5jcnlw
dC5vcmcvMBwGA1UdEQQVMBOCEW1haWwucGMtZnJlYWsubmV0MIH+BgNVHSAEgfYw
gfMwCAYGZ4EMAQIBMIHmBgsrBgEEAYLfEwEBATCB1jAmBggrBgEFBQcCARYaaHR0
cDovL2Nwcy5sZXRzZW5jcnlwdC5vcmcwgasGCCsGAQUFBwICMIGeDIGbVGhpcyBD
ZXJ0aWZpY2F0ZSBtYXkgb25seSBiZSByZWxpZWQgdXBvbiBieSBSZWx5aW5nIFBh
cnRpZXMgYW5kIG9ubHkgaW4gYWNjb3JkYW5jZSB3aXRoIHRoZSBDZXJ0aWZpY2F0
ZSBQb2xpY3kgZm91bmQgYXQgaHR0cHM6Ly9sZXRzZW5jcnlwdC5vcmcvcmVwb3Np
dG9yeS8wggEEBgorBgEEAdZ5AgQCBIH1BIHyAPAAdwDiaUuuJujpQAnohhu2O4PU
Puf+dIj7pI8okwGd3fHb/gAAAWZfUA/1AAAEAwBIMEYCIQDW3ket0jK+vt2z6+6E
ngKKTzPiYyHV901HgpKruQpJYgIhAOh9F4Ey40/PLXmMl0bh716Z9IqLtW0jXwWE
4hRqVo6gAHUAKTxRllTIOWW6qlD8WAfUt2+/WHopctykwwz05UVH9HgAAAFmX1AP
8wAABAMARjBEAiBsjuficK0zplzgiYT7C/bhXAUGCqjbixx60FKZXz+iZAIgS80L
56AnBDEZGFiZUXNJa3clp+dbEIy97VQD3UDkLTEwDQYJKoZIhvcNAQELBQADggEB
AJyGszRkr6ydxNOnzPyKMhh1lZVHm5w8Djth+YhhOBqmkmk9FGpTExRl5sr6uY5I
ydRz9uR0ih8r8hSG8RhVJhugl4kVC2LGKyeBb2CvVWizLFsQVqJ9KMuO/PAhZXib
OlLTnSf/1ySV3g/YPaJDbvylLfKtN+nq27V1uHytI0Udvf5ONsf04j1HyQb8y3W6
1AqQF+rhf0nmaCeXinDHUOkZSoohGCZ5o2H/Gyae/oWPIO3GTcEOBCGoBdQpaZlT
Y4HH1Vhx3wK1lMk2SMk1gKtxeNkS9vUQJT04xUB1JbGVGNgclvHGGtLEmfUBLvTh
Sh8QQg407ZKOU5/CexFReGo=
—–END CERTIFICATE—–


Same way a .der files content / encryption algorithm and domain name could be grasped.
 

root@pcfreak:~# openssl x509 -in cert.der -inform der -text
Certificate:
    Data:
        Version: 3 (0x2)
        Serial Number:
            ad:c2:96:6f:4b:db:31:5c
    Signature Algorithm: sha256WithRSAEncryption
        Issuer: CN = example.com
        Validity
            Not Before: Jun 22 04:00:37 2015 GMT
            Not After : Jul 22 04:00:37 2015 GMT

        Subject: CN = example.com
        Subject Public Key Info:
            Public Key Algorithm: rsaEncryption
                Public-Key: (512 bit)

                Modulus:
                    00:ac:75:73:b4:51:ed:1f:dd:ae:70:52:43:fc:df:
                    c7:5b:d0:2c:75:1b:14:b8:75:01:04:10:e5:1f:03:
                    65:45:dd:df:a7:9f:34:ae:fd:be:e9:05:84:df:47:
                    16:81:d9:89:4b:ce:8e:6d:1c:fa:95:44:e8:af:84:
                    74:4f:ed:c2:e5
                Exponent: 65537 (0x10001)
        X509v3 extensions:
            X509v3 Subject Key Identifier:
                26:CF:C8:ED:4B:D7:94:B2:E4:25:03:58:24:8F:04:C0:74:D5:97:8A
            X509v3 Authority Key Identifier:
                keyid:26:CF:C8:ED:4B:D7:94:B2:E4:25:03:58:24:8F:04:C0:74:D5:97:8A


            X509v3 Basic Constraints:
                CA:TRUE
    Signature Algorithm: sha256WithRSAEncryption
         0c:8b:ff:12:80:9e:4c:90:bc:26:b0:96:20:ab:76:0c:64:71:
         d2:15:48:a5:33:f6:47:e4:03:df:76:5e:0f:cd:e1:1b:5e:d1:
         4d:c2:1f:8d:b8:63:2f:c9:7d:6e:5c:3b:cb:cd:a3:d0:d8:27:
         74:66:a3:76:06:a5:fb:81:3a:b6
—–BEGIN CERTIFICATE—–
MIIBdTCCAR+gAwIBAgIJAK3Clm9L2zFcMA0GCSqGSIb3DQEBCwUAMBYxFDASBgNV
BAMMC2V4YW1wbGUuY29tMB4XDTE1MDYyMjA0MDAzN1oXDTE1MDcyMjA0MDAzN1ow
FjEUMBIGA1UEAwwLZXhhbXBsZS5jb20wXDANBgkqhkiG9w0BAQEFAANLADBIAkEA
rHVztFHtH92ucFJD/N/HW9AsdRsUuHUBBBDlHwNlRd3fp580rv2+6QWE30cWgdmJ
S86ObRz6lUTor4R0T+3C5QIDAQABo1AwTjAdBgNVHQ4EFgQUJs/I7UvXlLLkJQNY
JI8EwHTVl4owHwYDVR0jBBgwFoAUJs/I7UvXlLLkJQNYJI8EwHTVl4owDAYDVR0T
BAUwAwEB/zANBgkqhkiG9w0BAQsFAANBAAyL/xKAnkyQvCawliCrdgxkcdIVSKUz
9kfkA992Xg/N4Rte0U3CH424Yy/JfW5cO8vNo9DYJ3Rmo3YGpfuBOrY=
—–END CERTIFICATE—–


2. How to display content and info about .CSR (Certificate Signing request)


root@pcfreak:~# openssl req -in cert.csr -noout -text
 

Certificate Request:
    Data:
        Version: 1 (0x0)
        Subject: C = BG, ST = BG, L = Dobrich, O = Pc Freak, CN = mail.www.pc-freak.net, emailAddress = hipo@www.pc-freak.net
        Subject Public Key Info:
            Public Key Algorithm: rsaEncryption
                Public-Key: (2048 bit)
                Modulus:
                    00:b1:83:a7:07:62:19:d4:60:95:58:49:de:b3:48:
                    a8:39:31:fa:5a:bd:2b:d6:73:94:50:36:72:74:18:
                    58:b6:27:d3:0b:26:75:15:a8:ba:1b:77:a7:c9:54:
                    96:1f:c7:8d:da:bd:c9:17:91:53:85:9e:0a:f4:71:
                    3c:fb:d6:e4:75:41:c1:95:32:e1:22:fc:7b:1f:36:
                    23:12:00:ca:37:27:d5:f9:9b:29:48:4a:51:95:d1:
                    40:d0:ea:94:51:98:98:6b:d3:d9:79:1d:a1:65:bb:
                    a9:d1:ab:c9:46:6e:03:ee:24:45:e5:f2:73:e5:f4:
                    82:4a:08:57:b1:06:52:c3:cc:42:9a:02:5b:7a:7c:
                    bd:34:d5:5f:d7:ba:ef:27:d5:3d:97:16:69:06:c7:
                    c1:06:5e:d9:07:16:3f:a3:61:50:9d:dd:ea:95:32:
                    f1:ee:93:82:48:df:20:8b:ae:d2:95:89:05:e4:3d:
                    0c:d7:e1:cf:07:ae:55:84:11:06:92:be:34:b4:a2:
                    a1:ce:07:06:bf:21:bc:80:e2:03:d2:85:b4:64:02:
                    8d:cd:d2:86:1c:49:41:52:43:a8:12:f8:ef:2c:f4:
                    be:a0:dc:ac:ea:27:3a:f9:ab:ab:27:da:28:63:1d:
                    10:5a:4f:b8:51:42:40:ae:be:c0:2d:e9:a3:5a:5a:
                    23:7f
                Exponent: 65537 (0x10001)
        Attributes:
            a0:00
    Signature Algorithm: sha256WithRSAEncryption
         47:f0:54:cd:5e:46:6f:2c:cc:48:7e:85:f0:a8:96:10:ca:a3:
         15:98:77:d3:02:95:8c:67:84:e3:55:d2:0c:e8:d5:a7:ba:82:
         95:fb:ce:73:4c:bc:8f:da:85:97:0c:a8:59:32:b3:a4:af:0a:
         80:4c:78:7f:62:cd:1b:00:01:e8:51:27:9c:eb:75:29:80:e9:
         99:24:fc:86:e2:09:28:be:47:5a:1d:bf:b1:b4:c4:29:4e:6e:
         f3:70:b4:58:f8:d9:a6:63:03:8b:a1:ef:ee:6d:1a:35:33:1e:
         b2:32:25:c1:33:37:3d:46:82:37:9b:0d:4c:40:20:ae:ff:e0:
         cc:51:a2:6b:dd:74:26:d6:93:26:89:c7:76:29:13:cf:6e:5a:
         0f:7c:1b:f5:80:be:3b:6a:a3:c0:10:cd:07:1e:a2:31:8b:49:
         94:d7:63:cf:93:8d:80:03:75:4a:76:b4:cd:14:fe:96:62:61:
         6b:96:8f:c0:a5:ef:67:c7:5e:c0:a5:4b:4f:95:57:b6:43:03:
         8b:6d:10:5f:ab:f2:95:54:ba:85:8e:8b:c1:99:ea:fd:3f:5e:
         23:01:d4:27:f3:e9:20:37:c4:05:47:30:67:94:53:f0:87:27:
         48:73:57:55:f2:70:04:b1:e9:29:eb:2e:2c:9a:cc:55:f4:cc:
         a4:71:c2:5a


That's all folks 🙂


Run multiple PHP versions (PHP 5 and PHP 7) with NGINX on the same server howto

Wednesday, October 3rd, 2018

how-to-run-multiple-php-versions-on-same-Linux-server-nginx-webserver-php5-7-logo

It is common sysadmin task to have two versions of PHP running on the same physical or Virtual server to be able to run simultaneously old PHP 5.X legacy applications and PHP 7.X written websites / web applications.

In the past this task was much more complicated than today  you had to compile for example Apache and PHP modules from source and enable it through fastcgi.
Today with the raise of NGINX Web Server and its possibility to run much of the PHP Apps running on top of Apache.
For the sake of this tutorial I'll be using Debian Strecth 9.0.
The reason to use NGINX instead of Apache for this tutorial are numerous, it is light weight (uses less resources – CPU ./ Memory) it is secure smaller in size.
 

1. Install NGINX Web Server


# apt-get install –yes nginx 


2. Install PHP.7.0 FPM module


# apt-get install php7.0-cli php7.0-fpm


3. Install PHP 5.6 FPM Using external deb repository

Debian default repositories does not include support for PHP 5.6, hence we need to add the respective repositories providing PHP 5.6


# apt-get install apt-transport-https


# curl https://packages.sury.org/php/apt.gpg | apt-key add –
echo 'deb https://packages.sury.org/php/ stretch main' > /etc/apt/sources.list.d/deb.sury.org.list
apt-get update


Next install PHP 5.6 from just added repos


# apt-get install –yes php5.6-cli php5.6-fpm


4. Check Multiple PHP versions PHP 5 and PHP 7 aree properly installed 


# php7.0 -v
PHP 7.0.15-1 (cli)
# php5.6 -v


Debian has a default set-up for PHP CLI (Console Interface command) pointing to PHP 7.0, e.g.


# php -v
PHP 7.0.15-1 (cli)


If you prefer to use as prefer PHP 5.6 instead you can do it with debian update-alternative cmd:


# update-alternatives –config php


5. Configure both installed PHP -es

Edit /etc/php/7.0/fpm/pool.d/www.conf and look for the listen option. It should equal to /run/php/php7.0-fpm.sock or something alike.
Now do the same for 5.6, it should contain the same with just 5.6 instead of 7.0. Note that it could also be a bind address, i.e. IP address with port (which is performance-wise more suitable for production than sockets). 


6. Configuring NGINX webserver


Nginx configuration files are stored in /etc/nginx 

– On Debian the .deb package structure of nginx is is made that all available virtual hosts for nginx just like for Apache are stored  in sites-available directory and production enabled virtualhosts are symlinks to sites-enabled

– Shared configuration for reuse among multiple domains is stored in inside the snippets directory

– fastcgi.conf file contains FastCGI specific variables that are passed to PHP

– The snippets/fastcgi-php.conf is just a helper file to prepare configuration that is passed to PHP module

It is a good idea to remove any unnecessery configuration from /etc/nginx/sites-enabled 
 

7. Create configuration for PHP 7.0


To make simple the test the main (root) directory of nginx will be set to have a simple phpinfo(); file.
 

mkdir /var/www/site-with-php7
echo -e '<?php\nphpinfo();' > /var/www/site-with-php7/index.php 


Then create actual Nginx configuration


# vim /etc/nginx/sites-available/site-with-enabed-php7.X


server {
    listen 8770 default_server;
    listen [::]:8870 default_server;

    server_name _;
    root /var/www/site-with-php7;
    index index.php;
    location / {
        include snippets/fastcgi-php.conf;
        fastcgi_pass unix:/run/php/php7.0-fpm.sock; # adjust for the listen setting discussed above
    }


As seen from configuration PHP 7 will be serving PHP scripts written for php 7  on TCP port 8870


8. Create configuration for PHP 5.6


# mkdir /var/www/site-with-php5.6
# echo -e '<?php\nphpinfo();' > /var/www/site-with-php5.6/index.php


server {
    listen 8756 default_server;
    listen [::]:8856 default_server;

    server_name _;
    root /var/www/site-with-php5.6;
    index index.php;
    location / {
        include snippets/fastcgi-php.conf;
        fastcgi_pass unix:/run/php/php5.6-fpm.sock; # adjust for the listen setting discussed above
    }
}

As you see from configuration PHP 5.6 will be serving PHP 5.6 files on TCP port 8756

To enable both NGINX configurations to load enable both nginx vhosts as there is no a2ensite like for enabling NGINX configurations the following  cmd does it
 

# ln -s /etc/nginx/sites-available/site-with-php5.6 /etc/nginx/sites-enabled/
#  ln -s /etc/nginx/sites-available/site-with-php7.0 /etc/nginx/sites-enabled/

To load the new NGINX Virtualhost configurations, restart next:
 

# systemctl reload nginx.service


9. Testing NGINX + PHP configuration set-up on port 8870 / 8876


– Test NGINX connection on 8876
 

lynx -dump http://localhost:8870

– Test NGINX connection on 8870
 

lynx -dump http://localhost:8870

Both commands should dump you output from PHP 7 (if your server lacks lynx i warmly recommend it, though you can use wget to test).


To sum it up


Even though generally it is a bad idea to have 2 instances of application service be it NGINX / Apache from security point of view, it is sometimes a necessity especially when you
or your customers are unwilling to invest money for upgrade of their websites / application infrastructure and if the clients want to keep obsolete PHP code and mix it with a new.
Still migration will be required as you would perhaps want to have some kind of Load Balancer round robin with another NGINX / Apache or Haproxy to make different applications
open under a separate CDN hostname
.

Install Jenkins software development automation server on GNU / Linux

Tuesday, September 18th, 2018

jenkins-automate-installation-on-logo-title

As I have gone through a hiring procedures for Dev Ops system administration (Senior System Engineer) positions in the largest IT company in Belarus EPAM (A Global provider for software engineering and IT consulting.one of the Dev Ops test tasks to do was to automate installation of Jenkins software development automation server on a Virtual Machine running Linust Guest of choice (VMWare / VirtualBox) with Ansible / Docker or Pure Shell Script as I love simplicity I choose to do it via Bash Shell script.

As Dev Ops position is more and more transforming into a programmer job into the New Age of non-sense Cloud Computing (I hate Clouds guys – I share Richard Stallman opinion that "Clouds are clouding your minds" !!! ) … the need for environments such as Jenkins allowing multiple pseudo "sys admins" (mostly copy / paste new age coders) to write and build there programs in Go Language / Python / Perl / Bash with a single environment for Continuous Integration (CI) that could deploy and keep software versionings in GitHub / Mercurial / SVN is exponentionally raising.

Old School Computer Geeks would definitely be amazed (reasonably) on why on earth would someone need a Web Based Java Crazy environment that Jenkins is to build a multiple language code and submit it to a source repository system
But as the people like to hype and make easy things harder adding more and more layers of complexity, the product is the new buziness hype terms Continuous Integration / Continuous Integration raise exponentially together with the softwares to do stuff.
As IT people are becoming more and more lazy and illitetelarete things like Jenkins is the next web development CI environment that is about to die in the coming 5 to 10 years.

Jenkins doesn't really cut the need for writting scrpits to make your application (Makefiles), for the Business Corporate world it is heavily used nowadays, because it is used to building projects using Web UI, running tests, doing static code analysis, and deploying.

What makes Jenkins in terms of IT architecture design solution is that every project that it builds is build via its Java Virtuam Machine Processor backend (the server itself runs in the background of the OS runs it through Java VM as a WAR file (Web Application Resource) with the help of Few Ruby and other scripted files.
Besides that JNS has in the moment of writting more than 1400 years spanning across platforms, UI, administration, source code management, and, most frequently, build management.

Jenkins is either used as a standalone server or as a servlet in Java app servers such as Tomcat.

This is the short script I came up with in bash that when executed installs Jenkins on the remote VM host server that ran Debian 9 Linux, the install_jenkins.sh script is downloadable here.

#!/bin/bash
# Install jenkins and test whether it runs prints password on prompt or send via email
# if email variable is set Jenkins password will be set to your email of choice using mail command
# NOTE: bsd-mailx package should be installed in order for email sent to work and local machine should be running a properly configured
# relay SMTP
# Author: Georgi Georgiev 
# hipo@www.pc-freak.net
email='hipo@mail.com';

add_repos_install_jenkins () {
apt-get install –yes -qq apt-transport-https git curl

wget -q -O – https://pkg.jenkins.io/debian/jenkins.io.key | sudo apt-key add –

if [ “$(sed -n ‘/jenkins/p’ /etc/apt/sources.list|wc -l)” -eq 0 ]; then
echo 'deb https://pkg.jenkins.io/debian binary/' >> /etc/apt/sources.list
fi

apt-get update -qq && apt-get install –yes -qq jenkins
}

check_j_install () {
if [ “$(dpkg –get-selections | cut -f1|grep -i jenkins)” ]; then echo 'succesfully installed'; 

else printf 'Problem in installing please check'; 
exit 1; 

fi

}

check_j_running_s_pass () {
if [ $(ps -e -o command|grep -i jenkins) ]; then 
echo 'Jenkins process working.'; 
echo ‘… do more here if necessery with some more commands’; 
else 
echo 'not working log to file' >> jenkins.log 
exit 1; 
fi

JENKINS_PASSWORD=`cat /var/lib/jenkins/secrets/initialAdminPassword`;
echo "Jenkins Admin password is $JENKINS_PASSWORD" | tee -a "jenkins_credentials.log";
if [ ! -z $email ]; then
echo $JENKINS_PASSWORD | mail -s "NEW Jenkins password" $email


fi

}

main () {
        add_repos_install_jenkins;
        check_j_install;
        check_j_running_s_pass;

}

main;

To run the script on the remote VM server started for the purpose I created a passwordless ssh key authentication with
 

ssh-keygen -t rsa


and 


ssh-copy-id -i ~/.ssh/id_dsa.pub root@remote-vm-host.com


command … for more check out my previous article "How to execute command to Multiple Servers / Establishing passwordless SSH key authentication on 50+ servers"

Once the passwordless authentication was established to remote Private Virtual Server I've used scp command to upload my install_jenkins.sh script with:


# scp -v install_jenkins.sh root@remote-vm-host.com:/root/install_jenkins.sh

Sending file modes: C0644 726 install_jenkins.sh
Sink: C0644 726 install_jenkins.sh
install_jenkins.sh              


Next to run the install_jenkins.sh on remote host I used remote SSH run command capability, the syntax goes like this:


ssh [USER-NAME]@[REMOTE-HOST] [command or script]


In that case the command I used was:


ssh root@remote-vm-host.com "chmod +x; /root/jenkins.sh"


Next I launched Firefox browser and accessed http://localhost:8080 on the VM host and used the long password generated from the script by command:


JENKINS_PASSWORD=`cat cat /var/lib/jenkins/secrets/initialAdminPassword`;


echo $JENKINS_PASSWORD

In the process of Initial Jenkins setup I selected the GitHub plugins necessery for me to connect Jenkins with GitHub WebHooks (for that perhaps I will write another article when I have time).

jenkins-plugin-installer-screenshot-linux-large

Jenkins Getting Started Initial Screen

jenkins-selecting-plugins-to-use-getting-started

Jenkins Selecting Plugins Screen

Once successfully set-up Jenkins Initial Project creation / Configuration ( Control Panel ) screen looks like so

jenkins-main-screen-successfully-deployed-on-gnu-linux

There was also a task to create a simple print Jenkins and Shell environment variables with a sample Jenkins Free Style Project.
Following 
the New Item menu and setting it to Execute Shell commands as a Build Parameters, the parameters set for the Jenkins Free Style Project to Print the Environment Varibles were like so:


#!/bin/sh

echo “Jenskins Environment Variables”

echo "BUILD_NUMBER" :: $BUILD_NUMBER

echo "BUILD_ID" :: $BUILD_ID

echo "BUILD_DISPLAY_NAME" :: $BUILD_DISPLAY_NAME

echo "JOB_NAME" :: $JOB_NAME

echo "JOB_BASE_NAME" :: $JOB_BASE_NAME

echo "BUILD_TAG" :: $BUILD_TAG

echo "EXECUTOR_NUMBER" :: $EXECUTOR_NUMBER

echo "NODE_NAME" :: $NODE_NAME

echo "NODE_LABELS" :: $NODE_LABELS

echo "WORKSPACE" :: $WORKSPACE

echo "JENKINS_HOME" :: $JENKINS_HOME

echo "JENKINS_URL" :: $JENKINS_URL

echo "BUILD_URL" ::$BUILD_URL

echo "JOB_URL" :: $JOB_URL

echo “===Linux Shell Variables ===”
env


Well, it wasn't really a rocket science was it?! 🙂

That's all folks, see you soon.

How to reset lost OwnCloud admin password credentials with Linux command

Friday, September 28th, 2018

owncloud-change-password-on-owncloud-7-8-linux-howto

Some time ago I've explained how to set-up a personal Cloud via OwnCloud on Linux to be able to access and share your data across all your Phone / Notebook / PCs / Tablet devices and be free from Amazon Cloud slavery.

Now as I haven't used a setup of OwnCloud it seems I forgot my OwnCloud password and besides that I am not sure which email address I filled as a recovery email and was lazy to go through all the OwnCloud MySQL database tables, thus I looked for
other ways to recover the forgotten password. Finally I ended up using the command line, below is how OwnCloud 7 admin password can be easily reset (recovered) with occ php command:


root@pcfreak:/var/www/owncloud# sudo -u www-data php occ user:resetpassword admin
PHP module intl not installed.
Please ask your server administrator to install the module.


An unhandled exception has been thrown:
Exception: Environment not properly prepared. in /var/www/owncloud/lib/private/Console/Application.php:135
Stack trace:
#0 /var/www/owncloud/console.php(105): OC\Console\Application->loadCommands(Object(Symfony\Component\Console\Input\ArgvInput), Object(Symfony\Component\Console\Output\ConsoleOutput))
#1 /var/www/owncloud/occ(11): require_once('/var/www/ownclo…')
#2 {main}root@pcfreak:/var/www/owncloud# apt-cache search php|grep -i intl
php-intl – Internationalisation module for PHP [default]
php-symfony-polyfill-intl-grapheme – Symfony polyfill for intl's grapheme_* functions
php-symfony-polyfill-intl-icu – Symfony polyfill for intl's ICU-related data and classes
php-symfony-polyfill-intl-normalizer – Symfony polyfill for intl's Normalizer class and related functions
php7.0-intl – Internationalisation module for PHP
php-symfony-intl – limited replacement layer for the PHP extension intl
php-symfony-locale – deprecated replacement layer for the PHP extension intl
php5-intl – internationalisation module for php5
root@pcfreak:/var/www/owncloud# apt-get install php7.0-intl
Четене на списъците с пакети… Готово
Изграждане на дървото със зависимости       
Четене на информацията за състоянието… Готово
Следните пакети са били инсталирани автоматично и вече не са необходими:
  docutils-common docutils-doc gcj-4.9-jre-lib gnat-4.9-base libasn1-8-heimdal libavcodec56 libavformat56 libavresample2 libavutil54 libbind9-90 libboost-program-options1.55.0 libboost-python1.55.0 libcompress-raw-bzip2-perl libcompress-raw-zlib-perl libcrypt-openssl-random-perl
  libdnet libdns-export100 libdns100 libegl1-mesa-drivers libexiv2-13 libgcj15 libglew1.10 libgnat-4.9 libgnutls-openssl27 libgphoto2-port10 libgphoto2-port10:i386 libhcrypto4-heimdal libhdb9-heimdal libheimbase1-heimdal libhx509-5-heimdal libimobiledevice4 libinput5 libintl-perl
  libintl-xs-perl libirs-export91 libisc-export95 libisc95 libisccc90 libisccfg-export90 libisccfg90 libjson-c3 libkrb5-26-heimdal libllvm3.5:i386 libllvm3.8 liblognorm1 liblwres90 libntdb1 libopenvg1-mesa libplist2 libprocps3 libpsl0 libroken18-heimdal librrd4 libtfm1
  libusbmuxd2 libvpx1:i386 libwebpdemux1 libwebpdemux2 libwebpmux1 libwind0-heimdal libwings2 libwraster3 libwutil3 libx264-142 libxtables10 linux-image-3.16.0-4-amd64 python-characteristic python-docutils python-ndg-httpsclient python-ntdb python-pil python-pygments
  python-pyinotify python-roman python-twisted-lore python-twisted-mail python-twisted-names python-twisted-news python-twisted-runner python-twisted-words
Използвайте „apt autoremove“ за да ги премахнете.
Следните НОВИ пакети ще бъдат инсталирани:
  php7.0-intl
0 актуализирани, 1 нови инсталирани, 0 за премахване и 1 без промяна.
Необходимо е да се изтеглят 124 kB архиви.
След тази операция ще бъде използвано 523 kB допълнително дисково пространство.
Изт:1 http://ftp.uk.debian.org/debian stable/main amd64 php7.0-intl amd64 7.0.30-0+deb9u1 [124 kB]
Изтеглени 124 kB за 1с (93,7 kB/сек)        


Selecting previously unselected package php7.0-intl.
(Reading database … 210111 files and directories currently installed.)
Preparing to unpack …/php7.0-intl_7.0.30-0+deb9u1_amd64.deb …
Unpacking php7.0-intl (7.0.30-0+deb9u1) …
Processing triggers for libapache2-mod-php7.0 (7.0.30-0+deb9u1) …
Setting up php7.0-intl (7.0.30-0+deb9u1) …

Creating config file /etc/php/7.0/mods-available/intl.ini with new version
Processing triggers for libapache2-mod-php7.0 (7.0.30-0+deb9u1) …
root@pcfreak:/var/www/owncloud# occ user:resetpassword admin
bash: occ: командата не е открита
root@pcfreak:/var/www/owncloud# sudo -u www-data php occ user:resetpassword admin
Enter a new password: 
Confirm the new password: 
Successfully reset password for admin
root@pcfreak:/var/www/owncloud# 


root@pcfreak:/var/www/owncloud# sudo -u www-data php occ user:resetpassword admin
Enter a new password: 
Confirm the new password: 
Successfully reset password for admin


owncloud-screenshot-on-my-debian-gnu-linux-in-chrome-browser

That's all now I can login again to WEB UI interface and use my owncloud-client to synchronize content from my notebook to OwnCloud


This method should work work on resetting password of OwnCloud version 7, 8 and 9 on Linux (Fedora, Ubuntu, CentOS and RHEL) if OwnCoud was installed using rpm / deb packages.