Posts Tagged ‘foo’

How to install / add new root certificates on Debian, Ubuntu, Mint Linux

Saturday, October 21st, 2017

add-install-new-root-ca-certificates-to-debian-ubuntu-linux-howto

How to add / Installing a root/CA Certificate on Debian, Ubuntu, Mint Linux


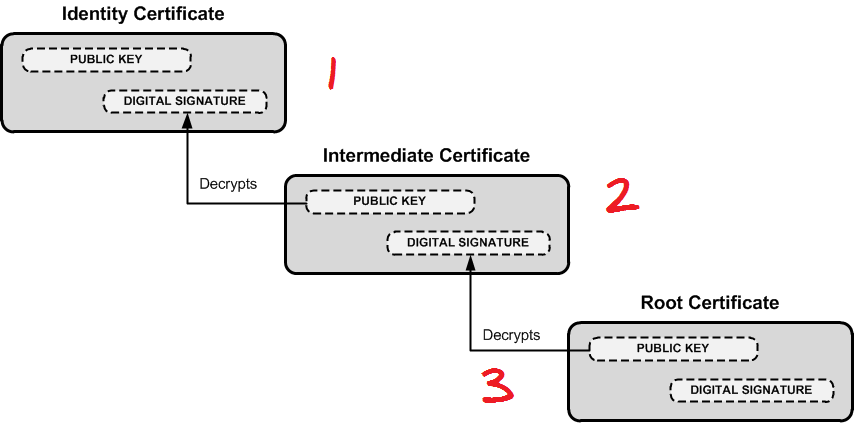
 Because of various auditing failures and other security issues, the CAcert root certificate set is slowly disappearing from the Ubuntu and Debian ‘ca-certificates’ package.

That's really tricky because if you're a system administrator or have a bunch of programmers whose needs is to install a new set of root certificates for their freshly develped Application or you have to make a corporate certificates added to debian rootca, then the good news is it is quite easy to install new certificates to deb based distributions.


Given a CA certificate file foo.crt, follow these steps to install it on Debian / Ubuntu:

    Create a directory for extra CA certificates in /usr/share/ca-certificates:


    debian:~# mkdir /usr/share/ca-certificates/extra-certificates


    Copy the CA .crt file to this directory:


    debian:~# cp foo.crt /usr/share/ca-certificates/extra-certificates/foo.crt


    Let Debian / Ubuntu add the .crt file's path relative to /usr/share/ca-certificates to /etc/ca-certificates.conf (the file lists certificates that you wish to use or to ignore to be installed in /etc/ssl/certs)


    debian:~# dpkg-reconfigure ca-certificates


In case you want to include a .pem file to the list of trustable certificates on Debian / Ubuntu, it must first be converted to a .crt file first, you can do that with:


    debian:~# openssl x509 -in foo.pem -inform PEM -out foo.crt


Lets say you want to add some custom Root certificate for exapmle cacert.org


   debian:~# mkdir /usr/local/share/ca-certificates/cacert.org
   debian:~# cd /usr/local/share/ca-certificates/cacert.org
   debian:~# mkdir /usr/local/share/ca-certificates/cacert.org
   debian:~# wget -P /usr/local/share/ca-certificates/cacert.org http://www.cacert.org/certs/root.crt http://www.cacert.org/certs/class3.crt


Then once again update the ca certificates bundle

   debian:~# update-ca-certificates


How to set a crontab to execute commands on a seconds time interval on GNU / Linux and FreeBSD

Sunday, October 30th, 2011

crontab-execute-cron-jobs-every-second-on-linux-cron-logo
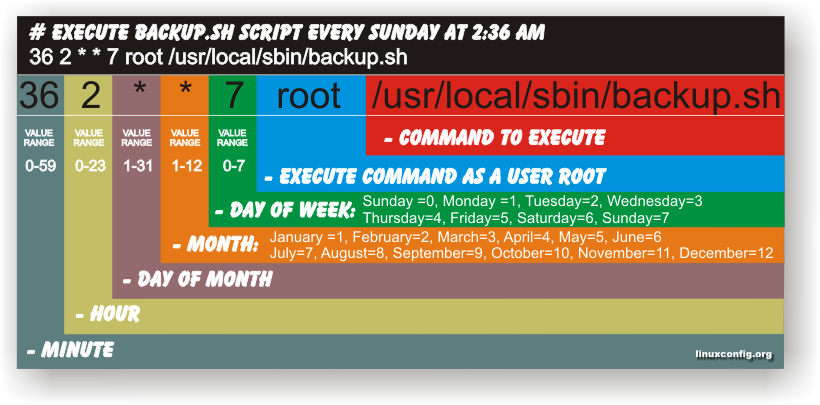
Have you ever been in need to execute some commands scheduled via a crontab, every let’s say 5 seconds?, naturally this is not possible with crontab, however adding a small shell script to loop and execute a command or commands every 5 seconds and setting it up to execute once in a minute through crontab makes this possible.
Here is an example shell script that does execute commands every 5 seconds:

#!/bin/bash
command1_to_exec='/bin/ls';
command2_to_exec='/bin/pwd';
for i in $(echo 1 2 3 4 5 6 7 8 9 10 11); do
sleep 5;
$command1_to_exec; $command2_to_exec;
done

This script will issue a sleep every 5 seconds and execute the two commands defined as $command1_to_exec and $command2_to_exec

Copy paste the script to a file or fetch exec_every_5_secs_cmds.sh from here

The script can easily be modified to execute on any seconds interval delay, the record to put on cron to use with this script should look something like:

# echo '* * * * * /path/to/exec_every_5_secs_cmds.sh' | crontab -

Where of course /path/to/exec_every_5_secs_cmds.sh needs to be modified to a proper script name and path location.

Another way to do the on a number of seconds program / command schedule without using cron at all is setting up an endless loop to run/refresh via /etc/inittab with a number of predefined commands inside. An example endless loop script to run via inittab would look something like:

while [ 1 ]; do
/bin/ls
sleep 5;
done

To run the above sample never ending script using inittab, one needs to add to the end of inittab, some line like:

mine:234:respawn:/path/to/script_name.sh

A quick way to add the line from consone would be with echo:

echo 'mine:234:respawn:/path/to/script' >> /etc/inittab

Of course the proper paths, should be put in:

Then to load up the newly added inittab line, inittab needs to be reloaded with cmd:

# init q

I've also red, some other methods suggested to run programs on a periodic seconds basis using just cron, what I found in stackoverflow.com's  as a thread proposed as a solution is:

* * * * * /foo/bar/your_script
* * * * * sleep 15; /foo/bar/your_script
* * * * * sleep 30; /foo/bar/your_script
* * * * * sleep 45; /foo/bar/your_script

One guy, even suggested a shorted way with cron:

0/15 * * * * * /path/to/my/script

How to install Samsung ML-2010 (ML-2010P) Mono Laser Printer on Xubuntu GNU/Linux

Wednesday, January 18th, 2012

I had to make one old Samsung ML-2010P Laser Printer work on Xubuntu Linux . I've had some issues in installing it, I couldn't fine any step by step tutorial online, on how the printer can be made work fine on Linux. Therefore I took the time to experiment and see if I could make it work. Since the printer is old, not much people are interested any more in making the printer operational on Linux, hence I couldn't find too much relevant posts and sites on the net, anyways thanks God after a bit of pondering I finally succeeded to make the Samsung ML-2010P printer to print on Linux.This are the exact steps one has to follow to make this old bunch of hardware to play nice on Linux:

1. use lsusb to list the printer model

root@linux:~# lsusb |grep -i samsung
Bus 001 Device 003: ID 04e8:326c Samsung Electronics Co., Ltd ML-2010P Mono Laser Printer

You see the printer reports as Samsung Electronics Co., Ltd ML-2010P Mono Laser Printer

2. Install cups printing service required packages

root@linux:~# apt-get install cups cups-bsd cups-client cups-common
root@linux:~# apt-get install cups-driver-gutenprint ghostscript-cups
root@linux:~# apt-get install python-cups python-cupshelpers

3. Install foomatic packages

root@linux:~# apt-get install foomatic-db foomatic-db-engine foomatic-db-gutenprint
root@linux:~# apt-get install foomatic-filters python-foomatic

4. Install hpijs hplip printconfand other packages necesssery for proper printer operation

root@linux:~# apt-get install hpijs hplip hplip-data ijsgutenprint
root@linux:~# apt-get install min12xxw openprinting-pdds printconf foo2zjs

P.S. Some of the packages I list might already have been installed as a dependency to another package, as I'm writting this article few days after I've succeeded installing the printer, I don't remember the exact install order.

5. Install splix (SPL Driver for Unix)

Here is a quote taken from Spix's project website:

"SpliX is a set of CUPS printer drivers for SPL (Samsung Printer Language) printers.
If you have a such printer, you need to download and use SpliX. Moreover you will find documentation about this proprietary language.
"

root@linux:~# apt-get install splix

For more information on splix, check on Splix SPL driver for UNIX website http://splix.ap2c.org/

You can check on the projects website the Samsung ML 2010 Printer is marked as Working
Next step is to configure the Printer

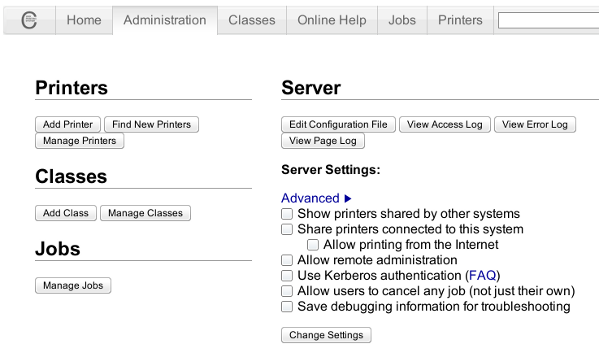
6. Go to Cups interface on localhost in browser and Add the Samsung printer.

Use Firefox, SeaMonkey or any browser of choice to configure CUPS:

Type in the browser:

http://localhost:631

Next a password prompt will appear asking for a user/pass. The user/pass you have to use is the same as the password of the user account you're logged on with.

UNIX Linux Administration CUPS Printer adding Samsung ML 2010 ML-2010P Xubuntu

Click on the Add Printer button and choose to add the Samsung ML-2010.

Then restart the CUP Service (cupsd) to make it load the new settings:

root@linux:~# /etc/init.d/cups restart

Now give the printer a try in printing some page in SeaMonkey, Chrome or Firefox (the quickest way is through pressing CTRL + P )

Following this steps, I've managed to run the printer on Xubuntu Linux, though the same steps if followed should most probably make the Samsnung ML 2010 play nice with other Linux distributions with a little or no adjustments.
I'll be glad to hear if someone succeeded in making the printer work on other distributions, if so please drop me a comment.
That's all folks! Enjoy printing 😉

Using perl and sed to substitute strings in multiple files on Linux and BSD

Friday, August 26th, 2011

Using perl and sed to replace strings in files on Linux, FreeBSD, OpenBSD, NetBSD and other UnixOn many occasions when had to administer on Linux, BSD, SunOS or any other *nix, there is a need to substitute strings inside files or group of files containing a certain string with another one.

The task is not too complex and many of the senior sysadmins out there would certainly already has faced this requirement and probably had a good idea on files substitution with perl and sed, however I’m quite sure there are dozen of system administrators out there who did not know, how and still haven’t faced a situation where there i a requirement to substitute from a command shell or via a scripting language.

This article tagets exactly these system administrators who are not 100% sys op Gurus 😉

1. Substitute text strings inside files on Linux and BSD with perl

Perl programming language has originally been created to do a lot of text manipulation as well as most of the Linux / Unix based hosts today have installed working copy of perl , therefore using perl as a mean to substitute one string in a file to another one is maybe the best way to completet the task.
Another good thing about perl is that text processing with it is said to be in most cases a bit faster than sed .
However it is still dependent on the string to be substituted I haven’t done benchmark tests to positively say 100% that always perl is quicker, however my common sense suggests perl will be quicker.

Now enough talk here is a very simple way to substitute a reoccuring, text string inside a file with another chosen one is like so:

debian:~# perl -pi -e 's/foo/bar/g' file1 file2

This will substitute the string foo with bar everywhere it’s matched in file1 and file2

However the above code is a bit “dangerous” as it does not preserve a backup copy of the original files, where string is substituted is not made.
Therefore using the above command should only be used where one is 100% sure about the string changes to be made.

Hence a better idea whether conducting the text substitution is to keep also the original file backup under a let’s say .bak extension. To achieve that I use perl as follows:

freebsd# perl -i.bak -p -e 's/syzdarma/magdanoz/g;' file1 file2

This command creates copies of the original files file1 and file2 under the names file1.bak and file2.bak , the files file1 and file2 text occurance of strings syzdarma will get substituted with magdanoz using the option /g which means – (substitute globally).

2. Substitute string in all files inside directory using perl on Linux and BSD

Every now and then the there is a need to do manipulations with large amounts of files, I can’t right now remember a good scenario where I had to change all occuring matching strings to anther one to all files located inside a directory, anyhow I’ve done this on a number of occasions.

A good way to do a mass file string substitution on Linux and BSD hosts equipped with a bash shell is via the commands:

debian:/root/textfiles:# for i in $(echo *.txt); do perl -i.bak -p -e 's/old_string/new_string/g;' $i; done

Where the text files had the default txt file extension .txt

Above bash loop prints each of the files located in /root/textfiles and substitutes everywhere (globally) the old_string with new_string .

Another alternative to the above example to replace multiple occuring text string in all files in multiple directories is possible using a combination of shell commands grep, perl, sort, uniq and xargs .
Let’s say that one wants to match everywhere inside the root directory and all the descendant directories for files with a custom string and substitute it to another one, this can be done with the cmd:

debian:~# grep -R -files-with-matches 'old_string' / | sort | uniq | xargs perl -pi~ -e 's/old_string/new_string/g'

This command will lookup for string old_string in all files in the / – root directory and in case of occurance will substitute with new_string (This command’s idea was borrowed as an idea from http://linuxadmin.org so thx.).

Using the combination of 5 commands, however is not very wise in terms of efficiency.

Therefore to save some system resources, its better in terms of efficiency to take advantage of the find command in combination with xargs , here is how:

debian:~# find / | xargs grep 'old_string' -sl |uniq | xargs perl -pi~ -e 's/old_string/new_string/g'

Once again the find command example will do exactly the same as the substitute method with grep -R …

As enough is said about the way to substitute text strings inside files using perl, I will further explain how text strings can be substituted using sed

The main reason why using sed could be a better choice in some cases is that Unices are not equipped by default with perl interpreter. In general the amount of servers who contains installed sed compared to the ones with perl language interpreter is surely higher.

3. Substitute text strings inside files on Linux and BSD with sed stream editor

In many occasions, wether a website is hosted, one needs to quickly conduct a change in string inside all files located in a directory, to resolve issues with static urls directly encoded in html.
To achieve this task here is a code using two little bash script loops in conjunctions with sed, echo and mv commands:

debian:/var/www/website# for i in $(ls -1); do cat $i |sed -e "s#index.htm#http://www.webdomain.com/#g">$i.new; done
debian:/var/www/website# for i in $(ls *.new); do mv $i $(echo $i |sed -e "s#.new##g"); done

The above command sed -e “s#index.htm#http://www.webdomain.com/#g”, instructs sed to substitute all appearance of the text string index.htm to the new text string http://www.webdomain.com

First for bash loop, creates all the files with substituted string to file1.new, file2.new, file3.new etc.
The second for loop uses mv to overwrite the original input files file1, file2, file3, etc. with the newly created ones file1.new, file2.new, file3.new

There is a a way shorter way to conclude the same text substitutions task using a simpler one liner with only using sed and bash’s eval capabilities, here is how:

debian:/var/www/website# sed -i 's/old_string/new_string/g' *

Above command will change old_string to new_string inside all files in directory /var/www/website

Whether a change has to be made with less than 1024 files using this method might be more efficient, however whether a text substitute has to be done to let’s say 5000+ the above simplistic version will not work. An error of Argument list too long will prevent the sed -i ‘s/old_string/new_string/g’ to complete its task.

The above for loop 2 liner should be also working without problems with FreeBSD and the rest of BSD derivatives, though I have not tested it yet, hence any feedback from FreeBSD guys is mostly welcome.

Consider that in order to have the for loops commands work on FreeBSD or NetBSD, they have to be run under a bash shell.
That’s all folks thanks the Lord for letting me write this nice article, I hope it gives some insights on how multiple files text replace on Unix works .
Cheers 😉