Posts Tagged ‘proper location’

Install xmame from source on Debian Linux 7.0 (Wheezy) to play for better MAME (Arcade Games Emulation)

Thursday, May 30th, 2013

xmame logo install xmame on latest stable debian

Whether you're keen on playing old school arcade games. And you just updated or installed latest stable Debian 7 Wheezy. You will find out current installable Mame (Arcade Emulator) package cannot play many of the hot Games, even though game rom files are okay and you might have played those games in some previous versions of Debian with now obsolete but apparently better working emu  xmame.

As playing Captain Command, Xain'D Sleena, Cadillac & Dinosaurs and Punisher Classic Arcades is one of my great entertainments when I have some free time. I took the time to find out if xmame is still installable either by deb package or from source.

Unfortunately xmame for latest Debian releases is not available from unofficial repositories, so I proceeded with installing it from source. Thanksfully source install was successful. Hence, below is explained how to install xmame from source on Debian Wheezy and Debian testing/unstable.
First before compiling install a bunch of development packages necessary for proper compilation:

# apt-get install --yes zlib1g-dev
# apt-get install --yes libexpat1-dev
# apt-get install --yes libghc-x11-dev
# apt-get install --yes x11proto-video-dev
# apt-get install --yes libxv-dev

Download xmame 0.103 source archive (xmame-0.103.tar.bz2)

Tar archive doesn't have configure script so to compile it just run make ;

# cd /usr/local/src
# tar -jxvvf xmame-0.103.tar.bz2
# su hipo
cd xmame-0.103
$ make
...
....
$ exit
# make install
.....


In case some header .h file is still missing and compile fails, as it happened to me on few occasions. You can install and use apt-file;

One important note is xmame's build will take very long on my machine with 2Gb of Memory and Dual Core 1.8 Ghz it took about 1,.30 or 2 hours. 

# apt-get –yes install apt-file
# apt-file update

To find from which package the the missing .h file can be installed

# apt-file search Header-Name.h

Then just install package which will provide needed header.

Next step is to create xmame config file:
# mkdir /usr/local/share/xmame/
xmame-0.103$ cp -rpf ./src/unix/doc/xmamerc.dist /usr/local/share/xmame/xmamerc

In xmamerc set proper location for Mame ROM files:

# vim /usr/local/share/xmame/xmamerc
Find line;

rompath                 /usr/local/share/xmame/roms

and change it to whether Rom files are located. In my case they're in /disk/Games/Mames/roms, so change rompath to;
 

rompath                 /disk/Games/Mames/roms

There are some other configurations which you might want to tune. A well configured xmamerc that works fine for me is here

Finally link xmame.x11 to /usr/bin/xmame

# ln -sf /usr/local/bin/xmame.x11 /usr/bin/xmame

After having properly configured XMamE'S roms Directory to launch a game, for example punisher.zip or captcomm.zip:

$ xmame punisher
....
 $ xmame captcom
....

captain_commando_arcade-game-logo running on xmame Linux

I've build xmame from source on Debian but I suppose same guide should be working okay on Ubuntu, Mint and rest of Debian distributions. I'll be happy to get feedback if someone succeeded running xmame on other distro. If you do please drop me a comment with distro name and specifics or problems faced.

Improve night sleep with F.lex on Mac OS X, iPhone and iPad

Monday, February 25th, 2013

f.lux application change screen color gamma to sleep better when using computer late at night macOSX and iphone
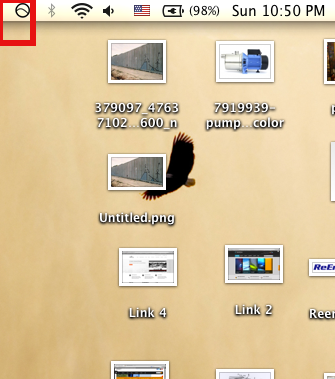
Recently I blogged about how to reduce night sleep problems and diminish insomnia on Linux with little command line tool – redshift. Now I'm in a friend who is a Mac user and since he had lately problems with sleeping. I remembered about redshift and one other tool which I read about called F.lex. We give it a try and installed it on his Mac OS X Lion – ver (10.7.5). Installation is like other standard Mac OS X applications, download f.lux version for Mac OS then click  .DMG binary and you're asked if you want to install the program in Mac active Applications. That's all the program is installed and you don't even need to configure it as the program automatically determines Time Zone / Geographic Location  configured for OS X. Once installed you will notice the F.lux switching screen gamma icon on left of Mac panel:

sleep better when using Mac laptop at night with F.lux

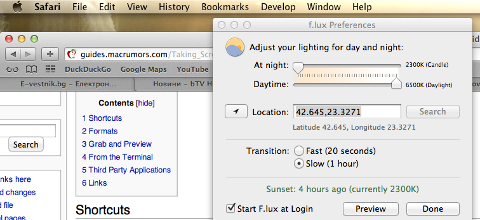
In F.lux configuration, by using Search button the program can automatically determine Geographic Location, however if you it fails to determine proper location and improperly sets the screen color gamma, you can manually set location coordinates. F.lux tunes screen color gamma accordingly to day or night and time in day. If it is night it makes the screen reddish, so eyes our eyes relax strain (stress) and our organism prepares to get to bed so once you're in bed it is easier for your brain to get asleep.

F.lux screenshot on Mac OS X Lion improve night sleep insomnia

Now here it is 23:37 at Night and F.lux smartly changed the color gamma accordingly to night mode (reddish) gamma. I've noticed on F.lux's website there is version for iPhone and iPad

Installing qmailmrtg (qmail graph statistics on qmail activity) on Debian Lenny

Monday, April 19th, 2010

1. First it’s necessery to have the mrtg debian package installed.
If it’s not installed then we have to install it:

debian-server:~# apt-get install mrtg

2. Second download the qmailmrtg source binary
To download the latest current source release of qmailmrtg execute:

debian-server:~# wget http://www.inter7.com/qmailmrtg7/qmailmrtg7-4.2.tar.gz

It’s a pity qmailmrtg is not available for download via debian repositories.

3. Third download the qmail.mrtg.cfg configuration file

debian-server~# wget https://www.pc-freak.net/files/qmail.mrtg.cfg

Now you have to put the file somewhere, usually it’s best to put it in the /etc/ directory.
Make sure the file is existing in /etc/qmail.mrtg.cfg
4. Untar compile and install qmailmrtg binary


debian-server:~# tar -xzvvf qmailmrtg7-4.2.tar.gz
...
debian-server:~# make && make install

strip qmailmrtg7
cp qmailmrtg7 /usr/local/bin
rm -rf *.o qmailmrtg7 checkq core
cc checkq.c -o checkq
./checkq
cc -s -O qmailmrtg7.c -o qmailmrtg7
qmailmrtg7.c: In function ‘main’:
qmailmrtg7.c:69: warning: incompatible implicit declaration of
built-in function ‘exit’
qmailmrtg7.c:93: warning: incompatible implicit declaration of
built-in function ‘exit’
qmailmrtg7.c:131: warning: incompatible implicit declaration of
built-in function ‘exit’
qmailmrtg7.c:137: warning: incompatible implicit declaration of
built-in function ‘exit’

5. Set proper file permissions according to the user you indent to execute qmailmrtg as
I personally execute it as root user, if you intend to do so as well set a permissions to
/etc/qmail.mrtg.cfg of 700.
In order to do that issue the command:

debian-server:~# chmod 700 /etc/qmail.mrtg.cfg

6. You will now need to modify the qmail.mrtg.cfg according to your needs
There you have to set a proper location where the qmailmrtg shall generate it’s html data files.
I use the /var/www/qmailmrtg qmailmrtg log file location. If you will do so as wellyou have to create the directory.

7. Create qmailmrtg html log files directory

debian-server:~# mkdir /var/log/qmailmrtg

8. Now all left is to set a proper cron line to periodically invoke qmailmrtg in order to generate qmail activity statistics.

Before we add the desired root’s crontab instructions we have to open the crontab for edit, using the command.

debian-server:~# crontab -u root -e

I personally use and recommend the following line as a line to be added to root’s crontab.

0-55/5 * * * * env LANG=C /usr/bin/mrtg /etc/qmail.mrtg.cfg > /dev/null
9. Copy index.html from qmailmrtg source directory to /var/log/qmailmrtg


debian-server:/usr/local/src/qmailmrtg7-4.2# cp -rpf index.html /var/log/qmailmrtg

10. Last step is to make sure Apache’s configuration contains lines that will enable you to access the qmail activity statistics.

The quickest way to do that in Debian running Apache 2.2 is to edit /etc/apache2/apache2.conf and add a directory Alias as follows

Alias /qmailmrtg/ "/var/www/qmailmrtg/"

Now after Apache restart /etc/init.d/apache2 restart
You should be now able to access the qmail mrtg qmail log statistics through your Apache’s default configured host.
For instance, assuming your default configured Apache host is domain.com. You’ll be able to reach the qmailmrtg statistics through an url like:

http://domain.com/qmailmrtg/

After I verified and ensured myself qmail mrtg is working correctly after all the above explained steps partook I wasn’t happy with some headlines in the index.html and the html tile of qmailmrtg,
so as a last step I manually edited the /var/www/qmailmrtg/index.html to attune it to my likings.

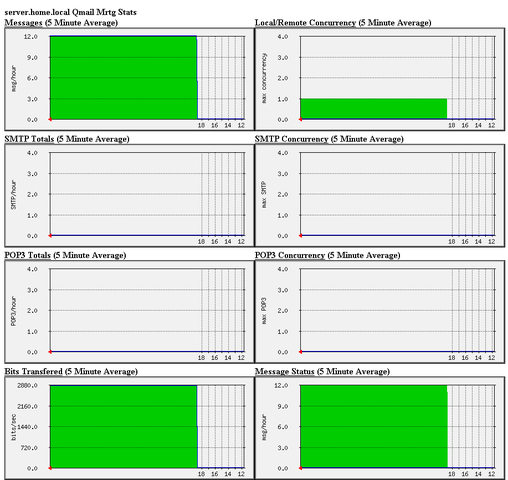
Here is a screenshot of the qmailmrtg web statistics in action.

qmail mrtg on debian lenny