Posts Tagged ‘debian package’

Installing the phpbb forum on Debian (Squeeze/Sid) Linux

Saturday, September 11th, 2010

howto-easily-install-phpbb-on-debian-gnu-linux

I've just installed the phpbb forum on a Debian Linux because we needed a goodquick to install communication media in order to improve our internal communication in a student project in Strategic HR we're developing right now in Arnhem Business School.

Here are the exact steps I followed to have a properly it properly instlled:

1. Install the phpbb3 debian package
This was pretty straight forward:

debian:~# apt-get install phpbb3

At this point of installation I've faced a dpkg-reconfigure phpbb deb package configuration issue:
I was prompted to pass in the credentials for my MySQL password right after I've selected the MySQL as my preferred database back engine.
I've feeded my MySQL root password as well as my preferred forum database name, however the database installation failed because, somehow the configuration procedure tried to connect to my MySQL database with the htcheck user.
I guess this has to be a bug in the package itself or something from my previous installation misconfigured the way the debian database backend configuration was operating.
My assumption is that my previously installed htcheck package or something beforehand I've done right after the htcheck and htcheck-php packages installation.

after the package configuration failed still the package had a status of properly installed when I reviewed it with dpkg
I've thought about trying to manually reconfigure it using the dpkg-reconfigure debian command and I gave it a try like that:

debian:~# dpkg-reconfigure phpbb3

This time along with the other fields I've to fill in the ncurses interface I was prompted for a username before the password prompted appeared.
Logically I tried to fill in the root as it's my global privileges MySQL allowed user.
However that didn't helped at all and again the configuration tried to send the credentials with user htcheck to my MySQL database server.
To deal with the situation I had to approach it in the good old manual way.

2. Manually prepare / create the required phpbb forum database

To completet that connected to the MySQL server with the mysql client and created the proper database like so:

debian:~# mysql -u root -p
mysql>
CREATE database phpbb3forum;

3. Use phpmyadmin or the mysql client command line to create a new user for the phpbb forum

Here since adding up the user using the phpmyadmin was a way easier to do I decided to go that route, anyways using the mysql cli is also an option.

From phpmyadmin It's pretty easy to add a new user and grant privileges to a certain database, to do so navigate to the following database:

Privileges -> -> Add a new user ->

Now type your User name: , Host , Password , Re-type password , also for a Host: you have to choose Local from the drop down menu.

Leave the Database for user field empty as we have already previously created our desired database in step 2 of this article

Now press the "Go" button and the user will get created.

Further after choose the Privileges menu right on the bottom of the page once again, select through the checkbox the username you have just created let's say the previously created user is phpbb3

Go to Action (There is a picture with a man and a pencil on the right side of this button

Scroll down to the page part saying Database-specific privileges and in the field Add privileges on the following database: fill in your previosly created database name in our case it's phpbb3forum

and then press the "Go" button once again.
A page will appear where you will have to select the exact privileges you would like to grant on the specific selected database.
For some simplicity just check all the checkbox to grant as many privilegs to your database as you could.
Then again you will have to press the "Go" button and there you go you should have already configured an username and database ready to go with your new phpbb forum.

4. Create a virtualhost if you would like to have the forum as a subdomain or into a separate domain

If you decide to have the forum on a separate sub-domain or domain as I did you will have to add some kind of Virtualhost into either your Apache configuration /etc/apache2/apache2.conf or into where officially the virutualhosts are laid in Debian Linux in /etc/apache2/sites-available
I've personally created a new file like for instance /etc/apache2/sites-available/mysubdomain.mydomain.com

Here is an example content of the new Virtualhost:

<VirtualHost *>
ServerAdmin admin-email@domain.com
ServerName mysubdomain.domain.com

# Indexes + Directory Root.
DirectoryIndex index.php index.php5 index.htm index.html index.pl index.cgi index.phtml index.jsp index.py index.asp

DocumentRoot /usr/share/phpbb3/www/

# Logfiles
ErrorLog /var/log/apache2/yourdomain/error.log
CustomLog /var/log/apache2/yourdomain/access.log combined
# CustomLog /dev/null combined
<Directory /usr/share/phpbb3/www/>
Options FollowSymLinks MultiViews -Includes ExecCGI
AllowOverride All
Order allow,deny
allow from all </Directory>
</VirtualHost>

In above Virtualhost just change the values for ServerAdmin , ServerName , DocumentRoot , ErrorLog , CustomLog and Directory declaration to adjust it to your situation.

5. Restart the Apache webserver for the new Virtualhost to take affect

debian:~# /etc/init.d/apache2 restart

Now accessing your http://mysubdomain.domain.com should display the installed phpbb3 forum
The default username and password for your forum you can use straight are:

username: admin
password: admin

So far so good you by now have the PHPBB3 forum properly installed and running, however if you try to Register a new user in the forum you will notice that it's impossible because of a terrible ugly message reading:

Sorry but this board is currently unavailable.

I've spend few minutes online to scrape through the forums before I can understand what I have to stop that annoying message from appearing and allow new users to register in the phpbb forum

The solution came natural and was a setting that had to be changed with the forum admin account, thus login as admin and look at the bottom of the page, below the text reading Powered by phpBB © 2000, 2002, 2005, 2007 phpBB Group you will notice a link with Administration Control Panel
just press there a whole bunch of menus will appear on the screen allowing you to do numerous things, however what you will have to do is go to
Board Settings -> Disable Board

and change the radio button there to say No

That's all now your forum will be ready to go and your users can freely register and if the server where the forum is installed has an already running mail server, they will receive an emails with a registration data concerning their new registrations in your new phpbb forum.
Cheers and Enjoy your new shiny phpbb Forum 🙂

How to install and configure djbdns from source as a Cachening Localhost Proxy resolver to increase resolving efficiency on Debian 6 Squeeze

Monday, August 1st, 2011

djbdns-logo-install-configure-djbdns-from-source-on-gnu-linux-to-accelerate-server-dns-resolving
It seems DjbDNS on Debian Squeeze has been not included as a Debian package. There is still possibility to install djbdns from an older deb package or install it from source. I however decided to install it from source as finding the old Debian package for Lenny and Etch takes time, plus I'm running an amd64 version of Debian and this might even more complicate the situation.
Installing it from source is not really a Debian way but at least it works.

In this article I assume that daemontools and ucspi-tcp are preliminary installed, if not one needs to install them with:

debian:~# apt-get install ucspi-tcp daemontools daemontools-run
...

The above two ones are required as DJBDNS is originally made to run through djb's daemontools.

Here is the exact step I took to have it installed as local caching DNS server on a Debian Squeeze server:

1. Download and untar DjbDNS

debian:~# wget -q http://cr.yp.to/djbdns/djbdns-1.05.tar.gz debian:~# tar -zxvvf djbdns-1.05.tar.gz
...

2. Add DjbDNS users to /etc/passwd

Creating the below two users is not arbitrary but it's recommendable.

echo 'dnscache:*:54321:54321:dnscache:/dev/null:/dev/null' >> /etc/passwd
echo 'dnslog:*:54322:54322:dnslog:/dev/null:/dev/null' >> /etc/passwd

3. Compile DJBDNS nameserver

First it's necessery to use the below echo command to work around a common Linux bug:

debian:~# cd djbdns-1.05
debian:/root/djbdns-1.05# echo gcc -O2 -include /usr/include/errno.h > conf-cc

Next let's make it:

debian:/root/djbdns-1.05# make

4. Install the compiled djbdns binaries

debian:/root/djbdns-1.05# make setup check
# here comes some long install related output

If no errors are produced by make setup check this means that the djbdns should have installed itself fine.

As installation is compileted it's a good idea to report about the newly installed DjbDNS server if running a mail server. This info is used by Dan Bernstein to gather statistical data about the number of installations of djbdns servers throughout the world.

5. Do some general configurations to the newly installed DJBDNS

Now let's copy the list of the IP addresses of the global DNS root servers in /etc/.

debian:/root/djbdns-1.05# cp -rpf dnsroots.global /etc/ debian:/root/djbdns-1.05# ./dnscache-conf dnscache dnslog /etc/dnscache 0.0.0.0

dnscache-conf will generate some default configuration files for djbdns in /etc/dnscache

Next allow the networks which should be able to use the just installed djbdns server as a caching server:

debian:/root/djbdns-1.05# cd /etc/dnscache/root/ip
debian:/etc/dnscache/root# touch 192.168.1
debian:/root/djbdns-1.05# touch 123.123

First command will allow all ips in range 192.168.1.* to be able to access the DNS server and the second command will allow all ips from 123.123.1-255.1-255 to be able to query the server.

Some further fine tunning can be done from the files:

/etc/dnscache/env/CACHESIZE and /etc/dnscache/env/DATALIMIT

As a last step, before it's running, we have to link the /etc/dnscache to daemontools like so:

debian:/root/djbdns-1.05# ln -sf /etc/dnscache /etc/service/dnscache

If the daemontools is not linked to be accessible via /etc/service it's also a good to link it there:

debian:~# ln -sf /etc/service /

Now the DJBDNS should be running fine, to test if it's running without errors through daemontools I used:

debian:~# ps ax|grep -i readproc
5358 pts/18 R+ 0:00 grep -i readproc
11824 ? S 0:00 readproctitle service errors: ...........

If no errors are displayed it's configured and running to also test if it's capable of resolving I used the host command:

debian:~# host www.pc-freak.net localhost
Using domain server:
Name: localhost
Address: 127.0.0.1#53
Aliases:

www.pc-freak.net has address 83.228.93.76
www.pc-freak.net mail is handled by 0 mail.www.pc-freak.net.

Now the DJBDNS is properly installed and if you test it for a while with time host somehost.com localhost , you will see how quick it is in resolving.

The advantage of running DJBDNS is it does not require almost no maintance, its rock solid and great just like all other Dan Bernstein's written software.
Enjoy 😉

Prism on Linux a way to turn any Web site location into a Desktop application

Wednesday, September 23rd, 2009

I was googling for some cool features to enrich my Google desktop while I found an applicaiton whichis said to be helpful.
It’s called Prism and is a Mozilla Lab experiment project. Actually it’s nothing special.
It creates a simple window in which it can visualize a website making it look exactly like your desktopapplications.
It has a couple of possiblities like creating a desktop icon for your website, enablesome kind of navigation keys, show status messages on what’s happening on the desktop embeded application andshow navigation bars.
The project is said to be a revolutionary next step towards integrating the webwith your desktop
. You can check out Prism’s website further on On mozilla’s prism website . It might be interesting for you to check out Prism in action before you might go for a try on Youtube here .
Prism is both available via Firefox extension or a desktop application both of which provides you with the describedabove prism functionality. As a Debian user you might wonder if prism is available as a debian package, well there is one
, even though it’s not a release part of the offician debian package distribution. If you’d like to test prismvia it’s debian package use the following prism deb package
,anyways the downside of using the 0.9 debian package is that you won’t be running prism’s latest release.
If you’d like to be running the latest prism version please download it from mozilla’s website.
Well enough talk let me tell you my personal view on Prism. It’s a COMPLETE BULLSHIT! 🙂 I don’t see how any geek wouldhave benefit of the app neither, how does it bridge in the web with the desktop.
It’s simply a crap that could takeof your daily lifetime to install and review 🙂
END—–

Create Easy Data Backups with Rsnapshot back-up tool on GNU / Linux

Monday, April 15th, 2013


rsnapshot Linux and FreeBSD easy data backup tool logo
Backing up information on Linux servers is essential part of routine system adminsitrator job. Thus I decided to write for those interested in how one can easily create backups of important data through a tiny tool called rsnapshot which I prior used to make periodic data incremental backups on few of Debian Linux servers I manage. In case you wonder why use rsnapshot and not just rsync – the reasons are 2.
a. Rsnapshot is very easy to configure and use and you don't need to have deep understanding on  rsync numerous options to use it.
b. Rsnapshot does support incremental data backups – saving a lot of disk space on backup host.


Mentioning  incremental data backups for some those term might be a news so I will in short explain here what is Incremental Data Backups?

Incremental Data Backups are such backups which only create new backup of system scheduled files to backup only whether there are changes in files to backup or new ones are added to directory/directories set to be routinely backed up. Incremental backups are often desirable as they consume minimum storage space and are quicker to perform than normal periodic whole data archiving (differential backups). rsync has also support for incremental backups but configuring it to do so takes time and requires extra time on reading and understanding how they work, so I personally prefer simplicity rsnapshot brings.

1. Installing rsnapshot with apt-get

Here is rsnapshot debian package description;

debian:~#  apt-cache show rsnapshot|grep -i description -A 5


Description: local and remote filesystem snapshot utility
 rsnapshot is an rsync-based filesystem snapshot utility. It can take
 incremental backups of local and remote filesystems for any number of
 machines. rsnapshot makes extensive use of hard links, so disk space is
 only used when absolutely necessary.
Homepage: http://www.rsnapshot.org/

As you can read from description, rsnapshot is a frontend command using rsync to make data backups.

Install of rsnapshot is done through;

 debian:~# apt-get install --yes rsnapshot

Reading package lists… Done
Building dependency tree      
Reading state information… Done
The following NEW packages will be installed:
  rsnapshot
0 upgraded, 1 newly installed, 0 to remove and 0 not upgraded.
Need to get 0 B/140 kB of archives.
After this operation, 598 kB of additional disk space will be used.
Selecting previously deselected package rsnapshot.
(Reading database … 87026 files and directories currently installed.)
Unpacking rsnapshot (from …/rsnapshot_1.3.1-1_all.deb) … –
Processing triggers for man-db …
Setting up rsnapshot (1.3.1-1) …

2. Rsnapshot  package content and Documentation

Once installed here is file content of rsnapshot deb package;

debian:~# dpkg -L rsnapshot


/.
/usr
/usr/share
/usr/share/doc-base
/usr/share/doc-base/rsnapshot
/usr/share/doc
/usr/share/doc/rsnapshot
/usr/share/doc/rsnapshot/TODO
/usr/share/doc/rsnapshot/changelog.gz
/usr/share/doc/rsnapshot/Upgrading_from_1.1.gz
/usr/share/doc/rsnapshot/examples
/usr/share/doc/rsnapshot/examples/rsnapshot.conf.default.gz
/usr/share/doc/rsnapshot/examples/utils
/usr/share/doc/rsnapshot/examples/utils/backup_mysql.sh
/usr/share/doc/rsnapshot/examples/utils/mysqlbackup.pl
/usr/share/doc/rsnapshot/examples/utils/random_file_verify.sh
/usr/share/doc/rsnapshot/examples/utils/rsnapreport.pl.gz
/usr/share/doc/rsnapshot/examples/utils/make_cvs_snapshot.sh
/usr/share/doc/rsnapshot/examples/utils/backup_pgsql.sh
/usr/share/doc/rsnapshot/examples/utils/rsnapshotdb
/usr/share/doc/rsnapshot/examples/utils/rsnapshotdb/CHANGES.txt
/usr/share/doc/rsnapshot/examples/utils/rsnapshotdb/rsnapshotDB.pl.gz
/usr/share/doc/rsnapshot/examples/utils/rsnapshotdb/INSTALL.txt
/usr/share/doc/rsnapshot/examples/utils/rsnapshotdb/TODO.txt
/usr/share/doc/rsnapshot/examples/utils/rsnapshotdb/rsnapshotDB.xsd
/usr/share/doc/rsnapshot/examples/utils/rsnapshotdb/rsnapshotDB.conf.sample
/usr/share/doc/rsnapshot/examples/utils/rsnapshotdb/README.txt
/usr/share/doc/rsnapshot/examples/utils/rsnapshot-copy
/usr/share/doc/rsnapshot/examples/utils/backup_rsnapshot_cvsroot.sh
/usr/share/doc/rsnapshot/examples/utils/backup_dpkg.sh
/usr/share/doc/rsnapshot/examples/utils/sign_packages.sh
/usr/share/doc/rsnapshot/examples/utils/mkmakefile.sh
/usr/share/doc/rsnapshot/examples/utils/rsnaptar
/usr/share/doc/rsnapshot/examples/utils/rsnapshot_invert.sh
/usr/share/doc/rsnapshot/examples/utils/rsnapshot_if_mounted.sh
/usr/share/doc/rsnapshot/examples/utils/README
/usr/share/doc/rsnapshot/examples/utils/debug_moving_files.sh
/usr/share/doc/rsnapshot/examples/utils/backup_smb_share.sh
/usr/share/doc/rsnapshot/README.gz
/usr/share/doc/rsnapshot/changelog.Debian.gz
/usr/share/doc/rsnapshot/copyright
/usr/share/doc/rsnapshot/README.Debian
/usr/share/doc/rsnapshot/html
/usr/share/doc/rsnapshot/html/rsnapshot-HOWTO.en.html
/usr/share/doc/rsnapshot/NEWS.Debian.gz
/usr/share/lintian
/usr/share/lintian/overrides
/usr/share/lintian/overrides/rsnapshot
/usr/share/man
/usr/share/man/man1
/usr/share/man/man1/rsnapshot.1.gz
/usr/share/man/man1/rsnapshot-diff.1.gz
/usr/bin
/usr/bin/rsnapshot-diff
/usr/bin/rsnapshot
/var
/var/cache
/var/cache/rsnapshot
/etc
/etc/cron.d
/etc/cron.d/rsnapshot
/etc/rsnapshot.conf
/etc/logrotate.d
/etc/logrotate.d/rsnapshot

To get basic idea, on rsnapshot and how it can be configured and run manually as well as how it can be set-up to run periodic via a cronjob README shipped with package is a good start point.

debian:~# zless /usr/share/doc/rsnapshot/README.gz
....

It is also useful to check program documentation in HTML, whether you have some text browser installed – i.e. lynx or links:

debian:~# links /usr/share/doc/rsnapshot/html/rsnapshot-HOWTO.en.html

Note that many of information in rsnapshot-HOWTO is related to how rsnapshot is installed manually from source, so for Deb based distro users reading these sections can be safely skipped. For Debian users hence it is useful to read howto from section 4.A onwards. man rsnapshot's Examle section is very good reading too as it gives a lot of use scenarios necessary in more complicated backup situations.

3. Configuring Rsnapshot – Setting Data Directories to Backup

Configuration of Rsnapshot is done through /etc/rsnapshot.conf file. There is plenty of comments in file, so opening in text editor and taking few minutes to read commented lines is necessery. Configuration options just like with most Linux tool config files is done through config directives, not commented.

debian:~# cat /etc/rsnapshot.conf |grep -v "#"|uniq


config_version    1.2

snapshot_root    /var/cache/rsnapshot/

cmd_rm        /bin/rm

cmd_rsync    /usr/bin/rsync

cmd_logger    /usr/bin/logger

interval    hourly    6
interval    daily    7
interval    weekly    4

verbose        2

loglevel    3

lockfile    /var/run/rsnapshot.pid

backup    /home/        localhost/
backup    /etc/        localhost/
backup    /usr/local/    localhost/


Above config options are clear to understand, there is interval of backups to set (hourly, daily, weekly), verbose level of rsnapshot backup operation log file, lockfile which will be used by rsnapshot to prevent duplicate rsnapshot runs and last backup directive in which you need to specify what needs to be backed up. In config file there is also commented variable for creating rsnapshot backup once a month

#interval   monthly 3

If you need to create backups once a month uncomment it.

In backup directive add all directories from filesystem which need to have routine backup, for example I keep my Apache Web server files in /var/www/, store various install software in
/root/

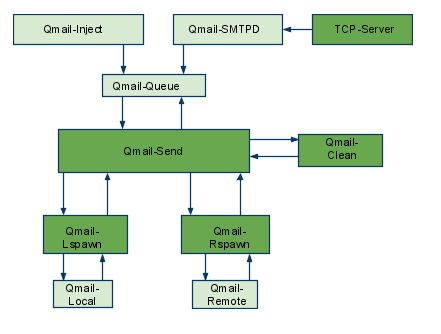
and keep backup of Qmail (Vpopmail) old emails kept in
/var/vpopmail
.
To make rsnapshot backup those I add after rest of backup directives:

backup  /var/www/   localhost/
backup  /var/vpopmail/  localhost/
backup  /root/  localhost/


It is good practice to change snapshot_root directive to /root/.backups or whether you prefer to keep snapshot_root to default /var/cache/rsnapshot at least link with ln command /root/.backups to -> /root/.backups.

debian:~# ln -sf /var/cache/rsnapshot /root/.backups

If you change snapshot_root to /root/.backups, don't forget to create /root/.backups and set chmod  dir persmissions only readable to owner, i.e.:

debian:~# mkdir /root/.rsnapshot
debian:~# chmod -R 700 /root/.backups

Note that, it is important to use tab delimiters, everywhere in /etc/rsnapshot.conf, if you use space key delimiter instead of Tab you will end up with errors preventing rsnapshot to run.

4. Testing rsnapshot configuration and launching it first time

I will say it once again use Tab key for delimiters in config. It was my mistake on first time Rsnapshot launch to use spaces to delimiter my config options, thus testing my configuration, rsnapshot print an error and failed:

debian:~# rsnapshot configtest


———————————————————
rsnapshot encountered an error! The program was invoked with these options: /usr/bin/rsnapshot configtest ———————————————————
ERROR: /etc/rsnapshot.conf on line 199: ERROR: backup /var/www/ localhost/
ERROR: ———————————————————
ERROR: Errors were found in /etc/rsnapshot.conf, ERROR: rsnapshot can not continue. If you think an entry looks right, make
ERROR: sure you don't have spaces where only tabs should be.  

After changing, Space delimiters with Tabs and re-running rsnapshot configtest if all fine you get:

debian:~# rsnapshot configtest
Syntax OK

Once all good with config to launch Rsnapshot do its first complete incremental data backup, to display what rsnapshot will backup and what exact rsync invocations will it use type:


debian:~# rsnapshot -t hourly

echo 5644 > /var/run/rsnapshot.pid
mv /var/cache/rsnapshot/hourly.2/ /var/cache/rsnapshot/hourly.3/
mv /var/cache/rsnapshot/hourly.1/ /var/cache/rsnapshot/hourly.2/
native_cp_al("/var/cache/rsnapshot/hourly.0", \
    "/var/cache/rsnapshot/hourly.1")
/usr/bin/rsync -a –delete –numeric-ids –relative –delete-excluded /home \
    /var/cache/rsnapshot/hourly.0/localhost/
/usr/bin/rsync -a –delete –numeric-ids –relative –delete-excluded /etc \
    /var/cache/rsnapshot/hourly.0/localhost/
/usr/bin/rsync -a –delete –numeric-ids –relative –delete-excluded \
    /usr/local /var/cache/rsnapshot/hourly.0/localhost/
/usr/bin/rsync -a –delete –numeric-ids –relative –delete-excluded \
    /var/www /var/cache/rsnapshot/hourly.0/localhost/
/usr/bin/rsync -a –delete –numeric-ids –relative –delete-excluded \
    /var/vpopmail /var/cache/rsnapshot/hourly.0/localhost/
/usr/bin/rsync -a –delete –numeric-ids –relative –delete-excluded /root \
    /var/cache/rsnapshot/hourly.0/localhost/
touch /var/cache/rsnapshot/hourly.0/

To launch backup first time manually:

debian:~# rsnapshot hourly

Depending on backupped data (Mega/Giga/Terabytes) size and the number of files which had to be backed up, backup takes from minutes to hours.
Note that it is always good idea to create backups on separate hard disk configured in some kind of RAID array, preferrably (RAID 1 or RAID 5). Creating backups on separate hard disk has numerous advantages, the most important one is it doesn't put too much Input / Output (I/O) stress on hard disk and thus will not create server downtimes on High traffic – Busy servers slow old Hard Disks or servers with Big amount of I/O HDD read/writes .

5. Enabling Rsnapshot to create backups via scheduled cron job

On package install Rsnapshot creates a skele file for running via cronjob in /etc/cron.d/rsnapshot.

debian:~# cat /etc/cron.d/rsnapshot


# This is a sample cron file for rsnapshot.
# The values used correspond to the examples in /etc/rsnapshot.conf.
# There you can also set the backup points and many other things.
#
# To activate this cron file you have to uncomment the lines below.
# Feel free to adapt it to your needs.

# 0 */4        * * *        root    /usr/bin/rsnapshot hourly
# 30 3      * * *        root    /usr/bin/rsnapshot daily
# 0  3      * * 1        root    /usr/bin/rsnapshot weekly
# 30 2      1 * *        root    /usr/bin/rsnapshot monthly
 

To make hourly, daily, weekly, monthly backup uncomment one of above 4 lines. For paranoid admins scared to loose even a bit of data, hourly data is a good solution. For me personally I prefer configuring weekly backups for the reason I routinely monitor servers – keeping an eye regularly on dmesg and checking Linux smard / smartmontools logs to find out whether a hard disk or RAID has bad blocks

6. Checking backup size / backup difference and backup structure

Checking size of backups can be done by using standard du command on backup directory:

debian:~# du -hsc /var/cache/rsnapshot/*
4.3G /var/cache/rsnapshot/hourly.0
4.5M /var/cache/rsnapshot/hourly.1
68M /var/cache/rsnapshot/hourly.2
4.4G total

rsnapshot also has du argument via which backup size can be viewed:

debian:~# rsnapshot du 4.3G /var/cache/rsnapshot/hourly.0/
4.5M /var/cache/rsnapshot/hourly.1/
68M /var/cache/rsnapshot/hourly.2/
4.4G total

As you can see each new incremental backup is with new number after hourly{0,1,2} etc.

To check difference between two different backups:

debian:~# rsnapshot diff /var/cache/rsnapshot/hourly.0/ /var/cache/rsnapshot/hourly.1/
Comparing /var/cache/rsnapshot/hourly.1 to /var/cache/rsnapshot/hourly.0
Between /var/cache/rsnapshot/hourly.1 and /var/cache/rsnapshot/hourly.0:
660 were added, taking 3728377727 bytes;
492 were removed, saving 17623 bytes;

Structure of backed up files is identical to normal copy of files without any compression:

debian:~# cd /root/.backups/hourly.0/localhost/
debian:~/.backups/hourly.0/localhost# ls

etc/ home/ root/ usr/ var/


7. Restoing files or directory from rsnapshot backup

To restore lets say /var directory cd into it:

debian:~/.backups/hourly.0/localhost# cd var
debian:~/.backups/hourly.0/localhost/var#

Then use rsync as follows:

debian:~/.backups/hourly.0/localhost/var# rsync -avr * /


8. Creating rsnapshot backups from remote server via SSH protocol

In /etc/rsnapshot.conf you should have set SSH port on which remote server is accepting SSH connections. Standard port is 22, however it is wise to configure on backup server SSH to listen to some other non standard port.

In config variables to look on are:

ssh_args -p 22

and

Onwards to enable remote login via ssh uncomment in /etc/rsnapshot.conf :

# cmd_ssh /usr/bin/ssh

to

cmd_ssh /usr/bin/ssh

Before starting rsnapshot to create backups on remote host2 you need to Configure automatic SSH passwordless login by generating DSA or RSA key pair between host1 and host2. Where host1 is machine on which rsnapshot is run and to which backups will be copied from host2
Once passwordless ssh to remote host is active, to force rsnapshot create backups from host1 you will need to add near end of /etc/rsnapshot.conf .

backup  root@host2.com:/root/ host2.com/

The same way you can add a number of remote hosts from which periodic backups will be created to central host1. Only condition is on each node – host3, host4, host5.

backup  root@host3.com:/root/root/ host3.com
backup  root@host4.com:/home/ host4.com
backup  root@host4.com:/var/ host4.com

To create on host1 public key (id_dsa.pub) file with command:

debian:~# ssh-keygen -t dsa
...
....
debian:~# ssh-copy-id -i ~/.ssh/id_dsa.pub root@host3

Once all hosts that needs to get backed up to central backup host – host1. To test if backups gets uploaded manually issue:

debian:~# rsnapshot -v hourly
...

Rsnapshot has a number of other scripts which can be easily integrated with it in /usr/share/doc/rsnapshot/examples/utils.
Inside you can find example scripts on how to create MySQL / PostgreSQL database backup, Samba Share backups, backup CVS repositories and so on. The scripts can be easily modified and work with mostly any data or protocol with a bit of tweaking. Short description of each of example scripts can be found in /usr/share/doc/rsnapshot/examples/utils/README

AEWAN – a nice advanced GNU / Linux console ASCII art text editor

Saturday, May 19th, 2012

I'm a guy fascinated by ASCII art, since the very early days I saw a piece of this awesome digital art.

As time passed and computers went to be used mostly  graphics resolution, ASCII art loose its huge popularity from the early DOS and BBS (internet primordial days).

However, this kind  of art is still higly valued by true computer geeks.
In that manner of thoughts, lately I'm researching widely on ASCII art tools and ASCII art open source tools available for Linux.
Last time I check what is available for 'ASCII job' was before 5 years time. Recently I decided to review once again and see if there are new software for doing ascii manipulations on Linux and this is how this article got born.

My attention was caught by aewan (ASCII-art Editor Without A Name), while searching for ASCII keyword description packages with:

apt-cache search ascii

Aewan project official website is on sourceforge check it out here

Here is the complete description of the Debian package:

hipo@noah:~$ apt-cache show aewan|grep -i description -A 5
Description: ASCII-art Editor Without A Name
aewan is an ASCII art editor with support for multiple layers that can be
edited individually, colors, rectangular copy and paste, and intelligent
horizontal and vertical flipping (converts '\' to '/', etc). It produces
both stand-alone art files and an easy-to-parse format for integration
into your terminal applications.

I installed it to give it a try:

noah:~# apt-get --yes install aewan
Selecting previously deselected package aewan.
(Reading database ... 388522 files and directories currently installed.)
Unpacking aewan (from .../aewan_1.0.01-3_amd64.deb) ...
Processing triggers for man-db ...
Setting up aewan (1.0.01-3) ...

aewan package provides three executable binaries:

noah:~# dpkg -L aewan|grep -i /bin/ /usr/bin/aecat
/usr/bin/aewan
/usr/bin/aemakeflic

1. aewan binary is the ascii-art editor itself

2. aecat is utility to display an aewan documents (aewan format saved files)3. aemakeflictool to produce an animation from an aewan document

Next I ran it in plain console tty  to check how it is like:

hipo@noah:~$ aewan

Below are screenshots to give you an idea how powerful aewan ASCII art editor is:

AEWAN ASCII art editor entry information screen Debian GNU / Linux shot

Aewan immediate entry screen after start up

Aewan ASCII art editor Linux showing the major functionality of aewan on Debian GNU / Linux Squeeze

Aewan ASCII art editor – all of the supported tool functions

As you can see from the shot the editor is very feature rich. I was stunned to find out it even supports layers (in ASCII!!) (w0w!). 
It even has a Layers Manager (like GIMP) 🙂

To create my first ASCII art I used the:

New

menu.

This however didn't immediately show the prompt, where I can type  the ascii characters to draw my picture. In order to be able to draw inside the editor, its necessary to open at least one layer, through using the menu:

Add Layer (defaults)

then the interactive ASCII art editor appeared.

While an ASCII art is created with the editor you can select the color of the input characters by using Drawing Color menu seen in the above screenshot.

aewan drawing color choose color Linux shot

I've played few minutes and created a sample ascii art, just to test the color and editor "look & feel", my conclusions are the editor chars drawing is awesome.

Aewan ascii art produced on my Debian GNU / Linux host

All the commands available via menus are also accessible via a shortcut key combinations:

Aewan Linux Ascii art editor quick key shortcut commands

aewan controls are just great and definitely over-shadows every other text editor I used to draw an ASCII art so far.
Once saved the ASCII art, are by default saved in a plain gzipped ascii text. You can therefore simply zcat the the saves;
Don't expect zcat to show you the ascii as they're displayed in aewan, zcat-ing it will instead  display just the stored meta data; the meta data is interpreted and displayed properly only with aecat command.

aewan aecat displaying properly previously saved ascii art picture

I've checked online for rpm builds too and such are available, so installing on Fedora, CentOS, SuSE etc. is up to downloading the right distro / hardware architecture rpm package and running:

# rpm -ivh aewan*.rpm

On the official website, there are also instructions to compile from source, Slackware users and users of other distros which doesn't have a package build should compile manually with the usual:

$ tar -zxf aewan-1.0.01.tar.gz
$ cd aewan-1.0.01
$ ./configure
$ make
$ su -c "make install"

For those inrested to make animations with aemakeflic you need to first save a multiple layers of pictures. The idea of creating ASCII art video is pretty much like the old school way to make animation "draw every scene" and movie it. Once all different scene layers of the ASCII art animation are prepared one could use  aemakeflic to export all the ASCII layers as common video.

aemakeflic has the ability to export the ASCII animation in a runnable shell script to display the animation. The other way aemakeflic can be used is to produce a picture in kind of text format showing the video whether seen with  less cmd.
Making ASCII animation takes a lot of time and effort. Since i'm too lazy and I lack the time I haven't tested this functionality. Anyways I've seen some ascii videos on telnet  to remote hosts (some past time); therefore I guess they were made using aewan and later animated with aemakeflic.

I will close this post with a nice colorful ASCII art, made with aewan (picture is taken from the project page):

Aewan Flipping Selection Screenshot
 

How to fix a broken QMAIL queue with queue-repair and qmhandle

Friday, May 27th, 2011

How qmail works, qmail queue picture :)

The aim of this small post is to give just a brief idea of how I fix my qmail server after breaking it or in case it is broken after mail bomb attacks, etc.

Most common cases when I break my qmail queue myself, are after I’m implementing some new patches and reinstall parts of the qmail server with a patched version of default qmail binaries.
On other occasions, I simply used the qmailctl to start or stop the server as a part of some routine tasks necessery for the administration of the qmail server.

Everybody who has already experience with qmail should have experienced, that qmail is very fragile and could break even with a simple changes, though if it works once it’s rock solid piece of mail servant.

Below I explain few ways I used through my days as a qmail sys admin to deal with broken or messed queues.

1. Fixing a broken qmail queue using automatic tools There are few handy tools which in most cases are able to solve issues with the queue, one very popular one isqueue-repair – check http://pyropus.ca/software/queue-repair/.
Installation of qmail-repair is dead easy, but it needs to be installed from source as no official debian package is available:

linux:/usr/local/src# wget http://pyropus.ca/software/queue-repair/queue-repair-0.9.0.tar.gz
linux:/usr/local/src# tar -xzvvf queue-repair-0.9.0.tar.gzdrwxr-xr-x charlesc/qcc 0 2003-10-22 16:54 queue-repair-0.9.0/
-rw-r--r-- charlesc/qcc 268 2003-10-22 16:54 queue-repair-0.9.0/TODO
-rw-r--r-- charlesc/qcc 1700 2003-10-22 16:54 queue-repair-0.9.0/CHANGELOG
-rw-r--r-- charlesc/qcc 18007 2003-10-22 16:54 queue-repair-0.9.0/COPYING
-rw-r--r-- charlesc/qcc 1098 2003-10-22 16:54 queue-repair-0.9.0/BLURB
-rwxr-xr-x charlesc/qcc 26286 2003-10-22 16:54 queue-repair-0.9.0/queue_repair.py

To check if there are issues fixable within the qmail queue it’s as easy as:

linux:/usr/local/src# cd queue-repair-0.9.0
linux:/usr/local/src/queue-repair-0.9.0# ./queue-repair -t
...
checking files...
checking queue/mess files...
checking split locations...

The tool will walk through the mail sub-directories containing mail queued files in /var/qmail/queue and will list any issues found.
It’s recommended that the qmail server is stopped before any queue modify operations are issued on the server:

linux:/usr/local/src# qmailctl stop
...

Further on in order to solve any found issues with the queue, there is the “-r”/repair option:

linux:/usr/local/src/queue-repair-0.9.0# ./queue-repair -r
...

Another tool which comes handy whether a repair of a messed qmail queue is needed is qmhandlehttp://sourceforge.net/projects/qmhandle/

The use of qmhandle is also pretty easy, all one has to do is to follow the usual classical steps of a download the source & compile:

linux:/usr/local/src# wget https://www.pc-freak.net/files/qmhandle-1.3.2.tar.gz
linux:/usr/local/src# tar -zxvvf qmhandle-1.3.2
...
linux:/usr/local/src# cd qmhandle-1.3.2

Once again it’s necessery that the qmail server is stopped via its init script before qmHandle tool is used, e.g.:

linux:~# qmailctl stop
...

There is a difference between qmail queue repair tool and qmail handle , while qmail queue-repair tool is used to fix improper permissions of queued files with the qmail queue, qmhandle ‘s application is to completely delete the stored mail contents of a broken queue.

Deleting all the qmail queue content is in some cases the only option to fix the queue.
Often such a drastic measure is required after a heavy mail server overload, let’s say a result of spammers or caused by virus infected mail users which send a massive amounts of spam mails.

Thus at many cases when queue-repair was unable to solve a queue mess, I use qmhandble and sacrifice all the queued emails by completely wiping them out like so:

linux:/usr/local/src/qmhandle-1.3.2# ./qmhandle -D
...

Above command would eradicate all queued emails. Hopefully after the qmail server gets launched again with qmailctl start all the mail server operations should be back to normal.

Note that the use of qmhandle’s queue delete capabilities is pretty dangerous, if you forgot to stop the qmail server before issuing the above command!

Note that in order to use both qmHandle and queue-repair tools you will need to install python interpreter as both of the tools are written in python.

To check what is currently in the queue in Qmail, there are also native tools available, as you should probably know if you have dealt with qmail, e.g.:

debian:~# qmail-qstat
messages in queue: 2
messages in queue but not yet preprocessed: 0

Often when there are problems with Qmail and more specificly with qmail server queue the qmail-qstat command does show messages in queue, however when an attempt to check what kind of messages are in the queue with qmail-qread no messages are shown, for instance below you see an example of that, even though qmail-qstat claims 2 messages are in the queue, qmail-qread is unable to list the messages:

debian:~# qmail-qread
debian:~#

If all is fine with qmail queue above’s qmail-qread command should have returned something similar to:

debian:~# qmail-qread
26 May 2011 07:46:47 GMT #659982 3517 <hipo@www.pc-freak.net>
remote somemail@gmail.nl
26 May 2011 07:46:47 GMT #659983 3517 <hipo@www.pc-freak.net>

2. Fixing qmail queue manually This is very dangerous initiative, so before you try anything, make sure that you know what you’re doing, the possibility that you make the situation worst if you attempt to tamper manually the qmail queue is quite high 🙂

However if you’re still convinced to try fixing it manually, take a look at /var/qmail/queue it’s very likely that there are permission issues with some of the queued files, in order to fix the situation it’s necessery that the following directories:

/var/qmail/queue/mess/
/var/qmail/queue/remote/
/var/qmail/queue/bounce
/var/qmail/queue/info

gets explored with midnight commander / mc or some kind of convenient file explorer.

If there are queued files owned by users different from qmailq and user group qmail , for instance if owned by the root user, a simple chown qmailq:qmail to the wrong permissions file, should be able to resolve the issues.

Apart from all I explain above, there are many other ways suggested online on howto clean a qmail queue, one very popular one is using James’s qfixq shell script.

This script as of this very date is not working on Debian based systems, the script is dedicated initially to run on Fedora and Redhat based Linuces

Moreover myy experience with qfixq was never successful.

One very important note which is often a cause of many problems, is always make sure you stop and start the qmail server with an interval of at least of 10 seconds.

I’ve managed many servers which after an immediate (undelayed) qmailctl stop and qmailctl start was unable to run the whole engine of the qmail server (and either email sending or email receiving was not properly working) afterwards.

In that cases many weird behaviours are common, consider this seriously if you deal with the qmail-queue, it might happen that even if you have fixed your qmail queue, after a restart the qmail might breaks up.
I’ve experienced this kind of oddities numerous times, thus when I do changes to qmail I always make sure I restart the server a couple of times (at least 5 times 😉 ) always with a good delay between the HUPs.

And as always with qmail prayer is always needed, this server is complex, you never know what will happen next 🙂

Abe’s Amazing Adventure, A Dangerous Dave 2 like GNU Linux / FreeBSD Arcade Game substitute

Wednesday, December 14th, 2011

Abe's Amazing Adventure Game menu screenshot, A Dangerous Dave like Linux arcade game
While looking over the installable packages in System -> Administration -> Software Center on my my Debian powered notebook, I’ve accidently rolled over a game called Abe’s Amazing Adventure , as a big oldschool arcade game fan, I’ve immediately clicked on Install being impatient to see the overall game atmosphere and gameplay as well as storyline.

Abe’s Amazing Adventure is available under the debian package name abe and can be installed by issuing:

debian:~# apt-get install abe I was pleasently surprised to find out the gameplay and the overall game feels like the golden classical arcade game Dangerous Dave

For youngsters who never played the amazing absolute killing arcade ! as well as for people who feel nostalgic about Dangerous Dave 2 here is a nice gameplay screenshot:

Dangerous Dave 2 screenshot

Here is also a screenshot of Abe’s Amazing Adventure gameplay:

Abes Amazing Adventure Dangerous Dave like Linux / BSD Arcade Game like screenshot

You can see the great resemblense between the two games even by the screenshot; In both games you have to collect keys to open doors and diamonds which gives you points. Of course there are some differences as you can see Abe’s Amazing Adventure ‘s graphics has some additional items like Baloons with which your main character can fly over distances (for a limited time). There is also more diversity in the enemy types you face on the road to unlock the different doors. The game has also a red stars which while taken saves the game so if you quit the game on next game load up starting the game automatically starts you from the last save point.

Abes Amazing Adventure Star gameplay Screenshot on Debian

The ( 6 ) baloons seen in the screenshot on the left upper corner can be used occasionally to fly some distance by pressing Enter .
There are health recovery kits one can take to recover, some health damaged by hitting obstacles on the way.
The game story is short but entertaining, just like the general game feel:

Abes amazing adventure game story
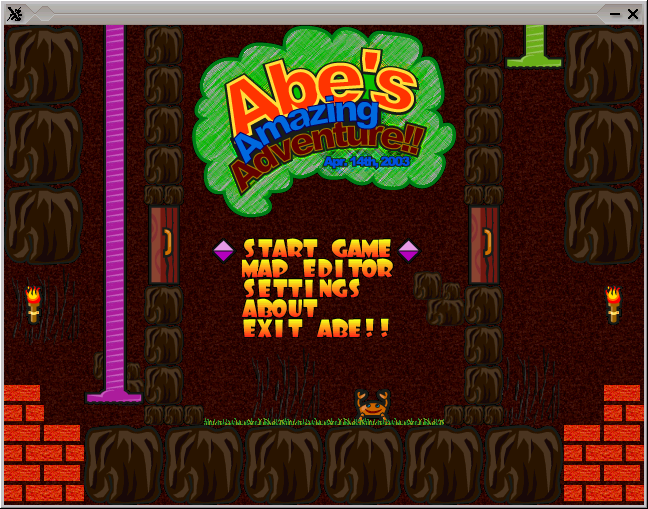
The game music is relaxing and more or less in the spirit of arcade games, the keyboard interactivety is pretty good as well.One thing I see can be improved to make the game better are the graphics, they’re a bit childish and too cubical, where sometimes some more general characters and obstacles animation will give the game a better look. Anyways for the year 2003 and for a free software arcade the game is not bad. For children and growing kids the game is just perfect, even for big kids like me its good to spend an hour of jump and run fun 😉

Installing qmailmrtg (qmail graph statistics on qmail activity) on Debian Lenny

Monday, April 19th, 2010

1. First it’s necessery to have the mrtg debian package installed.
If it’s not installed then we have to install it:

debian-server:~# apt-get install mrtg

2. Second download the qmailmrtg source binary
To download the latest current source release of qmailmrtg execute:

debian-server:~# wget http://www.inter7.com/qmailmrtg7/qmailmrtg7-4.2.tar.gz

It’s a pity qmailmrtg is not available for download via debian repositories.

3. Third download the qmail.mrtg.cfg configuration file

debian-server~# wget https://www.pc-freak.net/files/qmail.mrtg.cfg

Now you have to put the file somewhere, usually it’s best to put it in the /etc/ directory.
Make sure the file is existing in /etc/qmail.mrtg.cfg
4. Untar compile and install qmailmrtg binary


debian-server:~# tar -xzvvf qmailmrtg7-4.2.tar.gz
...
debian-server:~# make && make install

strip qmailmrtg7
cp qmailmrtg7 /usr/local/bin
rm -rf *.o qmailmrtg7 checkq core
cc checkq.c -o checkq
./checkq
cc -s -O qmailmrtg7.c -o qmailmrtg7
qmailmrtg7.c: In function ‘main’:
qmailmrtg7.c:69: warning: incompatible implicit declaration of
built-in function ‘exit’
qmailmrtg7.c:93: warning: incompatible implicit declaration of
built-in function ‘exit’
qmailmrtg7.c:131: warning: incompatible implicit declaration of
built-in function ‘exit’
qmailmrtg7.c:137: warning: incompatible implicit declaration of
built-in function ‘exit’

5. Set proper file permissions according to the user you indent to execute qmailmrtg as
I personally execute it as root user, if you intend to do so as well set a permissions to
/etc/qmail.mrtg.cfg of 700.
In order to do that issue the command:

debian-server:~# chmod 700 /etc/qmail.mrtg.cfg

6. You will now need to modify the qmail.mrtg.cfg according to your needs
There you have to set a proper location where the qmailmrtg shall generate it’s html data files.
I use the /var/www/qmailmrtg qmailmrtg log file location. If you will do so as wellyou have to create the directory.

7. Create qmailmrtg html log files directory

debian-server:~# mkdir /var/log/qmailmrtg

8. Now all left is to set a proper cron line to periodically invoke qmailmrtg in order to generate qmail activity statistics.

Before we add the desired root’s crontab instructions we have to open the crontab for edit, using the command.

debian-server:~# crontab -u root -e

I personally use and recommend the following line as a line to be added to root’s crontab.

0-55/5 * * * * env LANG=C /usr/bin/mrtg /etc/qmail.mrtg.cfg > /dev/null
9. Copy index.html from qmailmrtg source directory to /var/log/qmailmrtg


debian-server:/usr/local/src/qmailmrtg7-4.2# cp -rpf index.html /var/log/qmailmrtg

10. Last step is to make sure Apache’s configuration contains lines that will enable you to access the qmail activity statistics.

The quickest way to do that in Debian running Apache 2.2 is to edit /etc/apache2/apache2.conf and add a directory Alias as follows

Alias /qmailmrtg/ "/var/www/qmailmrtg/"

Now after Apache restart /etc/init.d/apache2 restart
You should be now able to access the qmail mrtg qmail log statistics through your Apache’s default configured host.
For instance, assuming your default configured Apache host is domain.com. You’ll be able to reach the qmailmrtg statistics through an url like:

http://domain.com/qmailmrtg/

After I verified and ensured myself qmail mrtg is working correctly after all the above explained steps partook I wasn’t happy with some headlines in the index.html and the html tile of qmailmrtg,
so as a last step I manually edited the /var/www/qmailmrtg/index.html to attune it to my likings.

Here is a screenshot of the qmailmrtg web statistics in action.

qmail mrtg on debian lenny