Posts Tagged ‘amp’

How to automate open xen Hypervisor Virtual Machines backups shell script

Tuesday, June 22nd, 2021

openxen-backup-logo As a sysadmin that have my own Open Xen Debian Hypervisor running on a Lenovo ThinkServer few months ago due to a human error I managed to mess up one of my virtual machines and rebuild the Operating System from scratch and restore files service and MySQl data from backup that really pissed me of and this brought the need for having a decent Virtual Machine OpenXen backup solution I can implement on the Debian ( Buster) 10.10 running the free community Open Xen version 4.11.4+107-gef32c7afa2-1. The Hypervisor is a relative small one holding just 7 VM s:

HypervisorHost:~#  xl list
Name                                        ID   Mem VCPUs      State   Time(s)
Domain-0                                     0 11102    24     r—–  214176.4
pcfrxenweb                                  11 12288     4     -b—-  247425.5
pcfrxen                                     12 16384    10     -b—-  1371621.4
windows7                                    20  4096     2     -b—-   97887.2
haproxy2                                    21  4096     2     -b—-   11806.9
jitsi-meet                                  22  2048     2     -b—-   12843.9
zabbix                                      23  2048     2     -b—-   20275.1
centos7                                     24  2040     2     -b—-   10898.2

HypervisorHost:~# xl list|grep -v 'Name ' |grep  -v 'Domain-0'  |wc -l
7


The backup strategy of the script is very simple to shutdown the running VM machine, make a copy with rsync to a backup location the image of each of the Virtual Machines in a bash shell loop for each virtual machine shown in output of xl command and backup to a preset local directory in my case this is /backups/ the backup of each virtual machine is produced within a separate backup directory with a respective timestamp. Backup VM .img files are produced in my case to mounted 2x external attached hard drives each of which is a 4 Terabyte Seagate Plus Backup (Storage). The original version of the script was made to be a slightly different by Zhiqiang Ma whose script I used for a template to come up with my xen VM backup solution. To prevent the Hypervisor's load the script is made to do it with a nice of (nice -n 10) this might be not required or you might want to modify it to better suit your needs. Below is the script itself you can fetch a copy of it /usr/sbin/xen_vm_backups.sh :

#!/bin/bash

# Author: Zhiqiang Ma (http://www.ericzma.com/)
# Modified to work with xl and OpenXen by Georgi Georgiev – https://pc-freak.net
# Original creation dateDec. 27, 2010
# Script takes all defined vms under xen_name_list and prepares backup of each
# after shutting down the machine prepares archive and copies archive in externally attached mounted /backup/disk1 HDD
# Latest update: 08.06.2021 G. Georgiev – hipo@pc-freak.net

mark_file=/backups/disk1/tmp/xen-bak-marker
log_file=/var/log/xen/backups/bak-$(date +%Y_%m_%d).log
err_log_file=/var/log/xen/backups/bak_err-$(date +%H_%M_%Y_%m_%d).log
xen_dir=/xen/domains
xen_vmconfig_dir=/etc/xen/
local_bak_dir=/backups/disk1/tmp
#bak_dir=xenbak@backup_host1:/lhome/xenbak
bak_dir=/backups/disk1/xen-backups/xen_images/$(date +%Y_%m_%d)/xen/domains
#xen_name_list="haproxy2 pcfrxenweb jitsi-meet zabbix windows7 centos7 pcfrxenweb pcfrxen"
xen_name_list="windows7 haproxy2 jitsi-meet zabbix centos7"

if [ ! -d /var/log/xen/backups ]; then
echo mkdir -p /var/log/xen/backups
 mkdir -p /var/log/xen/backups
fi

if [ ! -d $bak_dir ]; then
echo mkdir -p $bak_dir
 mkdir -p $bak_dir

fi


# check whether bak runned last week
if [ -e $mark_file ] ; then
        echo  rm -f $mark_file
 rm -f $mark_file
else
        echo  touch $mark_file
 touch $mark_file
  # exit 0
fi

# set std and stderr to log file
        echo mv $log_file $log_file.old
       mv $log_file $log_file.old
        echo mv $err_log_file $err_log_file.old
       mv $err_log_file $err_log_file.old
        echo "exec 2> $err_log_file"
       exec 2> $err_log_file
        echo "exec > $log_file"
       exec > $log_file


# check whether the VM is running
# We only backup running VMs

echo "*** Check alive VMs"

xen_name_list_tmp=""

for i in $xen_name_list
do
        echo "/usr/sbin/xl list > /tmp/tmp-xen-list"
        /usr/sbin/xl list > /tmp/tmp-xen-list
  grepinlist=`grep $i" " /tmp/tmp-xen-list`;
  if [[ “$grepinlist” == “” ]]
  then
    echo $i is not alive.
  else
    echo $i is alive.
    xen_name_list_tmp=$xen_name_list_tmp" "$i
  fi
done

xen_name_list=$xen_name_list_tmp

echo "Alive VM list:"

for i in $xen_name_list
do
   echo $i
done

echo "End alive VM list."

###############################
date
echo "*** Backup starts"

###############################
date
echo "*** Copy VMs to local disk"

for i in $xen_name_list
do
  date
  echo "Shutdown $i"
        echo  /usr/sbin/xl shutdown $i
        /usr/sbin/xl shutdown $i
        if [ $? != ‘0’ ]; then
                echo 'Not Xen Disk image destroying …';
                /usr/sbin/xl destroy $i
        fi
  sleep 30

  echo "Copy $i"
  echo "Copy to local_bak_dir: $local_bak_dir"
      echo /usr/bin/rsync -avhW –no-compress –progress $xen_dir/$i/{disk.img,swap.img} $local_bak_dir/$i/
     time /usr/bin/rsync -avhW –no-compress –progress $xen_dir/$i/{disk.img,swap.img} $local_bak_dir/$i/
      echo /usr/bin/rsync -avhW –no-compress –progress $xen_vmconfig_dir/$i.cfg $local_bak_dir/$i.cfg
     time /usr/bin/rsync -avhW –no-compress –progress $xen_vmconfig_dir/$i.cfg $local_bak_dir/$i.cfg
  date
  echo "Create $i"
  # with vmmem=1024"
  # /usr/sbin/xm create $xen_dir/vm.run vmid=$i vmmem=1024
          echo /usr/sbin/xl create $xen_vmconfig_dir/$i.cfg
          /usr/sbin/xl create $xen_vmconfig_dir/$i.cfg
## Uncomment if you need to copy with scp somewhere
###       echo scp $log_file $bak_dir/xen-bak-111.log
###      echo  /usr/bin/rsync -avhW –no-compress –progress $log_file $local_bak_dir/xen-bak-111.log
done

####################
date
echo "*** Compress local bak vmdisks"

for i in $xen_name_list
do
  date
  echo "Compress $i"
      echo tar -z -cfv $bak_dir/$i-$(date +%Y_%m_%d).tar.gz $local_bak_dir/$i-$(date +%Y_%m_%d) $local_bak_dir/$i.cfg
     time nice -n 10 tar -z -cvf $bak_dir/$i-$(date +%Y_%m_%d).tar.gz $local_bak_dir/$i/ $local_bak_dir/$i.cfg
    echo rm -vf $local_bak_dir/$i/ $local_bak_dir/$i.cfg
    rm -vrf $local_bak_dir/$i/{disk.img,swap.img}  $local_bak_dir/$i.cfg
done

####################
date
echo "*** Copy local bak vmdisks to remote machines"

copy_remote () {
for i in $xen_name_list
do
  date
  echo "Copy to remote: vm$i"
        echo  scp $local_bak_dir/vmdisk0-$i.tar.gz $bak_dir/vmdisk0-$i.tar.gz
done

#####################
date
echo "Backup finishes"
        echo scp $log_file $bak_dir/bak-111.log

}

date
echo "Backup finished"


Things to configure before start using using the script to prepare backups for you is the xen_name_list variable

#  directory skele where to store already prepared backups
bak_dir=/backups/disk1/xen-backups/xen_images/$(date +%Y_%m_%d)/xen/domains

# The configurations of the running Xen Virtual Machines
xen_vmconfig_dir=/etc/xen/
# a local directory that will be used for backup creation ( I prefer this directory to be on the backup storage location )
local_bak_dir=/backups/disk1/tmp
#bak_dir=xenbak@backup_host1:/lhome/xenbak
# the structure on the backup location where daily .img backups with be produced with rsync and tar archived with bzip2
bak_dir=/backups/disk1/xen-backups/xen_images/$(date +%Y_%m_%d)/xen/domains

# list here all the Virtual Machines you want the script to create backups of
xen_name_list="windows7 haproxy2 jitsi-meet zabbix centos7"

If you need the script to copy the backup of Virtual Machine images to external Backup server via Local Lan or to a remote Internet located encrypted connection with a passwordless ssh authentication (once you have prepared the Machines to automatically login without pass over ssh with specific user), you can uncomment the script commented section to adapt it to copy to remote host.

Once you have placed at place /usr/sbin/xen_vm_backups.sh use a cronjob to prepare backups on a regular basis, for example I use the following cron to produce a working copy of the Virtual Machine backups everyday.
 

# crontab -u root -l 

# create windows7 haproxy2 jitsi-meet centos7 zabbix VMs backup once a month
00 06 1,2,3,4,5,6,7,8,9,10,11,12 * * /usr/sbin/xen_vm_backups.sh 2>&1 >/dev/null


I do clean up virtual machines Images that are older than 95 days with another cron job

# crontab -u root -l

# Delete xen image files older than 95 days to clear up space from backup HDD
45 06 17 * * find /backups/disk1/xen-backups/xen_images* -type f -mtime +95 -exec rm {} \; 2>&1 >/dev/null

#### Delete xen config backups older than 1 year+3 days (368 days)
45 06 17 * * find /backups/disk1/xen-backups/xen_config* -type f -mtime +368 -exec rm {} \; 2>&1 >/dev/null
How to Install and Play old Arcade Multiple Arcade Machine Emulator Games on Linux in 2021 with xmame and GXMame GUI Frontend

Friday, May 14th, 2021

mame-multiple-arcade-machine-emulator
I've earlier blogged on how to install and play old arcade games with xmame compiled from source on the now old Debian 7 Linux under the article Install xmame from source on Debian Linux 7.0 (Wheezy) to play for better MAME (Arcade Games Emulation)
as well article on using the newer version of MAME emulator instead of xmame under the article Playing Arcade old school games on Debian Linux as well as how to make the MAME emulator work with a joystick see my previous How to configure Joystick ( Gamepad ) on Debian, Ubuntu, Mint GNU / Linux easily.

Since I have preinstalled my notebook with fresh Debian 10 Buster, for a long time I did not have the time as well as desire to play my favourite games of the youth to name a few this is Xain'd Sleena / Cadillacs and Dinosaurs (1993) / the Punisher (1993) / Captain Commando (1991) / Super Mario / Contra / Final Fight etc. and rest of the the SEGA Mega Drive / GameBoy / Nintendo / Terminator game (fake clone of nintendo) and other killing Arcade Classics of the late 90s and early year 2000, which we played on a public houses on a game cabinets with a joysticks. 
Hence I tried to reproduce some of my articles just as of 2021 to see whether still we can get a nice playable MAME emulator on Linux with a Graphical GUI for Mate or GNOME. And it seems using a straight mame out of Debian standard repositories did not work with some of the more sophisticated ROM .zip files from the nices such as Punisher or XSLEENA.zip, this is how this article got born in an attempt to give a way for such old school game freaks as me to be able to play there favorite games of the youth.

Below is the few steps adapted mostly from above articles with some head banging and loosing multiple hours wondering until I finally got a working XMAME ROM emulator with the simple but working GXMAME graphical frontend for M.A.M.E..

To compile xmame with joystick support be it analog or whatever joystick you have to use a Makefile like below

https://www.pc-freak.net/files/xmame-0.103-Makefile-for-joystick

Copy it on your PC and remove it to Makefile in the xmame-0.103 source dir:

# cd /usr/local/src/xmame-0.103


I have to install all the necessery package dependencies development header files, some of which are mentioned in the beginning of post articles and some of which I had to install manually, such as the preset Debian meta-package build-essentials Things to install on newly installed GNU / Linux (My favourite must have Linux text and GUI programs missing in fresh Linux installs), just to mention a few I remember had to install based on some compilation errors:

# apt-get install build-essential
# apt-get install –yes zlib1g-dev

# apt-get install –yes libexpat1-dev
# apt-get install –yes libghc-x11-dev
# apt-get install –yes x11proto-video-dev
# apt-get install –yes libxv-dev
# apt-get install libxext6
# apt-get install libxext6-dev
# apt-get install libxext-dev
# apt-get install libjpeg62-turbo-dev
# apt-get install libxinerama-dev
# apt-get install libgtk-3-dev
# apt-get install syslog-ng-dev
# apt-get install libgtk2.0-dev


If I'm missing some package necessery here you will have to find it yourself based on the *.h file produced as error during compile you should look it up with a cmd like:

# apt-file search glib2.h


And install it further.

You will need to edit Makefile or take and straight use or if necessery adapt an already prepared Makefile for my purpose:
 

# wget https://www.pc-freak.net/files/xmame-0.103-Makefile-for-joystick;
# mv https://www.pc-freak.net/files/xmame-0.103-Makefile-for-joystick Makefile
# make && make install


Some .zip roms does not properly work with the newer mame you need to instead use xmame ..

Below is the version I use on Debian 10 as of May 2021 year.

hipo@jeremiah:/usr/local/src$ xmame –version
GLINFO: loaded OpenGL library libGL.so!
GLINFO: loaded GLU    library libGLU.so!
xmame (x11) version 0.103 (May 13 2021)


To make the joystick work in xmame you will need to have a preset of modules loaded on the Linux for my old Genius joystick this is what works.

hipo@jeremiah:~/Games$ cat /etc/modules
# /etc/modules: kernel modules to load at boot time.
#
# This file contains the names of kernel modules that should be loaded
# at boot time, one per line. Lines beginning with "#" are ignored.
snd-seq
3c59x
snd-emu10k1
snd-pcm-oss
snd-mixer-oss
snd-seq-oss
joydev
ns558
sidewinder
gameport
analog
adi
pcigame
iforce
evdev
usbhid


Fill in your joystick module there and make sure you manually load each one of the modules with modprobe command.
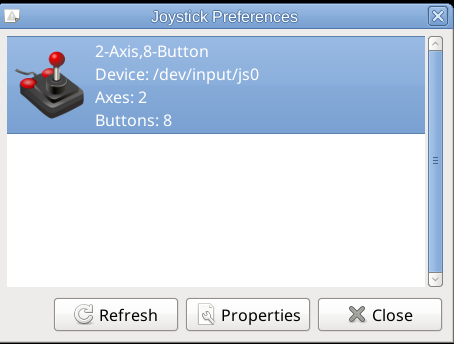
Next calibrate the joystick with some tool like jktest-gtk

jktest-gtk-linux-screenshot
If you need a good frontend for MATE / GNOME for xmame try gxmame. It is a real pain in the ass to configure, note that the only working version of xmame with good configuration as well as gxmame with a game list that is prebuild.
If you need xmame-0.103.tar.bz2 exact xmame version I'm using thethe archive is on:

https://www.pc-freak.net/files/xmame-0.103.tar.bz2
An old bundle of both gxmame and xmamerc configs is here

https://www.pc-freak.net/files/xmame.tar.gz

https://www.pc-freak.net/files/xmame-config-for-joystick-hipo.tar.gz
For example my old working version of xmame ~/.xmame is here https://www.pc-freak.net/files/xmame-config-for-joystick-hipo.tar.gz

Configuration of gxmame (even though it has has a GUI for configuring is below:

https://www.pc-freak.net/files/gxmame.tar.gz

xmamerc sample working file is here

https://www.pc-freak.net/files/xmamerc

My newest current version as of Debian 10 Squeeze of xmame and gxmame is below:

https://www.pc-freak.net/files/gxmame-config-newest_may_2021.tar.gz

https://www.pc-freak.net/files/xmame-config-newest_may_2021.tar.gz

Note that my rom files and stuff is located and configured in neewst configs to be under /home/hipo/Games/roms/ if your location is others grep it in .xmame/* and .gxmame/* files and set the correct PATH locations.

A VERY IMPORTANT NOTE is not to use the stable version of GXMAME even though it worked in 2003 fine as the project is abandoned and unsupported as of 2021 the latest downloadable stable gxmame file on Sourceforge gxmame-0.34b website is not working correctly (even though it compiles fine).
You have to compile and use instead the newer version gxmame-0.35beta1.

If you want to use gxmame with a joystick you need to compile it with the respective option:
 

root@jeremiah:/usr/local/src/gxmame-0.35beta1# ./configure –enable-joystick


gxmame 0.35beta1

Print debugging messages…… : no
Joystick support………….. : yes

GXMame will be installed in /usr/local/bin.
Warning: You have an old copy of gxmame at /usr/local/bin/gxmame.


configure complete, now type 'make'

To install compiled binaries do the usual:
 

# make && make install

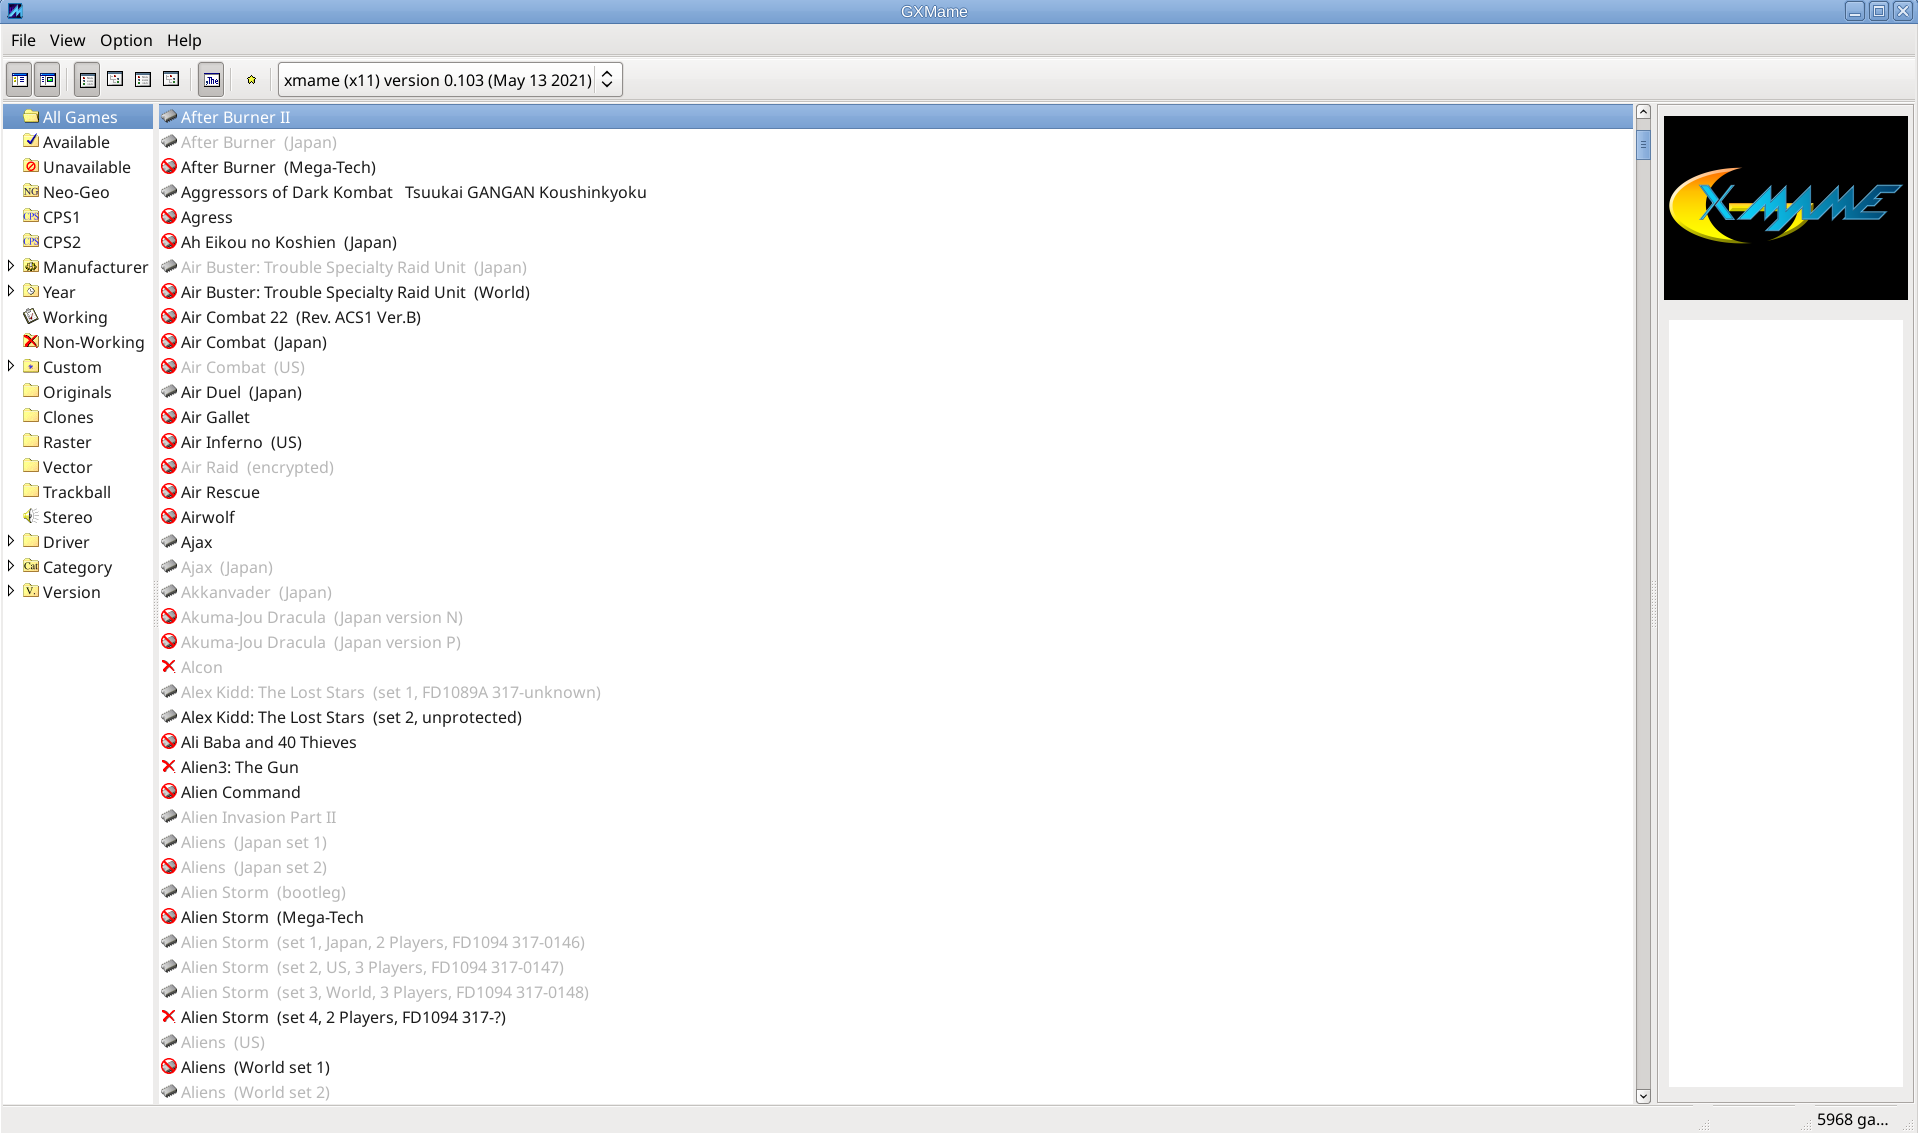
gxmame binary should be installed under /usr/local/bin/gxmame once launched you should get the shiny gxmame GUI.

gxmame-screenshot-debian-10-gnu-linux-mate-desktop

Perhaps there was other stuff I've done in the process I forgot to document here, so if you try to follow my guide and something does not work please tell me what I'm missing and you can't handle it either contact me.

The guide is for Debian Linux but should work on other .Deb based Linux distros such as Ubuntu / Linux Mint etc.

To enjoy my 4GB present of ROM files containing many of best well known M.A.M.E. ARCADE GAMES check archive here. Note that this collection was downloaded on the Internet and I do not hold any responsibility of the archive. If it contains files with any copyright infringment this is to be on your own.
 

Fix “init: Id “ad” respawning too fast: disabled for 5 minutes” – Reload /etc/inittab changes in memory apply without rebooting Linux server

Thursday, April 15th, 2021

inittab-logo-reload-inittab-without-reboot

During my daily sysadmin tasks I've been contacted by a colleague, reporting issues with missing logs in rsyslog on a very old Redhat Server release 5.11.
Exact version is:

root@linux-server:~# cat /etc/redhat-release
Red Hat Enterprise Linux Server release 5.11 (Tikanga)

After checking the logs, I have confirmed his finding that in reality since about more than a year logs were not produced and al I could find multiple messages in /var/log/messages reading like:

init: Id "ad" respawning too fast: disabled for 5 minutes

I've checked the status of rsyslog which seemed to be fine

root@linux-server:~# /etc/init.d/rsyslog status
rsyslogd (pid  13709) is running…

The redhat version on the system was

root@linux-server:~# rpm -qa |grep -i rsyslog
rsyslog-3.22.1-7.el5


root@linux-server:~# tail -n 16 /var/log/messages
Apr 15 17:21:25 linux-server init: Id "ad" respawning too fast: disabled for 5 minutes
Apr 15 17:26:26 linux-server init: Id "ad" respawning too fast: disabled for 5 minutes
Apr 15 17:31:27 linux-server init: Id "ad" respawning too fast: disabled for 5 minutes
Apr 15 17:36:28 linux-server init: Id "ad" respawning too fast: disabled for 5 minutes
Apr 15 17:41:29 linux-server init: Id "ad" respawning too fast: disabled for 5 minutes
Apr 15 17:46:30 linux-server init: Id "ad" respawning too fast: disabled for 5 minutes
Apr 15 17:51:31 linux-server init: Id "ad" respawning too fast: disabled for 5 minutes
Apr 15 17:56:32 linux-server init: Id "ad" respawning too fast: disabled for 5 minutes
Apr 15 18:01:33 linux-server init: Id "ad" respawning too fast: disabled for 5 minutes
Apr 15 18:06:34 linux-server init: Id "ad" respawning too fast: disabled for 5 minutes
Apr 15 18:11:35 linux-server init: Id "ad" respawning too fast: disabled for 5 minutes
Apr 15 18:16:38 linux-server init: Id "ad" respawning too fast: disabled for 5 minutes
Apr 15 18:21:39 linux-server init: Id "ad" respawning too fast: disabled for 5 minutes


root@linux-server:~# /etc/init.d/rsyslog status
rsyslogd (pid  13709) is running…

Since the system is so old and I've seen this message and experienced this "respawning too fast: disabled for 5 minutes" myself in the past on some old Redhat 6.0 before RHEL was born as well as on Slackware Linux. The /etc/inittab which is nowadays obsoleted in newer Linux distributions was used to keep respawing a processes which have the chance to die out for some reason. 

For those unfamiliar with inittab there is a short extract from man inittab to get idea what it is.


NAME
       inittab  –  format of the inittab file used by the sysv-compatible init
       process

DESCRIPTION
       The inittab file describes which processes are started  at  bootup  and
       during  normal  operation  (e.g. /etc/init.d/boot, /etc/init.d/rc, get-
       tys…).  Init(8) distinguishes multiple runlevels, each of  which  can
       have  its  own  set of processes that are started.  Valid runlevels are
       0-6 plus A, B, and C for ondemand entries.  An  entry  in  the  inittab
       file has the following format:

              id:runlevels:action:process
 

So for example the use of /etc/inittab was very handy to configure a separate TTY12 (physical console) in the text environment of Linux to log all your messages. Another good use if you had a bash / perl / python script that you wanted to respawn (resurrect itself if it does out) on OS level without adding additional software like Dan Bernstein's all famous daemontools inittab was the right thing to use. It is a pity nowadays inittab is obsoleted in modern Linux OSes but the most likely reason to remove it is if you put some broken script that overeats CPU or memory if it runs multiple times you can easily get into a hung system.

Thus the logical thing to do is to check /etc/inittab content for any strange issues with less /etc/inittab and near the end of file found the problematic process which was triggering a never ending error messages to rsyslog and the module to protect from such messages in rsyslog by values $SystemLogRateLimitInterval and $SystemLogRateLimitBurst

# configure rsyslog rate limiting
# Rate-limiting
$SystemLogRateLimitInterval 5
$SystemLogRateLimitBurst 50000

The problem causing respawning too fast: disabled for 5 minutes

Was an old version of TivSM IBM Tivoli Service Manager /opt/tivoli/tsm/client/ba/bin/dsmc, set in the past in /etc/inittab it seems some colleague after updating to a more recent version has either changed the location of dsmc binary either the architecture of old tsm itself required a record in /etc/inittab in case if for some reasons or bugs the dsmc during backup creation was dying.

root@linux-server:~# tail -8 /etc/inittab
6:2345:respawn:/sbin/mingetty tty6

# Run xdm in runlevel 5
x:5:respawn:/etc/X11/prefdm -nodaemon

#ad:2345:respawn:/opt/tivoli/tsm/client/ba/bin/dsmc sched >/dev/null 2>&1
root@linux-server:~# rpm -qa |grep -i tivsm
TIVsm-API-5.3.4-0
TIVsm-stagent-5.3.4-0
TIVsm-BA-5.3.4-0
TIVsm-API64-5.3.4-0


The logical thing to do was to check whether this binary exist at all here is the result:

root@linux-server:~$ ls -al /opt/tivoli/tsm/client/ba/bin/dsmc
ls: /opt/tivoli/tsm/client/ba/bin/dsmc: No such file or directory

Obviously someone decided to comment out the inittab support for /opt/tivoli/tsm/client/ba/bin/dsmc as the binary was not present and the dsmc backup was executed via a separate one time cron job or the service itself was configured to run continue, but forgot to reread its configuration so in the kernel memory inittab was still having the instruction to loop over the dsmc binary, since the Linux machine was not rebooted ages (1472 days) or 4.8 years time.

root@linux-server:~#  uname -a; echo; uptime
Linux linux-server2.6.18-419.el5 #1 SMP Wed Feb 22 22:40:57 EST 2017 x86_64 x86_64 x86_64 GNU/Linux

 19:04:34 up 1472 days,  5:20,  1 user,  load average: 0.12, 0.07, 0.06


So what really happens is <b>inittab</b> is trying to kind of re-run all the time dsmc process in a similar way like it would in a bash never ending loop;


while [ 1 ]; do 
/opt/tivoli/tsm/client/ba/bin/dsmc sched
done

Since the $PATH location to the binary returns 'No such file or directory' message this message floods up the rsyslog every second which triggers the LimitBurst protection of rsyslog causing rsyslog to disable completely logging for 5 minutes. The next 5 minutes when the time expires for blocking out logging due to reached limit burst.
dsmc binary sends again few ten thousand of messages for few seconds which are already waiting in a queue of rsyslog and the LimitBurst anti DDoS protection activates again. The reason for the LimitBurst is simply because if it logging is not disabled quickly the repeating message is going to fill the hard drive of the system and noone will be able to login. So rsyslog activated the good protection.

It seems noone from support colleagues, never ever noticed this init: Id "ad" respawning too fast: disabled for 5 minutes in /var/log/messages. So since the syslog was continuesly blocked by overflow of non-sense messages, systems  normal logging was interruped and respectively prevented any other meaningful error messages and warnings from the system to get properly logged  and perhaps flooed the remote rsyslog logging servers @logging-servers:514 in /etc/rsyslog.conf


Fix to respawning too fast: disabled for 5 minutes

Very simply make /etc/inittab get reloaded in memory with:

root@linux-server:~# /sbin/init q

or with the linked telnet, which was so much used by us sys admins in the past

root@linux-server:~# /sbin/telinit q

To make the rsyslog suspension disabled of course we need to restart it again.

root@linux-server:~# /etc/init.d/rsyslog restart

root@linux-server:~# /etc/init.d/rsyslog status
rsyslogd (pid  13710) is running…

And Voila logs from services are being delivered normally via configured stuff in /etc/rsyslog.conf, to make sure this is so:

root@linux-server:~# tail -8 /var/log/messages
Apr 15 14:36:29 linux-serverinit: Id "ad" respawning too fast: disabled for 5 minutes
Apr 15 14:41:37 linux-serverinit: Id "ad" respawning too fast: disabled for 5 minutes
Apr 15 14:51:22 linux-serverinit: Id "ad" respawning too fast: disabled for 5 minutes
Apr 15 14:56:30 linux-serverinit: Id "ad" respawning too fast: disabled for 5 minutes
Apr 15 15:01:38 linux-serverinit: Id "ad" respawning too fast: disabled for 5 minutes
Apr 15 15:06:45 linux-serverinit: Id "ad" respawning too fast: disabled for 5 minutes
Apr 15 18:21:49 linux-server init: Re-reading inittab
Apr 15 18:21:54 linux-server kernel: imklog 3.22.1, log source = /proc/kmsg started.
Apr 15 18:21:54 linux-server rsyslogd: [origin software=”rsyslogd” swVersion=”3.22.1″ x-pid=”13709″ x-info=”http://www.rsyslog.com”] (re)start
Apr 15 18:41:54 linux-server rsyslogd: — MARK —
Apr 15 19:01:54 linux-server rsyslogd: — MARK —
Apr 15 19:21:54 linux-server rsyslogd: — MARK —
Apr 15 19:41:54 linux-server rsyslogd: — MARK —
Apr 15 20:01:54 linux-server rsyslogd: — MARK —

How to redirect / forward all postfix emails to one external email address?

Thursday, October 29th, 2020

Postfix_mailserver-logo-howto-forward-email-with-regular-expression-or-maildrop

Lets say you're  a sysadmin doing email migration of a Clustered SMTP and due to that you want to capture for a while all incoming email traffic and redirect it (forward it) towards another single mailbox, where you can review the mail traffic that is flowing for a few hours and analyze it more deeper. This aproach is useful if you have a small or middle sized mail servers and won't be so useful on a mail server that handels few  hundreds of mails hourly. In below article I'll show you how.

How to redirect all postfix mail for a specific domain to single external email address?

There are different ways but if you don't want to just intercept the traffic and a create a copy of email traffic using the always_bcc integrated postfix option (as pointed in my previous article postfix copy every email to a central mailbox).  You can do a copy of email flow via some custom written dispatcher script set to be run by the MTA on each mail arriva, or use maildrop filtering functionality below is very simple example with maildrop in case if you want to filter out and deliver to external email address only email targetted to specific domain.

If you use maildrop as local delivery agent to copy email targetted to specifidc domain to another defined email use rule like:

if ( /^From:.*domain\.com/:h ) {
  cc "!someothermail@domain2.com"
}


To use maildrop to just forward email incoming from a specific sender towards local existing email address on the postfix to an external email address  use something like:

if ( /^From: .*linus@mail.example.com.*/ )
{
        dotlock "forward.lock" {
          log "Forward mail"
          to "|/usr/sbin/sendmail linuxbox@collector.example.com"
        }
}

Then to make the filter active assuming the user has a physical unix mailbox, paste above to local user's  $HOME/.mailfilter.

What to do if your mail delivered via your Email-Server.com are sent from a monitoring and alarming scripts that are sending towards many mailboxes that no longer exist after the migration?

To achive capturing all normal attempted to be sent traffic via the mail server, we can forward all served mails towards a single external mail address you can use the nice capability of postfix to understand PCRE perl compatible regular expressions. Regular expressions in postfix of course has its specific I recommend you take a look to the postfix regexp table documentation here, as well as check the Postfix Regex / Tester / Debugger online tool – useful to validate a regexp you want to implement.

How to use postfix regular expression to do a redirect of all sent emails via your postfix mail relayhost towards external mail servers?


In main.cf /etc/postfix/main.cf include this line near bottom or as a last line:

virtual_maps = hash:/etc/postfix/virtual, regexp:/etc/postfix/virtual-regexp

One defines the virtual file which can be used to define any of your virtual domains you want to simulate as present on the local postfix, the regexp: does load the file which is read by postfix where you can type the regular expression applied to every incoming email via SMTP port 25 or encrypted MTA ports 385 / 995 etc.

So how to redirect all postfix mail to one external email address for later analysis?

Create file /etc/postfix/virtual-regexp

/.+@.+/ external-forward-email@gmail.com

Next build the mapfile (this will generate /etc/postfix/virtual-regexp.db )
 

# postmap /etc/postfix/virtual-regexp

This also requires a virtual.db to exist. If it doesn't create an empty file called virtual and run again postmap postfix .db generator

# touch /etc/postfix/virtual && postmap /etc/postfix/virtual


Note in /etc/postfix/virtual you can add your postfix mail domains for which you want the MTA to accept mail as a local mail.

In case you need to view all postfix defined virtual domains configured to accept mail locally on the mail server.
 

$ postconf -n | grep virtual
virtual_alias_domains = mydomain.com myanotherdomain.com
virtual_alias_maps = hash:/etc/postfix/virtual


The regexp /.+@.+/ external-forward-email@gmail.com applied will start forwarding mails immediately after you reload the MTA with:

# systemctl restart postfix


If you want to exclude target mail domains to not be captured by above regexp, in /etc/postfix/virtual-regexp place:

/.+@exclude-domain1.com/ @exclude-domain1.com
/.+@exclude-domain2.com/ @exclude-domain2.com

Time for a test. Send a test email


Next step is to Test it mail forwarding works as expected
 

# echo -e "Tseting body" | mail -s "testing subject" -r "testing@test.com" whatevertest-user@mail-recipient-domain.com

Improve wordpress admin password encryption authentication keys security with WordPress Unique Authentication Keys and Salts

Friday, October 9th, 2020

wordpress-improve-security-logo-linux

Having a wordpress blog or website with an admistrator and access via a Secured SSL channel is common nowadays. However there are plenty of SSL encryption leaks already out there and many of which are either slow to be patched or the hosting companies does not care enough to patch on time the libssl Linux libraries / webserver level. Taking that in consideration many websites hosted on some unmaintained one-time run not-frequently updated Linux servers are still vulneable and it might happen that, if you paid for some shared hosting in the past and someone else besides you hosted the website and forget you even your wordpress installation is still living on one of this SSL vulnerable hosts. In situations like that malicious hackers could break up the SSL security up to some level or even if the SSL is secured use MITM (MAN IN THE MIDDLE) attack to simulate your well secured and trusted SSID Name WIFi network to  redirects the network traffic you use (via an SSL transparent Proxy) to connect to WordPress Administrator Dashbiard via https://your-domain.com/wp-admin. Once your traffic is going through the malicious hax0r even if you haven't used the password to authenticate every time, e.g. you have saved the password in browser and WordPress Admin Panel authentication is achieved via a Cookie the cookies generated and used one time by Woddpress site could be easily stealed one time and later from the vicious 1337 h4x0r and reverse the hash with an interceptor Tool and login to your wordpress …

Therefore to improve the wordpress site security it very important to have configured WordPress Unique Authentication Keys and Salts (known also as the WordPress security keys).

They're used by WordPress installation to have a uniquely generated different key and Salt from the default one to the opened WordPress Blog / Site Admin session every time.

So what are the Authentication Unique Keys and Salts and why they are Used?

Like with almost any other web application, when PHP session is opened to WordPress, the code creates a number of Cookies stored locally on your computer.

Two of the cookies created are called:

 wordpress_[hash]
wordpress_logged_in_[hash]

First  cookie is used only in the admin pages (WordPress dashboard), while the second cookie is used throughout WordPress to determine if you are logged in to WordPress or not. Note: [hash] is a random hashed value typically assigned to your session, therefore in reality the cookies name would be named something like wordpress_ffc02f68bc9926448e9222893b6c29a9.

WordPress session stores your authentication details (i.e. WordPress username and password) in both of the above mentioned cookies.

The authentication details are hashed, hence it is almost impossible for anyone to reverse the hash and guess your password through a cookie should it be stolen. By almost impossible it also means that with today’s computers it is practically unfeasible to do so.

WordPress security keys are made up of four authentication keys and four hashing salts (random generated data) that when used together they add an extra layer to your cookies and passwords. 

The authentication details in these cookies are hashed using the random pattern specified in the WordPress security keys. I will not get into too much details but as you might have heard in Cryptography Salts and Keys are important – an indepth explanation on Salts Cryptography (here). A good reading for those who want to know more on how does the authentication based and salts work is on stackexchange.

How to Set up Salt and Key Authentication on WordPress
 

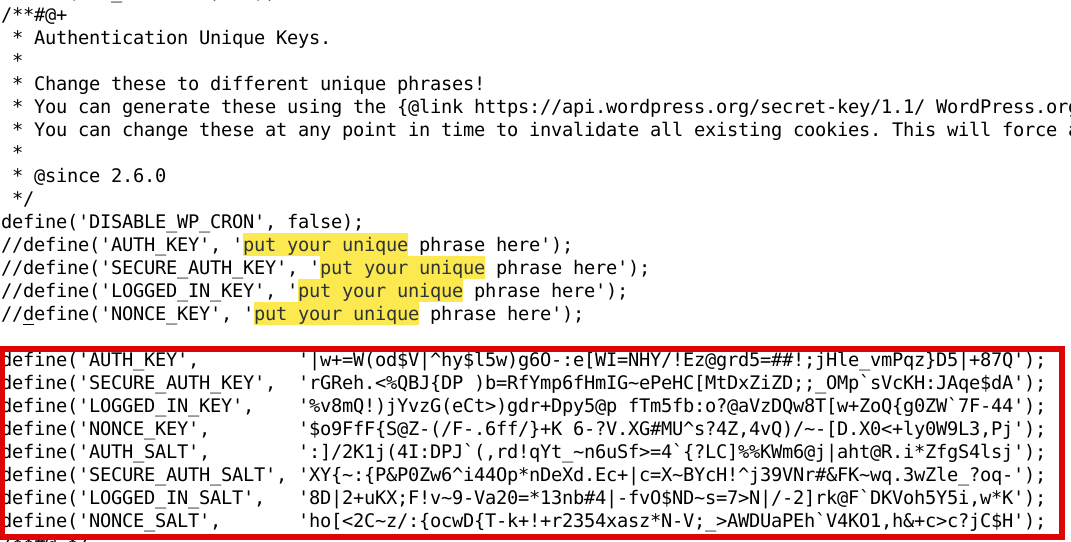
To be used by WP Salts and Key should be configured under wp-config.php usually they look like so:

wordpress-website-blog-salts-keys-wp-config-screenshot-linux

!!! Note !!!  that generating (manually or generated via a random generator program), the definition strings you have to use a random string value of more than 60 characters to prevent predictability 

The default on any newly installed WordPress Website is to have the 4 definitions with _KEY and the four _SALTs to be unconfigured strings looks something like:

default-WordPress-security-keys-and-salts-entries-in-wordPress-wp-config-php-file

Most people never ever take a look at wp-config.php as only the Web GUI Is used for any maintainance, tasks so there is a great chance that if you never heard specifically by some WordPress Security Expert forum or some Security plugin (such as WP Titan Anti Spam & Security) installed to report the WP KEY / SALT you might have never noticed it in the config.

There are 8 WordPress security keys in current WP Installs, but not all of them have been introduced at the same time.
Historically they were introduced in WP versions in below order:

WordPress 2.6: AUTH_KEY, SECURE_AUTH_KEY, LOGGED_IN_KEY
WordPress 2.7: NONCE_KEY
WordPress 3.0: AUTH_SALT, SECURE_AUTH_SALT, LOGGED_IN_SALT, NONCE_SALT

Setting a custom random generated values is an easy task as there is already online Wordpress Security key Random generator.
You can visit above address and you will get an automatic randomly generated values which could be straight copy / pasted to your wp-config.php.

Howeever if you're a paranoic on the guessability of the random generator algorithm, I would advice you use the generator and change some random values yourself on each of the 8 line, the end result in the configuration should be something similar to:


define('AUTH_KEY',         '|w+=W(od$V|^hy$F5w)g6O-:e[WI=NHY/!Ez@grd5=##!;jHle_vFPqz}D5|+87Q');
define('SECURE_AUTH_KEY',  'rGReh.<%QBJ{DP )p=BfYmp6fHmIG~ePeHC[MtDxZiZD;;_OMp`sVcKH:JAqe$dA');
define('LOGGED_IN_KEY',    '%v8mQ!)jYvzG(eCt>)bdr+Rpy5@t fTm5fb:o?@aVzDQw8T[w+aoQ{g0ZW`7F-44');
define('NONCE_KEY',        '$o9FfF{S@Z-(/F-.6fC/}+K 6-?V.XG#MU^s?4Z,4vQ)/~-[D.X0<+ly0W9L3,Pj');
define('AUTH_SALT',        ':]/2K1j(4I:DPJ`(,rK!qYt_~n8uSf>=4`{?LC]%%KWm6@j|aht@R.i*ZfgS4lsj');
define('SECURE_AUTH_SALT', 'XY{~:{P&P0Vw6^i44Op*nDeXd.Ec+|c=S~BYcH!^j39VNr#&FK~wq.3wZle_?oq-');
define('LOGGED_IN_SALT',   '8D|2+uKX;F!v~8-Va20=*d3nb#4|-fv0$ND~s=7>N|/-2]rk@F`DKVoh5Y5i,w*K');
define('NONCE_SALT',       'ho[<2C~z/:{ocwD{T-w+!+r2394xasz*N-V;_>AWDUaPEh`V4KO1,h&+c>c?jC$H');


Wordpress-auth-key-secure-auth-salt-Linux-wordpress-admin-security-hardening

Once above defines are set, do not forget to comment or remove old AUTH_KEY / SECURE_AUTH_KEY / LOGGED_IN_KEY / AUTH_SALT / SECURE_AUTH_SALT / LOGGED_IN_SALT /NONCE_SALT keys.

The values are configured one time and never have to be changed, WordPress installation automatic updates or Installed WP Plugins will not tamper the value with time.
You should never expand or show your private generated keys to anyone otherwise this could be used to hack your website site.
It is also a good security practice to change this keys, especially if you have some suspects someone has somehow stolen your wp-onfig keys. 
 

Closure

Having AUTH KEYs and Properly configured is essential step to improve your WordPress site security. Anytime having any doubt for a browser hijacked session (or if you have logged in) to your /wp-admin via unsecured public Computer with a chance of a stolen site cookies you should reset keys / salts to a new random values. Setting the auth keys is not a panacea and frequent WP site core updates and plugins should be made to secure your install. Always do frequent audits to WP owned websites with a tool such as WPScan is essential to keep your WP Website unhacked.


Howto Configure Linux shell Prompt / Setup custom Terminal show Prompt using default shell variables PS1, PS2, PS3, PS4

Tuesday, August 27th, 2019

how-to-configure-lunux-bsd-shell-prompt-ps1-howto-make-your-terminal-console-shell-nice-and-shiny-1

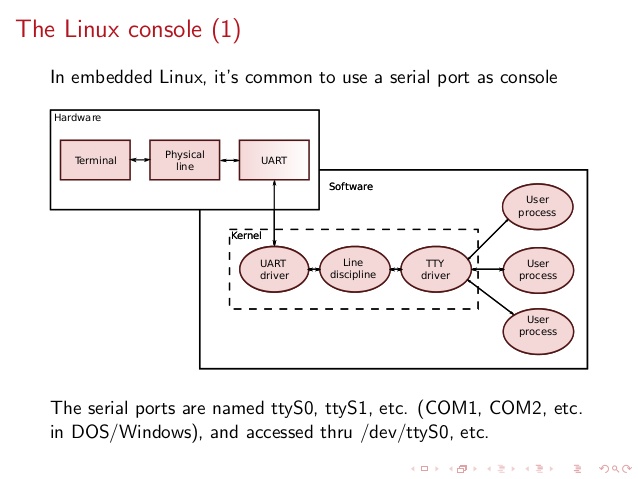
System Console, Command Operation Console  or Terminal is a Physical device for text (command) input from keyboard, getting the command output and monitoring the status of a shell or programs I/O operations generated traditionally with attached screen. With the development of Computers, physical consoles has become emulated and the input output is translated on the monitor usually via a data transfer  protocol historically mostly over TCP/IP connection to remote IP with telnet or rsh, but due to security limitations Consoles are now accessed over data (encrypted) network protocols with SHA2 / MD5 cryptography algorithm enabled such as over SSH (Secure Shell) network protocol..
The ancestors of physical consoles which in the past were just a Terminal (Monitoring / Monitor device attached to a MainFrame system computer).

Mainframe-physical-terminal-monitor-Old-Computer

What is Physical Console
A classical TTY (TeleTYpewriter) device looked like so and served the purpose of being just a communication and display deivce, whether in reality the actual computing and storage tape devices were in a separate room and communicating to Terminal.

mainframe-super-computer-computing-tape-machine
TTYs are still present in  modern UNIX like GNU / Linux distrubions OSes and the BSD berkley 4.4 code based FreeBSD / NetBSD / OpenBSD if you have installed the OS on a physical computer in FreeBSD and Solaris / SunOS there is also tty command. TTY utility in *nix writes the name of the terminal attached to standard input to standard output, in Linux there is a GNU remake of same program part called GNU tty of coreutils package (try man tty) for more.

The physical console is recognizable in Linux as it is indicated with other tree letters pts – (pseudo terminal device) standing for a terminal device which is emulated by an other program (example: xterm, screen, or ssh are such programs). A pts is the slave part of a pts is pseudo there is no separate binary program for it but it is dynamically allocated in memory.
PTS is also called Line consle in Cisco Switches / Router devices, VTY is the physical Serial Console connected on your Cisco device and the network connection emulation to network device is creates with a virtual console session VTL (Virtual Terminal Line). In freebsd the actual /dev/pts* /dev/tty* temporary devices on the OS are slightly different and have naming such as /dev/ttys001.
But the existence of tty and pts emulator is not enough for communicating interrupts to Kernel and UserLand binaries of the Linux / BSD OS, thus to send the commands on top of it is running a System Shell as CSH / TSH / TCSH or BASH which is usually the first program set to run after user logs in over ptty or pseudo tty virtual terminal.

linux-tty-terminal-explained-brief-intro-to-linux-device-drivers-20-638


Setting the Bash Prompt in Terminal / Console on GNU / Linux

Bash has system environments to control multiple of variables, which are usually visible with env command, one important variable to change in the past was for example USER / USERNAME which was red by IRC Chat clients  such as BitchX / irssi and could be displayed publicly so if not changed to a separate value, one could have known your Linux login username by simple /whois query to the Nickname in question (if no inetd / xinetd service was running on the Linux box and usually inetd was not running).

Below is my custom set USER / USERNAME to separate

hipo@pcfreak:~$ env|grep USER
USERNAME=Attitude
USER=Attitude

There is plenty of variables to  tune email such as MAIL store directory, terminal used TERM, EDITOR etc. but there are some
variables that are not visible with env query as they're not globally available for all users but just for the single user, to show this ones you need to use declare command instead, to get a full list of All Single and System Wide defined variables and functions type declare in the bash shell, for readability, below is last 10 returned results:


hipo@pcfreak:~$ declare | tail -10
{
    local quoted=${1//\'/\'\\\'\'};
    printf "'%s'" "$quoted"
}
quote_readline ()
{
    local quoted;
    _quote_readline_by_ref "$1" ret;
    printf %s "$ret"
}


PS1 is present there virtually on any modern Linux distribution and is installed through user home's directory $HOME/.bashrc , ~/.profile or .bash_profile or System Wide globally for all existing users in /etc/passwd (password database file) from /etc/bash.bashrc
In Debian / Ubuntu / Mint GNU / Linux this system variable is set in user home's .bashrc but in Fedora / RHEL Linux distro,
PS1 is configured from /home/username/.bash_profile to find out where PS1 is located for ur user:

cd ~
grep -Rli PS1 .bash*

Here is one more example:

hipo@pcfreak:~$ declare|grep -i PS1|head -1
PS1='\[\e]0;\u@\h: \w\a\]${debian_chroot:+($debian_chroot)}\u@\h:\w\$ '
 

hipo@pcfreak:~$ grep PS1 /etc/bash.bashrc
[ -z “$PS1” ] && return
# but only if not SUDOing and have SUDO_PS1 set; then assume smart user.
if ! [ -n “${SUDO_USER}” -a -n “${SUDO_PS1}” ]; then
  PS1='${debian_chroot:+($debian_chroot)}\u@\h:\w\$ '


Getting current logged in user shell configured PS1 variable can be done with echo:

hipo@pcfreak:~$ echo $PS1
\[\e]0;\u@\h: \w\a\]${debian_chroot:+($debian_chroot)}\u@\h:\w\$

So lets observe a little bit the meaning of this obscure line of (code) instructions code which are understood by BASH when being red from PS1 var to do so, I'll give a list of meaning of main understood commands, each of which is defined with \.

The ${debian_chroot} shell variable is defined from /etc/bash.bashrc

Easiest way to change PS1 is to export the string you like with the arguments like so:


root@linux:/home/hipo# export PS1='My-Custom_Server-Name# '
My-Custom_Server-Name# echo $PS1
My-Custom_Server-Name#


  •     \a : an ASCII bell character (07)
  •     \d : the date in “Weekday Month Date” format (e.g., “Tue May 26”)
  •     \D{format} : the format is passed to strftime(3) and the result is inserted into the prompt string; an empty format results in a locale-specific time representation. The braces are required
  •     \e : an ASCII escape character (033)
  •     \h : the hostname up to the first ‘.’
  •     \H : the hostname
  •     \j : the number of jobs currently managed by the shell
  •     \l : the basename of the shell's terminal device name
  •     \n : newline
  •     \r : carriage return
  •     \s : the name of the shell, the basename of $0 (the portion following the final slash)
  •     \t : the current time in 24-hour HH:MM:SS format
  •     \T : the current time in 12-hour HH:MM:SS format
  •     \@ : the current time in 12-hour am/pm format
  •     \A : the current time in 24-hour HH:MM format
  •     \u : the username of the current user
  •     \v : the version of bash (e.g., 2.00)
  •     \V : the release of bash, version + patch level (e.g., 2.00.0)
  •     \w : the current working directory, with $HOME abbreviated with a tilde
  •     \W : the basename of the current working directory, with $HOME abbreviated with a tilde
  •     \! : the history number of this command
  •     \# : the command number of this command
  •     \$ : if the effective UID is 0, a #, otherwise a $
  •     \nnn : the character corresponding to the octal number nnn
  •     \\ : a backslash
  •     \[ : begin a sequence of non-printing characters, which could be used to embed a terminal control sequence into the prompt
  •     \] : end a sequence of non-printing characters

The default's PS1 set prompt on Debian Linux is:
 

echo $PS1
\[\e]0;\u@\h: \w\a\]${debian_chroot:+($debian_chroot)}\u@\h:\w\$


As you can see \u (print username) \h (print hostname)  and \W (basename of current working dir) or \w (print $HOME/current working dir)
are the most essential, the rest are bell character, escape character etc.

A very good way to make your life easier and learn the abbreviations / generate exactly the PS1 PROMPT you want to have is with Easy Bash PS1 Generator Web Utility
with which you can just click over buttons that are capable to produce all of the PS1 codes.
 

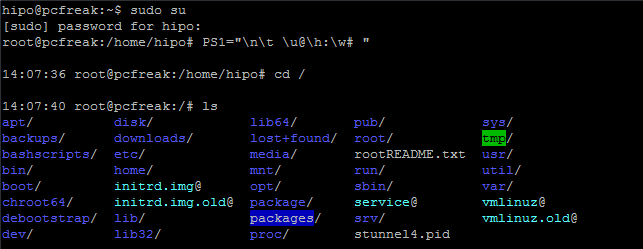
1. How to show current hour:minute:seconds / print full date in Prompt Shell (PS)


Here is an example with setting the Bash Shell prompt  to include also the current time in format hour:minute:seconds (very useful if you're executing commands on a critical servers and you run commands in some kind of virtual terminal like screen or tmux.
 

root@pcfreak:~# PS1="\n\t \u@\h:\w# "
14:03:51 root@pcfreak:/home#


PS1-how-to-setup-date-time-hour-minutes-and-seconds-in-bash-shell-prompt


export PS1='\u@\H \D{%Y-%m-%d %H:%M;%S%z}] \W ] \$ '


export-PS1-Linux-set-full-date-time-clock-prompt-screenshot-console


Make superuser appear in RED color (adding PS1 prompt custom color for a User)
 

root@pcfreak:~$  PS1="\\[$(tput setaf 1)\\]\\u@\\h:\\w #\\[$(tput sgr0)\\]"


how-to-change-colors-in-bash-prompt-shell-on-linux-shell-environment

In above example the Shell Prompt Color changed is changed for administrator (root) to shebang symbol # in red, green, yellow and blue for the sake to show you how it is done, however this example can be adapted for any user on the system. Setting different coloring for users is very handy if you have to administer Mail Server service like Qmail or other Application that consists of multiple small ones of multiple daemons such as qmail + vpopmail + clamd + mysql etc. Under such circumstances, coloring each of the users in different color like in the example for debugging is very useful.

Coloring the PS1 system prompt on Linux to different color has been a standard practice in Linux Server environments running Redhat Enterprise Linux (RHEL) and SuSE Enterprise Linux and some Desktop distributions such as Mint Linux.

To make The Root prompt Red colored only for system super user (root) on any Linux distribution
, add the following to /etc/bashrc, e.g.

vim /etc/bashrc


# If id command returns zero, you've root access.
if [ $(id -u) -eq 0 ];
then # you are root, set red colour prompt
  PS1="\\[$(tput setaf 1)\\]\\u@\\h:\\w #\\[$(tput sgr0)\\]"
else # normal
  PS1="[\\u@\\h:\\w] $"
fi


2. How to make the prompt of a System user appear Green


Add to ~/.bashrc  following line


PS1="\\[$(tput setaf 2)\\]\\u@\\h:\\w #\\[$(tput sgr0)\\]"


3. Print New line, username@hostname, base PTY, shell level, history (number), newline and full working directory $PWD


export PS1='\n[\u@\h \l:$SHLVL:\!]\n$PWD\$ '


4. Showing the numbert of jobs the shell is currently managing.


This is useful if you run and switch with fg / bg (foreground / background) commands
to switch between jobs and forget some old job.


export PS1='\u@\H \D{%Y-%m-%d %H:%M;%S%z}] \W \$]'


Multi Lines Prompt / Make very colorful Shell prompt full of stats info

PS1="\n\[\033[35m\]\$(/bin/date)\n\[\033[32m\]\w\n\[\033[1;31m\]\u@\h: \[\033[1;34m\]\$(/usr/bin/tty | /bin/sed -e ‘s:/dev/::’): \[\033[1;36m\]\$(/bin/ls -1 | /usr/bin/wc -l | /bin/sed ‘s: ::g’) files \[\033[1;33m\]\$(/bin/ls -lah | /bin/grep -m 1 total | /bin/sed ‘s/total //’)b\[\033[0m\] -> \[\033[0m\]"


prompt-show-how-many-files-and-virtual-pts-ps1-linux
 

5. Set color change on command failure


If you have a broken command or the command ended with non zero output with some kind of bad nasty message and you want to make, that more appearing making it red heighlighted, here is how:


PROMPT_COMMAND='PS1="\[\033[0;33m\][\!]\`if [[ \$? = “0” ]]; then echo “\\[\\033[32m\\]”; else echo “\\[\\033[31m\\]”; fi\`[\u.\h: \`if [[ `pwd|wc -c|tr -d ” “` > 18 ]]; then echo “\\W”; else echo “\\w”; fi\`]\$\[\033[0m\] “; echo -ne “\033]0;`hostname -s`:`pwd`\007"'


6. Other beautiful PS1 Color Prompts with statistics


PS1="\n\[\e[32;1m\](\[\e[37;1m\]\u\[\e[32;1m\])-(\[\e[37;1m\]jobs:\j\[\e[32;1m\])-(\[\e[37;1m\]\w\[\e[32;1m\])\n(\[\[\e[37;1m\]! \!\[\e[32;1m\])-> \[\e[0m\]"


another-very-beuatiful-bash-colorful-prompt


7. Add Muliple Colors to Same Shell prompt


function prompt { local BLUE="\[\033[0;34m\]” local DARK_BLUE=”\[\033[1;34m\]” local RED=”\[\033[0;31m\]” local DARK_RED=”\[\033[1;31m\]” local NO_COLOR=”\[\033[0m\]” case $TERM in xterm*|rxvt*) TITLEBAR=’\[\033]0;\u@\h:\w\007\]’ ;; *) TITLEBAR=”” ;; esac PS1=”\u@\h [\t]> ” PS1=”${TITLEBAR}\ $BLUE\u@\h $RED[\t]>$NO_COLOR " PS2='continue-> ' PS4='$0.$LINENO+ ' }

colorful-prompt-blue-and-red-linux-console-PS1
 

8. Setting / Change Shell background Color


changing-background-color-of-bash-shell-prompt-linux


export PS1="\[$(tput bold)$(tput setb 4)$(tput setaf 7)\]\u@\h:\w $ \[$(tput sgr0)\]"


tput Color Capabilities:

  • tput setab [1-7] – Set a background color using ANSI escape
  • tput setb [1-7] – Set a background color
  • tput setaf [1-7] – Set a foreground color using ANSI escape
  • tput setf [1-7] – Set a foreground color

tput Text Mode Capabilities:

  • tput bold – Set bold mode
  • tput dim – turn on half-bright mode
  • tput smul – begin underline mode
  • tput rmul – exit underline mode
  • tput rev – Turn on reverse mode
  • tput smso – Enter standout mode (bold on rxvt)
  • tput rmso – Exit standout mode
  • tput sgr0 – Turn off all attributes

Color Code for tput:

  • 0 – Black
  • 1 – Red
  • 2 – Green
  • 3 – Yellow
  • 4 – Blue
  • 5 – Magenta
  • 6 – Cyan
  • 7 – White


9. Howto Use bash shell function inside PS1 variable

If you administrate Apache or other HTTPD servers or any other server whose processes are forked and do raise drastically at times to keep an eye while actively working on the server.


function httpdcount { ps aux | grep apache2 | grep -v grep | wc -l } export PS1="\u@\h [`httpdcount`]> "

10. PS2, PS3, PS4 little known variables
 

I'll not get much into detail to PS2, PS3, PS4 but will mention them as perhaps many people are not even aware they exist.
They're rarely used in the daily system administrator's work but useful for Shell scripting purposes of Dev Ops and Shell Scripting Guru Programmers.

  • PS2 – Continuation interactive prompt

A very long unix command can be broken down to multiple line by giving \ at the end of the line. The default interactive prompt for a multi-line command is “> “.  Let us change this default behavior to display “continue->” by using PS2 environment variable as shown below.

hipo@db-host :~$ myisamchk –silent –force –fast –update-state \
> –key_buffer_size=512M –sort_buffer_size=512M \
> –read_buffer_size=4M –write_buffer_size=4M \
> /var/lib/mysql/bugs/*.MYI
[Note: This uses the default “>” for continuation prompt]

  • PS3 – Prompt used by “select” inside shell script (usefulif you write scripts with user prompts)


  • PS4 – Used by “set -x” to prefix tracing output
    The PS4 shell variable defines the prompt that gets displayed.

You can find  example with script demonstrating PS2, PS3, PS4 use via small shell scripts in thegeekstuff's article Take control of PS1, PS2, PS3, PS4 read it here


Summary


In this article, I've shortly reviewed on what is a TTY, how it evolved into Pseudo TTY and how it relates to current shells which are the interface communicating with the modern UNIX like Operating systems's userland and kernel.
Also it was reviewed shortly how the current definitions of shell variables could be viewed with declare cmd. Also I went through on how to display the PS1 variable and  on how to modify PS1 and make the prompt different statistics and monitoring parameters straight into the command shell. I've shown some common PS1 strings that report on current date hour, minute, seconds, modify the coloring of the bash prompt shell, show processes count, and some PS1 examples were given that combines beuatiful shell coloring as well as how the Prompt background color can be changed.
Finally was shown how a combination of commands can be executed by exporting to PS1 to update process counf of Apache on every shell prompt iteration.
Other shell goodies are mostly welcome


How to install KVM Kernel-based Virtual Machine Virtualization on Linux

Sunday, October 14th, 2018

install-KVM-Kernel-based-Virtual-Machine-virtualization-on-Linux

If you want to run multiple virtual machines on GNU / Linux server or your Linux powered Desktop you have the possibility to use a couple of Virtual Machines just to name a few VirtualBox and VMWare are the option the native way to do it is using the Linux kernel via a loadable kernel module called KVM (Kernel-based Virtual Machine).
Though Oracle's Virtualbox generally works and you could add new test beds virtual machines (install multiple Linux / *BSD OS) it is not fully Free Software and not even fully open source licensed, VMWare even though superior as a Virtualization product is proprietary and its application costs a lot of money which not each develpoper or small / mid-sized company could afford.

Once the kvm.ko module is loaded your Linux kernel turns into a full-featured Virtual Machine Hypervisor.
Starting with Linux kernel 2.6.X the KVM Hypervisor is available and easy to install virtually all modern Linux distributions Redhat / CentOS Debian / Ubuntu etc. support it and its up to running few commands to install and start using the Power of Kernel embedded Virtualization.

KVM could be used to run in parallel multiple Operating Systems such as Windows / Linux / FreeBSD and others of BSDs family,  each running under a separate virtual machine with its private dedicated (isolated), disc, graphic card, network card etc.

To start up I assume you have already installed some kind of Linux distribution either locally or on a remote dedicated server.
 

1. Installing KVM on Debian GNU / Linux / Ubuntu / Mint and other deb based distros


Using APT tool install below packages:


root@jeremiah:~# apt install –yes qemu-kvm libvirt-clients libvirt-daemon-system bridge-utils libguestfs-tools genisoimage virtinst libosinfo-bin


2. Installing virt-manager GUI to manage Virtual servers


root@jeremiah:~# apt-cache show virt-manager|grep -i desc -A 1
Description-en: desktop application for managing virtual machines
 It presents a summary view of running domains and their live performance &

Description-md5: 9f7f584744b77cdacc2291f2a8ac220e
Homepage: http://virt-manager.et.redhat.com/


root@jeremiah:~# apt install –yes virt-manager


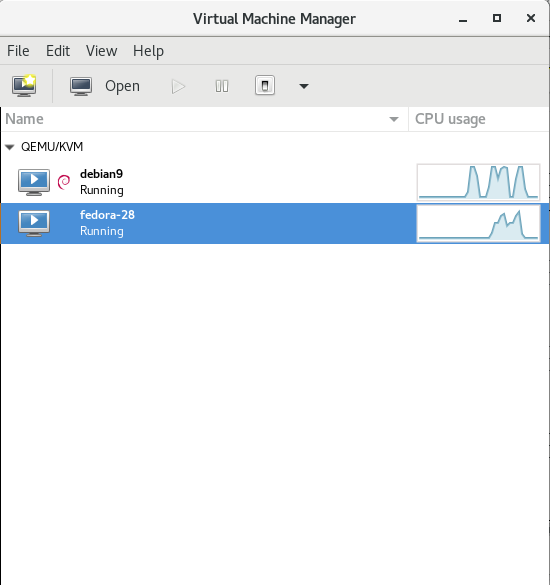
virtual-manager-kvm-gnu-linux-virtual-machines-cpu-hdd-load-statistics-screenshot


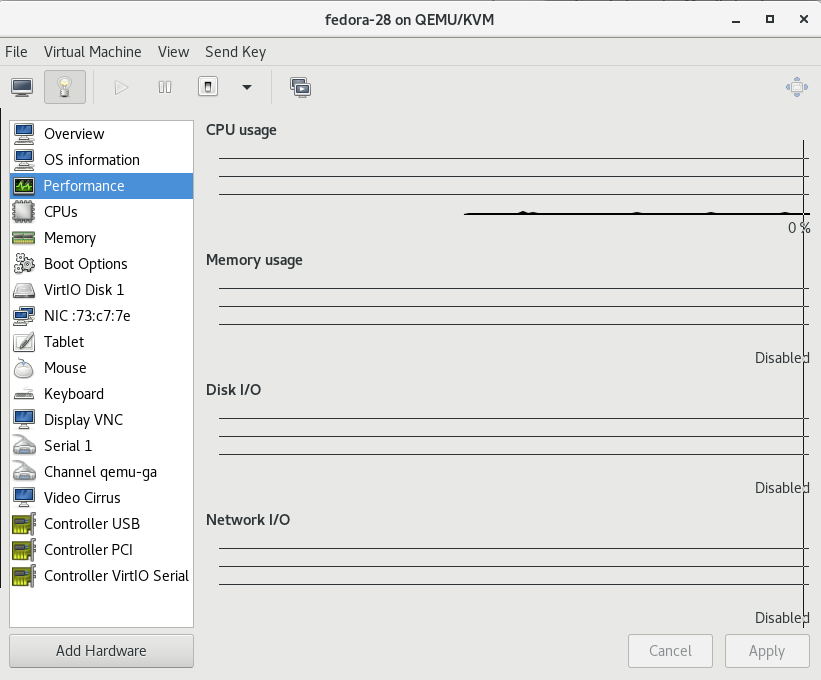
virtual-manager-fedora-28-linux-virtual-machine-settings-screenshot


3. Configure bridged networking to allow access to newly configured VMs

Bridging has to be added via /etc/network/interfaces therefore it is a good idea to create a backup of it before modifying:


# cp -rpf /etc/network/interfaces /etc/network/interfaces.bakup-$(echo $(date '+%Y-%m-%d-%H'))


# vim /etc/network/interfaces

auto br0
 iface br0 inet static
         address 10.15.44.26
         netmask 255.255.255.192
         broadcast 10.15.44.63
         dns-nameservers 10.0.80.11 10.0.80.12
         # set static route for LAN
      post-up route add -net 10.0.0.0 netmask 255.0.0.0 gw 10.18.44.1
      post-up route add -net 161.26.0.0 netmask 255.255.0.0 gw 10.18.44.1
         bridge_ports eth0
         bridge_stp off
         bridge_fd 0
         bridge_maxwait 0
 
 # br1 setup with static wan IPv4 with ISP router as a default gateway
 auto br1
 iface br1 inet static
         address 192.168.222.51
         netmask 255.255.255.248
         broadcast 192.168.222.55
         gateway 192.168.222.49
         bridge_ports eth1
         bridge_stp off
         bridge_fd 0
         bridge_maxwait 0


Once file is saved in vim editor restart the networking.


# systemctl restart network.manager


To verify whether the bridge has been succesfully upped.


root@jeremiah:/home/hipo/kvm# brctl show
bridge name    bridge id        STP enabled    interfaces
virbr0        8000.525400cb1cd1    yes        virbr0-nic


4. List all installable Virtual OS images
 

root@jeremiah:/home/hipo/kvm# virt-builder -list
centos-6                 x86_64     CentOS 6.6
centos-7.0               x86_64     CentOS 7.0
centos-7.1               x86_64     CentOS 7.1
centos-7.2               aarch64    CentOS 7.2 (aarch64)
centos-7.2               x86_64     CentOS 7.2
centos-7.3               x86_64     CentOS 7.3
centos-7.4               x86_64     CentOS 7.4
centos-7.5               x86_64     CentOS 7.5
cirros-0.3.1             x86_64     CirrOS 0.3.1
cirros-0.3.5             x86_64     CirrOS 0.3.5
debian-6                 x86_64     Debian 6 (Squeeze)
debian-7                 sparc64    Debian 7 (Wheezy) (sparc64)
debian-7                 x86_64     Debian 7 (wheezy)
debian-8                 x86_64     Debian 8 (jessie)
debian-9                 x86_64     Debian 9 (stretch)
fedora-18                x86_64     Fedora® 18
fedora-19                x86_64     Fedora® 19
fedora-20                x86_64     Fedora® 20
fedora-21                aarch64    Fedora® 21 Server (aarch64)
fedora-21                armv7l     Fedora® 21 Server (armv7l)
fedora-21                ppc64      Fedora® 21 Server (ppc64)
fedora-21                ppc64le    Fedora® 21 Server (ppc64le)
fedora-21                x86_64     Fedora® 21 Server
fedora-22                aarch64    Fedora® 22 Server (aarch64)
fedora-22                armv7l     Fedora® 22 Server (armv7l)
fedora-22                i686       Fedora® 22 Server (i686)
fedora-22                x86_64     Fedora® 22 Server
fedora-23                aarch64    Fedora® 23 Server (aarch64)
fedora-23                armv7l     Fedora® 23 Server (armv7l)
fedora-23                i686       Fedora® 23 Server (i686)
fedora-23                ppc64      Fedora® 23 Server (ppc64)
fedora-23                ppc64le    Fedora® 23 Server (ppc64le)
fedora-23                x86_64     Fedora® 23 Server
fedora-24                aarch64    Fedora® 24 Server (aarch64)
fedora-24                armv7l     Fedora® 24 Server (armv7l)
fedora-24                i686       Fedora® 24 Server (i686)
fedora-24                x86_64     Fedora® 24 Server
fedora-25                aarch64    Fedora® 25 Server (aarch64)
fedora-25                armv7l     Fedora® 25 Server (armv7l)
fedora-25                i686       Fedora® 25 Server (i686)
fedora-25                ppc64      Fedora® 25 Server (ppc64)
fedora-25                ppc64le    Fedora® 25 Server (ppc64le)
fedora-25                x86_64     Fedora® 25 Server
fedora-26                aarch64    Fedora® 26 Server (aarch64)
fedora-26                armv7l     Fedora® 26 Server (armv7l)
fedora-26                i686       Fedora® 26 Server (i686)
fedora-26                ppc64      Fedora® 26 Server (ppc64)
fedora-26                ppc64le    Fedora® 26 Server (ppc64le)
fedora-26                x86_64     Fedora® 26 Server
fedora-27                aarch64    Fedora® 27 Server (aarch64)
fedora-27                armv7l     Fedora® 27 Server (armv7l)
fedora-27                i686       Fedora® 27 Server (i686)
fedora-27                ppc64      Fedora® 27 Server (ppc64)
fedora-27                ppc64le    Fedora® 27 Server (ppc64le)
fedora-27                x86_64     Fedora® 27 Server
fedora-28                i686       Fedora® 28 Server (i686)
fedora-28                x86_64     Fedora® 28 Server
freebsd-11.1             x86_64     FreeBSD 11.1
scientificlinux-6        x86_64     Scientific Linux 6.5
ubuntu-10.04             x86_64     Ubuntu 10.04 (Lucid)
ubuntu-12.04             x86_64     Ubuntu 12.04 (Precise)
ubuntu-14.04             x86_64     Ubuntu 14.04 (Trusty)
ubuntu-16.04             x86_64     Ubuntu 16.04 (Xenial)
ubuntu-18.04             x86_64     Ubuntu 18.04 (bionic)
opensuse-13.1            x86_64     openSUSE 13.1
opensuse-13.2            x86_64     openSUSE 13.2
opensuse-42.1            x86_64     openSUSE Leap 42.1
opensuse-tumbleweed      x86_64     openSUSE Tumbleweed


5. Create Virtual Machine OS-es from scratch with virt-builder

Below we'll create two images one for Fedora 28 and 1 for Debian 9 using the virt-builder (a tool to build virtual images quickly), the images that could be used are shown through below virt-builder –list command.
 

# iso='fedora-28';
# iso1='debian-9';


# sudo virt-builder $iso \
     –size=10G \
     –format qcow2 -o /var/lib/libvirt/images/$iso-vm1.qcow2 \
     –hostname $iso-vm1 \
     –network \
     –timezone Europe/Sofia


[   3.3] Downloading: http://libguestfs.org/download/builder/fedora-28.xz
[   5.2] Planning how to build this image
[   5.2] Uncompressing
[  20.8] Resizing (using virt-resize) to expand the disk to 10.0G
[  50.8] Opening the new disk
[  53.7] Setting a random seed
[  53.7] Setting the hostname: fedora-28-vm1
[  53.7] Setting the timezone: Europe/Sofia
[  53.7] Setting passwords
virt-builder: Setting random password of root to YMTkxaJIkEU24Ytf

[  54.7] Finishing off
                   Output file: /var/lib/libvirt/images/fedora-28-vm1.qcow2
                   Output size: 10.0G
                 Output format: qcow2
            Total usable space: 9.3G
                    Free space: 8.2G (87%)


# sudo virt-builder $iso1 \
     –size=10G \
     –format qcow2 -o /var/lib/libvirt/images/$iso-vm1.qcow2 \
     –hostname $iso1-vm1 \
     –network \
     –timezone Europe/Sofia


[   3.2] Downloading: http://libguestfs.org/download/builder/debian-9.xz
[   4.1] Planning how to build this image
[   4.1] Uncompressing
[  16.9] Resizing (using virt-resize) to expand the disk to 10.0G
[  40.1] Opening the new disk
[  42.9] Setting a random seed
virt-builder: warning: random seed could not be set for this type of guest
[  42.9] Setting the hostname: debian-9-vm1
[  43.6] Setting the timezone: Europe/Sofia
[  43.6] Setting passwords
virt-builder: Setting random password of root to JtzEYGff9KxL5jCR
[  44.3] Finishing off
                   Output file: /var/lib/libvirt/images/debian-9-vm1.qcow2
                   Output size: 10.0G
                 Output format: qcow2
            Total usable space: 9.8G
                    Free space: 9.0G (91%)


vim bridged.xml

<network>
  <name>br0</name>
  <forward mode="bridge"/>
  <bridge name="br0"/>
</network>


# sudo virsh net-define –file bridged.xml
# sudo virsh net-autostart br0
# sudo virsh net-start br0


Above two commands will download pre-packaged KVM isos and store them inside /var/lib/libvirt/images/ you see also the root (administrator) password for both ISOs printed out.


root@jeremiah:/home/hipo/kvm# ls -ld /var/lib/libvirt/images/*
-rw-r–r– 1 root         root         10739318784 Oct 12 23:45 /var/lib/libvirt/images/debian-9-vm1.qcow2
-rw-r–r– 1 root         root         10739318784 Oct 12 23:46 /var/lib/libvirt/images/fedora-28-vm1.qcow2


To access directly the new created VMs as we have specified the –vnc option it is possible to directly vnc to the new host with VNC client (in linux I use vncviewer), on Windows you can use something like TightVNC.
 

6. Use official Linux distributions ISO boot files to install into KVM VM


Those who would like to run inside KVM VM Linux could do it directly using installable ISO files and install the set of Linux with the required packages, just like installing a fresh new Linux on a bare-metal machine.
To do so download your ISO image from the net (either from official distro website or a mirror website, in case if you need to spin an older version) and use virt-install to run the installer inside KVM.


root@jeremiah:~# cd /var/lib/libvirt/boot/;
root@jeremiah:~# wget http://mirrors.netix.net/centos/7.5.1804/isos/x86_64/CentOS-7-x86_64-DVD-1804.iso


# sudo virt-install \
–virt-type=kvm \
–name centos7 \
–ram 2048 \
–vcpus=2 \
–os-variant=centos7.0 \
–virt-type=kvm \
–hvm \
–cdrom=/var/lib/libvirt/boot/CentOS-7-x86_64-DVD-1804.iso \
–network=bridge=br0,model=virtio \
–network=bridge=br1,model=virtio \
–graphics vnc \
–disk path=/var/lib/libvirt/images/centos7.qcow2,size=40,bus=virtio,format=qcow2


7. List newly created VMs with Virsh command


root@jeremiah:/home/hipo/kvm# virsh list –all
 Id    Name                           State
—————————————————-
 3     fedora-28                      running
 –     debian9                        shut off


The –all parameter lists all available VMs ready to spin, if you want to check what are the VMs that are only running use instead:


root@jeremiah:/home/hipo/kvm# virsh list
 Id    Name                           State
—————————————————-
 3     fedora-28                      running


8. Install Virtual Machine OS-es

Below lines will install 2 Virtual machines one Fedora 28 and Debian 9


 os='fedora-28';
virt-install –import –name $os \
    –ram 2048 \
    –vcpu 2 \
    –disk path=/var/lib/libvirt/images/$os-vm1.qcow2,format=qcow2 \
    –os-variant fedora-unknown \
    –network=bridge=br0,model=virtio \
    –noautoconsole \
  –hvm \
  –graphics vnc

os='debian9';
virt-install –import –name $os     \
–ram 2048     \
–vcpu 2     \
–disk path=/var/lib/libvirt/images/$os-vm1.qcow2,format=qcow2     \
–os-variant debian9     –network=bridge=br0,model=virtio     \
–noautoconsole \
–hvm \
–graphics vnc


To deploy more just change the virtual machine type in os variable and modify the –os-variant variable to match the distribution name, to get the correct –os-variant variables that can be passed use osinfo-query below is output of the cmd:


root@jeremiah:/home/hipo/kvm# osinfo-query os
 Short ID             | Name                                               | Version  | ID                                      
———————-+—————————————————-+———-+—————————————–
 altlinux1.0          | Mandrake RE Spring 2001                            | 1.0      | http://altlinux.org/altlinux/1.0        
 altlinux2.0          | ALT Linux 2.0                                      | 2.0      | http://altlinux.org/altlinux/2.0        
 altlinux2.2          | ALT Linux 2.2                                      | 2.2      | http://altlinux.org/altlinux/2.2        
 altlinux2.4          | ALT Linux 2.4                                      | 2.4      | http://altlinux.org/altlinux/2.4        
 altlinux3.0          | ALT Linux 3.0                                      | 3.0      | http://altlinux.org/altlinux/3.0        
 altlinux4.0          | ALT Linux 4.0                                      | 4.0      | http://altlinux.org/altlinux/4.0        
 altlinux4.1          | ALT Linux 4.1                                      | 4.1      | http://altlinux.org/altlinux/4.1        
 altlinux5.0          | ALT Linux 5.0                                      | 5.0      | http://altlinux.org/altlinux/5.0        
 altlinux6.0          | ALT Linux 6.0                                      | 6.0      | http://altlinux.org/altlinux/6.0        
 altlinux7.0          | ALT Linux 7.0                                      | 7.0      | http://altlinux.org/altlinux/7.0        
 centos6.0            | CentOS 6.0                                         | 6.0      | http://centos.org/centos/6.0            
 centos6.1            | CentOS 6.1                                         | 6.1      | http://centos.org/centos/6.1            
 centos6.2            | CentOS 6.2                                         | 6.2      | http://centos.org/centos/6.2            
 centos6.3            | CentOS 6.3                                         | 6.3      | http://centos.org/centos/6.3            
 centos6.4            | CentOS 6.4                                         | 6.4      | http://centos.org/centos/6.4            
 centos6.5            | CentOS 6.5                                         | 6.5      | http://centos.org/centos/6.5            
 centos6.6            | CentOS 6.6                                         | 6.6      | http://centos.org/centos/6.6            
 centos6.7            | CentOS 6.7                                         | 6.7      | http://centos.org/centos/6.7            
 centos6.8            | CentOS 6.8                                         | 6.8      | http://centos.org/centos/6.8            
 centos6.9            | CentOS 6.9                                         | 6.9      | http://centos.org/centos/6.9            
 centos7.0            | CentOS 7.0                                         | 7.0      | http://centos.org/centos/7.0            
 debian1.1            | Debian Buzz                                        | 1.1      | http://debian.org/debian/1.1            
 debian1.2            | Debian Rex                                         | 1.2      | http://debian.org/debian/1.2            
 debian1.3            | Debian Bo                                          | 1.3      | http://debian.org/debian/1.3            
 debian2.0            | Debian Hamm                                        | 2.0      | http://debian.org/debian/2.0            
 debian2.1            | Debian Slink                                       | 2.1      | http://debian.org/debian/2.1            
 debian2.2            | Debian Potato                                      | 2.2      | http://debian.org/debian/2.2            
 debian3              | Debian Woody                                       | 3        | http://debian.org/debian/3              
 debian3.1            | Debian Sarge                                       | 3.1      | http://debian.org/debian/3.1            
 debian4              | Debian Etch                                        | 4        | http://debian.org/debian/4              
 debian5              | Debian Lenny                                       | 5        | http://debian.org/debian/5              
 debian6              | Debian Squeeze                                     | 6        | http://debian.org/debian/6              
 debian7              | Debian Wheezy                                      | 7        | http://debian.org/debian/7              
 debian8              | Debian Jessie                                      | 8        | http://debian.org/debian/8              
 debian9              | Debian Stretch                                     | 9        | http://debian.org/debian/9              
 debiantesting        | Debian Testing                                     | testing  | http://debian.org/debian/testing        
 fedora-unknown       | Fedora                                             | unknown  | http://fedoraproject.org/fedora/unknown
 fedora1              | Fedora Core 1                                      | 1        | http://fedoraproject.org/fedora/1       
 fedora10             | Fedora 10                                          | 10       | http://fedoraproject.org/fedora/10      
 fedora11             | Fedora 11                                          | 11       | http://fedoraproject.org/fedora/11      
 fedora12             | Fedora 12                                          | 12       | http://fedoraproject.org/fedora/12      
 fedora13             | Fedora 13                                          | 13       | http://fedoraproject.org/fedora/13      
 fedora14             | Fedora 14                                          | 14       | http://fedoraproject.org/fedora/14      
 fedora15             | Fedora 15                                          | 15       | http://fedoraproject.org/fedora/15      
 fedora16             | Fedora 16                                          | 16       | http://fedoraproject.org/fedora/16      
 fedora17             | Fedora 17                                          | 17       | http://fedoraproject.org/fedora/17      
 fedora18             | Fedora 18                                          | 18       | http://fedoraproject.org/fedora/18      
 fedora19             | Fedora 19                                          | 19       | http://fedoraproject.org/fedora/19      
 fedora2              | Fedora Core 2                                      | 2        | http://fedoraproject.org/fedora/2       
 fedora20             | Fedora 20                                          | 20       | http://fedoraproject.org/fedora/20      
 fedora21             | Fedora 21                                          | 21       | http://fedoraproject.org/fedora/21      
 fedora22             | Fedora 22                                          | 22       | http://fedoraproject.org/fedora/22      
 fedora23             | Fedora 23                                          | 23       | http://fedoraproject.org/fedora/23      
 fedora24             | Fedora 24                                          | 24       | http://fedoraproject.org/fedora/24      
 fedora25             | Fedora 25                                          | 25       | http://fedoraproject.org/fedora/25      
 fedora26             | Fedora 26                                          | 26       | http://fedoraproject.org/fedora/26      
 fedora3              | Fedora Core 3                                      | 3        | http://fedoraproject.org/fedora/3       
 fedora4              | Fedora Core 4                                      | 4        | http://fedoraproject.org/fedora/4       
 fedora5              | Fedora Core 5                                      | 5        | http://fedoraproject.org/fedora/5       
 fedora6              | Fedora Core 6                                      | 6        | http://fedoraproject.org/fedora/6       
 fedora7              | Fedora 7                                           | 7        | http://fedoraproject.org/fedora/7       
 fedora8              | Fedora 8                                           | 8        | http://fedoraproject.org/fedora/8       
 fedora9              | Fedora 9                                           | 9        | http://fedoraproject.org/fedora/9       
 freebsd1.0           | FreeBSD 1.0                                        | 1.0      | http://freebsd.org/freebsd/1.0          
 freebsd10.0          | FreeBSD 10.0                                       | 10.0     | http://freebsd.org/freebsd/10.0         
 freebsd10.1          | FreeBSD 10.1                                       | 10.1     | http://freebsd.org/freebsd/10.1         
 freebsd10.2          | FreeBSD 10.2                                       | 10.2     | http://freebsd.org/freebsd/10.2         
 freebsd10.3          | FreeBSD 10.3                                       | 10.3     | http://freebsd.org/freebsd/10.3         
 freebsd10.4          | FreeBSD 10.4                                       | 10.4     | http://freebsd.org/freebsd/10.4         
 freebsd11.0          | FreeBSD 11.0                                       | 11.0     | http://freebsd.org/freebsd/11.0         
 freebsd11.1          | FreeBSD 11.1                                       | 11.1     | http://freebsd.org/freebsd/11.1         
 freebsd2.0           | FreeBSD 2.0                                        | 2.0      | http://freebsd.org/freebsd/2.0          
 freebsd2.0.5         | FreeBSD 2.0.5                                      | 2.0.5    | http://freebsd.org/freebsd/2.0.5        
 freebsd2.2.8         | FreeBSD 2.2.8                                      | 2.2.8    | http://freebsd.org/freebsd/2.2.8        
 freebsd2.2.9         | FreeBSD 2.2.9                                      | 2.2.9    | http://freebsd.org/freebsd/2.2.9        
 freebsd3.0           | FreeBSD 3.0                                        | 3.0      | http://freebsd.org/freebsd/3.0          
 freebsd3.2           | FreeBSD 3.2                                        | 3.2      | http://freebsd.org/freebsd/3.2          
 freebsd4.0           | FreeBSD 4.0                                        | 4.0      | http://freebsd.org/freebsd/4.0          
 freebsd4.1           | FreeBSD 4.1                                        | 4.1      | http://freebsd.org/freebsd/4.1          
 freebsd4.10          | FreeBSD 4.10                                       | 4.10     | http://freebsd.org/freebsd/4.10         
 freebsd4.11          | FreeBSD 4.11                                       | 4.11     | http://freebsd.org/freebsd/4.11         
 freebsd4.2           | FreeBSD 4.2                                        | 4.2      | http://freebsd.org/freebsd/4.2          
 freebsd4.3           | FreeBSD 4.3                                        | 4.3      | http://freebsd.org/freebsd/4.3          
 freebsd4.4           | FreeBSD 4.4                                        | 4.4      | http://freebsd.org/freebsd/4.4          
 freebsd4.5           | FreeBSD 4.5                                        | 4.5      | http://freebsd.org/freebsd/4.5          
 freebsd4.6           | FreeBSD 4.6                                        | 4.6      | http://freebsd.org/freebsd/4.6          
 freebsd4.7           | FreeBSD 4.7                                        | 4.7      | http://freebsd.org/freebsd/4.7          
 freebsd4.8           | FreeBSD 4.8                                        | 4.8      | http://freebsd.org/freebsd/4.8          
 freebsd4.9           | FreeBSD 4.9                                        | 4.9      | http://freebsd.org/freebsd/4.9          
 freebsd5.0           | FreeBSD 5.0                                        | 5.0      | http://freebsd.org/freebsd/5.0          
 freebsd5.1           | FreeBSD 5.1                                        | 5.1      | http://freebsd.org/freebsd/5.1          
 freebsd5.2           | FreeBSD 5.2                                        | 5.2      | http://freebsd.org/freebsd/5.2          
 freebsd5.2.1         | FreeBSD 5.2.1                                      | 5.2.1    | http://freebsd.org/freebsd/5.2.1        
 freebsd5.3           | FreeBSD 5.3                                        | 5.3      | http://freebsd.org/freebsd/5.3          
 freebsd5.4           | FreeBSD 5.4                                        | 5.4      | http://freebsd.org/freebsd/5.4          
 freebsd5.5           | FreeBSD 5.5                                        | 5.5      | http://freebsd.org/freebsd/5.5          
 freebsd6.0           | FreeBSD 6.0                                        | 6.0      | http://freebsd.org/freebsd/6.0          
 freebsd6.1           | FreeBSD 6.1                                        | 6.1      | http://freebsd.org/freebsd/6.1          
 freebsd6.2           | FreeBSD 6.2                                        | 6.2      | http://freebsd.org/freebsd/6.2          
 freebsd6.3           | FreeBSD 6.3                                        | 6.3      | http://freebsd.org/freebsd/6.3          
 freebsd6.4           | FreeBSD 6.4                                        | 6.4      | http://freebsd.org/freebsd/6.4          
 freebsd7.0           | FreeBSD 7.0                                        | 7.0      | http://freebsd.org/freebsd/7.0          
 freebsd7.1           | FreeBSD 7.1                                        | 7.1      | http://freebsd.org/freebsd/7.1          
 freebsd7.2           | FreeBSD 7.2                                        | 7.2      | http://freebsd.org/freebsd/7.2          
 freebsd7.3           | FreeBSD 7.3                                        | 7.3      | http://freebsd.org/freebsd/7.3          
 freebsd7.4           | FreeBSD 7.4                                        | 7.4      | http://freebsd.org/freebsd/7.4          
 freebsd8.0           | FreeBSD 8.0                                        | 8.0      | http://freebsd.org/freebsd/8.0          
 freebsd8.1           | FreeBSD 8.1                                        | 8.1      | http://freebsd.org/freebsd/8.1          
 freebsd8.2           | FreeBSD 8.2                                        | 8.2      | http://freebsd.org/freebsd/8.2          
 freebsd8.3           | FreeBSD 8.3                                        | 8.3      | http://freebsd.org/freebsd/8.3          
 freebsd8.4           | FreeBSD 8.4                                        | 8.4      | http://freebsd.org/freebsd/8.4          
 freebsd9.0           | FreeBSD 9.0                                        | 9.0      | http://freebsd.org/freebsd/9.0          
 freebsd9.1           | FreeBSD 9.1                                        | 9.1      | http://freebsd.org/freebsd/9.1          
 freebsd9.2           | FreeBSD 9.2                                        | 9.2      | http://freebsd.org/freebsd/9.2          
 freebsd9.3           | FreeBSD 9.3                                        | 9.3      | http://freebsd.org/freebsd/9.3          
 freedos1.2           | FreeDOS 1.2                                        | 1.2      | http://freedos.org/freedos/1.2          
 gnome-continuous-3.10 | GNOME 3.10                                         | 3.10     | http://gnome.org/gnome-continuous/3.10  
 gnome-continuous-3.12 | GNOME 3.12                                         | 3.12     | http://gnome.org/gnome-continuous/3.12  
 gnome-continuous-3.14 | GNOME 3.14                                         | 3.14     | http://gnome.org/gnome-continuous/3.14  
 gnome3.6             | GNOME 3.6                                          | 3.6      | http://gnome.org/gnome/3.6              
 gnome3.8             | GNOME 3.8                                          | 3.8      | http://gnome.org/gnome/3.8              
 macosx10.0           | MacOS X Cheetah                                    | 10.0     | http://apple.com/macosx/10.0            
 macosx10.1           | MacOS X Puma                                       | 10.1     | http://apple.com/macosx/10.1            
 macosx10.2           | MacOS X Jaguar                                     | 10.2     | http://apple.com/macosx/10.2            
 macosx10.3           | MacOS X Panther                                    | 10.3     | http://apple.com/macosx/10.3            
 macosx10.4           | MacOS X Tiger                                      | 10.4     | http://apple.com/macosx/10.4            
 macosx10.5           | MacOS X Leopard                                    | 10.5     | http://apple.com/macosx/10.5            
 macosx10.6           | MacOS X Snow Leopard                               | 10.6     | http://apple.com/macosx/10.6            
 macosx10.7           | MacOS X Lion                                       | 10.7     | http://apple.com/macosx/10.7            
 mageia1              | Mageia 1                                           | 1        | http://mageia.org/mageia/1              
 mageia2              | Mageia 2                                           | 2        | http://mageia.org/mageia/2              
 mageia3              | Mageia 3                                           | 3        | http://mageia.org/mageia/3              
 mageia4              | Mageia 4                                           | 4        | http://mageia.org/mageia/4              
 mageia5              | Mageia 5                                           | 5        | http://mageia.org/mageia/5              
 mageia6              | Mageia 6                                           | 6        | http://mageia.org/mageia/6              
 mandrake10.0         | Mandrake Linux 10.0                                | 10.0     | http://mandriva.com/mandrake/10.0       
 mandrake10.1         | Mandrake Linux 10.1                                | 10.1     | http://mandriva.com/mandrake/10.1       
 mandrake10.2         | Mandrake Linux 10.2                                | 10.2     | http://mandriva.com/mandrake/10.2       
 mandrake5.1          | Mandrake Linux 5.1                                 | 5.1      | http://mandriva.com/mandrake/5.1        
 mandrake5.2          | Mandrake Linux 5.2                                 | 5.2      | http://mandriva.com/mandrake/5.2        
 mandrake5.3          | Mandrake Linux 5.3                                 | 5.3      | http://mandriva.com/mandrake/5.3        
 mandrake6.0          | Mandrake Linux 6.0                                 | 6.0      | http://mandriva.com/mandrake/6.0        
 mandrake6.1          | Mandrake Linux 6.1                                 | 6.1      | http://mandriva.com/mandrake/6.1        
 mandrake7.0          | Mandrake Linux 7.0                                 | 7.0      | http://mandriva.com/mandrake/7.0        
 mandrake7.1          | Mandrake Linux 7.1                                 | 7.1      | http://mandriva.com/mandrake/7.1        
 mandrake7.2          | Mandrake Linux 7.2                                 | 7.2      | http://mandriva.com/mandrake/7.2        
 mandrake8.0          | Mandrake Linux 8.0                                 | 8.0      | http://mandriva.com/mandrake/8.0        
 mandrake8.1          | Mandrake Linux 8.1                                 | 8.1      | http://mandriva.com/mandrake/8.1        
 mandrake8.2          | Mandrake Linux 8.2                                 | 8.2      | http://mandriva.com/mandrake/8.2        
 mandrake9.0          | Mandrake Linux 9.0                                 | 9.0      | http://mandriva.com/mandrake/9.0        
 mandrake9.1          | Mandrake Linux 9.1                                 | 9.1      | http://mandriva.com/mandrake/9.1        
 mandrake9.2          | Mandrake Linux 9.2                                 | 9.2      | http://mandriva.com/mandrake/9.2        
 mandriva2006.0       | Mandriva Linux 2006.0                              | 2006.0   | http://mandriva.com/mandriva/2006.0     
 mandriva2007         | Mandriva Linux 2007                                | 2007     | http://mandriva.com/mandriva/2007       
 mandriva2007.1       | Mandriva Linux 2007 Spring                         | 2007.1   | http://mandriva.com/mandriva/2007.1     
 mandriva2008.0       | Mandriva Linux 2008                                | 2008.0   | http://mandriva.com/mandriva/2008.0     
 mandriva2008.1       | Mandriva Linux 2008 Spring                         | 2008.1   | http://mandriva.com/mandriva/2008.1     
 mandriva2009.0       | Mandriva Linux 2009                                | 2009.0   | http://mandriva.com/mandriva/2009.0     
 mandriva2009.1       | Mandriva Linux 2009 Spring                         | 2009.1   | http://mandriva.com/mandriva/2009.1     
 mandriva2010.0       | Mandriva Linux 2010                                | 2010.0   | http://mandriva.com/mandriva/2010.0     
 mandriva2010.1       | Mandriva Linux 2010 Spring                         | 2010.1   | http://mandriva.com/mandriva/2010.1     
 mandriva2010.2       | Mandriva Linux 2010.2                              | 2010.2   | http://mandriva.com/mandriva/2010.2     
 mandriva2011         | Mandriva Linux 2011                                | 2011     | http://mandriva.com/mandriva/2011       
 mbs1.0               | Mandriva Business Server 1.0                       | 1.0      | http://mandriva.com/mbs/1.0             
 mes5                 | Mandriva Enterprise Server 5.0                     | 5.0      | http://mandriva.com/mes/5.0             
 mes5.1               | Mandriva Enterprise Server 5.1                     | 5.1      | http://mandriva.com/mes/5.1             
 msdos6.22            | Microsoft MS-DOS 6.22                              | 6.22     | http://microsoft.com/msdos/6.22         
 netbsd0.8            | NetBSD 0.8                                         | 0.8      | http://netbsd.org/netbsd/0.8            
 netbsd0.9            | NetBSD 0.9                                         | 0.9      | http://netbsd.org/netbsd/0.9            
 netbsd1.0            | NetBSD 1.0                                         | 1.0      | http://netbsd.org/netbsd/1.0            
 netbsd1.1            | NetBSD 1.1                                         | 1.1      | http://netbsd.org/netbsd/1.1            
 netbsd1.2            | NetBSD 1.2                                         | 1.2      | http://netbsd.org/netbsd/1.2            
 netbsd1.3            | NetBSD 1.3                                         | 1.3      | http://netbsd.org/netbsd/1.3            
 netbsd1.4            | NetBSD 1.4                                         | 1.4      | http://netbsd.org/netbsd/1.4            
 netbsd1.5            | NetBSD 1.5                                         | 1.5      | http://netbsd.org/netbsd/1.5            
 netbsd1.6            | NetBSD 1.6                                         | 1.6      | http://netbsd.org/netbsd/1.6            
 netbsd2.0            | NetBSD 2.0                                         | 2.0      | http://netbsd.org/netbsd/2.0            
 netbsd3.0            | NetBSD 3.0                                         | 3.0      | http://netbsd.org/netbsd/3.0            
 netbsd4.0            | NetBSD 4.0                                         | 4.0      | http://netbsd.org/netbsd/4.0            
 netbsd5.0            | NetBSD 5.0                                         | 5.0      | http://netbsd.org/netbsd/5.0            
 netbsd5.1            | NetBSD 5.1                                         | 5.1      | http://netbsd.org/netbsd/5.1            
 netbsd6.0            | NetBSD 6.0                                         | 6.0      | http://netbsd.org/netbsd/6.0            
 netbsd6.1            | NetBSD 6.1                                         | 6.1      | http://netbsd.org/netbsd/6.1            
 netbsd7.0            | NetBSD 7.0                                         | 7.0      | http://netbsd.org/netbsd/7.0            
 netbsd7.1            | NetBSD 7.1                                         | 7.1      | http://netbsd.org/netbsd/7.1            
 netbsd7.1.1          | NetBSD 7.1.1                                       | 7.1.1    | http://netbsd.org/netbsd/7.1.1          
 netware4             | Novell Netware 4                                   | 4        | http://novell.com/netware/4             
 netware5             | Novell Netware 5                                   | 5        | http://novell.com/netware/5             
 netware6             | Novell Netware 6                                   | 6        | http://novell.com/netware/6             
 openbsd4.2           | OpenBSD 4.2                                        | 4.2      | http://openbsd.org/openbsd/4.2          
 openbsd4.3           | OpenBSD 4.3                                        | 4.3      | http://openbsd.org/openbsd/4.3          
 openbsd4.4           | OpenBSD 4.4                                        | 4.4      | http://openbsd.org/openbsd/4.4          
 openbsd4.5           | OpenBSD 4.5                                        | 4.5      | http://openbsd.org/openbsd/4.5          
 openbsd4.8           | OpenBSD 4.8                                        | 4.8      | http://openbsd.org/openbsd/4.8          
 openbsd4.9           | OpenBSD 4.9                                        | 4.9      | http://openbsd.org/openbsd/4.9          
 openbsd5.0           | OpenBSD 5.0                                        | 5.0      | http://openbsd.org/openbsd/5.0          
 openbsd5.1           | OpenBSD 5.1                                        | 5.1      | http://openbsd.org/openbsd/5.1          
 openbsd5.2           | OpenBSD 5.2                                        | 5.2      | http://openbsd.org/openbsd/5.2          
 openbsd5.3           | OpenBSD 5.3                                        | 5.3      | http://openbsd.org/openbsd/5.3          
 openbsd5.4           | OpenBSD 5.4                                        | 5.4      | http://openbsd.org/openbsd/5.4          
 openbsd5.5           | OpenBSD 5.5                                        | 5.5      | http://openbsd.org/openbsd/5.5          
 openbsd5.6           | OpenBSD 5.6                                        | 5.6      | http://openbsd.org/openbsd/5.6          
 openbsd5.7           | OpenBSD 5.7                                        | 5.7      | http://openbsd.org/openbsd/5.7          
 openbsd5.8           | OpenBSD 5.8                                        | 5.8      | http://openbsd.org/openbsd/5.8          
 openbsd5.9           | OpenBSD 5.9                                        | 5.9      | http://openbsd.org/openbsd/5.9          
 openbsd6.0           | OpenBSD 6.0                                        | 6.0      | http://openbsd.org/openbsd/6.0          
 openbsd6.1           | OpenBSD 6.1                                        | 6.1      | http://openbsd.org/openbsd/6.1          
 openbsd6.2           | OpenBSD 6.2                                        | 6.2      | http://openbsd.org/openbsd/6.2          
 opensolaris2009.06   | OpenSolaris 2009.06                                | 2009.06  | http://sun.com/opensolaris/2009.06      
 opensuse-factory     | openSUSE                                           | factory  | http://opensuse.org/opensuse/factory    
 opensuse-unknown     | openSUSE                                           | unknown  | http://opensuse.org/opensuse/unknown    
 opensuse10.2         | openSUSE 10.2                                      | 10.2     | http://opensuse.org/opensuse/10.2       
 opensuse10.3         | openSUSE 10.3                                      | 10.3     | http://opensuse.org/opensuse/10.3       
 opensuse11.0         | openSUSE 11.0                                      | 11.0     | http://opensuse.org/opensuse/11.0       
 opensuse11.1         | openSUSE 11.1                                      | 11.1     | http://opensuse.org/opensuse/11.1       
 opensuse11.2         | openSUSE 11.2                                      | 11.2     | http://opensuse.org/opensuse/11.2       
 opensuse11.3         | openSUSE 11.3                                      | 11.3     | http://opensuse.org/opensuse/11.3       
 opensuse11.4         | openSUSE 11.4                                      | 11.4     | http://opensuse.org/opensuse/11.4       
 opensuse12.1         | openSUSE 12.1                                      | 12.1     | http://opensuse.org/opensuse/12.1       
 opensuse12.2         | openSUSE 12.2                                      | 12.2     | http://opensuse.org/opensuse/12.2       
 opensuse12.3         | openSUSE 12.3                                      | 12.3     | http://opensuse.org/opensuse/12.3       
 opensuse13.1         | openSUSE 13.1                                      | 13.1     | http://opensuse.org/opensuse/13.1       
 opensuse13.2         | openSUSE 13.2                                      | 13.2     | http://opensuse.org/opensuse/13.2       
 opensuse42.1         | openSUSE Leap 42.1                                 | 42.1     | http://opensuse.org/opensuse/42.1       
 opensuse42.2         | openSUSE Leap 42.2                                 | 42.2     | http://opensuse.org/opensuse/42.2       
 opensuse42.3         | openSUSE Leap 42.3                                 | 42.3     | http://opensuse.org/opensuse/42.3       
 opensusetumbleweed   | openSUSE Tumbleweed                                | tumbleweed | http://opensuse.org/opensuse/tumbleweed
 rhel-atomic-7.0      | Red Hat Enterprise Linux Atomic Host 7.0           | 7.0      | http://redhat.com/rhel-atomic/7.0       
 rhel-atomic-7.1      | Red Hat Enterprise Linux Atomic Host 7.1           | 7.1      | http://redhat.com/rhel-atomic/7.1       
 rhel-atomic-7.2      | Red Hat Enterprise Linux Atomic Host 7.2           | 7.2      | http://redhat.com/rhel-atomic/7.2       
 rhel2.1              | Red Hat Enterprise Linux 2.1                       | 2.1      | http://redhat.com/rhel/2.1              
 rhel2.1.1            | Red Hat Enterprise Linux 2.1 Update 1  
/etc/bind/masters/elinvent.com            | 2.1.1    | http://redhat.com/rhel/2.1.1            
 rhel2.1.2            | Red Hat Enterprise Linux 2.1 Update 2              | 2.1.2    | http://redhat.com/rhel/2.1.2            
 rhel2.1.3            | Red Hat Enterprise Linux 2.1 Update 3              | 2.1.3    | http://redhat.com/rhel/2.1.3            
 rhel2.1.4            | Red Hat Enterprise Linux 2.1 Update 4              | 2.1.4    | http://redhat.com/rhel/2.1.4            
 rhel2.1.5            | Red Hat Enterprise Linux 2.1 Update 5              | 2.1.5    | http://redhat.com/rhel/2.1.5            
 rhel2.1.6            | Red Hat Enterprise Linux 2.1 Update 6              | 2.1.6    | http://redhat.com/rhel/2.1.6            
 rhel2.1.7            | Red Hat Enterprise Linux 2.1 Update 7              | 2.1.7    | http://redhat.com/rhel/2.1.7            
 rhel3                | Red Hat Enterprise Linux 3                         | 3        | http://redhat.com/rhel/3                
 rhel3.1              | Red Hat Enterprise Linux 3 Update 1                | 3.1      | http://redhat.com/rhel/3.1              
 rhel3.2              | Red Hat Enterprise Linux 3 Update 2                | 3.2      | http://redhat.com/rhel/3.2              
 rhel3.3              | Red Hat Enterprise Linux 3 Update 3                | 3.3      | http://redhat.com/rhel/3.3              
 rhel3.4              | Red Hat Enterprise Linux 3 Update 4                | 3.4      | http://redhat.com/rhel/3.4              
 rhel3.5              | Red Hat Enterprise Linux 3 Update 5                | 3.5      | http://redhat.com/rhel/3.5              
 rhel3.6              | Red Hat Enterprise Linux 3 Update 6                | 3.6      | http://redhat.com/rhel/3.6              
 rhel3.7              | Red Hat Enterprise Linux 3 Update 7                | 3.7      | http://redhat.com/rhel/3.7              
 rhel3.8              | Red Hat Enterprise Linux 3 Update 8                | 3.8      | http://redhat.com/rhel/3.8              
 rhel3.9              | Red Hat Enterprise Linux 3 Update 9                | 3.9      | http://redhat.com/rhel/3.9              
 rhel4.0              | Red Hat Enterprise Linux 4.0                       | 4.0      | http://redhat.com/rhel/4.0              
 rhel4.1              | Red Hat Enterprise Linux 4.1                       | 4.1      | http://redhat.com/rhel/4.1              
 rhel4.2              | Red Hat Enterprise Linux 4.2                       | 4.2      | http://redhat.com/rhel/4.2              
 rhel4.3              | Red Hat Enterprise Linux 4.3                       | 4.3      | http://redhat.com/rhel/4.3              
 rhel4.4              | Red Hat Enterprise Linux 4.4                       | 4.4      | http://redhat.com/rhel/4.4              
 rhel4.5              | Red Hat Enterprise Linux 4.5                       | 4.5      | http://redhat.com/rhel/4.5              
 rhel4.6              | Red Hat Enterprise Linux 4.6                       | 4.6      | http://redhat.com/rhel/4.6              
 rhel4.7              | Red Hat Enterprise Linux 4.7                       | 4.7      | http://redhat.com/rhel/4.7              
 rhel4.8              | Red Hat Enterprise Linux 4.8                       | 4.8      | http://redhat.com/rhel/4.8              
 rhel4.9              | Red Hat Enterprise Linux 4.9                       | 4.9      | http://redhat.com/rhel/4.9              
 rhel5.0              | Red Hat Enterprise Linux 5.0                       | 5.0      | http://redhat.com/rhel/5.0              
 rhel5.1              | Red Hat Enterprise Linux 5.1                       | 5.1      | http://redhat.com/rhel/5.1              
 rhel5.10             | Red Hat Enterprise Linux 5.10                      | 5.10     | http://redhat.com/rhel/5.10             
 rhel5.11             | Red Hat Enterprise Linux 5.11                      | 5.11     | http://redhat.com/rhel/5.11             
 rhel5.2              | Red Hat Enterprise Linux 5.2                       | 5.2      | http://redhat.com/rhel/5.2              
 rhel5.3              | Red Hat Enterprise Linux 5.3                       | 5.3      | http://redhat.com/rhel/5.3              
 rhel5.4              | Red Hat Enterprise Linux 5.4                       | 5.4      | http://redhat.com/rhel/5.4              
 rhel5.5              | Red Hat Enterprise Linux 5.5                       | 5.5      | http://redhat.com/rhel/5.5              
 rhel5.6              | Red Hat Enterprise Linux 5.6                       | 5.6      | http://redhat.com/rhel/5.6              
 rhel5.7              | Red Hat Enterprise Linux 5.7                       | 5.7      | http://redhat.com/rhel/5.7              
 rhel5.8              | Red Hat Enterprise Linux 5.8                       | 5.8      | http://redhat.com/rhel/5.8              
 rhel5.9              | Red Hat Enterprise Linux 5.9                       | 5.9      | http://redhat.com/rhel/5.9              
 rhel6.0              | Red Hat Enterprise Linux 6.0                       | 6.0      | http://redhat.com/rhel/6.0              
 rhel6.1              | Red Hat Enterprise Linux 6.1                       | 6.1      | http://redhat.com/rhel/6.1              
 rhel6.2              | Red Hat Enterprise Linux 6.2                       | 6.2      | http://redhat.com/rhel/6.2              
 rhel6.3              | Red Hat Enterprise Linux 6.3                       | 6.3      | http://redhat.com/rhel/6.3              
 rhel6.4              | Red Hat Enterprise Linux 6.4                       | 6.4      | http://redhat.com/rhel/6.4              
 rhel6.5              | Red Hat Enterprise Linux 6.5                       | 6.5      | http://redhat.com/rhel/6.5              
 rhel6.6              | Red Hat Enterprise Linux 6.6                       | 6.6      | http://redhat.com/rhel/6.6              
 rhel6.7              | Red Hat Enterprise Linux 6.7                       | 6.7      | http://redhat.com/rhel/6.7              
 rhel6.8              | Red Hat Enterprise Linux 6.8                       | 6.8      | http://redhat.com/rhel/6.8              
 rhel6.9              | Red Hat Enterprise Linux 6.9                       | 6.9      | http://redhat.com/rhel/6.9              
 rhel7.0              | Red Hat Enterprise Linux 7.0                       | 7.0      | http://redhat.com/rhel/7.0              
 rhel7.1              | Red Hat Enterprise Linux 7.1                       | 7.1      | http://redhat.com/rhel/7.1              
 rhel7.2              | Red Hat Enterprise Linux 7.2                       | 7.2      | http://redhat.com/rhel/7.2              
 rhel7.3              | Red Hat Enterprise Linux 7.3                       | 7.3      | http://redhat.com/rhel/7.3              
 rhel7.4              | Red Hat Enterprise Linux 7.4                       | 7.4      | http://redhat.com/rhel/7.4              
 rhl1.0               | Red Hat Linux 1.0                                  | 1.0      | http://redhat.com/rhl/1.0               
 rhl1.1               | Red Hat Linux 1.1                                  | 1.1      | http://redhat.com/rhl/1.1               
 rhl2.0               | Red Hat Linux 2.0                                  | 2.0      | http://redhat.com/rhl/2.0               
 rhl2.1               | Red Hat Linux 2.1                                  | 2.1      | http://redhat.com/rhl/2.1               
 rhl3.0.3             | Red Hat Linux 3.0.3                                | 3.0.3    | http://redhat.com/rhl/3.0.3             
 rhl4.0               | Red Hat Linux 4.0                                  | 4.0      | http://redhat.com/rhl/4.0               
 rhl4.1               | Red Hat Linux 4.1                                  | 4.1      | http://redhat.com/rhl/4.1               
 rhl4.2               | Red Hat Linux 4.2                                  | 4.2      | http://redhat.com/rhl/4.2               
 rhl5.0               | Red Hat Linux 5.0                                  | 5.0      | http://redhat.com/rhl/5.0               
 rhl5.1               | Red Hat Linux 5.1                                  | 5.1      | http://redhat.com/rhl/5.1               
 rhl5.2               | Red Hat Linux 5.2                                  | 5.2      | http://redhat.com/rhl/5.2               
 rhl6.0               | Red Hat Linux 6.0                                  | 6.0      | http://redhat.com/rhl/6.0               
 rhl6.1               | Red Hat Linux 6.1                                  | 6.1      | http://redhat.com/rhl/6.1               
 rhl6.2               | Red Hat Linux 6.2                                  | 6.2      | http://redhat.com/rhl/6.2               
 rhl7                 | Red Hat Linux 7                                    | 7        | http://redhat.com/rhl/7                 
 rhl7.1               | Red Hat Linux 7.1                                  | 7.1      | http://redhat.com/rhl/7.1               
 rhl7.2               | Red Hat Linux 7.2                                  | 7.2      | http://redhat.com/rhl/7.2               
 rhl7.3               | Red Hat Linux 7.3                                  | 7.3      | http://redhat.com/rhl/7.3               
 rhl8.0               | Red Hat Linux 8.0                                  | 8.0      | http://redhat.com/rhl/8.0               
 rhl9                 | Red Hat Linux 9                                    | 9        | http://redhat.com/rhl/9                 
 sled10               | SUSE Linux Enterprise Desktop 10                   | 10       | http://suse.com/sled/10                 
 sled10sp1            | SUSE Linux Enterprise Desktop 10 SP1               | 10.1     | http://suse.com/sled/10.1               
 sled10sp2            | SUSE Linux Enterprise Desktop 10 SP2               | 10.2     | http://suse.com/sled/10.2               
 sled10sp3            | SUSE Linux Enterprise Desktop 10 SP3               | 10.3     | http://suse.com/sled/10.3               
 sled10sp4            | SUSE Linux Enterprise Desktop 10 SP4               | 10.4     | http://suse.com/sled/10.4               
 sled11               | SUSE Linux Enterprise Desktop 11                   | 11       | http://suse.com/sled/11                 
 sled11sp1            | SUSE Linux Enterprise Desktop 11 SP1               | 11.1     | http://suse.com/sled/11.1               
 sled11sp2            | SUSE Linux Enterprise Desktop 11 SP2               | 11.2     | http://suse.com/sled/11.2               
 sled11sp3            | SUSE Linux Enterprise Desktop 11 SP3               | 11.3     | http://suse.com/sled/11.3               
 sled11sp4            | SUSE Linux Enterprise Desktop 11 SP4               | 11.4     | http://suse.com/sled/11.4               
 sled12               | SUSE Linux Enterprise Desktop 12                   | 12       | http://suse.com/sled/12                 
 sled12sp1            | SUSE Linux Enterprise Desktop 12 SP1               | 12.1     | http://suse.com/sled/12.1               
 sled12sp2            | SUSE Linux Enterprise Desktop 12 SP2               | 12.2     | http://suse.com/sled/12.2               
 sled9                | SUSE Linux Enterprise Desktop 9                    | 9        | http://suse.com/sled/9                  
 sles10               | SUSE Linux Enterprise Server 10            
/etc/bind/masters/elinvent.com        | 10       | http://suse.com/sles/10                 
 sles10sp1            | SUSE Linux Enterprise Server 10 SP1                | 10.1     | http://suse.com/sles/10.1               
 sles10sp2            | SUSE Linux Enterprise Server 10 SP2                | 10.2     | http://suse.com/sles/10.2               
 sles10sp3            | SUSE Linux Enterprise Server 10 SP3                | 10.3     | http://suse.com/sles/10.3               
 sles10sp4            | SUSE Linux Enterprise Server 10 SP4                | 10.4     | http://suse.com/sles/10.4               
 sles11               | SUSE Linux Enterprise Server 11                    | 11       | http://suse.com/sles/11                 
 sles11sp1            | SUSE Linux Enterprise Server 11 SP1                | 11.1     | http://suse.com/sles/11.1               
 sles11sp2            | SUSE Linux Enterprise Server 11 SP2                | 11.2     | http://suse.com/sles/11.2               
 sles11sp3            | SUSE Linux Enterprise Server 11 SP3                | 11.3     | http://suse.com/sles/11.3               
 sles11sp4            | SUSE Linux Enterprise Server 11 SP4                | 11.4     | http://suse.com/sles/11.4               
 sles12               | SUSE Linux Enterprise Server 12                    | 12       | http://suse.com/sles/12                 
 sles12sp1            | SUSE Linux Enterprise Server 12 SP1                | 12.1     | http://suse.com/sles/12.1               
 sles12sp2            | SUSE Linux Enterprise Server 12 SP2                | 12.2     | http://suse.com/sles/12.2               
 sles9                | SUSE Linux Enterprise Server 9                     | 9        | http://suse.com/sles/9                  
 solaris10            | Solaris 10                                         | 10       | http://sun.com/solaris/10               
 solaris11            | Oracle Solaris 11                                  | 11       | http://oracle.com/solaris/11            
 solaris9             | Solaris 9                                          | 9        | http://sun.com/solaris/9                
 ubuntu10.04          | Ubuntu 10.04 LTS                                   | 10.04    | http://ubuntu.com/ubuntu/10.04          
 ubuntu10.10          | Ubuntu 10.10                                       | 10.10    | http://ubuntu.com/ubuntu/10.10          
 ubuntu11.04          | Ubuntu 11.04                                       | 11.04    | http://ubuntu.com/ubuntu/11.04          
 ubuntu11.10          | Ubuntu 11.10                                       | 11.10    | http://ubuntu.com/ubuntu/11.10          
 ubuntu12.04          | Ubuntu 12.04 LTS                                   | 12.04    | http://ubuntu.com/ubuntu/12.04          
 ubuntu12.10          | Ubuntu 12.10                                       | 12.10    | http://ubuntu.com/ubuntu/12.10          
 ubuntu13.04          | Ubuntu 13.04                                       | 13.04    | http://ubuntu.com/ubuntu/13.04          
 ubuntu13.10          | Ubuntu 13.10                                       | 13.10    | http://ubuntu.com/ubuntu/13.10          
 ubuntu14.04          | Ubuntu 14.04 LTS                                   | 14.04    | http://ubuntu.com/ubuntu/14.04          
 ubuntu14.10          | Ubuntu 14.10                                       | 14.10    | http://ubuntu.com/ubuntu/14.10          
 ubuntu15.04          | Ubuntu 15.04                                       | 15.04    | http://ubuntu.com/ubuntu/15.04          
 ubuntu15.10          | Ubuntu 15.10                                       | 15.10    | http://ubuntu.com/ubuntu/15.10          
 ubuntu16.04          | Ubuntu 16.04                                       | 16.04    | http://ubuntu.com/ubuntu/16.04          
 ubuntu16.10          | Ubuntu 16.10                                       | 16.10    | http://ubuntu.com/ubuntu/16.10          
 ubuntu17.04          | Ubuntu 17.04                                       | 17.04    | http://ubuntu.com/ubuntu/17.04          
 ubuntu17.10          | Ubuntu 17.10                                       | 17.10    | http://ubuntu.com/ubuntu/17.10          
 ubuntu4.10           | Ubuntu 4.10                                        | 4.10     | http://ubuntu.com/ubuntu/4.10           
 ubuntu5.04           | Ubuntu 5.04                                        | 5.04     | http://ubuntu.com/ubuntu/5.04           
 ubuntu5.10           | Ubuntu 5.10                                        | 5.10     | http://ubuntu.com/ubuntu/5.10           
 ubuntu6.06           | Ubuntu 6.06 LTS                                    | 6.06     | http://ubuntu.com/ubuntu/6.06           
 ubuntu6.10           | Ubuntu 6.10                                        | 6.10     | http://ubuntu.com/ubuntu/6.10           
 ubuntu7.04           | Ubuntu 7.04                                        | 7.04     | http://ubuntu.com/ubuntu/7.04           
 ubuntu7.10           | Ubuntu 7.10                                        | 7.10     | http://ubuntu.com/ubuntu/7.10           
 ubuntu8.04           | Ubuntu 8.04 LTS                                    | 8.04     | http://ubuntu.com/ubuntu/8.04           
 ubuntu8.10           | Ubuntu 8.10                                        | 8.10     | http://ubuntu.com/ubuntu/8.10           
 ubuntu9.04           | Ubuntu 9.04                                        | 9.04     | http://ubuntu.com/ubuntu/9.04           
 ubuntu9.10           | Ubuntu 9.10                                        | 9.10     | http://ubuntu.com/ubuntu/9.10           
 win1.0               | Microsoft Windows 1.0                              | 1.0      | http://microsoft.com/win/1.0            
 win10                | Microsoft Windows 10                               | 10.0     | http://microsoft.com/win/10             
 win2.0               | Microsoft Windows 2.0                              | 2.0      | http://microsoft.com/win/2.0            
 win2.1               | Microsoft Windows 2.1                              | 2.1      | http://microsoft.com/win/2.1            
 win2k                | Microsoft Windows 2000                             | 5.0      | http://microsoft.com/win/2k             
 win2k12              | Microsoft Windows Server 2012                      | 6.3      | http://microsoft.com/win/2k12           
 win2k12r2            | Microsoft Windows Server 2012 R2                   | 6.3      | http://microsoft.com/win/2k12r2         
 win2k3               | Microsoft Windows Server 2003                      | 5.2      | http://microsoft.com/win/2k3            
 win2k3r2             | Microsoft Windows Server 2003 R2                   | 5.2      | http://microsoft.com/win/2k3r2          
 win2k8               | Microsoft Windows Server 2008                      | 6.0      | http://microsoft.com/win/2k8            
 win2k8r2             | Microsoft Windows Server 2008 R2                   | 6.1      | http://microsoft.com/win/2k8r2          
 win3.1               | Microsoft Windows 3.1                              | 3.1      | http://microsoft.com/win/3.1            
 win7                 | Microsoft Windows 7                                | 6.1      | http://microsoft.com/win/7              
 win8                 | Microsoft Windows 8                                | 6.2      | http://microsoft.com/win/8              
 win8.1               | Microsoft Windows 8.1                              | 6.3      | http://microsoft.com/win/8.1            
 win95                | Microsoft Windows 95                               | 4.0      | http://microsoft.com/win/95             
 win98                | Microsoft Windows 98                               | 4.1      | http://microsoft.com/win/98             
 winme                | Microsoft Windows Millennium Edition               | 4.9      | http://microsoft.com/win/me             
 winnt3.1             | Microsoft Windows NT Server 3.1                    | 3.1      | http://microsoft.com/winnt/3.1          
 winnt3.5             | Microsoft Windows NT Server 3.5                    | 3.5      | http://microsoft.com/winnt/3.5          
 winnt3.51            | Microsoft Windows NT Server 3.51                   | 3.51     | http://microsoft.com/winnt/3.51         
 winnt4.0             | Microsoft Windows NT Server 4.0                    | 4.0      | http://microsoft.com/winnt/4.0          
 winvista             | Microsoft Windows Vista                            | 6.0      | http://microsoft.com/win/vista          
 winxp                | Microsoft Windows XP                               | 5.1      | http://microsoft.com/win/xp  


9. Start / Stop listed KVM Virtual Machine


root@jeremiah:~# virsh list –all
 Id    Name                           State
—————————————————-
 3     fedora-28                      running
 –     debian9                        shut off


To start debian9 linux virtual machine that is currently off


root@jeremiah:~# virsh start fedora-28
Domain fedora-28 started


root@jeremiah:/home/hipo# virsh start debian9
error: Failed to start domain debian9
error: Requested operation is not valid: network 'default' is not active

root@jeremiah:/home/hipo# virsh net-list –all
Name                 State      Autostart     Persistent
———————————————————-
br0                  active     yes           yes
default              inactive   no            yes


root@jeremiah:/home/hipo# virsh net-start default
Network default started

root@jeremiah:/home/hipo# virsh start debian9
Domain debian9 started


10. Attach to running VM with virsh or virt-manager


root@jeremiah:~# virsh list
 Id    Name                           State
—————————————————-
 1     fedora-28                      running
 3     debian9                        running

root@jeremiah:~# virsh connect debian9


Note that to make the login prompt appear you have to press enter once after the ^] connection string appears


kvm-connect-to-virtual-machine-with-virsh-command-screenshot-howto

An alternative way is to use virt-manager GUI KVM desktop management interface and click over the Virtual Machine Guest name, in same fashion like in VirtualBox.

virtual-manager-virt-manager-screenshot-with-Virtual-Machines-inside-on-Debian-Linux

virt-manager-gui-interface-connect-to-fedora-28-virtual-machine

If you have KVM running on your Linux desktop PC / notebook you can also connect via VNC with virsh command.


root@jericho:~# virsh vncdisplay centos7


Another handy thing is to expose the Virtualized Guest OS with VNC in order to be able to connect and manage installation or further Linux configuration via VNC using an SSH Tunnel with port forwarding:


$ ssh hipo@www.pc-freak.net -L 5901:127.0.0.1:5901


11.  Start / Shutdown / Suspend / Reboot (safe reboot) a VM guest machine domain


root@jericho:~# virsh shutdown debian9
root@jericho:~# virsh start fedora-28
root@jericho:~# virsh suspend debian9
root@jericho:~# virsh reboot fedora-28


12. Remove / Delete KVM Virtual Machines domain


root@jeremiah:~# virsh undefine fedora-28
root@jeremiah:~# virsh destroy fedora-28


Closing words


Using KVM to experiment with different OS distributions is really fun just like you can easily run a number of the major most popular Linux Distributions and a set of different versions. It takes few minutes to have a fully functional Linux to play with and it saves a lot of hassles when dealing with GNU / Linux and FreeBSD, doing so in Virtualbox for me prooved to be much more complicated (not to mention that often Virtualbox had an ugly bugs so even Importing an Appliance as a Guest VM with an official distro OS-es failed with weird errors.
One other very practical use of Kerkel-based Virtualization is if you want to run your servers using own Micro-Services architecture (e.g. run multiple Linux OS-es each running a separate Apache / Nginx / MySQL / PostGreSQL / Backup / Storage) etc. all of it running on a single dedicated server or a self-hosted bare-metal
There are plenty of Web Interfaces for Management KVM (proprietary and free software) that could even futher simplify the use and deploy / destory of KVM VMs.
All that makes possible running your own Linux or Web hosting provider a relatively easy task and seriously could cut business expenses and operational (maintenance) costs.

If you plan to run youw own hosting company, I can help you establish your infrastructure and advise you on the right technologies to use.


Non-free packages to install to make Ubuntu Linux Multimedia ready / Post install packages for new Ubuntu installations

Monday, January 23rd, 2012

non-free-packages-to-install-make-ubuntu-linux-multimedia-ready

1. Add Medibuntu package repository

root@ubuntu:~# wget --output-document=/etc/apt/sources.list.d/medibuntu.list \
http://www.medibuntu.org/sources.list.d/$(lsb_release -cs).list \
&& apt-get --quiet update \
&& apt-get --yes --quiet --allow-unauthenticated install medibuntu-keyring \
&& apt-get --quiet update

2. Enable Ubuntu to play Restricted DVD
root@ubuntu:~# apt-get install --yes libdvdread4
...
root@ubuntu:~# /usr/share/doc/libdvdread4/install-css.sh

After that VLC will be ready to play DVDs for some programs which was compiled without DVD, source rebuilt is required.

If DVDs hang you might need to set a Region Code with regionset:

# regionset

3. Install non-free codecs

root@ubuntu:~# apt-get install non-free-codecs

4. Install Chromium ffmpeg nonfree codecs

root@ubuntu:~# apt-get install chromium
root@ubuntu:~# apt-get install chromium-codecs-ffmpeg-nonfree

5. Install w32codecs / w64codecs

Depending on the Ubuntu Linux installation architecture 32/64 bit install w32codecs or w64codecs

For 32 bit (x86) Ubuntu install w32codecs:

root@ubuntu:~# apt-get install w32codecs

For 64 bit arch Ubuntu:

root@ubuntu:~# apt-get install w64codecs

6. Install ubuntu-restricted-extras meta package

root@ubuntu:~# apt-get install ubuntu-restricted-extras

7. Install cheese for webcam picture/video snapshotting

root@ubuntu:~# apt-get install cheese

8. Install GIMP, Inkscape, xsane,sane, shotwell etc.

root@ubuntu:~# apt-get --yes install sane xsane gimp inkscape gimp-data-extras gimp-plugin-registry \
blender gcolor2 showtwell bluefish kompozer

9. Install multimedia Sound & Video utilities

Install Subtitle editor, video editiking , sound editing, mp3 player, iso mounters, DVD/CD Burners

root@ubuntu:~# apt-get install rhythmbox banshee smplayer mplayer \
realplayer audacity brasero jokosher istanbuk gtk-recordMyDesktop \acetoneisohexedit furiusisomount winff fala audacious dvdstyler lives hydrogen
subtitleeditor gnome-subtitles electricsheep k3b

10. Install CD / DVD RIP tools

root@ubuntu:~# apt-get install acidrip sound-juicer ogmrip thoggen
11. Install chat messanger programs, Browsers, mail pop3 clients, torrent, emulators, ftp clients etc.

apt-get install seamonkey thunderbird transmission transmission-gtk gbgoffice kbedic \
pidgin openoffice.org gxine mozilla-plugin-vlc wine dosbox samba filezilla amsn ntp \epiphany-browser ntpdate desktop-webmail alltray chmsee gftp xchat-gnome ghex \gnome-genius bleachbit arista

12. Install Non-Free Flash Player

Unfortunately Gnash is not yet production ready and crashes in many websites …

root@ubuntu:~# apt-get install flashplugin-nonfree flashplugin-nonfree-extrasound swfdec-gnome

13. Install Archive / Unarchive management programs

root@ubuntu:~# apt-get install unace unrar zip unzip p7zip-full p7zip-rar sharutils rar uudeview \
mpack lha arj cabextract file-roller

15. Install VirtualBox and QEmu

root@ubuntu:~# apt-get install qemu-launcher qemu-kvm-extras virtualbox virtualbox-ose \
virtualbox-ose-guest-dkms virtualbox-ose-guest-dkms

This should be enough to use Ubuntu normally for multimedia Desktop just as MS Windows for most of the daily activities.
Am I missing some important program?

My E-Marketing Report Final Godaddy.com Versus Enom.com for Download (Godaddy.com compared to Enom.com)

Monday, April 4th, 2011

Some few months ago, I’ve posted some study materials for e-marketing & commerce course (discipline) that I followed in Arnhem Business School (ABS)
Apart from that I had a final assignment which was supposed to be handed in some few weeks before the begging of the Christmas break.

The Emarketing assignment’s aim was to make a comparison of two websites which are operating in the same or very similar business field

The report’s goal was to present to the E-marketing teacher which in my case was Peter Stemers that the student has been acquainted with the basic theories of Emarketing.
The project was actually rather easy and the main issue to build up a project like this is the start up to complete it you just need to put a start and persist in expanding the document.

As the topic was very interesting to myself I started quite early in preparing my assignment (just a few weeks after it was assigned).

I’ve considered my profound interest into Information and Computer Technology (ICT) and decided to create a report which evaluates two websites which are into the IT sphere.
After a examination over a few possible domain names like for example:
Verizon – verizon.com and AT&T – att.com
1& 1and1.co.uk and Godaddy etc.

I’ve finally set my websites to compare choice on: Godaddy.com and enom.com

The criterias for selection of Godaddy and Enom as a target companies to compare their online business was as follows::

1. Both Godaddy and Enom are into the same business online industry, ( e.g. domain selling, reselling, blog hosting, webhosting, SSL certificates, online presence Search Engine optimization etc.)
Some other selection factor that convinced me to choose exactly Enom.com and Godaddy were that this are the biggest companies in the domain names selling IT sector and even better the Domain Selling industry has a tight relation to the History of how the Internet emerged.

The report became really thoroughful, the Godaddy vs Enom emarketing report has the size of 59 pages. Officially the study criterias has been that normally the usual student emarketing reports contains about 15 to 20 pages, however as the business products and services that this huge internet domain reseller companies has, I was forced to exceed the set teacher limitation of 20 pages and do it in 59 pages.

I’ve handed in my emarketing report and Peter Stemers graded it with 8.5 points from 10 possible (which by the way is quite a high mark for Arnhem Business School)

By the wat the E-marketing course was quite a silly one though for people that are not have an avarage computer knowledge and interest into Internet Commerce it was okay.

To read the table of contents of the Report comparison Enom compared to Godaddy click over here
Here is also my Emarketing Final Report Godaddy.com vs Enom.com (Godaddy.com compared to Enom.com) in both PDF and DOC, I hope this reports will be helpful to some marketing researchers out there to get an estimate on how the two companies are performing in the domain selling and reselling business:

1. Download My Emarketing and E-commerce report Godaddy Versus Enom.com (Godaddy Compared to Enom.com) doc version

2. Download E-marketing report Godaddy.Com VS Enom.Com (Godaddy.com Compared to Enom.com) in PDF

Compiling this Emarketing report costed me a lot of effort and time, the overall completion of the report has took me about a two weeks time, whether each day I worked a couple of hours on it.
I express also my big thanks to Alex Petrov (a friend of mine) for helping me read and review the report and fix some minor errors in sentence structures and my language of expression.

The Godaddy VS Enom Emarketing report outlines, numerous pitfalls that both Enom Company and Go Daddy has done in terms of SEO, Emarketing, user friendliness and usability

I believe this report could be really helpful for the these two competitive companies and could help them improve both their user image, their accessibility and Search Engine indexing.
On the other hand the report could be a good example for (HAN – Arnhem Business School E-Marketing) students on how to write a good looking Emarketing report to give themselves a pass.

An interesting fact is that before I decide to publish the report online and make it available to everyone I tried a known selling marketing report, I tried to offer to both Godaddy.Com and Enom.Com to sell them this report by sending the offer to their marketing and sales guys.
Enom.com has returned me an email, that they will look forward to my request, whether with Godaddy I have received an email by Go Daddy founder and CEO Bob Parons and the COO Warren Adelman

I will present you here the reply just to show you how impodent this mans are! My offer to sell them this great report for the symbolic sum of 200 EUR which will help their companies grow was considered I quote: “Unsolicated Report”.
Below I present you my offer email plus the impudent reply email by GoDaddy’s CEO and CEO:


SNAP – My Email to Godaddy
Hi Bob,

My name is Georgi Georgiev and I’m currently completing my bachelor in
Business Administration in HAN University of Applied Sciences (The
Netherlands).

Currently I’m developing an E-marketing report which is comparing the 2
largest internet domian registrars
godaddy.com and enom.com.

The report is a in depth SEO and E-marketing analysis of current
positioning in major search engines of Godaddy.com and Enom.com as well
as an overall analysis of user user friendliness, screen resolution
readiness of the two websites.
In the report I also analyse the behaviour of the enom.com and
godaddy.com as tested with different major Internet web browsers,
general user experience. External statistical websites etc. etc.

This research document does also concludes what are the strengths &
weaknesses of both your company and enom.com. The aim of the report is
to show, what Godaddy advantages and pitfalls if compared to Enom.com.

It also includes a number of suggestion for improvements which will be
beneficial for your company to drive more internet traffic to you as
well as increase your number of customers.

The report is 60 pages long document and includes many things that might
be beneficial for your business.

If you’re interested into the report and you’d like to buy it for me for
a very cheap price of 200 EUR, please contact me on my mail
hipo@www.pc-freak.net or systemexec@gmail.com.

Best Regards,
Georgi


Georgi Georgiev

——
END of SNAP

SNAP – Godaddy’s Bob Parson and Warren Adelman Reply Email:

Office of the President Response
Dear Georgi Georgiev,

Thank you for contacting the Office of the President. Our CEO, Bob Parsons, and President and COO, Warren Adelman, have asked me to respond on their behalf.

We value your time and appreciate the information you have provided regarding this request. Please understand that we are not seeking to acquire any unsolicited reports of this nature at this time.

Thank you for your understanding.

Sincerely,

Jordan McAlister

Hope this post is helpful to some students stucked with writting their E-marketing report
I also hope it shows how proficient, I’m in building reports and might be a good exapmle on how qualitative my work is and enhearten somebody to hire me as an E-marketing consultant 😉

Install TorrentFlux Bit Torrent Web management interface on Debian / Ubuntu Linux

Tuesday, July 15th, 2014

torrent flux logo
Torrentflux
is web based, feature-rich BitTorrent download manager.
Torrentflux is a must have installed server software for anyone who does regular torrent downloads and want to access the downloads from anywhere on the internet.

TorrentFlux is a PHP based BitTorrent controller that runs on a web
 server. It can manage all of your BitTorrent downloads from anywhere
 through a convenient and easy-to-use web interface.
 .
 TorrentFlux uses a MySQL database to manage the downloads.

 TorrentFlux enables you to run BitTorrent downloads unattended on a monitor-less or remote server 24 hours a day, while still maintaining complete control from any web browser. Now you can control your  downloading on your firewall, or keep up with downloads while on  vacation. It uses the BitTornado client to download files, and also  requires a web server with PHP.
 
 Some of the Torrentflux features:

   * Upload Torrents via URL or File Upload
   * Start, Stop, and Delete Torrents with ease
   * Advanced Torrent start options (ports, speeds, etc.)
   * Multi-user interface
   * RSS Feeds, download Torrents files with a click
   * Run several torrents at once
   * View Download Progress of all torrents at a glance
   * View drive space at a glance
   * View Torrent file meta information
   * Built-in User management and Security
   * Private Messaging
   * Themes (selectable per user)
   * Upload History


Before installing Bittorrent you will need to have a running version of Debian, Ubuntu or any other debian derivative (though it can easily be run on any Linux distro). To install AMP (Apache MySQL Server, PHP) you can follow first part of my previous article Installing Usual PHP Apache MySQL for new Debian GNU / Linux installs.

So what for is TorrentFlux Useful?
Torrenflux is precious and must have if you have to access filtered torrent from outside of your homecountry and you have a running server already in your home country in that I was using TorrentFlux to access Bulgarian Zamunda.Net Torrent Tracker from Holland and was downloading first movies from the Bulgarian Torrent Tracker to my Fluxbox installed on my Dobrich home router and then used FTP to transfer movies to the Netherlands. Talking about many people choose to also install VSFTP and use it together with Torrentflux …

1. Install TorrentFlux and its dependencies (BitTornado, Bittorrent, Zip, Unzip, Bzip etc.) the "Debian Way"


On my Debian 7 Wheezy home machine  I run

apt-get install –yes bzip2 php5-gd php5-cli unrar-free grep python net-tools mawk wget unzip cksfv vlc-nox uudeview python-crypto libxml-simple-perl libxml-dom-perl libdbd-mysql-perl bittorrent bittornado


a) Install TorrentFlux the Debian Way

apt-get install –yes torrentflux


You will be prompted with a coule of screens, to set a new MySQL database user and password and SQL database, as well as offered to restart Apache to make Torrentflux accessible like as on below screenshots.

configuring-torrentflux-debian-linux-screenshot-2


configuring-torrentflux-debian-linux-screenshot 3

configuring-torrentflux-debian-linux-screenshot-4

To make new installed torrentflux accessible from web you will either have to configure it via some new Apache VirtualHost or make a symbolic link to /usr/share/torrentflux/www :
 

cd /var/www/
ln -sf /usr/share/torrentflux/www/ torrentflux


That's all you're all done to access torrentflux either access it via your default configured webserver domain name or via localhost if you're logged in to same pc where installing.

http://www.your-domain.com/torrentflux

or

http://127.0.0.1/torrentflux

configuring-torrentflux-after-first-login-in-web-debian-linux

2. Install latest Torrentflux version from source

Alternatively if you want to have the latest version (because the Debian version is part of the stable distribution is a little bit outdated you will have to fetch Torrentflux-b4rt and unarchive it:

cd /tmp/
wget http://download.berlios.de/tf-b4rt/torrentflux-b4rt_1.0-beta2.tar.bz2

tar -xjf torrentflux-b4rt_1.0-beta2.tar.bz2

mv torrentflux-b4rt_1.0-beta2 /opt/torrentflux

Then to make torrentflux visible from web server I had to create a symbolic link to installation directory:
 

ln -sf /opt/torrentflux/html /var/www/torrentflux

For further initial configuration its necessery to make Torrentflux config writtable by www-data (the user with which Apache is running on Debian).


chown -R www-data:www-data /var/www/torrentflux/inc/config/


Next it its required to create somewhere download folder where TorrentFlux will keep downloaded Torrents

mkdir /var/lib/torrentflux


Apache HTTP server will have to have write ther:

chown -R www-data:www-data /var/lib/torrentflux


If you already haven't restarted Apache earlier in installing TorrentFlux pre-requirements, you will have to do it now:


/etc/init.d/apache2 restart


As TorrentFlux depends on its MySQL backend, we need to also create manually TorrentFlux database username and a password
 

export SQL_DB='torrentflux';
TFLUXSQL_USERNAME='torrentflux';
TFLUX_SQL_PWD='any-secret-password';

echo "CREATE DATABASE IF NOT EXISTS $SQL_DB DEFAULT CHARACTER SET utf8 DEFAULT COLLATE utf8_unicode_ci"
| mysql –user=root –password

echo "GRANT ALL PRIVILEGES ON $SQL_DB.*
TO $TFLUXSQL_USERNAME@localhost
IDENTIFIED BY $TFLUX_SQL_PWD;" | mysql –user=root –password


Substitute with your Database, Username and Password above shell variables – $SQL_DB, $TFLUX_USERNAME, $TFLUX_SQL_PWD

To configure TorrentFlux access it in browser:

http://your-domain.com/torrentflux
 

By accessing it for a first time, you will redirected to setup.php, in case something goes wrong and yuo're not redirected (probably some mod_rewrite issues add setup.php to url – e.g., acess –

http://your-domain.com/torrentflux/setup.php

I will not enter details, about Web config, because everything there is pretty clear.

Just in short – you will have to now choose:

Choose Database
Choose Database Information of database (put in the exact name of TorrentFlux databse previously created)
Uncheck the box for "Create new database"
Choose as a download location upper created directory – /var/lib/torrentflux

If you get an error on software dependencies screen for missing unrar – just install it
VLC may show an error as well, that's not a problem because VLC is probably not to be used.
Finally after completion of all, you will get an error that setup.php cannot be deleted.
 

To prevent, someone to re-configure it through http://your-domain/torrentflux/setup.php URL remove setup.php


rm /var/www/torrentflux/setup.php

To prevent someone rewrite anything in config file from web we have to revert back config/ folder not to be writable by Apache


chown -R root:root /var/www/torrentflux/inc/config/

Now in browser to access torrentflux type:


http://ipofyourbox/torrentflux

/torrentflux should redirect you to login.php if for some reason it doesn't type it manually in URL.

First account you will login is the super user account, you can allow multiple users to use it by adding multiple accounts.

torrentflux-install-on-debian-ubuntu-gnu-linux-web-management-torrent-interface

As you will see there is plety of configuration options to play with.

You will definitely want to look in Server Page, some very important page to look is the Transfer Page – from there you can adjust the bandwidth of your connection on 100Mbit network this would be 12500 – to use the maximum possible connection provided by your ISP set the max bandwidth to 0. You have the option to also set a default bittorrent client, by default this will be bittornado.


If you have troubles downloading from TorrentTrackers make sure your router is configured to forward port 49160 to 49300

Now if you have a lot of storage create accounts also for your friends and enjoy torrentflux 🙂