Posts Tagged ‘command line tool’
Tuesday, October 3rd, 2017

IS THERE A GRAPHIC ( GUI ) TOOL TO VIEW HARDWARE INFORMATION ON LINUX?
If you are a console maniac like myself, perhaps you never think that you might need anything graphical besides to view hardware information on Linux, but as we're growing older sometimes it becomes much less easier to just use a graphical tool that can show us all the information we need regarding a Notebook / Desktop PC with Linux or even Server machine with enabled Graphical Environment with a brand new installed GNU / Linux whatever version (I hope you don't own server with running Xorg / Gnome / Mate / Xfce etc. as that's pretty much a waste of hardware resource and opens a dozen of other security risks for the server running services ).
There are at least 2 ways to quickly check hardware on both PC WorkStation or Server, the easiest and quickest for PC / Notebook Linux users if you have installed GTK libraries or Gnome Desktop Environment is with;
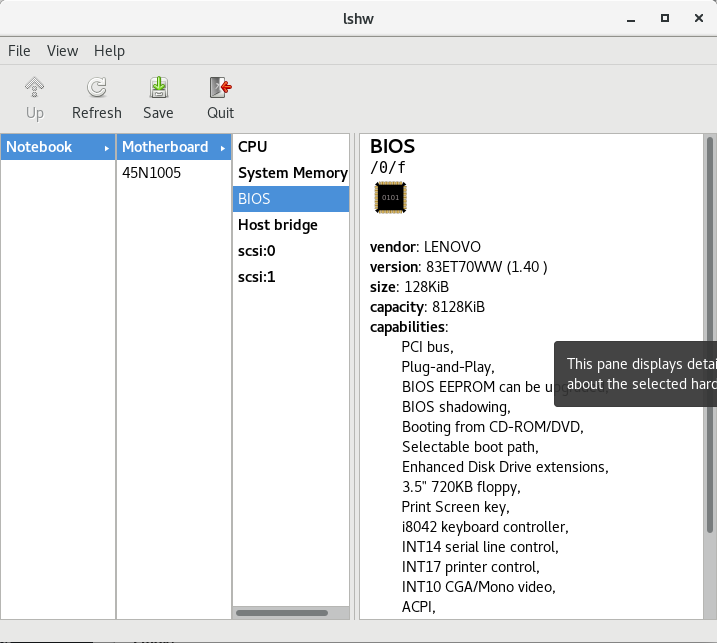
LSHW-GTK
LSHW-GTK is simply a GTK frontend over the command line tool for hardware information gathering LSHW
HardiInfo
HardInfo – is a small application that displays information about your hardware and operating system. Currently it knows about PCI, ISA PnP, USB, IDE, SCSI, Serial and parallel port devices.
1. Howto Install LSHW-GTK / HardInfo on Debian / Ubuntu / Mint GNU / Linux to easy view hardware information
To install both of them on Debian / Ubuntu GNU / Linux, run:
apt-get install –yes lshw lshw-gtk hardinfo
2. Howto install LSHW-GTK on Fedora, CentOS and OpenSuSE Linux to view easy hardware information
On RedHat RPM based Linux distributions, the package to install is called lshw-gui
Install with yum RPM package manager:
yum install –yes lshw lshw-gui hardinfo
3. Run lshw-gtk / hardinfo
Again, find them and run from GUI environment menus or run manually like in below example:
$ lshw-gtk
$ hardinfo
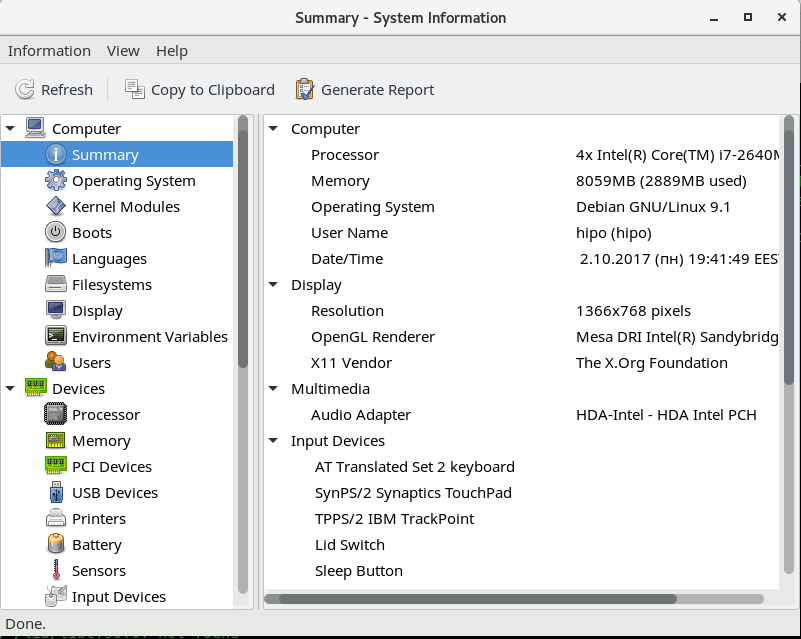
As you see hardinfo is really interactive and it gives you pretty much all the information, you might need, the only information that was missing at my case and I guess, that would happen to others is information about the SSD Hard Disk, which 180GB
HardInfo is really amazing program as it even includes various common Benchmark Tests and comparison with other Computers:
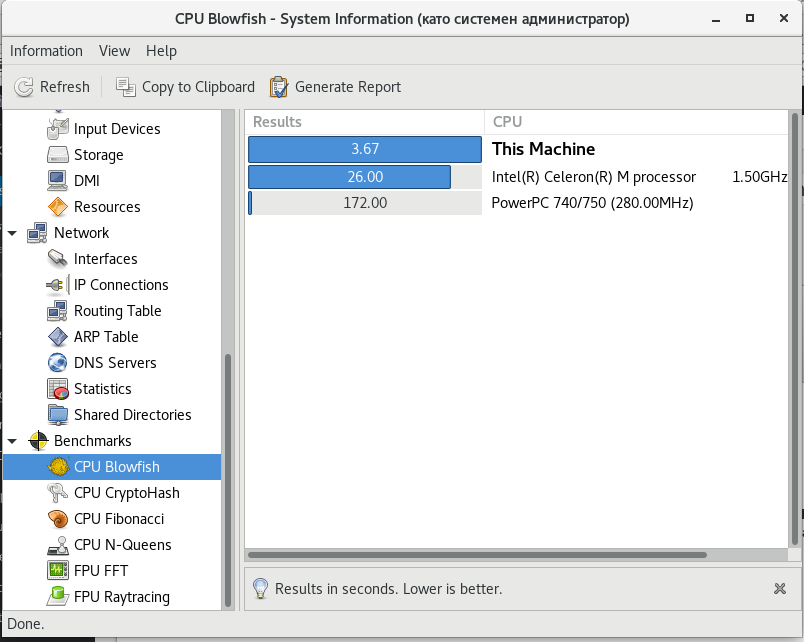
True that the tests, are pretty simple but still could be useful.
Now run it either from GNOME / Cinnamon (The default graphical environment of Debian Linux) or PLASMA (The new name for the second most popular Linux Graphical Environment – KDE desktop environment)
$ lshw
Here is few more screenshots from hardware info reported from my ThinkPad T410 Laptop Running Debian 9 Stretch at the moment.
MotherBoard -> BIOS Information
(thatnks God this old but gold Thinkpad T420 business notebook does not run UEFI substitute for BIOS 🙂
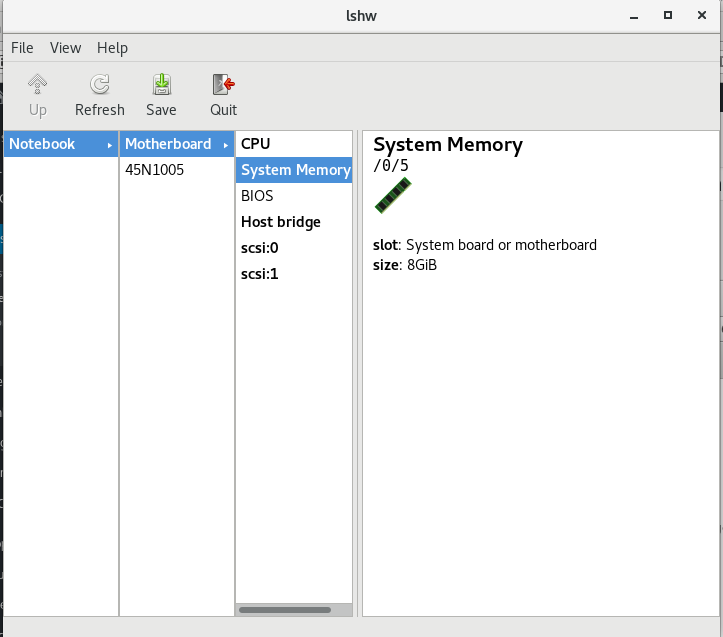
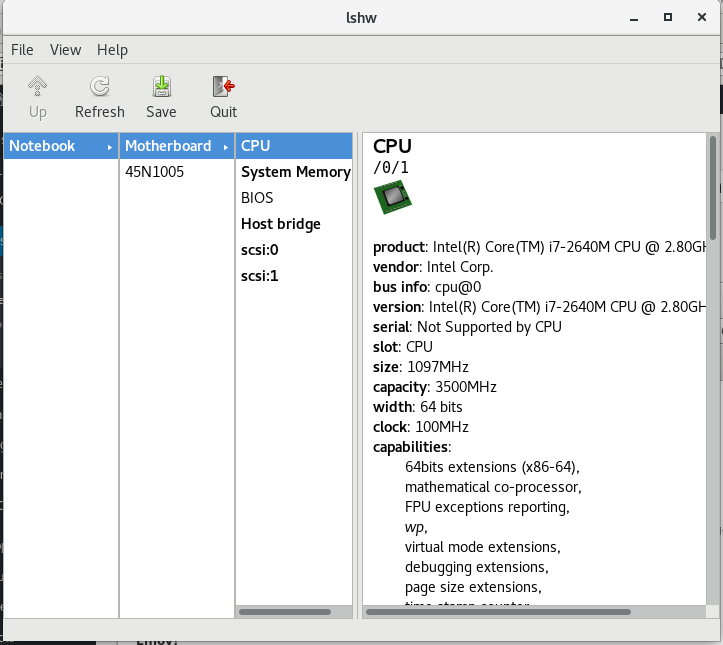
CPU Information (with all the supported CPU capabilities (extensions)
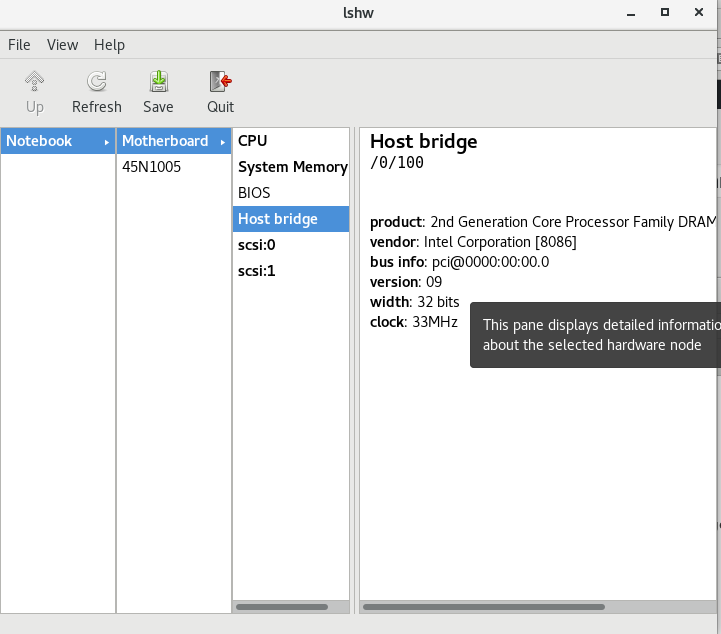
Host Bridge Info
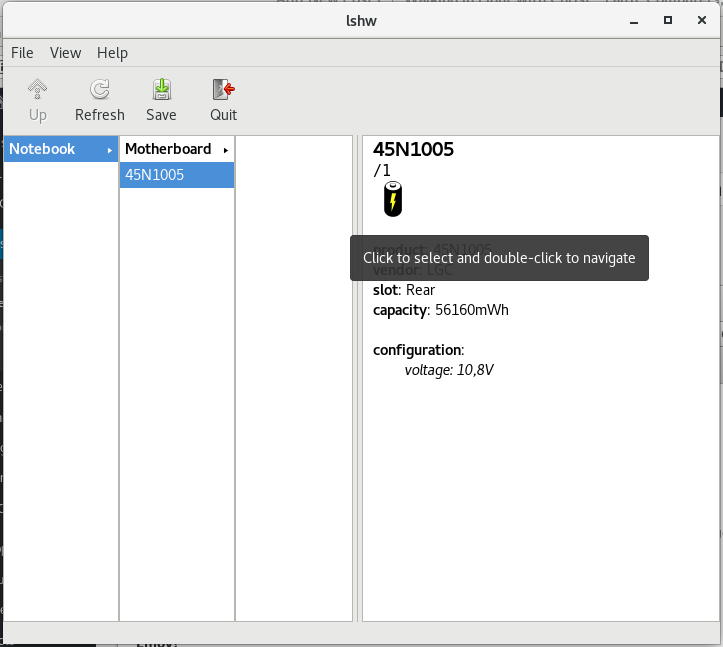
Thinkpad BATTERY (45N1005) Info
By the way another Way to GUI View your Computer is to just generate HTML from lshw command line tool (as it supports export to HTML), here is how:
$ lshw -html > ~/hardware-specs.html
Then just open it with Browser, for example I like GNOME Epiphany browser, so I'll read HTML with it:
$ epiphany ~/hardware-specs.html
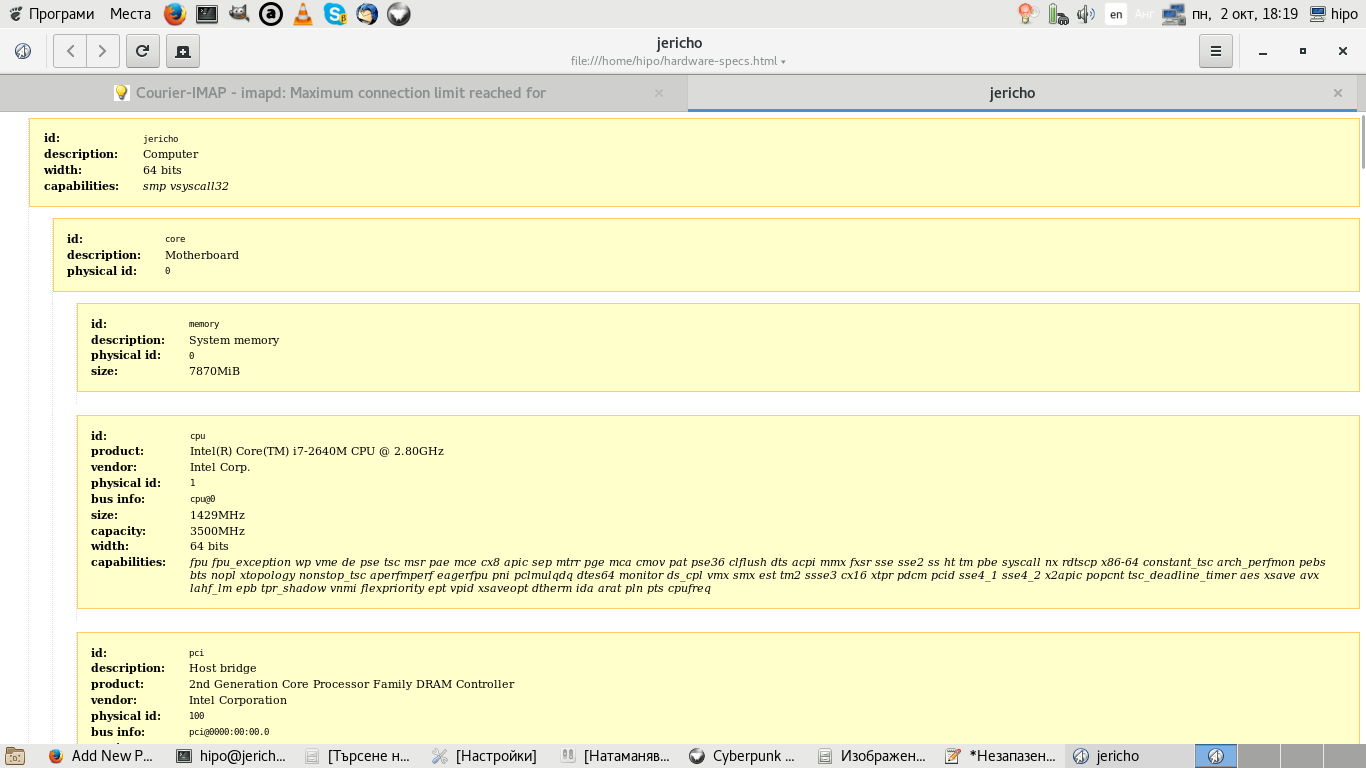
The great thing about generating HTML report for hardware is that on Staging / Production / Development servers which you inherited from some other administrator who for some reason (laziness 🙂 ) didn't left necessery documentation, you can easily map the machine hardware and even if it is a group of machines, you can automate report generation for all of them write a short script that parses the data on each of the HTML reports and finally creates a merged document with main important information about hardware of a cluster of computers etc.
If you still want to stick to console run the console version of lshw or use dmidecode or lshw:
$ lshw
hipo@jericho:~$ lshw
WARNING: you should run this program as super-user.
jericho
description: Computer
width: 64 bits
capabilities: smp vsyscall32
*-core
description: Motherboard
physical id: 0
*-memory
description: System memory
physical id: 0
size: 7870MiB
*-cpu
product: Intel(R) Core(TM) i7-2640M CPU @ 2.80GHz
vendor: Intel Corp.
physical id: 1
bus info: cpu@0
size: 891MHz
capacity: 3500MHz
width: 64 bits
capabilities: fpu fpu_exception wp vme de pse tsc msr pae mce cx8 apic sep mtrr pge mca cmov pat pse36 clflush dts acpi mmx fxsr sse sse2 ss ht tm pbe syscall nx rdtscp x86-64 constant_tsc arch_perfmon pebs bts nopl xtopology nonstop_tsc aperfmperf eagerfpu pni pclmulqdq dtes64 monitor ds_cpl vmx smx est tm2 ssse3 cx16 xtpr pdcm pcid sse4_1 sse4_2 x2apic popcnt tsc_deadline_timer aes xsave avx lahf_lm epb tpr_shadow vnmi flexpriority ept vpid xsaveopt dtherm ida arat pln pts cpufreq
*-pci
description: Host bridge
product: 2nd Generation Core Processor Family DRAM Controller
vendor: Intel Corporation
physical id: 100
bus info: pci@0000:00:00.0
version: 09
width: 32 bits
clock: 33MHz
*-pci:0
description: PCI bridge
product: Xeon E3-1200/2nd Generation Core Processor Family PCI Express Root Port
vendor: Intel Corporation
physical id: 1
bus info: pci@0000:00:01.0
version: 09
width: 32 bits
clock: 33MHz
capabilities: pci normal_decode bus_master cap_list
configuration: driver=pcieport
resources: irq:24 ioport:5000(size=4096) memory:f0000000-f10fffff ioport:c0000000(size=301989888)
*-generic UNCLAIMED
description: Unassigned class
product: Illegal Vendor ID
vendor: Illegal Vendor ID
physical id: 0
bus info: pci@0000:01:00.0
version: ff
width: 32 bits
clock: 66MHz
capabilities: bus_master vga_palette cap_list
configuration: latency=255 maxlatency=255 mingnt=255
resources: memory:f0000000-f0ffffff memory:c0000000-cfffffff memory:d0000000-d1ffffff ioport:5000(size=128) memory:f1000000-f107ffff
*-display
description: VGA compatible controller
product: 2nd Generation Core Processor Family Integrated Graphics Controller
vendor: Intel Corporation
physical id: 2
bus info: pci@0000:00:02.0
version: 09
width: 64 bits
clock: 33MHz
capabilities: vga_controller bus_master cap_list rom
configuration: driver=i915 latency=0
resources: irq:30 memory:f1400000-f17fffff memory:e0000000-efffffff ioport:6000(size=64) memory:c0000-dffff
*-communication:0
description: Communication controller
product: 6 Series/C200 Series Chipset Family MEI Controller #1
vendor: Intel Corporation
physical id: 16
bus info: pci@0000:00:16.0
version: 04
width: 64 bits
clock: 33MHz
capabilities: bus_master cap_list
configuration: driver=mei_me latency=0
resources: irq:27 memory:f3925000-f392500f
*-communication:1
description: Serial controller
product: 6 Series/C200 Series Chipset Family KT Controller
vendor: Intel Corporation
physical id: 16.3
bus info: pci@0000:00:16.3
version: 04
width: 32 bits
clock: 66MHz
capabilities: 16550 bus_master cap_list
configuration: driver=serial latency=0
resources: irq:19 ioport:60b0(size=8) memory:f392c000-f392cfff
*-network
description: Ethernet interface
product: 82579LM Gigabit Network Connection
vendor: Intel Corporation
physical id: 19
bus info: pci@0000:00:19.0
logical name: enp0s25
version: 04
serial: 00:21:cc:cc:b2:27
capacity: 1Gbit/s
width: 32 bits
clock: 33MHz
capabilities: bus_master cap_list ethernet physical tp 10bt 10bt-fd 100bt 100bt-fd 1000bt-fd autonegotiation
configuration: autonegotiation=on broadcast=yes driver=e1000e driverversion=3.2.6-k firmware=0.13-3 latency=0 link=no multicast=yes port=twisted pair
resources: irq:25 memory:f3900000-f391ffff memory:f392b000-f392bfff ioport:6080(size=32)
*-usb:0
description: USB controller
product: 6 Series/C200 Series Chipset Family USB Enhanced Host Controller #2
vendor: Intel Corporation
physical id: 1a
bus info: pci@0000:00:1a.0
version: 04
width: 32 bits
clock: 33MHz
capabilities: ehci bus_master cap_list
configuration: driver=ehci-pci latency=0
resources: irq:16 memory:f392a000-f392a3ff
*-multimedia
description: Audio device
product: 6 Series/C200 Series Chipset Family High Definition Audio Controller
vendor: Intel Corporation
physical id: 1b
bus info: pci@0000:00:1b.0
version: 04
width: 64 bits
clock: 33MHz
capabilities: bus_master cap_list
configuration: driver=snd_hda_intel latency=0
resources: irq:29 memory:f3920000-f3923fff
*-pci:1
description: PCI bridge
product: 6 Series/C200 Series Chipset Family PCI Express Root Port 1
vendor: Intel Corporation
physical id: 1c
bus info: pci@0000:00:1c.0
version: b4
width: 32 bits
clock: 33MHz
capabilities: pci normal_decode cap_list
configuration: driver=pcieport
resources: irq:16
*-pci:2
description: PCI bridge
product: 6 Series/C200 Series Chipset Family PCI Express Root Port 2
vendor: Intel Corporation
physical id: 1c.1
bus info: pci@0000:00:1c.1
version: b4
width: 32 bits
clock: 33MHz
capabilities: pci normal_decode bus_master cap_list
configuration: driver=pcieport
resources: irq:17 memory:f3800000-f38fffff
*-network
description: Wireless interface
product: Centrino Advanced-N 6205 [Taylor Peak]
vendor: Intel Corporation
physical id: 0
bus info: pci@0000:03:00.0
logical name: wlp3s0
version: 34
serial: 26:ad:26:50:f1:db
width: 64 bits
clock: 33MHz
capabilities: bus_master cap_list ethernet physical wireless
configuration: broadcast=yes driver=iwlwifi driverversion=4.9.0-3-amd64 firmware=18.168.6.1 ip=192.168.0.102 latency=0 link=yes multicast=yes wireless=IEEE 802.11
resources: irq:28 memory:f3800000-f3801fff
*-pci:3
description: PCI bridge
product: 6 Series/C200 Series Chipset Family PCI Express Root Port 4
vendor: Intel Corporation
physical id: 1c.3
bus info: pci@0000:00:1c.3
version: b4
width: 32 bits
clock: 33MHz
capabilities: pci normal_decode bus_master cap_list
configuration: driver=pcieport
resources: irq:19 ioport:4000(size=4096) memory:f3000000-f37fffff ioport:f1800000(size=8388608)
*-pci:4
description: PCI bridge
product: 6 Series/C200 Series Chipset Family PCI Express Root Port 5
vendor: Intel Corporation
physical id: 1c.4
bus info: pci@0000:00:1c.4
version: b4
width: 32 bits
clock: 33MHz
capabilities: pci normal_decode bus_master cap_list
configuration: driver=pcieport
resources: irq:16 ioport:3000(size=4096) memory:f2800000-f2ffffff ioport:f2000000(size=8388608)
*-generic
description: System peripheral
product: MMC/SD Host Controller
vendor: Ricoh Co Ltd
physical id: 0
bus info: pci@0000:0d:00.0
version: 08
width: 32 bits
clock: 33MHz
capabilities: bus_master cap_list
configuration: driver=sdhci-pci latency=0
resources: irq:16 memory:f2800000-f28000ff
*-usb:1
description: USB controller
product: 6 Series/C200 Series Chipset Family USB Enhanced Host Controller #1
vendor: Intel Corporation
physical id: 1d
bus info: pci@0000:00:1d.0
version: 04
width: 32 bits
clock: 33MHz
capabilities: ehci bus_master cap_list
configuration: driver=ehci-pci latency=0
resources: irq:23 memory:f3929000-f39293ff
*-isa
description: ISA bridge
product: QM67 Express Chipset Family LPC Controller
vendor: Intel Corporation
physical id: 1f
bus info: pci@0000:00:1f.0
version: 04
width: 32 bits
clock: 33MHz
capabilities: isa bus_master cap_list
configuration: driver=lpc_ich latency=0
resources: irq:0
*-storage
description: SATA controller
product: 6 Series/C200 Series Chipset Family 6 port SATA AHCI Controller
vendor: Intel Corporation
physical id: 1f.2
bus info: pci@0000:00:1f.2
version: 04
width: 32 bits
clock: 66MHz
capabilities: storage ahci_1.0 bus_master cap_list
configuration: driver=ahci latency=0
resources: irq:26 ioport:60a8(size=8) ioport:60bc(size=4) ioport:60a0(size=8) ioport:60b8(size=4) ioport:6060(size=32) memory:f3928000-f39287ff
*-serial
description: SMBus
product: 6 Series/C200 Series Chipset Family SMBus Controller
vendor: Intel Corporation
physical id: 1f.3
bus info: pci@0000:00:1f.3
version: 04
width: 64 bits
clock: 33MHz
configuration: driver=i801_smbus latency=0
resources: irq:18 memory:f3924000-f39240ff ioport:efa0(size=32)
*-scsi
physical id: 2
logical name: scsi1
capabilities: emulated
*-cdrom
description: DVD-RAM writer
product: DVDRAM GT50N
vendor: HL-DT-ST
physical id: 0.0.0
bus info: scsi@1:0.0.0
logical name: /dev/cdrom
logical name: /dev/cdrw
logical name: /dev/dvd
logical name: /dev/dvdrw
logical name: /dev/sr0
version: LT20
capabilities: removable audio cd-r cd-rw dvd dvd-r dvd-ram
configuration: ansiversion=5 status=nodisc
WARNING: output may be incomplete or inaccurate, you should run this program as super-user.
Enjoy Life ! 🙂
Tags: capabilities, check hardware configuration pc linux graphcal program, clock, command line tool, gathering, graphic tool check hardware linux, graphical environment, gui linux hardware info, Hardware Information, Host Bridge Info, How to, Install, intel corporation, Linux, LSHW, manager, memory, pci, size, version, width
Posted in Linux, Linux and FreeBSD Desktop, Performance Tuning, System Administration | No Comments »
Wednesday, January 27th, 2016 
I've been working a bit on a client's automation, the task is to automate process of installations of Apaches / Tomcats / JBoss and Java servers, so me and colleagues don't waste too
much time in trivial things. To complete that I've created a small repository on a Apache with a WebDav server with major versions of each general branch of Application servers and Javas.
In order to access the remote URL where the .tar.gz binaries archives reside, I had to use a proxy serve as the client runs all his network in a DMZ and all Web Port 80 and 443 HTTPS traffic inside the client network
has to pass by the network proxy.
Thus to make the downloads possible via the shell script, writting I needed to set the script to use the HTTPS proxy server. I've been using proxy earlier and I was pretty aware of the http_proxy bash shell
variable thus I tried to use this one for the Secured HTTPS proxy, however the connection was failing and thanks to colleague Anatoliy I realized the whole problem is I'm trying to use http_proxy shell variable
which has to only be used for unencrypted Proxy servers and in this case the proxy server is over SSL encrypted HTTPS protocol so instead the right variable to use is:
https_proxy
The https_proxy var syntax, goes like this:
proxy_url='http-proxy-url.net:8080';
export https_proxy="$proxy_url"

Once the https_proxy variable is set UNIX's wget non interactive download tool starts using the proxy_url variable set proxy and the downloads in my script works.
Hence to make the different version application archives download work out, I've used wget like so:
wget –no-check-certificate –timeout=5 https://full-path-to-url.net/file.rar
For other BSD / HP-UX / SunOS UNIX Servers where shells are different from Bourne Again (Bash) Shell, the http_proxy and https_proxy variable might not be working.
In such cases if you have curl (command line tool) is available instead of wget to script downloads you can use something like:
curl -O -1 -k –proxy http-proxy-url.net:8080 https://full-path-to-url.net/file.rar
The http_proxy and https_proxy variables works perfect also on Mac OS X, default bash shell, so Mac users enjoy.
For some bash users in some kind of firewall hardened environments like in my case, its handy to permanently set a proxy to all shell activities via auto login Linux / *unix scripts .bashrc or .bash_profile that saves the inconvenience to always
set the proxy so lynx and links, elinks text console browsers does work also anytime you login to shell.
Well that's it, my script enjoys proxying traffic 🙂
Tags: client, command line tool, downloads, export, How to, HTTPS, Linux, net, network, proxy server, rar, shell script, use, wget
Posted in Curious Facts, Everyday Life, IBM AIX UNIX, Linux, Mac OS X, Remote System Administration, System Administration, Various | No Comments »
Friday, April 15th, 2011 
If you're on Linux the questions like, how can I convert between video and audio formats, how to do photo editing etc. etc. have always been a taugh question as with it's diversity Linux often allows too many ways to do the same things.
In the spirit of questioning I have been recently curious, how can a subtitles be added to a flash video (.flv) video?
After some research online I've come up with the below suggested solution which uses mplayer to do the flash inclusion of the subtitles file.
mplayer your_flash_movie.flv -fs -subfont-text-scale 3
While including the subtitles to the .flv file, it's best to close up all the active browsers and if running something else on the desktop close it up.
Note that above's mplayer example for (.srt and .sub) subtitle files example is only appropriate for a .flv movie files which already has a third party published subtitle files.
What is interesting is that often if you want to make custom subtitles to let's say a video downloaded from Youtube on Linux the mplayer way pointed above will be useless. Why?
Well the Linux programs that allows a user to add custom subtitles to a movie does not support the flv (flash video) file format.
My idea on how to create custom subtitles and embed them into a flv movie file is very simple and it goes like this:
1. Convert the .flv file format to let's say .avi or .mpeg
2. Use gnome-subitles or subtitleeditor to create the subtitles for the .avi or .mpeg file
3. Convert back the .avi/.mpeg file with included subtitles to .flv (flash video format)
This methodology is really long and time consuming, but pitily as far as my understanding goes it's the only way to do that on your Linux until now.
To make the conversations between .flv and .avi format you will need to use the ffmpeg – (FFMpeg command line tool video converter), here is how:
– Convert .flv to .avi
debian:~# /usr/bin/ffmpeg -i input_flvfilename.flv output_avifilename.avi
– Convert .avi file to .flv
debian:~# /usr/bin/ffmpeg -y -i /path/to/your/avi/input_avifilename.avi -acodec mp3 -ar 22050 -f flv

/path/to/your/flv/output_flvfilename.flv
The required overall tools which you will have to have installed on your Debian or Ubuntu Linux are:
1. ffmpeg
2. gnome-subtitles
3. subtitleeditor
4. mplayer
You will also have to spend some time to get to know gnome-subtitles or subtitleeditor, but it won't be that long until you get the idea on how to use them.
Tags: and, avi, avi file, avi format, avi mpeg, close, command line tool, consuming, conversations, Convert, custom, Desktop, editing, editor, ffmpeg, file, Flash, flv file format, format, Gnome, How to, inclusion, Linux, linux programs, methodology, movie file, movie files, mpeg, mpeg file, mplayer, party, photo editing, something, subtitle editor, subtitle files, subtitles, taugh, time, time consuming, tool, Ubuntu, use, video, video converter, video file, youtube
Posted in Linux, Linux and FreeBSD Desktop, Linux Audio & Video | 1 Comment »
Wednesday, April 13th, 2011 
Watching videos in youtube today and already for about 2 years is the de-facto hype.
There is almost none a day passed without almost each one of us has watched a dozen videos in Youtube.
Watching videos in youtube has become even more addictive for many than the early days of Internet Relay Chats (IRC)
As youtube is very accessible for people and it’s a comparativily easy way people share more and more with the day.
There is no question that the business idea of youtube is great and youtube generates millions of dollars for Google day by day, however I have a serious objection here! All is good the only pitfall is that you don’t own the youtube videos you watch!
Youtube’s story is not that different from the story of the cloud computing threat to internet users Freedom
The good thing here is that we’re not still completely dependant on youtube and there is still way to retrieve your favourite youtube video and store it for later watching or distribution.
Probably the most famous browser plugin that allows files retrieval from youtube, as most people know is DownloadHelper .
However using download helper is browser dependant, you need to use the browser to save the plugin and I don’t find it to be the best way to download a youtube video.
Since the old days I have started using Linux, I’ve been quite addicted to as many things on my linux as possible from the command line (terminal / console) (CLI) .
In that manner of thoughts it was a real delight for me to find out that a group of free software developer guys has come up with a command line tool that allows downloads of youtube videos straight from terminal, the great software is called youtube-dl and at the moment of this post writting it’s to be found on the URL address:
http://rg3.github.com/youtube-dl/
Youtube-dl is written in python so, it requires the Python interpreter, version 2.5 in order to properly run on Unix, Mac OS X or even on Windows!
The fact that it’s written in python has made the little shiny tool quite a multi-platform one.
To start using immediately the tool on a Debian or Ubuntu Linux you will have to install python (even though in most cases you must have it already installed):
1. To make sure you have python interpreter installed issue the cmd:
debian:~# apt-get install python

Building dependency tree

Reading state information... Done

python is already the newest version.

0 upgraded, 0 newly installed, 0 to remove and 0 not upgraded.
As you can see from above apt-get’s output I do have it installed so nothing gets installed.
2. As a next step I used links to download the youtube-dl python script, like so:
debian:~# links https://github.com/rg3/youtube-dl/raw/2011.03.29/youtube-dl >> youtube-dl

Use the links interface to save youtube-dl and use gzip to ungzip it

debian:~# gzip -d youtube-dl.gz

debian:~# chmod +x youtube-dl
Now to make it system wide accessible I have copied the youtube-dl to /usr/local/bin , whether I selected /usr/local/bin as a location as this location is predetermined to contain mostly files which does not belong to a regular deb package.
3. Move youtube-dl to /usr/local/bin
debian:~# mv youtube-dl /usr/local/bin
4. Test the newly installed youtube-dl command line youtube retrieval tool:
debian:~# ./youtube-dl https://www.youtube.com/watch?v=g7tvI6JCXD0

[youtube] Setting language

[youtube] g7tvI6JCXD0: Downloading video webpage

[youtube] g7tvI6JCXD0: Downloading video info webpage

[youtube] g7tvI6JCXD0: Extracting video information

[download] Destination: g7tvI6JCXD0.flv

[download] 53.3% of 22.62M at 33.23k/s ETA 05:25

[download] 100.0% of 22.62M at 31.91k/s ETA 00:00 [u
As you might have noticed from the above youtube-dl command output the newly retrieved youtube file will be saved under a name g7tvI6JCXD0.flv
The line I passed to youtube-dl is directly taken from my browser and pasted to console, the file downloading from youtube took me about 10 minutes but this is mostly because of some kind of youtube server speed restrictions …
In general at least I have this video for later, watching, so after a while I can watch it once again without loosing a lot of time trying to remember what was the video headline name
5. To use youtube-dl in a bit advanced way you can for instance invoke the command with options like:
debian:~# ./youtube-dl -l -w -c https://www.youtube.com/watch?v=g7tvI6JCXD0

[youtube] Setting language

[youtube] g7tvI6JCXD0: Downloading video webpage

[youtube] g7tvI6JCXD0: Downloading video info webpage

[youtube] g7tvI6JCXD0: Extracting video information

[download] Destination: BSD is Dying, Jason Dixon, NYCBSDCon 2007-g7tvI6JCXD0.flv

[download] 4.4% of 22.62M at 1.43M/s ETA 00:15
As you can see now youtube-dl was even able to detect the downloaded video file name and store it on the computer with a correct name 😉
I would recommend you also to check out the youtube-dl help page, to do use command: youtube-dl –help
Tags: browser plugin, business idea, command line tool, computing, download, Extracting, favourite, favourity, file, free software developer, google, great software, gzip, hype, info, information, internet relay chats, internet users, irc, JCXD, line terminal, location, mac os x, many things, none, objection, os x, pitfall, plugin, python, python interpreter, software, story, terminal, threat, tool, url address, video, youtube video, youtube videos
Posted in Linux and FreeBSD Desktop, Linux Audio & Video | 4 Comments »
Friday, May 17th, 2013 
It is generally useful to combine multiple pictures into single one. A example case, where merging pictures on Linux is necessary is if you previously used ImageMagick's convert command line tool to convert PDF file (pages) to JPEG / PNG pictures. Unfortunately convertion with convert(as far as I know is only capable of generating multiple picture files instead of one single one), thus you further need montage to merge pages in separate photos to one. In my case I had my Curriculum Vitae in PDF and I needed to have same PDF in single photo for my applications for online Job Employment Belarusian portal site rabota.tut.by.
montage is one of numerous ImageMagick package script (plugins).
On all major Linux distributions (Debian / Ubuntu, Fedora, CentOS, RHEL, SuSE) montage comes installed together with imagemagick deb / rpm package.
Whether you don't have montage on Debian / Ubuntu and deb derivatives install it via:
linux:~# apt-get install --yes imagemagick

....
On CentOS, Fedora, RHEL, SuSE to install montage:
 [root@centos ~]# yum -y install imagemagick

....
To merge two JPEG Photos into single PNG format picture:
linux:~$ montage -geometry +2+2 Picture-1.jpeg Merged-picture.png
Combining more photos, lets say my 8 Pages photos output from previous PDF convert to pictures is done with:
linux:~$ montage -geometry +8+8 CV_Georgi_Georgiev_bg-0.png \ CV_Georgi_Georgiev_bg-1.png \ CV_Georgi_Georgiev_bg-2.png \ CV_Georgi_Georgiev_bg-3.png \ CV_Georgi_Georgiev_bg-4.png \ CV_Georgi_Georgiev_bg-5.png \ CV_Georgi_Georgiev_bg-6.png \ CV_Georgi_Georgiev_bg-7.png \ CV_Georgi_Georgiev_bg.png
montage has plenty of useful other options, to do various photo montages from command line. Other way to merge photos with montage is by using:
linux:~$ montage -mode concatenate -tile 1x input-pic*.jpg out.jpg
Merging photos is also possible by using directly convert.
Combining multiple photos into single JPEG or PNG with Imagick convert is done with:
linux:~$ convert -append input-pic-*.jpg combined-picture.jpg
Other example use of montage is located on ImageMagick's montage's script site here
Tags: bg 2, command line tool, command shell, geometry, georgi, ImageMagick, imagemagick package, jpeg photos, Linux, linux distributions, merging pictures, portal site, rhel, single one, Ubuntu
Posted in Everyday Life, Linux and FreeBSD Desktop, System Administration, Various | No Comments »
Monday, February 25th, 2013 
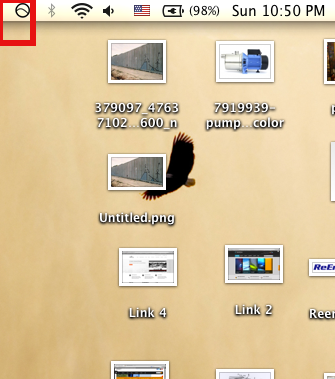
Recently I blogged about how to reduce night sleep problems and diminish insomnia on Linux with little command line tool – redshift. Now I'm in a friend who is a Mac user and since he had lately problems with sleeping. I remembered about redshift and one other tool which I read about called F.lex. We give it a try and installed it on his Mac OS X Lion – ver (10.7.5). Installation is like other standard Mac OS X applications, download f.lux version for Mac OS then click .DMG binary and you're asked if you want to install the program in Mac active Applications. That's all the program is installed and you don't even need to configure it as the program automatically determines Time Zone / Geographic Location configured for OS X. Once installed you will notice the F.lux switching screen gamma icon on left of Mac panel:
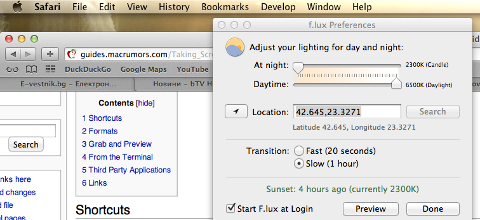
In F.lux configuration, by using Search button the program can automatically determine Geographic Location, however if you it fails to determine proper location and improperly sets the screen color gamma, you can manually set location coordinates. F.lux tunes screen color gamma accordingly to day or night and time in day. If it is night it makes the screen reddish, so eyes our eyes relax strain (stress) and our organism prepares to get to bed so once you're in bed it is easier for your brain to get asleep.
Now here it is 23:37 at Night and F.lux smartly changed the color gamma accordingly to night mode (reddish) gamma. I've noticed on F.lux's website there is version for iPhone and iPad
Tags: command line tool, geographic location, insomnia, late at night, Linux, lion, mac os x, mac panel, os x, proper location, screen gamma, search button, sleep, sleep problems
Posted in Everyday Life, Mac OS X, System Administration, Various | No Comments »
Sunday, June 12th, 2011 I’ve been assigned the task to add on one of the qmail powered servers I administrate about 50 email addresses via command line.
Each email addresses was required to be configured to have the same mail password.
Adding the email addresses via an interface would be a killing time consuming task and will probably require at least 1 hour of time to add the emails with qmailwebmin, qadmin, qubit or the other vpopmail qmail web administration interfaces available nowdays.
To solve the task, I’ve used a line oner bash shell script which reads all my 80 emails from a file and adds them with vpopmail’s command line tool vpasswd on the mail server.
Here is the one liner shell script I’ve written to solve the task:
debian:~# while read line; do vadduser $line Email_Pass_Phrase; done < email_list_file.txt
In above’s code I’ve used the email_list_file.txt file is a text file on the server and contains list of all my 50 email addresses, where each line in the file contains one email. The Email_Pass_Phrase is actually the password I’ve set for all the new email addresses being created with vpasswd
That’s all now the 50 email addresses on the server are created and I’ve saved at least one hour of boring repeating actions in the browser 😉
Tags: administrate, bash shell script, browser, command, command line tool, consuming, email accounts, email addresses, email list, file, file txt, interface, killing time, line, little shell, lt, mail password, mail server, new email, nowdays, password, phrase, qadmin, Qmail, qubit, read, servers, Shell, ssh, time, time consuming task, tool, TXT, vadduser, vpasswd, vpopmail, web administration
Posted in Qmail, System Administration | No Comments »
Sunday, February 26th, 2012 In my last article, I've explained How to create PNG, JPG, GIF pictures from one single PDF document
Convertion of PDF to images is useful, however as PNG and JPEG graphic formats are raster graphics the image quality gets crappy if the picture is zoomed to lets say 300%.
This means convertion to PNG / GIF etc. is not a good practice especially if image quality is targetted.
I myself am not a quality freak but it was interesting to find out if it is possible to convert the PDF pages to SVG (Scalable Vector Graphics) graphics format.
Converting PDF to SVG is very easy as for GNU / Linux there is a command line tool called pdf2svg
pdf2svg's official page is here
The traditional source way compile and install is described on the homepage. For Debian users pdf2svg has already existing a deb package.
To install pdf2svg on Debian use:
debian:~# apt-get install --yes pdf2svg

...
Once installed usage of pdf2svg to convert PDF to multiple SVG files is analogous to imagemagick's convert .
To convert the 44 pages Projects.pdf to multiple SVG pages – (each PDF page to a separate SVG file) issue:
debian:~/project-pdf-to-images$ for i in $(seq 1 44); do \

pdf2svg Projects.pdf Projects-$i.SVG $i; \

done
This little loop tells each page number from the 44 PDF document to be stored in separate SVG vector graphics file:
debian:~/project-pdf-to-images$ ls -1 *.svg|wc -l

44
For BSD users and in particular FreeBSD ones png2svg has a bsd port in:
/usr/ports/graphics/pdf2svg
Installing on BSD is possible directly via the port and convertion of PDF to SVG on FreeBSD, should be working in the same manner. The only requirement is that bash shell is used for the above little bash loop, as by default FreeBSD runs the csh.
On FreeBSD launch /usr/local/bin/bash, before following the Linux instructions if you're not already in bash.
Now the output SVG files are perfect for editting with Inkscape or Scribus and the picture quality is way superior to old rasterized (JPEG, PNG) images
Tags: Auto, bash shell, bsd users, command line tool, Convert, Converting, convertion, crappy, deb, deb package, debian project, debian users, document, documentConvertion, Draft, editting, format, freak, GIF, gnu linux, graphic formats, Graphics, graphics format, graphics graphics, homepage, Image, image quality, ImageMagick, inkscape, issue, JPG, jpg gif, line, Linux, nbsp, number, package, page, pdf document, picture, png, png images, Projects, raster graphics, rasterized, Scalable, scalable vector graphics, Scribus, Shell, svg file, svg files, tool, traditional source, use, vector, way
Posted in Linux, Linux and FreeBSD Desktop, System Administration | No Comments »


