Posts Tagged ‘sleep’

How to run SSH server Mac OS X and set it to auto boot on Mac Book system start

Monday, February 5th, 2024

mac os X

How to run SSH Server on Mac OS X to administrate remotely your MAC OS to access remote MacBook Air or Mac OS 

Linux / UNIX users know it is pretty easy to run OpenSSH server on old Linux SystemV releases

it is done with cmd:

# /etc/init.d/sshd start


On newer Linux distros where systemd is the standard it is done wtih:

# systemctl start ssh.service

To enable ssh service on boot on systemd distros

# systemctl enable ssh.service


To enable SSH access on Mac OS X this is done wtih a simple command

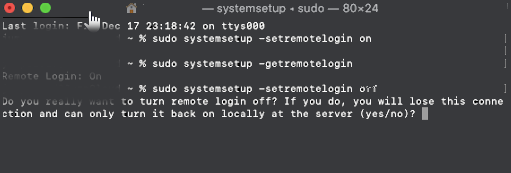
To check the status of SSH server being on or OFF, either connect with netcat to TCP port 22, which is usually installed by default on most MAC OS-es or run:

# systemsetup -getremotelogin

To start and enable SSH service on Mac OS X run:

# systemsetup -setremotelogin on 


If you later need to turn off the SSH service

# systemsetup -setremotelogin off

Actually systemsetup command can do pretty much on MAC OS X and it is worthy to take a look at it, if you're running a MAC PC or Mac Book laptop.

systemsetup can set the current date, change time server host, set computer name (hostname) and much more.

sh-3.2# systemsetup -help

systemsetup Help Information
————————————-
Usage: systemsetup -getdate
        Display current date.

Usage: systemsetup -setdate <mm:dd:yy>
        Set current date to <mm:dd:yy>.

Usage: systemsetup -gettime
        Display current time.

Usage: systemsetup -settime <hh:mm:ss>
        Set current time to <hh:mm:ss>.

Usage: systemsetup -gettimezone
        Display current time zone.

Usage: systemsetup -settimezone <timezone>
        Set current time zone to <timezone>. Use "-listtimezones" to list time zones.

Usage: systemsetup -listtimezones
        List time zones supported by this machine.

Usage: systemsetup -getusingnetworktime
        Display whether network time is on or off.

Usage: systemsetup -setusingnetworktime <on off>
        Set using network time to either <on> or <off>.

Usage: systemsetup -getnetworktimeserver
        Display network time server.

Usage: systemsetup -setnetworktimeserver <timeserver>
        Set network time server to <timeserver>.

Usage: systemsetup -getsleep
        Display amount of idle time until computer, display and hard disk sleep.

Usage: systemsetup -setsleep <minutes>
        Set amount of idle time until computer, display and hard disk sleep to <minutes>.
        Specify "Never" or "Off" for never.

Usage: systemsetup -getcomputersleep
        Display amount of idle time until computer sleeps.

Usage: systemsetup -setcomputersleep <minutes>
        Set amount of idle time until compputer sleeps to <minutes>.
        Specify "Never" or "Off" for never.

Usage: systemsetup -getdisplaysleep
        Display amount of idle time until display sleeps.

Usage: systemsetup -setdisplaysleep <minutes>
        Set amount of idle time until display sleeps to <minutes>.
        Specify "Never" or "Off" for never.

Usage: systemsetup -getharddisksleep
        Display amount of idle time until hard disk sleeps.

Usage: systemsetup -setharddisksleep <minutes>
        Set amount of idle time until hard disk sleeps to <minutes>.
        Specify "Never" or "Off" for never.

Usage: systemsetup -getwakeonmodem
        Display whether wake on modem is on or off.

Usage: systemsetup -setwakeonmodem <on off>
        Set wake on modem to either <on> or <off>.

Usage: systemsetup -getwakeonnetworkaccess
        Display whether wake on network access is on or off.

Usage: systemsetup -setwakeonnetworkaccess <on off>
        Set wake on network access to either <on> or <off>.

Usage: systemsetup -getrestartpowerfailure
        Display whether restart on power failure is on or off.

Usage: systemsetup -setrestartpowerfailure <on off>
        Set restart on power failure to either <on> or <off>.

Usage: systemsetup -getrestartfreeze
        Display whether restart on freeze is on or off.

Usage: systemsetup -setrestartfreeze <on off>
        Set restart on freeze to either <on> or <off>.

Usage: systemsetup -getallowpowerbuttontosleepcomputer
        Display whether the power button is able to sleep the computer.

Usage: systemsetup -setallowpowerbuttontosleepcomputer <on off>
        Enable or disable whether the power button can sleep the computer.

Usage: systemsetup -getremotelogin
        Display whether remote login is on or off.

Usage: systemsetup -setremotelogin <on off>
        Set remote login to either <on> or <off>. Use "systemsetup -f -setremotelogin off" to suppress prompting when turning remote login off.

Usage: systemsetup -getremoteappleevents
        Display whether remote apple events are on or off.

Usage: systemsetup -setremoteappleevents <on off>
        Set remote apple events to either <on> or <off>.

Usage: systemsetup -getcomputername
        Display computer name.

Usage: systemsetup -setcomputername <computername>
        Set computer name to <computername>.

Usage: systemsetup -getlocalsubnetname
        Display local subnet name.

Usage: systemsetup -setlocalsubnetname <name>
        Set local subnet name to <name>.

Usage: systemsetup -getstartupdisk
        Display current startup disk.

Usage: systemsetup -setstartupdisk <disk>
        Set current startup disk to <disk>.

Usage: systemsetup -liststartupdisks
        List startup disks on this machine.

Usage: systemsetup -getwaitforstartupafterpowerfailure
        Get the number of seconds after which the computer will start up after a power failure.

Usage: systemsetup -setwaitforstartupafterpowerfailure <seconds>
        Set the number of seconds after which the computer will start up after a power failure. The <seconds> value must be a multiple of 30 seconds.

Usage: systemsetup -getdisablekeyboardwhenenclosurelockisengaged
        Get whether or not the keyboard should be disabled when the X Serve enclosure lock is engaged.

Usage: systemsetup -setdisablekeyboardwhenenclosurelockisengaged <yes no>
        Set whether or not the keyboard should be disabled when the X Serve enclosure lock is engaged.

Usage: systemsetup -version
        Display version of systemsetup tool.

Usage: systemsetup -help
        Display help.

Usage: systemsetup -printCommands
        Display commands.


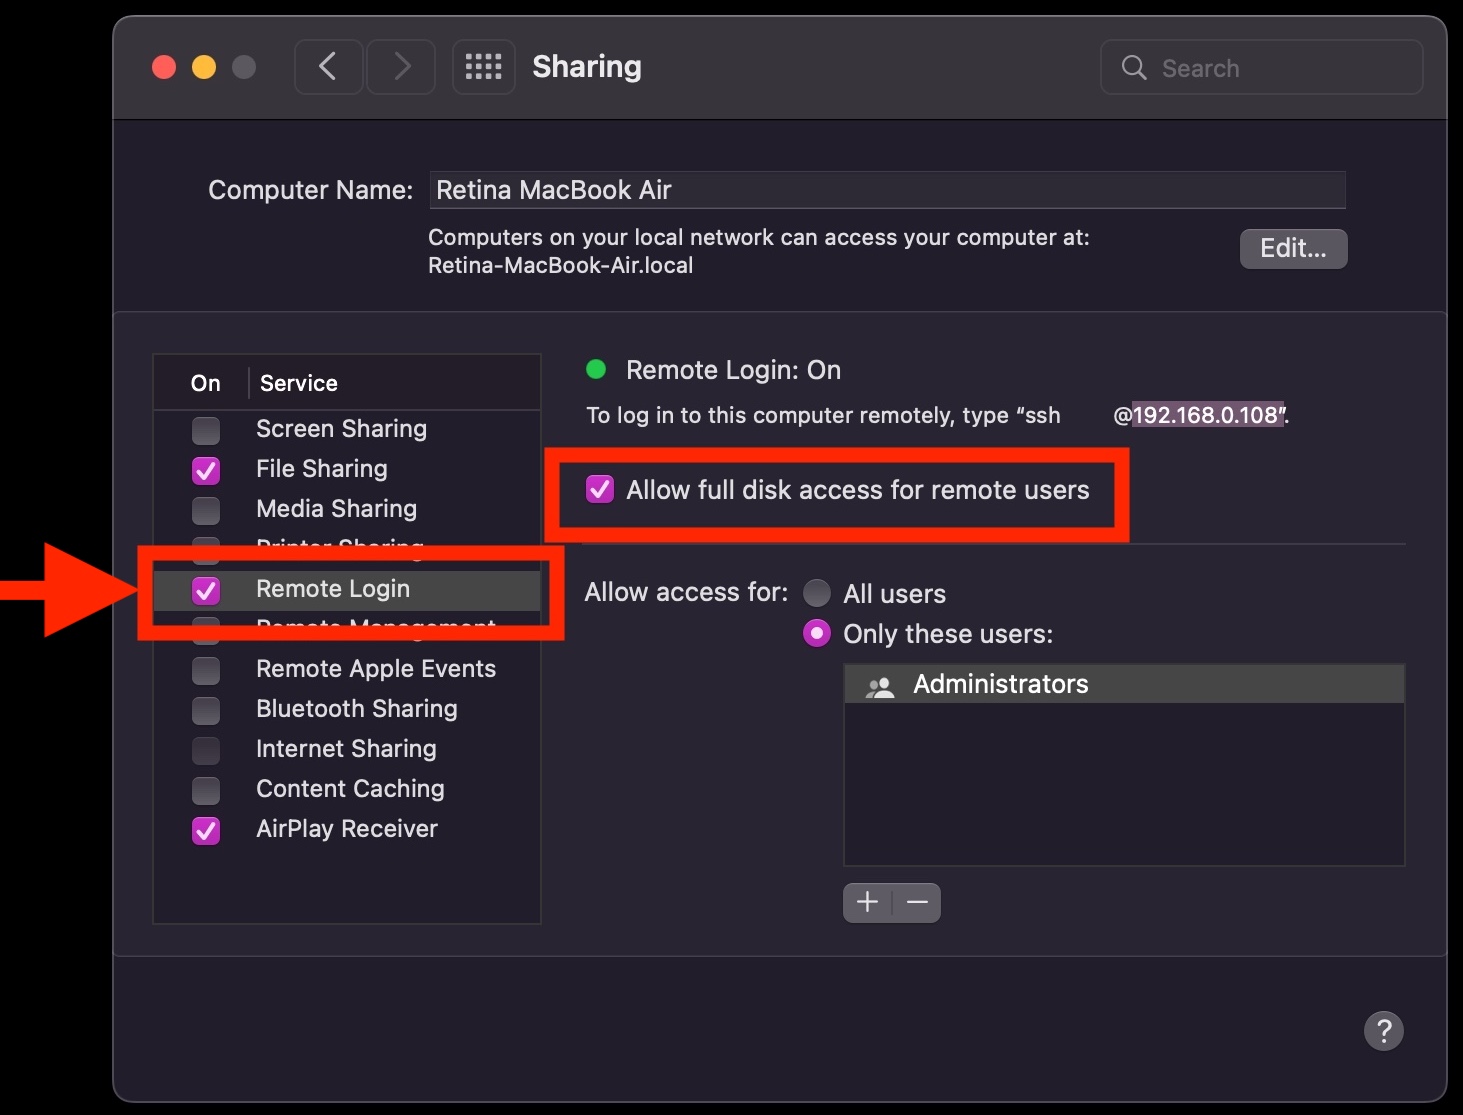
Enabling SSH in Mac OS X computers can be done also from Graphical interface for the lazy ones.

enable-ssh-mac-remote-login-from-mac-OS-X-gui

Make laptop not to sleep on close on Microsoft Windows 10 / Disable notebook LID close sleep Windows

Thursday, November 8th, 2018

Windows10-Define-power-options-actions-settings

I have to use Windows 10 Enterprise on a notebook for Work purposes once again and use a Docking station connected to an external Display Monitor at the Company Office work location one of the first things to configure is to disable LID Display Sleep on laptop close because otherwise the notebook has to be left opened almost half opened in order to work with the PC to change that unwanted behavior there is an easy way via Windows Control Panel configuration, here is how:

Open

Windows Control Panel 


navigate to:

edit-plan-settings-power-settings-windows-10.png


Power Options


choose:

Change advanced power settings, scroll down a bit to:

power-options-power-buttons-and-lid-lid-close-action-do-nothing-windows-10-scresnshot


Power Buttons and lid (menu) 


press over it from sub-menu
 

Plugged in


Select


Do nothing


That's all from now on closing the notebook when plugged in to the Dock station or to a direct External Monitor will no longer do the sleep.

As you can see from the menus, there is a lot of triggering rules to configure further from Power Management (Advanced Settings) on how applications / USBs / Multimedia and Hard Disks should behave under different power conditions so if you have the time I recommend you go through them and check them for yourself.

How to stop REDSHIFT night light brightness and color saturation eye strain protection on GNU / Linux

Tuesday, August 7th, 2018

http://jonls.dk/assets/redshift-icon-256

You know on most operating systems such as Windows 8 / 10 ,  Mac OS X as well as  GNU / Linux / BSDs (FreeBSD) etc. with graphical environments such as  GNOME / KDE etc. , there is this default functionality nowadays that is helping to reduce eye strain and improve night sleep by modifying the light and brightness as well as coloring eminated by the monitor. 

On Windows this technology is called Night Light and is easily enabled by nagivating through menus:


Start  > Settings  > System > Display > Night light > Night light settings.


set-your-display-windows-night-time-windows-os-10

Windows 10 Night Time settings shot

On GNU / Linux and BSD-es the eye strain application that comes preinstalled by default on most distributions is redshift – for more what is redshift check out my previous article get more peaceful night sleep on Ubuntu, Mint and Xubuntu Linux.

There is also the alternative to use F.lux (which by the way is used to prevent eye strain on Mac OS X and was the program of choice to prevent eye strain in older Windows versions)

Even though Night Light / and redshift monitor color warmth change is often mostly useful and have a positive impact improving sleep as well removes eye strain on Linux my experience with it is not too positive as it changes the monitor color gamma and makes it often quite reddish and annoying even through a normal day and not only night time.
This makes the work experience on the computer not pleasurable thus just removing it for me and I guess for many would be a must.

Assuming that you have installed Free software OS such as Linux with redshift (note that on on older releases of Deb and RPM package based distributions: you will have to manually install it with something like:)

On Debian based distros with:
 

root@debian:~# apt-get install –yes redshift redshift-gtk


On RPM Fedora / Cent OS, Redhat Enterprise Linux etc. with a command like:


[root@fedora]# yum install –yes redshift redshift-gtk

redshift-on-KDE-settings-menu

Redshift settings on Linux with KDE GUI

So in order to remove redshift it completely from Linux which usually on most GNU / Linux distros is running as a default process

redshift-change-monitor-brightness-to-reduce-eye-strain-gnome


1. * Make sure you kill all processes called redshift and redshift-gtk


to do so check processes with same name and KILL 'EM ALL!:
 

root@linux:~# ps aux|grep -i redshift
hipo     44058  2.8  0.5 620980 42340 pts/2    Sl+  20:33   0:00 /usr/bin/python3 /usr/bin/redshift-gtk
hipo     44059  0.1  0.0 295712  6476 pts/2    Sl+  20:33   0:00 /usr/bin/redshift -v

root@linux:~# kill -9 44058 44059


2. * Set the color temperature of the Monitor / Screen back to 6500K (this can be done either by the button menu that most screens have)


or manually with redshift itself by executing command:


root@linux:~# redshift -O 6500


As the screen is back to normal color gamma, its now time to completely remove redshift in order to prevent it to mess up with your monitor colors, on next PC boot or on Gnome / Mate whatever UI used session logout.

To do so issue commands:


root@linux:~# dpkg –purge redshift redshift-gtk
(Reading database … 516053 files and directories currently installed.)
Removing redshift-gtk (1.11-1) …
Purging configuration files for redshift-gtk (1.11-1) …
Removing redshift (1.11-1) …
Processing triggers for man-db (2.8.3-2) …
Processing triggers for hicolor-icon-theme (0.17-2) …
Processing triggers for mime-support (3.61) …
Processing triggers for gnome-menus (3.13.3-11) …
Processing triggers for desktop-file-utils (0.23-3) …
Processing triggers for menu (2.1.47+b1) …

3. Enjoy normal colors on your monitor  Goodbye Forever REDSHIFT, goodbuy dark crappy Screen during the day. Hello normal Screen light !!! 🙂

Command to get CPU server load in % percentage using bash and /proc/stat on Linux

Wednesday, March 11th, 2015

Command-to-get-CPU-server-load-in-percentage-using-bash-shell-script-and-linux-proc-stat

Getting load avarage is easy with uptime command, however since nowadays Linux servers are running on multiple CPU machines and Dual cores, returned load avarage shows only information concerning a single processor. Of course seeing overall CPU server load is possible with TOP / TLoad command  / HTOP and a bunch of other monitoring commands, but how you can get a CPU percentage server load using just  /proc/stat and bash scripting? Here is hwo:
 

:;sleep=1;CPU=(`cat /proc/stat | head -n 1`);PREV_TOTAL=0;for VALUE in "${CPU[@]}”; do let “PREV_TOTAL=$PREV_TOTAL+$VALUE”;done;PREV_IDLE=${CPU[4]};sleep $sleep; CPU=(`cat /proc/stat | head -n 1`);unset CPU[0];IDLE=${CPU[4]};TOTAL=0; for VALUE in “${CPU[@]}"; do let "TOTAL=$TOTAL+$VALUE"; done;echo $(echo "scale=2; ((($sleep*1000)*(($TOTAL-$PREV_TOTAL)-($IDLE-$PREV_IDLE))/($TOTAL-$PREV_TOTAL))/10)" | bc -l );

52.45

As you can see command output shows CPU is loaded on 52.45%, so this server will soon have to be replaced with better hardware, because it gets CPU loaded over 50%

It is useful to use above bash shell command one liner together with little for loop to refresh output every few seconds and see how the CPU is loaded in percentage over time.


for i in $(seq 0 10); do :;sleep=1;CPU=(`cat /proc/stat | head -n 1`);PREV_TOTAL=0;for VALUE in "${CPU[@]}”; do let “PREV_TOTAL=$PREV_TOTAL+$VALUE”;done;PREV_IDLE=${CPU[4]};sleep $sleep; CPU=(`cat /proc/stat | head -n 1`);unset CPU[0];IDLE=${CPU[4]};TOTAL=0; for VALUE in “${CPU[@]}"; do let "TOTAL=$TOTAL+$VALUE"; done;echo $(echo "scale=2; ((($sleep*1000)*(($TOTAL-$PREV_TOTAL)-($IDLE-$PREV_IDLE))/($TOTAL-$PREV_TOTAL))/10)" | bc -l ); done

47.50

13.86
27.36
82.67
77.18

To monitor "forever" output from all server processor overall load use:
 

while [ 1 ]; do :;sleep=1;CPU=(`cat /proc/stat | head -n 1`);PREV_TOTAL=0;for VALUE in “${CPU[@]}”; do let “PREV_TOTAL=$PREV_TOTAL+$VALUE”;done;PREV_IDLE=${CPU[4]};sleep $sleep; CPU=(`cat /proc/stat | head -n 1`);unset CPU[0];IDLE=${CPU[4]};TOTAL=0; for VALUE in “${CPU[@]}"; do let "TOTAL=$TOTAL+$VALUE"; done;echo $(echo "scale=2; ((($sleep*1000)*(($TOTAL-$PREV_TOTAL)-($IDLE-$PREV_IDLE))/($TOTAL-$PREV_TOTAL))/10)" | bc -l ); done


Restart hung Mac OS application – How to kill programs in Mac OS – alternative of Windows CTRL + ALT + DEL

Friday, May 23rd, 2014

mac-kill-hung-application-killing-freezed-application-on-mac-osx
If you happen to have the rare case of having a hung MAC OS X application and you're coming from a Linux / Windows background you will be certainly wonderhing how to kill Mac OS X hung application.
In Mac OS the 3 golden buttons to kill crashed application are:


COMMAND + OPTION + ESCAPE

Command + Option + Escape

while pressed simultaneously is the Mac Computer equivalent of Windows CTRL + ALT + DEL

mac-os-force-kill-hung-application-force-program-exit-mac-OSX

Holding together COMMAND  + OPTION + ESCAPE on MAC OS brings up the Force Quit Window showing and letting you choose between the list of open applications. To close freezed MAC application, choose it and Press the Force Quit Button this will kill immediately that application.  

To directly end application without invoking the choose Force Quit Window menu, to force a hanging app quit right click on its icon in Dock (CTRL + Click) and choose "Force Quit” from context menu.

A little bit more on why applications hung in MAC OS. Each application in MAC OS has its event queue. Event queue is created on initial application launch, event queue is buffer that accepts input from system (could be user input from kbd or mouse, messages passed from other programs etc.). Program is hanging when system detects queued events are not being used.

macOSX-EventQueue-reason-for-application-hung-in-macs
Other reasons for Mac OS hanging program is whether you're attaching detaching new hardware peripherals (i.e. problems caused by improper mount / unmounts), same hang issues are often observed on BSD and Linux. Sometimes just re-connecting (mouse, external hdd etc.) resolves it.
Program hungs due to buggy software are much rarer in Macs just like in IPhones and Ipads due to fact mac applications are very well tested until published in appstore.

Issues with program hungs in Mac sometimes happen after "sleep mode" during "system wake" function – closing, opening macbook. If a crashed program is of critical importance and you don't want to "Force Quit" with COMMAND + OPTION + ESC. Try send PC to sleep mode for a minute or 2 by pressing together OPTION + COMMAND + EJECT.

An alternative approach to solve hanging app issue is to Force-quit Finder and Dock to try that, launch Terminal

And type there:

# killall Dock

Other useful to know Mac OS keyboard combination is COMMAND + OPTION + POWERHold together Command and Option and after a while press Power – This is a shortcut to instruct your Mac PC to reboot.

How to set a crontab to execute commands on a seconds time interval on GNU / Linux and FreeBSD

Sunday, October 30th, 2011

crontab-execute-cron-jobs-every-second-on-linux-cron-logo
Have you ever been in need to execute some commands scheduled via a crontab, every let’s say 5 seconds?, naturally this is not possible with crontab, however adding a small shell script to loop and execute a command or commands every 5 seconds and setting it up to execute once in a minute through crontab makes this possible.
Here is an example shell script that does execute commands every 5 seconds:

#!/bin/bash
command1_to_exec='/bin/ls';
command2_to_exec='/bin/pwd';
for i in $(echo 1 2 3 4 5 6 7 8 9 10 11); do
sleep 5;
$command1_to_exec; $command2_to_exec;
done

This script will issue a sleep every 5 seconds and execute the two commands defined as $command1_to_exec and $command2_to_exec

Copy paste the script to a file or fetch exec_every_5_secs_cmds.sh from here

The script can easily be modified to execute on any seconds interval delay, the record to put on cron to use with this script should look something like:

# echo '* * * * * /path/to/exec_every_5_secs_cmds.sh' | crontab -

Where of course /path/to/exec_every_5_secs_cmds.sh needs to be modified to a proper script name and path location.

Another way to do the on a number of seconds program / command schedule without using cron at all is setting up an endless loop to run/refresh via /etc/inittab with a number of predefined commands inside. An example endless loop script to run via inittab would look something like:

while [ 1 ]; do
/bin/ls
sleep 5;
done

To run the above sample never ending script using inittab, one needs to add to the end of inittab, some line like:

mine:234:respawn:/path/to/script_name.sh

A quick way to add the line from consone would be with echo:

echo 'mine:234:respawn:/path/to/script' >> /etc/inittab

Of course the proper paths, should be put in:

Then to load up the newly added inittab line, inittab needs to be reloaded with cmd:

# init q

I've also red, some other methods suggested to run programs on a periodic seconds basis using just cron, what I found in stackoverflow.com's  as a thread proposed as a solution is:

* * * * * /foo/bar/your_script
* * * * * sleep 15; /foo/bar/your_script
* * * * * sleep 30; /foo/bar/your_script
* * * * * sleep 45; /foo/bar/your_script

One guy, even suggested a shorted way with cron:

0/15 * * * * * /path/to/my/script

How to check if your Linux WebServer is under a DoS attack

Friday, July 22nd, 2011

There are few commands I usually use to track if my server is possibly under a Denial of Service attack or under Distributed Denial of Service

Sys Admins who still have not experienced the terrible times of being under a DoS attack are happy people for sure …

1. How to Detect a TCP/IP Denial of Service Attack This are the commands I use to find out if a loaded Linux server is under a heavy DoS attack, one of the most essential one is of course netstat.
To check if a server is under a DoS attack with netstat, it’s common to use:

linux:~# netstat -ntu | awk '{print $5}' | cut -d: -f1 | sort | uniq -c | sort -n|wc -l

If the output of below command returns a result like 2000 or 3000 connections!, then obviously it’s very likely the server is under a DoS attack.

To check all the IPS currently connected to the Apache Webserver and get a very brief statistics on the number of times each of the IPs connected to my server, I use the cmd:

linux:~# netstat -ntu | awk '{print $5}' | cut -d: -f1 | sort | uniq -c | sort -n
221 80.143.207.107 233 145.53.103.70 540 82.176.164.36

As you could see from the above command output the IP 80.143.207.107 is either connected 221 times to the server or is in state of connecting or disconnecting to the node.

Another possible way to check, if a Linux or BSD server is under a Distributed DoS is with the list open files command lsof
Here is how lsof can be used to list the approximate number of ESTABLISHED connections to port 80.

linux:~# lsof -i TCP:80
litespeed 241931 nobody 17u IPv4 18372655 TCP server.www.pc-freak.net:http (LISTEN)
litespeed 241931 nobody 25u IPv4 18372659 TCP 85.17.159.89:http (LISTEN)
litespeed 241931 nobody 30u IPv4 29149647 TCP server.www.pc-freak.net:http->83.101.6.41:54565 (ESTABLISHED)
litespeed 241931 nobody 33u IPv4 18372647 TCP 85.17.159.93:http (LISTEN)
litespeed 241931 nobody 34u IPv4 29137514 TCP server.www.pc-freak.net:http->83.101.6.41:50885 (ESTABLISHED)
litespeed 241931 nobody 35u IPv4 29137831 TCP server.www.pc-freak.net:http->83.101.6.41:52312 (ESTABLISHED)
litespeed 241931 nobody 37w IPv4 29132085 TCP server.www.pc-freak.net:http->83.101.6.41:50000 (ESTABLISHED)

Another way to get an approximate number of established connections to let’s say Apache or LiteSpeed webserver with lsof can be achieved like so:

linux:~# lsof -i TCP:80 |wc -l
2100

I find it handy to keep track of above lsof command output every few secs with gnu watch , like so:

linux:~# watch "lsof -i TCP:80"

2. How to Detect if a Linux server is under an ICMP SMURF attack

ICMP attack is still heavily used, even though it’s already old fashioned and there are plenty of other Denial of Service attack types, one of the quickest way to find out if a server is under an ICMP attack is through the command:

server:~# while :; do netstat -s| grep -i icmp | egrep 'received|sent' ; sleep 1; done
120026 ICMP messages received
1769507 ICMP messages sent
120026 ICMP messages received
1769507 ICMP messages sent

As you can see the above one liner in a loop would check for sent and recieved ICMP packets every few seconds, if there are big difference between in the output returned every few secs by above command, then obviously the server is under an ICMP attack and needs to hardened.

3. How to detect a SYN flood with netstat

linux:~# netstat -nap | grep SYN | wc -l
1032

1032 SYNs per second is quite a high number and except if the server is not serving let’s say 5000 user requests per second, therefore as the above output reveals it’s very likely the server is under attack, if however I get results like 100/200 SYNs, then obviously there is no SYN flood targetting the machine 😉

Another two netstat command application, which helps determining if a server is under a Denial of Service attacks are:

server:~# netstat -tuna |wc -l
10012

and

server:~# netstat -tun |wc -l
9606

Of course there also some other ways to check the count the IPs who sent SYN to the webserver, for example:

server:~# netstat -n | grep :80 | grep SYN |wc -l

In many cases of course the top or htop can be useful to find, if many processes of a certain type are hanging around.

4. Checking if UDP Denial of Service is targetting the server

server:~# netstat -nap | grep 'udp' | awk '{print $5}' | cut -d: -f1 | sort |uniq -c |sort -n

The above command will list information concerning possible UDP DoS.

The command can easily be accustomed also to check for both possible TCP and UDP denial of service, like so:

server:~# netstat -nap | grep 'tcp|udp' | awk '{print $5}' | cut -d: -f1 | sort |uniq -c |sort -n
104 109.161.198.86
115 112.197.147.216
129 212.10.160.148
227 201.13.27.137
3148 91.121.85.220

If after getting an IP that has too many connections to the server and is almost certainly a DoS host you would like to filter this IP.

You can use the /sbin/route command to filter it out, using route will probably be a better choice instead of iptables, as iptables would load up the CPU more than simply cutting the route to the server.

Here is how I remove hosts to not be able to route packets to my server:

route add 110.92.0.55 reject

The above command would null route the access of IP 110.92.0.55 to my server.

Later on to look up for a null routed IP to my host, I use:

route -n |grep -i 110.92.0.55

Well hopefully this should be enough to give a brief overview on how, one can dig in his server and find if he is under a Distributed Denial of Service, hope it’s helpful to somebody out there.
Cheers 😉

Get more peaceful night sleep on Ubuntu, Mint and Xubuntu Linux using gtk-redshift

Monday, March 11th, 2013

gtk redshift Xubuntu Linux screenshot sleep peacefully when using computer at late

If you want to have more peaceful night sleep when working on Ubuntu or other Debian based Linux distro, be sure to have gtk-redshift installed.
It is a little program that simply changes the color gamma of screen and makes your screen look more reddish at night. According to many scientific research done on how we humans react, whether using computer late at night. It is concluded that less bright colors and especially reddish color gamma relaxes our eye strain and thus makes it easier for us to get a sleep quickly once in bed. gtk-redshift is available in latest Ubuntu 12.04 as well as on other Ubuntu derivatives (Xubuntu, Mint Linux) etc.

Easiest way to install it is via respective GUI Package Manager or via good old Synaptic (GUI aptitude frontend).
I personally prefer to always install Synaptic on new Desktop Linux PCs, use it as package GUI frontend, for the simple reason it offers one very similar "unified" package Installer outlook across different Linux distros.

The quickest way to use GUI version of Redshift is to install with apt:

root@xubuntu:~# apt-get install --yes gtk-redshift
....

To further use it it needs one time to be run with color gamma paraments, launch it first time via terminal with:
user@xubuntu:~$ gtk-redshift  -l 52.5:13.4

It is a good idea to make a tiny shell script wrapper with good settings for gtk-redshift and later use this shell wrapper as launcher :

root@xubuntu:~# echo '#!/bin/sh' >> /usr/local/bin/gtk-redshift
root@xubuntu:~# echo 'gtk-redshift' >> /usr/local/bin/gtk-redshift
root@xubuntu:~# chmod +x /usr/local/bin/gtk-redshift

From then on, to launch it you can directly open it via terminal

user@xubuntu:~$ /usr/local/bin/gtk-redshift

To make the program permanently work, make it run via respective GUI environment startup . In GNOME add it start-up from:

user@xubuntu:~$ gnome-session-manager

Important note to make about gtk-redshift is that on some older monitor screens, very early in morning the screen becomes too red, making screen look like displaying on very old long time used CRT monitors. For people working in fields like; Web Design, Architecture, or any drawing twisted colors effect will be annoying and will probably interfere with your perception of colors. However for programmers, system administrators and people who use computer mainly for typing and reading gtk-redshift is huge blessing.

Enjoy ! 🙂
 

Improve night sleep with F.lex on Mac OS X, iPhone and iPad

Monday, February 25th, 2013

f.lux application change screen color gamma to sleep better when using computer late at night macOSX and iphone
Recently I blogged about how to reduce night sleep problems and diminish insomnia on Linux with little command line tool – redshift. Now I'm in a friend who is a Mac user and since he had lately problems with sleeping. I remembered about redshift and one other tool which I read about called F.lex. We give it a try and installed it on his Mac OS X Lion – ver (10.7.5). Installation is like other standard Mac OS X applications, download f.lux version for Mac OS then click  .DMG binary and you're asked if you want to install the program in Mac active Applications. That's all the program is installed and you don't even need to configure it as the program automatically determines Time Zone / Geographic Location  configured for OS X. Once installed you will notice the F.lux switching screen gamma icon on left of Mac panel:

sleep better when using Mac laptop at night with F.lux

In F.lux configuration, by using Search button the program can automatically determine Geographic Location, however if you it fails to determine proper location and improperly sets the screen color gamma, you can manually set location coordinates. F.lux tunes screen color gamma accordingly to day or night and time in day. If it is night it makes the screen reddish, so eyes our eyes relax strain (stress) and our organism prepares to get to bed so once you're in bed it is easier for your brain to get asleep.

F.lux screenshot on Mac OS X Lion improve night sleep insomnia

Now here it is 23:37 at Night and F.lux smartly changed the color gamma accordingly to night mode (reddish) gamma. I've noticed on F.lux's website there is version for iPhone and iPad

Improve your night sleep (Insomnia) on Linux with redshift

Friday, February 15th, 2013

sleep better at night while using Linux with redshift command line and gui applet / improve your insomnia while being a linux user
For a while I've been experiencing troubles with getting asleep. As I work in the field of IT already for 10 years and with time it seems the problem is accelerating. I've read on the internet a lot on the topic of getting asleep and how this relates to computers and computer equipment use and came to the conclusion one of the main reasons I have troubles getting asleep is I use computer late at night usually I use PC until 2, 3 o'clock. Then when I go to bed, I cannot fall asleep until its early in the morning usually 6, 7 in the morning. My main operating system on notebook is Linux so almost all of the time I use Linux. I've noticed when I occasionally use Windows, my eyes tend to be less strained afterwards and I sleep better. Thus I suspected there should be some kind of tool in Linux which changes how PC screen displays to make eyes more relaxed. I didn't have the time to research seriously and before some time the little research I've done on this led me to nothing. Just a week ago, I've read one of the articles in Linux Magazine (December) issue, there is a very thorough article in it on how to avoid headaches and eye strain using a tiny tool which changes monitor screen gamma called redshift. In this article will explain in short how to install and use redshift to make your PC work less stressful and improve your sleeping at night. I'm using Debian as a basis Linux distro and thre redshift is available via package, other deb derivatives Ubuntu, Xubuntu etc. aslo have it. For Fedora and most of other Linux distributions redshift is also available from default repositories. For those who use Slackware or some older Linux distributions, redshift has to be installed manually from source but this should be trivial.

1. Install Redshift and Redshift-gtk packages

To install on Debian and Ubuntu:

# apt-get –yes install redshift redshift-gtk

On Fedora install with yum:

# yum -y install redshift

After installed you will have two programs to tune the screen color temperature, one is console based ( redshift ) and the other one is GUI based ( gtk-redshift ).

redshift-gtk is a GUI frontend

Here is a list of redshift tool options:

2. Changing color gamma with redshift

hipo@noah:~$ redshift -h
Usage: redshift -l LAT:LON -t DAY:NIGHT [OPTIONS...]

Set color temperature of display according to time of day.

  -h        Display this help message
  -v        Verbose output

  -g R:G:B    Additional gamma correction to apply
  -l LAT:LON    Your current location
  -m METHOD    Method to use to set color temperature (randr or vidmode)
  -o        One shot mode (do not continously adjust color temperature)
  -r        Disable initial temperature transition
  -s SCREEN    X screen to apply adjustments to
  -t DAY:NIGHT    Color temperature to set at daytime/night

Please report bugs to <https://bugs.launchpad.net/redshift>

To set your screen to Reddish mode which will relax your eye strain and therefore – when you go to sleep you have a better sleep, type:

 hipo@noah:~$ redshift -l -35:-56 -t 5000:3300

Other monitor red-color afternoon or night time gamma to relax your eyes is;

hipo@noah:~$ redshift -l 52.5:13.4

3. Setting redshift to auto change screen gamma via cronjob

If you prefer automatically changing color gamma to reddish at night – will make your eyes (and hence organism) less alert set as a cronjob in lets say 22:00 o'clock at night;

 hipo@noah:~$ crontab -u root -e

00 22 * * * redshift -l -35:-56 -t 5000:3300 2>&1 >/dev/null

4. Controlling manually between standard and reddish color gamma through gtk-redshift

For people who like to control and switch between color gamma using GNOME Applet run gtk-redshift like so:

hipo@noah:~$ gtk-redshift  -l 52.5:13.4

gtk redshift gnome applet screenshot Debian Linux

Clicking on the icon of redshift the color gamma gets changed to red, another toggle reverses back to normal.

There is another tool called F.lux which does the same as redshift. F.lux precedes redshift, actually redshift author write it as attempt to create superior F.lux. Flux works on Windows and Mac OS X – so users who work at night on this platforms might want ot check it. I tried installing f.lux on my Debian Squeeze Linux but had troubles because of requirement for newer python-appindicator :

noah:/home/hipo# apt-get install fluxgui
Reading package lists... Done
Building dependency tree      
Reading state information... Done
Some packages could not be installed. This may mean that you have
requested an impossible situation or if you are using the unstable
distribution that some required packages have not yet been created
or been moved out of Incoming.
The following information may help to resolve the situation:

The following packages have unmet dependencies:
 fluxgui : Depends: python-appindicator (>= 0.0.19) but it is not installable
E: Broken packages


Probably with some tampering I can make f.lux work but I was lazy and since I already had redshift, I decided to quit and just be a happy redshift user.