Posts Tagged ‘desktop system’

Monitor General Server / Desktop system health in console on Linux and FreeBSD

Tuesday, October 4th, 2011

slurm-output-monitoring-networking
saidar
is a text based ncurses program to display live statistics about general system health.

It displays in one refreshable screen (similar to top) statistics about server state of:
CPU, Load, Memory, Swap, Network, I/O disk operations
Besides that saidar supports a ncurses console colors, which makes it more funny to look at.
Saidar extracts the statistics for system state based on libgstrap cross platform statistics library about pc system health.

On Debian, Ubuntu, Fedora, CentOS Linuxes saider is available for install straight from distribution repositories.
On Debian and Ubuntu saidar is installed with cmd:

debian:~# apt-get install saidar
...

On CentOS and Fedora saidar is bundled as a part of statgrab-tools rpm package.
Installing it on 64 bit CentOS with yum is with command:

[root@centos ~]# yum install statgrab-tools.x86_64

Saidar is also available on FreeBSD as a part of the /usr/ports/devel/libgstrab, hence to use on my FreeBSD I had to install the libgstrab port:

freebsd# cd /usr/ports/devel/libstatgrab
freebsd# make install clean

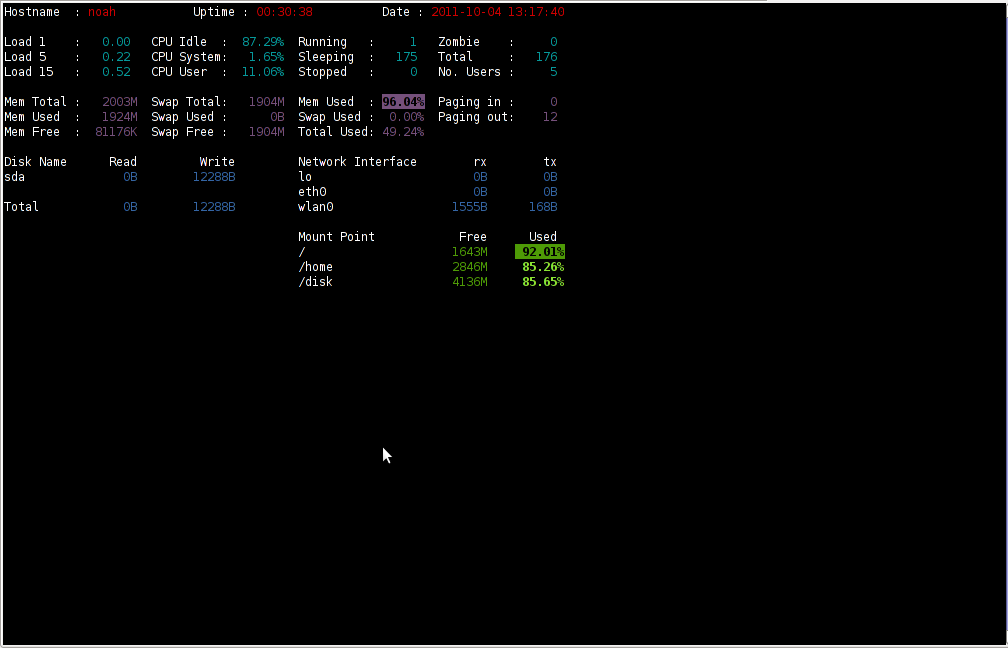
Here is saidar running on my Desktop Debian on Thinkpad in color output:

debian:~# saidar -c

Saidar Linux General statistics Screenshot

I've seen many people, who use various shell scripts to output system monitoring information, this scripts however are often written to just run without efficiency in mind and they put some let's say 1% extra load on the system CPU. This is not the case with saidar which is written in C and hence the program is optimized well for what it does.

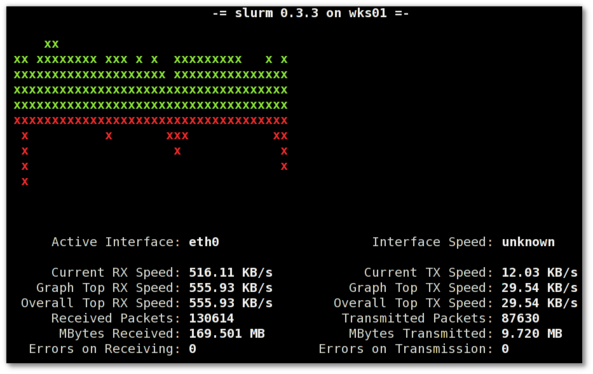
Update: Next to saidar I recommend you check out Slurm (Real Time Network Interface Monitor) it can visualizes network interface traffic using ascii graph such as on top of the article. On Debian and Ubuntu Slurm is available and easily installable via simple:
 

apt-get install –yes slurm


How to improve Linux kernel security with GrSecurity / Maximum Linux kernel security with GrSecurity

Tuesday, May 3rd, 2011

In short I’ll explain here what is Grsecurity http://www.grsecurity.net/ for all those who have not used it yet and what kind of capabilities concerning enhanced kernel security it has.

Grsecurity is a combination of patches for the Linux kernel accenting at the improving kernel security.

The typical application of GrSecurity is in the field of Linux systems which are administered through SSH/Shell, e.g. (remote hosts), though you can also configure grsecurity on a normal Linux desktop system if you want a super secured Linux desktop ;).

GrSecurity is used heavily to protect server system which require a multiple users to have access to the shell.

On systems where multiple user access is required it’s a well known fact that (malicious users, crackers or dumb script kiddies) get administrator (root) privileges with a some just poped in 0 day root kernel exploit.
If you’re an administrator of a system (let’s say a web hosting) server with multiple users having access to the shell it’s also common that exploits aiming at hanging in certain daemon service is executed by some of the users.
In other occasions you have users which are trying to DoS the server with some 0 day Denial of Service exploit.
In all this cases GrSecurity having a kernel with grsecurity is priceless.

Installing grsecurity patched kernel is an easy task for Debian and Ubuntu and is explained in one of my previous articles.
This article aims to explain in short some configuration options for a GrSecurity tightened kernel, when one have to compile a new kernel from source.

I would skip the details on how to compile the kernel and simply show you some picture screens with GrSecurity configuration options which are working well and needs to be set-up before a make command is issued to compile the new kernel.

After preparing the kernel source for compilation and issuing:

linux:/usr/src/kernel-source$ make menuconfig

You will have to select options like the ones you see in the pictures below:

[nggallery id=”8″]

After completing and saving your kernel config file, continue as usual with an ordinary kernel compilation, e.g.:

linux:/usr/src/kernel-source$ make
linux:/usr/src/kernel-source$ make modules
linux:/usr/src/kernel-source$ su root
linux:/usr/src/kernel-source# make modules_install
linux:/usr/src/kernel-source# make install
linux:/usr/src/kernel-source# mkinitrd -o initrd.img-2.6.xx 2.6.xx

Also make sure the grub is properly configured to load the newly compiled and installed kernel.

After a system reboot, if all is fine you should be able to boot up the grsecurity tightened newly compiled kernel, but be careful and make sure you have a backup solution before you reboot, don’t blame me if your new grsecurity patched kernel fails to boot! You’re on your own boy 😉
This article is written thanks to based originally on his article in Bulgarian. If you’re a Bulgarian you might also checkout static’s blog