Posts Tagged ‘picture’
Friday, February 26th, 2016 
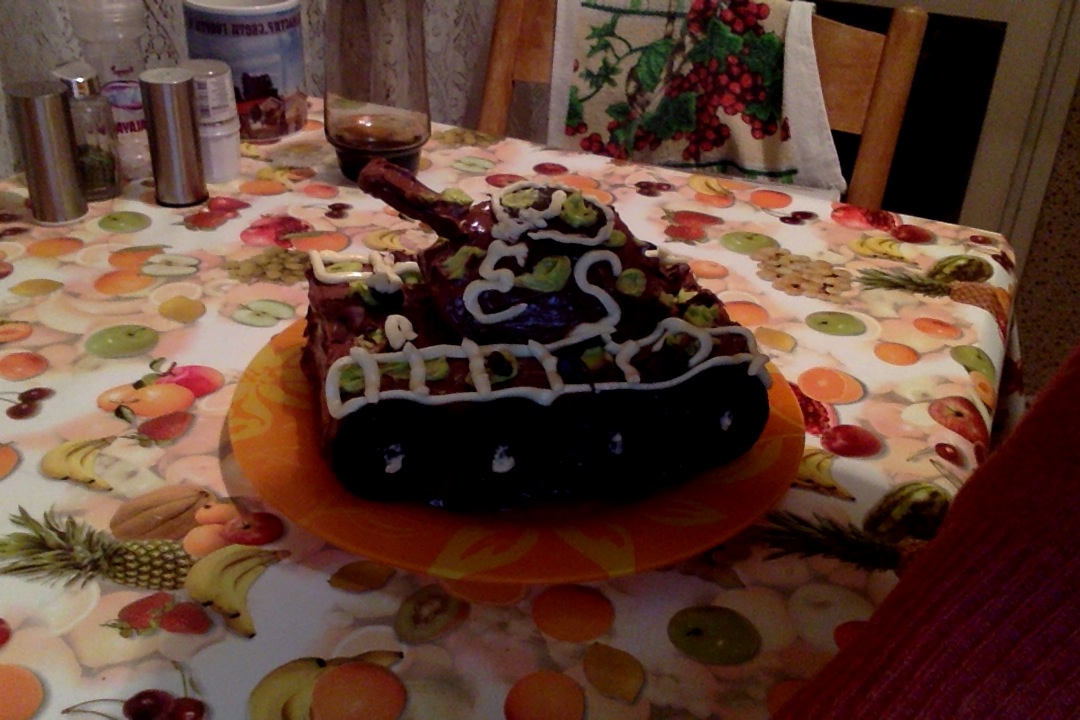
It seems we lost our Good high quality Digital Camera somewhere and I was in need urgently to make a good quality photo (my ZTE Phone) has a very bad camera, so I got the idea to use Macbookair's camera as it has better
resolution to picture my present a Tank Tort 🙂 hand made by my wife as a present for the Day of the Defender of the Fatherland which is a major feast in Russia, Belarus and many of the ex-Soviet Union members communist countries.
Actually using build in camare in MacBookAir is a handy thing for people mising at the moment a good high quality digital camera as it is thin and light and build in MacBook cam can be used to make Videos and Pictures exactly the same way
as an ordinary Tablet Computer is used so commonly nowadays by many:
In other words I needed for the Mac OS X equivalent to Cheese's (Photo and Video) capturer program for Linux.
Luckily for people interested in using their Mac OS notebook as a amateur camera this is easy by using default shipped Mac Application called:
Photo Booth app
To Launch Photo Booth app it just look it up in Finder and double click it:
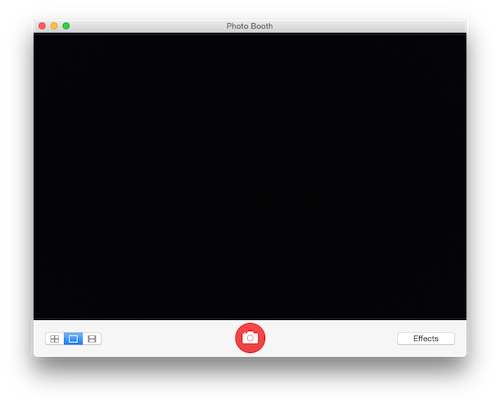
Clicking the large red button underneath the preview area will take a picture after an optional countdown.

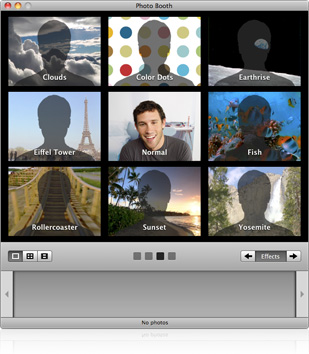
Besides being able to capture Video and Pictures from Mac's camera it could add also some nice effects to taken pictures and videos (supports a basic video editing) features and effects.
The effects you can choose are are: Sepia, Black and White, Glow, Comic Book, Normal, Colored Pencil, Thermal Camera, X-Ray, and Pop Art. There are also effects that change the person in the picture using these effects: Bulge, Dent, Twirl, Squeeze, Mirror, Light Tunnel, Fish Eye, and Stretch. Actually photographic filters of Photo Booth are very similar to Adobe Photoshop.
By default Photo Booth will create picture, howver
Photo Booth saves your photos as JPEG files in a folder named Photo Booth, located in your home folder.
Choose File > Reveal in Finder
to see your picture files.
A much better way to be able to easily see and access all taken Pictures and Videos with Photo Booth is to
open Terminal
and type:
——-
$ cd Pictures
$ ln -s Photo\ Booth\ Library/Pictures/ PhotoBoothPics
This will make Link to pictures be easily accessible from your Finder -> Pictures folder
Applying custom photo backgrounds
A very useful feature of Photo Booth is that the user can apply backdrops to provide an effect similar to a green screen. When a backdrop is selected, a message appears telling the user to step away from the camera. Once the background is analyzed, the user steps back in front of the camera and is shown in front of the chosen backdrop.
For people who prefer to take photos using a console program on Mac OS I guess you should take a look at ffpeg
Here is one more snapshot of the Tort Tank snapshot made with the Macbookair of Svetlana 🙂
P.S. If you like the Tort Tank and you happen to live in Sofia Bulgaria, you can order it by dropping me a comment with request 🙂
Enjoy ! 🙂
Tags: Adobe Photoshop, apple, com, digital camera, good, Launch Photo Booth, look, make, notebook, Pc, picture, program, question, Tort Tank, video editing, Videos, www
Posted in Curious Facts, Entertainment, Everyday Life, Mac OS X, Various | No Comments »
Thursday, June 23rd, 2011 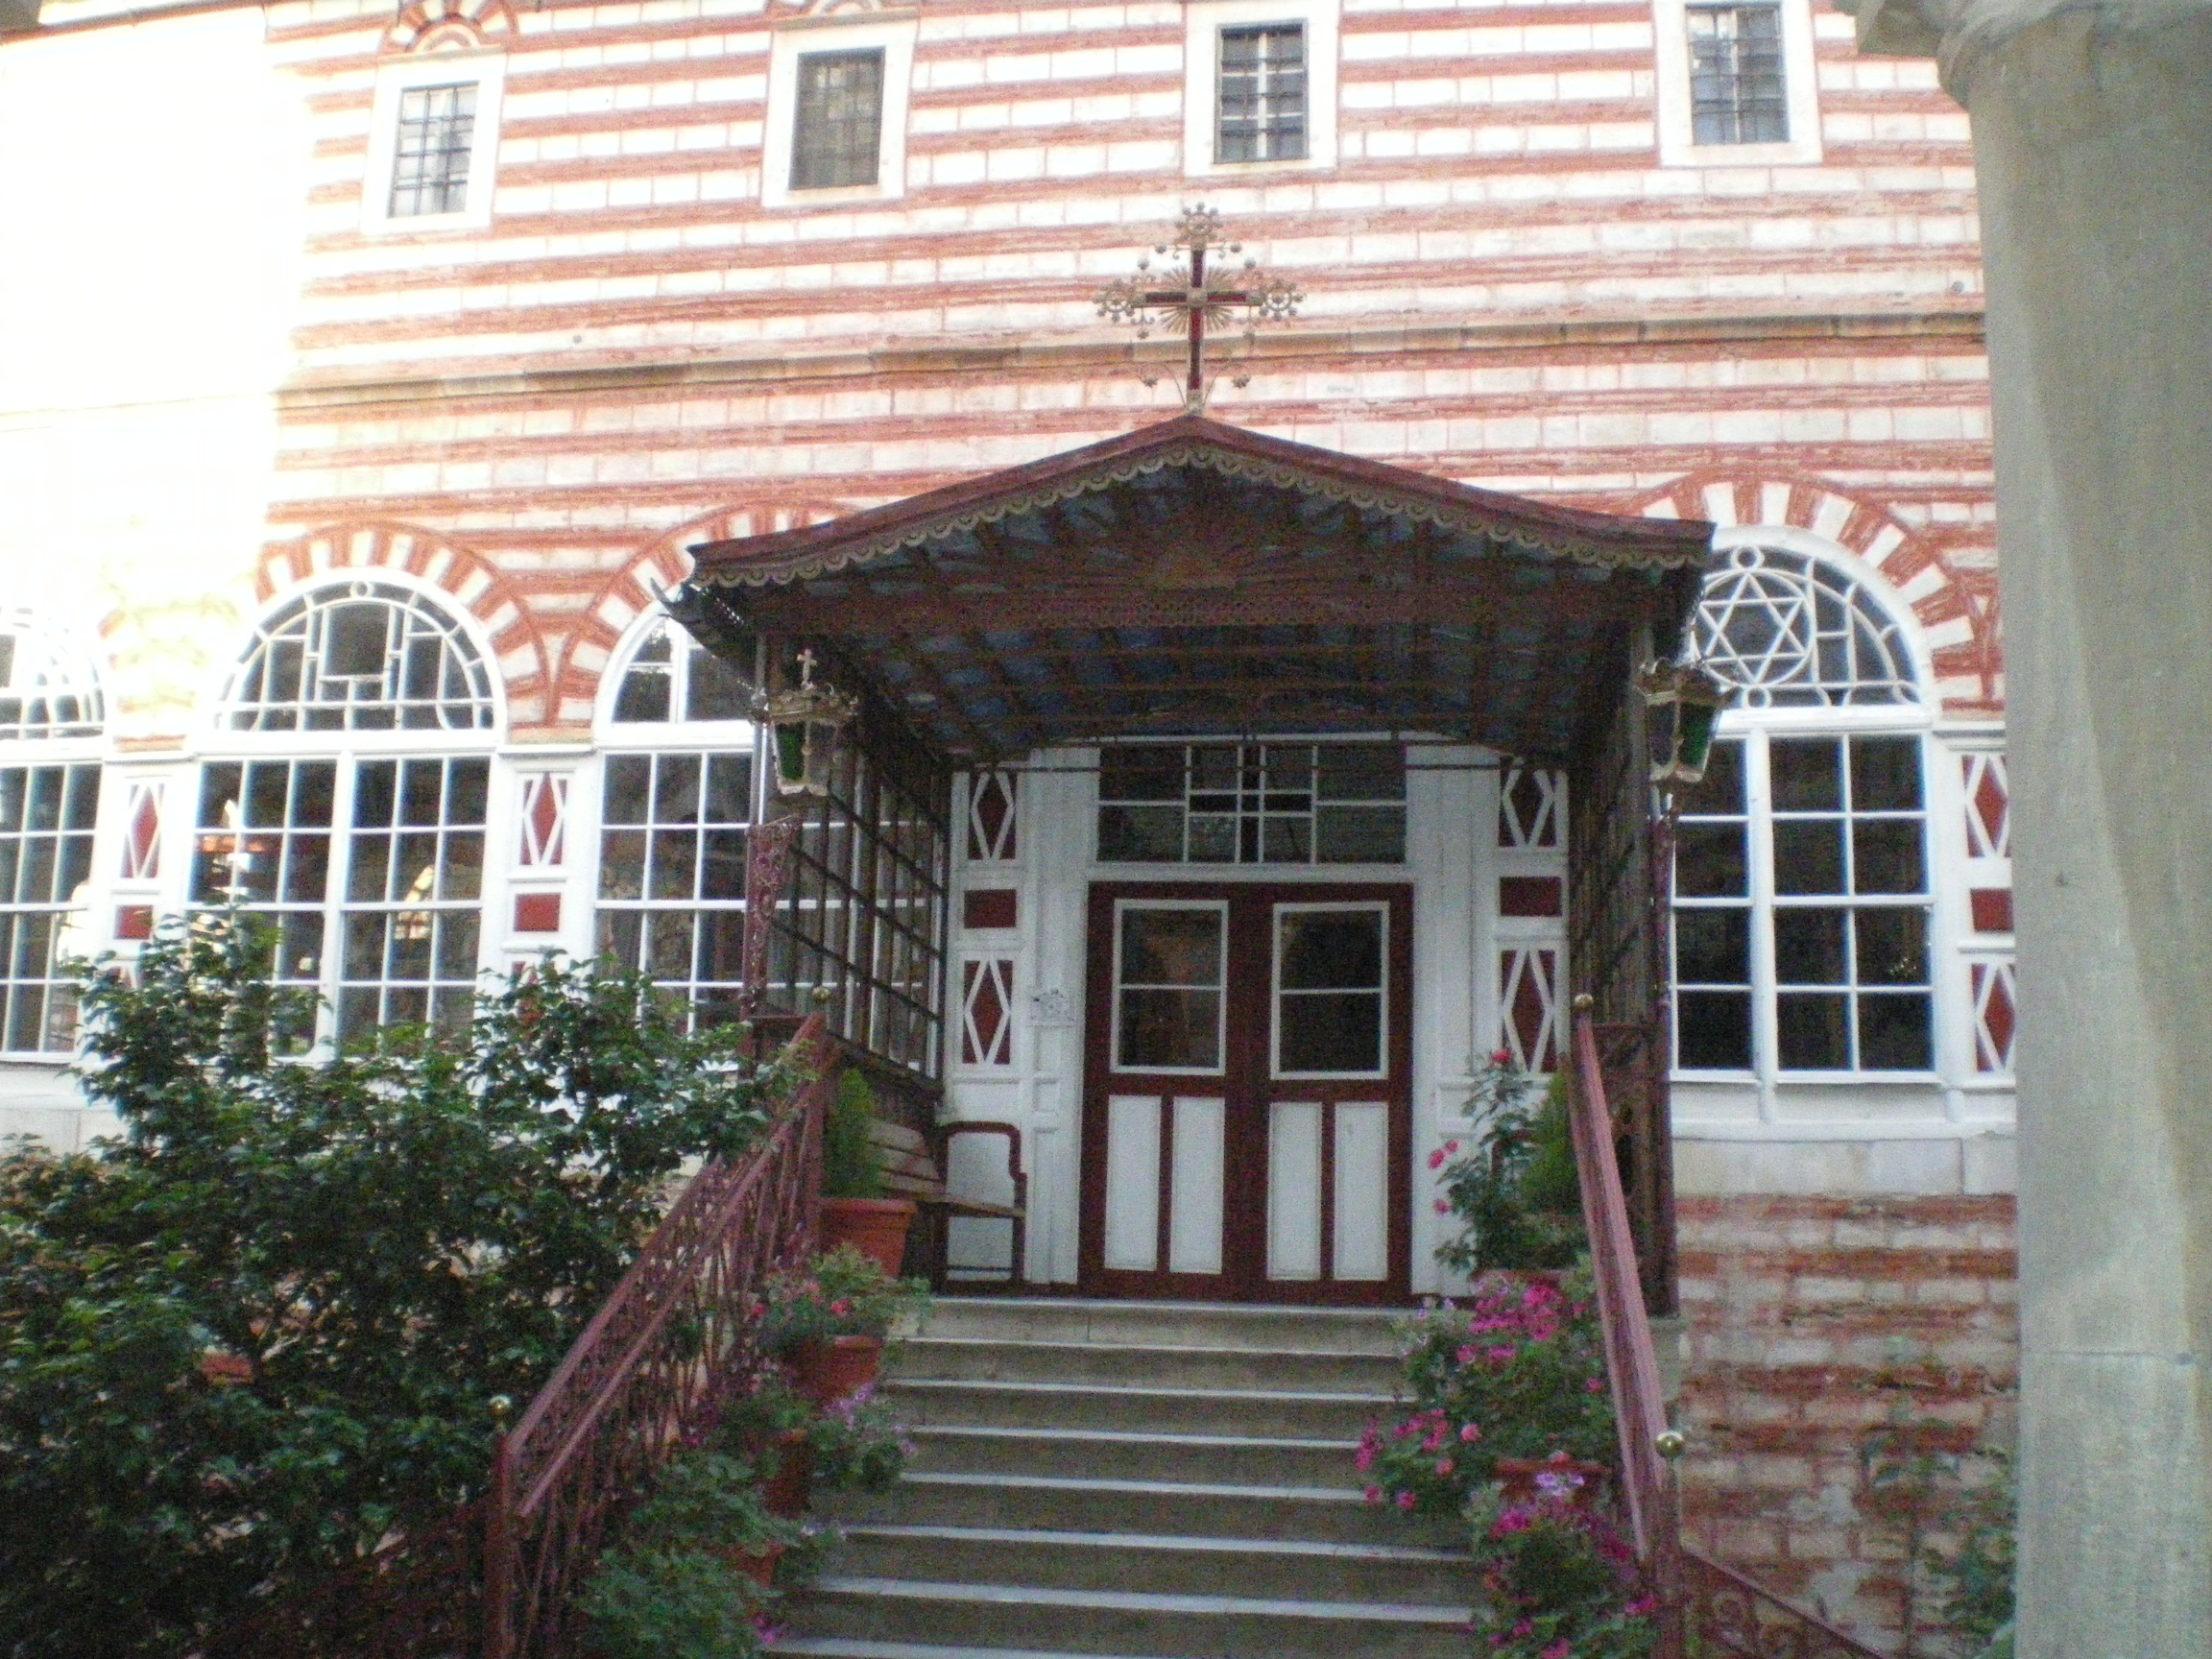
Holy Mount Athos st. Georgi the Glory Bringer – Zographus Monastic main Church
I start this post with the St. George Zographus Monastery’s main Church as the Zographus Monastery on Holy Mount Athos was our brother Georgi last eartly place he wanted to spend the remaining of his eartly life.
Today it’s the 40th day since our brother in Christ (ipodeacon) Georgi Nedev has presented his humble soul to our Saviour Jesus.
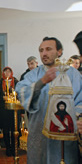
This is the only picture I have of our brother Georgi
His living was as humble as his departure from this life and his passing I believe in the eternal life with God.
Georgi had the severe desire to become a monk in Holy Mount Athos and has multiple friends in there which loved him and often prayed for him.
Now on this 40 day in our Bulgarian monastery in Holy Mount Athos, Saint George – The GloryBringer (Zographus) monks will be serving a requiem service (Panihida – as we say in Slavonic)
His departure was striking and sudden for of us in the Church community here in Dobrich’s Holy Trinity Church, as well as not less shocking for the Holy Mount Athos Zographus monks Christian community who loved our brother sincerely.
Some short biographic facts about our brother ipodeacon Georgi Nedev are here
Unfortunately the bio-facts I know about Georgi are very little, as I only knew him for a couple of years. Even though the short time I used to know him, I can say I was blessed through him and I’m exteremely grateful to him, it was through him I’ve learned a bit more about Holy Mount Athos and our Bulgarian monk community that is in Zographus, as well as some very minor details concerning the spiritual Church life that I’ve never thought about.
It was thanks to him I was being encouraged on numerous times in terrible times of desparation and loss of faith and track in life.
Thanks to him I was being explained for a first time, how one can go for a pilgrimage journey to Holy Mount Athos and how one can get the pilgrim’s permit documentation related to going there called in greek diamontirium
He also told me about numerous miracles about Holy Mount Athos, and explained me one needs to pray to the Holy Theotokos Virgin Mary and ask her that is being allowed to enter this holy place.
This last lent, even though his sickness Georgi was regularly visiting the evening services in the Church and was dilegent in his spiritual life.
I remember him expressing his enormous joy the last time I saw him on a Holy Liturgy for he took the Holy Communion.
After the Church service, I asked him how is he, his answer was; I’m not feeling well, but praise be to God! for I was able to take the Holy Communion
Many times when I asked him what are his future plans, he used to answer I don’t know anything, it’s all in the God’s will (hands) for me.
You can see yourself how great his dedicated for God was by his own words.
As our priest, who used to be his confessor said, “Georgi was a righteous man and God took him early on”.
Let eternal be your Memory beloved brother Georgi now and Forver and Ever! Amen!
Tags: answer, beloved brother, bishop, bit, brother in christ, Bulgarian, Communion, CommunionMany, desparation, diamontirium, dilegent, eternal life, Forver, George Zographus Monastery, georgi, Holy, Holy Mount Athos Zographus, holy theotokos, holy trinity church, humble soul, ipodeacon, journey, last, life thanks, life today, memory, minor details, Monastery, monk, Monks, mount athos, permit, picture, pilgrim, pilgrimage journey, place, pray, priest, requiem, requiem service, saviour jesus, Service, soul, spiritual, spiritual church, spiritual life, st george, terrible times, time, today, Trinity, trinity church, virgin mary, Vladishka, Zographus
Posted in Christianity, Everyday Life | 1 Comment »
Tuesday, May 3rd, 2011 In short I’ll explain here what is Grsecurity http://www.grsecurity.net/ for all those who have not used it yet and what kind of capabilities concerning enhanced kernel security it has.
Grsecurity is a combination of patches for the Linux kernel accenting at the improving kernel security.
The typical application of GrSecurity is in the field of Linux systems which are administered through SSH/Shell, e.g. (remote hosts), though you can also configure grsecurity on a normal Linux desktop system if you want a super secured Linux desktop ;).
GrSecurity is used heavily to protect server system which require a multiple users to have access to the shell.
On systems where multiple user access is required it’s a well known fact that (malicious users, crackers or dumb script kiddies) get administrator (root) privileges with a some just poped in 0 day root kernel exploit.
If you’re an administrator of a system (let’s say a web hosting) server with multiple users having access to the shell it’s also common that exploits aiming at hanging in certain daemon service is executed by some of the users.
In other occasions you have users which are trying to DoS the server with some 0 day Denial of Service exploit.
In all this cases GrSecurity having a kernel with grsecurity is priceless.
Installing grsecurity patched kernel is an easy task for Debian and Ubuntu and is explained in one of my previous articles.
This article aims to explain in short some configuration options for a GrSecurity tightened kernel, when one have to compile a new kernel from source.
I would skip the details on how to compile the kernel and simply show you some picture screens with GrSecurity configuration options which are working well and needs to be set-up before a make command is issued to compile the new kernel.
After preparing the kernel source for compilation and issuing:
linux:/usr/src/kernel-source$ make menuconfig
You will have to select options like the ones you see in the pictures below:
[nggallery id=”8″]
After completing and saving your kernel config file, continue as usual with an ordinary kernel compilation, e.g.:
linux:/usr/src/kernel-source$ make

linux:/usr/src/kernel-source$ make modules

linux:/usr/src/kernel-source$ su root

linux:/usr/src/kernel-source# make modules_install

linux:/usr/src/kernel-source# make install

linux:/usr/src/kernel-source# mkinitrd -o initrd.img-2.6.xx 2.6.xx
Also make sure the grub is properly configured to load the newly compiled and installed kernel.
After a system reboot, if all is fine you should be able to boot up the grsecurity tightened newly compiled kernel, but be careful and make sure you have a backup solution before you reboot, don’t blame me if your new grsecurity patched kernel fails to boot! You’re on your own boy 😉
This article is written thanks to based originally on his article in Bulgarian. If you’re a Bulgarian you might also checkout static’s blog
Tags: administrator, combination, compilation, config, configuration options, configure, crackers, day, Denial, denial of service, Desktop, desktop system, exploits, file, grsecurity, hosting server, How to, img, installlinux, kernel source, Linux, linux desktop, linux kernel, linux systems, make, malicious users, Maximum, maximum linux, menuconfigYou, multiple users, picture, root, root privileges, say, script, script kiddies, server system, Shell, src, system, typical application, Ubuntu, usr
Posted in Linux, Linux and FreeBSD Desktop, System Administration | No Comments »
Thursday, March 18th, 2010 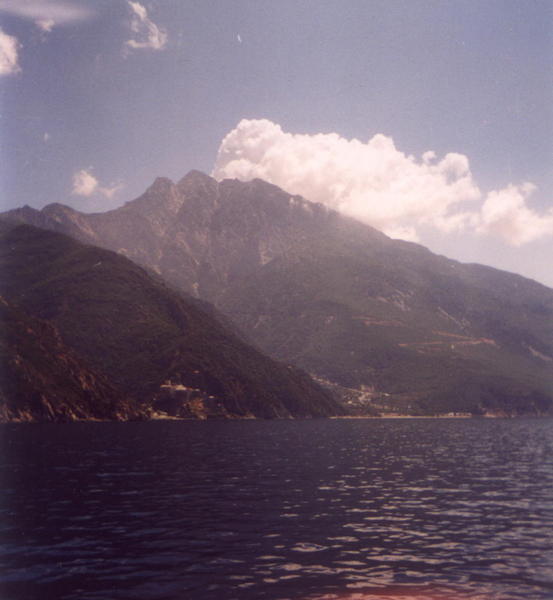
This wonderful picture of Mounth Athos – Holy Mountain (A monk republic situated in Northern Greece) was taken by my kind-hearted girlfriend Dorothy (Angellyca / GrimminaGroll) , during her trip to Kabala and some other Tourist destinations in Greece, while on a boat crossing near Mount Athos. I hope she won’t be very angry with me that I post her picture, but I felt obliged to do so!
So Thank you Dear Dorothy, and please don’t be mad at me 🙂
Tags: mount athos, Mounth Athos Sideview, Northern Greece, picture, trip
Posted in Christianity | No Comments »
Monday, May 12th, 2014 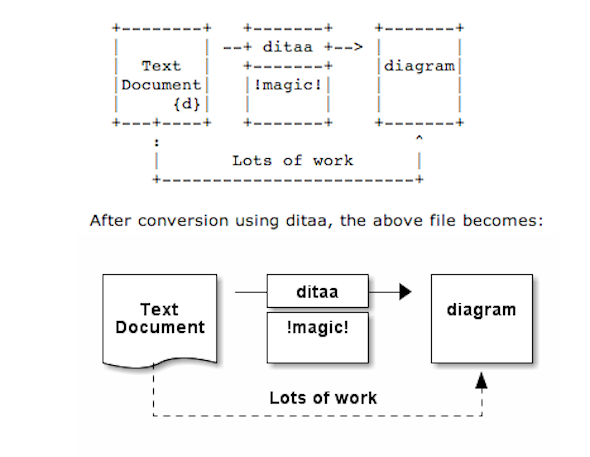
As part of my passion for ASCII art, I've found another interesting tool useful to ASCII art maniacs like me, the tool is called ditta and is able to convert manually drawn ASCII art diagrams to graphics, below is tool description from my debian apt-cache as well as a screenshot:
apt-cache show ditaa|grep -i ditaa -A 4
Package: ditaa
Priority: optional
Section: graphics
Installed-Size: 164
Maintainer: David Paleino <dapal@debian.org>
—
Filename: pool/main/d/ditaa/ditaa_0.9+ds1-2_all.deb
Size: 107270
MD5sum: 05ec52d9274b954b053f1835ca5d7a7f
SHA1: 792d91d05fff2a2a19c0ebce317351d138436c18
SHA256: c4319d32e7918aab782e2f38cdad745bc9023f9f09a999033d983095ee4f70d5
—
DiTAA is a small command-line utility that can convert diagrams drawn using
ASCII art ("drawings" that contain characters that resemble lines, like | /
and -), into proper bitmap graphics.
.
DiTAA also uses special markup syntax to increase the possibilities of shapes
and symbols that can be rendered.
Homepage: http://ditaa.org
To install ditaa on Debian and Ubuntu Linux:
debian:~# apt-get install --yes ditaa

...
Ditaa text diagram to Graphics converter is also available in Fedora Linux and in Source RPMs to be used on Redhat Based RPM distributions.
To install in most of RPM based Linuxes:
[root@fedora:~]# yum install -y ditaa
…
For most people probably Ditta will not be of any value except as a PoC and of a Hack value just like Ditaa's home page suggests. Nomatter that Ditta is cool but has just 2 drawback it doesn't understand non-latin characters i.e. Cyrillic and requires Java Virtual Machine .. but if you're a real geek you will do the sacrifice to install a whole bunch of the heavy java for the sake of some oldschool fun 🙂 Being written in Java makes Ditta multi-platform, but you will need a Java VM version of at least 1.6 (it doesn't work with Java 1.5).
The format Ditta understands is close to HTML
<ditaa [optional parameters]>

... (some ditaa-code) ...

</ditaa>
There are also special tags understood by Ditta which are automatically turned into shaped graphical buttons and forms.
Not all shape selector tags are documented on the ditaa site. A quick source scan revealed:
| tag | Description |
| {c} | decision(Choice) |
| {d} | document |
| {io} | input/output, parallelogram |
| {mo} | manual operation |
| {o} | ellipse, circle |
| {s} | storage |
| {tr} | trapezoid (looks like an inverted {mo} ) |
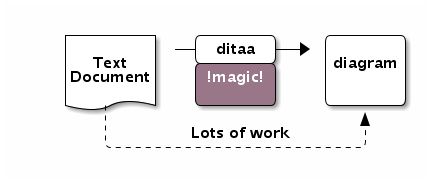
Here is an example Ditta code
<ditaa round noedgesep right>
+--------+   +-------+    +-------+
|        | --+ ditaa +--> |       |
|  Text  |   +-------+    |diagram|
|Document|   |!magic!|    |       |
|     {d}|   |  c478 |    |       |
+---+----+   +-------+    +-------+
:                         ^
|       Lots of work      :
+-------------------------+
</ditaa>
This Ditta code will generate following picture:
To learn more on ditta please check Ditaa's Project homepage on Sourceforge
Many thanks to Cybercity's 30 Cool Open Source Software of 2013 for inspiring this post.
Tags: Ascii, bitmap, bunch, close, command line utility, Cool Open Source Software, Debian, diagram, doesn, Graphics, input output, Java, java virtual machine, need, org, passion, picture, platform, possibilities, site, syntax, tool, utility
Posted in Curious Facts, Entertainment, Everyday Life, Various | 1 Comment »
Sunday, March 16th, 2008 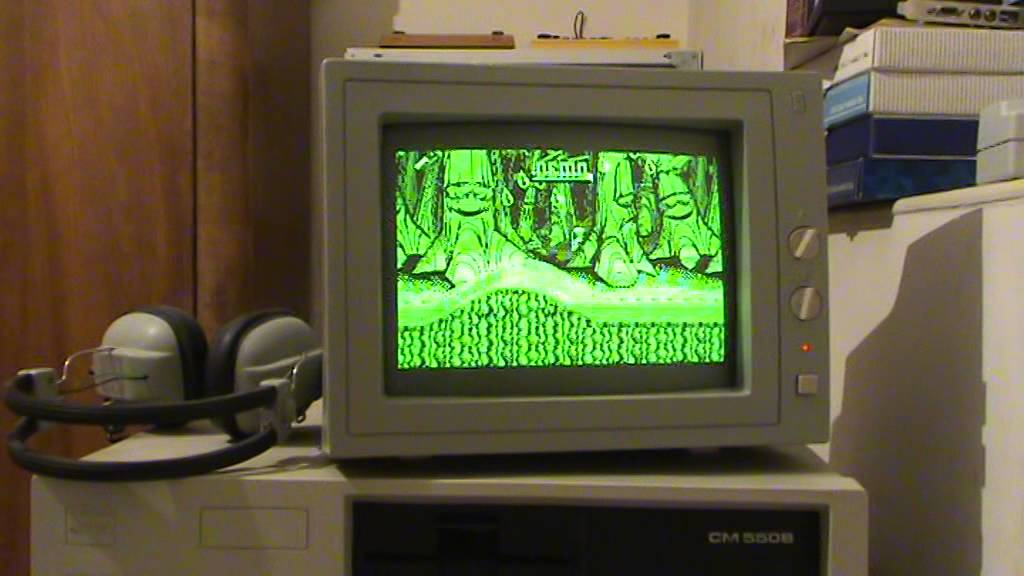
A friend of mine gave me an interesting link it’s about Pravetz A computer systems which were an absolute hit here in Bulgaria, they are produced here and we should be proud we had our Bulgarian computers. Here is the link Pravetz! 🙂
Pravetz was a was copy of Apple ][ (Pravetz 8A, 8C, 8M), Oric (Pravets 8D) and IBM-PC (Pravetz 16 also known as XT).
Pravetz was named after a town of Pravetz which is the homeplace of the ex-Bulgarian communist party leader and President of Socialist Bulgaria Todor Jivkov. Pravetz had a huge production quantities as about 200 000 were exported to coutnries from Soviet Union block. My generation people about 30 have grown with Pravetz and many nowadays IT specialists in Bulgaria had learned computer basics on 8 or 16 bit Pravetz machine. Its compatability with DOS made it a great game-station PC. Owning Pravetz PC at communist times was considered as a sign of elitism as only Police station and highest authorities or people close to party leaders had one of those even in 1995 still owning a Pravetz PC was considered an extra-ordinary think.
Pravetz 16 was part of the MIK-16 family of computers, which included:
– Pravetz 16 (the one on the picture, 4.77Mhz)
– Pravetz 16A (1x Floppy, 1x 5MB HDD)
– Pravetz 16H (improved one, 8Mhz, 1 or 2 Half size floppies + 1x HDD 20MB – half size)
– Pravetz-286
The first version of Pravetz 16 had a built-in Basic on a ROM chip, which loaded if no OS was present. The 16A did not have a built-in Basic.
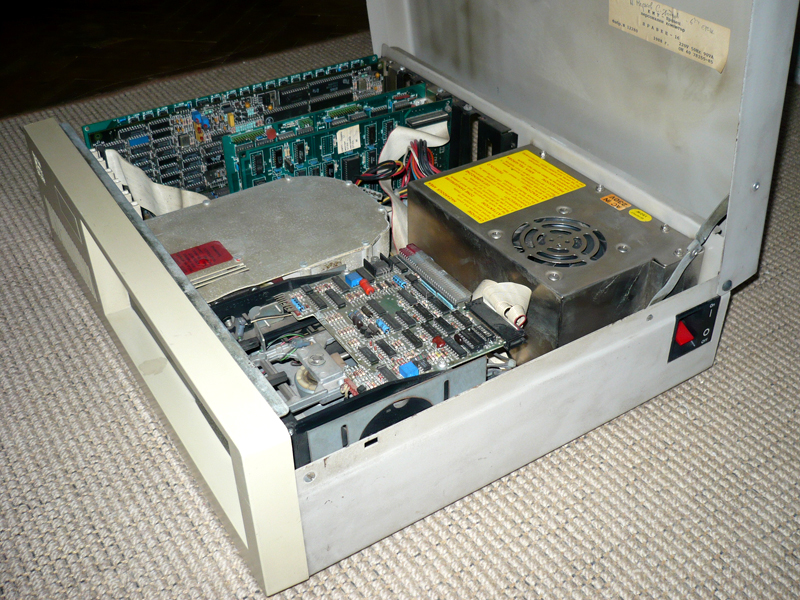
The 20 Megabytes HDD was a revolution, for almost 4 years the HDD never show any errors. There was a CGA (Color Graphics Adapter) built-in control, and i had a 16-color display (or monochrome black and green display based on the model). This machine was excellent for making DOS-programing, and was used till the middle of the 90’s, mostly in government facilities.
The following software was available for Pravetz:
-programing languages (BASIC-16, PASCAL, Cobol,Ada);
-dBASE systems (Micro-PC-2);
-Text editors (Text-16, MicroTEXT-16, DOKS-2);
-Electronic schedules (Superplan-16, MicroPLAN/16);
-information-searching systems (INFOS);
-Administration automatisation (MIS);
-Integrated products (MULTIPACK);
-Machine graphics;
-CAD (GraphCAD, PLOT-1);
-communication utilities;
-learning&enjoy programs;
-specialised products.
Many people were installing MS-DOS 5.0 or 7.0 or DR-DOS and using the PC with DOS programs, where most compatible with XT were working just fine. My own monitor was monochrome and had problems with displaying some color gammas and thus in Games some of the colors were not displayed. However owning a Pravetz was amazing thing at that time, it was a mania and a building block of a whole PC-geek generation that emerged from Pravetz Culture.
At that time in the distant 1988 when Bulgaria was still highly industrialized country in Plovdiv we were producing another made in Bulgarian Computer called Puldin (Puldin is the ancient name of the city of Plovdiv Bulgaria).
What was unique about Puldin was it was computer completely built from scratch with its own hardware and software architecture.
Puldin was produced in 4 modifications 601-A/U/M/T, the RAM memory was 64KB, the ROM was from 4KB up to 68KB depend on the model, the video output could be connected to normal TV, there was LAN card, Printer centronics output, Cassete input, RS232, Floppy disk, etc.
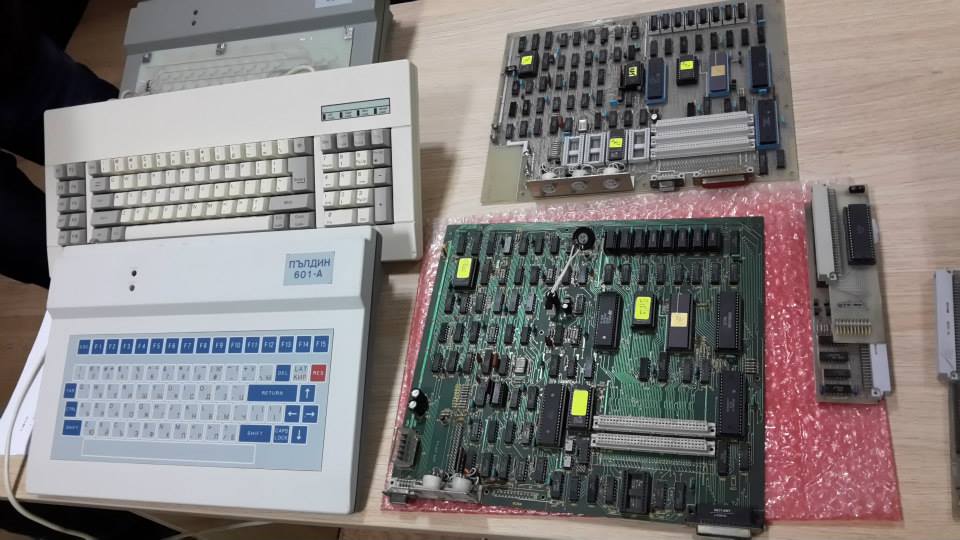
As you can see in above screenshot the keyboard was slightly different from Pravetz one it gives an impression of unique design (Apple Mac styled) 🙂
Though keyboard looks nice it was terrible to use, there was no tactile click feed back so you basically don’t know if you pressed the key, fortunately later models had connector for external IBM-PC keyboard with keys, which make the work easier.The computer was already unefficient as in 1988 there were already lot of computers on the market including IBM-PC with 16 bit processor running at the remarkable 4.77Mhz.
Puldin processor was a Motorola 6800 copies named CM601 at that time produced in Botevgrad. It was running UniDOS which was basically a made from scratch MS-DOS alternative.
The computer was equipped with Assembler, BASIC, Pascal, Editor, Diagnostic tools, even DBase equivalent. Puldin was produced in small volume ~ 30 000 – 50000 computers mainly shipped to Russia as Russia was main market for Bulgarian products at that time. Software developed on Puldin could be moved to IBM-PC by using Pascal P-code and this was highly revolutionary as it had capabilities similar to Java long before Java was existent.
Computer was developed by 6 developers which were students at that time and they made it as enthusiasts without taking a penny for it. One of the software developers who worked on Puldin was also author of Eagle DOS for Apple ][ (Pravetz82) and UniDOS for Puldin and now has his own company selling computers http://eagle.bg.
The guy who wrote the Assembler BIOS and Basic ROM for Puldin – Todor Todorov became more famous with his virus works instead of what he did for Puldin the now mythological Dark Avanger
Tags: Apple Pravetz82, architecture, Bulgarian Computer, guy, link, picture, pravetz first bulgarian computer, Pravetz Pravetz, Puldin Todor Todorov, software, virus
Posted in Curious Facts, Entertainment, Everyday Life, Various | 1 Comment »
Friday, February 14th, 2014 Lets say you're an admin involved in webhosting and due to a programmer's mistake, you end up with directory full with files with extension in upper cases but for actual version of website (all pictures are red only in lower cases), hence would like to transform these to lower cases.
To give an example, to illustrate what I mean, lets say you have in a directory files like;
filename.JPG, picture.PNG, new-picture.GIF
and you would like all files to be renamed to lower extension characters, i.e.:
filename.jpg, picture.png, new-picture.gif.
# find . -name '*.*' -exec sh -c 'a=$(echo {} | sed -r "s/([^.]*)\$/\L\1/"); [ "$a" != "{}" ] && mv "{}" "$a" ' \;
That's all enjoy 🙂
Tags: admin, directory, due, echo, end, JPG, Linux, Linux Rename, mistake, mv, picture, png, Rename
Posted in Linux, System Administration, Various | No Comments »
Wednesday, February 12th, 2014 
I WORK FOR MONEY IF YOU WANT LOYALTY – HIRE A DOG!
I was told about those picture few months ago by a friend (Ivan Pushkaroff – Pushi) while we were drinking beer together in (Delfincheto – a pub more known among people under the name "Ribkata (The Fish)" – A Metal Music pub in Studentski Grad (Sofia's Student City). By the way if you're in Sofia and near "Studentski Grad" be sure to drop by there – they serve great and always fresh fish also for ex-metal heads for me it is always nice to get some memories about "the good old metal years"
when I tried to complain how difficult it is for me on my job place. I'm a quite sensitive person and a perfectionist and always try to do a great job. Often however there are many obstacles to do your job in right way (as you depend on so many bureaucracy and external people that even if you do your best someone else can mix it up and screw all your effort by not doing his part of the job. The failure of project or Task due to inadeaquacy of someone else involved to do his job right can leave you with a feeling that you have failed even though it is completely not your fault. As these days I'm quite stressed on my job and I have to work on a lot of badly designed projects (and improperly) assigned tasks – yes in big companies it is like these "the right hand doesn't know what the left one is doing". I remembered my dear friend advice to not take it seriously or personally and decided to put these funny picture in hope that these will help me and others to deal with situation of hardships in job in a humorous way After all I'm just a mercenary and I'm doing my best right now in my job at HP … I work for money if they expect higher degree of loyalty let them hire a dog 🙂
Tags: dear friend, drinking beer, effort, feeling, fish, hardships, job, left, lot, money, picture, place, right, screw, situation, someone
Posted in Curious Facts, Entertainment, Everyday Life | No Comments »
Tuesday, October 22nd, 2013 
I'm forced to use Windows in my work place in HP and occasionally have to open pictures. Default Windows viewer Windows Photo Viewer is very limited in what it can do. It can't even Rotate a picture so I find it a good idea to find a good alternative. Historically I liked to use IrfanView Freeware but I saw a colleague to use FastStone Image Viewer and I decided to give it a try. It looks more function rich than IrfanView so I install it and intend to use it as primary picture viewer on HP work Elitebook 8470p with Windows 7.
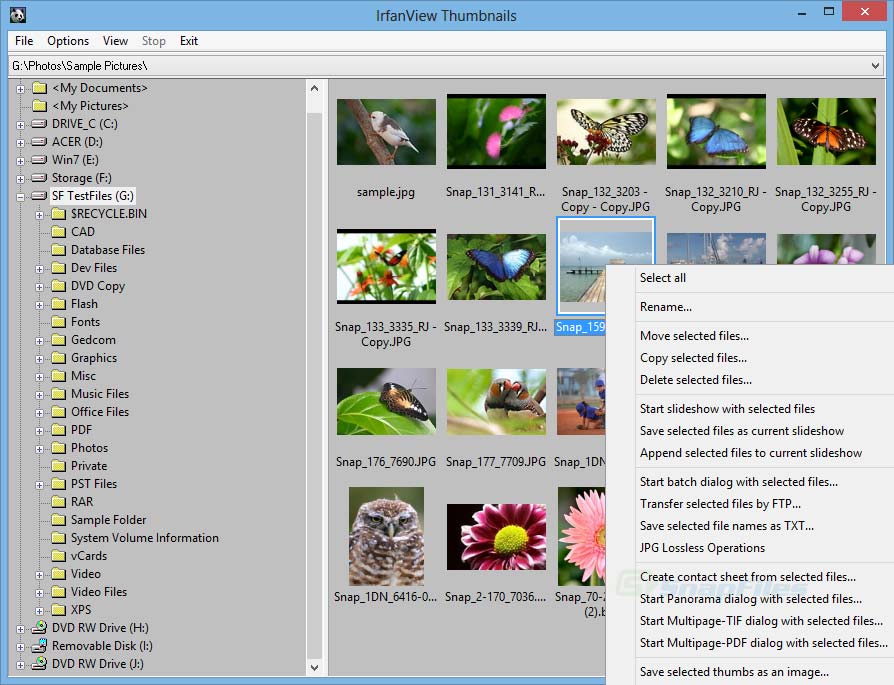
I strongly recommend the program to anyone looking for a good alternative to 'woody' Windows Image Viewer and who for some reason wants alternative to Irfanview.
FastStone has all the basic features I need like Crop image, Rotate Image etc. by using it I don't have to run GIMP for simple image manipulations. Another good reason to use FastStone is many of well known shortcut keys are similar to Proprietary (Non-Free) ACDSee which I used to heavily used in old days when I was still using Windows 98 so it feels using it quite confortable. Other thing is FastStone manages quite well non-standard RAW formats from various Cameras.
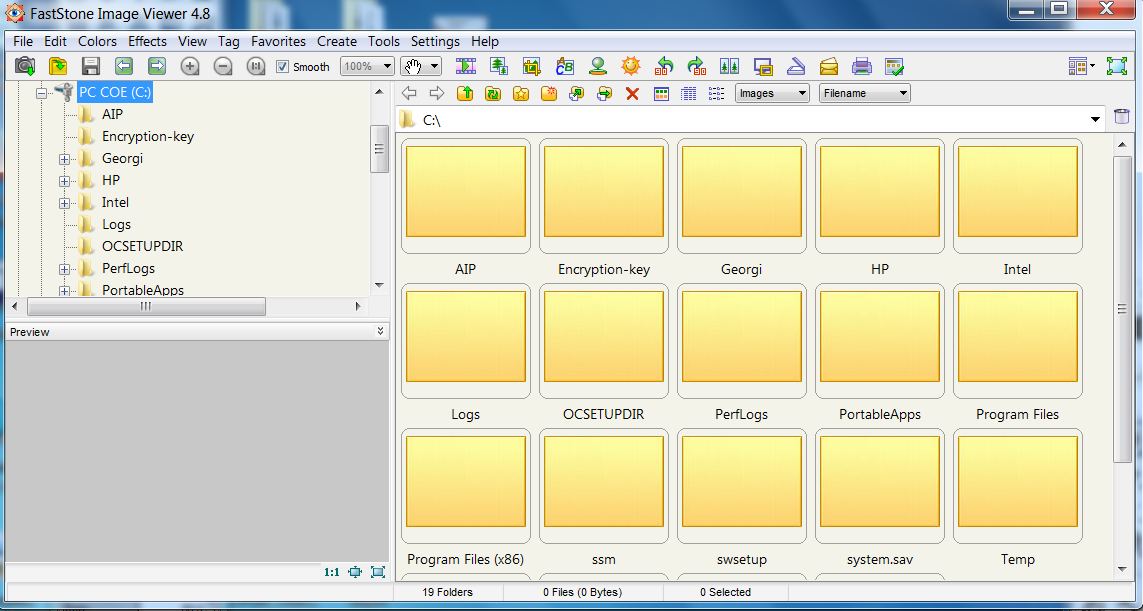
FastStone has even a bunch of standard Effects to apply to a picture, play with Shadows Lightning and most of basic professional File manipulation embedded. Hope someone will benefit out of the post and will start using it.
Enjoy
Tags: alternative, Default Windows viewer, FastStone Image Viewer, freeware, Image Viewer, picture, Rotate Image, software, viewer, Windows, Windows Image Viewer, Windows Photo Viewer
Posted in Windows | No Comments »
Friday, May 18th, 2012 A friend of mine, just mentioned about a program ASCIIPic – capable of converting graphic images in JPEG to plain text ASCII in Microsoft Windows OSes.
Yesterday I blogged about caca-utils (img2txt) – console tool to convert picture graphics to plain text ASCII , so knowing of the Windows freeware ASCIIPic existence catched my attention and I decided to give it a try to get idea what is situation with Images to ASCII text convertion in Windows? 🙂.
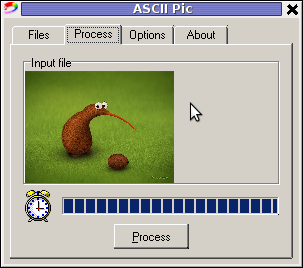
1. Generating ASCII from JPEG images with ASCII Pic
As I don't have a Microsoft Windows OS at hand, I downloaded it and run it on my Debian notebook with WINE (Wine Is Not an Emulator) MS-Windows emulator.
For my surprise the program run succesfuly its GUI interface and worked pretty smooth even emulated on Linux.
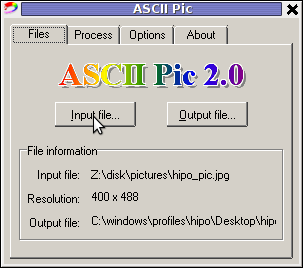
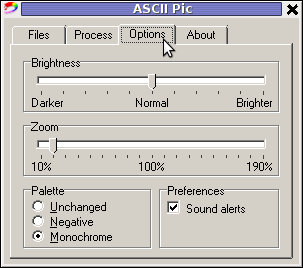
As of time of writting, the latest version of the freeware program available is 2.0. You see in above screenshot the program is pretty intutive to use. You select an Input file, an Output file and you're ready to Process the image to TXT.
One small note to make here is the program couldn't recognize as Input files images in PNG or GIF formats, it seems the only image formats the program recognizes as input are JPEG and BMP.
The converted images to ASCII results are quite unsatisfactory, I tried converting few pictures originally in size 1024×768 but the produced ASCII was messy huge (the program didn't automatically set height / width dimensions to 60×80 and therefore, when I revied the produced pictures, they were very ugly and hardly readable. It could be the same image looks better if reviewed in MS-Windows Notepad but I seriously doubt that …
I thought some improvement to the produced ASCII image might be possible from the app options so I played around with the Zoom, Negation, Brightness and Monochrome options, none of them had a drastic change on the output. Using any of the program options didn't make the output TXT "image" to look closer riginal JPEGs..
ASCII Pic official website contains a number of other tiny tools, like WinKill and RemoteShut, however most of the tools are already too obslete and useless just like ASCII Pic
If I have to compare ASCIIPic produced ASCII Images to libcaca's Linux img2txt, asciipic's ASCII images are a piece of crap.
2. jp2a command line tool image to ASCII generator
As of time of writting a good alternative program I found for Windows is jp2a
jp2a is a free GPL-ed software available for all major operating system architectures Linux, BSD, Mac OS X, Windows.
jp2a is a command line tool and lacks any GUI interface but if compared to ASCII Pic the output ASCII image is awesome.
jp2a Windows binary can be downloaded from here , also I've made a mirror of windows jp2a bin in case if it disappears here
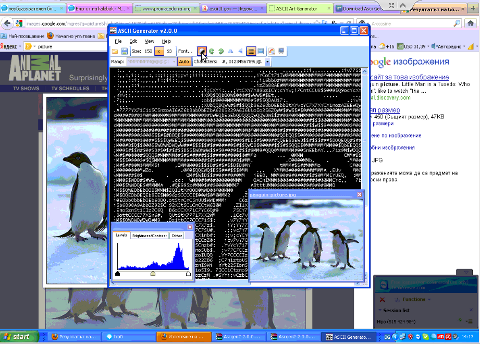
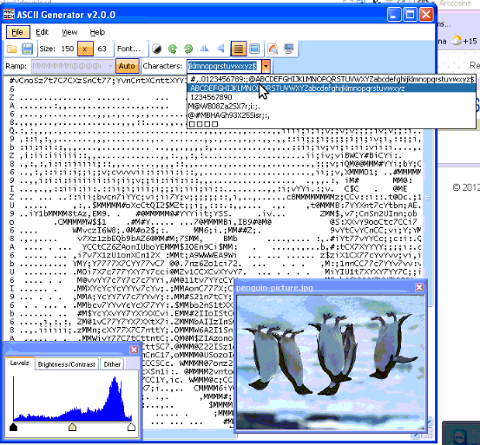
3. ASCII Generator 2 (asc2gen) – Windows GUI Images to ASCII generator
ASC 2 Gen is actually the best I can find program to convert images to ascii in Win as of time of writting.
Just like img2txt it generates pretty decent looking text images.
ASC2Gen failed to run emulated on my Linux host with wine version 1.0.1, hence to test it I used a a Windows host via teamviewer.
Below are few screenshots illustrating most of the options ASCII2GEN provides:
asc2gen penguins in inverted color set (black color text background)
ASC2GEN flipped backhed generated image to ASCII
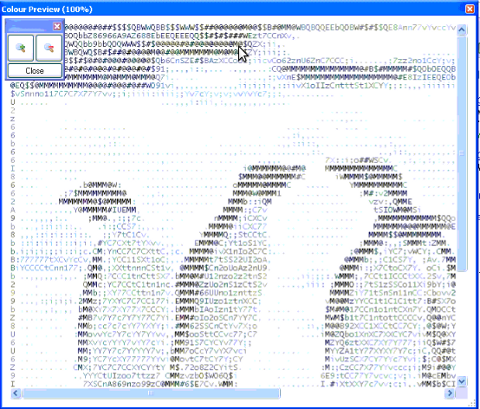
Picture to ASCII text converted with ASCII colors
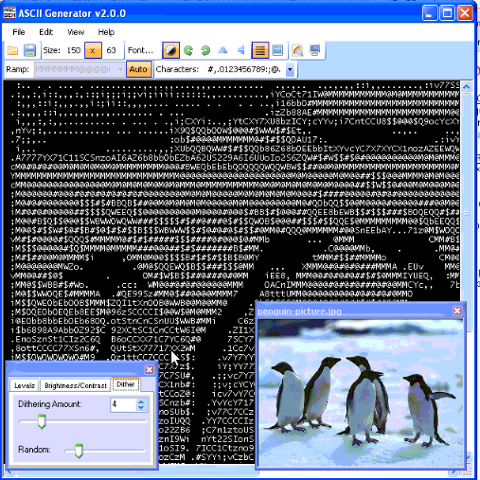
ascii2gen dithering level option shot
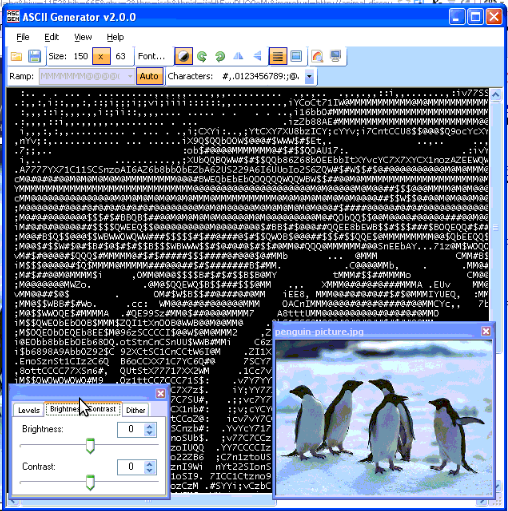
asc2gen contrast / brigthness atune shot
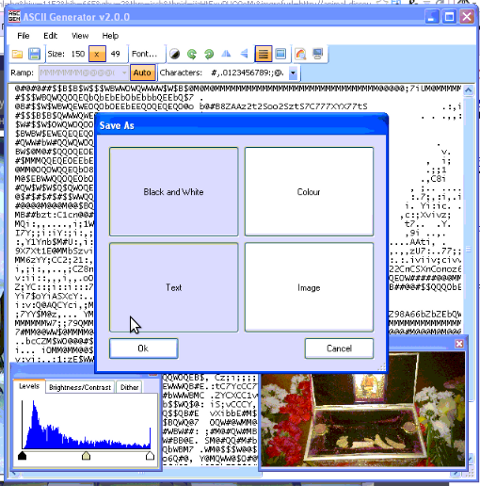
asc2gen save as options shot
Something else nice is it supports a lot of image file formats as input including (BMP and GIF) images.
I've also made a mirror of asc2gen v. 2.0.0 here
While researching online, I found plenty of other Image to ASCII geneartors, however as I didn't tested them I can't say if they are better ones.
Anyways I will be happy to hear if anyone knows other good ASCII generator alternative progs for Winblows?
Tags: ascii art, ascii image, ascii text, Auto, convertion, Draft, drastic change, emulator, existence, file, freeware, freeware program, GIF, gif formats, graphic images, gui interface, host, Image, image formats, images, img, input files, jpeg images, Microsoft, microsoft windows 2000, microsoft windows os, ms windows notepad, negation, Output, Pic, PicAs, picture, png, process, program options, quot, screenshot, shot, shotasc, text, text ascii, time, tool, width dimensions, wine, wine wine
Posted in Entertainment, Everyday Life, Various, Windows | 4 Comments »


