Posts Tagged ‘linux desktop’

How to turn On or Off Screen Reader ORCA on Linux Desktop enabled by mistype or a kid smash on the keyboard

Wednesday, November 22nd, 2023

orca-screen-reader-communication-services-logo

For those who type quite fast and use Microsoft Windows, its quite common to start the annoying NARRATOR (Windows Speaking Program) by accidently due to mistyping pressing together Windows key + Control + Enter.
This enables Narrator to read stuff on the screen here and there and to turn it off you just have to either Lock the Windows Computer and press again Windows key + Control + Enter to TURN OFF NARRATOR.

Linux does not have a Narrator but have also embedded Eye impairment Assistive Technology called ORCA.

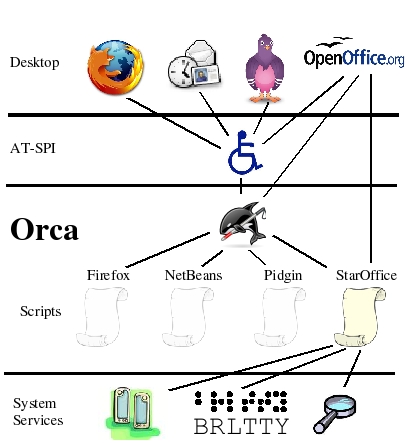
Orca works with applications and toolkits that support the Assistive Technology Service Provider Interface (AT-SPI), which is the primary assistive technology infrastructure for Linux and Solaris. Applications and toolkits supporting the AT-SPI include the GNOME Gtk+ toolkit, the Java platform's Swing toolkit, LibreOffice, Gecko, and WebKitGtk. AT-SPI support for the KDE Qt toolkit is being pursued.

ORCA is nowadays installed and integrated into many if not most Linux distributions out there. Enabling ORCA is not such a common thing on Linux,so today I got quite puzzled once I came back to the computer, leaving the 3.7 months kid near the Keyboard and finding out that I've enabled aloud screen reader that is reading what is every Window / Menu / Program or object I select with the mouse on my Linux MATE Desktop home GUI environment running on top of Debian Linux.

After a quick look up in Google on what exactly is the Linux program that is reading my screen I came across ORCA, which seem to be visible also as running in my process list:

hipo@jeremiah:~/Downloads$ ps -ef|grep -i orca
hipo     1068376    7960 17 18:48 tty2     00:00:01 orca

After a quick check online I found out that,

To start (Turn On ) Orca Screen Reader using the keyboard:

Windows logo button (Super Key) key + Alt + S 

Of course, it is possible to shut off the annoying reader by simply killing it with:

kill -9 orca


Ubuntu users, could start Orca using a mouse and keyboard:

Open the Activities overview and start typing Accessibility.

Click Accessibility to open the panel.

Select thez to open it.

Switch the Screen Reader switch to on.

Problem solved now Screen Reader on Linux is disabled, maybe it is time to disable Orca key press ability to prevent the kid from enabling it again since I don't need it actively thanksfully. with

xmodmap -e 'keycode <value>='

or simply removing the orca package with apt:

# apt remove orca

Get Hardware System info on Debian Linux / How to detecting hardware and servers model on GNU / Linux

Wednesday, December 12th, 2012

hardware-info-getting-on-linux-howto

Users who are novice to Linux should be probably interested on how to get a decent Hardware System Information. Getting system info on Windows is quite straight forward, however on Linux and especially on Linux servers it is a bit confusing at first and even for people who spend years administrating Linux servers, or even have a Linux desktop it is very likely after a period of time to forget how exactly last time got the hardware system information. I'm administrating Linux servers and running a linux desktop for already almost 11 years and often it happened I'm away from configuring a new server for a year, or even when configuring a new server I don't need to get exact system information from command line, as I know it already from the server hardware manual. However whether managing a bunch of dedicated servers or purchasing new systems which are physically away and someone pre-configured the server with some basis Linux install, often a very raw info is provided by the Dedicated Provider on exact server metrics. Other situation, where it is good idea to have a precise system hardware vendor information on a server, is if you just joined a company with a bunch of existing dedicated servers, whose exact hardware configuration is no documented anywhere and suddenly some RAID or piece of hardware located on 1 of the 100 dedicated servers starts misbehaving causing hour down-times and client important data loss.

In any of those cases it always takes me few times of research to find out what exact methodology I used to get the hardware info last time. To make my life for future times easier and not loose the few minutes of research and reading on how to get Linux server system information I decided to write this short article, which might hopefully be useful to others out there who face similar periodic questioning on what was the command to get hardware system info.

Of course the general commands to get some general overview on a Linux server as anyone knows are:

a. dmesg
b. cat /proc/cpuinfo
c. lspci
d. lsusb
c. free -m

A note to make here is that in order to have lsusb and lspci commands present you will have to have installed the deb packs lsusb and pciutils.

However as I prior said, this tools output is not enough or the output is not enough systematic and hard to read and understand especially for lazy or short memory admins like me. Thus it is worthy to mention few others which can be installed as a separate packages and gives more structured and very precised information on what kind of machine hardware you're accessing through ssh.

Here is the list of all of profiled hardware detection progs and scripts:

1. dmidecode

2. lshw

3. x86info

4. hwinfo

5. hardinfo

6. biosdecode


To install all of them in a raw with apt-get do:

debian:~# apt-get install --yes dmidecode lshw x86info hwinfo hardinfo superiotool
Reading package lists... Done
Building dependency tree      
Reading state information... Done
dmidecode is already the newest version.
hardinfo is already the newest version.
lshw is already the newest version.
The following extra packages will be installed:
  libhd16
The following NEW packages will be installed:
  hwinfo libhd16 superiotool x86info
0 upgraded, 4 newly installed, 0 to remove and 9 not upgraded.
Need to get 827 kB of archives.
After this operation, 4,506 kB of additional disk space will be used.
Get:1 http://ftp.uk.debian.org/debian/ squeeze/main libhd16 amd64 16.0-2 [696 kB]
Get:2 http://ftp.uk.debian.org/debian/ squeeze/main hwinfo amd64 16.0-2 [46.6 kB]
Get:3 http://ftp.uk.debian.org/debian/ squeeze/main superiotool amd64 0.0+r5050-1 [43.0 kB]
Get:4 http://ftp.uk.debian.org/debian/ squeeze/main x86info amd64 1.25-1 [40.9 kB]
Fetched 827 kB in 2s (378 kB/s)  
Selecting previously deselected package libhd16.
(Reading database ... 85783 files and directories currently installed.)
Unpacking libhd16 (from .../libhd16_16.0-2_amd64.deb) ...
Selecting previously deselected package hwinfo.
Unpacking hwinfo (from .../hwinfo_16.0-2_amd64.deb) ...
Selecting previously deselected package superiotool.
Unpacking superiotool (from .../superiotool_0.0+r5050-1_amd64.deb) ...
Selecting previously deselected package x86info.
Unpacking x86info (from .../x86info_1.25-1_amd64.deb) ...
Processing triggers for man-db ...
Setting up libhd16 (16.0-2) ...
Setting up hwinfo (16.0-2) ...
Setting up superiotool (0.0+r5050-1) ...
Setting up x86info (1.25-1) ...

Next just try to launch the tools one by one and check the content of the output, in my view  the most useful one and maybe also the most popular is dmidecode, the rest however might be useful to get specific hardware debug info.

1.  hwinfo

debian:~# hwinfo |tee -a server-hardware-info.txt
....

hwinfo will provide you a very long list of very thoroughful information on hardware. A lot of the info it shows however is not so useful for regular admins, but will be of high value to people who need to develop a new Linux driver for respective hardware.

2. lswh

debian:~# lshw > linux-hw-info.txt

lshw provides long list of debug information and if the output is not redirected to a file the screen gets flooded, if not piped to less. For that reason I will not paste output here.

3. x86info

debian:~# x86info

x86info v1.25.  Dave Jones 2001-2009
Feedback to <davej@redhat.com>.

Found 2 CPUs
————————————————————————–
CPU #1

EFamily: 0 EModel: 2 Family: 6 Model: 42 Stepping: 7
CPU Model: Unknown model.
Processor name string: Intel(R) Pentium(R) CPU G630 @ 2.70GHz
Type: 0 (Original OEM)    Brand: 0 (Unsupported)
Number of cores per physical package=8
Number of logical processors per socket=16
Number of logical processors per core=2
APIC ID: 0x0    Package: 0  Core: 0   SMT ID 0
————————————————————————–
CPU #2
EFamily: 0 EModel: 2 Family: 6 Model: 42 Stepping: 7
CPU Model: Unknown model.
Processor name string: Intel(R) Pentium(R) CPU G630 @ 2.70GHz
Type: 0 (Original OEM)    Brand: 0 (Unsupported)
Number of cores per physical package=8
Number of logical processors per socket=16
Number of logical processors per core=2
APIC ID: 0x2    Package: 0  Core: 0   SMT ID 2
————————————————————————–
WARNING: Detected SMP, but unable to access cpuid driver.
Used Uniprocessor CPU routines. Results inaccurate.

As you see x86info, mainly provides information on CPU Cache, exact model, family AND APIC (don't mix it with ACPI – advanced power management interface)
APIC is a chip that remaps IOs and IRQs of your computer to the CPU(s), thus in most cases it is more of not so needed debug information.

4. biosdecode

debian:~#  biosdecode
# biosdecode 2.9
ACPI 2.0 present.
    OEM Identifier: LENOVO
    RSD Table 32-bit Address: 0xBCD9C028
    XSD Table 64-bit Address: 0x00000000BCD9C068
SMBIOS 2.6 present.
    Structure Table Length: 2233 bytes
    Structure Table Address: 0x000EBB70
    Number Of Structures: 59
    Maximum Structure Size: 184 bytes
PNP BIOS 1.0 present.
    Event Notification: Not Supported
    Real Mode 16-bit Code Address: F000:BC66
    Real Mode 16-bit Data Address: F000:0000
    16-bit Protected Mode Code Address: 0x000FBC8E
    16-bit Protected Mode Data Address: 0x000F0000
PCI Interrupt Routing 1.0 present.
    Router ID: 00:1f.0
    Exclusive IRQs: None
    Compatible Router: 8086:27b8
    Slot Entry 1: ID 00:1f, on-board
    Slot Entry 2: ID 00:1b, on-board
    Slot Entry 3: ID 00:16, on-board
    Slot Entry 4: ID 00:1c, on-board
    Slot Entry 5: ID 02:00, slot number 21
    Slot Entry 6: ID 00:01, on-board
    Slot Entry 7: ID 00:06, on-board
    Slot Entry 8: ID 00:1d, on-board
    Slot Entry 9: ID 00:1a, on-board
    Slot Entry 10: ID 03:00, on-board
    Slot Entry 11: ID 00:02, on-board
    Slot Entry 12: ID 00:00, on-board

As you see biosdecode, also provides a lot of hex addresses, also reports on the exact CPU architecture on the system.

The line   XSD Table 64-bit Address: 0x00000000BCD9C068, indicated the host is running a 64 bit CPU, most of the rest info like Slot entries IDs etc. is not so useful.

The most useful info that biosdecode provides is the exact type of BIOS (Basic Input Output System) bundled with the system in my case the BIOS is running on a Lenovo host and is vendored by Lenovo, thus it shows in the cmd output:

OEM Identifier: LENOVO

5. hardinfo

debian:~# hardinfo | tee -a hardware-info.txt
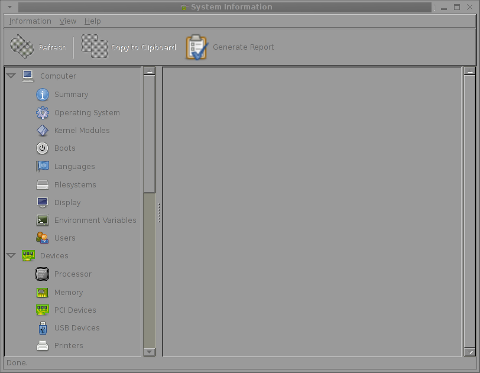

hardinfo gnome screenshot debian gnu / linux

HardInfo is the GNOME GTK+ program which displays robust and thouroughful info in same was as Windows System Info does on  GNOME Desktop. If however you run it under console or via ssh it does display what it detects as: 

Computer hardware, operating system, kernel modules, supported system languages, existing filesystems, Display, set environment variables, Existing system users, Processor type, Memory, PCI and USB devices, Printers (if attached), Battery type (if run on laptop), Storage, Other Input devices

hardinfo, does a few benchmarking tests using CPU stress test algorithms to do Blowfish encryption, CryptoHash, Fibonacci, N-Queens, FPU FFT and FPU raytracing. This benchmark values, if run on a couple of hosts can be used to compare different hardware performances.

6. dmidecode

debian: # dmidecode > system-hware-info.txt

The output from dmidecode is very very detailed and verbose. Though along with the useful info there is plenty of debug information, the debug information it provides is much user friendly / user comprehensible than the rest of tools, thus I guess dmidecode is nowadays preferred by me and probably most of the Linux sys admins.

debian:~# dmidecode |head -n 34
# dmidecode 2.9
SMBIOS 2.6 present.
59 structures occupying 2233 bytes.
Table at 0x000EBB70.

Handle 0x0000, DMI type 0, 24 bytes
BIOS Information
    Vendor: LENOVO
    Version: 9QKT37AUS
    Release Date: 02/14/2012
    Address: 0xF0000
    Runtime Size: 64 kB
    ROM Size: 2560 kB
    Characteristics:
        PCI is supported
        BIOS is upgradeable
        BIOS shadowing is allowed
        Boot from CD is supported
        Selectable boot is supported
        BIOS ROM is socketed
        EDD is supported
        5.25"/1.2 MB floppy services are supported (int 13h)
        3.5"/720 KB floppy services are supported (int 13h)
        3.5"/2.88 MB floppy services are supported (int 13h)
        Print screen service is supported (int 5h)
        8042 keyboard services are supported (int 9h)
        Serial services are supported (int 14h)
        Printer services are supported (int 17h)
        ACPI is supported
        USB legacy is supported
        BIOS boot specification is supported
        Targeted content distribution is supported
    BIOS Revision: 0.37
 

Though it is the most useful tool on some hardware configurations it might not display any data because the BIOS is lacking a DMI implementation.

In almost all cases dmidecode is enough to check what kind of hardware you have ssh-ed to. dmidecode is available also not only on Debian but on Fedora and almost all (if not all Linux distros), through default repositories.
How to improve Linux kernel security with GrSecurity / Maximum Linux kernel security with GrSecurity

Tuesday, May 3rd, 2011

In short I’ll explain here what is Grsecurity http://www.grsecurity.net/ for all those who have not used it yet and what kind of capabilities concerning enhanced kernel security it has.

Grsecurity is a combination of patches for the Linux kernel accenting at the improving kernel security.

The typical application of GrSecurity is in the field of Linux systems which are administered through SSH/Shell, e.g. (remote hosts), though you can also configure grsecurity on a normal Linux desktop system if you want a super secured Linux desktop ;).

GrSecurity is used heavily to protect server system which require a multiple users to have access to the shell.

On systems where multiple user access is required it’s a well known fact that (malicious users, crackers or dumb script kiddies) get administrator (root) privileges with a some just poped in 0 day root kernel exploit.
If you’re an administrator of a system (let’s say a web hosting) server with multiple users having access to the shell it’s also common that exploits aiming at hanging in certain daemon service is executed by some of the users.
In other occasions you have users which are trying to DoS the server with some 0 day Denial of Service exploit.
In all this cases GrSecurity having a kernel with grsecurity is priceless.

Installing grsecurity patched kernel is an easy task for Debian and Ubuntu and is explained in one of my previous articles.
This article aims to explain in short some configuration options for a GrSecurity tightened kernel, when one have to compile a new kernel from source.

I would skip the details on how to compile the kernel and simply show you some picture screens with GrSecurity configuration options which are working well and needs to be set-up before a make command is issued to compile the new kernel.

After preparing the kernel source for compilation and issuing:

linux:/usr/src/kernel-source$ make menuconfig

You will have to select options like the ones you see in the pictures below:

[nggallery id=”8″]

After completing and saving your kernel config file, continue as usual with an ordinary kernel compilation, e.g.:

linux:/usr/src/kernel-source$ make
linux:/usr/src/kernel-source$ make modules
linux:/usr/src/kernel-source$ su root
linux:/usr/src/kernel-source# make modules_install
linux:/usr/src/kernel-source# make install
linux:/usr/src/kernel-source# mkinitrd -o initrd.img-2.6.xx 2.6.xx

Also make sure the grub is properly configured to load the newly compiled and installed kernel.

After a system reboot, if all is fine you should be able to boot up the grsecurity tightened newly compiled kernel, but be careful and make sure you have a backup solution before you reboot, don’t blame me if your new grsecurity patched kernel fails to boot! You’re on your own boy 😉
This article is written thanks to based originally on his article in Bulgarian. If you’re a Bulgarian you might also checkout static’s blog

Save data from failing hard disk on Linux – Rescuing data from failing disk with bad blocks

Wednesday, April 16th, 2014

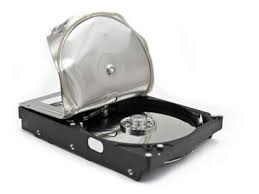
save-data-from-failing-hard-drive-data-recovery-badblocks-linux_1.jpg
Sooner or later your Linux Desktop or Linux server hard drive will start breaking up, whether you have a hardware or software RAID 1, 6 or 10 you can  and good hard disk health monitoring software you can react on time but sometimes as admins we have to take care of old servers which either have RAID 0 or missing RAID configuration and or disk firmware is unable to recognize failing blocks on time and remap them. Thus it is quite useful to have techniques to save data from failing hard disk drives with physical badblocks.

With ddrescue tool there is still hope for your Linux data though disk is full of unrecoverable I/O errors.

apt-cache show ddrescue
 

apt-cache show ddrescue|grep -i description -A 12

Description: copy data from one file or block device to another
 dd_rescue is a tool to help you to save data from crashed
 partition. Like dd, dd_rescue does copy data from one file or
 block device to another. But dd_rescue does not abort on errors
 on the input file (unless you specify a maximum error number).
 It uses two block sizes, a large (soft) block size and a small
 (hard) block size. In case of errors, the size falls back to the
 small one and is promoted again after a while without errors.
 If the copying process is interrupted by the user it is possible
 to continue at any position later. It also does not truncate
 the output file (unless asked to). It allows you to start from
 the end of a file and move backwards as well. dd_rescue does
 not provide character conversions.


To use ddrescue for saving data first thing is to shutdown the Linux host boot the system with a Rescue LiveCD like SystemRescueCD – (Linux system rescue disk), Knoppix (Most famous bootable LiveCD / LiveDVD), Ubuntu Rescue Remix or BackTrack LiveCD – (A security centered "hackers" distro which can be used also for forensics and data recovery), then mount the failing disk (I assume disk is still mountable :). Note that it is very important to mount the disk as read only, because any write operation on hard drive increases chance that it completely becomes unusable before saving your data!

To make backup of your whole hard disk data to secondary mounted disk into /mnt/second_disk

# mkdir /mnt/second_disk/rescue
# mount /dev/sda2 /mnt/second_disk/rescue
# dd_rescue -d -r 10 /dev/sda1 /mnt/second_disk/rescue/backup.img
# mount -o loop /mnt/second_disk/rescue/backup.img

In above example change /dev/sda2 to whatever your hard drive device is named.

Whether you have already an identical secondary drive attached to the Linux host and you would like to copy whole failing Linux partition (/dev/sda) to the identical drive (/dev/sdb) issue:

ddrescue -d -f -r3 /dev/sda /dev/sdb /media/PNY_usb/rescue.logfile

If you got just a few unreadable files and you would like to recover only them then run ddrescue just on the damaged files:

ddrescue -d –R -r 100 /damaged/disk/some_dir/damaged_file /mnt/secondary_disk/some_dir/recoveredfile

-d instructs to use direct I/O
-R retrims the error area on each retry
-r 100 sets the retry limit to 100 (tries to read data 100 times before resign)

Of course this is not always working as on some HDDs recovery is impossible due to hard physical damages, if above command can't recover a file in 10 attempts it is very likely that it never succeeds …

A small note to make here is that there is another tool dd_rescue (make sure you don't confuse them) – which is also for recovery but GNU ddrescue performs better with recovery.
How ddrescue works is it keeps track of the bad sectors, and go back and try to do a slow read of that data in order to read them.
By the way BSD users would happy to know there is ddrescue port already, so data recovery on BSDs *NIX filesystems if you're a Windows user you can use ddrescue to recover data too via Cygwin.
Of course final data recovery is also very much into God's hands so before launching ddrescue, don't forget to say a prayer 🙂

luckyBackup Linux GUI back-up and synchronization tool

Wednesday, May 14th, 2014

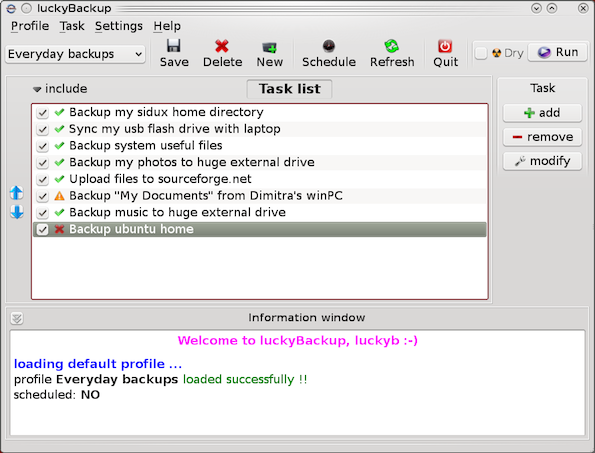
luckybackup_best-linux-graphical-tool-for-backup_linux_gui-defacto-standard-tool
If you're a using GNU / Linux  for Desktop and you're already tired of creating backups by your own hacks using terminal and you want to make your life a little bit more easier and easily automate your important files back up through GUI program take a look at luckyBackup.

Luckibackup is a GUI frontend to the infamous rsync command line backup  tool. Luckibackup is available as a package in almost all modern Linux distributions its very easy to setup and can save you a lot of time especially if you have to manage a number of your Workplace Desktop Office Linux based computers.
Luckibackup is an absolute must have program for Linux Desktop start-up users. If you're migrating from Microsoft Windows realm and you're used to BackupPC, Luckibackup is probably the defacto Linux BackupPC substitute.

The sad news for Linux GNOME Desktop users is luckibackup is written in QT and it using it will load up a bit your notebook.
It is not installed by default so once a new Linux Desktop is installed you will have to install it manually on Debian and Ubuntu based Linux-es to install Luckibackup apt-get it.

debian:~# apt-get install --yes luckibackup
...

On Fedora and CentOS Linux install LuckiBackup via yum rpm package manager

[root@centos :~]# yum -y install luckibackup
.

Luckibackup is also ported for OpenSuSE Slackware, Gentoo, Mandriva and ArchLinux. In 2009 Luckibackup won the prize of Sourceforge Community Choice Awards for "best new project".

luckyBackup copies over only the changes you've made to the source directory and nothing more.
You will be surprised when your huge source is backed up in seconds (after the first backup).

Whatever changes you make to the source including adding, moving, deleting, modifying files / directories etc, will have the same effect to the destination.
Owner, group, time stamps, links and permissions of files are preserved (unless stated otherwise).

Luckibackup creates different multiple backup "snapshots".Each snapshot is an image of the source data that refers to a specific date-time.
Easy rollback to any of the snapshots is possible. Besides that luckibackup support Sync (just like rsync) od any directories keeping the files that were most recently modified on both of them.

Useful if you modify files on more than one PCs (using a flash-drive and don't want to bother remembering what did you use last. Luckibackup is capable of excluding certain files or directories from backupsExclude any file, folder or pattern from backup transfer.

After each operation a logfile is created in your home folder. You can have a look at it any time you want.

luckyBackup can run in command line if you wish not to use the gui, but you have to first create the profile that is going to be executed.
Type "luckybackup –help" at a terminal to see usage and supported options.
There is also TrayNotification – Visual feedback at the tray area informs you about what is going on.


Convert WAV to MP3 in command line with LAME on Linux

Friday, April 8th, 2011

I needed to convert a bunch of files from WAV to MP3 format on my Linux desktop.

I’ve placed all my wav files to the directory /home/hipo/wav

And then I issued the small one liner script to convert the .wav files to .mp3 using the niftly lame linux mp3 convertor.

Here is how I did it:

linux-desktop:~$ cd wav
linux-desktop:/home/hipo/wav$ for i in *.wav; do
new_name=$(echo $i |sed -e 's#wav#mp3#g');
lame -V0 -h -b 160 --vbr-new "$i" "$new_name";
done

After executing the little script you might go and have a coffee, if you have thousands of files, each file convertion takes about 10-15 seconds of time (speed depends on your CPU).

Here is some output from a lame convertion to mp3 taking place:

Encoding as 8 kHz single-ch MPEG-2.5 Layer III VBR(q=0)
Frame | CPU time/estim | REAL time/estim | play/CPU | ETA
27237/27237 (100%)| 0:12/ 0:12| 0:12/ 0:12| 155.89x| 0:00
64 [27237] ***************************************************************
----------------------------------------------
kbps mono % long switch short %
64.0 100.0 84.1 8.9 7.0
If you want to save my convertion quickly for a later, download my Convert WAV to mp3 from a directory with lame shell script here

Actually there are plenty of other ways to convert wav to mp3 on Linux through mplayer, ffmpeg even with mpg123.

There are also some GUI programs that could do the convertion like winff , however for some weird reason after installing WinFF on my debian it was not able to complete convertion to mp3?!
But it doesn’t matter, the good news is I did what I wanted to via the simple lame program and the above script, hope it helps somebody out there.

How to record microphone input sound (only) using good old ffmpeg

Tuesday, December 25th, 2012

The good old ffmpeg, along with being able to capture sound and video from your Linux Desktop or a certain Window and Skype whatever WebCamera input is also able to record sound from both camera or embedded laptop microphone. Here is how:

# ffmpeg -f alsa -ac 2 -i pulse   -acodec pcm_s16le -vcodec libx264 -vpre lossless_ultrafast -threads 0  -y  myVOICE.wav

This as you can see from arguments, uses GNOME's pulseaudio (audio service) and ALSA. Sound is first streamed through alsa and then the sound inflow is passed to be processed and multipled in a separate sound channel by pulseaudio. This method though said to be working fine on Ubuntu Linux is not working well on some other Linux distributions like Debian if one is using ALSA configured to use a software sound multiplexor via the so called – alsa dsnoop interface (previously I write how to use it in order to make Skype and other programs use SoundBlaster proper – article is here)

Below is the output warning I got whether trying ffmpeg with -f alsa and -i pulse arguments:

hipo@noah:~/Desktop$ ffmpeg -f alsa -ac 2 -i pulse   -acodec pcm_s16le -vcodec libx264 -vpre lossless_ultrafast -threads 0  -y  myVOICE.wav
FFmpeg version SVN-r25838, Copyright (c) 2000-2010 the FFmpeg developers
  built on Sep 20 2011 17:00:01 with gcc 4.4.5
  configuration: --enable-libdc1394 --prefix=/usr --extra-cflags='-Wall -g ' --cc='ccache cc' --enable-shared --enable-libmp3lame --enable-gpl --enable-libvorbis --enable-pthreads --enable-libfaac --enable-libxvid --enable-postproc --enable-x11grab --enable-libgsm --enable-libtheora --enable-libopencore-amrnb --enable-libopencore-amrwb --enable-libx264 --enable-libspeex --enable-nonfree --disable-stripping --enable-avfilter --enable-libdirac --disable-decoder=libdirac --enable-libschroedinger --disable-encoder=libschroedinger --enable-version3 --enable-libopenjpeg --enable-libvpx --enable-librtmp --extra-libs=-lgcrypt --disable-altivec --disable-armv5te --disable-armv6 --disable-vis
  libavutil     50.33. 0 / 50.43. 0
  libavcore      0.14. 0 /  0.14. 0
  libavcodec    52.97. 2 / 52.97. 2
  libavformat   52.87. 1 / 52.87. 1
  libavdevice   52. 2. 2 / 52. 2. 2
  libavfilter    1.65. 0 /  1.65. 0
  libswscale     0.12. 0 /  0.14. 1
  libpostproc   51. 2. 0 / 51. 2. 0
[alsa @ 0x633160] capture with some ALSA plugins, especially dsnoop, may hang.

where concrete programs, are run which take use of OSS (Open Sound System) – an already obsolete sound architecture. By the way on current Debian / Fedora etc. Linux-es OSS is managed and played only, whether few kernel modules are already  pre-loaded, below are the ones as pasted from my Debian Squeeze:

# lsmod | grep -i oss
snd_pcm_oss            32591  0
snd_mixer_oss          12606  1 snd_pcm_oss
snd_pcm                60487  3 snd_hda_intel,snd_hda_codec,snd_pcm_oss
snd                    46526  15 snd_hda_codec_analog,snd_hda_intel,snd_hda_codec,snd_hwdep,snd_pcm_oss,snd_mixer_oss,snd_pcm,snd_rawmidi,snd_seq,snd_timer,snd_seq_device

The oss processed sound recording from ffmpeg is not working, well on my Linux, cause I have my custom (non-Debian) native binary Firefox downloaded and installed from Firefox's website.The browser is compiled to open automatically /dev/dsp which in practice uses the above-mentioned OSS listed modules, which on their behalf when used break out the sound processed by alsa and respectively pulseaudio (those who use Linux for longer time should remember in the times of OSS only one certain sound stream was possible to be processed / played on Linux historically before ALSA come to scene to be "defacto" standard kernel sound processor. Well ofcourse firefox developers who compiled the Firefox for Linux probably was using Slackware or some other Linux distro which probably used to play sound still via OSS or maybe they compiled it so thinking OSS because of its historical importance is still supported by more Linux distributions than alsa is. I like the custom compiled Firefox to run on my Debian instead of default Debian Squeeze (IceWeasel) cause firefox.org ,Firefox version is much newer and supports better latest HTML5  as well as it includes ability to download and apply automatic updates to the latest version provided by Firefox team. However I fou

Thus for Linux users like me using latest firefox binary from firefox.org (in parallel) with opened Firefox browser to record sound from Webcam or Embedded notebook mic the obsolete OSS has to be used, here is how:

# ffmpeg -f oss -ac 2 -i /dev/dsp   -acodec pcm_s16le -vcodec libx264 -vpre lossless_ultrafast -threads 0  -y  my-recorder-VOICE.wav

Enjoy ;)

Linux then and Now statistics diagram on GNU/Linux use grow 1994 – 2011

Tuesday, January 31st, 2012

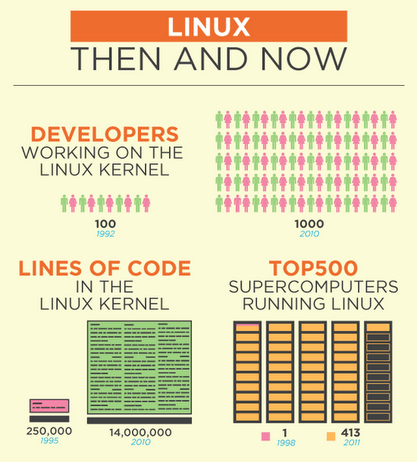
Linux then and now developers line of code top 500 super computers and GNU / Linux 1994 - 2011, Kernel source code lines


In above graphics you see development of GNU/Linux through the years startingfrom 1992 to 2010.  You see for the past 18 years the number of kernel developers has rasised from 100 to 1000 (10 times). The number of super computers based on GNU / Linux operating system was only 1, while in 2011 they were already 413. Just for information Top 10 Super computers in terms of CPU power are running on top of some Linux + GNU environment based operating system.

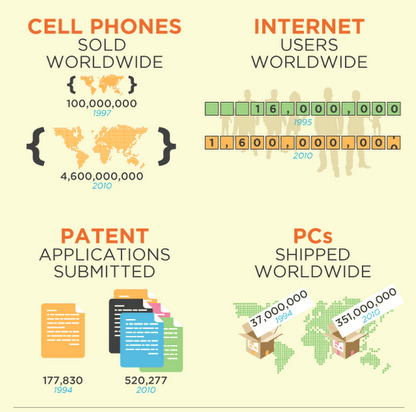
Cell Phones baed on Linux or GNU sold worldwide, Internet users growth, PCs with linux shipped worldwide

You see the number of Patented software increased approximate 3 times for 16 years … PC shipped with Linux all oer the world increased almost 10 times.

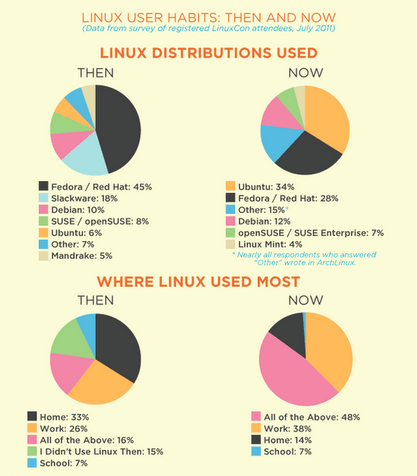
GNU / Linux user habits then and now pie, Where Linux is used most survey results

A survey was run among the biggest Linux convention LinuxCon aiming to find out the share difference between users using different distros, as well as a survey to answer the question where is Linux mostly used. Obviously even though the Ubuntu desktop boom this years Linux is still mostly used in work location, home desktop / notebook users are almost 3 times less.
The survey show the sad results,  the Linux in school and academic communities is less used than for professional purposes. On the desktop things has slightly changed, for the last 5-7 years. From the position of being a Linux Desktop leading OS, Fedora went into the shadows in favour of  the "less free" (in terms of Freedom) Ubuntu.

Linux users then and now, biggest successes and challenges for Linux and free software use and adoption

All system administrators knows well Linux is a very common choice for building small or middle enterprise business information systems. Hugest platforms which are the web backbone today like Google, Facebook, Twitter, Stock Exchanges,  Mail services, various technical equipment etc. runs on top of Linux. Even though the huge number of adoption Linux and free software is though to not be legally assured this is well known among free software and open source evangelist under the term FUD.

Android found its way also in Samsung Galaxy and a number of tablet devices running Linux based kernel OS was shipped in 2011.

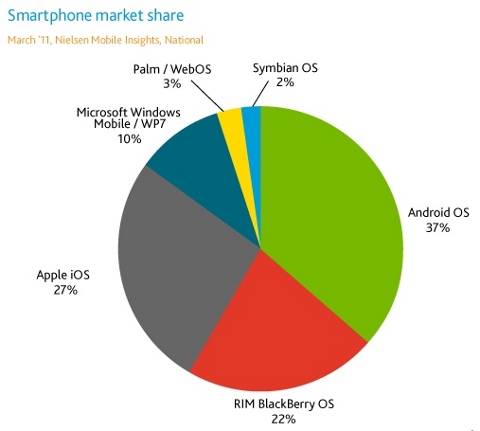
With the raise of Android which (base is mostly Linux kernel and less GNU tools based). The spread of Linux has seen a huge raise on the mobile (smart phones) market as well. You see in above chart as of 2011 Android sells had the highest market share  with 37%.
The year 2011 was not among the best Linux users anywas, as Unity does turned away many users to become Linux converts. The big GNOME 3 mess, which was called by Linus Toravlds a "holy mess" , along with the kernel.org's security break in does also contributed that year 2011 ended up as a bad one for free software.

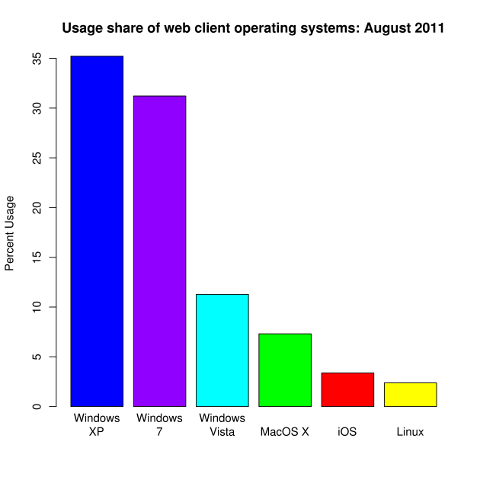
Linux, Windows 7, Vista, XP, MacOS X, iOS market share chart

As of August 2011, the global Linux market approximate market share is about 3% of all the installed OSes currently existing in the world. And compared to 5 years ago there is a little decline in the share. I believe the 2012 will be a better year for both development and adoption of free software and Linux.


PixBros a nice Arcade Game remake of Bubble Bobble for GNU/Linux

Monday, September 26th, 2011

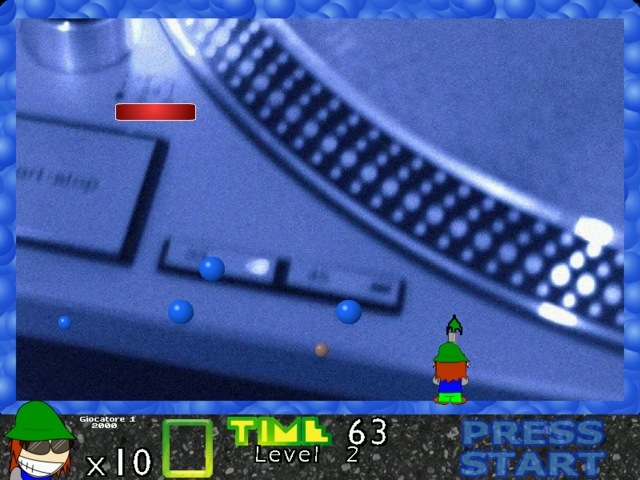
PixBros Linux Bubble Bobble like Game Screenshot

While checking my sister’s notebook running Ubuntu GNU/Linux. I decided to check the gui package installer for some new Linux games that entered Ubuntu 11.04. A quick view over the games and I come across awesome game called PixBros

The game is combining three great arcade games from my young years Bubble Bobble, Snow Bros and Tumple Pop . The game really brought some joy to my boring lifeand here it comes I’ve written a small article to share my little joy.

In the game you can select one of three characters and play a remake version of Bubble Bobble on your Linux Desktop. Besides that the music is absolutely awesome like it is with most of the classic arcade games 😉
The game characters graphics is also trendy, like you can see in the screen below:

PixBros Bubble Bobble Linux game like entry Screen characters

The game history is also intriuging and in the old-school arcade games spirit.
PixBros Start New Game screen, game gangsta characters

The game is published under GPL v2, so its one more great game in the family of free software games 😉
PixBros has also port (binary installer) for Windows, Nintendo Wii and few other platforms. As a multi-platform game its very suitable for little Children to develop their reflexes and intellect. Therefore for parents who wants to use free software to grow up their kids mind, PixBros will fit well with other games likeTux Math, Tux Paint, Tux Typing which are stimulating the kid to learn
The game is also great for big kids like me and other arcade maniacs as well 😉
I have only one small note about the game just like with many other Linux games, by default the game starts in minimized screen and trying to play it in fullscreen is only possible by using the menus available from within the game itself.
This kind of behaviour reduces some of the initial game enjoyment and maybe in the future releases of the game let’s say when it reaches stable version 1.0 it will be nice the game to start in fullscreen by default.

The creator team of PixBrosPix Juegos has 4 other games created, all of which are primary developed for GNU/Linux and downloadable from PixJuegos game dev crew official website . Unfortunately the crew official website does not English translation.

The other games from PixJuegos one can enjoy are; A Remake of the classic Atari frog game again for Linux (available for install via a deb package on latest Ubuntu 11.04):

PixFrogger - Atari modern Frog game remake for Linux

A Super Pang modern remake – Pix Pang , below is a screenshot for all those that can’t remember Pang 😉

Super Pang arcade classic screenshot
Super Pang

Here is also a screenshot of PixJuegos’s PixPang running on Linux:

PixPang Super Pang Linux Remake

PixGuegos game development team has also two other games in their site portfolio; this are Garnatron and PixDash . Here are screenshots:

Garnatron Linux Spaceship arcade game screenshot

PixDash Linux arcade game screenshot
Congrats to the guys of PixJuegos for their great Linux games! I wish them a lot of success and a lot of productive years in Linux game development 😉

Best software available today for Linux video Desktop capturing on Debian

Tuesday, April 19th, 2011

I’ve been experimenting since some time in order to understand better what is the current situation with Video Desktop Capturing Software available today for Linux and FreeBSD.

My previous investigations has led me to write an article about xvidcap called How to make Video from your Linux Desktop with xvidcap

Though xvidcap works pretty well, it is currently uncapable of capturing the audio stream of a Linux Desktop env and hence part of the interactivity of the videos is missing when used.

A bit of further investigation on the topic has pointed me to 3 free software programs which are capable to record Desktop environment on Linux with sound embedded

The interesting screen video capturing Desktop tools I’ve found are:

1. recordMyDesktop
2. Istanbul
and
3. vnc2swf

Installing them on a Debian based distribution is pleasable, as there are installable debian packages of each one which I installed easily with apt:

debian:~# apt-get install istanbul recordmydesktop gtk-recordmydesktop vnc2swf

RecordMyDesktop‘s package contains a command line little tool which when started directly starts capturing video and audio of the Linux Desktop. After a Ctrl+C is pressed the program quits, saves and encodes the video in ogg-encapsulated theora-vorbis file format.

Here is the output I got in saving a sample file by launching recordmydesktop without any arguments:

hipo@debian:~/Desktop$ recordmydesktop
Initial recording window is set to:
X:0 Y:0 Width:1024 Height:768
Adjusted recording window is set to:
X:0 Y:0 Width:1024 Height:768
Your window manager appears to be Metacity

Initializing…
Buffer size adjusted to 4096 from 4096 frames.
Opened PCM device hw:0,0
Recording on device hw:0,0 is set to:
2 channels at 22050Hz
Capturing!
Broken pipe: Overrun occurred.
^C
*********************************************

Cached 5 MB, from 207 MB that were received.
Average cache compression ratio: 97.3 %

*********************************************
Saved 69 frames in a total of 69 requests
Shutting down..Broken pipe: Overrun occurred.

STATE:ENCODING
Encoding started!
This may take several minutes.
Pressing Ctrl-C will cancel the procedure (resuming will not be possible, but
any portion of the video, which is already encoded won’t be deleted).
Please wait…
Output file: out.ogv
[100%]
Encoding finished!
Wait a moment please…

Done.
Written 692529 bytes
(635547 of which were video data and 56982 audio data)

Cleanning up cache…
Done!!!
Goodbye!

The captured file as I you see in the above output is saved in file out.ogv

RecordMyDesktop has also a GUI interface (written in Python) called gtk-recordmydesktop

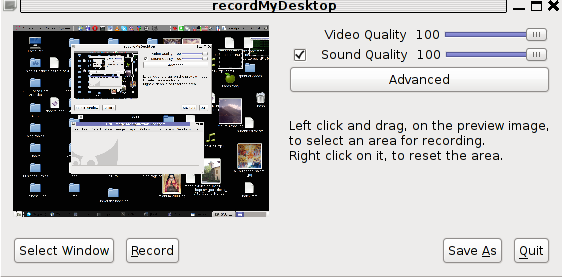
Below you see a screenshot of the GUI gtk-recordmydesktop:

RecordMyDesktop GTK interface entry screen

gtk-recordmydesktop is a super-easy to use as you already see in the picture, you can either configure it with Advanced button or use Save As button to select where you want the Desktop captured video and audio to be stored.

In Debian Squeeze 6.0, the Advanced GUI button interface button is not working but that’s not such an issue, as the rest of the buttons works fine.
After the recordmydesktop‘s Record button is pressed it will start capturing from your Desktop and the window seen in the above screenshot will disappear/hide in the system tray:

recordmydesktop recording minimized in system tray
When you press over the white little square in the system tray the screen capturing will be interrupted and a window will pop-up informing you that the captured video and audio is being encoded, here is another screenshot of recordmydesktop encoding a saved Desktop video stream:

recordmydesktop saving captured desktop video

After the final .ogv file is encoded and saved to further transfer it into (.flv) I used ffmpeg;

debian:~# ffmpeg -i test.ogv test.flv
...

Now let’s evaluate a bit on the the final results, the produced test.ogv‘s synchronization between sound and video was not good as the sound was starting earlier than the video and therefore even though recordmydesktop used to be highly praised on the net, the proggie developers still needs to do some bug fixing
Further on, I continued and (gave the other Desktop screen capturer) Istanbul a try hoping that at least with it the video and audio of my Linux desktop will be properly captured. But guess what, the results with Istanbul was even more unsatisfactory as the produced videos and sounds, were slow and a lot of frames from the screens were missing completely.
Moreover the sound which was supposed to accompany the video was completely 🙁

Thus I will skip on talking about Istanbul as in my view, this piece of software is far away from being production ready.

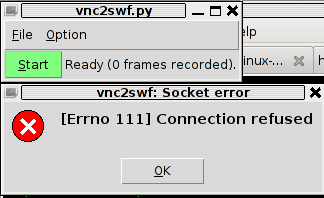
I also tested vnc2swf , launched it by: pressing alt+f2 and typing in vnc2swf in GNOME’s run application prompt, just to be surprised by an error …:

vnc2swf error no 111 Connection refused

The reason for this error is caused by the xserver (Xorg) port 5900 is being closed by default on Debian

However this error is easily solvable, by making the Xserver to listen to a the port 5900, to make the Xorg server on Debian to listen on this port you need to edit the file:

/etc/X11/xinit/xserverrc

and change inside it:

exec /usr/bin/X -nolisten tcp "$@"

with:

exec /usr/bin/X "$@"

and either reboot your Linux or restart only the Xorg server by pressing Ctrl+Alt+BackSpace

Now let me conclude, the results from my desktop video screen capturing experiments prooved that vnc2swf is superior (as it is capable of properly saving a movie with sound and video from a Linux Desktop). It appears this soft is actually the best one you can use to make a video of your Linux desktop.

Sadly my testing has proven that Linux is still lacking behind Windows and Mac in even doing the most simple tasks …
Let’s hope that situation will get better soon and Gnome or KDE developers will soon provide us with better software capable to save properly a video and audio captured from the Linux Desktop.