Posts Tagged ‘rpm’

Enable automatic updates on CentOS 8 , CentOS 9 Stream Linux with dnf-automatic and Cockpit Web GUI package management tool

Wednesday, January 15th, 2025

centos-8-and-centos-9-linux-enable-automatic-rpm-yum-updates-with-dnf-automatic-logo

Security for any OS is critical nowadays, thus as a CentOS legacy system admin at work or using CentOS Stream releases 8 and 9 that are to be around for the coming years

CentOS 8 and CentOS 9 Stream Lifecycle


CentOS Stream follows the same lifecycle as Red Hat Enterprise Linux. From version 8 onward this means every version is supported for 10 years, split into 5 years of Full Support and 5 years of maintenance support. Users also have the option to purchase an additional 3 years of Extended Life Cycle Support (ELS) as an add-on.

Version    General Availability    Full Support Ends    Maintenance Support Ends    Extended Life Cycle Support (ELS) Ends
8    May 7, 2019    May 31, 2024    May 31, 2029    May 31, 2032
9    May 18, 2022    May 31, 2027    May 31, 2032    May 31, 2035


In this article, you are going to learn how to enable automatic software updates on CentOS 8 and CentOS 9 ( Stream ) Linux OS-es. I'll show how to set up your system to download and apply  security and other updates without user intervention.

It is really useful to use the CentOS automatic updates OS capability, turning on updates and instead typing all the time yum update && yum upgrade (and wasting time to observe the process) as it takes usually some 5 to 10 minutes to make the OS automatically install updates in the background and notify you once all is done so you can periodically check what the dnf-automatic automatic update tool has done that in most cases of success would save you at least few minutes per host. Automatic updates is critical especially if you have to maintain an infrastructure of CentOS virtual servers at version 8 or 9.

Those who use heavily used CentOS might have already enabled and used dnf-automatic, but I guess just like me until recently, most people using CentOS 8 don’t know how to enable and apply CentOS Linux updates automatically and those article might be helpful.
 

1. Enable Automatic CentOS 8 / 9 Updates Using DNF Automatic RPM Package


Install the DNF-automatic RPM package, it will provide a DNF component that enables start automatically the update process. 
To install it on both CentOS 8 / 9.

[root@centos ~]# yum install dnf-automatic
CentOS Stream 9 – BaseOS                                                                                                                                   78 kB/s |  14 kB     00:00
CentOS Stream 9 – AppStream                                                                                                                                28 kB/s |  15 kB     00:00
CentOS Stream 9 – Extras packages                                                                                                                          81 kB/s |  18 kB     00:00
Dependencies resolved.
======================================================
 Package                                         Architecture                             Version                                          Repository                                Size
======================================================
Installing:
 dnf-automatic                                   noarch                                   4.14.0-23.el9                                    baseos                                    33 k
Upgrading:
 dnf                                             noarch                                   4.14.0-23.el9                                    baseos                                   478 k
 dnf-data                                        noarch                                   4.14.0-23.el9                                    baseos                                    37 k
 python3-dnf                                     noarch                                   4.14.0-23.el9                                    baseos                                   461 k
 yum                                             noarch                                   4.14.0-23.el9                                    baseos                                    88 k

Transaction Summary
=======================================================
Install  1 Package
Upgrade  4 Packages

Total download size: 1.1 M
Is this ok [y/N]: y
Downloading Packages:
(1/5): dnf-data-4.14.0-23.el9.noarch.rpm                                                                                                                  556 kB/s |  37 kB     00:00
(2/5): dnf-automatic-4.14.0-23.el9.noarch.rpm                                                                                                             406 kB/s |  33 kB     00:00
(3/5): yum-4.14.0-23.el9.noarch.rpm                                                                                                                       1.4 MB/s |  88 kB     00:00
(4/5): python3-dnf-4.14.0-23.el9.noarch.rpm                                                                                                               4.9 MB/s | 461 kB     00:00
(5/5): dnf-4.14.0-23.el9.noarch.rpm                                                                                                                       2.6 MB/s | 478 kB     00:00
——————————————————————————————————
Total                                                                                                                                                     1.1 MB/s | 1.1 MB     00:00
Running transaction check
Transaction check succeeded.
Running transaction test
Transaction test succeeded.
Running transaction
  Preparing        :                                                                                                                                                                  1/1
  Upgrading        : dnf-data-4.14.0-23.el9.noarch                                                                                                                                    1/9
  Upgrading        : python3-dnf-4.14.0-23.el9.noarch                                                                                                                                 2/9
  Upgrading        : dnf-4.14.0-23.el9.noarch                                                                                                                                         3/9
  Running scriptlet: dnf-4.14.0-23.el9.noarch                                                                                                                                         3/9
  Installing       : dnf-automatic-4.14.0-23.el9.noarch                                                                                                                               4/9
  Running scriptlet: dnf-automatic-4.14.0-23.el9.noarch                                                                                                                               4/9
  Upgrading        : yum-4.14.0-23.el9.noarch                                                                                                                                         5/9
  Cleanup          : yum-4.14.0-9.el9.noarch                                                                                                                                          6/9
  Running scriptlet: dnf-4.14.0-9.el9.noarch                                                                                                                                          7/9
  Cleanup          : dnf-4.14.0-9.el9.noarch                                                                                                                                          7/9
  Running scriptlet: dnf-4.14.0-9.el9.noarch                                                                                                                                          7/9
  Cleanup          : python3-dnf-4.14.0-9.el9.noarch                                                                                                                                  8/9
  Cleanup          : dnf-data-4.14.0-9.el9.noarch                                                                                                                                     9/9
  Running scriptlet: dnf-data-4.14.0-9.el9.noarch                                                                                                                                     9/9
  Verifying        : dnf-automatic-4.14.0-23.el9.noarch                                                                                                                               1/9
  Verifying        : dnf-4.14.0-23.el9.noarch                                                                                                                                         2/9
  Verifying        : dnf-4.14.0-9.el9.noarch                                                                                                                                          3/9
  Verifying        : dnf-data-4.14.0-23.el9.noarch                                                                                                                                    4/9
  Verifying        : dnf-data-4.14.0-9.el9.noarch                                                                                                                                     5/9
  Verifying        : python3-dnf-4.14.0-23.el9.noarch                                                                                                                                 6/9
  Verifying        : python3-dnf-4.14.0-9.el9.noarch                                                                                                                                  7/9
  Verifying        : yum-4.14.0-23.el9.noarch                                                                                                                                         8/9
  Verifying        : yum-4.14.0-9.el9.noarch                                                                                                                                          9/9

Upgraded:
  dnf-4.14.0-23.el9.noarch                   dnf-data-4.14.0-23.el9.noarch                   python3-dnf-4.14.0-23.el9.noarch                   yum-4.14.0-23.el9.noarch
Installed:
  dnf-automatic-4.14.0-23.el9.noarch

Complete!
[root@centos ~]#

Here is info on what dnf-automatic package will do: 

[root@centos ~]# rpm -qi dnf-automatic
Name        : dnf-automatic
Version     : 4.14.0
Release     : 23.el9
Architecture: noarch
Install Date: Wed 15 Jan 2025 08:00:47 AM -03
Group       : Unspecified
Size        : 57937
License     : GPLv2+
Signature   : RSA/SHA256, Thu 02 Jan 2025 01:19:43 PM -03, Key ID 05b555b38483c65d
Source RPM  : dnf-4.14.0-23.el9.src.rpm
Build Date  : Thu 12 Dec 2024 07:30:24 AM -03
Build Host  : s390-08.stream.rdu2.redhat.com
Packager    : builder@centos.org
Vendor      : CentOS
URL         : https://github.com/rpm-software-management/dnf
Summary     : Package manager – automated upgrades
Description :
Systemd units that can periodically download package upgrades and apply them.


Next up is configuring the dnf-automatic updates. The configuration file is located at /etc/dnf/automatic.conf. Once you have opened the file, you can to set the required values to fit your software requirements.
The values you might want to modify are as so:


[root@centos ~]# grep -v \# /etc/dnf/automatic.conf|sed '/^$/d'
[commands]
upgrade_type = default
random_sleep = 0
network_online_timeout = 60
download_updates = yes
apply_updates = no
reboot = never
reboot_command = "shutdown -r +5 'Rebooting after applying package updates'"
[emitters]
emit_via = stdio
[email]
email_from = root@example.com
email_to = root
email_host = localhost
[command]
[command_email]
email_from = root@example.com
email_to = root
[base]
debuglevel = 1
[root@centos ~]#


The most important things you need to tune in automatic.conf are:

[root@centos ~]# vim /etc/dnf/automatic.conf

apply_updates = no


should be changed to yes 

apply_updates = yes

for automatic updates to start by dnf-automatic service

It is nice to set the email server to use configuration values, as well as email from, email to and the way for
email to be set emit_via = stdio is default (check out the other options if to be used inside the commented lines)

Finally, you can now run dnf-automatic, execute the following command to schedule DNF automatic updates for your CentOS 8 machine.

[root@centos ~]# systemctl enable –now dnf-automatic.timer


The command above enables and starts the system timer. To check the status of the dnf-automatic service, run the following.

[root@centos ~]#  systemctl list-timers *dnf-*
NEXT                        LEFT       LAST                        PASSED      UNIT                ACTIVATES
Wed 2025-01-15 09:31:52 -03 13min left –                           –           dnf-makecache.timer dnf-makecache.service
Thu 2025-01-16 06:21:20 -03 21h left   Wed 2025-01-15 08:09:20 -03 1h 8min ago dnf-automatic.timer dnf-automatic.service

2 timers listed.
Pass –all to see loaded but inactive timers, too.

[root@centos ~]#


Enable and Manage Automatic updates with Cockpit GUI web interface


Sooner or later even hard core sysadmins has to enter the 21 century and start using a Web interfaces for server or Desktop Linux management to offload your head for more important stuff.
Cockpit is a great tool to help you automatically manage and update your servers with no need to use the Linux console most of the time.

Cockpit is a very powerful tool you can use to manage remotely updates through a web interface, it is very handy tool for system admins as it gives you overview over updates and supports automatic updates and set RPM package management tasks through web-based console. 
Cockpit allows updates over multiple servers and it makes it a kind of server orchestration tool that allows yo to update many same versioned operating system software.


If you haven't it already pre-installed in CentOS 8 / 9 depending on the type ofinstall you have done, you might need to install Cockpit.

To install cockpit

[root@centos ~]# yum install cockpit -y

To make the web service accessible in a browser you'll have to start it with cmds:

[root@centos ~]# systemctl start cockpit
[root@centos ~]# systemctl status cockpit

To access cockpit you'll either have to access it on https://localhost:9090 in case you need to access it locally via https://SERVER_IP:9090/.
Note that of course you will have to have firewalld enabling traffic to SERVER_IP PORT 9090.


centos-steam-cockpit-web-gui-autoupdate-tool-linux-screenshot1

By default cockpit will run with self signed certificate, if you need you can set up a certbot certificate or regenerate the self signed one for better managed security risk. For a first time if you haven't changed the certificate simply use the browser exclusion menu and login to Cockpit.

Once logged in you can check the available updates.


centos-steam-cockpit-web-gui-autoupdate-tool-linux-screenshot0

By default you will have to login with non-root account, preferably that should be an account who is authorized to become root via sudo.
To elevate to administrative privileges while in cockpit clock on 'Administrative access' and grant cockpit your superuser privileges.

centos-steam-cockpit-web-gui-autoupdate-tool-linux-screenshot2

Once authorized you can run the upgrade and enojy a coffee or beer in the mean time 🙂

centos-steam-cockpit-web-gui-autoupdate-tool-linux-screenshot-update-ongoing

Among the useful cockpit options, is also the Terminal through which you can run commands like over a normal Web SSH service.

The 'Logs' section is also very useful as it shows you clearly synthesized information on failed services and modules, since last OS system boot.


https://pc-freak.net/images/centos-steam-cockpit-web-gui-autoupdate-tool-linux-screenshot3

To add and manage updates for multiple hosts use the 'Add new host' menu that is a expansion of the main machine on which cockpit runs.


centos-steam-cockpit-web-gui-autoupdate-tool-linux-automatic-updates-settings

In the next window, turn automatic updates ON. You can now select the type of updates you want (Apply All Updates or Apply Security Updates), the day and time you want the updates applied, and the server rebooted.

CentOS 9's cockpit even have support for the innovative Kernel live patching, so the machine kernel can be updated even Live and you can save the reboot after complete patching of OS including the kernel.

centos-steam-cockpit-web-gui-autoupdate-tool-linux-kernel-live-patching-menu

Note that you cannot set up automatic updates without rebooting the system. Therefore, make sure your server can be rebooted at the time you’ve selected for the updates.

Sum it up


In this post, we learned have learned how to set up automatic updates for your CentOS 8 / 9 Linux. There are two main stream ways you can do it.
1. By using DNF automatic updates tool.
By enabling DNF automatic updates on CentOS 8 Linux the machine updated is faster, seemless and frequent as compared to manual updates.

This protects the OS more about crackers cyber-attacks. Secondly for the more lazy admins or for better structuring of updates (if it has to be executed on multiple hosts), the Cockpit web console is available.

With Cockpit, it’s much easy to enable automatic updates as the GUI is self-explanatory graphical user interface (GUI) as opposed to the DNF automatic updates, which would waste you more time on CLI ( shell ).
 

yum search file in all installable RPM, find out which rpm package provides binary file or missing library dependency on CentOS / RHEL / Fedora

Friday, August 23rd, 2024

images/centos-rhel-yum-clean-var-cache-yum

Sometimes if you have a missing library or a file you know should be available via an rpm but you're not sure which RPM you have to install you have to look up for library or binary file amongs all available installable r[ms on Redhat Linux / CentOS / Fedora or other RPM based distro.

It is really annoying especially, if you try to install an rpm binary and the package does not install due to missing dependency library. Having a missing dependency package could happen, if you use some custom internal prepared repository that is mirroring from original rpm repositories and the RPM Repositories are situated behind a DMZ firewall network (such scenarios are common for corporations and IT companies).
 
Finding out which file is provided by which package on Debian / Ubuntu and other deb based linux distributions is easy and done via the

# apt-file search filename

Thus if you're a system administrator coming from a Debian GNU / Linux sysadmin realm into the wonderful world of redhats, you will want to have an alternative to apt-file tool. You will be happy to find out that that this tedious task is easily done in RPM based Linux and is integrated straight into yum package manager too.

The command to search which rpm package provides a file is:

# yum whatprovides 'nc'

[root@rhel-linux ~]# yum whatprovides nc
Loaded plugins: fastestmirror, versionlock
Loading mirror speeds from cached hostfile
2:nmap-ncat-6.40-19.el7.x86_64 : Nmap's Netcat replacement
Repo        : base
Matched from:
Provides    : nc


2:nmap-ncat-6.40-19.el7.x86_64 : Nmap's Netcat replacement
Repo        : @base
Matched from:
Provides    : nc


yum whatprovides search_file_name can be also invoked with its shortcut yum provides 'search_file_name'

[root@rhel-server ~]# yum provides '/bin/ls'
Loaded plugins: fastestmirror, versionlock
Loading mirror speeds from cached hostfile
coreutils-8.22-24.el7.x86_64 : A set of basic GNU tools commonly used in shell scripts
Repo        : base
Matched from:
Filename    : /bin/ls

coreutils-8.22-24.el7_9.2.x86_64 : A set of basic GNU tools commonly used in shell scripts
Repo        : updates
Matched from:
Filename    : /bin/ls

 Here is another example:

[root@rhel-server ~]# yum -q provides '*lesspipe.sh*'
less-458-9.el7.x86_64 : A text file browser similar to more, but better
Repo        : base
Matched from:
Filename    : /usr/bin/lesspipe.sh

source-highlight-3.1.6-6.el7.i686 : Produces a document with syntax highlighting
Repo        : base
Matched from:
Filename    : /usr/bin/src-hilite-lesspipe.sh

source-highlight-3.1.6-6.el7.x86_64 : Produces a document with syntax highlighting
Repo        : base
Matched from:
Filename    : /usr/bin/src-hilite-lesspipe.sh

spirv-tools-2019.1-4.el7.x86_64 : API and commands for processing SPIR-V modules
Repo        : epel
Matched from:
Filename    : /usr/bin/spirv-lesspipe.sh

You can search for any file and if the RPm repository is defined under /etc/yum/repos.d/* and enabled, yum whatprovides command should be able to find it and tell you which RPM package you have to install to have the file installed Redhat way.

  • You can list all enabled RPM repositories with cmd:
     

[root@rhel-server ~]# yum repolist enabled
Loaded plugins: fastestmirror, versionlock
Loading mirror speeds from cached hostfile
repo id                                                   repo name                                                                      status
3party                                                    Third party packages – x86_64                                                   2,631
base/7/x86_64                                             CentOS-7 – Base                                                                10,072
cr/7/x86_64                                               CentOS-7 – CR                                                                       0
epel/7/x86_64                                             EPEL packages for RedCent 7 – x86_64                                           13,791
extras/7/x86_64                                           CentOS-7 – Extras                                                                 526
updates/7/x86_64                                          CentOS-7 – Updates                                                              5,802
zabbix-6.0                                                Zabbix 6.0 repo                                                                   429
repolist: 33,251
 

  • To list disable RPM repositories:
     

# yum repolist disabled


To list all present available repositories that could be enabled and are set via the /etc/yum.repos.d/* configs

# yum repolist all

Install Zabbix Proxy configure and connect to Zabbix server on CentOS Linux

Thursday, May 4th, 2023

Install Zabbix Proxy configure and connect to Zabbix server on CentOS Linux

1. Why use Zabbix-Proxy hidden advantages of using Zabbix-Proxy ?
 

Proxy can be used for many purposes and can provide many hidden benefits, just to name few of them:

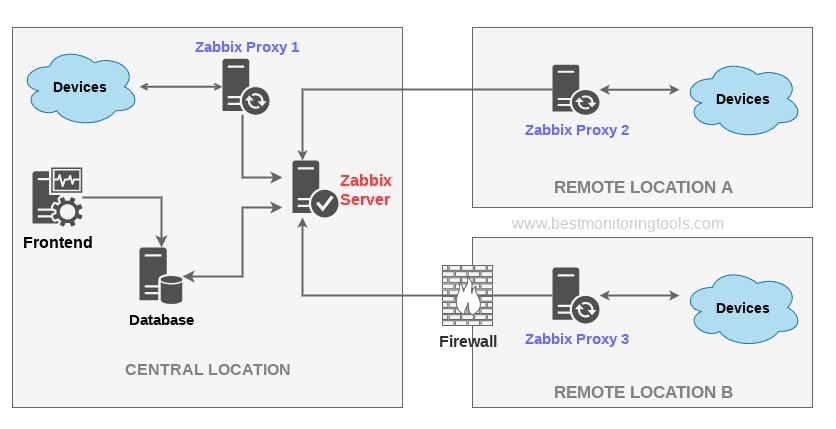
  • Offload Zabbix Server when monitoring thousands of devices
  • Monitor remote locations
  • Monitor locations having unreliable communications
  • Simplify maintenance of distributed monitoring
  • Improved Security (Zabbix server can be restricted to be connectable only by the set of connected Zabbix Proxy / Proxies


advantages-of-using-zabbix-proxy-instead-of-direct-connect-monitored-hosts-to-zabbix-server-diagram


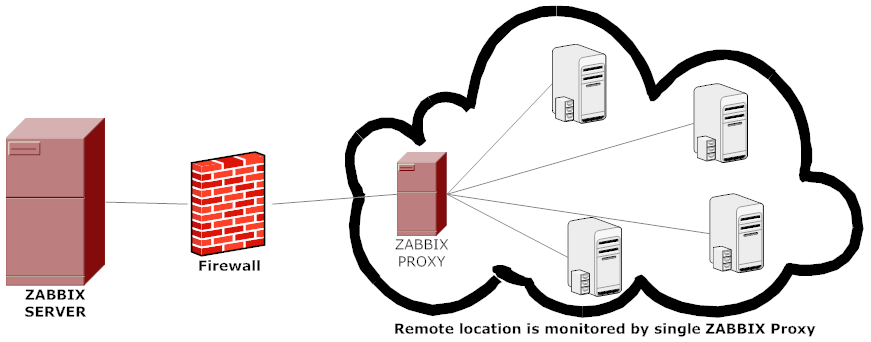
A Zabbix proxy is the ideal solution if you have numerous hosts with multiple slow items that are affecting the performance of the server simply because processes are spending most of the time simply waiting for a response. A proxy can collect information from all hosts using its internal processes and then send raw historical data to the server. The time needed to connect and receive the host response will be on the proxy site, and the server performance will not be affected at all. A proxy just sends raw values to the server, and the server itself does not have to connect to the host to get the data.
 

2. Install zabbix-proxy-sqlite3 rpm package from Zabbix Official Repositories download page

Zabbix repository provides choice of 3 packages named as follows:

zabbix-proxy-mysql
zabbix-proxy-pgsql
zabbix-proxy-sqlite3

where the last value of the name (after zabbix-proxy) represents database type of the package — MySQL, PostgreSQL and SQLite respectively.

To not bother installing MySQL / PostgreSQL separate database servers, a lightweight choice is to use the sqlite3 db version. 
As I prefer zabbix-proxy data to be stored inside a flat database, thus I choose to use zabbix-proxy-sqlite3.

[root@sysadminshelp:/root ]# yum info zabbix-proxy-sqlite3-5.0.31-1.el7.x86_64
Заредени плъгини: fastestmirror
Loading mirror speeds from cached hostfile
 * base: mirrors.netix.net
 * epel: fedora.ipacct.com
 * extras: mirrors.netix.net
 * remi: remi.mirror.karneval.cz
 * remi-php74: remi.mirror.karneval.cz
 * remi-safe: remi.mirror.karneval.cz
 * updates: mirrors.netix.net
Инсталирани пакети
Име         : zabbix-proxy-sqlite3
Архитект.   : x86_64
Версия      : 5.0.31
Издание     : 1.el7
Обем        : 4.4 M
Хранилище   : installed
Обобщение   : Zabbix proxy for SQLite3 database
URL         : http://www.zabbix.com/
Лиценз      : GPLv2+
Описание    : Zabbix proxy with SQLite3 database support.

My experience to try to install thethe default CentOS RPM package for zabbix-proxy-sqlite3 provided by default
RPM package that came with CentOS did not work as expected and trying to install / configure and use it via

[root@sysadminshelp:/root ]# yum install zabbix-proxy-sqlite3.x86_64 -y

[root@sysadminshelp:/root ]# vi /etc/zabbix/zabbix_proxy.conf


Led me to a nasty errors seen in /var/log/zabbixsrv/zabbix_proxy.log like:

May 1st 2023, 08:42:45.020 zabbix_server cannot set list of PSK ciphersuites: file ssl_lib.c line 1314: error:1410D0B9:SSL routines:SSL_CTX_set_cipher_list:no cipher match
May 1st 2023, 08:42:45.018 zabbix_server cannot set list of PSK ciphersuites: file ssl_lib.c line 1314: error:1410D0B9:SSL routines:SSL_CTX_set_cipher_list:no cipher match
May 1st 2023, 08:42:45.013 zabbix_server cannot set list of PSK ciphersuites: file ssl_lib.c line 1314: error:1410D0B9:SSL routines:SSL_CTX_set_cipher_list:no cipher match
May 1st 2023, 08:42:45.011 zabbix_server cannot set list of PSK ciphersuites: file ssl_lib.c line 1314: error:1410D0B9:SSL routines:SSL_CTX_set_cipher_list:no cipher match


After some googling and reading some threads came upon this one https://support.zabbix.com/browse/ZBXNEXT-3604, there is exmplaed errors preventing the configured zabbix-proxy
to start are caused by the zabbix-proxy-sqlite3 package provided by Redhat (due to openssl incompitability bug or something ).

As one of people in the discussion pointed out the quickest workaround suggested is simply to use the official Zabbix Repository packages for zabbix-proxy-sqlite3, in order to not waste anymore time on this
trivial stuff to install it, simply run:

[root@sysadminshelp:/root ]# rpm -Uvh \
https://repo.zabbix.com/zabbix/5.0/rhel/7/x86_64/zabbix-proxy-sqlite3-5.0.31-1.el7.x86_64.rpm

Alternative way if you seem to not have the machine connected to the internet is simply download the package with wget / lynx / curl / w3m from another machine 
that can reach the Internet upload the package via the local LAN or VPN and install it:

# wget https://repo.zabbix.com/zabbix/5.0/rhel/7/x86_64/zabbix-proxy-sqlite3-5.0.31-1.el7.x86_64.rpm

[root@sysadminshelp:/root ]# rpm -ivh zabbix-proxy-sqlite3-5.0.31-1.el7.x86_64.rpm

NOTE ! Before you install proxy, keep in mind that your proxy version must match the Zabbix server version !

3. Generate a PSK random secret key and set proper permissions for zabbix-proxy directories


[root@sysadminshelp:/root ]# cd /etc/zabbix/
    
[root@sysadminshelp:/root ]# openssl rand -hex 32 >> /etc/zabbix/zabbix_proxy.psk     
[root@sysadminshelp:/root ]# chown root:zabbix zabbix_proxy.psk [root@sysadminshelp:/root ]# vi /etc/zabbix/zabbix_proxy.conf [root@sysadminshelp:/root ]# mkdir -p /var/lib/zabbix-proxy/sqlite3db
[root@sysadminshelp:/root ]# chown -R zabbix:zabbix /var/lib/zabbix-proxy
[root@sysadminshelp:/var/lib/zabbixsrv/sqlite3db]# sqlite3 zabbix_proxy
SQLite version 3.7.17 2013-05-20 00:56:22
Enter ".help" for instructions
Enter SQL statements terminated with a ";"
sqlite> .databases
seq  name             file
—  —————  ———————————————————-
0    main             /var/lib/zabbixsrv/sqlite3db/zabbix_proxy
sqlite>
[root@sysadminshelp:/root ]# vi /etc/zabbix_proxy.conf
#DBName=zabbix_proxy
DBName=/var/lib/zabbixsrv/sqlite3db/zabbix_proxy

4. Configure zabbix proxy to be able to connect to Zabbix Server

[root@sysadminshelp:/root ]#  vi /etc/zabbix/zabbix_proxy.conf     ############ GENERAL PARAMETERS #################
    ProxyMode=0
    Server=192.168.1.28
    ServerPort=10051
    Hostname=zabbix-proxy
    ListenPort=10051
    SourceIP=10.168.1.55
    LogFile=/var/log/zabbix/zabbix_proxy.log
    LogFileSize=1
    DebugLevel=2
    PidFile=/var/run/zabbix/zabbix_proxy.pid
    DBName=/var/lib/zabbix-proxy/sqlite3db/zabbix_proxy.db
    DBUser=zabbix
    
    ######### PROXY SPECIFIC PARAMETERS #############
    ProxyOfflineBuffer=24
    HeartbeatFrequency=60
    ConfigFrequency=120
    
    ############ ADVANCED PARAMETERS ################
    StartPollersUnreachable=3
    StartHTTPPollers=3
    JavaGateway=127.0.0.1
    JavaGatewayPort=10052
    StartJavaPollers=5
    SNMPTrapperFile=/var/log/snmptrap/snmptrap.log
    StartSNMPTrapper=1
    CacheSize=32M
    Timeout=4
    ExternalScripts=/usr/lib/zabbix/externalscripts
    LogSlowQueries=3000
    
    ####### TLS-RELATED PARAMETERS #######
    TLSConnect=psk
    TLSAccept=psk
    TLSPSKIdentity=PSK zabbix-proxy-fqdn-hostname
    TLSPSKFile=/etc/zabbix/zabbix_proxy.psk

5. Check and make sure the installed zabbix proxy as well as the zabbix_proxy server zabbix_agentd client and zabbix_server are at the same major version release

a) Check zabbix proxy version

[root@sysadminshelp:/etc/zabbix]# zabbix_proxy -V
zabbix_proxy (Zabbix) 5.0.31
Revision f64a07aefca 30 January 2023, compilation time: Jan 30 2023 09:55:10

Copyright (C) 2023 Zabbix SIA
License GPLv2+: GNU GPL version 2 or later <https://www.gnu.org/licenses/>.
This is free software: you are free to change and redistribute it according to
the license. There is NO WARRANTY, to the extent permitted by law.

This product includes software developed by the OpenSSL Project
for use in the OpenSSL Toolkit (http://www.openssl.org/).

Compiled with OpenSSL 1.0.1e-fips 11 Feb 2013
Running with OpenSSL 1.0.1e-fips 11 Feb 2013

[root@sysadminshelp:/etc/zabbix]#

b) check zabbix_agentd version

[root@sysadminshelp:/etc/zabbix]# zabbix_agentd -V
zabbix_agentd (daemon) (Zabbix) 5.0.30
Revision 2c96c38fb4b 28 November 2022, compilation time: Nov 28 2022 11:27:43

Copyright (C) 2022 Zabbix SIA
License GPLv2+: GNU GPL version 2 or later <https://www.gnu.org/licenses/>.
This is free software: you are free to change and redistribute it according to
the license. There is NO WARRANTY, to the extent permitted by law.

This product includes software developed by the OpenSSL Project
for use in the OpenSSL Toolkit (http://www.openssl.org/).

Compiled with OpenSSL 1.0.1e-fips 11 Feb 2013
Running with OpenSSL 1.0.1e-fips 11 Feb 2013

c) Check zabbix server version

[root@zabbix:~]# zabbix_server -V
zabbix_server (Zabbix) 5.0.30
Revision 2c96c38fb4b 28 November 2022, compilation time: Nov 28 2022 09:19:03

Copyright (C) 2022 Zabbix SIA
License GPLv2+: GNU GPL version 2 or later <https://www.gnu.org/licenses/>.
This is free software: you are free to change and redistribute it according to
the license. There is NO WARRANTY, to the extent permitted by law.

This product includes software developed by the OpenSSL Project
for use in the OpenSSL Toolkit (http://www.openssl.org/).

Compiled with OpenSSL 1.1.1d  10 Sep 2019
Running with OpenSSL 1.1.1n  15 Mar 2022

6. Starting the zabbix-proxy for a first time

Before beginning with installation make sure selinux is disabled, as it might cause some issues with Zabbix

[root@sysadminshelp:/etc/zabbix]# sestatus
SELinux status:                 disabled

If you need to have the selinux enabled you will have to allow the zabbix-proxy into selinux as well:

cd /tmp
# grep zabbix_proxy /var/log/audit/audit.log | grep denied | audit2allow -m zabbix_proxy > zabbix_proxy.te
grep zabbix_proxy /var/log/audit/audit.log | grep denied | audit2allow -M zabbix_proxy
semodule -i zabbix_proxy.pp


[root@sysadminshelp:/etc/zabbix]# systemctl start zabbix-proxy

Also lets enable zabbix-proxy to automatically start it on next server reboot / boot.

root@sysadminshelp:/etc/zabbix]# systemctl enable zabbix-proxy

Normally running zabbix-proxy should provide a status messages like:

[root@sysadminshelp:/etc/zabbix]# systemctl status zabbix-proxy
● zabbix-proxy.service – Zabbix Proxy
   Loaded: loaded (/usr/lib/systemd/system/zabbix-proxy.service; disabled; vendor preset: disabled)
   Active: active (running) since чт 2023-05-04 14:58:36 CEST; 2h 59min ago
  Process: 8500 ExecStop=/bin/kill -SIGTERM $MAINPID (code=exited, status=0/SUCCESS)
  Process: 8504 ExecStart=/usr/sbin/zabbix_proxy -c $CONFFILE (code=exited, status=0/SUCCESS)
 Main PID: 8506 (zabbix_proxy)
   CGroup: /system.slice/zabbix-proxy.service
           ├─8506 /usr/sbin/zabbix_proxy -c /etc/zabbix/zabbix_proxy.conf
           ├─8507 /usr/sbin/zabbix_proxy: configuration syncer [synced config 40521 bytes in 0.0…
           ├─8508 /usr/sbin/zabbix_proxy: trapper #1 [processed data in 0.000808 sec, waiting fo…
           ├─8509 /usr/sbin/zabbix_proxy: trapper #2 [processed data in 0.005028 sec, waiting fo…
           ├─8510 /usr/sbin/zabbix_proxy: trapper #3 [processed data in 0.001240 sec, waiting fo…
           ├─8511 /usr/sbin/zabbix_proxy: trapper #4 [processed data in 0.004378 sec, waiting fo…
           ├─8512 /usr/sbin/zabbix_proxy: trapper #5 [processed data in 0.004991 sec, waiting fo…
           ├─8513 /usr/sbin/zabbix_proxy: preprocessing manager #1 [queued 0, processed 3 values…
           ├─8514 /usr/sbin/zabbix_proxy: preprocessing worker #1 started
           ├─8515 /usr/sbin/zabbix_proxy: preprocessing worker #2 started
           ├─8516 /usr/sbin/zabbix_proxy: preprocessing worker #3 started
           ├─8517 /usr/sbin/zabbix_proxy: heartbeat sender [sending heartbeat message success in…
           ├─8518 /usr/sbin/zabbix_proxy: data sender [sent 0 values in 0.005241 sec, idle 1 sec…
           ├─8519 /usr/sbin/zabbix_proxy: housekeeper [deleted 4501 records in 0.011462 sec, idl…
           ├─8520 /usr/sbin/zabbix_proxy: http poller #1 [got 0 values in 0.000248 sec, idle 5 s…
           ├─8521 /usr/sbin/zabbix_proxy: http poller #2 [got 0 values in 0.000239 sec, idle 5 s…
           ├─8522 /usr/sbin/zabbix_proxy: http poller #3 [got 0 values in 0.000328 sec, idle 5 s…
           ├─8523 /usr/sbin/zabbix_proxy: discoverer #1 [processed 0 rules in 0.000261 sec, idle…
           ├─8524 /usr/sbin/zabbix_proxy: history syncer #1 [processed 0 values in 0.000009 sec,…
           ├─8525 /usr/sbin/zabbix_proxy: history syncer #2 [processed 0 values in 0.000007 sec,…
           ├─8526 /usr/sbin/zabbix_proxy: history syncer #3 [processed 0 values in 0.000014 sec,…
           ├─8527 /usr/sbin/zabbix_proxy: history syncer #4 [processed 0 values in 0.000021 sec,…
           ├─8528 /usr/sbin/zabbix_proxy: java poller #1 [got 0 values in 0.000017 sec, idle 5 s…
           ├─8529 /usr/sbin/zabbix_proxy: java poller #2 [got 0 values in 0.000019 sec, idle 5 s…
           ├─8530 /usr/sbin/zabbix_proxy: java poller #3 [got 0 values in 0.000019 sec, idle 5 s…
           ├─8531 /usr/sbin/zabbix_proxy: java poller #4 [got 0 values in 0.000018 sec, idle 5 s…
           ├─8532 /usr/sbin/zabbix_proxy: java poller #5 [got 0 values in 0.000013 sec, idle 5 s…
           ├─8533 /usr/sbin/zabbix_proxy: snmp trapper [processed data in 0.000026 sec, idle 1 s…
           ├─8534 /usr/sbin/zabbix_proxy: self-monitoring [processed data in 0.000034 sec, idle …
           ├─8535 /usr/sbin/zabbix_proxy: task manager [processed 0 task(s) in 0.000169 sec, idl…
           ├─8536 /usr/sbin/zabbix_proxy: poller #1 [got 0 values in 0.000012 sec, idle 5 sec]
           ├─8537 /usr/sbin/zabbix_proxy: poller #2 [got 0 values in 0.000021 sec, idle 5 sec]
           ├─8538 /usr/sbin/zabbix_proxy: poller #3 [got 0 values in 0.000039 sec, idle 5 sec]
           ├─8539 /usr/sbin/zabbix_proxy: poller #4 [got 0 values in 0.000024 sec, idle 5 sec]
           ├─8540 /usr/sbin/zabbix_proxy: poller #5 [got 0 values in 0.000019 sec, idle 5 sec]
           ├─8541 /usr/sbin/zabbix_proxy: unreachable poller #1 [got 0 values in 0.000011 sec, i…
           ├─8542 /usr/sbin/zabbix_proxy: unreachable poller #2 [got 0 values in 0.000018 sec, i…
           ├─8543 /usr/sbin/zabbix_proxy: unreachable poller #3 [got 0 values in 0.000041 sec, i…
           └─8544 /usr/sbin/zabbix_proxy: icmp pinger #1 [got 0 values in 0.000022 sec, idle 5 s…

май 04 14:58:36 sysadminshelp systemd[1]: Stopped Zabbix Proxy.
май 04 14:58:36 sysadminshelp systemd[1]: Starting Zabbix Proxy…
май 04 14:58:36 sysadminshelp systemd[1]: Started Zabbix Proxy.

zabbix-server-zabbix-proxy-and-zabbix-clients-overview-diagram

7. Configure zabbix-agentd to use your just new brand new zabbix-proxy

Here is my sample configuration file:

[root@sysadminshelp:/etc/zabbix]# grep -v \# /etc/zabbix/zabbix_agentd.conf | sed '/^$/d'
PidFile=/var/run/zabbix/zabbix_agentd.pid
LogFile=/var/log/zabbix/zabbix_agentd.log
LogFileSize=0
Server=zabbix-proxy
ServerActive=zabbix-proxy:10051
ListenIP
Hostname=sysadminshelp
BufferSend=30
BufferSize=100
Include=/etc/zabbix/zabbix_agentd.d/*.conf


Note that the ServerActive given "zabbix-proxy" should be resolvable from the host, or even better you might want to put the IP of the Proxy if
you don't have at least a pseudo Hostname already configured inside /etc/hosts or actual DNS 'A' Active record configured inside a properly resolving
DNS server configured on the host via /etc/resolv.conf.


8. Create and Configure new proxy into the Zabbix-server host
 

Go to the zabbix server web interface URL into menus:

zabbix-administration-proxy-config
 

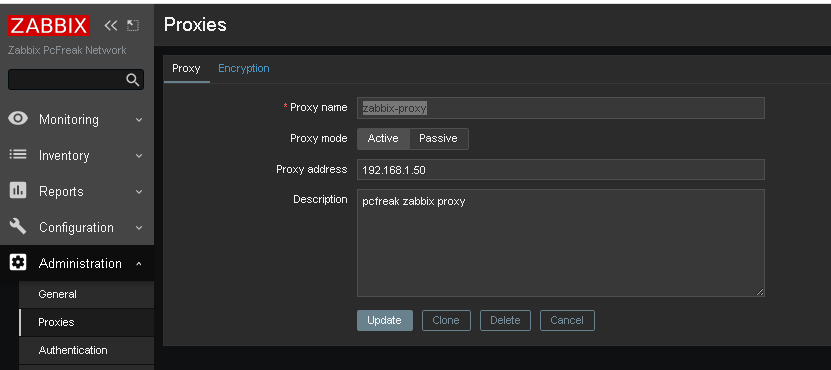
Administration -> Proxies (Proxy) 


Click on ;

Create Proxy button (uppper right corner)

*Proxy name: usually-your-host-pingable-fqdn
Proxy mode: Active
Proxy address: 192.168.1.50
Description: pcfreak zabbix proxy


Administration -> Proxies -> Encryption


From "Connection to proxy"

Untick "No encryption"

and

Tick "PSK"


zabbix-administration-proxy-config-encryption

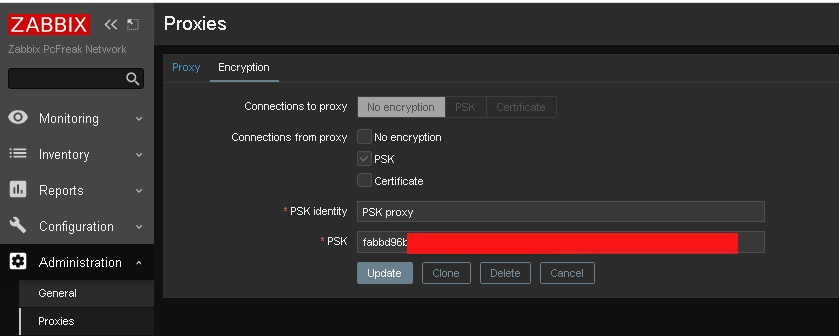
*PSK Identity: PSK proxy
*PSK: Put the key here (copy from /etc/zabbix/zabbix_proxy.psk generated steps earlier with openssl)

[root@sysadminshelp:/etc/zabbix]# cat zabbix_proxy.psk
faddbd96be00ac42c892fda5201634df25d51f3ndbbbf6cee9d354b2817092a28

Press the "Update" Button

zabbix-administration-proxy-config-encryption1

and go again to Proxies and check the zabbix-proxy is connected to the server and hosts configured to use the zabbix proxy reporting frequently.

To make sure that the configured new hosts to use the Zabbix Proxy instead of direct connection to Zabbix Server, go to Latest Data and check whether the configured Hostnames to connect to the Zabbix-Proxy continues to sent Data still.

9. Debugging problems with zabix-proxy and zabbix-agentd connectivity to proxy

In case of troubles check out what is going on inside the Zabbix Proxy / Agent and Server log files
 

[root@sysadminshelp:/etc/zabbix]# tail -n 50 /var/log/zabbix/zabbix_proxy.log

 6832:20230504:134032.281 Starting Zabbix Proxy (active) [zabbix-proxy]. Zabbix 5.0.31 (revision f
64a07aefca).
  6832:20230504:134032.281 **** Enabled features ****
  6832:20230504:134032.281 SNMP monitoring:       YES
  6832:20230504:134032.281 IPMI monitoring:       YES
  6832:20230504:134032.281 Web monitoring:        YES
  6832:20230504:134032.281 VMware monitoring:     YES
  6832:20230504:134032.281 ODBC:                  YES
  6832:20230504:134032.281 SSH support:           YES
  6832:20230504:134032.281 IPv6 support:          YES
  6832:20230504:134032.281 TLS support:           YES
  6832:20230504:134032.281 **************************
  6832:20230504:134032.281 using configuration file: /etc/zabbix/zabbix_proxy.conf
  6832:20230504:134032.291 current database version (mandatory/optional): 05000000/05000005
  6832:20230504:134032.291 required mandatory version: 05000000
  6832:20230504:134032.292 proxy #0 started [main process]
  6833:20230504:134032.292 proxy #1 started [configuration syncer #1]
  6833:20230504:134032.329 received configuration data from server at "192.168.1.28", datalen 40521
  6834:20230504:134032.392 proxy #2 started [trapper #1]
  6835:20230504:134032.401 proxy #3 started [trapper #2]
  6836:20230504:134032.402 proxy #4 started [trapper #3]
  6838:20230504:134032.405 proxy #6 started [trapper #5]
  6837:20230504:134032.409 proxy #5 started [trapper #4]
  6843:20230504:134032.409 proxy #11 started [heartbeat sender #1]
  6845:20230504:134032.412 proxy #13 started [housekeeper #1]
  6847:20230504:134032.412 proxy #15 started [discoverer #1]
  8526:20230504:145836.512 proxy #20 started [history syncer #3]
  8517:20230504:145836.512 proxy #11 started [heartbeat sender #1]
  8530:20230504:145836.515 proxy #24 started [java poller #3]
  8531:20230504:145836.517 proxy #25 started [java poller #4]
  8532:20230504:145836.520 proxy #26 started [java poller #5]
  8536:20230504:145836.522 proxy #30 started [poller #1]
  8527:20230504:145836.525 proxy #21 started [history syncer #4]
  8535:20230504:145836.525 proxy #29 started [task manager #1]
  8533:20230504:145836.528 proxy #27 started [snmp trapper #1]
  8539:20230504:145836.528 proxy #33 started [poller #4]
  8538:20230504:145836.529 proxy #32 started [poller #3]
  8534:20230504:145836.532 proxy #28 started [self-monitoring #1]
  8544:20230504:145836.532 proxy #38 started [icmp pinger #1]
  8543:20230504:145836.532 proxy #37 started [unreachable poller #3]
  8542:20230504:145836.535 proxy #36 started [unreachable poller #2]
  8541:20230504:145836.537 proxy #35 started [unreachable poller #1]
  8540:20230504:145836.540 proxy #34 started [poller #5]
  8507:20230504:150036.453 received configuration data from server at "192.168.1.28", datalen 40521
  8507:20230504:150236.503 received configuration data from server at "192.168.1.28", datalen 40521
  8507:20230504:150436.556 received configuration data from server at "192.168.1.28", datalen 40521
  8507:20230504:150636.608 received configuration data from server at "192.168.1.28", datalen 40521
  8507:20230504:150836.662 received configuration data from server at "192.168.1.28", datalen 40521


[root@sysadminshelp:/etc/zabbix]# tail -n 10  /var/log/zabbix-agent/zabbix_agentd.log
3096166:20230504:182840.461 agent #1 started [collector]
3096167:20230504:182840.462 agent #2 started [listener #1]
3096168:20230504:182840.463 agent #3 started [listener #2]
3096169:20230504:182840.464 agent #4 started [listener #3]
3096170:20230504:182840.464 agent #5 started [active checks #1]

If necessery to Debug further and track some strange errors, you might want to increase the DebugLevel to lets say DebugLevel=5

5 – extended debugging (produces even more information)

If checking both zabbix_agentd.log and zabbix_proxy.log cannot give you enough of a hint on what might be the issues you face with your userparameter scripts or missing Monitored data etc. and hopefully you have access to the zabbix-server machine, check out the zabbix server log as well

[root@zabbix:~]# tail -n 100 /var/log/zabbix/zabbix_server.log

3145027:20230504:182641.556 sending configuration data to proxy "zabbix-proxy" at "192.168.1.50", datalen 40521, bytes 6120 with compression ratio 6.6
3145029:20230504:182716.529 cannot send list of active checks to "192.168.1.30": host [pcfrxenweb] not found
3145028:20230504:182731.959 cannot send list of active checks to "192.168.1.30": host [pcfrxenweb] not found
3145029:20230504:182756.634 cannot send list of active checks to "192.168.1.30": host [pcfrxenweb] not found

Wrapping it up

In this article, we have learned how to install and configure a zabbix-proxy server and prepare a PSK encryption secret key for it.
We learned also  how to connect this server to the central zabbix monitoring host machine in Active mode, so both Zabbix proxy and server can communicate in a secure crypted form,
as well as how to set zabbix_agentd clients to connect to the zabbix proxy
which will from itself send its data to the Central Zabbix server host as well as how to Debug and hopefully solve issues with communication between Zabbix client -> Zabbix Proxy -> Zabbix server.

I know this article, does not say anything revolutionary and there is plenty of posts online talking about how to run yourself a zabbix proxy and make in your home or corporate network,
but I thought to write it down as by writting it and reading a bit more on the topic of Zabbix Server / Proxy / Agent, that give myself a better overview on how this technologies work and such an article will give myself an easier step by step guide to follow,
in future when I have to configure Zabbix Environments for personal hobby or professionally for customers.
Hope you enjoyed. Cheers ! 🙂

How to start Syslog ( Syslog-ng ) on IBM AIX

Thursday, October 20th, 2022

how-to-enable-syslog-ng-on-ibm-aix-unix-know-AIX-logo.svg

Syslog-ng is a system logging application, which can be a replacement of the default syslog. With syslog-ng, the log messages can be sent in an ecrypted/secure channel to a remote server. If the central log server or the network connection becomes unavailable syslog-ng will store messages on the local hard disk.

The syslog-ng application automatically sends the stored messages to the server when the connection is reestablished, in the same order the messages were received. The disk buffer is persistent – no messages are lost even if syslog-ng is restarted. (Another possibility to send those messages to a secondary server.)

syslog-ng can filter log messages and select only the ones matching certain criteria, but it cannot interpret and analyze the meaning behind the messages. It can receive messages from files, remote hosts, and other sources, and these are sent to one or more destinations (files, remote hosts..),

It has a server – client model, here only syslog-ng client informations will be described (syslog-ng server has not been tested, only client, which were sending messages to a remote server (qradar).)

One missing feature of syslog-ng, that it cannot rotate logs by itself. For log rotation an external tool like logrotate needs to be used.


1. Install / Uninstall syslog-ng on AIX


1.1. Install syslog-ng on AIX
 

After downloading the syslog-ng installer package, we have 2 options
– run ./syslog-ng-<edition>-<version>-<OS>-<platform>.run script, or
– install as an rpm package: rpm -i syslog-ng-premium-edition-<version>-<OS>-<arch>.rpm

During install, the default syslogd will be replaced automatically by syslog-ng (no parallel operation is possible).


1.2. Uninstall syslog-ng on AIX
 

If the .run installer has been used: /opt/syslog-ng/bin/uninstall.sh (The uninstall script will automatically restore the syslog daemon used before installing syslog-ng.)
If the .rpm package has been used: rpm -e syslog-ng-premium-edition (with rpm, it does not restore the syslog daemon used before syslog-ng).


AIX is a custom and non-free OS if you had to deal with it you might might ponder how to stop / start syslog-ng.
The paths to binaries on AIX
The configuration is not universal, but represents the GEK server.

2. Set Automatic start of syslog-ng on AIX

Enable Start from /etc/tcpip:

start /opt/freeware/sbin/syslog-ng "$src_running"


3. Check syslog-ng configuration is correct
 

Configuration could be under separate locations but the most likely ones for  syslog-ng.conf and license.txt files are located in the
/opt/syslog-ng/etc/ directory or /etc/syslog-ng depending on how it was configured on install time.


After changing tuning the configuration, it can be checked for errors:

# /opt/freeware/sbin/syslog-ng –syntax-only

How to RPM update Hypervisors and Virtual Machines running Haproxy High Availability cluster on KVM, Virtuozzo without a downtime on RHEL / CentOS Linux

Friday, May 20th, 2022

virtuozzo-kvm-virtual-machines-and-hypervisor-update-manual-haproxy-logo


Here is the scenario, lets say you have on your daily task list two Hypervisor (HV) hosts running CentOS or RHEL Linux with KVM or Virutozzo technology and inside the HV hosts you have configured at least 2 pairs of virtual machines one residing on HV Host 1 and one residing on HV Host 2 and you need to constantly keep the hosts to the latest distribution major release security patchset.

The Virtual Machines has been running another set of Redhat Linux or CentOS configured to work in a High Availability Cluster running Haproxy / Apache / Postfix or any other kind of HA solution on top of corosync / keepalived or whatever application cluster scripts Free or Open Source technology that supports a switch between clustered Application nodes.

The logical question comes how to keep up the CentOS / RHEL Machines uptodate without interfering with the operations of the Applications running on the cluster?

Assuming that the 2 or more machines are configured to run in Active / Passive App member mode, e.g. one machine is Active at any time and the other is always Passive, a switch is possible between the Active and Passive node.

HAProxy--Load-Balancer-cluster-2-nodes-your-Servers

In this article I'll give a simple step by step tested example on how you I succeeded to update (for security reasons) up to the latest available Distribution major release patchset on one by one first the Clustered App on Virtual Machines 1 and VM2 on Linux Hypervisor Host 1. Then the App cluster VM 1 / VM 2 on Hypervisor Host 2.
And finally update the Hypervisor1 (after moving the Active resources from it to Hypervisor2) and updating the Hypervisor2 after moving the App running resources back on HV1.
I know the procedure is a bit monotonic but it tries to go through everything step by step to try to mitigate any possible problems. In case of failure of some rpm dependencies during yum / dnf tool updates you can always revert to backups so in anyways don't forget to have a fully functional backup of each of the HV hosts and the VMs somewhere on a separate machine before proceeding further, any possible failures due to following my aritcle literally is your responsibility 🙂


0. Check situation before the update on HVs / get VM IDs etc.

Check the virsion of each of the machines to be updated both Hypervisor and Hosted VMs, on each machine run:
 

# cat /etc/redhat-release
CentOS Linux release 7.9.2009 (Core)


The machine setup I'll be dealing with is as follows:
 

hypervisor-host1 -> hypervisor-host1.fqdn.com 
•    virt-mach-centos1
•    virt-machine-zabbix-proxy-centos (zabbix proxy)

hypervisor-host2 -> hypervisor-host2.fqdn.com
•    virt-mach-centos2
•    virt-machine-zabbix2-proxy-centos (zabbix proxy)

To check what is yours check out with virsh cmd –if on KVM or with prlctl if using Virutozzo, you should get something like:

[root@hypervisor-host2 ~]# virsh list
 Id Name State
—————————————————-
 1 vm-host1 running
 2 virt-mach-centos2 running

 # virsh list –all

[root@hypervisor-host1 ~]# virsh list
 Id Name State
—————————————————-
 1 vm-host2 running
 3 virt-mach-centos1 running

[root@hypervisor-host1 ~]# prlctl list
UUID                                    STATUS       IP_ADDR         T  NAME
{dc37c201-08c9-589d-aa20-9386d63ce3f3}  running      –               VM virt-mach-centos1
{76e8a5f8-caa8-5442-830e-aa4bfe8d42d9}  running      –               VM vm-host2
[root@hypervisor-host1 ~]#

If you have stopped VMs with Virtuozzo to list the stopped ones as well.
 

# prlctl list -a

[root@hypervisor-host2 74a7bbe8-9245-5385-ac0d-d10299100789]# vzlist -a
                                CTID      NPROC STATUS    IP_ADDR         HOSTNAME
[root@hypervisor-host2 74a7bbe8-9245-5385-ac0d-d10299100789]# prlctl list
UUID                                    STATUS       IP_ADDR         T  NAME
{92075803-a4ce-5ec0-a3d8-9ee83d85fc76}  running      –               VM virt-mach-centos2
{74a7bbe8-9245-5385-ac0d-d10299100789}  running      –               VM vm-host1

# prlctl list -a


If due to Virtuozzo version above command does not return you can manually check in the VM located folder, VM ID etc.
 

[root@hypervisor-host2 vmprivate]# ls
74a7bbe8-9245-4385-ac0d-d10299100789  92075803-a4ce-4ec0-a3d8-9ee83d85fc76
[root@hypervisor-host2 vmprivate]# pwd
/vz/vmprivate
[root@hypervisor-host2 vmprivate]#


[root@hypervisor-host1 ~]# ls -al /vz/vmprivate/
total 20
drwxr-x—. 5 root root 4096 Feb 14  2019 .
drwxr-xr-x. 7 root root 4096 Feb 13  2019 ..
drwxr-x–x. 4 root root 4096 Feb 18  2019 1c863dfc-1deb-493c-820f-3005a0457627
drwxr-x–x. 4 root root 4096 Feb 14  2019 76e8a5f8-caa8-4442-830e-aa4bfe8d42d9
drwxr-x–x. 4 root root 4096 Feb 14  2019 dc37c201-08c9-489d-aa20-9386d63ce3f3
[root@hypervisor-host1 ~]#


Before doing anything with the VMs, also don't forget to check the Hypervisor hosts has enough space, otherwise you'll get in big troubles !
 

[root@hypervisor-host2 vmprivate]# df -h
Filesystem                       Size  Used Avail Use% Mounted on
/dev/mapper/centos_hypervisor-host2-root   20G  1.8G   17G  10% /
devtmpfs                          20G     0   20G   0% /dev
tmpfs                             20G     0   20G   0% /dev/shm
tmpfs                             20G  2.0G   18G  11% /run
tmpfs                             20G     0   20G   0% /sys/fs/cgroup
/dev/sda1                        992M  159M  766M  18% /boot
/dev/mapper/centos_hypervisor-host2-home  9.8G   37M  9.2G   1% /home
/dev/mapper/centos_hypervisor-host2-var   9.8G  355M  8.9G   4% /var
/dev/mapper/centos_hypervisor-host2-vz    755G   25G  692G   4% /vz


[root@hypervisor-host1 ~]# df -h
Filesystem               Size  Used Avail Use% Mounted on
/dev/mapper/centos-root   50G  1.8G   45G   4% /
devtmpfs                  20G     0   20G   0% /dev
tmpfs                     20G     0   20G   0% /dev/shm
tmpfs                     20G  2.1G   18G  11% /run
tmpfs                     20G     0   20G   0% /sys/fs/cgroup
/dev/sda2                992M  153M  772M  17% /boot
/dev/mapper/centos-home  9.8G   37M  9.2G   1% /home
/dev/mapper/centos-var   9.8G  406M  8.9G   5% /var
/dev/mapper/centos-vz    689G   12G  643G   2% /vz

Another thing to do before proceeding with update is to check and tune if needed the amount of CentOS repositories used, before doing anything with yum.
 

[root@hypervisor-host2 yum.repos.d]# ls -al
total 68
drwxr-xr-x.   2 root root  4096 Oct  6 13:13 .
drwxr-xr-x. 110 root root 12288 Oct  7 11:13 ..
-rw-r–r–.   1 root root  4382 Mar 14  2019 CentOS7.repo
-rw-r–r–.   1 root root  1664 Sep  5  2019 CentOS-Base.repo
-rw-r–r–.   1 root root  1309 Sep  5  2019 CentOS-CR.repo
-rw-r–r–.   1 root root   649 Sep  5  2019 CentOS-Debuginfo.repo
-rw-r–r–.   1 root root   314 Sep  5  2019 CentOS-fasttrack.repo
-rw-r–r–.   1 root root   630 Sep  5  2019 CentOS-Media.repo
-rw-r–r–.   1 root root  1331 Sep  5  2019 CentOS-Sources.repo
-rw-r–r–.   1 root root  6639 Sep  5  2019 CentOS-Vault.repo
-rw-r–r–.   1 root root  1303 Mar 14  2019 factory.repo
-rw-r–r–.   1 root root   666 Sep  8 10:13 openvz.repo
[root@hypervisor-host2 yum.repos.d]#


[root@hypervisor-host1 yum.repos.d]# ls -al
total 68
drwxr-xr-x.   2 root root  4096 Oct  6 13:13 .
drwxr-xr-x. 112 root root 12288 Oct  7 11:09 ..
-rw-r–r–.   1 root root  1664 Sep  5  2019 CentOS-Base.repo
-rw-r–r–.   1 root root  1309 Sep  5  2019 CentOS-CR.repo
-rw-r–r–.   1 root root   649 Sep  5  2019 CentOS-Debuginfo.repo
-rw-r–r–.   1 root root   314 Sep  5  2019 CentOS-fasttrack.repo
-rw-r–r–.   1 root root   630 Sep  5  2019 CentOS-Media.repo
-rw-r–r–.   1 root root  1331 Sep  5  2019 CentOS-Sources.repo
-rw-r–r–.   1 root root  6639 Sep  5  2019 CentOS-Vault.repo
-rw-r–r–.   1 root root  1303 Mar 14  2019 factory.repo
-rw-r–r–.   1 root root   300 Mar 14  2019 obsoleted_tmpls.repo
-rw-r–r–.   1 root root   666 Sep  8 10:13 openvz.repo


1. Dump VM definition XMs (to have it in case if it gets wiped during update)

There is always a possibility that something will fail during the update and you might be unable to restore back to the old version of the Virtual Machine due to some config misconfigurations or whatever thus a very good idea, before proceeding to modify the working VMs is to use KVM's virsh and dump the exact set of XML configuration that makes the VM roll properly.

To do so:
Check a little bit up in the article how we have listed the IDs that are part of the directory containing the VM.
 

[root@hypervisor-host1 ]# virsh dumpxml (Id of VM virt-mach-centos1 ) > /root/virt-mach-centos1_config_bak.xml
[root@hypervisor-host2 ]# virsh dumpxml (Id of VM virt-mach-centos2) > /root/virt-mach-centos2_config_bak.xml


2. Set on standby virt-mach-centos1 (virt-mach-centos1)

As I'm upgrading two machines that are configured to run an haproxy corosync cluster, before proceeding to update the active host, we have to switch off
the proxied traffic from node1 to node2, – e.g. standby the active node, so the cluster can move up the traffic to other available node.
 

[root@virt-mach-centos1 ~]# pcs cluster standby virt-mach-centos1


3. Stop VM virt-mach-centos1 & backup on Hypervisor host (hypervisor-host1) for VM1

Another prevention step to make sure you don't get into damaged VM or broken haproxy cluster after the upgrade is to of course backup 


[root@hypervisor-host1 ]# prlctl backup virt-mach-centos1

or
 

[root@hypervisor-host1 ]# prlctl stop virt-mach-centos1
[root@hypervisor-host1 ]# cp -rpf /vz/vmprivate/dc37c201-08c9-489d-aa20-9386d63ce3f3 /vz/vmprivate/dc37c201-08c9-489d-aa20-9386d63ce3f3-bak
[root@hypervisor-host1 ]# tar -czvf virt-mach-centos1_vm_virt-mach-centos1.tar.gz /vz/vmprivate/dc37c201-08c9-489d-aa20-9386d63ce3f3

[root@hypervisor-host1 ]# prlctl start virt-mach-centos1


4. Remove package version locks on all hosts

If you're using package locking to prevent some other colleague to not accidently upgrade the machine (if multiple sysadmins are managing the host), you might use the RPM package locking meachanism, if that is used check RPM packs that are locked and release the locking.

+ List actual list of locked packages

[root@hypervisor-host1 ]# yum versionlock list  

…..
0:libtalloc-2.1.16-1.el7.*
0:libedit-3.0-12.20121213cvs.el7.*
0:p11-kit-trust-0.23.5-3.el7.*
1:quota-nls-4.01-19.el7.*
0:perl-Exporter-5.68-3.el7.*
0:sudo-1.8.23-9.el7.*
0:libxslt-1.1.28-5.el7.*
versionlock list done
                          

+ Clear the locking            

# yum versionlock clear                               


+ List actual list / == clear all entries
 

[root@virt-mach-centos2 ]# yum versionlock list; yum versionlock clear
[root@virt-mach-centos1 ]# yum versionlock list; yum versionlock clear
[root@hypervisor-host1 ~]# yum versionlock list; yum versionlock clear
[root@hypervisor-host2 ~]# yum versionlock list; yum versionlock clear


5. Do yum update virt-mach-centos1


For some clarity if something goes wrong, it is really a good idea to make a dump of the basic packages installed before the RPM package update is initiated,
The exact versoin of RHEL or CentOS as well as the list of locked packages, if locking is used.

Enter virt-mach-centos1 (ssh virt-mach-centos1) and run following cmds:
 

# cat /etc/redhat-release  > /root/logs/redhat-release-$(hostname)-$(date '+%Y-%m-%d_%H-%M-%S').out
# cat /etc/grub.d/30_os-prober > /root/logs/grub2-efi-$(hostname)-$(date '+%Y-%m-%d_%H-%M-%S').out


+ Only if needed!!
 

# yum versionlock clear
# yum versionlock list


Clear any previous RPM packages – careful with that as you might want to keep the old RPMs, if unsure comment out below line
 

# yum clean all |tee /root/logs/yumcleanall-$(hostname)-$(date '+%Y-%m-%d_%H-%M-%S').out


Proceed with the update and monitor closely the output of commands and log out everything inside files using a small script that you should place under /root/status the script is given at the end of the aritcle.:
 

yum check-update |tee /root/logs/yumcheckupdate-$(hostname)-$(date '+%Y-%m-%d_%H-%M-%S').out
yum check-update | wc -l
yum update |tee /root/logs/yumupdate-$(hostname)-$(date '+%Y-%m-%d_%H-%M-%S').out
sh /root/status |tee /root/logs/status-before-$(hostname)-$(date '+%Y-%m-%d_%H-%M-%S').out


6. Check if everything is running fine after upgrade

Reboot VM
 

# shutdown -r now


7. Stop VM virt-mach-centos2 & backup  on Hypervisor host (hypervisor-host2)

Same backup step as prior 

# prlctl backup virt-mach-centos2


or
 

# prlctl stop virt-mach-centos2
# cp -rpf /vz/vmprivate/92075803-a4ce-4ec0-a3d8-9ee83d85fc76 /vz/vmprivate/92075803-a4ce-4ec0-a3d8-9ee83d85fc76-bak
## tar -czvf virt-mach-centos2_vm_virt-mach-centos2.tar.gz /vz/vmprivate/92075803-a4ce-4ec0-a3d8-9ee83d85fc76

# prctl start virt-mach-centos2


8. Do yum update on virt-mach-centos2

Log system state, before the update
 

# cat /etc/redhat-release  > /root/logs/redhat-release-vorher-$(hostname)-$(date '+%Y-%m-%d_%H-%M-%S').out
# cat /etc/grub.d/30_os-prober > /root/logs/grub2-efi-vorher-$(hostname)-$(date '+%Y-%m-%d_%H-%M-%S').out
# yum versionlock clear == if needed!!
# yum versionlock list


Clean old install update / packages if required
 

# yum clean all |tee /root/logs/yumcleanall-$(hostname)-$(date '+%Y-%m-%d_%H-%M-%S').out


Initiate the update

# yum check-update |tee /root/logs/yumcheckupdate-$(hostname)-$(date '+%Y-%m-%d_%H-%M-%S').out 2>&1
# yum check-update | wc -l 
# yum update |tee /root/logs/yumupdate-$(hostname)-$(date '+%Y-%m-%d_%H-%M-%S').out 2>&1
# sh /root/status |tee /root/logs/status-before-$(hostname)-$(date '+%Y-%m-%d_%H-%M-%S').out


9. Check if everything is running fine after upgrade
 

Reboot VM
 

# shutdown -r now


10. Stop VM vm-host2 & backup
 

# prlctl backup vm-host2


or

# prlctl stop vm-host2

Or copy the actual directory containig the Virtozzo VM (use the correct ID)
 

# cp -rpf /vz/vmprivate/76e8a5f8-caa8-5442-830e-aa4bfe8d42d9 /vz/vmprivate/76e8a5f8-caa8-5442-830e-aa4bfe8d42d9-bak
## tar -czvf vm-host2.tar.gz /vz/vmprivate/76e8a5f8-caa8-4442-830e-aa5bfe8d42d9

# prctl start vm-host2


11. Do yum update vm-host2
 

# cat /etc/redhat-release  > /root/logs/redhat-release-vorher-$(hostname)-$(date '+%Y-%m-%d_%H-%M-%S').out
# cat /etc/grub.d/30_os-prober > /root/logs/grub2-efi-vorher-$(hostname)-$(date '+%Y-%m-%d_%H-%M-%S').out


Clear only if needed

# yum versionlock clear
# yum versionlock list
# yum clean all |tee /root/logs/yumcleanall-$(hostname)-$(date '+%Y-%m-%d_%H-%M-%S').out


Do the rpm upgrade

# yum check-update |tee /root/logs/yumcheckupdate-$(hostname)-$(date '+%Y-%m-%d_%H-%M-%S').out
# yum check-update | wc -l
# yum update |tee /root/logs/yumupdate-$(hostname)-$(date '+%Y-%m-%d_%H-%M-%S').out
# sh /root/status |tee /root/logs/status-before-$(hostname)-$(date '+%Y-%m-%d_%H-%M-%S').out


12. Check if everything is running fine after upgrade
 

Reboot VM
 

# shutdown -r now


13. Do yum update hypervisor-host2


# cat /etc/redhat-release  > /root/logs/redhat-release-vorher-$(hostname)-$(date '+%Y-%m-%d_%H-%M-%S').out
# cat /etc/grub.d/30_os-prober > /root/logs/grub2-efi-vorher-$(hostname)-$(date '+%Y-%m-%d_%H-%M-%S').out

Clear lock   if needed

# yum versionlock clear
# yum versionlock list
# yum clean all |tee /root/logs/yumcleanall-$(hostname)-$(date '+%Y-%m-%d_%H-%M-%S').out


Update rpms
 

# yum check-update |tee /root/logs/yumcheckupdate-$(hostname)-$(date '+%Y-%m-%d_%H-%M-%S').out 2>&1
# yum check-update | wc -l
# yum update |tee /root/logs/yumupdate-$(hostname)-$(date '+%Y-%m-%d_%H-%M-%S').out 2>&1
# sh /root/status |tee /root/logs/status-before-$(hostname)-$(date '+%Y-%m-%d_%H-%M-%S').out


14. Stop VM vm-host1 & backup


Some as ealier
 

# prlctl backup vm-host1

or
 

# prlctl stop vm-host1

# cp -rpf /vz/vmprivate/74a7bbe8-9245-4385-ac0d-d10299100789 /vz/vmprivate/74a7bbe8-9245-4385-ac0d-d10299100789-bak
# tar -czvf vm-host1.tar.gz /vz/vmprivate/74a7bbe8-9245-4385-ac0d-d10299100789

# prctl start vm-host1


15. Do yum update vm-host2
 

# cat /etc/redhat-release  > /root/logs/redhat-release-vorher-$(hostname)-$(date '+%Y-%m-%d_%H-%M-%S').out
# cat /etc/grub.d/30_os-prober > /root/logs/grub2-efi-vorher-$(hostname)-$(date '+%Y-%m-%d_%H-%M-%S').out
# yum versionlock clear == if needed!!
# yum versionlock list
# yum clean all |tee /root/logs/yumcleanall-$(hostname)-$(date '+%Y-%m-%d_%H-%M-%S').out
# yum check-update |tee /root/logs/yumcheckupdate-$(hostname)-$(date '+%Y-%m-%d_%H-%M-%S').out
# yum check-update | wc -l
# yum update |tee /root/logs/yumupdate-$(hostname)-$(date '+%Y-%m-%d_%H-%M-%S').out
# sh /root/status |tee /root/logs/status-before-$(hostname)-$(date '+%Y-%m-%d_%H-%M-%S').out


16. Check if everything is running fine after upgrade

+ Reboot VM

# shutdown -r now


17. Do yum update hypervisor-host1

Same procedure for HV host 1 

# cat /etc/redhat-release  > /root/logs/redhat-release-vorher-$(hostname)-$(date '+%Y-%m-%d_%H-%M-%S').out
# cat /etc/grub.d/30_os-prober > /root/logs/grub2-efi-vorher-$(hostname)-$(date '+%Y-%m-%d_%H-%M-%S').out

Clear lock
 

# yum versionlock clear
# yum versionlock list
# yum clean all |tee /root/logs/yumcleanall-$(hostname)-$(date '+%Y-%m-%d_%H-%M-%S').out

# yum check-update |tee /root/logs/yumcheckupdate-$(hostname)-$(date '+%Y-%m-%d_%H-%M-%S').out
# yum check-update | wc -l
# yum update |tee /root/logs/yumupdate-$(hostname)-$(date '+%Y-%m-%d_%H-%M-%S').out
# sh /root/status |tee /root/logs/status-before-$(hostname)-$(date '+%Y-%m-%d_%H-%M-%S').out


18. Check if everything is running fine after upgrade

Reboot VM
 

# shutdown -r now


Check hypervisor-host1 all VMs run as expected 


19. Check if everything is running fine after upgrade

Reboot VM
 

# shutdown -r now


Check hypervisor-host2 all VMs run as expected afterwards


20. Check once more VMs and haproxy or any other contained services in VMs run as expected

Login to hosts and check processes and logs for errors etc.
 

21. Haproxy Unstandby virt-mach-centos1

Assuming that the virt-mach-centos1 and virt-mach-centos2 are running a Haproxy / corosync cluster you can try to standby node1 and check the result
hopefully all should be fine and traffic should come to host node2.

[root@virt-mach-centos1 ~]# pcs cluster unstandby virt-mach-centos1


Monitor logs and make sure HAproxy works fine on virt-mach-centos1


22. If necessery to redefine VMs (in case they disappear from virsh) or virtuosso is not working

[root@virt-mach-centos1 ]# virsh define /root/virt-mach-centos1_config_bak.xml
[root@virt-mach-centos1 ]# virsh define /root/virt-mach-centos2_config_bak.xml


23. Set versionlock to RPMs to prevent accident updates and check OS version release

[root@virt-mach-centos2 ]# yum versionlock \*
[root@virt-mach-centos1 ]# yum versionlock \*
[root@hypervisor-host1 ~]# yum versionlock \*
[root@hypervisor-host2 ~]# yum versionlock \*

[root@hypervisor-host2 ~]# cat /etc/redhat-release 
CentOS Linux release 7.8.2003 (Core)

Other useful hints

[root@hypervisor-host1 ~]# virsh console dc37c201-08c9-489d-aa20-9386d63ce3f3
Connected to domain virt-mach-centos1
..

! Compare packages count before the upgrade on each of the supposable identical VMs and HVs – if there is difference in package count review what kind of packages are different and try to make the machines to look as identical as possible  !

Packages to update on hypervisor-host1 Count: XXX
Packages to update on hypervisor-host2 Count: XXX
Packages to update virt-mach-centos1 Count: – 254
Packages to update virt-mach-centos2 Count: – 249

The /root/status script

+++

#!/bin/sh
echo  '=======================================================   '
echo  '= Systemctl list-unit-files –type=service | grep enabled '
echo  '=======================================================   '
systemctl list-unit-files –type=service | grep enabled

echo  '=======================================================   '
echo  '= systemctl | grep ".service" | grep "running"            '
echo  '=======================================================   '
systemctl | grep ".service" | grep "running"

echo  '=======================================================   '
echo  '= chkconfig –list                                        '
echo  '=======================================================   '
chkconfig –list

echo  '=======================================================   '
echo  '= netstat -tulpn                                          '
echo  '=======================================================   '
netstat -tulpn

echo  '=======================================================   '
echo  '= netstat -r                                              '
echo  '=======================================================   '
netstat -r


+++

That's all folks, once going through the article, after some 2 hours of efforts or so you should have an up2date machines.
Any problems faced or feedback is mostly welcome as this might help others who have the same setup.

Thanks for reading me 🙂

Adding proxy to yum repository on Redhat / Fedora / CentOS and other RPM based Linux distributions, Listing and enabling new RPM repositories

Tuesday, September 7th, 2021

yum-add-proxy-host-for-redhat-linux-centos-list-rpm-repositories-enable-disable-repositories

Sometimes if you work in a company that is following PCI standards with very tight security you might need to use a custom company prepared RPM repositories that are accessible only via a specific custom maintained repositories or alternatively you might need the proxy node  to access an external internet repository from the DMZ-ed firewalled zone where the servers lays .
Hence to still be able to maintain the RPM based servers up2date to the latest security patches and install software with yumone very useful feature of yum package manager is to use a proxy host through which you will reach your Redhat Package Manager files  files.

1. The http_proxy and https_proxy shell variables 

To set  a proxy host you need to define there the IP / Hostname or the Fully Qualified Domain Name (FQDN).

By default "http_proxy and https_proxy are empty. As you can guess https_proxy is used if you have a Secure Socket Layer (SSL) certificate for encrypting the communication channel (e.g. you have https:// URL).

[root@rhel: ~]# echo $http_proxy
[root@rhel: ~]#

2. Setting passwordless or password protected proxy host via http_proxy, https_proxy variables

There is a one time very straight forward to configure proxying of traffic via a specific remote configured server with server bourne again  shell (BASH)'s understood variables:
 

a.) Set password free open proxy to shell environment.

[root@centos: ~]# export https_proxy="https://remote-proxy-server:8080"


Now use yum as usual to update the available installabe package list or simply upgrade to the latest packages with lets say:

[root@rhel: ~]# yum check-update && yum update

b.) Configuring password protected proxy for yum

If your proxy is password protected for even tigher security you can provide the password on the command line as well.

[root@centos: ~]# export http_proxy="http://username:pAssW0rd@server:port/"

Note that if you have some special characters you will have to pass the string inside single quotes or escape them to make sure the password will properly handled to server, before trying out the proxy with yum, echo the variable.

[root@centos: ~]# export http_proxy='http://username:p@s#w:E@192.168.0.1:3128/'
  [root@centos: ~]# echo $http_proxy
http://username:p@s#w:E@server:port/

Then do whatever with yum:

[root@centos: ~]# yum check-update && yum search sharutils


If something is wrong and proxy is not properly connected try to reach for the repository manually with curl or wget

[root@centos: ~]# curl -ilk http://download.fedoraproject.org/pub/epel/7/SRPMS/ /epel/7/SRPMS/
HTTP/1.1 302 Found
Date: Tue, 07 Sep 2021 16:49:59 GMT
Server: Apache
X-Frame-Options: SAMEORIGIN
X-Xss-Protection: 1; mode=block
X-Content-Type-Options: nosniff
Referrer-Policy: same-origin
Location: http://mirror.telepoint.bg/epel/7/SRPMS/
Content-Type: text/plain
Content-Length: 0
AppTime: D=2264
X-Fedora-ProxyServer: proxy01.iad2.fedoraproject.org
X-Fedora-RequestID: YTeYOE3mQPHH_rxD0sdlGAAAA80
X-Cache: MISS from pcfreak
X-Cache-Lookup: MISS from pcfreak:3128
Via: 1.1 pcfreak (squid/4.6)
Connection: keep-alive


Or if you need, you can test the user, password protected proxy with wget as so:

[root@centos: ~]# wget –proxy-user=USERNAME –proxy-password=PASSWORD http://your-proxy-domain.com/optional-rpms/


If you have lynx installed on the machine you can do the remote proxy successful authentication check with it with less typing:

[root@centos: ~]# lynx -pauth=USER:PASSWORD http://proxy-domain.com/optional-rpm/


3. Making yum proxy connection permanent via /etc/yum.conf


Perhaps the easiest and quickest way to add the http_proxy / https_proxy configured is to store it to automatically load on each server ssh login in your admin user (root) in /root/.bashrc or /root/.bash_profile or in the global /etc/profile or /etc/profile.d/custom.sh etc.

However if you don't want to have hacks and have more cleanness on the systems, the recommended "Redhat way" so to say is to store the configuration inside /etc/yum.conf

To do it via /etc/yum.conf you have to have some records there like:

# The proxy server – proxy server:port number 
proxy=http://mycache.mydomain.com:3128 
# The account details for yum connections 
proxy_username=yum-user 
proxy_password=qwerty-secret-pass

4. Listing RPM repositories and their state

As I had to install sharutils RPM package to the server which contains the file /bin/uuencode (that is provided on CentOS 7.9 Linux from Repo: base/7/x86_64 I had to check whether the repository was installed on the server.

To get a list of all yum repositories avaiable 

[root@centos:/etc/yum.repos.d]# yum repolist all
Loaded plugins: fastestmirror
Loading mirror speeds from cached hostfile
 * base: centos.telecoms.bg
 * epel: mirrors.netix.net
 * extras: centos.telecoms.bg
 * remi: mirrors.netix.net
 * remi-php74: mirrors.netix.net
 * remi-safe: mirrors.netix.net
 * updates: centos.telecoms.bg
repo id                                repo name                                                                         status
base/7/x86_64                          CentOS-7 – Base                                                                   enabled: 10,072
base-debuginfo/x86_64                  CentOS-7 – Debuginfo                                                              disabled
base-source/7                          CentOS-7 – Base Sources                                                           disabled
c7-media                               CentOS-7 – Media                                                                  disabled
centos-kernel/7/x86_64                 CentOS LTS Kernels for x86_64                                                     disabled
centos-kernel-experimental/7/x86_64    CentOS Experimental Kernels for x86_64                                            disabled
centosplus/7/x86_64                    CentOS-7 – Plus                                                                   disabled
centosplus-source/7                    CentOS-7 – Plus Sources                                                           disabled
cr/7/x86_64                            CentOS-7 – cr                                                                     disabled
epel/x86_64                            Extra Packages for Enterprise Linux 7 – x86_64                                    enabled: 13,667
epel-debuginfo/x86_64                  Extra Packages for Enterprise Linux 7 – x86_64 – Debug                            disabled
epel-source/x86_64                     Extra Packages for Enterprise Linux 7 – x86_64 – Source                           disabled
epel-testing/x86_64                    Extra Packages for Enterprise Linux 7 – Testing – x86_64                          disabled
epel-testing-debuginfo/x86_64          Extra Packages for Enterprise Linux 7 – Testing – x86_64 – Debug                  disabled
epel-testing-source/x86_64             Extra Packages for Enterprise Linux 7 – Testing – x86_64 – Source                 disabled
extras/7/x86_64                        CentOS-7 – Extras                                                                 enabled:    500
extras-source/7                        CentOS-7 – Extras Sources                                                         disabled
fasttrack/7/x86_64                     CentOS-7 – fasttrack                                                              disabled
remi                                   Remi's RPM repository for Enterprise Linux 7 – x86_64                             enabled:  7,229
remi-debuginfo/x86_64                  Remi's RPM repository for Enterprise Linux 7 – x86_64 – debuginfo                 disabled
remi-glpi91                            Remi's GLPI 9.1 RPM repository for Enterprise Linux 7 – x86_64                    disabled
remi-glpi92                            Remi's GLPI 9.2 RPM repository for Enterprise Linux 7 – x86_64                    disabled
remi-glpi93                            Remi's GLPI 9.3 RPM repository for Enterprise Linux 7 – x86_64                    disabled
remi-glpi94                            Remi's GLPI 9.4 RPM repository for Enterprise Linux 7 – x86_64                    disabled
remi-modular                           Remi's Modular repository for Enterprise Linux 7 – x86_64                         disabled
remi-modular-test                      Remi's Modular testing repository for Enterprise Linux 7 – x86_64                 disabled
remi-php54                             Remi's PHP 5.4 RPM repository for Enterprise Linux 7 – x86_64                     disabled
remi-php55                             Remi's PHP 5.5 RPM repository for Enterprise Linux 7 – x86_64                     disabled
remi-php55-debuginfo/x86_64            Remi's PHP 5.5 RPM repository for Enterprise Linux 7 – x86_64 – debuginfo         disabled
!remi-php56                            Remi's PHP 5.6 RPM repository for Enterprise Linux 7 – x86_64                     disabled
remi-php56-debuginfo/x86_64            Remi's PHP 5.6 RPM repository for Enterprise Linux 7 – x86_64 – debuginfo         disabled
remi-php70                             Remi's PHP 7.0 RPM repository for Enterprise Linux 7 – x86_64                     disabled
remi-php70-debuginfo/x86_64            Remi's PHP 7.0 RPM repository for Enterprise Linux 7 – x86_64 – debuginfo         disabled
remi-php70-test                        Remi's PHP 7.0 test RPM repository for Enterprise Linux 7 – x86_64                disabled
remi-php70-test-debuginfo/x86_64       Remi's PHP 7.0 test RPM repository for Enterprise Linux 7 – x86_64 – debuginfo    disabled
remi-php71                             Remi's PHP 7.1 RPM repository for Enterprise Linux 7 – x86_64                     disabled
remi-php71-debuginfo/x86_64            Remi's PHP 7.1 RPM repository for Enterprise Linux 7 – x86_64 – debuginfo         disabled
remi-php71-test                        Remi's PHP 7.1 test RPM repository for Enterprise Linux 7 – x86_64                disabled
remi-php71-test-debuginfo/x86_64       Remi's PHP 7.1 test RPM repository for Enterprise Linux 7 – x86_64 – debuginfo    disabled
!remi-php72                            Remi's PHP 7.2 RPM repository for Enterprise Linux 7 – x86_64                     disabled
remi-php72-debuginfo/x86_64            Remi's PHP 7.2 RPM repository for Enterprise Linux 7 – x86_64 – debuginfo         disabled
remi-php72-test                        Remi's PHP 7.2 test RPM repository for Enterprise Linux 7 – x86_64                disabled
remi-php72-test-debuginfo/x86_64       Remi's PHP 7.2 test RPM repository for Enterprise Linux 7 – x86_64 – debuginfo    disabled
remi-php73                             Remi's PHP 7.3 RPM repository for Enterprise Linux 7 – x86_64                     disabled
remi-php73-debuginfo/x86_64            Remi's PHP 7.3 RPM repository for Enterprise Linux 7 – x86_64 – debuginfo         disabled
remi-php73-test                        Remi's PHP 7.3 test RPM repository for Enterprise Linux 7 – x86_64                disabled
remi-php73-test-debuginfo/x86_64       Remi's PHP 7.3 test RPM repository for Enterprise Linux 7 – x86_64 – debuginfo    disabled
remi-php74                             Remi's PHP 7.4 RPM repository for Enterprise Linux 7 – x86_64                     enabled:    423
remi-php74-debuginfo/x86_64            Remi's PHP 7.4 RPM repository for Enterprise Linux 7 – x86_64 – debuginfo         disabled
remi-php74-test                        Remi's PHP 7.4 test RPM repository for Enterprise Linux 7 – x86_64                disabled
remi-php74-test-debuginfo/x86_64       Remi's PHP 7.4 test RPM repository for Enterprise Linux 7 – x86_64 – debuginfo    disabled
remi-php80                             Remi's PHP 8.0 RPM repository for Enterprise Linux 7 – x86_64                     disabled
remi-php80-debuginfo/x86_64            Remi's PHP 8.0 RPM repository for Enterprise Linux 7 – x86_64 – debuginfo         disabled
remi-php80-test                        Remi's PHP 8.0 test RPM repository for Enterprise Linux 7 – x86_64                disabled
remi-php80-test-debuginfo/x86_64       Remi's PHP 8.0 test RPM repository for Enterprise Linux 7 – x86_64 – debuginfo    disabled
remi-safe                              Safe Remi's RPM repository for Enterprise Linux 7 – x86_64                        enabled:  4,549
remi-safe-debuginfo/x86_64             Remi's RPM repository for Enterprise Linux 7 – x86_64 – debuginfo                 disabled
remi-test                              Remi's test RPM repository for Enterprise Linux 7 – x86_64                        disabled
remi-test-debuginfo/x86_64             Remi's test RPM repository for Enterprise Linux 7 – x86_64 – debuginfo            disabled
updates/7/x86_64                       CentOS-7 – Updates                                                                enabled:  2,741
updates-source/7                       CentOS-7 – Updates Sources                                                        disabled
zabbix/x86_64                          Zabbix Official Repository – x86_64                                               enabled:    178
zabbix-debuginfo/x86_64                Zabbix Official Repository debuginfo – x86_64                                     disabled
zabbix-frontend/x86_64                 Zabbix Official Repository frontend – x86_64                                      disabled
zabbix-non-supported/x86_64            Zabbix Official Repository non-supported – x86_64                                 enabled:      5
repolist: 39,364

[root@centos:/etc/yum.repos.d]# yum repolist all|grep -i 'base/7/x86_64'
base/7/x86_64                       CentOS-7 – Base              enabled: 10,072


As you can see in CentOS 7 sharutils is enabled from default repositories, however this is not the case on Redhat 7.9, hence to install sharutils there you can one time enable RPM repository to install sharutils 

[root@centos:/etc/yum.repos.d]# yum –enablerepo=rhel-7-server-optional-rpms install sharutils

To install zabbix-agent on the same Redhat server, without caring that I need precisely  know the RPM repository that is providing zabbix agent that in that was (Repo: 3party/7Server/x86_64)  I had to:

[root@centos:/etc/yum.repos.d]# yum –enablerepo \* install zabbix-agent zabbix-sender


Permanently enabling repositories of course is possible via editting or creating fresh new file configuration manually on CentOS / Fedora under directory /etc/yum.repos.d/
On Redhat Enterprise Linux  servers it is easier to use the subscription-manager command instead, like this:
 

[root@rhel:/root]# subscription-manager repos –disable=epel/7Server/x86_64

[root@rhel:/root]# subscription-manager repos –enable=rhel-6-server-optional-rpms

Create simple proxy http server with netcat ( nc ) based tiny shell script

Tuesday, January 26th, 2021

use-Netcat_proxy-picture

The need of proxy server is inevitable nowadays especially if you have servers located in a paranoid security environments. Where virtually all is being passed through some kind of a proxy server. In my work we have recently started a  CentOS Linux release 7.9.2009 on HP Proliant DL360e Gen8 (host named rhel-testing).

HP DL360e are quite old nowadays but since we have spare servers and we can refurnish them to use as a local testing internal server Hypervisor it is okay for us. The machine is attached to a Rack that is connected to a Secured Deimilitarized Zone LAN (DMZ Network) which is so much filtered that even simple access to the local company homebrew RPM repository is not accessible from the machine.
Thus to set and remove software from the machine we needed a way to make yum repositories be available, and it seems the only way was to use a proxy server (situated on another accessible server which we use as a jump host to access the testing machine).

Since opening additional firewall request was a time consuming non-sense and the machine is just for testing purposes, we had to come with a solution where we can somehow access a Local repository RPM storage server http://rpm-package-server-repo.com/ for which we have a separate /etc/yum.repos.d/custom-rpms.repo definition file created.

This is why we needed a simplistic way to run a proxy but as we did not have the easy way to install privoxy / squid / haproxy or apache webserver configured as a proxy (to install one of those of relatively giant piece of software need to copy many rpm packages and manually satisfy dependencies), we looked for a simplistic way to run a proxy server on jump-host machine host A.

A note to make here is jump-host that was about to serve as a proxy  had already HTTP access towards the RPM repositories http://rpm-package-server-repo.com and could normally fetch packages with curl or wget via it …

For to create a simple proxy server out of nothing, I've googled a bit thinking that it should be possible either with BASH's TCP/IP capabilities or some other small C written tool compiled as a static binary, just to find out that netcat swiss army knife as a proxy server bash script is capable of doing the trick.

Jump host machine which was about to be used as a proxy server for http traffic did not have enabled access to tcp/port 8888 (port's firewall policies were prohibiting access to it).Since 8888 was the port targetted to run the proxy to allow TCP/IP port 8888 accessibility from the testing RHEL machine towards jump host, we had to issue first on jump host:

[root@jump-host: ~ ]# firewall-cmd –permanent –zone=public –add-port=8888/tcp

To run the script once placed under /root/tcp-proxy.sh on jump-host we had to run a never ending loop in a GNU screen session to make sure it runs forever:

Original tcp-proxy.sh script used taken from above article is:
 

#!/bin/sh -e


if [ $# != 3 ]
then
    echo "usage: $0 <src-port> <dst-host> <dst-port>"
    exit 0
fi

TMP=`mktemp -d`
BACK=$TMP/pipe.back
SENT=$TMP/pipe.sent
RCVD=$TMP/pipe.rcvd
trap 'rm -rf "$TMP"' EXIT
mkfifo -m 0600 "$BACK" "$SENT" "$RCVD"
sed 's/^/ => /' <"$SENT" &
sed 's/^/<=  /' <"$RCVD" &
nc -l -p "$1" <"$BACK" | tee "$SENT" | nc "$2" "$3" | tee "$RCVD" >"$BACK"


Above tcp-proxy.sh script you can download here.

I've tested the script one time and it worked, the script syntax is:

 [root@jump-host: ~ ]#  sh tcp-proxy.sh
usage: tcp-proxy.sh <src-port> <dst-host> <dst-port>


To make it work for one time connection I've run it as so:


 [root@jump-host: ~ ]# sh tcp-proxy.sh 8888 rpm-package-server-repo.com 80


To make the script work all the time I had to use one small one liner infinite bash loop which goes like this:

[root@jump-host: ~ ]#  while [ 1 ]; do sh tcp-proxy.sh 8888 rpm-package-server-repo.com 80; done​

On rhel-testing we had to configure for yum and all applications to use a proxy temporary via
 

[root@rhel-tresting: ~ ]# export http_proxy=jump-host_machine_accessibleIP:8888


And then use the normal yum check-update && yum update to apply to rhel-testing machine latest RPM package security updates.

The nice stuff about the tcp-proxy.sh with netcat in a inifite loop is you will see the binary copy of traffic flowing on the script which will make you feel like in those notorious Hackers movies ! 🙂

The stupid stuff is that sometimes some connections and RPM database updates or RPMs could be cancelled due to some kind of network issues.

To make the connection issues that are occuring to the improvised proxy server go away we finally used a slightly modified version from the original netcat script, which read like this.
 

#!/bin/sh -e


if [ $# != 3 ]
then
    echo "usage: $0 <src-port> <dst-host> <dst-port>"
        exit 0
        fi

        TMP=`mktemp -d`
        BACK=$TMP/pipe.back
        SENT=$TMP/pipe.sent
        RCVD=$TMP/pipe.rcvd
        trap 'rm -rf "$TMP"' EXIT
        mkfifo -m 0600 "$BACK" "$SENT" "$RCVD"
        sed 's/^/ => /' <"$SENT" &
        sed 's/^/<=  /' <"$RCVD" &
        nc –proxy-type http -l -p "$1" <"$BACK" | tee "$SENT" | nc "$2" "$3" | tee "$RCVD" >"$BACK"


Modified version tcp-proxy1.sh with –proxy-type http argument passed to netcat script u can download here.

With –proxy-type http yum check-update works normal just like with any normal fully functional http_proxy configured.

Next step wasto make the configuration permanent you can either add to /root/.bashrc or /etc/bashrc (if you need the setting to be system wide for every user that logged in to Linux system).

[root@rhel-tresting: ~ ]#  echo "http_proxy=http://jump-host_machine_accessibleIP:8888/" > /etc/environment


If you need to set the new built netcat TCP proxy only for yum package update tool include proxy only in /etc/yum.conf:

[root@rhel-tresting: ~ ]# vi /etc/yum.conf
proxy=http_proxy=http://jump-host_machine_accessibleIP:8888/


That's all now you have a proxy out of nothing with just a simple netcat enjoy.

Howto Upgrade IBM Spectrum Protect Backup Client TSM 7.X to 8.1.8, Update Tivoli 8.1.8 to 8.1.11 on CentOS and Redhat Linux

Thursday, December 3rd, 2020


IBM-spectrum-protect-backup-logo-tivoli-tsm-logo

Having another day of a system administrator boredom, we had a task to upgrade some Tivoli TSM Backup clients running on a 20+ machines powered by CentOS and RHEL Linux to prepare the systems to be on the latest patched IBM Spectrum Backup client version available from IBM. For the task of patching I've used a central server where, I've initially downloaded the provided TSM client binaries archives. From this machine, we have copied TivSM*.tar to each and every system that needs to be patched and then patched. The task is not too complex as the running TSM in the machines are all at the same version and all running a recent patched version of Linux. Hence to make sure all works as expected we have tested TSM is upgraded from 7.X.X to 8.X.X on one machine and then test 8.1.8 to 8.1.11 upgrade on another one. Once having confirmed that Backups works as expected after upgrade. We have proceeded to do it massively on each of the rest 20+ hosts.
Below article's goal is to help some lazy sysadmin with the task to prepare an TSM Backup upgrade procedure to standartize TSM Upgrade, which as many of the IBM's softwares is very specific and its upgrade requires, a bit of manual work and extra cautious as there seems to be no easy way (or at least I don't know it), to do the upgrade by simply adding an RPM repository and doing, something like yum install tivsm*.


0. Check if there is at least 2G free of space

According to documentation the minimum space you need to a functional install without having it half installed or filling up your filesystem is 2 Gigabytes of Free Memory on a filesystem where the .tar and rpms will be living.

Thus check what is the situation with your filesystem where you wills store the .tar archice and extract .RPM files / install the RPM files.

# df -h

1. Download the correct tarball with 8.1 Client

On one central machine you would need to download the Tivoli you can do that via wget / curl / lynx whatever is at hand on the Linux server.

As of time of writting this article TSM's 8.1.11 location is at
URL:

http://public.dhe.ibm.com/storage/tivoli-storage-management/maintenance/client/v8r1/Linux/LinuxX86/BA/v8111/

I've made a local download mirror of Tivoli TSM 8.1.11 here.
In case you need to install IBM Spectrum Backup Client to a PCI secured environment to a DMZ-ed LAN network from a work PC you can Download it first from your local PC and via Citrix client upload program or WinSCP upload it to a central replication host from where you will later copy to each of the other server nodes that needs to be upgraded.

Lets Copy archive to all Server hosts where you want it later installed, using a small hack

Assuming you already have an Excel document or a Plain text document with all the IPs of the affected hosts where you will need to get TSM upgraded. Extract this data and from it create a plain text file /home/user/hosts.txt containing all the machine IPs lined up separated with carriage return separations (\n), so you can loop over each one and use scp to send the files.

– Replicate Tivoli tar to all machine hosts where you want to get IBM Spectrum installed or upgraded.
Do it with a loop like this:

# for i in $(cat hosts.txt); do scp 8.1.11.0-TIV-TSMBAC-LinuxX86.tar user@$i:/home/user/; done

 Copy to a Copy buffer temporary your server password assuming all your passwords to each machine are identical and paste your login user pass for each host to initiate transfer
 

2. SSH to each of the Machine hosts IPs

Once you login to the host you want to upgrade
Go to your user $HOME /home/user and create files where we'll temporary store Tivoli archive files and extract RPMs

[root@linux-server user]# mkdir -p ~/tsm/TSM_BCK/
[root@linux-server user]# mv 8.1.11.0-TIV-TSMBAC-LinuxX86.tar ~/tsm
[root@linux-server user]# cd tsm
[root@linux-server user]# tar -xvvf 8.1.11.0-TIV-TSMBAC-LinuxX86.tar
gskcrypt64-8.0.55.17.linux.x86_64.rpm
GSKit.pub.pgp
gskssl64-8.0.55.17.linux.x86_64.rpm
README_api.htm
README.htm
RPM-GPG-KEY-ibmpkg
TIVsm-API64.x86_64.rpm
TIVsm-APIcit.x86_64.rpm
TIVsm-BAcit.x86_64.rpm
TIVsm-BAhdw.x86_64.rpm
TIVsm-BA.x86_64.rpm
TIVsm-filepath-source.tar.gz
TIVsm-JBB.x86_64.rpm
TIVsm-WEBGUI.x86_64.rpm
update.txt

3. Create backup of old backup files

It is always a good idea to keep old backup files

[root@linux-server tsm]# cp -av /opt/tivoli/tsm/client/ba/bin/dsm.opt ~/tsm/TSM_BCK/dsm.opt_bak_$(date +'%Y_%M_%H')
[root@linux-server tsm]# cp -av /opt/tivoli/tsm/client/ba/bin/dsm.sys ~/tsm/TSM_BCK/dsm.sys_bak_$(date +'%Y_%M_%H')

[root@linux-server tsm]# [[ -f /etc/adsm/TSM.PWD ]] && cp -av /etc/adsm/TSM.PWD ~/TSM_BCK/ || echo 'file doesnt exist'

/etc/adsm/TSM.PWD this file is only there as legacy for TSM it contained encrypted passwords inver 7 for updates. In TSM v.8 encryption file is not there as new mechanism for sensitive data was introduced.
Be aware that from Tivoli 8.X it will return error
exist'

!! Note – if dsm.opt , dsm.sys files are on different locations – please use correct full path locations !!

4. Stop  dsmcad – TSM Service daemon

[root@linux-server tsm]# systemctl stop dsmcad

5. Locate and deinstall all old Clients

Depending on the version to upgrade if you're upgrading from TSM version 7 to 8, you will get output like.

[root@linux-server tsm]# rpm -qa | grep 'TIVsm-'
TIVsm-BA-7.1.6-2.x86_64
TIVsm-API64-7.1.6-2.x86_64

If you're one of this paranoid admins you can remove TIVsm packs  one by one.

[root@linux-server tsm]# rpm -e TIVsm-BA-7.1.6-2.x86_64
[root@linux-server tsm]# rpm -e TIVsm-API64-7.1.6-2.x86_64

Instead if upgrading from version 8.1.8 to 8.1.11 due to the Security CVE advisory recently published by IBM e.g. (IBM Runtime Vulnerability affects IBM Spectrum Backup archive Client) and  vulnerability in Apache Commons Log4J affecting IBM Spectrum Protect Backup Archive Client.

[root@linux-server tsm]# rpm -qa | grep 'TIVsm-'
TIVsm-API64-8.1.8-0.x86_64
TIVsm-BA-8.1.8-0.x86_64

Assuming you're not scared of a bit automation you can straight do it with below one liner too 🙂

# rpm -e $(rpm -qa | grep TIVsm)

[root@linux-server tsm]# rpm -qa | grep gsk
[root@linux-server tsm]# rpm -e gskcrypt64 gskssl64

6. Check uninstallation success:

[root@linux-server tsm]# rpm -qa | grep TIVsm
[root@linux-server tsm]# rpm -qa | grep gsk

Here you should an Empty output, if packages are not on the system, e.g. Empty output is good output ! 🙂

7. Install new client IBM Spectrum Client (Tivoli Storage Manager) and lib dependencies

[root@linux-server tsm]# rpm -ivh gskcrypt64-8.0.55.4.linux.x86_64.rpm
[root@linux-server tsm]# rpm -ivh gskssl64-8.0.55.4.linux.x86_64.rpm

 If you're lazy to type you can do as well

[root@linux-server tsm]# rpm -Uvh gsk*

Next step is to install main Tivoli SM components the the API files and BA (The Backup Archive Client)

[root@linux-server tsm]# rpm -ivh TIVsm-API64.x86_64.rpm
[root@linux-server tsm]# rpm -ivh TIVsm-BA.x86_64.rpm

If you have to do it on multiple servers and you do it manually following a guide like this, you might instead want to install them with one liner.

[root@linux-server tsm]# rpm -ivh TIVsm-API64.x86_64.rpm TIVsm-BA.x86_64.rpm

There are some Not mandatory "Common Inventory Technology" components (at some cases if you're using the API install it we did not need that), just for the sake if you need them on your servers due to backup architecture, install also below commented rpm files.

## rpm -ivh TIVsm-APIcit.x86_64.rpm

## rpm -ivh TIVsm-BAcit.x86_64.rpm

These packages not needed only for operation WebGUI TSM GUI management, (JBB) Journal Based Backup, BAhdw (the ONTAP library)


— TIVsm-WEBGUI.x86_64.rpm
— TIVsm-JBB.x86_64.rpm
— TIVsm-BAhdw.x86_64.rpm

8. Start and enable dsmcad service

[root@linux-server tsm]# systemctl stop dsmcad

You will get

##Warning: dsmcad.service changed on disk. Run 'systemctl daemon-reload' to reload units.

[root@linux-server tsm]# systemctl daemon-reload

[root@linux-server tsm]# systemctl start dsmcad


## enable dsmcad – it is disabled by default after install

[root@linux-server ~]# systemctl enable dsmcad

[root@linux-server tsm]# systemctl status dsmcad

9. Check dmscad service is really running

Once enabled IBM TSM will spawn a process in the bacground dmscad if it started properly you should have the process backgrounded.

[root@linux-server tsm]# ps -ef|grep -i dsm|grep -v grep
root      2881     1  0 18:05 ?        00:00:01 /usr/bin/dsmcad

If process is not there there might be some library or something not at place preventing the process to start …

10. Check DSMCAD /var/tsm logs for errors

After having dsmcad process enabled and running in background

[root@linux-server tsm]# grep -i Version /var/tsm/sched.log|tail -1
12/03/2020 18:06:29   Server Version 8, Release 1, Level 10.000


[root@linux-server tsm]# cat /var/tsm/dsmerror.log

To see the current TSM configuration files we can  grep out comments *

[root@linux-server tsm]# grep -v '*' /opt/tivoli/tsm/client/ba/bin/dsm.sys

Example Configuration of the agent:
—————————————————-
   *TSM SERVER NODE Location
   Servername           tsm_server
   COMMmethod           TCPip
   TCPPort              1400
   TCPServeraddress     tsmserver2.backuphost.com
   NodeName             NODE.SERVER-TO-BACKUP-HOSTNAME.COM
   Passwordaccess       generate
   SCHEDLOGNAME         /var/tsm/sched.log
   SCHEDLOGRETENTION    21 D
   SCHEDMODE            POLLING
   MANAGEDServices      schedule
   ERRORLOGNAME         /var/tsm/dsmerror.log
   ERRORLOGRETENTION    30 D
   INCLEXCL             /opt/tivoli/tsm/client/ba/bin/inclexcl.tsm

11. Remove tsm install directory tar ball and rpms to save space on system

The current version of Tivoli service manager is 586 Megabytes.

[root@linux-server tsm]# du -hsc 8.1.11.0-TIV-TSMBAC-LinuxX86.tar
586M    8.1.11.0-TIV-TSMBAC-LinuxX86.tar

Some systems are on purpose configured to have less space under their /home directory,
hence it is a good idea to clear up unnecessery files after completion.

Lets get rid of all the IBM Spectrum archive source files and the rest of RPMs used for installation.

[root@linux-server tsm]# rm -rf ~/tsm/{*.tar,*.rpm,*.gpg,*.htm,*.txt}

12. Check backups are really created on the configured remote Central backup server

To make sure after the upgrade the backups are continuously created and properly stored on the IBM Tivoly remote central backup server, either manually initiate a backup or wait for lets say a day and run dsmc client to show all created backups from previous day. To make sure you'll not get empty output you can on purpose modify some file by simply opening it and writting over without chaning anything e.g. modify your ~/.bashrc or ~/.bash_profile

## List all backups for '/' root directory from -fromdate='DD/MM/YY'

[root@linux-server tsm]# dsmc
Protect>
IBM Spectrum Protect
Command Line Backup-Archive Client Interface
  Client Version 8, Release 1, Level 11.0
  Client date/time: 12/03/2020 18:14:03
(c) Copyright by IBM Corporation and other(s) 1990, 2020. All Rights Reserved.

Node Name: NODE.SERVER-TO-BACKUP-HOSTNAME.COM
Session established with server TSM2_SERVER: AIX
  Server Version 8, Release 1, Level 10.000
  Server date/time: 12/03/2020 18:14:04  Last access: 12/03/2020 18:06:29
 
Protect> query backup -subdir=yes "/" -fromdate=12/3/2020
           Size        Backup Date                Mgmt Class           A/I File
           —-        ———–                ———-           — —-
         6,776  B  12/03/2020 01:26:53             DEFAULT              A  /etc/freshclam.conf
         6,685  B  12/03/2020 01:26:53             DEFAULT              A  /etc/freshclam.conf-2020-12-02
         5,602  B  12/03/2020 01:26:53             DEFAULT              A  /etc/hosts
         5,506  B  12/03/2020 01:26:53             DEFAULT              A  /etc/hosts-2020-12-02
           398  B  12/03/2020 01:26:53             DEFAULT              A  /opt/tivoli/tsm/client/ba/bin/tsmstats.ini
       114,328  B  12/03/2020 01:26:53             DEFAULT              A  /root/.bash_history
           403  B  12/03/2020 01:26:53             DEFAULT              A  /root/.lesshst

Procedure Instructions to safe upgrade CentOS / RHEL Linux 7 Core to latest release

Thursday, February 13th, 2020

safe-upgrade-CentOS-and_Redhat_Enterprise_Linux_RHEL-7-to-latest-stable-release

Generally upgrading both RHEL and CentOS can be done straight with yum tool just we're pretty aware and mostly anyone could do the update, but it is good idea to do some
steps in advance to make backup of any old basic files that might help us to debug what is wrong in case if the Operating System fails to boot after the routine Machine OS restart
after the upgrade that is usually a good idea to make sure that machine is still bootable after the upgrade.

This procedure can be shortened or maybe extended depending on the needs of the custom case but the general framework should be useful anyways to someone that's why
I decided to post this.

Before you go lets prepare a small status script which we'll use to report status of  sysctl installed and enabled services as well as the netstat connections state and
configured IP addresses and routing on the system.

The script show_running_services_netstat_ips_route.sh to be used during our different upgrade stages:
 

# script status ###
echo "STARTED: $(date '+%Y-%m-%d_%H-%M-%S'):" | tee /root/logs/yumcheckupdate-$(hostname)-$(date '+%Y-%m-%d_%H-%M-%S').out
systemctl list-unit-files –type=service | grep enabled
systemctl | grep ".service" | grep "running"
netstat -tulpn
netstat -r
ip a s
/sbin/route -n
echo "ENDED $(date '+%Y-%m-%d_%H-%M-%S'):" | tee /root/logs/yumcheckupdate-$(hostname)-$(date '+%Y-%m-%d_%H-%M-%S').out
####


– Save the script in any file like /root/status.sh

– Make the /root/logs directoriy.
 

[root@redhat: ~ ]# mkdir /root/logs
[root@redhat: ~ ]# vim /root/status.sh
[root@redhat: ~ ]# chmod +x /root/status.sh


1. Get a dump of CentOS installed version release and grub-mkconfig generated os_probe


[root@redhat: ~ ]# cat /etc/redhat-release  > /root/logs/redhat-release-vorher-$(hostname)-$(date '+%Y-%m-%d_%H-%M-%S').out
[root@redhat: ~ ]# cat /etc/grub.d/30_os-prober > /root/logs/grub2-efi-vorher-$(hostname)-$(date '+%Y-%m-%d_%H-%M-%S').out


2. Clear old versionlock marked RPM packages (if there are such)


On servers maintained by multitude of system administrators just like the case is inside a Global Corporations and generally in the corporate world , where people do access the systems via LDAP and more than a single person
has superuser privileges. It is a good prevention measure to use yum package management  functionality to RPM based Linux distributions called  versionlock.
versionlock for those who hear it for a first time is locking the versions of the installed RPM packages so if someone by mistake or on purpose decides to do something like :

[root@redhat: ~ ]# yum install packageversion

Having the versionlock set will prevent the updated package to be installed with a different branch package version.

Also it will prevent a playful unknowing person who just wants to upgrade the system without any deep knowledge to be able to
run

[root@redhat: ~ ]# yum upgrade

update and leave the system in unbootable state, that will be only revealed during the next system reboot.

If you haven't used versionlock before and you want to use it you can do it with:

[root@redhat: ~ ]# yum install yum-plugin-versionlock

To add all the packages for compiling C code and all the interdependend packages, you can do something like:


[root@redhat: ~ ]# yum versionlock gcc-*

If you want to clear up the versionlock, once it is in use run:

[root@redhat: ~ ]#  yum versionlock clear
[root@redhat: ~ ]#  yum versionlock list


3.  Check RPC enabled / disabled


This step is not necessery but it is a good idea to check whether it running on the system, because sometimes after upgrade rpcbind gets automatically started after package upgrade and reboot. 
If we find it running we'll need to stop and mask the service.


# check if rpc enabled
[root@redhat: ~ ]# systemctl list-unit-files|grep -i rpc
var-lib-nfs-rpc_pipefs.mount                                      static
auth-rpcgss-module.service                                        static
rpc-gssd.service                                                  static
rpc-rquotad.service                                               disabled
rpc-statd-notify.service                                          static
rpc-statd.service                                                 static
rpcbind.service                                                   disabled
rpcgssd.service                                                   static
rpcidmapd.service                                                 static
rpcbind.socket                                                    disabled
rpc_pipefs.target                                                 static
rpcbind.target                                                    static

[root@redhat: ~ ]# systemctl status rpcbind.service
● rpcbind.service – RPC bind service
   Loaded: loaded (/usr/lib/systemd/system/rpcbind.service; disabled; vendor preset: enabled)
   Active: inactive (dead)


[root@redhat: ~ ]# systemctl status rpcbind.socket
● rpcbind.socket – RPCbind Server Activation Socket
   Loaded: loaded (/usr/lib/systemd/system/rpcbind.socket; disabled; vendor preset: enabled)
   Active: inactive (dead)
   Listen: /var/run/rpcbind.sock (Stream)
           0.0.0.0:111 (Stream)
           0.0.0.0:111 (Datagram)
           [::]:111 (Stream)
           [::]:111 (Datagram)


4. Check any previously existing downloaded / installed RPMs (check yum cache)


yum install package-name / yum upgrade keeps downloaded packages via its operations inside its cache directory structures in /var/cache/yum/*.
Hence it is good idea to check what were the previously installed packages and their count.


[root@redhat: ~ ]# cd /var/cache/yum/x86_64/;
[root@redhat: ~ ]# find . -iname '*.rpm'|wc -l


5. List RPM repositories set on the server


 [root@redhat: ~ ]# yum repolist
Loaded plugins: fastestmirror, versionlock
Repodata is over 2 weeks old. Install yum-cron? Or run: yum makecache fast
Determining fastest mirrors
repo id                                                                                 repo name                                                                                                            status
!atos-ac/7/x86_64                                                                       Atos Repository                                                                                                       3,128
!base/7/x86_64                                                                          CentOS-7 – Base                                                                                                      10,019
!cr/7/x86_64                                                                            CentOS-7 – CR                                                                                                         2,686
!epel/x86_64                                                                            Extra Packages for Enterprise Linux 7 – x86_64                                                                          165
!extras/7/x86_64                                                                        CentOS-7 – Extras                                                                                                       435
!updates/7/x86_64                                                                       CentOS-7 – Updates                                                                                                    2,500


This step is mandatory to make sure you're upgrading to latest packages from the right repositories for more concretics check what is inside in confs /etc/yum.repos.d/ ,  /etc/yum.conf 
 

6. Clean up any old rpm yum cache packages


This step is again mandatory but a good to follow just to have some more clearness on what packages is our upgrade downloading (not to mix up the old upgrades / installs with our newest one).
For documentation purposes all deleted packages list if such is to be kept under /root/logs/yumclean-install*.out file

[root@redhat: ~ ]# yum clean all |tee /root/logs/yumcleanall-$(hostname)-$(date '+%Y-%m-%d_%H-%M-%S').out


7. List the upgradeable packages's latest repository provided versions


[root@redhat: ~ ]# yum check-update |tee /root/logs/yumcheckupdate-$(hostname)-$(date '+%Y-%m-%d_%H-%M-%S').out


Then to be aware how many packages we'll be updating:


[root@redhat: ~ ]#  yum check-update | wc -l


8. Apply the actual uplisted RPM packages to be upgraded


[root@redhat: ~ ]# yum update |tee /root/logs/yumupdate-$(hostname)-$(date '+%Y-%m-%d_%H-%M-%S').out


Again output is logged to /root/logs/yumcheckupate-*.out 


9. Monitor downloaded packages count real time


To make sure yum upgrade is not in some hanging state and just get some general idea in which state of the upgrade is it e.g. Download / Pre-Update / Install  / Upgrade/ Post-Update etc.
in mean time when yum upgrade is running to monitor,  how many packages has the yum upgrade downloaded from remote RPM set repositories:


[root@redhat: ~ ]#  watch "ls -al /var/cache/yum/x86_64/7Server/…OS-repository…/packages/|wc -l"


10. Run status script to get the status again


[root@redhat: ~ ]# sh /root/status.sh |tee /root/logs/status-before-$(hostname)-$(date '+%Y-%m-%d_%H-%M-%S').out


11. Add back versionlock for all RPM packs


Set all RPM packages installed on the RHEL / CentOS versionlock for all packages.


#==if needed
# yum versionlock \*


12. Get whether old software configuration is not messed up during the Package upgrade (Lookup the logs for .rpmsave and .rpmnew)


During the upgrade old RPM configuration is probably changed and yum did automatically save .rpmsave / .rpmnew saves of it thus it is a good idea to grep the prepared logs for any matches of this 2 strings :
 

[root@redhat: ~ ]#   grep -i ".rpm" /root/logs/yumupdate-server-host-2020-01-20_14-30-41.out
[root@redhat: ~ ]#  grep -i ".rpmsave" /root/logs/yumupdate-server-host-2020-01-20_14-30-41.out
[root@redhat: ~ ]#  grep -i ".rpmnew" /root/logs/yumupdate-server-host-2020-01-20_14-30-41.out


If above commands returns output usually it is fine if there is is .rpmnew output but, if you get grep output of .rpmsave it is a good idea to review the files compare with the original files that were .rpmsaved with the 
substituted config file and atune the differences with the changes manually made for some program functionality.

What are the .rpmsave / .rpmnew files ?
This files are coded files that got triggered by the RPM install / upgrade due to prewritten procedures on time of RPM build.


If a file was installed as part of a rpm, it is a config file (i.e. marked with the %config tag), you've edited the file afterwards and you now update the rpm then the new config file (from the newer rpm) will replace your old config file (i.e. become the active file).
The latter will be renamed with the .rpmsave suffix.

If a file was installed as part of a rpm, it is a noreplace-config file (i.e. marked with the %config(noreplace) tag), you've edited the file afterwards and you now update the rpm then your old config file will stay in place (i.e. stay active) and the new config file (from the newer rpm) will be copied to disk with the .rpmnew suffix.
See e.g. this table for all the details. 

In both cases you or some program has edited the config file(s) and that's why you see the .rpmsave / .rpmnew files after the upgrade because rpm will upgrade config files silently and without backup files if the local file is untouched.

After a system upgrade it is a good idea to scan your filesystem for these files and make sure that correct config files are active and maybe merge the new contents from the .rpmnew files into the production files. You can remove the .rpmsave and .rpmnew files when you're done.


If you need to get a list of all .rpmnew .rpmsave files on the server do:

[root@redhat: ~ ]#  find / -print | egrep "rpmnew$|rpmsave$


13. Reboot the system 

To check whether on next hang up or power outage the system will boot normally after the upgrade, reboot to test it.


you can :


[root@redhat: ~ ]#  reboot


either

[root@redhat: ~ ]#  shutdown -r now


or if on newer Linux with systemd in ues below systemctl reboot.target.

[root@redhat: ~ ]#  systemctl start reboot.target


14. Get again the system status with our status script after reboot

[root@redhat: ~ ]#  sh /root/status.sh |tee /root/logs/status-after-$(hostname)-$(date '+%Y-%m-%d_%H-%M-%S').out


15. Clean up any versionlocks if earlier set


[root@redhat: ~ ]# yum versionlock clear
[root@redhat: ~ ]# yum versionlock list


16. Check services and logs for problems


After the reboot Check closely all running services on system make sure every process / listening ports and services on the system are running fine, just like before the upgrade.
If the sytem had firewall,  check whether firewall rules are not broken, e.g. some NAT is not missing or anything earlier configured to automatically start via /etc/rc.local or some other
custom scripts were run and have done what was expected. 
Go through all the logs in /var/log that are most essential /var/log/boot.log , /var/log/messages … yum.log etc. that could reveal any issues after the boot. In case if running some application server or mail server check /var/log/mail.log or whenever it is configured to log.
If the system runs apache closely check the logs /var/log/httpd/error.log or php_errors.log for any strange errors that occured due to some issues caused by the newer installed packages.
Usually most of the cases all this should be flawless but a multiple check over your work is a stake for good results.