Posts Tagged ‘administrator’

Improve MobaXterm Best Windows terminal client with some additional settings tune ups / Install extra Linux Cygwin tools on MobaXterm and various post install configuration goodies

Friday, January 20th, 2023

mobaxterm-logo_400x400-terminal-client-tune-up-howto-for-a-new-install

Earlier I've written a an article MobaXTerm: A good gnome-terminal like tabbed SSH client for Windows / Windows Putty Tabs Alternative in which I've introduced the best in my opinion SSH / Telnet / VNC / RDP / Xserver in one Terminal client emulator for Windows operating systems.

The client has been around for quite some time and it has been improving rapidly over the last 10 years, where it now more looks like a separate Operating System than a single terminal client. It's size is quite compact as well and my opinion and every self respectiving developer, system administrator, IT geek or a hacker would definitely
use the mobaxterm at home or at work place on a daily. I guess some of my readers, who have already migrated SuperPutty / SecureCRT or Putty / XMing or whatever kind of exotic Remote SSH Console terminal is used could validate this 🙂

Therefore as I've set up Mobaxterm on a multiple computers all around, I've found it useful to write a small article with some post-install hints (tune ups) one can do immediately once he has installed the Desktop or Portable Apps version of mobaxterm on desktop PC / notebook.
 

1. Set up your bashrc server / command aliases

Lets say you need to setup some rules for connectivity via a socks proxy to dig holes over a harsh company firewalls or add
custom options to every ssh client attempt to remote server, or simply alias some of your servers with custom connectivity options
and so on simply open vi / vim text editor from mobaxterm local terminal and place inside your rules, for example that could be anything like:


alias ssh='ssh -o stricthostkeychecking=no -o passwordauthentication=yes -o PreferredAuthentications=password  -v'
alias sftp='sftp -o stricthostkeychecking=no -o passwordauthentication=yes -o PreferredAuthentications=password'

alias work-server='ssh UserName@work-server -v -o passwordauthentication=yes -o PreferredAuthentications=password'

alias proxy='ssh -D 3128 UserName@proxyIP-host1 -o ConnectTimeout=80'
alias proxy1='ssh -D 3128 UserName@proxy-host2 -p 443 -o ConnectTimeout=60'
alias proxy3='ssh -D 3128 Username@proxy-host3 -p 443 -o ConnectTimeout=60'

Simply open the terminal and setup whatever you require
export ftp_proxy="http://proxy-host:8080"
export https_proxy="https://proxy-host:8080"
export http_proxy="http://proxy-host:8080"
export HTTP_PROXY="http://proxy-host:8080"
export HTTPS_PROXY="http://proxy-host:8080"


2. Set mobaxterm presistent directory / persistent root directory and default text editor

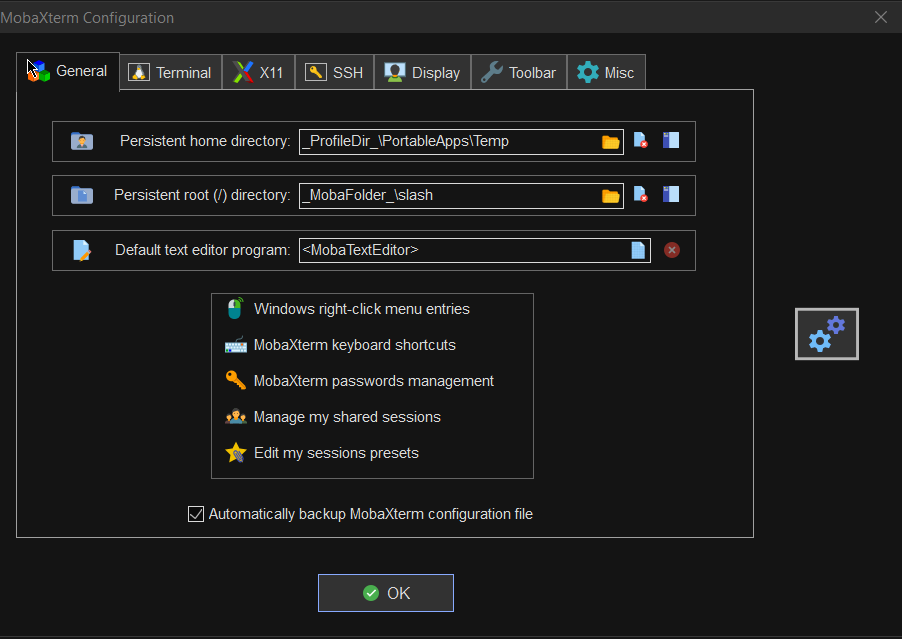
Make sure you have properly defined at least Persistent directory / Persistent directory if you want to keep the files under your /home/mobaxterm and root directory be able to save your data from local mobaxterm terminal work you have done.
To do so o to Configuration -> General

MobaXterm-persistent-home-directory
 

3. Change default settings for Opening / Closing Terminal tabs just like in gnome-terminal
MobaXterm is really awesome as the developer, followed pretty much the logic of some common GNU / Linux Terminal clients like Gnome-Terminal and KDE's default Konsole terminal.

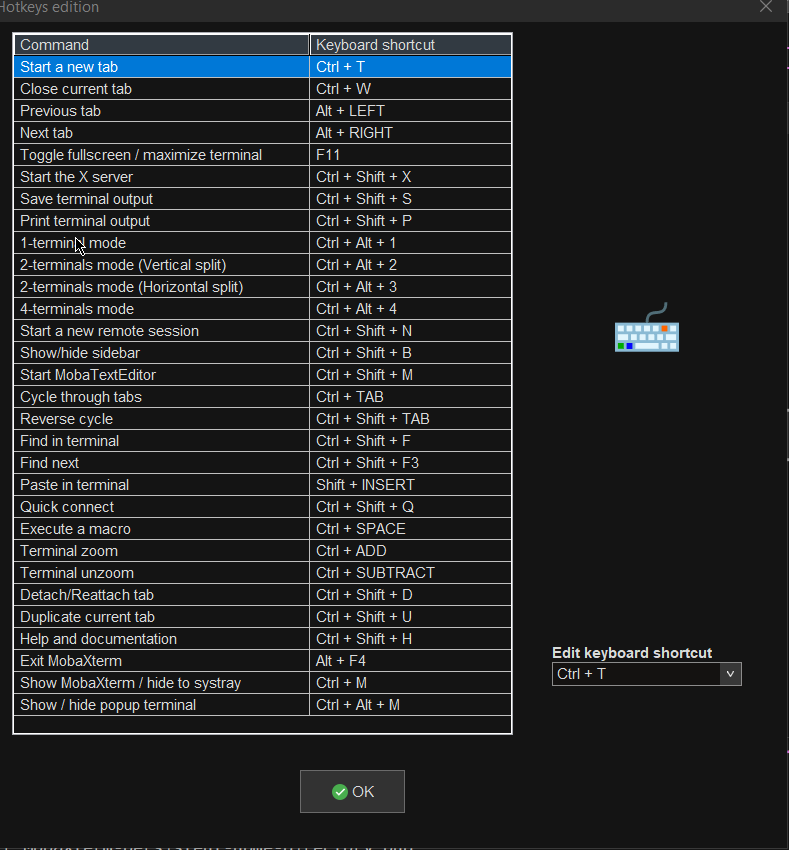
One of the first things to do once Mobaxterm is installed on the PC is to set up nice key binds as default onces might be heard to learn at the beginning or you might have already the habit to use the certain set of key combinations on your Linux desktop:

Common once are:

1. Open tab / Close tab common once I bind to are (CTRL + T / CTRL + W)
2. Previous tab move / Next tab move keys common one I use are (ALT + LEFT / ALT + RIGHT)
3. Find in terminal (CTRL + F)

rebind-mobaxterm-standard-keys
 

4. Make MobaXterm to automatically open a terminal to not Start local terminal every time

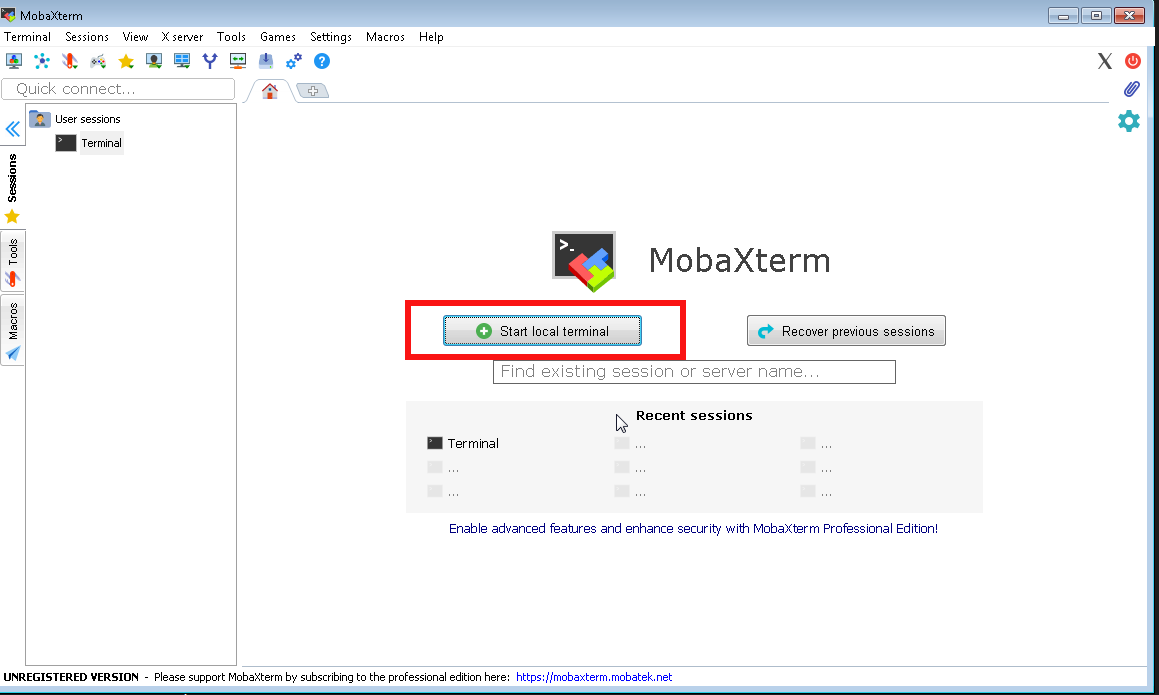
By default mobaxterm it is really annoying cause every time you run it after system reboot you have to select
Start local terminal
Once you run the terminal you get this prompt and you have to press on Start local terminal

mobaxterm-start-local-terminal


How to make Mobaxterm automatically open local Terminal Tab on every boot?
 

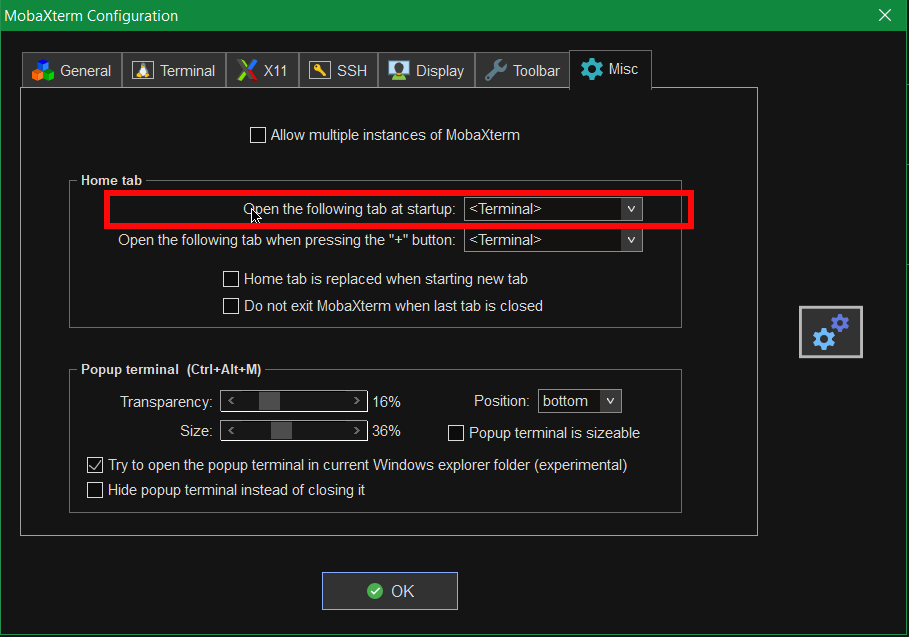
To fix this so every time a local terminal is spawn on MobaXterm you have get to:
 

Settings -> Configuration -> Misc


Open the Following tab at startup by default it will be

<Home (Pinned)>

Change it to:

<Terminal>

mobaxterm-open-the-followintab-tab-in-startup

That's it on next login your Local Terminal with /bin/bash.exe will auto load !
 

[hipo.WINDOWS-PC] ➤ env|grep -i SHELL
SHELL=/bin/bash.exe
PATH=/bin:/drives/c/Users/hipo/DOCUME~1
/MobaXterm/slash/bin:/drives/c/Windows:/drives/c/Windows/system32:/drives/c/Windows/system32:/drives/c/Windows:/drives/c/Windows/System32/Wbem:
/drives/c/Windows/System32/WindowsPowerShell/v1.0:/drives/c/Windows/sysnative
PSModulePath=C:\Windows\system32\WindowsPowerShell\v1.0\Modules\
CMDPATH=C:\Windows\system32;C:\Windows;C:\Windows\System32\Wbem;
C:\Windows\System32\WindowsPowerShell\v1.0\;C:\Windows\sysnative\;
C:\Users\hipo\DOCUME~1\MobaXterm\slash\bin
WINPATH=C:\Windows\system32;C:\Windows;C:\Windows\System32\Wbem;C:\Windows\System32\WindowsPowerShell\v1.0\;C:\Windows\sysnative\


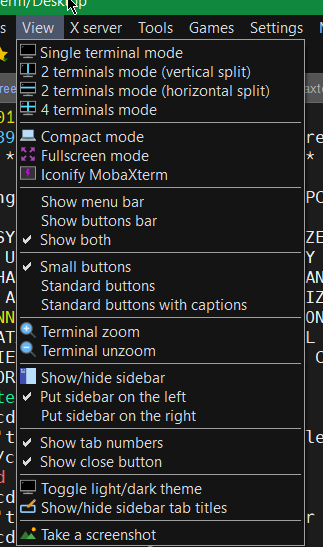
5. Make menu buttons to appear smaller


Go to menu and select
View -> (Small Buttons)

mobaxterm-select-small-buttons-screenshot

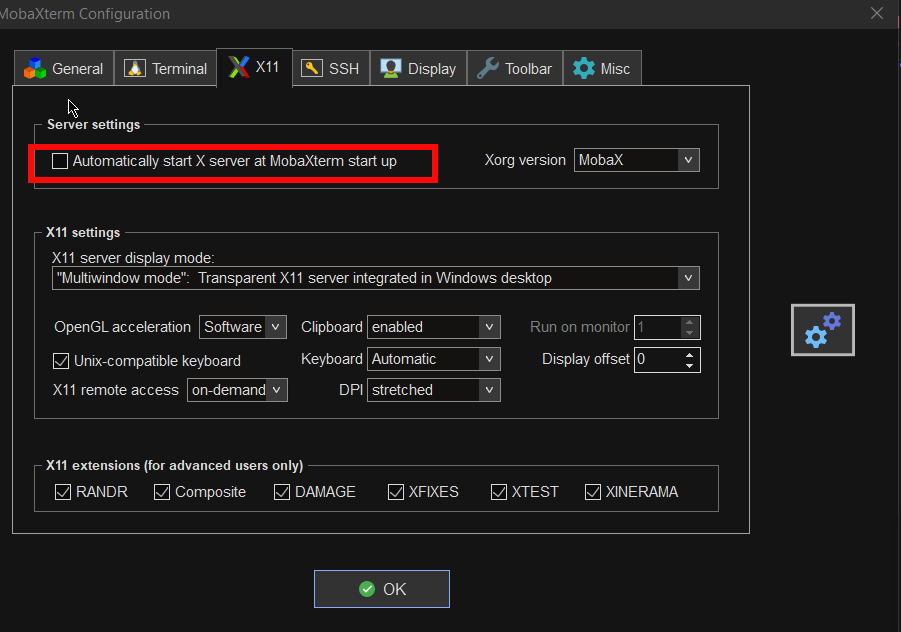
6. Disable auto start of XServer to prevent a port listener on the machine on TCP port

By default mobaxterm opens XServer listener, so you can immediately connect from a remote SSH servers missing Xserver and install software requiring an XServer, for example software such as Oracle Database or some MiddleWare WebLogig or IBM's Web Sphere. This is useful but if you want to have a good security only allow this server on a purpose. Otherwise the XServer will run in parallel with rest of your Moba and just load up your PC and eat up some RAM memory. To disable it go to:
mobaxterm-x11-automatically-start-X-server-disable-stop-at-startup

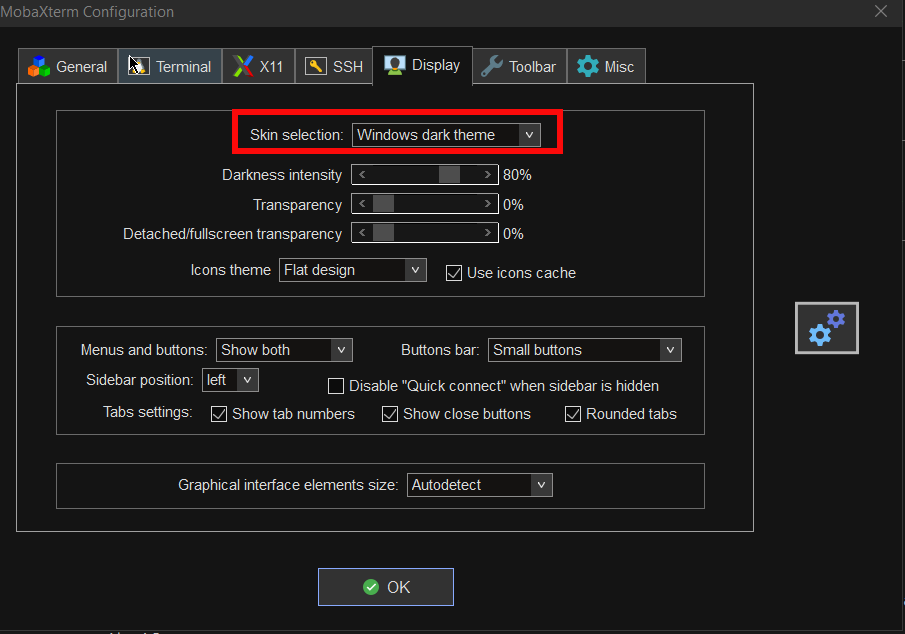
7. Change the mobaxterm Default theme to Dark

This is optional I like to set the Theme to Dark, also as a Theme for Windows as well as for MobaxTerm, the aim of that is simply to not put extra stress on my eye sight. Being on the PC around 8 to 10 hours and spending some 6 to 8 hours on console work is enough. If you want to do as well.

mobaxterm-change-default-theme-to-dark-theme

8. Install additional set of common Linux tools to mobaxterm to use on Windows
 

Tools such as:

1. Midnight Commander (mc)
2. Wget
3. Curl
4. Vim
5. Screen
6. Rsync
7. Perl
8. W3m
9. dosunix
10. unix2dos
11. gnupg
12. diffutils
13. mysql
14. mpg123
15. whois


If you want to have a set of packages pre-installed that are including above as well as the rest of mine, here is a dump of my installed mobapt manager packages:

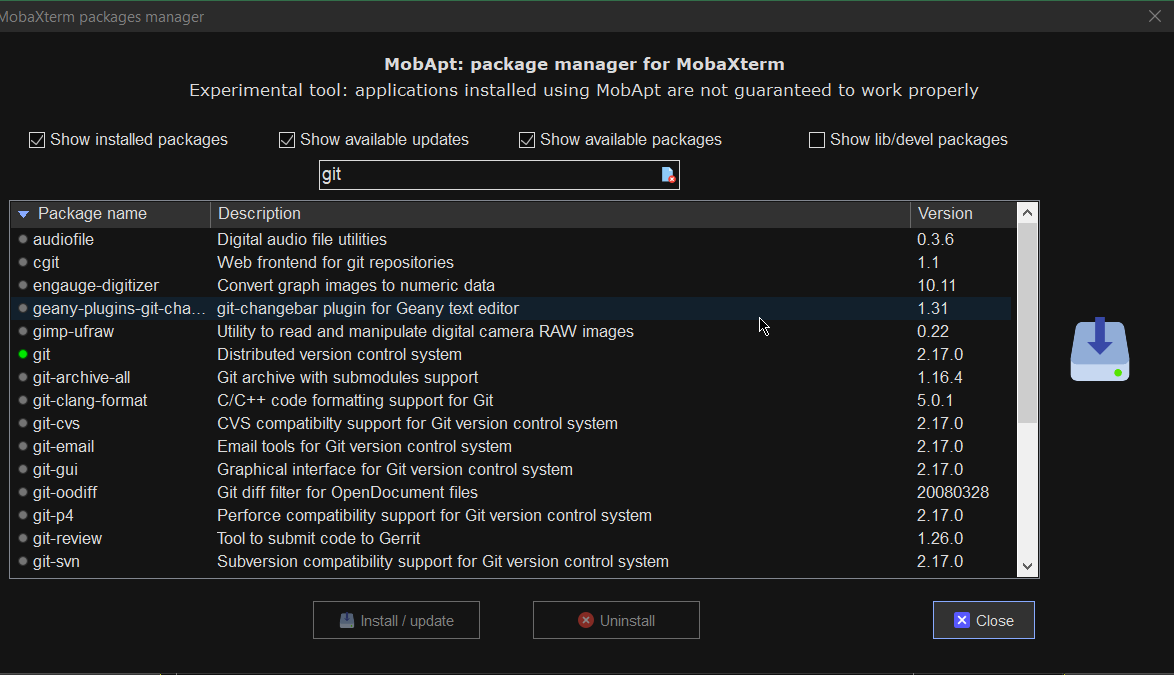
For more simply use the experimental Mobaxterm  Graphical Package installer
 

[hipo.WINDOWS-PC] ➤  for i in $(cat Downloads/installed-packages-mobaxterm.txt ); do apt-cyg install $i; done
 

Found package GeoIP-database

Installing GeoIP-database
Downloading GeoIP-database-20180505-1.tar.xz…
Unpacking GeoIP-database-20180505-1.tar.xz…


Running postinstall scripts
Package GeoIP-database installed.

Rebasing new libraries

Found package adwaita-icon-theme

Installing adwaita-icon-theme
Downloading adwaita-icon-theme-3.26.1-1.tar.xz…


You will be prompted for a single Yes for the respository

MobApt Packages Manager

mobapt-pkg-manager-install-git-from-gui-mobaxterm-package-installer

Though it is said it is experimental, I have to say the MobApt Apt Manager works quite good, I never had any issues with it so far.

9. Mobaxterm.ini the settings storage file that can help you move your configurations

If you have to prepeare new MobaXterm on multiple PCs frequently perhaps it is best to just copy the Mobaxterm.ini file. 
Here is an example of my mobaxterm.ini for download.
 

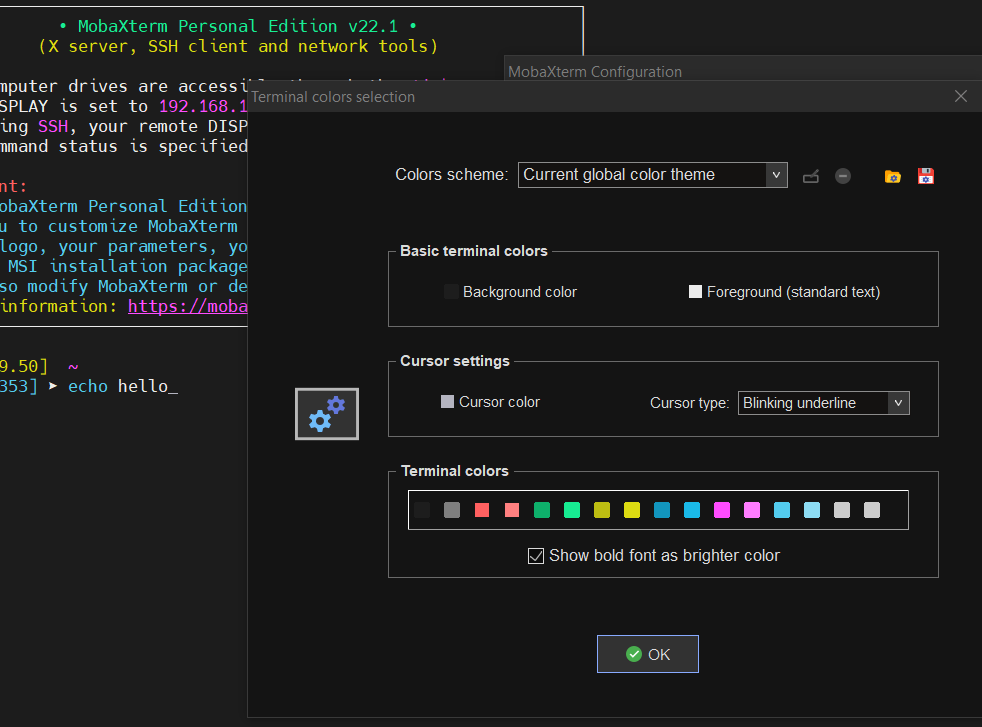
10. Change terminal colors and curor type and enable blinking (customizations)


Settings -> Configuration -> Terminal -> (Default Terminal Color Settings)


mobaxterm-change-terminal-colors-and-blinking-cursor-setting-screenshot

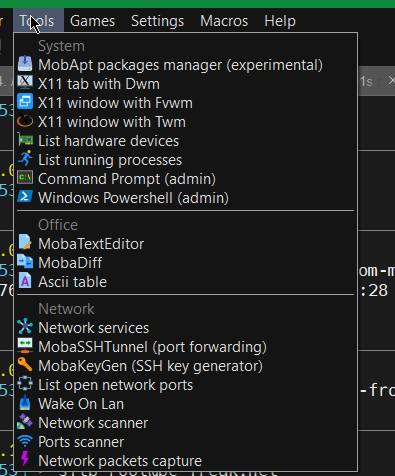
11. Use very useful moba Tools
 

mobaxterm-terminal-great-useful-tools-screenshot
For sysadmins Moba has plenty of other jems such as:

  • Network Port scanner such as Nmap with GUI

  • list open network ports (GUI interface to netmap)

  • SSH tunnel tool

  • Moba Diff

  • Wake on Lan

  • Network Packet capturer (such as tcpdump)

  • List running processes (such as taskmgr in simple form)

  • List machine hardware devices (such as Windows Device manager)

 
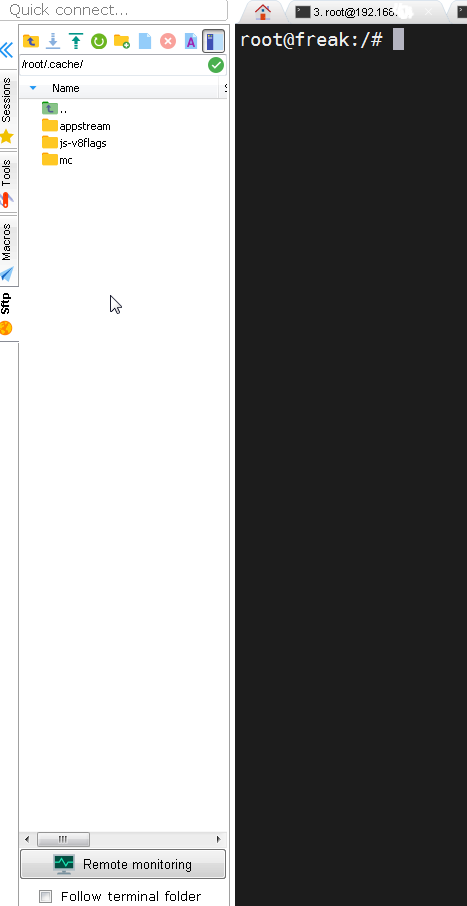
12. Remote monitoring of opened ssh session


To enable remote monitoring for a Saved session simply use the "Remote monitoring" button on the down left corner of the terminal.

mobaxterm-remote-monitoring-of-remote-ssh-server-screenshot-button

Or to enable it for a new host, open:

1. "Saved sessions"
2. Click over "User sessions"
3. New Session -> (SSH)
4. Basic SSH Settings (Remote host) -> OK
5. Click over the new created session
6. Click on Remote monitoring for the opened session

remote-monitoring-from-mobaxterm-screenshot

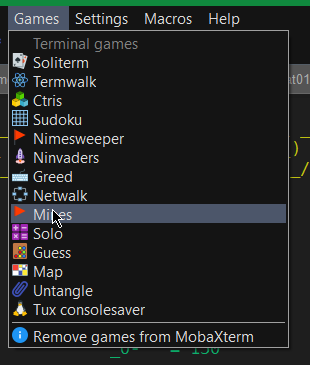
13. Play some mobaxterm console games

As you might have pissed off of configuring go on and enjoy some of the great console games, some of which are also present on a normal Linux new distribution installation. 🙂

mobaxterm-list-of-games-screenshot

List of Moba Games

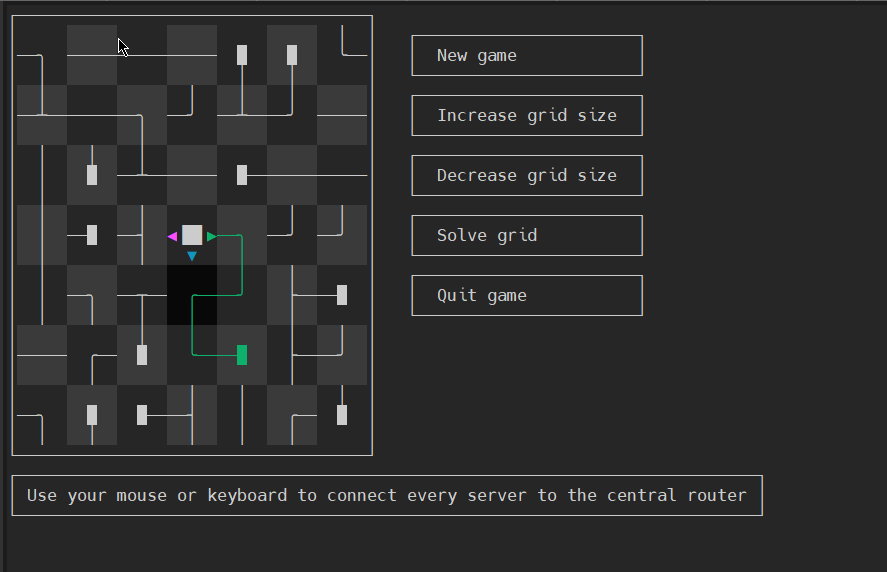
teamwalk-mobaxterm-console-connect-network-routers-game
TeamWalk (Use your mouse or keyboard to connect every server to the central router)

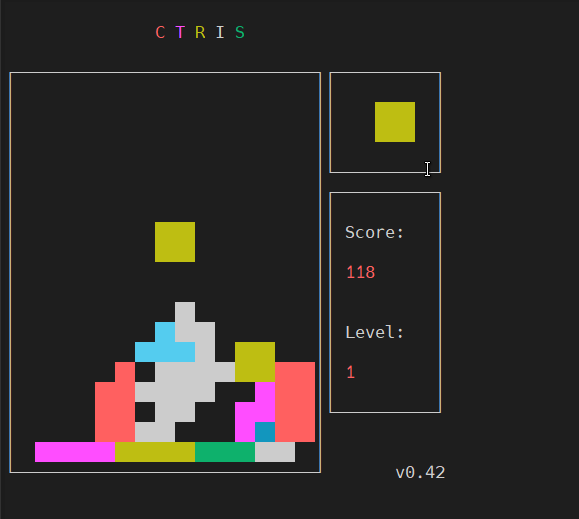
ctris-console-text-game-mobaxterm

Ctris Console tetris from Mobaxterm

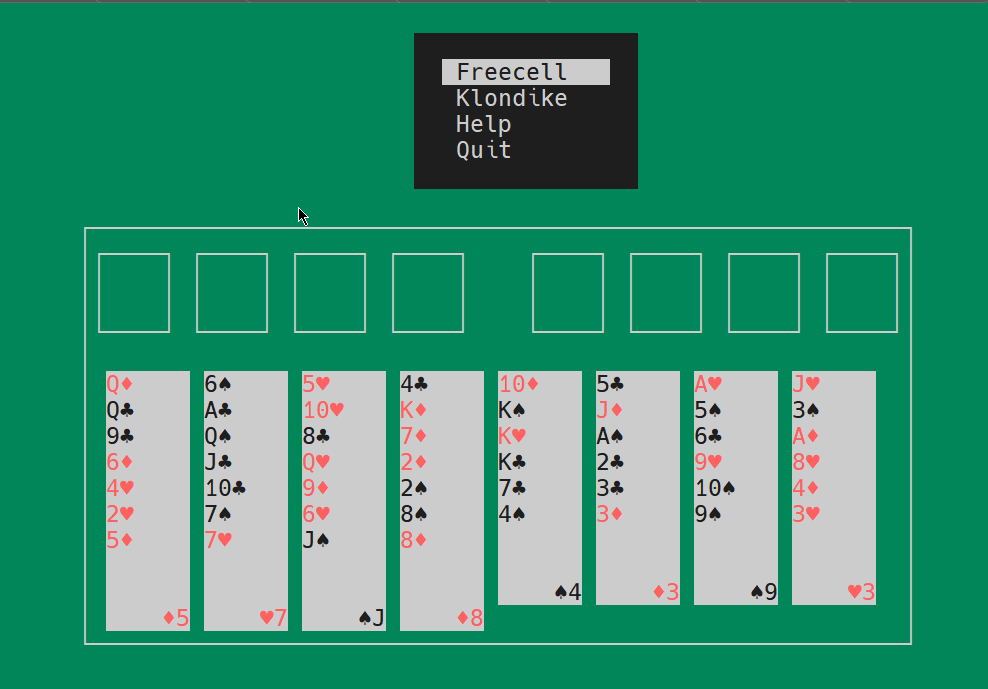
solitaire-text-console-game-played-on-mobaxterm-screenshot

Text console Solitaire from Moba
 

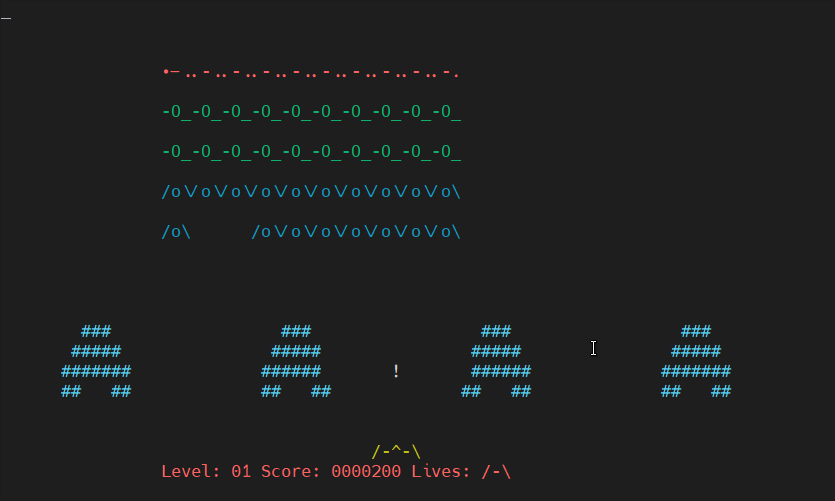
Ninvaders-console-game-mobaxterm

Here is NinVaders (Text Version of Space Invaders Arcade Classic)
 

Enjoy ! 🙂

How to disable Windows pagefile.sys and hiberfil.sys to temporary or permamently save disk space if space is critically low

Monday, March 28th, 2022

howto-pagefile-hiberfil.sys-remove-reduce-increase-increase-size-windows-logo

Sometimes you have to work with Windows 7 / 8 / 10 PCs  etc. that has a very small partition C:\
drive or othertimes due to whatever the disk got filled up with time and has only few megabytes left
and this totally broke up the windows performance as Windows OS becomes terribly sluggish and even
simple things as opening Internet Browser (Chrome / Firefox / Opera ) or Windows Explorer stones the PC performance.

You might of course try to use something like Spacesniffer tool (a great tool to find lost data space on PC s short description on it is found in my previous article how to
delete temporary Internet Files and Folders to to speed up and free disk space
 ) or use CCleaner to clean up a bit the pc.
Sometimes this is not enough though or it is not possible to do at all the main
partition disk C:\ is anyhow too much low (only 30-50MB are available on HDD) or the Physical or Virtual Machine containing the OS is filled with important data
and you couldn't risk to remove anything including Internet Temporary files, browsing cookies … whatever.

Lets say you are the fate chosen guy as sysadmin to face this uneasy situation and have no easy
way to add disk space from another present free space partition or could not add a new SATA hard drive
SSD drive, what should you do?
 

The solution wipe off pagefile.sys and hiberfil.sys

Usually every Windows installation has a pagefile.sys and hiberfil.sys.

  • pagefile.sys – is the default file that is used as a swap file, immediately once the machine runs out of memory. For Unix / Linux users better understanding pagefile.sys is the equivallent of Linux's swap partition. Of course as the pagefile is in a file and not in separate partition the swapping in Windows is perhaps generally worse than in Linux.
  • hiberfil.sys – is used to store data from the machine on machine Hibernation (for those who use the feature)


Pagefile.sys which depending on the configured RAM memory on the OS could takes up up to 5 – 8 GB, there hanging around doing nothing but just occupying space. Thus a temporary workaround that could free you some space even though it will degrade performance and on servers and production machines this is not a good solution on just user machines, where you temporary need to free space any other important task you can free up space
by seriously reducing the preconfigured default size of pagefile.sys (which usually is 1.5 times the active memory on the OS – hence if you have 4GB you would have a 6Gigabytes of pagefile.sys).

Other possibility especially on laptop and movable devices running Win OS is to disable hiberfil.sys, read below how this is done.


The temporary solution here is to simply free space by either reducing the pagefile.sys or completely disabling it


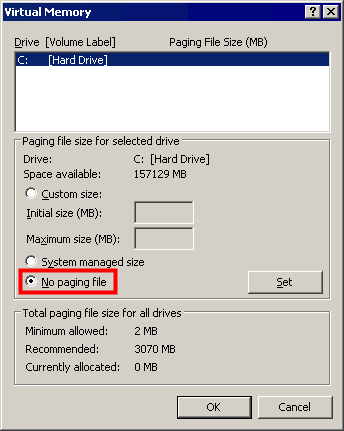
1. Disable pagefile.sys on Windows XP, Windows 7 / 8 / 10 / 11


The GUI interface to disable pagefile across all NT based Windows OS-es is quite similar, the only difference is newer versions of Windows has slightly more options.


1.1 Disable pagefile on Windows XP


Quickest way is to find pagefile.sys settings from GUI menus

1. Computer (My Computer) – right click mouse
2. Properties (System Preperties will appear)
3. Advanced (tab) 
4. Settings
5. Advanced (tab)
6. Change button

windows-xp-pagefile-disable-screenshot

1.2 Disable pagefile on Windows 7


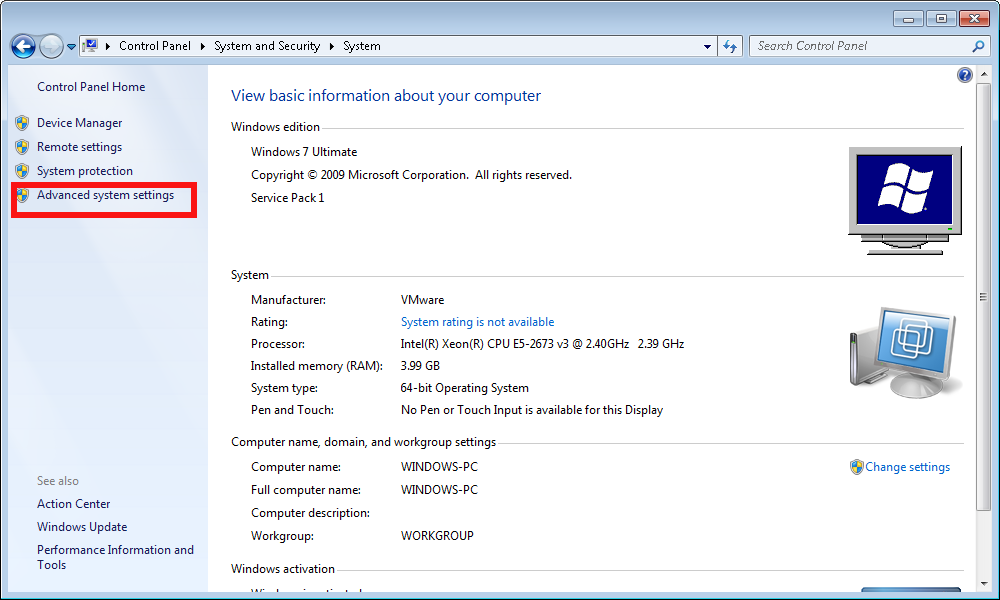
advanced-system-settings-control-panel-system-and-security-screenshot

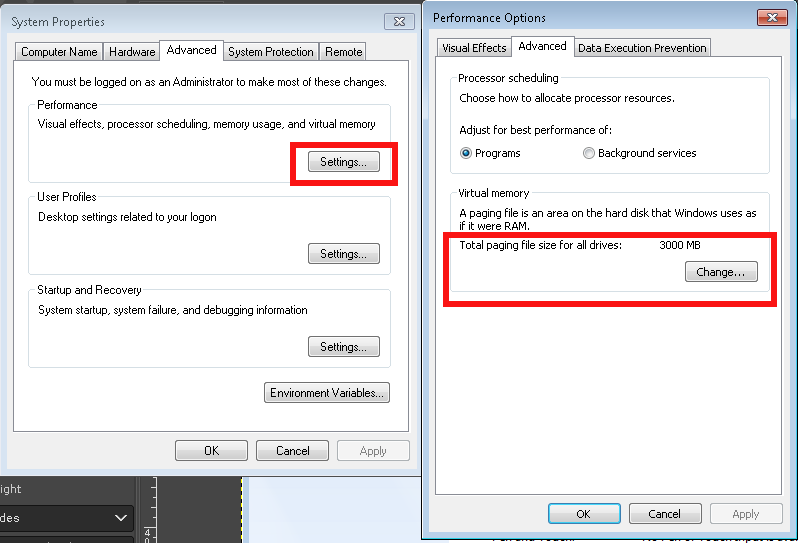
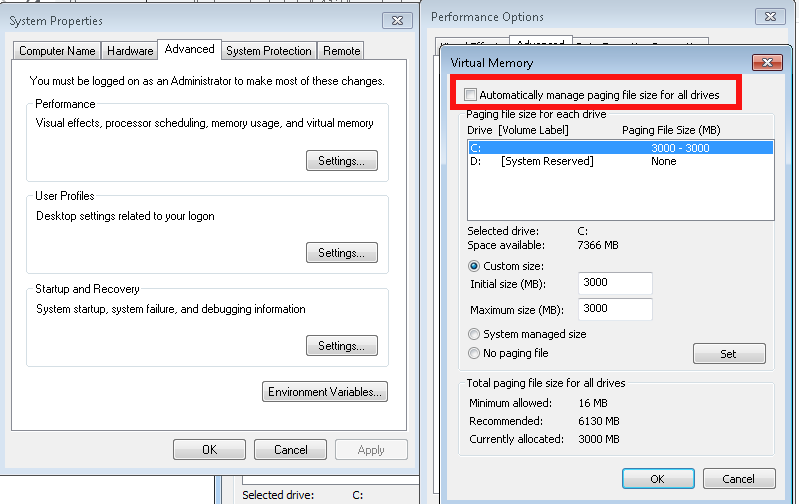
windows-system-properties-screenshot-properties-advanced-change-Virtual-memory-pagefile-screenshot

system-properties-performance-options
 

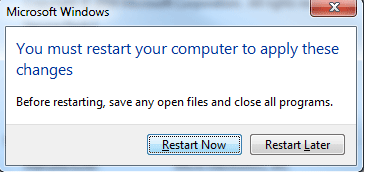
Once applied you'll be required to reboot the PC

How-to-turn-off-Virtual-Memory-Paging_File-in-Windows-7-restart


1.3 Disable Increase / Decrease pagefile.sys on Windows 10 / Win 11
 

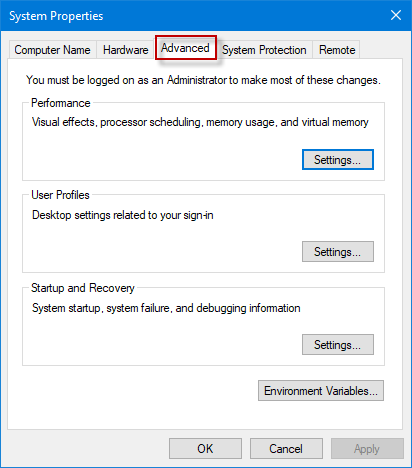
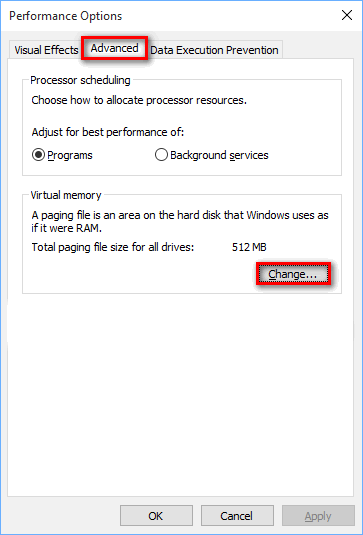
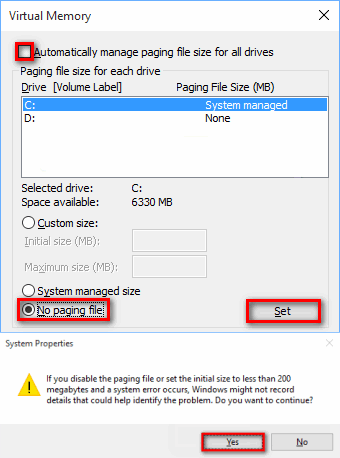
open-system-properties-advanced-win10

win10-performance-options-menu-screenshot

configure-virtual-memory-win-10-screenshot


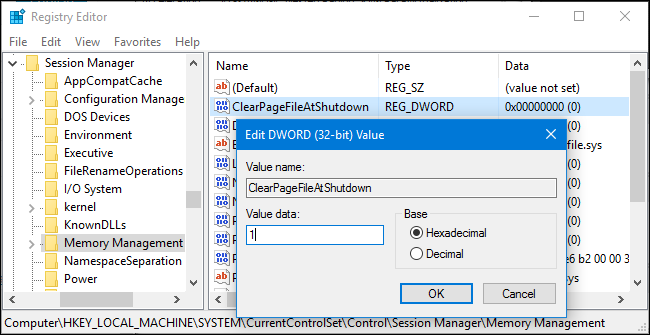
1.4 Make Windows clear pagefile.sys on shutdown

On home PCs it might be useful thing to clear up ( nullify) pagefile.sys on shutdown, that could save you some disk space on every reboot, until file continuously grows to its configured Maximum.

Run

regedit

Modify registry key at location


HKEY_LOCAL_MACHINE\SYSTEM\CurrentControlSet\Control\Session Manager\Memory Management

windows-clean-up-pagefile-sys-file-on-shutdown-or-reboot-registry-editor-value-screenshot

You can apply the value also via a registry file you can get the Enable Clearpagefile at shutdown here .reg.
 

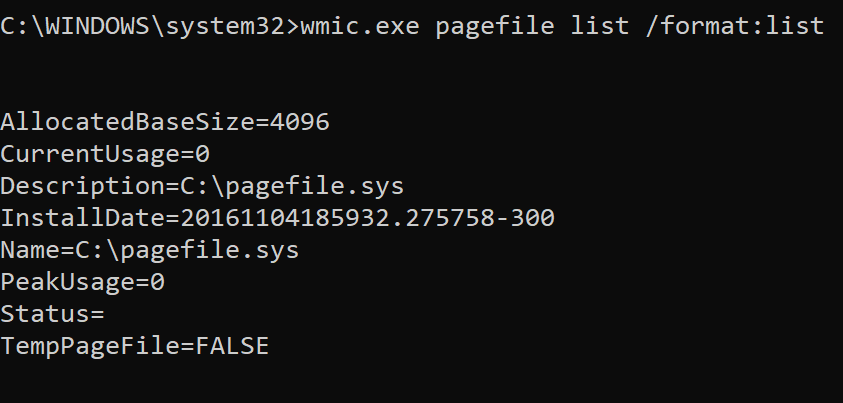
2. Manipulating pagefile.sys size and file delete from command line with wmic tool 

For scripting purposes you might want to use the wmic pagefile which can do increase / decrase or delete the file without GUI, that is very helpful if you have to admin a Windows Domain (Active Directory)
 

[hipo.WINDOWS-PC] ➤ wmic pagefile /?

PAGEFILE – Virtual memory file swapping management.

HINT: BNF for Alias usage.
(<alias> [WMIObject] | [] | [] ) [].

USAGE:

PAGEFILE ASSOC []
PAGEFILE CREATE <assign list>
PAGEFILE DELETE
PAGEFILE GET [] []
PAGEFILE LIST [] []


[hipo.WINDOWS-PC] ➤ wmic pagefile
AllocatedBaseSize  Caption          CurrentUsage  Description      InstallDate                Name             PeakUsage  Status  TempPageFile
4709               C:\pagefile.sys  499           C:\pagefile.sys  20200912061902.938000+180  C:\pagefile.sys  525                FALSE


[hipo.WINDOWS-PC] ➤ wmic pagefile list /format:list

AllocatedBaseSize=4709
CurrentUsage=499
Description=C:\pagefile.sys
InstallDate=20200912061902.938000+180
Name=C:\pagefile.sys
PeakUsage=525
Status=
TempPageFile=FALSE

wmic-pagefile-command-line-tool-for-windows-default-output-screenshot


  • To change the Initial Size or Maximum Size of Pagefile use:
     

➤ wmic pagefileset where name="C:\\pagefile.sys" set InitialSize=2048,MaximumSize=2048

  • To move the pagefile / change location of pagefile to less occupied disk drive partition (i.e. D:\ drive)


    Sometimes you might have multiple drives on the PC and some of them might be having multitudes of gigabytes while main drive C:\ could be fully occupied due to initial install bad drive organization, in that case a good work arount to save you space so you can work normally with the server is just to temporary or permanently move pagefile to another drive.

wmic pagefileset where name="D:\\pagefile.sys" set InitialSize=2048,MaximumSize=2048


!! CONSIDER !!! 

That if you have the option to move the pagefile.sys for best performance it is advicable to place the file inside another physical disk, preferrably a Solid State Drive one, SATA disks are too slow and reduced Input / Output disk operations will lead to degraded performance, if there is lack of memory (i.e. pagefile.sys is actively open read and wrote in).
 

  • To delete pagefile.sys 
     

➤ wmic pagefileset where name="C:\\pagefile.sys" delete


If for some reason you prefer to not use wmic but simple del command you can delete pagefile.sys also by:

Removing file default "Hidden" and "system" file attributes – set for security reasons as the file is a system file usually not touched by user. This will save you from "permission denied" errors:
 

➤ attrib -s -h %systemdrive%\pagefile.sys


Delete the file:
 

➤ del /a /q %systemdrive%\pagefile.sys


3. Disable hibernation on Windows 7 / 8 and Win 10 / 11

Disabling hibernation file hiberfil.sys can also free up some space, especially if the hibernation has been actively used before and the file is written with data. Of course, that is more common on notebooks.
Windows hibernation has significantly improved over time though i didn't have very pleasant experience in the past and I prefer to disable it just in case.
 

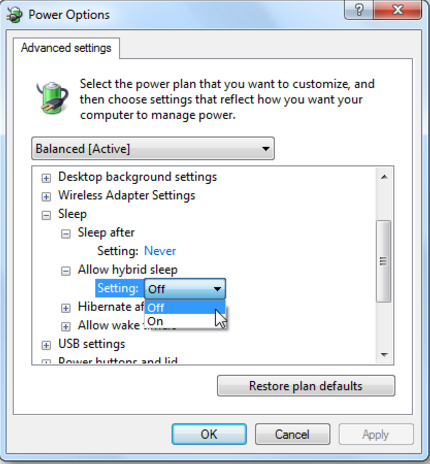
3.1 Disable Windows 7 / 8 / 10 / 11 hibernation from GUI 

Disable it through:

Control Panel -> All Control Panel Items -> Power Options -> Edit Plan Settings -> Change advanced power settings


 like shown in below screenshot:

Windqows-power-options-Advanced-settings-Allow-Hybrid-sleep-option-menu-screenshot


3.2 Disable Windows 7 / 8 / 10 / 11 hibernation from command line

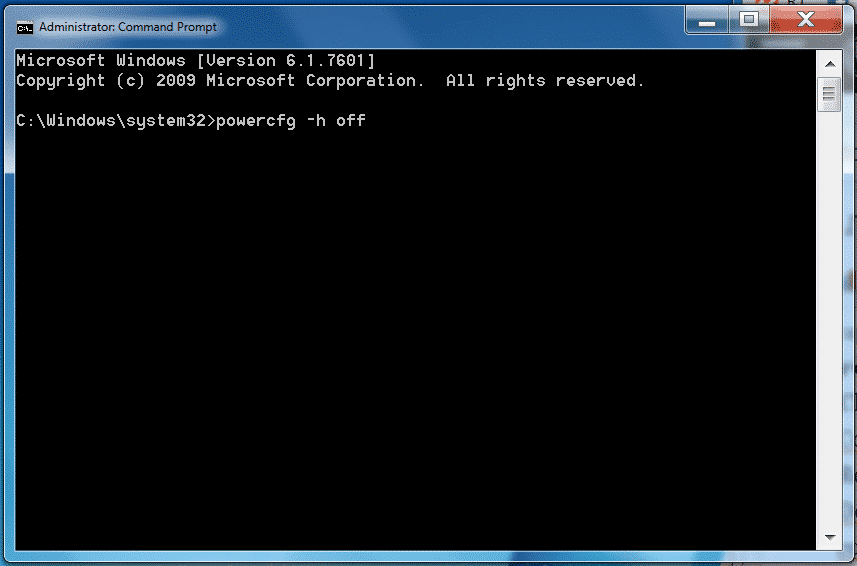
Disable hibernation Is done in the same way through the powercfg.exe command, to disable it
if you're cut of disk space and you want to save space from it:

run as Administrator in Command Line Windows (cmd.exe)
 

powercfg.exe /hibernate off

If you later need to switch on hibernation
 

powercfg.exe /hibernate on


disable-hiberfile-windows-screenshot

3.3 Disable Windows hibernation on legacy Windows XP

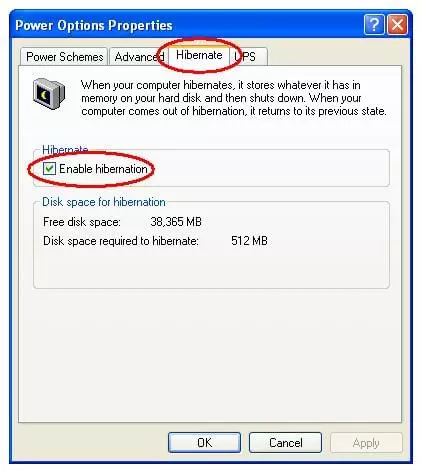
On XP to disable hibernation open

1. Power Options Properties
2. Select Hibernate
3. Select Enable Hibernation to clear the checkbox and disable Hibernation mode. 
4. Select OK to apply the change.

Close the Power Options Properties box. 

enable-disable-hibernate-windows-xp-menu-screenshot

To sum it up

We have learned some basics on Windows swapping and hibernation and i've tried to give some insight on how thiese files if misconfigured could lead to degraded Win OS performance. In any case using SSD as of 2022 to store both files is a best practice for machines that has plenty of memory always try to completely disable / remove the files. It was shown how  to manage pagefile.sys and hiberfil.sys across Windows Operating Systems different versions both from GUI and via command line as well as how you can configure pagefile.sys to be cleared up on pc reboot.
 

How to Create New Windows 10 NTFS Drive partition from new empty ( Unallocated ) space with Windows Disk Management or diskpart command

Thursday, November 18th, 2021

Windows-10-paritioning-with-disk-management-diskmgmt.msc

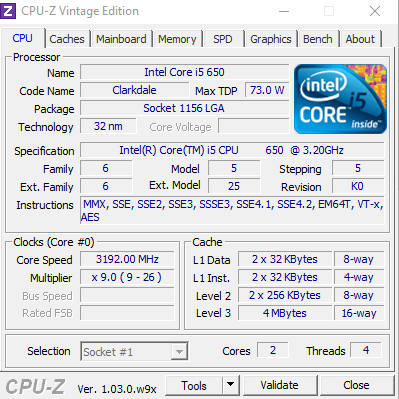
As mentioned in previous article, I've been setting up a new PC that is a bit old a 11 years old Lenovo ThinkCentre model M90P with 8 GB of Memory, Intel(R) Core(TM) i5 CPU         650  @ 3.20GHz   3.19 GHz, Intel Q57 Express Chipset.

After the installation was successful on the new Desktop PC attached SSD, I was curious to see how Windows detects the 521 GB Solid State Drive Samsung  Disk, as well as to assign all the SSD Disk space, so I don't have unused parts of the drive hanging around.

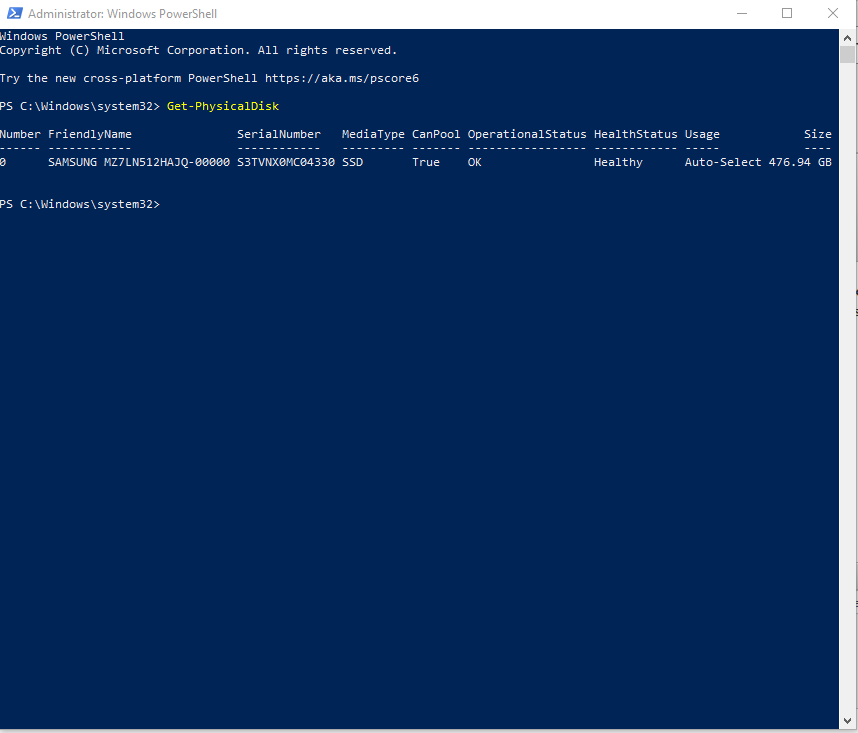
To get the exact type of SSD installed on the Lenovo ThinkCentre, it comes to a simple PowerShell command (note that the PowerShell command has to be executed as Administrator).


Windows PowerShell
Copyright (C) Microsoft Corporation. All rights reserved.

Try the new cross-platform PowerShell https://aka.ms/pscore6

PS C:\Windows\system32> Get-PhysicalDisk

Number FriendlyName               SerialNumber   MediaType CanPool OperationalStatus HealthStatus Usage            Size
—— ————               ————   ——— ——- —————– ———— —–            —-
0      SAMSUNG MZ7LN512HAJQ-00000 S3TVNX0MC04330 SSD       True    OK                Healthy      Auto-Select 476.94 GB


PS C:\Windows\system32>


PowerShell-Get-PhysicalDisk-command-print-exact-SSD-type-attached-to-a-Windows-computer 

During the Windows installation, I did installed Windows on a 110GB partition that was left behind from my attempt to copy another 120GB ssd drive as, I've described in my previous article.
Cause of that big part of the SAMSUNG MZ7LN512HAJQ-00000 SSD was left unpartitioned ( unallocated ) and respectively the space did not show in Windows, hence to work around this I was supposed to 
create new Windows Drive and format it either in VFAT (FAT32) or NTFS. Through the years when I had to do such an operations I often either booted from some bootCD and did the desired partitioning or if
partitioning had to be done on a LivePC without reboot, I've used Windows Partitioning Software, such as:

  • The Industry Standard Partition Manager ( Acronis Disk Director ) 
     
  • EaseUS Partition Manager


Using a Good partition manager is a great thing if some complicated partitioning operations needs to be done,  however for such a trivial stuff such as mine in that case – Creating a new NTFS filesystem from unallocated space is a bit of nonsense, thus this time I've decided to use the Windows Standard tool for Partitioinng
 

  • Disk Management

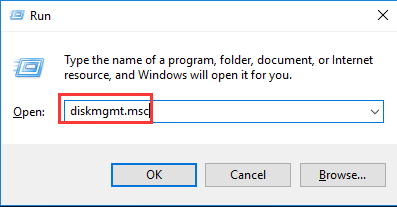
To run the tool you need to run Computer Management tool first either by just looking it up in the Search bar near Start menu (Windows 10 flag icon) or by invoking command line start window, by pressing together

Windows Button + R and runnining command:

C:\Users\Emilian> compmgmt.msc


From there on navigate to

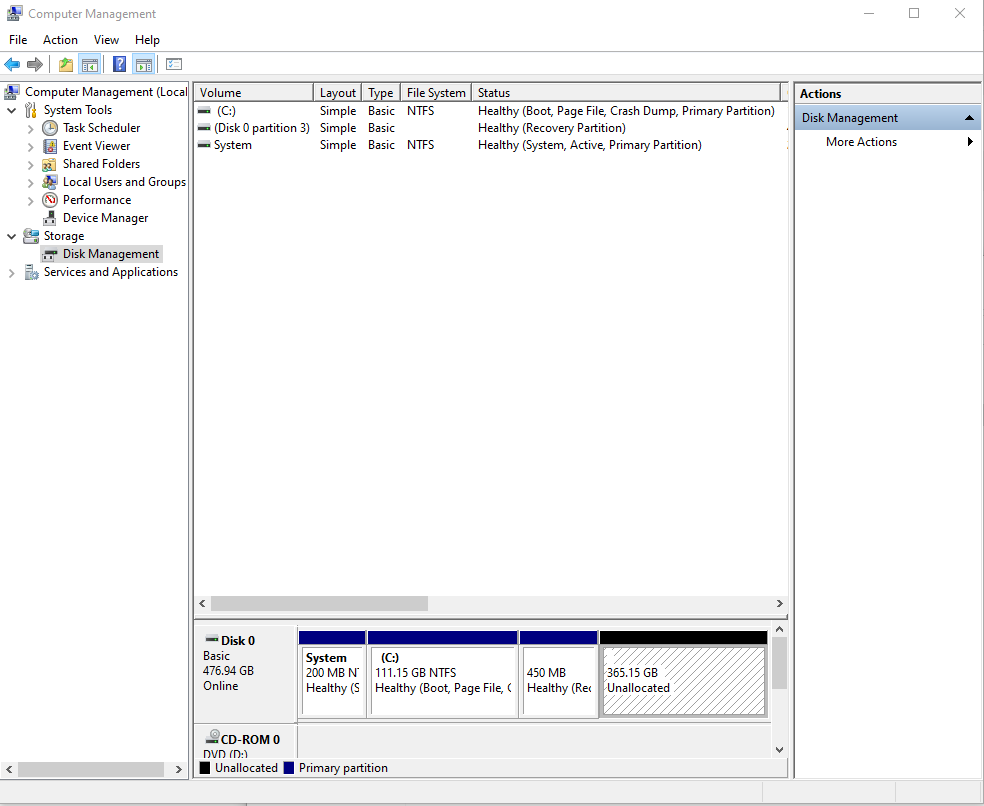
Storage -> Disk Management

windows-computer-management-screenshot

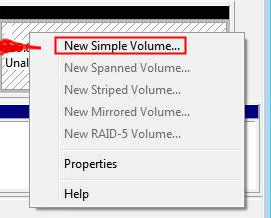
Go over box Unallocated (365.15 GB) and Press Right Mouse Button and select

-> New Simple Volume

new-simple-volume-screenshot

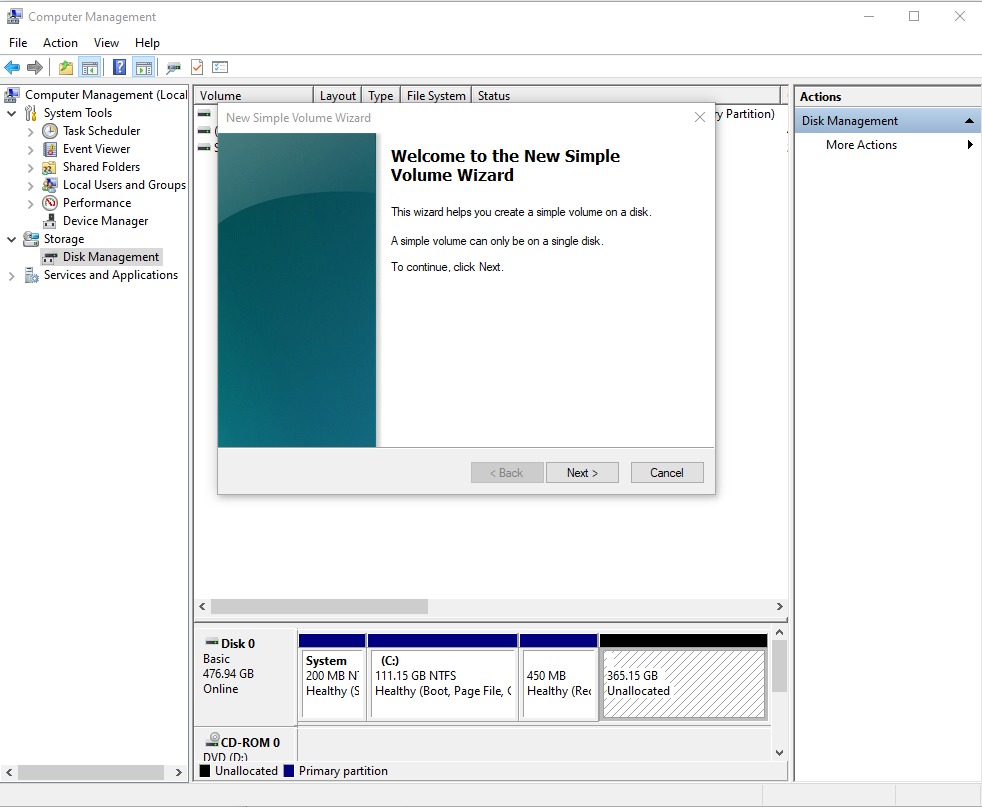
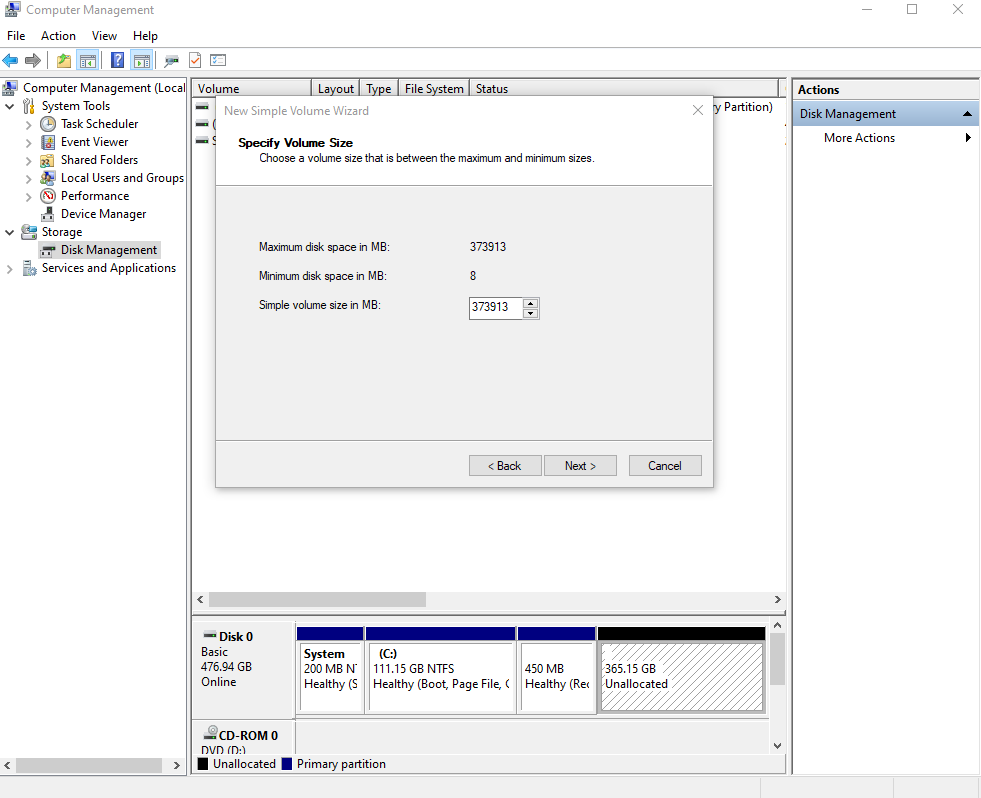
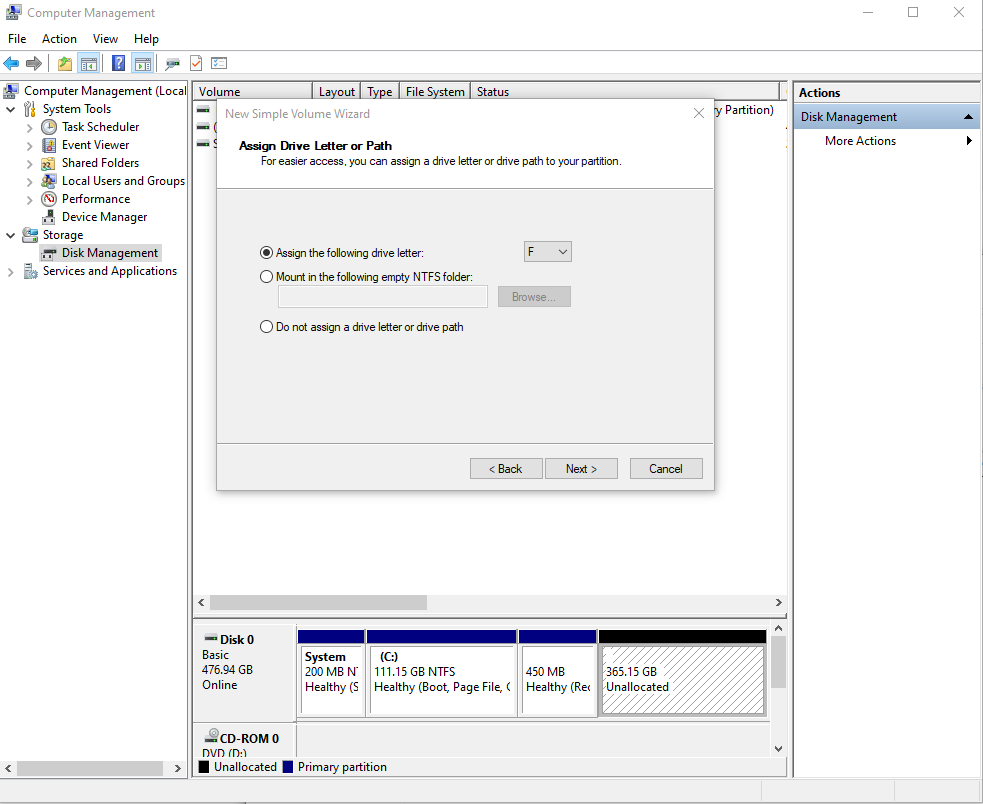
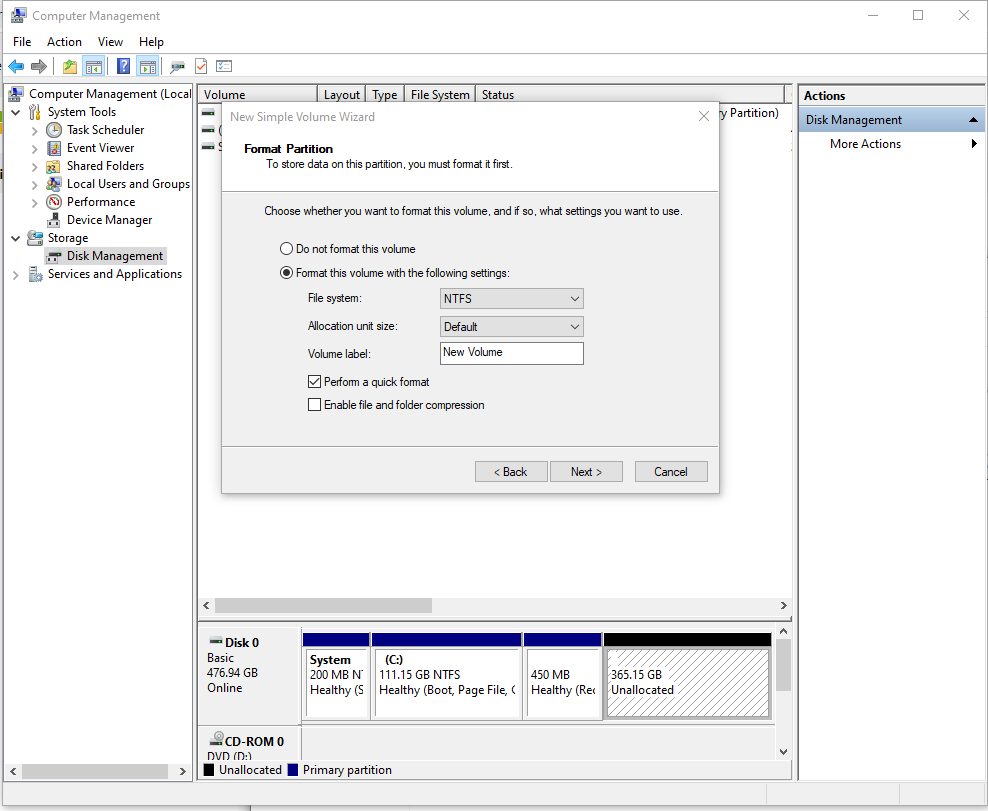
Next steps are quite self explanatory, had to just follow the New Simple Volme Wizard steps

windows-computer-management-screenshot

windows-computer-management-screenshot-3

windows-computer-management-screenshot-4

I Prefer to use NTFS because it is quicker and kinda of a standard since Windows 8+ onwards, besides that this computer will be used as a simple web browsing station and there is no plans the disk will ever have to be attached to a different OS like UNIX / LInux..However always keep in mind for compitability reasons VFAT Filesystem is usually not a bad idea. 

windows-computer-management-screenshot-5

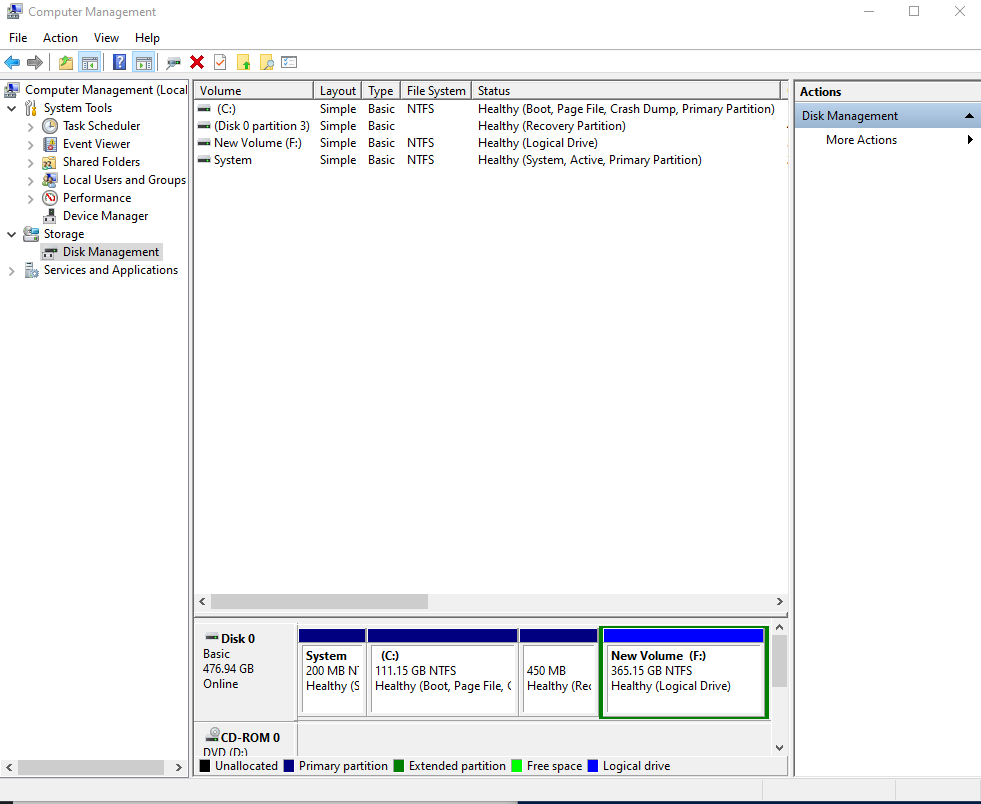
https://www.pc-freak.net/images/new-ntfs-volume-F-drive-windows-10-screenshot

As you can see the drive is prepared and now accessible from Windows Explorer under Drive F:\. If you wonder why the drive is not D:\, it seems to create the D:\ the unallocated space is supposed to be be on a separate Disk which waas not the case with this PC setup.

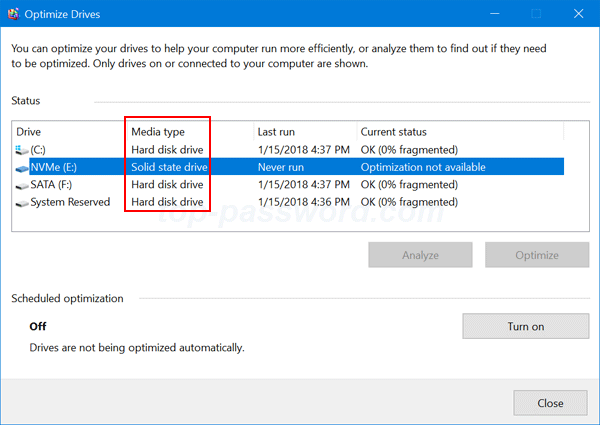
After installing the SSD drive and setting the proper partitions another good practice is to use Disk Defragmenter Win tool to optimize the Drives for speed. Another useful feature of disk degragmenter is you can use it to check what kind of hard drive you have installed e.g. SATA or SSD, as well as check if the installed SSD is NVME (Non-Volatile-Memory-Express), e.g. of a faster type.

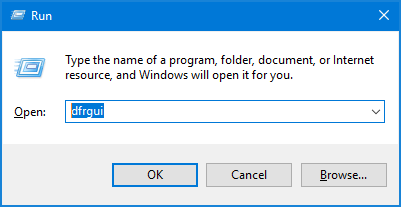
To run Disk Degrafmenter do  Win key + R


C:\Users\Emilian> dfrgui


dfrgui-command-screenshot-windows-1

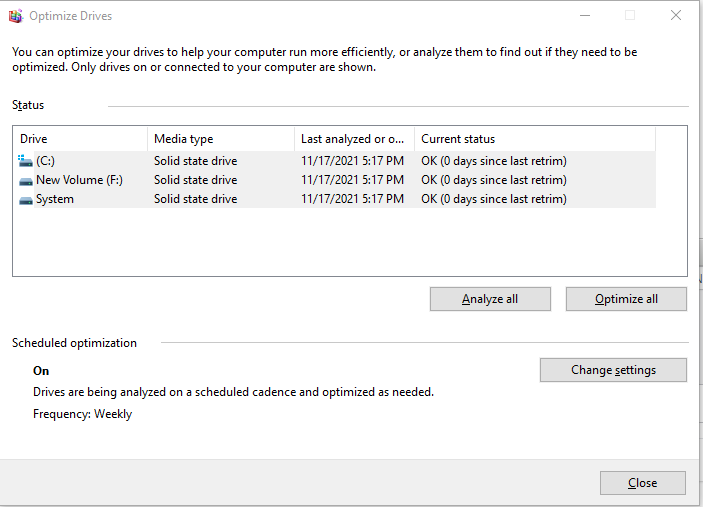
Below is what dfrgui reports on the ThinkCentre after running Disk Optimize for each Drive – (Optimize All) option.

dfrgui-partitions-on-lenovo-thinkcentre-windows-screeshot

Just to show you what you can see with dfrgui, here is the dfrgui screenshot from another PC that has attached both SATA disk and NVME SSD Drive.

dfrgui-command-screenshot-windows-2


How to do partitioning from Windows console with diskpart command (useful for scripting)


If you're coming from Linux world and you're pretty used to fdisk / cfdisk etc. to do partitioning daily, then you'll be most happy to hear about existence of the diskpart command in Windows, which is a kinda of an equivalent tool.
The tool is perfect for domain administrators which need to do some dynamic partitioning operations on multiple computers at once.

 To use diskpart you need Administrator command prompt, there is much you can do with diskpart, below is how to create another NTFS partition on a secondary

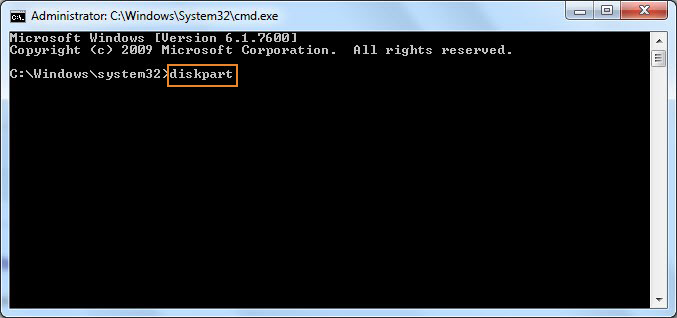
C:\Windows\System32> diskpart

diskpart-win-screenshot-1

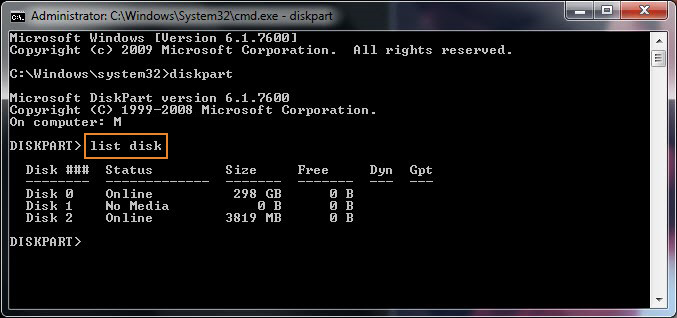
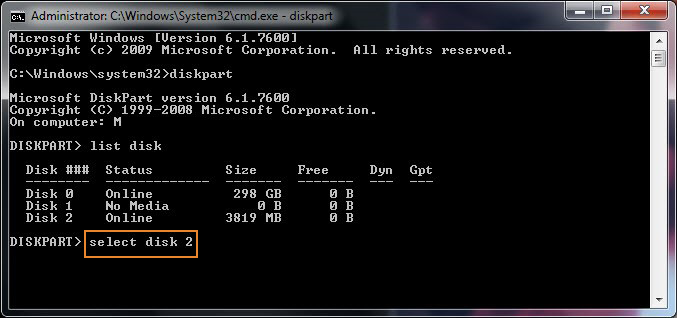
DISKPART> list disk

diskpart-win-screenshot-2

DISKPART> select disk 2

diskpart-win-screenshot-3

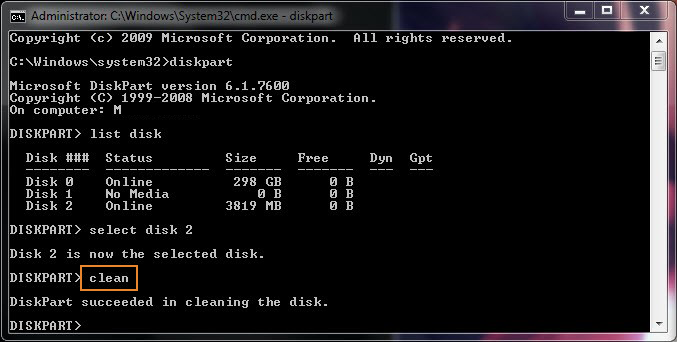
To clean all the content (e.g. delete everything on hard drive) e.g. all files and directories

!!! BEWARE NOT TO DELETE BY MISTAKE YOUR DATA DON'T BLAME ME IF YOU JUST COPY PASTE IRRESPONSIBLY WITHOUT THINKING.
AFTER ALL IT IS YOUR COMPUTER !!!

DISKPART> clean


diskpart-win-screenshot-4

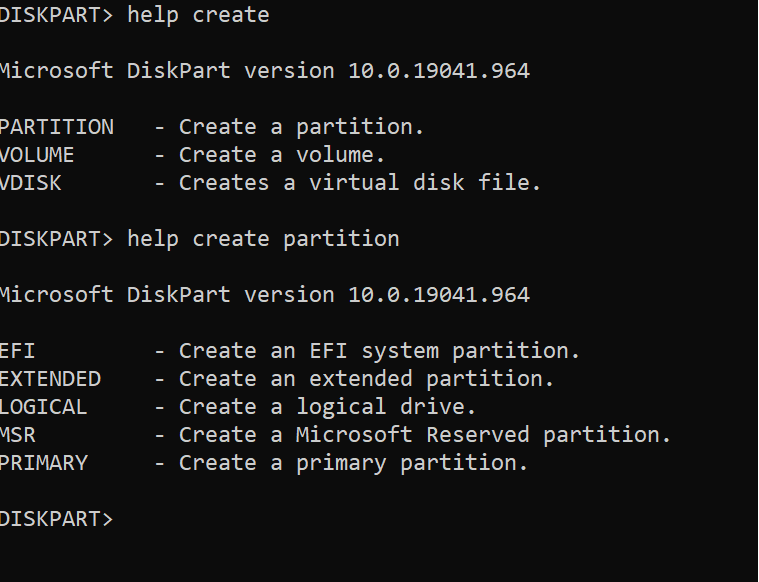
Next lets, create a partition, in below screenshot you can see how to use help and what are the supported partition types in Windows 10 as of year 2021.


/diskpart-help-create-partition-type-screenshot
 

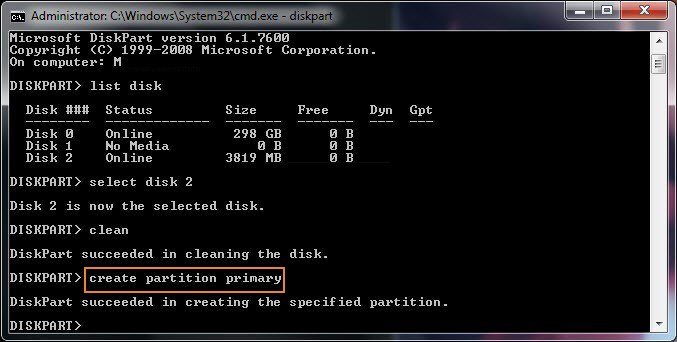
DISKPART> create partition primary

diskpart-win-screenshot-6

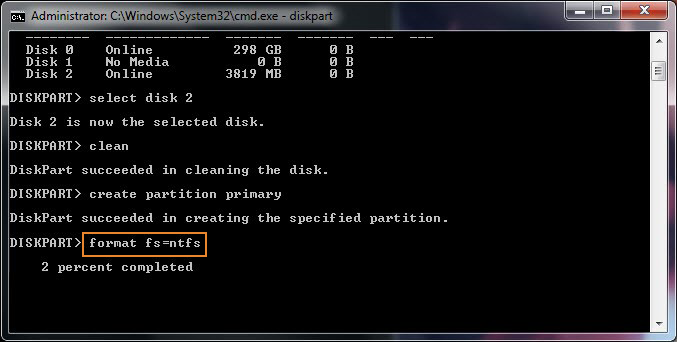
To format new assigned primary partition as NTFS

DISKPART> format fs=ntfs

diskpart-win-screenshot-7

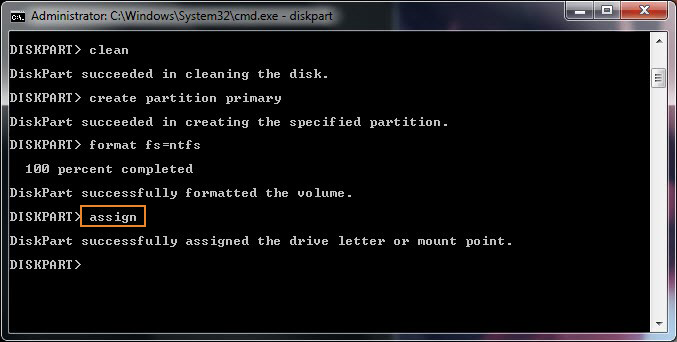
Once formatted to assign Drive letter that is the next available free one in order

DISKPART> assign


diskpart-win-screenshot-8

If instead of auto assigning a letter to new formatted partition, you would want to assign a specific Drive letter, lets say F:\> as it was in our case with the Graphical Windows Disk Management tool earlier in article.

DISKPART> assign letter=F


Using diskpart it is pretty easy to do much stuff from command line such as formatting a new attached empty unallocated drive, or formatting and setting a desired filesysteem of external attached Hard Drive. Note that the disk list arguments will list any externally attached Supported Storage and you can use disklist similarly to do quick format / repartition / wipe out data or whatever.

Further on just for fun I've run CPUID which is a great Windows freeware tool to report System Information, pretty much like the good old Everest such as exact CPU type, MainBoard, Graphics Card and Mainboard type of the certain hardware you have on running.

cpuid-screenshot-windows-10
 
That's all folks Hope this article, helped you learn something new.

Cheers 😉


Change Windows 10 default lock screen image via win registry LockScreenImage key change

Tuesday, September 21st, 2021

fix-lock-screen-missing-change-option-on-windows-10-windows-registry-icon

If you do work for a corporation on a Windows machine that is part of Windows Active Directory domain or a Microsoft 365 environment and your Domain admimistrator after some of the scheduled updates. Has enforced a Windows lock screen image change.
You  might be surprised to have some annoying corporation logo picture shown as a default Lock Screen image on your computer on next reoboot. Perhaps for some people it doesn't matter but for as a person who seriously like customizations, and a valuer of
freedom having an enforced picture logo each time I press CTRL + L (To lock my computer) is really annoying.

The logical question hence was how to reverse my desired image as  a default lock screen to enkoy. Some would enjoy some relaxing picture of a Woods, Cave or whatever Natural place landscape. I personally prefer simplicity so I simply use a simple purely black
background.

To do it you'll have anyways to have some kind of superuser access to the computer. At the company I'm epmloyeed, it is possible to temporary request Administrator access this is done via a software installed on the machine. So once I request it I become
Administratof of machine for 20 minutes. In that time I do used a 'Run as Administartor' command prompt cmd.exe and inside Windows registry do the following Registry change.

The first logical thing to do is to try to manually set the picture via:
 

Settings ->  Lock Screen

But unfortunately as you can see in below screenshot, there was no way to change the LockScreen background image.

Windows-settings-lockscreen-screenshot

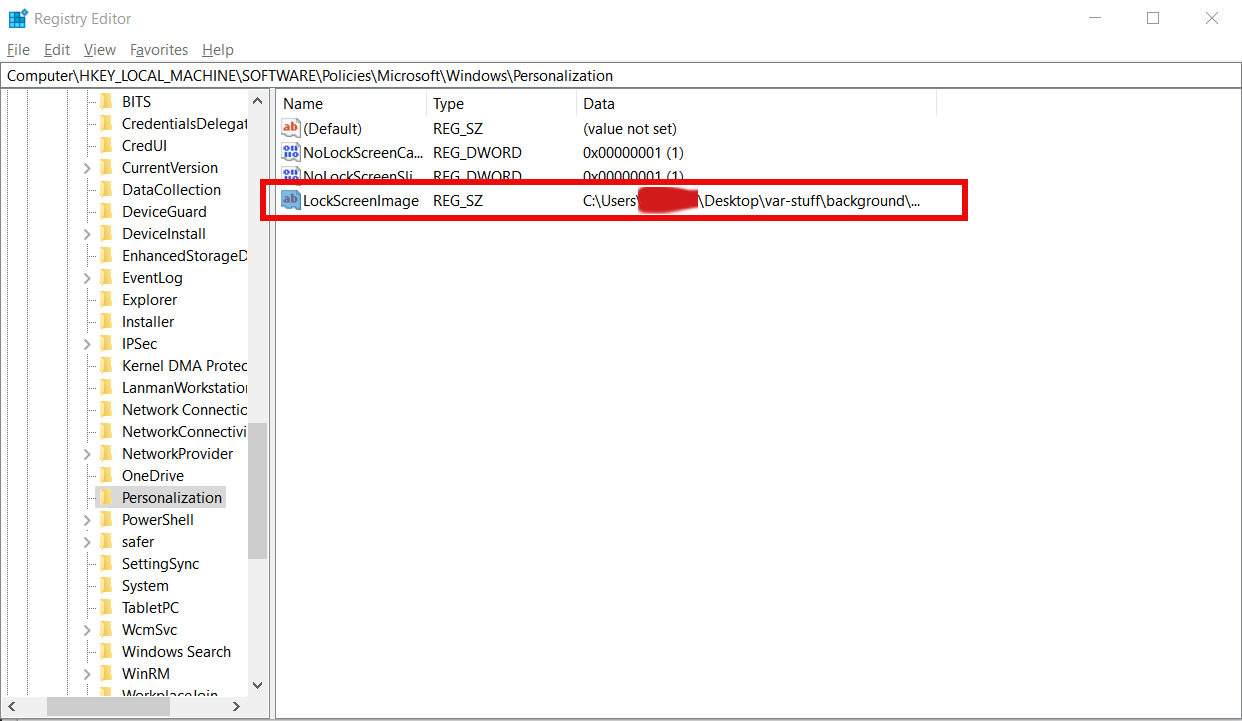
In Windows Registry Editor

I had to go to registry path


[HKEY_LOCAL_MACHINE\SOFTWARE\Policies\Microsoft\Windows\.]

And from there in create a new "String Value" key
 

"LockScreenImage"


so full registry key path should be equal to:


[HKEY_LOCAL_MACHINE\SOFTWARE\Policies\Microsoft\Windows\Personalization\LockScreenImage]"

The value to set is:

C:\Users\a768839\Desktop\var-stuff\background\Desired-background-picture.jpg

windows-registry-change-lock-screen-background-picture-from-registry-screenshot

If you want to set a black background picture for LockScreen like me you can download my black background picture from here.

That's all press CTRL + L  key combination and the black screen background lock screen picture will appear !

Hopefully the Domain admin, would not soon enforce some policty to update the registry keys or return your old registry database from backup if something crashs out with something strange to break just set configuration.

To test whether the setting will stay permanent after the next scheduled Windows PC update of policies enforced by the Active Directory (AD) sysadmin, run manually from CMD.EXE

C:\> gpupdate /force


The command will download latest policies from Windows Domain, try to lock the screen once again with Control + L, if the background picture is still there most likely the Picture change would stay for a long.
If you get again the corporation preset domain background instead,  you're out of luck and will have to follow the same steps every, now and then after a domani policy update.

Enjoy your new smooth LockScreen Image 🙂


Improve wordpress admin password encryption authentication keys security with WordPress Unique Authentication Keys and Salts

Friday, October 9th, 2020

wordpress-improve-security-logo-linux

Having a wordpress blog or website with an admistrator and access via a Secured SSL channel is common nowadays. However there are plenty of SSL encryption leaks already out there and many of which are either slow to be patched or the hosting companies does not care enough to patch on time the libssl Linux libraries / webserver level. Taking that in consideration many websites hosted on some unmaintained one-time run not-frequently updated Linux servers are still vulneable and it might happen that, if you paid for some shared hosting in the past and someone else besides you hosted the website and forget you even your wordpress installation is still living on one of this SSL vulnerable hosts. In situations like that malicious hackers could break up the SSL security up to some level or even if the SSL is secured use MITM (MAN IN THE MIDDLE) attack to simulate your well secured and trusted SSID Name WIFi network to  redirects the network traffic you use (via an SSL transparent Proxy) to connect to WordPress Administrator Dashbiard via https://your-domain.com/wp-admin. Once your traffic is going through the malicious hax0r even if you haven't used the password to authenticate every time, e.g. you have saved the password in browser and WordPress Admin Panel authentication is achieved via a Cookie the cookies generated and used one time by Woddpress site could be easily stealed one time and later from the vicious 1337 h4x0r and reverse the hash with an interceptor Tool and login to your wordpress …

Therefore to improve the wordpress site security it very important to have configured WordPress Unique Authentication Keys and Salts (known also as the WordPress security keys).

They're used by WordPress installation to have a uniquely generated different key and Salt from the default one to the opened WordPress Blog / Site Admin session every time.

So what are the Authentication Unique Keys and Salts and why they are Used?

Like with almost any other web application, when PHP session is opened to WordPress, the code creates a number of Cookies stored locally on your computer.

Two of the cookies created are called:

 wordpress_[hash]
wordpress_logged_in_[hash]

First  cookie is used only in the admin pages (WordPress dashboard), while the second cookie is used throughout WordPress to determine if you are logged in to WordPress or not. Note: [hash] is a random hashed value typically assigned to your session, therefore in reality the cookies name would be named something like wordpress_ffc02f68bc9926448e9222893b6c29a9.

WordPress session stores your authentication details (i.e. WordPress username and password) in both of the above mentioned cookies.

The authentication details are hashed, hence it is almost impossible for anyone to reverse the hash and guess your password through a cookie should it be stolen. By almost impossible it also means that with today’s computers it is practically unfeasible to do so.

WordPress security keys are made up of four authentication keys and four hashing salts (random generated data) that when used together they add an extra layer to your cookies and passwords. 

The authentication details in these cookies are hashed using the random pattern specified in the WordPress security keys. I will not get into too much details but as you might have heard in Cryptography Salts and Keys are important – an indepth explanation on Salts Cryptography (here). A good reading for those who want to know more on how does the authentication based and salts work is on stackexchange.

How to Set up Salt and Key Authentication on WordPress
 

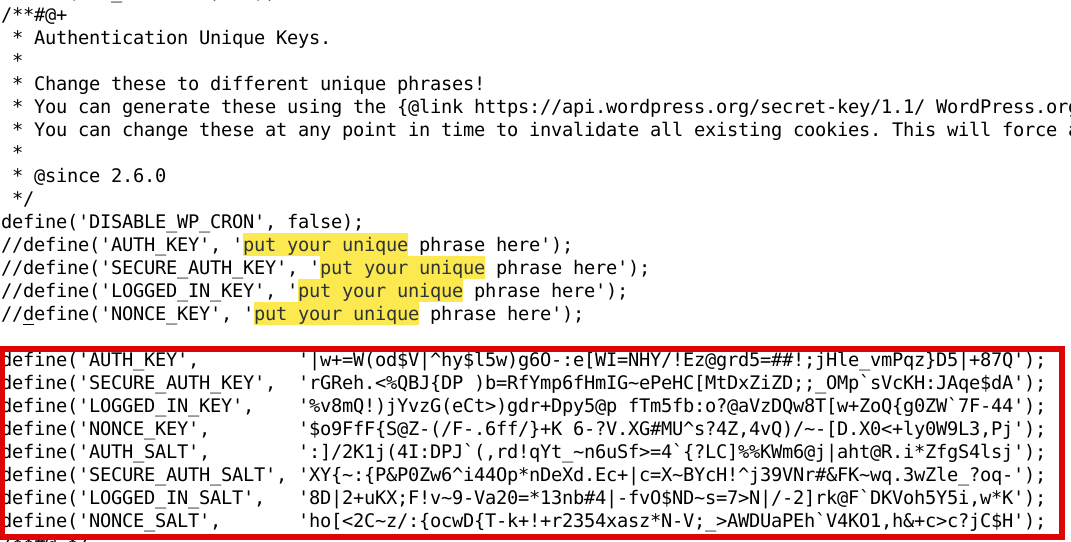
To be used by WP Salts and Key should be configured under wp-config.php usually they look like so:

wordpress-website-blog-salts-keys-wp-config-screenshot-linux

!!! Note !!!  that generating (manually or generated via a random generator program), the definition strings you have to use a random string value of more than 60 characters to prevent predictability 

The default on any newly installed WordPress Website is to have the 4 definitions with _KEY and the four _SALTs to be unconfigured strings looks something like:

default-WordPress-security-keys-and-salts-entries-in-wordPress-wp-config-php-file

Most people never ever take a look at wp-config.php as only the Web GUI Is used for any maintainance, tasks so there is a great chance that if you never heard specifically by some WordPress Security Expert forum or some Security plugin (such as WP Titan Anti Spam & Security) installed to report the WP KEY / SALT you might have never noticed it in the config.

There are 8 WordPress security keys in current WP Installs, but not all of them have been introduced at the same time.
Historically they were introduced in WP versions in below order:

WordPress 2.6: AUTH_KEY, SECURE_AUTH_KEY, LOGGED_IN_KEY
WordPress 2.7: NONCE_KEY
WordPress 3.0: AUTH_SALT, SECURE_AUTH_SALT, LOGGED_IN_SALT, NONCE_SALT

Setting a custom random generated values is an easy task as there is already online Wordpress Security key Random generator.
You can visit above address and you will get an automatic randomly generated values which could be straight copy / pasted to your wp-config.php.

Howeever if you're a paranoic on the guessability of the random generator algorithm, I would advice you use the generator and change some random values yourself on each of the 8 line, the end result in the configuration should be something similar to:


define('AUTH_KEY',         '|w+=W(od$V|^hy$F5w)g6O-:e[WI=NHY/!Ez@grd5=##!;jHle_vFPqz}D5|+87Q');
define('SECURE_AUTH_KEY',  'rGReh.<%QBJ{DP )p=BfYmp6fHmIG~ePeHC[MtDxZiZD;;_OMp`sVcKH:JAqe$dA');
define('LOGGED_IN_KEY',    '%v8mQ!)jYvzG(eCt>)bdr+Rpy5@t fTm5fb:o?@aVzDQw8T[w+aoQ{g0ZW`7F-44');
define('NONCE_KEY',        '$o9FfF{S@Z-(/F-.6fC/}+K 6-?V.XG#MU^s?4Z,4vQ)/~-[D.X0<+ly0W9L3,Pj');
define('AUTH_SALT',        ':]/2K1j(4I:DPJ`(,rK!qYt_~n8uSf>=4`{?LC]%%KWm6@j|aht@R.i*ZfgS4lsj');
define('SECURE_AUTH_SALT', 'XY{~:{P&P0Vw6^i44Op*nDeXd.Ec+|c=S~BYcH!^j39VNr#&FK~wq.3wZle_?oq-');
define('LOGGED_IN_SALT',   '8D|2+uKX;F!v~8-Va20=*d3nb#4|-fv0$ND~s=7>N|/-2]rk@F`DKVoh5Y5i,w*K');
define('NONCE_SALT',       'ho[<2C~z/:{ocwD{T-w+!+r2394xasz*N-V;_>AWDUaPEh`V4KO1,h&+c>c?jC$H');


Wordpress-auth-key-secure-auth-salt-Linux-wordpress-admin-security-hardening

Once above defines are set, do not forget to comment or remove old AUTH_KEY / SECURE_AUTH_KEY / LOGGED_IN_KEY / AUTH_SALT / SECURE_AUTH_SALT / LOGGED_IN_SALT /NONCE_SALT keys.

The values are configured one time and never have to be changed, WordPress installation automatic updates or Installed WP Plugins will not tamper the value with time.
You should never expand or show your private generated keys to anyone otherwise this could be used to hack your website site.
It is also a good security practice to change this keys, especially if you have some suspects someone has somehow stolen your wp-onfig keys. 
 

Closure

Having AUTH KEYs and Properly configured is essential step to improve your WordPress site security. Anytime having any doubt for a browser hijacked session (or if you have logged in) to your /wp-admin via unsecured public Computer with a chance of a stolen site cookies you should reset keys / salts to a new random values. Setting the auth keys is not a panacea and frequent WP site core updates and plugins should be made to secure your install. Always do frequent audits to WP owned websites with a tool such as WPScan is essential to keep your WP Website unhacked.


Howto Configure Linux shell Prompt / Setup custom Terminal show Prompt using default shell variables PS1, PS2, PS3, PS4

Tuesday, August 27th, 2019

how-to-configure-lunux-bsd-shell-prompt-ps1-howto-make-your-terminal-console-shell-nice-and-shiny-1

System Console, Command Operation Console  or Terminal is a Physical device for text (command) input from keyboard, getting the command output and monitoring the status of a shell or programs I/O operations generated traditionally with attached screen. With the development of Computers, physical consoles has become emulated and the input output is translated on the monitor usually via a data transfer  protocol historically mostly over TCP/IP connection to remote IP with telnet or rsh, but due to security limitations Consoles are now accessed over data (encrypted) network protocols with SHA2 / MD5 cryptography algorithm enabled such as over SSH (Secure Shell) network protocol..
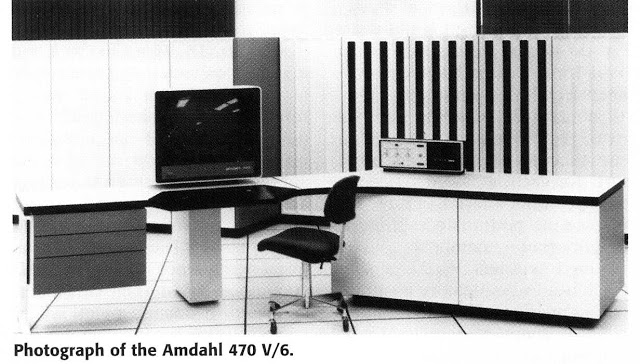
The ancestors of physical consoles which in the past were just a Terminal (Monitoring / Monitor device attached to a MainFrame system computer).

Mainframe-physical-terminal-monitor-Old-Computer

What is Physical Console
A classical TTY (TeleTYpewriter) device looked like so and served the purpose of being just a communication and display deivce, whether in reality the actual computing and storage tape devices were in a separate room and communicating to Terminal.

mainframe-super-computer-computing-tape-machine
TTYs are still present in  modern UNIX like GNU / Linux distrubions OSes and the BSD berkley 4.4 code based FreeBSD / NetBSD / OpenBSD if you have installed the OS on a physical computer in FreeBSD and Solaris / SunOS there is also tty command. TTY utility in *nix writes the name of the terminal attached to standard input to standard output, in Linux there is a GNU remake of same program part called GNU tty of coreutils package (try man tty) for more.

The physical console is recognizable in Linux as it is indicated with other tree letters pts – (pseudo terminal device) standing for a terminal device which is emulated by an other program (example: xterm, screen, or ssh are such programs). A pts is the slave part of a pts is pseudo there is no separate binary program for it but it is dynamically allocated in memory.
PTS is also called Line consle in Cisco Switches / Router devices, VTY is the physical Serial Console connected on your Cisco device and the network connection emulation to network device is creates with a virtual console session VTL (Virtual Terminal Line). In freebsd the actual /dev/pts* /dev/tty* temporary devices on the OS are slightly different and have naming such as /dev/ttys001.
But the existence of tty and pts emulator is not enough for communicating interrupts to Kernel and UserLand binaries of the Linux / BSD OS, thus to send the commands on top of it is running a System Shell as CSH / TSH / TCSH or BASH which is usually the first program set to run after user logs in over ptty or pseudo tty virtual terminal.

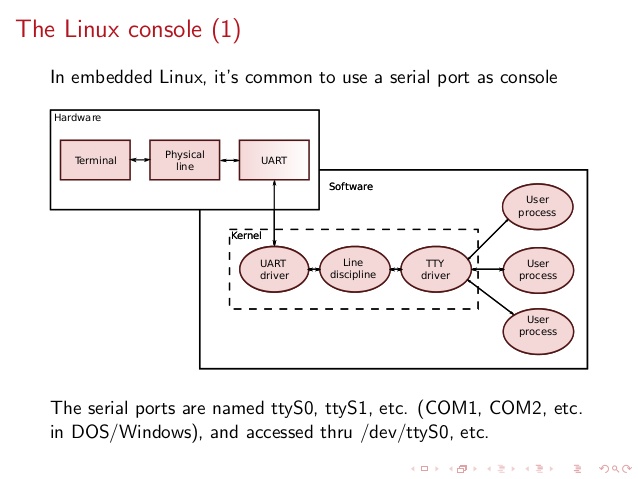
linux-tty-terminal-explained-brief-intro-to-linux-device-drivers-20-638


Setting the Bash Prompt in Terminal / Console on GNU / Linux

Bash has system environments to control multiple of variables, which are usually visible with env command, one important variable to change in the past was for example USER / USERNAME which was red by IRC Chat clients  such as BitchX / irssi and could be displayed publicly so if not changed to a separate value, one could have known your Linux login username by simple /whois query to the Nickname in question (if no inetd / xinetd service was running on the Linux box and usually inetd was not running).

Below is my custom set USER / USERNAME to separate

hipo@pcfreak:~$ env|grep USER
USERNAME=Attitude
USER=Attitude

There is plenty of variables to  tune email such as MAIL store directory, terminal used TERM, EDITOR etc. but there are some
variables that are not visible with env query as they're not globally available for all users but just for the single user, to show this ones you need to use declare command instead, to get a full list of All Single and System Wide defined variables and functions type declare in the bash shell, for readability, below is last 10 returned results:


hipo@pcfreak:~$ declare | tail -10
{
    local quoted=${1//\'/\'\\\'\'};
    printf "'%s'" "$quoted"
}
quote_readline ()
{
    local quoted;
    _quote_readline_by_ref "$1" ret;
    printf %s "$ret"
}


PS1 is present there virtually on any modern Linux distribution and is installed through user home's directory $HOME/.bashrc , ~/.profile or .bash_profile or System Wide globally for all existing users in /etc/passwd (password database file) from /etc/bash.bashrc
In Debian / Ubuntu / Mint GNU / Linux this system variable is set in user home's .bashrc but in Fedora / RHEL Linux distro,
PS1 is configured from /home/username/.bash_profile to find out where PS1 is located for ur user:

cd ~
grep -Rli PS1 .bash*

Here is one more example:

hipo@pcfreak:~$ declare|grep -i PS1|head -1
PS1='\[\e]0;\u@\h: \w\a\]${debian_chroot:+($debian_chroot)}\u@\h:\w\$ '
 

hipo@pcfreak:~$ grep PS1 /etc/bash.bashrc
[ -z “$PS1” ] && return
# but only if not SUDOing and have SUDO_PS1 set; then assume smart user.
if ! [ -n “${SUDO_USER}” -a -n “${SUDO_PS1}” ]; then
  PS1='${debian_chroot:+($debian_chroot)}\u@\h:\w\$ '


Getting current logged in user shell configured PS1 variable can be done with echo:

hipo@pcfreak:~$ echo $PS1
\[\e]0;\u@\h: \w\a\]${debian_chroot:+($debian_chroot)}\u@\h:\w\$

So lets observe a little bit the meaning of this obscure line of (code) instructions code which are understood by BASH when being red from PS1 var to do so, I'll give a list of meaning of main understood commands, each of which is defined with \.

The ${debian_chroot} shell variable is defined from /etc/bash.bashrc

Easiest way to change PS1 is to export the string you like with the arguments like so:


root@linux:/home/hipo# export PS1='My-Custom_Server-Name# '
My-Custom_Server-Name# echo $PS1
My-Custom_Server-Name#


  •     \a : an ASCII bell character (07)
  •     \d : the date in “Weekday Month Date” format (e.g., “Tue May 26”)
  •     \D{format} : the format is passed to strftime(3) and the result is inserted into the prompt string; an empty format results in a locale-specific time representation. The braces are required
  •     \e : an ASCII escape character (033)
  •     \h : the hostname up to the first ‘.’
  •     \H : the hostname
  •     \j : the number of jobs currently managed by the shell
  •     \l : the basename of the shell's terminal device name
  •     \n : newline
  •     \r : carriage return
  •     \s : the name of the shell, the basename of $0 (the portion following the final slash)
  •     \t : the current time in 24-hour HH:MM:SS format
  •     \T : the current time in 12-hour HH:MM:SS format
  •     \@ : the current time in 12-hour am/pm format
  •     \A : the current time in 24-hour HH:MM format
  •     \u : the username of the current user
  •     \v : the version of bash (e.g., 2.00)
  •     \V : the release of bash, version + patch level (e.g., 2.00.0)
  •     \w : the current working directory, with $HOME abbreviated with a tilde
  •     \W : the basename of the current working directory, with $HOME abbreviated with a tilde
  •     \! : the history number of this command
  •     \# : the command number of this command
  •     \$ : if the effective UID is 0, a #, otherwise a $
  •     \nnn : the character corresponding to the octal number nnn
  •     \\ : a backslash
  •     \[ : begin a sequence of non-printing characters, which could be used to embed a terminal control sequence into the prompt
  •     \] : end a sequence of non-printing characters

The default's PS1 set prompt on Debian Linux is:
 

echo $PS1
\[\e]0;\u@\h: \w\a\]${debian_chroot:+($debian_chroot)}\u@\h:\w\$


As you can see \u (print username) \h (print hostname)  and \W (basename of current working dir) or \w (print $HOME/current working dir)
are the most essential, the rest are bell character, escape character etc.

A very good way to make your life easier and learn the abbreviations / generate exactly the PS1 PROMPT you want to have is with Easy Bash PS1 Generator Web Utility
with which you can just click over buttons that are capable to produce all of the PS1 codes.
 

1. How to show current hour:minute:seconds / print full date in Prompt Shell (PS)


Here is an example with setting the Bash Shell prompt  to include also the current time in format hour:minute:seconds (very useful if you're executing commands on a critical servers and you run commands in some kind of virtual terminal like screen or tmux.
 

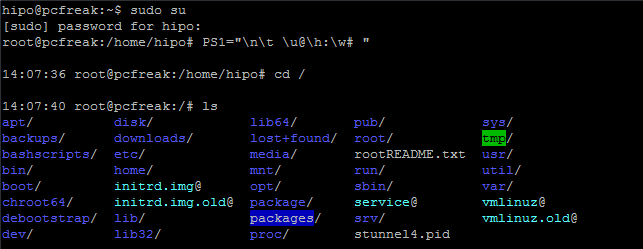
root@pcfreak:~# PS1="\n\t \u@\h:\w# "
14:03:51 root@pcfreak:/home#


PS1-how-to-setup-date-time-hour-minutes-and-seconds-in-bash-shell-prompt


export PS1='\u@\H \D{%Y-%m-%d %H:%M;%S%z}] \W ] \$ '


export-PS1-Linux-set-full-date-time-clock-prompt-screenshot-console


Make superuser appear in RED color (adding PS1 prompt custom color for a User)
 

root@pcfreak:~$  PS1="\\[$(tput setaf 1)\\]\\u@\\h:\\w #\\[$(tput sgr0)\\]"


how-to-change-colors-in-bash-prompt-shell-on-linux-shell-environment

In above example the Shell Prompt Color changed is changed for administrator (root) to shebang symbol # in red, green, yellow and blue for the sake to show you how it is done, however this example can be adapted for any user on the system. Setting different coloring for users is very handy if you have to administer Mail Server service like Qmail or other Application that consists of multiple small ones of multiple daemons such as qmail + vpopmail + clamd + mysql etc. Under such circumstances, coloring each of the users in different color like in the example for debugging is very useful.

Coloring the PS1 system prompt on Linux to different color has been a standard practice in Linux Server environments running Redhat Enterprise Linux (RHEL) and SuSE Enterprise Linux and some Desktop distributions such as Mint Linux.

To make The Root prompt Red colored only for system super user (root) on any Linux distribution
, add the following to /etc/bashrc, e.g.

vim /etc/bashrc


# If id command returns zero, you've root access.
if [ $(id -u) -eq 0 ];
then # you are root, set red colour prompt
  PS1="\\[$(tput setaf 1)\\]\\u@\\h:\\w #\\[$(tput sgr0)\\]"
else # normal
  PS1="[\\u@\\h:\\w] $"
fi


2. How to make the prompt of a System user appear Green


Add to ~/.bashrc  following line


PS1="\\[$(tput setaf 2)\\]\\u@\\h:\\w #\\[$(tput sgr0)\\]"


3. Print New line, username@hostname, base PTY, shell level, history (number), newline and full working directory $PWD


export PS1='\n[\u@\h \l:$SHLVL:\!]\n$PWD\$ '


4. Showing the numbert of jobs the shell is currently managing.


This is useful if you run and switch with fg / bg (foreground / background) commands
to switch between jobs and forget some old job.


export PS1='\u@\H \D{%Y-%m-%d %H:%M;%S%z}] \W \$]'


Multi Lines Prompt / Make very colorful Shell prompt full of stats info

PS1="\n\[\033[35m\]\$(/bin/date)\n\[\033[32m\]\w\n\[\033[1;31m\]\u@\h: \[\033[1;34m\]\$(/usr/bin/tty | /bin/sed -e ‘s:/dev/::’): \[\033[1;36m\]\$(/bin/ls -1 | /usr/bin/wc -l | /bin/sed ‘s: ::g’) files \[\033[1;33m\]\$(/bin/ls -lah | /bin/grep -m 1 total | /bin/sed ‘s/total //’)b\[\033[0m\] -> \[\033[0m\]"


prompt-show-how-many-files-and-virtual-pts-ps1-linux
 

5. Set color change on command failure


If you have a broken command or the command ended with non zero output with some kind of bad nasty message and you want to make, that more appearing making it red heighlighted, here is how:


PROMPT_COMMAND='PS1="\[\033[0;33m\][\!]\`if [[ \$? = “0” ]]; then echo “\\[\\033[32m\\]”; else echo “\\[\\033[31m\\]”; fi\`[\u.\h: \`if [[ `pwd|wc -c|tr -d ” “` > 18 ]]; then echo “\\W”; else echo “\\w”; fi\`]\$\[\033[0m\] “; echo -ne “\033]0;`hostname -s`:`pwd`\007"'


6. Other beautiful PS1 Color Prompts with statistics


PS1="\n\[\e[32;1m\](\[\e[37;1m\]\u\[\e[32;1m\])-(\[\e[37;1m\]jobs:\j\[\e[32;1m\])-(\[\e[37;1m\]\w\[\e[32;1m\])\n(\[\[\e[37;1m\]! \!\[\e[32;1m\])-> \[\e[0m\]"


another-very-beuatiful-bash-colorful-prompt


7. Add Muliple Colors to Same Shell prompt


function prompt { local BLUE="\[\033[0;34m\]” local DARK_BLUE=”\[\033[1;34m\]” local RED=”\[\033[0;31m\]” local DARK_RED=”\[\033[1;31m\]” local NO_COLOR=”\[\033[0m\]” case $TERM in xterm*|rxvt*) TITLEBAR=’\[\033]0;\u@\h:\w\007\]’ ;; *) TITLEBAR=”” ;; esac PS1=”\u@\h [\t]> ” PS1=”${TITLEBAR}\ $BLUE\u@\h $RED[\t]>$NO_COLOR " PS2='continue-> ' PS4='$0.$LINENO+ ' }

colorful-prompt-blue-and-red-linux-console-PS1
 

8. Setting / Change Shell background Color


changing-background-color-of-bash-shell-prompt-linux


export PS1="\[$(tput bold)$(tput setb 4)$(tput setaf 7)\]\u@\h:\w $ \[$(tput sgr0)\]"


tput Color Capabilities:

  • tput setab [1-7] – Set a background color using ANSI escape
  • tput setb [1-7] – Set a background color
  • tput setaf [1-7] – Set a foreground color using ANSI escape
  • tput setf [1-7] – Set a foreground color

tput Text Mode Capabilities:

  • tput bold – Set bold mode
  • tput dim – turn on half-bright mode
  • tput smul – begin underline mode
  • tput rmul – exit underline mode
  • tput rev – Turn on reverse mode
  • tput smso – Enter standout mode (bold on rxvt)
  • tput rmso – Exit standout mode
  • tput sgr0 – Turn off all attributes

Color Code for tput:

  • 0 – Black
  • 1 – Red
  • 2 – Green
  • 3 – Yellow
  • 4 – Blue
  • 5 – Magenta
  • 6 – Cyan
  • 7 – White


9. Howto Use bash shell function inside PS1 variable

If you administrate Apache or other HTTPD servers or any other server whose processes are forked and do raise drastically at times to keep an eye while actively working on the server.


function httpdcount { ps aux | grep apache2 | grep -v grep | wc -l } export PS1="\u@\h [`httpdcount`]> "

10. PS2, PS3, PS4 little known variables
 

I'll not get much into detail to PS2, PS3, PS4 but will mention them as perhaps many people are not even aware they exist.
They're rarely used in the daily system administrator's work but useful for Shell scripting purposes of Dev Ops and Shell Scripting Guru Programmers.

  • PS2 – Continuation interactive prompt

A very long unix command can be broken down to multiple line by giving \ at the end of the line. The default interactive prompt for a multi-line command is “> “.  Let us change this default behavior to display “continue->” by using PS2 environment variable as shown below.

hipo@db-host :~$ myisamchk –silent –force –fast –update-state \
> –key_buffer_size=512M –sort_buffer_size=512M \
> –read_buffer_size=4M –write_buffer_size=4M \
> /var/lib/mysql/bugs/*.MYI
[Note: This uses the default “>” for continuation prompt]

  • PS3 – Prompt used by “select” inside shell script (usefulif you write scripts with user prompts)


  • PS4 – Used by “set -x” to prefix tracing output
    The PS4 shell variable defines the prompt that gets displayed.

You can find  example with script demonstrating PS2, PS3, PS4 use via small shell scripts in thegeekstuff's article Take control of PS1, PS2, PS3, PS4 read it here


Summary


In this article, I've shortly reviewed on what is a TTY, how it evolved into Pseudo TTY and how it relates to current shells which are the interface communicating with the modern UNIX like Operating systems's userland and kernel.
Also it was reviewed shortly how the current definitions of shell variables could be viewed with declare cmd. Also I went through on how to display the PS1 variable and  on how to modify PS1 and make the prompt different statistics and monitoring parameters straight into the command shell. I've shown some common PS1 strings that report on current date hour, minute, seconds, modify the coloring of the bash prompt shell, show processes count, and some PS1 examples were given that combines beuatiful shell coloring as well as how the Prompt background color can be changed.
Finally was shown how a combination of commands can be executed by exporting to PS1 to update process counf of Apache on every shell prompt iteration.
Other shell goodies are mostly welcome


Export / Import PuTTY Tunnels SSH Sessions from one to another Windows machine howto

Thursday, January 31st, 2019

Putty-copy-ssh-tunnels-howto-from-one-to-another-windows-machine-3

As I've started on job position – Linux Architect in last November 2018 in Itelligence AG as a contractor (External Service) – a great German company who hires the best IT specialists out there and offers a flexible time schedules for emploees doing various very cool IT advanced operations and Strategic advancement of SAP's Cloud used Technology and Services improvements for SAP SE – SAP S4HANA and HEC (HANA Enterprise Cloud) and been given for work hardware a shiny Lenovo Thinkpad 500 Laptop with Windows 10 OS (SAP pre-installed), I needed to make some SSH Tunnels to machines to (Hop Station / Jump hosts) for that purpose, after some experimenting with MobaXterm Free (Personal Edition 11.0) and the presumable limitations of tunnels of the free client as well as my laziness to add the multiple ssh tunnels to different ssh / rdp / vnc etc. servers, finally I decided to just copy all the tunnels from a colleague who runs Putty and again use the good old Putty – old school Winblows SSH Terminal Client but just for creating the SSH tunnels and for rest use MobaXterm, just like in old times while still employe in Hewlett Packard. For that reason to copy the Tunnels from my dear German Colleague Henry Beck (A good herated collegue who works in field of Storage dealing with NetApps / filer Clusters QNap etc.).

Till that moment I had no idea how copying a saved SSH Tunnels definition is possible, I did a quick research just to find out this is done not with Putty Interface itself but, insetead through dumping Windows Putty Stored Registry records into a File, then transfer to the PC where Tunnels needs to be imported and then again (either double click the registry file) to load it, into registry or use Windows registry editor command line interface reg, here is how:
 

1. Export


Run cmd.exe (note below command) 

requires elevated Run as Administrator prompt:

Only sessions:

regedit /e "%USERPROFILE%\Desktop\putty-sessions.reg" HKEY_CURRENT_USER\Software\SimonTatham\PuTTY\Sessions

All settings:

regedit /e "%USERPROFILE%\Desktop\putty.reg" HKEY_CURRENT_USER\Software\SimonTatham

Powershell:

If you have powershell installed on machine, to dump

Only sessions:


reg export HKCU\Software\SimonTatham\PuTTY\Sessions ([Environment]::GetFolderPath("Desktop") + "\putty-sessions.reg")

All settings:

reg export HKCU\Software\SimonTatham ([Environment]::GetFolderPath("Desktop") + "\putty.reg")


2. Import

Double-click on the 

*.reg

 file and accept the import.


Alternative ways:


cmd.exe

require elevated command prompt:

regedit /i putty-sessions.reg regedit /i putty.reg

PowerShell:

reg import putty-sessions.reg reg import putty.reg


Below are some things to consider:

Note !do not replace 

SimonTatham

 with your username.


Note !: It will create a 

reg

 file on the Desktop of the current user (for a different location modify path)


Note !: It will not export your related (old system stored) SSH keys.

What to expect next?

Putty-Tunnels-SSH-Sessions-screenshot-Windows

The result is in Putty you will have the Tunnel sessions loadable when you launch (Portable or installed) Putty version.
Press Load button over the required saved Tunnels list and there you go under


Connection SSH -> Tunnels 


you will see all the copied tunnels.

Enjoy!

How to install KVM Kernel-based Virtual Machine Virtualization on Linux

Sunday, October 14th, 2018

install-KVM-Kernel-based-Virtual-Machine-virtualization-on-Linux

If you want to run multiple virtual machines on GNU / Linux server or your Linux powered Desktop you have the possibility to use a couple of Virtual Machines just to name a few VirtualBox and VMWare are the option the native way to do it is using the Linux kernel via a loadable kernel module called KVM (Kernel-based Virtual Machine).
Though Oracle's Virtualbox generally works and you could add new test beds virtual machines (install multiple Linux / *BSD OS) it is not fully Free Software and not even fully open source licensed, VMWare even though superior as a Virtualization product is proprietary and its application costs a lot of money which not each develpoper or small / mid-sized company could afford.

Once the kvm.ko module is loaded your Linux kernel turns into a full-featured Virtual Machine Hypervisor.
Starting with Linux kernel 2.6.X the KVM Hypervisor is available and easy to install virtually all modern Linux distributions Redhat / CentOS Debian / Ubuntu etc. support it and its up to running few commands to install and start using the Power of Kernel embedded Virtualization.

KVM could be used to run in parallel multiple Operating Systems such as Windows / Linux / FreeBSD and others of BSDs family,  each running under a separate virtual machine with its private dedicated (isolated), disc, graphic card, network card etc.

To start up I assume you have already installed some kind of Linux distribution either locally or on a remote dedicated server.
 

1. Installing KVM on Debian GNU / Linux / Ubuntu / Mint and other deb based distros


Using APT tool install below packages:


root@jeremiah:~# apt install –yes qemu-kvm libvirt-clients libvirt-daemon-system bridge-utils libguestfs-tools genisoimage virtinst libosinfo-bin


2. Installing virt-manager GUI to manage Virtual servers


root@jeremiah:~# apt-cache show virt-manager|grep -i desc -A 1
Description-en: desktop application for managing virtual machines
 It presents a summary view of running domains and their live performance &

Description-md5: 9f7f584744b77cdacc2291f2a8ac220e
Homepage: http://virt-manager.et.redhat.com/


root@jeremiah:~# apt install –yes virt-manager


virtual-manager-kvm-gnu-linux-virtual-machines-cpu-hdd-load-statistics-screenshot


virtual-manager-fedora-28-linux-virtual-machine-settings-screenshot


3. Configure bridged networking to allow access to newly configured VMs

Bridging has to be added via /etc/network/interfaces therefore it is a good idea to create a backup of it before modifying:


# cp -rpf /etc/network/interfaces /etc/network/interfaces.bakup-$(echo $(date '+%Y-%m-%d-%H'))


# vim /etc/network/interfaces

auto br0
 iface br0 inet static
         address 10.15.44.26
         netmask 255.255.255.192
         broadcast 10.15.44.63
         dns-nameservers 10.0.80.11 10.0.80.12
         # set static route for LAN
      post-up route add -net 10.0.0.0 netmask 255.0.0.0 gw 10.18.44.1
      post-up route add -net 161.26.0.0 netmask 255.255.0.0 gw 10.18.44.1
         bridge_ports eth0
         bridge_stp off
         bridge_fd 0
         bridge_maxwait 0
 
 # br1 setup with static wan IPv4 with ISP router as a default gateway
 auto br1
 iface br1 inet static
         address 192.168.222.51
         netmask 255.255.255.248
         broadcast 192.168.222.55
         gateway 192.168.222.49
         bridge_ports eth1
         bridge_stp off
         bridge_fd 0
         bridge_maxwait 0


Once file is saved in vim editor restart the networking.


# systemctl restart network.manager


To verify whether the bridge has been succesfully upped.


root@jeremiah:/home/hipo/kvm# brctl show
bridge name    bridge id        STP enabled    interfaces
virbr0        8000.525400cb1cd1    yes        virbr0-nic


4. List all installable Virtual OS images
 

root@jeremiah:/home/hipo/kvm# virt-builder -list
centos-6                 x86_64     CentOS 6.6
centos-7.0               x86_64     CentOS 7.0
centos-7.1               x86_64     CentOS 7.1
centos-7.2               aarch64    CentOS 7.2 (aarch64)
centos-7.2               x86_64     CentOS 7.2
centos-7.3               x86_64     CentOS 7.3
centos-7.4               x86_64     CentOS 7.4
centos-7.5               x86_64     CentOS 7.5
cirros-0.3.1             x86_64     CirrOS 0.3.1
cirros-0.3.5             x86_64     CirrOS 0.3.5
debian-6                 x86_64     Debian 6 (Squeeze)
debian-7                 sparc64    Debian 7 (Wheezy) (sparc64)
debian-7                 x86_64     Debian 7 (wheezy)
debian-8                 x86_64     Debian 8 (jessie)
debian-9                 x86_64     Debian 9 (stretch)
fedora-18                x86_64     Fedora® 18
fedora-19                x86_64     Fedora® 19
fedora-20                x86_64     Fedora® 20
fedora-21                aarch64    Fedora® 21 Server (aarch64)
fedora-21                armv7l     Fedora® 21 Server (armv7l)
fedora-21                ppc64      Fedora® 21 Server (ppc64)
fedora-21                ppc64le    Fedora® 21 Server (ppc64le)
fedora-21                x86_64     Fedora® 21 Server
fedora-22                aarch64    Fedora® 22 Server (aarch64)
fedora-22                armv7l     Fedora® 22 Server (armv7l)
fedora-22                i686       Fedora® 22 Server (i686)
fedora-22                x86_64     Fedora® 22 Server
fedora-23                aarch64    Fedora® 23 Server (aarch64)
fedora-23                armv7l     Fedora® 23 Server (armv7l)
fedora-23                i686       Fedora® 23 Server (i686)
fedora-23                ppc64      Fedora® 23 Server (ppc64)
fedora-23                ppc64le    Fedora® 23 Server (ppc64le)
fedora-23                x86_64     Fedora® 23 Server
fedora-24                aarch64    Fedora® 24 Server (aarch64)
fedora-24                armv7l     Fedora® 24 Server (armv7l)
fedora-24                i686       Fedora® 24 Server (i686)
fedora-24                x86_64     Fedora® 24 Server
fedora-25                aarch64    Fedora® 25 Server (aarch64)
fedora-25                armv7l     Fedora® 25 Server (armv7l)
fedora-25                i686       Fedora® 25 Server (i686)
fedora-25                ppc64      Fedora® 25 Server (ppc64)
fedora-25                ppc64le    Fedora® 25 Server (ppc64le)
fedora-25                x86_64     Fedora® 25 Server
fedora-26                aarch64    Fedora® 26 Server (aarch64)
fedora-26                armv7l     Fedora® 26 Server (armv7l)
fedora-26                i686       Fedora® 26 Server (i686)
fedora-26                ppc64      Fedora® 26 Server (ppc64)
fedora-26                ppc64le    Fedora® 26 Server (ppc64le)
fedora-26                x86_64     Fedora® 26 Server
fedora-27                aarch64    Fedora® 27 Server (aarch64)
fedora-27                armv7l     Fedora® 27 Server (armv7l)
fedora-27                i686       Fedora® 27 Server (i686)
fedora-27                ppc64      Fedora® 27 Server (ppc64)
fedora-27                ppc64le    Fedora® 27 Server (ppc64le)
fedora-27                x86_64     Fedora® 27 Server
fedora-28                i686       Fedora® 28 Server (i686)
fedora-28                x86_64     Fedora® 28 Server
freebsd-11.1             x86_64     FreeBSD 11.1
scientificlinux-6        x86_64     Scientific Linux 6.5
ubuntu-10.04             x86_64     Ubuntu 10.04 (Lucid)
ubuntu-12.04             x86_64     Ubuntu 12.04 (Precise)
ubuntu-14.04             x86_64     Ubuntu 14.04 (Trusty)
ubuntu-16.04             x86_64     Ubuntu 16.04 (Xenial)
ubuntu-18.04             x86_64     Ubuntu 18.04 (bionic)
opensuse-13.1            x86_64     openSUSE 13.1
opensuse-13.2            x86_64     openSUSE 13.2
opensuse-42.1            x86_64     openSUSE Leap 42.1
opensuse-tumbleweed      x86_64     openSUSE Tumbleweed


5. Create Virtual Machine OS-es from scratch with virt-builder

Below we'll create two images one for Fedora 28 and 1 for Debian 9 using the virt-builder (a tool to build virtual images quickly), the images that could be used are shown through below virt-builder –list command.
 

# iso='fedora-28';
# iso1='debian-9';


# sudo virt-builder $iso \
     –size=10G \
     –format qcow2 -o /var/lib/libvirt/images/$iso-vm1.qcow2 \
     –hostname $iso-vm1 \
     –network \
     –timezone Europe/Sofia


[   3.3] Downloading: http://libguestfs.org/download/builder/fedora-28.xz
[   5.2] Planning how to build this image
[   5.2] Uncompressing
[  20.8] Resizing (using virt-resize) to expand the disk to 10.0G
[  50.8] Opening the new disk
[  53.7] Setting a random seed
[  53.7] Setting the hostname: fedora-28-vm1
[  53.7] Setting the timezone: Europe/Sofia
[  53.7] Setting passwords
virt-builder: Setting random password of root to YMTkxaJIkEU24Ytf

[  54.7] Finishing off
                   Output file: /var/lib/libvirt/images/fedora-28-vm1.qcow2
                   Output size: 10.0G
                 Output format: qcow2
            Total usable space: 9.3G
                    Free space: 8.2G (87%)


# sudo virt-builder $iso1 \
     –size=10G \
     –format qcow2 -o /var/lib/libvirt/images/$iso-vm1.qcow2 \
     –hostname $iso1-vm1 \
     –network \
     –timezone Europe/Sofia


[   3.2] Downloading: http://libguestfs.org/download/builder/debian-9.xz
[   4.1] Planning how to build this image
[   4.1] Uncompressing
[  16.9] Resizing (using virt-resize) to expand the disk to 10.0G
[  40.1] Opening the new disk
[  42.9] Setting a random seed
virt-builder: warning: random seed could not be set for this type of guest
[  42.9] Setting the hostname: debian-9-vm1
[  43.6] Setting the timezone: Europe/Sofia
[  43.6] Setting passwords
virt-builder: Setting random password of root to JtzEYGff9KxL5jCR
[  44.3] Finishing off
                   Output file: /var/lib/libvirt/images/debian-9-vm1.qcow2
                   Output size: 10.0G
                 Output format: qcow2
            Total usable space: 9.8G
                    Free space: 9.0G (91%)


vim bridged.xml

<network>
  <name>br0</name>
  <forward mode="bridge"/>
  <bridge name="br0"/>
</network>


# sudo virsh net-define –file bridged.xml
# sudo virsh net-autostart br0
# sudo virsh net-start br0


Above two commands will download pre-packaged KVM isos and store them inside /var/lib/libvirt/images/ you see also the root (administrator) password for both ISOs printed out.


root@jeremiah:/home/hipo/kvm# ls -ld /var/lib/libvirt/images/*
-rw-r–r– 1 root         root         10739318784 Oct 12 23:45 /var/lib/libvirt/images/debian-9-vm1.qcow2
-rw-r–r– 1 root         root         10739318784 Oct 12 23:46 /var/lib/libvirt/images/fedora-28-vm1.qcow2


To access directly the new created VMs as we have specified the –vnc option it is possible to directly vnc to the new host with VNC client (in linux I use vncviewer), on Windows you can use something like TightVNC.
 

6. Use official Linux distributions ISO boot files to install into KVM VM


Those who would like to run inside KVM VM Linux could do it directly using installable ISO files and install the set of Linux with the required packages, just like installing a fresh new Linux on a bare-metal machine.
To do so download your ISO image from the net (either from official distro website or a mirror website, in case if you need to spin an older version) and use virt-install to run the installer inside KVM.


root@jeremiah:~# cd /var/lib/libvirt/boot/;
root@jeremiah:~# wget http://mirrors.netix.net/centos/7.5.1804/isos/x86_64/CentOS-7-x86_64-DVD-1804.iso


# sudo virt-install \
–virt-type=kvm \
–name centos7 \
–ram 2048 \
–vcpus=2 \
–os-variant=centos7.0 \
–virt-type=kvm \
–hvm \
–cdrom=/var/lib/libvirt/boot/CentOS-7-x86_64-DVD-1804.iso \
–network=bridge=br0,model=virtio \
–network=bridge=br1,model=virtio \
–graphics vnc \
–disk path=/var/lib/libvirt/images/centos7.qcow2,size=40,bus=virtio,format=qcow2


7. List newly created VMs with Virsh command


root@jeremiah:/home/hipo/kvm# virsh list –all
 Id    Name                           State
—————————————————-
 3     fedora-28                      running
 –     debian9                        shut off


The –all parameter lists all available VMs ready to spin, if you want to check what are the VMs that are only running use instead:


root@jeremiah:/home/hipo/kvm# virsh list
 Id    Name                           State
—————————————————-
 3     fedora-28                      running


8. Install Virtual Machine OS-es

Below lines will install 2 Virtual machines one Fedora 28 and Debian 9


 os='fedora-28';
virt-install –import –name $os \
    –ram 2048 \
    –vcpu 2 \
    –disk path=/var/lib/libvirt/images/$os-vm1.qcow2,format=qcow2 \
    –os-variant fedora-unknown \
    –network=bridge=br0,model=virtio \
    –noautoconsole \
  –hvm \
  –graphics vnc

os='debian9';
virt-install –import –name $os     \
–ram 2048     \
–vcpu 2     \
–disk path=/var/lib/libvirt/images/$os-vm1.qcow2,format=qcow2     \
–os-variant debian9     –network=bridge=br0,model=virtio     \
–noautoconsole \
–hvm \
–graphics vnc


To deploy more just change the virtual machine type in os variable and modify the –os-variant variable to match the distribution name, to get the correct –os-variant variables that can be passed use osinfo-query below is output of the cmd:


root@jeremiah:/home/hipo/kvm# osinfo-query os
 Short ID             | Name                                               | Version  | ID                                      
———————-+—————————————————-+———-+—————————————–
 altlinux1.0          | Mandrake RE Spring 2001                            | 1.0      | http://altlinux.org/altlinux/1.0        
 altlinux2.0          | ALT Linux 2.0                                      | 2.0      | http://altlinux.org/altlinux/2.0        
 altlinux2.2          | ALT Linux 2.2                                      | 2.2      | http://altlinux.org/altlinux/2.2        
 altlinux2.4          | ALT Linux 2.4                                      | 2.4      | http://altlinux.org/altlinux/2.4        
 altlinux3.0          | ALT Linux 3.0                                      | 3.0      | http://altlinux.org/altlinux/3.0        
 altlinux4.0          | ALT Linux 4.0                                      | 4.0      | http://altlinux.org/altlinux/4.0        
 altlinux4.1          | ALT Linux 4.1                                      | 4.1      | http://altlinux.org/altlinux/4.1        
 altlinux5.0          | ALT Linux 5.0                                      | 5.0      | http://altlinux.org/altlinux/5.0        
 altlinux6.0          | ALT Linux 6.0                                      | 6.0      | http://altlinux.org/altlinux/6.0        
 altlinux7.0          | ALT Linux 7.0                                      | 7.0      | http://altlinux.org/altlinux/7.0        
 centos6.0            | CentOS 6.0                                         | 6.0      | http://centos.org/centos/6.0            
 centos6.1            | CentOS 6.1                                         | 6.1      | http://centos.org/centos/6.1            
 centos6.2            | CentOS 6.2                                         | 6.2      | http://centos.org/centos/6.2            
 centos6.3            | CentOS 6.3                                         | 6.3      | http://centos.org/centos/6.3            
 centos6.4            | CentOS 6.4                                         | 6.4      | http://centos.org/centos/6.4            
 centos6.5            | CentOS 6.5                                         | 6.5      | http://centos.org/centos/6.5            
 centos6.6            | CentOS 6.6                                         | 6.6      | http://centos.org/centos/6.6            
 centos6.7            | CentOS 6.7                                         | 6.7      | http://centos.org/centos/6.7            
 centos6.8            | CentOS 6.8                                         | 6.8      | http://centos.org/centos/6.8            
 centos6.9            | CentOS 6.9                                         | 6.9      | http://centos.org/centos/6.9            
 centos7.0            | CentOS 7.0                                         | 7.0      | http://centos.org/centos/7.0            
 debian1.1            | Debian Buzz                                        | 1.1      | http://debian.org/debian/1.1            
 debian1.2            | Debian Rex                                         | 1.2      | http://debian.org/debian/1.2            
 debian1.3            | Debian Bo                                          | 1.3      | http://debian.org/debian/1.3            
 debian2.0            | Debian Hamm                                        | 2.0      | http://debian.org/debian/2.0            
 debian2.1            | Debian Slink                                       | 2.1      | http://debian.org/debian/2.1            
 debian2.2            | Debian Potato                                      | 2.2      | http://debian.org/debian/2.2            
 debian3              | Debian Woody                                       | 3        | http://debian.org/debian/3              
 debian3.1            | Debian Sarge                                       | 3.1      | http://debian.org/debian/3.1            
 debian4              | Debian Etch                                        | 4        | http://debian.org/debian/4              
 debian5              | Debian Lenny                                       | 5        | http://debian.org/debian/5              
 debian6              | Debian Squeeze                                     | 6        | http://debian.org/debian/6              
 debian7              | Debian Wheezy                                      | 7        | http://debian.org/debian/7              
 debian8              | Debian Jessie                                      | 8        | http://debian.org/debian/8              
 debian9              | Debian Stretch                                     | 9        | http://debian.org/debian/9              
 debiantesting        | Debian Testing                                     | testing  | http://debian.org/debian/testing        
 fedora-unknown       | Fedora                                             | unknown  | http://fedoraproject.org/fedora/unknown
 fedora1              | Fedora Core 1                                      | 1        | http://fedoraproject.org/fedora/1       
 fedora10             | Fedora 10                                          | 10       | http://fedoraproject.org/fedora/10      
 fedora11             | Fedora 11                                          | 11       | http://fedoraproject.org/fedora/11      
 fedora12             | Fedora 12                                          | 12       | http://fedoraproject.org/fedora/12      
 fedora13             | Fedora 13                                          | 13       | http://fedoraproject.org/fedora/13      
 fedora14             | Fedora 14                                          | 14       | http://fedoraproject.org/fedora/14      
 fedora15             | Fedora 15                                          | 15       | http://fedoraproject.org/fedora/15      
 fedora16             | Fedora 16                                          | 16       | http://fedoraproject.org/fedora/16      
 fedora17             | Fedora 17                                          | 17       | http://fedoraproject.org/fedora/17      
 fedora18             | Fedora 18                                          | 18       | http://fedoraproject.org/fedora/18      
 fedora19             | Fedora 19                                          | 19       | http://fedoraproject.org/fedora/19      
 fedora2              | Fedora Core 2                                      | 2        | http://fedoraproject.org/fedora/2       
 fedora20             | Fedora 20                                          | 20       | http://fedoraproject.org/fedora/20      
 fedora21             | Fedora 21                                          | 21       | http://fedoraproject.org/fedora/21      
 fedora22             | Fedora 22                                          | 22       | http://fedoraproject.org/fedora/22      
 fedora23             | Fedora 23                                          | 23       | http://fedoraproject.org/fedora/23      
 fedora24             | Fedora 24                                          | 24       | http://fedoraproject.org/fedora/24      
 fedora25             | Fedora 25                                          | 25       | http://fedoraproject.org/fedora/25      
 fedora26             | Fedora 26                                          | 26       | http://fedoraproject.org/fedora/26      
 fedora3              | Fedora Core 3                                      | 3        | http://fedoraproject.org/fedora/3       
 fedora4              | Fedora Core 4                                      | 4        | http://fedoraproject.org/fedora/4       
 fedora5              | Fedora Core 5                                      | 5        | http://fedoraproject.org/fedora/5       
 fedora6              | Fedora Core 6                                      | 6        | http://fedoraproject.org/fedora/6       
 fedora7              | Fedora 7                                           | 7        | http://fedoraproject.org/fedora/7       
 fedora8              | Fedora 8                                           | 8        | http://fedoraproject.org/fedora/8       
 fedora9              | Fedora 9                                           | 9        | http://fedoraproject.org/fedora/9       
 freebsd1.0           | FreeBSD 1.0                                        | 1.0      | http://freebsd.org/freebsd/1.0          
 freebsd10.0          | FreeBSD 10.0                                       | 10.0     | http://freebsd.org/freebsd/10.0         
 freebsd10.1          | FreeBSD 10.1                                       | 10.1     | http://freebsd.org/freebsd/10.1         
 freebsd10.2          | FreeBSD 10.2                                       | 10.2     | http://freebsd.org/freebsd/10.2         
 freebsd10.3          | FreeBSD 10.3                                       | 10.3     | http://freebsd.org/freebsd/10.3         
 freebsd10.4          | FreeBSD 10.4                                       | 10.4     | http://freebsd.org/freebsd/10.4         
 freebsd11.0          | FreeBSD 11.0                                       | 11.0     | http://freebsd.org/freebsd/11.0         
 freebsd11.1          | FreeBSD 11.1                                       | 11.1     | http://freebsd.org/freebsd/11.1         
 freebsd2.0           | FreeBSD 2.0                                        | 2.0      | http://freebsd.org/freebsd/2.0          
 freebsd2.0.5         | FreeBSD 2.0.5                                      | 2.0.5    | http://freebsd.org/freebsd/2.0.5        
 freebsd2.2.8         | FreeBSD 2.2.8                                      | 2.2.8    | http://freebsd.org/freebsd/2.2.8        
 freebsd2.2.9         | FreeBSD 2.2.9                                      | 2.2.9    | http://freebsd.org/freebsd/2.2.9        
 freebsd3.0           | FreeBSD 3.0                                        | 3.0      | http://freebsd.org/freebsd/3.0          
 freebsd3.2           | FreeBSD 3.2                                        | 3.2      | http://freebsd.org/freebsd/3.2          
 freebsd4.0           | FreeBSD 4.0                                        | 4.0      | http://freebsd.org/freebsd/4.0          
 freebsd4.1           | FreeBSD 4.1                                        | 4.1      | http://freebsd.org/freebsd/4.1          
 freebsd4.10          | FreeBSD 4.10                                       | 4.10     | http://freebsd.org/freebsd/4.10         
 freebsd4.11          | FreeBSD 4.11                                       | 4.11     | http://freebsd.org/freebsd/4.11         
 freebsd4.2           | FreeBSD 4.2                                        | 4.2      | http://freebsd.org/freebsd/4.2          
 freebsd4.3           | FreeBSD 4.3                                        | 4.3      | http://freebsd.org/freebsd/4.3          
 freebsd4.4           | FreeBSD 4.4                                        | 4.4      | http://freebsd.org/freebsd/4.4          
 freebsd4.5           | FreeBSD 4.5                                        | 4.5      | http://freebsd.org/freebsd/4.5          
 freebsd4.6           | FreeBSD 4.6                                        | 4.6      | http://freebsd.org/freebsd/4.6          
 freebsd4.7           | FreeBSD 4.7                                        | 4.7      | http://freebsd.org/freebsd/4.7          
 freebsd4.8           | FreeBSD 4.8                                        | 4.8      | http://freebsd.org/freebsd/4.8          
 freebsd4.9           | FreeBSD 4.9                                        | 4.9      | http://freebsd.org/freebsd/4.9          
 freebsd5.0           | FreeBSD 5.0                                        | 5.0      | http://freebsd.org/freebsd/5.0          
 freebsd5.1           | FreeBSD 5.1                                        | 5.1      | http://freebsd.org/freebsd/5.1          
 freebsd5.2           | FreeBSD 5.2                                        | 5.2      | http://freebsd.org/freebsd/5.2          
 freebsd5.2.1         | FreeBSD 5.2.1                                      | 5.2.1    | http://freebsd.org/freebsd/5.2.1        
 freebsd5.3           | FreeBSD 5.3                                        | 5.3      | http://freebsd.org/freebsd/5.3          
 freebsd5.4           | FreeBSD 5.4                                        | 5.4      | http://freebsd.org/freebsd/5.4          
 freebsd5.5           | FreeBSD 5.5                                        | 5.5      | http://freebsd.org/freebsd/5.5          
 freebsd6.0           | FreeBSD 6.0                                        | 6.0      | http://freebsd.org/freebsd/6.0          
 freebsd6.1           | FreeBSD 6.1                                        | 6.1      | http://freebsd.org/freebsd/6.1          
 freebsd6.2           | FreeBSD 6.2                                        | 6.2      | http://freebsd.org/freebsd/6.2          
 freebsd6.3           | FreeBSD 6.3                                        | 6.3      | http://freebsd.org/freebsd/6.3          
 freebsd6.4           | FreeBSD 6.4                                        | 6.4      | http://freebsd.org/freebsd/6.4          
 freebsd7.0           | FreeBSD 7.0                                        | 7.0      | http://freebsd.org/freebsd/7.0          
 freebsd7.1           | FreeBSD 7.1                                        | 7.1      | http://freebsd.org/freebsd/7.1          
 freebsd7.2           | FreeBSD 7.2                                        | 7.2      | http://freebsd.org/freebsd/7.2          
 freebsd7.3           | FreeBSD 7.3                                        | 7.3      | http://freebsd.org/freebsd/7.3          
 freebsd7.4           | FreeBSD 7.4                                        | 7.4      | http://freebsd.org/freebsd/7.4          
 freebsd8.0           | FreeBSD 8.0                                        | 8.0      | http://freebsd.org/freebsd/8.0          
 freebsd8.1           | FreeBSD 8.1                                        | 8.1      | http://freebsd.org/freebsd/8.1          
 freebsd8.2           | FreeBSD 8.2                                        | 8.2      | http://freebsd.org/freebsd/8.2          
 freebsd8.3           | FreeBSD 8.3                                        | 8.3      | http://freebsd.org/freebsd/8.3          
 freebsd8.4           | FreeBSD 8.4                                        | 8.4      | http://freebsd.org/freebsd/8.4          
 freebsd9.0           | FreeBSD 9.0                                        | 9.0      | http://freebsd.org/freebsd/9.0          
 freebsd9.1           | FreeBSD 9.1                                        | 9.1      | http://freebsd.org/freebsd/9.1          
 freebsd9.2           | FreeBSD 9.2                                        | 9.2      | http://freebsd.org/freebsd/9.2          
 freebsd9.3           | FreeBSD 9.3                                        | 9.3      | http://freebsd.org/freebsd/9.3          
 freedos1.2           | FreeDOS 1.2                                        | 1.2      | http://freedos.org/freedos/1.2          
 gnome-continuous-3.10 | GNOME 3.10                                         | 3.10     | http://gnome.org/gnome-continuous/3.10  
 gnome-continuous-3.12 | GNOME 3.12                                         | 3.12     | http://gnome.org/gnome-continuous/3.12  
 gnome-continuous-3.14 | GNOME 3.14                                         | 3.14     | http://gnome.org/gnome-continuous/3.14  
 gnome3.6             | GNOME 3.6                                          | 3.6      | http://gnome.org/gnome/3.6              
 gnome3.8             | GNOME 3.8                                          | 3.8      | http://gnome.org/gnome/3.8              
 macosx10.0           | MacOS X Cheetah                                    | 10.0     | http://apple.com/macosx/10.0            
 macosx10.1           | MacOS X Puma                                       | 10.1     | http://apple.com/macosx/10.1            
 macosx10.2           | MacOS X Jaguar                                     | 10.2     | http://apple.com/macosx/10.2            
 macosx10.3           | MacOS X Panther                                    | 10.3     | http://apple.com/macosx/10.3            
 macosx10.4           | MacOS X Tiger                                      | 10.4     | http://apple.com/macosx/10.4            
 macosx10.5           | MacOS X Leopard                                    | 10.5     | http://apple.com/macosx/10.5            
 macosx10.6           | MacOS X Snow Leopard                               | 10.6     | http://apple.com/macosx/10.6            
 macosx10.7           | MacOS X Lion                                       | 10.7     | http://apple.com/macosx/10.7            
 mageia1              | Mageia 1                                           | 1        | http://mageia.org/mageia/1              
 mageia2              | Mageia 2                                           | 2        | http://mageia.org/mageia/2              
 mageia3              | Mageia 3                                           | 3        | http://mageia.org/mageia/3              
 mageia4              | Mageia 4                                           | 4        | http://mageia.org/mageia/4              
 mageia5              | Mageia 5                                           | 5        | http://mageia.org/mageia/5              
 mageia6              | Mageia 6                                           | 6        | http://mageia.org/mageia/6              
 mandrake10.0         | Mandrake Linux 10.0                                | 10.0     | http://mandriva.com/mandrake/10.0       
 mandrake10.1         | Mandrake Linux 10.1                                | 10.1     | http://mandriva.com/mandrake/10.1       
 mandrake10.2         | Mandrake Linux 10.2                                | 10.2     | http://mandriva.com/mandrake/10.2       
 mandrake5.1          | Mandrake Linux 5.1                                 | 5.1      | http://mandriva.com/mandrake/5.1        
 mandrake5.2          | Mandrake Linux 5.2                                 | 5.2      | http://mandriva.com/mandrake/5.2        
 mandrake5.3          | Mandrake Linux 5.3                                 | 5.3      | http://mandriva.com/mandrake/5.3        
 mandrake6.0          | Mandrake Linux 6.0                                 | 6.0      | http://mandriva.com/mandrake/6.0        
 mandrake6.1          | Mandrake Linux 6.1                                 | 6.1      | http://mandriva.com/mandrake/6.1        
 mandrake7.0          | Mandrake Linux 7.0                                 | 7.0      | http://mandriva.com/mandrake/7.0        
 mandrake7.1          | Mandrake Linux 7.1                                 | 7.1      | http://mandriva.com/mandrake/7.1        
 mandrake7.2          | Mandrake Linux 7.2                                 | 7.2      | http://mandriva.com/mandrake/7.2        
 mandrake8.0          | Mandrake Linux 8.0                                 | 8.0      | http://mandriva.com/mandrake/8.0        
 mandrake8.1          | Mandrake Linux 8.1                                 | 8.1      | http://mandriva.com/mandrake/8.1        
 mandrake8.2          | Mandrake Linux 8.2                                 | 8.2      | http://mandriva.com/mandrake/8.2        
 mandrake9.0          | Mandrake Linux 9.0                                 | 9.0      | http://mandriva.com/mandrake/9.0        
 mandrake9.1          | Mandrake Linux 9.1                                 | 9.1      | http://mandriva.com/mandrake/9.1        
 mandrake9.2          | Mandrake Linux 9.2                                 | 9.2      | http://mandriva.com/mandrake/9.2        
 mandriva2006.0       | Mandriva Linux 2006.0                              | 2006.0   | http://mandriva.com/mandriva/2006.0     
 mandriva2007         | Mandriva Linux 2007                                | 2007     | http://mandriva.com/mandriva/2007       
 mandriva2007.1       | Mandriva Linux 2007 Spring                         | 2007.1   | http://mandriva.com/mandriva/2007.1     
 mandriva2008.0       | Mandriva Linux 2008                                | 2008.0   | http://mandriva.com/mandriva/2008.0     
 mandriva2008.1       | Mandriva Linux 2008 Spring                         | 2008.1   | http://mandriva.com/mandriva/2008.1     
 mandriva2009.0       | Mandriva Linux 2009                                | 2009.0   | http://mandriva.com/mandriva/2009.0     
 mandriva2009.1       | Mandriva Linux 2009 Spring                         | 2009.1   | http://mandriva.com/mandriva/2009.1     
 mandriva2010.0       | Mandriva Linux 2010                                | 2010.0   | http://mandriva.com/mandriva/2010.0     
 mandriva2010.1       | Mandriva Linux 2010 Spring                         | 2010.1   | http://mandriva.com/mandriva/2010.1     
 mandriva2010.2       | Mandriva Linux 2010.2                              | 2010.2   | http://mandriva.com/mandriva/2010.2     
 mandriva2011         | Mandriva Linux 2011                                | 2011     | http://mandriva.com/mandriva/2011       
 mbs1.0               | Mandriva Business Server 1.0                       | 1.0      | http://mandriva.com/mbs/1.0             
 mes5                 | Mandriva Enterprise Server 5.0                     | 5.0      | http://mandriva.com/mes/5.0             
 mes5.1               | Mandriva Enterprise Server 5.1                     | 5.1      | http://mandriva.com/mes/5.1             
 msdos6.22            | Microsoft MS-DOS 6.22                              | 6.22     | http://microsoft.com/msdos/6.22         
 netbsd0.8            | NetBSD 0.8                                         | 0.8      | http://netbsd.org/netbsd/0.8            
 netbsd0.9            | NetBSD 0.9                                         | 0.9      | http://netbsd.org/netbsd/0.9            
 netbsd1.0            | NetBSD 1.0                                         | 1.0      | http://netbsd.org/netbsd/1.0            
 netbsd1.1            | NetBSD 1.1                                         | 1.1      | http://netbsd.org/netbsd/1.1            
 netbsd1.2            | NetBSD 1.2                                         | 1.2      | http://netbsd.org/netbsd/1.2            
 netbsd1.3            | NetBSD 1.3                                         | 1.3      | http://netbsd.org/netbsd/1.3            
 netbsd1.4            | NetBSD 1.4                                         | 1.4      | http://netbsd.org/netbsd/1.4            
 netbsd1.5            | NetBSD 1.5                                         | 1.5      | http://netbsd.org/netbsd/1.5            
 netbsd1.6            | NetBSD 1.6                                         | 1.6      | http://netbsd.org/netbsd/1.6            
 netbsd2.0            | NetBSD 2.0                                         | 2.0      | http://netbsd.org/netbsd/2.0            
 netbsd3.0            | NetBSD 3.0                                         | 3.0      | http://netbsd.org/netbsd/3.0            
 netbsd4.0            | NetBSD 4.0                                         | 4.0      | http://netbsd.org/netbsd/4.0            
 netbsd5.0            | NetBSD 5.0                                         | 5.0      | http://netbsd.org/netbsd/5.0            
 netbsd5.1            | NetBSD 5.1                                         | 5.1      | http://netbsd.org/netbsd/5.1            
 netbsd6.0            | NetBSD 6.0                                         | 6.0      | http://netbsd.org/netbsd/6.0            
 netbsd6.1            | NetBSD 6.1                                         | 6.1      | http://netbsd.org/netbsd/6.1            
 netbsd7.0            | NetBSD 7.0                                         | 7.0      | http://netbsd.org/netbsd/7.0            
 netbsd7.1            | NetBSD 7.1                                         | 7.1      | http://netbsd.org/netbsd/7.1            
 netbsd7.1.1          | NetBSD 7.1.1                                       | 7.1.1    | http://netbsd.org/netbsd/7.1.1          
 netware4             | Novell Netware 4                                   | 4        | http://novell.com/netware/4             
 netware5             | Novell Netware 5                                   | 5        | http://novell.com/netware/5             
 netware6             | Novell Netware 6                                   | 6        | http://novell.com/netware/6             
 openbsd4.2           | OpenBSD 4.2                                        | 4.2      | http://openbsd.org/openbsd/4.2          
 openbsd4.3           | OpenBSD 4.3                                        | 4.3      | http://openbsd.org/openbsd/4.3          
 openbsd4.4           | OpenBSD 4.4                                        | 4.4      | http://openbsd.org/openbsd/4.4          
 openbsd4.5           | OpenBSD 4.5                                        | 4.5      | http://openbsd.org/openbsd/4.5          
 openbsd4.8           | OpenBSD 4.8                                        | 4.8      | http://openbsd.org/openbsd/4.8          
 openbsd4.9           | OpenBSD 4.9                                        | 4.9      | http://openbsd.org/openbsd/4.9          
 openbsd5.0           | OpenBSD 5.0                                        | 5.0      | http://openbsd.org/openbsd/5.0          
 openbsd5.1           | OpenBSD 5.1                                        | 5.1      | http://openbsd.org/openbsd/5.1          
 openbsd5.2           | OpenBSD 5.2                                        | 5.2      | http://openbsd.org/openbsd/5.2          
 openbsd5.3           | OpenBSD 5.3                                        | 5.3      | http://openbsd.org/openbsd/5.3          
 openbsd5.4           | OpenBSD 5.4                                        | 5.4      | http://openbsd.org/openbsd/5.4          
 openbsd5.5           | OpenBSD 5.5                                        | 5.5      | http://openbsd.org/openbsd/5.5          
 openbsd5.6           | OpenBSD 5.6                                        | 5.6      | http://openbsd.org/openbsd/5.6          
 openbsd5.7           | OpenBSD 5.7                                        | 5.7      | http://openbsd.org/openbsd/5.7          
 openbsd5.8           | OpenBSD 5.8                                        | 5.8      | http://openbsd.org/openbsd/5.8          
 openbsd5.9           | OpenBSD 5.9                                        | 5.9      | http://openbsd.org/openbsd/5.9          
 openbsd6.0           | OpenBSD 6.0                                        | 6.0      | http://openbsd.org/openbsd/6.0          
 openbsd6.1           | OpenBSD 6.1                                        | 6.1      | http://openbsd.org/openbsd/6.1          
 openbsd6.2           | OpenBSD 6.2                                        | 6.2      | http://openbsd.org/openbsd/6.2          
 opensolaris2009.06   | OpenSolaris 2009.06                                | 2009.06  | http://sun.com/opensolaris/2009.06      
 opensuse-factory     | openSUSE                                           | factory  | http://opensuse.org/opensuse/factory    
 opensuse-unknown     | openSUSE                                           | unknown  | http://opensuse.org/opensuse/unknown    
 opensuse10.2         | openSUSE 10.2                                      | 10.2     | http://opensuse.org/opensuse/10.2       
 opensuse10.3         | openSUSE 10.3                                      | 10.3     | http://opensuse.org/opensuse/10.3       
 opensuse11.0         | openSUSE 11.0                                      | 11.0     | http://opensuse.org/opensuse/11.0       
 opensuse11.1         | openSUSE 11.1                                      | 11.1     | http://opensuse.org/opensuse/11.1       
 opensuse11.2         | openSUSE 11.2                                      | 11.2     | http://opensuse.org/opensuse/11.2       
 opensuse11.3         | openSUSE 11.3                                      | 11.3     | http://opensuse.org/opensuse/11.3       
 opensuse11.4         | openSUSE 11.4                                      | 11.4     | http://opensuse.org/opensuse/11.4       
 opensuse12.1         | openSUSE 12.1                                      | 12.1     | http://opensuse.org/opensuse/12.1       
 opensuse12.2         | openSUSE 12.2                                      | 12.2     | http://opensuse.org/opensuse/12.2       
 opensuse12.3         | openSUSE 12.3                                      | 12.3     | http://opensuse.org/opensuse/12.3       
 opensuse13.1         | openSUSE 13.1                                      | 13.1     | http://opensuse.org/opensuse/13.1       
 opensuse13.2         | openSUSE 13.2                                      | 13.2     | http://opensuse.org/opensuse/13.2       
 opensuse42.1         | openSUSE Leap 42.1                                 | 42.1     | http://opensuse.org/opensuse/42.1       
 opensuse42.2         | openSUSE Leap 42.2                                 | 42.2     | http://opensuse.org/opensuse/42.2       
 opensuse42.3         | openSUSE Leap 42.3                                 | 42.3     | http://opensuse.org/opensuse/42.3       
 opensusetumbleweed   | openSUSE Tumbleweed                                | tumbleweed | http://opensuse.org/opensuse/tumbleweed
 rhel-atomic-7.0      | Red Hat Enterprise Linux Atomic Host 7.0           | 7.0      | http://redhat.com/rhel-atomic/7.0       
 rhel-atomic-7.1      | Red Hat Enterprise Linux Atomic Host 7.1           | 7.1      | http://redhat.com/rhel-atomic/7.1       
 rhel-atomic-7.2      | Red Hat Enterprise Linux Atomic Host 7.2           | 7.2      | http://redhat.com/rhel-atomic/7.2       
 rhel2.1              | Red Hat Enterprise Linux 2.1                       | 2.1      | http://redhat.com/rhel/2.1              
 rhel2.1.1            | Red Hat Enterprise Linux 2.1 Update 1  
/etc/bind/masters/elinvent.com            | 2.1.1    | http://redhat.com/rhel/2.1.1            
 rhel2.1.2            | Red Hat Enterprise Linux 2.1 Update 2              | 2.1.2    | http://redhat.com/rhel/2.1.2            
 rhel2.1.3            | Red Hat Enterprise Linux 2.1 Update 3              | 2.1.3    | http://redhat.com/rhel/2.1.3            
 rhel2.1.4            | Red Hat Enterprise Linux 2.1 Update 4              | 2.1.4    | http://redhat.com/rhel/2.1.4            
 rhel2.1.5            | Red Hat Enterprise Linux 2.1 Update 5              | 2.1.5    | http://redhat.com/rhel/2.1.5            
 rhel2.1.6            | Red Hat Enterprise Linux 2.1 Update 6              | 2.1.6    | http://redhat.com/rhel/2.1.6            
 rhel2.1.7            | Red Hat Enterprise Linux 2.1 Update 7              | 2.1.7    | http://redhat.com/rhel/2.1.7            
 rhel3                | Red Hat Enterprise Linux 3                         | 3        | http://redhat.com/rhel/3                
 rhel3.1              | Red Hat Enterprise Linux 3 Update 1                | 3.1      | http://redhat.com/rhel/3.1              
 rhel3.2              | Red Hat Enterprise Linux 3 Update 2                | 3.2      | http://redhat.com/rhel/3.2              
 rhel3.3              | Red Hat Enterprise Linux 3 Update 3                | 3.3      | http://redhat.com/rhel/3.3              
 rhel3.4              | Red Hat Enterprise Linux 3 Update 4                | 3.4      | http://redhat.com/rhel/3.4              
 rhel3.5              | Red Hat Enterprise Linux 3 Update 5                | 3.5      | http://redhat.com/rhel/3.5              
 rhel3.6              | Red Hat Enterprise Linux 3 Update 6                | 3.6      | http://redhat.com/rhel/3.6              
 rhel3.7              | Red Hat Enterprise Linux 3 Update 7                | 3.7      | http://redhat.com/rhel/3.7              
 rhel3.8              | Red Hat Enterprise Linux 3 Update 8                | 3.8      | http://redhat.com/rhel/3.8              
 rhel3.9              | Red Hat Enterprise Linux 3 Update 9                | 3.9      | http://redhat.com/rhel/3.9              
 rhel4.0              | Red Hat Enterprise Linux 4.0                       | 4.0      | http://redhat.com/rhel/4.0              
 rhel4.1              | Red Hat Enterprise Linux 4.1                       | 4.1      | http://redhat.com/rhel/4.1              
 rhel4.2              | Red Hat Enterprise Linux 4.2                       | 4.2      | http://redhat.com/rhel/4.2              
 rhel4.3              | Red Hat Enterprise Linux 4.3                       | 4.3      | http://redhat.com/rhel/4.3              
 rhel4.4              | Red Hat Enterprise Linux 4.4                       | 4.4      | http://redhat.com/rhel/4.4              
 rhel4.5              | Red Hat Enterprise Linux 4.5                       | 4.5      | http://redhat.com/rhel/4.5              
 rhel4.6              | Red Hat Enterprise Linux 4.6                       | 4.6      | http://redhat.com/rhel/4.6              
 rhel4.7              | Red Hat Enterprise Linux 4.7                       | 4.7      | http://redhat.com/rhel/4.7              
 rhel4.8              | Red Hat Enterprise Linux 4.8                       | 4.8      | http://redhat.com/rhel/4.8              
 rhel4.9              | Red Hat Enterprise Linux 4.9                       | 4.9      | http://redhat.com/rhel/4.9              
 rhel5.0              | Red Hat Enterprise Linux 5.0                       | 5.0      | http://redhat.com/rhel/5.0              
 rhel5.1              | Red Hat Enterprise Linux 5.1                       | 5.1      | http://redhat.com/rhel/5.1              
 rhel5.10             | Red Hat Enterprise Linux 5.10                      | 5.10     | http://redhat.com/rhel/5.10             
 rhel5.11             | Red Hat Enterprise Linux 5.11                      | 5.11     | http://redhat.com/rhel/5.11             
 rhel5.2              | Red Hat Enterprise Linux 5.2                       | 5.2      | http://redhat.com/rhel/5.2              
 rhel5.3              | Red Hat Enterprise Linux 5.3                       | 5.3      | http://redhat.com/rhel/5.3              
 rhel5.4              | Red Hat Enterprise Linux 5.4                       | 5.4      | http://redhat.com/rhel/5.4              
 rhel5.5              | Red Hat Enterprise Linux 5.5                       | 5.5      | http://redhat.com/rhel/5.5              
 rhel5.6              | Red Hat Enterprise Linux 5.6                       | 5.6      | http://redhat.com/rhel/5.6              
 rhel5.7              | Red Hat Enterprise Linux 5.7                       | 5.7      | http://redhat.com/rhel/5.7              
 rhel5.8              | Red Hat Enterprise Linux 5.8                       | 5.8      | http://redhat.com/rhel/5.8              
 rhel5.9              | Red Hat Enterprise Linux 5.9                       | 5.9      | http://redhat.com/rhel/5.9              
 rhel6.0              | Red Hat Enterprise Linux 6.0                       | 6.0      | http://redhat.com/rhel/6.0              
 rhel6.1              | Red Hat Enterprise Linux 6.1                       | 6.1      | http://redhat.com/rhel/6.1              
 rhel6.2              | Red Hat Enterprise Linux 6.2                       | 6.2      | http://redhat.com/rhel/6.2              
 rhel6.3              | Red Hat Enterprise Linux 6.3                       | 6.3      | http://redhat.com/rhel/6.3              
 rhel6.4              | Red Hat Enterprise Linux 6.4                       | 6.4      | http://redhat.com/rhel/6.4              
 rhel6.5              | Red Hat Enterprise Linux 6.5                       | 6.5      | http://redhat.com/rhel/6.5              
 rhel6.6              | Red Hat Enterprise Linux 6.6                       | 6.6      | http://redhat.com/rhel/6.6              
 rhel6.7              | Red Hat Enterprise Linux 6.7                       | 6.7      | http://redhat.com/rhel/6.7              
 rhel6.8              | Red Hat Enterprise Linux 6.8                       | 6.8      | http://redhat.com/rhel/6.8              
 rhel6.9              | Red Hat Enterprise Linux 6.9                       | 6.9      | http://redhat.com/rhel/6.9              
 rhel7.0              | Red Hat Enterprise Linux 7.0                       | 7.0      | http://redhat.com/rhel/7.0              
 rhel7.1              | Red Hat Enterprise Linux 7.1                       | 7.1      | http://redhat.com/rhel/7.1              
 rhel7.2              | Red Hat Enterprise Linux 7.2                       | 7.2      | http://redhat.com/rhel/7.2              
 rhel7.3              | Red Hat Enterprise Linux 7.3                       | 7.3      | http://redhat.com/rhel/7.3              
 rhel7.4              | Red Hat Enterprise Linux 7.4                       | 7.4      | http://redhat.com/rhel/7.4              
 rhl1.0               | Red Hat Linux 1.0                                  | 1.0      | http://redhat.com/rhl/1.0               
 rhl1.1               | Red Hat Linux 1.1                                  | 1.1      | http://redhat.com/rhl/1.1               
 rhl2.0               | Red Hat Linux 2.0                                  | 2.0      | http://redhat.com/rhl/2.0               
 rhl2.1               | Red Hat Linux 2.1                                  | 2.1      | http://redhat.com/rhl/2.1               
 rhl3.0.3             | Red Hat Linux 3.0.3                                | 3.0.3    | http://redhat.com/rhl/3.0.3             
 rhl4.0               | Red Hat Linux 4.0                                  | 4.0      | http://redhat.com/rhl/4.0               
 rhl4.1               | Red Hat Linux 4.1                                  | 4.1      | http://redhat.com/rhl/4.1               
 rhl4.2               | Red Hat Linux 4.2                                  | 4.2      | http://redhat.com/rhl/4.2               
 rhl5.0               | Red Hat Linux 5.0                                  | 5.0      | http://redhat.com/rhl/5.0               
 rhl5.1               | Red Hat Linux 5.1                                  | 5.1      | http://redhat.com/rhl/5.1               
 rhl5.2               | Red Hat Linux 5.2                                  | 5.2      | http://redhat.com/rhl/5.2               
 rhl6.0               | Red Hat Linux 6.0                                  | 6.0      | http://redhat.com/rhl/6.0               
 rhl6.1               | Red Hat Linux 6.1                                  | 6.1      | http://redhat.com/rhl/6.1               
 rhl6.2               | Red Hat Linux 6.2                                  | 6.2      | http://redhat.com/rhl/6.2               
 rhl7                 | Red Hat Linux 7                                    | 7        | http://redhat.com/rhl/7                 
 rhl7.1               | Red Hat Linux 7.1                                  | 7.1      | http://redhat.com/rhl/7.1               
 rhl7.2               | Red Hat Linux 7.2                                  | 7.2      | http://redhat.com/rhl/7.2               
 rhl7.3               | Red Hat Linux 7.3                                  | 7.3      | http://redhat.com/rhl/7.3               
 rhl8.0               | Red Hat Linux 8.0                                  | 8.0      | http://redhat.com/rhl/8.0               
 rhl9                 | Red Hat Linux 9                                    | 9        | http://redhat.com/rhl/9                 
 sled10               | SUSE Linux Enterprise Desktop 10                   | 10       | http://suse.com/sled/10                 
 sled10sp1            | SUSE Linux Enterprise Desktop 10 SP1               | 10.1     | http://suse.com/sled/10.1               
 sled10sp2            | SUSE Linux Enterprise Desktop 10 SP2               | 10.2     | http://suse.com/sled/10.2               
 sled10sp3            | SUSE Linux Enterprise Desktop 10 SP3               | 10.3     | http://suse.com/sled/10.3               
 sled10sp4            | SUSE Linux Enterprise Desktop 10 SP4               | 10.4     | http://suse.com/sled/10.4               
 sled11               | SUSE Linux Enterprise Desktop 11                   | 11       | http://suse.com/sled/11                 
 sled11sp1            | SUSE Linux Enterprise Desktop 11 SP1               | 11.1     | http://suse.com/sled/11.1               
 sled11sp2            | SUSE Linux Enterprise Desktop 11 SP2               | 11.2     | http://suse.com/sled/11.2               
 sled11sp3            | SUSE Linux Enterprise Desktop 11 SP3               | 11.3     | http://suse.com/sled/11.3               
 sled11sp4            | SUSE Linux Enterprise Desktop 11 SP4               | 11.4     | http://suse.com/sled/11.4               
 sled12               | SUSE Linux Enterprise Desktop 12                   | 12       | http://suse.com/sled/12                 
 sled12sp1            | SUSE Linux Enterprise Desktop 12 SP1               | 12.1     | http://suse.com/sled/12.1               
 sled12sp2            | SUSE Linux Enterprise Desktop 12 SP2               | 12.2     | http://suse.com/sled/12.2               
 sled9                | SUSE Linux Enterprise Desktop 9                    | 9        | http://suse.com/sled/9                  
 sles10               | SUSE Linux Enterprise Server 10            
/etc/bind/masters/elinvent.com        | 10       | http://suse.com/sles/10                 
 sles10sp1            | SUSE Linux Enterprise Server 10 SP1                | 10.1     | http://suse.com/sles/10.1               
 sles10sp2            | SUSE Linux Enterprise Server 10 SP2                | 10.2     | http://suse.com/sles/10.2               
 sles10sp3            | SUSE Linux Enterprise Server 10 SP3                | 10.3     | http://suse.com/sles/10.3               
 sles10sp4            | SUSE Linux Enterprise Server 10 SP4                | 10.4     | http://suse.com/sles/10.4               
 sles11               | SUSE Linux Enterprise Server 11                    | 11       | http://suse.com/sles/11                 
 sles11sp1            | SUSE Linux Enterprise Server 11 SP1                | 11.1     | http://suse.com/sles/11.1               
 sles11sp2            | SUSE Linux Enterprise Server 11 SP2                | 11.2     | http://suse.com/sles/11.2               
 sles11sp3            | SUSE Linux Enterprise Server 11 SP3                | 11.3     | http://suse.com/sles/11.3               
 sles11sp4            | SUSE Linux Enterprise Server 11 SP4                | 11.4     | http://suse.com/sles/11.4               
 sles12               | SUSE Linux Enterprise Server 12                    | 12       | http://suse.com/sles/12                 
 sles12sp1            | SUSE Linux Enterprise Server 12 SP1                | 12.1     | http://suse.com/sles/12.1               
 sles12sp2            | SUSE Linux Enterprise Server 12 SP2                | 12.2     | http://suse.com/sles/12.2               
 sles9                | SUSE Linux Enterprise Server 9                     | 9        | http://suse.com/sles/9                  
 solaris10            | Solaris 10                                         | 10       | http://sun.com/solaris/10               
 solaris11            | Oracle Solaris 11                                  | 11       | http://oracle.com/solaris/11            
 solaris9             | Solaris 9                                          | 9        | http://sun.com/solaris/9                
 ubuntu10.04          | Ubuntu 10.04 LTS                                   | 10.04    | http://ubuntu.com/ubuntu/10.04          
 ubuntu10.10          | Ubuntu 10.10                                       | 10.10    | http://ubuntu.com/ubuntu/10.10          
 ubuntu11.04          | Ubuntu 11.04                                       | 11.04    | http://ubuntu.com/ubuntu/11.04          
 ubuntu11.10          | Ubuntu 11.10                                       | 11.10    | http://ubuntu.com/ubuntu/11.10          
 ubuntu12.04          | Ubuntu 12.04 LTS                                   | 12.04    | http://ubuntu.com/ubuntu/12.04          
 ubuntu12.10          | Ubuntu 12.10                                       | 12.10    | http://ubuntu.com/ubuntu/12.10          
 ubuntu13.04          | Ubuntu 13.04                                       | 13.04    | http://ubuntu.com/ubuntu/13.04          
 ubuntu13.10          | Ubuntu 13.10                                       | 13.10    | http://ubuntu.com/ubuntu/13.10          
 ubuntu14.04          | Ubuntu 14.04 LTS                                   | 14.04    | http://ubuntu.com/ubuntu/14.04          
 ubuntu14.10          | Ubuntu 14.10                                       | 14.10    | http://ubuntu.com/ubuntu/14.10          
 ubuntu15.04          | Ubuntu 15.04                                       | 15.04    | http://ubuntu.com/ubuntu/15.04          
 ubuntu15.10          | Ubuntu 15.10                                       | 15.10    | http://ubuntu.com/ubuntu/15.10          
 ubuntu16.04          | Ubuntu 16.04                                       | 16.04    | http://ubuntu.com/ubuntu/16.04          
 ubuntu16.10          | Ubuntu 16.10                                       | 16.10    | http://ubuntu.com/ubuntu/16.10          
 ubuntu17.04          | Ubuntu 17.04                                       | 17.04    | http://ubuntu.com/ubuntu/17.04          
 ubuntu17.10          | Ubuntu 17.10                                       | 17.10    | http://ubuntu.com/ubuntu/17.10          
 ubuntu4.10           | Ubuntu 4.10                                        | 4.10     | http://ubuntu.com/ubuntu/4.10           
 ubuntu5.04           | Ubuntu 5.04                                        | 5.04     | http://ubuntu.com/ubuntu/5.04           
 ubuntu5.10           | Ubuntu 5.10                                        | 5.10     | http://ubuntu.com/ubuntu/5.10           
 ubuntu6.06           | Ubuntu 6.06 LTS                                    | 6.06     | http://ubuntu.com/ubuntu/6.06           
 ubuntu6.10           | Ubuntu 6.10                                        | 6.10     | http://ubuntu.com/ubuntu/6.10           
 ubuntu7.04           | Ubuntu 7.04                                        | 7.04     | http://ubuntu.com/ubuntu/7.04           
 ubuntu7.10           | Ubuntu 7.10                                        | 7.10     | http://ubuntu.com/ubuntu/7.10           
 ubuntu8.04           | Ubuntu 8.04 LTS                                    | 8.04     | http://ubuntu.com/ubuntu/8.04           
 ubuntu8.10           | Ubuntu 8.10                                        | 8.10     | http://ubuntu.com/ubuntu/8.10           
 ubuntu9.04           | Ubuntu 9.04                                        | 9.04     | http://ubuntu.com/ubuntu/9.04           
 ubuntu9.10           | Ubuntu 9.10                                        | 9.10     | http://ubuntu.com/ubuntu/9.10           
 win1.0               | Microsoft Windows 1.0                              | 1.0      | http://microsoft.com/win/1.0            
 win10                | Microsoft Windows 10                               | 10.0     | http://microsoft.com/win/10             
 win2.0               | Microsoft Windows 2.0                              | 2.0      | http://microsoft.com/win/2.0            
 win2.1               | Microsoft Windows 2.1                              | 2.1      | http://microsoft.com/win/2.1            
 win2k                | Microsoft Windows 2000                             | 5.0      | http://microsoft.com/win/2k             
 win2k12              | Microsoft Windows Server 2012                      | 6.3      | http://microsoft.com/win/2k12           
 win2k12r2            | Microsoft Windows Server 2012 R2                   | 6.3      | http://microsoft.com/win/2k12r2         
 win2k3               | Microsoft Windows Server 2003                      | 5.2      | http://microsoft.com/win/2k3            
 win2k3r2             | Microsoft Windows Server 2003 R2                   | 5.2      | http://microsoft.com/win/2k3r2          
 win2k8               | Microsoft Windows Server 2008                      | 6.0      | http://microsoft.com/win/2k8            
 win2k8r2             | Microsoft Windows Server 2008 R2                   | 6.1      | http://microsoft.com/win/2k8r2          
 win3.1               | Microsoft Windows 3.1                              | 3.1      | http://microsoft.com/win/3.1            
 win7                 | Microsoft Windows 7                                | 6.1      | http://microsoft.com/win/7              
 win8                 | Microsoft Windows 8                                | 6.2      | http://microsoft.com/win/8              
 win8.1               | Microsoft Windows 8.1                              | 6.3      | http://microsoft.com/win/8.1            
 win95                | Microsoft Windows 95                               | 4.0      | http://microsoft.com/win/95             
 win98                | Microsoft Windows 98                               | 4.1      | http://microsoft.com/win/98             
 winme                | Microsoft Windows Millennium Edition               | 4.9      | http://microsoft.com/win/me             
 winnt3.1             | Microsoft Windows NT Server 3.1                    | 3.1      | http://microsoft.com/winnt/3.1          
 winnt3.5             | Microsoft Windows NT Server 3.5                    | 3.5      | http://microsoft.com/winnt/3.5          
 winnt3.51            | Microsoft Windows NT Server 3.51                   | 3.51     | http://microsoft.com/winnt/3.51         
 winnt4.0             | Microsoft Windows NT Server 4.0                    | 4.0      | http://microsoft.com/winnt/4.0          
 winvista             | Microsoft Windows Vista                            | 6.0      | http://microsoft.com/win/vista          
 winxp                | Microsoft Windows XP                               | 5.1      | http://microsoft.com/win/xp  


9. Start / Stop listed KVM Virtual Machine


root@jeremiah:~# virsh list –all
 Id    Name                           State
—————————————————-
 3     fedora-28                      running
 –     debian9                        shut off


To start debian9 linux virtual machine that is currently off


root@jeremiah:~# virsh start fedora-28
Domain fedora-28 started


root@jeremiah:/home/hipo# virsh start debian9
error: Failed to start domain debian9
error: Requested operation is not valid: network 'default' is not active

root@jeremiah:/home/hipo# virsh net-list –all
Name                 State      Autostart     Persistent
———————————————————-
br0                  active     yes           yes
default              inactive   no            yes


root@jeremiah:/home/hipo# virsh net-start default
Network default started

root@jeremiah:/home/hipo# virsh start debian9
Domain debian9 started


10. Attach to running VM with virsh or virt-manager


root@jeremiah:~# virsh list
 Id    Name                           State
—————————————————-
 1     fedora-28                      running
 3     debian9                        running

root@jeremiah:~# virsh connect debian9


Note that to make the login prompt appear you have to press enter once after the ^] connection string appears


kvm-connect-to-virtual-machine-with-virsh-command-screenshot-howto

An alternative way is to use virt-manager GUI KVM desktop management interface and click over the Virtual Machine Guest name, in same fashion like in VirtualBox.

virtual-manager-virt-manager-screenshot-with-Virtual-Machines-inside-on-Debian-Linux

virt-manager-gui-interface-connect-to-fedora-28-virtual-machine

If you have KVM running on your Linux desktop PC / notebook you can also connect via VNC with virsh command.


root@jericho:~# virsh vncdisplay centos7


Another handy thing is to expose the Virtualized Guest OS with VNC in order to be able to connect and manage installation or further Linux configuration via VNC using an SSH Tunnel with port forwarding:


$ ssh hipo@www.pc-freak.net -L 5901:127.0.0.1:5901


11.  Start / Shutdown / Suspend / Reboot (safe reboot) a VM guest machine domain


root@jericho:~# virsh shutdown debian9
root@jericho:~# virsh start fedora-28
root@jericho:~# virsh suspend debian9
root@jericho:~# virsh reboot fedora-28


12. Remove / Delete KVM Virtual Machines domain


root@jeremiah:~# virsh undefine fedora-28
root@jeremiah:~# virsh destroy fedora-28


Closing words


Using KVM to experiment with different OS distributions is really fun just like you can easily run a number of the major most popular Linux Distributions and a set of different versions. It takes few minutes to have a fully functional Linux to play with and it saves a lot of hassles when dealing with GNU / Linux and FreeBSD, doing so in Virtualbox for me prooved to be much more complicated (not to mention that often Virtualbox had an ugly bugs so even Importing an Appliance as a Guest VM with an official distro OS-es failed with weird errors.
One other very practical use of Kerkel-based Virtualization is if you want to run your servers using own Micro-Services architecture (e.g. run multiple Linux OS-es each running a separate Apache / Nginx / MySQL / PostGreSQL / Backup / Storage) etc. all of it running on a single dedicated server or a self-hosted bare-metal
There are plenty of Web Interfaces for Management KVM (proprietary and free software) that could even futher simplify the use and deploy / destory of KVM VMs.
All that makes possible running your own Linux or Web hosting provider a relatively easy task and seriously could cut business expenses and operational (maintenance) costs.

If you plan to run youw own hosting company, I can help you establish your infrastructure and advise you on the right technologies to use.


How to check Linux OS install date / How long ago was Linux installed

Sunday, October 22nd, 2017

If you're sysadmin who inherited a few hundreds of Linux machines from a previous admin and you're in process of investigating how things were configured by the previous administrator one of the crucial things to find out might be

How Long ago was Linux installed?

Here is how to check the Linux OS install date.

The universal way nomatter the Linux distribution is to use fullowing command:


root@pcfreak:~# tune2fs -l /dev/sda1 | grep 'Filesystem created:'
Filesystem created:       Thu Sep  6 21:44:22 2012


Above command assumes the Linux's root partition / is installed on /dev/sda1 however if your case is different, e.g. the primary root partition is installed on /dev/sda2 or /dev/sdb1 / dev/sdb2 etc. just place the right first partition into the command.

If primary install root partition is /dev/sdb1 for example:
 

root@pcfreak:~# tune2fs -l /dev/sdb1 | grep 'Filesystem created:'


To find out what is the root partition of the Linux server installed use fdisk command:


root@pcfreak:~# fdisk -l


Disk /dev/sda: 465,8 GiB, 500107862016 bytes, 976773168 sectors
Units: sectors of 1 * 512 = 512 bytes
Sector size (logical/physical): 512 bytes / 512 bytes
I/O size (minimum/optimal): 512 bytes / 512 bytes
Disklabel type: dos
Disk identifier: 0x00051eda

Device     Boot     Start       End   Sectors   Size Id Type
/dev/sda1  *         2048 965193727 965191680 460,2G 83 Linux
/dev/sda2       965195774 976771071  11575298   5,5G  5 Extended
/dev/sda5       965195776 976771071  11575296   5,5G 82 Linux swap / Solaris

Disk /dev/sdb: 111,8 GiB, 120034123776 bytes, 234441648 sectors
Units: sectors of 1 * 512 = 512 bytes
Sector size (logical/physical): 512 bytes / 512 bytes
I/O size (minimum/optimal): 512 bytes / 512 bytes
Disklabel type: dos
Disk identifier: 0x00000000


Other ways to check the Linux OS install date on Debian / Ubuntu / Mint etc. deb. based GNU / Linux


Deban based Linux distributions do create an initial /var/log/installer directory containing various install information such as hardware-summary, partition, initial installed deb packages, exact version of Linux distribution, and the way it was installed either it was installed from an ISO image, or it was network install etc.


root@pcfreak:~# ls -al /var/log/installer/
total 1228
drwxr-xr-x  3 root root   4096 sep  6  2012 ./
drwxr-xr-x 72 root root  12288 окт 22 06:26 ../
drwxr-xr-x  2 root root   4096 sep  6  2012 cdebconf/
-rw-r–r–  1 root root  17691 sep  6  2012 hardware-summary
-rw-r–r–  1 root root    163 sep  6  2012 lsb-release
-rw——-  1 root root 779983 sep  6  2012 partman
-rw-r–r–  1 root root  51640 sep  6  2012 status
-rw——-  1 root root 363674 sep  6  2012 syslog


If those directory is missing was wiped out by the previous administrator, to clear up traces of his previous work before he left job another possible way to find out exact install date is to check timestamp of /lost+found directory;
 

root@pcfreak:~# ls -ld /lost+found/
drwx—— 2 root root 16384 sep  6  2012 /lost+found//


Check OS Linux install date on (Fedora, CentOS, Scientific Linux, Oracle and other Redhat RPM based Distros)


[root@centos: ~]# rpm -qi basesystem
Name        : basesystem
Version     : 10.0
Release     : 7.el7
Architecture: noarch
Install Date: Mon 02 May 2016 19:20:58 BST
Group       : System Environment/Base
Size        : 0
License     : Public Domain
Signature   : RSA/SHA256, Tue 01 Apr 2014 14:23:16 BST, Key ID     199e2f91fd431d51
Source RPM  : basesystem-10.0-7.el7.src.rpm
Build Date  : Fri 27 Dec 2013 17:22:15 GMT
Build Host  : ppc-015.build.eng.bos.redhat.com
Relocations : (not relocatable)
Packager    : Red Hat, Inc. <http://bugzilla.redhat.com/bugzilla>
Vendor      : Red Hat, Inc.
Summary     : The skeleton package which defines a simple Red Hat Enterprise Linux system
Description :
Basesystem defines the components of a basic Red Hat Enterprise Linux
system (for example, the package installation order to use during
bootstrapping). Basesystem should be in every installation of a system,
and it should never be removed.