
Posts Tagged ‘kernel source’

How to install VirtualBox Virtual Machine to run Windows XP on Ubuntu Linux (11.10)

Tuesday, January 17th, 2012

Enable_VirtualBox_Windows_XP-fullscreen-with-vboxguest-additions-iso
My beloved sister was complaining games were failing to properly be played with wine emulator , therefore I decided to be kind and help her by installing a Windows XP to run inside a Virtual Machine.My previous install experiments with running MS Windows XP on Linux was on Debian using QEMU virtualmachine emulator.
However as Qemu is a bit less interactive and slower virtualmachine for running Windows (though I prefer it for being completely free software), this time I decided to install the Windows OS with Virtualbox.

My hope was using VirtualBox would be a way easier but I was wrong… I've faced few troubles and I thought many people who initially try to install Virtualbox VM to run Windows on Ubuntu and other Debian based Linux distros will probably experience the same problems as mine, so here is how this article was born.

Here is what I did to have a VirtualBox OS emulator to run Windows XP SP2 on Ubuntu 11.10 Linux

1. Install Virtualbox required packages with apt

root@ubuntu:~# apt-get install virtualbox virtualbox-dkms virtualbox-guest-dkms root@ubuntu:~# apt-get install virtualbox-ose-dkms virtualbox-guest-utils virtualbox-guest-x11
...

If you prefer more GUI or lazy to type commands, the Software Package Manager can also be used to straight install the same packages.
virtualbox-dkms virtualbox-guest-dkms packages are the two which are absolutely necessery in order to enable VirtualBox to support installing Microsoft Windows XP. DKMS modules are also necessery to be able to emulate some other proprietary (non-free) operating systems.
The DKMS packages provide a source for building Vbox guest (OS) additional kernel modules. They also require the kernel source to be install otherwise they fail to compile.

Failing to build the DKMS modules will give you error every time you try to create new VirtualMachine container for installing a fresh Windows XP.
The error happens if the two packages do not properly build the vboxdrv extra Vbox kernel module while the Windows XP installer is loaded from a CD or ISO. The error to pop up is:

Kernel driver not installed (rc=-1908)

The VirtualBox Linux kernel driver (vboxdrv) is either not loaded or there is a permission problem with /dev/vboxdrv. Please reinstall the kernel module by executing
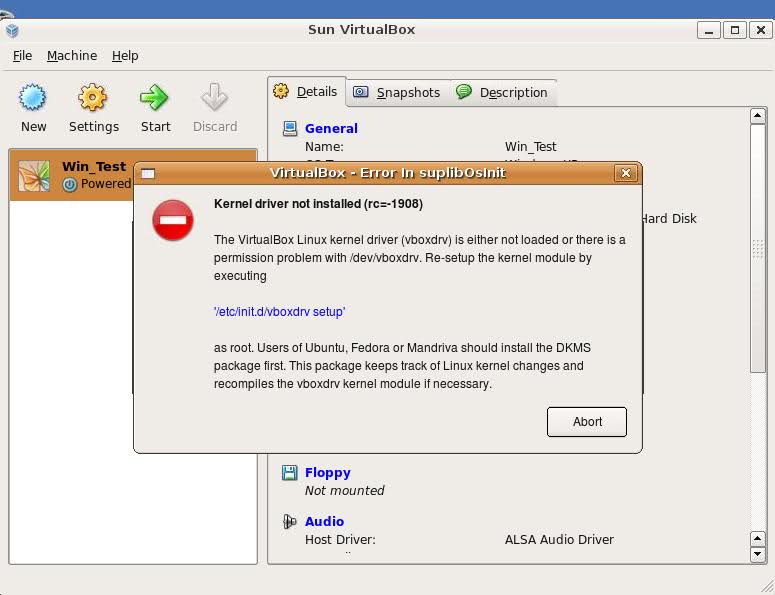
VirtualBox vboxdrv not loaded error Ubuntu Screen

To fix the error:

2. Install latest Kernel source that corresponds to your current kernel version

root@ubuntu:~# apt-get install linux-headers-`uname -r`
...

Next its necessery to rebuild the DKMS modules using dpkg-reconfigure:

3. Rebuild VirtualBox DKMS deb packages

root@ubuntu:~# dpkg-reconfigure virtualbox-dkms
...
root@ubuntu:~# dpkg-reconfigure virtualbox-guest-dkms
...
root@ubuntu:~# dpkg-reconfigure virtualbox-ose-dkms
...

Hopefully the copilation of vboxdrv kernel module should complete succesfully.
To test if all is fine just load the module:

4. Load vboxdrv virtualbox kernel module

root@ubuntu:~# modprobe vboxdrv
root@ubuntu:~#

If you get some error during loading, this means vboxdrv failed to properly compile, try read thoroughfully what the error is and fix it) ;).

As a next step the vboxdrv has to be set to load on every system boot.

5. Set vboxdrv to load on every Ubuntu boot

root@ubuntu:~# echo 'vboxdrv' >> /etc/modules

I am not sure if this step is required, it could be /etc/init.d/virtualbox init script automatically loads the module, anyways putting it to load on boot would do no harm, so better do it.

That's all now, you can launch VirtualBox and use the New button to initiate a new Virtual Machine, I will skip explaining how to do the configurations for a Windows XP as most of the configurations offered by default would simply work without any tampering.

After booting the Windows XP installer I simply followed the usual steps to install Windows and all went smoothly.
Below you see a screenshot showing the installed Windows XP Virtualbox saved VM session. The screenshot letters are in Bulgarian as my sisters default lanaguage for Ubuntu is bulgarian 😉
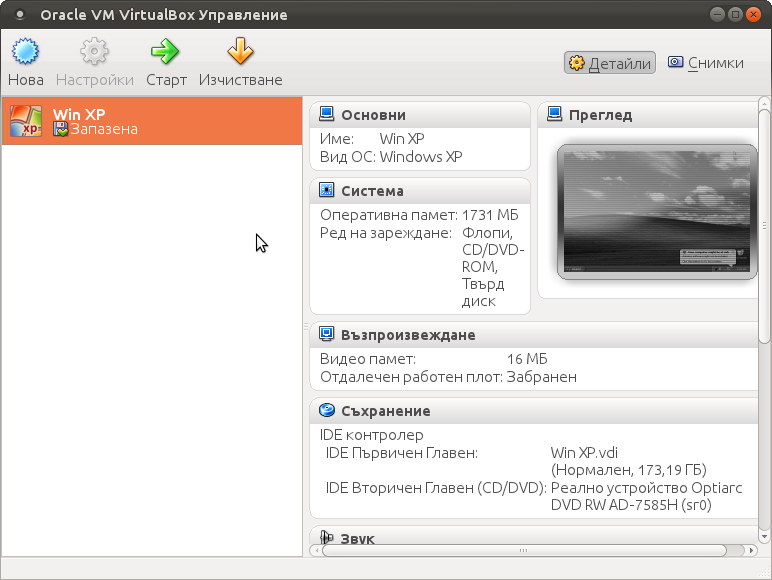
VirtualBox installed MS Windows VM screenshot

I hope this article helps someone out there. Please drop me a comment if you experience any troubles with it. Cya 🙂

How to improve Linux kernel security with GrSecurity / Maximum Linux kernel security with GrSecurity

Tuesday, May 3rd, 2011

In short I’ll explain here what is Grsecurity http://www.grsecurity.net/ for all those who have not used it yet and what kind of capabilities concerning enhanced kernel security it has.

Grsecurity is a combination of patches for the Linux kernel accenting at the improving kernel security.

The typical application of GrSecurity is in the field of Linux systems which are administered through SSH/Shell, e.g. (remote hosts), though you can also configure grsecurity on a normal Linux desktop system if you want a super secured Linux desktop ;).

GrSecurity is used heavily to protect server system which require a multiple users to have access to the shell.

On systems where multiple user access is required it’s a well known fact that (malicious users, crackers or dumb script kiddies) get administrator (root) privileges with a some just poped in 0 day root kernel exploit.
If you’re an administrator of a system (let’s say a web hosting) server with multiple users having access to the shell it’s also common that exploits aiming at hanging in certain daemon service is executed by some of the users.
In other occasions you have users which are trying to DoS the server with some 0 day Denial of Service exploit.
In all this cases GrSecurity having a kernel with grsecurity is priceless.

Installing grsecurity patched kernel is an easy task for Debian and Ubuntu and is explained in one of my previous articles.
This article aims to explain in short some configuration options for a GrSecurity tightened kernel, when one have to compile a new kernel from source.

I would skip the details on how to compile the kernel and simply show you some picture screens with GrSecurity configuration options which are working well and needs to be set-up before a make command is issued to compile the new kernel.

After preparing the kernel source for compilation and issuing:

linux:/usr/src/kernel-source$ make menuconfig

You will have to select options like the ones you see in the pictures below:

[nggallery id=”8″]

After completing and saving your kernel config file, continue as usual with an ordinary kernel compilation, e.g.:

linux:/usr/src/kernel-source$ make
linux:/usr/src/kernel-source$ make modules
linux:/usr/src/kernel-source$ su root
linux:/usr/src/kernel-source# make modules_install
linux:/usr/src/kernel-source# make install
linux:/usr/src/kernel-source# mkinitrd -o initrd.img-2.6.xx 2.6.xx

Also make sure the grub is properly configured to load the newly compiled and installed kernel.

After a system reboot, if all is fine you should be able to boot up the grsecurity tightened newly compiled kernel, but be careful and make sure you have a backup solution before you reboot, don’t blame me if your new grsecurity patched kernel fails to boot! You’re on your own boy 😉
This article is written thanks to based originally on his article in Bulgarian. If you’re a Bulgarian you might also checkout static’s blog

How to install Nvidia GeForce FX 5500 on Ubuntu 11.04

Tuesday, July 19th, 2011

Nvidia Tux GeForce GNU / Linux

Yesterday I was at a friend of mine who has recently installed Ubuntu 11.04 to his already oldish Desktop computer.

The system was 1.4Ghz (amd) with 512 RAM and some kind of Dell Trinitron 19 inch monitor
Even though he tried hard to make his NVIDIA GeForce FX 5500 ‘s drive to work properly with Ubuntu Natty Narwhal, he just has messed it even more.
As I always like helping people and I’m joyful for people who want to migrate to Linux, I took some time to make his NVIDIA GeForce work with this Ubuntu release.

First I tried to make it work by using some of the official NVIDIA Linux drivers located on nvidia.com following some online tutorial for Ubuntu claiming that it works but actually it didn’t, so finally after a bit of experimentation I found a way to make this video card work.
Here is how:

1. Install the following Ubuntu packages

root@ubuntu:~# apt-get install nouveau-firmware nvidia-173 nvidia-173-kernel-source
nvidia-cg-toolkit nvidia-common nvidia-current nvidia-glx-173 nvidia-settings
...

2. Load in the kernel and set to be auto loaded on boot nvidia’s driver kernel module nvidia-173

root@ubuntu:~# depmod -a;
root@ubutnu:~# modprobe nvidia-173
root@ubuntu:~# echo nvidia-173 >> /etc/modules

3. Stop temporary (Gnome dipsplay manager) gdm

root@ubuntu:~# service gdm stop
...

4. Use nvidia-xconfig to generate a working version of /etc/X11/xorg.conf for Nvidia

root@ubuntu:~# nvidia-xconfig
..

nvidia-xconfig will generate new /etc/X11/xorg.conf configuration corresponding to the Nvidia GeForce Fx 5500 and will move the old xorg.conf to xorg.conf.backup.

5. Start the gdm manager to be running again

root@ubuntu:~# service gdm start
...

Now the Xserver will start in a terrible mode of 640×480, probably because Ubuntu was unable to define correct VerticalSync and HorizontalSync for the 19 inch Dell Trinitron monitor or for some other weird reason, to fix this it’s quite easy though.
The fix to the NVIDIA GeForce 5500 running in 640×480 mode is done straigh via Gnome menus.

6. Use Gnome’s System -> Preferences -> Monitors to set raise up the Xserver resolution

Navigate to Gnome’s menus:

System -> Preferences -> Monitors

Gnome System Preferences Monitors Nvidia GeForce 5500 Ubuntu

Here you will have to select more appropriate resolution and a different refresh rate, which in my case was 1024×768 and further on to store the settings press the Apply button.

One oddity here was that according to the Monitor Preferences the refresh rate was running on 54 Hz which I don’t believe was the case as I guess it’s some kind of Gnome or Ubuntu bug. I changed the 54 Hz Refresh Rate to 50 Hz as using the 54 Hz refresh rate as the screen had a minor vibrations observable if one takes a thorough look on the screen.

Setting the NVIDIA GeForce 5500 driver to work with 50 Hz Refresh Rate in Gnome loooked like the Windows’s 85 Hz RR and looked quite nice so I left it this way.

Finally to test the newly installed driver 3D acceleration I used glxgears.

7. Install glxgears in order to be able to test that 3D acceleration on Nvidia works fine

root@ubuntu:~# apt-get install mesa-utils

After installing mesa-utils which nowdays contains glxgears executable one needs to execute the glxgears binary.

root@ubuntu:~# glxgears

Immediately after a window containing the glxgears should popup on the screen, like shown in below screenshot
Benchmark 3d Acceleration Linu glxgears

glxgears showed 3d acceleration works fine as the performance for 3d rendering shown was quite good and therefore 3D acceleration was running fine.

And that was it now the video works like and my friends, can enjoy the fun to have a generally virus Free OS 😉