Archive for June, 2014

Windows: VMWare Start / Stop from command line stop-vmware.bat / start-vmware.bat script

Wednesday, June 4th, 2014

vmware_start-stop-from-command-line-on-windows-os-bat-script
I'm experimenting with different Virtual Machines these days, because often running VMWare together with other Virtual Machines (like VirtualBox) might be causing crashes or VM instability – hence it is always best to have VMWare completely stopped. Unfortunately VMWare keeps running a number of respawning processes (vmnat.exe, vmnetdhcp.exe, vmware-authd.exe, vmware-usbarbitrator64.exe) which cannot be killed from Task Manager with Process KillEnd Tree option. Thus to make this services stop it is necessery run from cmd.exe (which is Run as Administrator):
 

NET STOP "VMware Workstation Server"
NET STOP "VMware USB Arbitration service"
NET STOP "VMware NAT Service"
NET STOP "VMware DHCP Service"
NET STOP "VMware Authorization Service"

If you will be doing regular START / STOP of VMWare on Windows servers it will be handy to create a little batch script stop-vmware.bat containing:
 

@ECHO OFF
NET STOP "VMware Workstation Server"
NET STOP "VMware USB Arbitration service"
NET STOP "VMware NAT Service"
NET STOP "VMware DHCP Service"
NET STOP "VMware Authorization Service"


Later whether it is necessery to start VMWare from Windows command line execute above services in reverse order (to prevent from getting warnings or errors on vmware dependent services.

NET START "VMware Authorization Service"
NET START "VMware DHCP Service"
NET START "VMware NAT Service"
NET START "VMware USB Arbitration service"
NET START "VMware Workstation Server"

To script it as a start script create file start-vmware.bat with:
 

NET START "VMware Authorization Service"
NET START "VMware DHCP Service"
NET START "VMware NAT Service"
NET START "VMware USB Arbitration service"
NET START "VMware Workstation Server"


Of course it is possible to also stop / start VMWare from GUI's Windows Services interface by righclicking on services with VMWare names and selecting "Start" / "Stop".

What is VT-x (Intel Virtualization) and AMD V (AMD Virtualization)

Wednesday, June 4th, 2014

what-is-vt-x-inel-amd-virtualization-amd-v
As I'm lately educating myself in field of Virtualziation and Virtual Machines, the interesting question poped up What is Virtualization on a Hardware Level and what are Intel's and AMD technologies supporting it?


  • Intel Virtualialization (Vt-x)

Is Intel's hardware assistance for processors running virtualization platforms. Intel's Virtualization for short is know as VT-x. Intel VT-x extensions are probably the best recognized extensions, adding migration, priority and memory handling capabilities to a wide range of Intel processors.
Intel VT includes series of extensions for hardware virtualization adding virtualization support to Intel chipsets, so that Virtual Machines could assign specific I/O Devices. Intel VT includes a series of extensions for hardware virtualization Intel Virtualization is better described here.
 

  • AMD-V (AMD virtualization)


Is a set of hardware extensions for the X86 processor architecture. Advanced Micro Dynamics (AMD) designed the extensions to perform repetitive tasks normally performed by software and improve resource use and virtual machine (VM) performance. Early virtualization efforts relied on software emulation to replace hardware functionality. But software emulation can be a slow and inefficient process. Because many virtualization tasks were handled through software, VM behavior and resource control were often poor, resulting in unacceptable VM performance on the server. AMD Virtualization (AMD-V) technology was first announced in 2004 and added to AMD's Pacifica 64-bit x86 processor designs. By 2006, AMD's Athlon 64 X2 and Athlon 64 FX processors appeared with AMD-V technology, and today, the technology is available on Turion 64 X2, second- and third-generation Opteron, Phenom and Phenom II processors. Just like with Intel Virtualization AMD-V Technology enables extra hardware support for assignment of specifics I/O on per virtualized OS. AMD V Virtualization is described more thoroughly here


Linux / BSD: Check if Apache web server is listening on port 80 and 443

Tuesday, June 3rd, 2014

apache_check_if_web_server_running_port-80-and-port-443-logo-linux-and-bsd-check-apache-running
If you're configuring a new Webserver or adding a new VirtualHost to an existing Apache configuration you will need to restart Apache with or without graceful option once Apache is restarted to assure Apache is continuously running on server (depending on Linux distribution) issue:

1. On Debian Linux / Ubuntu servers

# ps axuwf|grep -i apache|grep -v grep

root 23280 0.0 0.2 388744 16812 ? Ss May29 0:13 /usr/sbin/apache2 -k start
www-data 10815 0.0 0.0 559560 3616 ? S May30 2:25 _ /usr/sbin/apache2 -k start
www-data 10829 0.0 0.0 561340 3600 ? S May30 2:31 _ /usr/sbin/apache2 -k start
www-data 10906 0.0 0.0 554256 3580 ? S May30 0:20 _ /usr/sbin/apache2 -k start
www-data 10913 0.0 0.0 562488 3612 ? S May30 2:32 _ /usr/sbin/apache2 -k start
www-data 10915 0.0 0.0 555524 3588 ? S May30 0:19 _ /usr/sbin/apache2 -k start
www-data 10935 0.0 0.0 553760 3588 ? S May30 0:29 _ /usr/sbin/apache2 -k start


2. On CentOS, Fedora, RHEL and SuSE Linux and FreeBSD

ps ax | grep httpd | grep -v grep


7661 ? Ss 0:00 /usr/sbin/httpd
7664 ? S 0:00 /usr/sbin/httpd
7665 ? S 0:00 /usr/sbin/httpd
7666 ? S 0:00 /usr/sbin/httpd
7667 ? S 0:00 /usr/sbin/httpd
7668 ? S 0:00 /usr/sbin/httpd
7669 ? S 0:00 /usr/sbin/httpd
7670 ? S 0:00 /usr/sbin/httpd
7671 ? S 0:00 /usr/sbin/httpd


Whether a new Apache IP Based VirtualHosts are added to already existing Apache and you have added new

Listen 1.1.1.1:80
Listen 1.1.1.1:443

directives, after Apache is restarted to check whether Apache is listening on port :80 and :443
 

netstat -ln | grep -E ':80|443'

tcp        0      0 0.0.0.0:80              0.0.0.0:*               LISTEN
tcp        0      0 0.0.0.0:443            0.0.0.0:*               LISTEN


Meaning of 0.0.0.0 is that Apache is configured to Listen on Any Virtualhost IPs and interfaces. This output is usually returned whether in Apache config httpd.conf / apache2.conf webserver is configured with directive.

Listen *:80
 

If in netstat output there is some IP poping up for example  "192.168.1.1:http", this means that only connections to the "192.168.1.1" IP address will be accepted by Apache.

Another way to look for Apache in netstat (in case Apache is configured to listen on some non-standard port number) is with:

netstat -l |grep -E 'http|www'

tcp        0      0 *:www                   *:*                     LISTEN


As sometimes it might be possible that Apache is listening but its processes are in in defunct (Zommbie) state it is always a good idea, also to check if pages server by Apache are opening in browser (check it with elinks, lynx or curl)

To get more thorough information on Apache listened ports, protocol, user with which Apache is running nomatter of Linux distribution use lsof command:
 

/usr/bin/lsof -i|grep -E 'httpd|http|www'

httpd     6982 nobody    3u  IPv4  29388359      0t0  TCP www.pc-freak.net:https (LISTEN)
httpd    18071 nobody    3u  IPv4 702790659      0t0  TCP www.pc-freak.net:http (LISTEN)
httpd    18071 nobody    4u  IPv4 702790661      0t0  TCP www.pc-freak.net.net:https (LISTEN)


If Apache is not showing up even though restarted check what is going wrong in the error logs:

– on Debian standard error log is /var/log/apache2/error.log
– On RHEL, CentOS, SuSE std. error log is in /var/log/httpd/error.log
– on FeeBSD /var/log/httpd-error.log


Migrate VMWare Linux Virtual Machine to Virtualbox – Convert VMware .VMX to .OVF (Open Virtual Format)

Monday, June 2nd, 2014

migrate_vmware-virtual-machine-toto-virtualbox-vmx-to-ovf-migration

VMWare Virtual Machines are usually stored in OVA Format  which is bundle of OVF(Open Virtualization Format) and in multiple *.VMDK files.
Though other Virtual Machines are supposed to also support these "open virtualization format", different VM vendors implement and support it differently, therefore though in theory VirtualBox and QEMU are said to support OVA Format. Attempts to import such usually will fail. In this little article I will explain how VMWare stored (exported) VirtualMachine machine can be succesfully imported to VirtualBox.
 

1. Locate where is Virtualbox .vmx files from Window search or via dir command

I'm a console guy, so I prefer looking for VMWare's .vmx from command line:
 

C:\Users\GGEORGI7> cd c:\ C:\> dir /s *.vmx


Volume in drive C is PC COE
Volume Serial Number is XXXX-XXXX

Directory of C:\Users\ggeorgi7\Documents\Virtual Machines\Debian 7

06/02/14 11:06 AM 2,687 Debian 7.vmx
05/28/14 15:44 PM 370 Debian 7.vmxf
2 File(s) 3,057 bytes


2. Switch to wherever the VMWare virtualmachine .vmx file is located


C:\> cd \Users\ggeorgi7\Documents\Virtual Machines\Debian 7
 

N.B. !Make sure the VMWare Virtualmachine is Shutdown (if it is Suspended converted file will not be properly implemented inside VirtualBox!). Whether the migrated virtualhost is suspended, launch VMWare, restore its state and Shut it down properly before starting migration with ovftool.
 

3. Remove Vmware-tools, Reset Display settings and Input D (before exporting to OVF) in VMWare

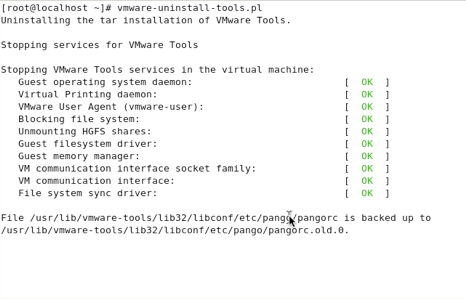
a) Remove vmware-tools

Vmware-tools kernel modules and stuff compiled specific for VMWare are no longer needed and might pose issues, thus it is always a good idea if previously installed in VMWare to wipe them out with cmd:

vmware-uninstall-tools.pl

uninstall-vmware-tools-linux-screenshot-migrating-vmware-to-virtualbox
b) Reset Display Device and Input Devices

Inside VMWare virtual machine Linux host, before shutting it down run:

mv /etc/X11/xorg.conf /etc/X11/xorg.conf.vmware

c) Remove Incomptable devices

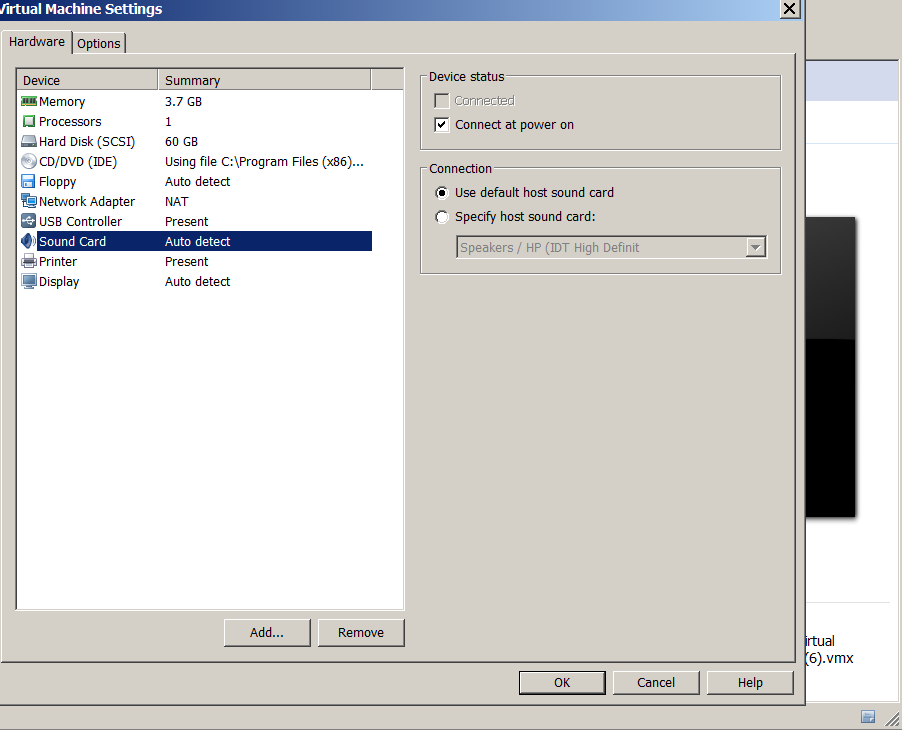
To prevent issues with sound – its necessary to remove VMWare device created for soundcard, in order to let VirtualBox create its soundcard device on 1st boot after migration. To do so click on Virtual Machine and from context menu click Settings then in  Hardware tab select Sound Card and Remove:
 

Settings -> Hardware -> Sound Card (Click Remove)

vmware-migration-remove-soundcard-to-make-work-sound-work-in-virtualbox


4. Make a Clone (Backup) of Virtual Machine

Its always a good idea to create backup of VMWare VM to be migrated just in case something goes wrong during migration, so you have a way to step back to the already working one. Once files are copied it might be a good idea to use use some archiver like PeaZip or 7-Zip to save some disk space.
 

mkdir SomeFolder
copy Path_To_Virtual_Machine Folder_for_Backup_Virtual_Machine


In my case this was


mkdir \Temp\VMWare-machine-backup
C:\>copy "C:\Users\ggeorgi7\Documents\Virtual Machines\Debian 7"\ c:\Temp\VM
ware-machine-backup

Restoring later VMWare VirtualMachines in case of some failure is done by simply copying backuped files to VMWare Working Directory folder

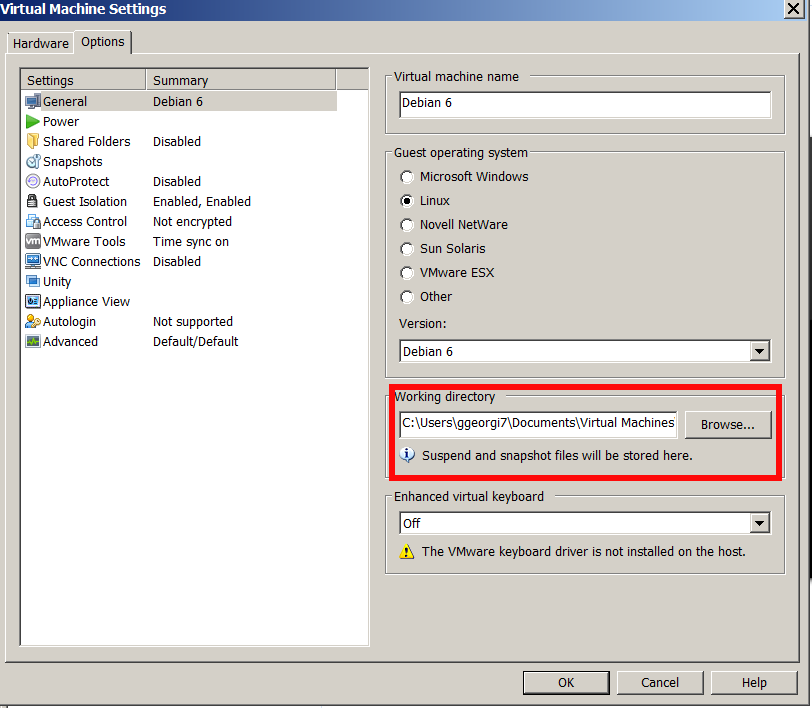
In case if Wondering

Where is stored VMWare Virtual Machines?


Check in:
 

VM -> Settings -> Options


vmware-working-directory-folder-where-are-stored-vmware-virtualmachines

5. Use VMWare ovftool.exe to convert .VMX to Open Virtualization Format (.OVF)


Though export from .VMX to .OVF it can be also done from VMWare GUI from:
 

File -> Export to OVF

Anyways I think it is better to do it via OVFTool console tool:

The most common location for  VMWare Workstation is:
 

C:\Program Files (x86)\Vmware\Vmware Workstation\OVFTool


For VMware Player it is:

C:\Program Files (x86)\Vmware\Vmware Player\OVFTool

Very important thing to mention here is you have to be cautious, Never to run together VMWare and VirtualBox.
!! Before proceeding to next OVTool .vmx to .ovf migration Shutdown the VirtualMachine and as a best practice close VMware completely.

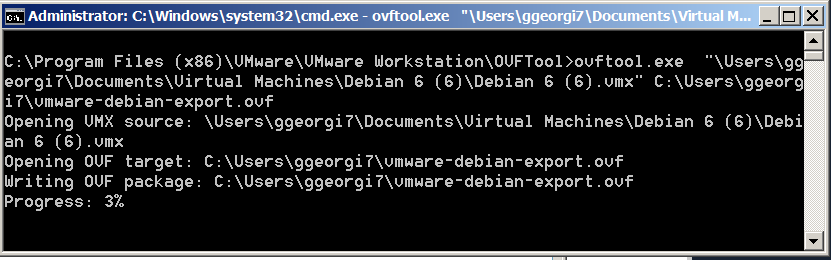
cd Location-directory-ofOVFTool
ovftool.exe Path-folder-to_VMVM_file.vmx Path-folder_to_VM_exportVM_file_export.ovf

C:\> cd "\Program Files (x86)\VMware\VMware Workstation"\OVFTool
C:\Program Files (x86)\VMware\VMware Workstation\OVFTool>ovftool.exe "\Users\ggeorgi7\Documents\Virtual Machines\Debian 7\Debian 7.vmx" C:\Users\ggeorg i7\vmware-debian-export.ovf


vmware-ovftool-convert-vmware-linux-virtual-machine-to-virtualbox


Convertion will take about 30 minutes on a normal computer hardware lets say (Dual Core PC 2Ghz with 4 Gb of RAM).
If you get a “failed to open disk” error during convertion, its likely that the virtual machine is still running or wasn’t shut down properly – boot the virtual machine and perform a shut down.

6. Launch VirtualBox, Install Guest Additions to enable Copy / Paste and USB support in Virtual Machine

After the process completes, you can boot the virtual machine. If you haven't earlier uninstalled vmware-tools  uninstall VMware Tools, and install VirtualBox’s Guest Additions (in order to allow Copy / Paste between VirtualBox and guess OS).
 

7. Launch VirtualBox and Import exported .OVF

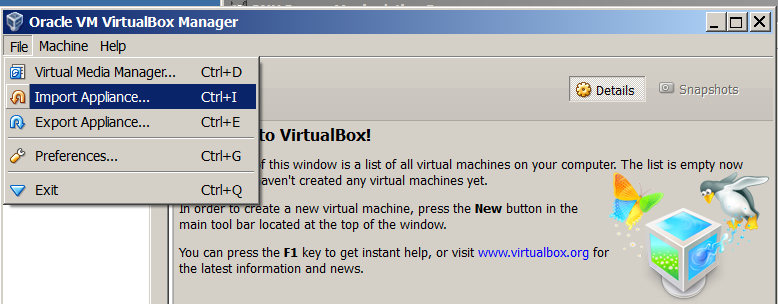
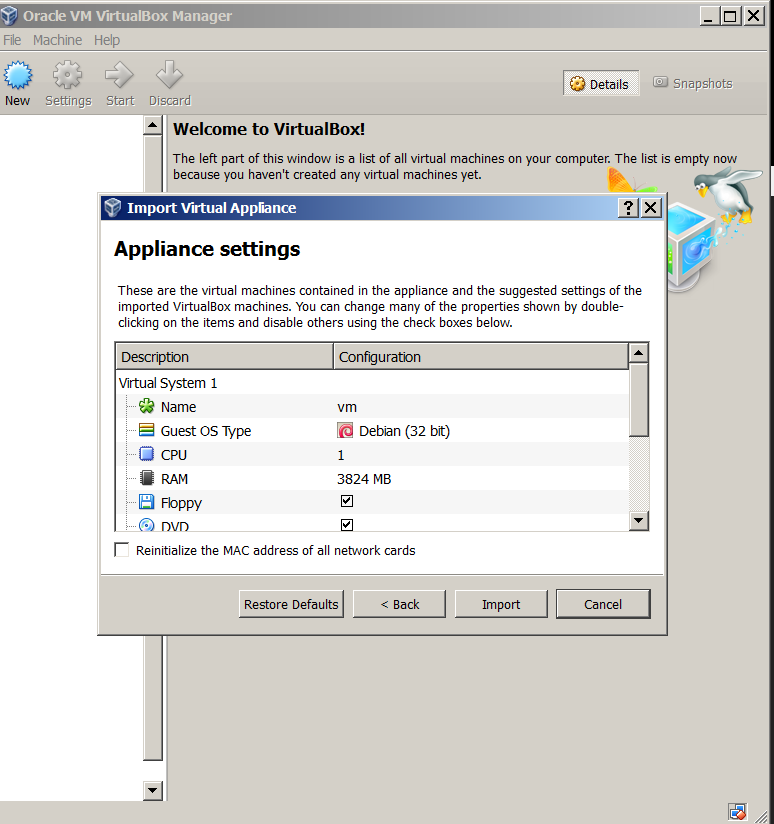
Once Virtual Machine is exported, to import it into VirtualBox, launch VirtualBox and choose:
 

File -> Import Appliance


virtualbox-import-vmware-old-virtual-machine-to-new-linux import vmware appliance

virtualbox-import-vmware-previously-installed-virtual-machine-linux import appliance virtualbox