Posts Tagged ‘line’

Fix “There Has Been a Critical Error on Your Website” wordpress error

Friday, December 2nd, 2022

there-has-been-a-critical-error-on-your-website-wordpress-critical-error-fix

Say you have a shiny working WordPress based website withtout any monitoring set for years but suddenly, you open the site and you get the terrifying error:
 

There Has Been a Critical Error on Your Website

That is quite of a stress for sure. As in the first few minutes you don't understand how this has happened since, you did not touched the perfeclty working site for a very, very long time.
Then you start to debug into the apache / nginx access.log, error.log and mysql mysql.err etc. franticly trying to figure it out the normal ideas pop-up immediately into mind, whether you have a recent backup for the website's database. If you have pair of high availability webservers service or backup databases that serve the traffic via a separate standby instance of the service, you might try to switch off the official service and see whether the standby Webserver / SQL server instance would serve the website fine.
However, if this is not an option and you have no standby backup service as a recovery Plan B option already set. Your only option is to continue to debug what is wrong.
Then the next thing to do is to check whether you don't have a Web Caching or Proxy in front of your webservers that are preventing you to see a recent version of the website and give you some old cache or you don't have an ISP proxy that is giving you some unreal results. That is easily seenable from the Webserver logs. If this is neither the case the next thing is to:
 

Enable WordPress (wp-config.php) Debug mode

By default for Security reasons the WordPress PHP execution debug mode is switched off inside wp-config.php.
When there are odd pages with the WordPress based blog or site however this can easily be changed by modifying the WP_DEBUG true|false value.

To do so edit with a text editor such as vim / nano / mcedit  wp-config.php or if no SSH access to the remote machine, use SFTP / FTP transfer protocol copy the file to your desktop and inspect it and make sure the WP_DEBUG / WP_DEBUG_DISPLAY / WP_DEBUG_LOG has following values:

define( 'WP_DEBUG', true );

define( 'WP_DEBUG_DISPLAY', false );

define( 'WP_DEBUG_LOG', true );

Reloading the Browser window tab with There is a critical error on Your website, you should get some Errors or Warnings like:
 

Warning: Illegal string offset 'parent_slug' in /var/www/websitecom/wp-content/plugins/photo-gallery/booster/main.php on line 180

Warning: Illegal string offset 'slug' in /var/www/websitecom/wp-content/plugins/photo-gallery/booster/main.php on line 180


Then you can temporary disable the problematic problem in that case for example the photo-gallery and recheck the website, and then restore from backup snapshot the respective plugin files version from a moment, when the website was working.

If this doesn't solve it and more plugins are crashing and you can't find an easy way to work-around it you miss a backup, you might try to


Disable all WordPress active plugins

Disable your plugins from the dashboard, visit Plugins > Installed Plugins and tick the checkbox at the top of the list to select them all.
Then click Bulk Actions -> Deactivate, which should be enough to disable any conflicts and restore your site.

You can do essentially the same thing through SSH / FTP session.

Step 1: Log in to your site with SSH / FTP.
Step 2: Open the wp-content folder to find your plugins.
Step 3: Rename the plugins folder to plugins_old and verify that your site is working again via SSH run commands:

# cd  path_to/plugins; mv plugins plugins_old

or rename via FTP client
Step 4: Rename the folder back to “plugins”. The plugins should be disabled still, so you should be able to log in to your dashboard and activate them one by one. If
the plugins reactivate automatically, rename individual plugin folders with _old until your site is restored.

Raise the PHP Memory Limit

Sometimes, a low PHP limitation causes critical errors on WP based blogs and sites, if necessery raise up the memory limitation via:

define( 'WP_MEMORY_LIMIT', '128M' );

Change Max Upload File Size and Text Processing function limits

To increase the max upload file size, add this code to wp-config.php:

ini_set('upload_max_size' , '256M' );

ini_set('post_max_size','256M');

And to fix the breaking of large pages on your site, add this code:

ini_set('pcre.recursion_limit',20000000);
ini_set('pcre.backtrack_limit',10000000);

Clear up any caches

If you use some session caching of the website on the machine such as memcached / ncache / redis / varnish or an haproxy or any proxy in front of the webserver to do some kind of High availability could produce strange  unexpected Critical errors on Your Website, thus restarting such services or cleaning up any cache would be advisable if you have such.
 

What Causes "There Has Been a Critical Error on Your Website" error?


The reason could be practically anything as WP is a kind of multi-comonent free and a bit of bloatware. The general ones could be  from a missing database table / table fields to a messed up plugin after update a disappeared critical plugin or essential wordpress PHP file, but in my specific case the reason was simple the Plugins Auto-update, which I have had the stupidity to enable.

The WordPress Automatic Updates, though saving you effort and Protecting your website in most cases against recent bugs and Exploits and increasing the WP security level, often causes issues and from my personal experience it is not recommended so better avoid it. Again next time you implement any automation to your server make sure you put some kind of monitoring.

Even if you decide to enable it make sure you do it the right way and not like me, by enabling some Monitoring to the WordPress site via Zabbix / Nagios / Cacti / monit  etc to be sure you get notified immediately if the WordPress based site is down.

Set proxy only for apt, apt-get, aptitude package manager on Debian / Ubuntu Linux

Wednesday, December 22nd, 2021

debian-package-manager-run-via-a-proxy


Intro

Main console package install apt-get / apt and / aptitude did not use the HTTP Proxy environment variables by default as there is no default proxy set on Debian / Ubuntu / Mint and other deb based distros after OS Install. Under some circunstances for DMZ placed or firewall secured servers, direct access to internet address or even Package repository is only allowed via a proxy and hence the package manager needs to have a proxy host set.
 Setting a global wide proxy on Linux is easily possible by setting http_proxy="http://yourhost.com:8080" and https_proxy or if FTP connection via ftp_proxy somewhere in /etc/profile , /etc/bashrc or via /etc/environment but as using this Shell variables set it global wide for all applications lynx / links / wget / curl, sometimes it is useful to set the Proxy host only for deb package management tools.

Note that if you want to set a proxy host for deb operations this can be done during initial OS install installation, the Apt configuration file would have been automatically updated then. 

Creating  an Apt Proxy Conf File

Apt loads all configuration files under /etc/apt/apt.conf.d. We can create a configuration specifically for our proxy there, keeping it separate from all other configurations.

  1. Create a new configuration file named proxy.conf.


    # touch /etc/apt/apt.conf.d/proxy.conf
    
  2. Open the proxy.conf file in a text editor.


    # vi /etc/apt/apt.conf.d/proxy.conf
    
  3. Add the following line to set your HTTP proxy for apt.


    Acquire::http::Proxy "http://username:password@proxy.server:port/";
    
  4. Add the following line to set your HTTPS proxy.


    Acquire::https::Proxy "http://username:passw0rd@proxy.server:port/";
    
  5. Save your changes and exit the text editor.
     

Your proxy settings will be applied the next time you run Apt.

Simplifying the Configuration

As mentioned by a user in the comments below, there is an alternative way for defining the proxy settings. While similar, it removes some redundancy.

Just like in the first example, create a new file under the /etc/apt/apt.conf.d directory for example /etc/apt/apt.conf.d/proxies, and then add the lines as.

Acquire {
HTTP::proxy "http://127.0.0.1:8080";
HTTPS::proxy "http://127.0.0.1:8080";
}


How to restart Microsoft IIS with command via Windows command line

Friday, August 19th, 2011

I'm tuning a Windows 2003 for better performance and securing it against DoS of service attacks. After applying all the changes I needed to restart the WebServer for the new configurations to take effect.
As I'm not a GUI kind of guy I found it handy there is a fast command to restart the Microsoft Internet Information Server. The command to restart IIS is:

c:> iisreset

Start Stop Restart Microsoft IIS Webserver from command line and GUI

Thursday, April 17th, 2014

start-stop-restart-microsoft-iis-howto-iis-server-logo
For a decomissioning project just recently I had the task to stop Microsoft IIS  on Windows Server system.
If you have been into security for a while you know well how many vulnerabilities Microsoft (Internet Information Server) Webserver used to be. Nowadays things with IIS are better but anyways it is better not to use it if possible …

Nomatter what the rason if you need to make IIS stop serving web pages here is how to do it via command line:

At Windows Command Prompt, type:

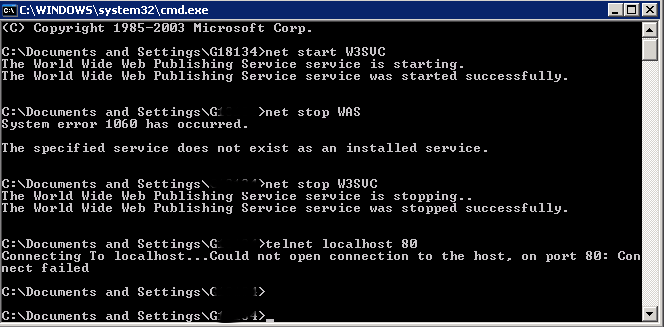
net stop WAS

If the command returns error message to stop it type:

net stop W3SVC

stop-microsoft-IIS-webservice
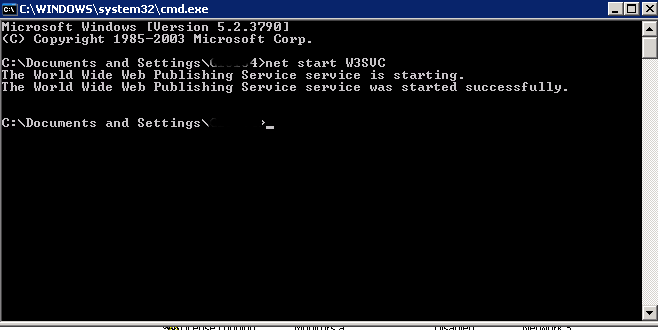
Just in case you have to start it again run:

net start W3SVC

start-restart-IIS-webserver-screenshot

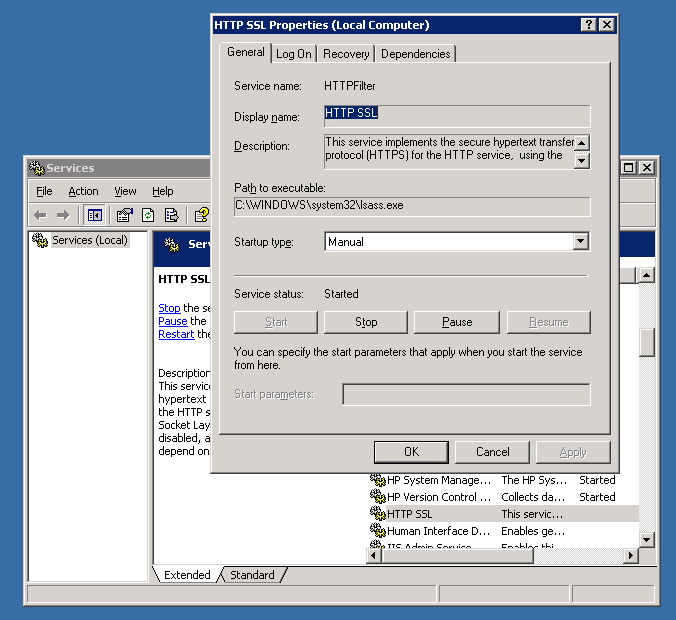
For those who prefer to do it from GUI interface, launch services.msc command from Windows Run:

> services.msc

services-msc-stop-microsoft-iis-webserver

In list of services lookup for
IIS Admin Service and HTTP SSL
a) (Click over it with right mouse button -> Properties)
b) Set Startup type to Manual
c) Click Stop Button

You're done now IIS is stopped to make sure it is stopped you can run from cmd.exe:

telnet localhost 80

when not working you should get 'Could not open connection to the host. on port 80: Connection failed' like shown up in screenshot.

Howto create Linux Music Audio CD from MP3 files / Create playable WAV format Audio CD Albums from MP3s

Tuesday, July 16th, 2019

cdburning-audio-music-cd-from-mp3-on-linuxcomapct-disc-tux-linux-logo

Recently my Mother asked me to prepare a Music Audio CD for her from a popular musician accordionist Stefan Georgiev from Dobrudja who has a unique folklore Bulgarian music.

As some of older people who still remember the age of the CD and who had most likely been into the CD burning Copy / Piracy business so popular in the countries of the ex-USSR so popular in the years 1995-2000 audio ,  Old CD Player Devices were not able to play the MP3 file format due to missing codecs (as MP3 was a proprietary compression that can't be installed on every device without paying the patent to the MP3 compression rights holder.

The revolutionary MP3 compression used to be booming standard for transferring Music data due to its high compression which made an ordinary MP3 of 5 minutes of 5MB (10+ times more compression than an ordinary classic WAV Audio the CPU intensiveness of MP3 files that puts on the reading device, requiring the CD Player to have a more powerful CPU.

Hence  due to high licensing cost and requirement for more powerful CPU enabled Audio Player many procuders of Audio Players never introduced MP3 to their devices and MP3 Neve become a standard for the Audio CD that was the standard for music listening inside almost every car out there.

Nowdays it is very rare need to create a Audio CD as audio CDs seems to be almost dead (As I heard from a Richard Stallman lecture In USA nowadays there is only 1 shop in the country where you can still buy CD or DVD drives) and only in third world as Africa Audio CDs perhaps are still in circulation.

Nomatter that as we have an old Stereo CD player on my village and perhaps many others, still have some old retired CD reading devices being able to burn out a CD is a useful thing.

Thus to make mother happy and as a learning excercise, I decided to prepare the CD for her on my Linux notebook.
Here I'll shortly describe the takes I took to make it happen which hopefully will be useful for other people that need to Convert and burn Audio CD from MP3 Album.


1. First I downloaded the Album in Mp3 format from Torrent tracker

My homeland Bulgaria and specific birth place place the city of Dobrich has been famous its folklore:  Galina Durmushlijska and Stefan Georgiev are just 2 of the many names along with Оркестър Кристал (Orchestra Crystal) and the multitude of gifted singers. My mother has a santiment for Stefan Georgiev, as she listened to this gifted accordinist on her Uncle's marriage.

Thus In my case this was (Стефан Георгиев Хора и ръченици от Добруджа) the album full song list here If you're interested to listen the Album and Enjoy unique Folklore from Dobrudja (Dobrich) my home city, Stefan Georgiev's album Hora and Rachenica Dances is available here


Stefan_Georgiev-old-audio-Music-CD-Hora-i-Rychenici-ot-Dobrudja-Horos-and-Ruchenitsas-from-Dobrudja-CD_Cover
I've downloaded them from Bulgarian famous torrent tracker zamunda.net in MP3 format.
Of course you need to have a CD / DVD readed and write device on the PC which nowdays is not present on most modern notebooks and PCs but as a last resort you can buy some cheap External Optical CD / DVD drive for 25 to 30$ from Amazon / Ebay etc.


2. You will need to install a couple of programs on Linux host (if you don't have it already)


To be able to convert from command line from MP3 to WAV you will need as minimum ffmpeg and normalize-audio packages as well as some kind of command line burning tool like cdrskin  wodim which is
the fork of old good known cdrecord, so in case if you you're wondering what happened with it just
use instead wodim.

Below is a good list of tools (assuming you have enough HDD space) to install:


root@jeremiah:/ # apt-get install –yes dvd+rw-tools cdw cdrdao audiotools growisofs cdlabelgen dvd+rw-tools k3b brasero wodim ffmpeg lame normalize-audio libavcodec58


Note that some of above packages I've installed just for other Write / Read operations for DVD drives and you might not need that but it is good to have it as some day in future you will perhaps need to write out a DVD or something.
Also the k3b here is specific to KDE and if you're a GNOME user you could use Native GNOME Desktop app such brasero or if you're in a more minimalistic Linux desktop due to hardware contrains use XFCE's native xfburn program.

If you're a console / terminal geek like me you will definitely enjoy to use cdw
 

root@jeremiah:/ # apt-cache show cdw|grep -i description -A 1
Description-en: Tool for burning CD's – console version
 Ncurses-based frontend for wodim and genisoimage. It can handle audio and

Description-md5: 77dacb1e6c00dada63762b78b9a605d5
Homepage: http://cdw.sourceforge.net/


3. Selecting preferred CD / DVD / BD program to use to write out the CD from Linux console


cdw uses wodim (which is a successor of good old known console cdrecord command most of use used on Linux in the past to burn out new Redhat / Debian / different Linux OS distro versions for upgrade purposes on Desktop and Server machines.

To check whether your CD / DVD drive is detected and ready to burn on your old PC issue:


root@jeremiah:/# wodim -checkdrive
Device was not specified. Trying to find an appropriate drive…
Detected CD-R drive: /dev/cdrw
Using /dev/cdrom of unknown capabilities
Device type    : Removable CD-ROM
Version        : 5
Response Format: 2
Capabilities   :
Vendor_info    : 'HL-DT-ST'
Identification : 'DVDRAM GT50N    '
Revision       : 'LT20'
Device seems to be: Generic mmc2 DVD-R/DVD-RW.
Using generic SCSI-3/mmc   CD-R/CD-RW driver (mmc_cdr).
Driver flags   : MMC-3 SWABAUDIO BURNFREE
Supported modes: TAO PACKET SAO SAO/R96P SAO/R96R RAW/R16 RAW/R96P RAW/R96R

You can also use xorriso (whose added value compared to other console burn cd tools is is not using external program for ISO9660 formatting neither it use an external or an external burn program for CD, DVD or BD (Blue Ray) drive but it has its own libraries incorporated from libburnia-project.org libs.

Below output is from my Thinkpad T420 notebook. If the old computer CD drive is there and still functional in most cases you should not get issues to detect it.

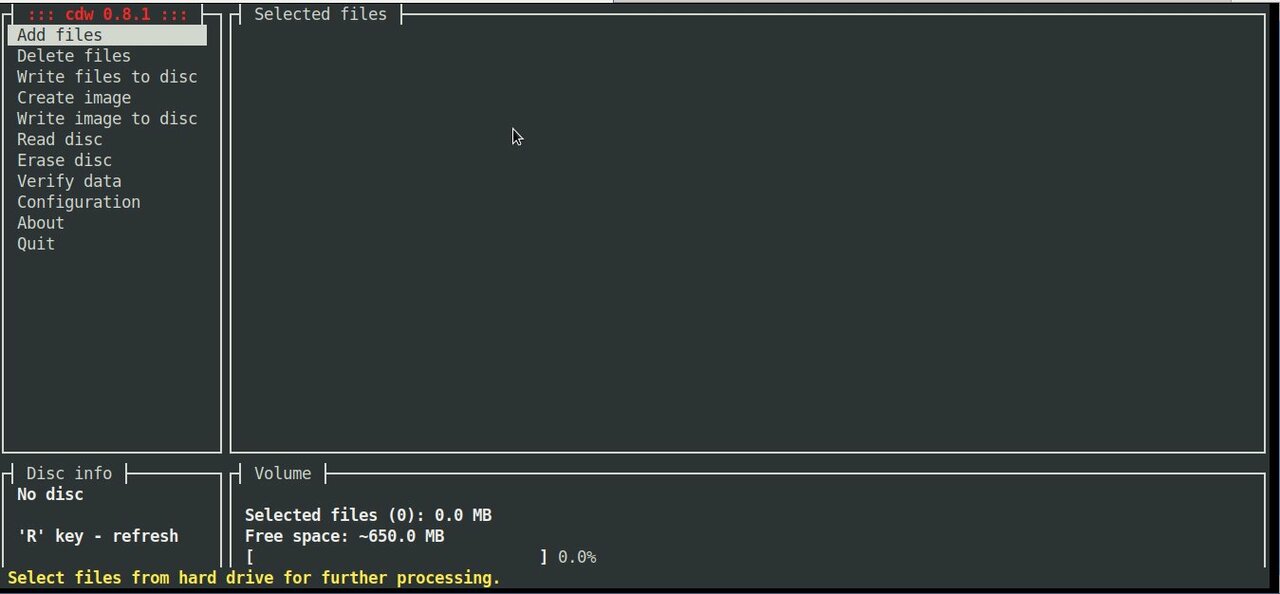
cdw ncurses text based CD burner tool's interface is super intuitive as you can see from below screenshot:

cdw-burn-cds-from-console-terminal-on-GNU-Linux-and-FreeBSD-old-PC-computer

CDW has many advanced abilities such as “blanking” a disk or ripping an audio CD on a selected folder. To overcome the possible problem of CDW not automatically detecting the disk you have inserted you can go to the “Configuration” menu, press F5 to enter the Hardware options and then on the first entry press enter and choose your device (by pressing enter again). Save the setting with F9.
 

4. Convert MP3 / MP4 Files or whatever format to .WAV to be ready to burn to CD


Collect all the files you want to have collected from the CD album in .MP3 a certain directory and use a small one liner loop to convert files to WAV with ffmpeg:
 

cd /disk/Music/Mp3s/Singer-Album-directory-with-MP3/

for i in $( ls *.mp3); do ffmpeg -i $i $i.wav; done


If you don't have ffmpeg installed and have mpg123 you can also do the Mp3 to WAV conversion with mpg123 cmd like so:


for i in $( ls ); do mpg123 -w $i.wav $i.mp3; done


Another alternative for conversion is to use good old lame (used to create Mp3 audio files but abling to also) decode
mp3 to wav.


lame –decode somefile.mp3 somefile.wav


In the past there was a burn command tool that was able to easily convert MP3s to WAV but in up2date Linux modern releases it is no longer available most likely due to licensing issues, for those on older Debian Linux 7 / 8 / 9 / Ubuntu 8 to 12.XX / old Fedoras etc. if you have the command you can install burn and use it (and not bother with shell loops):

apt-get install burn

or

yum install burn


Once you have it to convert


$ burn -A -a *.mp3


5. Fix file naming to remove empty spaces such as " " and substitute to underscores as some Old CD Players are
unable to understand spaces in file naming with another short loop.


for f in *; do mv "$f" `echo $f | tr ' ' '_'`; done


6. Normalize audio produced .WAV files (set the music volume to a certain level)


In case if wondering why normalize audio is needed here is short extract from normalize-audio man page command description to shed some light.

"normalize-audio  is  used  to  adjust  the volume of WAV or MP3 audio files to a standard volume level.  This is useful for things like creating mp3 mixes, where different recording levels on different albums can cause the volume to  vary  greatly from song to song."
 

cd /disk/Music/Mp3s/Singer-Album-directory-with-MP3/

normalize-audio -m *.wav


7. Burn the produced normalized Audio WAV files to the the CD


wodim -v -fix -eject dev='/dev/sr0' -audio -pad *.wav


Alternatively you can conver all your MP3 files to .WAV with anything be it audacity
or another program or even use 
GNOME's CDBurn tool brasero (if gnome user) or KDE's CDBurn which in my opinion is
the best CD / DVD burning application for Linux K3B.

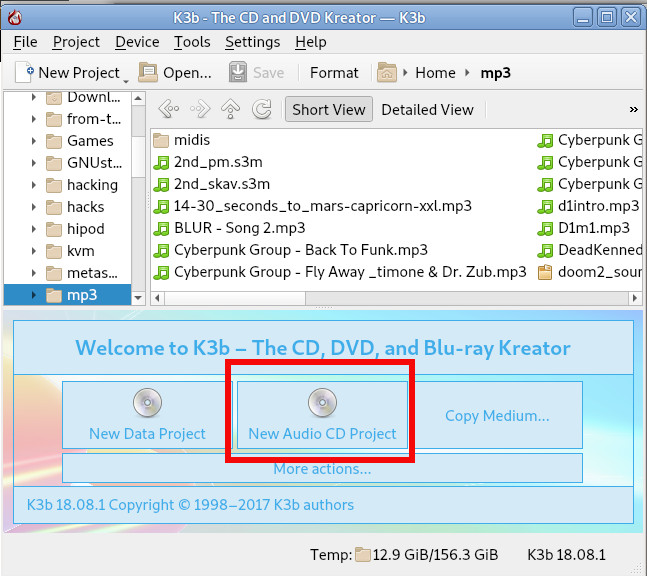
Burning Audio CD with K3b is up to few clicks and super easy and even k3b is going to handle the MP3 to WAV file Conversion itself. To burn audio with K3B just run it and click over 'New Audio CD Project'.

k3b-on-debian-gnu-linux-burn-audio-cd-screenshot

For those who want to learn a bit more on CD / DVD / Blue-Ray burning on GNU / Linux good readings are:
Linux CD Burning Mini Howto, is Linux's CD Writing Howto on ibiblio (though a bit obsolete) or Debian's official documentation on BurnCD.
 

8. What we learned here


Though the accent of this tutorial was how to Create Audio Music CD from MP3 on GNU / Linux, the same commands are available in most FreeBSD / NetBSD / OpenBSD ports tree so you can use the same method to build prepare Audio Music CD on *BSDs.

In this article, we went through few basic ways on how to prepare WAV files from MP3 normalize the new created WAV files on Linux, to prepare files for creation of Audio Music CD for the old mom or grandma's player or even just for fun to rewind some memories. For GUI users this is easily done with  k3b,  brasero or xfburn.

I've pointed you to cdw a super useful text ncurses tool that makes CD Burninng from plain text console (on servers) without a Xorg / WayLand  GUI installed super easy. It was shortly reviewed what has changed over the last few years and why and why cdrecord was substituted for wodim. A few examples were given on how to handle conversion through bash shell loops and you were pointed to some extra reading resources to learn a bit more on the topic.
There are plenty of custom scripts around for doing the same CD Burn / Covnersion tasks, so pointing me to any external / Shell / Perl scripts is mostly welcome.

Hope this learned you something new, Enjoy ! 🙂

Windows missing volume control on Windows 7, 8 Fix / How to run volume control from command line

Thursday, March 9th, 2017

windows-7-missing-volume-controller-bring-back-volume-control-windows-7-command-to-show-volume-control-on-windows-os


Windows 7/8 Volume Icon disappear from Taskbar?

If you are using  Windows 7 or  Windows 8 Operating System inside a corporate network and your notebook PC is inside domain controller controlled by some crazy administrators who for some reason decided to remove the Taskbar from your Taskbar tray you have come over to exactly same situation like I do here.

Actually some might have experienced an icon "combined" feature which gives the opportunity of some of the standard Tray icons we know since Windows 98 / XP onwards to not show full time in order to save you space. No doubt this feature is great one to use as it is distracting sometimes to have a tons of applications constantly keeping in the Taskbar (right down corner) however if the Active Domain admin did it without any notification and you're a kind of victim you might dislike especially since this behaviour is making you impossible to easily control your phone / headspeakers and mic.


windows-7-8-grouped-taskbar-icons-screenshot-volume-dialog-bar

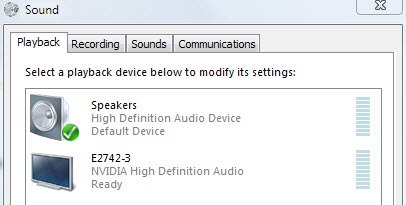
If you check in the Control Panel and click on Sounds  menu in Windows 7/8, you don't see any checkbox for adding the icon back as I have assumed, , but instead all the audio there you can only see the inputs and outputs on your system general settings.

windows-7-8-control-panel-sounds-dialog-box-properties

This behavior was made on purpose and makes sense cauze the taskbar icons since Win XP (if not mistaken) has to be controlled by the taskbar settings pan.

Thus in order to bring back the disappeared icon on  Winblows 7 / Win 8 there is a taskbar properties feature enabling to to hide or view the various taskbar running apps in that number the Volume icon, hence to bring back your Volme Control speaker icon to taskbar you need to customize it.

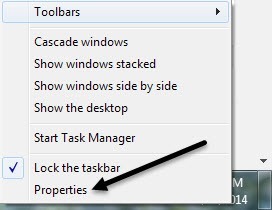
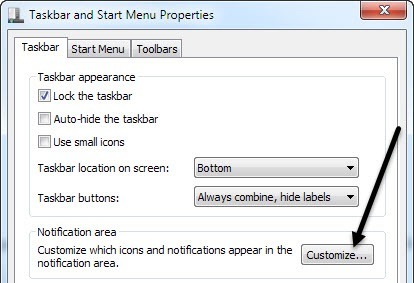
To do so do a mouse Right-click anywhere on the taskbar and choose Properties.

taskbar-properties-windows-7-8-dialog

Now, click on the Customize button under Notification area.

taskbar-and-startmenu-menu-properties-customize-taskbar-dialog-bar

In  Notification Area Icons dialog box, there is 2 ticks to check. Assure yourself the volume icon default behavior is set to

Show icon and notifications like in below screenshot

show-icon-notifications-volume-bar-windows-7-8-dialog

To make the new behaviour active click on Turn system icons on or off.

turn-system-icons-on-off-windows-7-8-notification-restore-default-icon-behavior-dialog

One thing to note here is the volume icon shoukld be set to On like in below| shot:


turn-system-icons-on-off-volume-icon-on-windows-7-8
If the reason for the disapperance of the Volume controller in task is not due to Domain Controllear policty it could happen due to late updates pushed by Microsoft if the PC needs a restart or after computer Log off operation.
Another reason for the casual disappearance of sound box could be also a buggy driver, so if the icon keeps disappearing over and over again, you better try to update the driver for your sound card.

However if you end up in a Windows Domain Controller (AD) Policy that is prohibiting the Sound Voulme to appear on your taskbar like in my case all the above won't help you solve it, but luckily there is an easy way to invoke the Volume Control dialog box via


sndvol.exe


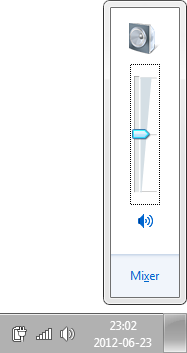
the command will bring up the Volume Control as in upper left corner of screen like in below screenshot:

windows-volume-mixer-taskbar-windows-7-8-shot


If you to show it with a silder use -f flag

sndvol.exe -f

Running just

sndvol.exe


opens the volume mixer, as you noted.


On windows XP the respective command to open a missing Volume Control dialog in taskbar, use instead:

sndvol32

command from Windows Command Prompt:


Start -> Run -> cmd.exe


sndvol32

no params to display master volume window


sndvol32 -x

to display small master volume window

sndvol32 -t

to display volume control only (as per sound icon)

If you have the Volume Controller behavior to be hidden or you need to view any other taskbar hidden application icon  it will be useful for you to use:

AutoHotKey Win+B to focus on the system tray, Left (arrow) to highlight the Volume Control icon icon, and then Enter to bring up the popup.
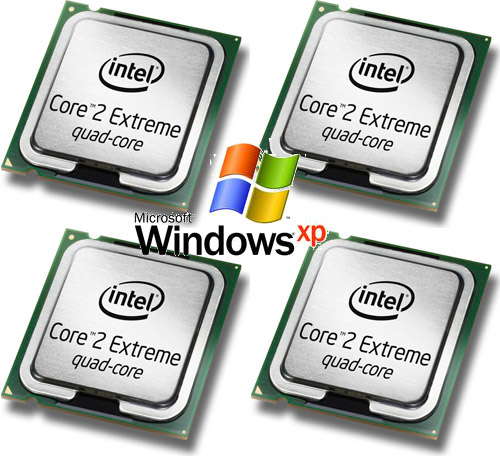
 

A good tip you might be interestted to use occasionally is  how to show the current Wireless networks via a command (if that's prohibited otherwise via GUI) so you can easily see the  Connected Networks on Windows using cmd:

rundll32 van.dll,RunVAN

Windows XP multicore not detected after CPU update – XP Enable multicore after singlecore install

Friday, April 8th, 2016

windows-xp-add-multicore-with-command-after-multiple-cpu-not-detected
These days it is not common to install Windows XP however for some old unsupproted applications that still work on XP in many countries  in Africa, Asia, Europe and even America. Custom patched Windows XP is still heaveily used for some corporate businesses in accounting and on airports and other government institutions even to these day, I'm aware of Windows still heavily used especially in  Russia, Belarus,Ukraine, Kazakhstan, Armenia, Bulgaria etc.

Hence still there is plenty of softwares designed to work XP the good old Win XP and thus often XP needs to be emulated on VMs though officially not supported any longer  by Microsoft (its Support lifecycle End was for a last time on April 14, 2009).

Now I guess these days I guess nobody doesn't install and use Windows XP on a normal hardware PC Desktop / laptop but XP is continually installed on Virtual machine servers VMWare / VirtualBox.

Hence if you happen to have already migrated or installed some old Windows XP operating systems under VMWare for a corporate clients single core machine (no matter virtual or physical) and the client requires an update of hardware of the Virtual Machine you will be surprised that even though you add a second / third etc. core (new CPUs) the virtual machine hardware and restart the Windows XP installation.

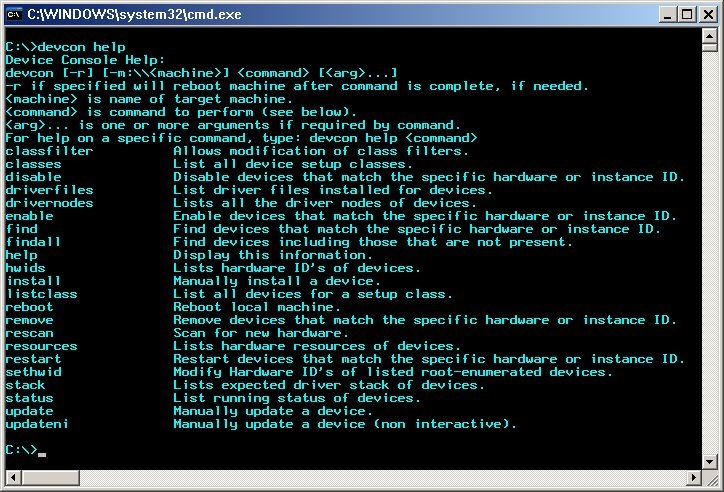
It seems XP is designed to remember the install time CPU model hardware so once the VM and doesn't have a way to update its HAL (Hardware Abstraction Layer) definitions if you install it in Virtualbox thus to make XP recognize the extra added CPU cores it is necessery to do a small hack with a devcon.exe utility downloadable from Microsoft site to do the trick

1. Download the command line devicemanager utility (devcon.exe) from Microsoft Development Network MSDN here.

Note that it will work only if you use the correct version depending whether XP is  (x86/x64) bit install so check it out from My Computer -> Properties.

windows-xp-multicore-not-detected-enable-add-multicore-after-singlecore-windows-xp-install-with-devcon-exe

2  Next. Execute the following 2 commands:

    devcon sethwid @ROOT\ACPI_HAL\0000 := +acpiapic_mp !acpiapic_up
    devcon update c:\windows\inf\hal.inf acpiapic_mp

devcon.exe will  let the automatic hardware detection find out the extra CPU (multicores) added.
Wait 'till you get prompted for a reboot.
Be brave Reboot! 🙂

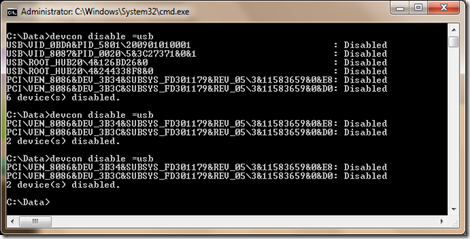
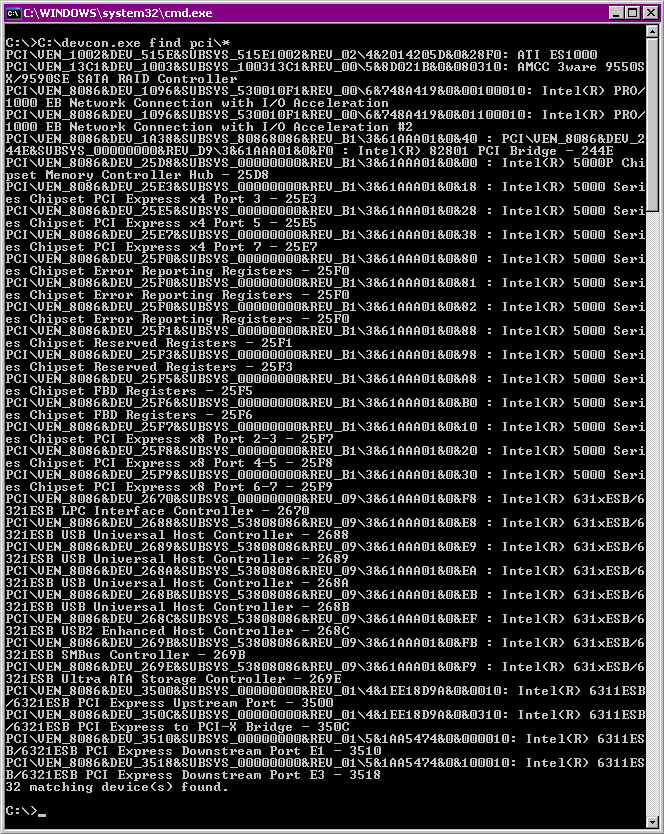
There is pretty much more fun useful things you can do with devcon.exe such as disabling USBs from command line,

DEVCON-command-DisableUSB_on-windows-xp-7-8-howto

listing your PCI devices and so on:

devcon-windows-command-to-list-pci-devices-on-xp7-win8-win10

You should now see all cores, hooray cores will appear in Task Manager / System Information.

Improve Apache Load Balancing with mod_cluster – Apaches to Tomcats Application servers Get Better Load Balancing

Thursday, March 31st, 2016

improve-apache-load-balancing-with-mod_cluster-apaches-to-tomcats-application-servers-get-better-load-balancing-mod_cluster-logo


Earlier I've blogged on How to set up Apache to to serve as a Load Balancer for 2, 3, 4  etc. Tomcat / other backend application servers with mod_proxy and mod_proxy_balancer, however though default Apache provided mod_proxy_balancer works fine most of the time, If you want a more precise and sophisticated balancing with better load distribuion you will probably want to install and use mod_cluster instead.


So what is Mod_Cluster and why use it instead of Apache proxy_balancer ?
 

Mod_cluster is an innovative Apache module for HTTP load balancing and proxying. It implements a communication channel between the load balancer and back-end nodes to make better load-balancing decisions and redistribute loads more evenly.

Why use mod_cluster instead of a traditional load balancer such as Apache's mod_balancer and mod_proxy or even a high-performance hardware balancer?

Thanks to its unique back-end communication channel, mod_cluster takes into account back-end servers' loads, and thus provides better and more precise load balancing tailored for JBoss and Tomcat servers. Mod_cluster also knows when an application is undeployed, and does not forward requests for its context (URL path) until its redeployment. And mod_cluster is easy to implement, use, and configure, requiring minimal configuration on the front-end Apache server and on the back-end servers.


So what is the advantage of mod_cluster vs mod proxy_balancer ?

Well here is few things that turns the scales  in favour for mod_cluster:


  •     advertises its presence via multicast so as workers can join without any configuration
     
  •     workers will report their available contexts
     
  •     mod_cluster will create proxies for these contexts automatically
     
  •     if you want to, you can still fine-tune this behaviour, e.g. so as .gif images are served from httpd and not from workers…
     
  •     most importantly: unlike pure mod_proxy or mod_jk, mod_cluster knows exactly how much load there is on each node because nodes are reporting their load back to the balancer via special messages
     
  •     default communication goes over AJP, you can use HTTP and HTTPS


1. How to install mod_cluster on Linux ?


You can use mod_cluster either with JBoss or Tomcat back-end servers. We'll install and configure mod_cluster with Tomcat under CentOS; using it with JBoss or on other Linux distributions is a similar process. I'll assume you already have at least one front-end Apache server and a few back-end Tomcat servers installed.

To install mod_cluster, first download the latest mod_cluster httpd binaries. Make sure to select the correct package for your hardware architecture – 32- or 64-bit.
Unpack the archive to create four new Apache module files: mod_advertise.so, mod_manager.so, mod_proxy_cluster.so, and mod_slotmem.so. We won't need mod_advertise.so; it advertises the location of the load balancer through multicast packets, but we will use a static address on each back-end server.

Copy the other three .so files to the default Apache modules directory (/etc/httpd/modules/ for CentOS).
Before loading the new modules in Apache you have to remove the default proxy balancer module (mod_proxy_balancer.so) because it is not compatible with mod_cluster.

Edit the Apache configuration file (/etc/httpd/conf/httpd.conf) and remove the line


LoadModule proxy_balancer_module modules/mod_proxy_balancer.so


Create a new configuration file and give it a name such as /etc/httpd/conf.d/mod_cluster.conf. Use it to load mod_cluster's modules:


LoadModule slotmem_module modules/mod_slotmem.so
LoadModule manager_module modules/mod_manager.so
LoadModule proxy_cluster_module modules/mod_proxy_cluster.so

In the same file add the rest of the settings you'll need for mod_cluster something like:

And for permissions and Virtualhost section

Listen 192.168.180.150:9999
<virtualhost  192.168.180.150:9999="">
<directory>
Order deny,allow
Allow from all 192.168
</directory>
ManagerBalancerName mymodcluster
EnableMCPMReceive
</virtualhost>

ProxyPass / balancer://mymodcluster/


The above directives create a new virtual host listening on port 9999 on the Apache server you want to use for load balancing, on which the load balancer will receive information from the back-end application servers. In this example, the virtual host is listening on IP address 192.168.204.203, and for security reasons it allows connections only from the 192.168.0.0/16 network.
The directive ManagerBalancerName defines the name of the cluster – mymodcluster in this example. The directive EnableMCPMReceive allows the back-end servers to send updates to the load balancer. The standard ProxyPass and ProxyPassReverse directives instruct Apache to proxy all requests to the mymodcluster balancer.
That's all you need for a minimal configuration of mod_cluster on the Apache load balancer. At next server restart Apache will automatically load the file mod_cluster.conf from the /etc/httpd/conf.d directory. To learn about more options that might be useful in specific scenarios, check mod_cluster's documentation.

While you're changing Apache configuration, you should probably set the log level in Apache to debug when you're getting started with mod_cluster, so that you can trace the communication between the front- and the back-end servers and troubleshoot problems more easily. To do so, edit Apache's configuration file and add the line LogLevel debug , then restart Apache.
 

2. How to set up Tomcat appserver for mod_cluster ?
 

Mod_cluster works with Tomcat version 6, 7 and 8, to set up the Tomcat back ends you have to deploy a few JAR files and make a change in Tomcat's server.xml configuration file.
The necessary JAR files extend Tomcat's default functionality so that it can communicate with the proxy load balancer. You can download the JAR file archive by clicking on "Java bundles" on the mod_cluster download page. It will be saved under the name mod_cluster-parent-1.2.6.Final-bin.tar.gz.

Create a new directory such as /root/java_bundles and extract the files from mod_cluster-parent-1.2.6.Final-bin.tar.gz there. Inside the directory /root/java_bundlesJBossWeb-Tomcat/lib/*.jar you will find all the necessary JAR files for Tomcat, including two Tomcat version-specific JAR files – mod_cluster-container-tomcat6-1.2.6.Final.jar for Tomcat 6 and mod_cluster-container-tomcat7-1.2.6.Final.jar for Tomcat 7. Delete the one that does not correspond to your Tomcat version.

Copy all the files from /root/java_bundlesJBossWeb-Tomcat/lib/ to your Tomcat lib directory – thus if you have installed Tomcat in

/srv/tomcat

run the command:


cp -rpf /root/java_bundles/JBossWeb-Tomcat/lib/* /srv/tomcat/lib/ .


Then edit your Tomcat's server.xml file

/srv/tomcat/conf/server.xml.


After the default listeners add the following line:


<listener classname="org.jboss.modcluster.container.catalina.standalone.ModClusterListener" proxylist="192.168.204.203:9999"> </listener>


This instructs Tomcat to send its mod_cluster-related information to IP 192.168.180.150 on TCP port 9999, which is what we set up as Apache's dedicated vhost for mod_cluster.
While that's enough for a basic mod_cluster setup, you should also configure a unique, intuitive JVM route value on each Tomcat instance so that you can easily differentiate the nodes later. To do so, edit the server.xml file and extend the Engine property to contain a jvmRoute, like this:
 

.


<engine defaulthost="localhost" jvmroute="node2" name="Catalina"></engine>


Assign a different value, such as node2, to each Tomcat instance. Then restart Tomcat so that these settings take effect.

To confirm that everything is working as expected and that the Tomcat instance connects to the load balancer, grep Tomcat's log for the string "modcluster" (case-insensitive). You should see output similar to:

Mar 29, 2016 10:05:00 AM org.jboss.modcluster.ModClusterService init
INFO: MODCLUSTER000001: Initializing mod_cluster ${project.version}
Mar 29, 2016 10:05:17 AM org.jboss.modcluster.ModClusterService connectionEstablished
INFO: MODCLUSTER000012: Catalina connector will use /192.168.180.150


This shows that mod_cluster has been successfully initialized and that it will use the connector for 192.168.204.204, the configured IP address for the main listener.
Also check Apache's error log. You should see confirmation about the properly working back-end server:

[Tue Mar 29 10:05:00 2013] [debug] proxy_util.c(2026): proxy: ajp: has acquired connection for (192.168.204.204)
[Tue Mar 29 10:05:00 2013] [debug] proxy_util.c(2082): proxy: connecting ajp://192.168.180.150:8009/ to  192.168.180.150:8009
[Tue Mar 29 10:05:00 2013] [debug] proxy_util.c(2209): proxy: connected / to  192.168.180.150:8009
[Tue Mar 29 10:05:00 2013] [debug] mod_proxy_cluster.c(1366): proxy_cluster_try_pingpong: connected to backend
[Tue Mar 29 10:05:00 2013] [debug] mod_proxy_cluster.c(1089): ajp_cping_cpong: Done
[Tue Mar 29 10:05:00 2013] [debug] proxy_util.c(2044): proxy: ajp: has released connection for (192.168.180.150)


This Apache error log shows that an AJP connection with 192.168.204.204 was successfully established and confirms the working state of the node, then shows that the load balancer closed the connection after the successful attempt.

You can start testing by opening in a browser the example servlet SessionExample, which is available in a default installation of Tomcat.
Access this servlet through a browser at the URL http://balancer_address/examples/servlets/servlet/SessionExample. In your browser you should see first a session ID that contains the name of the back-end node that is serving your request – for instance, Session ID: 5D90CB3C0AA05CB5FE13121E4B23E670.node2.

Next, through the servlet's web form, create different session attributes. If you have a properly working load balancer with sticky sessions you should always (that is, until your current browser session expires) access the same node, with the previously created session attributes still available.

To test further to confirm load balancing is in place, at the same time open the same servlet from another browser. You should be redirected to another back-end server where you can conduct a similar session test.
As you can see, mod_cluster is easy to use and configure. Give it a try to address sporadic single-back-end overloads that cause overall application slowdowns.

Check Windows Operating System install date, Full list of installed and uninstalled programs from command line / Check how old is your Windows installation?

Tuesday, March 29th, 2016

when-was-windows-installed-check-howto-from-command-line
Sometimes when you have some inherited Windows / Linux OS servers or Desktops, it is useful to be aware what is the Operating System install date. Usually the install date of the OS is closely to the date of purchase of the system this is especially true for Windows but not necessery true for Liunx based installs.

Knowing the install date is useful especially if you're not sure how outdated is a certain operating system. Knowing how long ago a current installation was performed could give you some hints on whether to create a re-install plans in order to keep system security up2date and could give you an idea whether the system is prone to some common errors of the time of installation or security flaws.


1. Check out how old is Windows install?

Finding out the age of WIndows installation can be performed across almost all NT 4.0 based Windowses and onwards, getting Winblows install date is obtained same way on both Windows XP / Vista/  7  and 8.

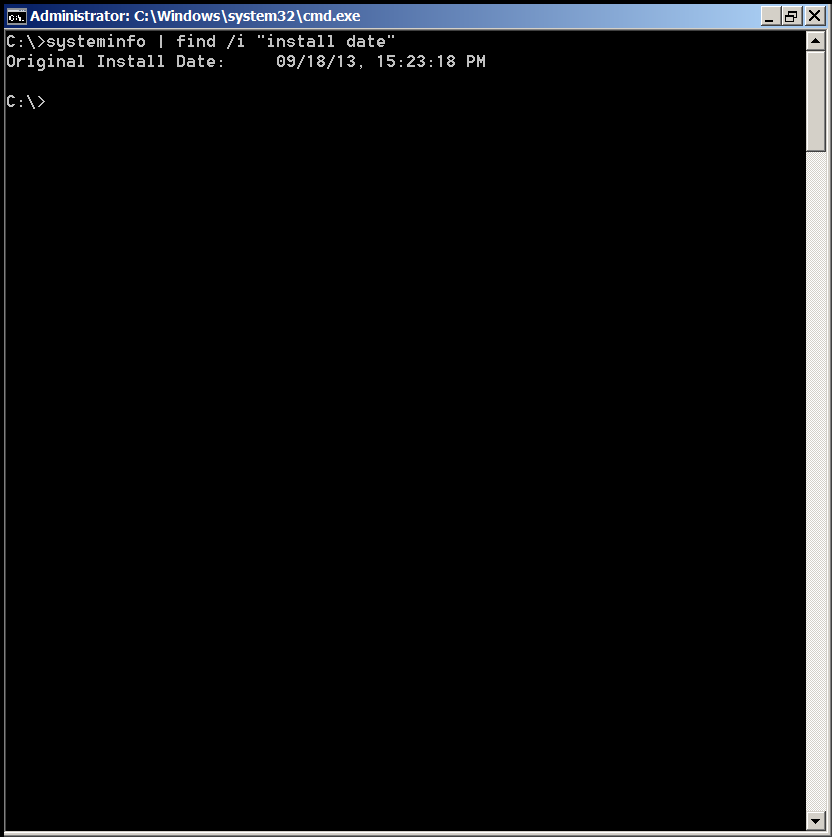
Besides many useful things such as detailed information about the configuration of your PC / notebook systeminfo could also provide you with install date, to do so just run from command line (cmd.exe).
 

C:\Users\hipo> systeminfo | find /i "install date"
Original Install Date:     09/18/13, 15:23:18 PM


check-windows-os-install-date-from-command-line-howto-screenshot

If you need to get the initial Windows system install date however it might be much better to use WMIC command to get the info:


C:\Users\hipo>WMIC OS GET installdate
InstallDate
20130918152318.000000+180


The only downside of using WMIC as you can see is it provides the Windows OS install date in a raw unparsed format, but for scripters that's great.

2. Check WIndows Installed and Uinstalled software and uptime from command line

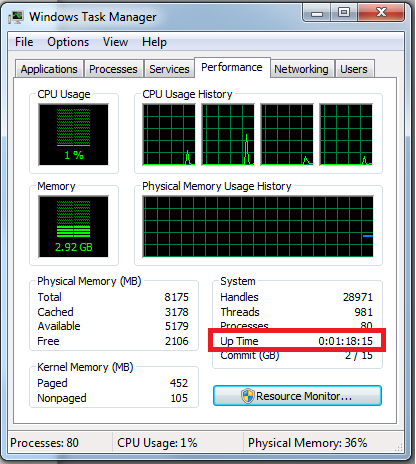
One common other thing next to Windows install date is what is the Windows uptime, the easiest way to get that is to run Task Manager in command line run taskmgr

windows-task-manager-how-to-check-windows-operating-system-uptime-easily

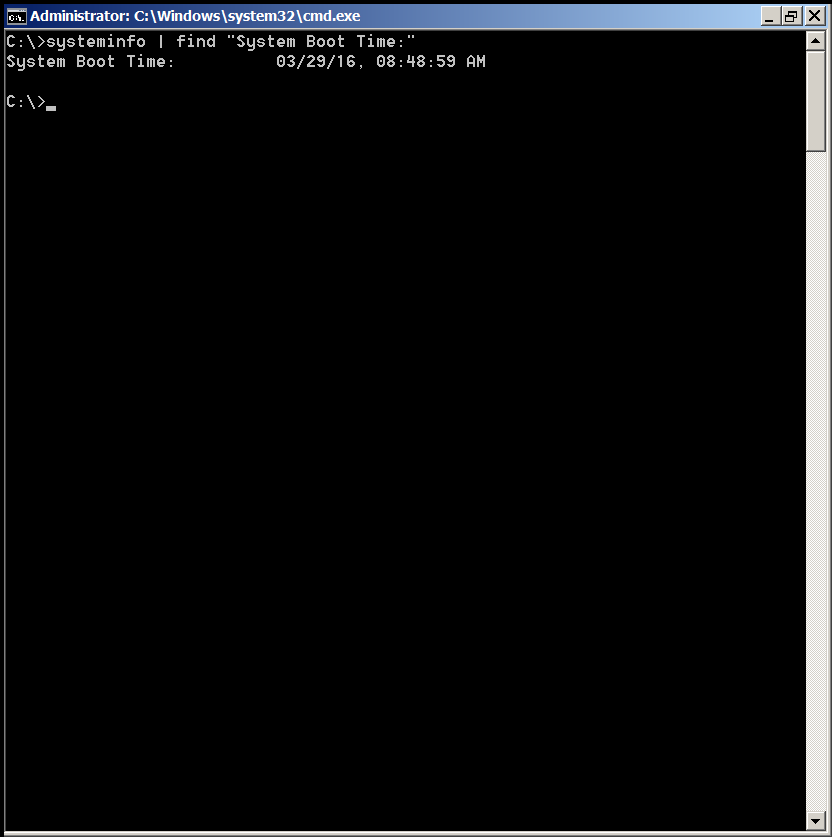
For those who want to get the uptime from windows command line for scripting purposes, this can be done again with systeminfo cmd, i.e.:


C:\> systeminfo | find "System Boot Time:"
System Boot Time:          03/29/16, 08:48:59 AM


windows-os-command-to-get-system-uptime-screenshot

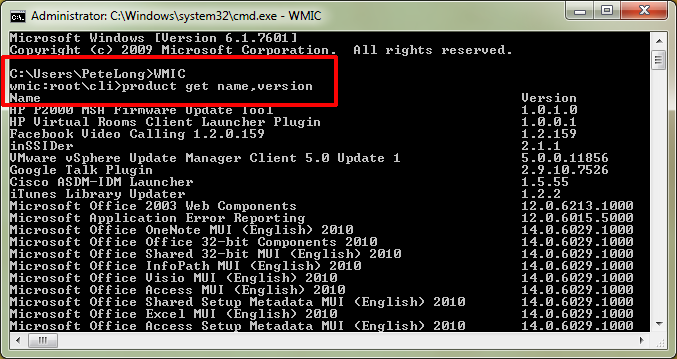
Other helpful Windows command liners you might want to find out about is getting all the Uninstalled and Installed programs from command line this again is done with WMIC


C:\> wmic /OUTPUT:my_software.txt product get name


get-a-full-list-of-installed-software-programs-on-windows-xp-vista-7-8-command-howto-screenshot

Alternative way to get a full list of installed software on Windows OS is to use Microsoft/SysInternals psinfo command:


C:\> psinfo -s > software.txt
C:\> psinfo -s -c > software.csv


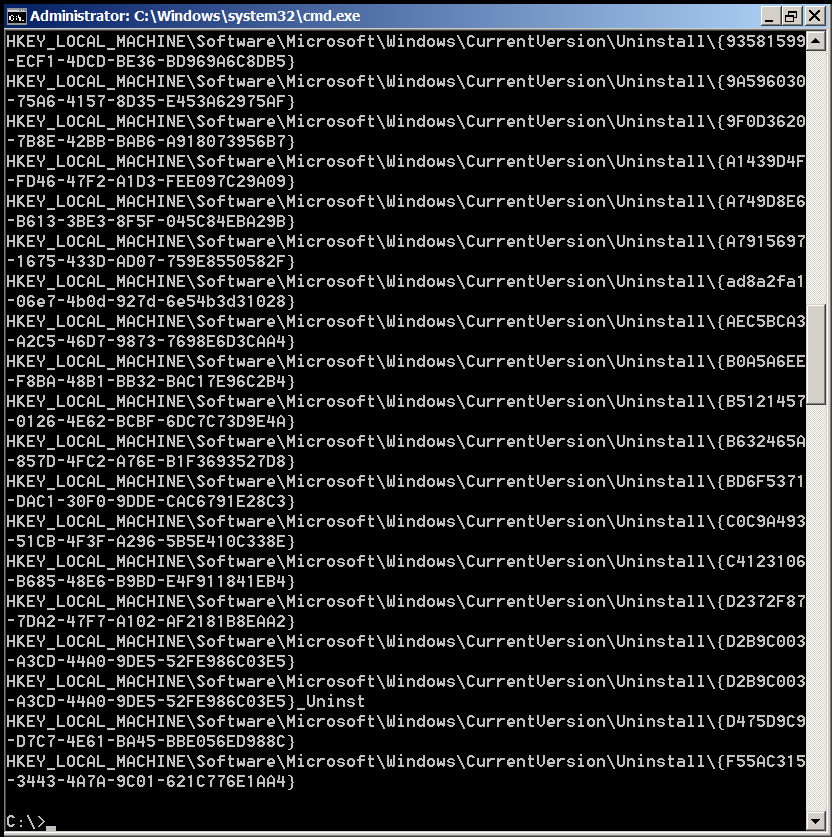
If you need to get a complete list of Uinstalled Software using command line (e.g. for batch scripting) purposes, you can query that from Windows registry, like so:


C:\>reg query HKEY_LOCAL_MACHINE\Software\Microsoft\Windows\CurrentVersion\Uninstall


Command Output will be something like on below shot:

windows-OS-show-get-full-list-of-uninstalled-programs-using-a-command-line-screenshot

Well that's all folks 🙂