[1.] I, John, the humble and sinful, who has never done anything good on earth, when I came into this wilderness of Rila, I found no man over here, but only wild animals and impenetrable thickets. I settled alone in it among the wild animals, without food nor shelter, but the sky was my shelter and the earth my bed and the herbs my food. But the good Lord, for the love of whom I disregarded everything and endured hunger and thirst, frost, the heat of the sun, and corporal nakedness, did not abandon me, but like a merciful and child-loving father he lavishly satisfied all my needs. What shall I contribute to the Lord for all he has given me? Many are his benefactions to me, for he looked from his holy height at my humbleness (cf. Luke 1:48) and lent his support to me to go through everything—not I, but the might of Christ, which is in me—because every good gift and every perfect gift is from him (James 1:17).
[2.] Seeing you today gathered together in the Lord here, where, as I told you, no man has dwelled until now, but only wild animals, and foreseeing that the end of my life here is soon coming on, because of this I made up my mind, before my departure (II Tim. 4:6) from life here, to leave you the present fatherly testament of mine, just as carnal fathers leave their children an earthly inheritance of silver and gold and other property, so that when you commemorate your father in the Holy Spirit, you do not forget his testament.
[3.] I know, my beloved children in God, I know you very well, that you, being beginners, are not confirmed yet in the monk’s life, but fear not, for the Lord’s "power is made perfect in weakness" (II Cor. 12:9). Just because of this I made up my mind to write for you this rough and ignorant testament of mine, so that you will keep it always in your minds to become stronger in body and soul, in the Lord, and go forward through the virtues in fear of God. Because I believe in my God, whom I have served since my youth and to whom I submitted zealously, after my departure, this wilderness, which until now was terrible and uninhabited, will be inhabited by a multitude of desert-citizens. What was written about it will be fulfilled: "The desolate hath many more children than she which hath a husband" (Is. 54:1; Gal. 4:27).
 [4.] Because of this I beg you, my children, whom I have gathered in the Lord, I beg of you, my flesh and blood, do not neglect your father’s admonition and together with the apostle I say: “I am in travail again until Christ be formed in you” (Gal. 4:19). I beg you and make you swear on the dread name of God not to violate or abandon anything after my death, but everything I have written let be carried out, as it is written and as you have promised before God. Whosoever oversteps or violates something of it, let him be damned and separated from the Father and the Son and the Holy Spirit, to have no share with the saints, who were pleasing to God ages ago, but let his share be with those who had crucified the Lord of Glory (Acts 7:2) and with his betrayer Judas, to be erased from “the book of life” (Phil. 4:3) and not to be inscribed [in it] with the righteous.
[5.] First of all, I bequeath to you the obligation to preserve the holy faith immaculate and unaffected by any false teaching, just as we received it from the holy fathers, without "being led away with diverse and strange teachings" (Heb. 13:9). Hold fast and keep the traditions you have heard and seen from me. Do not deviate either to the right, or to the left, but walk along the royal road. Keep yourselves carefully away from worldly fascinations and always remember why you have come out of the world, and why you have despised it and worldly things.
[6.] Now again, keep yourselves away from the avaricious snake, “for the love of money is the root of all evil” (I Tim. 6:10), according to the apostle, who calls it a second idolatry. Because for the hermit wealth consists not in silver and gold,5 but in perfect poverty, in the denial of his personal will, and in lofty humbleness. I am not telling you this as my commandments, but [I am] recalling for you the commandments of Christ. For he told his holy disciples and through them everybody who had renounced the world: "Take no gold, nor silver, nor a bag, nor copper in your belts" (Matt. 10:9) and so on. For gold and silver are great enemies of the monk and bite those who have them like a snake.

[7.] If we, however, have undoubted hope in God, he will not leave us deprived of anything, for he himself says: “A woman may forget her children, yet will I not forget thee” (Is. 49:15). Also in another place: “But seek first the kingdom of God, and his righteousness; and all these things shall be yours as well” (Matt. 6:33). For in the beginning, when I came to this wilderness, the sly enemy attempted to allure me, for the pious king sent to me a lot of gold.6 For the sake of God I refused to see him, for I understood that it was a perfidy of the devil. I did not accept it, but returned it to those who sent it, for I thought to myself: “If I wished to have gold and silver, and suchlike things, why came I into this terrible and impenetrable wilderness, where I found no man, but wild animals?” So I saved myself from the intrigues of the sly tempter, who endeavors to trip us up in those things, which we renounced willfully. That is why you are not to look for any of these things, “for your heavenly Father knows that you need them all” (Matt. 6:32) before your prayer [is offered].
[8.] Nor look to be recognized and beloved by earthly kings and princes, nor put your hope in them, leaving the heavenly King, with whom you enlisted to be soldiers and "wrestle not against flesh and blood," but "against the ruler of the darkness of this world" (Eph. 6:12). For the prophet Jeremiah also threatens us speaking so: "Cursed be the man that hopeth in man" and the rest. Enumerating the evils, he adds that "blessed is the man that hopeth in the Lord" (Jer. 17:5-8). Do not say: "What shall we eat, or drink, or in what shall we be dressed?" for the gentiles seek after these things. "Look at the birds of the air: for they neither sow nor reap, nor gather into barns; yet your heavenly father feeds them. Are you not of more value than they?" (Matt. 6:26). As soon as you have come out of the world, do not go back, neither with your body, nor with your mind, for, as it is said, "No man, having put his hand to the plough, and looking back, is fit for the Kingdom of Heaven" (Luke 9:62).
[9.] The Apostle [Paul] too, however, teaches us to "forget what lies behind and strain froward to what lies ahead" (Phil. 3:13). What does "forgetting those things which are behind" mean, my children? Nothing else except to deliver to oblivion all those things which, coming out of the world for God’s sake, we have left and despised, and to strive towards the feat which lies before us, to which we were called by our taskmaster, our most gracious God and Lord Jesus Christ, who has enabled us to endure his gentle yoke, "For his yoke is easy, and his burden is light" (Matt. 11:30).
[10.] As the grace of the Holy Spirit brought you together, so must you endeavor to live with one heart and one mind and one spirit, directing your eyes only towards the eternal reward, which God has prepared for those who have loved him. The communal life is in every way more useful for monks than the solitary one, for solitude is not suitable for the many, but only for a few who are perfect in all monastic virtues. The common life, on the other hand, is useful in general for everybody, about which the patristic books tell us and teach us sufficiently. The spirit-speaking prophet David glorified it saying: "See now what is so good and so pleasant as for brethren to dwell together in unity!" (Ps. 133:1). In addition to this, one spirit-moved ecclesiastical hymn writes in this way: "Because in this the Lord promised eternal life." But also our good Master Lord God Jesus Christ, does he not say to us himself, by his immaculate lips: "Where two or three are gathered together in my name, there I am in the midst of them"? (Matt. 18:20). Our God-bearing fathers say for the solitary life: "Woe to him that is alone when he falls; and there is not a second to lift him up" (Eccl. 4:10).
[11.] That is why, children, as the Holy Spirit through the mouth of the prophet glorifies the communal life, do you not neglect it either, but on the contrary, confirm it and be like "one body in the Lord" (Rom. 12:5), which has different members. Some of them form, however, the head which governs, others the feet which toil and bear, so that there is formed from all a single spiritual body in the Lord, created with a single mind and logical spirit, and directed by spiritual reasoning, in no wise having divisions. When such a dwelling and life in God is arranged, then he himself will be in the midst of you, governing you invisibly.
[12.] Do not seek the first place and authority, but remember those who have said: "If one would be first, he must be last of all, and servant of all" (Mark 9:35). Elect for yourselves preceptors and appoint superiors, whom God will show you, that is, men "of good report" (Acts 10:22) among everybody in spiritual matters and surpassing everybody in intelligence and spiritual discernment, and able to pasture well and comfortably the flock entrusted to them down the meadows of piety and of the life-giving commands of Christ. For these men it is proper to seek confirmation more from God than from our opinion.
| | | | 7. According to Goshev, "Zavetât," pp. 449–61, this author’s Parainesis had been available in a Slavonic translation since the reign of Symeon (893–927). |
| |
[13.] If, as our great father and monastic preceptor, the reverend Ephraem Syrus says,7 all of you begin to desire authority and presidencies, and all of you to be abbots, and all of you preceptors, and interpreters, and teachers, and among you spring up rivalries, quarrels, disputes, zealousness, calumnies, haughtinesses, envy and other passions indecorous for monks, then certainly be aware that Christ is not among you, for Christ is not the teacher of discord and dissent, but of peace and unity. For he prays to God the father for his holy disciples to be united, that is, of one mind—they themselves and everybody who believes in him through them, and says as follows: "Holy Father, keep them in thy name that they may be one, as we are" (John 17:11). In another place: "I do not pray for them only but also for those who believe in me through their word that all may be one" (John 17:20–21). If you will be one, be at peace one with another. For he said to his disciples, "Peace I leave with you, my peace I give you." (John 14: 27) For such is this peace of Christ, children, that again he speaks, saying, "Not as the world gives, do I give to you" (John 14:27). But this peace of Christ surpasses every mind. This is the peace, about which the prophet talks: "And his peace has no bounds." But also the apostle teaches us saying: "Strive for peace with all men and for the holiness, without which no man shall see God" (Heb. 12:14). May you have such a peace, now, among you, and let you arrange everything for God with great unity of mind and heart, so as not to enrage your own God and master.
[14.] If somebody is found among you who sows weeds, discords and other temptations, you have to eliminate at once such a man from your assembly, so that this will not be transfigured into a devouring canker, according to the apostle, and not to spread the evil among the good ones, and “lest any root of bitterness spring up and cause trouble by it, and the many be defiled” (Heb. 12:5); and the wicked wolf not trouble the peaceful flock of Christ, because this sort [of men] will appear. For of them Christ prophesies saying: "For it is necessary that temptations come; but woe to the world for temptations to sin!" (Matt. 16:7). For this and you, children, keep away from these things and do not allow them to live among you, but divert them away from yourselves as the shepherd chases away the scabby sheep from the pure flock.
[15.] Living together for the Lord’s sake and bearing the burdens of one another, do not neglect those who live in solitude and "wandering over deserts and in mountains, and in dens, and in caves of the earth, of whom the world was not worthy" (Heb. 11:38), but supply them as much as you can, in order to hold them as your petitioners before God, for the prayer of the pious may achieve much.
| | | | 8. For the translation of some of the late antique classics of ascetic literature into Slavonic, see Dujcev, "Réforme," p. 262. |
| |
[16.] Instruct yourselves in the Lord’s law day and night (Ps. 1:2). Read often the patristic books and try to be imitators of our holy fathers Antony, Theodosios and the others, who shone like lamps in the world with their good deeds.8 Hold firmly to the church rule, leaving or neglecting nothing of this, which is established by the holy fathers.
[17.] Manual labor must not be neglected by you, however, but work must be in your hands, and the prayer “Lord Jesus Christ, Son of God, have mercy on me, a sinner” must be permanently on your lips, as well as the memory of death in your mind. This was the practice of the ancient desert fathers. They did not eat their bread in vain, and they not only lived themselves by labor of their own hands, but they gave to the needy too, and so they were not disappointed in their hope. “For,” says the apostle [Paul], "it is well that the heart be strengthened by grace; not with foods which have not benefited their adherents" (Heb. 13:9). He says too: "Let brotherly love continue. Do not neglect to show hospitality to strangers; for thereby some have entertained angels unawares" (Heb. 13:1–2).
[18.] Establish the newly enlightened from your own race in the faith and instruct them to abandon the indecent pagan rites and the evil customs which they keep even after the acceptance of the holy faith. But they do this because of ignorance, and thus they need to be brought to their senses.
[19.] I had much more to say to you, my beloved children in the Lord, but it is impossible to write everything. I deliver you to him who is the source of all wisdom and reason, and the true Comforter— to the Holy and life-giving Spirit, in order that he himself gives you wisdom, to bring you to your senses, to enlighten you, to teach and instruct you in every good deed.
[20.] Now I leave you our beloved brother Gregory for instructor and superior in place of me, about whom all of you testify that he is able to govern you well and according to God, and you elect him by consensus as superior, even though he does not want it, but because of obedience and humility he acquiesces to your request. After him, [choose] whomever God will show you. As for myself, I wish henceforth to live in quiet and silence, to repent my sins and to beg mercy of God. Have mercy on me, your sinful father, always in your prayers that I may receive mercy on judgment day, for I have done nothing good on earth and fear that judgment and torment prepared for sinners like me. So may the blessing of God be with you all, guarding and protecting you from all evils. Amen.
I have written this in the year from the creation of the world 6449 ( = A.D. 941) on the twenty-fifth day of the month of March.
I, the humble and most sinful John, first inhabitant of the wilderness of Rila, sign with my own hand and confirm the above-written [testament].
© 2000 Dumbarton Oaks
Trustees for Harvard University
Washington, D.C.
Printed in the United States of America
Rila: Testament of John of Rila
Date: 941 Translator: Ilija Iliev
Here is also some more information of Rila Monastery for those who want to learn more what is consequence of a living of a great saint.
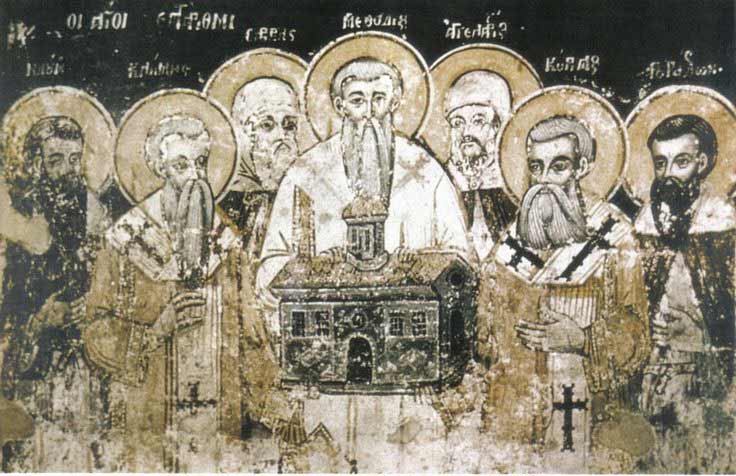
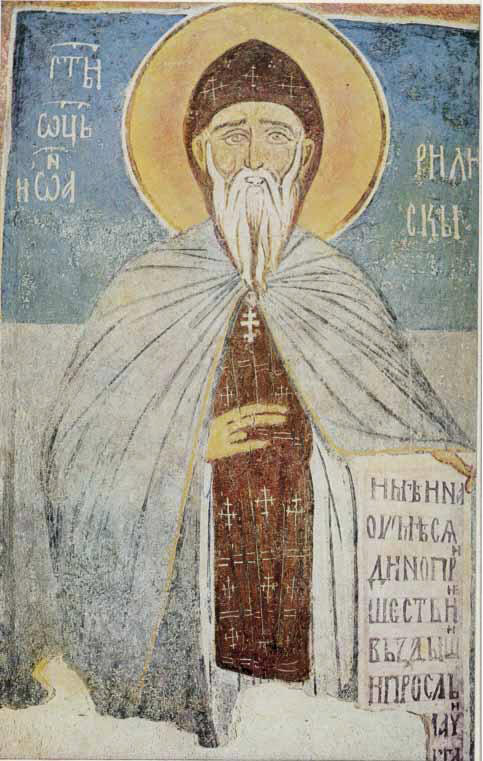
The monk John laid the foundations for what was to become the greatest monastery of medieval Bulgaria circa 930–31 in the mountains to the east of the Struma river valley in western Bulgaria.2 Born around 876–880, not much more than a dozen years after Boris-Michael (852–889), ruler of the Bulgars, had accepted Christianity in 865, John began his monastic career at the monastery of St. Dimiter near his birthplace, then lived for many years as a hermit. His final settlement was a site north of the Rila river, to the east of the present Rila monastery. Remains of the foundations of the first buildings are to be seen in the meadows south of the hermitage dedicated to St. Luke.3 Jealous of his independence, John refused to welcome the Bulgarian ruler Peter (927–969), who came to pay him homage. John’s Testament, translated below, was issued March 25, 941 to regulate the cenobitic community and is his only literary work. John then retired to his accustomed solitary life, and died on August 18, 946. He was a popular subject among hagiographers; seven lives in Bulgarian and two in Greek were composed between the twelfth and the nineteenth centuries.
B. Subsequent History of the Monastery in Medieval Times
Little is known about the Rila monastery during the Byzantine dominion over Bulgaria (1018– 1185). The earliest Slavonic life of John of Rila, the so-called "Popular Life," was composed in Bulgarian towards the end of this period, as was the first life in Greek, authored by George Skylitzes, an official on the staff of the Byzantine governor at Srédetz (modern Sofia) during the reign of Emperor Manuel I Komnenos (1143–1180), that now survives only in a Slavonic translation.5 The monastery’s fortunes revived considerably later during the Second Bulgarian Empire (1186–1396). Rila and several other monasteries, richly endowed by the Bulgarian rulers with new lands and villages, seem to have enjoyed considerable prosperity in the fourteenth century.6 There is also a charter of 1378 preserved in the monastery of the last Bulgarian king, Ivan Shishman (1371– 1393), that confirms the tax exemptions of the monastery’s existing properties and awards new lands as well; it refers to similar charters now lost that earlier Bulgarian monarchs had awarded to the monastery dating back to the middle of the thirteenth century.
Earlier in the fourteenth century, Rila had benefited also from a local patron, the protosebast Hreljo, a local lord and sometime vassal of the Serbian tsar Stephen Dusan (1331–1355), who erected a new monastery on the site of the existing Rila monastery, to the west of John’s original foundation, which continued in operation as the "Old Hermitage." Hreljo built a 75-foot protective tower, still preserved, in 1335. It included living quarters for Hreljo and his family as well as a chapel on the top floor dedicated to the Transfiguration.7 A brick inscription records Hreljo’s erection of this structure. In 1343 he also built a stone church, which survived until 1834. There were similar towers built at this time for the monasteries on Mount Athos (see (51) Koutloumousi [A4]), and there is one still existing at the Hilandar monastery. Forced to become a monk at the order of Dusan, who distrusted his loyalty, Hreljo was strangled to death by hired assassins in his tower in 1343, probably also at Dusan’s instigation. Hreljo’s gravestone, broken into many pieces, is preserved in the monastery’s museum and speaks of his entry into the monastery and unnatural death.8
In 1385, Dometian, the monastery’s superior, had John’s Testament recopied while hiding away the original along with the foundation’s other valuables for fear of the Turks, who had taken Srédetz in 1382. At about this time too Evtimij, the last Bulgarian patriarch of Turnovo, wrote his widely popular version of the Life of John of Rila.
C. Rila under Ottoman Rule
The Turkish sultans Beyazid I (1389–1402) and Mehmet I (1413–1421) issued firmans confirming the privileges Rila had received earlier from Bulgarian monarchs, but this did not save the monastery from later depredations, with the result that it was abandoned by the middle of the fifteenth century.9 There was a revival, however, in the second half of the century. Around 1460, the three brothers David, Joasaf and Teofan, sons of a certain Jakov, bishop of Krupnik, worked to strengthen and repair the damaged buildings. Shortly thereafter, a pact was reached in 1466 with the Russian monastery of St. Panteleemon on Mount Athos obliging Rila and the former institution to assist one another as needed in the future. Permission was obtained from the Turkish authorities in 1469 to transport the relics of John of Rila from Turnovo, the old capital of the Second Bulgarian Empire, where they had been since 1195. The translation considerably increased the Rila monastery’s prestige. A dependency (metoh) dedicated to Sts. Peter and Paul was built to the southwest of the main monastery in 1478.
Firmans issued by sultans Beyazid II (1481–1512) in 1498, Selim I (1512–1520) in 1519, and Murad III (1574–1595) confirmed the monastery in the possession of its properties, but like the earlier series of firmans, these did not succeed in protecting the foundation from the depredations of various brigands.10 Beginning in 1558–59, the monks succeeded in establishing direct relations with Russia, whose rulers they hoped would be sympathetic to their complaints of oppression at the hands of their Ottoman masters.
Despite extremely difficult conditions, which continued well into the second half of the eighteenth century, including attacks by robbers in 1766 and 1779, the monastery not only managed to survive but served as a kind of center of Bulgarian culture. Additional churches were built as dependencies towards the end of the eighteenth century and in the early years of the nineteenth century, then a complete reconstruction of the main monastery was begun in 1816.11 A fire in 1833, however, destroyed all the buildings there except for Hreljo’s tower and his fourteenthcentury stone church. The monastery was rebuilt once again in 1834 while the church was torn down to make room for a larger structure; both the monastery and the nineteenth-century church still stand today, along with Hreljo’s tower, the only medieval structure preserved on the site. Analysis Experts have endorsed the essential authenticity of the document.12 It is an example of the testamentary genre of monastic foundation documents, whose author seems to have made some use of (3) Theodore Studites and even (4) Stoudios.13 There are indeed some resemblances to the former document, such as the statement of purpose [3], the prohibition of changes [4], and the admonition to preserve the faith [5]. The use of the wilderness topos in the brief foundation history [1] also has a close parallel in (29) Kosmosoteira [1], a twelfth-century document. On the whole, however, this is a distinct document with its own concerns for the ordering of monastic life at Rila.
A. Lives of the Monks
Like his Stoudite predecessors, John of Rila endorses [10] the cenobitic lifestyle, but also urges his monks to establish [15] relations with and support neighboring solitaries. This coexistence of cenobitic and eremitic lifestyles, prefigured in John’s own career, would be one of the notable characteristics of Byzantine monasticism. The author demonstrates an acquaintance with the ascetic tradition of late antiquity, quoting [13] Ephraem Syrus and recommending [16] the study of patristic literature, in particular the Lives of St. Antony, founder of anchoritic monasticism, Theodosios the Koinobiarch, “and others” as well as respecting canon law. John also invokes [17] patristic authority for the practice of manual labor.
B. Constitutional Matters
While there is genuine disciplinary content in this document, its chief purpose, as in most testaments, was to designate [20] a successor, here the monk Gregory. John then announces his intent to retire into seclusion as part of an arrangement for assuring an orderly succession to the superiorship that is similar to that proposed in the eleventh century in (22) Evergetis [13]. C. Financial Matters
Aside from the commitment to self-sufficiency that seems implicit in his endorsement of manual labor, there are no indications of how John expected the foundation to support itself financially. He proudly asserts [7] that he refused a royal donation, perhaps an annuity like the solemnia attested in Byzantium in the tenth century, and he advises [8] his community not to seek favors from “earthly kings and princes” [8]. This deliberate shunning of material support is unusual. Many later founders did not fear for the independence of their foundations when accepting imperial largess or tax exemptions (e.g., (13) Ath. Typikon [36] or (19) Attaleiates [22]), nor did Rila itself long after John’s death. As Dujcev ("Réforme," p. 263) surmised, John probably was concerned about Bulgarian monasticism being too submissive to secular authority, understandably given the prior history of Bulgarian monasticism under royal patronage.