Watermarking is a technique to identify a physical or non-physical object with its owner (creator). First watermarks in history originates from very ancient times.
There are two basic types of Watermark types:
I. Physical Watermarks (classical)
II. Digital Watermarks
Historically Classical Watermarks, were mostly important. As we tend to use more and more visible and we switch to use of more invisible stuff, nowdays the importance and use of digital watermarks is steadily raising.
You have most likely already seen pictures from websites which contain a copyright holder message stamp or website logo on it.
As you could imagine the picture watermark is placed in order to prevent pictures from being re-used in another internet space ,without the picture copyright holder explicit permission…
Watermarks have entered most if not all areas of our life, but we often don't recognize they're there / rarely think about them.
Few of the many "physical watermarks" we use daily are:
- paper money watermark (to protect against anti money forgery)
- bank debit / credit cards stamps near the card chip
- postcards paper stamps
There are too many different kind of "physical watermarks" and since this is not the accent of this article, I will continue straight to explaiin a bit on Digital (picture) watermarks and how to watermark images with ImageMagick image editting command line suit.
Just like with physical watermarks, there are different kinds of digital watermarks. There are:
- Picture (Images) digital watermarks
- Video watermarks
- Audio stream digital watermarks
- Visual digital watermarks
- Invisible digital watermarks
– Steganography
– Visible area of text or picture over another text picture or video
– digital information (files) metadata with watermark content etc.
The topic of watermarking is quite wide, so I will stop here and focus on the main idea of this article – to show how to place digital watermark on graphic image or collection of pictures.
The most straightway non-interactive way to do picture watermarking is with ImageMagick's composite command line tool. This little handy tool is capable of creating watermarks in single and multiple pictures.
If you prefer to have a simple text as a watermark, then you should use imagick's convert cmd.
1. Putting a watermark of picture in the right bottom corner
$ composite -gravity southeast -dissolve 100 \

watermark_picture.png image-to-watermark.png \

output-watermarked-image.png

2. Placing watermark to picture in the bottom right corner
$ composite -gravity northeast -dissolve 80 \
output-watermarked-image.png
watermark_picture.png image-to-watermark.png \

3. Watermarking picture in the bottom left corner
$ composite -gravity southwest -dissolve 90 \

watermark_picture.png image-to-watermark.png \

output-watermarked-image.png

4. Watermarking picture in the top left corner
$ composite -gravity northwest -dissolve 100 \

watermark_picture.png image-to-watermark.jpg \

output-watermarked-image.jpg
As you see from above example, composite even accept mixing up input / output between PNG and JPEG pictures 🙂

5. Put a watermark in the image center
$ composite -gravity center -dissolve 100 \

watermark_picture.png image-to-watermark.png \

output-watermarked-image.png

6. Sealing image with custom text / Text Watermarking a picture
a) Writting text watermark to an image centered in "footer"
$ convert image-to-watermark.png -pointsize 20 \

-draw "gravity south fill black text 0,12 \

'hip0s Watermark'" output-watermarked-image.jpg
This will place a watermark in position 0,12, meaning the text will be added in the bottom center of the watermarked image.

-pointsize 20 defines the text font size. hip0s Watermark is the actual text that will be stamped.
b) Writting image watermark with font type customization (Arial Tahoma etc.):
To list all available fonts ready to be used by convert, type:
$ convert -list font

$ convert -list font |grep -i arial

Font: Arial-Black-Regular

family: Arial Black

glyphs: /usr/share/fonts/truetype/msttcorefonts/Arial_Black.ttf

Font: Arial-Bold

family: Arial

glyphs: /usr/share/fonts/truetype/msttcorefonts/Arial_Bold.ttf

Font: Arial-Bold-Italic

family: Arial

glyphs: /usr/share/fonts/truetype/msttcorefonts/arialbi.ttf

Font: Arial-Italic

family: Arial

glyphs: /usr/share/fonts/truetype/msttcorefonts/ariali.ttf

Font: Arial-Regular

family: Arial

glyphs: /usr/share/fonts/truetype/msttcorefonts/Arial.ttf
$ convert -list type

Bilevel

ColorSeparation

ColorSeparationMatte

Grayscale

GrayscaleMatte

Optimize

Palette

PaletteBilevelMatte

PaletteMatte

TrueColorMatte

TrueColor
On my system, I have 392 of fonts installed, to check the number of installed fonts ready for use by convert I used:
$ convert -list font|grep -i 'font:'|wc -l

392
To only check exact fonts names usable in convert:
$ convert -list font|grep -i 'font:'
To use the red marked Arial-Regular for font of the text picture timestamp issue;
$ convert watermark_picture.jpg -font Arial-Regular \

-pointsize 20 -draw "gravity south fill black text 0,12 'hip0s Watermark'" \

output-watermarked-image.jpg

c) Using external font with convert to place image text watermark
Lets say you would like to use an external font (arhangai.ttf) not listed in convert -font list usable fonts:
$ convert image-to-watermark.png -pointsize 20 \

-font /usr/share/fonts/truetype/arhangai/arhangai.ttf \

-draw "gravity south fill black text 0,12 \

'hip0s Watermark'" output-watermarked-image_7.png
Talking about fonts, if you would like to add some external, nice free-fonts (ttf) files to your current logged in user, exec:
hipo@noah:~$ cd ~/fonts

hipo@noah:/fonts$ for i in \

$(lynx -dump http://www.webpagepublicity.com/free-fonts.html|grep -i .ttf|grep -i http|awk '{ print $2 }'); \

do wget -r -l2 -nd -Nc $i;

done
This will add 85 new nice looking fonts. Putting fonts in .fonts/ directory, are red while fonts are looked up by applications installed on respective the server or desktop GNU / Linux systems. Any font put there is ready to be used across all ImageMagick command line tools, as well as will be added across the list of possible fonts to use in GIMP and the rest of gui editors installed on the system.
According to the (watermark) texts font size passed to convert on some pictures the text written will exceed the picture dimensions and only partially some of the text intended as watermark will be visible.
If you encounter the exceed picture text problem, take few minutes and play with fonts sizes until you have a good font size to fit the approximate dimensions of the (expected minimum / maximum – horizontal and vertical) stamped picture dimensions.
For the sake of clarity, here is a list with arguments used in above, composite and convert examples.
- composite — The ImageMagick command that combines two images.
- -dissolve 80 — The number after the option determines the brightness of the watermark. 100 is full strength.
- -gravity southeast — Determines the placement of watermark.
Possible options are; north, west, south, east, northwest, northeast, southeast, southwest, center - watermark_picture.png — The watermark image is the first argument.
- image-to-watermark.jpg — The second argument is the original image to be watermarked.
- output-watermarked-image.jpg — The third argument is the new composite image to be created.
N. B. ! If you don't specify a new file, be careful, the original file will be overwritten.
As ImageMagick is cross platform graphic editting suit – it runs on both *nix (Linux,BSD) and Windows. I have tested it on Linux, only but on FreeBSD and other BSDs it should work without any problem.
The composite and convert above examples should be easily rewritten to run on achieve watarmarking on MS Windows too.
7. Watermarking multiple pictures in a directory
To watermark multiple pictures within a directory use, a short bash loop in combination with either convert or composite could be used:
$ cd your-directory/

$ for i in *; do

convert $i -pointsize 20 -draw "gravity south fill black text 0,12 'hip0s Watermark'" output-watermarked-image.jpg

done
convert and composite also support wildcards like '*.JPG, *.PNG', but I'm not sure if this syntax can be used for mass picture marking?
8. Adding watermark and doing other various advanced Image Edit, Convert and Compose stuff with Phatch GUI program
Another program that is capable to put watermarks on pictures and besides that doing a number of routine graphic manipulation operations achievable with expert Image manipulation programs like GIMP / Inkscape is PHATCH = PHOTO & BATCH
Phatch is swiss army knife for doing web design or or graphics design on Linux.
Phatch is really great and easy to use program. Tt makes putting basic designer effects on pictures with no requirement for any design skills.
With Phatch you can become a designer for a day literally 😉
If you haven't used it yet, make sure you try it!
Below, are two screenshots of Phatch running on my Debian G* / Linux

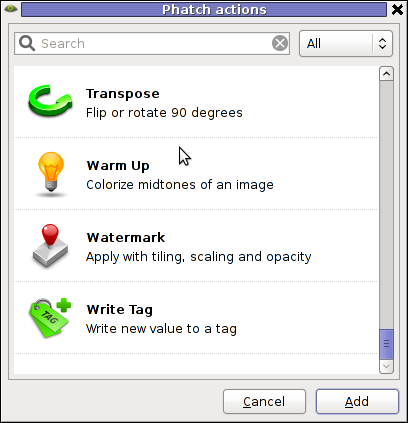
Phatch is installable via apt on Debian and Ubuntu Linux. It has also a phatch-cli tools, which are a possible substitute to ImageMagick's composite / convert tools.
On deb based distros install Phatch with:
noah:~# apt-get --yes install phatch phatch-cli
In Phatch it is also possible, to create a combination of filters to be later applied to an image file or a group of image files all in a directory. The program capabilities are really outstanding, it is pure joy to work with it.
Using Phatch GUI interface is hard to comprehend in the beginning, I needed few minutes until I can get the idea how to use it. Anyhow once you know the basics, its very easy to use onwards.
Phatch currently can perform the following actions:
- Auto Contrast – Maximize image contrast
- Border – Crop or add border to all sides
- Brightness – Adjust brightness from black to white
- Canvas – Crop the image or enlarge canvas without resizing the image
- Colorize – Colorize grayscale image
- Common – Copies the most common pixel value
- Contrast – Adjust from grey to black & white
- Convert Mode – Convert the color mode of an image (grayscale, RGB, RGBA or CMYK)
- Effect – Blur, Sharpen, Emboss, Smooth, ..
- Equalize – Equalize the image histogram
- Fit – Downsize and crop image with fixed ratio
- Grayscale – Fade all colours to gray
- Invert – Invert the colors of the image (negative)
- Maximum – Copies the maximum pixel value
- Median – Copies the median pixel value
- Minimum – Copies the minimum pixel value
- Offset – Offset by distance and wrap around
- Posterize – Reduce the number of bits of colour channel
- Rank – Copies the rank'th pixel value
- Rotate – Rotate with random angle
- Round – Round or crossed corners with variable radius and corners
- Saturation – Adjust saturation from grayscale to high
- Save – Save an image with variable compression in different types
- Scale – Scale an image with different resample filters.
- Shadow – Drop a blurred shadow under a photo with variable position, blur and color
- Solarize – Invert all pixel values above threshold
- Text – Write text at a given position
- Transpose – Flip or rotate an image by 90 degrees
- Watermark – Apply a watermark image with variable placement (offset, scaling, tiling) and opacity
Most of the function / effects Phatch in the up list works fine as I tested them to get to know the program.
The only effect that didn't worked for me is Blender effect.
Trying to apply the Blending effect I got error:
Can not apply action Blender:

'dict' object has no attribute 'rfind'
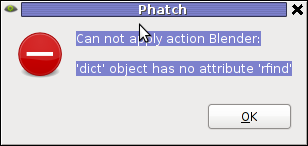
Its really a pity blender filter don't work. I've seen on Phatch's website some pictures showing the blender effect in action and it looks really awesome.
In attempt to work around the err, I tried downloading Phatch's latest release and running it with python interpreter but it didn't work out …
I tried also to install some packages to the system that somehow seemed to be related to blender – versatile 3D modeller/renderer program but this worked neither.
I suspect Phatch blender effect is not working on Ubuntu too as I've red complains in some Ubuntu forums.
If someone succeeding making blend effect work please let me know how?
Interesting feature of Phatch is the program support for applying its predefined filters using a cli interface.
The syntax for phatch cli, should be something like:
phatch -console action_list.phatch
Where action_list.phatch is a Phatch predefined filter. Anyways I didn't manage to figure out how to use the program CLI. I'll be glad to hear if someone succeeded in using the program console, if so please share with me how?
9. Adding Watermark to pictures with GIMP
To add a watermark text or picture in GIMP, there are plenty of ways but is more time consuming by both Phatch or convert, composite..
There is a script in gimp plugin registry site – watermark.scm which adds watermarking capability to GIMP
On my system this script was installed with the deb package gimp-data-extras. To apply the plugin on a pic, I used GIMP menus:
Filters -> Eg -> Copyright Placer

If someone knows about better or quicker ways to do watermarking, please share 🙂
