Posts Tagged ‘size’

Graphic tool to get Hardware Information on Linux / How to view Hardware Information easy in Linux

Tuesday, October 3rd, 2017


howto-get-graphically-system-hardware-info-linux-gui-program-for-hardware-recognition-linu


IS THERE A GRAPHIC ( GUI ) TOOL TO VIEW HARDWARE INFORMATION ON LINUX?


If you are a console maniac like myself, perhaps you never think that you might need anything graphical besides to view hardware information on Linux, but as we're growing older sometimes it becomes much less easier to just use a graphical tool that can show us all the information we need regarding a Notebook / Desktop PC with Linux or even Server machine with enabled Graphical Environment with a brand new installed GNU / Linux whatever version (I hope you don't own server with running Xorg / Gnome / Mate / Xfce etc. as that's pretty much a waste of hardware resource and opens a dozen of other security risks for the server running services ).


 There are at least 2 ways to quickly check hardware on both PC WorkStation or Server, the easiest and quickest for PC / Notebook Linux users if you have installed GTK libraries or Gnome Desktop Environment is with;
 

LSHW-GTK


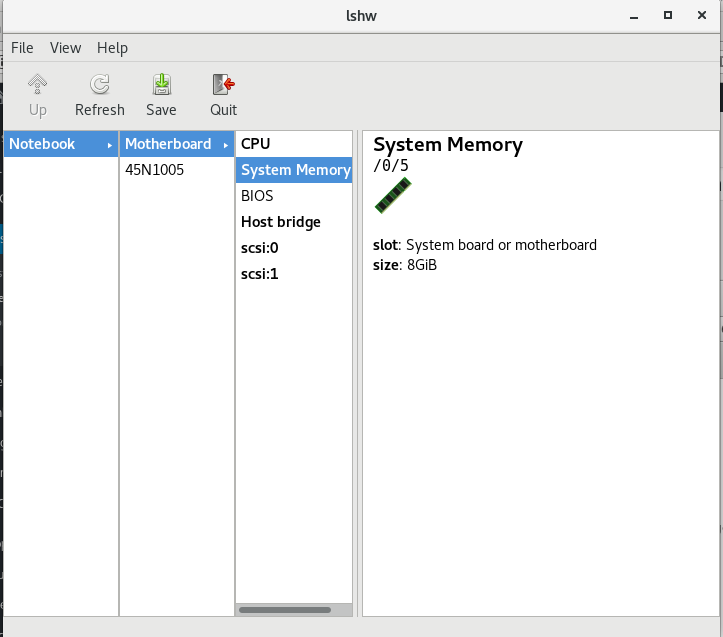
LSHW-GTK is simply a GTK frontend over the command line tool for hardware information gathering LSHW
 

HardiInfo


HardInfo – is a small application that displays information about your hardware and operating system. Currently it knows about PCI, ISA PnP, USB, IDE, SCSI, Serial and parallel port devices.


1. Howto Install LSHW-GTK / HardInfo on Debian / Ubuntu / Mint GNU / Linux to easy view hardware information


To install both of them on Debian / Ubuntu GNU / Linux, run:
 

apt-get install –yes lshw lshw-gtk hardinfo


2. Howto install LSHW-GTK on Fedora, CentOS and OpenSuSE Linux to view easy hardware information

On RedHat RPM based Linux distributions, the package to install is called lshw-gui

Install with yum RPM package manager:
 

yum install –yes lshw lshw-gui  hardinfo


3. Run lshw-gtk / hardinfo

Again, find them and run from GUI environment menus or run manually like in below example:

$ lshw-gtk


graphic-program-to-view-computer-hardware-on-linux-lshw-gtk-on-debian-linux-screenshot-view-hardware-easy-linux1


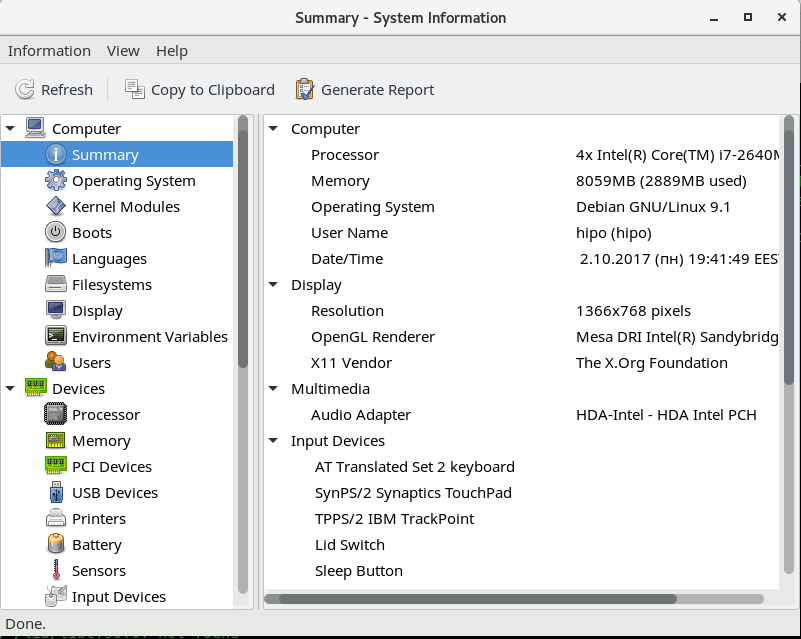
$ hardinfo


hardinfo-a-gui-program-to-view-computer-hardware-info-on-linux-and-freebsd

As you see hardinfo is really interactive and it gives you pretty much all the information, you might need, the only information that was missing at my case and I guess, that would happen to others is information about the SSD Hard Disk, which   180GB

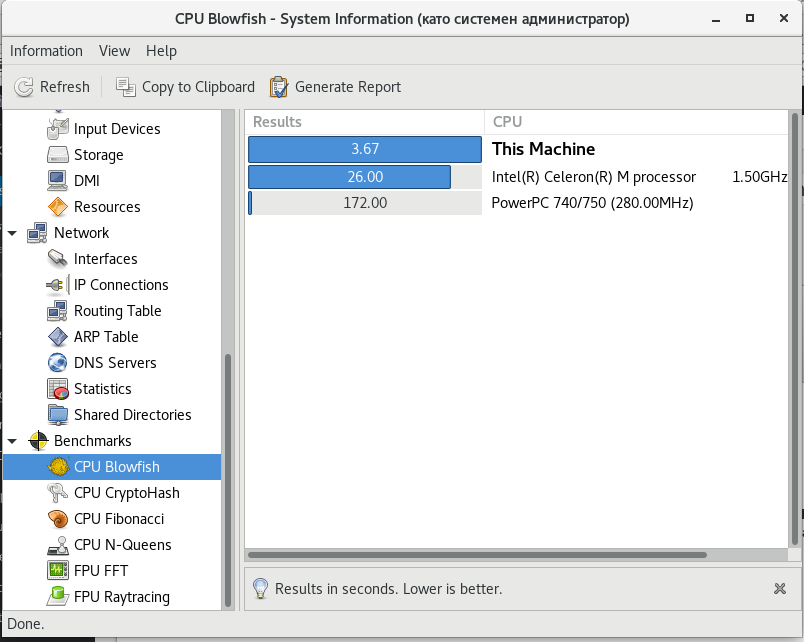
HardInfo is really amazing program as it even includes various common Benchmark Tests and comparison with other Computers:

hardinfo-get-hardware-information-easily-on-linux-and-freebsd-benchmark-info-screenshot-debian-stretch

True that the tests, are pretty simple but still could be useful.

Now run it either from GNOME / Cinnamon (The default graphical environment of Debian Linux) or PLASMA (The new name for the second most popular Linux Graphical Environment – KDE desktop environment)


$ lshw


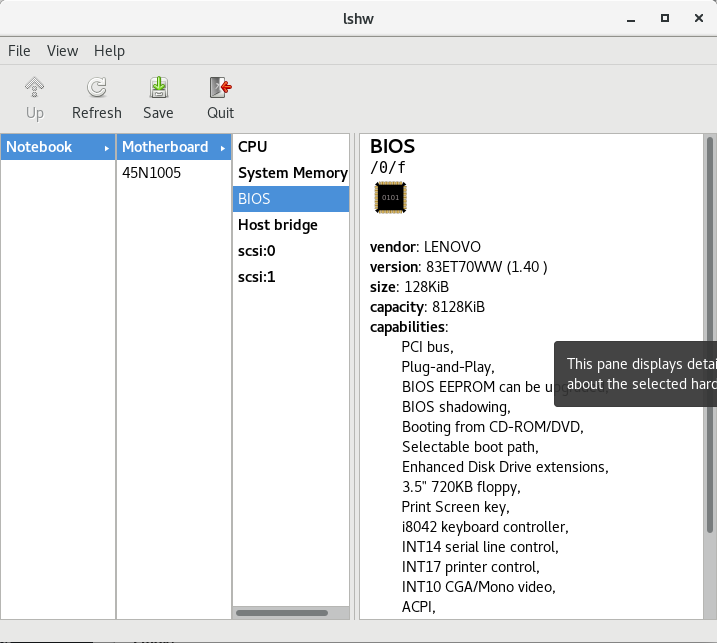
Here is few more screenshots from hardware info reported from my ThinkPad T410 Laptop Running Debian 9 Stretch at the moment.


MotherBoard -> BIOS Information

(thatnks God this old but gold Thinkpad T420 business notebook does not run UEFI substitute for BIOS 🙂

graphic-program-to-view-computer-hardware-on-linux-lshw-gtk-on-debian-linux-screenshot-view-hardware-easy-linux2

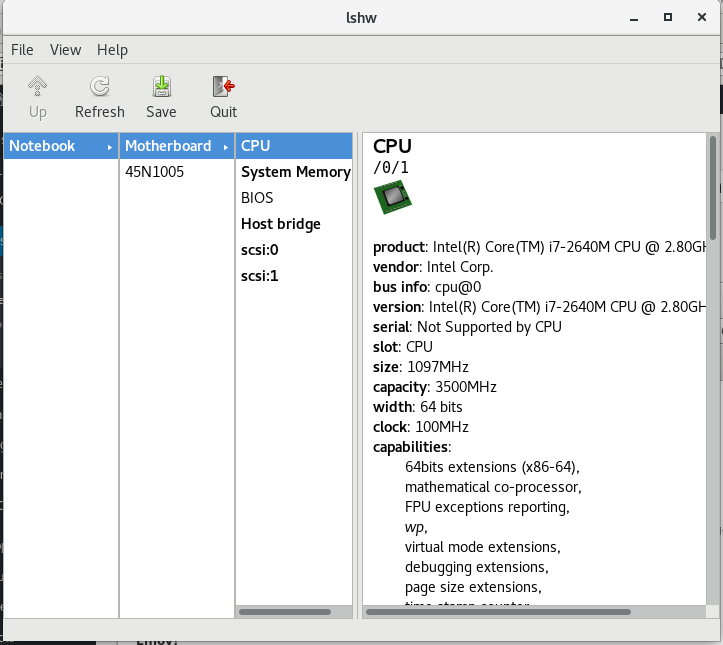
CPU Information (with all the supported CPU capabilities (extensions)

graphic-program-to-view-computer-hardware-on-linux-lshw-gtk-on-debian-linux-screenshot-view-hardware-easy-linux3

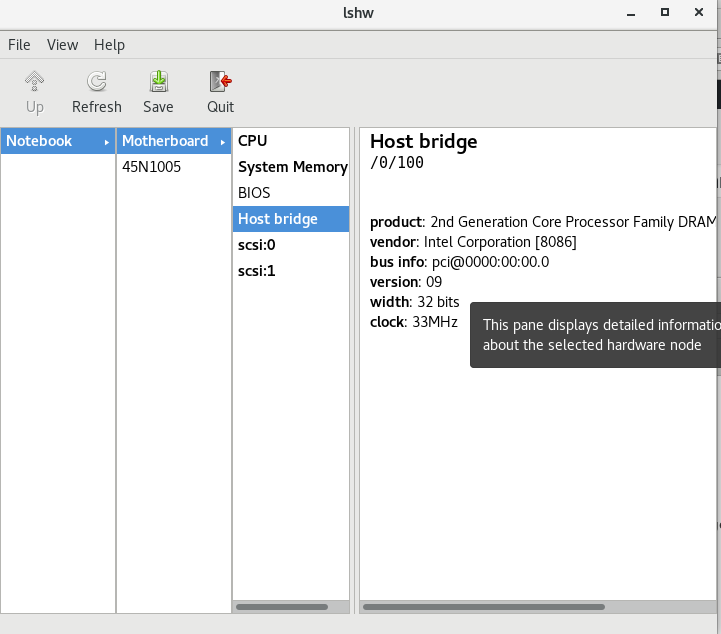
Host Bridge Info

graphic-program-to-view-computer-hardware-on-linux-lshw-gtk-on-debian-linux-screenshot-view-hardware-easy-linux4

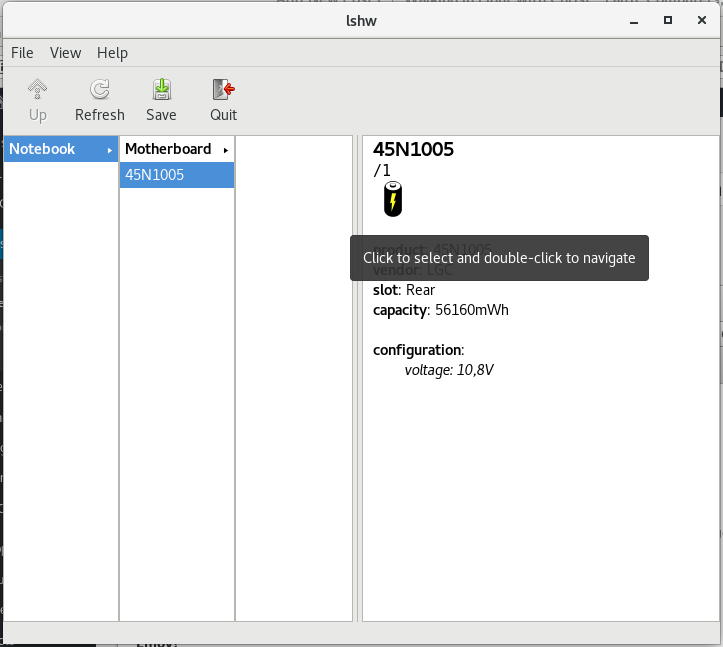
Thinkpad BATTERY (45N1005) Info

graphic-program-to-view-computer-hardware-on-linux-lshw-gtk-on-debian-linux-screenshot-view-hardware-easy-linux5

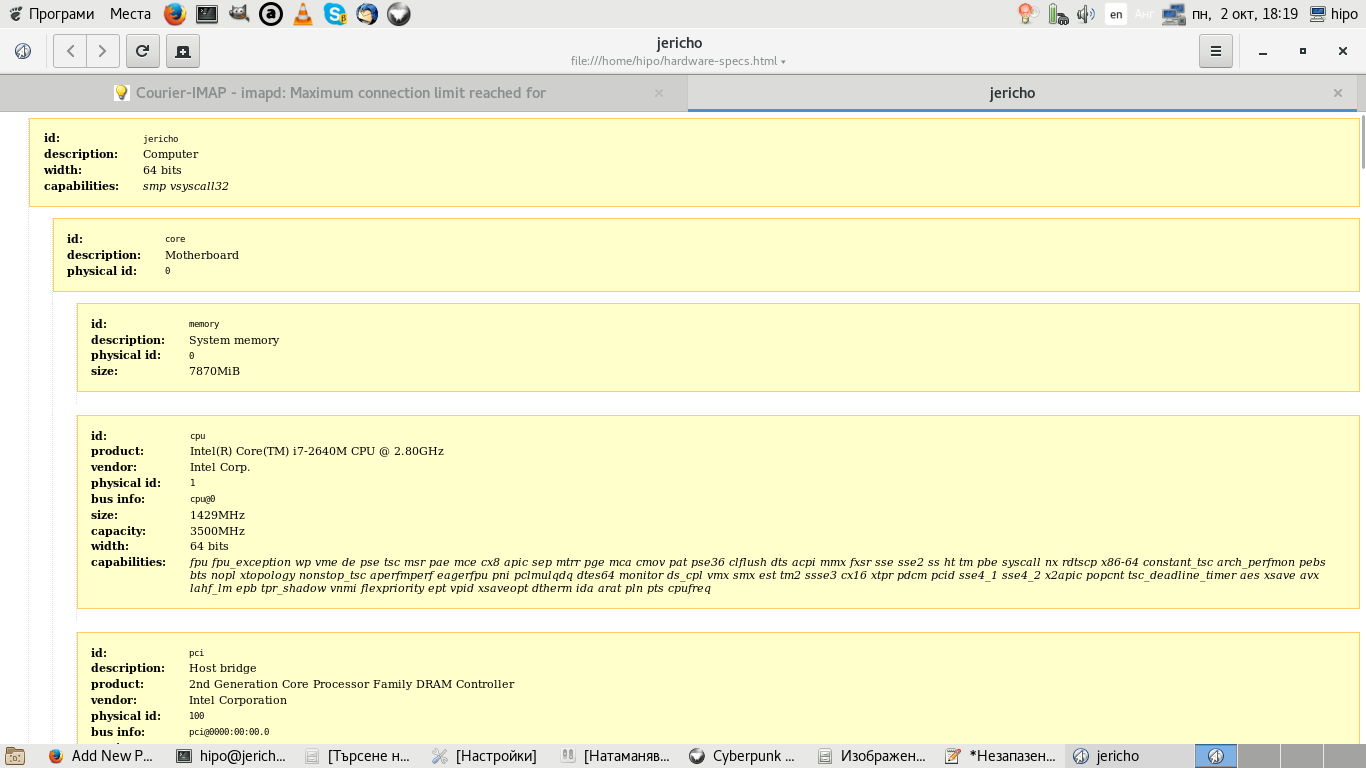
By the way another Way to GUI View your Computer is to just generate HTML from lshw command line tool (as it supports export to HTML), here is how:


$ lshw -html > ~/hardware-specs.html


Then just open it with Browser, for example I like GNOME Epiphany browser, so I'll read HTML with it:


$ epiphany ~/hardware-specs.html


graphical-software-to-view-hardware-on-linux-lshw-command-to-generate-html-and-view-it-graphically-in-browser-on-home-pc-or-server


The great thing about generating HTML report for hardware is that on Staging / Production / Development servers which you inherited from some other administrator who for some reason (laziness 🙂 ) didn't left necessery documentation, you can easily map the machine hardware and even if it is a group of machines, you can automate report generation for all of them write a short script that parses the data on each of the HTML reports and finally creates a merged document with main important information about hardware of a cluster of computers etc.

If you still want to stick to console run the console version of lshw or use dmidecode or lshw:


$ lshw

hipo@jericho:~$ lshw
WARNING: you should run this program as super-user.
jericho                     
    description: Computer
    width: 64 bits
    capabilities: smp vsyscall32
  *-core
       description: Motherboard
       physical id: 0
     *-memory
          description: System memory
          physical id: 0
          size: 7870MiB
     *-cpu
          product: Intel(R) Core(TM) i7-2640M CPU @ 2.80GHz
          vendor: Intel Corp.
          physical id: 1
          bus info: cpu@0
          size: 891MHz
          capacity: 3500MHz
          width: 64 bits
          capabilities: fpu fpu_exception wp vme de pse tsc msr pae mce cx8 apic sep mtrr pge mca cmov pat pse36 clflush dts acpi mmx fxsr sse sse2 ss ht tm pbe syscall nx rdtscp x86-64 constant_tsc arch_perfmon pebs bts nopl xtopology nonstop_tsc aperfmperf eagerfpu pni pclmulqdq dtes64 monitor ds_cpl vmx smx est tm2 ssse3 cx16 xtpr pdcm pcid sse4_1 sse4_2 x2apic popcnt tsc_deadline_timer aes xsave avx lahf_lm epb tpr_shadow vnmi flexpriority ept vpid xsaveopt dtherm ida arat pln pts cpufreq
     *-pci
          description: Host bridge
          product: 2nd Generation Core Processor Family DRAM Controller
          vendor: Intel Corporation
          physical id: 100
          bus info: pci@0000:00:00.0
          version: 09
          width: 32 bits
          clock: 33MHz
        *-pci:0
             description: PCI bridge
             product: Xeon E3-1200/2nd Generation Core Processor Family PCI Express Root Port
             vendor: Intel Corporation
             physical id: 1
             bus info: pci@0000:00:01.0
             version: 09
             width: 32 bits
             clock: 33MHz
             capabilities: pci normal_decode bus_master cap_list
             configuration: driver=pcieport
             resources: irq:24 ioport:5000(size=4096) memory:f0000000-f10fffff ioport:c0000000(size=301989888)
           *-generic UNCLAIMED
                description: Unassigned class
                product: Illegal Vendor ID
                vendor: Illegal Vendor ID
                physical id: 0
                bus info: pci@0000:01:00.0
                version: ff
                width: 32 bits
                clock: 66MHz
                capabilities: bus_master vga_palette cap_list
                configuration: latency=255 maxlatency=255 mingnt=255
                resources: memory:f0000000-f0ffffff memory:c0000000-cfffffff memory:d0000000-d1ffffff ioport:5000(size=128) memory:f1000000-f107ffff
        *-display
             description: VGA compatible controller
             product: 2nd Generation Core Processor Family Integrated Graphics Controller
             vendor: Intel Corporation
             physical id: 2
             bus info: pci@0000:00:02.0
             version: 09
             width: 64 bits
             clock: 33MHz
             capabilities: vga_controller bus_master cap_list rom
             configuration: driver=i915 latency=0
             resources: irq:30 memory:f1400000-f17fffff memory:e0000000-efffffff ioport:6000(size=64) memory:c0000-dffff
        *-communication:0
             description: Communication controller
             product: 6 Series/C200 Series Chipset Family MEI Controller #1
             vendor: Intel Corporation
             physical id: 16
             bus info: pci@0000:00:16.0
             version: 04
             width: 64 bits
             clock: 33MHz
             capabilities: bus_master cap_list
             configuration: driver=mei_me latency=0
             resources: irq:27 memory:f3925000-f392500f
        *-communication:1
             description: Serial controller
             product: 6 Series/C200 Series Chipset Family KT Controller
             vendor: Intel Corporation
             physical id: 16.3
             bus info: pci@0000:00:16.3
             version: 04
             width: 32 bits
             clock: 66MHz
             capabilities: 16550 bus_master cap_list
             configuration: driver=serial latency=0
             resources: irq:19 ioport:60b0(size=8) memory:f392c000-f392cfff
        *-network
             description: Ethernet interface
             product: 82579LM Gigabit Network Connection
             vendor: Intel Corporation
             physical id: 19
             bus info: pci@0000:00:19.0
             logical name: enp0s25
             version: 04
             serial: 00:21:cc:cc:b2:27
             capacity: 1Gbit/s
             width: 32 bits
             clock: 33MHz
             capabilities: bus_master cap_list ethernet physical tp 10bt 10bt-fd 100bt 100bt-fd 1000bt-fd autonegotiation
             configuration: autonegotiation=on broadcast=yes driver=e1000e driverversion=3.2.6-k firmware=0.13-3 latency=0 link=no multicast=yes port=twisted pair
             resources: irq:25 memory:f3900000-f391ffff memory:f392b000-f392bfff ioport:6080(size=32)
        *-usb:0
             description: USB controller
             product: 6 Series/C200 Series Chipset Family USB Enhanced Host Controller #2
             vendor: Intel Corporation
             physical id: 1a
             bus info: pci@0000:00:1a.0
             version: 04
             width: 32 bits
             clock: 33MHz
             capabilities: ehci bus_master cap_list
             configuration: driver=ehci-pci latency=0
             resources: irq:16 memory:f392a000-f392a3ff
        *-multimedia
             description: Audio device
             product: 6 Series/C200 Series Chipset Family High Definition Audio Controller
             vendor: Intel Corporation
             physical id: 1b
             bus info: pci@0000:00:1b.0
             version: 04
             width: 64 bits
             clock: 33MHz
             capabilities: bus_master cap_list
             configuration: driver=snd_hda_intel latency=0
             resources: irq:29 memory:f3920000-f3923fff
        *-pci:1
             description: PCI bridge
             product: 6 Series/C200 Series Chipset Family PCI Express Root Port 1
             vendor: Intel Corporation
             physical id: 1c
             bus info: pci@0000:00:1c.0
             version: b4
             width: 32 bits
             clock: 33MHz
             capabilities: pci normal_decode cap_list
             configuration: driver=pcieport
             resources: irq:16
        *-pci:2
             description: PCI bridge
             product: 6 Series/C200 Series Chipset Family PCI Express Root Port 2
             vendor: Intel Corporation
             physical id: 1c.1
             bus info: pci@0000:00:1c.1
             version: b4
             width: 32 bits
             clock: 33MHz
             capabilities: pci normal_decode bus_master cap_list
             configuration: driver=pcieport
             resources: irq:17 memory:f3800000-f38fffff
           *-network
                description: Wireless interface
                product: Centrino Advanced-N 6205 [Taylor Peak]
                vendor: Intel Corporation
                physical id: 0
                bus info: pci@0000:03:00.0
                logical name: wlp3s0
                version: 34
                serial: 26:ad:26:50:f1:db
                width: 64 bits
                clock: 33MHz
                capabilities: bus_master cap_list ethernet physical wireless
                configuration: broadcast=yes driver=iwlwifi driverversion=4.9.0-3-amd64 firmware=18.168.6.1 ip=192.168.0.102 latency=0 link=yes multicast=yes wireless=IEEE 802.11
                resources: irq:28 memory:f3800000-f3801fff
        *-pci:3
             description: PCI bridge
             product: 6 Series/C200 Series Chipset Family PCI Express Root Port 4
             vendor: Intel Corporation
             physical id: 1c.3
             bus info: pci@0000:00:1c.3
             version: b4
             width: 32 bits
             clock: 33MHz
             capabilities: pci normal_decode bus_master cap_list
             configuration: driver=pcieport
             resources: irq:19 ioport:4000(size=4096) memory:f3000000-f37fffff ioport:f1800000(size=8388608)
        *-pci:4
             description: PCI bridge
             product: 6 Series/C200 Series Chipset Family PCI Express Root Port 5
             vendor: Intel Corporation
             physical id: 1c.4
             bus info: pci@0000:00:1c.4
             version: b4
             width: 32 bits
             clock: 33MHz
             capabilities: pci normal_decode bus_master cap_list
             configuration: driver=pcieport
             resources: irq:16 ioport:3000(size=4096) memory:f2800000-f2ffffff ioport:f2000000(size=8388608)
           *-generic
                description: System peripheral
                product: MMC/SD Host Controller
                vendor: Ricoh Co Ltd
                physical id: 0
                bus info: pci@0000:0d:00.0
                version: 08
                width: 32 bits
                clock: 33MHz
                capabilities: bus_master cap_list
                configuration: driver=sdhci-pci latency=0
                resources: irq:16 memory:f2800000-f28000ff
        *-usb:1
             description: USB controller
             product: 6 Series/C200 Series Chipset Family USB Enhanced Host Controller #1
             vendor: Intel Corporation
             physical id: 1d
             bus info: pci@0000:00:1d.0
             version: 04
             width: 32 bits
             clock: 33MHz
             capabilities: ehci bus_master cap_list
             configuration: driver=ehci-pci latency=0
             resources: irq:23 memory:f3929000-f39293ff
        *-isa
             description: ISA bridge
             product: QM67 Express Chipset Family LPC Controller
             vendor: Intel Corporation
             physical id: 1f
             bus info: pci@0000:00:1f.0
             version: 04
             width: 32 bits
             clock: 33MHz
             capabilities: isa bus_master cap_list
             configuration: driver=lpc_ich latency=0
             resources: irq:0
        *-storage
             description: SATA controller
             product: 6 Series/C200 Series Chipset Family 6 port SATA AHCI Controller
             vendor: Intel Corporation
             physical id: 1f.2
             bus info: pci@0000:00:1f.2
             version: 04
             width: 32 bits
             clock: 66MHz
             capabilities: storage ahci_1.0 bus_master cap_list
             configuration: driver=ahci latency=0
             resources: irq:26 ioport:60a8(size=8) ioport:60bc(size=4) ioport:60a0(size=8) ioport:60b8(size=4) ioport:6060(size=32) memory:f3928000-f39287ff
        *-serial
             description: SMBus
             product: 6 Series/C200 Series Chipset Family SMBus Controller
             vendor: Intel Corporation
             physical id: 1f.3
             bus info: pci@0000:00:1f.3
             version: 04
             width: 64 bits
             clock: 33MHz
             configuration: driver=i801_smbus latency=0
             resources: irq:18 memory:f3924000-f39240ff ioport:efa0(size=32)
     *-scsi
          physical id: 2
          logical name: scsi1
          capabilities: emulated
        *-cdrom
             description: DVD-RAM writer
             product: DVDRAM GT50N
             vendor: HL-DT-ST
             physical id: 0.0.0
             bus info: scsi@1:0.0.0
             logical name: /dev/cdrom
             logical name: /dev/cdrw
             logical name: /dev/dvd
             logical name: /dev/dvdrw
             logical name: /dev/sr0
             version: LT20
             capabilities: removable audio cd-r cd-rw dvd dvd-r dvd-ram
             configuration: ansiversion=5 status=nodisc
WARNING: output may be incomplete or inaccurate, you should run this program as super-user.


Enjoy Life ! 🙂

Some standard software programs to install on Windows to make your Windows feel more like a Linux / Unix Desktop host

Friday, March 17th, 2017

linux-freebsd-unix-migration-to-windows-some-useful-customizations-and-program-softwares-to-install-to-make-your-windows-feel-like-more-linux-and-bsd-unix

If you're Windows user like me with a Linux / FreeBSD / OpenBSD / NetBSD – a dedicated Unix user and end up working for financial reasons in some TOP 100 Fortune companies (CSC, SAP, IBM, Hewlett Packard,Enterprise, Oracle) etc.  and forced for business purposes (cause some programs such as Skype for Business Desktop Share does not run fine on Unix like and thus you have to work notebook pre-installed with Windows 7 / 8 or 10 but you're so accustomed to customizations already from UNIX environments and you would like to create yourself the Windows to resemble Linux and probably customize much of how Windows behaves by default.

Here is what I personally did on my work Windows 7 Enterprise on my HP Elitebook notebook to give myself the extra things I'm used to my Debian Linux Desktop.


1. Downloaded and instaled standard gnome-terminal xterm like immediately (E.g. check MobaXterm great alternative to Putty),
2. Changed cutomize Windows 7 appearance to be more like classical Windows XP,  change Windows 8 / 10 start menu appearance to be more like in classic Windows 2000
3. Installed following bunch of softwares

  • VIM Text Editor for Windows
  • Thunderbird Mail Client
  • OpenVPN client
  • Oracle VM Virtualbox
  • Opera
  • Mozilla Firefox
  • Password Safe
  • Ext2FS / Ext3FS (support programs)
  • F.lux (to auto adjust screen brightness day and night for better sleep)
  • install ActivePerl for Windows
  • Install GNUWin Tools (and perhaps most importantly)
  • CygWin,  (to provide Windows with most needed console Linux tools), Clink.
  • WinSCP
  • Swish (to be able to remotely mount your Linux partitions and see them as local Windows drives)
  • dosbox (to play some of the good old Dos games :))
  • Windirstat (to easily check the size of complete directory and subdirectories)
  • SpaceSniffer (to be able to see which directory or files are taking the most space on the system)


Along with all above goodies here is also some good software I find essential for every web developer / system administrator / network administrator or java,  C, php pprogrammer out there that's using Windows as his Desktop platrofm.

Another thing I prefer  on Windows 7 when used as workstation is to change the default Windows 7 LogonUI screen background as well check out how here

Perhaps there is plenty of other goodprograms to install on Windows to make it feel even more like a Linux / Unix Desktop host, if you happen to somehow stuck to this article and you've migrated from Llinux / BSD desktop to Windows for work purposes please share with me any other goodies you happen to use that is from *Unix.

Trip to Balckhik Sea Resort City, Saint George Church Liturgy and The Palace Sea Garden of the Romanian Queen

Wednesday, May 11th, 2016

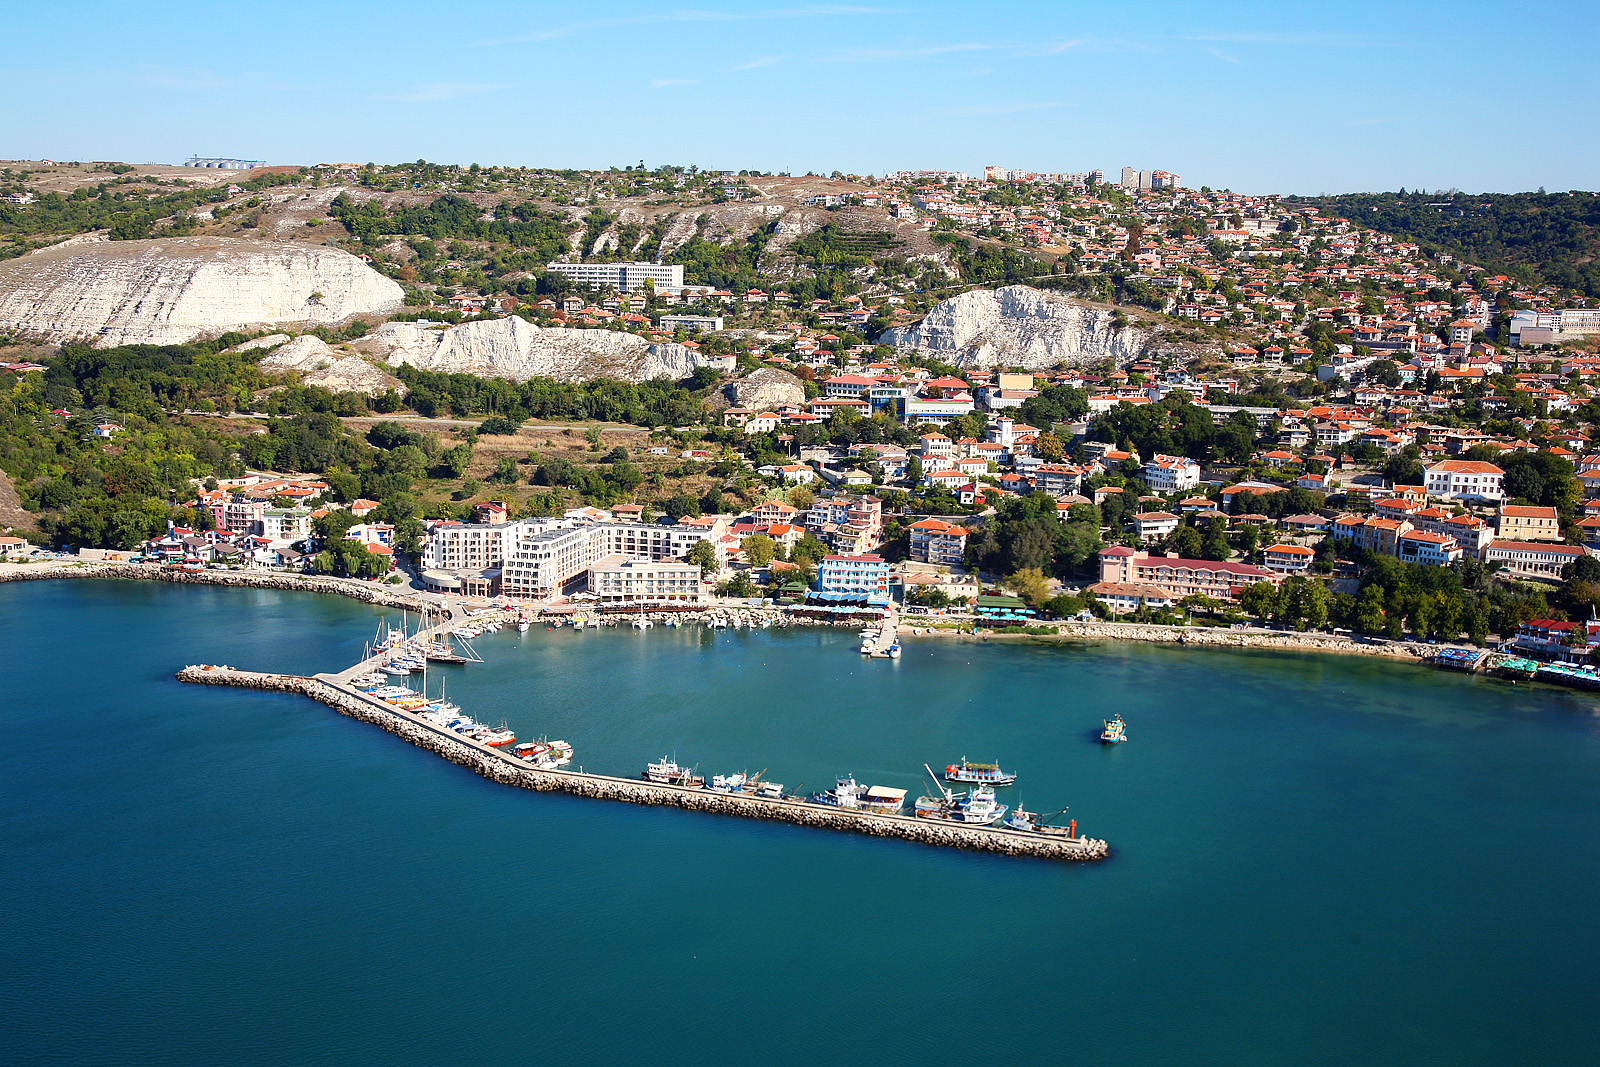
Balchik_Sea-Resort-Bulgaria_Aerial_photo-from-Black-Sea


Last Sunday 08.05.2016, we travelled with my beloved friend Elica on Opel Astra car (The so called Police Opel as this opel is well known in Bulgaria because it is the most used car by Police forces in Bulgaria. The distance  from Dobrich to Balchik Sea Town is very near (by car its only 31.5 km).
Nearby Balchik situated in 20-30 km, there are plenty of other uniquely beatiful Sea resorts, just to name a few Albena, Kranevo, Golden Sands, Kavarna.

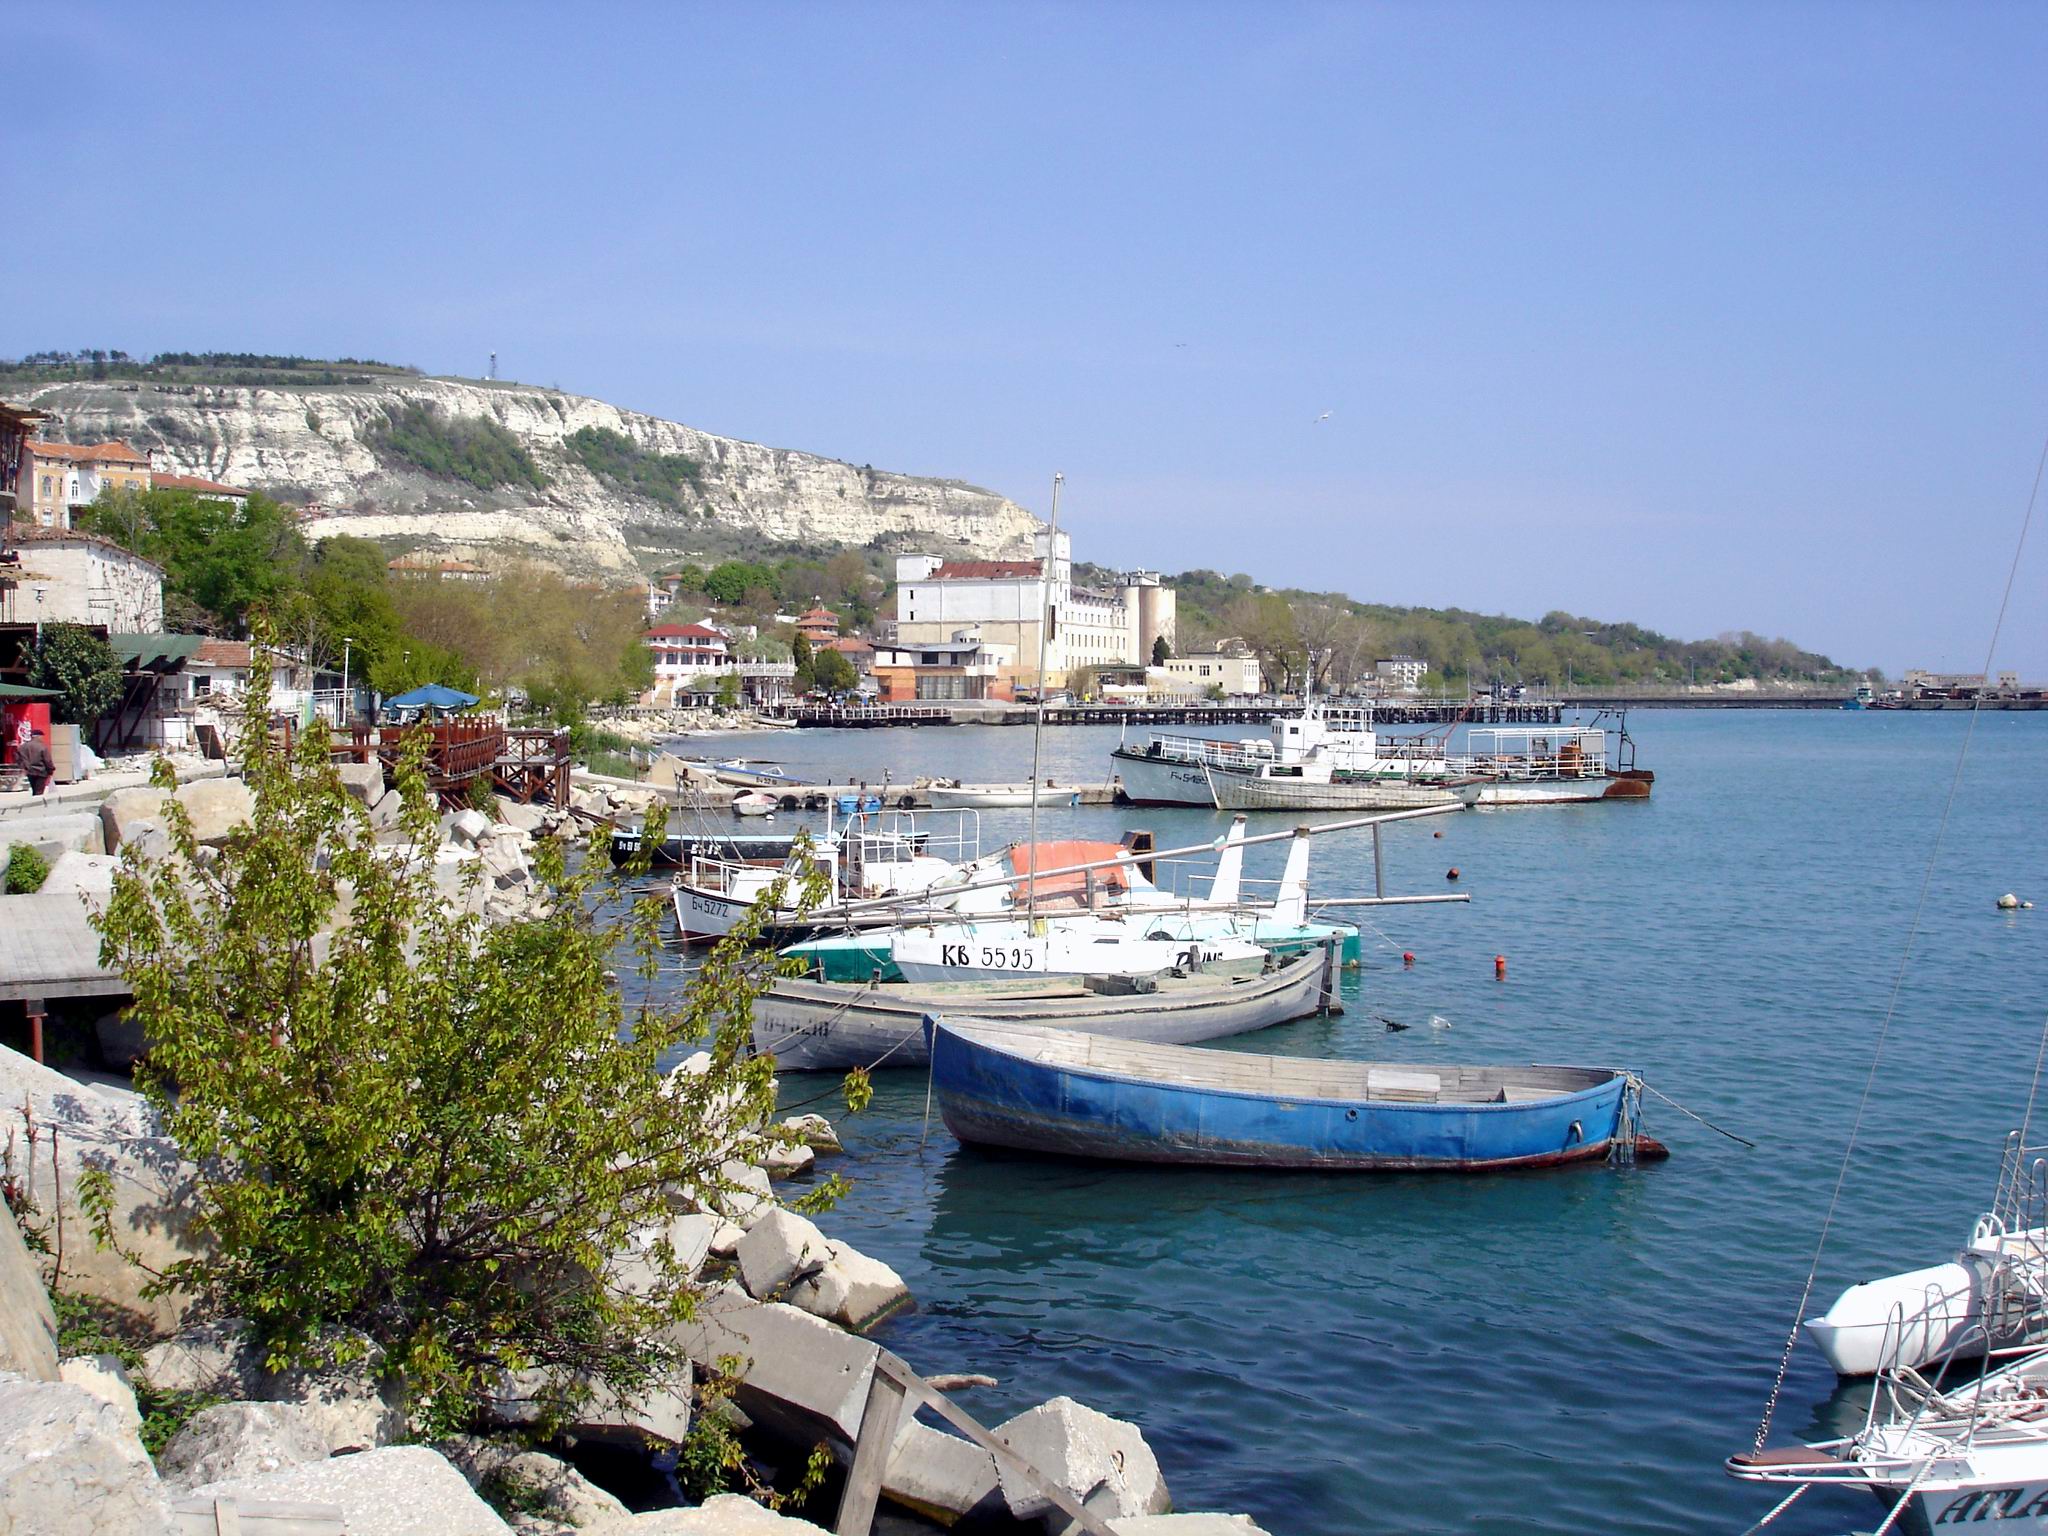
From Balchik Seacoast it is visible Albena's remote shore, which is one of favourite tourist destination for Russian and one of the most famous tourist resort in Bulgaria are visible. What makes Balchik a great place to visit is also its unique and rich history, the city was inhibited more than 2500+ years ago, according to Herodotus in 585 – 550 year B.C.

Balchik-sea-resort-boats-near-coast

Balchik's history is very dramaticit was of the important sea cities to control by Thracians (during Thracian Empire) later by  Romans, conseqnently by Greeks in Byzantine times and since the creation of Bulgaria in year 681 by Bulgarians (during first and second Bulgarian Kingdom) and under Turkish Slavery 1396-1878 by Turks (during Ottoman Turkish Empire), then after the liberation again by Bulgarians, during the Balkan wars controlled by Romanians as part of Romania and finally since September 7 1940 after the restoration of Southern Dobrudzha region to Bulgaria again part of Re-United Bulgaria.

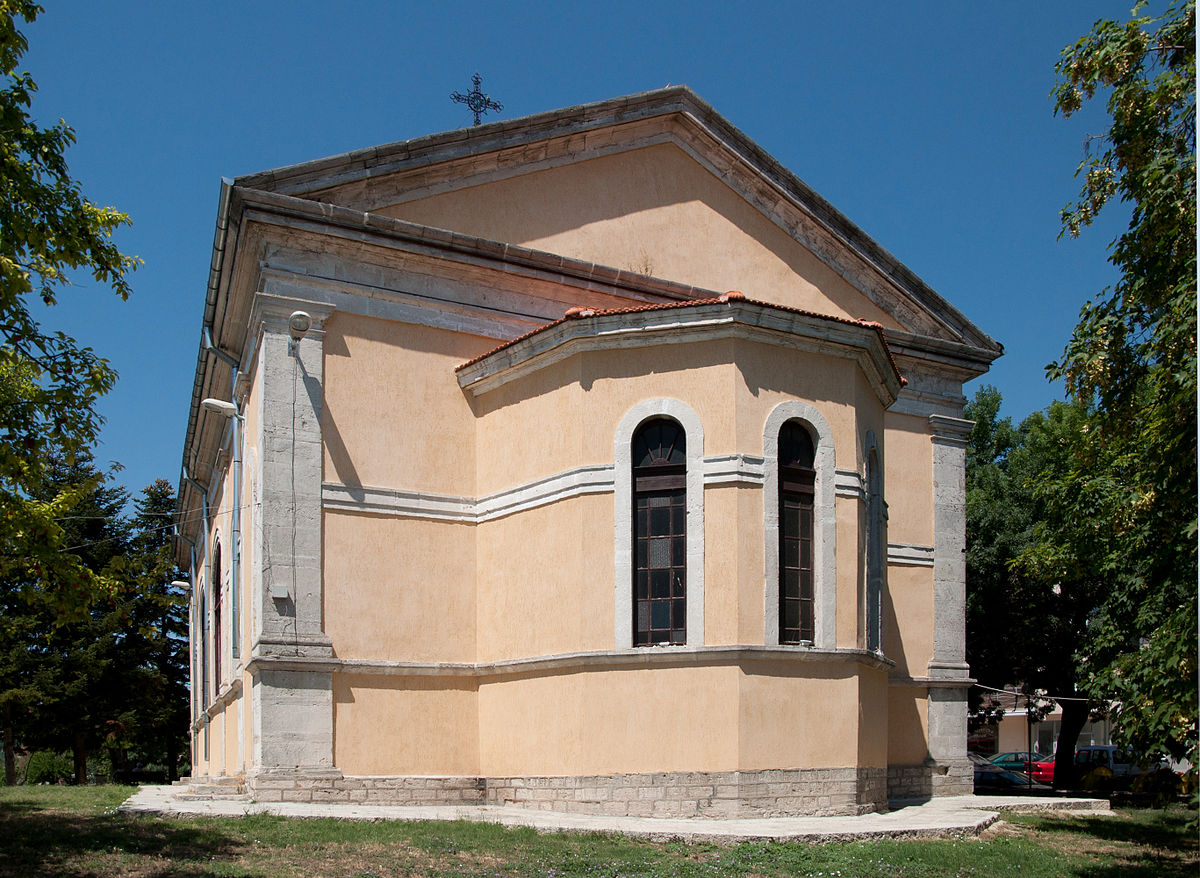
Once reaching Balchik, we attended Sunday Holy Liturgy in the Saint George majestic Church which on a first looks by its size gives the observer the impression of a small Eastern Cathedral Cathedral. On this date it was the Sunday of the Doubting Thomas the last day of the so called Bright week (the first week after Eastern Orthodox Pascha).

The service was amazingly beautiful with ac choire of only few ladies headed for my surprise by a non-Bulgarian (Belarusian) chorister lady Svetlana. The serving priest Father Stratia is a really tall and ascetic looking priest by the way he served the service and he prayed it was evident he possess a deep faith in God and perhaps a true heart relationship with Christ. The Church is full of icons and has a very unique iconostatis which by the words of the priest is the most unique Church iconostasis made by a Russian person and is the most unique and beatiful Church craftwork in the whole Dobrich region.

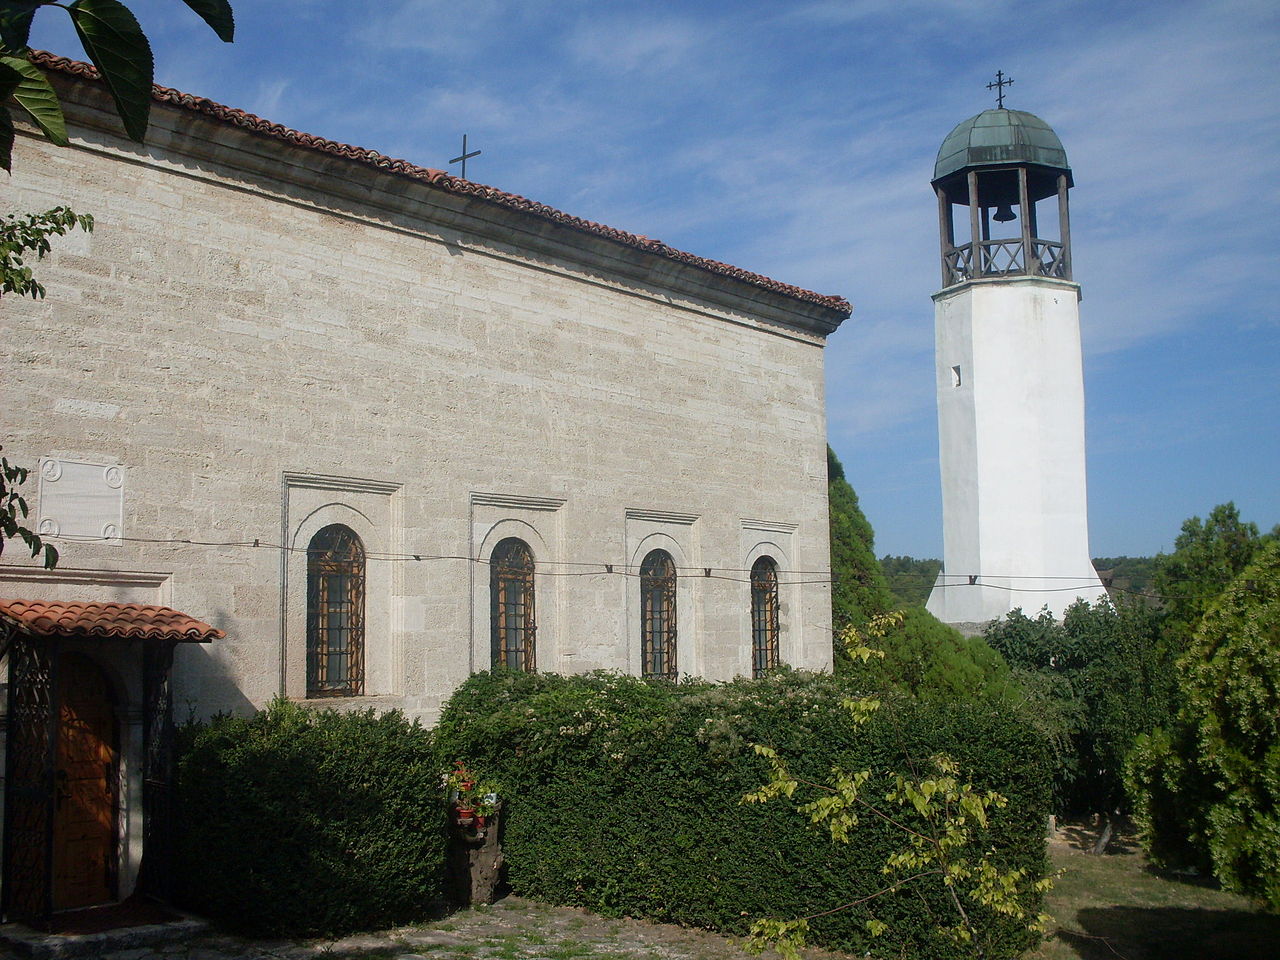
saint_George-Church-Eastern-Orthodox-Church-Seacity-Balchik

Saint George Eastern Orthodox Church Entrance – Balchik Sea City Resort, Bulgaria


The Russian influence in the Church is also evident by the many icons of well known Russian saints such as Saint John of Kronstadt, Saint Seraphim Seravski, Saint Xenia from Peterburg, Saint Matriona from Moscow, Saint King Vladimir etc. etc. Also it is very remembering experience in this Church the high number of different icons of saint George, many of which are well known and miracle making from Mount Athos (Fanailova) icon etc.

Saint_George_church-alter-in-Balchik-SeaCity-resort

Saint George Eastern Orthodox Church Alter – Balchik, Bulgaria

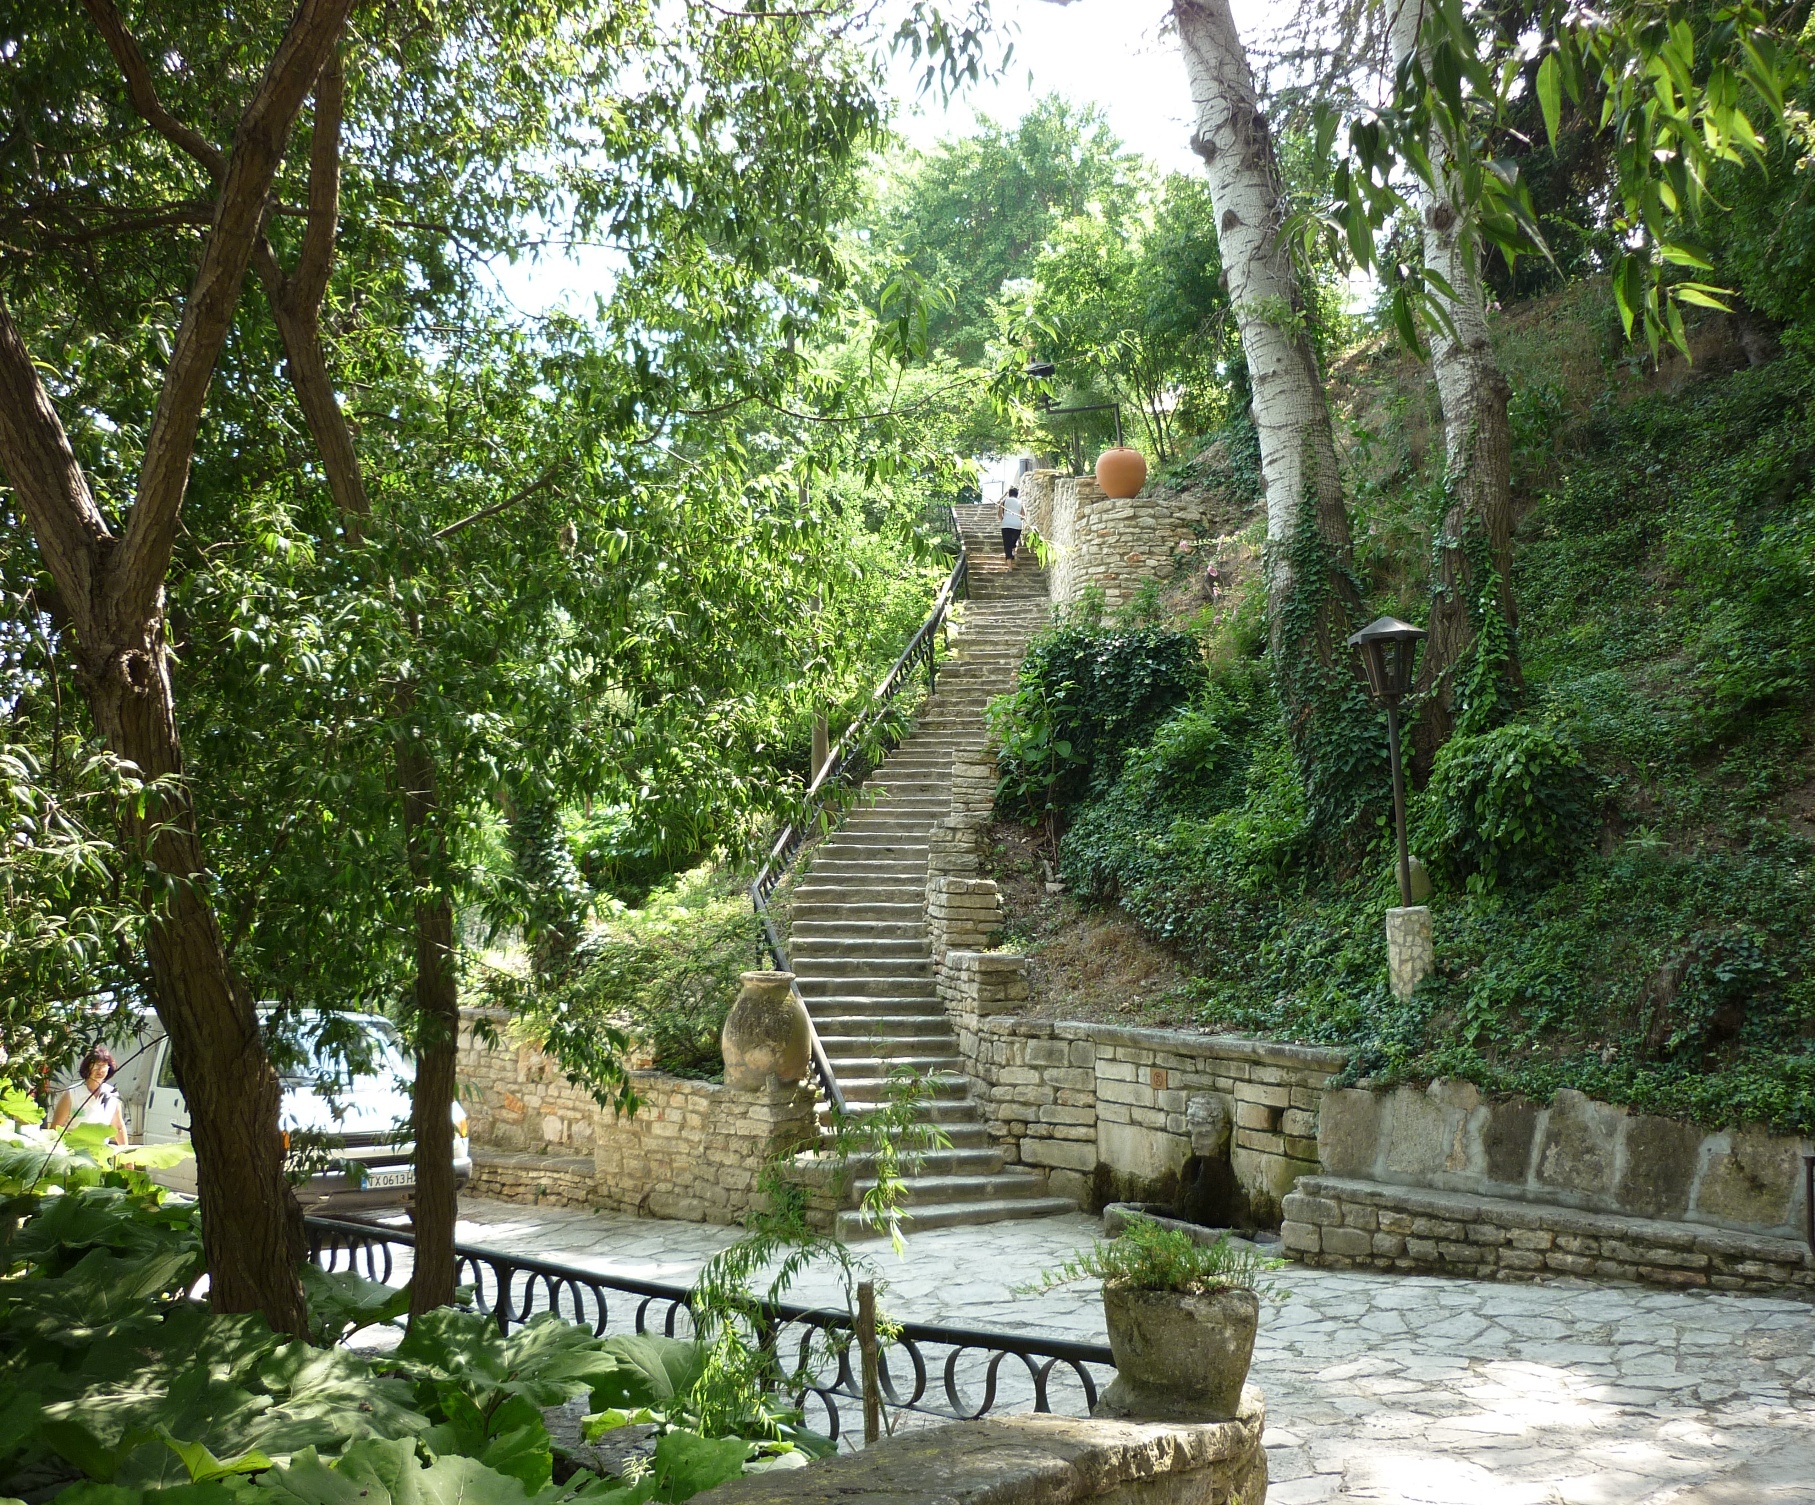
After the end of the Church service we had a walk through a piece of old stone strairs which are common for Balchik.

Balchik-old-city-stone-strairs

At the end of the service he blessed and wished a lot of "brightness and love" for the coming week and we went down from Balchik city center through a beautiful old stone stairs leading down to the Seacoast and Balchik's beach.

Balchik_cheap-caffeteria-sideview-to-black-sea-shore

We spend some time on the coffee waiting for Mitko and Samuil to drop by because we had agreed the previous day to travel by Mitko's Citroen C3 Pluriel (tutle sized car) from Balchik to Sofia.

Nearby the sea coast as in most of resorts there is a line with caffeterias and restaurands with a nice view facing the sea and a remote tiny mountain hights.
Balchik and the region is one of the most beautiful and green locations all around Dobrudja region with a beatiful plants, trees, herbs, woods. There are also few springs mineral drinable water in and nearby Balchik and the town is also famous for the healing mud center and many thermal springs of Tuzlata.

The temperature of the health water is 33 degrees centigrade; it is without color, low mineralized, and has excellent gustatory properties. The curative mud which comes from two firth lakes is dark brown, coarse-grained and has perfect physic-chemical properties. Near to the lakes there is a balneological center. Using the healing properties of the mug, good results have been reported on the treatment of gynecological, nervous diseases, diseases of the locomotory system and so on.

Balchik Tuzlata healing mud for recovering from and healing all kind of neurological, psycho-emotional and other diseases.

Balchik-Tuzlata-healing-mud-for-recovering-from-and-healing-of-all-kind-of-neurological-and-other-diseases

Perhaps the most famous and worthy thing to see in Balchik is Baclhik Palace (Dvoretz Balchik) which was constructed during 1926 – 1937  for the rest needs of the Romanian Queen during romanian control of the region in communist years of Bulgaria (1945 – 1989) and onwards it was reorganized to become one of the major and biggest Botanical garden in Bulgaria and is famous as Balchiks Botanical Garden exposing the largest collection of large cactuses in Bulgaria arranged in 1000 m2, the second biggest collection of Cactuses following after the one in Monaco.

Balchik-Botanical-garden-cactuses-second-largest-europe-collection-of-cactuses-in-Bulgaria

Few Cactuses shot – Balchik Botanical Garden Second Largest Botanical Garden in Europe

Balchik-Botanical-Garden-in-late-spring-Bulgaria-one-of-biggest-botanical-gardens-in-Europe

View to a Roman Catholic Chapel in Balchik Garden
 

The current Balchik Botanical garden has area of 65,000 m² and accommodates 2000 plant species belonging to 85 families and 200 genera a similar garden but smaller garden was build in Vrana's Bulgarian King Palace nearby Sofia

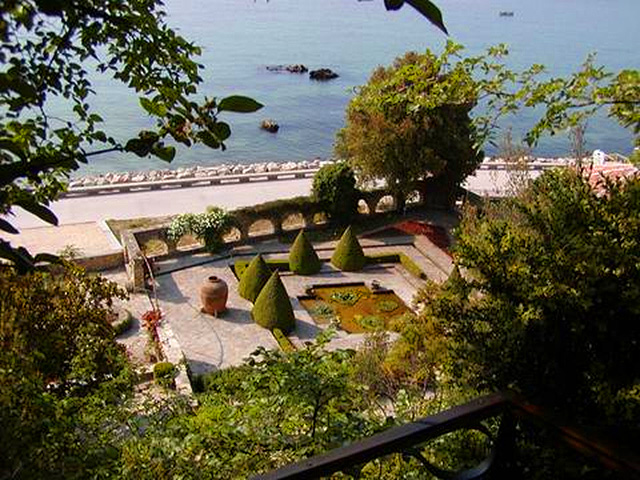
Balchik-sea-Botanical-Garden-and-a-queen-palace-one-of-most-beatiful-botanical-gardens-in-europe-and-world

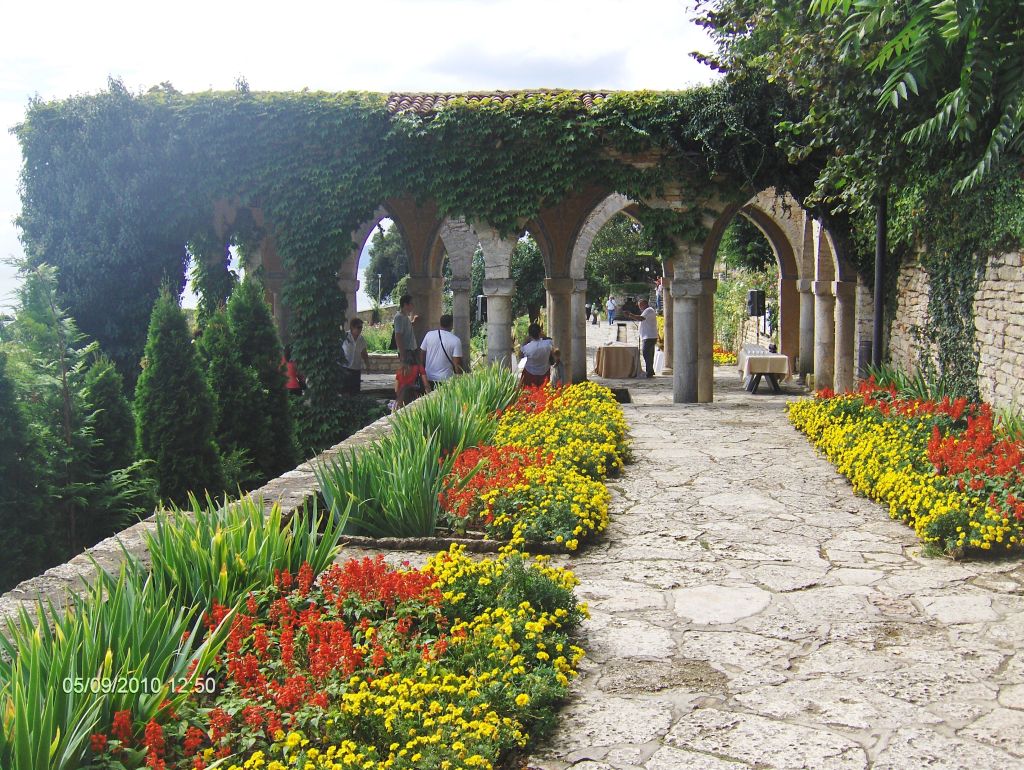
The garden is absolutely unique to see mixing together architectural characteristics for Balkans and oriental motifs such as from Islam the garden was build by Italian architects Augustino and Americo and the overall arrangement of the Palace was made by a Swiss frorist.

Balchik-unique-one-world-best-botanical-gardens-Bulgaria

The main Palace building's extravagant minaret coexists with a Christian chapel, perfectly illustrating the queen's Bahá'í beliefs.

Balchik-heaven-like-botanical-garden-one-of-best-in-Europe

A virtual tour of Balchik Palace check is on the official site of Palace here


Dvorec-Balchik-Botanical-Garden-Islamic-Minare

Though Balchik is only about 10000 to 12000 of citizens it is the second largest town in Dobrich region, rich for historical reason in diverse culture and architecture.

Below is a small chunk of the many interesting old historical things the lover of beauty can enjoy.

Balchik_old_townhouse_1871_-_door_detail

Though it is a little in size it has obsiouly rich citizen spirituality as the city has 5 Churches 4 of which in active service.

Saint_Nicholas_liberation-movement-Church-Balchik

Saint Nicolas Church built in Liberation of Bulgaria period

Sveta_Petka_Tarnovska-Church-in-Balchik


Another unique beatiful Eastern Orthodox Church to visit if you happen to be in Balchik is Saint Petka Tarnovska Church

Balchik is situated on a steep hills thus, the roads are а bit uneven like in mountains, one can see in city center also some builtiful 'bulgarian renesanse' buildings left from 19th century architecture in the famous for that time Austrian / Italian Architecture.

Bulgaria-Balchik-old_building-from-19th-century

As Balchik is small in size it is perfect for people who want to have rest in a cozy town and still have all conveniences of a beach resort. The overall feeling of being in Balchik is like in a small Italian sea town with the only difference that the prices of food and drinks in Balchik are quite affordable if compared to Western Europe resorts. A four people meal with some small drinks nearby see would be cheap like 40-50 euro.

Fix MySQL ibdata file size – ibdata1 file growing too large, preventing ibdata1 from eating all your server disk space

Thursday, April 2nd, 2015

fix-solve-mysql-ibdata-file-size-ibdata1-file-growing-too-large-and-preventing-ibdata1-from-eating-all-your-disk-space-innodb-vs-myisam

If you're a webhosting company hosting dozens of various websites that use MySQL with InnoDB  engine as a backend you've probably already experienced the annoying problem of MySQL's ibdata1 growing too large / eating all server's disk space and triggering disk space low alerts. The ibdata1 file, taking up hundreds of gigabytes is likely to be encountered on virtually all Linux distributions which run default MySQL server <= MySQL 5.6 (with default distro shipped my.cnf). The excremental ibdata1 raise appears usually due to a application software bug on how it queries the database. In theory there are no limitation for ibdata1 except maximum file size limitation set for the filesystem (and there is no limitation option set in my.cnf) meaning it is quite possible that under certain conditions ibdata1 grow over time can happily fill up your server LVM (Storage) drive partitions.

Unfortunately there is no way to shrink the ibdata1 file and only known work around (I found) is to set innodb_file_per_table option in my.cnf to force the MySQL server create separate *.ibd files under datadir (my.cnf variable) for each freshly created InnoDB table.
 

1. Checking size of ibdata1 file

On Debian / Ubuntu and other deb based Linux servers datadir is /var/lib/mysql/ibdata1

server:~# du -hsc /var/lib/mysql/ibdata1
45G     /var/lib/mysql/ibdata1
45G     total


2. Checking info about Databases and Innodb storage Engine

server:~# mysql -u root -p
password:

mysql> SHOW DATABASES;
+——————–+
| Database           |
+——————–+
| information_schema |
| bible              |
| blog               |
| blog-sezoni        |
| blogmonastery      |
| daniel             |
| ezmlm              |
| flash-games        |


Next step is to get some understanding about how many existing InnoDB tables are present within Database server:


mysql> SELECT COUNT(1) EngineCount,engine FROM information_schema.tables WHERE table_schema NOT IN ('information_schema','performance_schema','mysql') GROUP BY engine;
+————-+——–+
| EngineCount | engine |
+————-+——–+
|         131 | InnoDB |
|           5 | MEMORY |
|         584 | MyISAM |
+————-+——–+
3 rows in set (0.02 sec)

To get some more statistics related to InnoDb variables set on the SQL server:
 

mysqladmin -u root -p'Your-Server-Password' var | grep innodb


Here is also how to find which tables use InnoDb Engine

mysql> SELECT table_schema, table_name
    -> FROM INFORMATION_SCHEMA.TABLES
    -> WHERE engine = 'innodb';

+————–+————————–+
| table_schema | table_name               |
+————–+————————–+
| blog         | wp_blc_filters           |
| blog         | wp_blc_instances         |
| blog         | wp_blc_links             |
| blog         | wp_blc_synch             |
| blog         | wp_likes                 |
| blog         | wp_wpx_logs              |
| blog-sezoni  | wp_likes                 |
| icanga_web   | cronk                    |
| icanga_web   | cronk_category           |
| icanga_web   | cronk_category_cronk     |
| icanga_web   | cronk_principal_category |
| icanga_web   | cronk_principal_cronk    |


3. Check and Stop any Web / Mail / DNS service using MySQL

server:~# ps -efl |grep -E 'apache|nginx|dovecot|bind|radius|postfix'

Below cmd should return empty output, (e.g. Apache / Nginx / Postfix / Radius / Dovecot / DNS etc. services are properly stopped on server).

4. Create Backup dump all MySQL tables with mysqldump

Next step is to create full backup dump of all current MySQL databases (with mysqladmin):

server:~# mysqldump –opt –allow-keywords –add-drop-table –all-databases –events -u root -p > dump.sql
server:~# du -hsc /root/dump.sql
940M    dump.sql
940M    total


If you have free space on an external backup server or remotely mounted attached (NFS or SAN Storage) it is a good idea to make a full binary copy of MySQL data (just in case something wents wrong with above binary dump), copy respective directory depending on the Linux distro and install location of SQL binary files set (in my.cnf).
To check where are MySQL binary stored database data (check in my.cnf):

server:~# grep -i datadir /etc/mysql/my.cnf
datadir         = /var/lib/mysql

If server is CentOS / RHEL Fedora RPM based substitute in above grep cmd line /etc/mysql/my.cnf with /etc/my.cnf

if you're on Debian / Ubuntu:

server:~# /etc/init.d/mysql stop
server:~# cp -rpfv /var/lib/mysql /root/mysql-data-backup

Once above copy completes, DROP all all databases except, mysql, information_schema (which store MySQL existing user / passwords and Access Grants and Host Permissions)

5. Drop All databases except mysql and information_schema

server:~# mysql -u root -p
password:


mysql> SHOW DATABASES;

DROP DATABASE blog;
DROP DATABASE sessions;
DROP DATABASE wordpress;
DROP DATABASE micropcfreak;
DROP DATABASE statusnet;

          etc. etc.

ACHTUNG !!! DON'T execute!DROP database mysql; DROP database information_schema; !!! – cause this might damage your User permissions to databases

6. Stop MySQL server and add innodb_file_per_table and few more settings to prevent ibdata1 to grow infinitely in future

server:~# /etc/init.d/mysql stop

server:~# vim /etc/mysql/my.cnf
[mysqld]
innodb_file_per_table
innodb_flush_method=O_DIRECT
innodb_log_file_size=1G
innodb_buffer_pool_size=4G

Delete files taking up too much space – ibdata1 ib_logfile0 and ib_logfile1

server:~# cd /var/lib/mysql/
server:~#  rm -f ibdata1 ib_logfile0 ib_logfile1
server:~# /etc/init.d/mysql start
server:~# /etc/init.d/mysql stop
server:~# /etc/init.d/mysql start
server:~# ps ax |grep -i mysql


You should get no running MySQL instance (processes), so above ps command should return blank.
 

7. Re-Import previously dumped SQL databases with mysql cli client

server:~# cd /root/
server:~# mysql -u root -p < dump.sql

Hopefully import should went fine, and if no errors experienced new data should be in.

Altearnatively if your database is too big and you want to import it in less time to mitigate SQL downtime, instead import the database with:

server:~# mysql -u root -p
password:
mysql>  SET FOREIGN_KEY_CHECKS=0;
mysql> SOURCE /root/dump.sql;
mysql> SET FOREIGN_KEY_CHECKS=1;


If something goes wrong with the import for some reason, you can always copy over sql binary files from /root/mysql-data-backup/ to /var/lib/mysql/
 

8. Connect to mysql and check whether databases are listable and re-check ibdata file size

Once imported login with mysql cli and check whther databases are there with:

server:~# mysql -u root -p
SHOW DATABASES;

Next lets see what is currently the size of ibdata1, ib_logfile0 and ib_logfile1
 

server:~# du -hsc /var/lib/mysql/{ibdata1,ib_logfile0,ib_logfile1}
19M     /var/lib/mysql/ibdata1
1,1G    /var/lib/mysql/ib_logfile0
1,1G    /var/lib/mysql/ib_logfile1
2,1G    total

Now ibdata1 will grow, but only contain table metadata. Each InnoDB table will exist outside of ibdata1.
To better understand what I mean, lets say you have InnoDB table named blogdb.mytable.
If you go into /var/lib/mysql/blogdb, you will see two files
representing the table:

  •     mytable.frm (Storage Engine Header)
  •     mytable.ibd (Home of Table Data and Table Indexes for blogdb.mytable)

Now construction will be like that for each of MySQL stored databases instead of everything to go to ibdata1.
MySQL 5.6+ admins could relax as innodb_file_per_table is enabled by default in newer SQL releases.


Now to make sure your websites are working take few of the hosted websites URLs that use any of the imported databases and just browse.
In my case ibdata1 was 45GB after clearing it up I managed to save 43 GB of disk space!!!

Enjoy the disk saving! 🙂

Speed up WordPress / Joomla CMS and MySQL server on Linux with tmpfs ram file system / Decrease Website pageload times with RAM caching

Wednesday, March 4th, 2015

speed-up-accelerate-wordpress-joomla-drupal-cms-and-mysql-server-with-tmpfs_ramfs_decrease-pageload-times-with-ram-caching
As a WordPress blog owner and an sys admin that has to deal with servers running a lot of WordPress / Joomla / Droopal and other custom CMS installed on servers, performoing slow or big enough to put a significant load on servers
and I love efficiency and hardware cost saving is essential for my daily job, I'm constantly trying to find new ways to optimize Customer Website (WordPress) and rest of sites in order to utilize better our servers and improve our clients sites speed (and hence satisfaction). 

There is plenty of little things to do on servers but probably among the most crucial ones which we use nowadays that save us a lot of money is tmpfs, and earlier (ramfs) – previously known as shmfs).
TMPFS is a (Temporary File Storage Facility) Linux kernel technology based on ramfs (used by Linux kernel initrd / initramfs on boot time in order to load and store the Linux kernel in memory, before system hard disk partition file systems are mounted) which is heavily used by virtually all modern popular Linux distributions. 

Using ramfs (cramfs variation – Compressed ROM filesystem) has been used to store different system environment kernel and Desktop components of many Linux environment / applications and used by a lot of the Linux BootCD such as the most famous (Klaus Knopper's) KNOPPIX LiveCD and Trinity Rescue Kit Linux (TRK uses /dev/shm which btw can be seen on most modern Linux distros and is actually just another mounted tmpfs).
If you haven't tried Live Linux yet try it out as me and a lot of sysadmins out there use some kind of LiveLinux at least few times on yearly basis  to Recover Unbootable Linux servers after some applied remote Updates as well as for Rescuing (Save) Data from Linux server failing to properly boot because of hard disk (bad blocks) failures. As I said earlier TMPFS is also used on almost any distribution for the /dev/ filesystem which is kept in memory.

You can see which tmpfs partitions is used on your Linux server with:


debian-server:~# mount |grep -i tmpfs
tmpfs on /lib/init/rw type tmpfs (rw,nosuid,mode=0755)
udev on /dev type tmpfs (rw,mode=0755)
tmpfs on /dev/shm type tmpfs (rw,nosuid,nodev)


Above is an output from a standard Debian Linux server. On CentOS 7 standard mounted tmpfs are as follows:


[root@centos ~]# mount |grep -i tmpfs
devtmpfs on /dev type devtmpfs (rw,nosuid,seclabel,size=1016332k,nr_inodes=254083,mode=755)
tmpfs on /dev/shm type tmpfs (rw,nosuid,nodev,seclabel)
tmpfs on /run type tmpfs (rw,nosuid,nodev,seclabel,mode=755)
tmpfs on /sys/fs/cgroup type tmpfs (rw,nosuid,nodev,noexec,seclabel,mode=755)


[root@centos ~]# df -h|grep -i tmpfs
devtmpfs                 993M     0  993M   0% /dev
tmpfs                   1002M   92K 1002M   1% /dev/shm
tmpfs                   1002M  8.8M  993M   1% /run
tmpfs                   1002M     0 1002M   0% /sys/fs/cgroup

The /run tmpfs mounted directory is also to be seen also on latest Ubuntus and Fedoras and is actually the good old /var/run ( where applications keep there pids and some small app related files) stored in tmpfs filesystem stored in memory.

If you're wondering what is /dev/shm and why it appears mounted on every single Linux Server / Desktop you've ever used this is a special filesystem shared memory which various running programs (processes) can use to transfer data quick and efficient between each other to preven the slow disk swapping. People using Linux for the rest 15 years should remember /dev/shm has been a target of a lot of kernel exploits as historically it had a lot of security issues.

While writting this article I've just checked about KNOPPIX developed amd just for info as of time of writting this distro has already 1000+ programs on CD version and 2600+ packages / application on DVD version.
Nowadays Knoppix is mostly used mostly as USB Live Flash drive as a lot of people are dropping CD / DVD use (many servers doesn't have a CD / DVD Drive) and for USB Live Flash Linux distros tmpfs is also key technology used as this gives the end user an amazing fast experience (Desktop applications run much fasten on Live USBs when tmpfs is used than when the slow 7200 RPM HDDs are used).

Loading big parts of the distribution within RAM (with tmpfs from Linux Kernel 2.4+ onwards) is also heavily used by a lot of Cluster vendors in most of Clustered (Cloud) Linux based environemnts, cause TMPFS gives often speeds up improvements to x30 times and decreases greatly I/O HDD. FreeBSD users will be happy to know that TMPFS is already ported and could be used on from FreeBSD 7.0+ onward.

In this small article I will give you example use on how I use tmpfs to speed up our WordPress Websites which use WP Caching plugins such as W3 Total Cache and WP Super Cache
and Hyper Cache / WP Super Cache disk caching and MySQL server as a Database backend.
Below example is wordpress specific but since it can be easily applied to JoomlaDrupal or any other CMS out there that uses mySQL server to make a lot of CPU expensive memory hungry (LEFT JOIN) queries which end up using a slow 7200 RPM hard disk.


1. Preparing tmpfs partitions for WordPress File Cache directory
 

If you want to give tmpfs a test drive, I recommend you try to create / mount a 20 Megabyte partition. To create a tmpfs partition you don't need to use a tool like mkfs.ext3 / mkfs.ext4 as TMPFS is in reality a virtual filesystem that is mapped in the server system physical RAM (volatile memory). TMPFS is very nice because if you run out of free RAM system starts a combination of RAM use + some Hard disk SWAP 
The great thing about TMPFS is it never uses all of the available RAM and SWAP, which would not halt your server if TMPFS partition gets filled, but instead you will start getting the usual "Insufficient Disk Space", just like with a physical HDD parititon. RAMFS cares much less about server compared to TMPFS, because if RAMFS is historically older.

ramfs file systems cannot be limited in size like a disk base file system which is limited by it’s capacity, thus ramfs will continue using memory storage until the system runs out of RAM and likely crashes or becomes unresponsive. This is a problem if the application writing to the file system cannot be limited in total size, so in my opinion you better stay away from RAMFS except you have a good idea what you're doing. Another disadvantage of RAMFS compared to TMPFS is you cannot see the size of the file system in df and it can only be estimated by looking at the cached entry in free.

Note that before proceeding to use TMPFS or RAMFS you should know besides having advantages, there are certain serious disadvantage that if the server using tmpfs (in RAM) to store files crashes the customer might loose his data, therefore using RAM filesystems on Production servers is best to be used just for caching folders which are regularly synchronized with (rsync) to some folder to assure no data will be lost on server reboot or crash.

Memory of fast storage areas are ideally suited for applications which need repetitively small data areas for caching or using as temporary space such as Jira (Issue and Proejct Tracking Software) Indexing  As the data is lost when the machine reboots the tmpfs stored data must not be data of high importance as even scheduling backups cannot guarantee that all the data will be replicated in the even of a system crash.

To test mounting a tmpfs virtual (memory stored) filesystem issue:
 

mount -t tmpfs tmpfs -o size=256m /mnt/tmpfs


If you want to test mount a ramfs instead:


 mount -t ramfs -o size=256m ramfs /mnt/ramfs


debian-server:~#  mount |grep -i -E "ramfs|tmpfs"
tmpfs on /lib/init/rw type tmpfs (rw,nosuid,mode=0755)
udev on /dev type tmpfs (rw,mode=0755)
tmpfs on /dev/shm type tmpfs (rw,nosuid,nodev)
tmpfs on /mnt/tmpfs type tmpfs (rw,size=256m)
ramfs on /mnt/ramfs type tmpfs (rw,size=256m)


Once mounted tmpfs can be used in the same way as any ext4 / reiserfs filesystem. In the same way to make mounts permanent, its necessery to add a line to /etc/fstab

To illustrate better a tmpfs use case on my blog running WordPress with W3TotalCache (W3TC) plugin cache folder in /var/www/blog/wp-content/w3tc to get advantage of tmpfs to store w3tc files.

a) Stop Apache

On Debian
 

debian-server:~# /etc/init.d/apache stop


On CentOS 
 

[root@centos ~]# /etc/init.d/httpd stop


b) Move w3tc dir to w3tc-bak


debian-server:~# cd /var/www/blog/wp-content/
debian-server:~# mv w3tc w3tc-bak


c) Create w3tc directory
 

debian-server:/var/www/blog/wp-content# mkdir w3tc
debian-server:/var/www/blog/wp-content# chown -R www-data:www-data w3tc


d) Add tmpfs record to /etc/fstab

My W3TC Cache didn't grow bigger than 2Gigabytes so I create a 2Giga directory for it by adding following in /etc/fstab 
 

debian-server:~# vim /etc/fstab


tmpfs /var/www/blog/wp-content/w3tc tmpfs defaults,size=2g,noexec,nosuid,uid=33,gid=33,mode=1755 0 0


You might also want to add the nr_inodes (option) to tmpfs while mounting. nr_inodes is the maximum inode for instance. Default is half the number of your physical RAM pages, (on a machine with highmem) the number of lowmem RAM page, some common option that should work is nr_inodes=5k, if you're unsure what this option does you can safely skip it 🙂

e) Mount new added tmpfs folder

Then to mount the newly added filesystem issue:
 

mount -a


Or if you're on a CentOS / RHEL server use httpd Apache user instead and whenever you have docroot and wordpress installed.


[root@centos ~]# chown -R apache:apache: w3tc


If you're using Apache SuPHP use whatever the UID / GID is proper.

On CentOS you will need to set proper UID and GID (UserID / GroupID), to find out which ones to to use check in /etc/passwd:
 

[root@centos ~]# grep -i apache /etc/passwd
apache:x:48:48:Apache:/var/www:/sbin/nologin


f) Move old w3tc cache from w3tc-bak to w3tc


debian-server:/var/www/blog/wp-content# mv w3tc-bak/* w3tc/


g) Start again Apache

On Debian:


debian-server:~# /etc/init.d/apache2 start


On CentOS:
 

[root@centos~]# /etc/init.d/httpd start

h) Keeping w3tc cache site folder synced

As I said earlier the biggest problem with caching (the reason why many hosting providers) and site admins refuse to use it is they might loose some data, to prevent data loss or at least mitigate the data loss to few minutes intervals it is a good idea to synchronize tmpfs kept folders somewhere to disk with rsync.

To achieve that use a cronjob like this:
 

debian-server:~# crontab -u root -e
*/5 * * * * /usr/bin/ionice -c3 -n7 /usr/bin/nice -n 19 /usr/bin/rsync -ah –stats –delete /var/www/blog/wp-content/w3tc/ /backups/tmpfs/cache/ 1>/dev/null


Note that you will need to have the /backups/tmpfs/cache folder existing, create it with:


debian-server:~# mkdir -p /backups/tmpfs/cache


You will also need to add a rsync synchronization from backupped folder to tmpfs (in case if the server gets accidently rebooted because it hanged or power outage), place in

/etc/rc.local


ionice -c3 -n7 nice -n 19 rsync -ahv –stats –delete /backups/tmpfs/cache/ /var/www/blog/wp-content/w3tc/ 1>/dev/null


(somewhere before exit 0) line
 

0 05 * * * /usr/bin/ionice -c3 -n7 /bin/nice -n 19 /usr/bin/rsync -ah –stats –delete /var/www/blog/wp-content/w3tc/ /backups/tmpfs/cache/ 1>/dev/null


2. Preparing tmpfs partitions for MySQL server temp File Cache directory


Its common that MySQL servers had to serve a lot of long and heavy SQL JOIN Queries mostly by related posts WP plugins such as (Zemanta Related Posts) and Contextual Related posts though MySQLs are well optimized  to work as much as efficient using mysql tuner (tuning primer) still often SQL servers get a lot of temp tables created to disk (about 25% to 30%) of all SQL queries use somehow HDD to serve queries and as this is very slow and there is file lock created the overall MySQL performance becomes sluggish at times to fix (resolve) that without playing with SQL code to optimize the slow queries the best way I found is by using TMPFS as MySQL temp folder.

To do so I create a TMPFS usually the size of 256 MB because this is usually enough for us, but other hosting companies might want to add bigger virtual temp disk:

a) Add tmpfs new dir to /etc/fstab

In /etc/fstab add below record with vim editor:
 

debian-server:~# vim /etc/fstab


tmpfs /var/mysqltmp tmpfs rw,gid=111,uid=108,size=256M,nr_inodes=10k,mode=0700 0 0


Note that the uid / and gid 105 and 114 are taken again from /etc/passwd

On Debian

debian-server:~# grep -i mysql /etc/passwd
mysql:x:108:111:MySQL Server,,,:/var/lib/mysql:/bin/false


On CentOS
 

[root@centos ~]# grep -i mysql /etc/passwd
mysql:x:27:27:MySQL Server:/var/lib/mysql:/bin/bash


b) Create folder /var/mysqltmp or whenever you want to place the tmpfs memory kept SQL folder


debian-server:~# mkdir /var/mysqltmp
debian-server:~# chown mysql:mysql /var/mysqltmp


debian-server:~# mount|grep -i tmpfs
tmpfs on /lib/init/rw type tmpfs (rw,nosuid,mode=0755)
udev on /dev type tmpfs (rw,mode=0755)
tmpfs on /dev/shm type tmpfs (rw,nosuid,nodev)
tmpfs on /var/www/blog/wp-content/w3tc type tmpfs (rw,noexec,nosuid,size=2g,uid=33,gid=33,mode=1755)
tmpfs on /var/mysqltmp type tmpfs (rw,gid=108,uid=111,size=256M,nr_inodes=10k,mode=0700)


c) Add new path to tmpfs created folder in my.cnf 

Then  edit /etc/mysql/my.cnf


debian-server:~# vim /etc/mysql/my.cnf

[mysqld]
#
# * Basic Settings
#
user        = mysql
pid-file    = /var/run/mysqld/mysqld.pid
socket      = /var/run/mysqld/mysqld.sock
port        = 3306
basedir     = /usr
datadir     = /var/lib/mysql
tmpdir      = /var/mysqltmp


On CentOS edit and change tmpdir in same way within /etc/my.cnf


d) Finally Restart Apache and MySQL to make mysql start using new set tmpfs memory kept folder

On Debian:
 

debian-server:~# /etc/init.d/apache2 stop; /etc/init.d/mysql restart; /etc/init.d/apache2 start

On CentOS:
 

[root@centos ~]# /etc/init.d/httpd stop; /etc/init.d/mysqld restart; /etc/initd/httpd start


Now monitor your server and check your pagespeed increase for me such an optimization usually improves site performance so site becomes +50% faster, to see the difference you can test your website before applying tmpfs caching for site and after that by using Google PageInsight (PageSpeed) Online Test. Though this example is for MySQL and WordPress you can easily adopt the same for Joomla if you have Joomla Caching enabled to some folder, same goes for any other CMS such as Drupal that can take use of Disk Caching. Actually its a small secret of many Hosting providers that allow clients to create sites via CPanel and Kloxo this tmpfs optimizations are already used for sites and by this the provider is able to offer better website service on lower prices. VPS hosting providers also use heavy caching. A lot of people are using TMPFS also to accelerate Sites that have enabled Google Pagespeed as Cacher and accelerator, as PageSpeed module puts a heavy HDD I/O load that can easily stone the server. Many admins also choose to use TMPFS for  /tmp, /var/run, and /var/lock directories as this leads often to significant overall server services operations improvement.
Once you have tmpfs enabled, It is a good idea to periodically monitor your SWAP used space with (df -h), because if you allocate bigger tmpfs partitions than your physical memory and tmpfs's full size starts to be used your machine will start swapping heavily and this could have a very negative performance affect.
 

debian-server:~# df -h|grep -i tmpfs
tmpfs            3,9G     0   3,9G   0% /lib/init/rw
tmpfs            3,9G     0   3,9G   0% /dev/shm
tmpfs            2,0G  1,4G   712M  66% /var/www/blog/wp-content/w3tc
tmpfs            256M     0   256M   0% /mnt/tmpfs
tmpfs            256M  236K   256M   1% /var/mysqltmp

The applications of tmpfs to accelerate services is up to your imagination, so I will be glad to hear from other admins on any interesting other application or problems faced while using TMPFS.

 Enjoy! 🙂

Howto install XCache Debian on GNU / Linux to accelerate Apache Webserver – XCache Best alternative to outdated PHP cacher EAccelerator

Thursday, February 26th, 2015

xcache_install-and-enable-best-alternative-php-cacher-to-eaccelerator-logo
I was using Eaccelerator until recently on all Apache / PHP / MySQL  (LAMP) web-servers as a caching engine (Webserver accelerator) across all Debian GNU / Linux Lenny / Squeeze / Etch servers.
However recently, I've noticed in phpinfo output on some of the Debian hosts, that eaccelerator was loaded but showed:

 Caching Enabled false

eaccelerator_caching_enabled_false-phpinfo-screenshot-apache-debian-linux.


Our servers are quite busy serving about 50 000 to 100 000 requests and thus not having enabled caching puts a lot of extra load on the CPU and eats a lot of memory which were usually saved by eAccelerator.
Logically I tried fixing the issues following some Stackoverflow threads recommendations such as this one but didn't work I tried playing manually spending hours trying to make eaccelerator run again and as a final mean, I even tried to upgrade eaccelerator to newer version but noticed the latest available eaccelerator version 0.9.6 was 2.5 years old (from 03.09.2012). Thus while there is no new release, just make s so just to make sure I didn't break the module with (default Debian bundled distribution package which is also installed on the servers)  re-installed eAccelerator from source 

This didn't worked either and since I was totally pissed off by the worsened systems performance (CPU load increased with to 10-30%) per server, I looked for some alternatives I can use and in the mean time I learned a bit more about history of PHP Accelerators, I learned some interesting things such as that  ionCube (PHPA) was the  first PHP Accelerator Apache like module (encoding PHP code),  created in 2001, later it become inspirational for  birth to PHP-APC (Alternative PHP Cache) Apache module. 
There is also Zend Opcache PHP accelerator (available since PHP 5.5 onwards)  but since Zend OpCache caches well PHP Zend written PHP code and servers run PHP 5.4 + sites are not using Zend PHP Framewosk  this was an option.
Further investigation lead me to MMCache which is already too obsolete (latest release is from 2013), PHPExpress – PHP Encoder which  was said to run on Windows, Linux, FreeBSD, NetBSD, Mac OS X, and Solaris) but already looks dead as there were no new releases since January 2012) and finally Lighttpd's XCache.

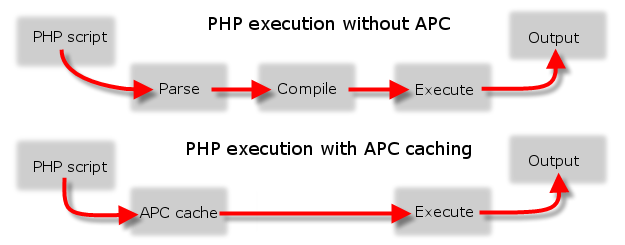
To give you an idea on what exactly is the difference between Apache Webserver with PHP-APC Caching or other PHP Cacher enabled and the Standard way PHP Interprets PHP scripts below is a diagram:

php-apc-cache-how-php-caching-works-with-and-without-encoding-php-code-diagram

Obviously my short research shows that from all the available PHP Cache Encoder / Accelerators only ones that seemed to be recently updated (under active development) are APC and XCache.
I've already used PHP-APC earlier on some servers and was having having some random Apache Webservers crashes and weird empty pages with some PHP pages and besides that APC is known to give lower speed in PHP caching than Eaccelerator and XCache, leaving me with the only and logical choise to use XCACHE.

Here is how Xcache developers describe their opcacher:
 

XCache is a free, open source operation code cacher, it is designed to enhance the performance of PHP scripts execution on servers. It optimizes the performance by eliminating the compilation time of PHP code by caching the compiled version of code into the memory and this way the compiled version loads the PHP script directly from the memory. This will surety accelerate the page generation time by up to 5 times faster and also optimizes and increases many other aspects of php scripts and reduce website/server load.


Thanksfully XCache is shipped by default with all Debians (Etch /Lenny / Squeeze / Wheezy)  Linuces so to install it just run the standard apt cmd:
 

apt-get install –yes php5-xcache


Then to enable XCache all I had to do is edit /etc/php5/apache2/php.ini and place below code
 

debian-server:~# vim /etc/php5/apache2/php.ini


[xcache-common]
;; install as zend extension (recommended), normally "$extension_dir/xcache.so"
;;zend_extension = /usr/lib/php5/20100525/xcache.so


[xcache.admin]
xcache.admin.enable_auth = On
; Configure this to use admin pages
; xcache.admin.user = "mOo"
; xcache.admin.pass = md5($your_password)
; xcache.admin.pass = ""

[xcache]
; ini only settings, all the values here is default unless explained

; select low level shm/allocator scheme implemenation
xcache.shm_scheme =        "mmap"
; to disable: xcache.size=0
; to enable : xcache.size=64M etc (any size > 0) and your system mmap allows
xcache.size  =                16M
; set to cpu count (cat /proc/cpuinfo |grep -c processor)
xcache.count =                 1
; just a hash hints, you can always store count(items) > slots
xcache.slots =                8K
; ttl of the cache item, 0=forever
xcache.ttl   =                 0
; interval of gc scanning expired items, 0=no scan, other values is in seconds
xcache.gc_interval =           0
; same as aboves but for variable cache

Note that Debian location which instructs xcache to load in Apache as a module is xcache.ini – e.g. /usr/share/php5/xcache/xcache.ini, so instead of placing above configuration right into php.ini you might prefer to place it in xcache.ini (though I personally prefer php.ini) because it is easier for me to later control how PHP behaves from single location.

To test whether XCache is enabled for Apache Webserver:

Create phpinfo.php somewhere in DocumentRoot (in my case this was /var/www/php_info.php)

debian-server:~# vim /var/www/php_info.php


<php?
phpinfo()
?>


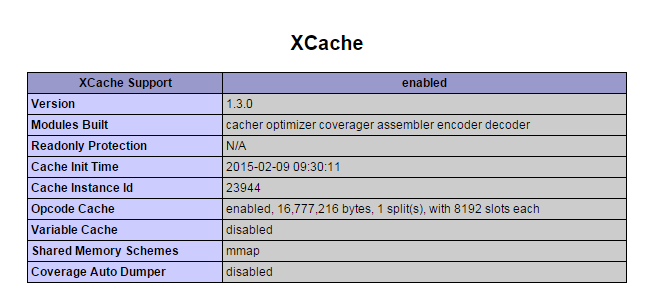
When you access the php_info.php in browser you will get XCache loaded as in below screenshot:


xcache_loaded-in-php-apache-phpinfo-output-debian-gnu-linux-server

To Test whether Xcache is enabled also for PHP CLI (applications set to run as a crontab – cronjob) :
 

debian-server:~# php -v
PHP 5.4.37-1~dotdeb.0 (cli) (built: Feb  2 2015 05:03:00)
Copyright (c) 1997-2014 The PHP Group
Zend Engine v2.4.0, Copyright (c) 1998-2014 Zend Technologies
    with XCache v3.2.0, Copyright (c) 2005-2014, by mOo
    with XCache Cacher v3.2.0, Copyright (c) 2005-2014, by mOo


Once it is tested as successful install you might want to enable the XCache admin (which is disabled by default), to enable XCache Admin on Debian you need to generate new password for it first like so:


echo -n "xcache_rulez" | md5sum
acbf5ba4a44f03058aa0ad11e0a6b645


Then you need to add in /etc/php5/mods-available/xcache.ini

debian-server:~# vim /etc/php5/mods-available/xcache.ini
[xcache.admin]
xcache.admin.enable_auth = On
; Configure this to use admin pages
 xcache.admin.user = "admin"
; xcache.admin.pass = md5($your_password)
 xcache.admin.pass = "change_with_above_generated_password_here"


To enable admin and be able to access it in a browser (if you're using as a documentroot /var/www/ and docroot supports interpretting php scripts and (has AllowOverride All) enabled to also support htaccess authentication do:
 

debian-server:~# cd /var/www/
debian-server:~# ln -sf /usr/share/xcache/htdocs/ xcache

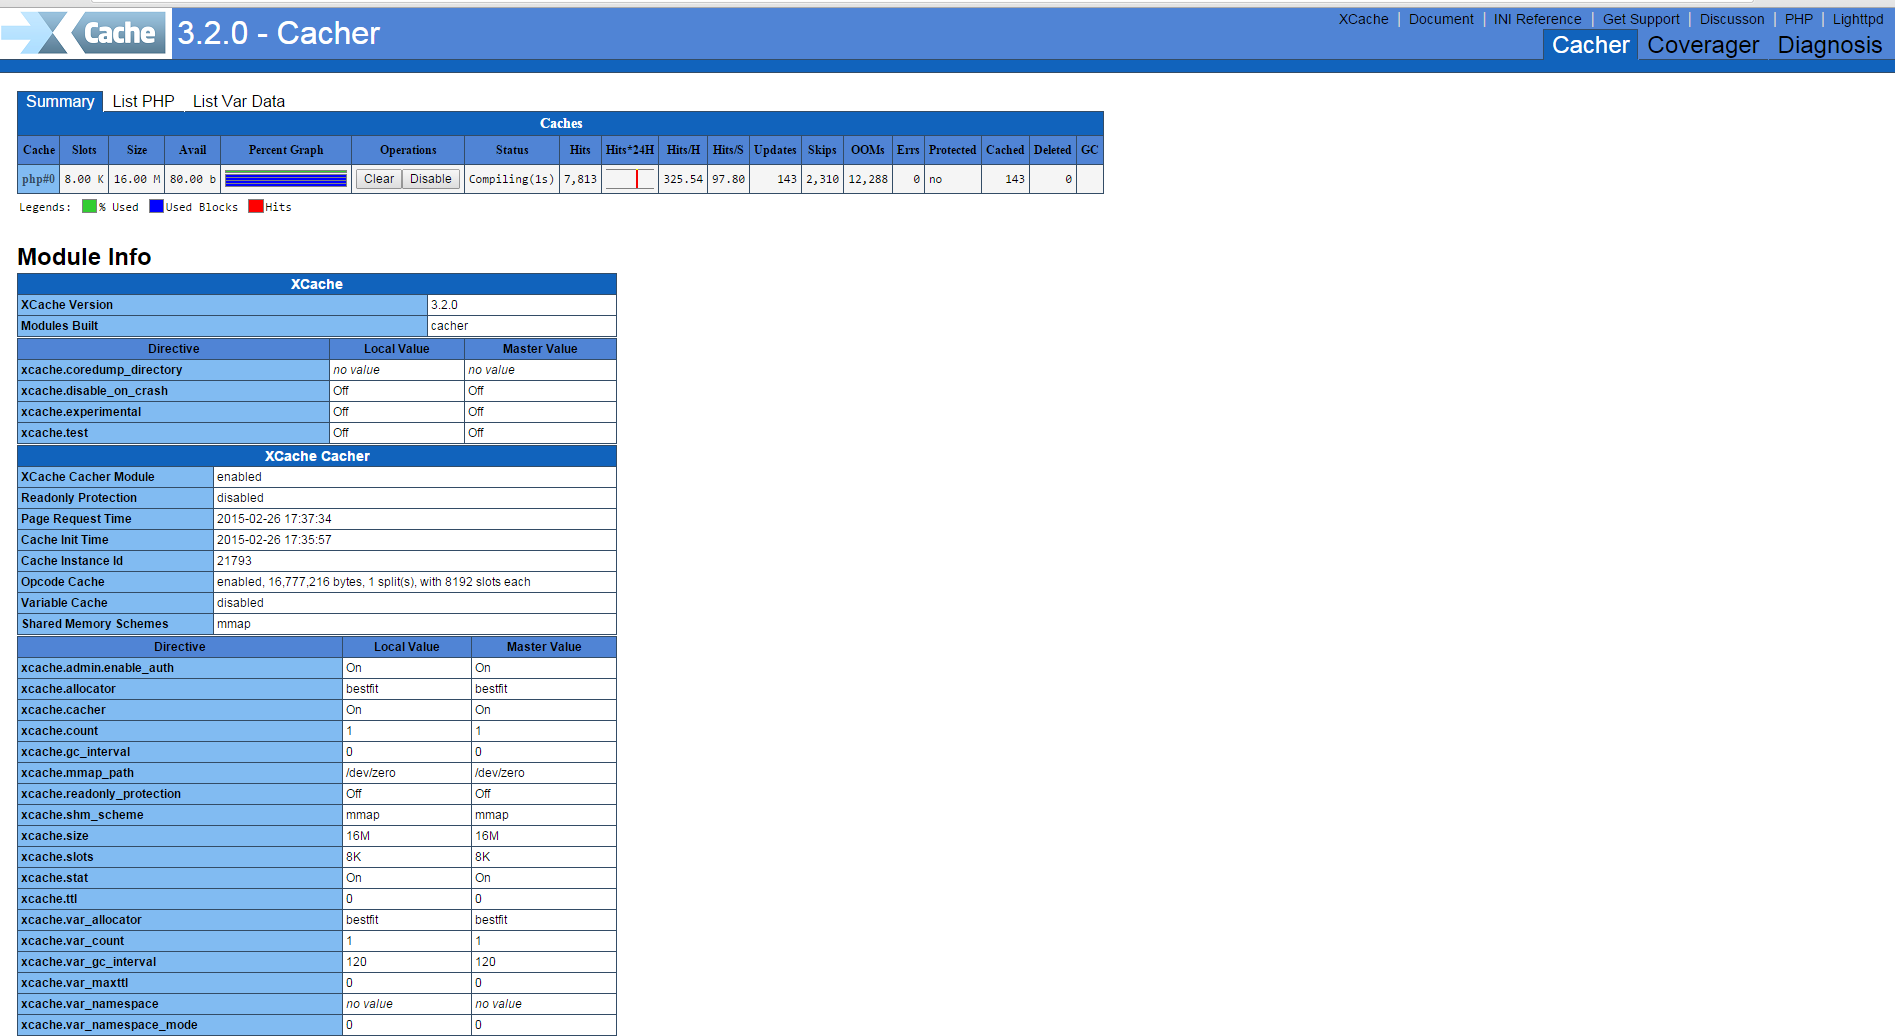
When you access http://your-url-address.com/xcache/ you should see in browser some statistics along with all configured xcache options:

xcacher-admin-on-debian-gnu-linux-in-chrome-browser-screenshot-enable-xcacher-admin-howto

If you have time you can play with the options and get some speed minor speed improvements. The overall increase in page opening XCache should give you is between 100% – 190% !

Enjoy 🙂
Improve Website Apache Webserver SEO without Website source code moficitations with Google PageSpeed module on Debian, Ubuntu, CentOS, Fedora and SuSE Linux

Thursday, December 18th, 2014

Improve-website-apache-webserver-seo-without-website-source-code-modifications-with-Google-PageSpeed-Apache-module

For hosting companies and even personal website speed performance becomes increasingly important factor that gives higher and higher weight on overall PageRank and is one of the key things for Successful Site Search Engine Optimization (positioning) in Search Engines of a not specially SEO friendly crafted website.

Virtually all Google / Yahoo / Bing,  Yahoo  etc. Search Engines give better pagerank to websites which load faster and has little or no downtimes, for the reason a faster loading time of a website pages means better user experience and is indicator that the website is well maintained. 

Often websites deployed written for purpose of a business-es or just community CMS / Blog Website Open Source systems such as Joomla, Drupal and WordPress by default are not made to provide fantastic speed right after deploy without install of custom plugins and website tuning, i.e.:

  • Content size optimization (gzipping)
  • More efficient way to deliver CSS / Javascript (MinifyJS / CSS files into single ones
  • HTML optimization
  • Stripping (useful) page Comments
  • Adding <head> if missing on pages etc.

. Therefore as I said in many of my previous LAMP Optimization articles page  (opening) speed could make really Bad Users / Clients experience when the site grows too big or is badly optimized it gives degraded page speed times (often page loads 20 / 30 seconds waiting for the page to load!). Having Pages lagging on big information sites or EShos has both Ruining Company's Image on the market and quickly convinces the user to use another service from the already thosands available and thus drives out (potential) customers.

As Programming code maintainance and improvement is usually very costly, companies that want to save money or can't afford it (because of the shrinking budgets dictacted by the global economic crisis), the best thing to do is to ask your sysadmin to Squeeze the Best out of the WebService and Servers without major (Backend Code) infrastructural changes.

To  Speed up Apache and create Proper Page Caching without installing on server external PHP Caching modules such as Eaccelerator  / PHP APC caching and without
extra CMS modules
such as lets say WordPress W3 Total Cache there is Google Develop Apache Webserver external module – PageSpeed.

Here is Google Pagespeed Module overview :
 

PageSpeed speeds up your site and reduces page load time. This open-source webserver module automatically applies web performance best practices to pages and associated assets (CSS, JavaScript, images) without requiring that you modify your existing content or workflow.


What does Apache Google PageSpeed actually does?
 

  • Automatic website and asset optimization
  • Latest web optimization techniques
  • 40+ configurable optimization filters
  • Free, open-source, and frequently updated
  • Deployed by individual sites, hosting providers, CDNs


1. Install PageSpeed on Debian / Ubuntu, deb derivatives) Linux

a) Download and install module 

On 64 bit deb based Linux:

cd /usr/local/src
wget https://dl-ssl.google.com/dl/linux/direct/mod-pagespeed-stable_current_amd64.deb 
dpkg -i mod-pagespeed-stable_current_amd64.deb
apt-get -f install


On 32 bit Linux:

cd /usr/local/src
wget https://dl-ssl.google.com/dl/linux/direct/mod-pagespeed-stable_current_i386.deb
dpkg -i 
direct/mod-pagespeed-stable_current_i386.deb
apt-get -f install


b) Restart Apache
 

sudo /etc/init.d/apache2 restart

Important files and folders placed on server by deb installer are:

/usr/bin/pagespeed_js_minify – binary that does Javascript minification
/etc/apache2/mods-available/pagespeed.conf – Pagespeed config
/etc/apache2/mods-available/pagespeed.load – Load module directives in Apache
/etc/cron.daily/mod-pagespeed – mod_pagespeed cron script for checking and installing latest updates.
/var/cache/mod_pagespeed – Mod Pagespeed cahing folder (useful to install memcached to increase even further caching performance)
/var/log/pagespeed – Directory to store pagespeed log files


2. Install PageSpeed on (RPM based CentOS, Fedora, RHEL / SuSE Linux)


RPM 64 bit package install:
 

rpm -Uvh https://dl-ssl.google.com/dl/linux/direct/mod-pagespeed-beta_current_x86_64.rpm


32 bit pack version:
 

rpm -Uvh https://dl-ssl.google.com/dl/linux/direct/mod-pagespeed-stable_current_i386.rpm


Modify pagespeed mod config 

Restart Apache

sudo /etc/init.d/httpd restart


Important config files and folders created during RPM install are:

  • /etc/cron.daily/mod-pagespeed : mod_pagespeed cron script for checking and installing latest updates.
  • /etc/httpd/conf.d/pagespeed.conf : The main configuration file for Apache.
  • /usr/lib/httpd/modules/mod_pagespeed.so : mod_pagespeed module for Apache.
  • /var/www/mod_pagespeed/cache : File caching direcotry for web sites.
  • /var/www/mod_pagespeed/files : File generate prefix for web sites.

3. Configuring Google PageSpeed module


To configure PageSpeed you can either edit the package installed bundled pagespeed.conf (/etc/apache2/mods-available/pagspeed.conf,  /etc/httpd/conf.d/pagespeed.conf) or insert configuration items inside Apache VirtualHosts config files or even if you need flexibility and you don't have straight access to Apache config files (on shared hosting servers where module is available) through .htaccess.
Anyways try to avoid adding pagespeed directives to .htaccess as it will be too slow and inefficient.

Configuration is managed by setting different so-called "Rewrite Levels". Default behavior is to use Level of "Corefilters.", a set of filters (module behavior configs) which according to Google is safe for use. PageSpeed Filters is a set of actions applied to Web Delivered files.

Default config setting is hence:
 

ModPagespeedRewriteLevel CoreFilters

Disabling default set of filters is done with:
 

ModPagespeedRewriteLevel PassThrough

"Corefilters" default filter set as of time of writting this article:
 

add_head
combine_css
convert_jpeg_to_progressive
convert_meta_tags
extend_cache
flatten_css_imports
inline_css
inline_import_to_link
inline_javascript
rewrite_css
rewrite_images
rewrite_javascript
rewrite_style_attributes_with_url

Complete documentation on Configuring PageSpeed Filters is here.

If caching is turned on, default PageSped caching is configured in /var/cache/mod_pagespeed/
Enabling someof the non-Corefilters that sometimes are useful for SEO (reduce of served / returned pagesize) are:
 

ModPagespeedEnableFilters pedantic,remove_comments

By default pagespeed does some things (such as inline_css, inline_javascript and rewrite_images (Optimize, removing Excess pixels).  My litle experience with pagespeed shows in some cases this could break websites), so I found for my case useful to disable some of the filters:


vim /etc/apache2/mods-available/pagespeed.conf


ModPagespeedDisableFilters rewrite_images,convert_jpeg_to_progressive,inline_css,inline_javascript


4. Testing if PageSpeed is Enabled pagespeed_admin

By default PageSpeed has Admin which by default is only allowed to be accessed from server localhost (127.0.0.1) to get basic statistics either install text browser like lynx / elinks or add more access IPs again in pagespeed config / vhosts pagespeed.conf include more Allow lines like below:


    <Location /pagespeed_admin>
        Order allow,deny
        Allow from localhost
        Allow from 127.0.0.1
        Allow from 192.168.1.1
        Allow from xxx.xxx.xxx.xxx

        #Allow from All
        SetHandler pagespeed_admin
    </Location>
    <Location /pagespeed_global_admin>
        Order allow,deny
        Allow from localhost
        Allow from 127.0.0.1

        Allow from 192.168.1.1
        Allow from xxx.xxx.xxx.xxx
        SetHandler pagespeed_global_admin
    </Location>


Once configured pagespeed_admin access it with favourite browser on:

http://127.0.0.1/pagespeed_admin
http://127.0.0.1/pagespeed_global_admin

improve-website-apache-webserver-seo-without-source-code-modifications-google-pagespeed_admin_panel

Other way to test it is enabled is by creating php file with good old <? phpinfo(); ?> – PHP stats enabled / disabled features code:

pagespeed-in-phpinfo-x-mod-pagespeed-output-screenshot-apache-webserver

I've also tested also pagespeed unstable release, but experienced some segmentation faults in both error.log and access.log so finally decided to keep using stable release.

PageSpeed is a great way to boost your server sites performance, however it comes on certain costs as expect your server CPU Load to jump drastically, (in my case it jumped more than twice), there are Linux servers where enabling the module could totally stone the servers, so before implementing the module on a Production system environment, always first test thouroughfully with loaded pagespeed on UAT (testing) environment with AB or Siege (Apache Benchmarking Tools).

Improve Websites SEO: Optimize images to Increase website loading performance on Linux server – Image Compress tools

Friday, December 5th, 2014

Optimize-website-images-pictures-to-Increase-website-loading-performance-on-Linux-server_Image_Compress_tools-Improve-Websites_SEO
Part of our daily life as Web hosting system adminstrators is to constantly strive to better utilize our Linux / Windows hosting servers hardware.
Therefore it is our constant task to look for new better ways to optimize our Apache Sites and Webservers in order to return served application content light fast to keep the Boss and customers happy 🙂

There are things to tune up for better server performance and better CPU / memory utilization on both server Application server side as well as the website programming code backend, html and pictures / images

Thus it is critically important to not only keep the Webserver / PHP engine optimized but keep hosted sites  stored images and source code clean and efficient.

We as admins usually couldn't directly interfere with clearning the source code and often we have to host a crappy written sites with picture upload forms with un-optimized Image files that was  produced on old Photo Cameras, "Ancient" Mobile Mobiles, Win XP MS Paint, various versions Photoshop, Gimp etc.).

It is a well known fact that a big part from a Website User Experience is how fast the user loads a page, thus if HTML / CSS loaded images loads slow has a negative impact on user look & feel about website

Therefore by optimizing the size of hosted sites Images, you Save Network bandwidth and in some cases when Large Gallery sites HDD disk space.

On Linux, there are already a many command line tools to inspect and optimize (compress) the size of PNG, JPEG, GIF, BMP, PNM, Tiff Images, most famous ones are:

  • optipng – PNG optimizer that recompresses image files to a smaller size, without losing any information.
  • jpegoptim –   lossless JPEG optimization (based on optimizing the Huffman tables) and "lossy" optimization based on setting a maximum quality factor.
  • pngcrush – Recommended tool to use by Stoyan Stefanov (Yahoo Yslow Developer)
  • jpegtran – Recommended to use by Google 
  • gifsicle –  command-line tool for creating, editing, and getting information about GIF images and animations. 

It is hence useful to first run manually availale Linux image optimization tools (to get an idea what they do) and later automate them to run as scripts to optimize server stored images size and make pictures load faster on websites and thus improve End Users Experience and speed up Image content delivery to GoogleBot / YahooBot / Bing Crawlers which will make Search Engines to position server hosted sites better (more SEO Friendly).


  • How much percents of  space (Mega / Gigabytes ) Pictures compress can save you?

If you run it on 500MB image directory, you can probably save about 20 to 50MB of size, so don't expect extraordinary file reduce, however 5% to 10% reduce in size is not bad too. If you host 100 sites each with half gigas of data this would mean saving of 5GB of data and some 5GB from backups 🙂 At extraordinary cases you can expect 20% to 30% of storage reduce. For even better image compression you can try out GIMP's – Save for Web option.
 

  • Installing jpegtran, optpng, jpegoptim, pngcrush gifsicle on Debian / Ubuntu (deb based) Linux
     

apt-get install –yes libjpeg-progs optipng jpegoptim pngcrush gifsicle


  • Installing  jpegtran, optpng, jpegoptim, pngcrush, gifsicle on Fedora / CentOS / RHEL (RPM based distros)
     

yum -y install pngcrush libjpeg-turbo-utils opt-jpg opt-png opt-gif


gifsicle is not availale by default on Redhacks 🙂 but there is a RPM package for fedora from http://pkgs.repoforge.org/gifsicle/


Some examples of running image compression on GNU / Linux

  • optipng and jpegoptim optimize for all files in directory
     

cd /home/sites/

find . -iname '*.png' -print0 | xargs -0 optipng -o7 -preserve
find . -iname '*.jpg' -print0 |
 xargs -0 jpegoptim –max=90 –strip-all –preserve –totals


In jpegoptim command, the option –strip-all will strip any metadata including Exif data from images. For websites JPEG metadata is usually not needed, so usually its ok to strip them.

Above jpegoptim example will decrease slightly JPEG image quality to 90%. quality level of 90 is still high enough and website visitors are unlikely to spot any visible quality reduction / defects in the image.


  • pngcrush all files in a directory example
     

cd /home/sites/

for png in `find $IMG_DIR -iname "*.png"`; do
    echo "crushing $png …"
        pngcrush -rem alla -reduce -brute "$png" temp.png


    # preserve original on error
    if [ $? = 0 ]; then
        mv -f temp.png $png
        else
        rm temp.png
        fi
done

  • Run jpegtran on sites directory
     

find /home/sites -name "*.jpg" -type f -exec jpegtran -copy none -optimize -outfile {} {} ;


  • Set a script to compress / reduce size of Sites Images


Here is a basic optimize_images.sh which I used earlier before and was reducing the overall images size just 5 to 10%, then I found the much improved version of optimize images shell script  (useful to  clear up EXIF picture data / And Comments from JPG / PNG files). The script execution could take very long time on large image directories and thus could cause a high HDD disk I/O, however if ran once a week at night time its not such a big deal. 

To set it to run on your server as a cronjob:
 

cd /usr/sbin/
wget -q https://www.pc-freak.net/bshscr/optimize_images2.sh
crontab -u root -e 


Sample cron job to run once a month on 10th and 27th in 3 o'clock AM:
 

 00 3 10,27 * * /usr/sbin/optimize_images2.sh 2>&1 >/dev/null


Also if you need to further optimize million of tiny sized PNG files Yahoo Smush.it service could be helpful. For compression maniacs its worthy to check out also TinyPNG Service (however be awre that this service compresses files with significant quality loss) making picture quality visibly deteriorated.

Besides optimizing server stored Pictures, here are some other stuff that helps in increasing server utilization / lower webpages loading time.

Starting up with the installation (when site is to use Apache + PHP) for its backend, the first thing to on the freshlyinstalled Linux server is to implement the following list of Apache common Timeout variables that help better scale the webserver for the CMS-es hosted, enable Webserver caching with (mod_deflate), enable eAccelerator tune PHP common php variable etc.

Other thing  I sometimes use to speed-up performance of Apache child responce time up to 20-30  is to Include into Virtualhost / httpd.conf Apache configuration any htacces mod_rewrite rules.

On too heavily loaded sites On-line stores / Large Company website portals with more than 60 000 – 100 000 unique IP visitors a day it is useful tip to disable completely Apache logging in access.log / error.log.

Often when old architecture websites are moved from older Linux OS version to a newer one with newer versions of Apache / PHP often sites are working without major code rework, but use many functions which are already obsolete and thus many WARNING messages crap is logged into php_error.log / error.log. Thus to save disk space and decrease hard disk I/O operations it is good to Disable PHP Notices and Warnings messages
 

Trip to Troyan Bulgaria and Troyan Monastery – Third monastery by size in Bulgaria

Tuesday, August 12th, 2014

Troan Monastery Church - Trip to Troyan Monastery from 16th century Bulgaria - 3rd monastery by size in Bulgaria
This weekend I went with my wife for a Trip To Troyan monastery from Sofia – bus ticket currently costs 12 lv (6 euro) and the distance is rawly 160 km.

Troyan is a remarkable mountain city situated in the center (heart) of Bulgaria, famous with being one of the main places where opposition and preparation for the Turkish Bulgarian war occured. Troyan monastery situated near Oreshaka village was one of the places where the idea of liberation of Bulgaria originated. Troyan was often visited by the remarkable revolutionaries and greatest Bulgarian heroes of all times like Vasil Levski and Hristo Botev.

Troyan Monastery - ancient orthodox monastery in Bulgaria from 16th century

Here in Troyan there was existing one of the many secret commitees in period (1869 – 1876) – Central Secret Revolutionary Committee (BRCK – as widely known in Bulgaria), creation of this commitee become reality thanks to the Deacon Vasil Levsky who saw there is no awakened Bulgarians to fight for national freedom.
Efforts of CSRC later lead to Liberation of Bulgarian from 500 years Bulgarians being under the yoke of Turkish Slavery.

Eco path in the steps of the Apostle of Freedom Vasil Levsky Bulgaria

Our first impressions from Troyan were quite negative, the bus station looks post communistic and a little bit like a horror movie, near the bus station there was a lot of criminal looking gipsies.
Just 5 minutes walk from there is a small beautiful park with children playground, what impressed me most in the park is a bush cutted in the form of ancient amphora and next to the park is the city center surrounded by a river Beli Osym, all from the city center you can see the beatiful mountains all around. There are two historical museums filled with archaelogical remains from early ages, national dresses, weapons from the Liberation war, explanation with chunks of history and Bulgarian national heroes connected to Troyan, there are beautiful expoisitions on how locals used to live through the ages museums, famous paintings original of local artistsBulgaria is a unique country, because of it combines outstanding nature and rich history remains of which is well preserved and standing firm testifying about the Bulgaria glorious past.

Entrance door of The Troyan Monastery - Troianska sveta obitel uspenie Bogorodichno

After taking a walk in the city center, we went to a local city bus station to take a bus to Oreshaka village – at the end of which is located Troyan Monastery. His Beuaitutide Patriarch Maxim who passed away 98 years old was born in Oreshaka village and become monk in Troyan monastery and was a brother of Troan monastery. Currently his holy body is buried in the monastery which is titled "The Dormition of the most Holy Theotokos".  One can feel the place is graceful even from reaching near Oreshaka village, the near view is also stunningly beautiful. The bus from Troyan has a bus stop right in front of the monastery and is cheap (costed only 1.90 lv per person 0.80 euro cents). Bus to the monastery travels 4 times a day, so it was convenient to reach the monastery.
Oreshaka and Troyan region is well famous since ancient times with its skillful craftsman and all kind of crafts developing.

Tryoan monastery mamut and lion - monuments from ancient God creation

Near the monastery there is small chapel from which the monastery started, the history of Troyan monastery, all revives around the miraculous icon of Holy Theotokos (Troeruchica – The Tree Handed Virgin).

Miracle making icon in Troyan Monastery Holy Virgin (Theotokos) Troeruchica - Tree Handed

The monastery story revives around this icon, a monk from holy Mount Athos was travelling to Vlashko (nowadays situated in Carpathians – Romania near border with Moldova), on his way he heard about a hermit with his pupil living near Oreshaka region and spend some time in fasting and prayer with the hermit local people heard about the miracle making icon and come from near and distant regions to venerate the Holy Virgin and pray. When the time come and he decided to move further in his trip to Vlashko he put the icon on his settled horse, made the sign of the cross and walked after few steps the horse stumbled and break his leg, in this event the monk understand it is not God's will to travel and he returned back to the hermit. After spending some time with the hermit, he settled again his horse but on exactly the same place the horse fall again – in that the monk understood this happens because the icon wants to stay on that place. The hermit offered to the monk that he stay there and they service God together, but traveling monk rejected, he venerated the holy icon for a last time and continued his travel to Vlashko. A small brotherhood formed by God's providence near the hermit and they decided to make a small wooden Church for Troeruchica and started servicing God there. This is how Troyan monastery started in the XVI century. The Glory of the Holy icon of Virgin Mary (Troeruchica) quickly spread all around enslaved Bulgarian lands and people come from all regions to pray to the Virgin to cure them, grant them good fortune, good health, solve spritual and family problems … The notes over the last 400 years shows that everyone that come with faith and prayed in front of the Virgin icon found confort, healing, numb started talking, deaf started hearing, paralytics walked.

Sveta_Bogorodica-Troeruchica-Holy-Theotokos-miracle-making-icon-Troyan

Monastery chronicles say that thanks to the Theotokos Troeruruchica in year 1837 the icon saved the locals from the black death which was taking its toll in the region, nobody that came to the monastery to ask for protection from the plague didn't suffered plague, everyone that decided to stay in the monastery during the plague survived, even though people from all around were coming to confess and take the sacraments, no one in the monastery wasn't infected by plague.

We arrived in Troyan Monastery around 16:30 and by arriving were hospitally accepted by our marriage godfather Galin and his sister Denica and were threated with fresh watermelon and even 50 grams of Bulgarian traditional drink Rakia. They're currently painting walls in the monastery dining room in 18:00 we had the blessing to attend the evening Church service. The service was deep and unique experience that moves you to the Kingdom of heaven. After the Church service we went to nearby Mehana Kaizer (Old Bulgarian Dining Inn – Krychma whole made to look in Old Bulgarian Style – there is plenty of traditional food to choose and food was super delicious 🙂

kaizer-krychma-traditional-inn-pub-near-Troyan-monastery

On Sunday 10.08.2014 we were for the Holy Liturgy service and after that we walked through the monastic Church and saw near the Church the bell tower and next to it the old monks monastic graveyard. We visited also the museum of the monastery which contains various religious use objects dating back from year 1700+, old  craftmen instruments, old icons, potirs, priest clothes, old coins from all around the world and Bulgaria. There was a lot of information about historical facts regarding the monastery brotherhood, as well as some chronicles and documents explaining participation of the monastery in the fight for national freedom of Bulgaria. The musem is made of two rooms one of which was the same room where the Apostle of Freedom Vasil Levsky – one can see there the exact hiding place which Vasil Levsky was using to sleep secretly – the hiding place looks like a normal wardrobe.

Scyth saint Nicolas near Troan Monastery Oreshaka Bulgaria - revolutionary city led to freedom of Bulgaria

After seeing the museum, we went to see the monastic Scyth – "Saint Nicola", which was used earlier by the monks, whenever they wanted to have period of seclusion to raise their spiritual life. The Scyth has a large Church in honor of Saint Nicolas, most likely this Church was visited by people from the village, in times when Christians in Bulgaria was forbidden to attend Church services by Turkish Empire – and this is why it was build in such a secluded place. Near the scyth is the grave of a famous rebel for Bulgarian Freedom, and there is a cave with a spring.

Graveyard and skeleton of haidut - rebel Velko fighter for Bulgarian freedom Schyth near Troyan Monastery

Then we walked back the road to Troan Monastery and near the monastery, we went to see workshop of a carpenter lady who makes wooden ornaments for Churches in the region and the monastery.

The lady give us some herbs as a blessing. We had the chance to also take the blessing from the current Abbot Biship Sionij who was earlier rector of Sofia's Seminary Saint "John of Rila".

Monitoring CPU load and memory usage on Mac OS X command line (Terminal)

Thursday, July 3rd, 2014

macosx-server-screenshot-server-assistant-apple-tool
You might be stunned to find out Mac OS X has a server variant called Mac OS X server. For the usual admin having to administer a Mac OS X based server is something rarely to do, however it might happen some day, and besides that nowadays Mac OS X has about 10% percentage share of PC desktop and laptops used on the Internet (data collected from w3cschools log files). Thus cause it is among popular OSes, it very possible sooner or later as a sysadmin you will have to troubleshoot issues on at least Mac OS X notebook. Mac has plenty of instruments to debug OS issues as it is UNIX (BSD) based

Mac OS X has already a GUI tool called Activity Monitor (existing in Mac OS 10.3 onwards) in earlier verions, there was tool called Process Viewer and CPU Monitor.

To start Activity Monitor open Finder and launch it via:

Applications -> Utilities -> Activity Monitor

As a Linux guy, I like to use command line and there Mac OS X is equipped with a good arsenal of tools to check CPU load and Memory. Mac OS X comes with sar – (system activity reporter), top (process monitor) and vm_stat (virtual memory statistics) command – these ones are equivalent of Linux's sar (from sysstats package), top and Linux vmstat (report virtual memory statistics).

1. Check out Mac OS X HDD Input / Output statistics
 

$ sar -d -f ~/output.sar

20:43:18   device    r+w/s    blks/s
New Disk: [disk0] IODeviceTree:/PCI0@0/RP06@1C,5/SSD0@0/PRT0@0/PMP@0/@0:0
New Disk: [disk1] IOService:/IOResources/IOHDIXController/IOHDIXHDDriveOutKernel@1/IODiskImageBlockStorageDeviceOutKernel/IOBlockStorageDriver/Apple UDIF, только для чтения, сжатый (zlib)
New Disk: [disk2] IOService:/IOResources/IOHDIXController/IOHDIXHDDriveOutKernel@3/IODiskImageBlockStorageDeviceOutKernel/IOBlockStorageDriver/Apple UDIF, только для чтения, сжатый (bzip2)
New Disk: [disk3] IOService:/IOResources/IOHDIXController/IOHDIXHDDriveOutKernel@4/IODiskImageBlockStorageDeviceOutKernel/IOBlockStorageDriver/Apple UDIF, только для чтения, сжатый (bzip2)
New Disk: [disk4] IOService:/IOResources/IOHDIXController/IOHDIXHDDriveOutKernel@6/IODiskImageBlockStorageDeviceOutKernel/IOBlockStorageDriver/Apple UDIF, только для чтения, сжатый (zlib)
20:43:28   disk0        7        312
20:43:28   disk1        0          0
20:43:28   disk2        0          0
20:43:28   disk3        0          0
20:43:28   disk4        0          0
20:43:38   disk0       12        251
20:43:38   disk1        0          

2. Checking Mac OS X CPU Load from terminal

To check Load from Mac OS command line use:
 

$ sar -o ~/output.sar 10 10

That gathers 10 sets of metrics at 10 second intervals. You can then extract useful information from the output file (even while it's still running), this will get you cpu load on Mac OS system spitting stats every 10 seconds.


21:22:33  %usr  %nice   %sys   %idle
21:22:43    7      0      2     90
21:22:53    8      0      3     89
21:23:03   11      0      4     85
21:23:13    9      0      3     88
21:23:23    9      0      3     88
21:23:33    7      0      3     90
21:23:43   10      0      3     87
21:23:53   10      0      4     85
21:24:03   10      0      5     85
21:24:13    8      0      3     88
Average:      8      0      3     87   


3. Checking Free memory on  Mac OS X

Use this obscure one liner to free -m Linux memory command like output from Mac terminal

$ vm_stat | perl -ne '/page size of (d+)/ and $size=$1; /Pagess+([^:]+)[^d]+(d+)/ and printf("%-16s % 16.2f Min", "$1:", $2 * $size / 1048576);'
 

free: 43.38 Mi
active: 1762.00 Mi
inactive: 1676.91 Mi
speculative: 3.29 Mi
wired down: 609.38 Mi
copy-on-write: 29431.01 Mi
zero filled: 4687689.80 Mi
reactivated: 30288.86 Mi


To show inactive memory in Gigabytes every 10 seconds

$ vm_stat 10 | awk 'NR>2 {gsub("K","000");print ($1+$4)/256000}'

1.70532
1.70455
1.70389
1.6904


It is also possible to get memory statistics on Mac PC running top in non-interactive mode and grepping it from output:

$ top -l 1 | head -n 10 | grep PhysMem | sed 's/, /n /g'


PhysMem: 599M wired, 1735M active, 1712M inactive, 4046M used, 47M free.


4. Quick command to get Kernel / how many CPUs, available memory and load avarage on Mac OS X

From y. 2003 onwards of Mac OS have hostinfo(host information) command, providing admin with quick way to get System Info on Mac OS

$ hostinfo


Mach kernel version:
Darwin Kernel Version 12.5.0: Sun Sep 29 13:33:47 PDT 2013; root:xnu-2050.48.12~1/RELEASE_X86_64
Kernel configured for up to 4 processors.
2 processors are physically available.
4 processors are logically available.
Processor type: i486 (Intel 80486)
Processors active: 0 1 2 3
Primary memory available: 4.00 gigabytes
Default processor set: 98 tasks, 621 threads, 4 processors
Load average: 1.63, Mach factor: 2.54


If you need more verbose information on system hardware and resources, check out system_profiler. As the manual describes it, system_profiler(reports system hardware and software configuration.) cmd:

$ system_profiler Here is a link to output file generated by system_prifler