Posts Tagged ‘noah’
Tuesday, July 9th, 2019 
I've just took a time to upgrade my Debian 9 Stretch Linux to Debian Buster on my old school Laptop (that turned 11 years old) Lenovo Thinkpad R61 . The upgrade went more or less without severe issues except few things.
The overall procedure followed is described n a few websites out there already and comes up to;
0. Set the proper repository location in /etc/apt/sources.list
Before update the sources.list used are:
deb [arch=amd64,i386] http://ftp.bg.debian.org/debian/ buster main contrib non-free
deb-src [arch=amd64,i386] http://ftp.bg.debian.org/debian/ buster main contrib non-free
deb [arch=amd64,i386] http://security.debian.org/ buster/updates main contrib non-free
deb-src [arch=amd64,i386] http://security.debian.org/ buster/updates main contrib non-free
deb [arch=amd64,i386] http://ftp.bg.debian.org/debian/ buster-updates main contrib non-free
deb-src [arch=amd64,i386] http://ftp.bg.debian.org/debian/ buster-updates main contrib non-free
deb http://ftp.debian.org/debian buster-backports main
For people that had stretch defined in /etc/apt/sources.list you should change them to buster or stable, easiest and quickest way to omit editting with vim / nano etc. is run as root or via sudo:
sed -i 's/stretch/buster/g' /etc/apt/sources.list
sed -i 's/stretch/buster/g' /etc/apt/sources.list.d/*.list
The minimum of config in sources.list after the modification should be
deb http://deb.debian.org/debian buster main
deb http://deb.debian.org/debian buster-updates main
deb http://security.debian.org/debian-security buster/updates main
Or if you want to always be with latest stable packages (which is my practice for notebooks):
deb http://deb.debian.org/debian stable main
deb http://deb.debian.org/debian stable-updates main
deb http://security.debian.org/debian-security stable/updates main
1. Getting list of hold packages if such exist and unholding them, e.g.
apt-mark showhold
Same could also be done via dpkg
dpkg –get-selections | grep hold
To unhold a package if such is found:
echo "package_name install"|sudo dpkg –set-selections
For those who don't know what hold package is this is usually package you want to keep at certain version all the time even though after running apt-get upgrade to get the latest package versions.
2. Use df -h and assure you have at least 5 – 10 GB free space on root directory / before proceed
df -h /
3. Update packages list to set new set repos as default
apt update
4. apt upgrade
apt upgrade
Here some 10 – 15 times you have to confirm what you want to do with configuration that has changed if you're unsure about the config (and it is not critical service) you're aware as such as Apache / MySQL / SMTP etc. it is best to install the latest maintainer version.
Hopefully here you will not get fatal errors that will interrupt it.
P.S. It is best to run apt-update either in VTTY (Virtual console session) with screen or tmux or via a physical tty (if this is not a remote server) as during the updates your GUI access to the gnome-terminal or konsole / xterm whatever console used might get cut. Thus it is best to do it with command:
screen apt upgrade
5. Run dist-upgrade to finalize the upgrade from Stertch to Buster
Once all is completed of the new installed packages, you will need to finally do, once again it is best to run via screen, if you don't have installed screen install it:
if [ $(which screen) ]; then echo 'Installed'; else apt-get install –yes screen ; fi
screen apt dist-upgrade
Here once again you should set whether old configuration to some e services has to stay or the new Debian maintainer package shipped one will overwrite the old and locally modified (due to some reason), here do wisely whatever you will otherwise some configured services might not boot as expected on next boot.
6. What if you get packages failed on update
If you get a certain package failed to configure after installed due to some reason, if it is a systemd service use:
journalctl -xe |head -n 50
or fully observer output of journalctl -xe and decide on yourself.
In most cases
dpkg-reconfigure failed-package-name
should do the trick or at least give you more hints on how to solve it.
Also if a package seems to be in inconsistent or broken state after upgrade and simple dpkg-reconfigure doesn't help, a good command
that can help you is
dpkg-reconfigure -f package_name
or you can try to workaround a failed package setup with:
dpkg –configure -a
If dpkg-reconfigure doesn't help either as I experienced in prior of Debian from Debian 6 -> 7 an Debian 7 ->8 updates on some Computers, then a very useful thing to try is:
apt-get update –fix-missing
apt-get install -f
At certain cases the only work around to be able to complete the package upgrade is to to remove the package with apt remove but due to config errors even that is not possible to work around this as final resort run:
dpkg –remove –force-remove-reinstreq
7. Clean up ununeeded packages
Some packages are left over due to package dependencies from Stretch and not needed in buster anymore to remove them.
apt autoremove
8. Reboot system once all upgrade is over
/sbin/reboot
9. Verify your just upgraded Debian is in a good state
root@noah:~# uname -a;
Linux noah 4.19.0-5-rt-amd64 #1 SMP PREEMPT RT Debian 4.19.37-5 (2019-06-19) x86_64 GNU/Linux
root@noah:~# cat /etc/issue.net
Debian GNU/Linux 10
root@noah:~# lsb_release -a
No LSB modules are available.
Distributor ID: Debian
Description: Debian GNU/Linux 10 (buster)
Release: 10
Codename: buster
root@noah:~# hostnamectl
Static hostname: noah
Icon name: computer-laptop
Chassis: laptop
Machine ID: 4759d9c2f20265938692146351a07929
Boot ID: 256eb64ffa5e413b8f959f7ef43d919f
Operating System: Debian GNU/Linux 10 (buster)
Kernel: Linux 4.19.0-5-rt-amd64
Architecture: x86-64
10. Remove annoying picture short animation with debian logo looping
By default Debian 10 boots up with annoying screen hiding all the status of loaded services state .e.g. you cannot see the services that shows in [ FAILED ] state and which do show as [ OK ] to revert back the old behavior I'm used to for historical reasons and as it shows a lot of good Boot time debugging info, in previous Debian distributions this was possible by setting the right configuration options in /etc/default/grub
which so far in my config was like so
GRUB_CMDLINE_LINUX_DEFAULT="quiet splash scsi_mod.use_blk_mq=y dm_mod.use_blk_mq=y zswap.enabled=1 text"
Note that zswap.enabled=1 passed option is because my notebook is pretty old machine from 2008 with 4GB of memory and zswap does accelerate performance when working with swap – especially helpful on Older PCs for more you can read more about zswap on ArchLinux wiki
After modifying this configuration to load the new config into grub the cmd is:
/usr/sbin/update-grub
As this was not working and tried number of reboots finally I found that annoying animated gif like picture shown up is caused by plymouth below is excerpts from Plymouth's manual page:
"The plymouth sends commands to a running plymouthd. This is used during the boot process to control the display of the graphical boot splash."
Plymouth has a set of themes one can set:
# plymouth-set-default-theme -l
futureprototype
details
futureprototype
joy
lines
moonlight
softwaves
spacefun
text
tribar
I tried to change that theme to make the boot process as text boot as I'm used to historically with cmd:
update-alternatives –config text.plymouth
As after reboot I hoped the PC will start booting in text but this does not happened so the final fix to turn back to textmode service boot was to completely remove plymouth
apt-get remove –yes plymouth
Tags: boot, boots, configured, dpkg, Hopefully, Linux Debian Buster, list, noah, org, Reboot, root directory, screen, services, setting, setup, shows, stable packages, things, turned, updates, Upgrade Debian Linux
Posted in Linux, Linux and FreeBSD Desktop, Linux on Laptops, Linux Package Management, Various | No Comments »
Tuesday, August 28th, 2018 
As I'm currently looking for ways to maximize my incomes without taking participation in 5 days week 8 hours schedule in a Big Corporation office job (which prooved for me to be a terrible slavery) I decided to give Free Lancing a try once again.
Historically I have registrations in some of the most popular Free Lancing services Web platforms such as freelancer.com and upwork.com.
But none of them really was easy enough to handle as applying and winning a project there is usually a lot of headbanging into the walls and the platforms are full of clients that are looking for free lancers for short-term projects the work selection there required too much work, often projects offered there are seriously under-paid and its really hard to negotiate with many of the clients as they're unprofessional in the fields they're working (don't get me wrong I'm not saying many people are not very successful with this platforms, and that the platforms are not providing work for me I only say it is not really something to my liking …
In the mean time if you happen to read this article and looking for a High Quality Empoyee Cheap System Administrator or automation developmer, an IT counseling FreeLancer or a Ultra cheap WebHosting service in the European Union, I'll be very happy if you become my client.
Anyways … further on I decided to further experiment a little bit with other Free Lancing platforms (suggested by a friend Mitko Ivanov who helped me a lot with things and is continuing to help me over the last year ).
So following his kind suggestion I already tried one of the popular FreeLancing freeeup.com which is looking only for a best specialists into the fields of Marketing, Development, System Administration etc. but even though I tried hard with them the guys decided I am not matching there criteria for a the best 1% of all the people in the field of IT so my application for the platform was rejected twice over the last 1 month and a half.
Another similar new platform for free lancing that looks promising that I've learned about is toptal.com (there site Slogan is Hire FreeLance Talent from the Top 3%) so I went there and registered.
I had hit a road block there too as it seems, there website registration form was not tested enough with non-Windows operating systems with Mozilla Firefox and as it happens that I am using Debian GNU / Linux for my Desktop their drop-down menus was not working, just like some of the form on their website regular expression checks failed.
I've contacted the guys to inform them about their problems (and they kindly advised) I just give a try a registration with different browser (i.e. Google Chrome) which I immediately did and registratoin there was finally a success.
I have to say the new user application form registration of toptal also annoyed me with the stupid requirement to provide a picture in 1000px x 1000px but as this freelancing platform is still new and has way to go until it is established name in the field of freelancing such as upwork.com and I warmly excuse them.
Once registerered for them the user has to schedule an entry interview just like it goes with a standard company interview with a kind of Human Resources (HR) specialist and I guess some technical guys in order to evaluate on your value (Ha-Ha, someone else to determine your value is already crazy but all crazy employees do it still, of course I don't care as I well know that my value is much more than what they put on me).
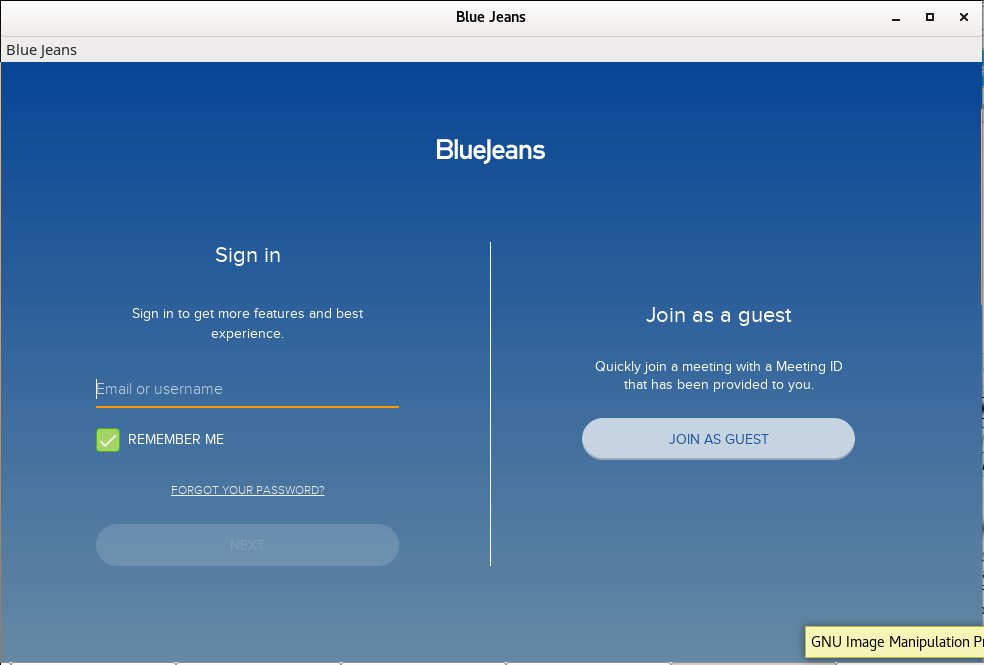
The online interview once scheduled has to be done in a Web Meeting (Online Rooms) Platform called BlueJeans similar to Cisco WebEx (that is today heavily used in Corporate world in companies such as Hewlett Packard where we used it heavily, IBM, Concentrix etc.) and others Zoom, JoinMe GotoMeeting, HighFive.
As you could guess BlueJeans (which is by the way a Cloud based meeting software – yackes !) is planned to work mainly on Windows and Mac OS Operating Systems and even though there is a BlueJeans Linux version the provided binary is only for RedHat based linuxes in the RPM binary package format, so in order for me to participate in the scheduled meeting, I either had to port the package and install it on my Debian (what triggeted me to write this article or) use a Virtual Machine such as VirtualBox or VMWare running some kind of Windows OS such as Windows 8 / 10 etc.
Even though I have a Windows 10 OS testbed in a Virtualbox container, I preferred to not use it for BlueJeans and do it the hard way and install BlueJeans on my Debian 9.5 Stretch Linux.
That appeared to be a relatively easy process, so below is how I did it:
1. Download alien convertion (tool) that allows you to convert RPM -> deb, Slackware -> Deb and Linux Standard Base (LDB) packages to deb package format
noah:~# apt-get install –yes alien
…
2. Download latest BlueJeans version from BlueJeans website
As of time of writting this article the download link for bluejeans online conferencing software is here
noah:~# wget https://swdl.bluejeans.com/desktop/linux/1.36/1.36.9/bluejeans-1.36.9.x86_64.rpm
…
3. Convert bluejeans rpm package with alien
noah:~# alien –to-deb bluejeans-*.rpm
Warning: Skipping conversion of scripts in package bluejeans: postinst postrm preinst prerm
Warning: Use the –scripts parameter to include the scripts.
bluejeans_1.36.9-2_amd64.deb generated
root@jericho:/home/hipo/Свалени# dpkg -i bluejeans_*.deb
Selecting previously unselected package bluejeans.
(Reading database … 516203 files and directories currently installed.)
Preparing to unpack bluejeans_1.36.9-2_amd64.deb …
Unpacking bluejeans (1.36.9-2) …
Setting up bluejeans (1.36.9-2) …
4. Install the deb package as usual with dpkg tool
noah: ~# dpkg -i bluejeans_*.deb
By default BlueJeans were installed under directory /opt/bluejeans
noah:~# ls -al /opt/bluejeans/bluejeans-bin
-rwxr-xr-x 1 root root 72423392 Jun 14 02:31 /opt/bluejeans/bluejeans-bin*
5. Fix missing library links if such are present in order to make BlueJeans workable
Historically I have dealt with many Linux programs that are provided only in RPM package format and I knew that often once an RPM is converted to DEB with alien due to the package dependency differences on Redhats (CentOS / Fedora etc.) there are problems with missing libraries.
This time this was the case as well, so as usual right after install I did a check up with ldd (print shared object dependencies Linux command) to find out about missing libraries and one library appeared missing.
noah:~# ldd /opt/bluejeans/bluejeans-bin
linux-vdso.so.1 (0x00007fffa2182000)
librt.so.1 => /lib/x86_64-linux-gnu/librt.so.1 (0x00007fae95f5e000)
libdl.so.2 => /lib/x86_64-linux-gnu/libdl.so.2 (0x00007fae95d5a000)
libgtk-x11-2.0.so.0 => /usr/lib/x86_64-linux-gnu/libgtk-x11-2.0.so.0 (0x00007fae95718000)
libgdk-x11-2.0.so.0 => /usr/lib/x86_64-linux-gnu/libgdk-x11-2.0.so.0 (0x00007fae95463000)
libatk-1.0.so.0 => /usr/lib/x86_64-linux-gnu/libatk-1.0.so.0 (0x00007fae9523d000)
libpangocairo-1.0.so.0 => /usr/lib/x86_64-linux-gnu/libpangocairo-1.0.so.0 (0x00007fae95030000)
libgdk_pixbuf-2.0.so.0 => /usr/lib/x86_64-linux-gnu/libgdk_pixbuf-2.0.so.0 (0x00007fae94e0c000)
libcairo.so.2 => /usr/lib/x86_64-linux-gnu/libcairo.so.2 (0x00007fae94aef000)
libpango-1.0.so.0 => /usr/lib/x86_64-linux-gnu/libpango-1.0.so.0 (0x00007fae948aa000)
libfreetype.so.6 => /usr/lib/x86_64-linux-gnu/libfreetype.so.6 (0x00007fae945f5000)
libfontconfig.so.1 => /usr/lib/x86_64-linux-gnu/libfontconfig.so.1 (0x00007fae943b2000)
libgobject-2.0.so.0 => /usr/lib/x86_64-linux-gnu/libgobject-2.0.so.0 (0x00007fae9415e000)
libglib-2.0.so.0 => /usr/lib/x86_64-linux-gnu/libglib-2.0.so.0 (0x00007fae93e48000)
libX11.so.6 => /usr/lib/x86_64-linux-gnu/libX11.so.6 (0x00007fae93b0a000)
libXi.so.6 => /usr/lib/x86_64-linux-gnu/libXi.so.6 (0x00007fae938fa000)
libnss3.so => /usr/lib/x86_64-linux-gnu/libnss3.so (0x00007fae935b1000)
libnssutil3.so => /usr/lib/x86_64-linux-gnu/libnssutil3.so (0x00007fae93381000)
libsmime3.so => /usr/lib/x86_64-linux-gnu/libsmime3.so (0x00007fae93154000)
libplc4.so => /usr/lib/x86_64-linux-gnu/libplc4.so (0x00007fae92f4f000)
libnspr4.so => /usr/lib/x86_64-linux-gnu/libnspr4.so (0x00007fae92d10000)
libgconf-2.so.4 => /usr/lib/x86_64-linux-gnu/libgconf-2.so.4 (0x00007fae92adf000)
libexpat.so.1 => /lib/x86_64-linux-gnu/libexpat.so.1 (0x00007fae928ad000)
libXext.so.6 => /usr/lib/x86_64-linux-gnu/libXext.so.6 (0x00007fae9269b000)
libXfixes.so.3 => /usr/lib/x86_64-linux-gnu/libXfixes.so.3 (0x00007fae92495000)
libXrender.so.1 => /usr/lib/x86_64-linux-gnu/libXrender.so.1 (0x00007fae9228b000)
libXcomposite.so.1 => /usr/lib/x86_64-linux-gnu/libXcomposite.so.1 (0x00007fae92088000)
libasound.so.2 => /usr/lib/x86_64-linux-gnu/libasound.so.2 (0x00007fae91d8a000)
libXdamage.so.1 => /usr/lib/x86_64-linux-gnu/libXdamage.so.1 (0x00007fae91b87000)
libXtst.so.6 => /usr/lib/x86_64-linux-gnu/libXtst.so.6 (0x00007fae91981000)
libpthread.so.0 => /lib/x86_64-linux-gnu/libpthread.so.0 (0x00007fae91763000)
libcap.so.2 => /lib/x86_64-linux-gnu/libcap.so.2 (0x00007fae9155d000)
libudev.so.0 => not found
libdbus-1.so.3 => /lib/x86_64-linux-gnu/libdbus-1.so.3 (0x00007fae9130c000)
libnotify.so.4 => /usr/lib/x86_64-linux-gnu/libnotify.so.4 (0x00007fae91104000)
libstdc++.so.6 => /usr/lib/x86_64-linux-gnu/libstdc++.so.6 (0x00007fae90d85000)
libm.so.6 => /lib/x86_64-linux-gnu/libm.so.6 (0x00007fae909f2000)
libgcc_s.so.1 => /lib/x86_64-linux-gnu/libgcc_s.so.1 (0x00007fae907db000)
libc.so.6 => /lib/x86_64-linux-gnu/libc.so.6 (0x00007fae90421000)
/lib64/ld-linux-x86-64.so.2 (0x00007fae96166000)
libgmodule-2.0.so.0 => /usr/lib/x86_64-linux-gnu/libgmodule-2.0.so.0 (0x00007fae9021d000)
libgio-2.0.so.0 => /usr/lib/x86_64-linux-gnu/libgio-2.0.so.0 (0x00007fae8fe7f000)
libpangoft2-1.0.so.0 => /usr/lib/x86_64-linux-gnu/libpangoft2-1.0.so.0 (0x00007fae8fc6a000)
libfribidi.so.0 => /usr/lib/x86_64-linux-gnu/libfribidi.so.0 (0x00007fae8fa53000)
libXinerama.so.1 => /usr/lib/x86_64-linux-gnu/libXinerama.so.1 (0x00007fae8f850000)
libXrandr.so.2 => /usr/lib/x86_64-linux-gnu/libXrandr.so.2 (0x00007fae8f645000)
libXcursor.so.1 => /usr/lib/x86_64-linux-gnu/libXcursor.so.1 (0x00007fae8f43b000)
libpng16.so.16 => /usr/lib/x86_64-linux-gnu/libpng16.so.16 (0x00007fae8f208000)
libz.so.1 => /lib/x86_64-linux-gnu/libz.so.1 (0x00007fae8efea000)
libpixman-1.so.0 => /usr/lib/x86_64-linux-gnu/libpixman-1.so.0 (0x00007fae8ed44000)
libxcb-shm.so.0 => /usr/lib/x86_64-linux-gnu/libxcb-shm.so.0 (0x00007fae8eb41000)
libxcb.so.1 => /usr/lib/x86_64-linux-gnu/libxcb.so.1 (0x00007fae8e919000)
libxcb-render.so.0 => /usr/lib/x86_64-linux-gnu/libxcb-render.so.0 (0x00007fae8e70b000)
libthai.so.0 => /usr/lib/x86_64-linux-gnu/libthai.so.0 (0x00007fae8e501000)
libuuid.so.1 => /lib/x86_64-linux-gnu/libuuid.so.1 (0x00007fae8e2fa000)
libffi.so.6 => /usr/lib/x86_64-linux-gnu/libffi.so.6 (0x00007fae8e0f1000)
libpcre.so.3 => /lib/x86_64-linux-gnu/libpcre.so.3 (0x00007fae8de7f000)
libplds4.so => /usr/lib/x86_64-linux-gnu/libplds4.so (0x00007fae8dc7b000)
libgthread-2.0.so.0 => /usr/lib/x86_64-linux-gnu/libgthread-2.0.so.0 (0x00007fae8da79000)
libdbus-glib-1.so.2 => /usr/lib/x86_64-linux-gnu/libdbus-glib-1.so.2 (0x00007fae8d851000)
libsystemd.so.0 => /lib/x86_64-linux-gnu/libsystemd.so.0 (0x00007fae8d5c9000)
libselinux.so.1 => /lib/x86_64-linux-gnu/libselinux.so.1 (0x00007fae8d3a1000)
libresolv.so.2 => /lib/x86_64-linux-gnu/libresolv.so.2 (0x00007fae8d18a000)
libmount.so.1 => /lib/x86_64-linux-gnu/libmount.so.1 (0x00007fae8cf31000)
libharfbuzz.so.0 => /usr/lib/x86_64-linux-gnu/libharfbuzz.so.0 (0x00007fae8cc81000)
libXau.so.6 => /usr/lib/x86_64-linux-gnu/libXau.so.6 (0x00007fae8ca7d000)
libXdmcp.so.6 => /usr/lib/x86_64-linux-gnu/libXdmcp.so.6 (0x00007fae8c877000)
libdatrie.so.1 => /usr/lib/x86_64-linux-gnu/libdatrie.so.1 (0x00007fae8c66f000)
liblzma.so.5 => /lib/x86_64-linux-gnu/liblzma.so.5 (0x00007fae8c449000)
liblz4.so.1 => /usr/lib/x86_64-linux-gnu/liblz4.so.1 (0x00007fae8c22c000)
libgcrypt.so.20 => /lib/x86_64-linux-gnu/libgcrypt.so.20 (0x00007fae8bf10000)
libblkid.so.1 => /lib/x86_64-linux-gnu/libblkid.so.1 (0x00007fae8bcc1000)
libgraphite2.so.3 => /usr/lib/x86_64-linux-gnu/libgraphite2.so.3 (0x00007fae8ba94000)
libbsd.so.0 => /lib/x86_64-linux-gnu/libbsd.so.0 (0x00007fae8b87d000)
libgpg-error.so.0 => /lib/x86_64-linux-gnu/libgpg-error.so.0 (0x00007fae8b65d000)
As I am on my notebook with Debian 9 and on Debian / Ubuntus and other Linuxes udevd daemon and connected libraries are long time existing, it was obvious the problems to dependencies are because of missing library links (or library version inconsistencies).
To find out what kind of libudev.so* are present I used slocate package (locate) command.
noah:~# locate libudev.so
/lib/i386-linux-gnu/libudev.so.1
/lib/i386-linux-gnu/libudev.so.1.6.10
/lib/x86_64-linux-gnu/libudev.so
/lib/x86_64-linux-gnu/libudev.so.1
/lib/x86_64-linux-gnu/libudev.so.1.6.10
Obviously the missing library libudev.so.0 was present under a different name so I give a try to just create a new symbolic link from libudev.so.1 to libudev.so.0 hoping that the libudev library version Blue Jeans was compiled against did not have a missing binary objects from the ones installed on my OS.
noah:~# ln -sf /lib/x86_64-linux-gnu/libudev.so.1 /lib/x86_64-linux-gnu/libudev.so.0
noah:~# ldd /opt/bluejeans/bluejeans-bin |grep -i 'not found'
Above command did not return any missing libraries, so I went further and executed it.
6. Go start BlueJeans and register a user or use the anonymous login to be ready for the scheduled online meting
… And, Guess, what it works! 🙂
noah:~# /opt/bluejeans/bluejeans-bin
To make it easy to remember to later start the binary under a familiar name, I've also created a link into
noah:~# ln -sf /opt/bluejeans/bluejeans-bin /usr/bin/bluejeans
noah:~# sudo su – hipo
hipo@noah:~$ /usr/bin/bluejeans
Tags: command, convertion, How to, installed, libc, linuxes, noah, platforms, rpm, slavery, Web Meeting Online Rooms Platform
Posted in Company onboarding basics, File Convert Tools, Linux, Linux and FreeBSD Desktop, Various | No Comments »
Thursday, September 28th, 2017 
Being a long time GNU / Linux user, I've been quite dissatisfied for the fact that in latest Debian and Ubuntu Linux, the default Key combination to Kill X (CTRL + ALT + BACKSPACE) is no longer working.
Though nowdays Xorg (XServer) is pretty stable it still happens from time to time for some application to overload the PC badly and make Gnome or KDE environment little or no responsive at all and here comes the goody CTRL + ALT + BACKSPACE it is pretty much like (CTRL + ALT + DEL) did restarted the computer in DOS and earlier Windows OS-es once the environment became unusable with the only difference that just Xorg server is restarted and the other using programs that are in background work just like they used to.
CTRL + ALT + Backspace is a great thing to use especially if you're running some homebrew server and you use it both as a Server with some few little websites and as a Desktop environment to browse the net and do basic stuff.
So here comes the question how to make the CTRL + ALT + BACKSPACE keyboard combination be killing Xserver like in the good old days?
The easiest way to do it interactively in ncurses interface is by running:
root@noah:~# dpkg-reconfigure keyboard-configuration
If somehow on the machine you don't have dpkg-reconfigure or you prefer to do set CTRL + ALT + BACKSPACE Kill Switch manually edit /etc/default/keyboard
inside change value of
XKBOPTIONS="terminate:ctrl_alt_bksp"
like shown below file:
root@noah:/home/hipo# cat /etc/default/keyboard
# KEYBOARD CONFIGURATION FILE
# Consult the keyboard(5) manual page.
XKBMODEL="pc105"
XKBLAYOUT="us"
XKBVARIANT=""
XKBOPTIONS="terminate:ctrl_alt_bksp"
BACKSPACE="guess"
The configuration should be working across Debian 7, 8, 9 as well as Ubuntu 12 ..14 .. 16 and hopefully in future releases too, just as many other Linux distributions like Mint etc. the Xserver Kill Switch setting should be located in same file.
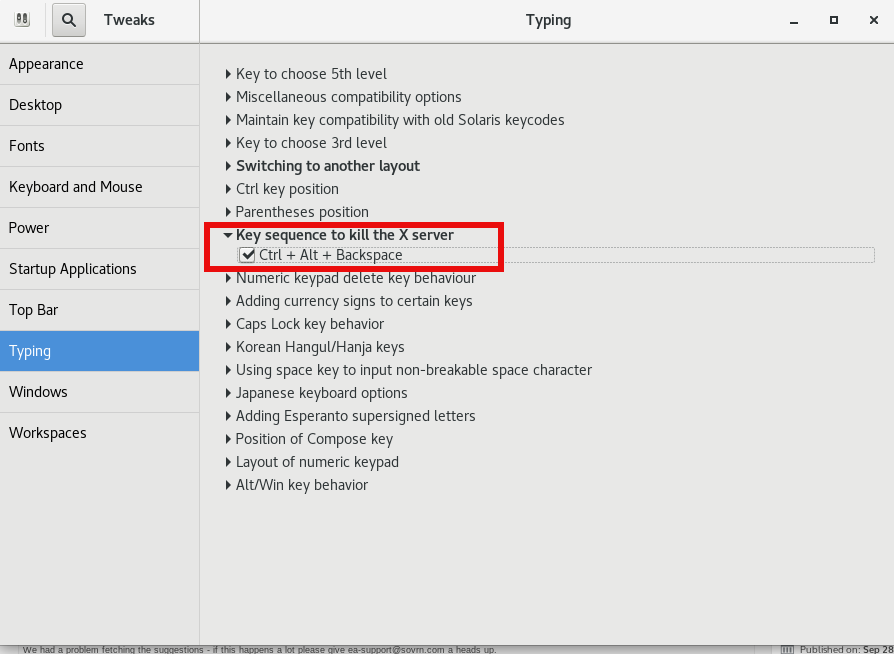
Finally if even after that change the Control Alt BackSpace Kill Switch sequence refuses to work in GNOME Desktop environment, it might be due to a local setting typical for GNOME and this should be fixed via the good known gnome-tweak-tool
So GNOME users should run it from command line and check the setting there, e.g.:
$ gnome-tweak-tool
You should check:
Typing -> Kill Sequence to Kill the X Server
it should look like shown in below screenshot:
Tags: change back X server to Control Alt Backspace, Control Alt Backspace, Debian Ubuntu Linux, default, enable X Kill switch to CTRL ALT BACKSPACE, How to, keyboard, ncurses interface, noah, use, working, XKBOPTIONS
Posted in Gnome, Linux, Linux and FreeBSD Desktop | No Comments »
Tuesday, May 8th, 2012 
I believe, the quickest way to take notes on Linux and BSD and later view the notes is to use the command line.
A very easy simple way to keep record of various short notes is just to use a simple text editor like (vim) and store each note in a separate file in lets say ~/notes/ directory.
Actually, I'm using this way to take notes and store sensitive info for various important information I need for further reference, since 5 years or so..
Opening a new text editor for each note and then doing cd ~/notes/; ls |grep -i 'string' is a bit time consuming.
Fortunately there is a quick two shell functions hack that shortens time for note taking. The following two bash functions has to be added in ~/.bashrc:
n() {

vim ~/notes/"$*".txt

}

nls() {

ls -c ~/notes/ | grep "$1"

}
Copy / Paste this two functions in the beginning or the end of ~/.bashrc in order to use them.
Also if ~/notes directory is not existing, yet create it:
hipo@noah:~$ mkdir notes
To make the two new input functions active across opened bash shells on console or terminal either re-login or reread the .bashrc by "sourcing it", e.g.
hipo@noah:~$ source ~/.bashrc
Afterwards, note taking becomes a piece of cake to store a new note with login credentials (user/password) for a new registration to a random named website, type something like:
hipo@noah:~$ n my_website_name-user-pass
This will open for editting ~/.notes/my_website_name-user-pass.txt, type the new desired note content and do save and exit from vim (press esc and type :x!.
Then to get a quick list of all previously stored notes use:
hipo@noah:~$ nls website

my_website_name-user-pass.txt
If you already have a directory containing subdirectories with various taken notes (like me), you will need to use an improved version nls written by Jason Ryan, the nls improved is like this:
nls () { tree -CR --noreport ~/notes | awk '{

if ((NR >) gsub(/.txt/,"")); if

(NF==1) print $1; else if (NF==2)

print $2; else if (NF==3)

printf " %s\n", $3}';

}
This two functions, were not my creation but was suggested in Linux Magazine issue 135 article entitled Command-line task managers and note-taking tools written by Dmitri Popov.
Hope this two functions, will be helpful to console geeks out there.
Tags: Auto, BSD, cake, consuming, copy paste, cr, Draft, file, freebsd, gnu linux, hack, hipo, important information, info, information, input functions, jason ryan, Linux, login, login credentials, mkdir, need, nls, noah, opening, password, piece, piece of cake, sensitive info, Shell, shell functions, shells, something, store, subdirectories, terminal, text, time, time consuming, Tip Quick Note, txtIf, type, use, vim, websitemy
Posted in Curious Facts, Linux, System Administration, vim editor | 2 Comments »
Wednesday, October 19th, 2011 
I've been using Debian GNU / Linux on my Thinkpad laptop for almost 3 years and half. Initially the Debian version which I had installed was a stable Debian Lenny. As I was mostly dissatisfied of the old versions of the programs, I migrated to testing / unstable
Testing / unstables shipped program versions were a bit better but still back in the day I wanted to get advantage of the latest program versions so for a while I switched to unstable .
Later I regretted for this bad idea, after the migration to Unstable, it was too buggy to run on a notebook one uses for everyday work.
Then to revert back to a bit stable I downgraded to testing unstable again.
When Debian launched Debian Squeeze I set in my /etc/apt/sources.list file software repositories to be the one for the stable Debian Squeeze.
As you can see, I've done quite a lot of "experiments" and "excersises". Many packages were installed, then removed, some became obsolete with time others I just temporary installed out of curiosity. Anyways as a result I ended up with many packages uninstalled / removed , which still kept some of their directory structres and configurations on the machine.
Today, I decided to check how many of these obsolete packages are still present in dpkg database and I was shocked to find out 412 debs were still in my package database! To check the number I used cmd:
root@noah:~# dpkg -l | grep -i '^rcs.*$'|wc -l
Considering the tremendous number of packs waiting to be purged, I decided to get rid of this old and already unnecessery files for the sake of clarity, besides that removing the old already uninstalled packages removes old configuration files, readmes, directories and frees some little space and therefore frees some inodes 😉
Before proceeding to remove them, I carefully reviewed and all the package names which I was about to completely purge in order to make sure there is no package with a configuration files I might need in future:
root@noah:~# dpkg -l |grep -i '^rcs.*$'

...
After reviewing all the deb packages possessing the rc – (remove candidate) flag, I used the following bash one liners to remove the obsolete deb packages:
root@noah:~# for i in $(dpkg -l |grep -i '^rcs.*$'|awk '{ print $2 }'); do echo dpkg --purge $i done...

root@noah:~# for i in $(dpkg -l |grep -i '^rcs.*$'|awk '{ print $2 }'); do dpkg --purge $i done
First line will just print out what will be purged with dpkg , so after I checked it out I used the second one to purge all the RC packs.
Tags: bad idea, bit, buggy, candidate, clarity, cmd, configuration files, curiosity, deb packages, debian version, debs, dpkg, everyday work, file, half, How to, inodes, laptop, Linux, little space, machine, need, noah, number, old versions, package, package database, package names, program versions, purge, quot, root, software, software repositories, squeeze, system, system directories, testing, time, Ubuntu, work
Posted in Linux, Linux and FreeBSD Desktop, Linux Audio & Video, System Administration, Various | 3 Comments »
Monday, June 11th, 2012 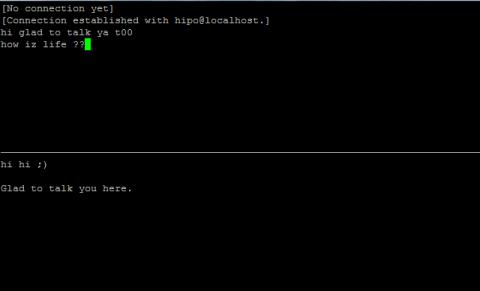
After writting in previous article on how talk be used to handle interactive chat console sessions on FreeBSD, I thought of dropping a few lines on how same is done on Debian, so here is how:
1.; Install talk and talkd
noah:/home/hipo# apt-get --yes install talk talkd

Reading package lists... Done

Building dependency tree

Reading state information... Done

The following NEW packages will be installed:

talk talkd

0 upgraded, 2 newly installed, 0 to remove and 93 not upgraded.

Need to get 19.0 kB/42.3 kB of archives.

After this operation, 201 kB of additional disk space will be used.

Get:1 http://ftp.nl.debian.org/debian/ stable/main talkd amd64 0.17-14 [19.0 kB]

Fetched 19.0 kB in 0s (67.1 kB/s)

Selecting previously deselected package talk.

(Reading database ... 90%

Unpacking talk (from .../talk_0.17-14_amd64.deb) ...

Selecting previously deselected package talkd.

Unpacking talkd (from .../talkd_0.17-14_amd64.deb) ...

Processing triggers for man-db ...

Setting up talk (0.17-14) ...

update-alternatives: using /usr/bin/netkit-ntalk to provide /usr/bin/talk (talk) in auto mode.

Setting up talkd (0.17-14) ...
2.;; Check and make sure talk and ntalkd lines are present in /etc/inetd.conf
noah:/home/hipo# grep -i talk /etc/inetd.conf

#:BSD: Shell, login, exec and talk are BSD protocols.

talk dgram udp wait nobody.tty /usr/sbin/in.talkd in.talkd

ntalk dgram udp wait nobody.tty /usr/sbin/in.ntalkd in.ntalkd
Now you probably wonder why are there two lines in /etc/inetd.conf for ))
in.talkd and in.ntald
in.talkd daemon's aim is to deliver talk sessions between logged in users on one Linux host with few logged in users willing to talk to each other locally;;
Wheter in.ntalkd is designed to serve interactive user talks between the host where in.ntalkd is installed and remote systems ruwhich have the talk client program installed. Of course in order for remote talks to work properly the firewall (if such has to be modified to allow in.ntalkd chats. I've never used in.ntalkd and on most machines having in.ntald hanging around from inetd, could be a potential security hole so, for people not planning to initiate remote TALKs between Unix / Linux / BSD hosts on a network it is a good practice the ntalkd line seen above in inetd.conf to be commented out ::;
noah:/home/hipo# grep -i talk /etc/inetd.conf

#:BSD: Shell, login, exec and talk are BSD protocols.

talk dgram udp wait nobody.tty /usr/sbin/in.talkd in.talkd

#ntalk dgram udp wait nobody.tty /usr/sbin/in.ntalkd in.ntalkd
3.;;; Restart openbsd-inetd init script and talk is ready to use
noah:~# /etc/init.d/openbsd-inetd restart

* Restarting internet superserver inetd
Onwards to use talk between two users the syntax is same like on other BSD, as a matter of fact TALK – console / terminal interactive chat originally was developed for the 4.2BSD UNIX release ;; the Linux code is a port of this BSD talk and not rewrite from scratch.
Using talk between two logged in users on pts/1 (lets say user test) and tty1 (user logged as root) is done with:
noah:~$ tty

noah:~$ talk root@localhost tty1

/dev/pts/1
On tty1 the user has to have enabled Talk sessions request, by default this behaviour in Debian and probably other Debian based Linuxes (Ubuntu) for instance is configured to have talks disabled, i,e ,,,
root@noah:~# mesg

is n
Enabling it on root console is done with:
root@noah:~# mesg y
Once enabled the root will be able to see the TALK service requests on tty1 otherwise, the user gets nothing. With enabled messaging the root user will get on his tty:
Message from TalkDaemon@his_machine...

talk: connection requested by your_name@your_machine.

talk: respond with: talk your_name@your_machine
So on the root console to reply back to talk chat request:
noah:~$ talk hipo@localhost
Tags: aim, Auto, auto mode, building, configured, confnoah, daemon, deb, debian gnu, dependency, dependency tree, dgram, Disk, disk space, DoneBuilding, Draft, exec, Fetched, freebsd, gnu linux, inetd, information, Install, Installing, interactive user, localhost, login, mesg, network, noah, nobody, ntalk, ntalkd, operation, package, protocols, reading database, reading package, request, root, root user, sbin, sessions, Shell, shell login, state information, tree, tty, wait, work, writting
Posted in Curious Facts, Everyday Life, Linux, Various | No Comments »
Saturday, April 28th, 2012 
If there is necessity to look for a string in all hidden files with all sub-level subdirectories (be aware this will be time consuming and CPU stressing) use:
hipo@noah:~$ grep -rli 'PATH' .*
./.gftp/gftprc
./.gftp/cache/cache.OOqZVP
….
Sometimes its necessery to only grep for variables within the first-level directories (lets say you would like to grep a 'PATH' variable set, string within the $HOME directory, the command is:
hipo@noah:~$ grep PATH .[!.]*
.profile:PATH=/bin:/usr/bin/:${PATH}
.profile:export PATH
.profile:# set PATH so it includes user's private bin if it exists
.profile: PATH="$HOME/bin:$PATH"
.profile.language-env-bak:# set PATH so it includes user's private bin if it exists
.profile.language-env-bak: PATH="$HOME/bin:$PATH"
.viminfo:?/PATH.xcyrillic: XNLSPATH=/usr/X11R6/lib/X11/nls
.xcyrillic: export XNLSPATH
The regular expression .[!.]*, means exclude any file or directory name starting with '..', e.g. match only .* files
Note that to use the grep PATH .[!.]* on FreeBSD you will have to use this regular expression in bash shell, the default BSD csh or tsch shells will not recognize the regular expression, e.g.:
grep PATH '.[!.]*'
grep: .[!.]*: No such file or directory
Hence on BSD, if you need to look up for a string within the home directory, hidden files: .profile .bashrc .bash_profile .cshrc run it under bash shell:
freebsd# /usr/local/bin/bash
[root@freebsd:/home/hipo]# grep PATH .[!.]*
.bash_profile:# set PATH so it includes user's private bin if it exists
.bash_profile:# PATH=~/bin:"${PATH}"
.bash_profile:# do the same with …
Another easier to remember, alternative grep cmd is:
hipo@noah:~$ grep PATH .*
.profile:PATH=/bin:/usr/bin/:${PATH}
.profile:export PATH
.profile:# set PATH so it includes user's private bin if it exists
.profile: PATH="$HOME/bin:$PATH"
….
Note that grep 'string' .* is a bit different in meaning, as it will not prevent grep to match filenames with names ..filename1, ..filename2 etc.
Though grep 'string' .* will work note that it will sometimes output some unwanted matches if filenames with double dot in the beginning of file name are there …
That's all folks 🙂
Tags: Auto, bash shell, bit, BSD, cache cache, cmd, consuming, csh, cshrc, directory name, Draft, export path, expression, file, freebsd, gftp, grep, hipo, home directory, How to, level directories, Linux, MANPATHAnother, nbsp, necessery, noah, note, Path, path profile, private bin, profile path, quot, regular expression, rli, root, set path, Shell, shrc, text, text strings, time, time consuming, tsch, value, XNLSPATH, XNLSPATHThe, zcompdump
Posted in FreeBSD, Linux, System Administration | 2 Comments »
Friday, September 17th, 2010 
A close friend of mine Pro-Xex (a.k.a. Necroleak) has released Savage Wheels game for Linux.
The Savage Wheels game is a recreation of a game in a way similar to the good old Destruction Derby that most of the hard code old school arcade know very well.
The Savage Wheels has been an existant for a long time for a free download. However for a couple of years the Pro-XeX decided not to publish it’s code publicly, his considerations were that the code is too messy and not ready to go public.
For almost 2 years now the game source code has been existent openly for download from a source repository at google code
Though the source was there for download, until recently, the game source code was not ready to compile on Linux, though the game’s programming style used is 100% compatible with the Linux / BSD platform.
Right now the game is licensed under the MIT free software license
A few weeks before Peter (Pro-Xex) has contacted me and shared and told me the good news, that he has finally ported the game for the Linux platform and asked me to help him a bit with the game testing!
I thought this is pretty cool, but I was busy until this very day that I actually downloaded the compiled binary of Savage Wheels on my Debian Testing/Unstable (Squeeze/Sid) and gave it a try.
I’m running the 64 bit Debian release, featuring kernel version:
Linux noah 2.6.32-5-amd64 #1 SMP Wed Aug 25 13:59:41 UTC 2010 x86_64 GNU/Linux
Installing the game was a really easy all I had to do is download the archived binary of the game and untar it into a new directory I’ve created for the game.
hipo@noah:~$ mkdir savagewheels

hipo@noah:~$ cd savagewheels

hipo@noah:~/savagewheels$ wget -c http://savagewheels.googlecode.com/files/savagewheels-1.4-linux-x86.tar.gz

hipo@noah:~/savagewheels$ tar -zxvf savagewheels-1.4-linux-x86.tar.gz
It will take like few secs until the game source gets extracted:
To go and start up the game I directly tried executing the game main binary file savagewheels , like you can see below
hipo@noah:~/savagewheels$ ./savagewheels

./savagewheels: error while loading shared libraries: libfmod-3.75.so: cannot open shared object file: No such file or directory
The error in loading library was pretty unexpected, but counting the fact that I’m one of the first people that test the game on Linux I guess it’s pretty normal.
In order to resolve the missing shared library on game execution It was necessary to copy the libfmod-3.75.so to /usr/local/lib/
To do so I issued as a root user:
hipo@noah:/home/hipo/savagewheels# cp -rpf libfmod-3.75.so /usr/local/lib
In case if you don’t want to copy the libfmod-3.75.so into /usr/local/lib, it’s also possible to use the shell export command to specify the exact location of libfmod-3.75.so to your current known systemlibraries.
If you prefer it that way issue command:
hipo@noah:~/savagewheels$ export LD_LIBRARY_PATH=.:$LD_LIBRARY_PATH
Now when I invoked the savagewheels game binary once again:
hipo@noah:~/savagewheels$ ./savagewheels
the game poped up in a window.
As I’ve red in the Readme.html file it’s already noted there that by default the game would run in window mode instead of full screen due to some bugs or video drivers etc.
Happily it was indicated in the Readme file that in order to run it in fullscreen, it’s necessary to invoke the game binary with the -force-fullscreen option included, e.g. running it in fullscreen comes to:
hipo@noah:~/savagewheels$ ./savagewheels -force-fullscreen
At first I was a bit confused when the game poped up before I notice the left side menu which appears could be only reached with the mouse pointer. So I warn you that if you go to give the game a try you will probably wonder how to start up the game after the game entry window with menus appears.
Since the game is so new with Linux it has several bugs to be fixed, one of the bugs is that the Window in which the game pops up by default couldn’t be closed if you press the close window button.
Another thing I do notice is that when I play sometimes during a I crash another car, my car gets stucked for a while.
Another thing which is not very intuitive about the game is the player keys, they could be fount expolained in Readme.html
But I’ll post them here as well to facilitate my dear readers who might be willing to play the game immediately without reading boring docs 🙂
So Player 1 keys are:
arrow keys to move

UP (accelerate up)

LEFT (turn left) RIGHT (turn right)

DOWN (back gear)

RIGHT CTRL - to place landmines

DELETE - self destruction
I think giving the player 1 keys are enough for the player 2 control keys take a quick look in Readme.html
Here is the time to tell you that the game music is absolutely awesome!! So the game is worthy to play just because Pro-Xex has present the user with the wonderful soundtrack that is.
For some further general information related to the game you can read the Savage Wheels game Readme online from here
I would place the game among one of the best car crash games available currently for Linux, so if you’re a arcade game maniac you would probably have a great time with the game.
Tags: arcade game, download, error while loading shared libraries, game source code, hipo, Linux, noah, running, Savage Wheels Destruction Derby, window
Posted in Games Linux, Linux | No Comments »
Tuesday, July 6th, 2010 I’ve recently broke my grub untentianally while whiping out one of my disk partitions who was prepared to run a hackintosh.
Thus yesterday while switching on my notebook I was unpleasently surprised with an error Grub Error 17 and the boot process was hanging before it would even get to grub’s OS select menu.
That was nasty and gave me a big headache, since I wasn’t even sure if my partitions are still present.
What made things even worse that I haven’t created any backups preliminary to prepare for an emergency!
Thus restoring my system was absolutely compulsory at any cost.
In recovering the my grub boot manager I have used as a basis of my recovery an article called How to install Grub from a live Ubuntu cd
Though the article is quite comprehensive, it’s written a bit foolish, probably because it targets Ubuntu novice users 🙂
Another interesting article that gave me a hand during solving my issues was HOWTO: install grub with a chroot
Anyways, My first unsuccessful attempt was following a mix of the aforementioned articles and desperately trying to chroot to my mounted unbootable partition in order to be able to rewrite the grub loader in my MBR.
The error that slap me in my face during chroot was:
chroot: cannot execute /bin/sh : exec format error
Ghh Terrible … After reasoning on the shitty error I came to the conclusion that probably the livecd I’m trying to chroot to my debian linux partition is probably using a different incompatible version of glibc , if that kind of logic is true I concluded that it’s most likely that the glibc on my Linux system is newer (I came to that assumption because I was booting from livecds (Elive, Live CentOS as well Sabayon Linux, which were burnt about two years ago).
To proof my guesses I decided to try using Debian testing Squeeze/Sid install cd . That is the time to mention that I’m running Debian testing/unstable under the code name (Squeeze / Sid).
I downloaded the Debian testing amd64 last built image from here burnt it to a cd on another pc.
And booted it to my notebook, I wasn’t completely sure if the Install CD would have all the necessary recovery tools that I would need to rebuilt my grub but eventually it happened that the debian install cd1 has everything necessary for emergency situations like this one.
After I booted from the newly burned Debian install cd I followed the following recovery route to be able to recovery my system back to normal.It took me a while until I come with the steps described here, but I won’t get into details for brevity
1. Make new dir where you intend to mount your Linux partition and mount /proc, /dev, /dev/pts filesystems and the partition itself
noah:~# mkdir /mnt/root

noah:~# mount -t ext3 /dev/sda8 /mnt/root

noah:~# mount -o bind /dev /mnt/root/dev

noah:~# mount devpts /dev/pts -t devpts
Change /dev/sda8 in the above example commands with your partition name and number.
2. chroot to the mounted partition in order to be able to use your filesystem, exactly like you normally use it when you’re using your Linux partition
noah:~# chroot /mnt/root /bin/bash
Hopefully now you should be in locked in your filesystem and use your Linux non-bootable system as usual.
Being able to access your /boot/grub directory I suggest you first check that everything inside:
/boot/grub/menu.lst is well defined and there are no problems with the paths to the Linux partitions.
Next issue the following commands which will hopefully recover your broken grub boot loader.
noah:~# grub

noah:~# find /boot/grub/stage1
The second command find /boot/grub/stage1 should provide you with your partitions range e.g. it should return something like:
root (hd0,7)
Nevertheless in my case instead of the expected root (hd0,7) , I was returned
/boot/grub/stage1 not found
Useless to say this is uncool 🙂
As a normal reaction I tried experimenting in order to fix the mess. Logically enough I tried to reinstall grub using the
noah:~# grub-install --root-directory=/boot /dev/sda

noah:~# update-grub
To check if that would fix my grub issues I restarted my notebook. Well now grub menu appeared with some error generated by splashy
Trying to boot any of the setup Linux kernels was failing with some kind of error where the root file system was trying to be loaded from /root directory instead of the normal / because of that neither /proc /dev and /sys filesystems was unable to be mounted and the boot process was interrupting in some kind of rescue mode similar to busybox, though it was a was less flexible than a normal busybox shell.
To solve that shitty issue I once again booted with the Debian Testing (Sid / Squeeze ) Install CD1 and used the commands displayed above to mount my linux partition.
Next I reinstalled the following packages:
noah:~# apt-get update

noah:~# apt-get install --reinstall linux-image-amd64 uswsusp hibernate grub grub-common initramfs-tools
Here the grub reinstall actually required me to install the new grub generation 2 (version 2)
It was also necessary to remove the splashy
noah:~# apt-get remove splashy
As well as to grep through all my /etc/ and look for a /dev/sda6 and substitute it with my changed partition name /dev/sda8
One major thing where I substituted /dev/sda6 to my actual linux partition now with a name /dev/sda8 was in:
initramfs-tools/conf.d/resumeThe kernel reinstall and consequently (update) does offered me to substitute my normal /dev/sda* content in my /etc/fstab to some UUIDS like UUID=ba6058da-37f8-4065-854b-e3d0a874fb4e
Including this UUIDs and restarting now rendered my system completely unbootable … So I booted once again from the debian install cd .. arrgh 🙂 and removed the UUID new included lines in /etc/fstab and left the good old declarations.
After rebooting the system now my system booted once again! Hooray! All my data and everything is completely intact now Thanks God! 🙂
Tags: assumption, boot manager, boot process, chroot, debian linux, dev, disk partitions, exec format error, filesystems, glibc, gnu linux, grub boot loader, grub error 17, hackintosh, incompatible version, linux partition, linux system, livecd, MBR, mkdir, mnt, noah, novice users, Recover/Restore unbootable GRUB boot loader on Debian Testing GNU/Linux using Linux LiveCD (Debian Install CD1), recovery, squeeze, unsuccessful attempt, whiping
Posted in Linux, Linux and FreeBSD Desktop, System Administration | 8 Comments »
Friday, January 13th, 2012 scrot and import are two commands, which can be used to take screenshot in terminal on Linux and FreeBSD:
To use scrot cmd to take screenshots on Ubuntu and Debian the scrot package has to be installed:
noah:~# apt-get install scrot

...
scrot should also be available on most other Linux distributions in the main repositories, I'll be glad to hear if someone has used it on Fedora, SUSE etc.
On FreeBSD, there is a port called scrot , to install on FreeBSD:
freebsd# cd /usr/ports/graphics/scrot

freebsd# make install clean

...
Scrot has plenty of nice arguments one can use to make a screenshot. Maybe the most handy one in my view is after a preliminary set delay before screenshot is taken.
To take screenshot with it after lets say 5 seconds delay before the screenshot:
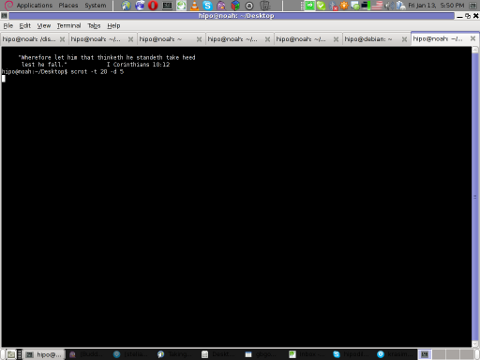
hipo@noah:~/Desktop$ scrot -t 20 -d 5
To put an year, month and day and year followed by screen resolution with scrot :
hipo@noah:~$ scrot '%Y-%m-%d_$wx$h.png'
Another way to take a screenshot of screen with command is by using ImageMagick's – import image manipulation package.
To take screenshot of the current screen via terminal using import , type in xterm, gnome-termina or Gnome's Run Application (ALT+F2)
hipo@noah:~$ import -window root ScreenShot.png
To make import command to save the taken screenshot in a format (minute:hour:day:month:year)i :
hipo@noah:~$ import -window root $screenshot_dir/screenshot-$(date +%M_%k_%d_%m_%Y|sed -e 's/^ *//').png
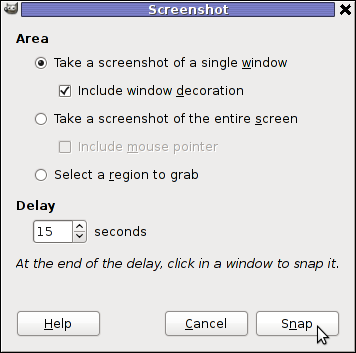
Taking a delayed screenshot is also possible via The GIMP via menus File -> Create -> Screenshot
Now here is an interesting question, what if I would like to take periodic screenshots of what I do on my Desktop to take random movie scenes from a movie I watch with totem or vlc??
This task is quite easily achiavable with a little bash shell script, I wrote:
screenshot_dir='Screenshots';

seconds='60';

if [ ! -d "$screenshot_dir" ]; then

mkdir $screenshot_dir;

fi

while [ 1 ]; do

sleep $seconds;

(import -window root $screenshot_dir/screenshot-$(date +%M_%k_%d_%m_%Y|sed -e 's/^ *//').png) &

done
This script will take screenshot automatically to Screenshots/ directory every (1 min – 60 seconds)
You can also my downloads take_screenshot_every_60_secs_import.sh here
To use take_screenshot_every_60_secs_import.sh just issue the script inside xterm or gnome-terminal, after that simply use your computer as you normally would.
The script will take snapshots every minute and store all taken screenshots in Screenshots dir.
If you prefer to use scrot to take automatically the screenshots every lets say 5 minutes, you can use a script like:
screenshot_dir='Screenshots';

# 300 secs (5 mins)seconds='300';

if [ ! -d "$screenshot_dir" ]; then

mkdir $screenshot_dir;

fi

while [ 1 ]; do

sleep $seconds;

(scrot $screenshot_dir/'%Y-%m-%d_$wx$h.png') &

done
You can fetch take_screenshot_every_60_secs_scrot.sh here
The script using scrot is better in terms of efficiency, the system load scrot will put on your machine will be less.
Using some of this scripts will be handy if you need screenshots to Movies, Programs and favourite Free Software games.
Hope this is educative to someone 😉
Tags: Alt, Auto, bash shell script, Desktop, Draft, fedora, freebsd, GIMP, Gnome, gnu linux, handy one, hipo, How to, image manipulation, ImageMagick, import, import command, import image, import window, linux distributions, manipulation package, multiple, noah, package, png, quot, repositories, root, screen, screenshot, Screenshots, scrot, Shell, someone, SUSE, terminal, totem, type, Ubuntu, wx, xterm, year
Posted in FreeBSD, Linux, Linux and FreeBSD Desktop, System Administration, Various | No Comments »


