Posts Tagged ‘Cipher’

How to check if shared library is loaded in AIX OS – Fix missing libreadline.so.7

Thursday, February 20th, 2020

ibm-aix-logo1

I've had to find out whether an externally Linux library is installed  on AIX system and whether something is not using it.
The returned errors was like so:


# gpg –export -a

Could not load program gpg:
Dependent module /opt/custom/lib/libreadline.a(libreadline.so.7) could not be loaded.
Member libreadline.so.7 is not found in archive


After a bit of investigation, I found that gpg was failing cause it linked to older version of libreadline.so.6, the workaround was to just substitute the newer version of libreadline.so.7 over the original installed one.

Thus I had a plan to first find out whether this libreadline.a is loaded and recognized by AIX UNIX first and second find out whether some of the running processes is not using that library.
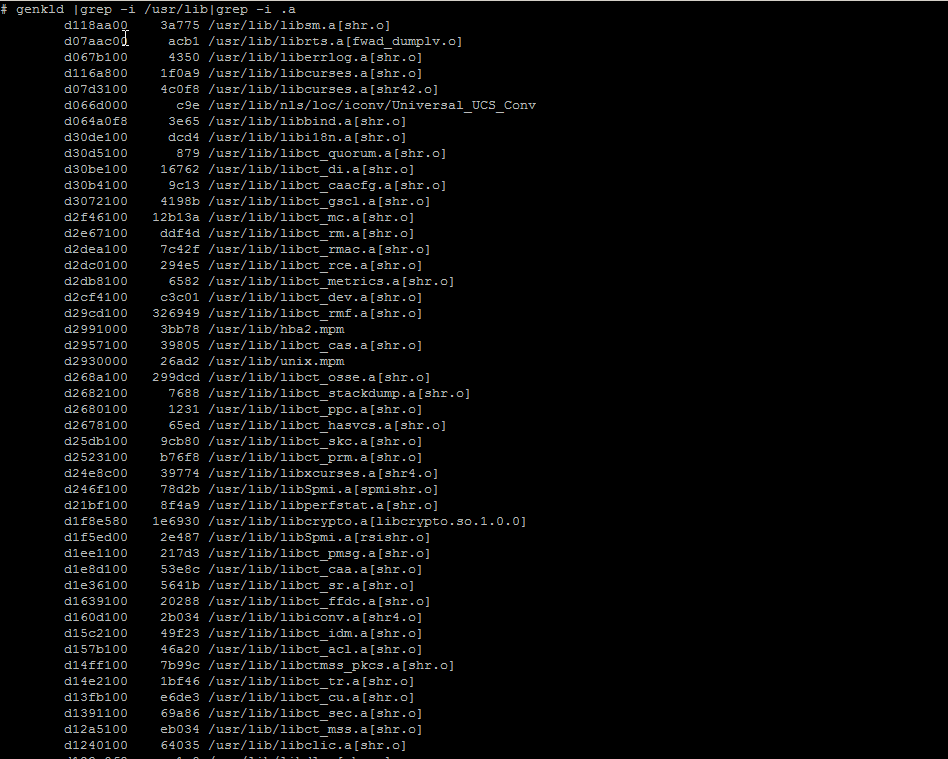
I've come across this interesting IBM official documenation that describes pretty good insights on how to determine whether a shared library  is currently loaded on the system. which mentions the genkld command that is doing
exactly what I needed.

In short:
genkld – creates a list that is printed to the console that shows all loaded shared libraries

genkld-screenshot-aix-unix

Next I used lsof (list open files) command to check whether there is in real time opened libraries by any of the running programs on the system.

After not finding anything and was sure the library is neither loaded as a system library in AIX nor it is used by any of the currently running AIX processes, I was sure I could proceed to safely overwrite libreadline.a (libreadline.so.6) with libreadline.a with (libreadline.so.7).

The result of that is again a normally running gpg as ldd command shows the binary is again normally linked to its dependend system libraries.
 

aix# ldd /usr/bin/gpg
/usr/bin/gpg needs:
         /usr/lib/threads/libc.a(shr.o)
         /usr/lib/libpthreads.a(shr_comm.o)
         /usr/lib/libpthreads.a(shr_xpg5.o)
         /opt/freeware/lib/libintl.a(libintl.so.1)
         /opt/freeware/lib/libreadline.a(libreadline.so.7)
         /opt/freeware/lib/libiconv.a(libiconv.so.2)
         /opt/freeware/lib/libz.a(libz.so.1)
         /opt/freeware/lib/libbz2.a(libbz2.so.1)
         /unix
         /usr/lib/libcrypt.a(shr.o)
         /opt/freeware/lib/libiconv.a(shr4.o)
         /usr/lib/libcurses.a(shr42.o)


# gpg –version
gpg (GnuPG) 1.4.22
Copyright (C) 2015 Free Software Foundation, Inc.
License GPLv3+: GNU GPL version 3 or later <http://gnu.org/licenses/gpl.html>
This is free software: you are free to change and redistribute it.
There is NO WARRANTY, to the extent permitted by law.


Home: ~/.gnupg
Supported algorithms:
Pubkey: RSA, RSA-E, RSA-S, ELG-E, DSA
Cipher: IDEA, 3DES, CAST5, BLOWFISH, AES, AES192, AES256, TWOFISH,
        CAMELLIA128, CAMELLIA192, CAMELLIA256
Hash: MD5, SHA1, RIPEMD160, SHA256, SHA384, SHA512, SHA224
Compression: Uncompressed, ZIP, ZLIB, BZIP2


How to connect to WiFi network using console or terminal on GNU / Linux

Wednesday, November 2nd, 2011

iwlist-screenshot-howto-connect-to-wifi-in-text-console-linux-wpasupplicant

Sometimes its useful to connect to Wireless Networks using console . The reasons for that might be many, one possible reason is to be able to debug, Wireless connection failures or simply omit the use of the many available GUI wifi connection programs.

As a first step before connecting in terminal is to look up for the wifi networks available for connection, this is done with cmd:

linux:~# iwlist wlan0 scanning
wlan0 Scan completed :
Cell 01 - Address: 00:24:01:90:8F:38
Channel:7
Frequency:2.442 GHz (Channel 7)
Quality=70/70 Signal level=-39 dBm
Encryption key:on
ESSID:"magdanoz"
Bit Rates:1 Mb/s; 2 Mb/s; 5.5 Mb/s; 11 Mb/s
Bit Rates:6 Mb/s; 9 Mb/s; 12 Mb/s; 48 Mb/s; 18 Mb/s
24 Mb/s; 36 Mb/s; 54 Mb/s
Mode:Master
Extra:tsf=000000034f5c786b
Extra: Last beacon: 68ms ago
IE: Unknown: 00086D616764616E6F7A
IE: Unknown: 010482848B96
IE: Unknown: 030107
IE: Unknown: 32080C1218602430486C
IE: Unknown: CC0700CC020000018A
IE: Unknown: CC0700CC0300000100
IE: WPA Version 1
Group Cipher : TKIP
Pairwise Ciphers (2) : TKIP CCMP
Authentication Suites (1) : PSK
IE: IEEE 802.11i/WPA2 Version 1
Group Cipher : TKIP
Pairwise Ciphers (2) : TKIP CCMP
Authentication Suites (1) : PSK
Cell 02 - Address: 00:1E:2A:60:5E:DC
Channel:1
...

To just list the ESSID s of the wifi networks:

linux:~# iwlist wlan0 scanning|grep -i 'essid'
ESSID:"magdanoz"
ESSID:"default"
ESSID:"todorov"
ESSID:"BTC-ADSL"
ESSID:"Zahari"
ESSID:"Drago"

1. Connecting to Open Wireless Network

Now from the above output it is clear 6 wifi networks are available for connection. The default wifi network from the list is an Open network (e.g. without pass). To connect to it I use cmd:

linux:~# /sbin/iwconfig wlan0 essid 'default'
linux:~# /sbin/iwconfig wlan0 key open

After connected to configure IP, Gateway and DNS from a DHCP server running on the WIFI router, dhclient cmd is used:

linux:~# /sbin/dhclient wlan0

2. Connecting to WEP 64bit / 128bit encrypted network

linux:~# /sbin/iwconfig wlan0 key 1234-5678-9101-1213

3. Connecting to WPA / WPA2 encrypted wifi network

To connect to WPA or WPA2 encrypted network its necessery to have installed wpasupplicant package. The name of the package might vary in different distributions on Debian and Ubuntu, the name of the package is wpasupplicant, on Fedora, CentOS and RHEL the package that has to be in is wpa_supplicant :
After having installed the wpa_supplicant to connect to the network with ESSID name magdanoz , wpa_passphrase is used first:

linux:~# /usr/bin/wpa_passphrase magdanoz Secret_Wifi_Password | tee -a /etc/wpa_supplicant.conf
network={
ssid="magdanoz"
#psk="Secret_Wifi_Password"
psk=6f7590250c4496ff7bf8dd25199ac3bb5a614d4bc069975aa884bcf084da73bc
}

As you see in above command the secret password key is generated printed on the screen and then added to /etc/wpa_supplicant.conf , necessery to establish the wireless connection with wpa_supplicant with cmd:

linux:~# /sbin/wpa_supplicant wpa_supplicant -d wext -i wlan0 -c /etc/wpa_supplicant.conf -B

-d wext instructs wpa_supplicant to use (Linux wireless extension driver).
-B tells wpa_supplicant to background the connection to prevent the wireless connection to drop off, if the console / terminal from which it is launched gets closed.

In case of succesful connection with wpa_supplicant , once again IP, Gateway and DNS is configured fetching the settings from the wifi hotspot dhcp server:

linux:~# /sbin/dhclient wlan0

General information about the wireless network and info related to the established connection can be obtained with /usr/bin/iwconfig :

linux:~# /sbin/iwconfig
lo no wireless extensions.
eth0 no wireless extensions.
wlan0 IEEE 802.11abg ESSID:"magdanoz"
Mode:Managed Frequency:2.442 GHz Access Point: 00:24:00:90:8F:38
Bit Rate=54 Mb/s Tx-Power=15 dBm
Retry long limit:7 RTS thr:off Fragment thr:off
Encryption key:off
Power Management:off
Link Quality=70/70 Signal level=-39 dBm
Rx invalid nwid:0 Rx invalid crypt:0 Rx invalid frag:0
Tx excessive retries:0 Invalid misc:0 Missed beacon:0

To configure the exact channel over which the wireless connection will be established again is done with iwconfig, for instance to configure wlan0 wifi connection established to be on wifi channel 7:

linux:~# /sbin/iwconfig wlan0 channel 11

By default iwconfig is set to automatically set the channel based on connected network ESSID , if the channel is modified to some specific number to revert it back use:

linux:~# /sbin/iwconfig wlan0 channel auto
 

How to check MASTER / SLAVE MySQL nodes status – Check MySQL Replication Status

Thursday, April 19th, 2012

I'm doing replication for one server. Its not the first time I do configure replication between two MySQL database nodes, however since I haven't done it for a few years, my "know how" has mostly vanished so I had some troubles in setting it up. Once I followed some steps to configure replication I had to check if the two MASTER / Slave MySQL db nodes communicate properly. Hence I decided to drop a short post on that just in case if someone has to do the same or if I myself forget how I did it so I can check later on:

1. Check if MASTER MySQL server node is configured properly

The standard way to check a MySQL master node status info is with:
 

mysql> show master status;
+——————+———-+———————————————————+——————+
| File | Position | Binlog_Do_DB | Binlog_Ignore_DB |
+——————+———-+———————————————————+——————+
| mysql-bin.000007 | 106 | database1,database2,database3 | |
+——————+———-+———————————————————+——————+
1 row in set (0.00 sec)

By putting \G some extra status info is provided:
 

mysql> show master status\G;
*************************** 1. row ***************************
File: mysql-bin.000007
Position: 106
Binlog_Do_DB: database1,database2,database3
Binlog_Ignore_DB:
1 row in set (0.00 sec)

ERROR:
No query specified

2. Check if Slave MySQL node is configured properly

To check status of the slave the cmd is:
 

mysql> show slave status;

The command returns an output like:
 

mysql> show slave status;+———————————-+————-+————-+————-+—————+——————+———————+————————-+—————+———————–+——————+——————-+——————————————————-+———————+——————–+————————+————————-+—————————–+————+————+————–+———————+—————–+—————–+—————-+—————+——————–+——————–+——————–+—————–+——————-+—————-+———————–+——————————-+—————+—————+—————-+—————-+| Slave_IO_State | Master_Host | Master_User | Master_Port | Connect_Retry | Master_Log_File | Read_Master_Log_Pos | Relay_Log_File | Relay_Log_Pos | Relay_Master_Log_File | Slave_IO_Running | Slave_SQL_Running | Replicate_Do_DB | Replicate_Ignore_DB | Replicate_Do_Table | Replicate_Ignore_Table | Replicate_Wild_Do_Table | Replicate_Wild_Ignore_Table | Last_Errno | Last_Error | Skip_Counter | Exec_Master_Log_Pos | Relay_Log_Space | Until_Condition | Until_Log_File | Until_Log_Pos | Master_SSL_Allowed | Master_SSL_CA_File | Master_SSL_CA_Path | Master_SSL_Cert | Master_SSL_Cipher | Master_SSL_Key | Seconds_Behind_Master | Master_SSL_Verify_Server_Cert | Last_IO_Errno | Last_IO_Error | Last_SQL_Errno | Last_SQL_Error |+———————————-+————-+————-+————-+—————+——————+———————+————————-+—————+———————–+——————+——————-+——————————————————-+———————+——————–+————————+————————-+—————————–+————+————+————–+———————+—————–+—————–+—————-+—————+——————–+——————–+——————–+—————–+——————-+—————-+———————–+——————————-+—————+—————+—————-+—————-+| Waiting for master to send event | HOST_NAME.COM | slave_user | 3306 | 10 | mysql-bin.000007 | 106 | mysqld-relay-bin.000002 | 251 | mysql-bin.000007 | Yes | Yes | database1,database2,database3 | | | | | | 0 | | 0 | 106 | 407 | None | | 0 | No | | | | | | 0 | No | 0 | | 0 | |+———————————-+————-+————-+————-+—————+——————+———————+————————-+—————+———————–+——————+——————-+——————————————————-+———————+——————–+————————+————————-+—————————–+————+————+————–+———————+—————–+—————–+—————-+—————+——————–+——————–+——————–+—————–+——————-+—————-+———————–+——————————-+—————+—————+—————-+—————-+

As you can see the output is not too readable, as there are too many columns and data to be displayed and this doesn't fit neither a text console nor a graphical terminal emulator.

To get more readable (more verbose) status for the SQL SLAVE, its better to use command:
 

mysql> show slave status\G;

Here is a sample returned output:
 

mysql> show slave status\G;*************************** 1. row *************************** Slave_IO_State: Waiting for master to send event Master_Host: HOST_NAME.COM Master_User: slave_user Master_Port: 3306 Connect_Retry: 10 Master_Log_File: mysql-bin.000007 Read_Master_Log_Pos: 106 Relay_Log_File: mysqld-relay-bin.000002 Relay_Log_Pos: 251 Relay_Master_Log_File: mysql-bin.000007 Slave_IO_Running: Yes Slave_SQL_Running: Yes Replicate_Do_DB: database1,database2,database3 Replicate_Ignore_DB: Replicate_Do_Table: Replicate_Ignore_Table: Replicate_Wild_Do_Table: Replicate_Wild_Ignore_Table: Last_Errno: 0 Last_Error: Skip_Counter: 0 Exec_Master_Log_Pos: 106 Relay_Log_Space: 407 Until_Condition: None Until_Log_File: Until_Log_Pos: 0 Master_SSL_Allowed: No Master_SSL_CA_File: Master_SSL_CA_Path: Master_SSL_Cert: Master_SSL_Cipher: Master_SSL_Key: Seconds_Behind_Master: 0Master_SSL_Verify_Server_Cert: No Last_IO_Errno: 0 Last_IO_Error: Last_SQL_Errno: 0 Last_SQL_Error: 1 row in set (0.00 sec)ERROR: No query specified

If show master status or shwo slave status commands didn't reveal replication issue, one needs to stare at the mysql log for more info.

How to check if newly installed SSL certificate for IMAP and IMAPS is properly installed

Tuesday, June 28th, 2011

Did you have to regenerate your SSL certificate for your mail server’s IMAP and IMAP SSL service?
Did you have to find out if the newly installed certificates are fine after install?

Here is how:

           root@server-hosting [/usr/local ]# openssl s_client -connect imap.example.com:993
root@server-hosting [/usr/local ]# openssl s_client -connect imap.example.com:143 -starttls imap

The output returned by this two commands will be the imap and imaps configured certificates as well as extensive info concerning the installed SSL, the last chunk of info to be spit is most crucial to know if certificate is fine.
It should be something like:

...
New, TLSv1/SSLv3, Cipher is AES256-SHA
Server public key is 1024 bit
Secure Renegotiation IS supported
Compression: NONE
Expansion: NONE
SSL-Session:
Protocol : TLSv1
Cipher : AES256-SHA
Session-ID: 0B69E91022CB56D64F56CFA08405944D9C4C0069EE4097890B98F1406CF084D5
Session-ID-ctx:
Master-Key: 13745B94E0C5A0604EB7529E7409251961DFD5F4134F3A8F
Key-Arg : None
Start Time: 1309265383
Timeout : 300 (sec)
Verify return code: 18 (self signed certificate)
---
. OK CAPABILITY completed
closed