Sometimes its useful to connect to Wireless Networks using console . The reasons for that might be many, one possible reason is to be able to debug, Wireless connection failures or simply omit the use of the many available GUI wifi connection programs.
As a first step before connecting in terminal is to look up for the wifi networks available for connection, this is done with cmd:
Now from the above output it is clear 6 wifi networks are available for connection. The default wifi network from the list is an Open network (e.g. without pass). To connect to it I use cmd:
linux:~# /sbin/iwconfig wlan0 essid 'default'

linux:~# /sbin/iwconfig wlan0 key open
After connected to configure IP, Gateway and DNS from a DHCP server running on the WIFI router, dhclient cmd is used:
linux:~# /sbin/dhclient wlan0
2. Connecting to WEP 64bit / 128bit encrypted network
3. Connecting to WPA / WPA2 encrypted wifi network
To connect to WPA or WPA2 encrypted network its necessery to have installed wpasupplicant package. The name of the package might vary in different distributions on Debian and Ubuntu, the name of the package is wpasupplicant, on Fedora, CentOS and RHEL the package that has to be in is wpa_supplicant : After having installed the wpa_supplicant to connect to the network with ESSID namemagdanoz , wpa_passphrase is used first:
linux:~# /usr/bin/wpa_passphrase magdanoz Secret_Wifi_Password | tee -a /etc/wpa_supplicant.conf

network={

ssid="magdanoz"

#psk="Secret_Wifi_Password"

psk=6f7590250c4496ff7bf8dd25199ac3bb5a614d4bc069975aa884bcf084da73bc

}
As you see in above command the secret password key is generated printed on the screen and then added to /etc/wpa_supplicant.conf , necessery to establish the wireless connection with wpa_supplicant with cmd:
-d wext instructs wpa_supplicant to use (Linux wireless extension driver). -B tells wpa_supplicant to background the connection to prevent the wireless connection to drop off, if the console / terminal from which it is launched gets closed.
In case of succesful connection with wpa_supplicant , once again IP, Gateway and DNS is configured fetching the settings from the wifi hotspot dhcp server:
linux:~# /sbin/dhclient wlan0
General information about the wireless network and info related to the established connection can be obtained with /usr/bin/iwconfig :
linux:~# /sbin/iwconfig

lo no wireless extensions.

eth0 no wireless extensions.

wlan0 IEEE 802.11abg ESSID:"magdanoz"

Mode:Managed Frequency:2.442 GHz Access Point: 00:24:00:90:8F:38

Bit Rate=54 Mb/s Tx-Power=15 dBm

Retry long limit:7 RTS thr:off Fragment thr:off

Encryption key:off

Power Management:off

Link Quality=70/70 Signal level=-39 dBm

Rx invalid nwid:0 Rx invalid crypt:0 Rx invalid frag:0

Tx excessive retries:0 Invalid misc:0 Missed beacon:0
To configure the exact channel over which the wireless connection will be established again is done with iwconfig, for instance to configure wlan0 wifi connection established to be on wifi channel 7:
linux:~# /sbin/iwconfig wlan0 channel 11
By default iwconfig is set to automatically set the channel based on connected network ESSID , if the channel is modified to some specific number to revert it back use:
My home run machine MySQL server was suddenly down as I tried to check my blog and other sites today, the error I saw while trying to open, this blog as well as other hosted sites using the MySQL was:
Error establishing a database connection
The topology, where this error occured is simple, I have two hosts:
1. Apache version 2.0.64 compiled support externally PHP scripts interpretation via libphp – the host runs on (FreeBSD)
2. A Debian GNU / Linux squeeze running MySQL server version 5.1.61
The Apache host is assigned a local IP address 192.168.0.1 and the SQL server is running on a host with IP 192.168.0.2
To diagnose the error I've logged in to 192.168.0.2 and weirdly the mysql-server was appearing to run just fine:
debian:~# ps ax |grep -i mysql 31781 pts/0 S 0:00 /bin/sh /usr/bin/mysqld_safe 31940 pts/0 Sl 12:08 /usr/sbin/mysqld –basedir=/usr –datadir=/var/lib/mysql –user=mysql –pid-file=/var/run/mysqld/mysqld.pid –socket=/var/run/mysqld/mysqld.sock –port=3306 31941 pts/0 S 0:00 logger -t mysqld -p daemon.error 32292 pts/0 S+ 0:00 grep -i mysql
Moreover I could connect to the localhost SQL server with mysql -u root -p and it seemed to run fine. The error Error establishing a database connection meant that either something is messed up with the database or 192.168.0.2 Mysql port 3306 is not properly accessible.
My first guess was something is wrong due to some firewall rules, so I tried to connect from 192.168.0.1 to 192.168.0.2 with telnet:
freebsd# telnet 192.168.0.2 3306 Trying 192.168.0.2… Connected to jericho. Escape character is '^]'. Host 'webserver' is blocked because of many connection errors; unblock with 'mysqladmin flush-hosts' Connection closed by foreign host.
Right after the telnet was initiated as I show in the above output the connection was immediately closed with the error:
Host 'webserver' is blocked because of many connection errors; unblock with 'mysqladmin flush-hosts'Connection closed by foreign host.
In the error 'webserver' is my Apache machine set hostname. The error clearly states the problems with the 'webserver' apache host unable to connect to the SQL database are due to 'many connection errors' and a fix i suggested with mysqladmin flush-hosts
To temporary solve the error and restore my normal connectivity between the Apache and the SQL servers I logged I had to issue on the SQL host:
mysqladmin -u root -p flush-hostsEnter password:
Thogh this temporar fix restored accessibility to the databases and hence the websites errors were resolved, this doesn't guarantee that in the future I wouldn't end up in the same situation and therefore I looked for a permanent fix to the issues once and for all.
The permanent fix consists in changing the default value set for max_connect_error in /etc/mysql/my.cnf, which by default is not too high. Therefore to raise up the variable value, added in my.cnf in conf section [mysqld]:
debian:~# vim /etc/mysql/my.cnf

...

max_connect_errors=4294967295
and afterwards restarted MYSQL:
debian:~# /etc/init.d/mysql restart

Stopping MySQL database server: mysqld.

Starting MySQL database server: mysqld.

Checking for corrupt, not cleanly closed and upgrade needing tables..
To make sure the assigned max_connect_errors=4294967295 is never reached due to Apache to SQL connection errors, I've also added as a cronjob.
In the cron I have omitted the mysqladmin -u root -p (user/pass) input options because for convenience I have already stored the mysql root password in /root/.my.cnf
The default behaviour of lynx – console text browser on Linuces, BSD and other free OSes is to always ask, for the accept cookies prompt once an internet web page is opened that requires browser cookies to be enabled.
I should admin, having this "secure by default" (always ask for new cookies) behaviour in lynx was a good practice from a security point of view.
Another reason, why this cookies prompt is enabled by default is back in the days, when lynx was actively developed by programmers the websites with cookies support was not that many and even cookies was mostly required for user/pass authentication (all those who still remember this days the websites that requires authentication was a way less than today) … With this said the current continuing security cautious behaviour in the browser, left from its old days is understandable.
However I personally sometimes, need to use lynx more frequently and this behaviour of always opening a new website in text mode in console to prompts me for a cookie suddenly becomes a big waste of time if you use lynx to browser more than few sites. Hence I decided to change the default way lynx handles cookies and make them enabled by default instead. Actually even in the past, when I was mainly using internet in console on every new server or home Linux install, I was again making the cookies to be permanently accepted. Everyone who used lynx a few times already knows its "annoying" to all time accept cookie prompts … This provoked me to write this short article to explain how enabling of constant cookie accepting in lynx is done
To enable the persistent cookies in lynx, one needs to edit lynx.cfg on different GNU / Linux and BSD* distributions lynx.cfg is located in different directory.
Most of the lynx.cfg usual locations are /etc/lynx/lynx.cfg or /etc/lynx.cfg as of time of writting this post in Debian Squeeze GNU / Linux the lynx.cfg is located in /etc/lynx-cur/lynx.cfg, whether for FreeBSD / NetBSD / OpenBSD users the file is located in /usr/local/etc/lynx.cfg
What I did to allow all cookies is open lynx.cfg in vim edit and change the following lines:
a)
#FORCE_SSL_COOKIES_SECURE:FALSE
with
FORCE_SSL_COOKIES_SECURE:TRUE
b)
#SET_COOKIES:TRUE
uncomment it to:
SET_COOKIES:TRUE
c) next, change
ACCEPT_ALL_COOKIES:FALSE
ACCEPT_ALL_COOKIES:TRUE
Onwards opening any website with lynx auto-accepts the cookies.
For people who care about there security (who still browse in console (surely not many anymore)), permanently allowing the cookies is not a good idea. But for those who are ready to drop off little security for convenience its ok.
I've gathered a collection of 15 Audio and Video songs dedicated to the Free Software / Open Source movement . All of the songs are based on the The Free Software Song Anthem written by Richard Mathew Stallman in the year 1991. The motive of the song is a Traditional Bulgarian song called Sadi Moma Bqla Loza – translated to bulgarian to something like Maid is Planting white Vines The original Free Software Song symbolizes all free software and the Free Software Movement and GNU and is in the Bulgarian unique / specific folk rhythm of 7 / 8 beats .
Most of the songs which I post hereby could also be found and downloaded from GNU's official Free Software Song page However some of the songs were only available from Youtube in the non-free format Flash Video (flv) . Hence, since the songs were dedicated to Free Software and apparently were being spread in a non-free format they either was missing any licensing or licensed under GFDL – free music / art GNU like license. To fix up this irragularity and add some freedom in terms of audio format of spreading, I've downloaded them and used ffmpeg2theora to convert the songs to the Free / Open Standard format Ogg Vorbis I'm quite sure that many people, who use Ubuntu or Linux Mint are pretty much unfamiliar with the Free Software Songs existence, also many people most likely have never heard the Free Software Songs or even those who heard it have rarely heard more than 2 or 3 of the song variations. Hereby, I'm sure many people who are lovers of Free Software will highly benefit and get inspired to continue in the Free Software by listening to these post shared little Free Software Song Collection .
The covers of the Original version publicly sang by Richard Stallman are in different musical genres, some of the song performances are in Folklore, played on Piano other covers are performed by musical bands in pop / punk en popular music styles, there are one person performances, cheerful christmas like soundings, 8 bit free software song, Metal free software variations etc. In the collection I've included also few other nice songs which are propaganda on free software, even though not a cover of the Free Software Song , I found them myself worthy to be included in the collection..:
Herein you can download or listen all the Free Software Songs version (Enjoyment is guaranteed! 😉 ):
Sooner or later your Linux Desktop or Linux server hard drive will start breaking up, whether you have a hardware or software RAID 1, 6 or 10 you can and good hard disk health monitoring software you can react on time but sometimes as admins we have to take care of old servers which either have RAID 0 or missing RAID configuration and or disk firmware is unable to recognize failing blocks on time and remap them. Thus it is quite useful to have techniques to save data from failing hard disk drives with physical badblocks.
With ddrescue tool there is still hope for your Linux data though disk is full of unrecoverable I/O errors.
apt-cache show ddrescue
apt-cache show ddrescue|grep -i description -A 12
Description: copy data from one file or block device to another dd_rescue is a tool to help you to save data from crashed partition. Like dd, dd_rescue does copy data from one file or block device to another. But dd_rescue does not abort on errors on the input file (unless you specify a maximum error number). It uses two block sizes, a large (soft) block size and a small (hard) block size. In case of errors, the size falls back to the small one and is promoted again after a while without errors. If the copying process is interrupted by the user it is possible to continue at any position later. It also does not truncate the output file (unless asked to). It allows you to start from the end of a file and move backwards as well. dd_rescue does not provide character conversions.
To use ddrescue for saving data first thing is to shutdown the Linux host boot the system with a Rescue LiveCD like SystemRescueCD – (Linux system rescue disk), Knoppix (Most famous bootable LiveCD / LiveDVD), Ubuntu Rescue Remix or BackTrack LiveCD – (A security centered "hackers" distro which can be used also for forensics and data recovery), then mount the failing disk (I assume disk is still mountable :). Note that it is very important to mount the disk as read only, because any write operation on hard drive increases chance that it completely becomes unusable before saving your data!
To make backup of your whole hard disk data to secondary mounted disk into /mnt/second_disk
# mount -o loop /mnt/second_disk/rescue/backup.img
In above example change /dev/sda2 to whatever your hard drive device is named.
Whether you have already an identical secondary drive attached to the Linux host and you would like to copy whole failing Linux partition (/dev/sda) to the identical drive (/dev/sdb) issue:
-d instructs to use direct I/O -R retrims the error area on each retry -r 100 sets the retry limit to 100 (tries to read data 100 times before resign)
Of course this is not always working as on some HDDs recovery is impossible due to hard physical damages, if above command can't recover a file in 10 attempts it is very likely that it never succeeds …
A small note to make here is that there is another tool dd_rescue (make sure you don't confuse them) – which is also for recovery but GNUddrescue performs better with recovery. How ddrescue works is it keeps track of the bad sectors, and go back and try to do a slow read of that data in order to read them. By the way BSD users would happy to know there is ddrescue port already, so data recovery on BSDs *NIX filesystems if you're a Windows user you can use ddrescue to recover data too via Cygwin. Of course final data recovery is also very much into God's hands so before launching ddrescue, don't forget to say a prayer 🙂
GNU Grep is equipped with a special option "-r" to grep recursively. Looking for string in a file in a sub-directories tree with the -r option is a piece of cake. You just do:
grep -r 'string' /directory/
or if you want to search recursively non-case sensitive for text
grep -ri 'string' .
Another classic GNU grep use (I use almost daily) is whether you want to match all files containing (case insensitive) string among all files:
grep -rli 'string' directory-name
Now if you want to grep whether a string is contained in a file or group of files in directory recursively on some other UNIX like HP-UX or Sun OS / Solaris where there is no GNU grep installed by default here is how to it:
Note that this approach to look for files containing string on UNIX is very slowThus on not too archaic UNIX systems for some better search performance it is better to use xargs;
find . | xargs grep searched-string
A small note to open here is by using xargs there might be weird results when run on filesystems with filenames starting with "-".
Thus comes the classical (ultimate) way to grep for files containing string with find + grep, e.g.
find / -exec grep grepped-string {} dev/null ;
Another way to search a string recursively in files is by using UNIX OS '*' (star) expression:
I’ve used K3B just recently to RIP an Audio CD with music to MP3. K3b has done a great job ripping the tracks, the only problem was By default k3b RIPs songs in OGG Vorbis (.ogg) and not mp3. I personally prefer OGG Vorbis as it is a free freedom respecting audio format, however the problem was the .ogg-s cannot be read on many of the audio players and it could be a problem reading the RIPped oggs on Windows. I’ve done the RIP not for myself but for a Belarusian gfriend of mine and she is completely computer illiterate and if I pass her the songs in .OGG, there is no chance she succed in listening the oggs. I’ve seen later k3b has an option to choose to convert directly to MP3 Using linux mp3 lame library this however is time consuming and I have to wait another 10 minutes or so for the songs to be ripped to shorten the time I decided to directly convert the existing .ogg files to .mp3 on my (Debian Linux). There are probably many ways to convert .ogg to mp3 on linux and likely many GUI frontends (like SoundConverter) to use in graphic env.
I however am a console freak so I preferred doing it from terminal. I’ve done quick research on the net and figured out the good old ffmpeg is capable of converting .oggs to .mp3s. To convert all mp3s just ripped in the separate directory I had to run ffmpeg in a tiny bash loop.
A short bash shell script 1 liner combined with ffmpeg does it, e.g.;
for f in *.ogg; do ffmpeg -i "$f" "`basename "$f" .ogg`.mp3"; done.....
The loop example is in bash so in order to make the code work on FreeBSD it is necessery it is run in a bash shell and not in BSDs so common csh or tcsh.
Well, that’s all oggs are in mp3; Hip-hip Hooray 😉
At security critical hosts running Apache + PHP based sites it is recommended functions like:
system();

exec();shell_exec();.....
to be disabled. The reason is to mainly harden against script kiddies who might exploit your site/s and upload some shitty SK tool like PHP WebShell, PHP Shell and the probably thousands of “hacker” variations that exist nowdays.
In latest Debian stable Squeeze, suhosin – advanced protection module for php5 is being installed and enabled in Apache (by default). Simply disabling a number of functions using suhosin, could prevent multiple of future headaches and hours of pondering on who 0wn3d your server ….
Disabling the basic PHP system(); and other similar functions which allows shell spawn is not always possible, since some websites or CMS platforms depends on them for proper runnig, anyways whether it is possible disabling ’em is a must. There are two ways to disable system(); functions; One is through using /etc/php5/apache2/conf.d/suhosin.ini and 2nd by adding a list of functions that has to be disabled directly in Website Virtualhost file or in apache2.conf (/etc/apache2/apache2.conf; For people hosting multiple virtualhost websites on the same server using the custom domain Virtualhost method is probably better, since on a global scale the functions could be enabled if some of the websites hosted on the server requires exec(); to work OK. In any case using /etc/php5/apache2/conf.d/suhosin.ini to disable system(); functions in PHP is less messy …
1. Disabling PHP system(); fuctions through /etc/apache2/apache2.conf and custom site Vhosts
Place somewhere (I prefer near the end of config);;;
Disabling it for custom virtualhost is done by simply adding above Apache directvies (before the closing tag in /etc/apache2/sites-enabled/custom-vhost.com
2. Disabling PHP system();, exec(); shell spawn with suhosin.ini
The broadcast and gateway configuration lines are not obligitory. dns-nameservers would re-create /etc/resolv.conf file with the nameserver values specified which in these case are Google Public DNS servers and OpenDNS servers.
Very important variable is allow-hotplug eth0 If these variable with eth0 lan interface is omitted or missing (due to some some weird reason), the result would be the output you see from the command below:
debian:~# /etc/init.d/networking restart

Running /etc/init.d/networking restart is deprecated because it may not enable again some interfaces ... (warning).

Reconfiguring network interfaces...
Besides the /etc/init.d/networking restart is deprecated because it may not enable again some interfaces … (warning). , if the allow-hotplug eth0 variable is omitted the eth0 interface would not be brough up on next server boot or via the networking start/stop/restart init script.
My first reaction when I saw the message was that probably I’ll have to use invoke-rc.d, e.g.: debian:~# invoke-rc.d networking restart
Running invoke-rc.d networking restart is deprecated because it may not enable again some interfaces ... (warning).
However as you see from above’s command output, running invoke-rc.d helped neither.
I was quite surprised with the inability to bring my network up for a while with the networking init script. Interestingly using the command:
debian:~# ifup eth0
was able to succesfully bring up the network interface, whether still invoke-rc.d networking start failed.
After some wondering I finally figured out that the eth0 was not brought up by networking init script, because auto eth0 or allow-hotplug eth0 (which by the way are completely interchangable variables) were missing.
I added allow-hotplug eth0 and afterwards the networking script worked like a charm 😉
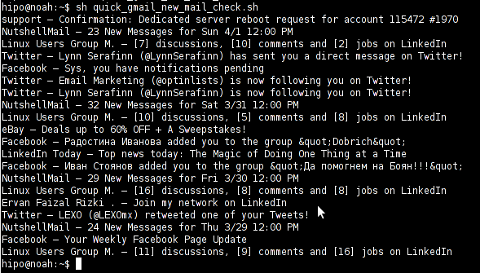
Linux Users Group M. – [7] discussions, [10] comments and [2] jobs on LinkedIn

Twitter – Lynn Serafinn (@LynnSerafinn) has sent you a direct message on Twitter!

Facebook – Sys, you have notifications pending

Twitter – Email Marketing (@optinlists) is now following you on Twitter!

Twitter – Lynn Serafinn (@LynnSerafinn) is now following you on Twitter!

NutshellMail – 32 New Messages for Sat 3/31 12:00 PM

Linux Users Group M. – [10] discussions, [5] comments and [8] jobs on LinkedIn

eBay – Deals up to 60% OFF + A Sweepstakes!

LinkedIn Today – Top news today: The Magic of Doing One Thing at a Time

NutshellMail – 29 New Messages for Fri 3/30 12:00 PM

Linux Users Group M. – [16] discussions, [8] comments and [8] jobs on LinkedIn

Ervan Faizal Rizki . – Join my network on LinkedIn

Twitter – LEXO (@LEXOmx) retweeted one of your Tweets!

NutshellMail – 24 New Messages for Thu 3/29 12:00 PM

Facebook – Your Weekly Facebook Page Update

Linux Users Group M. – [11] discussions, [9] comments and [16] jobs on LinkedIn
As you see this one liner uses curl to fetch the information from mail.google.com's atom feed and then uses awk and sed to parse the returned content and make it suitable for display.
A good use of a modified version of the script is in conjunction with a 15 minutes cron job to launch for new gmail mails and launch your favourite desktop mail client. This method is useful if you don't want a constant hanging Thunderbird or Evolution, pop3 / imap client on your system to just take up memory or dangle down the window list. I've done a little modification to the script to simply, launch a predefined email reader program, if gmail atom feed returns new unread mails are available, check or download my check_gmail_unread_mail.sh here Bear in mind, on occasions of errors with incorrect username or password, the script will not return any errors. The script is missing a properer error handling.Therefore, before you use the script make sure:
Once you read your new emails in lets say Thunderbird, close it and on the next delivered unread gmail mails, your mail client will pop up by itself again. Once the mail client is closed the script execution will be terminated. Consised that if you get too frequently gmail emails, using the script might be annoying as every 15 minutes your mail client will be re-opened.
If you use any of the shell scripts, make sure there are well secured (make it owned only by you). The gmail username and pass are in plain text, so someone can steal your password, very easily. For a one user Linux desktops systems as my case, security is not such a big concern, putting my user only readable script permissions (e.g. chmod 0700)is enough.
And shall not uncircumcision which is by nature, if it fulfil the law, judge thee, who by the letter and circumcision dost transgress the law? -- Romans 2:27


How to permanently enable Cookies in Lynx text browser – Disable accept cookies prompt in lynx console browser
Wednesday, April 18th, 2012The default behaviour of lynx – console text browser on Linuces, BSD and other free OSes is to always ask, for the accept cookies prompt once an internet web page is opened that requires browser cookies to be enabled.
I should admin, having this "secure by default" (always ask for new cookies) behaviour in lynx was a good practice from a security point of view.
Another reason, why this cookies prompt is enabled by default is back in the days, when lynx was actively developed by programmers the websites with cookies support was not that many and even cookies was mostly required for user/pass authentication (all those who still remember this days the websites that requires authentication was a way less than today) …
With this said the current continuing security cautious behaviour in the browser, left from its old days is understandable.
However I personally sometimes, need to use lynx more frequently and this behaviour of always opening a new website in text mode in console to prompts me for a cookie suddenly becomes a big waste of time if you use lynx to browser more than few sites. Hence I decided to change the default way lynx handles cookies and make them enabled by default instead.
Actually even in the past, when I was mainly using internet in console on every new server or home Linux install, I was again making the cookies to be permanently accepted.
Everyone who used lynx a few times already knows its "annoying" to all time accept cookie prompts … This provoked me to write this short article to explain how enabling of constant cookie accepting in lynx is done
To enable the persistent cookies in lynx, one needs to edit lynx.cfg on different GNU / Linux and BSD* distributions lynx.cfg is located in different directory.
Most of the lynx.cfg usual locations are /etc/lynx/lynx.cfg or /etc/lynx.cfg as of time of writting this post in Debian Squeeze GNU / Linux the lynx.cfg is located in /etc/lynx-cur/lynx.cfg, whether for FreeBSD / NetBSD / OpenBSD users the file is located in /usr/local/etc/lynx.cfg
What I did to allow all cookies is open lynx.cfg in vim edit and change the following lines:
a)
#FORCE_SSL_COOKIES_SECURE:FALSEwith
FORCE_SSL_COOKIES_SECURE:TRUEb)
#SET_COOKIES:TRUEuncomment it to:
SET_COOKIES:TRUEc) next, change
ACCEPT_ALL_COOKIES:FALSEACCEPT_ALL_COOKIES:TRUEOnwards opening any website with lynx auto-accepts the cookies.
For people who care about there security (who still browse in console (surely not many anymore)), permanently allowing the cookies is not a good idea. But for those who are ready to drop off little security for convenience its ok.
Tags: ALL, authentication, Auto, browser cookies, BSD, bsd distributions, cfg, change, convenience, Cookie, default behaviour, Draft, everyone, file, free oses, GNU, gnu linux, good, How to, internet web, Linux, Lynx, lynx one, NetBSD, Onwards, OpenBSD, page, persistent cookies, point of view, programmers, quot, reason, security point, squeeze, support, text, text browser, text mode, time, TRUEb, TRUEc, TRUEuncomment, uncomment, use, using internet, vim, waste, waste of time, web page, writ
Posted in Curious Facts, Everyday Life, FreeBSD, Linux, System Administration | 1 Comment »