Posts Tagged ‘Path’

How to search text strings only in hidden files dot (.) files within a directory on Linux and FreeBSD

Saturday, April 28th, 2012

how-to-search-hidden-files-linux-freebsd-logo_grep
If there is necessity to look for a string in all hidden files with all sub-level subdirectories (be aware this will be time consuming and CPU stressing) use:
 

hipo@noah:~$ grep -rli 'PATH' .*

./.gftp/gftprc
./.gftp/cache/cache.OOqZVP
….

Sometimes its necessery to only grep for variables within the first-level directories (lets say you would like to grep a 'PATH' variable set, string within the $HOME directory, the command is:

hipo@noah:~$ grep PATH .[!.]*

.profile:PATH=/bin:/usr/bin/:${PATH}
.profile:export PATH
.profile:# set PATH so it includes user's private bin if it exists
.profile: PATH="$HOME/bin:$PATH"
.profile.language-env-bak:# set PATH so it includes user's private bin if it exists
.profile.language-env-bak: PATH="$HOME/bin:$PATH"
.viminfo:?/PATH.xcyrillic: XNLSPATH=/usr/X11R6/lib/X11/nls
.xcyrillic: export XNLSPATH

The regular expression .[!.]*, means exclude any file or directory name starting with '..', e.g. match only .* files

Note that to use the grep PATH .[!.]* on FreeBSD you will have to use this regular expression in bash shell, the default BSD csh or tsch shells will not recognize the regular expression, e.g.:

grep PATH '.[!.]*'
grep: .[!.]*: No such file or directory

Hence on BSD, if you need to look up for a string within the home directory, hidden files: .profile .bashrc .bash_profile .cshrc run it under bash shell:

freebsd# /usr/local/bin/bash
[root@freebsd:/home/hipo]# grep PATH .[!.]*

.bash_profile:# set PATH so it includes user's private bin if it exists
.bash_profile:# PATH=~/bin:"${PATH}"
.bash_profile:# do the same with …

Another easier to remember, alternative grep cmd is:

hipo@noah:~$ grep PATH .*
.profile:PATH=/bin:/usr/bin/:${PATH}
.profile:export PATH
.profile:# set PATH so it includes user's private bin if it exists
.profile: PATH="$HOME/bin:$PATH"
….

Note that grep 'string' .* is a bit different in meaning, as it will not prevent grep to match filenames with names ..filename1, ..filename2 etc.
Though grep 'string' .* will work note that it will sometimes output some unwanted matches if filenames with double dot in the beginning of file name are there …
That's all folks 🙂

Weblogic – How to change / remove IP/hostname quick and dirty howto

Wednesday, March 11th, 2015

Oracle-Weblogic-Server-logo-how-to-change-ip-hostname-weblogic-quick-and-dirty-howto

This is just quick & dirty doc on how to change/remove IP/host on Oracle WebLogic Application server

– In logs the Error message will be message like:


<Oct 21, 2013 1:06:51 AM SGT> <Warning> <Security> <BEA-090504> <Certificate chain received from cluster2.yourdomain.com – 192.168.1.41 failed hostname verification check. Certificate contained cluster1.yourdomain.com but check expected cluster2.yourdomain.com>


Solution:

On web console – change/remove IP/hostname


As root / admin supersuser:


– Stop Weblogic Webserver 

As this is RHEL Linux, to stop WLS use standard init script start / stop service command


service wls stop


– As Application user create directory where new key will be created


mkdir /home/uwls11pp/tmp_key
cd /home/uwls11pp/tmp_key


– Make backup of current JKS (Keystore File)


cp /WLS/app/oracle/wls1036/wlserver_10.3/server/lib/DemoIdentity.jks /WLS/app/oracle/wls1036/wlserver_10.3/server/lib/DemoIdentity.jks_11032015


– Execute set env . script


/WLS/app/oracle/wls1036/wlserver_10.3/server/bin/setWLSEnv.sh


– Copy & paste output from script above and export variables


export CLASSPATH;
export PATH;


– Check old certificate in keystore


/WLS/app/oracle/jdk1.7.0_25/bin/keytool -list -v -keystore /WLS/app/oracle/wls1036/wlserver_10.3/server/lib/DemoIdentity.jks  -storepass DemoIdentityKeyStorePassPhrase


– Delete old Weblogic keystore JKS file


/WLS/app/oracle/jdk1.7.0_25/bin/keytool -delete -alias demoidentity -keystore /WLS/app/oracle/wls1036/wlserver_10.3/server/lib/DemoIdentity.jks -storepass DemoIdentityKeyStorePassPhrase


– Check wether proper Java version is used


java -version


– Get hostname from hosts file


cat /etc/hosts


#Replace weblogic1 with your FQDN (Fully Qualified Domain Name) – this step will create new certificate with new hostname


java utils.CertGen -cn weblogic1 -keyfilepass DemoIdentityPassPhrase -certfile newcert -keyfile newkey


#Import certificate to “official” keystore


java utils.ImportPrivateKey -keystore /WLS/app/oracle/wls1036/wlserver_10.3/server/lib/DemoIdentity.jks -storepass DemoIdentityKeyStorePassPhrase -keyfile newkey.pem -keyfilepass DemoIdentityPassPhrase -certfile newcert.pem -alias demoidentity


#Recheck once again if correct certificate is in use


/WLS/app/oracle/jdk1.7.0_25/bin/keytool -list -v -keystore /WLS/app/oracle/wls1036/wlserver_10.3/server/lib/DemoIdentity.jks  -storepass DemoIdentityKeyStorePassPhrase


– Finally issue as root user restart Weblogic server again


service wls start

How to check Windows server installed Tomcat and Java version

Tuesday, August 19th, 2014

how-to-check-get-java_and-tomcat-version-on-windows-java-and-tomcat-logo
I'm filling up a TOP (Turn to Production) form for a project where my part as Web and Middleware Engineer included install of Tomcat 7 and Java 1.7 on Windows server 2008 R2 standard. TOP is required Excel sheet standard document used by many large companies to fill in together with Project Manager before the server is to be launched into Production mode.

Therefore I needed to find out previously installed Tomcat and Java version, here is how:

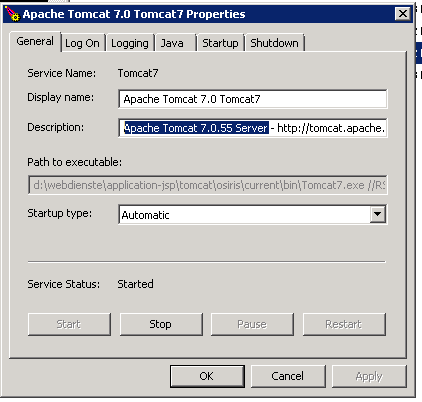
1. Go to Tomcat install directory and (click twice) run twice Tomcat7w

As tomcat is installed in Custom location in D:webdienste in this case I had to run:
 
D:webdiensteapplication-jsptomcatapplication-namecurrentbinTomcat7w.exe

I run it using command line (cmd.exe), however you can run it via Windows Explorer, if you're lazy typing.
You will get a window pop up like on below screenshot:

In this case Installed Tomcat version was 7.0.55

If you need to check the version on older Tomcat application server install you can run instead Tomcat6w – whether its Tomcat version 6 or Tomcat5w – for Tomcat ver. 5

In order to Check the java version the quickest way is via command line, again run cmd.exe from

Start -> Run -> cmd.exe

how-to-see-find-get-check-tomcat-version-on-windows-server-install-screenshot

Then cd to whenever is Java VM installed the usual location where it gets installed for Java 1.7 on Windows is:

C:Program FilesJavajre7bin

Java 8 common location is:

C:Program FilesJavajre8bin

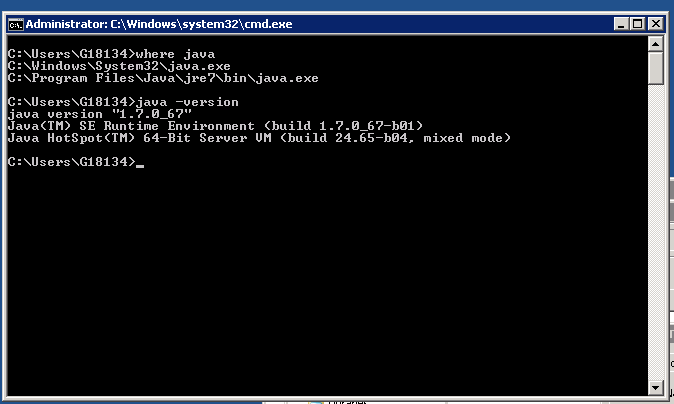
Java would automatically add PATH to Windows default PATH definitions during install, hence to find out exactly where java is installed on Windows server, type in cmd:

where java

Then to check the exact installed Java version on Win host is by invoking java (jre) cli with -version parameter:

java -version

how-to-check-get-java-version-info-on-windows-server-screenshot

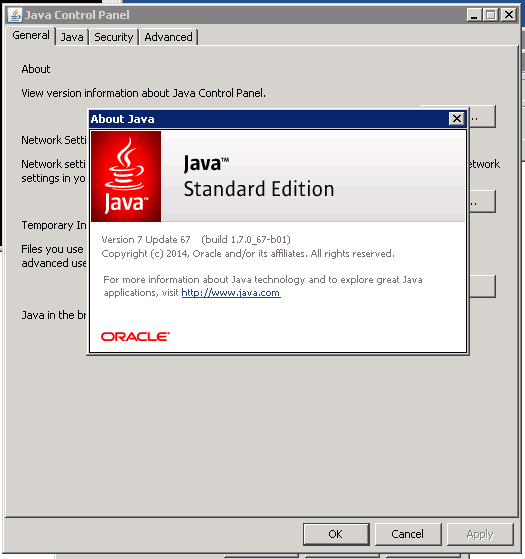
If you're lazy to type in commands, you can also check Java version in Windows from GUI by using:

Java Control Panel

To launch it in:

Start -> (Search Program and Files)

field type:

Java Conf and click on Java Control Panel

Then click on

General (tab) -> About

java-control-panel-gui-about-version-windows-server-screenshot


How to set a crontab to execute commands on a seconds time interval on GNU / Linux and FreeBSD

Sunday, October 30th, 2011

crontab-execute-cron-jobs-every-second-on-linux-cron-logo
Have you ever been in need to execute some commands scheduled via a crontab, every let’s say 5 seconds?, naturally this is not possible with crontab, however adding a small shell script to loop and execute a command or commands every 5 seconds and setting it up to execute once in a minute through crontab makes this possible.
Here is an example shell script that does execute commands every 5 seconds:

#!/bin/bash
command1_to_exec='/bin/ls';
command2_to_exec='/bin/pwd';
for i in $(echo 1 2 3 4 5 6 7 8 9 10 11); do
sleep 5;
$command1_to_exec; $command2_to_exec;
done

This script will issue a sleep every 5 seconds and execute the two commands defined as $command1_to_exec and $command2_to_exec

Copy paste the script to a file or fetch exec_every_5_secs_cmds.sh from here

The script can easily be modified to execute on any seconds interval delay, the record to put on cron to use with this script should look something like:

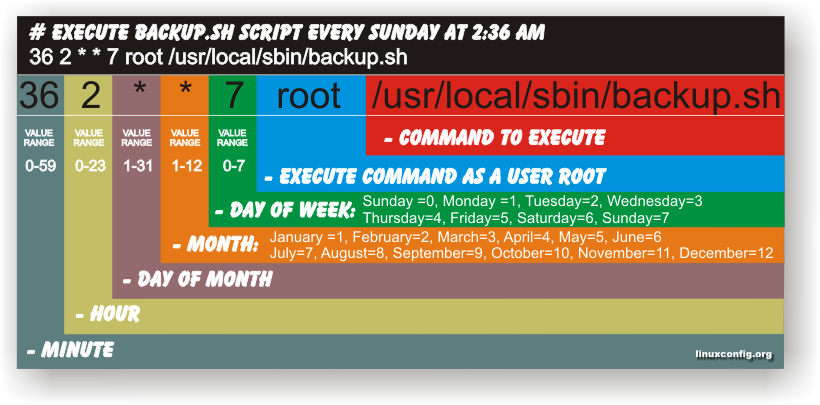
# echo '* * * * * /path/to/exec_every_5_secs_cmds.sh' | crontab -

Where of course /path/to/exec_every_5_secs_cmds.sh needs to be modified to a proper script name and path location.

Another way to do the on a number of seconds program / command schedule without using cron at all is setting up an endless loop to run/refresh via /etc/inittab with a number of predefined commands inside. An example endless loop script to run via inittab would look something like:

while [ 1 ]; do
/bin/ls
sleep 5;
done

To run the above sample never ending script using inittab, one needs to add to the end of inittab, some line like:

mine:234:respawn:/path/to/script_name.sh

A quick way to add the line from consone would be with echo:

echo 'mine:234:respawn:/path/to/script' >> /etc/inittab

Of course the proper paths, should be put in:

Then to load up the newly added inittab line, inittab needs to be reloaded with cmd:

# init q

I've also red, some other methods suggested to run programs on a periodic seconds basis using just cron, what I found in stackoverflow.com's  as a thread proposed as a solution is:

* * * * * /foo/bar/your_script
* * * * * sleep 15; /foo/bar/your_script
* * * * * sleep 30; /foo/bar/your_script
* * * * * sleep 45; /foo/bar/your_script

One guy, even suggested a shorted way with cron:

0/15 * * * * * /path/to/my/script

Windows equivalent of Linux which, whereis command – Windows WHERE command

Friday, June 6th, 2014

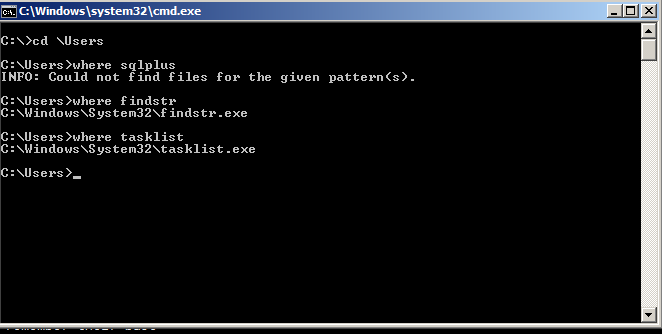
windows-find-commands-full-location-where-which-linux-commands-equivalent-in-windows-where-screenshot
In Linux there are the which and whereis commands showing you location of binaries included in $PATH # which lsof /usr/bin/lsof

# whereis lsof
lsof: /usr/bin/lsof /usr/share/man/man8/lsof.8.gz

so question arises what is which / whereis command Linux commands Windows equivalent?

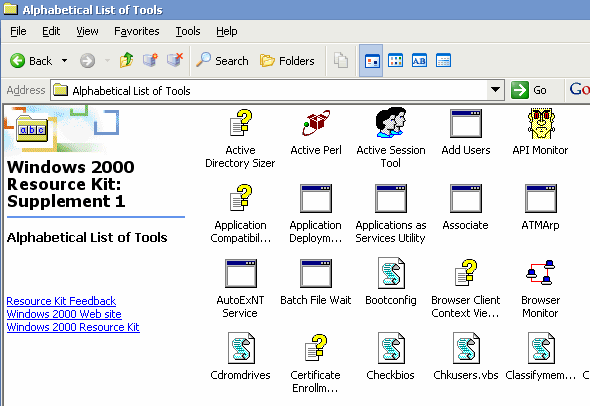
In older Windows Home / Server editions – e.g. – Windows XP, 2000, 2003 – there is no standard installed tool to show you location of windows %PATH% defined executables. However it is possible to add the WHERE command binary by installing Resource Kit tools for administrative tasks.

windows-resource-kit-tools-install-where-linux-command-equivalent-in-windows


In Windows Vista / 7 / 8 (and presumably in future Windows releases), WHERE command is (will be) available by default

C:\Users\Georgi>WHERE SQLPLUS
D:\webdienste\application\oracle\11.2.0\client_1\BIN\sqlplus.exe

Cheers! 🙂

How to check MASTER / SLAVE MySQL nodes status – Check MySQL Replication Status

Thursday, April 19th, 2012

I'm doing replication for one server. Its not the first time I do configure replication between two MySQL database nodes, however since I haven't done it for a few years, my "know how" has mostly vanished so I had some troubles in setting it up. Once I followed some steps to configure replication I had to check if the two MASTER / Slave MySQL db nodes communicate properly. Hence I decided to drop a short post on that just in case if someone has to do the same or if I myself forget how I did it so I can check later on:

1. Check if MASTER MySQL server node is configured properly

The standard way to check a MySQL master node status info is with:
 

mysql> show master status;
+——————+———-+———————————————————+——————+
| File | Position | Binlog_Do_DB | Binlog_Ignore_DB |
+——————+———-+———————————————————+——————+
| mysql-bin.000007 | 106 | database1,database2,database3 | |
+——————+———-+———————————————————+——————+
1 row in set (0.00 sec)

By putting \G some extra status info is provided:
 

mysql> show master status\G;
*************************** 1. row ***************************
File: mysql-bin.000007
Position: 106
Binlog_Do_DB: database1,database2,database3
Binlog_Ignore_DB:
1 row in set (0.00 sec)

ERROR:
No query specified

2. Check if Slave MySQL node is configured properly

To check status of the slave the cmd is:
 

mysql> show slave status;

The command returns an output like:
 

mysql> show slave status;+———————————-+————-+————-+————-+—————+——————+———————+————————-+—————+———————–+——————+——————-+——————————————————-+———————+——————–+————————+————————-+—————————–+————+————+————–+———————+—————–+—————–+—————-+—————+——————–+——————–+——————–+—————–+——————-+—————-+———————–+——————————-+—————+—————+—————-+—————-+| Slave_IO_State | Master_Host | Master_User | Master_Port | Connect_Retry | Master_Log_File | Read_Master_Log_Pos | Relay_Log_File | Relay_Log_Pos | Relay_Master_Log_File | Slave_IO_Running | Slave_SQL_Running | Replicate_Do_DB | Replicate_Ignore_DB | Replicate_Do_Table | Replicate_Ignore_Table | Replicate_Wild_Do_Table | Replicate_Wild_Ignore_Table | Last_Errno | Last_Error | Skip_Counter | Exec_Master_Log_Pos | Relay_Log_Space | Until_Condition | Until_Log_File | Until_Log_Pos | Master_SSL_Allowed | Master_SSL_CA_File | Master_SSL_CA_Path | Master_SSL_Cert | Master_SSL_Cipher | Master_SSL_Key | Seconds_Behind_Master | Master_SSL_Verify_Server_Cert | Last_IO_Errno | Last_IO_Error | Last_SQL_Errno | Last_SQL_Error |+———————————-+————-+————-+————-+—————+——————+———————+————————-+—————+———————–+——————+——————-+——————————————————-+———————+——————–+————————+————————-+—————————–+————+————+————–+———————+—————–+—————–+—————-+—————+——————–+——————–+——————–+—————–+——————-+—————-+———————–+——————————-+—————+—————+—————-+—————-+| Waiting for master to send event | HOST_NAME.COM | slave_user | 3306 | 10 | mysql-bin.000007 | 106 | mysqld-relay-bin.000002 | 251 | mysql-bin.000007 | Yes | Yes | database1,database2,database3 | | | | | | 0 | | 0 | 106 | 407 | None | | 0 | No | | | | | | 0 | No | 0 | | 0 | |+———————————-+————-+————-+————-+—————+——————+———————+————————-+—————+———————–+——————+——————-+——————————————————-+———————+——————–+————————+————————-+—————————–+————+————+————–+———————+—————–+—————–+—————-+—————+——————–+——————–+——————–+—————–+——————-+—————-+———————–+——————————-+—————+—————+—————-+—————-+

As you can see the output is not too readable, as there are too many columns and data to be displayed and this doesn't fit neither a text console nor a graphical terminal emulator.

To get more readable (more verbose) status for the SQL SLAVE, its better to use command:
 

mysql> show slave status\G;

Here is a sample returned output:
 

mysql> show slave status\G;*************************** 1. row *************************** Slave_IO_State: Waiting for master to send event Master_Host: HOST_NAME.COM Master_User: slave_user Master_Port: 3306 Connect_Retry: 10 Master_Log_File: mysql-bin.000007 Read_Master_Log_Pos: 106 Relay_Log_File: mysqld-relay-bin.000002 Relay_Log_Pos: 251 Relay_Master_Log_File: mysql-bin.000007 Slave_IO_Running: Yes Slave_SQL_Running: Yes Replicate_Do_DB: database1,database2,database3 Replicate_Ignore_DB: Replicate_Do_Table: Replicate_Ignore_Table: Replicate_Wild_Do_Table: Replicate_Wild_Ignore_Table: Last_Errno: 0 Last_Error: Skip_Counter: 0 Exec_Master_Log_Pos: 106 Relay_Log_Space: 407 Until_Condition: None Until_Log_File: Until_Log_Pos: 0 Master_SSL_Allowed: No Master_SSL_CA_File: Master_SSL_CA_Path: Master_SSL_Cert: Master_SSL_Cipher: Master_SSL_Key: Seconds_Behind_Master: 0Master_SSL_Verify_Server_Cert: No Last_IO_Errno: 0 Last_IO_Error: Last_SQL_Errno: 0 Last_SQL_Error: 1 row in set (0.00 sec)ERROR: No query specified

If show master status or shwo slave status commands didn't reveal replication issue, one needs to stare at the mysql log for more info.

How to mount NTFS Windows XP filesystem on FreeBSD, NetBSD, OpenBSD

Friday, May 11th, 2012

Mounting NTFS hdd partitions on FreeBSD logo picture

A friend of mine bring home a Seagate External Hard Disk Drive using USB 3 as a communication media. I needed to attach the hard disk to my FreeBSD router to transfer him some data, the External HDD is formatted to use NTFS as a main file partition and hence to make the file transfers I had to somehow mount the NTFS partition on the HDD.

FreeBSD and other BSDs, just like Linux does not have embedded NTFS file system mount support.
In order to add an external write support for the plugged hdd NTFS I looked in the ports tree:

freebsd# cd /usr/ports
freebsd# make search name='ntfs'
Port: fusefs-ntfs-2010.10.2
Path: /usr/ports/sysutils/fusefs-ntfs
Info: Mount NTFS partitions (read/write) and disk images
Maint: ports@FreeBSD.org
B-deps: fusefs-libs-2.7.4 libiconv-1.13.1_1 libtool-2.4 libublio-20070103 pkg-config-0.25_1
R-deps: fusefs-kmod-0.3.9.p1.20080208_7 fusefs-libs-2.7.4 libiconv-1.13.1_1 libublio-20070103 pkg-config-0.25_1
WWW: http://www.tuxera.com/community/

Port: ntfsprogs-2.0.0_1
Path: /usr/ports/sysutils/ntfsprogs
Info: Utilities and library to manipulate NTFS partitions
Maint: ports@FreeBSD.org
B-deps: fusefs-libs-2.7.4 libiconv-1.13.1_1 libublio-20070103 pkg-config-0.25_1
R-deps: libublio-20070103 pkg-config-0.25_1
WWW: http://www.linux-ntfs.org/
freebs# cd sysutils/fusefs-ntfs/
freebsd# ls
Makefile distinfo files/ pkg-descr pkg-plist
freebsd# cat pkg-descr
The ntfs-3g driver is an open source, freely available read/write NTFS
driver, which provides safe and fast handling of the Windows XP, Windows
Server 2003 and Windows 2000 filesystems. Almost the full POSIX filesystem
functionality is supported, the major exceptions are changing the file
ownerships and the access rights.
WWW: http://www.tuxera.com/community/

Using ntfs-3g I managed to succeed mounting the NTFS on my old PC running FreeBSD ver. 7_2

1. Installing fuserfs-ntfs support on BSD

Before I can use ntfs-3g, to mount the paritition, I had to install fuserfs-ntfs bsd port, with:

freebsd# cd /usr/ports/sysutils/fusefs-ntfs
freebsd# make install clean
.....

I was curious if ntfsprogs provides other utilities to do the ntfs mount but whilst trying to install it I realized it is already installed as a dependency package to fusefs-ntfs.

fusefs-ntfs package provides a number of utilities for creating, mounting, fixing and doing various manipulations with Microsoft NTFS filesystems.

Here is a list of all the executable utilities helpful in NTFS fs management:

freebsd# pkg_info -L fusefs-ntfs\* | grep -E "/bin/|/sbin|README"
/usr/local/bin/lowntfs-3g
/usr/local/bin/ntfs-3g
/usr/local/bin/ntfs-3g.probe
/usr/local/bin/ntfs-3g.secaudit
/usr/local/bin/ntfs-3g.usermap
/usr/local/bin/ntfscat
/usr/local/bin/ntfscluster
/usr/local/bin/ntfscmp
/usr/local/bin/ntfsfix
/usr/local/bin/ntfsinfo
/usr/local/bin/ntfsls
/usr/local/sbin/mkntfs
/usr/local/sbin/ntfsclone
/usr/local/sbin/ntfscp
/usr/local/sbin/ntfslabel
/usr/local/sbin/ntfsresize
/usr/local/sbin/ntfsundelete
/usr/local/share/doc/ntfs-3g/README
/usr/local/share/doc/ntfs-3g/README.FreeBSD

The README and README.FreeBSD are wonderful, reading for those who want to get more in depth knowledge on using the up-listed utilities.

One utility, worthy to mention, I have used in the past is ntfsfix. ntfsfix resolve issues with NTFS partitions which were not unmounted on system shutdown (electricity outage), system hang up etc.

2. Start fusefs (ntfs) and configure it to auto load on system boot

Once fuserfs-ntfs is installed, if its necessery ntfs fs mounts to be permanently supported on the BSD system add fusefs_enable="YES" to /etc/rc.conf(the FreeBSD services auto load conf).

freebsd# echo 'fusefs_enable="YES"' >> /etc/rc.conf

One note to make here is that you need to have also dbus_enable="YES" and hald_enable="YES" in /etc/rc.conf, not having this two in rc.conf will prevent fusefs to start properly. Do a quick grep to make sure this two variables are enabled:

Afterwards fsusefs load up script should be run:

freebsd# /usr/local/etc/rc.d/fusefs start
Starting fusefs.

Another alternative way to load ntfs support on the BSD host is to directly load fuse.ko kernel module:

freebsd# /sbin/kldload fuse.ko

3. Mounting the NTFS partition

In my case, the Seagate hard drive was detected as da0, where the NTFS partition was detected as s1 (da0s1):

freebsd# dmesg|grep -i da0
da0 at umass-sim0 bus 0 target 0 lun 0
da0: Fixed Direct Access SCSI-4 device
da0: 40.000MB/s transfers
da0: 953869MB (1953525164 512 byte sectors: 255H 63S/T 121601C)br />GEOM_LABEL: Label for provider da0s1 is ntfs/Expansion Drive.
GEOM_LABEL: Label for provider da0s1 is ntfs/Expansion Drive.

Therefore further to mount it one can use mount_ntfs (to quickly mount in read only mode) or ntfs-3g for (read / write mode):

If you need to just quickly mount a disk drive to copy some data and umount it with no need for writting to the NTFS partition do;

freebsd# /sbin/mount_ntfs /dev/ad0s1 /mnt/disk

Note that mount_ntfs command is a native BSD command and have nothing to do with ntfs-3g. Therefore using it to mount NTFS is not the same as mounting it via ntfs-3g cmd

freebsd# /usr/local/bin/ntfs-3g -o rw /dev/da0s1 /mnt/disk/

Something, I've noticed while using ntfs-3g is, it fails to properly exit even when the ntfs-3g shell execution is over:

freebsd# ps ax |grep -i ntfs|grep -v grep
18892 ?? Is 0:00.00 /usr/local/bin/ntfs-3g -o rw /dev/da0s1 /mnt/disk/

I dunno if this is some kind of ntfs-3g bug or feature specific to all versions of FreeBSD or it is something local to FBSD 7.2

Thought ntfs-3g, keeps appearing in process list, praise God as of time of writting NTFS support on FreeBSD prooved to be stable.
Read / Write disk operations to the NTFS I tested it with works great. Just about 5 years ago I still remember write mode was still experimental. Now it seems NTFS mounts can be used with no hassle even on production machines.

4. Auto mounting NTFS partition on FreeBSD system boot

There are two approaches towards 'the problem' I can think of.
The better way to auto mount on boot (in my view) is through /etc/fstab use

If /etc/fstab + ntfs-3g is to be used, you will however change the default /sbin/mount_ntfs command to point to /usr/local/bin/ntfs-3g, i.e.:

freebsd# mv /sbin/mount_ntfs /sbin/mount_ntfs.orig
freebsd# ln -s /usr/local/bin/ntfs-3g /sbin/mount_ntfs

Then to mount /dev/da0s1 via /etc/fstab add line:

/dev/ad0s1 /mnt/disk ntfs rw,late 0 0

To not bother with text editor run:

freebsd# echo '/dev/ad0s1 /mnt/disk ntfs rw,late 0 0' >> /etc/fstab

I've red in posts in freebsd forums, there is also a way to use ntfs-3g for mounting partitions, without substituting the original bsd /sbin/mount_ntfs, the exact commands suggested to be used with no need to prior mv /sbin/mount_ntfs to /sbin/mount_ntfs.orig and link it to ntfs is:

/dev/ad0s1 /disk ntfs rw,mountprog=/usr/local/bin/ntfs-3g,late 0 0

For any other NTFS partitions, for instance /dev/ad0s2, /dev/ad2s1 etc. simply change the parititon name and mount points.

The second alternative to adding the NTFS to auto mount is through /etc/rc.local. /etc/rc.local content will be executed very late in system boot. :

echo '/usr/local/bin/ntfs-3g -o rw /dev/da0s1' >> /etc/rc.local

One disadvanage of using /etc/rc.local for mounting the partition is the hanging ntfs-3g in proc list:

freebsd# ps ax |grep -i ntfs|grep -v grep
18892 ?? Is 0:00.00 /usr/local/bin/ntfs-3g -o rw /dev/da0s1 /mnt/disk/

Though, I haven't tested it yet. Using the same methodology should be perfectly working on PC-BSD, DragonFlyBSD, NetBSD and OpenBSD.
I will be glad if someone who runs any of the other BSDs can confirm, following this instructions works fine on these BSDs too.

Need something to push me go on

Monday, June 25th, 2007

The day didn’t started good. I feel lonely although I know I’m not, hope this won’t waste for too long. I hope something would happen into my life to give me a new breath and power to continue the path destined for me.END—–

God’s mercy

Thursday, September 6th, 2007

Glory be to the Father, The Son and The Holy Spirit! The Lord is very merciful. I’ve thinked a lot about my life.And I’ve realized that I’ve done many mistakes and that I don’t strive to hear his voice. Nor to follow his path formy life. So recently I’m praying for the Lord to guide me and teach me how to hear and understand his voice!As he said in the Holy Bible: “My sheeps hear my voice”. He have to teach me howto hear his voice.Also I’ve prayed few days ago about a sallary increase and Hallelujah! Today When I went to Varna I saw howthe lord heard my prayer I have a sallary increase. But I was increadibly happy because the Lord is hearing my prayers.Currently I think that God is healing my physical sickness. For which Glory be to Him The One Ever Living Lord and Our Lord Jesus Christ. Also I was very happy that a friend (Stoian) with which we discussed the topics of Our Faith the last Yeastern has received Christ as a Saviour. And is also going to the Orthodox Church. He has something I have lost a lot of days before the Fire in me the Lord has fired when I believed. Thanks Lord ! for every mercy and blessing you’re doing towards me.Mostly the last days I start realizing that we are so sinful and our minds are so deluded that we try to explain The Existence of God ( Something I tried to do for a very long time ), without actually seeking God but using our human knowledge and understanding. Let God not give me to do this anymore. Blessed, Blessed, Blessed are you Lord Shabbaoth Glory to your Heavenly Throne! I even smiled today looking at the sky :] God is merciful!!! END—–

The Notebook a nice romance movie worthy to see

Thursday, November 10th, 2011

The Notebook a great Romance Movie worthy to be seen

As I a person who values highly love between man and woman and believes in true love between man and woman under God’s providence I really enjoyed The Notebook and I recommend it to everyone out there looking for true love.
The movie gives a good example that one can experience great love. This is a fresh breath for me as I’m surrounded by dozens of people who does concentrate too much about the fleshly pleasure and forget that the essence of love is not in the flesh but in the love between man and woman’s spirit and soul.
The Notebook is a record of one true love story between a man and wife who went through love, hate long time separation, regret broken heart, loss of path in life, fading love and then after a long time of being away of each other burning love again.
It tells the story of a man and wife who loved so much that they get old together a story of true dedication and lasting love. Watch the movie you will certainly not regret it.