Posts Tagged ‘DNS’

Hack: Using ssh / curl or wget to test TCP port connection state to remote SSH, DNS, SMTP, MySQL or any other listening service in PCI environment servers

Wednesday, December 30th, 2020

using-curl-ssh-wget-to-test-tcp-port-opened-or-closed-for-web-mysql-smtp-or-any-other-linstener-in-pci-linux-logo

If you work on PCI high security environment servers in isolated local networks where each package installed on the Linux / Unix system is of importance it is pretty common that some basic stuff are not there in most cases it is considered a security hole to even have a simple telnet installed on the system. I do have experience with such environments myself and thus it is pretty daunting stuff so in best case you can use something like a simple ssh client if you're lucky and the CentOS / Redhat / Suse Linux whatever distro has openssh-client package installed.
If you're lucky to have the ssh onboard you can use telnet in same manner as netcat or the swiss army knife (nmap) network mapper tool to test whether remote service TCP / port is opened or not. As often this is useful, if you don't have access to the CISCO / Juniper or other (networ) / firewall equipment which is setting the boundaries and security port restrictions between networks and servers.

Below is example on how to use ssh client to test port connectivity to lets say the Internet, i.e.  Google / Yahoo search engines.
 

[root@pciserver: /home ]# ssh -oConnectTimeout=3 -v google.com -p 23
OpenSSH_7.9p1 Debian-10+deb10u2, OpenSSL 1.1.1g  21 Apr 2020
debug1: Connecting to google.com [172.217.169.206] port 23.
debug1: connect to address 172.217.169.206 port 23: Connection timed out
debug1: Connecting to google.com [2a00:1450:4017:80b::200e] port 23.
debug1: connect to address 2a00:1450:4017:80b::200e port 23: Cannot assign requested address
ssh: connect to host google.com port 23: Cannot assign requested address
root@pcfreak:/var/www/images# ssh -oConnectTimeout=3 -v google.com -p 80
OpenSSH_7.9p1 Debian-10+deb10u2, OpenSSL 1.1.1g  21 Apr 2020
debug1: Connecting to google.com [172.217.169.206] port 80.
debug1: connect to address 172.217.169.206 port 80: Connection timed out
debug1: Connecting to google.com [2a00:1450:4017:807::200e] port 80.
debug1: connect to address 2a00:1450:4017:807::200e port 80: Cannot assign requested address
ssh: connect to host google.com port 80: Cannot assign requested address
root@pcfreak:/var/www/images# ssh google.com -p 80
ssh_exchange_identification: Connection closed by remote host
root@pcfreak:/var/www/images# ssh google.com -p 80 -v -oConnectTimeout=3
OpenSSH_7.9p1 Debian-10+deb10u2, OpenSSL 1.1.1g  21 Apr 2020
debug1: Connecting to google.com [172.217.169.206] port 80.
debug1: connect to address 172.217.169.206 port 80: Connection timed out
debug1: Connecting to google.com [2a00:1450:4017:80b::200e] port 80.
debug1: connect to address 2a00:1450:4017:80b::200e port 80: Cannot assign requested address
ssh: connect to host google.com port 80: Cannot assign requested address
root@pcfreak:/var/www/images# ssh google.com -p 80 -v -oConnectTimeout=5
OpenSSH_7.9p1 Debian-10+deb10u2, OpenSSL 1.1.1g  21 Apr 2020
debug1: Connecting to google.com [142.250.184.142] port 80.
debug1: connect to address 142.250.184.142 port 80: Connection timed out
debug1: Connecting to google.com [2a00:1450:4017:80c::200e] port 80.
debug1: connect to address 2a00:1450:4017:80c::200e port 80: Cannot assign requested address
ssh: connect to host google.com port 80: Cannot assign requested address
root@pcfreak:/var/www/images# ssh google.com -p 80 -v
OpenSSH_7.9p1 Debian-10+deb10u2, OpenSSL 1.1.1g  21 Apr 2020
debug1: Connecting to google.com [172.217.169.206] port 80.
debug1: Connection established.
debug1: identity file /root/.ssh/id_rsa type 0
debug1: identity file /root/.ssh/id_rsa-cert type -1
debug1: identity file /root/.ssh/id_dsa type -1
debug1: identity file /root/.ssh/id_dsa-cert type -1
debug1: identity file /root/.ssh/id_ecdsa type -1
debug1: identity file /root/.ssh/id_ecdsa-cert type -1
debug1: identity file /root/.ssh/id_ed25519 type -1
debug1: identity file /root/.ssh/id_ed25519-cert type -1
debug1: identity file /root/.ssh/id_xmss type -1
debug1: identity file /root/.ssh/id_xmss-cert type -1
debug1: Local version string SSH-2.0-OpenSSH_7.9p1 Debian-10+deb10u2
debug1: ssh_exchange_identification: HTTP/1.0 400 Bad Request


debug1: ssh_exchange_identification: Content-Type: text/html; charset=UTF-8


debug1: ssh_exchange_identification: Referrer-Policy: no-referrer


debug1: ssh_exchange_identification: Content-Length: 1555


debug1: ssh_exchange_identification: Date: Wed, 30 Dec 2020 14:13:25 GMT


debug1: ssh_exchange_identification:


debug1: ssh_exchange_identification: <!DOCTYPE html>

debug1: ssh_exchange_identification: <html lang=en>

debug1: ssh_exchange_identification:   <meta charset=utf-8>

debug1: ssh_exchange_identification:   <meta name=viewport content="initial-scale=1, minimum-scale=1, width=device-width">

debug1: ssh_exchange_identification:   <title>Error 400 (Bad Request)!!1</title>

debug1: ssh_exchange_identification:   <style>

debug1: ssh_exchange_identification:     *{margin:0;padding:0}html,code{font:15px/22px arial,sans-serif}html{background:#fff;color:#222;padding:15px}body{margin:7% auto 0;max-width:390px;min-height:180px;padding:30px 0 15px}* > body{background:url(//www.google.com/images/errors/robot.png) 10
debug1: ssh_exchange_identification: 0% 5px no-repeat;padding-right:205px}p{margin:11px 0 22px;overflow:hidden}ins{color:#777;text-decoration:none}a img{border:0}@media screen and (max-width:772px){body{background:none;margin-top:0;max-width:none;padding-right:0}}#logo{background:url(//www.g
debug1: ssh_exchange_identification: oogle.com/images/branding/googlelogo/1x/googlelogo_color_150x54dp.png) no-repeat;margin-left:-5px}@media only screen and (min-resolution:192dpi){#logo{background:url(//www.google.com/images/branding/googlelogo/2x/googlelogo_color_150x54dp.png) no-repeat 0
debug1: ssh_exchange_identification: % 0%/100% 100%;-moz-border-image:url(//www.google.com/images/branding/googlelogo/2x/googlelogo_color_150x54dp.png) 0}}@media only screen and (-webkit-min-device-pixel-ratio:2){#logo{background:url(//www.google.com/images/branding/googlelogo/2x/googlelogo_
debug1: ssh_exchange_identification: color_150x54dp.png) no-repeat;-webkit-background-size:100% 100%}}#logo{display:inline-block;height:54px;width:150px}

debug1: ssh_exchange_identification:   </style>

debug1: ssh_exchange_identification:   <a href=//www.google.com/><span id=logo aria-label=Google></span></a>

debug1: ssh_exchange_identification:   <p><b>400.</b> <ins>That\342\200\231s an error.</ins>

debug1: ssh_exchange_identification:   <p>Your client has issued a malformed or illegal request.  <ins>That\342\200\231s all we know.</ins>

ssh_exchange_identification: Connection closed by remote host


Here is another example on how to test remote host whether a certain service such as DNS (bind) or telnetd is enabled and listening on remote local network  IP with ssh

[root@pciserver: /home ]# ssh 192.168.1.200 -p 53 -v -oConnectTimeout=5
OpenSSH_7.9p1 Debian-10+deb10u2, OpenSSL 1.1.1g  21 Apr 2020
debug1: Connecting to 192.168.1.200 [192.168.1.200] port 53.
debug1: connect to address 192.168.1.200 port 53: Connection timed out
ssh: connect to host 192.168.1.200 port 53: Connection timed out

[root@server: /home ]# ssh 192.168.1.200 -p 23 -v -oConnectTimeout=5
OpenSSH_7.9p1 Debian-10+deb10u2, OpenSSL 1.1.1g  21 Apr 2020
debug1: Connecting to 192.168.1.200 [192.168.1.200] port 23.
debug1: connect to address 192.168.1.200 port 23: Connection timed out
ssh: connect to host 192.168.1.200 port 23: Connection timed out


But what if Linux server you have tow work on is so paranoid that you even the ssh client is absent? Well you can use anything else that is capable of doing a connectivity to remote port such as wget or curl. Some web servers or application servers usually have wget or curl as it is integral part for some local shell scripts doing various operation needed for proper services functioning or simply to test locally a local or remote listener services, if that's the case we can use curl to connect and get output of a remote service simulating a normal telnet connection like this:

host:~# curl -vv 'telnet://remote-server-host5:22'
* About to connect() to remote-server-host5 port 22 (#0)
*   Trying 10.52.67.21… connected
* Connected to aflpvz625 (10.52.67.21) port 22 (#0)
SSH-2.0-OpenSSH_5.3

Now lets test whether we can connect remotely to a local net remote IP's Qmail mail server with curls telnet simulation mode:

host:~#  curl -vv 'telnet://192.168.0.200:25'
* Expire in 0 ms for 6 (transfer 0x56066e5ab900)
*   Trying 192.168.0.200…
* TCP_NODELAY set
* Expire in 200 ms for 4 (transfer 0x56066e5ab900)
* Connected to 192.168.0.200 (192.168.0.200) port 25 (#0)
220 This is Mail Pc-Freak.NET ESMTP

Fine it works, lets now test whether a remote server who has MySQL listener service on standard MySQL port TCP 3306 is reachable with curl

host:~#  curl -vv 'telnet://192.168.0.200:3306'
* Expire in 0 ms for 6 (transfer 0x5601fafae900)
*   Trying 192.168.0.200…
* TCP_NODELAY set
* Expire in 200 ms for 4 (transfer 0x5601fafae900)
* Connected to 192.168.0.200 (192.168.0.200) port 3306 (#0)
Warning: Binary output can mess up your terminal. Use "–output -" to tell
Warning: curl to output it to your terminal anyway, or consider "–output
Warning: <FILE>" to save to a file.
* Failed writing body (0 != 107)
* Closing connection 0
root@pcfreak:/var/www/images#  curl -vv 'telnet://192.168.0.200:3306'
* Expire in 0 ms for 6 (transfer 0x5598ad008900)
*   Trying 192.168.0.200…
* TCP_NODELAY set
* Expire in 200 ms for 4 (transfer 0x5598ad008900)
* Connected to 192.168.0.200 (192.168.0.200) port 3306 (#0)
Warning: Binary output can mess up your terminal. Use "–output -" to tell
Warning: curl to output it to your terminal anyway, or consider "–output
Warning: <FILE>" to save to a file.
* Failed writing body (0 != 107)
* Closing connection 0

As you can see the remote connection is returning binary data which is unknown to a standard telnet terminal thus to get the output received we need to pass curl suggested arguments.

host:~#  curl -vv 'telnet://192.168.0.200:3306' –output –
* Expire in 0 ms for 6 (transfer 0x55b205c02900)
*   Trying 192.168.0.200…
* TCP_NODELAY set
* Expire in 200 ms for 4 (transfer 0x55b205c02900)
* Connected to 192.168.0.200 (192.168.0.200) port 3306 (#0)
g


The curl trick used to troubleshoot remote port to remote host from a Windows OS host which does not have telnet installed by default but have curl instead.

Also When troubleshooting vSphere Replication, it is often necessary to troubleshoot port connectivity as common Windows utilities are not available.
As Curl is available in the VMware vCenter Server Appliance command line interface.

On servers where curl is not there but you have wget is installed you can use it also to test a remote port


# wget -vv -O /dev/null http://google.com:554 –timeout=5
–2020-12-30 16:54:22–  http://google.com:554/
Resolving google.com (google.com)… 172.217.169.206, 2a00:1450:4017:80b::200e
Connecting to google.com (google.com)|172.217.169.206|:554… failed: Connection timed out.
Connecting to google.com (google.com)|2a00:1450:4017:80b::200e|:554… failed: Cannot assign requested address.
Retrying.

–2020-12-30 16:54:28–  (try: 2)  http://google.com:554/
Connecting to google.com (google.com)|172.217.169.206|:554… ^C

As evident from output the port 554 is filtered in google which is pretty normal.

If curl or wget is not there either as a final alternative you can either install some perl, ruby, python or bash script etc. that can opens a remote socket to the remote IP.

Improve DNS lookup domain resolve speed on Linux / UNIX servers through /etc/resolv.conf timeout, attempts, rorate options

Thursday, February 27th, 2020

improve-dns-lookup-speed-on-Linux-UNIX-servers-resolv.conf-change-dns-settings-linux
If you're an performance optimization freak and you want to optimize your Linux servers to perform better in terms of DNS resolve slowness because of failing DNS resolve queries due to Domain Name Server request overload or due to Denial of Service attack towards it. It might be interesting to mention about some little known functionalities of /etc/resolv.conf described in the manual page.

The defined nameservers under /etc/resolv.conf are queried one by one waiting for responce of the sent DNS resolve request if it is not replied from the first one for some time, the 2nd one is queried until a responce is received by any of the defined nameserver IPs

A default /etc/resolv.conf on a new Linux server install looks something like this:
 

nameserver      10.10.8.1
nameserver      10.10.8.2
nameserver      10.10.8.3
search          sub.subdomain.com subdom.dom.domain.com


However one thing is that defined if NS1 dies out due to anything, it takes timeout time until the second or 3rd working one takes over to resolve the query.
This is controlled by the timeout value.

Below is description from man page

timeout:n
sets the amount of time the resolver will wait for a
response from a remote name server before retrying the
query via a different name server.  Measured in
seconds, the default is RES_TIMEOUT (currently 5, see
<resolv.h>).  The value for this option is silently
capped to 30.


  • In other words Timeout value is time to resolving IP address from hostname through DNS server,timeout option is to reduce hostname lookup time

As you see from manual default is 5 seconds which is quite high, thus reducing the value to 3 secs or even 1 seconds is a good sysadmin practice IMHO.

Another value that could be tuned in /etc/resolv.conf is attempts value below is what the manual says about it: 
 

attempts:n
                     Sets the number of times the resolver will send a query to its name servers before giving up and returning an error to the calling application.  The default is RES_DFLRETRY (cur‐
                     rently 2, see <resolv.h>).  The value for this option is silently capped to 5.


  • This means default behaviour on a failing DNS query resolve is to try to resend the DNS resolve request to the failing nameserver 5 more times, that is quite high thus it is a good practice from my experience to reduce it to something as 2 or 1


Another very useful resolv.conf value is rotate
The default behavior of how DNS outgoing Domain requests are handled is to use only the primary defined DNS, instead if you need to do a load balancing in a round-robin manner add to conf rotate option.

The final /etc/resolv.conf optimized would look like so:


linux# cat /etc/resolv.conf

nameserver      10.10.8.1
nameserver      10.10.8.2
nameserver      10.10.8.3
search          sub.subdomain.com subdom.dom.domain.com
options ndots:1
options timeout:1
options attempts:1
options rotate


The search opt. placement is also important to be placed in the right location in the file. The correct placement is after the nameservers defined, I have to say in older Linux distributions the correct placement of search option was to be on top of resolv.conf.

Note that this configuration is good and fits not only Linux but also is a good DNS lookup optimization speed on other UNIX derivatives such as FreeBSD / NetBSD as well as other Proprietary OS UNIX machines running IBM AIX etc.

On Linux it is also possible to place the options given in one single line like so, below is the config I have on my www.pc-freak.net running Lenovo server:


domain www.pc-freak.net
search www.pc-freak.net
#nameserver 192.168.0.1
nameserver 127.0.0.1
nameserver 83.228.92.2
nameserver 8.8.8.8
nameserver 83.228.92.1
nameserver 208.67.222.222
nameserver 208.67.220.220
options timeout:2 attempts:1 rotate


When is /etc/hosts record venerated and when is /etc/resolv.conf DNS defined queried for a defined DNS host?


One important thing to know when dealing with /etc/resolv.conf  is what happens if a Name domain is defined in both /etc/hosts and /etc/resolv.conf.
For example you have a www.pc-freak.net domain record in /etc/hosts to a certain domain
but the DNS nameserver 8.8.8.8 in Google has a record to an IP that is the real IP 83.228.93.76


83.228.93.75 irc.www.pc-freak.net www.pc-freak.net pcfreak.biz www.pc-freak.net pcfreak.us services.www.pc-freak.net jabber.www.pc-freak.net


# dig @8.8.8.8 www.pc-freak.net

; <<>> DiG 9.11.5-P4-5.1-Debian <<>> @8.8.8.8 www.pc-freak.net
; (1 server found)
;; global options: +cmd
;; Got answer:
;; ->>HEADER<<- opcode: QUERY, status: NOERROR, id: 54656
;; flags: qr rd ra; QUERY: 1, ANSWER: 1, AUTHORITY: 0, ADDITIONAL: 1

;; OPT PSEUDOSECTION:
; EDNS: version: 0, flags:; udp: 512
;; QUESTION SECTION:
;www.pc-freak.net.                  IN      A

;; ANSWER SECTION:
www.pc-freak.net.           3599    IN      A       83.228.93.76

;; Query time: 40 msec
;; SERVER: 8.8.8.8#53(8.8.8.8)
;; WHEN: чт фев 27 18:04:23 EET 2020
;; MSG SIZE  rcvd: 57


  • Which of the 2 different IPs will the applications installed on the server such as Apache / Squid / MySQL / tinyproxy for their DNS resolve operations?


Now it is time to say few words about /etc/nsswitch.conf (The Nameserver switching configuration file). This file defines the DNS resolve file used order in which the Operationg System does IP to domain translation and backwards.
 

# grep -i hosts: /etc/nsswitch.conf

hosts:          files dns myhostname

As you can see first the local defined in files like /etc/hosts record is venerated when resolving, then it is the externally configured DNS resolver IPs from /etc/resolv.conf.

nsswitch.conf  is used also for defining where the OS will look up for user / passwd (e.g. login credentials) on login, on systems which are having an LDAP authentication via the sssd (system security services daemon) via definitions like:


passwd:     files sss
shadow:     files sss
group:      files sss


E.g. the user login will be first try to read from local /etc/passwd , /etc/shadow , /etc/groups and if no matched record is found then the LDAP service the sssd is queried.

Mail send from command line on Linux and *BSD servers – useful for scripting

Monday, September 10th, 2018

mail-send-email-from-command-line-on-linux-and-freebsd-operating-systems-logo

Historically Email sending has been very different from what most people use it in the Office, there was no heavy Email clients such as Outlook Express no MX Exchange, no e-mail client capabilities for Calendar and Meetings schedule as it is in most of the modern corporate offices that depend on products such as Office 365 (I would call it a connectedHell 365 days a year !).

There was no free webmail and pop3 / imap providers such as Mail.Yahoo.com, Gmail.com, Hotmail.com, Yandex.com, RediffMail, Mail.com the innumerous lists goes and on.
Nope back in the day emails were doing what they were originally supposed to like the post services in real life simply send and receive messages.

For those who remember that charming times, people used to be using BBS-es (which were basicly a shared set-up home system as a server) or some of the few University Internal Email student accounts or by crazy sysadmins who received their notification and warnings logs about daemon (services) messages via local DMZ-ed network email servers and it was common to read the email directly with mail (mailx) text command or custom written scripts … It was not uncommon also that mailx was used heavily to send notification messages on triggered events from logs. Oh life was simple and clear back then, and even though today the email could be used in a similar fashion by hard-core old school sysadmins and Dev Ops / simple shell scriptings tasks or report cron jobs such usage is already in the deep history.

The number of ways one could send email in text format directly from the GNU / Linux / *BSD server to another remote mail MTA node (assuming it had properly configured Relay server be it Exim or Postifix) were plenty.

In this article I will try to rewind back some of the UNIX history by pinpointing a few of the most common ways, one used to send quick emails directly from a remote server connection terminal or lets say a cheap VPS few cents server, through something like (SSH or Telnet) etc.
 

1. Using the mail command client (part of bsd-mailx on Debian).
 

In my previous article Linux: "bash mail command not found" error fix
I ended the article with a short explanation on how this is done but I will repeat myself one more time here for the sake of clearness of this article.

root@linux:~# echo "Your Sample Message Body" | mail -s "Whatever … Message Subject" remote_receiver@remote-server-email-address.com


The mail command will connect to local server TCP PORT 25 on local configured MTA and send via it. If the local MTA is misconfigured or it doesn't have a proper MX / PTR DNS records etc. or not configure as a relay SMTP remote mail will not get delivered. Sent Email should be properly delivered at remote recipient address.

How to send HTML formatted emails using mailx command on Linux console / terminal shell using remote server through SSH ?

Connect to remote SSH server (VPS), dedicated server, home Linux router etc. and run:


root@linux:~# mailx -a 'Content-Type: text/html'
      -s "This is advanced mailx indeed!" < email_content.html
      "first_email_to_send_to@gmail.com, mail_recipient_2@yahoo.com"


email_content.html should be properly formatted (at best w3c standard compliant) HTML.

Here is an example email_content.html (skeleton file)


    To: your_customer@gmail.com
    Subject: This is an HTML message
    From: marketing@your_company.com
    Content-Type: text/html; charset="utf8"

    <html>
    <body>
    <div style="
        background-color:
        #abcdef; width: 300px;
        height: 300px;
        ">
    </div>
Whatever text mixed with valid email HTML tags here.
    </body>
    </html>


Above command sends to two email addresses however if you have a text formatted list of recipients you can easily use that file with a bash shell script for loop and send to multiple addresses red from lets say email_addresses_list.txt .

To further advance the one liner you can also want to provide an email attachment, lets say the file email_archive.rar by using the -A email_archive.rar argument.


root@linux:~# mailx -a 'Content-Type: text/html'
      -s "This is advanced mailx indeed!" -A ~/email_archive.rar < email_content.html
      "first_email_to_send_to@gmail.com, mail_recipient_2@yahoo.com"


For those familiar with Dan Bernstein's Qmail MTA (which even though a bit obsolete is still a Security and Stability Beast across email servers) – mailx command had to be substituted with a custom qmail one in order to be capable to send via qmail MTA daemon.
 

2. Using sendmail command to send email
 

Do you remember that heavy hard to configure MTA monster sendmail ? It was and until this very day is the default Mail Transport Agent for Slackware Linux.

Here is how we were supposed to send mail with it:


[root@sendmail-host ~]# vim email_content_to_be_delivered.txt


Content of file should be something like:

Subject: This Email is sent from UNIX Terminal Email

Hi this Email was typed in a file and send via sendmail console email client
(part of the sendmail mail server)

It is really fun to go back in the pre-history of Mail Content creation 🙂


[root@sendmail-host ~]# sendmail -v user_name@remote-mail-domain.com  < /tmp/email_content_to_be_delivered.txt


-v argument provided, will make the communication between the mail server and your mail transfer agent visible.
 

3. Using ssmtp command to send mail
 

ssmtp MTA and its included shell command was used historically as it was pretty straight forward you just launch it on the command line type on one line all your email and subject and ship it (by pressing the CTRL + D key combination).

To give it a try you can do:


root@linux:~# apt-get install ssmtp
Reading package lists… Done
Building dependency tree       
Reading state information… Done
The following additional packages will be installed:
  libgnutls-openssl27
The following packages will be REMOVED:
  exim4-base exim4-config exim4-daemon-heavy
The following NEW packages will be installed:
  libgnutls-openssl27 ssmtp
0 upgraded, 2 newly installed, 3 to remove and 1 not upgraded.
Need to get 239 kB of archives.
After this operation, 3,697 kB disk space will be freed.
Do you want to continue? [Y/n] Y
Get:1 http://ftp.us.debian.org/debian stretch/main amd64 ssmtp amd64 2.64-8+b2 [54.2 kB]
Get:2 http://ftp.us.debian.org/debian stretch/main amd64 libgnutls-openssl27 amd64 3.5.8-5+deb9u3 [184 kB]
Fetched 239 kB in 2s (88.5 kB/s)         
Preconfiguring packages …
dpkg: exim4-daemon-heavy: dependency problems, but removing anyway as you requested:
 mailutils depends on default-mta | mail-transport-agent; however:
  Package default-mta is not installed.
  Package mail-transport-agent is not installed.
  Package exim4-daemon-heavy which provides mail-transport-agent is to be removed.


(Reading database … 169307 files and directories currently installed.)
Removing exim4-daemon-heavy (4.89-2+deb9u3) …
dpkg: exim4-config: dependency problems, but removing anyway as you requested:
 exim4-base depends on exim4-config (>= 4.82) | exim4-config-2; however:
  Package exim4-config is to be removed.
  Package exim4-config-2 is not installed.
  Package exim4-config which provides exim4-config-2 is to be removed.
 exim4-base depends on exim4-config (>= 4.82) | exim4-config-2; however:
  Package exim4-config is to be removed.
  Package exim4-config-2 is not installed.
  Package exim4-config which provides exim4-config-2 is to be removed.

Removing exim4-config (4.89-2+deb9u3) …
Selecting previously unselected package ssmtp.
(Reading database … 169247 files and directories currently installed.)
Preparing to unpack …/ssmtp_2.64-8+b2_amd64.deb …
Unpacking ssmtp (2.64-8+b2) …
(Reading database … 169268 files and directories currently installed.)
Removing exim4-base (4.89-2+deb9u3) …
Selecting previously unselected package libgnutls-openssl27:amd64.
(Reading database … 169195 files and directories currently installed.)
Preparing to unpack …/libgnutls-openssl27_3.5.8-5+deb9u3_amd64.deb …
Unpacking libgnutls-openssl27:amd64 (3.5.8-5+deb9u3) …
Processing triggers for libc-bin (2.24-11+deb9u3) …
Setting up libgnutls-openssl27:amd64 (3.5.8-5+deb9u3) …
Setting up ssmtp (2.64-8+b2) …
Processing triggers for man-db (2.7.6.1-2) …
Processing triggers for libc-bin (2.24-11+deb9u3) …


As you see from above output local default Debian Linux Exim is removed …

Lets send a simple test email …


hipo@linux:~# ssmtp user@remote-mail-server.com
Subject: Simply Test SSMTP Email
This Email was send just as a test using SSMTP obscure client
via SMTP server.
^d


What is notable about ssmtp is that even though so obsolete today it supports of STARTTLS (email communication encryption) that is done via its config file


/etc/ssmtp/ssmtp.conf


4. Send Email from terminal using Mutt client
 

Mutt was and still is one of the swiff army of most used console text email clients along with Alpine and Fetchmail to know more about it read here

Mutt supports reading / sending mail from multiple mailboxes and capable of reading IMAP and POP3 mail fetch protocols and was a serious step forward over mailx. Its syntax pretty much resembles mailx cmds.


root@linux:~# mutt -s "Test Email" user@example.com < /dev/null


Send email including attachment a 15 megabytes MySQL backup of Squirrel Webmail


root@linux:~# mutt  -s "This is last backup small sized database" -a /home/backups/backup_db.sql user@remote-mail-server.com < /dev/null


5. Using simple telnet to test and send email (verify existence of email on remote SMTP)
 

As a Mail Server SysAdmin this is one of my best ways to test whether I had a server properly configured and even sometimes for the sake of fun I used it as a hack to send my mail 🙂
telnet is and will always be a great tool for doing SMTP issues troubleshooting.
 

It is very useful to test whether a remote SMTP TCP port 25 is opened or a local / remote server firewall prevents connections to MTA.

Below is an example connect and send example using telnet to my local SMTP on www.pc-freak.net (QMail powered (R) 🙂 )
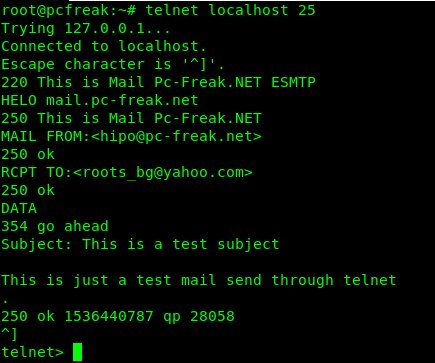
sending-email-using-telnet-command-howto-screenshot


root@pcfreak:~# telnet localhost 25
Trying 127.0.0.1…
Connected to localhost.
Escape character is '^]'.
220 This is Mail Pc-Freak.NET ESMTP
HELO mail.www.pc-freak.net
250 This is Mail Pc-Freak.NET
MAIL FROM:<hipo@www.pc-freak.net>
250 ok
RCPT TO:<roots_bg@yahoo.com>
250 ok
DATA
354 go ahead
Subject: This is a test subject


This is just a test mail send through telnet
.
250 ok 1536440787 qp 28058
^]
telnet>


Note that the returned messages are native to qmail, a postfix would return a slightly different content, here is another test example to remote SMTP running sendmail or postfix.


root@pcfreak:~# telnet mail.servername.com 25
Trying 127.0.0.1…
Connected to localhost.localdomain (127.0.0.1).
Escape character is '^]'.
220 mail.servername.com ESMTP Sendmail 8.13.8/8.13.8; Tue, 22 Oct 2013 05:05:59 -0400
HELO yahoo.com
250 mail.servername.com Hello mail.servername.com [127.0.0.1], pleased to meet you
mail from: systemexec@gmail.com
250 2.1.0 hipo@www.pc-freak.net… Sender ok
rcpt to: hip0d@yandex.ru
250 2.1.5 hip0d@yandex.ru… Recipient ok
data
354 Enter mail, end with "." on a line by itself
Hey
This is test email only


Thanks
.
250 2.0.0 r9M95xgc014513 Message accepted for delivery
quit
221 2.0.0 mail.servername.com closing connection
Connection closed by foreign host.


It is handy if you want to know whether remote MTA server has a certain Emailbox existing or not with telnet by simply trying to send to a certian email and checking the Email server returned output (note that the message returned depends on the remote MTA version and many qmails are configured to not give information on the initial SMTP handshake but returns instead a MAILER DAEMON failure error sent back to your sender address. Some MX servrers are still vulnerable to this attack yet, historically dreamhost.com. Below attack screenshot is made at the times before dreamhost.com fixed the brute force email issue.
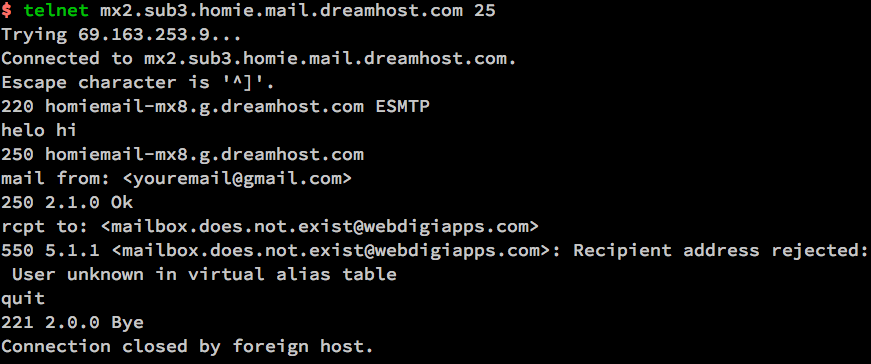
Terminal-Verify-existing-Email-with-telnet

6. Using simple netcat TCP/IP Swiss Army Knife to test and send email in console

netcat-logo-a-swiff-army-knife-of-the-hacker-and-security-expert-logo
Other tool besides telnet of testing remote / local SMTP is netcat tool (for reading and writting data across TCP and UDP connections).

The way to do it is analogous but since netcat is not present on most Linux OSes by default you need to install it through the package manager first be it apt or yum etc.

# apt-get –yes install netcat


First lets create a new file test_email_content.txt using bash's echo cmd.


# echo 'EHLO hostname
MAIL FROM: hip0d@yandex.ru
RCPT TO:   solutions@www.pc-freak.net
DATA
From: A tester <hip0d@yandex.ru>
To:   <solutions@www.pc-freak.net>
Date: date
Subject: A test message from test hostname


Delete me, please
.
QUIT
' >>test_email_content.txt


# netcat -C localhost 25 < test_email_content.txt


220 This is Mail Pc-Freak.NET ESMTP
250-This is Mail Pc-Freak.NET
250-STARTTLS
250-SIZE 80000000
250-PIPELINING
250 8BITMIME
250 ok
250 ok
354 go ahead
451 See http://pobox.com/~djb/docs/smtplf.html.

Because of its simplicity and the fact it has a bit more capabilities in reading / writing data over network it was no surprise it was among the favorite tools not only of crackers and penetration testers but also a precious debug tool for the avarage sysadmin. netcat's advantage over telnet is you can push-pull over the remote SMTP port (25) a non-interactive input.


7. Using openssl to connect and send email via encrypted channel


root@linux:~# openssl s_client -connect smtp.gmail.com:465 -crlf -ign_eof

    ===
               Certificate negotiation output from openssl command goes here
        ===

        220 smtp.gmail.com ESMTP j92sm925556edd.81 – gsmtp
            EHLO localhost
        250-smtp.gmail.com at your service, [78.139.22.28]
        250-SIZE 35882577
        250-8BITMIME
        250-AUTH LOGIN PLAIN XOAUTH2 PLAIN-CLIENTTOKEN OAUTHBEARER XOAUTH
        250-ENHANCEDSTATUSCODES
        250-PIPELINING
        250-CHUNKING
        250 SMTPUTF8
            AUTH PLAIN *passwordhash*
        235 2.7.0 Accepted
            MAIL FROM: <hipo@pcfreak.org>
        250 2.1.0 OK j92sm925556edd.81 – gsmtp
            rcpt to: <systemexec@gmail.com>
        250 2.1.5 OK j92sm925556edd.81 – gsmtp
            DATA
        354  Go ahead j92sm925556edd.81 – gsmtp
            Subject: This is openssl mailing

            Hello nice user
            .
        250 2.0.0 OK 1339757532 m46sm11546481eeh.9
            quit
        221 2.0.0 closing connection m46sm11546481eeh.9
        read:errno=0


8. Using CURL (URL transfer) tool to send SSL / TLS secured crypted channel emails via Gmail / Yahoo servers and MailGun Mail send API service


Using curl webpage downloading advanced tool for managing email send might be  a shocking news to many as it is idea is to just transfer data from a server.
curl is mostly used in conjunction with PHP website scripts for the reason it has a Native PHP implementation and many PHP based websites widely use it for download / upload of user data.
Interestingly besides support for HTTP and FTP it has support for POP3 and SMTP email protocols as well
If you don't have it installed on your server and you want to give it a try, install it first with apt:
 

root@linux:~# apt-get install curl


To learn more about curl capabilities make sure you check cURL –manual arg.
 

root@linux:~# curl –manual


a) Sending Emails via Gmail and other Mail Public services

Curl is capable to send emails from terminal using Gmail and Yahoo Mail services, if you want to give that a try.
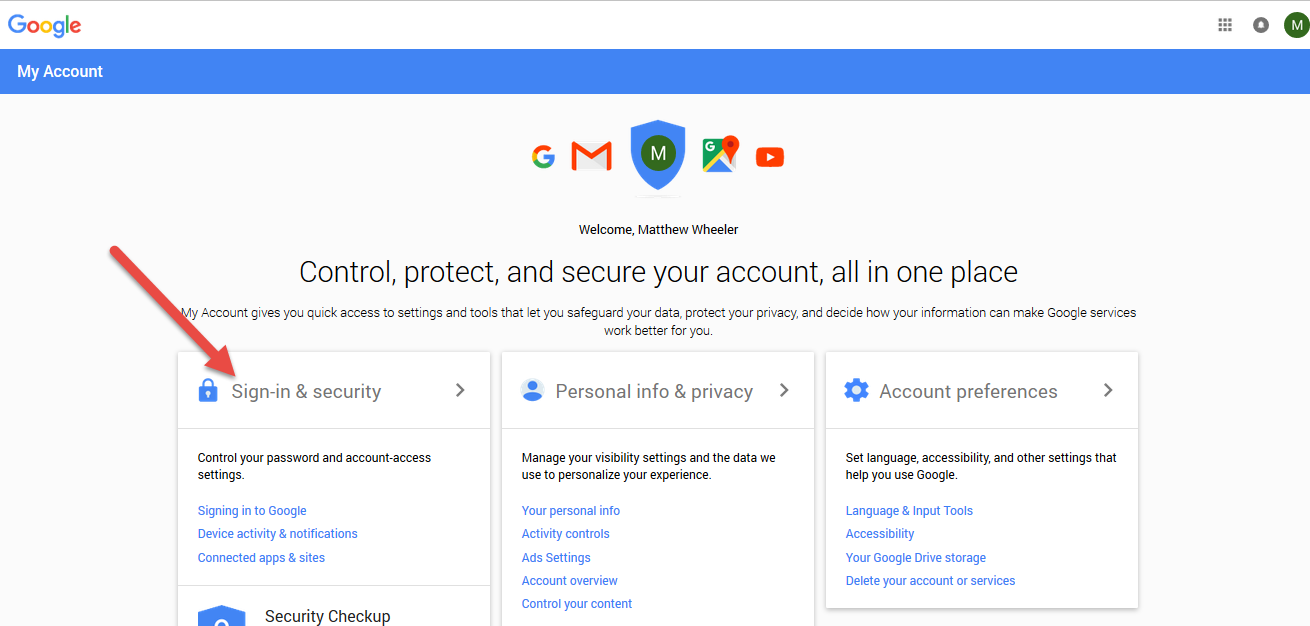
gmail-settings-google-allow-less-secure-apps-sign-in-to-google-screenshot

Go to myaccount.google.com URL and login from the web interface choose Sign in And Security choose Allow less Secure Apps to be -> ON and turn on access for less secure apps in Gmail. Though I have not tested it myself so far with Yahoo! Mail, I suppose it should have a similar security settings somewhere.

Here is how to use curl to send email via Gmail.
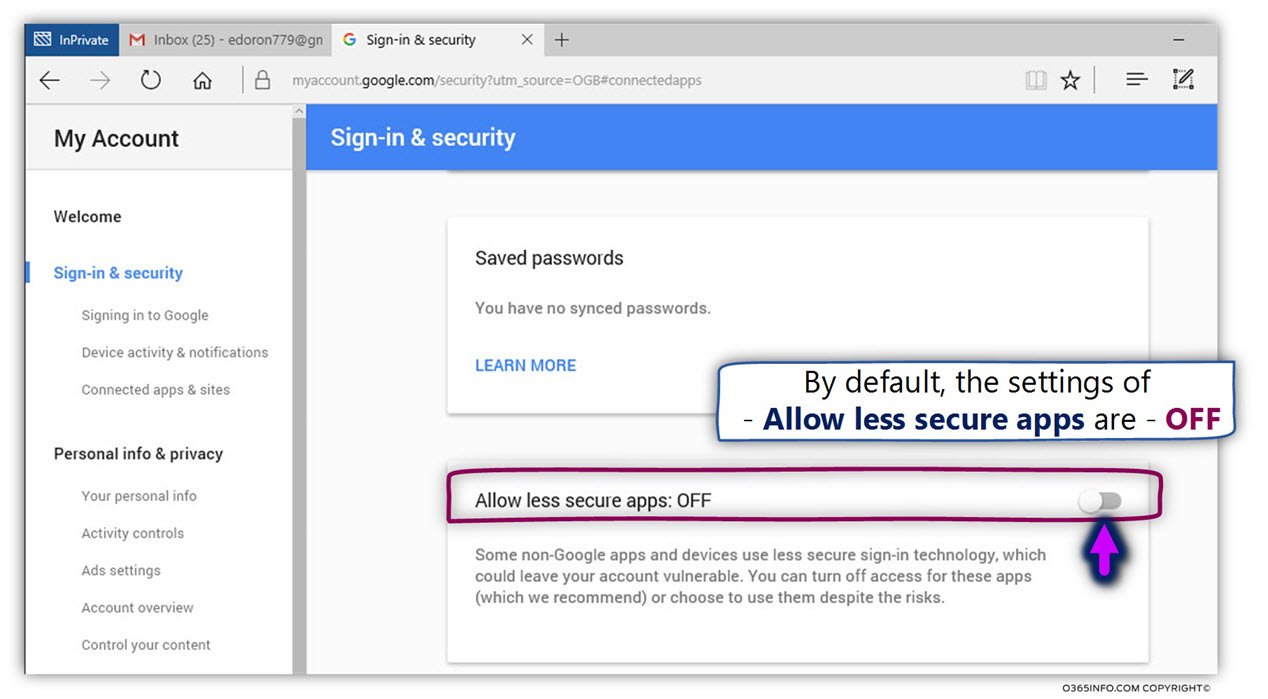
Gmail-password-Allow-less-secure-apps-ON-screenshot-howto-to-be-able-to-send-email-with-text-commands-with-encryption-and-outlook


root@linux:~# curl –url 'smtps://smtp.gmail.com:465' –ssl-reqd \
  –mail-from 'your_email@gmail.com' –mail-rcpt 'remote_recipient@mail.com' \
  –upload-file mail.txt –user 'your_email@gmail.com:your_accout_password'


b) Sending Emails using Mailgun.com (Transactional Email Service API for developers)

To use Mailgun to script sending automated emails go to Mailgun.com and create account and generate new API key.

Then use curl in a similar way like below example:


curl -sv –user 'api:key-7e55d003b…f79accd31a' \
    https://api.mailgun.net/v3/sandbox21a78f824…3eb160ebc79.mailgun.org/messages \
    -F from='Excited User <developer@yourcompany.com>' \
    -F to=sandbox21a78f824…3eb160ebc79.mailgun.org \
    -F to=user_acc@gmail.com \
    -F subject='Hello' \
    -F text='Testing Mailgun service!' \
   –form-string html='<h1>EDMdesigner Blog</h1><br /><cite>This tutorial helps me understand email sending from Linux console</cite>' \
    -F attachment=@logo_picture.jpg


The -F option that is heavy present in above command lets curl (Emulate a form filled in button in which user has pressed the submit button).
For more info of the options check out man curl.


9. Using swaks command to send emails from


root@linux:~# apt-cache show swaks|grep "Description" -B 10
Package: swaks
Version: 20170101.0-1
Installed-Size: 221
Maintainer: Andreas Metzler <ametzler@debian.org>
Architecture: all
Depends: perl
Recommends: libnet-dns-perl, libnet-ssleay-perl
Suggests: perl-doc, libauthen-sasl-perl, libauthen-ntlm-perl
Description-en: SMTP command-line test tool
 swaks (Swiss Army Knife SMTP) is a command-line tool written in Perl
 for testing SMTP setups; it supports STARTTLS and SMTP AUTH (PLAIN,
 LOGIN, CRAM-MD5, SPA, and DIGEST-MD5). swaks allows one to stop the
 SMTP dialog at any stage, e.g to check RCPT TO: without actually
 sending a mail.
 .
 If you are spending too much time iterating "telnet foo.example 25"
 swaks is for you.
Description-md5: f44c6c864f0f0cb3896aa932ce2bdaa8


root@linux:~# apt-get instal –yes swaks

root@linux:~# swaks –to mailbox@example.com -s smtp.gmail.com:587
      -tls -au <user-account> -ap <account-password>


The -tls argument (in order to use gmail encrypted TLS channel on port 587)

If you want to hide the password not to provide the password from command line so (in order not to log it to user history) add the -a options.

10. Using qmail-inject on Qmail mail servers to send simple emails

Create new file with content like:
 

root@qmail:~# vim email_file_content.text
To: user@mail-example.com
Subject: Test


This is a test message.
 

root@qmail:~# cat email_file_content.text | /var/qmail/bin/qmail-inject


qmail-inject is part of ordinary qmail installation so it is very simple it even doesn't return error codes it just ships what ever given as content to remote MTA.
If the linux host where you invoke it has a properly configured qmail installation the email will get immediately delivered. The advantage of qmail-inject over the other ones is it is really lightweight and will deliver the simple message more quickly than the the prior heavy tools but again it is more a Mail Delivery Agent (MDA) for quick debugging, if MTA is not working, than for daily email writting.

It is very useful to simply test whether email send works properly without sending any email content by (I used qmail-inject to test local email delivery works like so).
 

root@linux:~# echo 'To: mailbox_acc@mail-server.com' | /var/qmail/bin/qmail-inject


11. Debugging why Email send with text tool is not being send properly to remote recipient

If you use some of the above described methods and email is not delivered to remote recipient email addresses check /var/log/mail.log (for a general email log and postfix MTAs – the log is present on many of the Linux distributions) and /var/log/messages or /var/log/qmal (on Qmail installations) /var/log/exim4 (on servers running Exim as MTA).
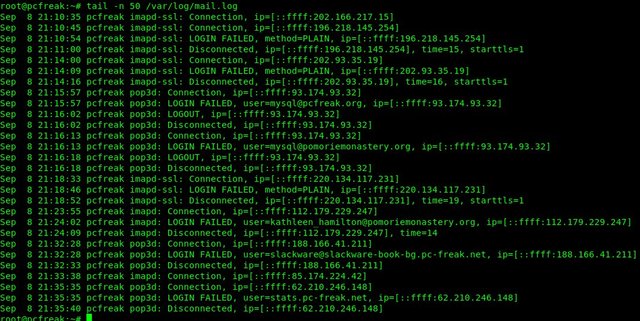
https://www.pc-freak.net/images/linux-email-log-debug-var-log-mail-output

 Closure

The ways to send email via Linux terminal are properly innumerous as there are plenty of scripted tools in various programming languages, I am sure in this article,  also missing a lot of pre-bundled installable distro packages. If you know other interesting ways / tools to send via terminal I would like to hear it.

Hope you enjoyed, happy mailing !

Thursday, July 14th, 2016

use-remote-dns-on-mozilla-firefox-howto-windows-linux-logo.svg

If you're using Mozilla Firefox browser to browse the Web with Traffic Tunneling via SSH Tunnel to your own Linux server like I do in order to prevent yourself traffic to be sniffed from your Work corporate computer (as most of the corporations such as IBM / Hewlett Packard / Concentrix etc. are forcing all employee PC traffic to be  to be transported via default set Windows Corporate Proxy active for all browsers.

Then you will certainly also want to prevent the DNS requests to be not logged somewhere in your Corporate IT department thus the question arises:

How to force DNS requests to be made through the Proxy server (SSH host)?

Nomatter where you're using Firefox browser with advanced proxying plugin such as FoxyProxy FF add-on or the default Proxy FF features the DNS lookups might end up in Corporate set DNS servers often forced for the computer / notebook and impossible to be changed to a custom ones as many of the Corporation internal Sharepoints and domains are only visible from their internal networks.

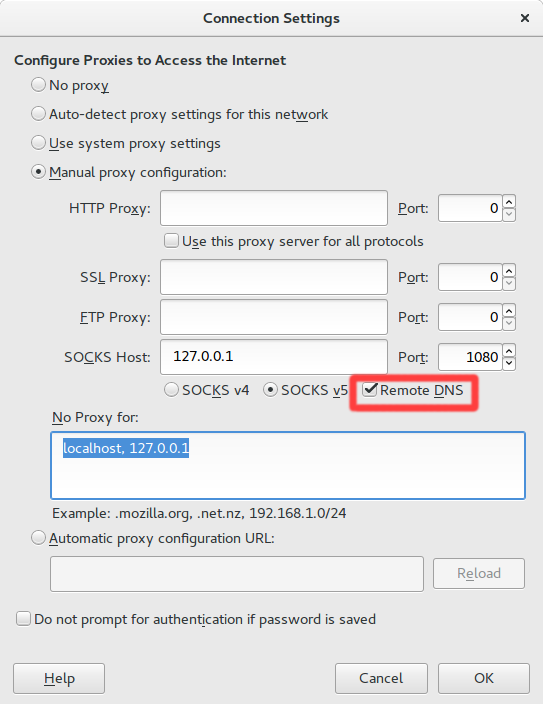
Thanksfully in newer versions there is an easy way to do it directly from Visual menus via:

Tools -> Options -> Advanced -> Network -> Settings

You will get a screen like below:
 

firefox-use-proxy-remote-dns-howto-screenshot

Just tick the Remote DNS and that will force Firefox to query remote Proxy server proxy DNS


If you happen to be running older Firefox which doesn't have the Remote DNS tick you can also try to set the setting manually:


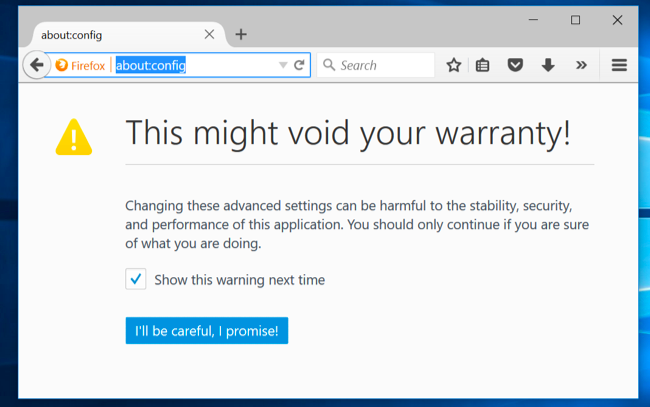
  1. In firefox type this in your address bar:

    about:config

  2. Click I'll be careful I  promise.

  3. In the filter textbox, type: proxy

  4. Find the preference name called *network.proxy.socks_remote_dns*. Double click it to set it to true.

    i-will-be-careful-i-promise-firefox-windows-screenshot-warranty


network-proxy-socks-remote_dns-firefox-screenshot

Enjoy ! 🙂

How to configure equivalent of Linux /etc/resolv.conf search domain.com in MS Windows – DNS Suffix

Thursday, June 26th, 2014

windows-append-dns-suffixes-on-windows-equivalent-of-linux-search-in-resolv-conf-screenshot

Linux's default file that defines what DNS servers will be used /etc/resolv.conf typically contains directives with the default search domain or domains; used for FQDN (Fully Qualified Domain Name) completion when no domain suffix is supplied as part of the  DNS query. Lets say sub-domains under domain.com  has to be accessed (in /etc/resolv.conf) there is:

search domain.com

That is very handy whether you have to ssh or open in web browser (sites) or multiple servers each residing under a single main domain name (for example:
server1.domain.com, server2.domain.com, server3.domain.com etc.) by typing in browser or SSH by only passing the sub-domain name i.e.:
 

http://server1
http://server2

or

ssh user@server1
ssh user@server2


Here is /etc/resolv.conf from www.pc-freak.net

# cat /etc/resolv.conf

domain www.pc-freak.net
search www.pc-freak.net bergon.net


Here is example of what I mean, ascii-games is a sub-domain of www.pc-freak.net (ascii-games.www.pc-freak.net) and is resolved with no need to type full FQDN


# host ascii-games
ascii-games.www.pc-freak.net has address 83.228.93.76


The DNS server knows that all failed to resolve queries by set DNS should be searched (resolved) under the defined search domain, i.e. each DNS query for server2, serverX (would try to be resolved as a subdomain of domain.com).

Therefore, a very good question is what is Microsoft Windows (2000, 2003, 8) OS equivalent way to define search domain.com into /etc/resolv.conf?

In Windows the same /etc/resolv.conf hosts search is done using the so called "DNS Suffixes".

DNS Suffixes are used for resolv of (domain name strings with no dots).

Adding a new DNS Suffix in Windows is done from

windows-control-panel-network-connections-screeshot-add-dns-suffix-equivalent-to-linux-resolv-conf-search


Control Panel -> Network and Sharing Center -> Change Adapter Settings


Here select LAN card Adapter used to bring Internet to Win host,be it Local Area Connection or

Wireless Network Connection

 and choose:

Properties


windows-append-dns-suffixes-on-windows-equivalent-of-linux-search-in-resolv-conf-screenshot


From

Network Connection Properties

dialog select

Internet Protocol Version 4 (TCP/IPv4)

and again click on

Properties


network-properties-internet-protocol-version4_tcp_ipv4-windows-settings-screenshot-advanced-tab-add-dns-suffix

On next dialog click on


Advanced (button) -> DNS (tab)

windows-append-dns-suffixes-on-windows-equivalent-of-linux-search-in-resolv-conf-screenshot


In field
 

DNS Suffix for this connection

fill in host which you would like to resolve with no need for FQDN and press the

Add


(exactly like adding search www.pc-freak.net in  /etc/resolv.conf on Linux host). Add multiple hosts DNS Suffix, if you want to access subdomains naming from multiple base domain.

Fix temporary DNS problems on Windows – ipconfig /flushdns

Monday, March 17th, 2014

fix temporary dns issues ipconfig /fush
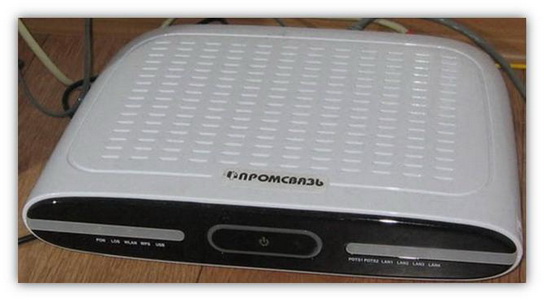
My internet connection is coming router over a strange Belarusian ADSL modem "Промсвязь". This device serves as ADSL modem and a Wireless Router.
promsviaz_belarusian_adsl_and_wifi_modem

Periodically I'm experiencing issues with DNS, where there is internet but DNS resolving stops woring even though in ipconfig /all I can see DNS settings are proper:

C:\Users\hipo> ipconfig /all

...
Wireless LAN adapter Wireless Network Connection:

   Connection-specific DNS Suffix  . :
   Description . . . . . . . . . . . : Intel(R) Centrino(R) Ultimate-N 6300 AGN
   Physical Address. . . . . . . . . : 3C-A9-F4-4C-E7-98
   DHCP Enabled. . . . . . . . . . . : Yes
   Autoconfiguration Enabled . . . . : Yes
   Link-local IPv6 Address . . . . . : fe80::5d2f:97b8:9e1a:2b13%63(Preferred)
   IPv4 Address. . . . . . . . . . . : 192.168.100.2(Preferred)
   Subnet Mask . . . . . . . . . . . : 255.255.255.0
   Lease Obtained. . . . . . . . . . : March 17, 2014 16:57:40 PM
   Lease Expires . . . . . . . . . . : March 18, 2014 16:57:40 PM
   Default Gateway . . . . . . . . . : 192.168.100.1
   DHCP Server . . . . . . . . . . . : 192.168.100.1
   DHCPv6 IAID . . . . . . . . . . . : 1094494708
   DHCPv6 Client DUID. . . . . . . . : 00-01-00-01-19-CB-1A-5D-A4-5D-36-5A-EB-84

   DNS Servers . . . . . . . . . . . : 8.8.8.8
                                       192.168.100.1
                                       8.8.4.4

   NetBIOS over Tcpip. . . . . . . . : Enabled


The fix to situation is to Restart Promsvijazy and restart my Notebook. As this fix takes a lot of time I found another "work around". Make Windows Flush its DNS servers (forget old DNS servers and re-assign them again)

C:\Users\hipo> ipconfig /flushdns

Windows IP Configuration Successfully flushed the DNS Resolver Cache.


Other useful commands to make connection re-initiate completely are:

ipconfig /renew

Renews all Adapter settings (Lan, Wiki, PPP etc.) – re-assign IPs / re-initiate connections and

ipconfig /release

Releases any established connection

Fixing QMAIL mail server SMTP auto-configure issues in Thunderbird and other mail IMAP / POP3 mobile clients

Friday, July 13th, 2012

One of the QMAIL mail servers, setup-uped on a Debian host has been creating some auto configuration issues. Every-time a new mail user tries to use the embedded Thunderbird client auto configuration, the auto config fails leaving the client unable to use his Mailbox through POP3 or IMAP protocols.

Since about 2 years Thunderbird and many other modern pop3 and imap mail desktop and mobile clients are by default using the auto configuration and hence it was unthinkable to manually change settings for new clients with the QMAIl install; Besides that most of the Office users are always confused, whether they have to manually change SMTP or POP3 host for a server.

Below is a screenshot displaying the warning during email auto-configuration:

Thunderbird new Mail account setup auto config warning SMTP not OKThe orange color in the button for the newly auto-detected smtp.mail-domain.com indicates, something is not right with the SMTP host.

Obviously, something was wrong with smtp.mail-domain.com, hence I checked where smtp.mail.domain.com resolves with host command. What I found was actually smtp.mail-domain.com Active ( A ) DNS records was pointing to an IP address, our company previously used for the mail server. At present time the correct mail server host name is mx.mail-domain.com and the QMAIL installation on mx.soccerfame.com is configured to be the actual SMTP server.

By default Thunderbird and many other POP3, IMAP mail clients, however automatically assume the default SMTP host for a mail server is to be configured under a host name smtp.mail-domain.com. This is really strange, especially when the primary MX record for mail-domain.com domain is pointing to mx.mail-domain.com, e.g.:

qmail:~# host -t MX mail-domain.com
soccerfame.com mail is handled by 10 mx.mail-domain.com.
soccerfame.com mail is handled by 20 mail.mail-domain.com.
soccerfame.com mail is handled by 30 mail-domain.com.

The whole warning was caused due to the fact mx.mail-domain.com was resolving to an IP like xxx.xxx.xxx.xxx, whether smtp.mail-domain.com was resolving to yyy.yyy.yyy.yyy

Both xxx.xxx.xxx.xxx and yyy.yyy.yyy.yyy hosts were configured to have a different qmail SMTP host i.e.:

The server under IP xxx.xxx.xxx.xxx – (mx.mail-domain.com) was configured in /var/qmail/control/me to be mx.mail-domain.com and the other old one yyy.yyy.yyy.yyy – (mail.mail-domain.com) had (mail.mail-domain.com) in /var/qmail/control/me

As smtp.mail-domain.com was actually being still resolved to mail.mail-domain.com, the EMAILs were improperly trying to be sent with a configured DNS hostname of smtp.mail-domain.com, where the actual one on the server was mail.mail-domain

It took, me about an hour of pondering what is causing the oddities until I got the here explained issue. As the DNS recors for the domain the sample mail-domain.com were handled by Godaddy, to fix the mess, I logged in to Godaddy and;

a) deleted – DNS record for smtp.mail-domain.com.
b) Created new CNAME record for smtp.mail-domain.com to be a domain alias for mx.soccerfame.com

A few minutes, afterwards I tried configuring once again the same email account in Thunderbird and this time both imap.mail-domain.com and smtp.mail-domain.com turned green; indicating everything is configured fine.

To be 100% sure all is working fine I first fetched, all email via the IMAP protocol without hassles and onwards sent a test email to my Gmail account; thanksfully the sent email was delivered to Gmail indicating both Get Mail and Send Mail functions worked now fine.

Thunderbird icedove new mail account setup auto config Okay
 

How to install and configure Jabber Server (Ejabberd) on Debian Lenny GNU / Linux

Wednesday, December 28th, 2011

Ejabberd server erlang logo hedgehog

I've recently installed a jabber server on one Debian Lenny server and hence decided to describe my installations steps hoping this would help ppl who would like to run their own jabber server on Debian . After some research of the jabber server softwares available, I decided to install Ejabberd

The reasons I choose Ejabberd is has rich documentation, good community around the project and the project in general looks like one of the best free software jabber servers available presently. Besides that ejabberd doesn't need Apache or MySQL and only depends on erlang programming language.

Here is the exact steps I followed to have installed and configured a running XMPP jabber server.

1. Install Ejabberd with apt

The installation of Ejabberd is standard, e.g.:

debian:~# apt-get --yes install ejabberd

Now as ejabberd is installed, some minor configuration is necessery before the server can be launched:

2. Edit /etc/ejabberd/ejabberd.cfg

Inside I changed the default settings for:

a) Uncomment%%override_acls.. Changed:

%%%% Remove the Access Control Lists before new ones are added.%%%%override_acls.

to

%%
%% Remove the Access Control Lists before new ones are added.
%%
override_acls.

b) Admin User from:

%% Admin user
{acl, admin, {user, "", "example.com"}}.

to

%% Admin user
{acl, admin, {user, "admin", "jabber.myserver-host.com"}}.

c) default %% Hostname of example.com to my real hostname:

%% Hostname
{hosts, ["jabber.myserver-host.com"]}.

The rest of the configurations in /etc/ejabberd/ejabberd.cfg can stay like it is, though it is interesting to read it carefully before continuing as, there are some config timings which might prevent the XMPP server from user brute force attacks as well as few other goodies like for example (ICQ, MSN , Yahoo etc.) protocol transports.

3. Add iptables ACCEPT traffic (allow) rules for ports which are used by Ejabberd

The minimum ACCEPT rules to add are:

/sbin/iptables -A INPUT -p tcp -m tcp --dport 22 -j ACCEPT
/sbin/iptables -A INPUT -p tcp -m tcp --dport 5222 -j ACCEPT
/sbin/iptables -A INPUT -p udp -m udp --dport 5222 -j ACCEPT
/sbin/iptables -A INPUT -p tcp -m tcp --dport 5223 -j ACCEPT
/sbin/iptables -A INPUT -p udp -m udp --dport 5223 -j ACCEPT
/sbin/iptables -A INPUT -p tcp -m tcp --dport 5269 -j ACCEPT
/sbin/iptables -A INPUT -p udp -m udp --dport 5269 -j ACCEPT
/sbin/iptables -A INPUT -p tcp -m tcp --dport 5280 -j ACCEPT
/sbin/iptables -A INPUT -p udp -m udp --dport 5280 -j ACCEPT
/sbin/iptables -A INPUT -p tcp -m tcp --dport 4369 -j ACCEPT
/sbin/iptables -A INPUT -p udp -m udp --dport 4369 -j ACCEPT
/sbin/iptables -A INPUT -p tcp -m tcp --dport 53873 -j ACCEPT

Of course if there is some specific file which stores iptables rules or some custom firewall these rules has to be added / modified to fit appropriate place or chain.

4. Restart ejabberd via init.d script

debian:~# /etc/init.d/ejabberd restart
Restarting jabber server: ejabberd is not running. Starting ejabberd.

5. Create ejabberd necessery new user accounts

debian:~# /usr/sbin/ejabberdctl register admin jabber.myserver-host.com mypasswd1
debian:~# /usr/sbin/ejabberdctl register hipo jabber.myserver-host.com mypasswd2
debian:~# /usr/sbin/ejabberdctl register newuser jabber.myserver-host.com mypasswd3
debian:~# /usr/sbin/ejabberdctl register newuser1 jabber.myserver-host.com mypasswd4
...
etc.

ejabberdctl ejabberd server client (frontend) has multiple other options and the manual is a good reading.

One helpful use of ejabberdctl is:

debian:~# /usr/sbin/ejabberdctl status
Node ejabberd@debian is started. Status: started
ejabberd is running

ejabberctl can be used also to delete some existent users, for example to delete the newuser1 just added above:

debian:~# /usr/sbin/ejabberdctl unregister newuser jabber.myserver-host.com

6. Post install web configurations

ejabberd server offers a web interface listening on port 5280, to access the web interface right after it is installed I used URL: http://jabber.myserver-host.com:5280/admin/

To login to http://jabber.myserver-host.com:5280/admin/ you will need to use the admin username previously added in this case:
admin@jabber.myserver-host.com mypasswd1

Anyways in the web interface there is not much of configuration options available for change.

7. Set dns SRV records

I'm using Godaddy 's DNS for my domain so here is a screenshot on the SRV records that needs to be configured on Godaddy:

GoDaddy DNS SRV records screenshot

In the screenshto Target is the Fually qualified domain hostname for the jabber server.

Setting the SRV records for the domain using Godaddy's DNS could take from 24 to 48 hours to propagate the changes among all the global DNS records so be patient.

If instead you use own custom BIND DNS server the records that needs to be added to the respective domain zone file are:

_xmpp-client._tcp 900 IN SRV 5 0 5222 jabber.myserver-host.com.
_xmpp-server._tcp 900 IN SRV 5 0 5269 jabber.myserver-host.com.
_jabber._tcp 900 IN SRV 5 0 5269 jabber.myserver-host.com.

8. Testing if the SRV dns records for domain are correct

debian:~$ nslookup
> set type=SRV
> jabber.myserver-host.com
 ...
> myserver-host.com

 If all is fine above nslookup request should return the requested domain SRV records.
You might be wondering what is the purpose of setting DNS SRV records at all, well if your jabber server has to communicate with the other jabber servers on the internet using the DNS SRV record is the way your server will found the other ones and vice versa.

DNS records can also be checked with dig for example

$ dig SRV _xmpp-server._tcp.mydomain.net

[…]

;; QUESTION SECTION:
;_xmpp-server._tcp.mydomain.net. IN SRV

;; ANSWER SECTION:
_xmpp-server._tcp.mydomain.net. 259200 IN SRV 5 0 5269 jabber.mydomain.net.

;; ADDITIONAL SECTION:
jabber.mydomain.net. 259200 IN A 11.22.33.44

;; Query time: 109 msec
;; SERVER: 212.27.40.241#53(212.27.40.241)
;; WHEN: Sat Aug 14 14:14:22 2010
;; MSG SIZE rcvd: 111

9. Debugging issues with ejabberd

Ejabberd log files are located in /var/log/ejabberd , you will have to check the logs in case of any issues with the jabber XMPP server. Here is the three files which log messages from ejabberd:

debian:~$ ls -1 /var/log/ejabberd/
ejabberd.log
erl_crash.dump
sasl.log

I will not get into details on the logs as the best way to find out about them is to read them 😉

10. Testing ejabberd server with Pidgin

To test if my Jabber server works properly I used Pidgin universal chat client . However there are plenty of other multiplatform jabber clients out there e.g.: Psi , Spark , Gajim etc.

Here is a screenshot of my (Accounts -> Manage Accounts -> Add) XMPP protocol configuration

Pidgin account configuration XMPP on debian Linux