Posts Tagged ‘find’

Using GeoIP on Linux: Country-Based Filtering, Logging, and Traffic Control

Friday, January 16th, 2026

geoip-on-linux-country-based-filtering-logging-traffic-control-logo

GeoIP is one of those technologies that quietly sits in the background of many systems, yet it can be extremely powerful when used correctly. Whether you want to block traffic from specific countries, analyze access logs, or add geographic context to security events, GeoIP can be a valuable addition to your Linux toolbox.

In this article, we’ll go deeper and look at real GeoIP usage examples for:

  • Log analysis
  • Firewalls
  • Apache HTTP Server
  • HAProxy

All examples are based on typical GNU/Linux server environments.

What Is GeoIP? 

GeoIP maps an IP address to geographic data such as:

  • Country
  • City
  • ASN / ISP (depending on database)

Most modern systems use MaxMind GeoLite2 databases (

.mmdb

format).

Keep in Mind ! :
GeoIP data is approximate. VPNs, proxies, mobile networks, and CGNAT reduce accuracy. GeoIP should be treated as a heuristic, not a guarantee.

1. Installing GeoIP Databases on Linux deb based distro

On Debian / Ubuntu:

#

apt install geoipupdate

Configure

/etc/GeoIP.conf

with your MaxMind license key and run:  

# geoipupdate

Databases are usually stored in:

/usr/share/GeoIP/

2. GeoIP for Log Analysis (to get idea of where does your traffic origins from)

GeoIP with Apache HTTP Server

Apache can use GeoIP in two main ways:

  1. To do IP origin Logging 

  2. Do Access control based on IP origin

An altenartive GeoIP common use is to post-processing logs to find out attempts to breach your security.

Lets say you want to

Find top attacking countries against your SSHd service.

# grep "Failed password" /var/log/auth.log | \
awk '{print $(NF-3)}' | \
while read ip; do geoiplookup $ip; done |
\ sort | uniq -c | sort -nr


This command will provide you a visibility on attack sources georaphical Country origin

3. Installing Apache GeoIP Module

For legacy GeoIP (older systems):

# apt install libapache2-mod-geoip

For modern systems, GeoIP2 is preferred:

# apt install libapache2-mod-geoip2

Enable the module:

# a2enmod geoip2
# systemctl reload apache2

4. Configure GeoIP Logging in Apache (basic config)

Add country code to access logs:

LogFormat "%h %l %u %t \"%r\" %>s %b %{GEOIP_COUNTRY_CODE}e" geoip
CustomLog /var/log/apache2/access.log geoip

This allows you to analyze traffic by country later without blocking users.

5. Country-Based Filter Blocking in Apache based on IP origin

Example: allow only selected countries:

<IfModule mod_geoip2.c>
SetEnvIf GEOIP_COUNTRY_CODE ^(BG|DE)$ AllowCountry
Deny from all
Allow from env=AllowCountry
</IfModule>

Use this carefully. Blocking at the web server layer is better than firewall-level blocking, but still risky if you have global users.

6. Apply GeoIP to Apache Virtual Host

You can apply GeoIP rules per site:

<VirtualHost *:80>
ServerName example.com
<IfModule mod_geoip2.c>
SetEnvIf GEOIP_COUNTRY_CODE CN BlockCountry >
Deny from env=BlockCountry
</IfModule>
</VirtualHost>

This is useful when only specific applications need filtering.

Firewall vs Application Layer GeoIP (Pros and Cons)

Layer

Pros

Cons

Firewall

Early blocking

Hard to debug

Apache

Flexible per-site rules

App overhead

HAProxy

Centralized control

Requires careful config

Logs only

Safest

No blocking

7. Apply GeoIP to HAProxy

HAProxy is an excellent place to apply GeoIP logic because:

  • It sits in front of applications
  • ​Rules are fast and explicit
  • Logging is centralized

a. Preparing GeoIP Filtering to HAProxy service

HAProxy supports GeoIP2 via Lua or native ACLs using

.mmdb

Example directory:

/usr/share/GeoIP/GeoLite2-Country.mmdb

b. GeoIP-Based Access Control Lists ( ACLs ) in HAProxy

Basic country-based blocking:

frontend http_in
bind *:80

acl from_china src -m geoip CN
acl from_russia src -m geoip RU

http-request deny if from_china
http-request deny if from_russia

default_backend web_servers

This blocks traffic early, before it hits Apache or nginx.

c. GeoIP-Based Routing across different haproxy backends

Instead of blocking, you can route traffic differently:


acl eu_users src -m geoip DE FR NL
use_backend eu_backend if eu_users
default_backend global_backend

This is useful for:

  • Geo-based load balancing
  • Regional content
  • Legal compliance separation

d. GeoIP Logging config for HAProxy

Add country code to logs:

log-format "%ci:%cp [%t] %ft %b %s %TR/%Tw/%Tc/%Tr/%Ta %ST %B %CC"

(%CC = country code)

This makes traffic analysis extremely efficient.

Keep in Mind !

Use HAProxy or web server level for enforcement, and firewall GeoIP only when absolutely necessary.

8. Fail2ban + GeoIP: Smarter Bans, Better Context

Fail2ban is excellent at reacting to abusive behavior, but by default it only sees IP addresses, not where they come from. Adding GeoIP allows you to:

  • Tag bans with country information
  • Apply different ban policies per region
  • Detect unusual behavior patterns

a. GeoIP-Enriched Fail2ban Logs

Fail2ban itself doesn’t natively evaluate GeoIP rules, but you can enrich logs post-ban.

Example action script (

/etc/fail2ban/action.d/geoip-notify.conf

):


[Definition]
actionban = echo "Banned from $(geoiplookup | cut -d: -f2)" >> /var/log/fail2ban-geoip.log
Enable it in a jail:
[sshd]
enabled = true
action = iptables[name=SSH] geoip-notify

Enable it in a jail:

[sshd]

enabled = true action = iptables[name=SSH] geoip-notify

Resulting log entry:

Banned 185.220.101.1 from Germany

This provides visibility without changing ban logic — a safe first step.


b. Use GeoIP-Aware Ban Policies 

You can also adjust ban times based on country.

Example strategy:

  • Short ban for local country
  • Longer ban for known high-noise regions

This is usually implemented via multiple jails and post-processing scripts rather than direct GeoIP matching inside Fail2ban.

Best practice:
Let Fail2ban do behavior detection — let GeoIP provide context, not decisions.

9. GeoIP with nftables (Linux Modern Firewall Layer)

iptables +

xt_geoip

is considered legacy. On modern systems, nftables is the preferred approach.

a. Using GeoIP Sets in nftables

nftables does not natively include GeoIP, but you can integrate GeoIP via generated IP sets.

Workflow:

  1. Convert GeoIP country IP ranges into nftables sets

  2. Load them dynamically

Example set definition:


table inet filter {
set geo_block {
type ipv4_addr
flags interval
}
}

Populate the set using a script:

nft add element inet filter geo_block { 1.2.3.0/24, 5.6.0.0/16 }

Then apply it:


chain input {
type filter hook input priority 0;
ip saddr @geo_block drop
}

b. Automating GeoIP ->  nftables

Typical automation pipeline:

GeoLite2 → country CSV → IP ranges → nftables set

Run this daily via cron.

Warning:

  • Large country sets = memory usage
  • Firewall reloads must be atomic
  • Test on non-production systems first

10. GeoIP Dashboard: Turning Logs into Insight

Blocking is optional — insight is mandatory.

a. Simple GeoIP Log Dashboard (CLI-Based)

Apache example:

# awk '{print $NF}' /var/log/apache2/access.log | \
sort | uniq -c | sort -nr

Where $NF contains country code.

Sample Result:

1243 US

987 DE

422 FR

310 CN

This already tells a story.

b. Visual Dashboard with ELK / Grafana

For larger environments:

HAProxy / Apache -> JSON logs Enrich logs with GeoIP

Send to:

  • ELK Stack
  • Loki + Grafana
  • Graylog

Metrics you want:

  • Requests per country
  • Errors per country
  • Bans per country
  • Login failures per country

This helps distinguish:

  • Marketing traffic
  • Legit users
  • Background Internet noise

11.  Create a Layered GeoIP Strategy

A sane, production-ready model using GeoIP would include something like:

  1. Logging first
    Apache / HAProxy logs with country codes

  2. Behavior detection
    Fail2ban reacts to abuse

  3. Traffic shaping
    HAProxy routes or rate-limits

  4. Firewall last
    nftables drops only obvious garbage

GeoIP is strongest when it supports decisions, not when it makes them alone.

12. Best Practices to consider

  • Prefer visibility over blocking
  • Avoid blanket country bans
  • Always log before denying

Combine GeoIP with:

  • Fail2ban
  • Rate limits
  • CAPTCHA or MFA
  • Keep GeoIP databases (regularly) updated
  • Test rules with real IPs before deploying

13. Common Mistakes to Avoid

Blocking entire continents Using GeoIP as authentication Applying firewall GeoIP without logs Forgetting database updates Assuming GeoIP accuracy

Close up

GeoIP is not a silver bullet against vampire attacks – but when used thoughtfully, it becomes a powerful signal enhancer and can give you a much broader understanding on what is going on inside your network traffic.

Whether you’re using it to filter out segment of evil intruders based on logs, routing traffic intelligently, or filtering obvious abusea, GeoIP fits naturally into a layered security model and is used across corporations and middle and even small sized businesses nowadays.

Used conservatively, GeoIP follows the classic Unix philosophy:

Small datasets, Simple rules, Real-world effectiveness, combined with rest of tools it gives info and ways to protect better your networks and server infra.

How to Easily Integrate AI Into Bash on Linux with ollama

Monday, January 12th, 2026

Essential Ollama Commands You Should Know | by Jaydeep Karale | Artificial Intelligence in Plain English

AI is more and more entering the Computer scene and so is also in the realm of Computer / Network management. Many proficient admins already start to get advantage to it.
AI doesn’t need a GUI, or a special cloud dashboard or fancy IDE so for console geeks Sysadmins / System engineers and Dev Ops it can be straightly integrated into the bash / zsh etc. and used to easify a bit your daily sys admin tasks.

If you live in the terminal, the most powerful place to add AI is Bash itself. With a few tools and a couple of lines of shell code, you can turn your terminal into an AI-powered assistant that writes commands, explains errors, and helps automate everyday Linux tasks.

No magic. No bloat. Just Unix philosophy with a brain.

1. AI as a Command-Line Tool

Instead of treating AI like a chatbot, treat it like any other CLI utility:

  • stdin → prompt
  • stdout → response
  • pipes → integration

Hardware Requirements of Ollama Server

2. Minimum VM (It runs, but you’ll hate it)

Only use this to test that things work.

  • vCPU: 2
  • RAM: 4 GB
  • Disk: 20 GB (SSD mandatory)
  • Storage type: ( HDD / network storage = bad )
  • Models: phi3, tinyllama

Expect:

  • Very slow pulls
  • Long startup times
  • Laggy responses

a. Recommended VM (Actually usable)

This is the sweet spot for Bash integration and daily CLI use.

  • vCPU: 4–6 (modern host CPU)
  • RAM: 8–12 GB
  • Disk: 30–50 GB local SSD
  • CPU type: host-passthrough (important!)
  • NUMA: off (for small VMs)

Models that feel okay:

  • phi3
  • mistral
  • llama3:8b (slow but tolerable)
 

b. “Feels Good” VM (CPU-only but not painful)

If you want it to feel responsive.

  • vCPU: 8
  • RAM: 16 GB
  • Disk: NVMe-backed storage
  • CPU flags: AVX2 enabled
  • Hugepages: optional but nice

Models:

  • llama3:8b
  • codellama:7b
  • mixtral (slow, but usable)
 

Hypervisor-Specific Advice (Important)

c. KVM / Proxmox (Best choice)

  • CPU type: host
  • Enable AES-NI, AVX, AVX2
  • Use virtio-scsi
  • Cache: writeback
  • IO thread: enabled

d. If running VM on VMware platform

  • Enable Expose hardware-assisted virtualization
  • Use paravirtual SCSI
  • Reserve memory if possible

e. VirtualBox (Not recommended)

  • Poor CPU feature exposure
  • Weak IO performance

Avoid if you can

f. Local AI With Ollama (Recommended)

If you want privacy, low latency, and no API keys, Ollama is currently the easiest way to run LLMs locally on Linux.

3. Install Ollama

# curl -fsSL https://ollama.com/install.sh | sh


Start the service:

# ollama serve

Pull a model (lightweight and fast):

# ollama pull llama3

Test it:

ollama run llama3 "Explain what the ls command does"

If that works, you’re ready to integrate.

To check whether all is properly setup after installed llama3:

root@haproxy2:~# ollama list
NAME             ID              SIZE      MODIFIED
llama3:latest    365c0bd3c000    4.7 GB    About an hour ago

root@haproxy2:~# systemctl status ollama
● ollama.service – Ollama Service
     Loaded: loaded (/etc/systemd/system/ollama.service; enabled; preset: enabled)
     Active: active (running) since Mon 2026-01-12 16:43:30 EET; 15min ago
   Main PID: 37436 (ollama)
      Tasks: 16 (limit: 6999)
     Memory: 5.0G
        CPU: 13min 5.264s
     CGroup: /system.slice/ollama.service
             ├─37436 /usr/local/bin/ollama serve
             └─37472 /usr/local/bin/ollama runner –model /usr/share/ollama/.ollama/models/blobs/sha256-6a0746a1ec1aef3e7ec53>

яну 12 16:45:34 haproxy2 ollama[37436]: llama_context: Flash Attention was auto, set to enabled
яну 12 16:45:34 haproxy2 ollama[37436]: llama_context:        CPU compute buffer size =   258.50 MiB
яну 12 16:45:34 haproxy2 ollama[37436]: llama_context: graph nodes  = 999
яну 12 16:45:34 haproxy2 ollama[37436]: llama_context: graph splits = 1
яну 12 16:45:34 haproxy2 ollama[37436]: time=2026-01-12T16:45:34.959+02:00 level=INFO source=server.go:1376 msg="llama runner>
яну 12 16:45:34 haproxy2 ollama[37436]: time=2026-01-12T16:45:34.989+02:00 level=INFO source=sched.go:517 msg="loaded runners>
яну 12 16:45:35 haproxy2 ollama[37436]: time=2026-01-12T16:45:35.000+02:00 level=INFO source=server.go:1338 msg="waiting for >
яну 12 16:45:35 haproxy2 ollama[37436]: time=2026-01-12T16:45:35.001+02:00 level=INFO source=server.go:1376 msg="llama runner>
яну 12 16:55:58 haproxy2 ollama[37436]: [GIN] 2026/01/12 – 16:55:58 | 200 |    3.669915ms |       127.0.0.1 | HEAD     "/"
яну 12 16:55:58 haproxy2 ollama[37436]: [GIN] 2026/01/12 – 16:55:58 | 200 |   42.244006ms |       127.0.0.1 | GET      "/api/>
root@haproxy2:~#

4. Turning AI Into a Bash Command

Let’s create a simple AI helper command called ai.

Add this to your ~/.bashrc or ~/.bash_aliases:

ai() {

  ollama run llama3 "$*"

}

Reload your shell:

$ source ~/.bashrc


Now you can do things like:

$ ai "Write a bash command to find large files"


$ ai "Explain this error: permission denied"

$ ai "Convert this sed command to awk"


At this point, AI is already a first-class CLI tool.

5. Using AI to Generate Bash Commands

One of the most useful patterns is asking AI to output only shell commands.

Example:

$ ai "Give me a bash command to recursively find .log files larger than 100MB. Output only the command."

Copy, paste, done.

You can even enforce this behavior with a wrapper:

aicmd() {

  ollama run llama3 "Output ONLY a valid bash command. No explanation. Task: $*"

}

Now:

$ aicmd "list running processes using more than 1GB RAM"

Danger note: always read commands before running them. AI is smart, not trustworthy.

6. AI for Explaining Commands and Logs

This is where AI shines.

Pipe output directly into it:

$ dmesg | tail -n 50 | ai "Explain what is happening here"

Or errors:

$ make 2>&1 | ai "Explain this error and suggest a fix"

You’ve just built a terminal-native debugger.

7. Smarter Bash History Search

You can even use AI to interpret your intent instead of remembering exact commands:

aih() {

  history | ai "From this bash history, find the best command for: $*"

}

Example:

$ aih "compress a directory into tar.gz"

It’s like Ctrl+R, but semantic.

8. Using AI With Shell Scripts

AI can help generate scripts inline:

$ ai "Write a bash script that monitors disk usage and sends a notification when it exceeds 90%"

You’re not replacing scripting skills – you’re accelerating them.

Think of AI as:

  • a junior sysadmin
  • a documentation search engine
  • a rubber duck that talks back

9. Where Ollama Stores Its Data

Depending on how it runs:

System service (most common)

Models live here:

/usr/share/ollama/.ollama/

Inside:

models/

blobs/

User-only install

~/.ollama/

Since you installed as root + systemd, use the first path.

See What’s Taking Space

# du -sh /usr/share/ollama/.ollama/*

Typical output:

  • models/ → metadata
  • blobs/ → the big files (GBs)

10. Remove Unused Models (Safe Way)

List models Ollama knows about:

# ollama list

Remove a model properly:

# ollama rm llama3

This removes metadata and unreferenced blobs.

Always try this first.

11. Full Manual Cleanup (Hard Reset)

If things are broken, stuck, or you want a clean slate:

Stop Ollama

# systemctl stop ollama

Delete all local models and cache

# rm -rf /usr/share/ollama/.ollama/models

# rm -rf /usr/share/ollama/.ollama/blobs

(Optional but safe)

# rm -rf /usr/share/ollama/.ollama/tmp

Start Ollama again

# systemctl start ollama

Ollama will recreate everything automatically.

Verify Cleanup Worked

# du -sh /usr/share/ollama/.ollama

# ollama list

You should see:

  • Very small disk usage
  • Empty model list

Prevent Disk Bloat (Highly Recommended)

Only pull small models on VMs

Stick to:

  • phi3
  • mistral
  • tinyllama

Remove models you don’t use

# ollama rm modelname

Set a custom data directory (optional)

If /usr is small, move Ollama data:

# systemctl stop ollama

# mkdir -p /opt/ollama-data

# chown -R ollama:ollama /opt/ollama-data

Edit service:

# systemctl edit ollama

Add:

[Service]

Environment=OLLAMA_HOME=/opt/ollama-data

Then:

# systemctl daemon-reload

# systemctl start ollama

Quick “Nuke It” One-Liner (Use With Care)

Deletes everything Ollama-related:

# systemctl stop ollama && rm -rf /usr/share/ollama/.ollama && systemctl start ollama

API-Based Option (Cloud Models)

If you prefer cloud models (OpenAI, Anthropic, etc.), the pattern is identical:

  • Use curl
  • Pass prompt
  • Parse output

Once AI returns text to stdout, Bash doesn’t care where it came from.

12. Best Practices how to use shell AI to not overload machine

Before you go wild:

  • Don’t auto-execute AI output
  • Don’t run AI as root
  • Treat responses as suggestions
  • Version-control important scripts
  • Keep prompts specific
     

AI is powerful — but Linux still assumes you know what you’re doing.

Sum it up

Adding AI to Bash isn’t about replacing skills.
It’s about removing friction.

When AI gets easy to use from the command line it is a great convenience for those who don't want to switch to browser all the time and copy / paste like crazy.
AI as a command-line tool fits perfectly into the Linux console:

  • composable
  • scriptable
  • optional
  • powerful

Once you’ve used AI from inside your shell for a few hours, going back to browser-based AI chat stuff like querying ChatGPT feels… slow and inefficient.
However keep in mind that ollama is away from perfect and has a lot of downsides and ChatGPT / Grok / DeepSeek often might give you better results, however as ollama is really isolated and non-depend on external sources your private quries will not get into a public AI historic database and you won't be tracked.
So everything has its Pros and Cons. I'm pretty sure that this tool and free AI tools like those will certainly have a good future and will be heavily used by system admins and
programmers in the coming future.
The terminal just got smarter. And it didn’t need a GUI to do it.

How To Install ChatGPT on Debian Linux with snap

Tuesday, August 19th, 2025

chatgpt-desktop-linux-screenshot

To install ChatGPT (official desktop app) on Debian Linux using Snap, do the following:
You need as

Prerequisites

  1. Debian-based system (e.g., Debian, Ubuntu, Mint whatever deb based Linux).

  2. Snap package manager installed.


1. Install Snap (if not installed)

Run these commands in your terminal:

# apt update sudo apt install snapd

Enable and start the Snap daemon:

# systemctl enable snapd sudo systemctl start snapd

Create a symbolic link to ensure

snap

is accessible:

# ln -s /var/lib/snapd/snap /snap


2. Find ChatGPT Snap Package

The official ChatGPT desktop app (by OpenAI) is not available as a Snap package directly from OpenAI, but a third-party Snap package or wrapper may exist.

You can search with:

# snap find chatgpt


As of now, you might see unofficial community packages (e.g.,

chatgpt-desktop

or

chatgpt-wrapper

, etc.).


3. Install ChatGPT Snap Package

If you find a package (e.g., chatgpt-desktop), install it like this:

# snap install chatgpt-desktop

Note: Be cautious about third-party Snap packages—review the publisher and permissions.

4.Launch ChatGPT

Once installed, launch it from your app menu or run:

/snap/bin/chatgpt-desktop-client


Alternative (if no Snap available)

If no Snap package is available or you're uncomfortable with third-party sources:

Option: Use the Official .deb Installer

OpenAI released an official desktop app for Linux in

.deb

format:

To use the native deb;

  1. Download from: https://openai.com/chat

  2. Install with:

# apt install ./chatgpt_*.deb


yum search file in all installable RPM, find out which rpm package provides binary file or missing library dependency on CentOS / RHEL / Fedora

Friday, August 23rd, 2024

images/centos-rhel-yum-clean-var-cache-yum

Sometimes if you have a missing library or a file you know should be available via an rpm but you're not sure which RPM you have to install you have to look up for library or binary file amongs all available installable r[ms on Redhat Linux / CentOS / Fedora or other RPM based distro.

It is really annoying especially, if you try to install an rpm binary and the package does not install due to missing dependency library. Having a missing dependency package could happen, if you use some custom internal prepared repository that is mirroring from original rpm repositories and the RPM Repositories are situated behind a DMZ firewall network (such scenarios are common for corporations and IT companies).
 
Finding out which file is provided by which package on Debian / Ubuntu and other deb based linux distributions is easy and done via the

# apt-file search filename

Thus if you're a system administrator coming from a Debian GNU / Linux sysadmin realm into the wonderful world of redhats, you will want to have an alternative to apt-file tool. You will be happy to find out that that this tedious task is easily done in RPM based Linux and is integrated straight into yum package manager too.

The command to search which rpm package provides a file is:

# yum whatprovides 'nc'

[root@rhel-linux ~]# yum whatprovides nc
Loaded plugins: fastestmirror, versionlock
Loading mirror speeds from cached hostfile
2:nmap-ncat-6.40-19.el7.x86_64 : Nmap's Netcat replacement
Repo        : base
Matched from:
Provides    : nc


2:nmap-ncat-6.40-19.el7.x86_64 : Nmap's Netcat replacement
Repo        : @base
Matched from:
Provides    : nc


yum whatprovides search_file_name can be also invoked with its shortcut yum provides 'search_file_name'

[root@rhel-server ~]# yum provides '/bin/ls'
Loaded plugins: fastestmirror, versionlock
Loading mirror speeds from cached hostfile
coreutils-8.22-24.el7.x86_64 : A set of basic GNU tools commonly used in shell scripts
Repo        : base
Matched from:
Filename    : /bin/ls

coreutils-8.22-24.el7_9.2.x86_64 : A set of basic GNU tools commonly used in shell scripts
Repo        : updates
Matched from:
Filename    : /bin/ls

 Here is another example:

[root@rhel-server ~]# yum -q provides '*lesspipe.sh*'
less-458-9.el7.x86_64 : A text file browser similar to more, but better
Repo        : base
Matched from:
Filename    : /usr/bin/lesspipe.sh

source-highlight-3.1.6-6.el7.i686 : Produces a document with syntax highlighting
Repo        : base
Matched from:
Filename    : /usr/bin/src-hilite-lesspipe.sh

source-highlight-3.1.6-6.el7.x86_64 : Produces a document with syntax highlighting
Repo        : base
Matched from:
Filename    : /usr/bin/src-hilite-lesspipe.sh

spirv-tools-2019.1-4.el7.x86_64 : API and commands for processing SPIR-V modules
Repo        : epel
Matched from:
Filename    : /usr/bin/spirv-lesspipe.sh

You can search for any file and if the RPm repository is defined under /etc/yum/repos.d/* and enabled, yum whatprovides command should be able to find it and tell you which RPM package you have to install to have the file installed Redhat way.

  • You can list all enabled RPM repositories with cmd:
     

[root@rhel-server ~]# yum repolist enabled
Loaded plugins: fastestmirror, versionlock
Loading mirror speeds from cached hostfile
repo id                                                   repo name                                                                      status
3party                                                    Third party packages – x86_64                                                   2,631
base/7/x86_64                                             CentOS-7 – Base                                                                10,072
cr/7/x86_64                                               CentOS-7 – CR                                                                       0
epel/7/x86_64                                             EPEL packages for RedCent 7 – x86_64                                           13,791
extras/7/x86_64                                           CentOS-7 – Extras                                                                 526
updates/7/x86_64                                          CentOS-7 – Updates                                                              5,802
zabbix-6.0                                                Zabbix 6.0 repo                                                                   429
repolist: 33,251
 

  • To list disable RPM repositories:
     

# yum repolist disabled


To list all present available repositories that could be enabled and are set via the /etc/yum.repos.d/* configs

# yum repolist all

How to count number of ESTABLISHED state TCP connections to a Windows server

Wednesday, March 13th, 2024

count-netstat-established-connections-on-windows-server-howto-windows-logo-debug-network-issues-windows

Even if you have the background of a Linux system administrator, sooner or later you will have have to deal with some Windows hosts, thus i'll blog in this article shortly on how the established TCP if it happens you will have to administarte a Windows hosts or help a windows sysadmin noobie 🙂

In Linux it is pretty easy to check the number of established conenctions, because of the wonderful command wc (word count). with a simple command like:
 

$ netstat -etna |wc -l


Then you will get the number of active TCP connections to the machine and based on that you can get an idea on how busy the server is.

But what if you have to deal with lets say a Microsoft Windows 2012 /2019 / 2020 or 2022 Server, assuming you logged in as Administrator and you see the machine is quite loaded and runs multiple Native Windows Administrator common services such as IIS / Active directory Failover Clustering, Proxy server etc.
How can you identify the established number of connections via a simple command in cmd.exe?

1.Count ESTABLISHED TCP connections from Windows Command Line

Here is the answer, simply use netstat native windows command and combine it with find, like that and use the /i (ignores the case of characters when searching the string) /c (count lines containing the string) options

C:\Windows\system32>netstat -p TCP -n|  find /i "ESTABLISHED" /c
1268

Voila, here are number of established connections, only 1268 that is relatively low.
However if you manage Windows servers, and you get some kind of hang ups as part of the monitoring, it is a good idea to setup a script based on this simple command for at least Windows Task Scheduler (the equivallent of Linux's crond service) to log for Peaks in Established connections to see whether Server crashes are not related to High Rise in established connections.
Even better if company uses Zabbix / Nagios, OpenNMS or other  old legacy monitoring stuff like Joschyd even as of today 2024 used in some big of the TOP IT companies such as SAP (they were still using it about 4 years ago for their SAP HANA Cloud), you can set the script to run and do a Monitoring template or Alerting rules to draw you graphs and Trigger Alerts if your connections hits a peak, then you at least might know your Windows server is under a "Hackers" Denial of Service attack or there is something happening on the network, like Cisco Network Infrastructure Switch flappings or whatever.

Perhaps an example script you can use if you decide to implement the little nestat established connection checks Monitoring in Zabbix is the one i've writen about in the previous article "Calculate established connection from IP address with shell script and log to zabbix graphic".

2. Few Useful netstat options for the Windows system admin
 

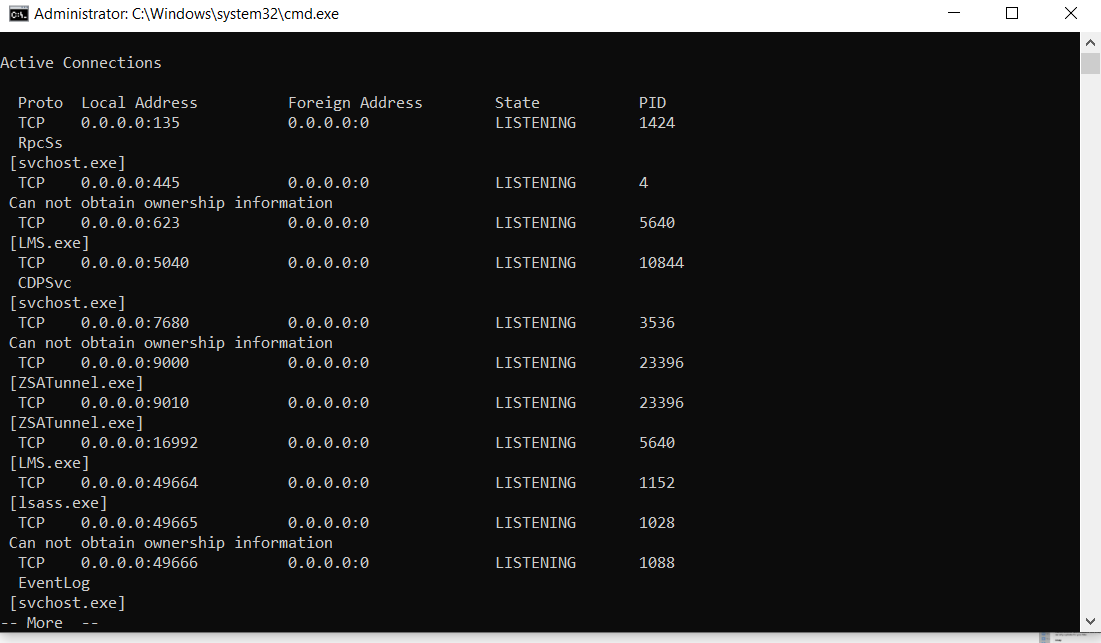
C:\Windows\System32> netstat -bona

netstat-useful-arguments-for-the-windows-system-administrator

Cmd.exe will lists executable files, local and external IP addresses and ports, and the state in list form. You immediately see which programs have created connections or are listening so that you can find offenders quickly.

b – displays the executable involved in  creating the connection.
o – displays the owning process ID.
n – displays address and port numbers.
a – displays all connections and listening ports.

As you can see in the screenshot, by using netstat -bona you get which process has binded to which local address and the Process ID PID of it, that is pretty useful in debugging stuff.

3. Use a Third Party GUI tool to debug more interactively connection issues

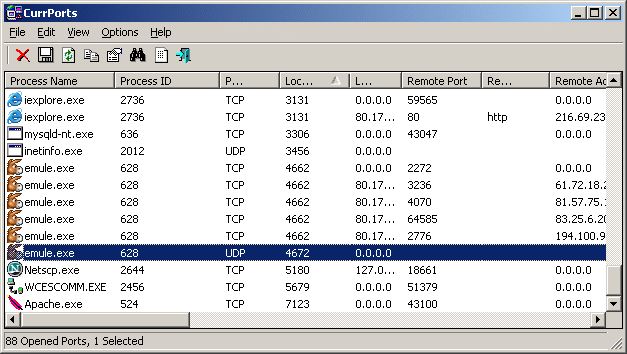
If you need to keep an eye in interactive mode, sometimes if there are issues CurrPorts tool can be of a great help
currports-windows-network-connections-diagnosis-cports

CurrPorts Tool own Description

CurrPorts is network monitoring software that displays the list of all currently opened TCP/IP and UDP ports on your local computer. For each port in the list, information about the process that opened the port is also displayed, including the process name, full path of the process, version information of the process (product name, file description, and so on), the time that the process was created, and the user that created it.
In addition, CurrPorts allows you to close unwanted TCP connections, kill the process that opened the ports, and save the TCP/UDP ports information to HTML file , XML file, or to tab-delimited text file.
CurrPorts also automatically mark with pink color suspicious TCP/UDP ports owned by unidentified applications (Applications without version information and icons).

Sum it up

What we learned is how to calculate number of established TCP connections from command line, useful for scripting, how you can use netstat to display the process ID and Process name that relates to a used Local / Remote TCP connections, and how eventually you can use this to connect it to some monitoring tool to periodically report High Peaks with TCP established connections (usually an indicator of servere system issues).

 

Analyze disk space usage in Linux / BSD with du / find and filelight /qdirstat / baobab GUI disk usage analyzers to check what takes up your disk space on Unix like OSes

Friday, April 21st, 2023

linux-how-to-find-out-what-files-and-directories-has-occupied-all-your-disk-space-partition-from-console-and-GUI_du-find-filelight-baobab-qdirstat-duff-linux-450x450

If you're a Desktop Linux or BSD UNIX user and your hard disk / external SSD / flash drive etc. space starts to be misteriously disapper due to whatever reaseon such as a crashing applications producing rapidly log error / warning messages leading quickly to filling up the disk or out of a sudden you have some Disk space lost without knowing what kind of data filled up the disk or you're downloading some big sized bittorrent files forgotten in your bittorrent client or complete mirroring a large website and you suddenly get the result of root directory ( / ) getting fully or nearly filled up, then you definitely would want to check out what has disk activity has eaten up your disk space and leaing to OS and Aplication slow responsiveness.

For the Linux regular *nix user finding out what is filling the disk is a trivial task with with find / du -hsc * but as people have different habits to use find and du I'll show you the most common ways I use this two command line tools to identify disk space low issues for the sake of comparison.
Others who have better easier ways to do it are very welcome to share it with me in the comments.
 

1. Finding large files on hard disk with find Linux command tool
 

host:~# find /home -type f -printf "%s\t%p\n" | sort -n | tail -10
2100000000    /home/hipo/Downloads/MameUIfx incl. ROMs/MameUIfx incl. ROMs-6.bin
2100000000    /home/hipo/Downloads/MameUIfx incl. ROMs/MameUIfx incl. ROMs-7.bin
2100000000    /home/hipo/Downloads/MameUIfx incl. ROMs/MameUIfx incl. ROMs-8.bin
2100000000    /home/hipo/Downloads/MameUIfx incl. ROMs/MameUIfx incl. ROMs-9.bin
2815424080    /home/hipo/.thunderbird/h3dasfii.default\
/ImapMail/imap.gmail.com/INBOX
2925584895    /home/hipo/Documents/.git/\
objects/pack/pack-8590b069cad26ac0af7560fb42b51fa9bfe41050.pack
4336918067    /home/hipo/Games/Mames_4GB-compilation-best-arcade-games-of-your-14_04_2021.tar.gz
6109003776    /home/hipo/VirtualBox VMs/CentOS/CentOS.vdi
23599251456    /home/hipo/VirtualBox VMs/Windows 7/Windows 7.vdi
33913044992    /home/hipo/VirtualBox VMs/Windows 10/Windows 10.vdi

I use less rarely find on Desktops and more when I have to do some kind of data usage analysis on servers, of course for my Linux home computer and any other Linux desktop machines, or just a small incomprehensive analysis du cmd is much more appropriate to use.


2. Finding large files Megabyte occupying space files sorted in Megabytes and Gigas with du
 

  • Check main 10 files sorted in megabytes that are hanging in a directory

pcfkreak:~# du -hsc /home/hipo/*|grep 'M\s'|sort -rn|head -n 10
956M    /home/hipo/last_dump1.sql
711M    /home/hipo/hipod
571M    /home/hipo/from-thinkpad_r61
453M    /home/hipo/ultimate-edition-themes
432M    /home/hipo/metasploit-framework
355M    /home/hipo/output-upgrade.txt
333M    /home/hipo/Плот
209M    /home/hipo/Work-New.tar.gz
98M    /home/hipo/DOOM64
90M    /home/hipo/mp3

  • Get 10 top larges files in Gigabytes that are space hungry and eating up your space

pcfkreak:~# du -hsc /home/hipo/*|grep 'G\s'|sort -rn|head -n 10
156G    total
60G    /home/hipo/VirtualBox VMs
37G    /home/hipo/Downloads
18G    /home/hipo/Desktop
11G    /home/hipo/Games
7.4G    /home/hipo/ownCloud
7.1G    /home/hipo/Документи
4.6G    /home/hipo/music
2.9G    /home/hipo/root
2.8G    /home/hipo/Documents


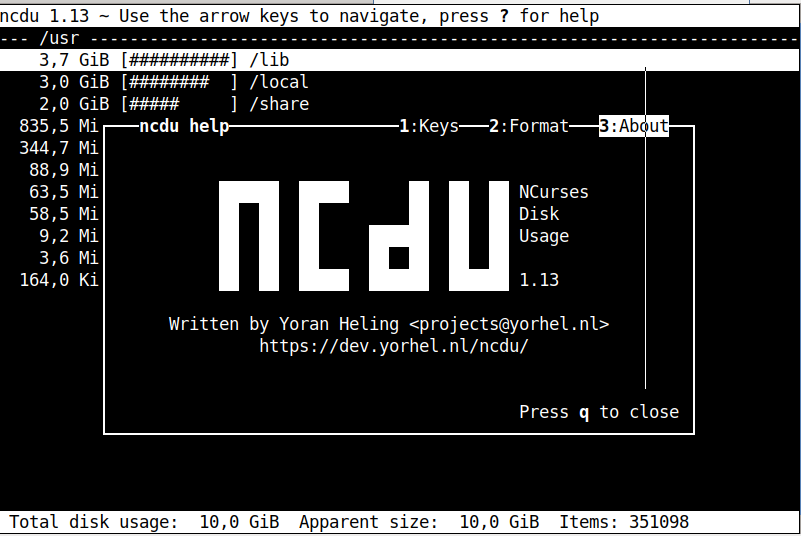
If you want to still work on the console terminal but you don't want to type too much you can use ncdu (ncurses) text tool, install it with

# apt install –yes ncdu


https://www.pc-freak.net/images/ncdu-gnu-linux-debian-screenshot.png

 For the most lazy ones or complete Linux newbies that doesn't want to spend time typing / learing or using text commands or softwares you can also check what has eaten up your full disk space with GUI tools as well.

There are at least 3 tools to use to check in Graphical Interface what has occupied your disk space on Linux / BSD, I'm aware of:

3. Filelight GUI disk usage analysis Linux tool

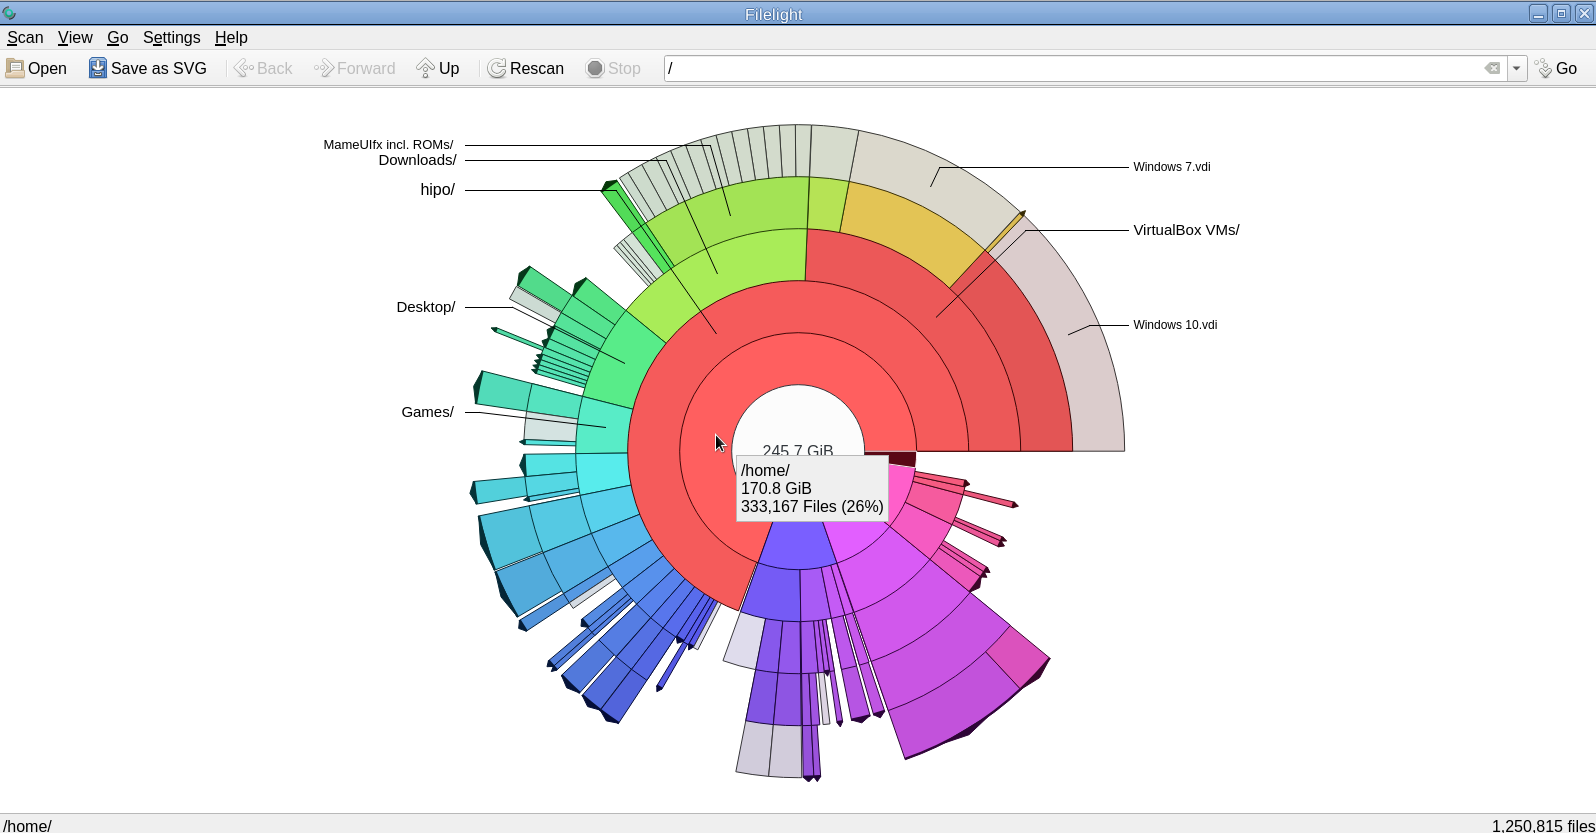
For those using KDE or preferring a shiny GUI interface that will capture the eye, perhaps filelight would be the option of choice tool to get analysis sum of your directory sturctures and file use on the laptop or desktop *unix OS.

unix-desktop:~# apt-cache show filelight|grep -i description-en -A 7
Description-en: show where your diskspace is being used
 Filelight allows you to understand your disk usage by graphically
 representing your filesystem as a set of concentric, segmented rings.
 .
 It is like a pie-chart, but the segments nest, allowing you to see both
 which directories take up all your space, and which directories
 and files inside those directories are the real culprits.
Description-md5: 397ff9a469e07a772f22460c66b66875


To use it simply go ahead and install it with apt or yum / dnf or whatever Linux package manager your distro uses:

unix-desktop:~# apt-get install –yes filelight

filelight-show-where-disk-space-is-being-used-graphically-tool-linux

4. GNOME DIsk Usage Analyzer Baobab GUI tool

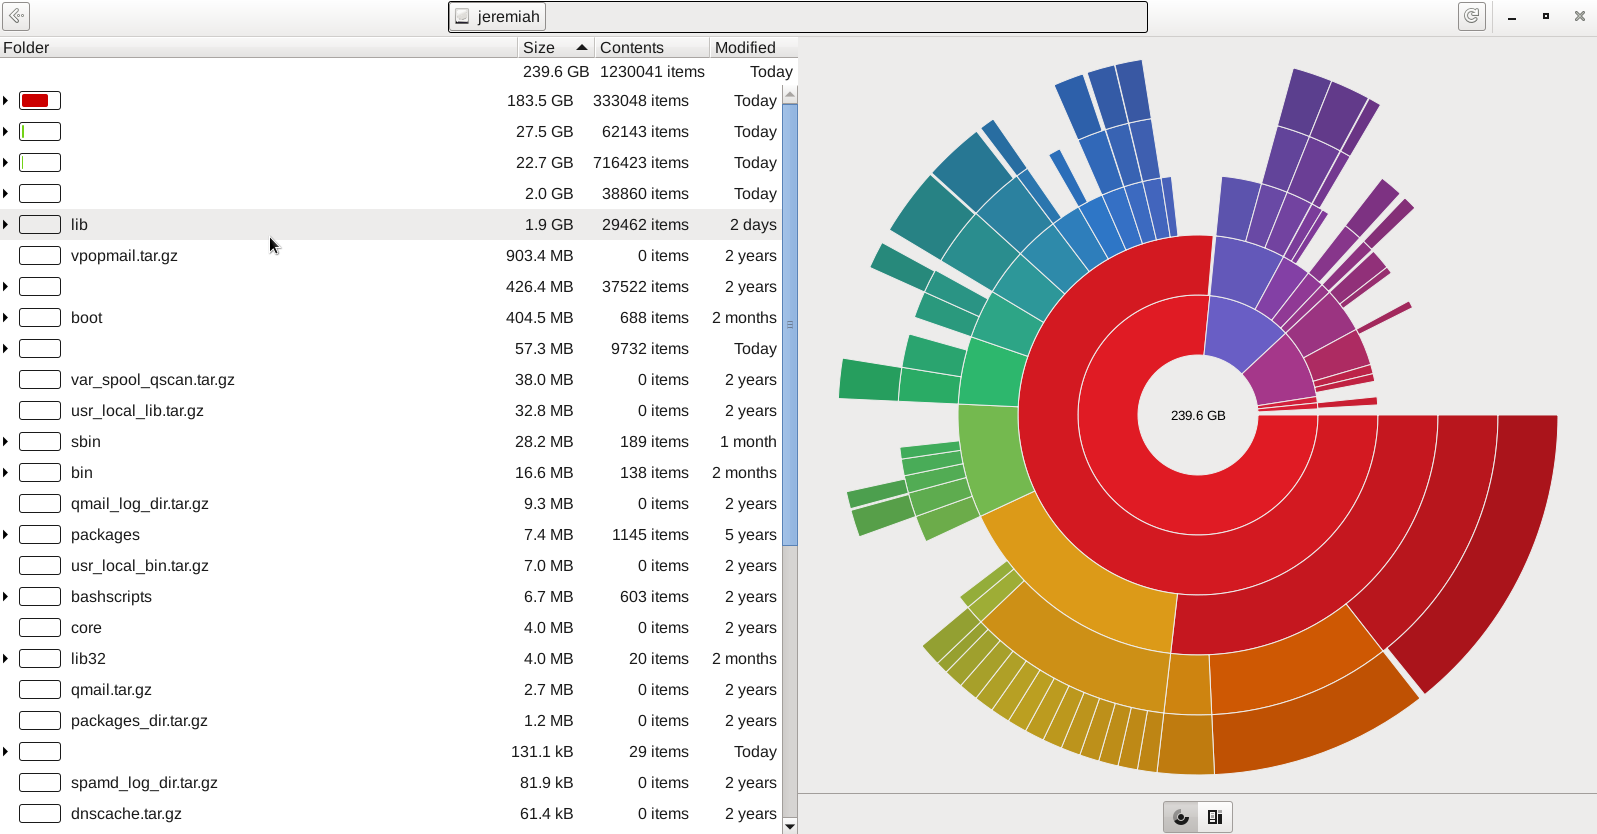
For those being a GNOME / Mate / Budgie / Cinnamon Graphical interface users baobab shold be the program to use as it uses the famous LibGD library.

unix-desktop:~# apt-cache show baobab|grep -i description-en -A10
Description-en: GNOME disk usage analyzer
 Disk Usage Analyzer is a graphical, menu-driven application to analyse
 disk usage in a GNOME environment. It can easily scan either the whole
 filesystem tree, or a specific user-requested directory branch (local or
 remote).
 .
 It also auto-detects in real-time any changes made to your home
 directory as far as any mounted/unmounted device. Disk Usage Analyzer
 also provides a full graphical treemap window for each selected folder.
Description-md5: 5f6072b89ebb1dc83433fa7658814dc6
Homepage: https://wiki.gnome.org/Apps/Baobab


gnome-disk-analyzer-baobab-tool-screenshot-of-hard-disk-directory-locations-sorted-by-size

5. Qdirstat graphical application to show where your disk space has gone on Linux

Qdirstat is perhaps well known tool to track disk space issues on Linux desktop hosts, known by the hardcore KDE / LXDE / LXQT / DDE GUI interface / environment lovers and as a KDE tool uses the infamous Qt library. I personally don't like it and don't put it on machines I use because I never use kde and don't want to waste my disk space with additional libraries such as the QT Library which historically was not totally free in terms of licensing and even now is in both free and non free licensing GPL / LGPL and QT Commercial Licensing license.

unix-desktop:~# apt-cache show qdirstat|grep -i description-en -A10
Description-en: Qt-based directory statistics
 QDirStat is a graphical application to show where your disk space has gone and
 to help you to clean it up.
 .
 QDirStat has a number of new features compared to KDirStat. To name a few:
  * Multi-selection in both the tree and the treemap.
  * Unlimited number of user-defined cleanup actions.
  * Properly show errors of cleanup actions (and their output, if desired).
  * File categories (MIME types) and their treemap color are now configurable.
  * Exclude rules for directories are easily configurable.
  * Desktop-agnostic; no longer relies on KDE or any other specific desktop.


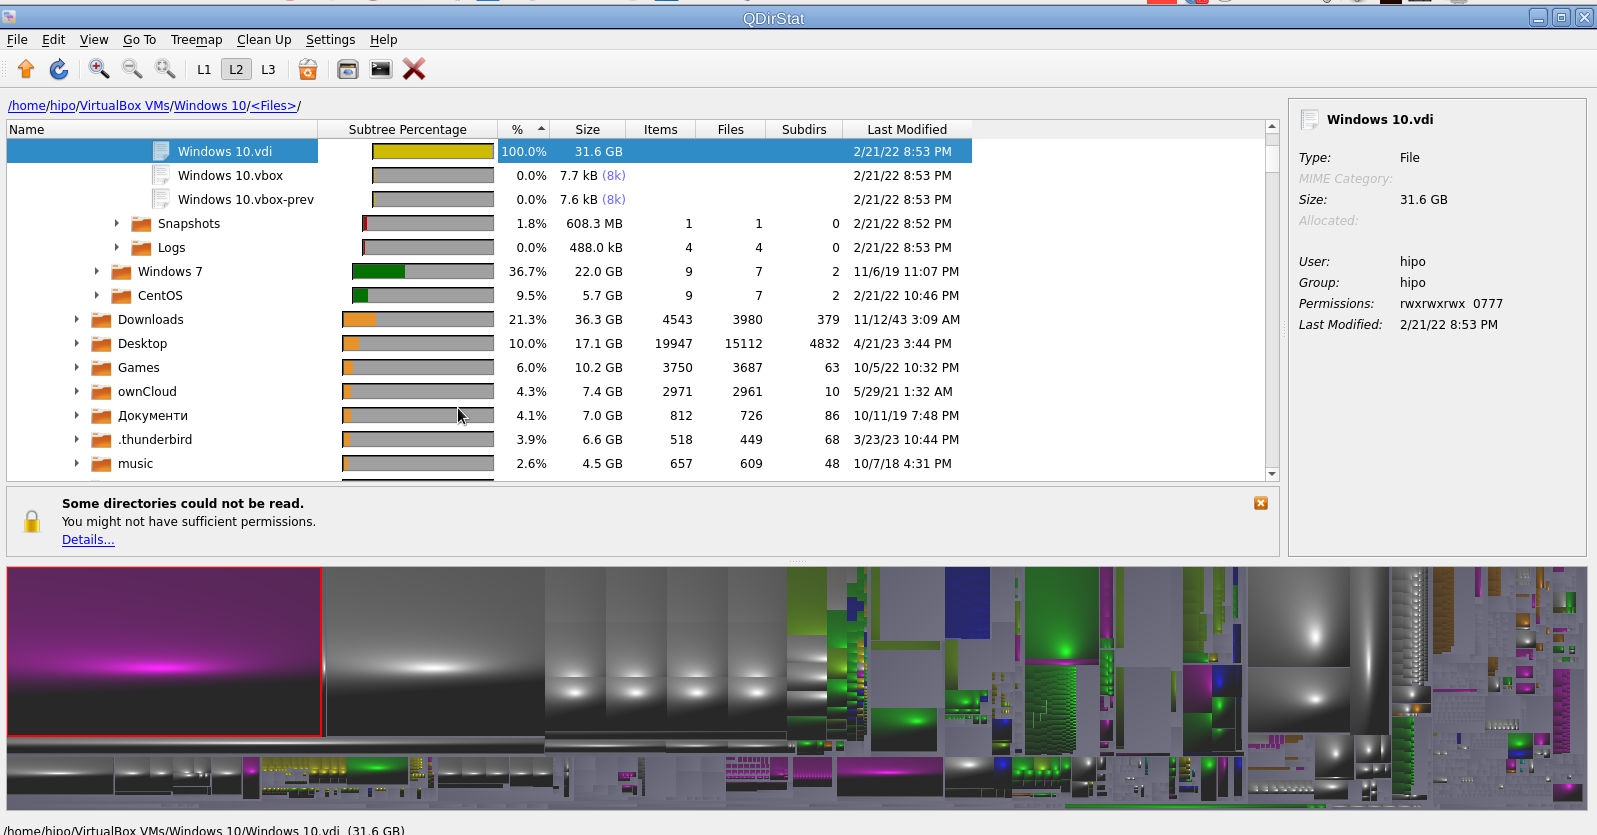
qdirstat-linux-screenshot-show-what-directory-uses-most-hard-disk-space

That shiny fuzed graphics is actually a repsesantation of all directories the bigger and if one scrolls on the colorful gamma a text with directory and size or file will appear. Though the graphical represantation is really c00l to me it is a bit unreadable, thus I prefer and recommend the other two GUI tools filelight or baobab instead.

6. Finding duplicate files on Linux system with duff command tool

Talking about big unknown left-over files on your hard drives, it is appropriate to mention one tool here that is a console one but very useful to anyone willing to get rid of old duplicate files that are hanging around on the disk. Sometimes such copies are produced while copying large amount of files from place to place or simply by mistake while copying Photo / Video files from your Smart Phone to Linux desktop etc. 

This is where the duff command line utility might be super beneficial for you.

unix-desktop:~# apt-cache show duff|grep -i description-en -A3
Description-en: Duplicate file finder
 Duff is a command-line utility for identifying duplicates in a given set of
 files.  It attempts to be usably fast and uses the SHA family of message
 digests as a part of the comparisons.

Using duff tool is very straight forward to see all the duplicate files hanging in a directory lets say your home folder.

unix-desktop:~#  duff -rP /home/hipo

/home/hipo/music/var/Quake II Soundtrack – Kill Ratio.mp3
/home/hipo/mp3/Quake II Soundtrack – Kill Ratio.mp3
2 files in cluster 44 (7913472 bytes, digest 98f38be49e2ffcbf90927f9357b3e24a81d5a649)
/home/hipo/music/var/HYPODIL_01-Scakauec.mp3
/home/hipo/mp3/HYPODIL_01-Scakauec.mp3
2 files in cluster 45 (2807808 bytes, digest ce9067ce1f132fc096a5044845c7fac73e99c0ed)
/home/hipo/music/var/Quake II Suondtrack – March Of The Stoggs.mp3
/home/hipo/mp3/Quake II Suondtrack – March Of The Stoggs.mp3
2 files in cluster 46 (3506176 bytes, digest efcc401b4ebda9b0b2367aceb8e334c8ba1a357d)
/home/hipo/music/var/Quake II Suondtrack – Quad Machine.mp3
/home/hipo/mp3/Quake II Suondtrack – Quad Machine.mp3
2 files in cluster 47 (7917568 bytes, digest 0905c1d790654016c2ecf2949f78d47a870c3822)
/home/hipo/music/var/Cyberpunk Group – Futureshock!.mp3
/home/hipo/mp3/Cyberpunk Group – Futureshock!.mp3

-r (Recursively search into all specified directories.)

P (Don't follow any symbolic links.  This overrides any previous -H or -L option.  This is the default.  Note that this only applies to directories, as sym‐
             bolic links to files are never followed.)

7. Deleting duplicate files with duff

If you're absolutely sure you know what you're doing and you have a backup in case if something messes up during duplicate teletions, to get rid of lets say any duplicate Picture files found by duff run sommething like:

# duff -e0 -r /home/hipo/Pictures/ | xargs -0 rm

!!! Please note that using duff is for those who absolutely know what they're doing and have their data recent data. Deleting the wrong data by mistake with the tool might put you in the first grade and you'll be the only one to blame  🙂 !!!

Wrap it Up

Filling up the disk with unknown large files is a task to resolve that happens often. For the unlazy on Linux / BSD / Mac OS and other UNIX like OS-es the easiest way is to use find or du with some one liner command. For the lazy Windows addicted Graphical users filelightqdirstat or baobab GUI disk usage analysis tools are there.
If you have a lot of files and many of thems are duplicates you can use duff to check them out and remove all unneded duplicates and save space. 
Hope this article, was helpful for someone.
That's all folks, enjoy your data profilactics, if you know any other good easy command or GUI tools or hints for drive disk space profilactics please share.

Happy Nativity Christ is Born ! Happy New Year 2022 and thanks for reading me

Wednesday, January 5th, 2022

Happy-Nativity-Christmas-christ-is-born-card

Christ is Born ! – Image Source: Holy Cross Monastery

Happy Nativity Christ was born 2022 years ago ! I wish a happy Nativity (Christmas).
ILet with the birth of Christ, his light and eternal dominion is born in us and lights us, as the star lighted the Magis who followed the Christmas star.

I wish my dear readers Peace, Love, Hope, Faith Good spiritual and bodily health and God's mercy by the prayers of the Holy Mother of God.

Saint_Alexander-Nevsky-Sofia-Bulgaria-Main-Cathedral-Church-fireworks
Saint Alexander Nevsky Largest Cathedral, Sofia Bulgaria. Tallest (53 m) and largest (by area and volume) cathedral in the Balkans and one of the 3 largest Eastern Orthodox Churches in Europe.

I wish you also a Happy New 2022 year ! Let the new year bring you new power to fight evil and do more good. Let the new year be peaceful, full of Grace and kindness to each of my dear readers ! Let the new year bring you more wisdom and understanding on everyone's life destination and bring you understanding on what is the proper things to do that would bring more joy and for our family, colleagues at work and people who surround is over the coming 12 months time.

Let each those who were sorrowful become joyful, those who hurted, get healed and those who worked hard find fruits out of their hard labor. Let those who hunger find food and those who are in pain find relief ! 
Use your obtained knowledge wisely and not only work on the mind  but work on the soul so they both become better !

Cheers and Happy New  Successful Year 2022 !!!

How to check Linux server power supply state is Okay / How to find out a Linux Power Supply is broken

Wednesday, January 6th, 2021

2U-power-supplies-get-status-if-Power-supply-broken-information-linux-ipmitool

If you're a sysadmin and managing remotely Linux servers, every now and then if a machine is hanging without a reason it useful to check the server Power Supply state. I say that because often if the machine is mysteriously hanging and a standard Root Cause Analysis (RCA) on /var/log/messages /var/log/dmesg /var/log/boot etc. did not bring you to any different conclusion. The next step after you send a technician to reboot the machine is to check on Linux OS level whether Power Supply Unit (PSU) hardware on the machine does not have some issues.
As blogged earlier on how to use ipmitool to manage remote ILO remote boards etc. the ipmitool can also be used to check status of Server PSUs.

Below is example output of 2 PSU server whose Power Supplies are functioning normally.
 

[root@linux-server ~]# ipmitool sdr type "Power Supply"

PS Heavy Load    | 2Bh | ok  | 19.1 | State Deasserted
Power Supply 1   | 70h | ok  | 10.1 | Presence detected
Power Supply 2   | 71h | ok  | 10.2 | Presence detected
PS Configuration | 72h | ok  | 19.1 |
PS 1 Therm Fault | 75h | ok  | 10.1 | Transition to OK
PS 2 Therm Fault | 76h | ok  | 10.2 | Transition to OK
PS1 12V OV Fault | 77h | ok  | 10.1 | Transition to OK
PS2 12V OV Fault | 78h | ok  | 10.2 | Transition to OK
PS1 12V UV Fault | 79h | ok  | 10.1 | Transition to OK
PS2 12V UV Fault | 7Ah | ok  | 10.2 | Transition to OK
PS1 12V OC Fault | 7Bh | ok  | 10.1 | Transition to OK
PS2 12V OC Fault | 7Ch | ok  | 10.2 | Transition to OK
PS1 12Vaux Fault | 7Dh | ok  | 10.1 | Transition to OK
PS2 12Vaux Fault | 7Eh | ok  | 10.2 | Transition to OK
Power Unit       | 7Fh | ok  | 19.1 | Fully Redundant

Now if you have a server lets say on an old ProLiant DL360e Gen8 whose Power Supply is damaged, you will get an from ipmitool similar to:

[root@linux-server  systemd]# ipmitool sdr type "Power Supply"
Power Supply 1   | 30h | ok  | 10.1 | 100 Watts, Presence detected
Power Supply 2   | 31h | ok  | 10.2 | 0 Watts, Presence detected, Failure detected, Power Supply AC lost
Power Supplies   | 33h | ok  | 10.3 | Redundancy Lost


If you don't have ipmitool installed due to security or whatever but you have the hardware detection software dmidecode you can use it too to get the Power Supply state

[root@linux-server  systemd]# dmidecode -t chassis
# dmidecode 3.2
Getting SMBIOS data from sysfs.
SMBIOS 2.8 present.


Handle 0x0300, DMI type 3, 21 bytes
Chassis Information
        Manufacturer: HP
        Type: Rack Mount Chassis
        Lock: Not Present
        Version: Not Specified
        Serial Number: CZJ38201ZH
        Asset Tag:
        Boot-up State: Critical
        Power Supply State: Critical

        Thermal State: Safe
        Security Status: Unknown
        OEM Information: 0x00000000
        Height: 1 U
        Number Of Power Cords: 2
        Contained Elements: 0

To find only Power Supply info status on a server with dmideode.

# dmidecode –type 39

monitoring-power-supply-hardware-information-linux-ipmitool

Plug between the power supply and the mainboard voltage / coms ATX specification

This can also be used on a normal Linux desktop PCs which usually have only 1U (one power supply) on many of Ubuntus and Linux desktops where lshw (list hardaware information) is installed to get the machine PSUs status with lshw 

 root@ubuntu:~# lshw -c power
  *-battery               
       product: 45N1111
       vendor: SONY
       physical id: 1
       slot: Front
       capacity: 23200mWh
       configuration: voltage=11.1V
        Thermal State: Safe
        Security Status: Unknown
        OEM Information: 0x00000000
        Height: 1 U
        Number Of Power Cords: 2
        Contained Elements: 0


Finally to get an extensive information on the voltages of the Power Supply you can use the good old lm_sensors.

# apt-get install lm-sensors
# sensors-detect 
# service kmod start

# sensors
# watch sensors


As manually monitoring Power Supplies and other various data is dubious, finally you might want to use some centralized monitoring. For one example on that you might want to check my prior Zabbix to Monitor Hardware Hard Drive / Temperature and Disk with lm_sensors / smartd on Linux with Zabbix.

How to check if shared library is loaded in AIX OS – Fix missing libreadline.so.7

Thursday, February 20th, 2020

ibm-aix-logo1

I've had to find out whether an externally Linux library is installed  on AIX system and whether something is not using it.
The returned errors was like so:


# gpg –export -a

Could not load program gpg:
Dependent module /opt/custom/lib/libreadline.a(libreadline.so.7) could not be loaded.
Member libreadline.so.7 is not found in archive


After a bit of investigation, I found that gpg was failing cause it linked to older version of libreadline.so.6, the workaround was to just substitute the newer version of libreadline.so.7 over the original installed one.

Thus I had a plan to first find out whether this libreadline.a is loaded and recognized by AIX UNIX first and second find out whether some of the running processes is not using that library.
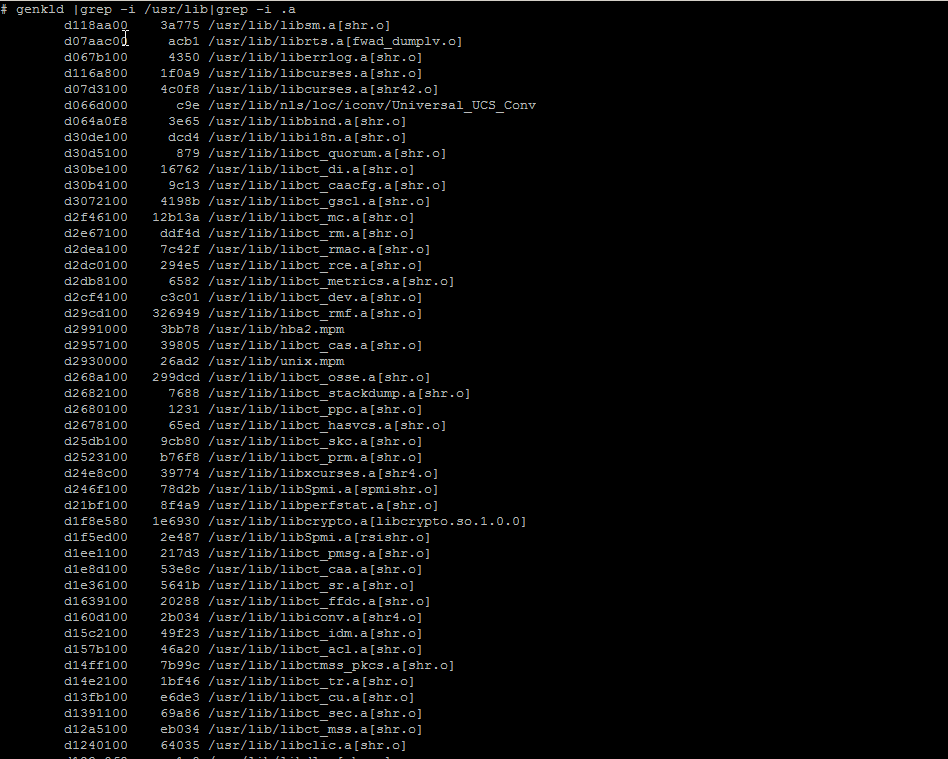
I've come across this interesting IBM official documenation that describes pretty good insights on how to determine whether a shared library  is currently loaded on the system. which mentions the genkld command that is doing
exactly what I needed.

In short:
genkld – creates a list that is printed to the console that shows all loaded shared libraries

genkld-screenshot-aix-unix

Next I used lsof (list open files) command to check whether there is in real time opened libraries by any of the running programs on the system.

After not finding anything and was sure the library is neither loaded as a system library in AIX nor it is used by any of the currently running AIX processes, I was sure I could proceed to safely overwrite libreadline.a (libreadline.so.6) with libreadline.a with (libreadline.so.7).

The result of that is again a normally running gpg as ldd command shows the binary is again normally linked to its dependend system libraries.
 

aix# ldd /usr/bin/gpg
/usr/bin/gpg needs:
         /usr/lib/threads/libc.a(shr.o)
         /usr/lib/libpthreads.a(shr_comm.o)
         /usr/lib/libpthreads.a(shr_xpg5.o)
         /opt/freeware/lib/libintl.a(libintl.so.1)
         /opt/freeware/lib/libreadline.a(libreadline.so.7)
         /opt/freeware/lib/libiconv.a(libiconv.so.2)
         /opt/freeware/lib/libz.a(libz.so.1)
         /opt/freeware/lib/libbz2.a(libbz2.so.1)
         /unix
         /usr/lib/libcrypt.a(shr.o)
         /opt/freeware/lib/libiconv.a(shr4.o)
         /usr/lib/libcurses.a(shr42.o)


# gpg –version
gpg (GnuPG) 1.4.22
Copyright (C) 2015 Free Software Foundation, Inc.
License GPLv3+: GNU GPL version 3 or later <http://gnu.org/licenses/gpl.html>
This is free software: you are free to change and redistribute it.
There is NO WARRANTY, to the extent permitted by law.


Home: ~/.gnupg
Supported algorithms:
Pubkey: RSA, RSA-E, RSA-S, ELG-E, DSA
Cipher: IDEA, 3DES, CAST5, BLOWFISH, AES, AES192, AES256, TWOFISH,
        CAMELLIA128, CAMELLIA192, CAMELLIA256
Hash: MD5, SHA1, RIPEMD160, SHA256, SHA384, SHA512, SHA224
Compression: Uncompressed, ZIP, ZLIB, BZIP2


How to Set MySQL MariaDB server root user to be able to connect from any host on the Internet / Solution to ‘ ERROR 1045 (28000): Access denied for user ‘root’@’localhost’ (using password: YES) ‘

Tuesday, September 3rd, 2019

How-to-set-up-MariaDB-server-root-admin-user-to-be-able-to-connect-from-any-host-anywhere-mariadb-seal-logo-picture

In this small article, I'll shortly explain on how I setup a Standard default package MariaDB Database server on Debian 10 Buster Linux and how I configured it to be accessible from any hostname on the Internet in order to make connection from remote Developer PC with MySQL GUI SQL administration tools such as MySQL WorkBench / HeidiSQL / Navicat / dbForge   as well as the few set-backs experienced in the process (e.g. what was the reason for ' ERROR 1045 (28000): Access denied for user 'root'@'localhost' (using password: YES) '  error and its solution.

Setting new or changing old MariaDB (MySQL) root server password


I've setup a brand new MariaDB database (The new free OpenSource software fork of MySQL) mariadb-server-10.3 on a Debian 10, right after the OS was installed with the usual apt command:

# apt install mariadb-server

Next tep was to change the root access password which was set to empty pass by default, e.g. connected with mysql CLI locally while logged via SSH on server and run:

MariaDB [(none)]> mysql -u root -p

use mysql;
update user set authentication_string=PASSWORD("MyChosenNewPassword") where User='root';

There was requirement by the customer, that MySQL server is not only accessed locally but be accessed from any IP address from anywhere on the Internet, so next step was to do so.

Allowing access to MySQL server from Anywhere

Allowing access from any host to MariaDB SQL server  is a bad security practice but as the customer is the King I've fulfilled this weird wish too, by changing the listener for MariaDB (MySQL) on Debian 10 codenamed Buster
 
changing the default listener
to be not the default 127.0.0.1 (localhost) but any listener is done by modifying the bind-address directive in conf /etc/mysql/mariadb.conf.d/50-server.cnf:

root@linux:~# vim /etc/mysql/mariadb.conf.d/50-server.cnf

Then comment out

bind-address  = 127.0.0.1

and  add instead 0.0.0.0 (any listener)


bind-address  = 0.0.0.0
root@linux:/etc/mysql/mariadb.conf.d# grep -i bind-address 50-server.cnf
##bind-address            = 127.0.0.1
bind-address    = 0.0.0.0


Then to make the new change effective restart MariaDB (luckily still using the old systemV init script even though systemd is working.
 

root@linux:~# /etc/init.d/mysql restart
[ ok ] Restarting mysql (via systemctl): mysql.service.


To make sure it is properly listening on MySQL defaults TCP port 3306, then as usual used netcat.

root@pritchi:~# netstat -etna |grep -i 3306
tcp        0      0 0.0.0.0:3306            0.0.0.0:*               LISTEN      109        1479917  


By the way the exact mariadb.cnf used on this middle-sized front-backend server is here – the serveris planned to be a Apache Web server + Database host with MySQL DB of a middle range to be able to serve few thousand of simultaneous unique customers.

To make sure no firewall is preventing MariaDB to be accessed, I've checked for any reject rules iptables and ipset definitions, e.g.:
 

root@linux:~# iptables -L |gre -i rej

root@linux:~# ipset list


Then to double make sure the MySQL is allowed to access from anywhere, used simple telnet from my Desktop Laptop PC (that also runs Debian Linux) towards the server .

hipo@jeremiah:~$ telnet 52.88.235.45 3306
Trying 52.88.235.45…
Connected to 52.88.235.45.
Escape character is '^]'.
[
5.5.5-10.3.15-MariaDB-1
                       rQ}Cs>v\��-��G1[W%O>+Y^OQmysql_native_password
Connection closed by foreign host.


As telnet is not supporting the data encryption after TCP proto connect, in a few seconds time, remote server connection is terminated.


Setting MySQL user to be able to connect to local server MySQL from any remote hostname


I've connected locally to MariaDB server with mysql -u root -p and issued following set of SQL commands to make MySQL root user be able to connect from anywhere:


CREATE USER 'root'@'%' IDENTIFIED BY 'my-secret-pass';
GRANT ALL ON *.* TO 'root'@'localhost';
GRANT ALL ON *.* TO 'root'@'%';


Next step, I've took was to try logging in with root (admin) MariaDB superuser from MySQL CLI (Command Line Interface) on my desktop just to find out, I'm facing a nasty error.
 

hipo@jeremiah:~$ mysql -u root -H remote-server-hostname.com -p
Enter password:
ERROR 1045 (28000): Access denied for user 'root'@'localhost' (using password: YES)


My first guess was something is wrong with my root user created in MySQL's mysql.user table (In MySQL this is the privileges table that stores, how MySQL user credentials are handled by mysqld local OS running process.


Changing the MySQL root (admin) password no longer possible on Debian 10 Buster?


The standard way ot change the MySQL root password well known via a simple dpkg-reconfigure (provided by Debian's debconf is no longer working so below command produces empty output instead of triggering the good old Ncurses text based interface well-known over the years …


root@linux:~# /usr/sbin/dpkg-reconfigure mariadb-server-10.3


Viewing MariaDB (MySQL) username / password set-up from the CLI


To list how this set-privileges looked like I've used following command:


MariaDB [mysql]> select * from mysql.user where User = 'root';
+———–+——+——————————————-+————-+————-+————-+————-+————-+———–+————-+—————+————–+———–+————+—————–+————+————+————–+————+———————–+——————+————–+—————–+——————+——————+—————-+———————+——————–+——————+————+————–+————————+———————+———-+————+————-+————–+—————+————-+—————–+———————-+———————–+———————–+——————+———+————–+——————–+
| Host      | User | Password                                  | Select_priv | Insert_priv | Update_priv | Delete_priv | Create_priv | Drop_priv | Reload_priv | Shutdown_priv | Process_priv | File_priv | Grant_priv | References_priv | Index_priv | Alter_priv | Show_db_priv | Super_priv | Create_tmp_table_priv | Lock_tables_priv | Execute_priv | Repl_slave_priv | Repl_client_priv | Create_view_priv | Show_view_priv | Create_routine_priv | Alter_routine_priv | Create_user_priv | Event_priv | Trigger_priv | Create_tablespace_priv | Delete_history_priv | ssl_type | ssl_cipher | x509_issuer | x509_subject | max_questions | max_updates | max_connections | max_user_connections | plugin                | authentication_string | password_expired | is_role | default_role | max_statement_time |
+———–+——+——————————————-+————-+————-+————-+————-+————-+———–+————-+—————+————–+———–+————+—————–+————+————+————–+————+———————–+——————+————–+—————–+——————+——————+—————-+———————+——————–+——————+————+————–+————————+———————+———-+————+————-+————–+—————+————-+—————–+———————-+———————–+———————–+——————+———+————–+——————–+
| localhost | root | *E6D338325F50177F2F6A15EDZE932D68C88B8C4F | Y           | Y           | Y           | Y           | Y           | Y         | Y           | Y             | Y            | Y         | Y          | Y               | Y          | Y          | Y            | Y          | Y                     | Y                | Y            | Y               | Y                | Y                | Y              | Y                   | Y                  | Y                | Y          | Y            | Y                      | Y                   |          |            |             |              |             0 |           0 |               0 |                    0 | mysql_native_password |                       | N                | N       |              |           0.000000 |
| %         | root | *E6D338325F50177F2F6A15EDZE932D68C88B8C4F | Y           | Y           | Y           | Y           | Y           | Y         | Y           | Y             | Y            | Y         | N          | Y               | Y          | Y          | Y            | Y          | Y                     | Y                | Y            | Y               | Y                | Y                | Y              | Y                   | Y                  | Y                | Y          | Y            | Y                      | Y                   |          |            |             |              |             0 |           0 |               0 |                    0 |                       |                       | N                | N       |              |           0.000000 |
+———–+——+——————————————-+————-+————-+————-+————-+————-+———–+————-+—————+————–+———–+————+—————–+————+————+————–+————+———————–+——————+————–+—————–+——————+——————+—————-+———————+——————–+——————+————+————–+————————+———————+———-+————+————-+————–+—————+————-+—————–+———————-+———————–+———————–+——————+———+————–+——————–+


The hashed (encrypted) password string is being changed from the one on the server, so please don't try to hack me (decrypt it) 🙂
As it is visible from below output the Host field for root has the '%' string which means, any hostname is authorized to be able to connect and login to the MySQL server, so this was not the problem.

After quite some time on reading on what causes
' ERROR 1045 (28000): Access denied for user 'root'@'localhost' (using password: YES)
',
I've spend some time reading various forum discussions online on the err such as the one on StackOverflow here SuperUser.com's  how to fix access denied for user 'root'@'localhost' and one on askubuntu.com's – ERROR 1045(28000) : Access denied for user 'root@localhost' (using password: no ) and after a while finally got it, thanks to a cool IRC.FREENODE.NET guy nicknamed, hedenface who pointed me I'm that, I'm trying to use the -H flag (Prodice HTML) instead of -h (host_name), it seems somehow I ended up with the wrong memory that the -H stands for hostname, by simply using -h I could again login Hooray!!!


root@linux:~$ mysql -u root -h remote-server-host.com -p
Enter password:
Welcome to the MariaDB monitor.  Commands end with ; or \g.
Your MariaDB connection id is 14
Server version: 10.3.15-MariaDB-1 Debian 10


Copyright (c) 2000, 2018, Oracle, MariaDB Corporation Ab and others.

Type 'help;' or '\h' for help. Type '\c' to clear the current input statement.


I've further asked the customer to confirm, he can connect also from his Microsoft Windows 10 PC situated on a different LAN network and got his confirmation. Few notes to make here is I've also installed phpmyadmin on the server using phpmyadmin php source code latest version, as in Debian 10 it seems the good old PHP is no longer available (as this crazy developers again made a mess and there is no phpmyadmin .deb package in Debian Buster – but that's a different story I'll perhaps try to document in some small article in future.