Posts Tagged ‘mail server’
Thursday, June 22nd, 2023 
In this article, I'm going to show you how to setup a very simple monitoring if a local running SMTP (Postfix / Qmail / Exim) is responding correctly on basic commands. The check would helpfully keep you in track to know whether your configured Linux server local MTA (Mail Transport Agent) is responding on requests on TCP / IP protocol Port 25, as well as a check for process existence of master (that is the main postfix) proccess, as well as the usual postfix spawned sub-processes qmgr (the postfix queue manager), tsl mgr (TLS session cache and PRNG manager), pickup (Postfix local mail pickup) – or email receiving process.
Normally a properly configured postfix installation on a Linux whatever you like distribution would look something like below:
# ps -ef|grep -Ei 'master|postfix'|grep -v grep
root 1959 1 0 Jun21 ? 00:00:00 /usr/libexec/postfix/master -w
postfix 1961 1959 0 Jun21 ? 00:00:00 qmgr -l -t unix -u
postfix 4542 1959 0 Jun21 ? 00:00:00 tlsmgr -l -t unix -u
postfix 2910288 1959 0 11:28 ? 00:00:00 pickup -l -t unix -u
At times, during mail server restarts the amount of processes that are sub spawned by postfix, may very and if you a do a postfix restart
# systemctl restart postfix
The amout of spawned processes running as postfix username might decrease, and only qmgr might be available for second thus in the consequential shown Template the zabbix processes check to make sure the Postfix is properly operational on the Linux machine is made to check for the absolute minumum of
1. master (postfix process) that runs with uid root
2. and one (postfix) username binded proccess
If the amount of processes on the host is less than this minimum number and the netcat is unable to simulate a "half-mail" sent, the configured Postfix alarm Action (media and Email) will take place, and you will get immediately notified, that the monitored Mail server has issue!
The idea is to use a small one liner connection with netcat and half simulate a normal SMTP transaction just like you would normally do:
root@pcfrxen:/root # telnet localhost 25
Trying 127.0.0.1…
Connected to localhost.
Escape character is '^]'.
220 This is Mail2 Pc-Freak.NET ESMTP
HELO localhost
250 This is Mail2 Pc-Freak.NET
MAIL FROM:<hipopo@pc-freak.net>
250 ok
RCPT TO:<hip0d@remote-smtp-server.com>
and then disconnect the connection.
1. Create new zabbix userparameter_smtp_check.conf file
The simple userparameter one liner script to do the task looks like this:
# vi /etc/zabbix/zabbix_agent.d/userparameter_smtp_check.conf
UserParameter=smtp.check,(if [[ $(echo -e “HELO localhost\n MAIL FROM: root@$HOSTNAME\n RCPT TO: report-email@your-desired-mail-server.com\n QUIT\n” | /usr/bin/nc localhost 25 -w 5 2>&1 | grep -Ei ‘220\s.*\sESMTP\sPostfix|250\s\.*|250\s\.*\sOk|250\s\.*\sOk|221\.*\s\w’|wc -l) == ‘5’ ]]; then echo "SMTP OK 1"; else echo "SMTP NOK 0"; fi)
Set the proper permissions so either file is owned by zabbix:zabbix or it is been able to be read from all system users.
# chmod a+r /etc/zabbix/zabbix_agent.d/userparameter_smtp_check.conf
2. Create a new Template for the Mail server monitoring
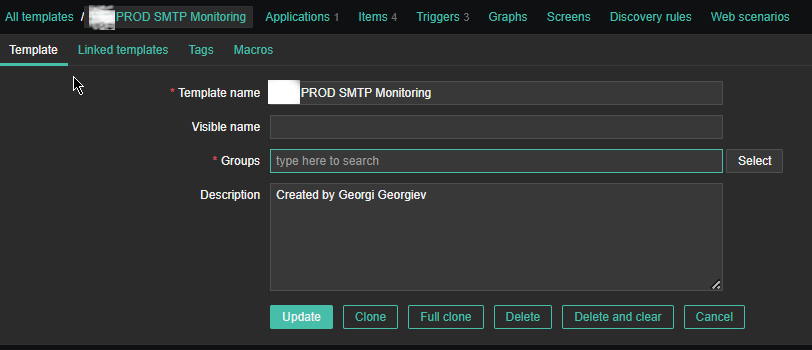

Just like any other template name it with what fits you as you see, I've call it PROD SMTP Monitoring, as the template is prepared to specifically monitor In Production Linux machines, and a separate template is used to monitor the Quality Assurance (QAs) as well as PreProd (Pre Productions).
3. Create the followng Items and Depedent Item to process zabbix-agent received data from the Userparam script
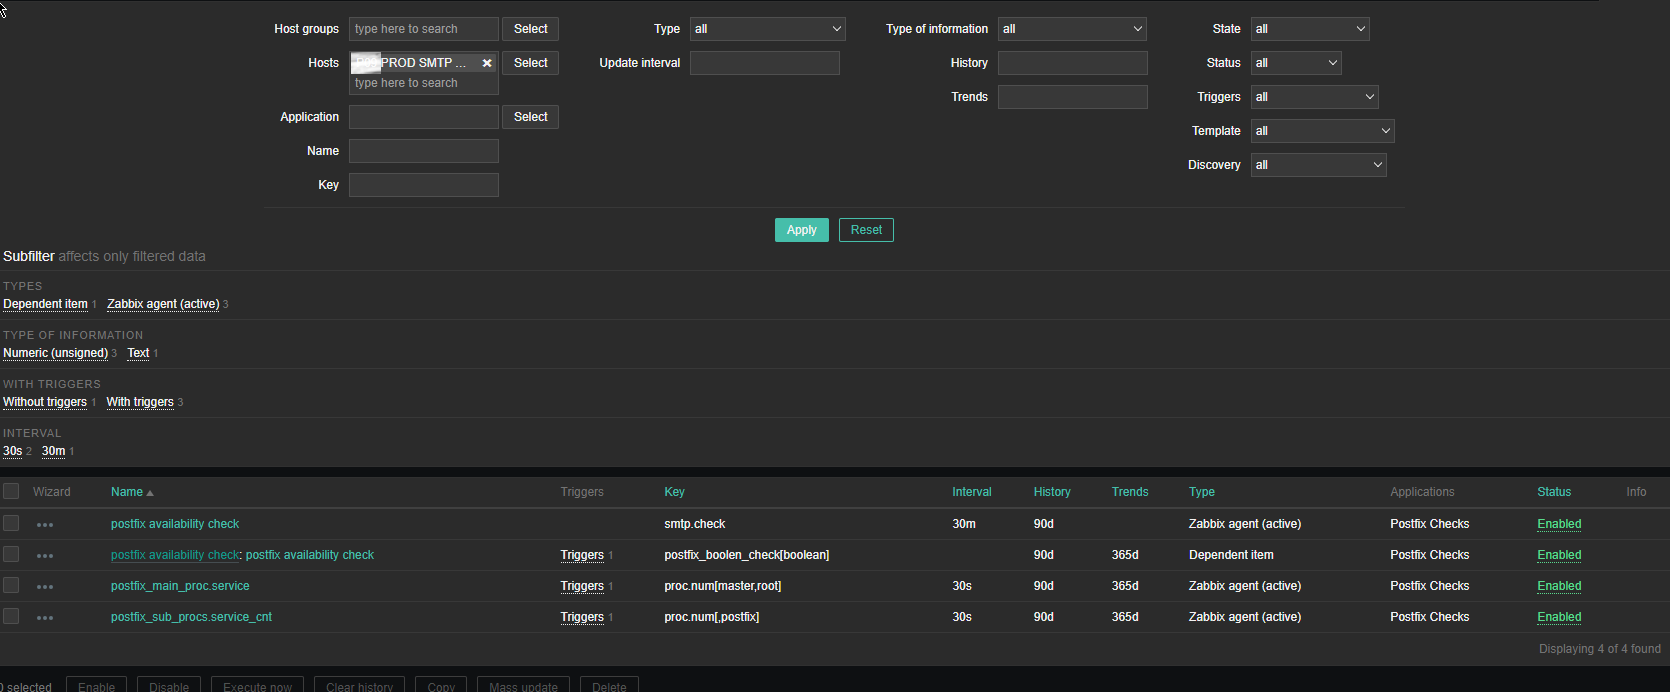
Above is the list of basic Items and Dependent Item you will need to configure inside the SMTP Check zabbix Template.
The Items should have the following content and configurations:
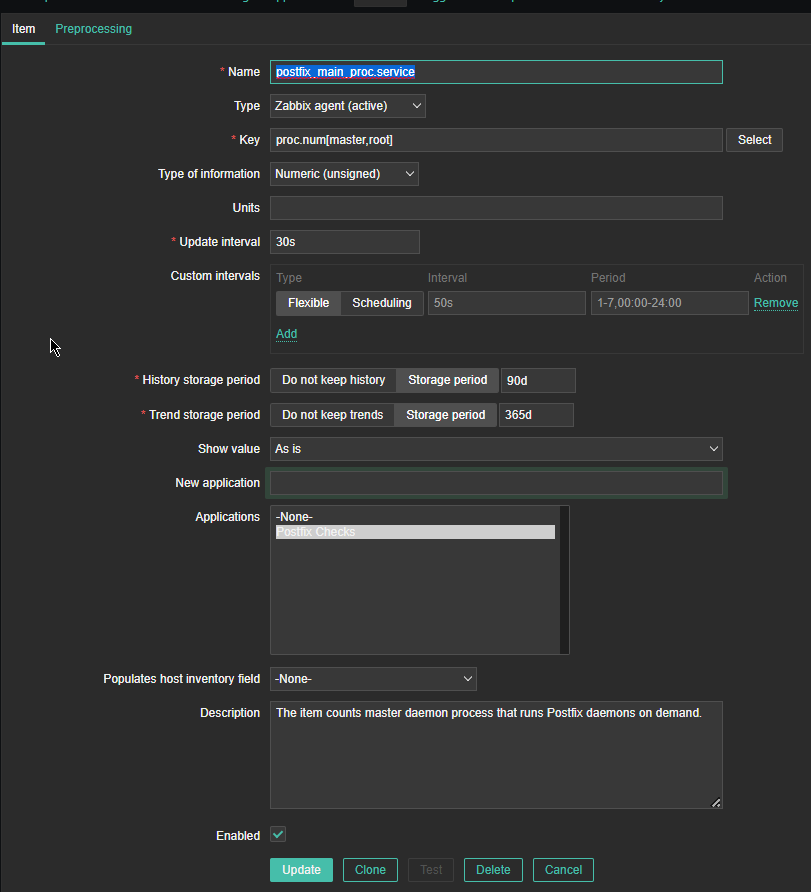
*Name: postfix_main_proc.service
Type: Zabbix agent(active)
*Key: proc.num[master,root]
Type of Information: Numeric (unassigned)
*Update interval: 30s
Custom Intervals: Flexible
*History storage period: 90d
*Trend storage period: 365d
Show Value: as is
Applications: Postfix Checks
Populated host inventory field: -None-
Description: The item counts master daemon process that runs Postfix daemons on demand
Where the arguments pased to proc.num[] function are:
master is the process that is being looked up for and root is the username with which the the postfix master daemon is running. If you need to adapt it for qmail or exim that shouldn't be a big deal you only have to in advance check the exact processes that are normally running on the machine
and configure a similar process check for it.
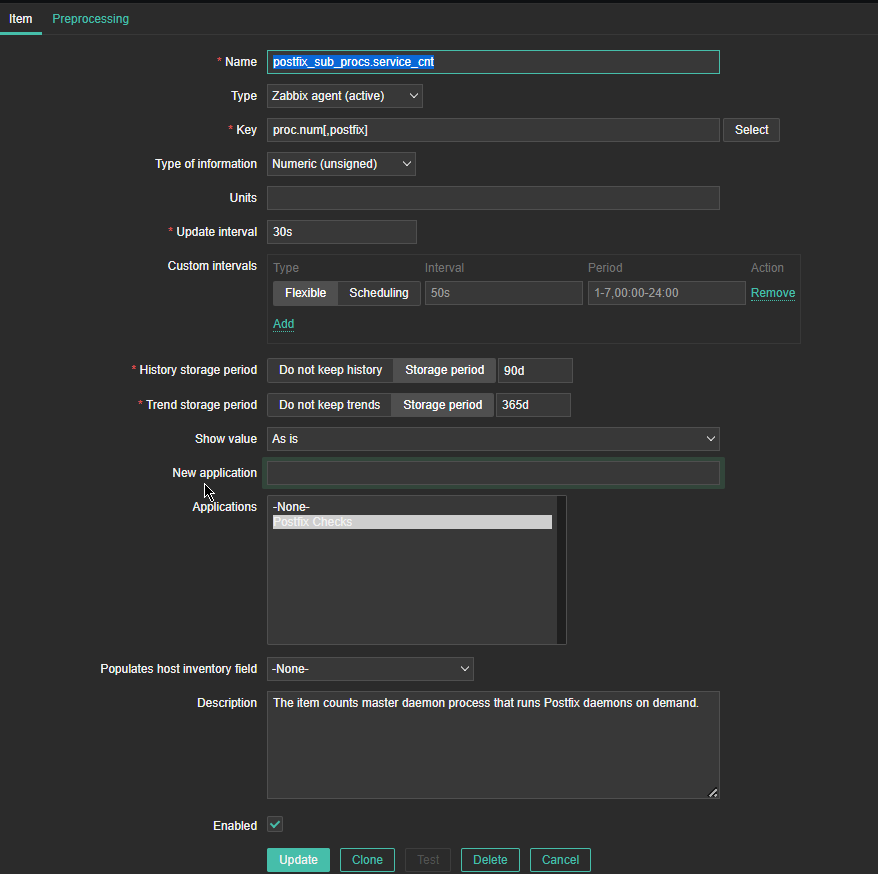
*Name: postfix_sub_procs.service_cnt
Type: Zabbix agent(active)
*Key: proc.num[,postfix]
Type of information: Numeric (unassigned)
Update Interval: 30s
*History Storage period: Storage Period 90d
*Trend storage period: Storage Period 365d
Description: The item counts master daemon processes that runs postfix daemons on demand.
Here the idea with this Item is to check the number of processes that are running with user / groupid that is postfix. Again for other SMPT different from postfix, just set it to whatever user / group
you would like zabbix to look up for in Linux the process list. As you can see here the check for existing postfix mta process is done every 30 seconds (for more critical environments you can put it to less).
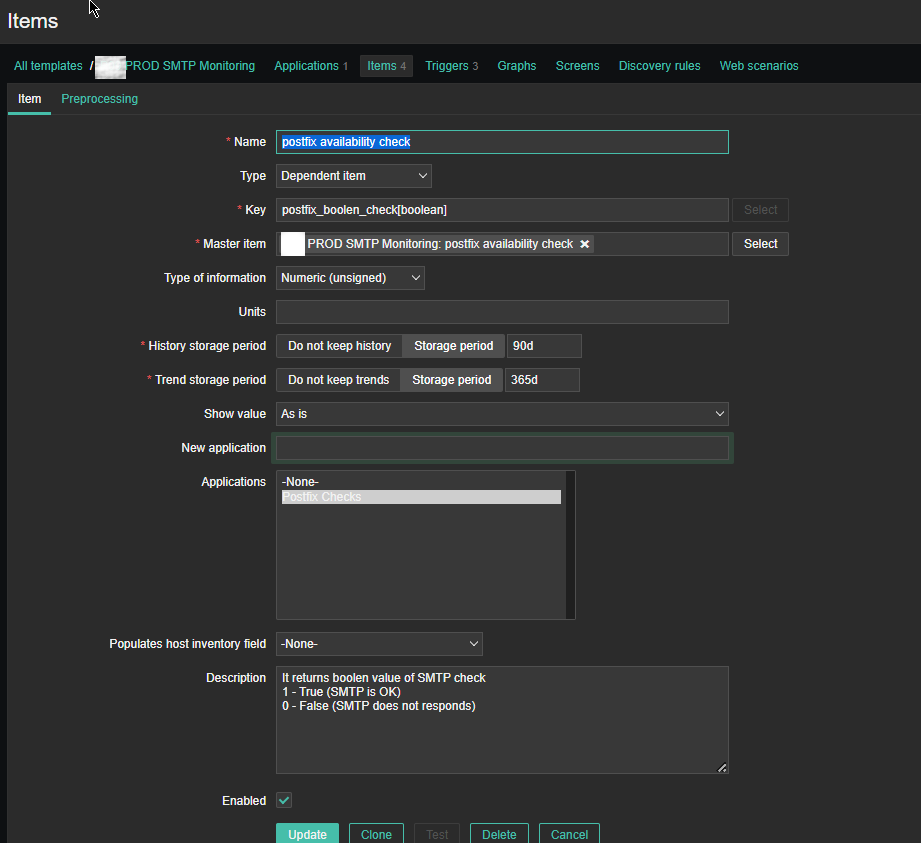
For simple zabbix use this Dependent Item is not necessery required. But as we would like to process more closely the output of the userparameter smtp script, you have to set it up.
If you want to write graphical representation by sending data to Grafana.
*Name: postfix availability check
Key: postfix_boolean_check[boolean]
Master Item: PROD SMTP Monitoring: postfix availability check
Type of Information: Numeric unassigned
*History storage period: Storage period 90d
*Trend storage period: 365d
Applications: Postfix Checks
Description: It returns boolean value of SMTP check
1 – True (SMTP is OK)
0 – False (SMTP does not responds)
Enabled: Tick
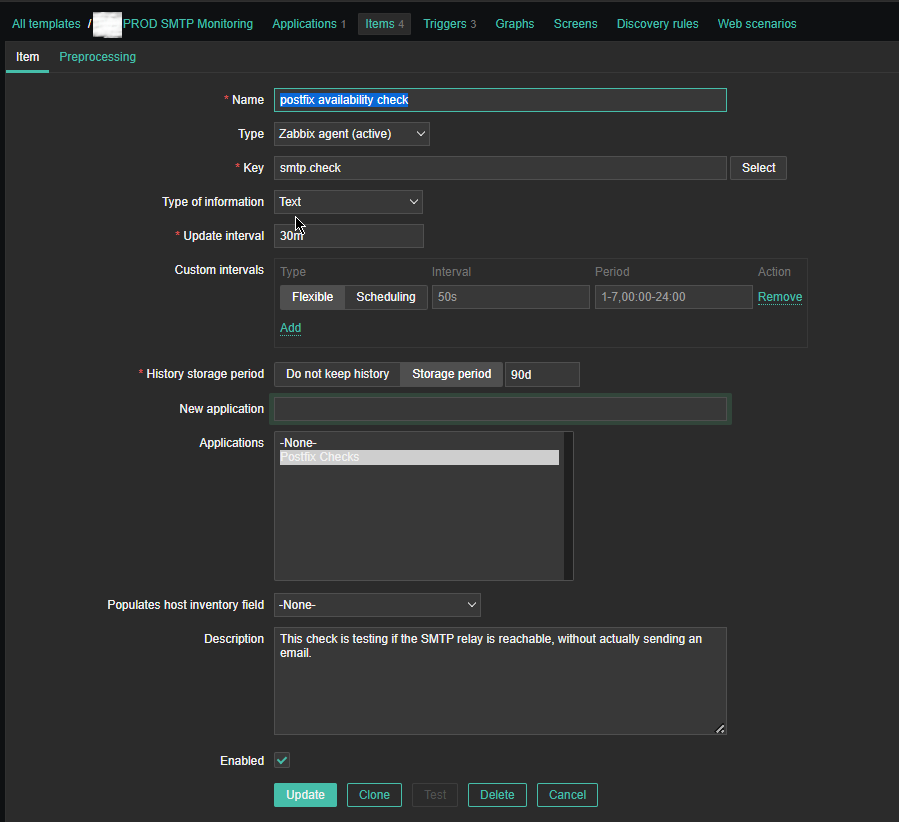
*Name: postfix availability check
*Key: smtp.check
Custom intervals: Flexible
*Update interval: 30 m
History sotrage period: Storage Period 90d
Applications: Postfix Checks
Populates host inventory field: -None-
Description: This check is testing if the SMTP relay is reachable, without actual sending an email
Enabled: Tick
4. Configure following Zabbix Triggers
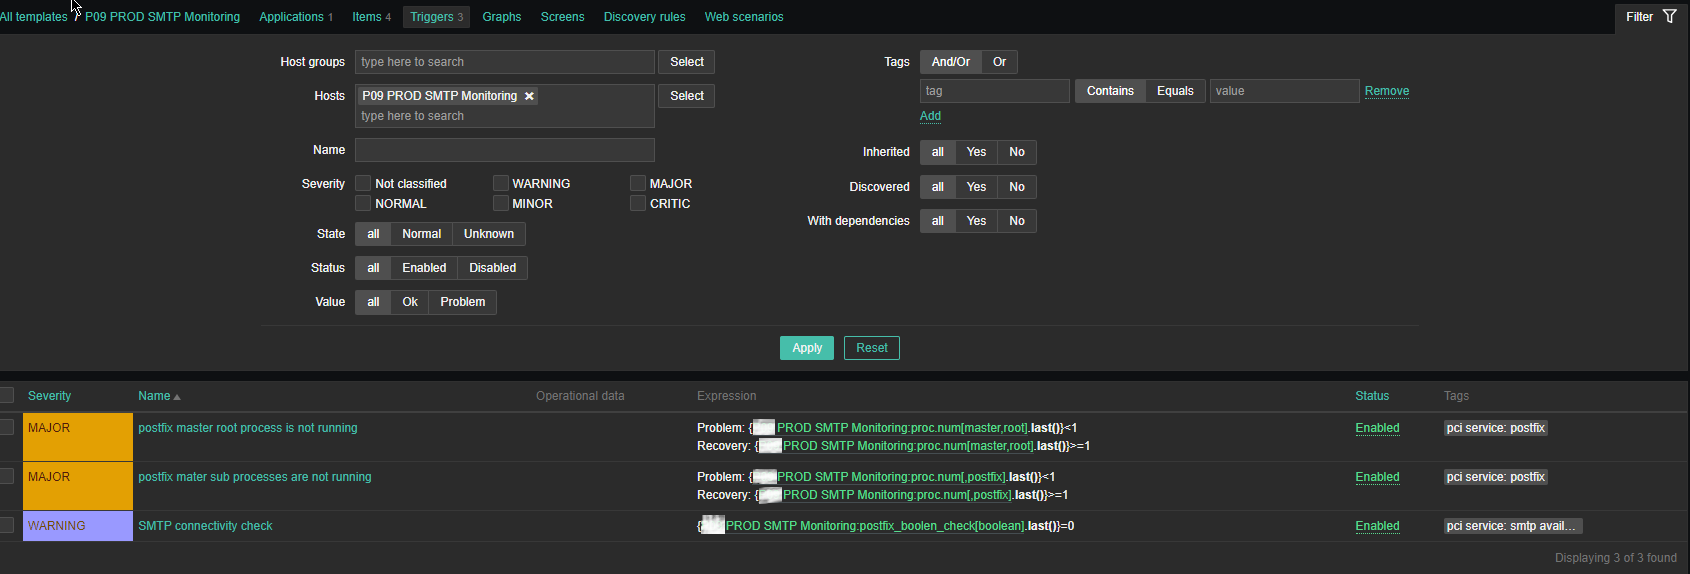
Note: The severity levels you should have previosly set in Zabbix up to your desired ones.
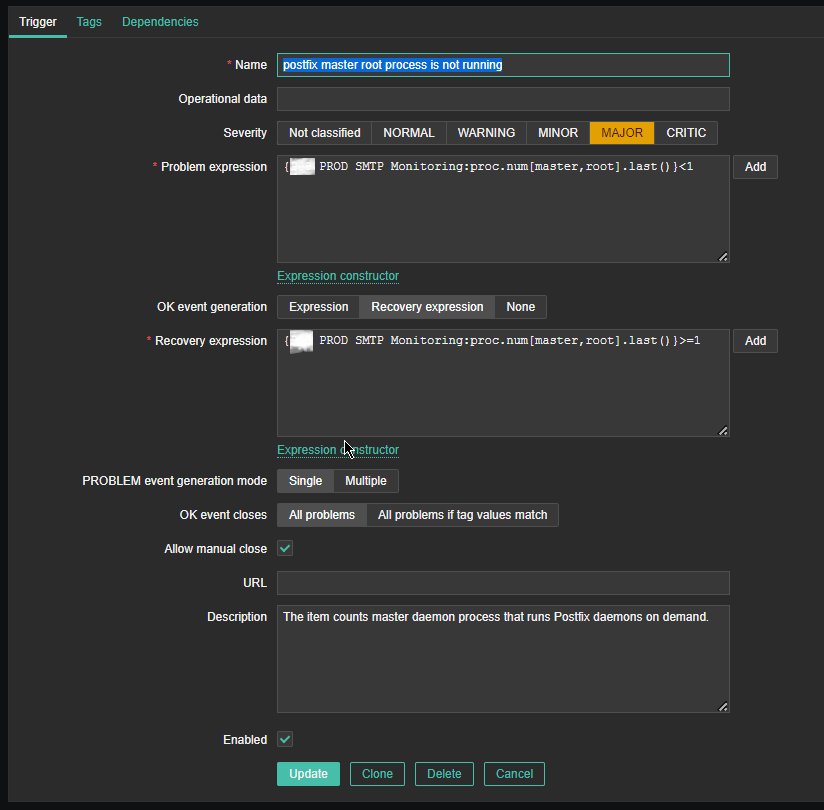
Name: postfix master root process is not running
*Problem Expression: {PROD SMTP Monitoring:proc.num[master,root].last()}<1
OK event generation: Recovery expression
*Recovery Expression: {PROD SMTP Monitoring:proc.num[master,root].last()}>=1
Allow manual close: Tick
Description: The item counts master daemon process that runs Postfix daemon on demand.
Enabed: Tick
I would like to have an AUTO RESOLVE for any detected mail issues, if an issue gets resolved. That is useful especially if you don't have the time to put the Zabbix monitoring in Maintainance Mode during Operating system planned updates / system reboots or unexpected system reboots due to electricity power loss to the server colocated – Data Center / Rack .
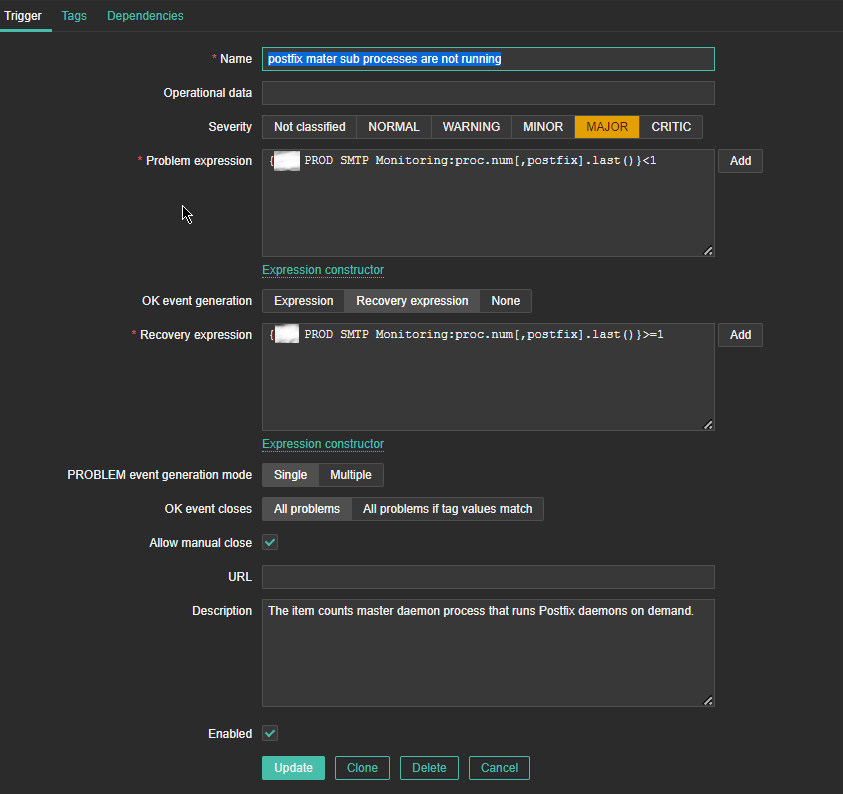
*Name: postfix master sub processes are not running
*Problem Expression: {P09 PROD SMTP Monitoring:proc.num[,postfix].last()}<1
PROBLEM event generation mode: Single
OK event closes: All problems
*Recovery Expression: {P09 PROD SMTP Monitoring:proc.num[,postfix].last()}>=1
Problem event generation mode: Single
OK event closes: All problems
Allow manual close: Tick
Enabled: Tick
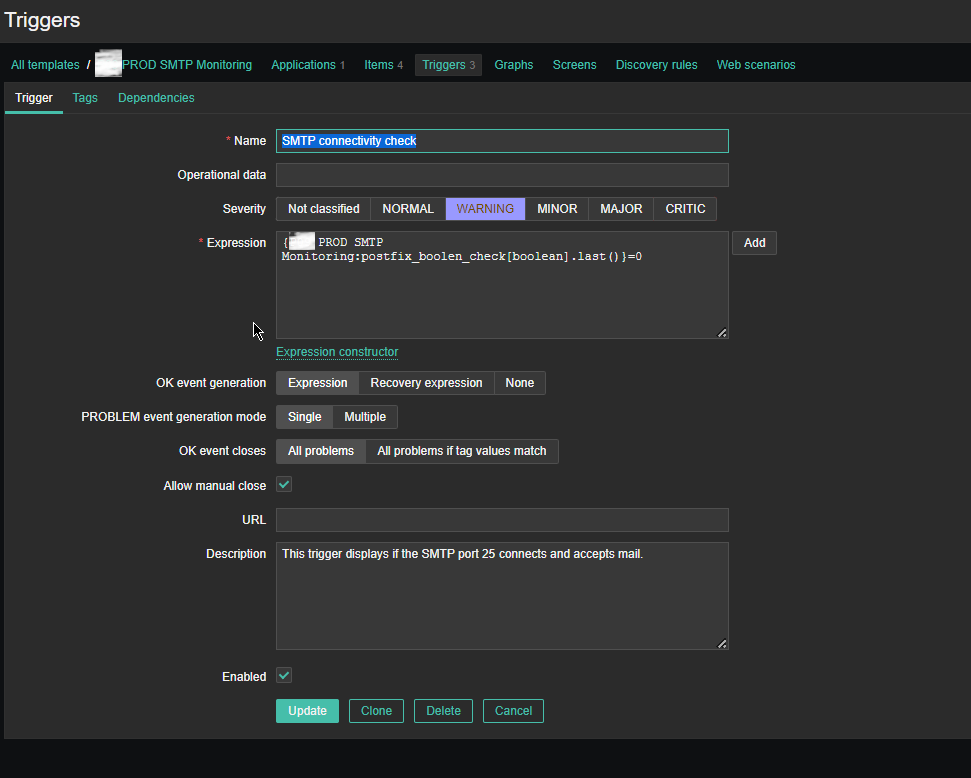
Name: SMTP connectivity check
Severity: WARNING
*Expression: {PROD SMTP Monitoring:postfix_boolen_check[boolean].last()}=0
OK event generation: Expression
PROBLEM even generation mode: SIngle
OK event closes: All problems
Allow manual close: Tick
Enabled: Tick
5. Configure respective Zabbix Action
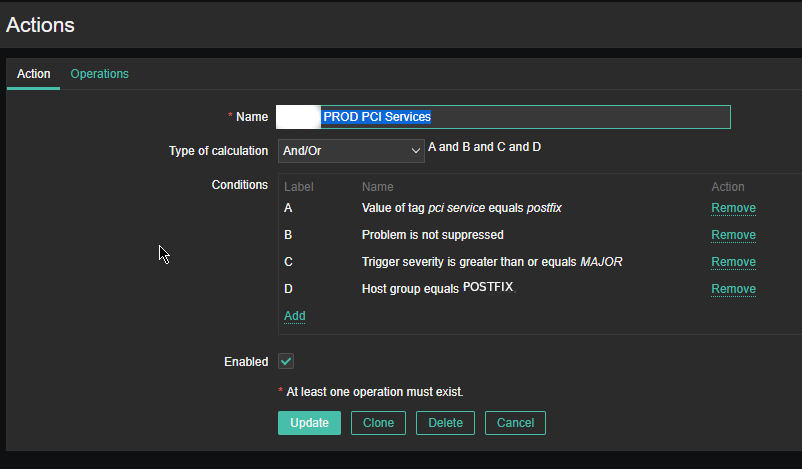
As the service is tagged with 'pci service' tag we define the respective conditions and according to your preferences, add as many conditions as you need for the Zabbix Action to take place.
NOTE! :
Assuming that communication chain beween Zabbix Server -> Zabbix Proxy (if zabbix proxy is used) -> Zabbix Agent works correctly you should start receiving that from the userparameter script in Zabbix with the configured smtp.check userparam key every 30 minutes.
Note that this simple nc check will keep a trail records inside your /var/log/maillog for each netcat connection, so keep in mind that in /var/log/maillog on each host which has configured the SMTP Check zabbix template, you will have some records similar to:
# tail -n 50 /var/log/maillog
2023-06-22T09:32:18.164128+02:00 lpgblu01f postfix/smtpd[2690485]: improper command pipelining after HELO from localhost[127.0.0.1]: MAIL FROM: root@your-machine-fqdn-address.com\n RCPT TO: your-supposable-receive-addr@whatever-mail-address.com\n QUIT\n
2023-06-22T09:32:18.208888+02:00 lpgblu01f postfix/smtpd[2690485]: 32EB02005B: client=localhost[127.0.0.1]
2023-06-22T09:32:18.209142+02:00 lpgblu01f postfix/smtpd[2690485]: disconnect from localhost[127.0.0.1] helo=1 mail=1 rcpt=1 quit=1 commands=4
2023-06-22T10:02:18.889440+02:00 lpgblu01f postfix/smtpd[2747269]: connect from localhost[127.0.0.1]
2023-06-22T10:02:18.889553+02:00 lpgblu01f postfix/smtpd[2747269]: improper command pipelining after HELO from localhost[127.0.0.1]: MAIL FROM: root@your-machine-fqdn-address.com\n RCPT TO: your-supposable-receive-addr@whatever-mail-address.com\n QUIT\n
2023-06-22T10:02:18.933933+02:00 lpgblu01f postfix/smtpd[2747269]: E3ED42005B: client=localhost[127.0.0.1]
2023-06-22T10:02:18.934227+02:00 lpgblu01f postfix/smtpd[2747269]: disconnect from localhost[127.0.0.1] helo=1 mail=1 rcpt=1 quit=1 commands=4
2023-06-22T10:32:26.143282+02:00 lpgblu01f postfix/smtpd[2804195]: connect from localhost[127.0.0.1]
2023-06-22T10:32:26.143439+02:00 lpgblu01f postfix/smtpd[2804195]: improper command pipelining after HELO from localhost[127.0.0.1]: MAIL FROM: root@your-machine-fqdn-address.com\n RCPT TO: your-supposable-receive-addr@whatever-mail-address.com\n QUIT\n
2023-06-22T10:32:26.186681+02:00 lpgblu01f postfix/smtpd[2804195]: 2D7F72005B: client=localhost[127.0.0.1]
2023-06-22T10:32:26.186958+02:00 lpgblu01f postfix/smtpd[2804195]: disconnect from localhost[127.0.0.1] helo=1 mail=1 rcpt=1 quit=1 commands=4
2023-06-22T11:02:26.924039+02:00 lpgblu01f postfix/smtpd[2860398]: connect from localhost[127.0.0.1]
2023-06-22T11:02:26.924160+02:00 lpgblu01f postfix/smtpd[2860398]: improper command pipelining after HELO from localhost[127.0.0.1]: MAIL FROM: root@your-machine-fqdn-address.com\n RCPT TO: your-supposable-receive-addr@whatever-mail-address.com\n QUIT\n
2023-06-22T11:02:26.963014+02:00 lpgblu01f postfix/smtpd[2860398]: EB08C2005B: client=localhost[127.0.0.1]
2023-06-22T11:02:26.963257+02:00 lpgblu01f postfix/smtpd[2860398]: disconnect from localhost[127.0.0.1] helo=1 mail=1 rcpt=1 quit=1 commands=4
2023-06-22T11:32:29.145553+02:00 lpgblu01f postfix/smtpd[2916905]: connect from localhost[127.0.0.1]
2023-06-22T11:32:29.145664+02:00 lpgblu01f postfix/smtpd[2916905]: improper command pipelining after HELO from localhost[127.0.0.1]: MAIL FROM: root@your-machine-fqdn-address.com\n RCPT TO: your-supposable-receive-addr@whatever-mail-address.com\n QUIT\n
2023-06-22T11:32:29.184539+02:00 lpgblu01f postfix/smtpd[2916905]: 2CF7D2005B: client=localhost[127.0.0.1]
2023-06-22T11:32:29.184729+02:00 lpgblu01f postfix/smtpd[2916905]: disconnect from localhost[127.0.0.1] helo=1 mail=1 rcpt=1 quit=1 commands=4
That's all folks use the :
Configuration -> Host (menu)
and assign the new SMTP check template to as many of the Linux hosts where you have setup the Userparameter script and Enjoy the new mail server monitoring at hand.
Tags: close, Connected, Enabled Tick, field, How to, Information Numeric, look, mail server, netcat, parameter, Postfix Mail, problem, script, setup, simple, Warning, work
Posted in Linux, Monitoring, System Administration, Zabbix | 3 Comments »
Friday, June 16th, 2023 
Messages are frozen when the mail server has determined it cannot do anything to deliver the message. (they can also be manually frozen).
Exim has option to set how long frozen messages are kept on the system.
On a Debian/Ubuntu based install the /etc/exim4/conf.d/main/02_exim4-config_options file has the option timeout_frozen_after = 7d. Which means messages frozen for 7 days will get expunged.
Frozen messages really shouldn't be a problem on most systems. They are often just spam messages that can't get properly delivered.
If you have to deal with freezed mails from the exim mail server, unlike postfix, where there is no "freeze" scheme but the messages just stuck in the queue and you might want to simply ask the mail server to resend failed to deliver messages once again through a simple:
# postqueue -f
With exim to ask the server to resend the freeze-d states messages there is another aproach:
It is for this reason that I am writing this post to share how you can ask the exim to resend the "frozen" messages, as on exim there is no so much straight forward way.
To find out what letters are stored in the exim queue run
# exim -bp
To unfreeze the messages a simple while loop can be written, which lists all frozen state messages and unfreezes these letters one by one in a cycle:
# exim -bp | grep -i frozen | awk '{print $3}' | while read LINE; do exim -Mt $LINE; done
Another approach to unfreeze the frozen multitude of messages which should be a bit quicker if you have to do it for a very large amount of frozen states mails is to use xargs command:
# mailq | grep frozen | awk '{print $3}' | xargs exim -v -M
Since we on exim topic in this article, for starters with Exim, here is few other useful exim queue commands, that might be beneficial if you have to deal with EXIM SMTP.
Attempting to send a mail with a specified ID
# /usr/sbin/exim -M email-id
Forcefully run another queue to execute
# /usr/sbin/exim -qf
We see the logs related to letter
# /usr/sbin/exim -Mvl messageID
To see the body of the letter
# /usr/sbin/exim -Mvb messageID
To see the beginning (header) of the letter only
# /usr/sbin/exim -Mvh messageID
Deletes the mail without sending any error messages
# /usr/sbin/exim -Mrm messageID
Shows the number of letters in the queue
# /usr/sbin/exim -bpr | grep "<" | wc -l
Shows the number of frozen mails in the queue
# /usr/sbin/exim -bpr | grep frozen | wc -l
Deletes all frozen letters
# /usr/sbin/exim -bpr | grep frozen | awk {'print $3'} | xargs exim -Mrm
To remove a message from the Exim queue
# exim -Mrm {message-id}
Remove all messages from the Exim queue
# exim -bp | awk '/^ *[0-9]+[mhd]/{print "exim -Mrm " $3}' | bash
Another way to do it:
# exim -bp | exiqgrep -i | xargs exim -Mrm
Fastest solution to delete all emails in exim queue (for less than 5 seconds) is
# cd /var/spool
# mv exim exim.old
# mkdir -p exim/input
# mkdir -p exim/msglog
# mkdir -p exim/db
# chown -R mail:mail exim
# /sbin/service exim restart
or if you have AV / AntiSpam integrated to mail server:
# cd /var/spool
# mv exim exim.old
# mkdir -p exim/db
# mkdir -p exim/input
# mkdir -p exim/msglog
# mkdir -p exim/scan
# chown -R mail:mail exim
# /sbin/service exim restart
Deletes the entire exim queue
# /usr/sbin/exim -qff
Tags: awk, cycle, Exim Mail, letter, mail server, mv, queue, sbin, usr, xargs
Posted in System Administration | 1 Comment »
Thursday, February 13th, 2020 
Generally upgrading both RHEL and CentOS can be done straight with yum tool just we're pretty aware and mostly anyone could do the update, but it is good idea to do some
steps in advance to make backup of any old basic files that might help us to debug what is wrong in case if the Operating System fails to boot after the routine Machine OS restart
after the upgrade that is usually a good idea to make sure that machine is still bootable after the upgrade.
This procedure can be shortened or maybe extended depending on the needs of the custom case but the general framework should be useful anyways to someone that's why
I decided to post this.
Before you go lets prepare a small status script which we'll use to report status of sysctl installed and enabled services as well as the netstat connections state and
configured IP addresses and routing on the system.
The script show_running_services_netstat_ips_route.sh to be used during our different upgrade stages:
# script status ###
echo "STARTED: $(date '+%Y-%m-%d_%H-%M-%S'):" | tee /root/logs/yumcheckupdate-$(hostname)-$(date '+%Y-%m-%d_%H-%M-%S').out
systemctl list-unit-files –type=service | grep enabled
systemctl | grep ".service" | grep "running"
netstat -tulpn
netstat -r
ip a s
/sbin/route -n
echo "ENDED $(date '+%Y-%m-%d_%H-%M-%S'):" | tee /root/logs/yumcheckupdate-$(hostname)-$(date '+%Y-%m-%d_%H-%M-%S').out
####
– Save the script in any file like /root/status.sh
– Make the /root/logs directoriy.
[root@redhat: ~ ]# mkdir /root/logs
[root@redhat: ~ ]# vim /root/status.sh
[root@redhat: ~ ]# chmod +x /root/status.sh
1. Get a dump of CentOS installed version release and grub-mkconfig generated os_probe
[root@redhat: ~ ]# cat /etc/redhat-release > /root/logs/redhat-release-vorher-$(hostname)-$(date '+%Y-%m-%d_%H-%M-%S').out
[root@redhat: ~ ]# cat /etc/grub.d/30_os-prober > /root/logs/grub2-efi-vorher-$(hostname)-$(date '+%Y-%m-%d_%H-%M-%S').out
2. Clear old versionlock marked RPM packages (if there are such)
On servers maintained by multitude of system administrators just like the case is inside a Global Corporations and generally in the corporate world , where people do access the systems via LDAP and more than a single person
has superuser privileges. It is a good prevention measure to use yum package management functionality to RPM based Linux distributions called versionlock.
versionlock for those who hear it for a first time is locking the versions of the installed RPM packages so if someone by mistake or on purpose decides to do something like :
[root@redhat: ~ ]# yum install packageversion
Having the versionlock set will prevent the updated package to be installed with a different branch package version.
Also it will prevent a playful unknowing person who just wants to upgrade the system without any deep knowledge to be able to
run
[root@redhat: ~ ]# yum upgrade
update and leave the system in unbootable state, that will be only revealed during the next system reboot.
If you haven't used versionlock before and you want to use it you can do it with:
[root@redhat: ~ ]# yum install yum-plugin-versionlock
To add all the packages for compiling C code and all the interdependend packages, you can do something like:
[root@redhat: ~ ]# yum versionlock gcc-*
If you want to clear up the versionlock, once it is in use run:
[root@redhat: ~ ]# yum versionlock clear
[root@redhat: ~ ]# yum versionlock list
3. Check RPC enabled / disabled
This step is not necessery but it is a good idea to check whether it running on the system, because sometimes after upgrade rpcbind gets automatically started after package upgrade and reboot.
If we find it running we'll need to stop and mask the service.
# check if rpc enabled
[root@redhat: ~ ]# systemctl list-unit-files|grep -i rpc
var-lib-nfs-rpc_pipefs.mount static
auth-rpcgss-module.service static
rpc-gssd.service static
rpc-rquotad.service disabled
rpc-statd-notify.service static
rpc-statd.service static
rpcbind.service disabled
rpcgssd.service static
rpcidmapd.service static
rpcbind.socket disabled
rpc_pipefs.target static
rpcbind.target static
[root@redhat: ~ ]# systemctl status rpcbind.service
● rpcbind.service – RPC bind service
Loaded: loaded (/usr/lib/systemd/system/rpcbind.service; disabled; vendor preset: enabled)
Active: inactive (dead)
[root@redhat: ~ ]# systemctl status rpcbind.socket
● rpcbind.socket – RPCbind Server Activation Socket
Loaded: loaded (/usr/lib/systemd/system/rpcbind.socket; disabled; vendor preset: enabled)
Active: inactive (dead)
Listen: /var/run/rpcbind.sock (Stream)
0.0.0.0:111 (Stream)
0.0.0.0:111 (Datagram)
[::]:111 (Stream)
[::]:111 (Datagram)
4. Check any previously existing downloaded / installed RPMs (check yum cache)
yum install package-name / yum upgrade keeps downloaded packages via its operations inside its cache directory structures in /var/cache/yum/*.
Hence it is good idea to check what were the previously installed packages and their count.
[root@redhat: ~ ]# cd /var/cache/yum/x86_64/;
[root@redhat: ~ ]# find . -iname '*.rpm'|wc -l
5. List RPM repositories set on the server
[root@redhat: ~ ]# yum repolist
Loaded plugins: fastestmirror, versionlock
Repodata is over 2 weeks old. Install yum-cron? Or run: yum makecache fast
Determining fastest mirrors
repo id repo name status
!atos-ac/7/x86_64 Atos Repository 3,128
!base/7/x86_64 CentOS-7 – Base 10,019
!cr/7/x86_64 CentOS-7 – CR 2,686
!epel/x86_64 Extra Packages for Enterprise Linux 7 – x86_64 165
!extras/7/x86_64 CentOS-7 – Extras 435
!updates/7/x86_64 CentOS-7 – Updates 2,500
This step is mandatory to make sure you're upgrading to latest packages from the right repositories for more concretics check what is inside in confs /etc/yum.repos.d/ , /etc/yum.conf
6. Clean up any old rpm yum cache packages
This step is again mandatory but a good to follow just to have some more clearness on what packages is our upgrade downloading (not to mix up the old upgrades / installs with our newest one).
For documentation purposes all deleted packages list if such is to be kept under /root/logs/yumclean-install*.out file
[root@redhat: ~ ]# yum clean all |tee /root/logs/yumcleanall-$(hostname)-$(date '+%Y-%m-%d_%H-%M-%S').out
7. List the upgradeable packages's latest repository provided versions
[root@redhat: ~ ]# yum check-update |tee /root/logs/yumcheckupdate-$(hostname)-$(date '+%Y-%m-%d_%H-%M-%S').out
Then to be aware how many packages we'll be updating:
[root@redhat: ~ ]# yum check-update | wc -l
8. Apply the actual uplisted RPM packages to be upgraded
[root@redhat: ~ ]# yum update |tee /root/logs/yumupdate-$(hostname)-$(date '+%Y-%m-%d_%H-%M-%S').out
Again output is logged to /root/logs/yumcheckupate-*.out
9. Monitor downloaded packages count real time
To make sure yum upgrade is not in some hanging state and just get some general idea in which state of the upgrade is it e.g. Download / Pre-Update / Install / Upgrade/ Post-Update etc.
in mean time when yum upgrade is running to monitor, how many packages has the yum upgrade downloaded from remote RPM set repositories:
[root@redhat: ~ ]# watch "ls -al /var/cache/yum/x86_64/7Server/…OS-repository…/packages/|wc -l"
10. Run status script to get the status again
[root@redhat: ~ ]# sh /root/status.sh |tee /root/logs/status-before-$(hostname)-$(date '+%Y-%m-%d_%H-%M-%S').out
11. Add back versionlock for all RPM packs
Set all RPM packages installed on the RHEL / CentOS versionlock for all packages.
#==if needed
# yum versionlock \*
12. Get whether old software configuration is not messed up during the Package upgrade (Lookup the logs for .rpmsave and .rpmnew)
During the upgrade old RPM configuration is probably changed and yum did automatically save .rpmsave / .rpmnew saves of it thus it is a good idea to grep the prepared logs for any matches of this 2 strings :
[root@redhat: ~ ]# grep -i ".rpm" /root/logs/yumupdate-server-host-2020-01-20_14-30-41.out
[root@redhat: ~ ]# grep -i ".rpmsave" /root/logs/yumupdate-server-host-2020-01-20_14-30-41.out
[root@redhat: ~ ]# grep -i ".rpmnew" /root/logs/yumupdate-server-host-2020-01-20_14-30-41.out
If above commands returns output usually it is fine if there is is .rpmnew output but, if you get grep output of .rpmsave it is a good idea to review the files compare with the original files that were .rpmsaved with the
substituted config file and atune the differences with the changes manually made for some program functionality.
What are the .rpmsave / .rpmnew files ?
This files are coded files that got triggered by the RPM install / upgrade due to prewritten procedures on time of RPM build.
If a file was installed as part of a rpm, it is a config file (i.e. marked with the %config tag), you've edited the file afterwards and you now update the rpm then the new config file (from the newer rpm) will replace your old config file (i.e. become the active file).
The latter will be renamed with the .rpmsave suffix.
If a file was installed as part of a rpm, it is a noreplace-config file (i.e. marked with the %config(noreplace) tag), you've edited the file afterwards and you now update the rpm then your old config file will stay in place (i.e. stay active) and the new config file (from the newer rpm) will be copied to disk with the .rpmnew suffix.
See e.g. this table for all the details.
In both cases you or some program has edited the config file(s) and that's why you see the .rpmsave / .rpmnew files after the upgrade because rpm will upgrade config files silently and without backup files if the local file is untouched.
After a system upgrade it is a good idea to scan your filesystem for these files and make sure that correct config files are active and maybe merge the new contents from the .rpmnew files into the production files. You can remove the .rpmsave and .rpmnew files when you're done.
If you need to get a list of all .rpmnew .rpmsave files on the server do:
[root@redhat: ~ ]# find / -print | egrep "rpmnew$|rpmsave$
13. Reboot the system
To check whether on next hang up or power outage the system will boot normally after the upgrade, reboot to test it.
you can :
[root@redhat: ~ ]# reboot
either
[root@redhat: ~ ]# shutdown -r now
or if on newer Linux with systemd in ues below systemctl reboot.target.
[root@redhat: ~ ]# systemctl start reboot.target
14. Get again the system status with our status script after reboot
[root@redhat: ~ ]# sh /root/status.sh |tee /root/logs/status-after-$(hostname)-$(date '+%Y-%m-%d_%H-%M-%S').out
15. Clean up any versionlocks if earlier set
[root@redhat: ~ ]# yum versionlock clear
[root@redhat: ~ ]# yum versionlock list
16. Check services and logs for problems
After the reboot Check closely all running services on system make sure every process / listening ports and services on the system are running fine, just like before the upgrade.
If the sytem had firewall, check whether firewall rules are not broken, e.g. some NAT is not missing or anything earlier configured to automatically start via /etc/rc.local or some other
custom scripts were run and have done what was expected.
Go through all the logs in /var/log that are most essential /var/log/boot.log , /var/log/messages … yum.log etc. that could reveal any issues after the boot. In case if running some application server or mail server check /var/log/mail.log or whenever it is configured to log.
If the system runs apache closely check the logs /var/log/httpd/error.log or php_errors.log for any strange errors that occured due to some issues caused by the newer installed packages.
Usually most of the cases all this should be flawless but a multiple check over your work is a stake for good results.
Tags: conf, config files, configured, fastest, filesystem, installed, logs, mail server, packages, power, Procedure Instructions, real time, Reboot, root, rpm, servers, system administrators, target, upgrade, yum
Posted in Linux, System Administration, Various | No Comments »
Friday, September 2nd, 2011 
One of the QMAIL server installs, I have installed very long time ago. I've been notified by clients, that the certificate of the mail server has expired and therefore I had to quickly renew the certificate.
This qmail installation, SSL certificates were located in /var/qmail/control under the names servercert.key and cervercert.pem
Renewing the certificates with a new self signed ones is pretty straight forward, to renew them I had to issue the following commands:
1. Generate servercert encoded key with 1024 bit encoding
debian:~# cd /var/qmail/control

debian:/var/qmail/control# openssl genrsa -des3 -out servercert.key.enc 1024

Generating RSA private key, 1024 bit long modulus

...........++++++

.........++++++

e is 65537 (0x10001)

Enter pass phrase for servercert.key.enc:

Verifying - Enter pass phrase for servercert.key.enc:
In the Enter pass phrase for servercert.key.enc I typed twice my encoded key password, any password is good, here though using a stronger one is better.
2. Generate the servercert.key file
debian:/var/qmail/control# openssl rsa -in servercert.key.enc -out servercert.key

Enter pass phrase for servercert.key.enc:

writing RSA key
3. Generate the certificate request
debian:/var/qmail/control# openssl req -new -key servercert.key -out servercert.csr

debian:/var/qmail/control# openssl rsa -in servercert.key.enc -out servercert.key

Enter pass phrase for servercert.key.enc:writing RSA key

root@soccerfame:/var/qmail/control# openssl req -new -key servercert.key -out servercert.csr

You are about to be asked to enter information that will be incorporated

into your certificate request.

What you are about to enter is what is called a Distinguished Name or a DN.

There are quite a few fields but you can leave some blank

For some fields there will be a default value,

If you enter '.', the field will be left blank.

-----

Country Name (2 letter code) [AU]:UK

State or Province Name (full name) [Some-State]:London

Locality Name (eg, city) []:London

Organization Name (eg, company) [Internet Widgits Pty Ltd]:My Company

Organizational Unit Name (eg, section) []:My Org

Common Name (eg, YOUR name) []:

Email Address []:admin@adminmail.com
Please enter the following 'extra' attributes
to be sent with your certificate request
A challenge password []:
An optional company name []:
In the above prompts its necessery to fill in the company name and location, as each of the prompts clearly states.
4. Sign the just generated certificate request
debian:/var/qmail/control# openssl x509 -req -days 9999 -in servercert.csr -signkey servercert.key -out servercert.crt
Notice the option -days 9999 this option instructs the newly generated self signed certificate to be valid for 9999 days which is quite a long time, the reason why the previous generated self signed certificate expired was that it was built for only 365 days
5. Fix the newly generated servercert.pem permissions
debian:~# cd /var/qmail/control

debian:/var/qmail/control# chmod 640 servercert.pem

debian:/var/qmail/control# chown vpopmail:vchkpw servercert.pem

debian:/var/qmail/control# cp -f servercert.pem clientcert.pem

debian:/var/qmail/control# chown root:qmail clientcert.pem

debian:/var/qmail/control# chmod 640 clientcert.pem
Finally to load the new certificate, restart of qmail is required:
6. Restart qmail server
debian:/var/qmail/control# qmailctl restart

Restarting qmail:

* Stopping qmail-smtpd.

* Sending qmail-send SIGTERM and restarting.

* Restarting qmail-smtpd.
Test the newly installed certificate
To test the newly installed SSL certificate use the following commands:
debian:~# openssl s_client -crlf -connect localhost:465 -quiet

depth=0 /C=UK/ST=London/L=London/O=My Org/OU=My Company/emailAddress=admin@adminmail.com

verify error:num=18:self signed certificate

verify return:1

...

debian:~# openssl s_client -starttls smtp -crlf -connect localhost:25 -quiet

depth=0 /C=UK/ST=London/L=London/O=My Org/OU=My Company/emailAddress=admin@adminmail.com

verify error:num=18:self signed certificate

verify return:1

250 AUTH LOGIN PLAIN CRAM-MD5

...
If an error is returned like 32943:error:140770FC:SSL routines:SSL23_GET_SERVER_HELLO:unknown protocol:s23_clnt.c:607: this means that SSL variable in the qmail-smtpdssl/run script is set to 0.
To solve this error, change SSL=0 to SSL=1 in /var/qmail/supervise/qmail-smtpdssl/run and do qmailctl restart
The error verify return:1 displayed is perfectly fine and it's more of a warning than an error as it just reports the certificate is self signed.
Tags: bit, certificate, certificate request, Certificates, client, com, control, csr, csropenssl, des3, Distinguished, distinguished name, dn, file, genrsa, How to, information, installation, key, key file, keyroot, localhost, long time, mail server, modulus, nam, openssl, option, password, pem, phrase, private key, province name, qmail installation, qmailctl, request, Restart, rocks, root, RSA, self, soccerfame, time, toaster, var
Posted in Linux, Qmail, System Administration, Various | 2 Comments »
Wednesday, October 26th, 2011 
After configuring a new Qmail+POP3+IMAP with vpopmail install based on Thibs QmailRocks I faced some issues with configuring mail accounts in Mozilla Thunderbird. The problem is also present in Microsoft Outlook Express as some colleagues working on Windows reported they can't configure there email accounts in Outlook either.
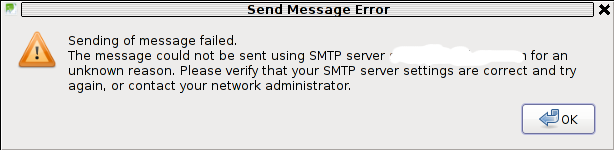
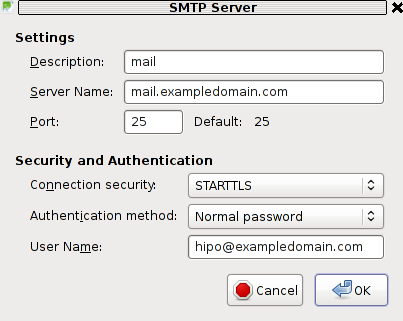
The issue was like this, the mail server is running fine, and I can send without issues directly from the server shell with mail command, however in Thunderbird I could only fetch the messages via POP3 or IMAP, whever I give a try to send one I got the error:
Sending of Message Failed

The message could not be sent using SMTP server for an

unknown reason. Please verify that SMTP server settings are correct and try

again, or contact your network administrator
Here is a screenshot preseting the issue, taken from my Thunderbird:
The reason for this error is an automatic setting that is being configured in Thunderbird in New Account Creation time:
Thunderbird queries the mail server and asks for the type of encryptions available for both POP3 and SMTP MX primary host.
Seeing that it supports STARTTLS data transfer encryption mail protocol for both POP3 / IMAP, Thunderbirds auto configuration does place STARTTLS to be used with SMTP and POP3
The incorrect setting which is being automatically filled in can be checked in following these Thunderbird menus:
Edit -> Account Settings -> Outgoing Server (SMTP)
If the configured mail account MX server is let's say mail.exampledomain.com one needs to Edit the settings for this SMTP auto configured domains and he will see some example settings like the one shown in the below screenshot:
You can see from above's screenshot that the auto configured Connection Security setting is improperly set to: STARTTLS. Usually STARTTLS should be working on SMTP port 25, however it seems the problem consists in the fact that the MAIL FROM and RCPT TO is sent in incorrec time (ain't sure if its before or after the encryption).
Therefore the consequence of this failure to use STARTTLS being detected as the correct encryption type for SMTP lead that the new configured mail server clients were unable tot properly connect and send emails via the SMTP listening server on port 25.
I give a try and changing the Connection Security:STARTTLS to Connection SecuritySSL/TLS immediately resolved the SMTP sending issues. Therefore as I found out the SMTP server is working just fine configured to use my QMAIL on port 465 with Connection Security: SSL/TLS and hence to work around the SMTP sending issues, decided to completely disable the STARTTLS encryption to be reported as a supported encryption by qmail-smtpd
On Thibs QmailRocks and some other Qmail installstions based more or less on qmail.jms1.net service damemontools scripts, this can be done by simply changing a line:
DENY_TLS=0
to
DENY_TLS=1
The qmail start up scripts which these change has to be done if one has configured a mail server based on QmailRocks Thibs updated tutorial are:
1. /service/qmail-smtpd
2. /service/qmail-smtpdssl
A quick way to do the DENY_TLS=0 to DENY_TLS=1 changes via sed is like this:
qmail# sed -e 's#DENY_TLS=0#DENY_TLS=1#g' /service/qmail-smtpd/run >> /tmp/qmail-smtpd-run;qmail# sed -e 's#DENY_TLS=0#DENY_TLS=1#g' /service/qmail-smtpdssl/run >> /tmp/qmail-smtpdssl-run;qmail# mv /tmp/qmail-smtpd-run /service/qmail-smtpd/run

qmail# mv /tmp/qmail-smtpdssl-run /service/qmail-smtpdssl/run
After the correct modifications, of course as usual a qmail restart is required, e.g.:
qmail# qmailctl restart

...
Making this changes, irradicated the sending issues. It's best practice that the account which had issues with sending before is deleted and recreated from scratch.
Hope this helps somebody out there who encounters the same issue. Cheers 😉
Tags: account creation, account settings, administratorHere, anunknown, auto configuration, com, configure, configured, connection security, creation time, email accounts, encryption, Express, host, How to, inco, issue, mail account, mail accounts, mail command, mail protocol, mail server, Microsoft, microsoft outlook express, Mozilla, mozilla thunderbird, mx server, network administrator, Outgoing, outgoing server, outlook, outlook mail, place, pop, Qmail, QmailRocks, reason, screenshot, Sending, server settings, server smtp, Shell, smtp, smtp port 25, starttls, thunderbirds, time, TLS, tmp, type, working
Posted in FreeBSD, Linux, Qmail, System Administration, Various, Web and CMS | 5 Comments »
Friday, October 21st, 2011 
I needed to migrate vpopmail/domains multiple directories stored on 2 servers to a single vpopmail install.
Merging the two vpopmails user Maildir/ stored accounts actually actually was quite simple, though it needed a bit of tweaks.
Here is how I migrated the two vpopmail installations to reside on the one vpopmail mail storage.
1. I used tar to archive the two vpopmail installations on the two different
First I logged in with root over ssh on the first node, e.g.:
qmail-server1:~# cd /home/vpopmail/

qmail-server1:/home/vpopmail# ionice -c 3 tar -czvf vpopmail1_$(date +%Y%m%d).tar.gz domains/

...
Then logged in on the second machine:
qmail-server2:~# cd /home/vpopmail

qmail-server2:/home/vpopmail# ionice -c 3 tar -czvf vpopmail2_$(date +%Y%m%d).tar.gz domains/
I used ionice -c 3 which instructs the tar archive of vpopmail directory to be created using idle (sparing the hard disk) from I/O overheads.
Sometimes not using ionice especially the case where hundreds of mail domains exist in domains/ could overload the server and stop the qmail and even sometimes ssh from properly responding for a very long periods as well as delaying the work of the mail server and failure to accept some user connections to pop3 or smtp protocols.I found out about the exisnte of ionice command just recently, reading some blog online. The command is absolute "must use", always when have to archive directories with tens of thousands of files and subdirectories. It's also nice in general, also on some copy or move operations on GNU / Linux, ionice is truly great.
Anyways after a while I had my both archives on both servers existing, so I used sftp (one can use scp as well) to transfer the archives to the newly configured qmail + vpopmail installation.
2. Use sftp or scp to copy the archives to the new configured vpopmail server
Again on both servers I had to execute, sftp I prefer sftp as I love being interactive on the shell 😉
qmail-server1:/home/vpopmail# sftp root@my-vpopmail-server-host.com

Password:

Connected to my-vpopmail-server-host.com.

sftp> cd /home/vpopmail

sftp> put vpopmail1_$(date +%Y%m%d).tar.gz

...

sftp> exit
Once again the same commands has to be issued on the second vpomail server, where the second domains/ mail accounts archive was just made:
qmail-server2:/home/vpopmail# sftp root@my-vpopmail-server-host.com

Password:

Connected to my-vpopmail-server-host.com.

sftp> cd /home/vpopmail

sftp> put vpopmail2_$(date +%Y%m%d).tar.gz

...

sftp> exit
Now as both of the archives are uploaded, next step is to login to the root@my-vpopmail-server-host.com server, where the two archives were just uploaded:
qmail-server1:/var/domains# ssh root@my-vpopmail-server-host.com

my-vpopmal-server-host:~# cd /home/vpopmailmy-vpopmail-server-host:/home/vpopmail# tar -zxvf vpopmail1_$(date +%Y%m%d).tar.gz domains/

...
Next on, the second vpopmail2_$(date +%Y%m%d).tar.gz is untarred:
3. Unarchive the uploaded vpopmail*.tar.gz archives
my-vpopmail-server-host:/home/vpopmail# tar -zxvf vpopmail2_$(date +%Y%m%d).tar.gz domains/

...
Now, if the two archives are properly tarred and no errors are returned (that was my case thx God).
4. Use a shell script to generate a script, to later change all user emails passwords on the my-vpopmail-server-host.com
The next thing which has to be done is that all email accounts with passwords are recreated with vpopmail's /home/vpopmail/bin/vpasswd command. Even though the domains are existing with the respective vpasswd and vpasswd.cdb in each mailbox on the new server my-vpopmail-server-host still the mailboxes were not visible by vpopmail. To make all the mailboxes with the correct passwords be responding on the new vpopmail connections via IMAP and POP3 mail fetch protocols, I wrote a small script which does change the passwords of all mailboxes just transferred from the two servers to my-vpopmail-server-host
The script is very simple and actually is not too automated, but at least it works. I've called my script to dump all the user passwords for all the vpopmail filesystem existing mail domains dump_vpopmail_mail_passwords.sh
To use the script its necessery that the script is downloaded on both the vpopmail mail servers from which domains/ directory is migrated, e.g.:
qmail-server1:/home/vpopmail# wget https://www.pc-freak.net/bshscr/dump_vpopmail_mail_passwords.sh

...

qmail-server1:/home/vpopmail# sh dump_vpopmail_mail_passwords.sh >> change_mail_account_pwds.sh
Same procedure goes on the second vpopmail server qmail-server2:
qmail-server2:/home/vpopmail# wget https://www.pc-freak.net/bshscr/dump_vpopmail_mail_passwords.sh

...

qmail-server2:/home/vpopmail# sh dump_vpopmail_mail_passwords.sh >> change_mail_account_pwds.sh
5. Upload the change_mail_accounts_pwds.sh shell script created on the two qmail mail servers to dump_vpopmail_mail_passwords.sh
Again I used sftp to upload the two change_mail_account_pwds.sh bash scripts:
qmail-server1:/home/vpopmail# sftp root@my-vpopmail-server-host.com

Password:

Connected to my-vpopmail-server-host.com.

sftp> put change_mail_account_pwds.sh change_mail_account_pwds1.sh

...

sftp> exit
sftp>
qmail-serve2:/home/vpopmail# sftp root@my-vpopmail-server-host.com

Password:

Connected to my-vpopmail-server-host.com.

sftp> put change_mail_account_pwds.sh change_mail_account_pwds2.sh

...

sftp> exit
6. Execute change_mail_account_pwds1.sh and change_mail_account_pwds2.sh on my-vpopmail-server-host.com
On the 3rd server where the two vpopmail domains are migrated my-vpopmail-server-host.com , from /home/vpopmail invoke the above two scripts:
root@my-vpopmail-server-host.com:/home/vpopmail# sh change_mail_account_pwds1.sh

root@my-vpopmail-server-host.com:/home/vpopmail# sh change_mail_account_pwds2.sh
The two scripts will contain list with all the two migrated vpopmail user mail addresses in a format similar to:
vpasswd mail_account@mail-domain.com password1

vpasswd mail_account1@mail-domain.com some_password

vpasswd mail_accountX@mail-domain.com other_password

etc..
After following this steps, all the mail accounts (or most of them ;)) should be merged from the two servers on the new configured vpopmail on my-vpopmail-server-host.com host.
The up-described procedure could be literally followed with migratingm any number of vpopmail /home/vpopmail/domains user email accounts.
If it has to be mass deployed based, its coparatively easy even to write an automated script to do the various aforementioned steps without any user interaction.
I've seen also some other explanations on how to migrate qmail.jsm1.net , but honestly was too lazy to read them, so I just came up with the ways described here.
One important note to make here is always to make backups, this steps worked for me but I can't guarantee this migration tutorial will work at all. I hope this helps somebody out there. Cheers 😉
Tags: archive directories, cd home, change, com, command, comPassword, configured, copy, czvf, Disk, email accounts, failure, gnu linux, gz, hard disk, How to, installation, login, long periods, mail accounts, mail domains, mail server, mail storage, move, node, pop, protocols, quot, root, scp, script, servers, sftp, Shell, smtp, ssh, tar archive, tar gz, tens of thousands, thx, tweaks, vpomail, vpopmail, wget, work
Posted in Linux, Qmail, System Administration, Various | 1 Comment »
Monday, August 1st, 2011 
It seems DjbDNS on Debian Squeeze has been not included as a Debian package. There is still possibility to install djbdns from an older deb package or install it from source. I however decided to install it from source as finding the old Debian package for Lenny and Etch takes time, plus I'm running an amd64 version of Debian and this might even more complicate the situation.
Installing it from source is not really a Debian way but at least it works.
In this article I assume that daemontools and ucspi-tcp are preliminary installed, if not one needs to install them with:
debian:~# apt-get install ucspi-tcp daemontools daemontools-run

...
The above two ones are required as DJBDNS is originally made to run through djb's daemontools.
Here is the exact step I took to have it installed as local caching DNS server on a Debian Squeeze server:
1. Download and untar DjbDNS
debian:~# wget -q http://cr.yp.to/djbdns/djbdns-1.05.tar.gz
debian:~# tar -zxvvf djbdns-1.05.tar.gz

...
2. Add DjbDNS users to /etc/passwd
Creating the below two users is not arbitrary but it's recommendable.
echo 'dnscache:*:54321:54321:dnscache:/dev/null:/dev/null' >> /etc/passwd

echo 'dnslog:*:54322:54322:dnslog:/dev/null:/dev/null' >> /etc/passwd
3. Compile DJBDNS nameserver
First it's necessery to use the below echo command to work around a common Linux bug:
debian:~# cd djbdns-1.05

debian:/root/djbdns-1.05# echo gcc -O2 -include /usr/include/errno.h > conf-cc
Next let's make it:
debian:/root/djbdns-1.05# make
4. Install the compiled djbdns binaries
debian:/root/djbdns-1.05# make setup check

# here comes some long install related output
If no errors are produced by make setup check this means that the djbdns should have installed itself fine.
As installation is compileted it's a good idea to report about the newly installed DjbDNS server if running a mail server. This info is used by Dan Bernstein to gather statistical data about the number of installations of djbdns servers throughout the world.
5. Do some general configurations to the newly installed DJBDNS
Now let's copy the list of the IP addresses of the global DNS root servers in /etc/.
debian:/root/djbdns-1.05# cp -rpf dnsroots.global /etc/
debian:/root/djbdns-1.05# ./dnscache-conf dnscache dnslog /etc/dnscache 0.0.0.0
dnscache-conf will generate some default configuration files for djbdns in /etc/dnscache
Next allow the networks which should be able to use the just installed djbdns server as a caching server:
debian:/root/djbdns-1.05# cd /etc/dnscache/root/ip

debian:/etc/dnscache/root# touch 192.168.1

debian:/root/djbdns-1.05# touch 123.123
First command will allow all ips in range 192.168.1.* to be able to access the DNS server and the second command will allow all ips from 123.123.1-255.1-255 to be able to query the server.
Some further fine tunning can be done from the files:
/etc/dnscache/env/CACHESIZE and /etc/dnscache/env/DATALIMIT
As a last step, before it's running, we have to link the /etc/dnscache to daemontools like so:
debian:/root/djbdns-1.05# ln -sf /etc/dnscache /etc/service/dnscache
If the daemontools is not linked to be accessible via /etc/service it's also a good to link it there:
debian:~# ln -sf /etc/service /
Now the DJBDNS should be running fine, to test if it's running without errors through daemontools I used:
debian:~# ps ax|grep -i readproc

5358 pts/18 R+ 0:00 grep -i readproc

11824 ? S 0:00 readproctitle service errors: ...........
If no errors are displayed it's configured and running to also test if it's capable of resolving I used the host command:
debian:~# host www.pc-freak.net localhost

Using domain server:

Name: localhost

Address: 127.0.0.1#53

Aliases:
www.pc-freak.net has address 83.228.93.76
www.pc-freak.net mail is handled by 0 mail.www.pc-freak.net.
Now the DJBDNS is properly installed and if you test it for a while with time host somehost.com localhost , you will see how quick it is in resolving.
The advantage of running DJBDNS is it does not require almost no maintance, its rock solid and great just like all other Dan Bernstein's written software.
Enjoy 😉
Tags: binaries, Cachening, Cachening Localhost Proxy, Compile, configure, configured, cr, daemontools, dan bern, dan bernstein, deb package, debian cd, debian package, djb, djbdns, DNS, dns server, echo command, efficiency, errno, etc passwd, etch, host, How to, Install, installation, Linux, linux bug, mail server, necessery, package, passwdecho, possibility, root, running, squeeze, statistical data, tar gz, tcp, time, Touch, untar, wget, yp, zxvvf
Posted in Linux, Performance Tuning, System Administration, Web and CMS | 4 Comments »
Thursday, July 7th, 2011 
If you're an administrator of a shared hosting server running mail server on localhost, you've definitely come across to issues with your mail server ip entering into public blacklists like spamhaus's CBL,XBL, PBL etc.
The usual procedure after one's ip gets listed in blacklists is to delist it manually following spamhaus or any other blacklist website's web interface, however often even after delisting yourself from blacklists you get back into them in a couple of hours, since your mail server continues to send a mass amounts of spam.
To track issues like as a system administrator I always use the good old network swiss army of knife tool tcpdump
tcpdump is really precious in tracking all kind of traffic oddities or mail server traffic.
To check if there are oddities with traffic flowing from a mail server on localhost after I login to a mail server with issues I use tcpdump command with following options:
tcpdump -nNxXi eth0 -s 0 proto TCP and port 25
The usual output of it should look something like:
root@hosting:/home/hipo/public_html:# tcpdump -nNxXi eth0 -s 0 proto TCP and port 25

tcpdump: verbose output suppressed, use -v or -vv for full protocol decodelistening on eth0, link-type EN10MB (Ethernet), capture size 65535 bytes

11:37:51.692685 IP xxx.xxx.xxx.xxx.smtp > 212.235.67.205.53745: P 2645817175:2645817203(28) ack 31168958 win 7632

0x0000: 4500 0044 92b4 4000 4006 9ae8 5511 9f4d E..D..@.@...U..M

0x0010: d4eb 43cd 0019 d1f1 9db3 f757 01db 99be ..C........W....

0x0020: 5018 1dd0 0d4e 0000 3235 3020 4f4b 2069 P....N..250.OK.i

0x0030: 643d 3151 656c 3150 2d30 3033 7666 412d d=1Qel1P-003vfA-

0x0040: 4730 0d0a G0..

11:37:52.175038 IP 212.235.67.205.53745 > xxx.xxx.xxx.xxx.smtp: . ack 28 win 65064

0x0000: 4500 0028 1bb4 4000 7706 db04 d4eb 43cd E..(..@.w.....C.

0x0010: 5511 9f4d d1f1 0019 01db 99be 9db3 f773 U..M...........s

0x0020: 5010 fe28 a1c8 0000 0000 0000 0000 P..(..........
In this example the xxx.xxx.xxx.xxx is the IP address of the hosting server (my mail server) and the other IP is the interaction of my mail server's smtp port 25 with tther machine 212.235.67.205.
If after issuing this command there are tons of repeating address IPs the mail server interacts with this is possible sign of spammers who sent traffic via the mail server.
Of course this is not always the case as sometimes, some clients use to send large newsletters or just some planned advertisements, however in most cases as I said it's a spammer.
To futher get the abuser I check Apache logs and the mail server logs. Also in many cases a spammer can be catched via observing the mail server logs (/var/log/maillog, /var/log/qmail/current or wherever the mail server logs it's interactions).
In the above tcpdump output you can even read some of the information flowing in between mail servers in a very raw form for example in above tcpdump output notice the 250.OK . This is obviously an interaction between the two mail servers where the server running on my hosting server with ip (xxx.xxx.xxx.xxx) sends to the remote mail server the command 250 OK
Hope this article is helpful to somebody 😉
Tags: ack, blacklists, cbl, command, course, delisting, eth, hipo, host, hosting server, How to, interaction, Knife, knife tool, localhost, log, login, logs, look, machine, mail server, mail servers, mass, mass amounts, n 250, oddities, PBL, proto, Qel, root, server ip, server traffic, size, smtp, something, spamhaus, spammer, swiss army, system administrator, tcpdump, tool, tther, verbose, vv, web interface, xxx
Posted in Linux, Monitoring, Networking, Qmail, System Administration | 3 Comments »
Monday, April 14th, 2014 
Spam has become a severe issue for administrators, not only for mail server admins but also for webshosting adms. Even the most secure spam protected mail server can get affected by spam due to fact it is configured to relay mail from other servers acting as web hosting sites.
Webhosting companies almost always suffer seriously from spam issues and often their mail servers gets blocked (enter spam blacklists), because of their irresponsible clients uploading lets say old vulnerable Joomla, WordPress without Akismet or proper spam handling plugin,a CMS which is not frequently supported / updated or custom client insecure php code.
What I mean is Shared server A is often configured to sent mail via (mail) server B. And often some of the many websites / scripts hosted on server A gets hacked and a spam form is uploaded and tons of spam start being shipped via mail server B.
Of course on mail server level it is possible to configure delay between mail sent and adopt a couple of policies to reduce spam, but the spam protection issue can't be completely solved thus admin of such server is forced to periodically keep an eye on what mail is sent from hosting server to mail server.
If you happen to be one of those Linux (Unix) webhosting admins who find few thousand of spammer emails into mail server logs or your eMail server queue and you can't seem to find what is causing it, cause there are multiple websites shared hosting using mainly PHP + SQL and you can't identify what php script is spamming by reviewing Apache log / PHP files. What you can do is get use of:
PHP mail.log directive
Precious tool in tracking spam issues is a PHP Mail.log parameter, mail log paramater is available since PHP version >= 5.3.0 and above.
PHP Mail.log parameter records all calls to the PHP mail() function including exact PHP headers, line numbers and path to script initiating mail sent.
Here is how it is used:
1. Create empty PHP Mail.log file
touch /var/log/phpmail.log
File has to be writtable to same user with which Apache is running in case of Apache with SuPHP running file has to be writtable by all users.
On Debian, Ubunut Linux:
chown www:data:www-data /var/log/phpmail.log
On CentOS, RHEL, SuSE phpmail.log has to be owned by httpd:
chown httpd:httpd /var/log/phpmail.log
On some other distros it might be chown nobody:nobody etc. depending on the user with which Apache server is running.
2. Add to php.ini configuration following lines
mail.add_x_header = On

mail.log = /var/log/phpmail.log
PHP directive instructs PHP to log complete outbund Mail header sent by mail() function, containing the UID of the web server or PHP process and the name of the script that sent the email;
(X-PHP-Originating-Script: 33:mailer.php)
i.e. it will make php start logging to phpmail.log stuff like:
mail() on [/var/www/pomoriemonasteryorg/components/com_xmap/2ktdz2.php:1]: To: info@globalremarketing.com.au — Headers: From: "Priority Mail" <status_93@pomoriemon
astery.org> X-Mailer: MailMagic2.0 Reply-To: "Priority Mail" <status_93@pomoriemonastery.com> Mime-Version: 1.0 Content-Type: multipart/alternative;boundary="——
—-13972215105347E886BADB5"
mail() on [/var/www/pomoriemonasteryorg/components/com_xmap/2ktdz2.php:1]: To: demil7167@yahoo.com — Headers: From: "One Day Shipping" <status_44@pomoriemonastery.
org> X-Mailer: CSMTPConnectionv1.3 Reply-To: "One Day Shipping" <status_44@pomoriemonastery.com> Mime-Version: 1.0 Content-Type: multipart/alternative;boundary="—
——-13972215105347E886BD344"
mail() on [/var/www/pomoriemonasteryorg/components/com_xmap/2ktdz2.php:1]: To: domainmanager@nadenranshepovser.biz — Headers: From: "Logistics Services" <customer.
id86@pomoriemonastery.com> X-Mailer: TheBat!(v3.99.27)UNREG Reply-To: "Logistics Services" <customer.id86@pomoriemonastery.com> Mime-Version: 1.0 Content-Type: mult
ipart/alternative;boundary="———-13972215105347E886BF43E"
mail() on [/var/www/pomoriemonasteryorg/components/com_xmap/2ktdz2.php:1]: To: bluesapphire89@yahoo.com — Headers: From: "Priority Mail" <status_73@pomoriemonaster
y.org> X-Mailer: FastMailer/Webmail(versionSM/1.2.6) Reply-To: "Priority Mail" <status_73@pomoriemonastery.com> Mime-Version: 1.0 Content-Type: multipart/alternativ
e;boundary="———-13972215105347E886C13F2"
On Debian / Ubuntu Linux to enable this logging, exec:
echo 'mail.add_x_header = On' >> /etc/php5/apache2/php.ini

echo 'mail.log = /var/log/phpmail.log' >> /etc/php5/apache2/php.ini
I find it useful to symlink /etc/php5/apache2/php.ini to /etc/php.ini its much easier to remember php location plus it is a standard location for many RPM based distros.
ln -sf /etc/php5/apache2/php.ini /etc/php.ini
Or another "Debian recommended way" to enable mail.add_x_header logging on Debian is via:
echo 'mail.add_x_header = On' >> /etc/php5/conf.d/mail.ini

echo 'mail.log = /var/log/phpmail.log' >> /etc/php5/conf.d/mail.ini
On Redhats (RHEL, CentOS, SuSE) Linux issue:
echo 'mail.add_x_header = On' >> /etc/php.ini

echo 'mail.log = /var/log/phpmail.log' >> /etc/php.ini
3. Restart Apache
On Debian / Ubuntu based linuces:
/etc/init.d/apache2 restart
P.S. Normally to restart Apache without interrupting client connections graceful option can be used, i.e. instead of restarting do:
/etc/init.d/apache2 graceful
On RPM baed CentOS, Fedora etc.:
/sbin/service httpd restart
or
apachectl graceful
4. Reading the log
To review in real time exact PHP scripts sending tons of spam tail it:
tail -f /var/log/phpmail.log
mail() on [/var/www/remote-admin/wp-includes/class-phpmailer.php:489]: To: theosfp813@hotmail.com — Headers: Date: Mon, 14 Apr 2014 03:27:23 +0000 Return-Path: wordpress@remotesystemadministration.com From: WordPress Message-ID: X-Priority: 3 X-Mailer: PHPMailer (phpmailer.sourceforge.net) [version 2.0.4] MIME-Version: 1.0 Content-Transfer-Encoding: 8bit Content-Type: text/plain; charset="UTF-8"
mail() on [/var/www/pomoriemonasteryorg/media/rsinstall_4de38d919da01/admin/js/tiny_mce/plugins/inlinepopups/skins/.3a1a1c.php:1]: To: 2070ccrabb@kiakom.net — Headers: From: "Manager Elijah Castillo" <elijah_castillo32@pomoriemonastery.com> X-Mailer: Mozilla/5.0 (Windows; U; Windows NT 5.0; es-ES; rv:1.9.1.7) Gecko/20100111 Thunderbird/3.0.1 Reply-To: "Manager Elijah Castillo" <elijah_castillo32@pomoriemonastery.com> Mime-Version: 1.0 Content-Type: multipart/alternative;boundary="———-1397463670534B9A76017CC"
mail() on [/var/www/pomoriemonasteryorg/media/rsinstall_4de38d919da01/admin/js/tiny_mce/plugins/inlinepopups/skins/.3a1a1c.php:1]: To: 20wmwebinfo@schools.bedfordshire.gov.uk — Headers: From: "Manager Justin Murphy" <justin_murphy16@pomoriemonastery.com> X-Mailer: Opera Mail/10.62 (Win32) Reply-To: "Manager Justin Murphy" <justin_murphy16@pomoriemonastery.com> Mime-Version: 1.0 Content-Type: multipart/alternative;boundary="———-1397463670534B9A7603ED6"
mail() on [/var/www/pomoriemonasteryorg/media/rsinstall_4de38d919da01/admin/js/tiny_mce/plugins/inlinepopups/skins/.3a1a1c.php:1]: To: tynyrilak@yahoo.com — Headers: From: "Manager Elijah Castillo" <elijah_castillo83@pomoriemonastery.com> X-Mailer: Mozilla/5.0 (Macintosh; U; Intel Mac OS X 10.5; pl; rv:1.9.1.9) Gecko/20100317 Thunderbird/3.0.4 Reply-To: "Manager Elijah Castillo" <elijah_castillo83@pomoriemonastery.com> Mime-Version: 1.0 Content-Type: multipart/alternative;boundary="———-1397463670534B9A7606308"
mail() on [/var/www/pomoriemonasteryorg/media/rsinstall_4de38d919da01/admin/js/tiny_mce/plugins/inlinepopups/skins/.3a1a1c.php:1]: To: 2112macdo1@armymail.mod.uk — Headers: From: "Manager Justin Murphy" <justin_murphy41@pomoriemonastery.com> X-Mailer: Mozilla/5.0 (Macintosh; U; Intel Mac OS X 10.5; pl; rv:1.9.1.9) Gecko/20100317 Thunderbird/3.0.4 Reply-To: "Manager Justin Murphy" <justin_murphy41@pomoriemonastery.com> Mime-Version: 1.0 Content-Type: multipart/alternative;boundary="———-1397463670534B9A76086D1"
As you can see there is a junky spam mails sent via some spammer script uploaded under name .3a1a1c.php, so to stop the dirty bastard, deleted the script:
rm -f /var/www/pomoriemonasteryorg/media/rsinstall_4de38d919da01/admin/js/tiny_mce/plugins/inlinepopups/skins/.3a1a1c.php
It is generally useful to also check (search) for all hidden .php files inside directoring storing multiple virtualhost websites, as often a weirdly named hidden .php is sure indicator of either a PHP Shell script kiddie tool or a spammer form.
Here is how to Find all Hidden Perl / PHP scripts inside /var/www:
find . -iname '.*.php'

./blog/wp-content/plugins/fckeditor-for-wordpress-plugin/ckeditor/plugins/selection/.0b1910.php

./blog/wp-content/plugins/fckeditor-for-wordpress-plugin/filemanager/browser/default/.497a0c.php

./blog/wp-content/plugins/__MACOSX/feedburner_feedsmith_plugin_2.3/._FeedBurner_FeedSmith_Plugin.php
find . -iname '.*.pl*'
….
Reviewing complete list of all hidden files is also often useful to determine shitty cracker stuff
find . -iname ".*"
Debugging via /var/log/phpmail.log enablement is useful but is more recommended on development and staging (QA) environments. Having it enable on productive server with high amounts of mail sent via PHP scripts or just on dedicated shared site server could cause both performance issues, hard disk could quickly get and most importantly could be a severe security hole as information from PHP scripts could be potentially exposed to external parties.
Tags: alternative, blacklists, blog, com, Date, echo, ini, init, log, logs, mail, mail server, mail servers, multiple, need, note, performance issues, php, php script, php scripts, php5, queue, script, scripts, server, servers, spam, spammer, Ubunut Linux
Posted in Computer Security, Linux, System Administration, Web and CMS | 3 Comments »
Monday, September 9th, 2013 
Clamav Antivirus is one of must have packages installed on a new Debian Linux server. It is not only necessary whether configuring a new Mail server be it Qmail or Postfix but is good to have to always check files on a Webserver. Until few years infecting of Sites with Viruses / Installing WebShells or Backdooring for further access using Perl or PHP vulnerable PHP code was not so common, However nowadays with increase of complexity of languages and increase of not security minded programmers this possibility dramatically increaed. Thus nowadays, whether I configure a new Apache + PHP + CGI support server I always install Clamav AV. Some might argue that Clamav Virus definitions are still too little compared to proprietary solutions like BitDefender / AVG or Avast but since my experience with this under Linux is not so bright as well as Clamav captures essential Viruses and Backdoors I still prefer to keep on with Clamav. Even on home Desktops with Linux clamav is of use as there are plenty of free-ware software for Linux which come only distributed only in a binary form and hence its good to check them with clamav before use whether they don't contain some well known Rootkit or Virus. Over the years Clamav has done great job for me whether I had to clean up "hacked" hosts containing script kiddie exploit scanners or Virus infected ELF binaries
.
1. Installing ClamAV in Debian Wheezy Linux
Before time there was a separate Debian repository called Volatille providing latest version release of Clamav, since Debian Squeeze Volatille project is discontinued, thus installing on Wheezy as a deb package is only available via standard Debian repositories.
 apt-get update && apt-get --yes upgrade

...
apt-get install --yes clamav clamav-daemon
As package dependencies you get installed:
clamav clamav-base clamav-freshclam libbz2-1.0 libclamav1 libcurl3 libidn11 ucf
Clamav-Daemon will launch immediately after packages are installed and is available as process name /usr/sbin/clamd
 # ps ax |grep -i clam

 2641 ?        Ssl    6:39 /usr/sbin/clamd

 2791 ?        Ss    12:04 /usr/bin/freshclam -d --quiet

12300 pts/0    S+     0:00 grep -i clam
2. Updating Clamav Antivirus Definitions
Its worthy say few words on clamav-freshclam as it is part of ClamAV which is used to update Clamav Virus definitions. Update of ClamAV vir definitions are updating automatically through /usr/bin/freshclam daemon which is started automatically by Debian postconfiguration scripts right after Clamav install.
Manual update of AV definitions can be done also with freshclam.
 # freshclam

ClamAV update process started at Sun Sep  8 17:48:36 2013

main.cvd is up to date (version: 54, sigs: 1044387, f-level: 60, builder: sven)

daily.cvd is up to date (version: 17830, sigs: 1696886, f-level: 63, builder: neo)

bytecode.cld is up to date (version: 225, sigs: 42, f-level: 63, builder: dgoddard)
To keep an eye on definition auto-updates (useful to check where something fails), check out in /var/log/clamav/freshclam.log
A sure indication that Anvirus updates are conducting fine should be log records like:
Sun Sep 8 16:27:44 2013 -> ————————————–
Sun Sep 8 17:27:44 2013 -> Received signal: wake up
Sun Sep 8 17:27:44 2013 -> ClamAV update process started at Sun Sep 8 17:27:44 2013
Sun Sep 8 17:27:44 2013 -> main.cvd is up to date (version: 54, sigs: 1044387, f-level: 60, builder: sven)
Sun Sep 8 17:27:44 2013 -> daily.cld is up to date (version: 17830, sigs: 1696886, f-level: 63, builder: neo)
Sun Sep 8 17:27:44 2013 -> bytecode.cld is up to date (version: 225, sigs: 42, f-level: 63, builder: dgoddard)
Sun Sep 8 17:27:47 2013 -> ————————————–
3. Configuring ClamAV
For Desktop use clamav default config is pretty good. However for servers its good to raise 2 up MaxThreads:
By default MaxThreads is 12
MaxThreads 12
Change to from 30 to 80 depending on how powerful machine ClamAV runs, even on some servers more Clamav threads might be necessary
MaxThreads 30
Other value I like changing is SelfCheck 3600 is too long time for clamav Virus definitions integrity I prefer to set it to 600, i.e.
SelfCheck 600
By default ClamAV is also configured to scan archive files as well. However for this to work you will have to have previously installed unzip and unrar on system. If still you don't have them installed run:
 # apt-get install --yes unrar unzip

...
Note that you will need to have non-free part of Debian deb repositories to /etc/apt/sources.list
Here is one of my sources.list
deb http://ftp.uk.debian.org/debian squeeze main contrib non-free
deb http://security.debian.org/ squeeze/updates main contrib non-free
deb-src http://security.debian.org/ squeeze/updates main contrib non-free
deb http://ftp.debian.skynet.be/ftp/debian/ squeeze main contrib non-free
deb-src http://ftp.debian.skynet.be/ftp/debian/ stable main contrib non-free
deb http://security.debian.org squeeze/updates main contrib non-free
deb-src http://security.debian.org/ squeeze/updates main contrib non-free
3. Scanning with ClamAV
 # clamscan -r /tmp/

./dos-58.160.208.43: OK

./dos-108.18.38.140: OK

./dos-188.194.80.100: OK

./dos-91.224.160.135: OK

./dos-128.253.117.70: OK

./dos-128.172.143.110: OK

./dos-77.92.102.34: OK

./dos-195.230.5.12: OK

...

....

----------- SCAN SUMMARY -----------

Known viruses: 2735887

Engine version: 0.97.8

Scanned directories: 1

Scanned files: 129

Infected files: 0

Data scanned: 0.00 MB

Data read: 0.00 MB (ratio 0.00:1)

Time: 4.769 sec (0 m 4 s)
-r flag stands for recursive scan – e.g. scan all sub-directories in directory and its content
To not flood your console / ssh connection one very useful option is -i (print only whetherinfected files are matched). Here is one more sample case:
 # clamscan -r -i /var/tmp/

----------- SCAN SUMMARY -----------

Known viruses: 2735887

Engine version: 0.97.8

Scanned directories: 1

Scanned files: 2

Infected files: 0

Data scanned: 0.26 MB

Data read: 0.13 MB (ratio 1.97:1)

Time: 4.824 sec (0 m 4 s)
Whether you're on a physical server console and it has pc speaker or sound blaster use –bell option to ring a bell every time a Virus infection is found, for exmpl.
# clamscan -r -i --bell /var/www/
…
4. Scanning periodically and reporting with ClamAV directories with websites
A very common use of ClamAV is to just setup a scheduled cronjob once a month to scan, whether server folder containing a bunch of websites in separate Virtualhosts contain some viruses or malicious stuff. Then as administrator check those logs once a month to make sure server site or group of sites does not become banned in search engine (blocked by Google Chrome and Firefox as Virus hotbed) …
 # crontab -u root -e

00 02 01 * * clamscan -r /var/www -l /var/log/websites-scan.log
Then once a month check out /var/log/websites-scan.log
Tags: avast, cgi support, clamav antivirus, complexity, deb package, debian gnu, debian linux, debian repositories, elf binaries, home desktops, mail server, new mail, Perl, php code, postfix, programmers, proprietary solutions, Qmail, rootkit, squeeze, support server, virus definitions
Posted in Computer Security, Linux, System Administration | No Comments »


