Posts Tagged ‘squeeze’
Saturday, September 11th, 2010 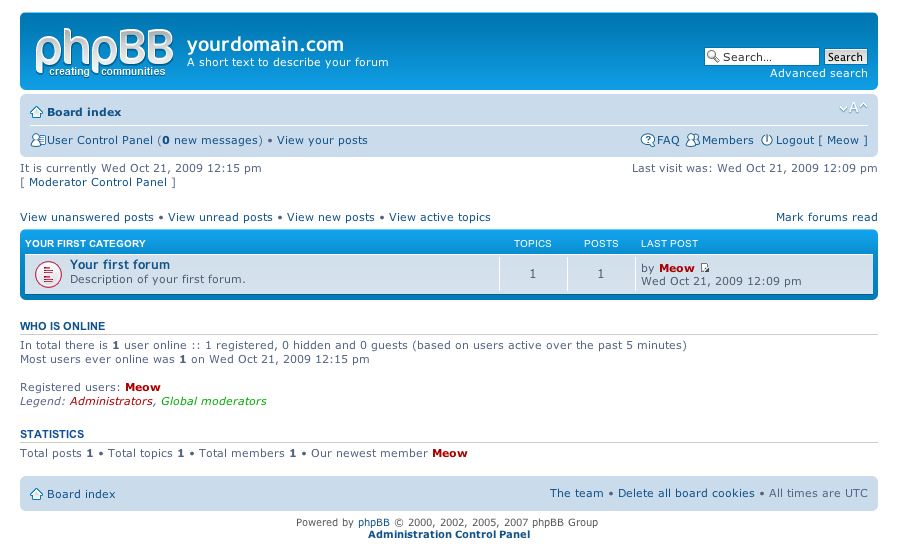
I've just installed the phpbb forum on a Debian Linux because we needed a goodquick to install communication media in order to improve our internal communication in a student project in Strategic HR we're developing right now in Arnhem Business School.
Here are the exact steps I followed to have a properly it properly instlled:
1. Install the phpbb3 debian package
This was pretty straight forward:
debian:~# apt-get install phpbb3
At this point of installation I've faced a dpkg-reconfigure phpbb deb package configuration issue:
I was prompted to pass in the credentials for my MySQL password right after I've selected the MySQL as my preferred database back engine.
I've feeded my MySQL root password as well as my preferred forum database name, however the database installation failed because, somehow the configuration procedure tried to connect to my MySQL database with the htcheck user.
I guess this has to be a bug in the package itself or something from my previous installation misconfigured the way the debian database backend configuration was operating.
My assumption is that my previously installed htcheck package or something beforehand I've done right after the htcheck and htcheck-php packages installation.
after the package configuration failed still the package had a status of properly installed when I reviewed it with dpkg
I've thought about trying to manually reconfigure it using the dpkg-reconfigure debian command and I gave it a try like that:
debian:~# dpkg-reconfigure phpbb3
This time along with the other fields I've to fill in the ncurses interface I was prompted for a username before the password prompted appeared.
Logically I tried to fill in the root as it's my global privileges MySQL allowed user.
However that didn't helped at all and again the configuration tried to send the credentials with user htcheck to my MySQL database server.
To deal with the situation I had to approach it in the good old manual way.
2. Manually prepare / create the required phpbb forum database
To completet that connected to the MySQL server with the mysql client and created the proper database like so:
debian:~# mysql -u root -p

mysql>

CREATE database phpbb3forum;
3. Use phpmyadmin or the mysql client command line to create a new user for the phpbb forum
Here since adding up the user using the phpmyadmin was a way easier to do I decided to go that route, anyways using the mysql cli is also an option.
From phpmyadmin It's pretty easy to add a new user and grant privileges to a certain database, to do so navigate to the following database:
Privileges -> -> Add a new user ->
Now type your User name: , Host , Password , Re-type password , also for a Host: you have to choose Local from the drop down menu.
Leave the Database for user field empty as we have already previously created our desired database in step 2 of this article
Now press the "Go" button and the user will get created.
Further after choose the Privileges menu right on the bottom of the page once again, select through the checkbox the username you have just created let's say the previously created user is phpbb3
Go to Action (There is a picture with a man and a pencil on the right side of this button
Scroll down to the page part saying Database-specific privileges and in the field Add privileges on the following database: fill in your previosly created database name in our case it's phpbb3forum
and then press the "Go" button once again.
A page will appear where you will have to select the exact privileges you would like to grant on the specific selected database.
For some simplicity just check all the checkbox to grant as many privilegs to your database as you could.
Then again you will have to press the "Go" button and there you go you should have already configured an username and database ready to go with your new phpbb forum.
4. Create a virtualhost if you would like to have the forum as a subdomain or into a separate domain
If you decide to have the forum on a separate sub-domain or domain as I did you will have to add some kind of Virtualhost into either your Apache configuration /etc/apache2/apache2.conf or into where officially the virutualhosts are laid in Debian Linux in /etc/apache2/sites-available
I've personally created a new file like for instance /etc/apache2/sites-available/mysubdomain.mydomain.com
Here is an example content of the new Virtualhost:
<VirtualHost *>

ServerAdmin admin-email@domain.com

ServerName mysubdomain.domain.com
# Indexes + Directory Root.
DirectoryIndex index.php index.php5 index.htm index.html index.pl index.cgi index.phtml index.jsp index.py index.asp
DocumentRoot /usr/share/phpbb3/www/
# Logfiles
ErrorLog /var/log/apache2/yourdomain/error.log
CustomLog /var/log/apache2/yourdomain/access.log combined
# CustomLog /dev/null combined
<Directory /usr/share/phpbb3/www/>
Options FollowSymLinks MultiViews -Includes ExecCGI
AllowOverride All
Order allow,deny
allow from all </Directory>
</VirtualHost>
In above Virtualhost just change the values for ServerAdmin , ServerName , DocumentRoot , ErrorLog , CustomLog and Directory declaration to adjust it to your situation.
5. Restart the Apache webserver for the new Virtualhost to take affect
debian:~# /etc/init.d/apache2 restart
Now accessing your http://mysubdomain.domain.com should display the installed phpbb3 forum
The default username and password for your forum you can use straight are:
username: admin
password: admin
So far so good you by now have the PHPBB3 forum properly installed and running, however if you try to Register a new user in the forum you will notice that it's impossible because of a terrible ugly message reading:
Sorry but this board is currently unavailable.
I've spend few minutes online to scrape through the forums before I can understand what I have to stop that annoying message from appearing and allow new users to register in the phpbb forum
The solution came natural and was a setting that had to be changed with the forum admin account, thus login as admin and look at the bottom of the page, below the text reading Powered by phpBB © 2000, 2002, 2005, 2007 phpBB Group you will notice a link with Administration Control Panel
just press there a whole bunch of menus will appear on the screen allowing you to do numerous things, however what you will have to do is go to
Board Settings -> Disable Board
and change the radio button there to say No
That's all now your forum will be ready to go and your users can freely register and if the server where the forum is installed has an already running mail server, they will receive an emails with a registration data concerning their new registrations in your new phpbb forum.
Cheers and Enjoy your new shiny phpbb Forum 🙂
Tags: apache, apache2, assumption, business school, Button, client, com, communication media, configuration issue, configuration procedure, credentials, CustomLog, database backend, database installation, database name, deb package, debian linux, debian package, Debian Squeeze Sid Linux, dpkg, exact steps, forum database, host, Install, installation, Installing, internal communication, mysql database server, mysubdomain, ncurses interface, package, page, password, php, phpbb forum, phpmyadmin, Privileges, Restart, right, root, ServerName, something, squeeze, strategic hr, student, username, Virtualhost
Posted in Linux, System Administration | 12 Comments »
Tuesday, October 25th, 2011 
After a recent new Debian Squeeze Apache+PHP server install and moving a website from another server host running on CentOS 5.7 Linux server, some of the PHP scripts running via crontab started displaying the following annoying PHP Warnings :
debian:~# php /home/website/www/cron/update.php
PHP Warning: PHP Startup: Unable to load dynamic library '/usr/lib/php5/20090626/suhosin.so' – /usr/lib/php5/20090626/suhosin.so: cannot open shared object file: No such file or directory in Unknown on line 0
Obviously the error revealed that PHP cli is not happy that, I've previously removes the suhosin php5-suhosin module from the system.
I wouldn't have removed php5-suhosin if sometimes it doesn't produced some odd experiences with the Apache webserver.
To fix the PHP Warning, I used first grep to see, where exactly the suhosin module gets included in debian's php.ini config files.
debian:~# cd /etc/php5

debian:/etc/php5# grep -rli suhosin *

apache2/conf.d/suhosin.ini

cgi/conf.d/suhosin.ini

cli/conf.d/suhosin.ini

conf.d/suhosin.ini
Yeah that's right Debian has three php.ini php config files. One for the php cli – /usr/bin/php, another for the Apache webserver loaded php library – /usr/lib/apache2/modules/libphp5.so and one for Apache's cgi module – /usr/lib/apache2/modules/mod_fcgid.so .
I was too lazy to edit all the above found declarations trying to include the suhosin module in PHP, hence I remembered that probably all this obsolete suhosin module declaration are still present because probably the php5-suhosin package is still not purged from the system.
A quick check with dpkg , further strenthened my assumption as the php5-suhosin module was still hanging around as an (rc – remove candidate);
debian:~# dpkg -l |grep -i suhosin

rc php5-suhosin 0.9.32.1-1 advanced protection module for php5
Hence to remove the obsolete package config and directories completely out of the system and hence solve the PHP Warning I used dpkg –purge, like so:
debian:~# dpkg --purge php5-suhosin

(Reading database ... 76048 files and directories currently installed.)

Removing php5-suhosin ...

Purging configuration files for php5-suhosin ...

Processing triggers for libapache2-mod-php5 ...

Reloading web server config: apache2.
Further on to make sure the PHP Warning is solved I did the cron php script another go and it produced no longer errors:
debian:~# php /home/website/www/cron/update.php

debian:~#
Tags: apache, apache php, assumption, candidate, CentOS, cgi, cgi module, cli, config, cron, debian gnu, declaration, declarations, doesn, dpkg, file, gnu linux, host, ini, inicgi, iniconf, lib, libapache, Linux, mod, odd experiences, package, php scripts, php server, protection, right, rli, server host, shared object, squeeze, suhosin, unable to load dynamic library, Warnings
Posted in Linux, System Administration, Various, Web and CMS | 8 Comments »
Sunday, May 20th, 2012 
My home run machine MySQL server was suddenly down as I tried to check my blog and other sites today, the error I saw while trying to open, this blog as well as other hosted sites using the MySQL was:
Error establishing a database connection
The topology, where this error occured is simple, I have two hosts:
1. Apache version 2.0.64 compiled support externally PHP scripts interpretation via libphp – the host runs on (FreeBSD)
2. A Debian GNU / Linux squeeze running MySQL server version 5.1.61
The Apache host is assigned a local IP address 192.168.0.1 and the SQL server is running on a host with IP 192.168.0.2
To diagnose the error I've logged in to 192.168.0.2 and weirdly the mysql-server was appearing to run just fine:
debian:~# ps ax |grep -i mysql
31781 pts/0 S 0:00 /bin/sh /usr/bin/mysqld_safe
31940 pts/0 Sl 12:08 /usr/sbin/mysqld –basedir=/usr –datadir=/var/lib/mysql –user=mysql –pid-file=/var/run/mysqld/mysqld.pid –socket=/var/run/mysqld/mysqld.sock –port=3306
31941 pts/0 S 0:00 logger -t mysqld -p daemon.error
32292 pts/0 S+ 0:00 grep -i mysql
Moreover I could connect to the localhost SQL server with mysql -u root -p and it seemed to run fine. The error Error establishing a database connection meant that either something is messed up with the database or 192.168.0.2 Mysql port 3306 is not properly accessible.
My first guess was something is wrong due to some firewall rules, so I tried to connect from 192.168.0.1 to 192.168.0.2 with telnet:
freebsd# telnet 192.168.0.2 3306
Trying 192.168.0.2…
Connected to jericho.
Escape character is '^]'.
Host 'webserver' is blocked because of many connection errors; unblock with 'mysqladmin flush-hosts'
Connection closed by foreign host.
Right after the telnet was initiated as I show in the above output the connection was immediately closed with the error:
Host 'webserver' is blocked because of many connection errors; unblock with 'mysqladmin flush-hosts'Connection closed by foreign host.
In the error 'webserver' is my Apache machine set hostname. The error clearly states the problems with the 'webserver' apache host unable to connect to the SQL database are due to 'many connection errors' and a fix i suggested with mysqladmin flush-hosts
To temporary solve the error and restore my normal connectivity between the Apache and the SQL servers I logged I had to issue on the SQL host:
mysqladmin -u root -p flush-hostsEnter password:
Thogh this temporar fix restored accessibility to the databases and hence the websites errors were resolved, this doesn't guarantee that in the future I wouldn't end up in the same situation and therefore I looked for a permanent fix to the issues once and for all.
The permanent fix consists in changing the default value set for max_connect_error in /etc/mysql/my.cnf, which by default is not too high. Therefore to raise up the variable value, added in my.cnf in conf section [mysqld]:
debian:~# vim /etc/mysql/my.cnf

...

max_connect_errors=4294967295
and afterwards restarted MYSQL:
debian:~# /etc/init.d/mysql restart

Stopping MySQL database server: mysqld.

Starting MySQL database server: mysqld.

Checking for corrupt, not cleanly closed and upgrade needing tables..
To make sure the assigned max_connect_errors=4294967295 is never reached due to Apache to SQL connection errors, I've also added as a cronjob.
debian:~# crontab -u root -e

00 03 * * * mysqladmin flush-hosts
In the cron I have omitted the mysqladmin -u root -p (user/pass) input options because for convenience I have already stored the mysql root password in /root/.my.cnf
Here is how /root/.my.cnf looks like:
debian:~# cat /root/.my.cnf

[client]

user=root

password=a_secret_sql_password
Now hopefully, this would permanently solve SQL's 'failure to accept connections' due to too many connection errors for future.
Tags: apache version, Auto, basedir, bin, cnf, connection, connectionThe, daemon, database connection, debian gnu, default, Draft, due, error error, firewall rules, fix, freebsd, GNU, guess, host, host name, hostname, lib, Linux, local ip address, localhost, machine, mysql server, mysqladmin, mysqld, mysqlMoreover, nbsp, occured, password, port 3306, root, root password, running, server version, sl 12, Socket, something, SQL, sql server, squeeze, support, topology, value, webserver
Posted in MySQL, System Administration, Web and CMS | No Comments »
Wednesday, October 19th, 2011 
I've been using Debian GNU / Linux on my Thinkpad laptop for almost 3 years and half. Initially the Debian version which I had installed was a stable Debian Lenny. As I was mostly dissatisfied of the old versions of the programs, I migrated to testing / unstable
Testing / unstables shipped program versions were a bit better but still back in the day I wanted to get advantage of the latest program versions so for a while I switched to unstable .
Later I regretted for this bad idea, after the migration to Unstable, it was too buggy to run on a notebook one uses for everyday work.
Then to revert back to a bit stable I downgraded to testing unstable again.
When Debian launched Debian Squeeze I set in my /etc/apt/sources.list file software repositories to be the one for the stable Debian Squeeze.
As you can see, I've done quite a lot of "experiments" and "excersises". Many packages were installed, then removed, some became obsolete with time others I just temporary installed out of curiosity. Anyways as a result I ended up with many packages uninstalled / removed , which still kept some of their directory structres and configurations on the machine.
Today, I decided to check how many of these obsolete packages are still present in dpkg database and I was shocked to find out 412 debs were still in my package database! To check the number I used cmd:
root@noah:~# dpkg -l | grep -i '^rcs.*$'|wc -l
Considering the tremendous number of packs waiting to be purged, I decided to get rid of this old and already unnecessery files for the sake of clarity, besides that removing the old already uninstalled packages removes old configuration files, readmes, directories and frees some little space and therefore frees some inodes 😉
Before proceeding to remove them, I carefully reviewed and all the package names which I was about to completely purge in order to make sure there is no package with a configuration files I might need in future:
root@noah:~# dpkg -l |grep -i '^rcs.*$'

...
After reviewing all the deb packages possessing the rc – (remove candidate) flag, I used the following bash one liners to remove the obsolete deb packages:
root@noah:~# for i in $(dpkg -l |grep -i '^rcs.*$'|awk '{ print $2 }'); do echo dpkg --purge $i done...

root@noah:~# for i in $(dpkg -l |grep -i '^rcs.*$'|awk '{ print $2 }'); do dpkg --purge $i done
First line will just print out what will be purged with dpkg , so after I checked it out I used the second one to purge all the RC packs.
Tags: bad idea, bit, buggy, candidate, clarity, cmd, configuration files, curiosity, deb packages, debian version, debs, dpkg, everyday work, file, half, How to, inodes, laptop, Linux, little space, machine, need, noah, number, old versions, package, package database, package names, program versions, purge, quot, root, software, software repositories, squeeze, system, system directories, testing, time, Ubuntu, work
Posted in Linux, Linux and FreeBSD Desktop, Linux Audio & Video, System Administration, Various | 3 Comments »
Monday, August 1st, 2011 
It seems DjbDNS on Debian Squeeze has been not included as a Debian package. There is still possibility to install djbdns from an older deb package or install it from source. I however decided to install it from source as finding the old Debian package for Lenny and Etch takes time, plus I'm running an amd64 version of Debian and this might even more complicate the situation.
Installing it from source is not really a Debian way but at least it works.
In this article I assume that daemontools and ucspi-tcp are preliminary installed, if not one needs to install them with:
debian:~# apt-get install ucspi-tcp daemontools daemontools-run

...
The above two ones are required as DJBDNS is originally made to run through djb's daemontools.
Here is the exact step I took to have it installed as local caching DNS server on a Debian Squeeze server:
1. Download and untar DjbDNS
debian:~# wget -q http://cr.yp.to/djbdns/djbdns-1.05.tar.gz
debian:~# tar -zxvvf djbdns-1.05.tar.gz

...
2. Add DjbDNS users to /etc/passwd
Creating the below two users is not arbitrary but it's recommendable.
echo 'dnscache:*:54321:54321:dnscache:/dev/null:/dev/null' >> /etc/passwd

echo 'dnslog:*:54322:54322:dnslog:/dev/null:/dev/null' >> /etc/passwd
3. Compile DJBDNS nameserver
First it's necessery to use the below echo command to work around a common Linux bug:
debian:~# cd djbdns-1.05

debian:/root/djbdns-1.05# echo gcc -O2 -include /usr/include/errno.h > conf-cc
Next let's make it:
debian:/root/djbdns-1.05# make
4. Install the compiled djbdns binaries
debian:/root/djbdns-1.05# make setup check

# here comes some long install related output
If no errors are produced by make setup check this means that the djbdns should have installed itself fine.
As installation is compileted it's a good idea to report about the newly installed DjbDNS server if running a mail server. This info is used by Dan Bernstein to gather statistical data about the number of installations of djbdns servers throughout the world.
5. Do some general configurations to the newly installed DJBDNS
Now let's copy the list of the IP addresses of the global DNS root servers in /etc/.
debian:/root/djbdns-1.05# cp -rpf dnsroots.global /etc/
debian:/root/djbdns-1.05# ./dnscache-conf dnscache dnslog /etc/dnscache 0.0.0.0
dnscache-conf will generate some default configuration files for djbdns in /etc/dnscache
Next allow the networks which should be able to use the just installed djbdns server as a caching server:
debian:/root/djbdns-1.05# cd /etc/dnscache/root/ip

debian:/etc/dnscache/root# touch 192.168.1

debian:/root/djbdns-1.05# touch 123.123
First command will allow all ips in range 192.168.1.* to be able to access the DNS server and the second command will allow all ips from 123.123.1-255.1-255 to be able to query the server.
Some further fine tunning can be done from the files:
/etc/dnscache/env/CACHESIZE and /etc/dnscache/env/DATALIMIT
As a last step, before it's running, we have to link the /etc/dnscache to daemontools like so:
debian:/root/djbdns-1.05# ln -sf /etc/dnscache /etc/service/dnscache
If the daemontools is not linked to be accessible via /etc/service it's also a good to link it there:
debian:~# ln -sf /etc/service /
Now the DJBDNS should be running fine, to test if it's running without errors through daemontools I used:
debian:~# ps ax|grep -i readproc

5358 pts/18 R+ 0:00 grep -i readproc

11824 ? S 0:00 readproctitle service errors: ...........
If no errors are displayed it's configured and running to also test if it's capable of resolving I used the host command:
debian:~# host www.pc-freak.net localhost

Using domain server:

Name: localhost

Address: 127.0.0.1#53

Aliases:
www.pc-freak.net has address 83.228.93.76
www.pc-freak.net mail is handled by 0 mail.www.pc-freak.net.
Now the DJBDNS is properly installed and if you test it for a while with time host somehost.com localhost , you will see how quick it is in resolving.
The advantage of running DJBDNS is it does not require almost no maintance, its rock solid and great just like all other Dan Bernstein's written software.
Enjoy 😉
Tags: binaries, Cachening, Cachening Localhost Proxy, Compile, configure, configured, cr, daemontools, dan bern, dan bernstein, deb package, debian cd, debian package, djb, djbdns, DNS, dns server, echo command, efficiency, errno, etc passwd, etch, host, How to, Install, installation, Linux, linux bug, mail server, necessery, package, passwdecho, possibility, root, running, squeeze, statistical data, tar gz, tcp, time, Touch, untar, wget, yp, zxvvf
Posted in Linux, Performance Tuning, System Administration, Web and CMS | 4 Comments »
Wednesday, April 18th, 2012 
The default behaviour of lynx – console text browser on Linuces, BSD and other free OSes is to always ask, for the accept cookies prompt once an internet web page is opened that requires browser cookies to be enabled.
I should admin, having this "secure by default" (always ask for new cookies) behaviour in lynx was a good practice from a security point of view.
Another reason, why this cookies prompt is enabled by default is back in the days, when lynx was actively developed by programmers the websites with cookies support was not that many and even cookies was mostly required for user/pass authentication (all those who still remember this days the websites that requires authentication was a way less than today) …
With this said the current continuing security cautious behaviour in the browser, left from its old days is understandable.
However I personally sometimes, need to use lynx more frequently and this behaviour of always opening a new website in text mode in console to prompts me for a cookie suddenly becomes a big waste of time if you use lynx to browser more than few sites. Hence I decided to change the default way lynx handles cookies and make them enabled by default instead.
Actually even in the past, when I was mainly using internet in console on every new server or home Linux install, I was again making the cookies to be permanently accepted.
Everyone who used lynx a few times already knows its "annoying" to all time accept cookie prompts … This provoked me to write this short article to explain how enabling of constant cookie accepting in lynx is done
To enable the persistent cookies in lynx, one needs to edit lynx.cfg on different GNU / Linux and BSD* distributions lynx.cfg is located in different directory.
Most of the lynx.cfg usual locations are /etc/lynx/lynx.cfg or /etc/lynx.cfg as of time of writting this post in Debian Squeeze GNU / Linux the lynx.cfg is located in /etc/lynx-cur/lynx.cfg, whether for FreeBSD / NetBSD / OpenBSD users the file is located in /usr/local/etc/lynx.cfg
What I did to allow all cookies is open lynx.cfg in vim edit and change the following lines:
a)
#FORCE_SSL_COOKIES_SECURE:FALSE
with
FORCE_SSL_COOKIES_SECURE:TRUE
b)
#SET_COOKIES:TRUE
uncomment it to:
SET_COOKIES:TRUE
c) next, change
ACCEPT_ALL_COOKIES:FALSE
ACCEPT_ALL_COOKIES:TRUE
Onwards opening any website with lynx auto-accepts the cookies.
For people who care about there security (who still browse in console (surely not many anymore)), permanently allowing the cookies is not a good idea. But for those who are ready to drop off little security for convenience its ok.
Tags: ALL, authentication, Auto, browser cookies, BSD, bsd distributions, cfg, change, convenience, Cookie, default behaviour, Draft, everyone, file, free oses, GNU, gnu linux, good, How to, internet web, Linux, Lynx, lynx one, NetBSD, Onwards, OpenBSD, page, persistent cookies, point of view, programmers, quot, reason, security point, squeeze, support, text, text browser, text mode, time, TRUEb, TRUEc, TRUEuncomment, uncomment, use, using internet, vim, waste, waste of time, web page, writ
Posted in Curious Facts, Everyday Life, FreeBSD, Linux, System Administration | 1 Comment »
Tuesday, July 6th, 2010 I’ve recently broke my grub untentianally while whiping out one of my disk partitions who was prepared to run a hackintosh.
Thus yesterday while switching on my notebook I was unpleasently surprised with an error Grub Error 17 and the boot process was hanging before it would even get to grub’s OS select menu.
That was nasty and gave me a big headache, since I wasn’t even sure if my partitions are still present.
What made things even worse that I haven’t created any backups preliminary to prepare for an emergency!
Thus restoring my system was absolutely compulsory at any cost.
In recovering the my grub boot manager I have used as a basis of my recovery an article called How to install Grub from a live Ubuntu cd
Though the article is quite comprehensive, it’s written a bit foolish, probably because it targets Ubuntu novice users 🙂
Another interesting article that gave me a hand during solving my issues was HOWTO: install grub with a chroot
Anyways, My first unsuccessful attempt was following a mix of the aforementioned articles and desperately trying to chroot to my mounted unbootable partition in order to be able to rewrite the grub loader in my MBR.
The error that slap me in my face during chroot was:
chroot: cannot execute /bin/sh : exec format error
Ghh Terrible … After reasoning on the shitty error I came to the conclusion that probably the livecd I’m trying to chroot to my debian linux partition is probably using a different incompatible version of glibc , if that kind of logic is true I concluded that it’s most likely that the glibc on my Linux system is newer (I came to that assumption because I was booting from livecds (Elive, Live CentOS as well Sabayon Linux, which were burnt about two years ago).
To proof my guesses I decided to try using Debian testing Squeeze/Sid install cd . That is the time to mention that I’m running Debian testing/unstable under the code name (Squeeze / Sid).
I downloaded the Debian testing amd64 last built image from here burnt it to a cd on another pc.
And booted it to my notebook, I wasn’t completely sure if the Install CD would have all the necessary recovery tools that I would need to rebuilt my grub but eventually it happened that the debian install cd1 has everything necessary for emergency situations like this one.
After I booted from the newly burned Debian install cd I followed the following recovery route to be able to recovery my system back to normal.It took me a while until I come with the steps described here, but I won’t get into details for brevity
1. Make new dir where you intend to mount your Linux partition and mount /proc, /dev, /dev/pts filesystems and the partition itself
noah:~# mkdir /mnt/root

noah:~# mount -t ext3 /dev/sda8 /mnt/root

noah:~# mount -o bind /dev /mnt/root/dev

noah:~# mount devpts /dev/pts -t devpts
Change /dev/sda8 in the above example commands with your partition name and number.
2. chroot to the mounted partition in order to be able to use your filesystem, exactly like you normally use it when you’re using your Linux partition
noah:~# chroot /mnt/root /bin/bash
Hopefully now you should be in locked in your filesystem and use your Linux non-bootable system as usual.
Being able to access your /boot/grub directory I suggest you first check that everything inside:
/boot/grub/menu.lst is well defined and there are no problems with the paths to the Linux partitions.
Next issue the following commands which will hopefully recover your broken grub boot loader.
noah:~# grub

noah:~# find /boot/grub/stage1
The second command find /boot/grub/stage1 should provide you with your partitions range e.g. it should return something like:
root (hd0,7)
Nevertheless in my case instead of the expected root (hd0,7) , I was returned
/boot/grub/stage1 not found
Useless to say this is uncool 🙂
As a normal reaction I tried experimenting in order to fix the mess. Logically enough I tried to reinstall grub using the
noah:~# grub-install --root-directory=/boot /dev/sda

noah:~# update-grub
To check if that would fix my grub issues I restarted my notebook. Well now grub menu appeared with some error generated by splashy
Trying to boot any of the setup Linux kernels was failing with some kind of error where the root file system was trying to be loaded from /root directory instead of the normal / because of that neither /proc /dev and /sys filesystems was unable to be mounted and the boot process was interrupting in some kind of rescue mode similar to busybox, though it was a was less flexible than a normal busybox shell.
To solve that shitty issue I once again booted with the Debian Testing (Sid / Squeeze ) Install CD1 and used the commands displayed above to mount my linux partition.
Next I reinstalled the following packages:
noah:~# apt-get update

noah:~# apt-get install --reinstall linux-image-amd64 uswsusp hibernate grub grub-common initramfs-tools
Here the grub reinstall actually required me to install the new grub generation 2 (version 2)
It was also necessary to remove the splashy
noah:~# apt-get remove splashy
As well as to grep through all my /etc/ and look for a /dev/sda6 and substitute it with my changed partition name /dev/sda8
One major thing where I substituted /dev/sda6 to my actual linux partition now with a name /dev/sda8 was in:
initramfs-tools/conf.d/resumeThe kernel reinstall and consequently (update) does offered me to substitute my normal /dev/sda* content in my /etc/fstab to some UUIDS like UUID=ba6058da-37f8-4065-854b-e3d0a874fb4e
Including this UUIDs and restarting now rendered my system completely unbootable … So I booted once again from the debian install cd .. arrgh 🙂 and removed the UUID new included lines in /etc/fstab and left the good old declarations.
After rebooting the system now my system booted once again! Hooray! All my data and everything is completely intact now Thanks God! 🙂
Tags: assumption, boot manager, boot process, chroot, debian linux, dev, disk partitions, exec format error, filesystems, glibc, gnu linux, grub boot loader, grub error 17, hackintosh, incompatible version, linux partition, linux system, livecd, MBR, mkdir, mnt, noah, novice users, Recover/Restore unbootable GRUB boot loader on Debian Testing GNU/Linux using Linux LiveCD (Debian Install CD1), recovery, squeeze, unsuccessful attempt, whiping
Posted in Linux, Linux and FreeBSD Desktop, System Administration | 8 Comments »
Thursday, February 14th, 2013 
I have a Debian GNU / Linux squeeze with bluetooth and bluetooth is started automatically on system boot. This is pretty annoying, cause I use bluetooth quite rarely.
disable / enable bluetooth via terminal is controlled via Linux sysfs virtual filesystem. The command to disable bluetooth one time is:
debian:~# echo 0 > /sys/devices/platform/thinkpad_acpi/bluetooth_enable
It is efficient in terms of energy saving especially if you use often your notebook on battery to turn off bluetooth permanently and only enable it when needed with:
debian:~# echo 1 > /sys/devices/platform/thinkpad_acpi/bluetooth_enable
To permanently disable bluetooth on Linux boot use:
# service bluetooth stop
In /etc/rc.local before exit 0 line place:
echo 0 > /sys/devices/platform/thinkpad_acpi/bluetooth_enable
An alternative method to permanently disable bluetooth (on other non-Thinkpad – any brand laptops) is via rfkill (bluetooth device control interface), on Ubuntu rfkill is installed by default but Debian users has to explicitly install it via apt:
debian:~# apt-get install –yes rfkill
Once rfkill is installed on host put a line before exit 0 in /etc/local:
rfkill block bluetooth
Tags: acpi, alternative, brand, control interface, debian gnu, debian users, echo 1, exit, lenovo thinkpad, line, Linux, linux ibm, notebook, one time, platform, squeeze, system boot, thinkpad laptops, Ubuntu, virtual filesystem
Posted in Bluetooth, Linux and FreeBSD Desktop, Various | No Comments »
Monday, June 3rd, 2013 
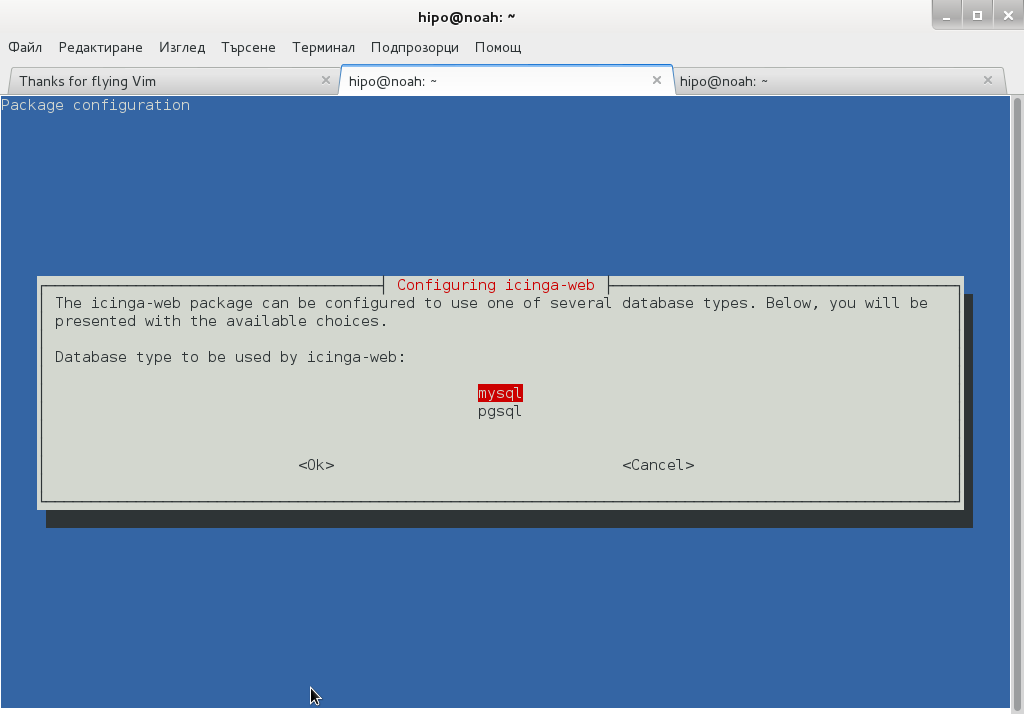
There is plenty of software for monitoring how server performs and whether servers are correctly up and running. There is probably no Debian Linux admin who didn't already worked or at least tried Nagios and Mointor to monitor and notify whether server is unreachable or how server services operate. Nagios and Munin are play well together to prevent possible upcoming problems with Web / Db / E-mail services or get notify whether they are completely inaccessible. One similar "next-generation" and less known software is Icanga.
The reason, why to use Icinga instead of Nagios is more features a list of what does Icinga supports more than Nagios is on its site here
I recently heard of it and decided to try it myself. To try Icanga I followed Icanga's install tutorial on Wiki.Icanga.Org here
In Debian Wheezy, Icinga is already part of official repositories so installing it like in Squeeze and Lenny does not require use of external Debian BackPorts repositories.
1. Install Icinga pre-requirement packages
debian:# apt-get --yes install php5 php5-cli php-pear php5-xmlrpc php5-xsl php5-gd php5-ldap php5-mysql
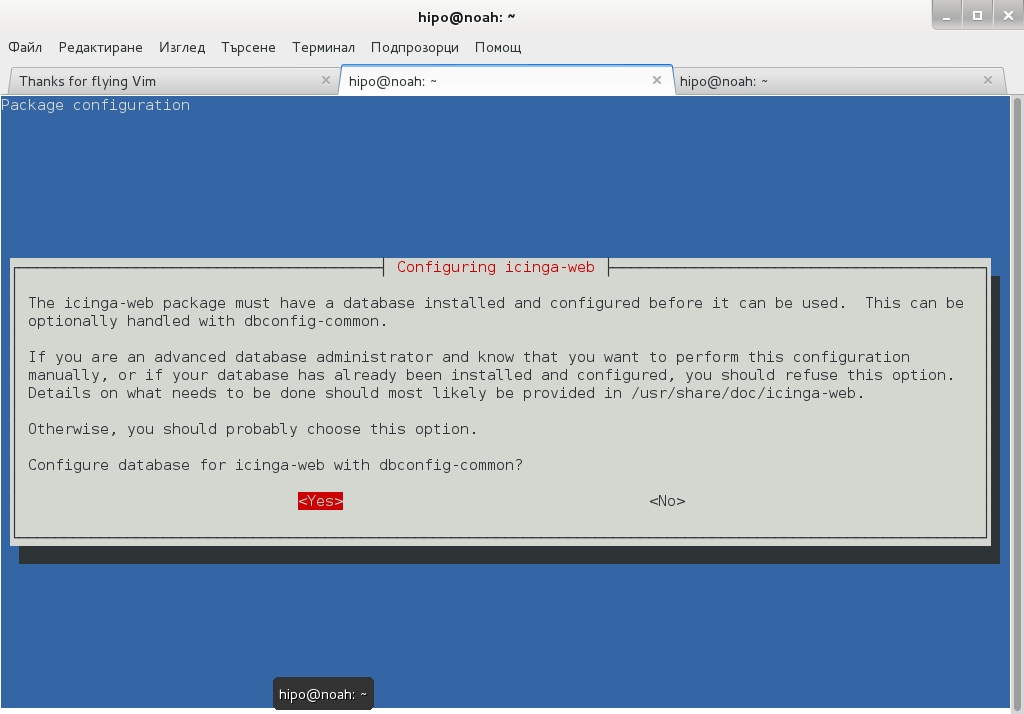
2. Install Icanga-web package
debian:~# apt-get --yes install icinga-web
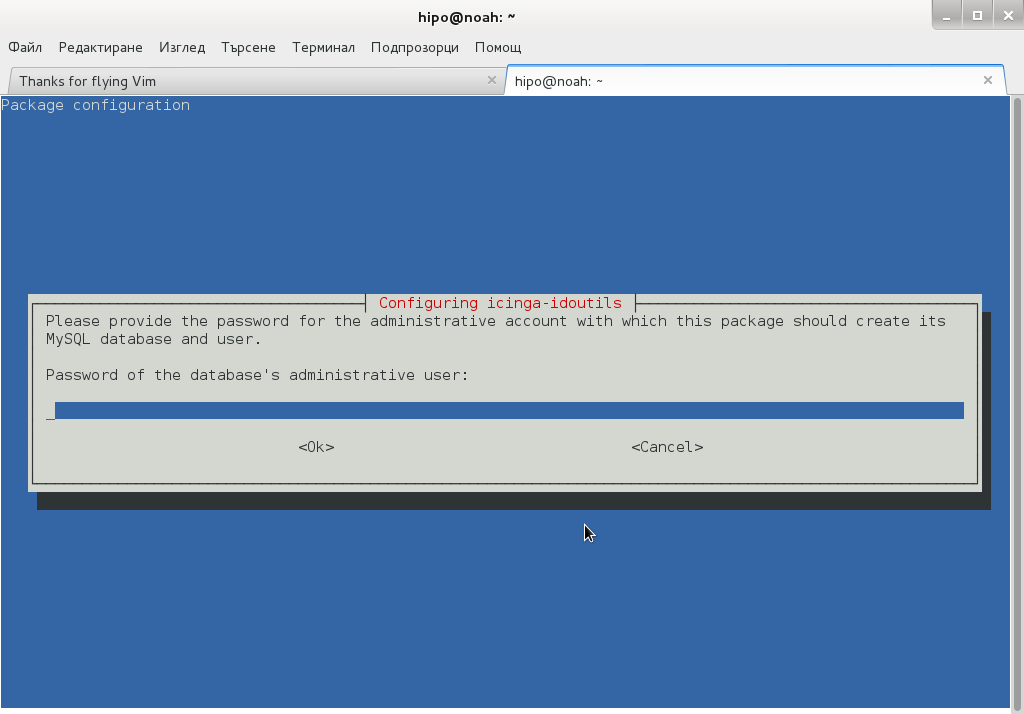
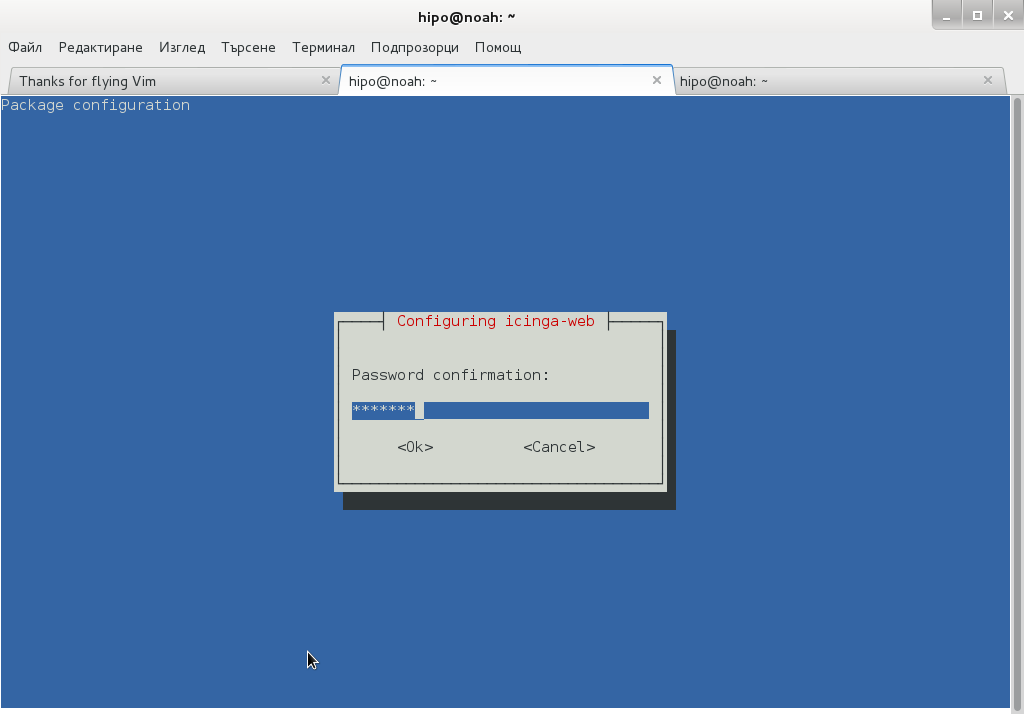
Here you will be prompted a number of times to answer few dialog questions important for security, as well as fill in MySQL server root user / password as well as SQL password that will icinga_web mySQL user use.
….
Setting up icinga-idoutils (1.7.1-6) …
dbconfig-common: writing config to /etc/dbconfig-common/icinga-idoutils.conf
granting access to database icinga for icinga-idoutils@localhost: success.
verifying access for icinga-idoutils@localhost: success.
creating database icinga: success.
verifying database icinga exists: success.
populating database via sql… done.
dbconfig-common: flushing administrative password
Setting up icinga-web (1.7.1+dfsg2-6) …
dbconfig-common: writing config to /etc/dbconfig-common/icinga-web.conf
Creating config file /etc/dbconfig-common/icinga-web.conf with new version
granting access to database icinga_web for icinga_web@localhost: success.
verifying access for icinga_web@localhost: success.
creating database icinga_web: success.
verifying database icinga_web exists: success.
populating database via sql… done.
dbconfig-common: flushing administrative password
Creating config file /etc/icinga-web/conf.d/database-web.xml with new version
database config successful: /etc/icinga-web/conf.d/database-web.xml
Creating config file /etc/icinga-web/conf.d/database-ido.xml with new version
database config successful: /etc/icinga-web/conf.d/database-ido.xml
enabling config for webserver apache2…
Enabling module rewrite.
To activate the new configuration, you need to run:
service apache2 restart
`/etc/apache2/conf.d/icinga-web.conf' -> `../../icinga-web/apache2.conf'
[ ok ] Reloading web server config: apache2 not running.
root password updates successfully!
Basedir: /usr Cachedir: /var/cache/icinga-web
Cache already purged!
3. Enable Apache mod_rewrite
debian:~# a2enmod rewrite
debian:~# /etc/init.d/apache2 restart
4. Icinga documentation files
Some key hints on Enabling some more nice Icinga features are mentioned in Icinga README files, check out, all docs files included with Icinga separate packs are into:
debian:~# ls -ld *icinga*/

drwxr-xr-x 3 root root 4096 Jun  3 10:48 icinga-common/

drwxr-xr-x 3 root root 4096 Jun  3 10:48 icinga-core/

drwxr-xr-x 3 root root 4096 Jun  3 10:48 icinga-idoutils/

drwxr-xr-x 2 root root 4096 Jun  3 10:48 icinga-web/
debian:~# less /usr/share/doc/icinga-web/README.Debian
debian:~# less /usr/share/doc/icinga-idoutils/README.Debian
5. Configuring Icinga
Icinga configurations are separated in two directories:
debian:~# ls -ld *icinga*
drwxr-xr-x 4 root root 4096 Jun 3 10:50 icinga
drwxr-xr-x 3 root root 4096 Jun 3 11:07 icinga-web
>
etc/icinga/ – (contains configurations files for on exact icinga backend server behavior)
/etc/icinga-web – (contains all kind of Icinga Apache configurations)
Main configuration worthy to look in after install is /etc/icinga/icinga.cfg.
6. Accessing newly installed Icinga via web
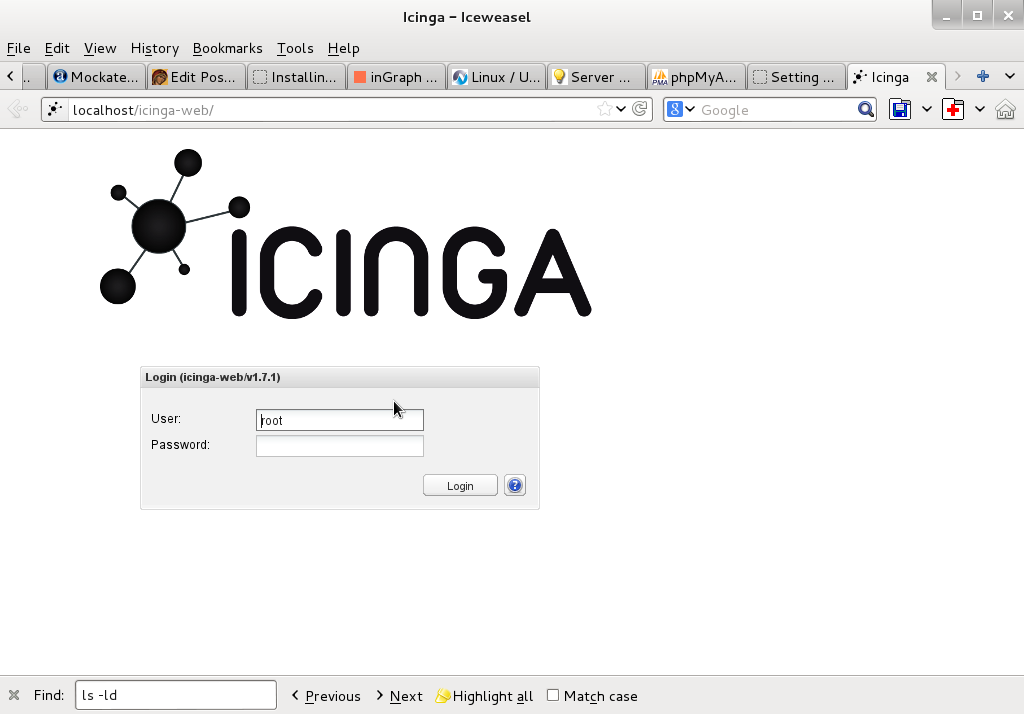
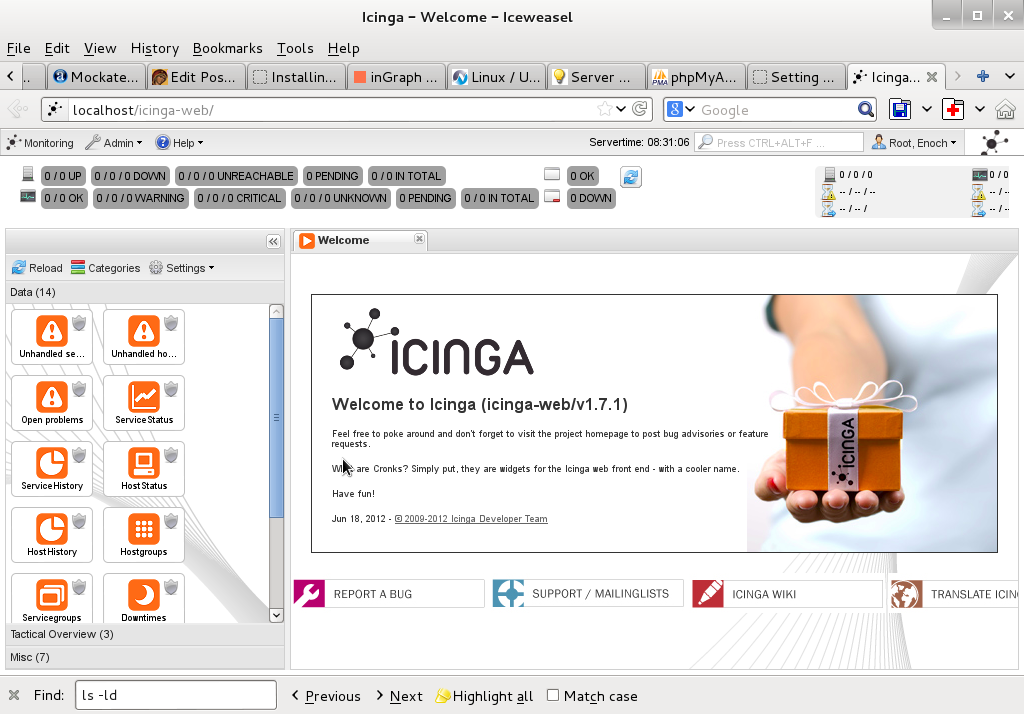
To access just installed Icinga, open in browser URL – htp://localhost/icinga-web
7. Monitoring host services with Icinga (NRPE)
As fork of Nagios. Icinga has similar modular architecture and uses number of external plugins to Monitor external host services list of existing plugins is on Icinga's wiki here.
Just like Nagios Icinga supports NRPE protocol (Nagios Remote Plugin Executor). To setup NRPE, nrpe plugin from nagios is used (nagios-nrpe-server).
To install NRPE on any of the nodes to be tracked;
debian: ~# apt-get install –yes nagios-nrpe-server
…
Then to configure NRPE edit /etc/nagios/nrpe_local.cfg
Once NRPE is supported in Icinga, you can install on Windows or Linux hosts NRPE clients like in Nagios to report on server processes state and easily monitor if server disk space / load or service is in critical state.
Tags: apache, apache2, debian linux, Debian Linux Installing, e mail services, Icanga Nagios, known software, Linux, Monitoring, new software, NRPE, php pear, repo, repositories, repository, root password, root root, server root, server services, servers, squeeze, version, web package, xml
Posted in Everyday Life, Linux, Monitoring, System Administration, Various | 1 Comment »
Monday, September 9th, 2013 
Clamav Antivirus is one of must have packages installed on a new Debian Linux server. It is not only necessary whether configuring a new Mail server be it Qmail or Postfix but is good to have to always check files on a Webserver. Until few years infecting of Sites with Viruses / Installing WebShells or Backdooring for further access using Perl or PHP vulnerable PHP code was not so common, However nowadays with increase of complexity of languages and increase of not security minded programmers this possibility dramatically increaed. Thus nowadays, whether I configure a new Apache + PHP + CGI support server I always install Clamav AV. Some might argue that Clamav Virus definitions are still too little compared to proprietary solutions like BitDefender / AVG or Avast but since my experience with this under Linux is not so bright as well as Clamav captures essential Viruses and Backdoors I still prefer to keep on with Clamav. Even on home Desktops with Linux clamav is of use as there are plenty of free-ware software for Linux which come only distributed only in a binary form and hence its good to check them with clamav before use whether they don't contain some well known Rootkit or Virus. Over the years Clamav has done great job for me whether I had to clean up "hacked" hosts containing script kiddie exploit scanners or Virus infected ELF binaries
.
1. Installing ClamAV in Debian Wheezy Linux
Before time there was a separate Debian repository called Volatille providing latest version release of Clamav, since Debian Squeeze Volatille project is discontinued, thus installing on Wheezy as a deb package is only available via standard Debian repositories.
 apt-get update && apt-get --yes upgrade

...
apt-get install --yes clamav clamav-daemon
As package dependencies you get installed:
clamav clamav-base clamav-freshclam libbz2-1.0 libclamav1 libcurl3 libidn11 ucf
Clamav-Daemon will launch immediately after packages are installed and is available as process name /usr/sbin/clamd
 # ps ax |grep -i clam

 2641 ?        Ssl    6:39 /usr/sbin/clamd

 2791 ?        Ss    12:04 /usr/bin/freshclam -d --quiet

12300 pts/0    S+     0:00 grep -i clam
2. Updating Clamav Antivirus Definitions
Its worthy say few words on clamav-freshclam as it is part of ClamAV which is used to update Clamav Virus definitions. Update of ClamAV vir definitions are updating automatically through /usr/bin/freshclam daemon which is started automatically by Debian postconfiguration scripts right after Clamav install.
Manual update of AV definitions can be done also with freshclam.
 # freshclam

ClamAV update process started at Sun Sep  8 17:48:36 2013

main.cvd is up to date (version: 54, sigs: 1044387, f-level: 60, builder: sven)

daily.cvd is up to date (version: 17830, sigs: 1696886, f-level: 63, builder: neo)

bytecode.cld is up to date (version: 225, sigs: 42, f-level: 63, builder: dgoddard)
To keep an eye on definition auto-updates (useful to check where something fails), check out in /var/log/clamav/freshclam.log
A sure indication that Anvirus updates are conducting fine should be log records like:
Sun Sep 8 16:27:44 2013 -> ————————————–
Sun Sep 8 17:27:44 2013 -> Received signal: wake up
Sun Sep 8 17:27:44 2013 -> ClamAV update process started at Sun Sep 8 17:27:44 2013
Sun Sep 8 17:27:44 2013 -> main.cvd is up to date (version: 54, sigs: 1044387, f-level: 60, builder: sven)
Sun Sep 8 17:27:44 2013 -> daily.cld is up to date (version: 17830, sigs: 1696886, f-level: 63, builder: neo)
Sun Sep 8 17:27:44 2013 -> bytecode.cld is up to date (version: 225, sigs: 42, f-level: 63, builder: dgoddard)
Sun Sep 8 17:27:47 2013 -> ————————————–
3. Configuring ClamAV
For Desktop use clamav default config is pretty good. However for servers its good to raise 2 up MaxThreads:
By default MaxThreads is 12
MaxThreads 12
Change to from 30 to 80 depending on how powerful machine ClamAV runs, even on some servers more Clamav threads might be necessary
MaxThreads 30
Other value I like changing is SelfCheck 3600 is too long time for clamav Virus definitions integrity I prefer to set it to 600, i.e.
SelfCheck 600
By default ClamAV is also configured to scan archive files as well. However for this to work you will have to have previously installed unzip and unrar on system. If still you don't have them installed run:
 # apt-get install --yes unrar unzip

...
Note that you will need to have non-free part of Debian deb repositories to /etc/apt/sources.list
Here is one of my sources.list
deb http://ftp.uk.debian.org/debian squeeze main contrib non-free
deb http://security.debian.org/ squeeze/updates main contrib non-free
deb-src http://security.debian.org/ squeeze/updates main contrib non-free
deb http://ftp.debian.skynet.be/ftp/debian/ squeeze main contrib non-free
deb-src http://ftp.debian.skynet.be/ftp/debian/ stable main contrib non-free
deb http://security.debian.org squeeze/updates main contrib non-free
deb-src http://security.debian.org/ squeeze/updates main contrib non-free
3. Scanning with ClamAV
 # clamscan -r /tmp/

./dos-58.160.208.43: OK

./dos-108.18.38.140: OK

./dos-188.194.80.100: OK

./dos-91.224.160.135: OK

./dos-128.253.117.70: OK

./dos-128.172.143.110: OK

./dos-77.92.102.34: OK

./dos-195.230.5.12: OK

...

....

----------- SCAN SUMMARY -----------

Known viruses: 2735887

Engine version: 0.97.8

Scanned directories: 1

Scanned files: 129

Infected files: 0

Data scanned: 0.00 MB

Data read: 0.00 MB (ratio 0.00:1)

Time: 4.769 sec (0 m 4 s)
-r flag stands for recursive scan – e.g. scan all sub-directories in directory and its content
To not flood your console / ssh connection one very useful option is -i (print only whetherinfected files are matched). Here is one more sample case:
 # clamscan -r -i /var/tmp/

----------- SCAN SUMMARY -----------

Known viruses: 2735887

Engine version: 0.97.8

Scanned directories: 1

Scanned files: 2

Infected files: 0

Data scanned: 0.26 MB

Data read: 0.13 MB (ratio 1.97:1)

Time: 4.824 sec (0 m 4 s)
Whether you're on a physical server console and it has pc speaker or sound blaster use –bell option to ring a bell every time a Virus infection is found, for exmpl.
# clamscan -r -i --bell /var/www/
…
4. Scanning periodically and reporting with ClamAV directories with websites
A very common use of ClamAV is to just setup a scheduled cronjob once a month to scan, whether server folder containing a bunch of websites in separate Virtualhosts contain some viruses or malicious stuff. Then as administrator check those logs once a month to make sure server site or group of sites does not become banned in search engine (blocked by Google Chrome and Firefox as Virus hotbed) …
 # crontab -u root -e

00 02 01 * * clamscan -r /var/www -l /var/log/websites-scan.log
Then once a month check out /var/log/websites-scan.log
Tags: avast, cgi support, clamav antivirus, complexity, deb package, debian gnu, debian linux, debian repositories, elf binaries, home desktops, mail server, new mail, Perl, php code, postfix, programmers, proprietary solutions, Qmail, rootkit, squeeze, support server, virus definitions
Posted in Computer Security, Linux, System Administration | No Comments »


How to permanently enable Cookies in Lynx text browser – Disable accept cookies prompt in lynx console browser
Wednesday, April 18th, 2012The default behaviour of lynx – console text browser on Linuces, BSD and other free OSes is to always ask, for the accept cookies prompt once an internet web page is opened that requires browser cookies to be enabled.
I should admin, having this "secure by default" (always ask for new cookies) behaviour in lynx was a good practice from a security point of view.
Another reason, why this cookies prompt is enabled by default is back in the days, when lynx was actively developed by programmers the websites with cookies support was not that many and even cookies was mostly required for user/pass authentication (all those who still remember this days the websites that requires authentication was a way less than today) …
With this said the current continuing security cautious behaviour in the browser, left from its old days is understandable.
However I personally sometimes, need to use lynx more frequently and this behaviour of always opening a new website in text mode in console to prompts me for a cookie suddenly becomes a big waste of time if you use lynx to browser more than few sites. Hence I decided to change the default way lynx handles cookies and make them enabled by default instead.
Actually even in the past, when I was mainly using internet in console on every new server or home Linux install, I was again making the cookies to be permanently accepted.
Everyone who used lynx a few times already knows its "annoying" to all time accept cookie prompts … This provoked me to write this short article to explain how enabling of constant cookie accepting in lynx is done
To enable the persistent cookies in lynx, one needs to edit lynx.cfg on different GNU / Linux and BSD* distributions lynx.cfg is located in different directory.
Most of the lynx.cfg usual locations are /etc/lynx/lynx.cfg or /etc/lynx.cfg as of time of writting this post in Debian Squeeze GNU / Linux the lynx.cfg is located in /etc/lynx-cur/lynx.cfg, whether for FreeBSD / NetBSD / OpenBSD users the file is located in /usr/local/etc/lynx.cfg
What I did to allow all cookies is open lynx.cfg in vim edit and change the following lines:
a)
#FORCE_SSL_COOKIES_SECURE:FALSEwith
FORCE_SSL_COOKIES_SECURE:TRUEb)
#SET_COOKIES:TRUEuncomment it to:
SET_COOKIES:TRUEc) next, change
ACCEPT_ALL_COOKIES:FALSEACCEPT_ALL_COOKIES:TRUEOnwards opening any website with lynx auto-accepts the cookies.
For people who care about there security (who still browse in console (surely not many anymore)), permanently allowing the cookies is not a good idea. But for those who are ready to drop off little security for convenience its ok.
Tags: ALL, authentication, Auto, browser cookies, BSD, bsd distributions, cfg, change, convenience, Cookie, default behaviour, Draft, everyone, file, free oses, GNU, gnu linux, good, How to, internet web, Linux, Lynx, lynx one, NetBSD, Onwards, OpenBSD, page, persistent cookies, point of view, programmers, quot, reason, security point, squeeze, support, text, text browser, text mode, time, TRUEb, TRUEc, TRUEuncomment, uncomment, use, using internet, vim, waste, waste of time, web page, writ
Posted in Curious Facts, Everyday Life, FreeBSD, Linux, System Administration | 1 Comment »